


A familiar document suddenly has an extra ending on its filename. Then another fails to open, and a text file appears beside the damaged files.
If that ending is .obsoft, take a moment before trying repairs. The order of your next actions can matter for both evidence and recovery.
Overview
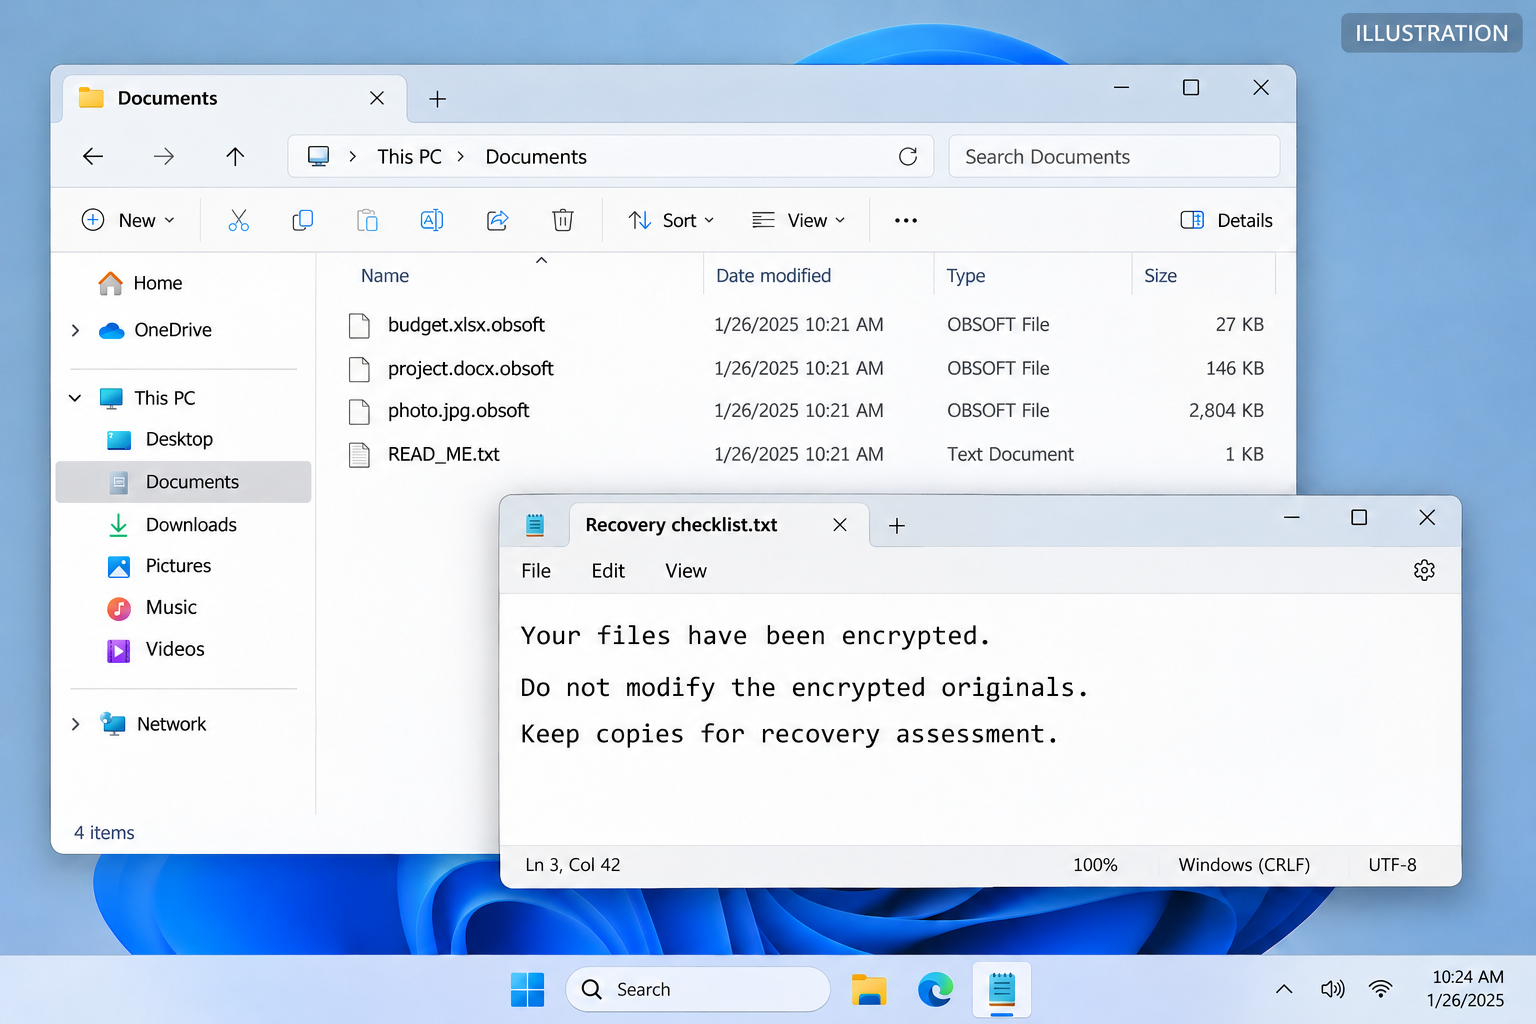
The .obsoft Extension and READ_ME.txt
OBSOFT is reported ransomware that encrypts files, adds the .obsoft extension, and creates a ransom note named READ_ME.txt.
A filename such as photo.jpg.obsoft is a warning sign when it appears alongside inaccessible files and the matching note.
Renaming the file back to photo.jpg does not reverse encryption. Keep untouched copies rather than experimenting on your only remaining originals.
Encryption Accompanied by a Data-Leak Threat
The reported note claims the victim’s company data was stolen and threatens publication. It also imposes short contact deadlines and a threatened price increase.
Those are attacker claims and pressure tactics. The note alone cannot establish which records were copied, whether exfiltration succeeded, or who was affected.
It compares its encryption with LockBit. That comparison does not independently identify OBSOFT as a LockBit variant or establish its cryptographic strength.
Removal and Recovery Are Separate Jobs
- Contain affected devices before connecting backups or restoring files.
- Preserve the note, relevant logs, and untouched encrypted copies.
- Remove active malware or rebuild compromised systems under an appropriate plan.
- Check verified backups and surviving previous versions.
- Use only a genuinely matching decryptor if a trusted source establishes one.
No matching public OBSOFT decryptor was identified in the checked recovery resources. Do not treat a generic decryption advertisement as a working solution.
A scanner can help remove the active infection. It does not supply the missing decryption key or make an exposed business network trustworthy by itself.
How OBSOFT Ransomware Works
Step 1: Malicious Access Precedes the Visible Damage
The available case description does not establish one confirmed entry route for every OBSOFT incident. The actual starting point needs investigation.
Ransomware incidents can involve malicious downloads, compromised credentials, or vulnerable systems. Those possibilities are not proof of how your machine was reached.
Preserve recent security alerts and suspicious correspondence. A responder can correlate them with the earliest known file changes and relevant sign-ins.
Do not search for an entry point by opening the suspected attachment again. That can cause more damage without answering the question safely.
Step 2: Files Become Unreadable and Their Names Change
The reported sample appends .obsoft to affected filenames. The visible change helps identify the incident, but the contents are the main problem.
File associations and default applications are not decryption tools. Trying a different photo viewer does not undo properly encrypted bytes.
Avoid batch-renaming or converting the affected collection. Recovery assessment is easier when the original filenames and note remain intact.
Keep a separate inventory of affected locations, including connected storage. Do not plug in additional drives merely to check whether they would be affected.
Step 3: The Note Creates a Second Source of Pressure
READ_ME.txt combines loss of access with the claim that sensitive information could be published. Those threats can pressure an organization even when backups exist.
The reported contact identifier is @obsoft2048 on Telegram. It is an incident indicator, not a support channel readers should use for routine advice.
Do not accept the note’s description of stolen records as a completed forensic assessment. Preserve it and let qualified responders investigate the disclosure risk.
Medical or personal-data references in a demand do not prove that every named category was present on the victim’s network.
Step 4: Deadlines Try to Replace a Considered Response
The note threatens a higher price after 24 hours and publication after 48 hours. These are the extortionist’s demands, not trusted recovery instructions.
They create a reason to act quickly, but not to act on the attacker’s terms. Containment and trusted incident-response contact should come first.
Payment provides no guarantee of a working key, complete restoration, or deletion of copied data. Do not let an unsolicited negotiator promise otherwise.
Organizations should involve appropriate security, legal, insurance, and leadership contacts. They may need to preserve evidence before making technical or financial decisions.
What to Do If OBSOFT Encrypted Your Files
Start with containment. Recovery experiments can wait until the affected storage and remaining clean copies are protected.
- Disconnect affected systems.
Unplug Ethernet and disable Wi-Fi. On a business network, contact the security team so isolation can be coordinated without disrupting unrelated critical systems.
- Protect backups and synchronized copies.
Keep backup drives disconnected. Stop synchronization where it can safely be controlled, and ask administrators to protect cloud versions and backup retention.
- Preserve the ransom note and incident details.
Record filenames, affected locations, discovery time, and security detections. Avoid deleting the note or sharing confidential samples through public upload services.
- Arrange trusted incident-response help.
Use established contacts. A company handling sensitive records needs a coordinated assessment of encryption, account access, and the claimed data theft.
- Do not pay a stranger promising guaranteed decryption.
Be especially cautious of unsolicited recovery messages. Ask any legitimate specialist to explain methods, costs, privacy protections, and whether payment reaches the attackers.
- Remove the infection before restoration.
Use the Windows cleanup below for an unmanaged personal computer, or follow your responder’s rebuilding plan. Keep recovery media away from active malware.
- Report the incident through the appropriate route.
In the US, the FBI’s Internet Crime Complaint Center accepts cybercrime reports. Elsewhere, use your national reporting service and organizational procedures.
Remove OBSOFT Ransomware From Windows
Step 1: Preserve Before Changing the System
For work-managed machines, obtain approval before scanning, rebooting, or deleting files. Responders may need evidence that those actions change.
For a personal device, keep untouched encrypted copies and the ransom note. If deleted-file recovery may matter, minimize writes to the affected storage.
Cleaning and evidence preservation may require a separate working copy or specialist assistance. Do not sacrifice the only recoverable copy to a hurried installation.
Step 2: Scan and Quarantine the Active Malware
Download the Correct Windows Installer
Use the download below for Malwarebytes for Windows. Obtain the installer on a trusted computer if the affected machine cannot browse safely.
Download MalwarebytesOpens the official free-scanner page. Choose the Windows download.Optional real-time protection: Malwarebytes Premium
On the official page, choose the free scanner download for Windows. Save the installer; manual scanning and quarantine do not require a Premium purchase.
MalwareTips may earn a commission through its product links. Buying ongoing protection is optional and is not a condition for following this cleanup procedure.
Do not run an installer supplied by the suspicious message, a remote caller, or a search advertisement pretending to offer urgent technical help.
Install and Open Malwarebytes
Open Downloads and double-click the MBSetup installer. Approve the Windows permission prompt only after confirming that it belongs to the installer you obtained.
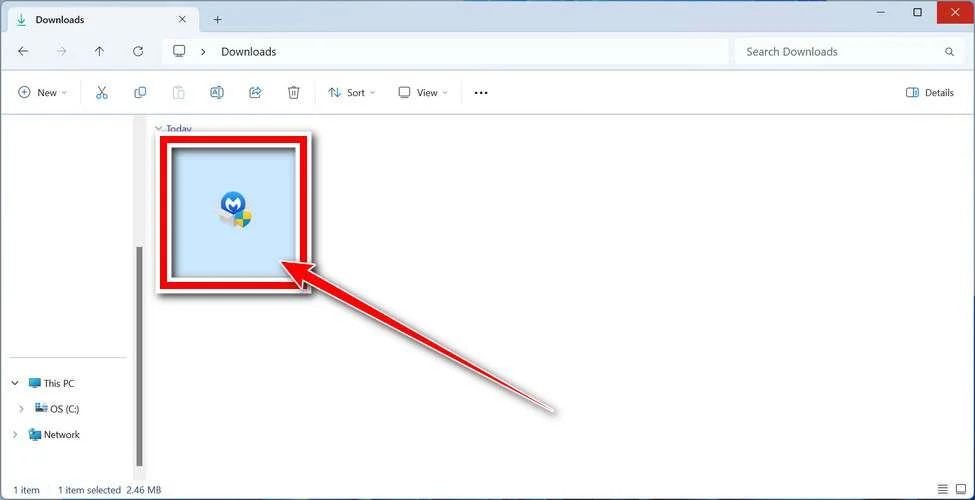
Follow the setup screens and choose the appropriate personal or work option. On a managed computer, obtain your security team’s approval before installing another tool.
Read optional offers carefully. You can skip an unwanted trial, browser add-on, or paid plan without abandoning a normal manual Windows scan.
Open the application when installation finishes. Let its detection information update if safe connectivity is available; do not reconnect an isolated business endpoint without authorization.
Run a Threat Scan, Then Check Other Affected Locations
From the dashboard, select Scan to start a Threat Scan. This checks common infection locations, memory, startup items, and the registry.
A Threat Scan is not a complete inspection of every drive. Use the Scanner tile’s three-dot menu and Advanced Scan for additional scanning choices.
Choose Custom Scan to inspect specific drives or folders. Select the Windows system drive and any other affected location your responder has approved.
Rootkit scanning is an optional Custom Scan setting on supported systems. Its absence on Windows ARM is not a reason to disable Windows protection.
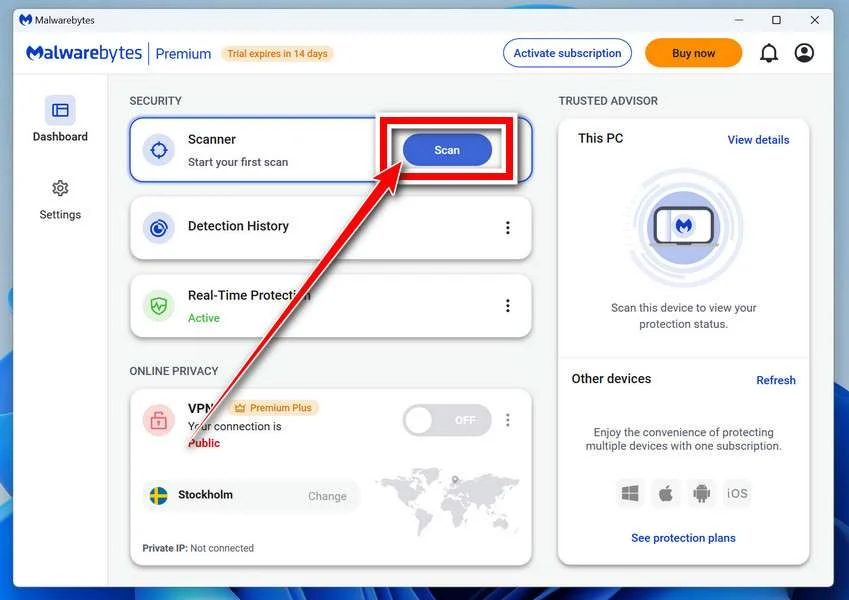
Allow the selected scan to finish. The duration depends on its scope, available storage, and the computer’s condition, so avoid a promised completion time.
If the application cannot update, start, or finish, save its error message. Repeatedly forcing a broken scanner is not a substitute for incident-response help.
When a report becomes available, review the detected names, locations, and actions. Keep a copy for whoever is helping investigate the compromise.
Review Detections and Quarantine Threats
Leave confirmed malicious items selected and choose Quarantine. Do not create an exclusion simply because a familiar program or system-looking filename appears in the report.
If a finding is unclear, record the detection and ask for advice. Do not manually delete random Windows files based only on their names.
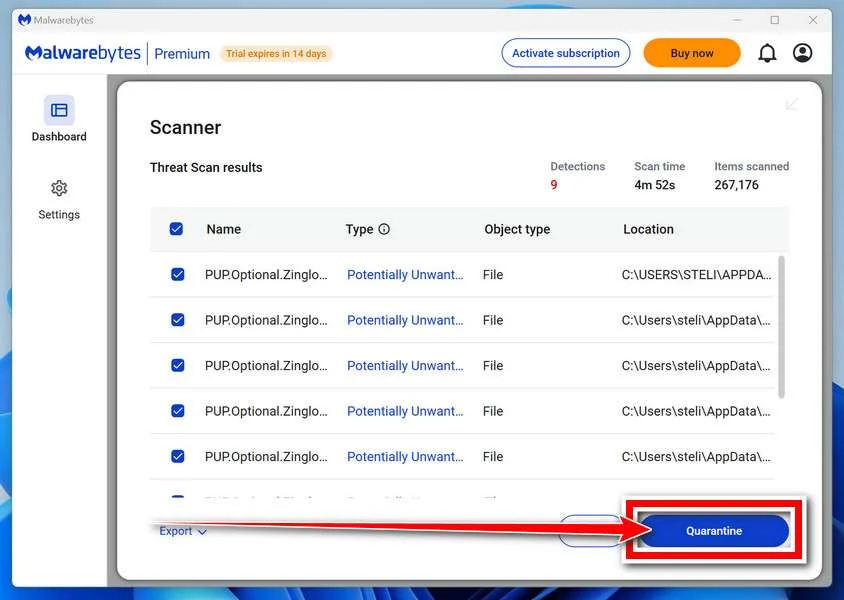
Quarantine isolates the items the tool identifies. Keep them there while the incident is assessed rather than restoring a suspicious file to test it.
Save the scan report after applying the actions. It can show a responder whether the original threat, related components, or potentially unwanted software was found.
A clean result does not undo earlier data theft. Continue the account and recovery actions relevant to this incident even when no active threat remains.
Restart if Requested and Review the Result
Save open work and allow a restart if Malwarebytes requests one. A managed-system responder may need to preserve evidence before approving that restart.
Keep backup storage disconnected during cleanup. Do not interpret a restart as permission to restore files or resume sensitive sign-ins immediately.
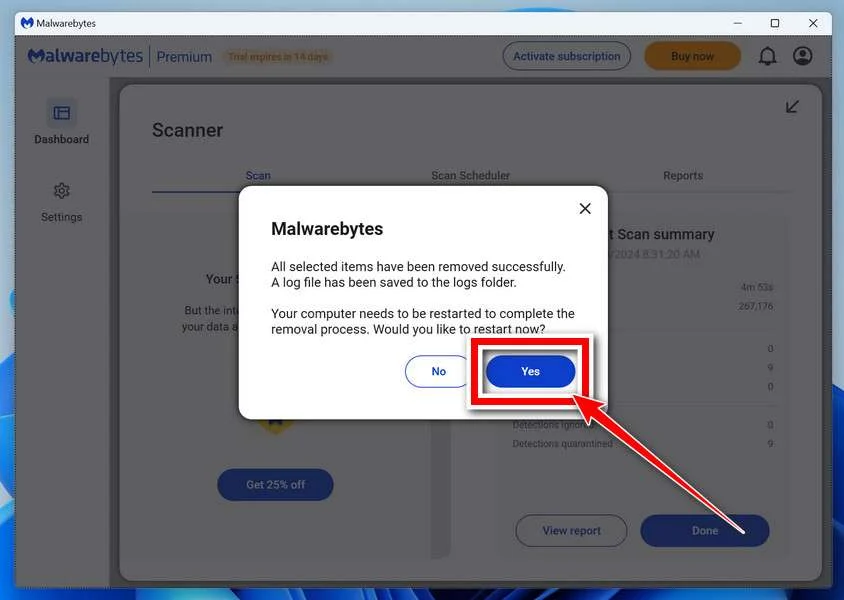
After Windows returns, reopen Malwarebytes and check the report. Run the follow-up scan appropriate to the affected locations and note any recurring detections.
Keep Windows Security and other established protection enabled. If threats return, stop ordinary use and obtain help rather than repeatedly excluding or deleting files.
For unresolved personal-device infections, ask in the MalwareTips malware-removal help forum. Do not post passwords, private logs, or confidential work documents publicly.
Step 3: Verify Cleanup or Use a Controlled Rebuild
After cleanup, assess recurring detections, unexpected accounts, and signs of continued file modification. Keep the device isolated if the compromise remains unresolved.
A clean rebuild may be appropriate when trust cannot be restored through inspection. Preserve necessary data and recovery evidence before any procedure that erases storage.
Restored files should go to a clean system. Do not reconnect a production share simply because one security tool finished scanning successfully.
Recover Files Encrypted With .obsoft
Identify the Case Before Choosing a Decryptor
Compare the extension, note, and available technical evidence. Filenames alone do not establish a cryptographic family, and similar branding can be copied.
Check the No More Ransom decryption catalog from a clean device. Use only tools that explicitly match the identified threat.
ID Ransomware can assist with identification. Review its submission requirements and privacy implications before uploading anything containing personal or business information.
Work on duplicates of encrypted files when testing an approved tool. A promised decryptor that asks you to disable protection or pay first deserves caution.
Restore Verified Backups Without Reintroducing the Infection
Find a backup from before the compromise, not merely before you noticed the extension. Attackers may have been present earlier.
Use a clean destination and restore a small test set first. Open representative documents, images, archives, and important application data.
Check whether cloud storage retained version history or a recovery feature for your account. Current synchronized files may already contain the encrypted versions.
Do not reconnect an offline backup to the original compromised system just to browse it. Keep an untouched backup copy while validating the restoration.
Check Surviving Shadow Copies With ShadowExplorer
ShadowExplorer can browse existing Windows shadow copies. It cannot recreate snapshots that were never made or were deleted.
Use its official download page and follow the included setup or portable instructions on an appropriately prepared system.
Open the application, choose the affected drive, and select a snapshot date from before the incident. An empty date list means none is available there.
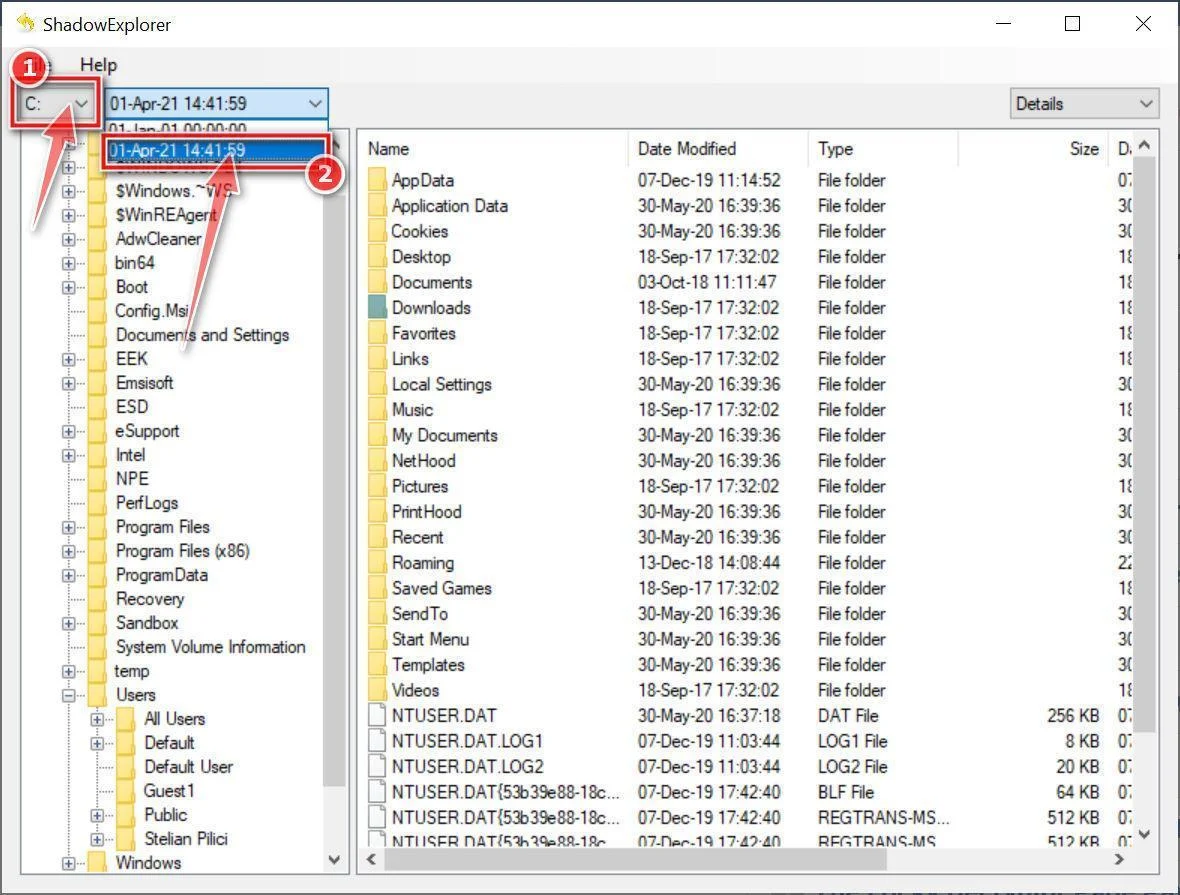
Browse to the folder you need. Look for the original file names and sizes rather than assuming every item belongs to an unaffected snapshot.
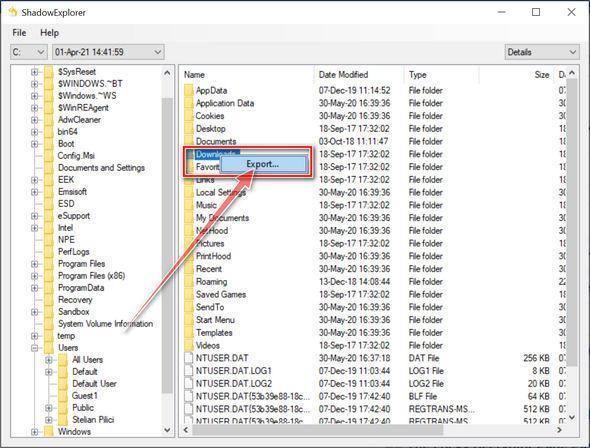
Right-click the desired file or folder and choose Export. Select another clean destination instead of overwriting the encrypted original.
Open several exported files to confirm they are usable. Keep encrypted copies and the note even if you recover part of the collection.
Consider Deleted-File Recovery Only When It Fits
Some incidents leave recoverable originals in unallocated space. Whether that happened here is not established, and overwritten or trimmed data may be unrecoverable.
EaseUS Data Recovery Wizard is a deleted-file recovery tool, not an OBSOFT decryptor. A license cannot turn encrypted content into the original document.
Use the site’s existing EaseUS recovery download route only after preserving the affected source.
Install on another drive or consult a recovery specialist. New writes to the damaged source can overwrite data you were hoping to recover.
Start the application and select the affected source drive for scanning. Choose the source, not the separate destination intended for recovered files.
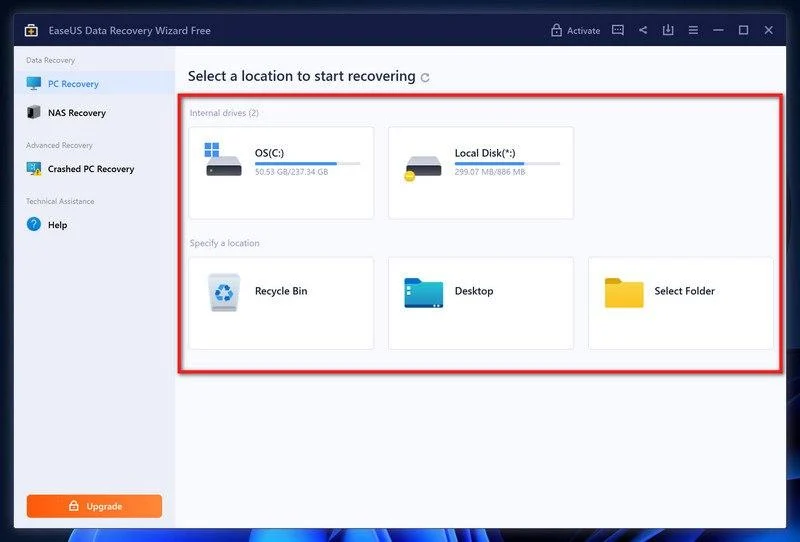
Let the scan finish, then filter results by file type or location. A listed filename does not guarantee the underlying content is intact.
Preview useful candidates before recovery. Check the current free allowance and any conditions before deciding whether a paid plan is worth considering.
Select readable candidates, choose Recover, and save them to the separate clean destination. Inspect the saved files before assuming recovery succeeded.
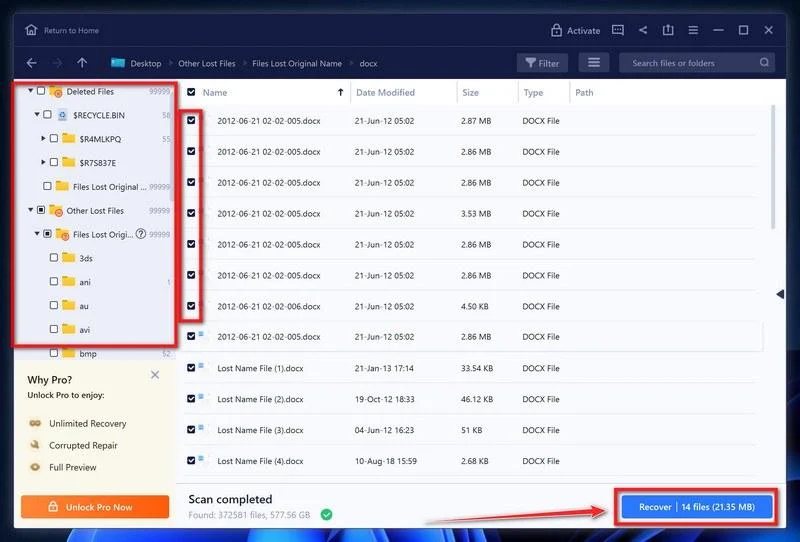
If the data is irreplaceable, stop experiments and seek specialist advice. Keeping the storage unchanged may preserve more options than repeated consumer-tool scans.
Frequently Asked Questions
Will removing .obsoft from a filename repair it?
No. The extension is a label, while encryption changes the contents. Preserve original names and work on copies during assessment.
Is OBSOFT definitely a LockBit variant?
The note’s comparison with LockBit is not enough to establish that relationship. Identification needs technical evidence, not attacker marketing.
Can Malwarebytes decrypt my files?
No. It can help detect and remove malware. Decryption, backup restoration, and recovery of surviving originals are separate processes.
Does the ransom note prove patient data was stolen?
No. It contains that allegation, but actual disclosure needs investigation. Organizations should preserve evidence and assess accessible sensitive records.
Is there a verified free OBSOFT decryptor?
None was identified in the checked trusted resources. Recheck the exact case through legitimate recovery catalogs rather than accepting unsolicited decryption offers.
Should I restore my backup immediately?
Not onto a potentially infected system. Contain the incident, establish a clean destination, and validate a small restoration before reconnecting valuable backup storage.
The Bottom Line
Do not pay or alter your only encrypted copies in a panic. Isolate affected systems and preserve the .obsoft files and READ_ME.txt for assessment.
Remove the infection through a trusted cleanup or rebuild, then restore verified backups or surviving originals. Treat alleged data theft as a separate investigation.

Join the discussion
0 commentsShare your experience or ask a question about this article.
Your progress
Did these steps help?
Let us know how the guide worked for you.
Describe what you see and the step you reached. Keep passwords and other private information out.
Discussion
Start the conversation
Have a question or something useful to share? Add the first comment.