

A payment confirmation usually brings relief, especially when several invoices are still open and cash flow matters.
The attached SWIFT copies seem to promise immediate proof, making the message difficult to ignore without checking.
Overview
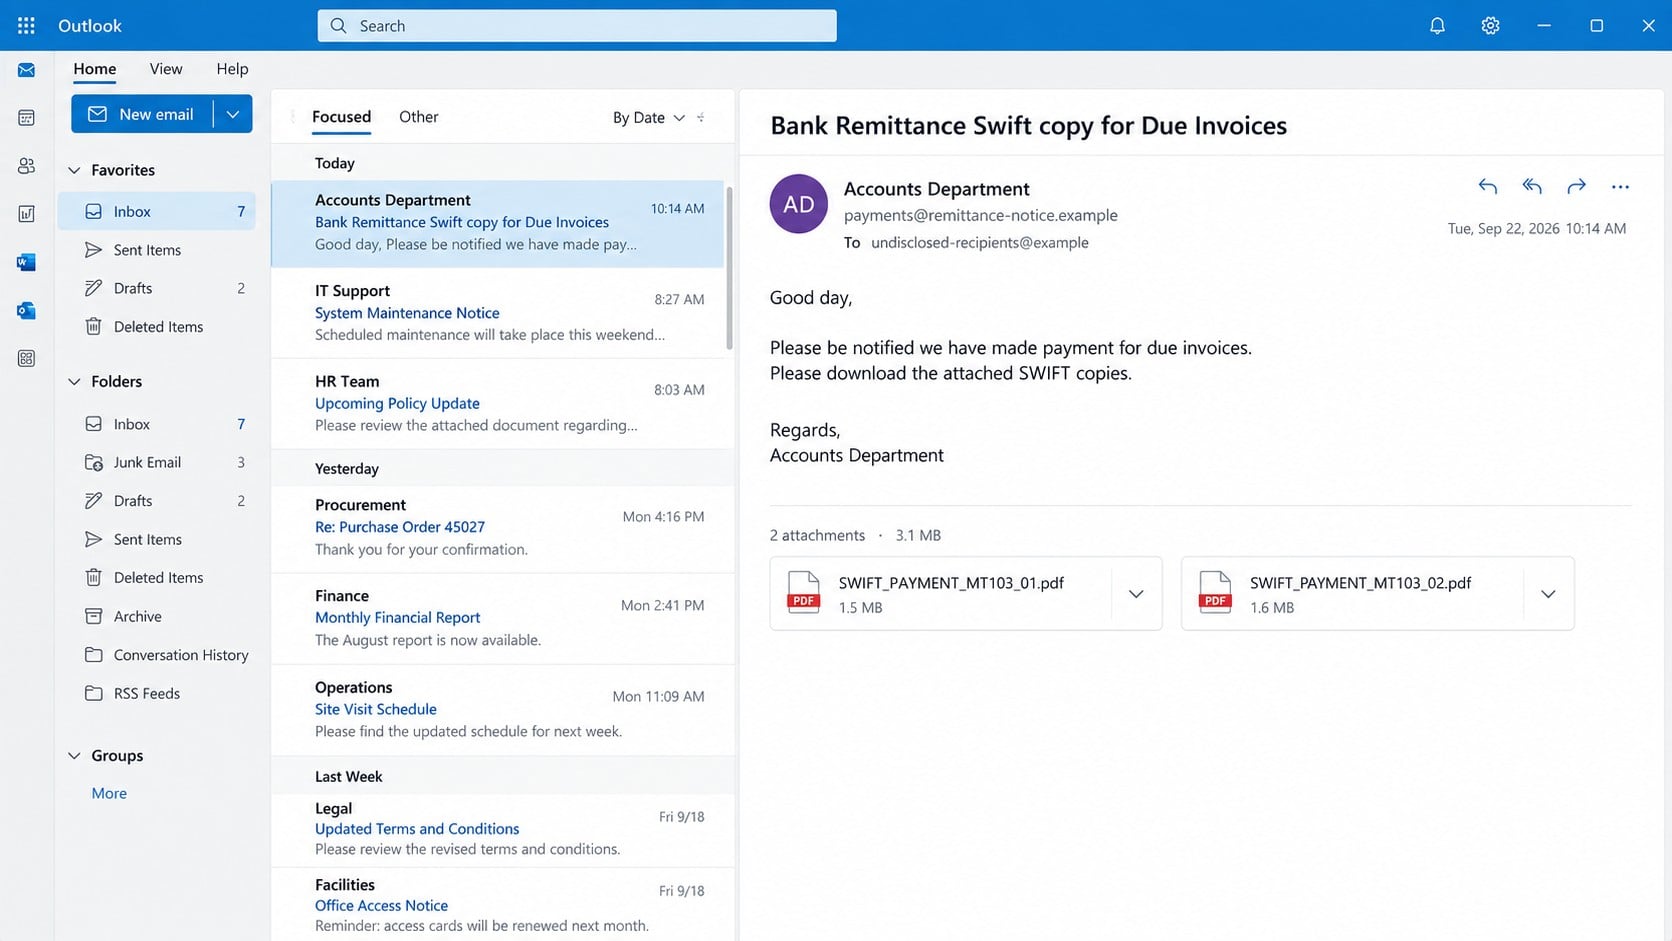
The email announces payment for unspecified invoices
The We Have Made Payment for Due Invoices email scam pretends to come from an Accounts Department.
One subject used “Bank Remittance Swift copy for Due Invoices,” while another version appeared as “Fw: Payment Confirmation.”
The message says outstanding invoices were paid and asks the recipient to download attached SWIFT payment copies.
It omits the buyer, supplier, invoice numbers, transfer amount, currency, bank, and recognizable business contact.
The PDF files point to a credential-stealing website
Attachments use names resembling MT103 transfer records, such as SWIFT_PAYMENT_MT103_01.pdf.
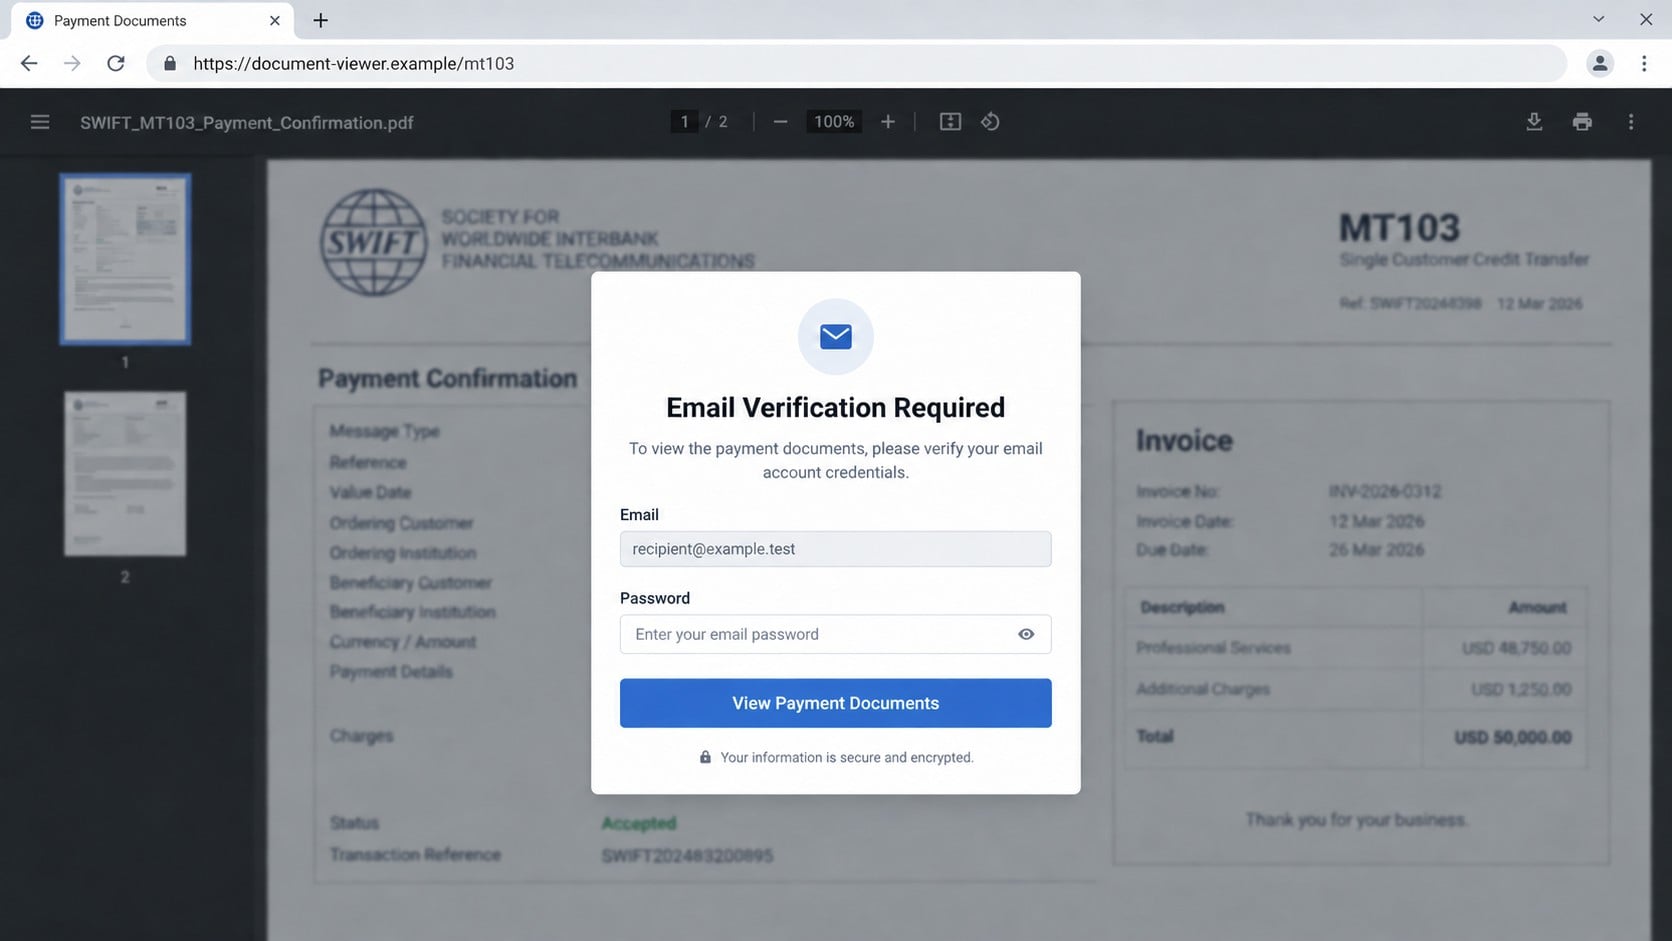
Opening the file directs the user to a fraudulent online document viewer rather than showing verifiable bank evidence.
An observed destination operated at montanarenaissance[.]co.za, although future campaigns can move elsewhere.
The page places a business invoice behind a popup claiming that email verification is required.
The promised remittance copy becomes a mailbox login
The form requests the recipient’s email address and password before allowing access to the supposed payment documents.
The address may be prefilled, making the page appear connected to the original message.
Submitted credentials are captured by the scammer, and no authentic SWIFT confirmation is delivered.
Warning signs include:
- The Accounts Department does not identify its company.
- No invoice number or paid amount appears in the message.
- Several attachments share generic SWIFT-themed filenames.
- The PDF sends the reader to an unrelated web domain.
- An invoice is visible but deliberately unreadable behind a login.
- The page requests an email password to display banking paperwork.
- The sender asks for receipt confirmation without naming a relationship.
- Internal accounting records contain no matching remittance.
Why a Payment Notice Creates Immediate Curiosity
Businesses routinely receive remittance advice before money appears in an account.
That delay makes a PDF confirmation seem useful and commercially normal.
Accounts-receivable staff may manage many customers, so an unfamiliar sender is not automatically dismissed.
A forwarded subject can also imply that the message passed through another employee.
The words SWIFT and MT103 provide technical authority without proving that a bank transfer occurred.
An MT103 is associated with certain international payment messages, but anyone can place that label on a filename.
The scam exploits the difference between recognizing a financial term and authenticating the document using it.
When recipients expect overdue money, the desire to reconcile the account can outrun normal caution.
A PDF Can Be a Signpost Instead of the Final Payload
People often treat PDF files as passive documents, but a PDF can contain clickable links.
In this campaign, the attachment acts as a bridge from the inbox to the phishing site.
The extra step can evade simple filters that focus on direct links inside the email body.
It also reassures the recipient because the file appears to be a conventional payment record.
The PDF does not need to exploit software to cause harm.
Its link relies on social engineering, convincing the reader to visit a page and enter information voluntarily.
Other variants could attach HTML files, cloud-share links, archives, or actual malware.
Unexpected financial attachments should therefore be verified before opening, regardless of their extension.
How the Payment for Due Invoices Email Scam Works
Step 1: Criminals send a vague remittance announcement
The opening message states that payment was made for due invoices.
Its wording is short enough to fit nearly any supplier, contractor, freelancer, or accounts department.
No customer-specific facts are provided because the same template is sent to many addresses.
Recipients supply their own context by thinking about real money they are expecting.
Step 2: SWIFT terminology gives the attachments financial weight
The files are named as though they contain bank transfer confirmations or MT103 records.
Multiple documents can suggest separate payments, invoices, or transaction pages.
File sizes and PDF icons make the attachments look like ordinary exports from a banking system.
None of those visible properties verifies their contents.
Step 3: Opening the PDF reveals a document link
The attachment encourages the reader to click through to view, verify, or download the full remittance information.
A security notice may claim that online access protects financial confidentiality.
The link leaves the email environment and reaches infrastructure unrelated to the supposed payer or bank.
Redirectors can be inserted so the final phishing domain is not obvious from the original attachment.
Step 4: A counterfeit viewer displays financial scenery
The website resembles a PDF reader and shows an invoice or SWIFT-style document behind a modal.
Visible headings and amounts create the impression that useful payment evidence has already loaded.
Important details remain blurred, preventing comparison with real invoices.
The page has no authenticated connection to a bank, payer, or document service.
Step 5: Email verification is presented as the access key
The popup asks for a mailbox address and password to unlock the payment copies.
A prefilled address may be extracted from the link itself.
Real banks do not authenticate SWIFT confirmations by collecting the recipient’s email password on an unrelated site.
The mismatch between document purpose and requested credential reveals the trap.
Step 6: The form transmits credentials to the operator
When submitted, the login data is sent to a phishing collection endpoint.
The page may reject the first attempt, hoping to collect another password.
A loading animation or redirect can make the missing document appear to be a temporary service problem.
The victim may wait for payment confirmation while criminals test the account.
Step 7: The mailbox is searched for financial opportunities
Attackers look for genuine invoices, customer contacts, bank details, and threads discussing overdue balances.
They can reply within existing conversations using the victim’s tone and signature.
A future message may claim that banking instructions changed, redirecting a real payment.
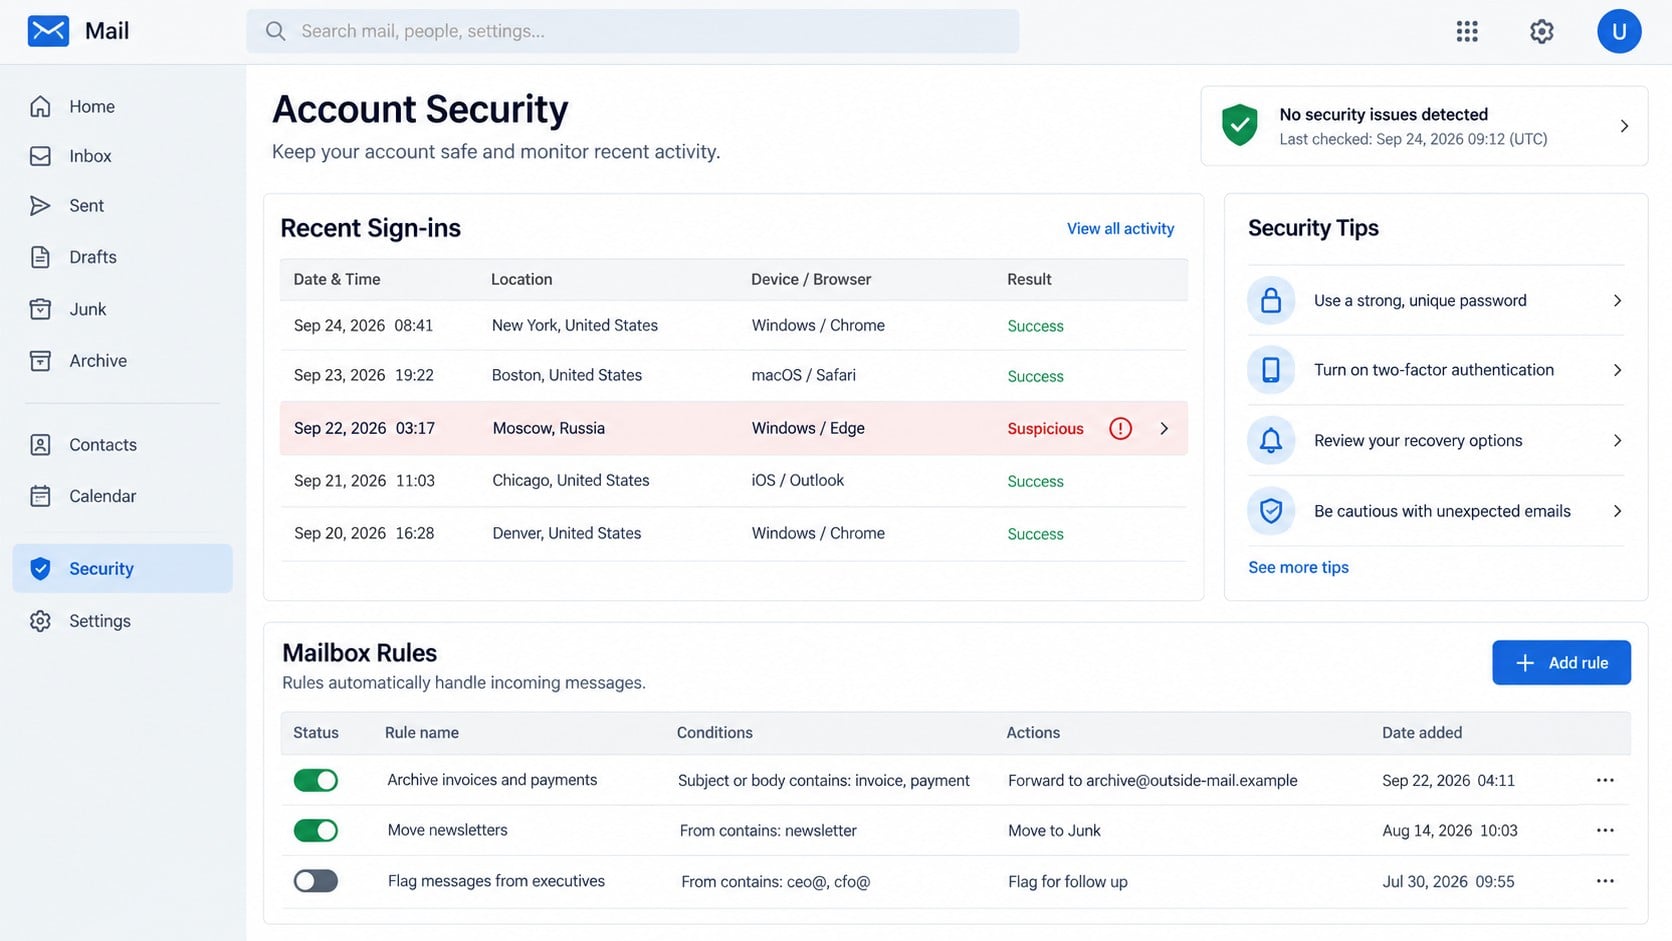
Forwarding rules can silently copy financial correspondence to an external account.
Step 8: The compromised identity spreads more payment lures
Customers and suppliers are more likely to trust messages from a known mailbox.
The attacker can distribute new invoice PDFs, shared documents, or payment confirmations using authentic contact history.
Email access may also enable password resets for storage, accounting, payroll, and commerce services.
The invented remittance can become a wider business email compromise incident.
Payer, Invoice, Banking, and Login Verification Checks
Match the claim with accounts-receivable records
Search outstanding invoices for the named customer, amount, currency, and expected payment date.
If the email provides none of those details, do not guess which account it concerns.
Ask the responsible account owner whether a remittance was expected.
An authentic payment should have a commercial history outside the unsolicited message.
Confirm the payer through an established contact
Call a verified customer number or use a known address from earlier correspondence.
Do not reply to the questionable sender to ask whether the email is genuine.
Request the transfer date, value, invoice references, and bank reference through the confirmed channel.
A real customer can provide those details without asking for your mailbox password.
Verify funds through your own bank
Open the bank’s official application or website independently and review incoming transactions.
A PDF supplied by an unknown party is not proof that money settled.
For significant transfers, ask the bank about the reference using a published number or assigned relationship contact.
Never rely on banking coordinates printed inside the suspect attachment.
Separate document access from email authentication
Close any financial viewer that asks for an email password on a foreign domain.
If a legitimate platform is involved, open it through a trusted bookmark or known account dashboard.
Use a password manager and heed domain mismatches when autofill is unavailable.
Document security should not require surrendering unrelated account credentials.
How a Stolen Mailbox Can Redirect Real Payments
Once inside, an intruder can monitor conversations instead of acting immediately.
They may wait until a genuine invoice is approved and a transfer is close.
A reply from the compromised account can introduce “updated” bank details with little visible disruption.
Rules can hide the real supplier’s objections or move payment replies away from the inbox.
Some criminals register lookalike domains and shift the conversation there after learning the participants.
Others remain inside the authentic thread, making the substitution more difficult to notice.
Bank-detail changes should always be verified verbally through a previously known contact.
The person confirming the change should not be reached using a number included with the new instructions.
Safe Handling Rules for Unexpected Payment Attachments
Do not open attachments merely because the subject matches current accounting work.
Confirm the sender and transaction first, preferably through the accounting system or an existing contact.
Use a protected document-analysis process when your organization provides one.
Never enable macros, install viewers, run scripts, or bypass security warnings to read financial paperwork.
Keep PDF readers, browsers, mail clients, and the operating system updated.
Report suspicious messages in a way that preserves attachments and complete headers for security review.
Shared finance mailboxes should use delegated access rather than a password distributed among employees.
Individual identities and strong multifactor authentication make suspicious sessions easier to contain.
What an MT103 Reference Does and Does Not Prove
MT103 refers to a standardized SWIFT message associated with certain cross-border customer credit transfers.
The term is real, which is why it gives a fake filename immediate financial credibility.
A legitimate confirmation contains structured transaction information that can be reconciled with a payer and receiving bank.
Simply placing “MT103” in a PDF title does not create a bank record.
Screenshots and editable documents can be fabricated, altered, or copied from unrelated transfers.
Even a plausible reference should be checked against the receiving account.
A pending, recalled, rejected, or nonexistent transfer cannot be proven by the sender’s attachment alone.
Ask the confirmed payer for traceable details through your established channel.
Then use your own bank’s platform or representative to verify whether the funds arrived.
The payment is real when independent records agree, not when the PDF looks professional.
Signs the Mailbox May Already Be Under Observation
Watch for messages becoming read before the owner opens them.
Unexpected forwarding notices, changed recovery information, and unfamiliar application consents require immediate investigation.
Customers may receive replies that the account owner cannot find in Sent Items.
Payment conversations can disappear into archive or deleted folders through attacker-created rules.
Sign-in history may show unfamiliar locations, browsers, older mail protocols, or access at unusual hours.
Repeated multifactor prompts can indicate that somebody is trying the stolen password.
Finance teams should report these clues together rather than treating each as an isolated mail problem.
A coordinated review can reveal the first access time and identify which conversations were exposed.
Continue monitoring after recovery because contacts may receive delayed fraud attempts based on stolen information.
Document every corrective action so later alerts can be compared with a known clean state.
What to Do if You Have Fallen Victim to This Scam
- Stop using the fake document page. Preserve the email, PDF files, headers, destination URLs, screenshots, and the submission time.
- Change the mailbox password immediately. Open the genuine provider directly from a trusted device and choose a unique replacement.
- Remove persistent access. Revoke sessions, devices, application passwords, connected applications, delegates, and unfamiliar recovery methods.
- Inspect financial mailbox settings. Check forwarding, rules, deleted messages, sent mail, archives, aliases, and automatic replies for tampering.
- Notify finance and security teams. They should review logs, payment threads, customer messages, and transactions during the exposure window.
- Confirm recent banking instructions. Call counterparties independently if any invoice, beneficiary, or transfer detail changed.
- Secure connected services. Reset reused credentials and review accounting, cloud storage, payroll, and banking accounts for unauthorized activity.
- Check the computer. Run Malwarebytes after opening unexpected files or downloads, then address detections before resuming sensitive work.
- Strengthen web filtering. AdGuard can block many reported phishing destinations and malicious redirects as an additional defensive layer.
- Report the incident. Notify the provider, abused website host, bank when appropriate, and relevant fraud or cybercrime authorities.
Is Your Device Infected? Run a Free Malware Scan
Slow performance, constant pop-ups, or strange behavior? These are classic signs of a malware infection. The fastest way to find out is to scan your device with Malwarebytes Free — one of the most trusted malware removal tools available.
The free version detects and removes the most common threats, including:
- Adware — the cause of those annoying pop-ups
- Browser hijackers — unwanted redirects and changed homepages
- Trojans and spyware — hidden programs stealing your data
- Potentially unwanted programs (PUPs) — software you never asked for
👉 Select your device below — Windows, Mac, or Android — then follow the simple steps to download Malwarebytes, scan your system, and remove any threats it finds. The scan usually takes 5 to 20 minutes.
Run a Malware Scan with Malwarebytes for Windows
Malwarebytes is one of the most popular and trusted anti-malware tools for Windows — and it’s completely free for removing infections. It catches threats that many antivirus programs miss, including adware, browser hijackers, and trojans. Follow the steps below to scan and clean your PC in just a few minutes.
Download Malwarebytes
Click the button below to download the latest version of Malwarebytes for Windows from the official source. The free version is all you need — it will scan your computer and remove adware, browser hijackers, and other malicious software at no cost.
Download MalwarebytesOfficial installer for Windows 11 and 10. Your download starts right away.Want real-time protection? See Malwarebytes Premium Malwarebytes Free for WindowsScans and removes malware at no cost
-
Install Malwarebytes
When the download finishes, open your Downloads folder and double-click the MBSetup file. If Windows shows a User Account Control pop-up, click “Yes” to allow the installation.

Follow the On-Screen Prompts to Install Malwarebytes
The setup wizard will walk you through a few quick screens:
-
Choose where you’re installing the program — “Personal Computer” or “Work Computer” — then click Next.

-
Malwarebytes will now install on your device. This usually takes under a minute.

-
When installation is complete, the “Welcome to Malwarebytes” screen will open automatically.

-
On the final screen, click Open Malwarebytes to launch the program.

-
Enable “Scan for Rootkits”
Before scanning, turn on rootkit detection so Malwarebytes can find even the most hidden threats. Click the Settings gear icon on the left side of the screen.

In the settings menu, find “Scan for rootkits” and click the toggle so it turns blue.

Done? Click “Dashboard” in the left pane to return to the main screen.
Start the Scan
Click the blue Scan button. Malwarebytes will automatically update its virus database and start checking your computer for malware.

-
Wait for the Scan to Finish
The scan checks your entire system for browser hijackers and other malicious programs, so it can take 5 to 20 minutes depending on your computer. Feel free to do something else — just check back occasionally to see the progress.

-
Quarantine the Detected Threats
When the scan is done, you’ll see a list of everything Malwarebytes found — malware, adware, and potentially unwanted programs. Click the “Quarantine” button to remove all of them at once.

Malwarebytes will now remove the malicious files and registry entries and move them safely into quarantine.

-
Restart Your Computer
Some threats can only be fully removed after a reboot. If Malwarebytes asks you to restart, click Yes. Once you’re logged back in, Malwarebytes has finished removing the threats it found.

That’s it — your Windows PC is now clean of trojans, adware, and other malware, and should be back to running smoothly.
If you are still having problems with your computer after completing these instructions, then please follow one of the steps:
- Run a computer scan with ESET Online Scanner
- Ask for help in our Windows Malware Removal Help & Support forum.
Run a Malware Scan with Malwarebytes for Mac
Malwarebytes for Mac is a free on-demand scanner that removes the malware other security software tends to miss — adware, browser hijackers, and unwanted programs included. Cleaning an infected Mac with Malwarebytes has always been completely free, and it’s our go-to recommendation. Follow the steps below to scan and clean your Mac in just a few minutes.
-
Download Malwarebytes for Mac
Click the button below to download the latest version of Malwarebytes for Mac.
Download MalwarebytesOfficial installer for macOS. Your download starts right away.Want real-time protection? See Malwarebytes PremiumMalwarebytes Free for MacScans and removes malware at no cost -
Open the Malwarebytes setup file
When the download finishes, open your Downloads folder and double-click the setup file to begin the installation.

-
Follow the On-Screen Prompts to Install Malwarebytes
The Malwarebytes for Mac Installer will guide you through a few quick screens. Click “Continue” and keep following the prompts until the installation completes.



When the installation is complete, Malwarebytes opens to the Welcome to Malwarebytes screen. Click “Get started“.
-
Select “Personal Computer” or “Work Computer”
Malwarebytes will ask what type of computer you’re installing it on. Click either Personal Computer or Work Computer, whichever applies.

-
Start the Scan
Click the “Scan” button. Malwarebytes will automatically update its detection database and begin checking your Mac for malware.

-
Wait for the Scan to Finish
Malwarebytes will scan your Mac for adware, browser hijackers, and other malicious programs. This can take a few minutes, so feel free to do something else — just check back occasionally to see the progress.

-
Quarantine the Detected Threats
When the scan is done, you’ll see a list of everything Malwarebytes found. Click the “Quarantine” button to remove all the threats at once.

-
Restart Your Mac
Malwarebytes will now remove all the malicious files it found. Some threats can only be fully removed after a reboot — if Malwarebytes asks you to restart, allow it. Once you’re logged back in, your Mac is clean.

That’s it — your Mac is now free of adware, rogue browser extensions, and other potentially harmful software.
If you are still experiencing problems while trying to remove a malicious program from your computer, please ask for help in our Mac Malware Removal Help & Support forum.
Run a Malware Scan with Malwarebytes for Android
Malwarebytes for Android automatically detects and removes dangerous threats like malware and ransomware so you don’t have to worry about your most-used device being compromised. Aggressive detection of adware and potentially unwanted programs keeps your Android phone or tablet running smooth.
-
Download Malwarebytes for Android.
You can download Malwarebytes for Android by clicking the link below.
Get Malwarebytes for AndroidOpens Google Play in a new tab.Want real-time protection? See Malwarebytes Premium for AndroidMalwarebytes for AndroidScans your phone and removes malware at no cost -
Install Malwarebytes for Android on your phone.
In the Google Play Store, tap “Install” to install Malwarebytes for Android on your device.

When the installation process has finished, tap “Open” to begin using Malwarebytes for Android. You can also open Malwarebytes by tapping on its icon in your phone menu or home screen.

-
Follow the on-screen prompts to complete the setup process
When Malwarebytes will open, you will see the Malwarebytes Setup Wizard which will guide you through a series of permissions and other setup options.
This is the first of two screens that explain the difference between the Premium and Free versions. Swipe this screen to continue.
Tap on “Got it” to proceed to the next step.
Malwarebytes for Android will now ask for a set of permissions that are required to scan your device and protect it from malware. Tap on “Give permission” to continue.
Tap on “Allow” to permit Malwarebytes to access the files on your phone.
-
Update database and run a scan with Malwarebytes for Android
You will now be prompted to update the Malwarebytes database and run a full system scan.

Click on “Update database” to update the Malwarebytes for Android definitions to the latest version, then click on “Run full scan” to perform a system scan.

-
Wait for the Malwarebytes scan to complete.
Malwarebytes will now start scanning your phone for adware and other malicious apps. This process can take a few minutes, so we suggest you do something else and periodically check on the status of the scan to see when it is finished.

-
Click on “Remove Selected”.
When the scan has been completed, you will be presented with a screen showing the malware infections that Malwarebytes for Android has detected. To remove the malicious apps that Malwarebytes has found, tap on the “Remove Selected” button.

-
Restart your phone.
Malwarebytes for Android will now remove all the malicious apps that it has found. To complete the malware removal process, Malwarebytes may ask you to restart your device.
That’s it — your Android phone is now clean — no more malicious apps, adware, or browser redirects.
If you are still having problems with your phone after completing these instructions, then please follow one of the steps:
- Restore your phone to factory settings by going to Settings > General management > Reset > Factory data reset.
- Ask for help in our Mobile Malware Removal Help & Support forum.
Stay Protected: Block Ads and Malicious Sites
Now that your device is clean, keep it that way. Most infections start with a malicious ad or a fake download button — so blocking them at the source is your best defense.
We recommend AdGuard, which blocks malicious ads, phishing pages, and dangerous redirects before they can reach you.
👉 Download AdGuard and browse safely
Frequently Asked Questions
Does an MT103 filename prove a SWIFT payment occurred?
No. Anyone can name a PDF after a banking message type.
Confirm the transfer through the payer and your own bank.
Why are no invoice numbers listed?
Vague wording lets the same lure reach many businesses.
The recipient is expected to connect it with whichever payment they are awaiting.
Can a PDF steal my password?
The PDF can direct you to a phishing website where the password is collected.
Other malicious files may also attempt software infection.
What if the payment really appears in my bank?
That coincidence does not authenticate the email.
Use bank records and a confirmed payer contact to obtain legitimate remittance information.
Is a prefilled email address evidence of a secure connection?
No. The address can be encoded in the link and inserted into the form automatically.
Should I confirm receipt by replying?
Use a known customer address or telephone number instead.
Replying to the lure confirms your mailbox is active and reaches the scammer.
The Bottom Line
The Payment for Due Invoices email uses SWIFT-themed PDFs and a fake financial viewer to turn curiosity about expected money into mailbox credential theft.
Match every payment with real accounting records, a confirmed payer, and your bank. A legitimate remittance never depends on an unrelated email-password form.

Join the discussion
0 commentsShare your experience or ask a question about this article.
Discussion
Start the conversation
Have a question or something useful to share? Add the first comment.