


Many users—especially those looking for free access to premium software—eventually come across KMSPico. It’s one of the most widely used hack tools for activating Microsoft products like Windows and Office without a valid license. While this might sound like an easy workaround, KMSPico is more than just a shortcut—it’s a potential gateway to malware, system instability, and legal issues.
In this article, we’ll explore what KMSPico is, how it works, the risks it poses, and—most importantly—how to remove any malware that may have come along with it.
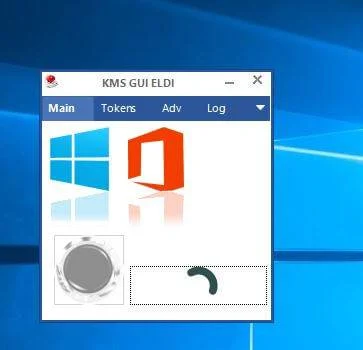
What Is KMSPico?
KMSPico is a hack tool designed to illegally activate Microsoft software. It works by mimicking Microsoft’s Key Management Service (KMS), a legitimate system used by businesses to activate software across multiple computers using a single key.
Once installed, KMSPico:
- Changes the licensing of Microsoft products (like Windows or Office) from “retail” to “volume license”
- Substitutes a fake KMS server for activation
- Tricks Microsoft software into believing it’s properly licensed
It essentially exploits a method meant for enterprise IT departments, repurposing it for piracy.
The Risks of Using KMSPico
Using KMSPico or similar tools carries several dangers, many of which are not immediately apparent to users. Here are some of the primary risks associated with this software:
1. Malware Distribution
Many versions of KMSPico come bundled with malicious software. Once installed, these malware-laden versions can perform harmful activities on your computer.
2. Unauthorized Remote Access
KMSPico has been known to establish communication with remote servers. This can allow attackers to:
- Report infections to the malware’s creator.
- Receive configurations or instructions for additional malicious activities.
- Download and execute malicious files, including updates or additional malware.
- Steal sensitive data from your system, such as passwords, financial information, or personal files.
- Use your system in a botnet to conduct attacks on other targets.
3. System Instability
Installing KMSPico may modify critical system files or introduce corrupted components, which can destabilize your operating system. This may lead to frequent crashes, poor performance, or even complete system failure.
4. Legal Consequences
Using KMSPico violates software licensing agreements, which is considered software piracy. Depending on your jurisdiction, this could lead to fines or other legal repercussions.
Malware Behaviors Observed in KMSPico
Malware distributed through KMSPico often exhibits the following behaviors:
- Establishing connections to remote servers: These connections are used to receive instructions, download additional malware, or upload stolen data.
- Downloading and executing arbitrary files: These files can include updates for the malware itself or entirely new malicious payloads.
- Uploading sensitive information: This can include passwords, personal data, or other files taken from the infected computer.
- Providing remote attackers with control: This allows them to execute commands on your computer, potentially turning it into a botnet or a tool for further attacks.
Common File Names Associated with KMSPico
Malicious versions of KMSPico have been distributed using a variety of file names to evade detection and confuse users. Some of the file names we have observed include:
AutoPico.exeKMSpico_setup.exeService_KMS.exeRe-LoaderByR@1n.exeKMSpico_10.2.0.san.rarwww.ratondownloads.com.br AT2016.rarRe-Loader RATON.exeKMSELDI.exeActivator.rar
If you come across any of these file names, exercise extreme caution, as they are likely associated with malicious activity.
Product Names Commonly Used by KMSPico
KMSPico is often distributed under misleading product names to disguise its true purpose. Some of the names we’ve seen include:
- Service_KMS
- AutoPico
- KMS GUI ELDI
- Re-Loader By R@1n
- Office 2016 KMS Activator Ultimate v1.1
These names may appear legitimate at first glance, but they are typically associated with illegal software.
Should you be uncertain as to whether a file has been reported correctly, we encourage you to submit the affected file to https://www.virustotal.com/ to be scanned with multiple antivirus engines.
Security companies frequently detect KMSPico and its variants under the following names:
- HackTool.KMS
- HackTool.KMSpico
- RiskWare.AutoKMS
- HackTool.WinActivator
- HackTool.IdleKMS
- HackTool.Agent.KMS
Although some of these files may appear to function normally, many are bundled with malware or are malware themselves—using the trusted name “KMSPico” to lure unsuspecting users.
To check your computer for malware and remove it for free, please use the guide below.
Removal Instructions for KMSPico Trojan
Please perform all the steps in the correct order. If you have any questions or doubts at any point, stop and ask for our assistance.
- STEP 1: Uninstall malicious programs from Windows
- STEP 2: Reset browsers back to default settings
- STEP 3: Use Rkill to terminate suspicious programs
- STEP 4: Use Malwarebytes to remove Trojans and unwanted programs
- STEP 5: Use HitmanPro to remove rootkits and other malware
- STEP 6: Use AdwCleaner to remove malicious browser policies and adware
- STEP 7: Perform a final check with ESET Online Scanner
STEP 1: Uninstall malicious programs from Windows
First, we’ll manually check your computer for unknown or malicious programs. Adware and browser hijackers often have a working uninstall entry — removing them this way takes care of the easy part before we run the scanners.
-
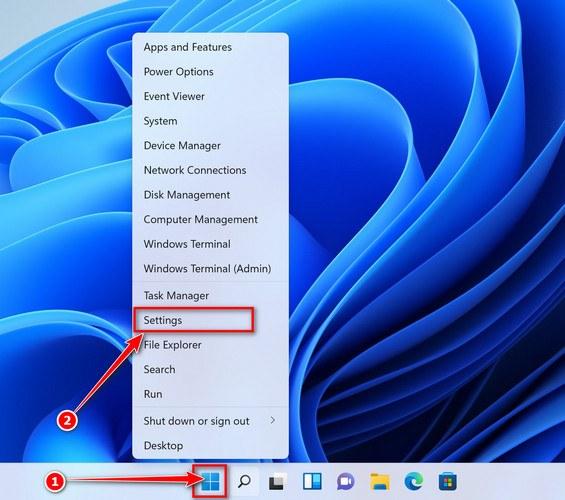
Open the Settings app
Press Windows + I on your keyboard to open Settings. Alternatively, right-click the Start button and select “Settings” from the menu.
-
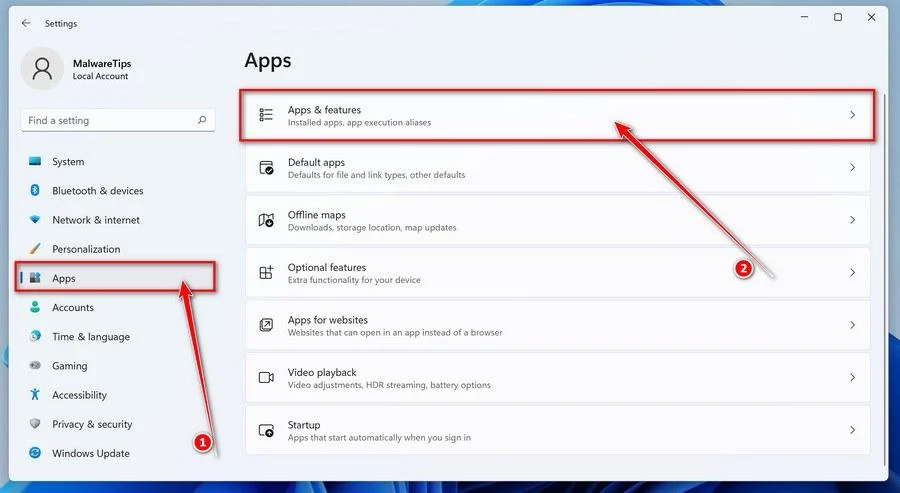
Go to “Apps & Features”
In the Settings window, click “Apps” in the sidebar, then select “Apps & Features“.
-
Find and uninstall the malicious program
Scroll through the list of installed apps and look for anything suspicious — a program you don’t remember installing, or one with a strange or generic name.
Quick tip: click “Sort by” and choose “Install date“. Malware is usually one of the most recently installed programs, so it will appear near the top.
When you find the malicious program, click the three dots next to it and select “Uninstall“.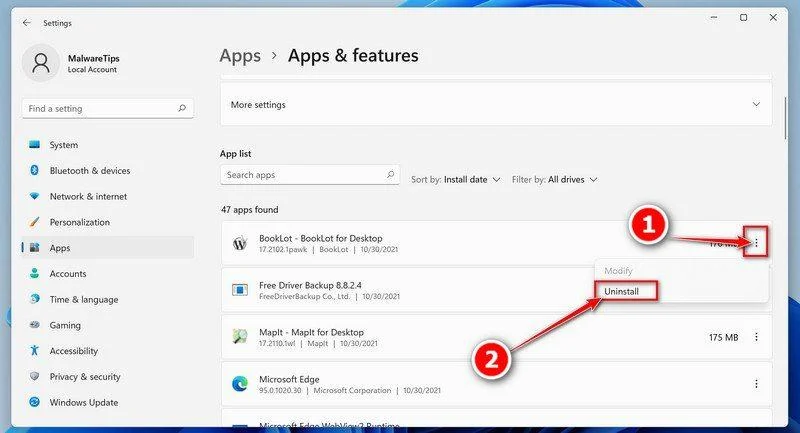 Didn’t find any suspicious programs? That’s fine — not all infections install visible apps. Just continue with the next step in this guide.
-
Complete the uninstall
Confirm by clicking Uninstall in the message box, then follow the remaining prompts.
Read each prompt carefully — some malicious programs use confusing wording or pre-ticked boxes hoping you’ll click through without looking.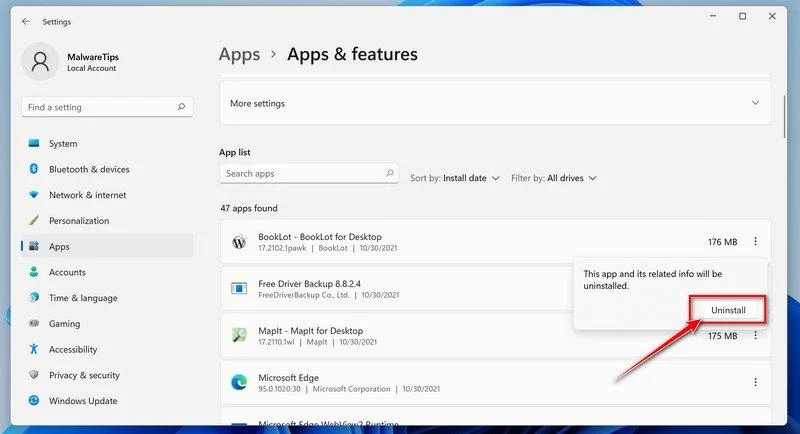
-
Open the Settings app
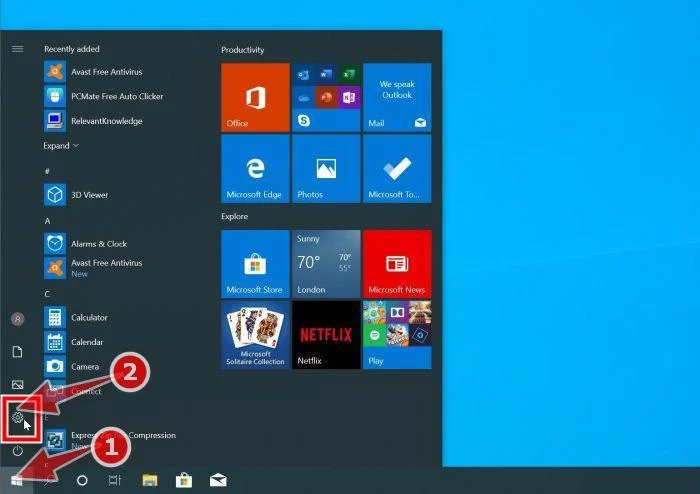
Press Windows + I on your keyboard to open Settings. Alternatively, click the Start button on the taskbar and select “Settings” (the gear icon).
-
Click on “Apps”
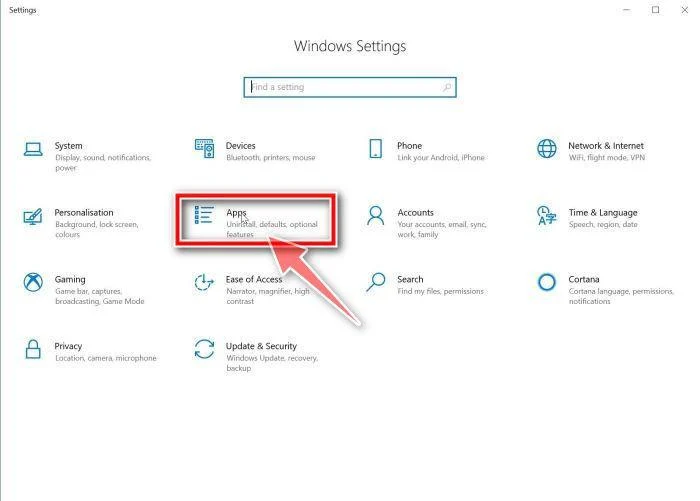
In the “Windows Settings” window, click “Apps“. The “Apps & Features” section should open by default — if it doesn’t, select it from the list on the left.
-
Find and uninstall the malicious program
Scroll through the list of installed apps and look for anything suspicious — a program you don’t remember installing, or one with a strange or generic name.
Quick tip: click “Sort by” and choose “Install date“. Malware is usually one of the most recently installed programs, so it will appear near the top.
When you find the malicious program, click on it and select “Uninstall“.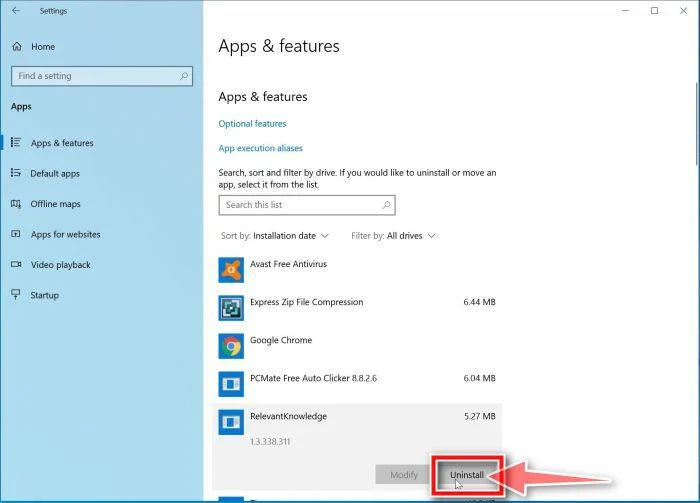 Didn’t find any suspicious programs? That’s fine — not all infections install visible apps. Just continue with the next step in this guide.
-
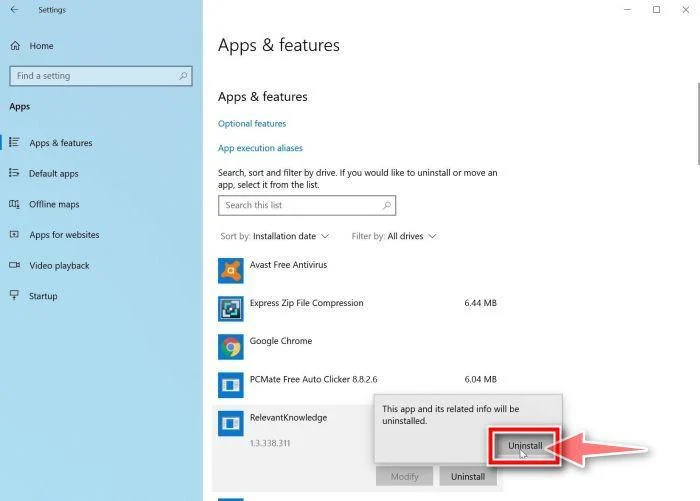
Complete the uninstall
Confirm by clicking Uninstall in the message box, then follow the remaining prompts.
Read each prompt carefully — some malicious programs use confusing wording or pre-ticked boxes hoping you’ll click through without looking.
-
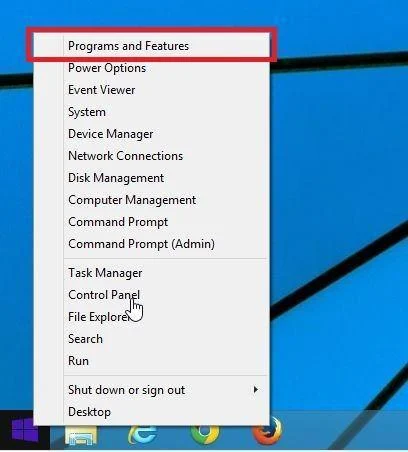
Open “Programs and Features”
Right-click the Start button in the taskbar, then select “Programs and Features“. This takes you straight to the list of installed programs.
-
Find and uninstall the malicious program
Scroll through the list of installed programs and look for anything suspicious — a program you don’t remember installing, or one with a strange or generic name. Click to highlight it, then click the “Uninstall” button.
Didn’t find any suspicious programs? That’s fine — not all infections install visible apps. Just continue with the next step in this guide.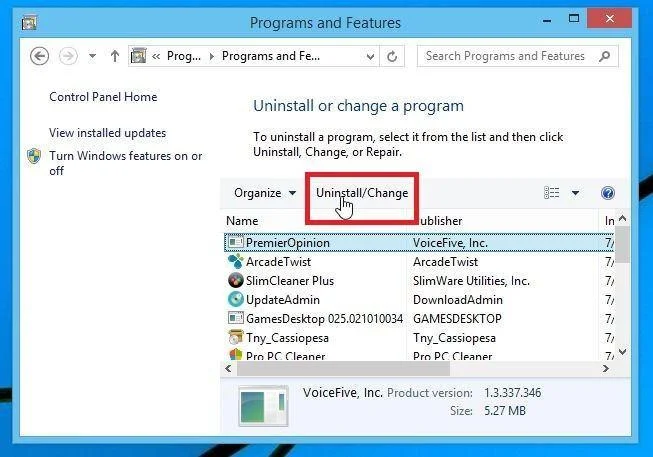
-
Complete the uninstall
Confirm by clicking Yes in the message box, then follow the remaining prompts. Read each prompt carefully — some malicious programs use confusing wording or pre-ticked boxes hoping you’ll click through without looking.
-
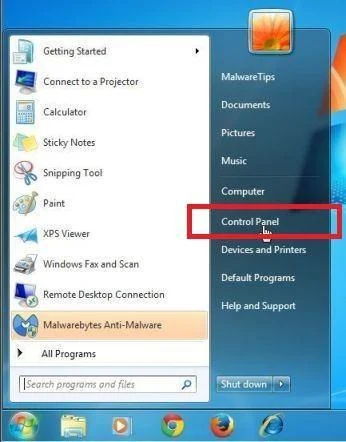
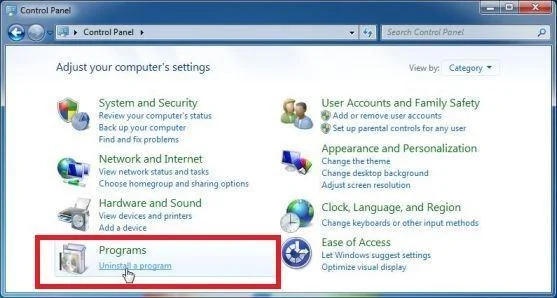
Open the Control Panel
Click the “Start” button, then click “Control Panel“.
-
Click on “Uninstall a Program”
In the Control Panel, click “Uninstall a Program” under the Programs category.
-
Find and uninstall the malicious program
Scroll through the list of installed programs and look for anything suspicious — a program you don’t remember installing, or one with a strange or generic name. Click to highlight it, then click the “Uninstall” button.
Didn’t find any suspicious programs? That’s fine — not all infections install visible apps. Just continue with the next step in this guide.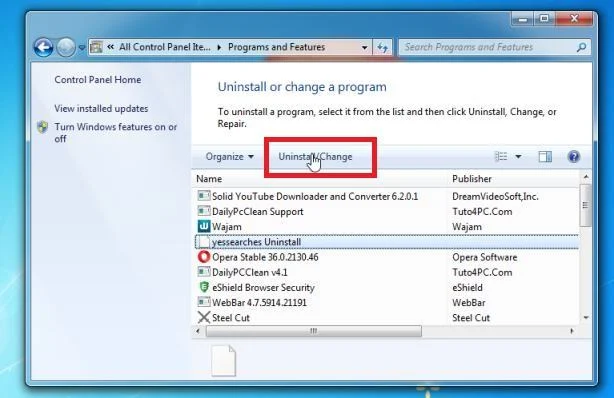
-
Complete the uninstall
Confirm by clicking Yes in the message box, then follow the remaining prompts. Read each prompt carefully — some malicious programs use confusing wording or pre-ticked boxes hoping you’ll click through without looking.
With the malicious programs removed, you’re ready for the next step in this guide.
STEP 2: Reset browsers back to default settings
In this step, we will remove spam notifications, malicious extensions, and change to default any settings that might have been changed by malware.
Please note that this method will remove all extensions, toolbars, and other customizations but will leave your bookmarks and favorites intact. For each browser that you have installed on your computer, please click on the browsers tab below and follow the displayed steps to reset that browser.
Reset Chrome for Windows to default settings
We will now reset your Chrome browser settings to their original defaults. This will reset your startup page, new tab page, search engine, and pinned tabs. It will also disable all extensions and clear temporary data like cookies. Your favorites, history, and saved passwords will not be cleared.
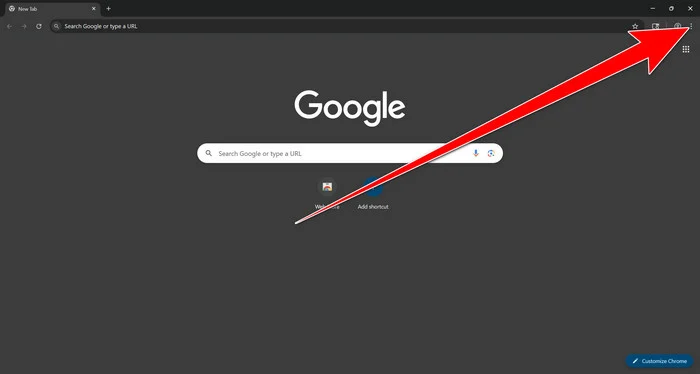
Open the Chrome menu
Open Google Chrome and click the three-dot (⋮) icon in the top-right corner.
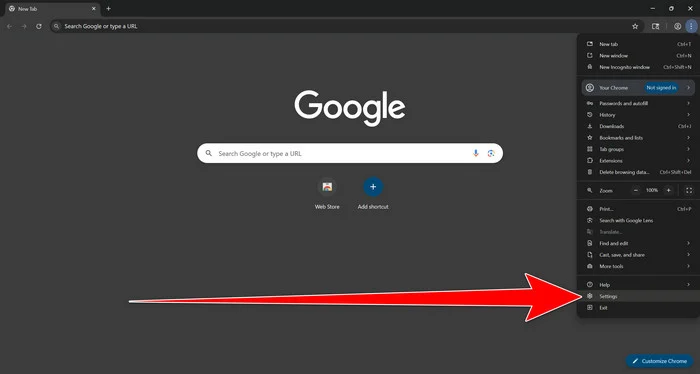
Open Chrome Settings
Select Settings from the Chrome menu.
Select “Reset settings”
Look at the menu on the left side of the Settings page. Scroll down and click Reset settings.
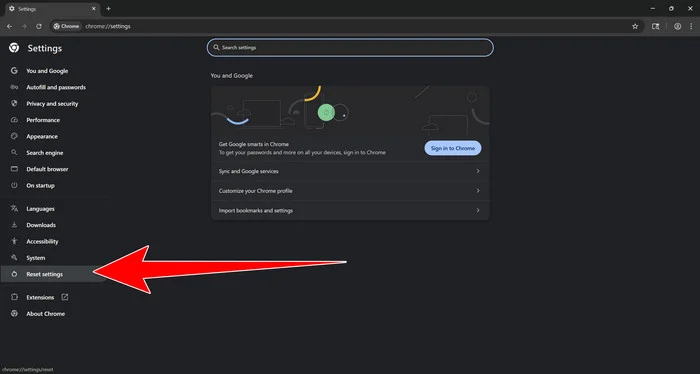
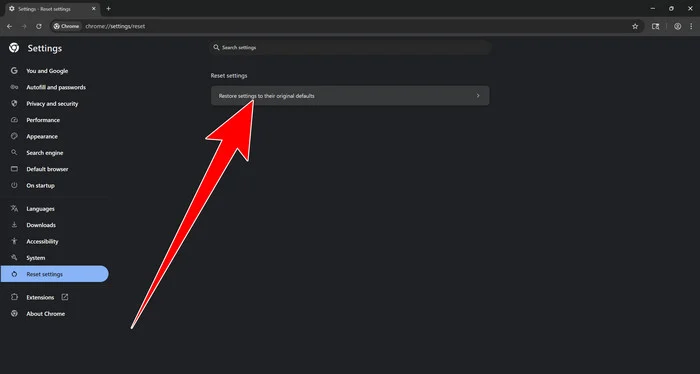
Restore Chrome’s original settings
Click Restore settings to their original defaults.
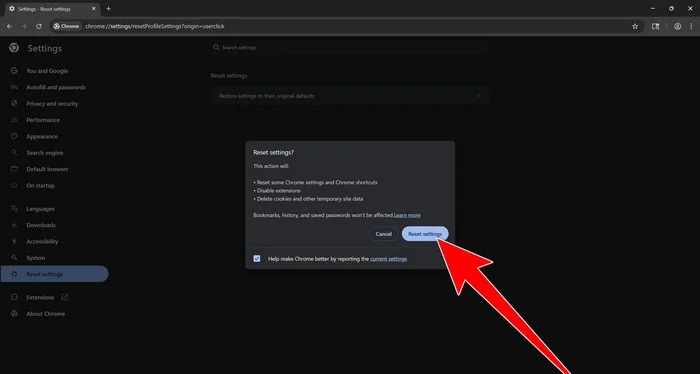
Confirm the Chrome reset
A confirmation window will appear. Click Reset settings.
This will:
- Restore the default search engine, homepage, and new tab page
- Reset startup pages and pinned tabs
- Disable installed extensions
- Clear temporary cookies and website data
Don’t worry: Chrome will not delete your bookmarks, browsing history, or saved passwords.
Restart Chrome and perform a test search. If your searches now open normally in Google, you can stop here.
If searches are still redirected through shady domains complete the additional step below.
Remove persistent search hijacker data
Only complete this step if the redirect continues after resetting Chrome.
Some browser hijackers hide inside Chrome’s local search-engine database. A standard Chrome reset may not remove this database, which is why searches can continue to pass through shady sites.
The following procedure creates a backup of the affected database and allows Chrome to build a new, clean version. This is safer and less disruptive than deleting the entire Chrome profile.
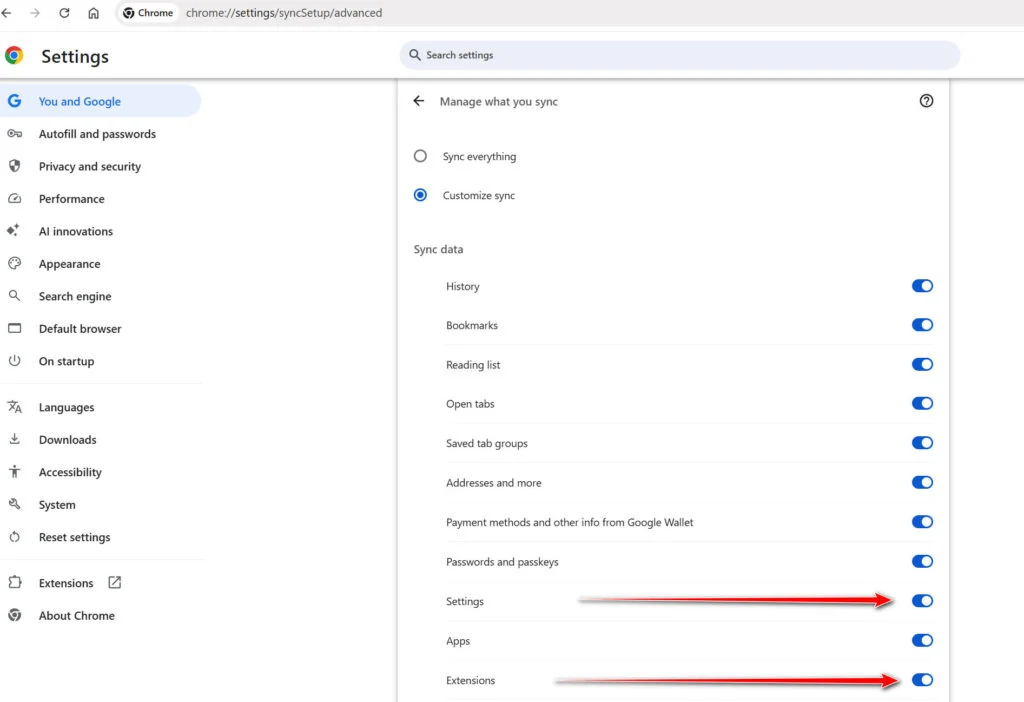
First, prevent Chrome Sync from restoring the hijacked settings:
- Open a new Chrome tab.
- Copy the following address, paste it into Chrome’s address bar, and press Enter:
chrome://settings/syncSetup/advanced - Under Manage what you sync, select Customize sync.
- Turn off Settings and Extensions.
- You can leave Bookmarks and Passwords enabled so your important data remains synchronized.
Note: Some newer Chrome versions may automatically redirect this address to the Google Account settings page. If that happens, locate the list of synchronized Chrome data and turn off Settings and Extensions there.
Now save anything you are working on and close every Chrome window.
Run the cleanup command:
- Press the Windows key on your keyboard.
- Type PowerShell.
- Open Windows PowerShell. Administrator access is not required.
- Copy the entire command shown below.
- Right-click inside the PowerShell window to paste the command, then press Enter.
- If Windows warns you about pasting multiple lines, select the option to continue.
$stamp = Get-Date -Format "yyyyMMdd-HHmmss"

Get-Process chrome -ErrorAction SilentlyContinue |
 Stop-Process -Force

$root = "$env:LOCALAPPDATA\Google\Chrome\User Data"

if (Test-Path $root) {
 $profiles = Get-ChildItem $root -Directory |
 Where-Object {
 $_.Name -eq "Default" -or
 $_.Name -match "^Profile \d+$"
 }

 foreach ($profile in $profiles) {
 foreach ($name in @(
 "Web Data",
 "Web Data-journal",
 "Web Data-wal",
 "Web Data-shm"
 )) {
 $file = Join-Path $profile.FullName $name

 if (Test-Path $file) {
 $backup = "$file.search-hijacker-backup-$stamp"
 Move-Item -LiteralPath $file -Destination $backup
 Write-Host "Backup created: $backup"
 }
 }
 }
}

Write-Host ""
Write-Host "Chrome search data has been cleaned."
Write-Host "You can now reopen Chrome."
Wait until PowerShell displays the following message:
Chrome search data has been cleaned.
You can now reopen Chrome.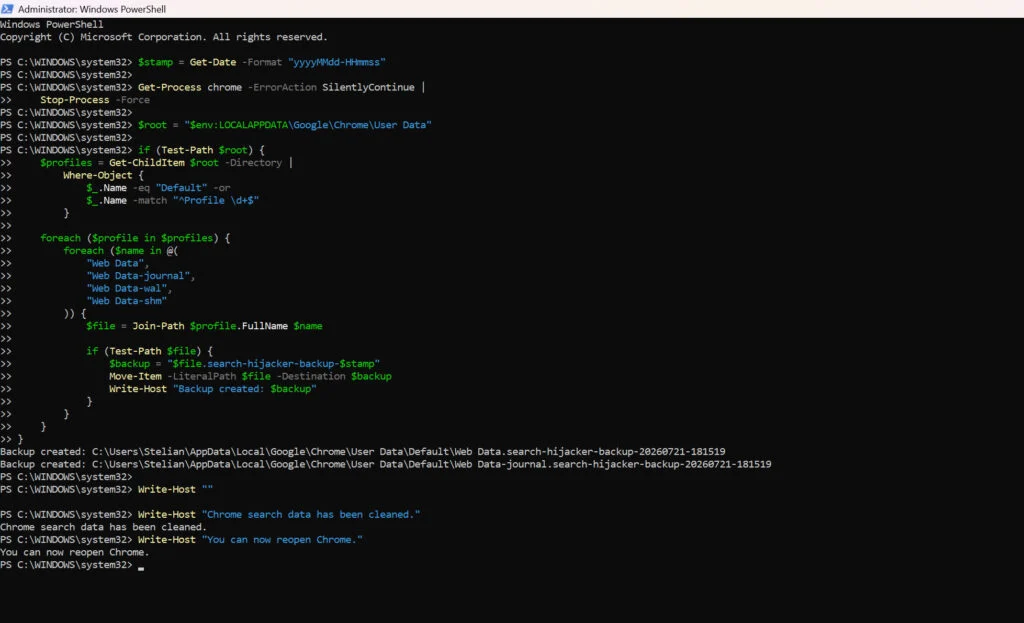
Close PowerShell and reopen Google Chrome. Chrome will automatically create a clean search database for every local profile.
Next, copy the following address, paste it into Chrome’s address bar, and press Enter:
chrome://settings/searchEnginesMake sure Google is selected as the default search engine. Test several searches from the address bar and confirm that they no longer pass through shady search engines.
Your important Chrome data is protected: the PowerShell cleanup does not remove bookmarks, saved passwords, browsing history, cookies, or installed extensions. However, it may reset locally stored Autofill addresses and form suggestions.
The original search database is not deleted. PowerShell renames it and adds
search-hijacker-backupto its filename so it can be recovered if necessary.Keep Settings and Extensions synchronization disabled while testing Chrome. Do not enable every extension at once. Enable only the extensions you recognize, one at a time, and test Chrome after each one.
If the redirect returns after enabling a particular extension, remove that extension immediately.
Reset Firefox for Windows to default settings
We will now reset your Firefox browser settings to their default. The reset feature fixes many issues by restoring Firefox to its factory default state while saving your essential information like bookmarks, passwords, web form auto-fill information, browsing history, and open tabs.
-
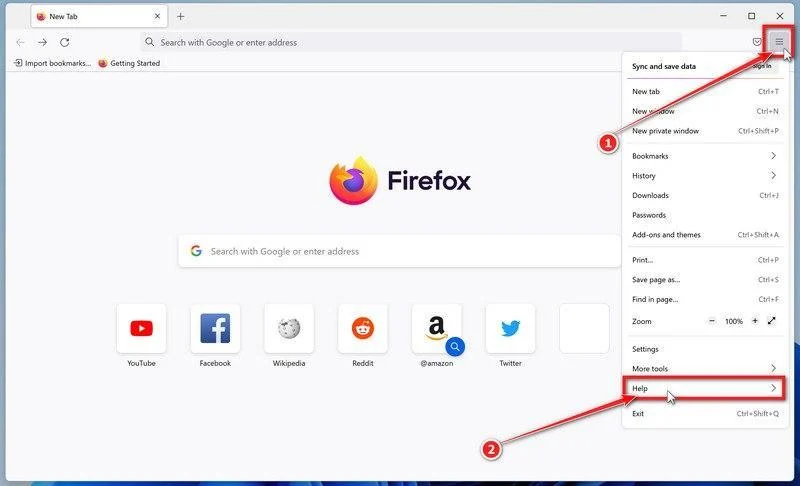
Open the Firefox menu and click “Help”
Click the three horizontal lines in the top-right corner of Firefox to open the main menu, then select “Help“.
-
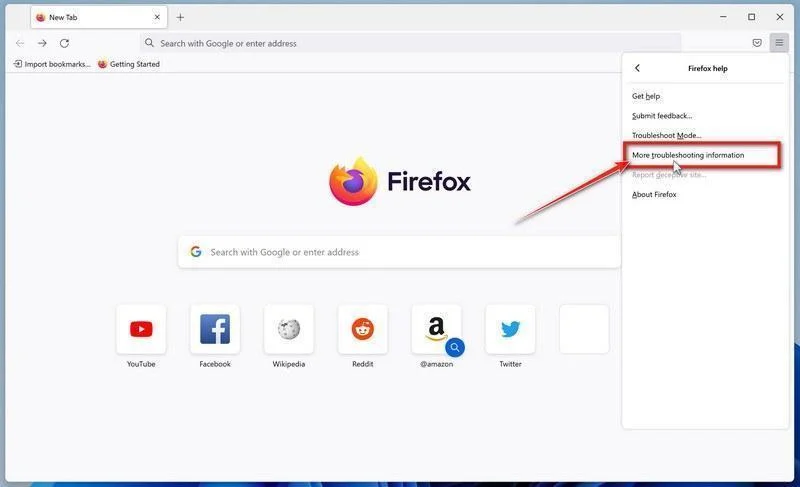
Click “More troubleshooting information”
In the Help menu, click “More troubleshooting information“.
-
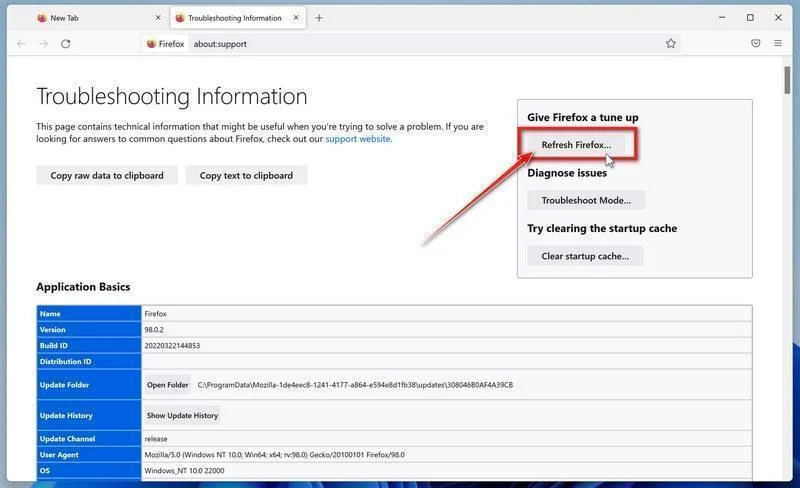
Click “Refresh Firefox”
On the “Troubleshooting Information” page, click the “Refresh Firefox” button in the top-right area of the page.
-
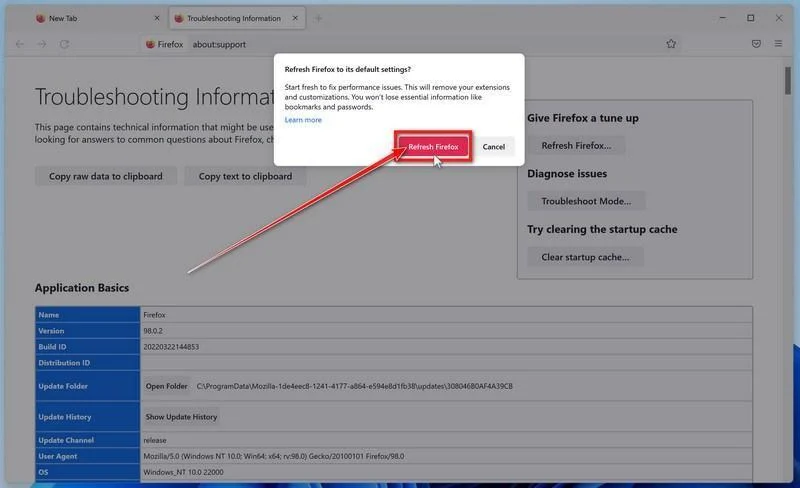
Confirm the refresh
In the confirmation window, click “Refresh Firefox” again. This removes extensions, themes, and customized settings — the usual hiding places for browser hijackers — while keeping your bookmarks, history, and saved passwords safe.
-
Click “Finish”
Firefox will close, reset itself to default settings, and reopen with a window listing the information that was restored. Click “Finish” — your Firefox is now clean.
About the “Old Firefox Data” folder: Firefox saves a copy of your old profile on your desktop. If something you need is missing after the reset, you can recover it from this folder. Otherwise, delete the folder — it contains sensitive data like passwords and cookies, and may also still hold the malicious files you just removed.
Reset Microsoft Edge to default settings
We will now reset your Microsoft Edge browser settings to their default. This will reset your startup page, new tab page, search engine, and pinned tabs. It will also disable all extensions and clear temporary data like cookies. Your favorites, history, and saved passwords will not be cleared.
Updated for Microsoft Edge on Windows 10 and Windows 11 — July 2026.
-
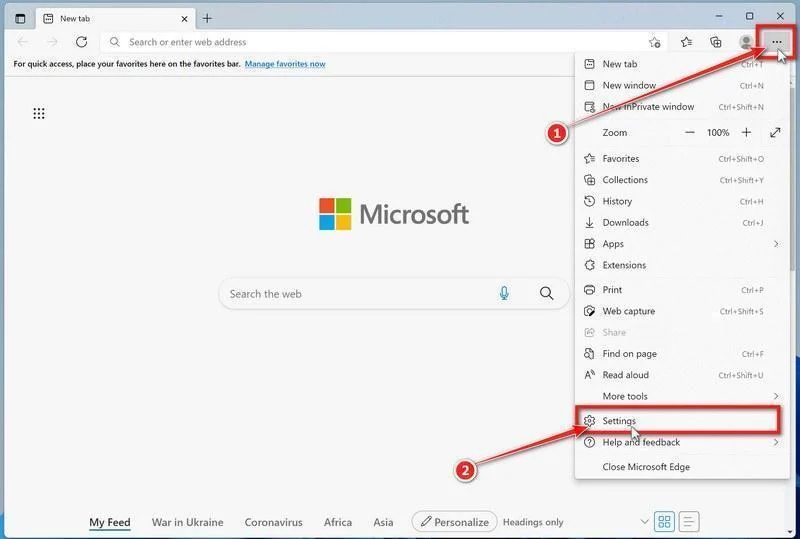
Open the Edge menu and click “Settings”
Open Microsoft Edge. In the top-right corner, click the three-dot (…) icon, then click Settings.
-
Prevent the unwanted settings from returning through Edge Sync
If you are signed in to Microsoft Edge, a bad setting or extension may be stored in your Microsoft account and return after the reset.
Copy the following address, paste it into the Edge address bar, and press Enter:
edge://settings/profiles/syncOn the Sync page, turn off these two options:
- Settings
- Extensions
You can leave Favorites and Passwords turned on.
If Edge says that sync is already off, simply continue to the next step.
Important: Edge Sync settings are separate for each profile. If you use more than one Edge profile, switch to each affected profile and repeat this step.
You do not need to sign out of your Microsoft account or delete the Edge profile.
-
Open “Reset settings”
In the left sidebar, click Reset settings.
You can also open the reset page directly. Copy the following address, paste it into the Edge address bar, and press Enter:
edge://settings/reset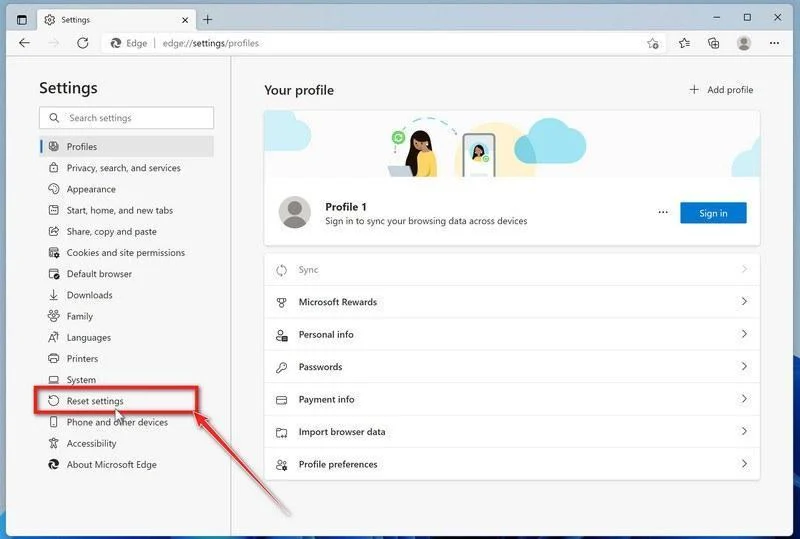
-
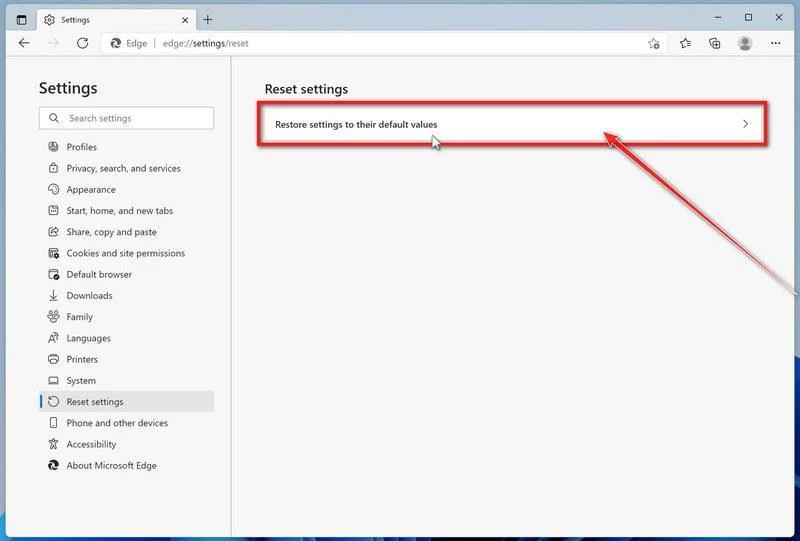
Click “Restore settings to their default values”
Click Restore settings to their default values.
-
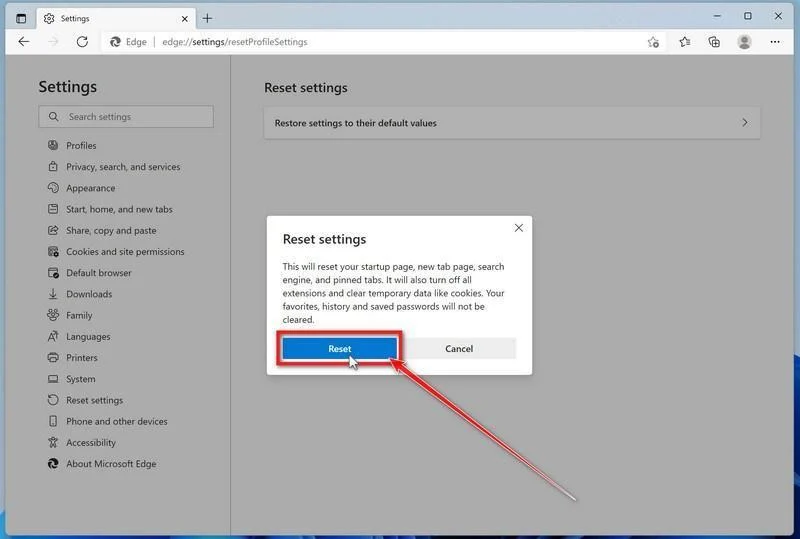
Confirm the reset
In the confirmation dialog, click Reset.
This resets the startup page, new tab page, search engine, and pinned tabs. It also disables all extensions and clears temporary site data, such as cookies.
Don’t worry: your favorites, browsing history, and saved passwords will not be deleted.
-
Check your extensions before turning them back on
Copy the following address, paste it into the Edge address bar, and press Enter:
edge://extensionsRemove any extension you do not recognize or no longer use. Pay particular attention to extensions related to search, coupons, shopping, PDF conversion, browser protection, new tabs, or video downloading.
Do not turn all extensions back on at the same time. Enable only the extensions you recognize and trust.
-
Select a trusted search engine
Copy the following address, paste it into the Edge address bar, and press Enter:
edge://settings/searchEnginesSelect Bing, Google, DuckDuckGo, or another search provider you trust and make it the default.
Remove any unknown search engines, especially providers with strange names or addresses that you did not add yourself.
Restart Edge and perform a search from the address bar. If searches are no longer redirected, you can stop here.
-
If the redirect remains, clean the corrupted search data without deleting the Edge profile
Use this additional step only if Edge continues to redirect searches after the normal reset.
This command cleans the search-engine database from every local Edge profile while keeping your favorites, saved passwords, browsing history, cookies, and profiles.
Before continuing: save anything you are working on because the command will close Microsoft Edge.
- Open the Windows Start menu.
- Type PowerShell.
- Open Windows PowerShell. Administrator access is not required.
- Copy the entire command below.
- Paste it into PowerShell and press Enter.
$stamp = Get-Date -Format "yyyyMMdd-HHmmss"
$root = Join-Path $env:LOCALAPPDATA "Microsoft\Edge\User Data"

Get-Process -Name msedge -ErrorAction SilentlyContinue |
    Stop-Process -Force -ErrorAction SilentlyContinue

Start-Sleep -Seconds 2

if (-not (Test-Path -LiteralPath $root)) {
    Write-Host "The Microsoft Edge profile folder was not found:"
    Write-Host $root
    return
}

$profiles = Get-ChildItem -LiteralPath $root -Directory |
    Where-Object {
        $_.Name -eq "Default" -or
        $_.Name -match "^Profile \d+$"
    }

$movedFiles = 0

foreach ($profile in $profiles) {
    foreach ($name in @(
        "Web Data",
        "Web Data-journal",
        "Web Data-wal",
        "Web Data-shm"
    )) {
        $file = Join-Path $profile.FullName $name

        if (Test-Path -LiteralPath $file) {
            $backup = "$file.search-reset-backup-$stamp"

            try {
                Move-Item -LiteralPath $file -Destination $backup -ErrorAction Stop
                Write-Host "Cleaned: $($profile.Name)\$name"
                $movedFiles++
            }
            catch {
                Write-Warning "Could not clean: $file"
            }
        }
    }
}

Write-Host ""

if ($movedFiles -gt 0) {
    Write-Host "Microsoft Edge search data has been cleaned." -ForegroundColor Green
    Write-Host "You can now reopen Microsoft Edge."
}
else {
    Write-Host "No Edge search database files were found." -ForegroundColor Yellow
}
The command does not permanently delete the original files. It renames them as backup files, and Edge creates a clean search database when it starts again.
Note: this additional cleanup may also reset saved form-fill suggestions, saved addresses, and manually added search engines. It does not delete favorites, passwords, or browsing history.
-
Reopen Edge and test the browser
Open Microsoft Edge again, visit edge://settings/searchEngines, and select your preferred search engine.
Perform several searches from the address bar to confirm that the redirect is gone.
Keep synchronization for Settings and Extensions turned off until you are certain that the computer and extensions are clean. If you enable them again, turn them on one at a time and test Edge after each change.
-
If Edge still redirects your searches
Open edge://policy. If this is your personal computer and Edge displays unknown policies such as ExtensionInstallForcelist or DefaultSearchProvider, the hijacker may be installed outside the browser profile.
In that situation, continue with the next malware-removal steps and run a complete antivirus scan. If the computer belongs to a company or school, contact its IT administrator before changing any policies.
Reset Internet Explorer to default settings
We will now reset your Internet Explorer browser settings to their default. You can reset Internet Explorer settings to return them to the state they were in when Internet Explorer was first installed on your computer.
-
Go to “Internet Options”.
Open Internet Explorer, click on the gear icon in the upper-right part of your browser, then select “Internet Options“.
-
Select the “Advanced” tab, then click “Reset”
In the “Internet Options” dialog box, select the “Advanced” tab, then click on the “Reset” button.
-
Click on “Reset”.
In the “Reset Internet Explorer settings” section, select the “Delete personal settings” checkbox, then click on the “Reset” button.
-
Click on “Close”.
When Internet Explorer has completed its task, click on the “Close” button in the confirmation dialogue box.
Close your browser and then you can open Internet Explorer again.
STEP 3: Use Rkill to terminate suspicious programs
Next, we’ll download and run Rkill to stop any suspicious processes running in the background. This prevents the malware from interfering with the removal tools in the following steps.
RKill is a program that was developed at BleepingComputer.com that attempts to terminate known malware processes so that your normal security software can then run and clean your computer of infections. When RKill runs it will kill malware processes and then removes incorrect executable associations and fixes policies that stop us from using certain tools.
-
Download Rkill.
You can download RKill to your computer from the below link. When at the download page, click on the Download Now button labeled iExplore.exe. We are downloading a renamed version of Rkill (iExplore.exe) because some malware will not allow processes to run unless they have a certain filename.
Download RKillOpens the BleepingComputer download page in a new tab. RKillStops malware processes so other tools can run
-
Run RKill.
After downloading, double-click the iExplore.exe icon to kill malicious processes. In most cases, downloaded files are saved to the Downloads folder.
The program may take some time to search for and end various malware programs.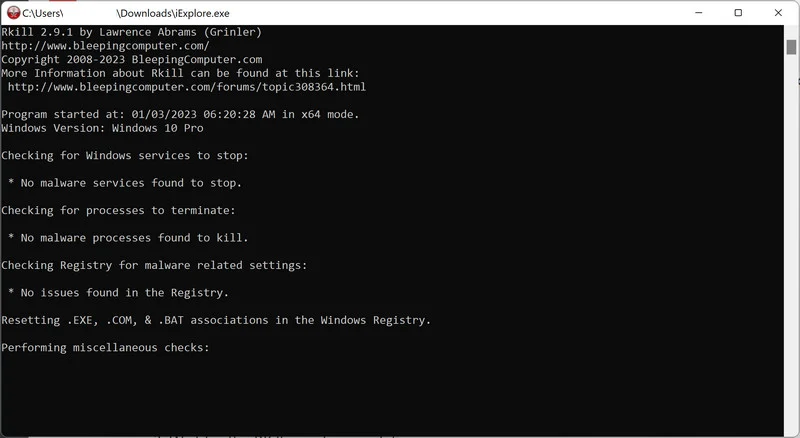
When it is finished, the black window will close automatically and a log file will open. Do not restart your computer. Proceed to the next step in this guide.
STEP 4: Use Malwarebytes to remove Trojans and unwanted programs
Now we’ll install Malwarebytes and run a full scan to detect and remove infections, adware, and potentially unwanted programs from your computer.
Malwarebytes is one of the most popular and trusted anti-malware tools for Windows — and it’s completely free for removing infections. It catches threats that many antivirus programs miss, including adware, browser hijackers, and trojans. Follow the steps below to scan and clean your PC in just a few minutes.
Download Malwarebytes
Click the button below to download the latest version of Malwarebytes for Windows from the official source. The free version is all you need — it will scan your computer and remove adware, browser hijackers, and other malicious software at no cost.
Download MalwarebytesOfficial installer for Windows 11 and 10. Your download starts right away.Want real-time protection? See Malwarebytes Premium Malwarebytes Free for WindowsScans and removes malware at no cost
-
Install Malwarebytes
When the download finishes, open your Downloads folder and double-click the MBSetup file. If Windows shows a User Account Control pop-up, click “Yes” to allow the installation.
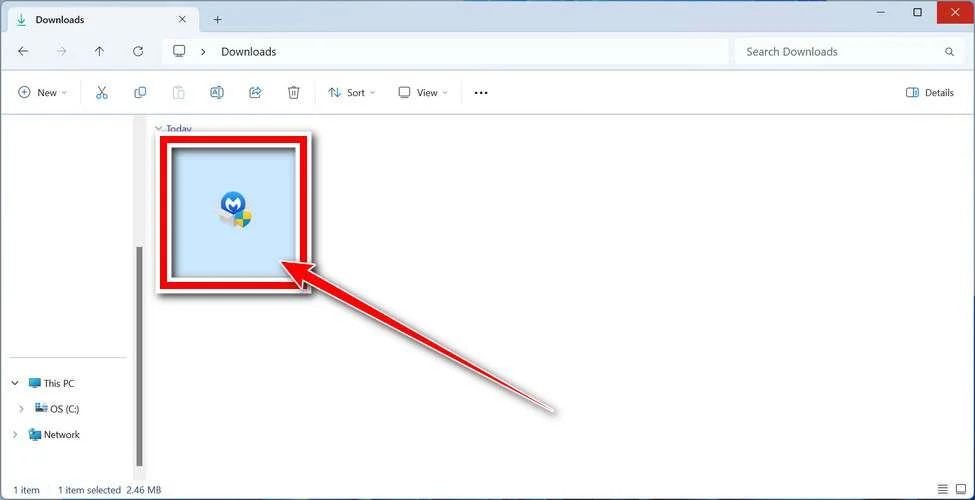
Follow the On-Screen Prompts to Install Malwarebytes
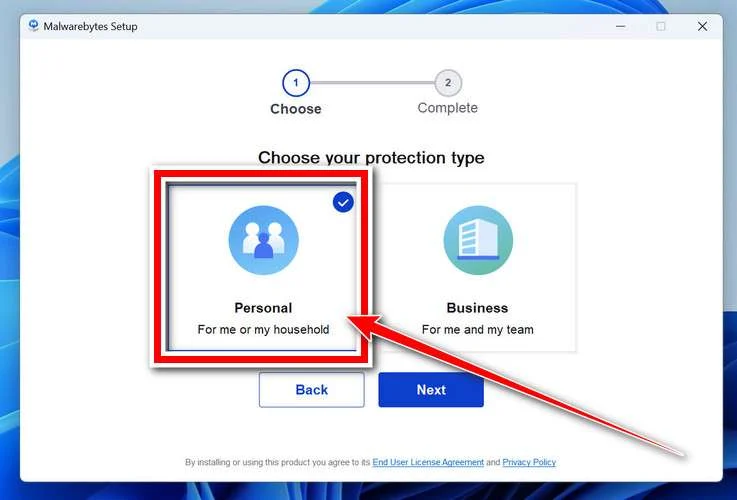
The setup wizard will walk you through a few quick screens:
-
Choose where you’re installing the program — “Personal Computer” or “Work Computer” — then click Next.
-
Malwarebytes will now install on your device. This usually takes under a minute.
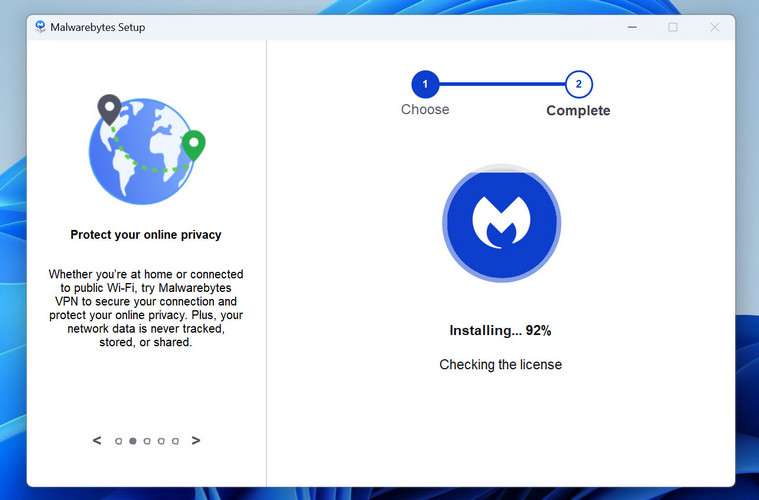
-
When installation is complete, the “Welcome to Malwarebytes” screen will open automatically.
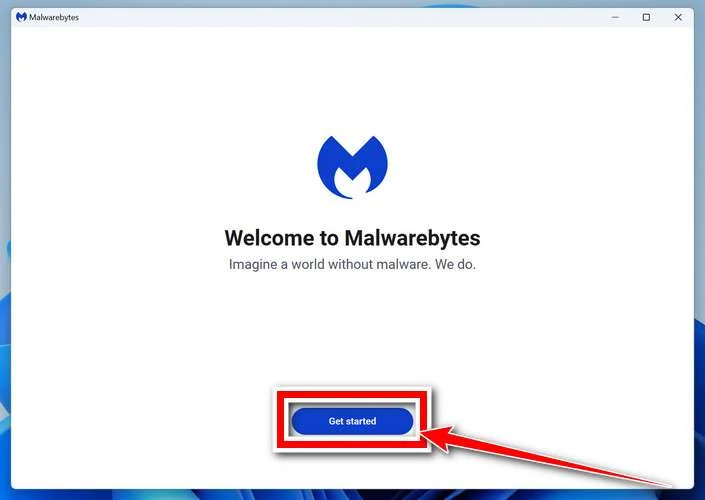
-
On the final screen, click Open Malwarebytes to launch the program.
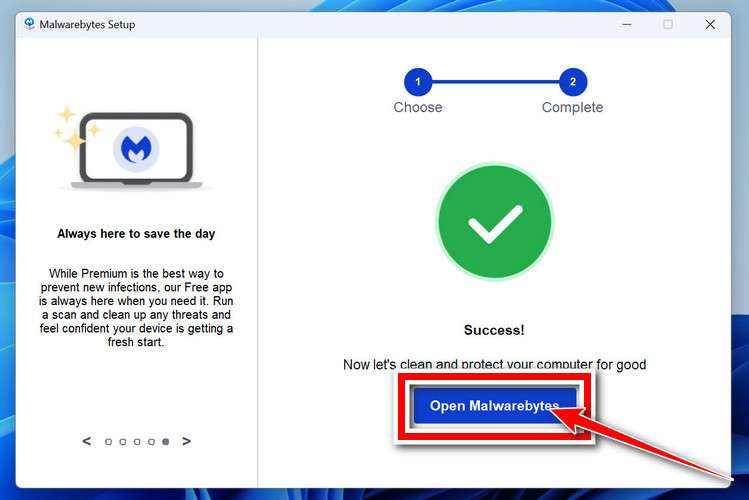
-
Enable “Scan for Rootkits”
Before scanning, turn on rootkit detection so Malwarebytes can find even the most hidden threats. Click the Settings gear icon on the left side of the screen.
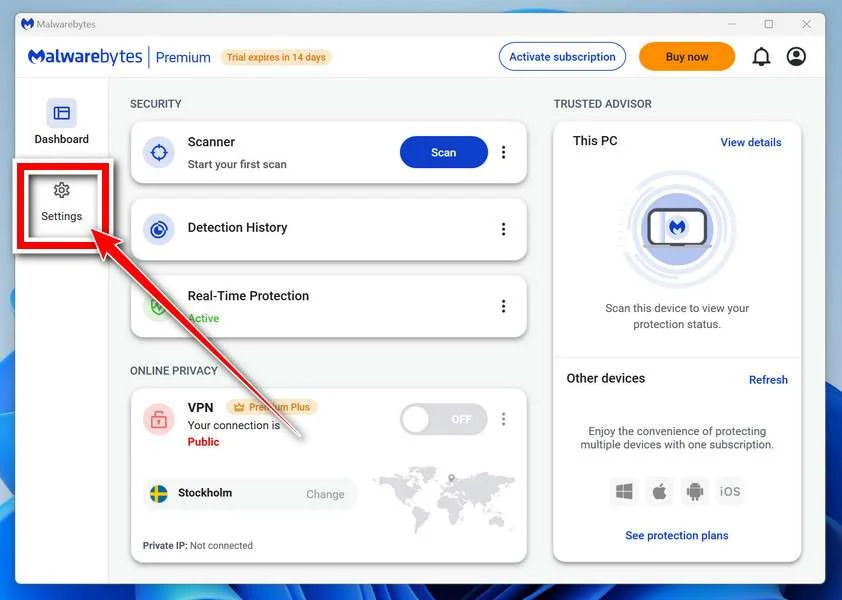
In the settings menu, find “Scan for rootkits” and click the toggle so it turns blue.
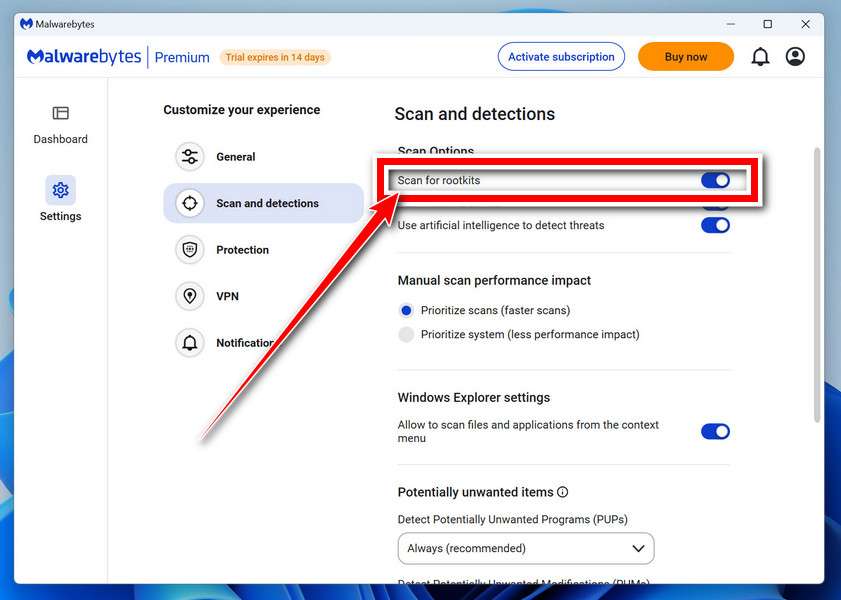
Done? Click “Dashboard” in the left pane to return to the main screen.
Start the Scan
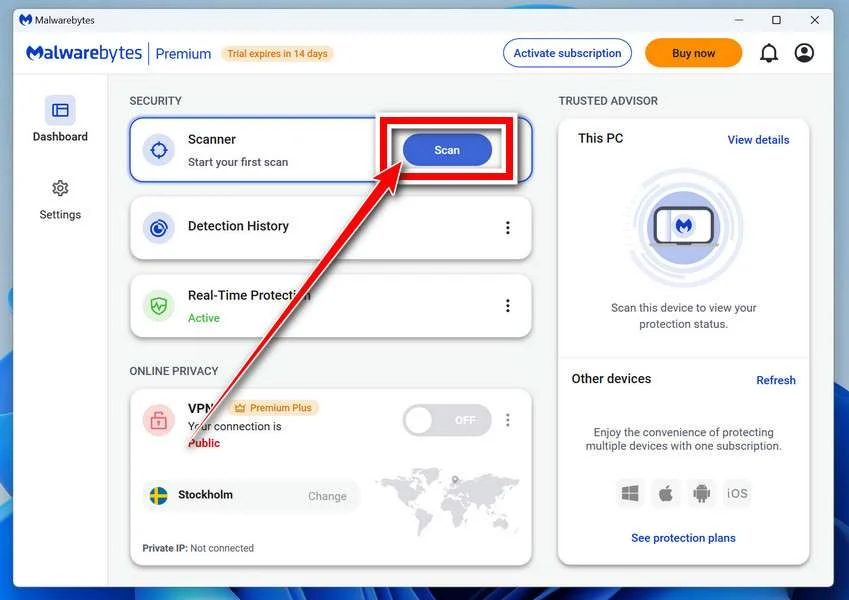
Click the blue Scan button. Malwarebytes will automatically update its virus database and start checking your computer for malware.
-
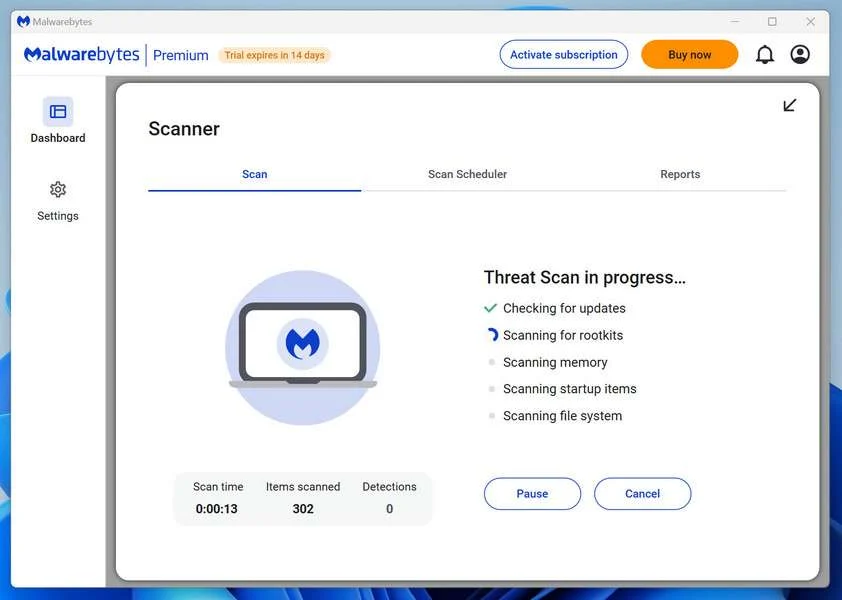
Wait for the Scan to Finish
The scan checks your entire system for browser hijackers and other malicious programs, so it can take 5 to 20 minutes depending on your computer. Feel free to do something else — just check back occasionally to see the progress.
-
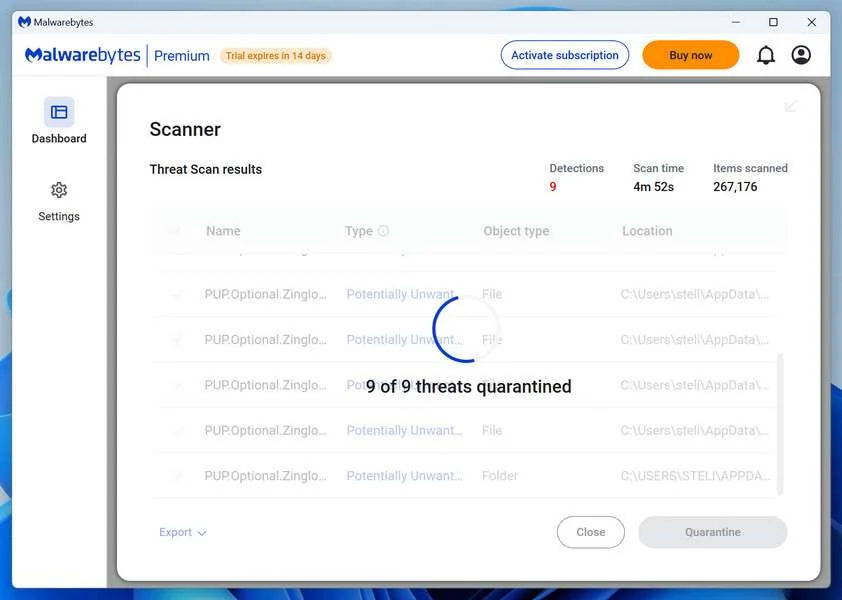
Quarantine the Detected Threats
When the scan is done, you’ll see a list of everything Malwarebytes found — malware, adware, and potentially unwanted programs. Click the “Quarantine” button to remove all of them at once.
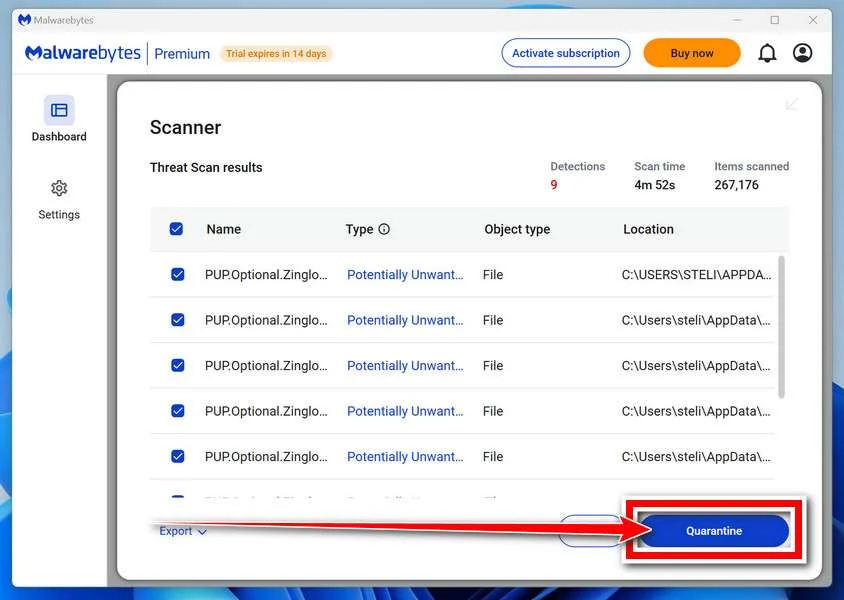
Malwarebytes will now remove the malicious files and registry entries and move them safely into quarantine.
-
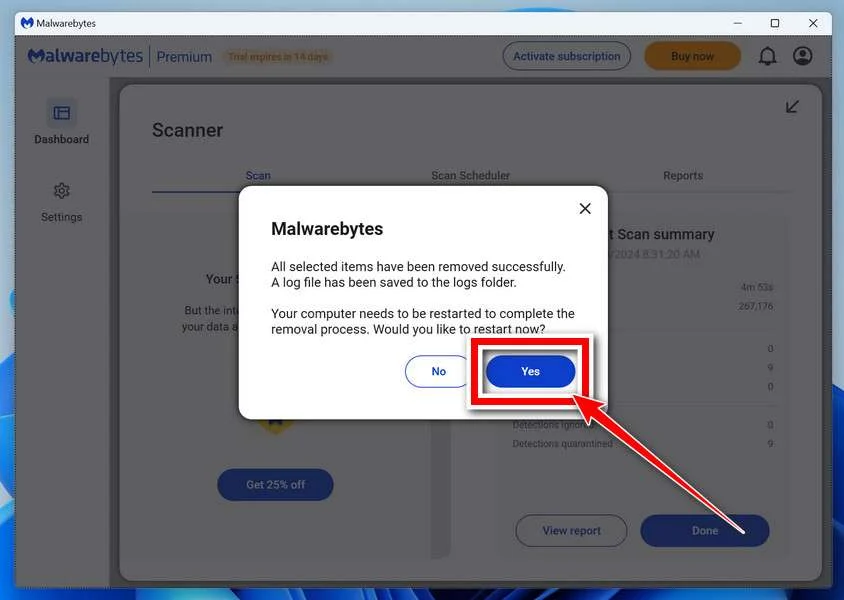
Restart Your Computer
Some threats can only be fully removed after a reboot. If Malwarebytes asks you to restart, click Yes. Once you’re logged back in, Malwarebytes has finished removing the threats it found.
STEP 5: Use HitmanPro to remove rootkits and other malware
Next, we’ll run a second-opinion scan with HitmanPro to catch Trojans, rootkits, and other malicious programs that may have survived the previous step.
HitmanPro is a second-opinion scanner — it’s designed to catch what your main antivirus might have missed. Instead of relying on a single detection engine, it checks the behavior of files in the locations where malware usually hides. Anything suspicious gets sent to the cloud, where it’s analyzed by two of the best antivirus engines available: Bitdefender and Kaspersky.
Good news: scanning is completely free, with no limits. You only need a license when it’s time to remove what was found — and even then, you can activate a free one-time 30-day trial to clean your PC at no cost. (A full license is $24.95 per year for 1 PC.)
-
Download HitmanPro
Click the button below to download HitmanPro. Remember — the scan is free, so you have nothing to lose by checking your PC.
Download HitmanProFree scan. Removing threats needs the free 30-day trial. Opens the official HitmanPro page in a new tab. HitmanProSecond-opinion malware scanner from Sophos
-
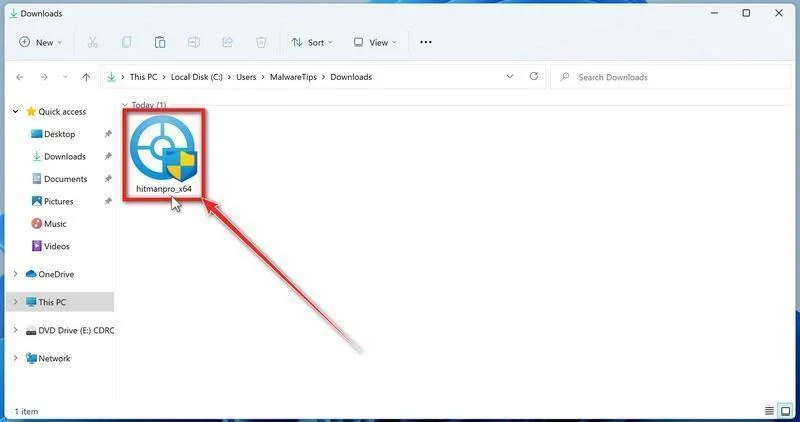
Install HitmanPro
When the download finishes, open your Downloads folder and double-click the file: “hitmanpro.exe” on 32-bit Windows, or “hitmanpro_x64.exe” on 64-bit Windows.
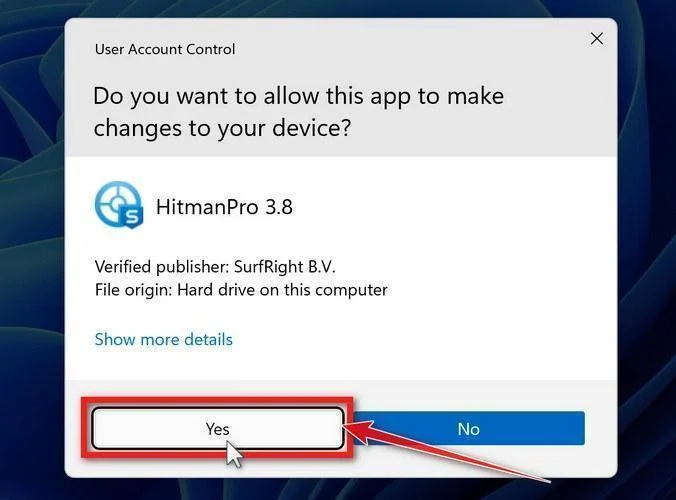
If a User Account Control pop-up asks whether HitmanPro can make changes to your device, click “Yes” to continue.
-
Follow the On-Screen Prompts
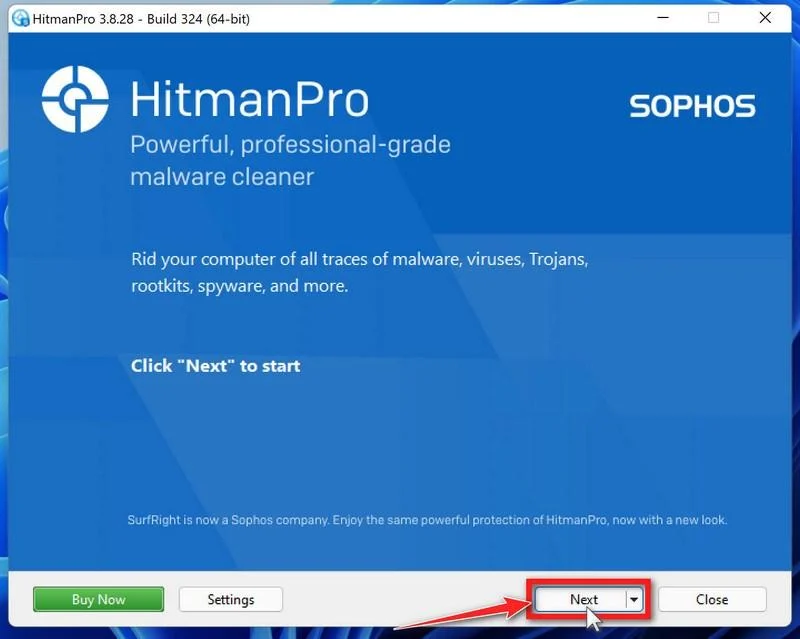
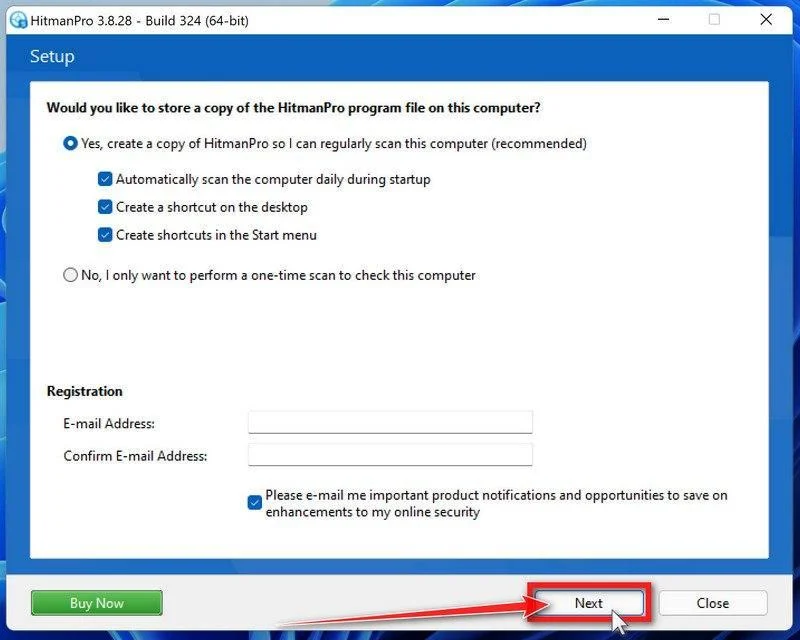
On the HitmanPro start screen, click “Next” to begin the system scan. No lengthy setup required — it goes straight to work.
-
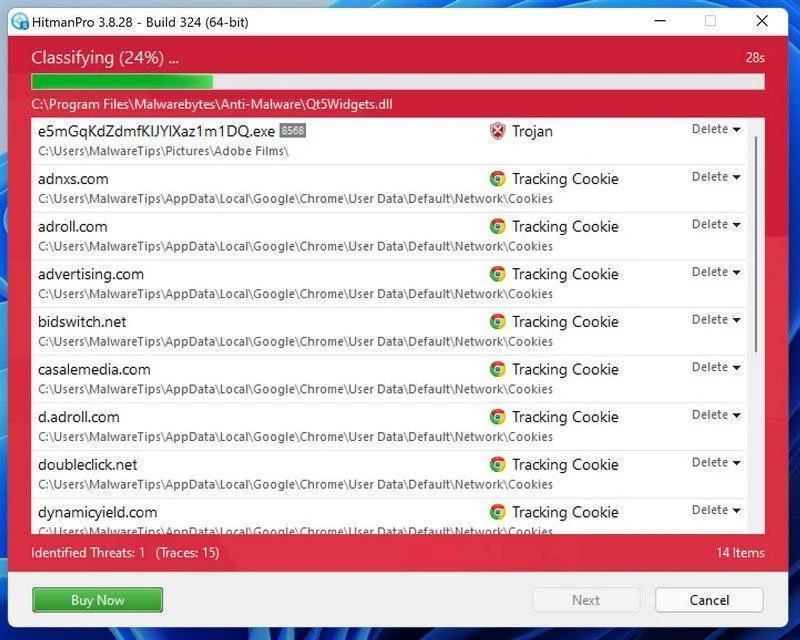
Wait for the Scan to Finish
HitmanPro will now check your computer for malicious programs. This usually takes just a few minutes thanks to its cloud-based scanning.
-
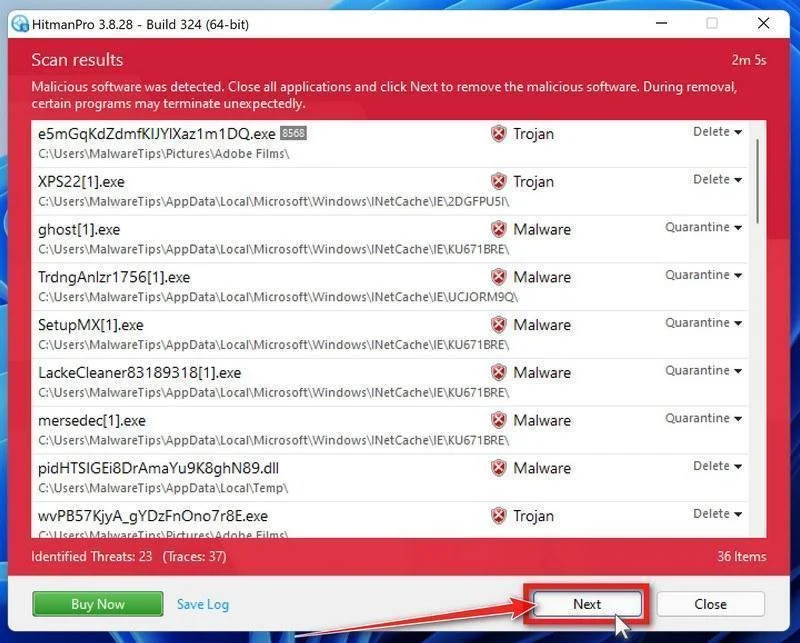
Review the Results and Click “Next”
When the scan is done, HitmanPro will show you everything it found. Click “Next” to remove the detected threats.
-
Click “Activate Free License”
To remove the malicious files, click the “Activate free license” button. This starts your free 30-day trial — no payment details needed — and unlocks the full cleanup.
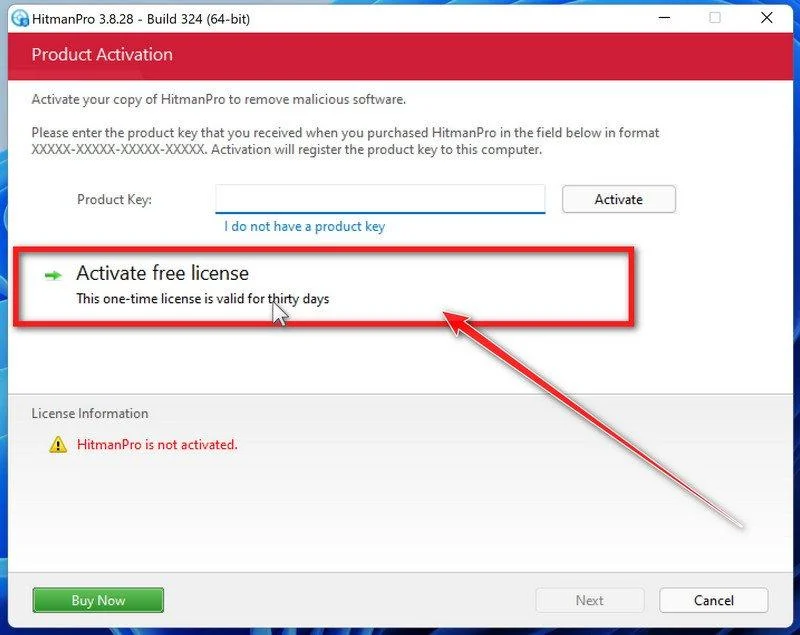
When the removal is complete, HitmanPro will show a summary of everything it cleaned. Click Next, then click Reboot if prompted. If there’s no reboot prompt, just click Close — your PC is clean.
STEP 6: Use AdwCleaner to remove malicious browser policies and adware
We’ll now use AdwCleaner to remove malicious browser policies and unwanted browser extensions — the leftovers that keep hijacking your browser settings even after the malware itself is gone.
AdwCleaner is a free on-demand scanner that specializes in adware, browser hijackers, and unwanted toolbars — the exact threats that mainstream antivirus programs often miss. It also includes tools that repair the damage malware leaves behind, like hijacked browser settings and malicious policies. It’s a quick scan that’s well worth running.
-
Download AdwCleaner
Click the button below to download AdwCleaner — it’s free, portable, and requires no installation.
Download AdwCleanerOpens the official download page in a new tab. Malwarebytes AdwCleanerRemoves adware and unwanted programs at no cost
-
Run AdwCleaner
Open your Downloads folder and double-click the file named “adwcleaner.exe“. There’s no installation — the program starts right away.
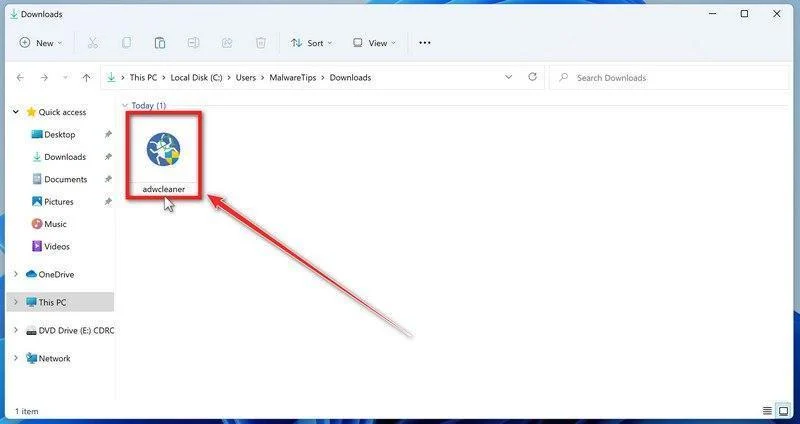
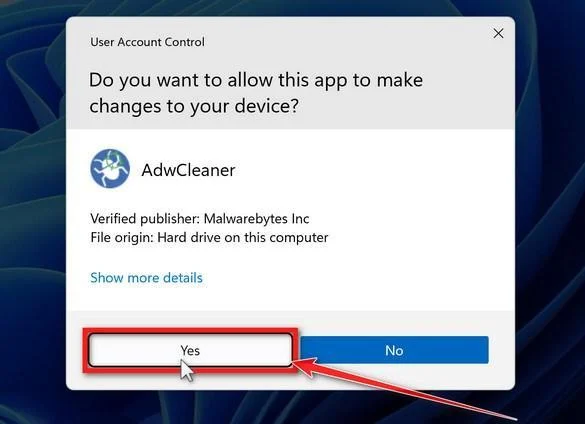
If Windows asks whether you want to allow AdwCleaner to run, click “Yes“. When the license agreement appears, click I agree to continue.
-
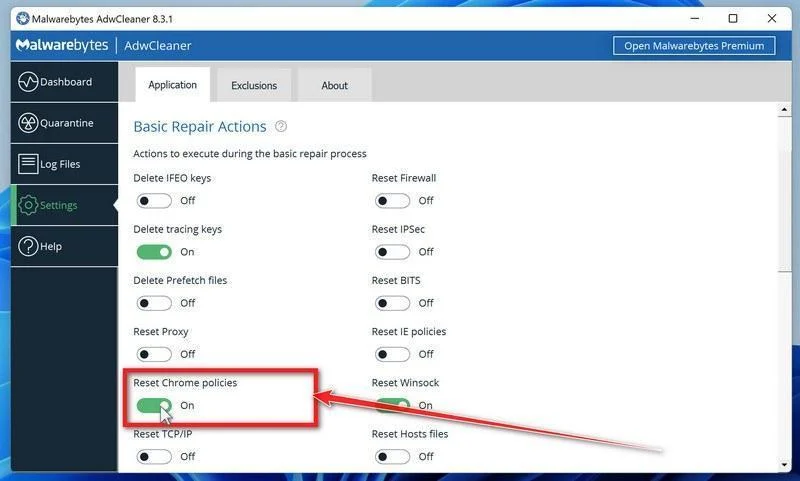
Enable “Reset Chrome policies”
This setting removes malicious browser policies — a trick malware uses to lock your browser settings so you can’t change them back. Click “Settings” on the left side of the window, then turn on “Reset Chrome policies“.
-
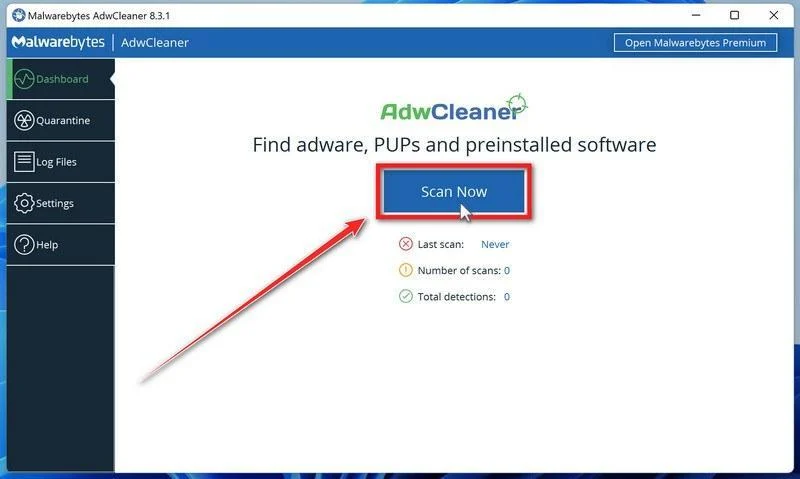
Start the Scan
Click “Dashboard” on the left side of the window, then click the “Scan” button.
-
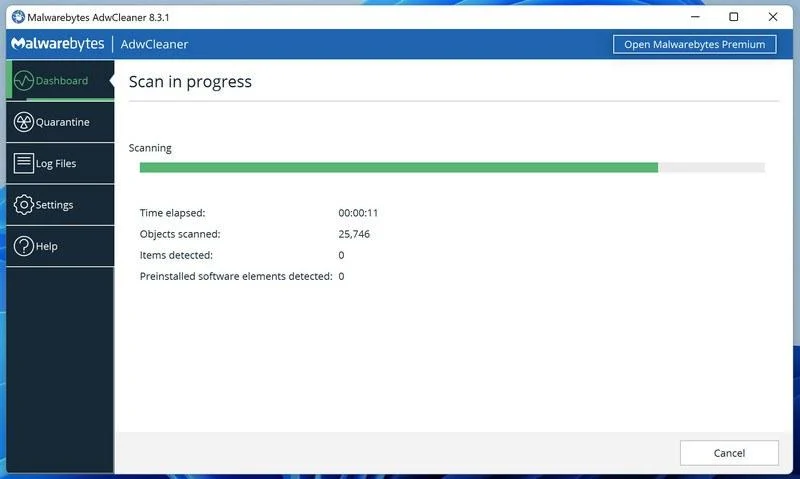
Wait for the Scan to Finish
AdwCleaner will now check your computer for adware and other malware. This usually takes only a few minutes — it’s one of the fastest scanners around.
-
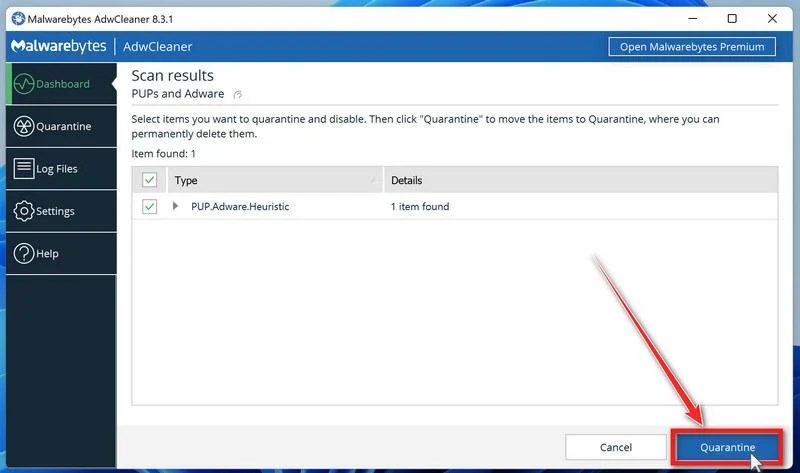
Quarantine the Detected Threats
When the scan finishes, AdwCleaner will list everything it found. Click the “Quarantine” button to remove all the malicious items at once.
-
Click “Continue” to Finish the Cleanup
Save any open work first — AdwCleaner needs to close your open programs before it can clean. When you’re ready, click the “Continue” button.
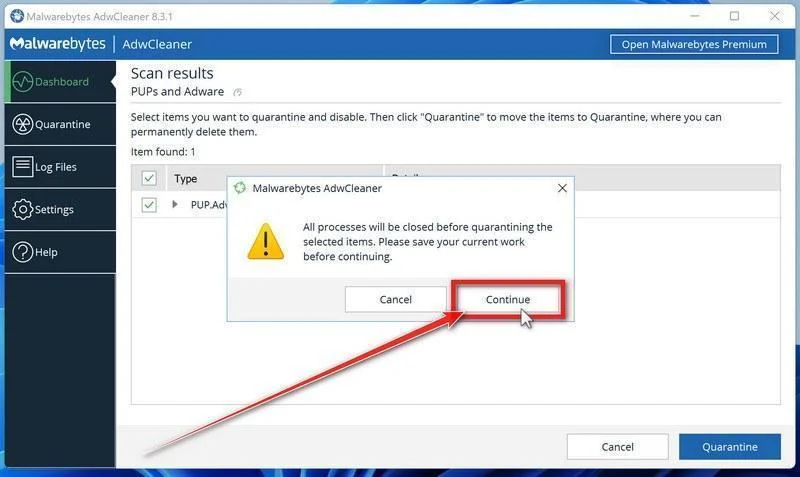
AdwCleaner will now delete all detected malware from your computer. If it asks you to restart your PC, allow it — your computer will be clean when you log back in.
STEP 7: Perform a final check with ESET Online Scanner
Finally, we’ll run ESET Online Scanner as a last sweep to confirm nothing was missed. If this scan comes back clean, your computer is malware-free.
ESET Online Scanner is a free second-opinion scanner that performs a deep, full-system check for viruses, trojans, rootkits, and other malware. We use it as the final step because it’s thorough — if anything slipped past the previous scans, ESET will find it. A clean result here means your computer is malware-free.
-
Download ESET Online Scanner
Click the button below to download ESET Online Scanner.
Download ESET Online ScannerOpens the official download page in a new tab. ESET Online ScannerFree one-time malware scan from ESET
-
Run the Installer
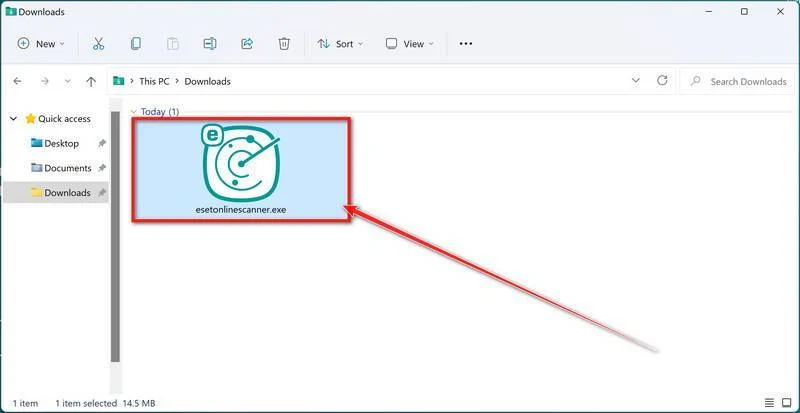
When the download finishes, open your Downloads folder and double-click “esetonlinescanner.exe“.
-
Install ESET Online Scanner
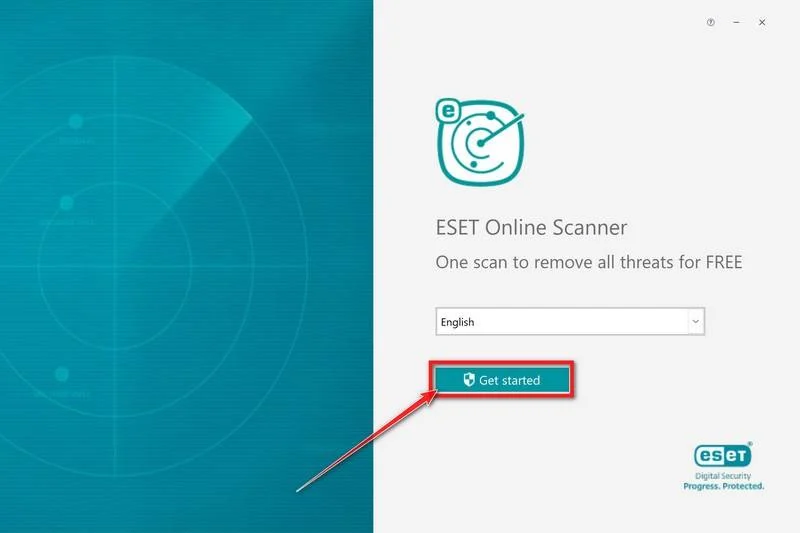
On the start screen, select your language from the drop-down menu and click Get started.
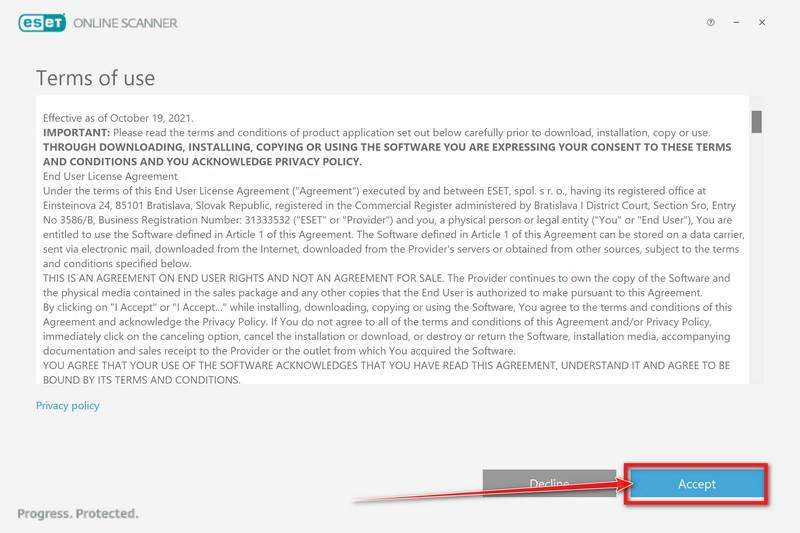
On the Terms of use screen, click Accept.
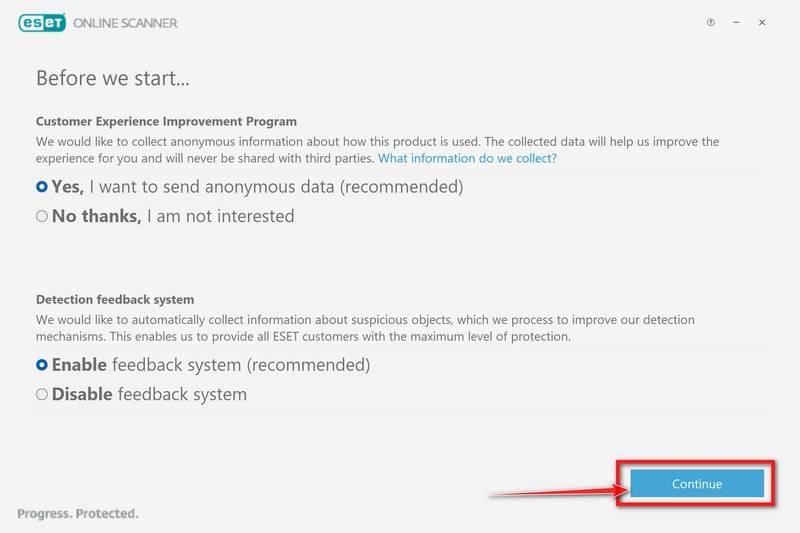
Choose your preferences for the Customer Experience Improvement Program and the Detection feedback system (either choice is fine), then click Continue.
-
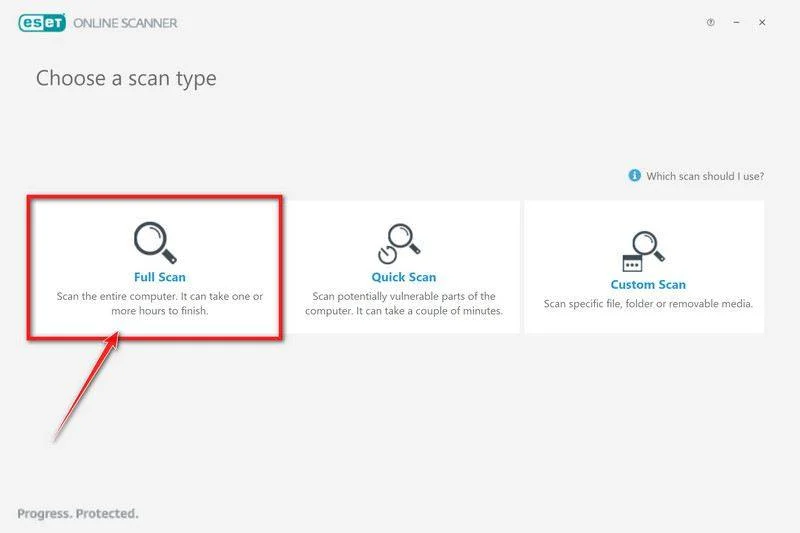
Start a Full Scan
Click Full Scan — this checks your entire computer, not just the common hiding spots.
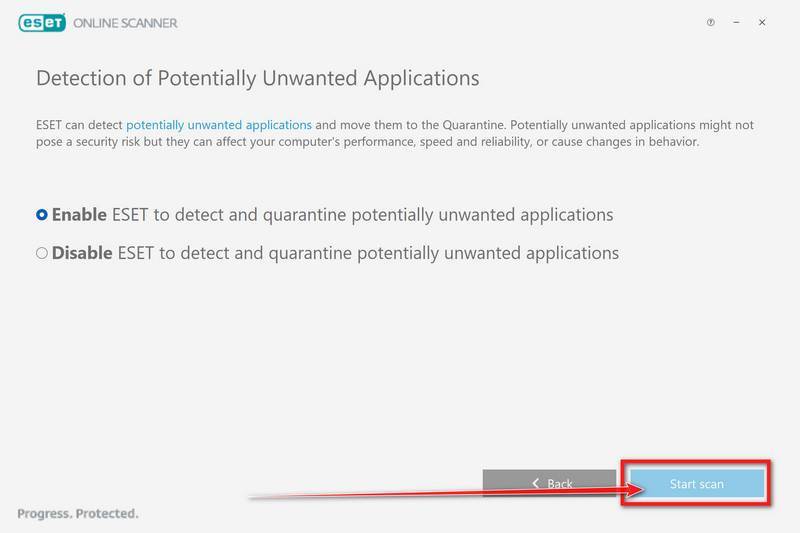
Select Enable for Detection of Potentially Unwanted Applications — this lets ESET catch adware and bundled junk programs, not just viruses. Then click Start scan.
-
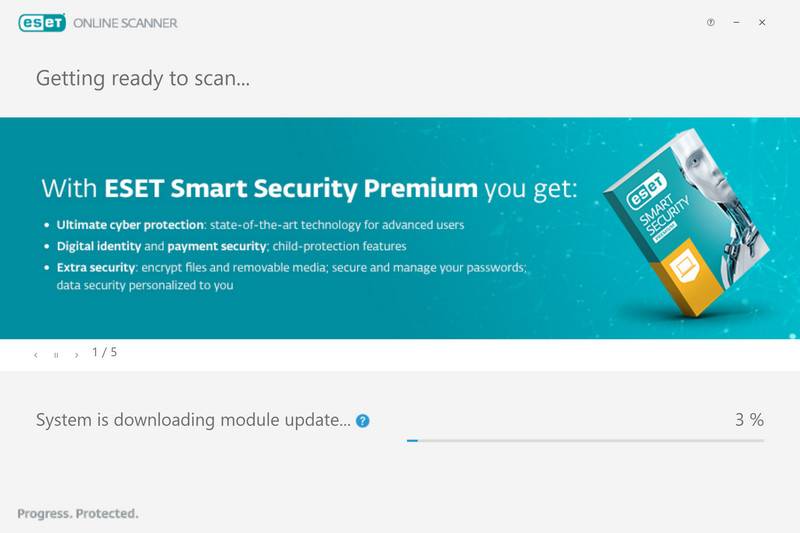
Wait for the Scan to Finish
ESET will now check every file on your computer. Because it’s a full scan, this can take a while — often an hour or more, depending on how much data you have. Leave it running in the background and check on it from time to time.
-
Review the Results
When the scan completes, the Found and resolved detections screen appears. Any threats found were automatically cleaned and quarantined — there’s nothing extra you need to do. Click View detailed results if you want to see exactly what was removed.
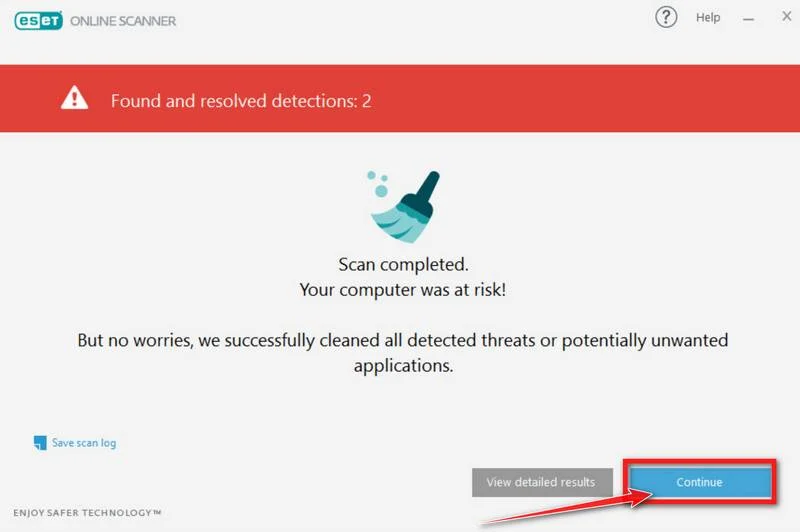
If ESET found nothing — congratulations, your computer has passed the final check and is malware-free.
Your computer should now be free of KMSPico Trojan and other malware.
If you are still having problems with your computer after completing these instructions, then please follow one of the steps:
- Run a computer scan with ESET Online Scanner
- Ask for help in our Windows Malware Removal Help & Support forum.
Frequently Asked Questions (FAQ)
Is KMSPico legal to use?
No, KMSPico is not legal. It circumvents Microsoft’s licensing system, which violates their Terms of Service. Using it could result in software deactivation, fines, or legal consequences, especially in business environments.
Is KMSPico a virus?
KMSPico itself is a hack tool, not a traditional virus. However, most versions available online are bundled with malware such as trojans, spyware, or adware. Since there’s no official source, every download carries risk.
Can antivirus software detect KMSPico?
Yes, most antivirus programs detect KMSPico as a potentially unwanted program (PUP) or riskware. Detection names include HackTool.KMS, HackTool.KMSpico, RiskWare.AutoKMS, and others.
Why do people use KMSPico?
Users typically turn to KMSPico to activate Microsoft Windows or Office without purchasing a license. While it grants access to paid features, it also introduces major risks like malware infections and legal issues.
What happens if I keep using KMSPico?
Using KMSPico can lead to security vulnerabilities, blocked software updates, malware infections, and invalid licenses. If the unofficial KMS server goes offline, your Microsoft products may also become deactivated.
How can I tell if KMSPico is installed on my computer?
Common signs include a folder named KMSPico or AutoKMS in Program Files or the Windows directory, suspicious background services, unknown scheduled tasks, and security alerts from your antivirus software.
What’s the safest way to activate Windows or Office?
The only safe and legal method is to buy a genuine license from Microsoft or an authorized reseller. This ensures full access to updates, support, and security patches.
Can removing KMSPico damage my system?
Removing KMSPico will not damage your system if done properly. Use antivirus tools to scan and clean your system, and follow the step-by-step removal process to ensure no remnants are left behind.
Final Thoughts: Shortcuts Come with Costs
KMSPico might look like a quick fix for expensive software—but it’s a risky trade-off. From exposure to malware and loss of system integrity to legal consequences, the costs can be much higher than just buying a legitimate license.
If you’ve used KMSPico, removing it is the first step toward securing your system. And if you’re considering it—remember that there’s no such thing as a free lunch when it comes to pirated software.
Better to stay safe and legit than to gamble your system’s security on a shortcut.

Join the discussion
0 commentsShare your experience or ask a question about this article.
Your progress
Did these steps help?
Let us know how the guide worked for you.
Describe what you see and the step you reached. Keep passwords and other private information out.
Discussion
Start the conversation
Have a question or something useful to share? Add the first comment.