If you cannot open your images, documents, or files and they have a “.venus” extension, then your computer is infected with the Venus ransomware.
What is the Venus ransomware?
The Venus ransomware is a file-encrypting ransomware infection that restricts access to data (documents, images, videos) by encrypting files with the “.venus” extension. It then attempts to extort money from victims by asking for “ransom”, in the form of Monero, in exchange for access to data.
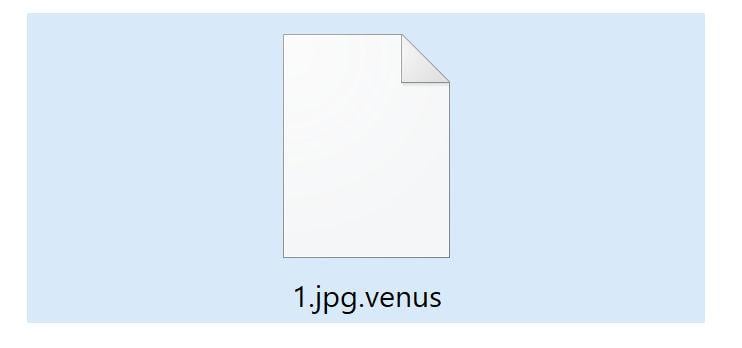
When you are first infected with the Venus ransomware it will scan your computer for images, videos, and important productivity documents and files such as .doc, .docx, .xls, .pdf. When these files are detected, the ransomware will encrypt them and change their extension to “.venus”, so that you are no longer able to be open them.
Once the Venus ransomware has encrypted the files on your computer, it will display a pop-up window and the “README.txt” file that contain the ransom note and instructions on how to contact the authors of this ransomware.
This is the ransom note that the Venus ransomware will show to its victims:
Hi, as you can see, all your files are encrypted.
Don’t panic, you can decrypt them, you just have to pay me for the ransom.
Payment is made only by bitcoin, and the amount you have to pay is 0.02 BITCOIN
You can buy very easily from these sites:
www.localbitcoins.com
www.paxful.com
A list of several sites where you can buy bitcoin can be found here:
https://bitcoin.org/en/exchanges
Make sure the address where you will send the bitcoin is:
After sending, contact us at this email address: xinoxix@tuta.io
With this subject:
After confirming the payment, you will receive a tutorial and the keys for decrypting the files.
If your computer is infected with this ransomware, we recommend that you contact the following government fraud and scam sites to report this attack:
- In the United States, go to the On Guard Online website.
- In Australia, go to the SCAMwatch website.
- In Canada, go to the Canadian Anti-Fraud Centre.
- In France, go to the Agence nationale de la sécurité des systèmes d’information
- In Germany, go to the Bundesamt für Sicherheit in der Informationstechnik website.
- In Ireland, go to the An Garda Síochána website.
- In New Zealand, go to the Consumer Affairs Scams website.
- In the United Kingdom, go to the Action Fraud website.
- If your country or region isn’t listed above, we recommend that you contact your country or region’s federal police or communications authority.
Unfortunately, it is not currently possible to decrypt the files encrypted by the Venus ransomware. It may, though, be possible in the future if the decryption keys are recovered from the cybercriminals’ servers. Therefore, if you do not plan on paying the ransom, it is advised that you make an image of the encrypted drives so that you can possibly decrypt them in the future.
How did the Venus ransomware get on my computer?
The Venus ransomware is distributed via spam email containing infected attachments or by exploiting vulnerabilities in the operating system and installed programs.
Here’s how the Venus ransomware might get on your computer:
- Cyber-criminals spam out an email, with forged header information, tricking you into believing that it is from a shipping company like DHL or FedEx. The email tells you that they tried to deliver a package to you, but failed for some reason. Sometimes the emails claim to be notifications of a shipment you have made. Either way, you can’t resist being curious as to what the email is referring to – and open the attached file (or click on a link inside the email). And with that, your computer is infected with the Venus ransomware.
- The Venus ransomware was also observed attacking victims by exploiting vulnerabilities in the program installed on the computer or the operating system itself. Commonly exploited software includes the operating system itself, browsers, Microsoft Office, and third-party applications.
Remove the Venus ransomware and recover the files
It’s recommended to create a backup image of the encrypted drives before proceeding with the below malware removal instructions.
This malware removal guide may appear overwhelming due to the number of steps and numerous programs that are being used. We have only written it this way to provide clear, detailed, and easy-to-understand instructions that anyone can use to remove malware for free.
Please perform all the steps in the correct order. If you have any questions or doubts at any point, stop and ask for our assistance.
- STEP 1: Start your computer in Safe Mode with Networking
- STEP 2: Use Malwarebytes Free to remove Venus ransomware
- STEP 3: Double-check for malicious programs with Emsisoft Emergency Kit
- STEP 4: Restore the files encrypted by the Venus ransomware
STEP 1: Start your computer in Safe Mode with Networking
In this first step, we will start your computer in Safe Mode with Networking to prevent Venus drivers and services from loading at Windows start-up. We’re using Safe mode because it starts Windows in a basic state, using a limited set of files and drivers.
- Press Windows logo key + I on your keyboard to open Settings. If that doesn’t work, select the Start button, then select Settings.
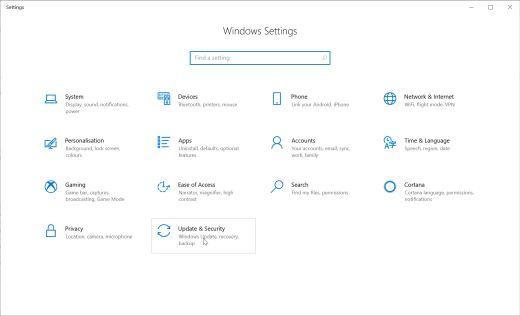
- When the Windows Settings window opens, select Update & Security, then click on Recovery.
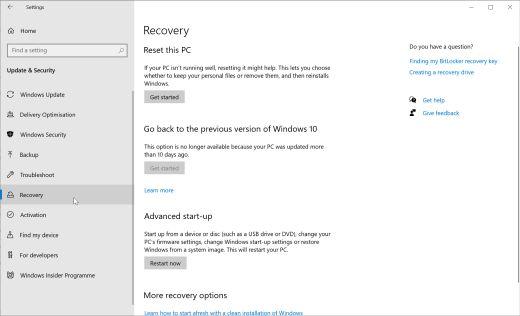
- Under Advanced startup, select Restart now.
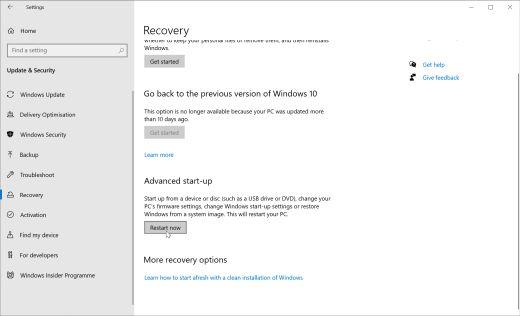
Now that you are in Windows Recovery Environment, you will follow these steps to take you to safe mode:
- On the Choose an option screen, select “Troubleshoot“.
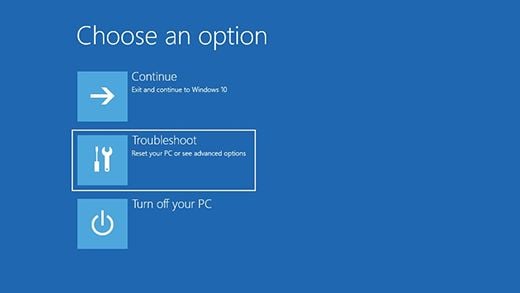
- On the “Troubleshoot” screen, click the “Advanced Options” button.
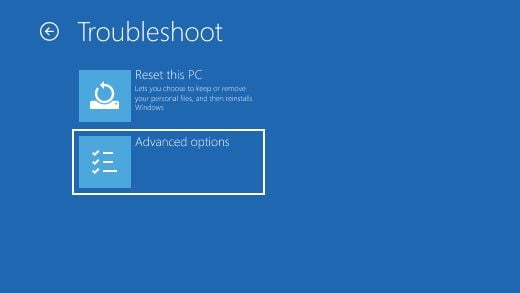
- On the “Advanced Options” page, click the “Startup Settings” option. In Windows 8, this option is labeled “Windows Startup Settings” instead.
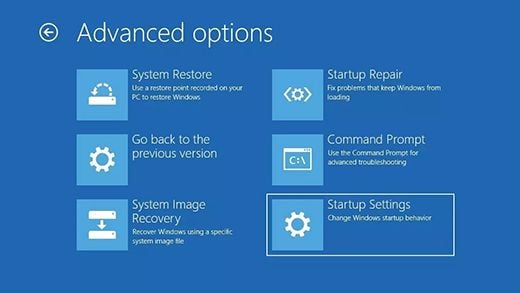
- On the “Startup Settings” page, click the “Restart”.
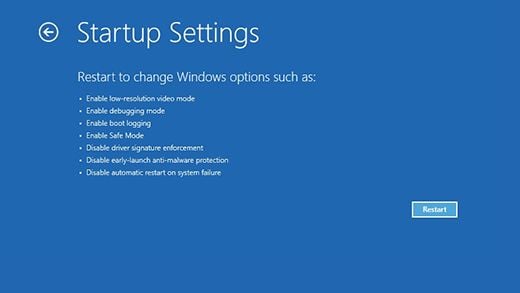
- After your device restarts, you’ll see a list of options. Select option 5 from the list or press F5 to enter Safe Mode with Networking.
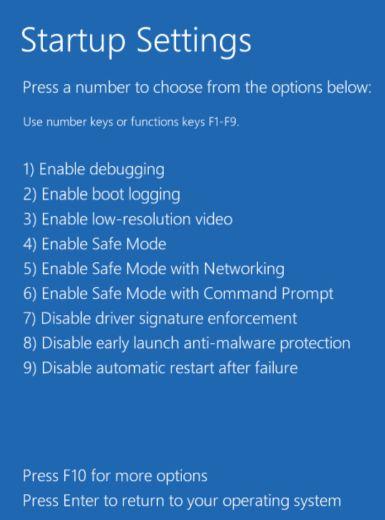
- While your computer is running in Safe Mode with Networking, we will need to download, install and run a scan with Malwarebytes (explained in Step 2).
- Remove all floppy disks, CDs, and DVDs from your computer, and then restart your computer.
- When the computer starts you will see your computer’s hardware being listed. When you see this information start to press the F8 key repeatedly until you are presented with the Advanced Boot Options.
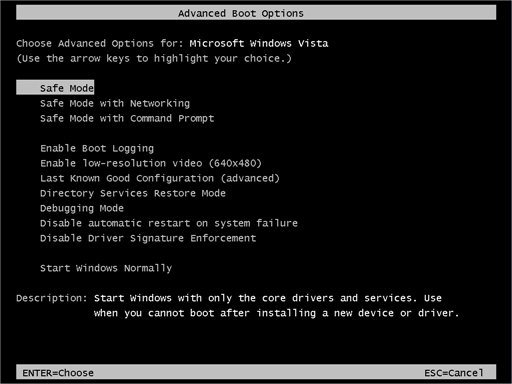
- In the Advanced Boot Options screen, use the arrow keys to highlight Safe Mode with Networking and then press Enter.
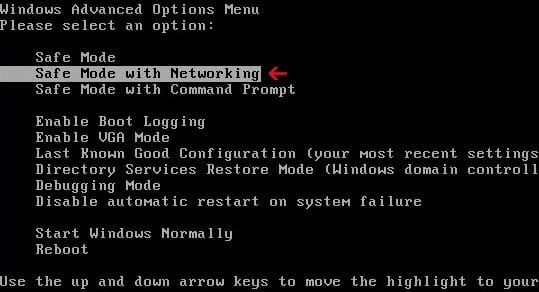
- While your computer is running in Safe Mode with Networking, we will need to download, install and run a scan with Malwarebytes (explained in Step 2).
STEP 2: Use Malwarebytes Free to remove Venus ransomware
Malwarebytes Free is one of the most popular and most used anti-malware software for Windows, and for good reasons. It is able to destroy many types of malware that other software tends to miss, without costing you absolutely nothing. When it comes to cleaning up an infected device, Malwarebytes has always been free and we recommend it as an essential tool in the fight against malware.
It is important to note that Malwarebytes Free will run alongside antivirus software without conflicts.
Download Malwarebytes Free.
You can download Malwarebytes by clicking the link below.
 MALWAREBYTES DOWNLOAD LINK
(The above link will open a new page from where you can download Malwarebytes)Double-click on the Malwarebytes setup file.
When Malwarebytes has finished downloading, double-click on the MBSetup file to install Malwarebytes on your computer. In most cases, downloaded files are saved to the Downloads folder.
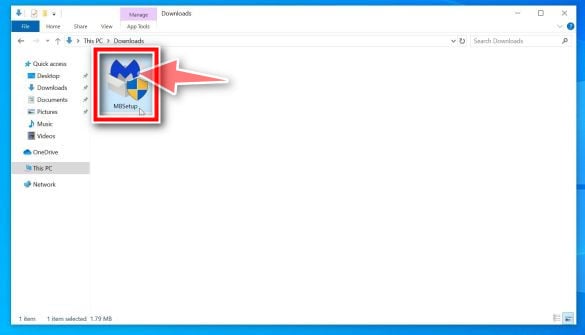
You may be presented with an User Account Control pop-up asking if you want to allow Malwarebytes to make changes to your device. If this happens, you should click “Yes” to continue with the Malwarebytes installation.
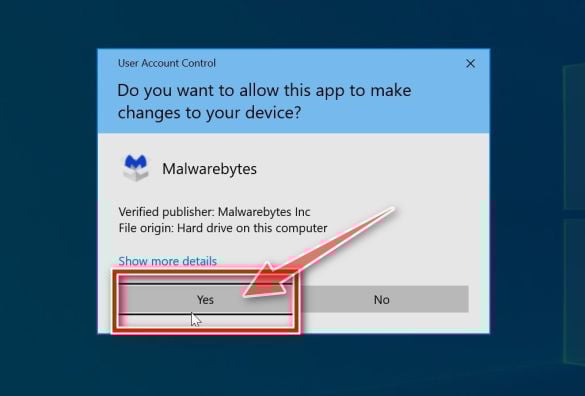
Follow the on-screen prompts to install Malwarebytes.
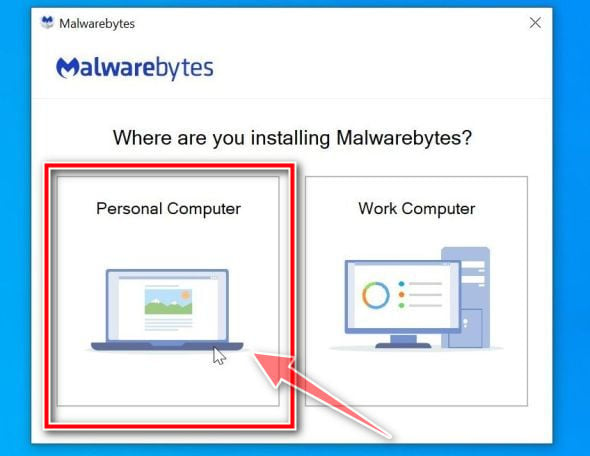
When the Malwarebytes installation begins, you will see the Malwarebytes setup wizard which will guide you through the installation process. The Malwarebytes installer will first ask you on what type of computer are you installing this program, click either Personal Computer or Work Computer.
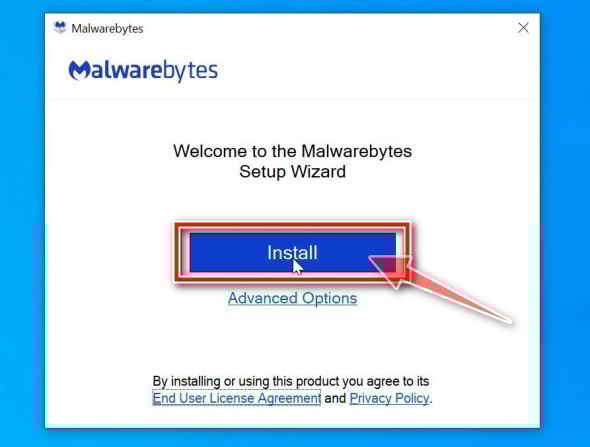
On the next screen, click “Install” to install Malwarebytes on your computer.
When your Malwarebytes installation completes, the program opens to the Welcome to Malwarebytes screen. Click the “Get started” button.
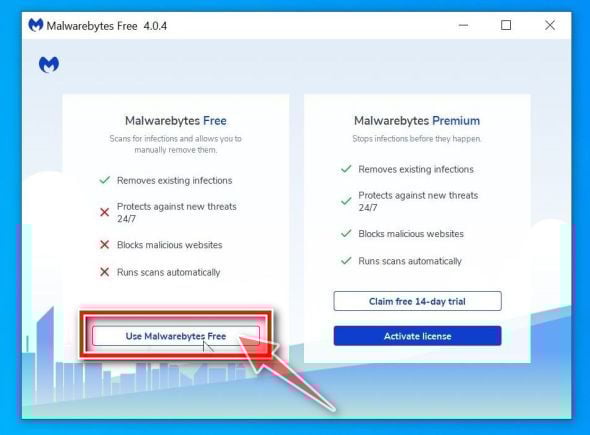
Select “Use Malwarebytes Free”.
After installing Malwarebytes, you’ll be prompted to select between the Free and the Premium version. The Malwarebytes Premium edition includes preventative tools like real-time scanning and ransomware protection, however, we will use the Free version to clean up the computer.
Click on “Use Malwarebytes Free“.
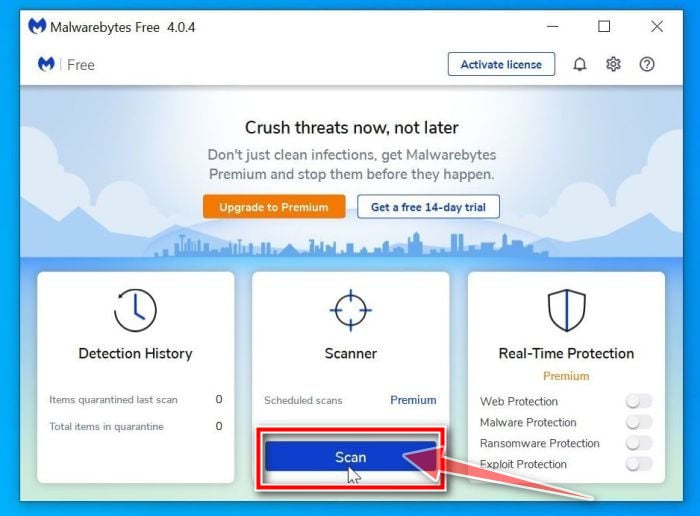
Click on “Scan”.
To scan your computer with Malwarebytes, click on the “Scan” button. Malwarebytes will automatically update the antivirus database and start scanning your computer for malware.
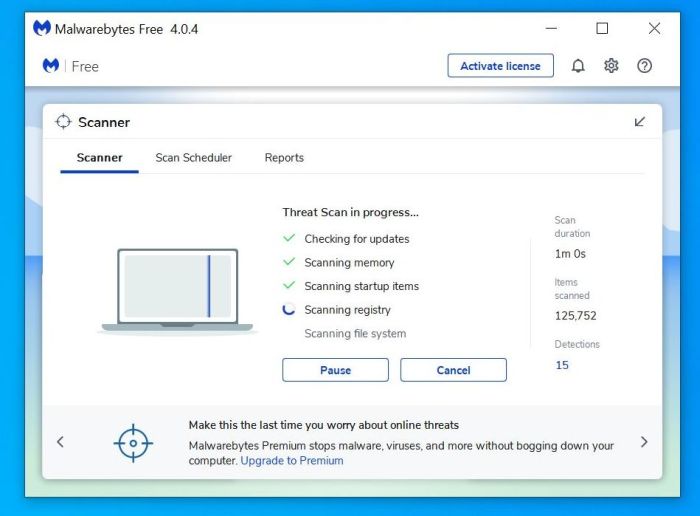
Wait for the Malwarebytes scan to complete.
Malwarebytes will scan your computer for adware and other malicious programs. This process can take a few minutes, so we suggest you do something else and periodically check on the status of the scan to see when it is finished.
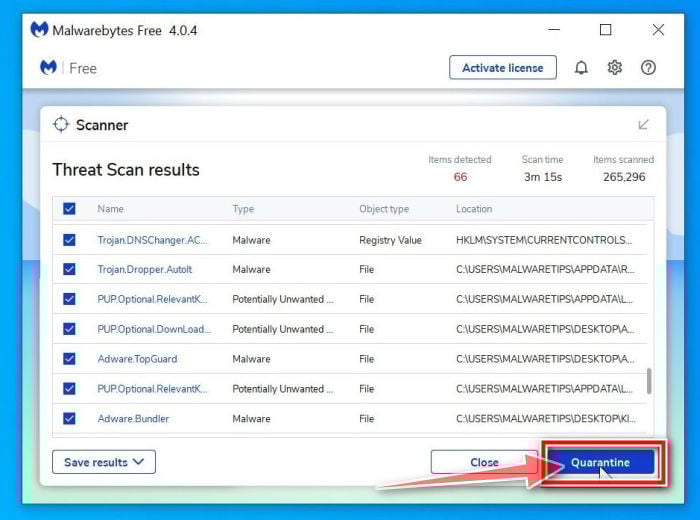
Click on “Quarantine”.
When the scan has completed, you will be presented with a screen showing the malware infections that Malwarebytes has detected. To remove the malicious programs that Malwarebytes has found, click on the “Quarantine” button.
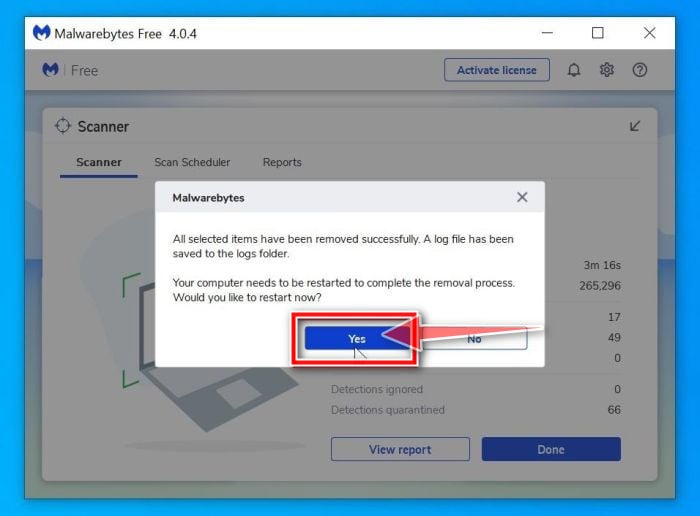
Restart computer.
Malwarebytes will now remove all the malicious files and registry keys that it has found. To complete the malware removal process, Malwarebytes may ask you to restart your computer.
When the malware removal process is complete, your computer should start in normal mode (if not, simply restart your device to exit Safe Mode) and continue with the rest of the instructions. We do recommend that you run another scan with Malwarebytes once you’re in Normal mode to make sure all the malicious files were removed.
STEP 3: Double-check for malicious programs with Emsisoft Emergency Kit
Emsisoft Emergency Kit is a free second opinion scanner that can be used without installation to scan and clean infected computers. Emsisoft scans the behavior of active files and also files in locations where malware normally resides for suspicious activity.
While the Malwarebytes and HitmanPro scans are more than enough, we’re recommending Emsisoft Emergency Kit to users who still have malware related issues or just want to make sure their computer is 100% clean.
Download Emsisoft Emergency Kit.
You can download Emsisoft Emergency Kit by clicking the link below.
 EMSISOFT EMERGENCY KIT DOWNLOAD LINK
(The above link will open a new web page from where you can download Emsisoft Emergency Kit)Install Emsisoft Emergency Kit.
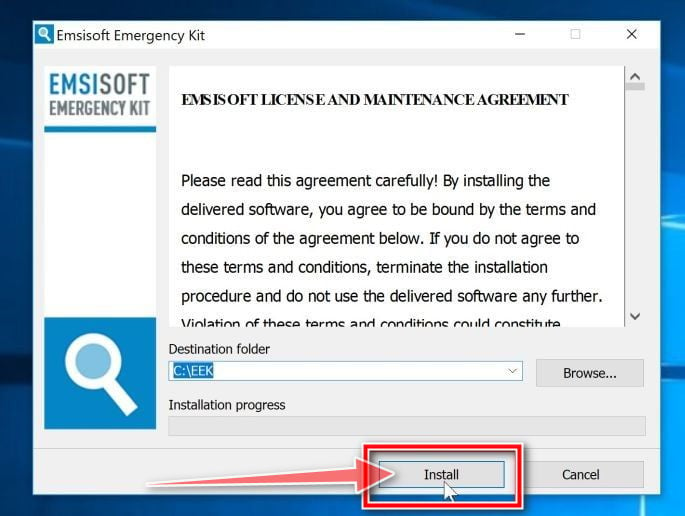
Double-click on the EmsisoftEmergencyKit setup file to start the installation process, then click on the “Install” button.
Start Emsisoft Emergency Kit.
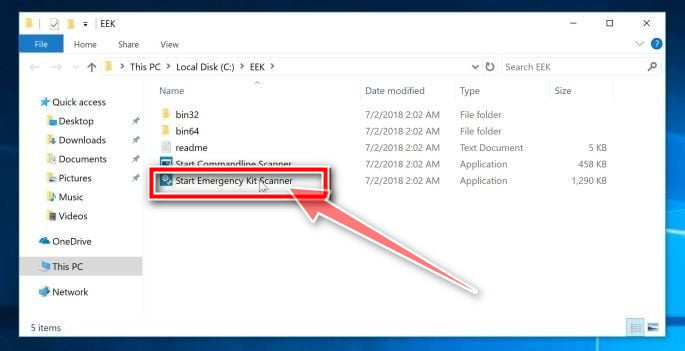
On your desktop the “EEK” folder (C:\EEK) should now be open. To start Emsisoft, click on the “Start Emsisoft Emergency Kit” file to open this program.
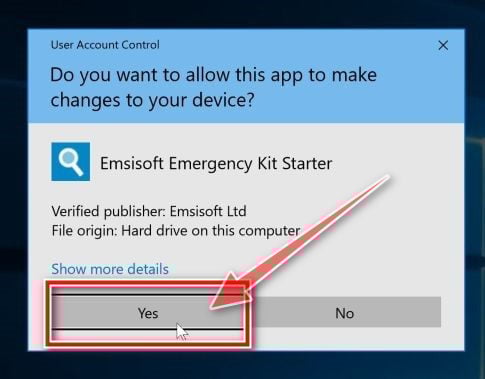
You may be presented with a User Account Control dialog asking you if you want to run this file. If this happens, you should click “Yes” to continue with the installation.
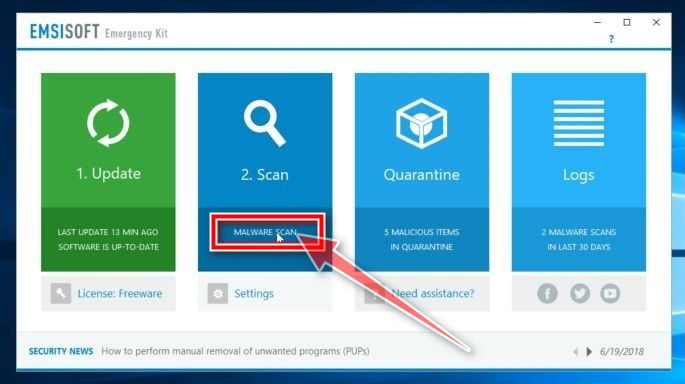
Click on “Malware Scan”.
Emsisoft Emergency Kit will start and it will ask you for permission to update itself. Once the update process is complete, click on the “Scan” tab, and perform a “Malware Scan“.
Emsisoft Emergency Kit will now scan your PC for malicious files. This process can take a few minutes.
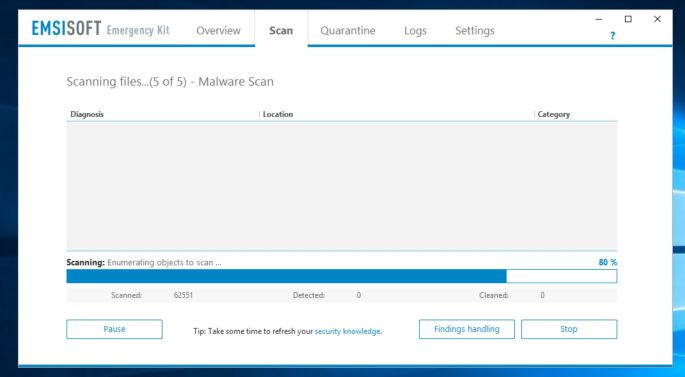
Click on “Quarantine selected”.
When the Emsisoft scan has finished, you will be presented with a screen reporting which malicious files were detected on your computer. To remove the malicious programs, click on the “Quarantine selected“.
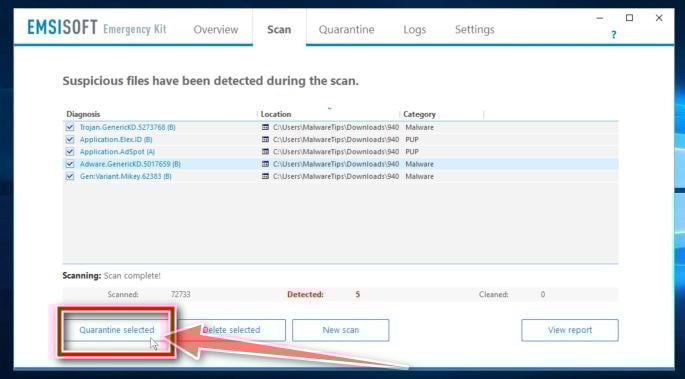
When the malware removal process is complete, Emsisoft Emergency Kit may need to restart your computer. Click on the “Restart” button to restart your computer.
When the process is complete, you can close Emsisoft and continue with the rest of the instructions.
STEP 4: Restore the files encrypted by the Venus ransomware
Unfortunately, it’s not possible to recover the files encrypted by the Venus ransomware because the private key which is needed to unlock the encrypted files is only available through the cybercriminals. However, below we’ve listed three methods you can use to try and recover your files.
Method 1: Search for a Venus ransomware decryption tool
At the time of writing this article, there was no decryption tool available for the Venus ransomware. However, the cybersecurity community is constantly working to create ransomware decryption tools, so you can try to search these sites for updates:
- https://id-ransomware.malwarehunterteam.com/
- https://decrypter.emsisoft.com/
- https://noransom.kaspersky.com/
- https://www.avast.com/ransomware-decryption-tools
Method 2: Try to recover your files with Recuva Free
With this second option, we will install and try to recover the encrypted files with Recuva, a free data recovery tool.
Download Recuva Free.
You can download Recuva from the below link.
 RECUVA FREE DOWNLOAD LINK
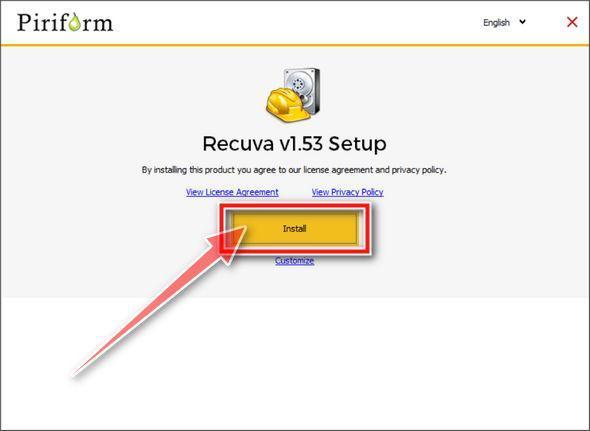
(This link will open a new web page from where you can download Recuva Free)Install Recuva.
Double-click on the rcsetup setup file to start the installation process, then follow the on-screen promts to install this program.
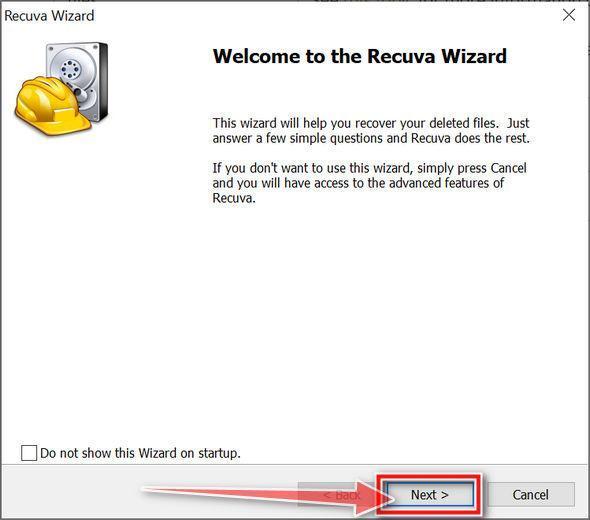
Go through Recuva’s Wizard.
When Recuva will start, it will display a Wizard which will guide you though different recovery options. To start this Wizard click on “Next.
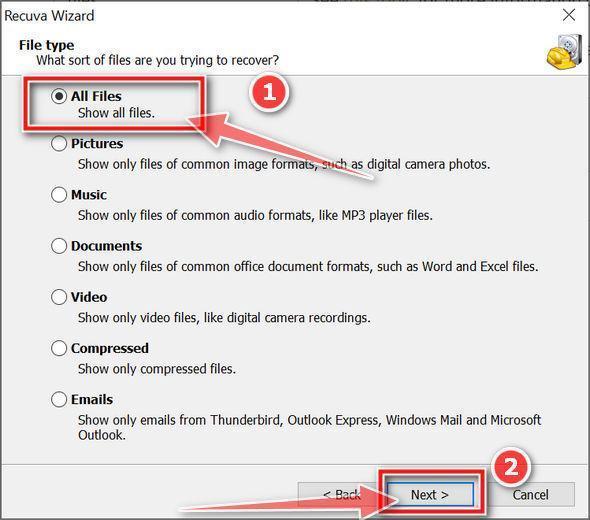
In the first screen, recuva will ask you want type of files you want to recover (documents, pictures, videos), click on “All files” and then click on “Next”.
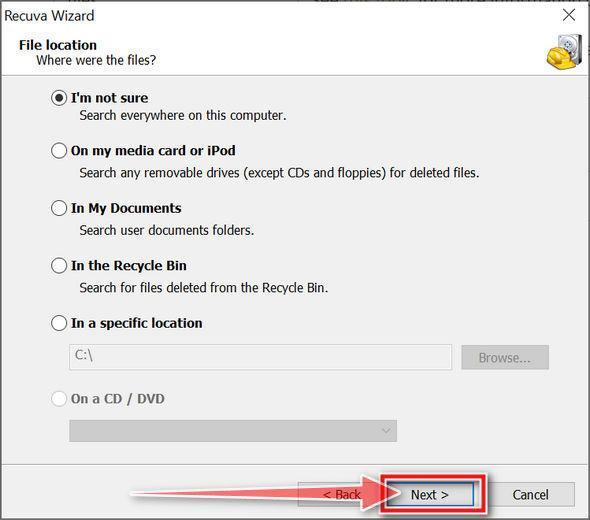
In the next screen, you’ll be asked where are the files located that you want to recover. Select “I’m not sure” to search all the folders on your computer, then click on “Next”.
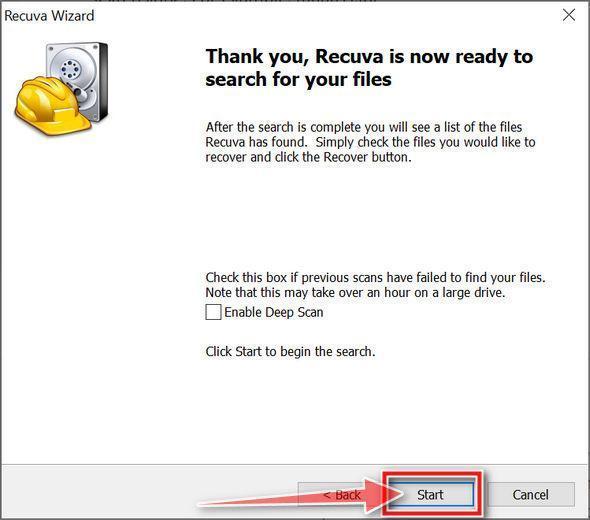
Next, click on “Start” to start the scan.
Select the files you want to recover.
Recuva will scan your computer, and once it’s finished it will display a list of all the files that were detected. Select the check boxes beside the file or files you want to restore. The color of the dot next to the file name indicates your chances for a successful recovery (green for excellent, orange for acceptable, and red for unlikely).
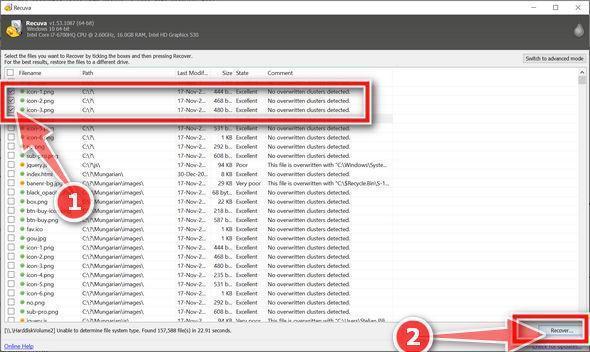
Click “Recover”.
Once you have selected the files you want to recover, click on “Recover”. Select a destination for the recovered files, then click on “Ok”.
Method 3: Try to restore your files with ShadowExplorer
The Venus ransomware will attempt to delete all shadow copies when you first start any executable on your computer after becoming infected. Thankfully, the infection is not always able to remove the shadow copies, so you should continue to try restoring your files using this method.
Download ShadowExplorer.
You can download ShadowExplorer from the below link.
SHADOW EXPLORER DOWNLOAD LINK
(This link will open a new web page from where you can download “ShadowExplorer”)Install ShadowExplorer.
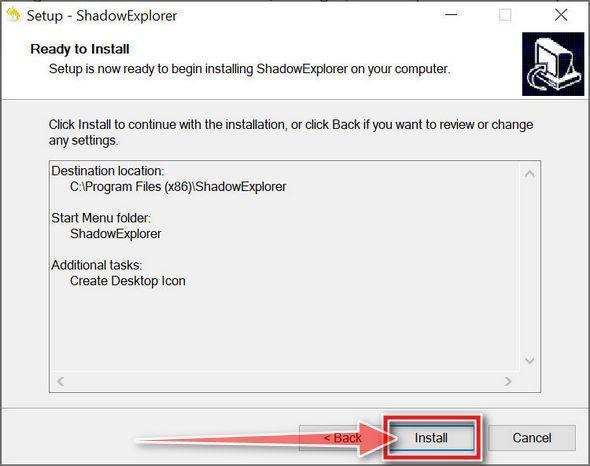
Double-click on the ShadowExplorer-x.x-setup file to start the installation process, then follow the on-screen promts to install this program.
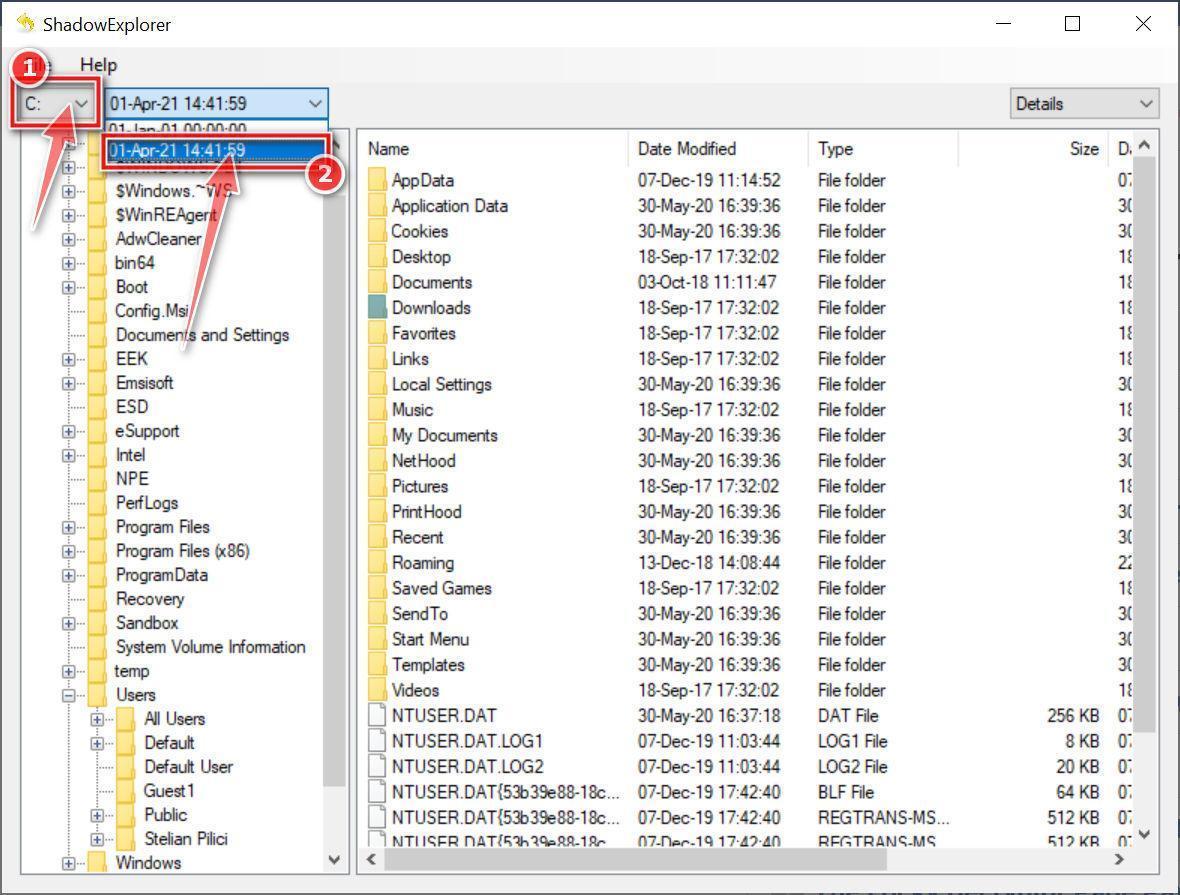
Select snapshot date.
Open ShadowExplorer and then from the top bar select the drive where the files that you want to save are located, then select from the snapshot available one previous to this infection.
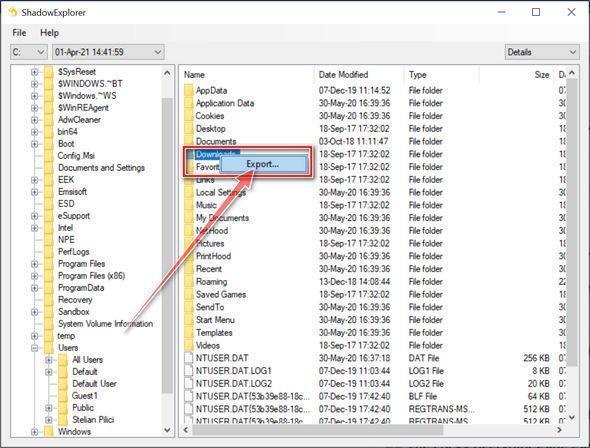
Export the files that you want to recover.
Once you have found a copy of the original file or folder, right-click on it and the select “Export”. A window will prompt you where you want to save the file or folder.
Your computer should now be free of the Venus ransomware infection. If your current antivirus allowed this malicious program on your computer, you may want to consider purchasing the full-featured version of Malwarebytes Anti-Malware to protect against these types of threats in the future.
If you are still having problems with your computer after completing these instructions, then please follow one of the steps:
- Run a computer scan with ESET Online Scanner
- Ask for help in our Windows Malware Removal Help & Support forum.


![Remove Gg.indoneviler.xyz Pop-up Ads [Virus Removal Guide] 23 McAfee scam 4](https://malwaretips.com/blogs/wp-content/uploads/2023/08/McAfee-scam-4-290x290.jpg)