


The so-called “Safety Services” pop-up is a classic browser-based tech support scam dressed up to look like a serious Microsoft or Windows security warning. It uses fear, urgency, and fake system messages to push people into calling a fraudulent phone number.
At first glance, the alert can look convincing, especially to someone caught off guard. It displays alarming text such as “Access has been Denied for safety reasons” and references suspicious file names like track(2).dll to make the threat feel technical and real. But this alert is not from Microsoft, not from Windows Security, and not from any legitimate support service.
This article explains exactly what this scam is, how it works, why it is dangerous, and what to do if you interacted with it.
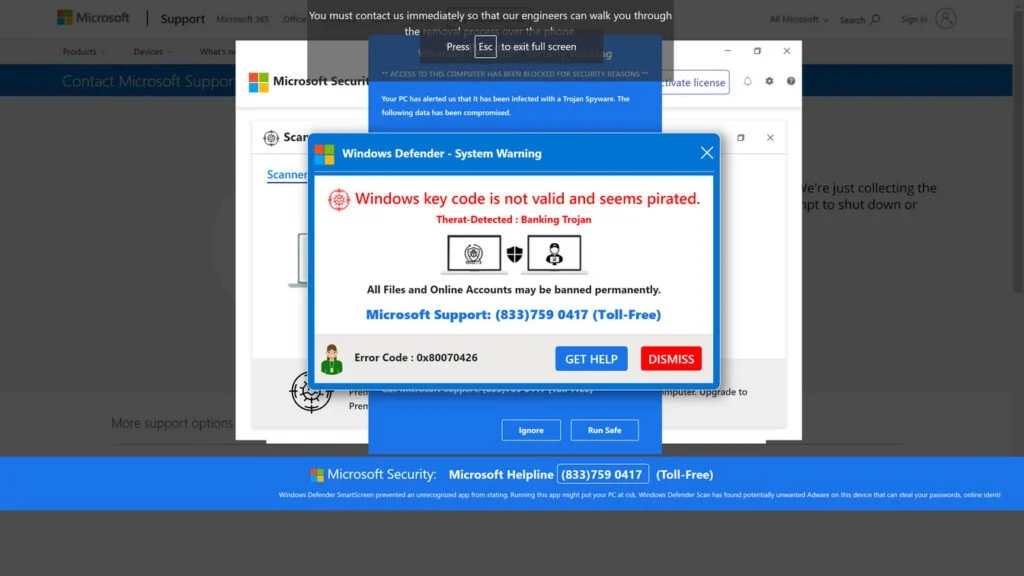
Scam Overview
The Safety Services pop-up scam is a fraudulent web page designed to impersonate Microsoft support and frighten users into calling scammers. The fake alert usually appears in a browser window and may load full-screen, loop warning sounds, or display overlays that make it seem like the computer has been locked or compromised.
The wording is intentionally dramatic. Victims may see messages like:
- Safety Services
- App: track(2).dll
- Unsafety Detected: track(2).dll
- Access has been Denied for safety reasons
- Call Windows Agent: +1-983-220-2263
That language is not how legitimate Microsoft security notifications are written. Real security products do not use awkward phrases like “Unsafety Detected” or ask users to call random toll-free or standard phone numbers shown inside a browser pop-up. That alone is a major red flag.
The goal of the scam is not to fix anything. The page is there to manipulate the victim into taking the next step: making contact with the scammers by phone. Once that happens, the scam moves from a fake browser warning to a direct social engineering attack.
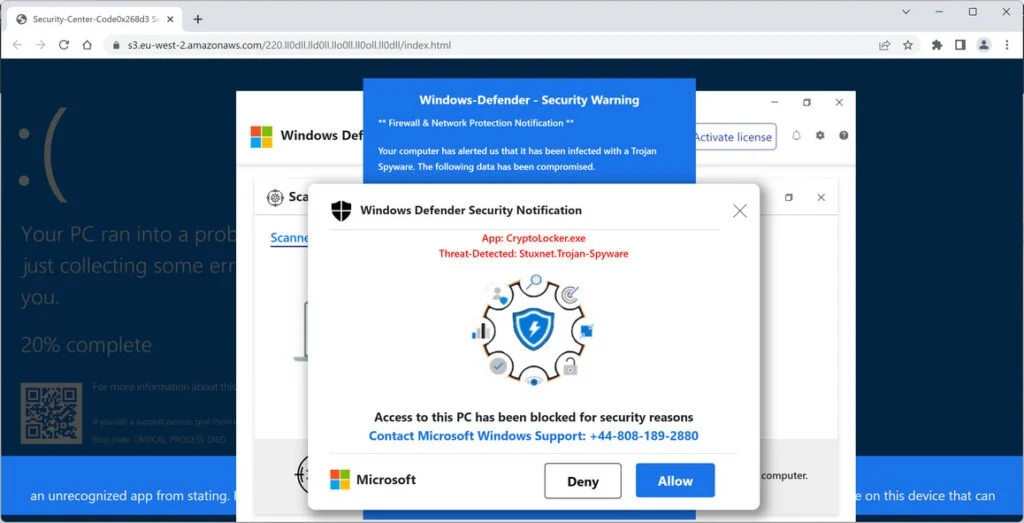
Why the pop-up looks convincing to some users
Many tech support scam pages are built to resemble official Microsoft pages. In screenshots associated with this scam, the page appears to mimic a Microsoft support site layout, using a familiar logo, product navigation, and a fake security dialog box layered over the page.
This visual trick matters because many people do not inspect URLs carefully. They see the Microsoft branding, the browser window, and an urgent warning, and they assume it must be authentic.
But the scam page is hosted on a suspicious domain that has nothing to do with Microsoft. In the screenshot, the address bar shows a long and unusual subdomain ending in azurefd.net, followed by a path that looks staged to imitate a Windows support page. That does not mean Microsoft is behind the scam. Attackers often abuse lookalike URLs, confusing paths, or cloud-hosted infrastructure to make malicious pages appear more credible.
A legitimate Microsoft support page would not suddenly display a dramatic “Safety Services” box claiming access has been denied and instructing users to call a phone number.
This is a tech support scam, not a real virus alert
This point is critical.
The pop-up may claim your computer is infected, hacked, blocked, or leaking personal data. It may mention breached email credentials, banking data, or stored passwords. It may say your PC has been locked for security reasons. It may even imply that your Windows license is compromised or that someone is actively stealing your information.
Those claims are fabricated.
The page itself is the scam. It is not a legitimate malware detection interface. It is not a built-in Windows component. It is not Microsoft Defender. It is not an authentic browser safety message. It is a web page designed to scare you.
Sometimes victims assume that because the screen was hard to close, the computer must really be infected. That is not necessarily true. Scam pages often use browser tricks such as repeated dialog boxes, fake full-screen warnings, keyboard traps, aggressive scripts, and looping audio to create the illusion that the machine is locked down. In many cases, the page is malicious and disruptive, but the core trick is psychological, not technical.
Why scammers use fake file names like track(2).dll
The reference to track(2).dll is part of the deception. Scammers often include a file name, process name, error code, or supposed threat ID because technical terms sound authoritative.
Most users are not familiar with the naming patterns of Windows files, DLLs, security alerts, or system processes. So when they see something like App: track(2).dll and Unsafety Detected: track(2).dll, they assume the warning must be based on some kind of scan.
That is precisely what the scammers want.
In reality, the wording is sloppy and unnatural. Security products do not usually present messages in that format. The phrase “Unsafety Detected” is especially awkward and not something a legitimate Microsoft alert would say. The text is written to look technical enough to frighten users, but not accurate enough to withstand scrutiny.
This is common in scam operations. The wording is often grammatically weak, but the fear factor still works because the target is usually overwhelmed, confused, or pressured into acting quickly.
The phone number is the real trap
The visible phone number is one of the most important elements of the scam. In this case, the page tells users to callscam phone numbers and refers to the recipient as a Windows Agent.
That phrase is bogus.
There is no reason Microsoft would push support through a random number inside a browser pop-up generated from a suspicious page. Real Microsoft support does not operate this way. Tech support scammers want the victim to call because a live phone conversation gives them much more control.
Once on the phone, the scammer can:
- Sound confident and professional
- Increase urgency
- Guide the victim step by step
- Ask invasive questions
- Direct the victim to install remote access software
- Manipulate the victim into making payments
The browser page is only the first hook. The phone call is where the real financial and privacy damage begins.
What happens when victims call
After calling the number, victims typically reach a fake tech support center. The person answering may introduce themselves as a Microsoft technician, Windows support representative, security specialist, refund department worker, or certified system engineer.
None of that should be trusted.
These scam operators follow scripts. They usually begin by asking what message appeared on the screen. Then they reassure the victim that they have reached the right place. This is done to lower resistance and establish authority.
From there, the scammer may claim that:
- The computer is infected with trojans, spyware, or ransomware
- Personal information has been exposed
- Banking credentials are at risk
- Hackers are using the computer remotely
- The machine has been blacklisted
- A security firewall has blocked access
- The victim needs immediate technical intervention
The scammer may then instruct the victim to download remote access software such as AnyDesk, TeamViewer, UltraViewer, Zoho Assist, or a similar tool. They frame this as necessary so they can “inspect,” “clean,” “unlock,” or “secure” the device.
Once remote access is granted, the situation becomes far more dangerous.
Why remote access is so risky
Remote access software is not inherently malicious. Many legitimate businesses use it for real technical support. The danger comes from who is controlling it.
If a scammer gains remote access to your device, they can:
- Browse files
- Open documents
- View saved passwords
- Access email accounts if already signed in
- Visit banking or shopping sites
- Install additional software
- Modify system settings
- Create persistence methods for future access
- Disable security protections
- Harvest personal or financial information
In some cases, the scammer pretends to perform a security scan while opening normal Windows tools like Event Viewer, Command Prompt, or system logs. They misrepresent harmless entries as proof of hacking. This is a very common tech support scam tactic. The victim sees lots of text and warnings they do not understand, and the scammer uses that confusion to justify payment or further access.
The payment phase of the scam
Eventually, the scammers demand money.
That demand may come in different forms. They may say the victim needs to pay for:
- Antivirus activation
- Firewall renewal
- System cleanup
- Data protection services
- Multi-year support subscription
- Network security license
- Refund verification
- Device unlock
- Microsoft protection plan
The numbers vary. Some victims are asked for a few hundred dollars. Others lose thousands.
Scammers frequently pressure victims to pay through unusual or hard-to-reverse methods, including:
- Gift cards
- Bank transfer
- Wire transfer
- Zelle or similar transfer tools
- Cash apps
- Cryptocurrency
- Card payment processed over the phone
- Online banking actions performed while the scammer watches remotely
Gift cards are especially common because once the code is shared, the money is usually gone. The scammer may insist that gift cards are required for “verification” or “security activation.” That is false. Legitimate Microsoft support does not ask people to pay with gift cards.
Why older adults are often targeted
Tech support scams often hit older adults particularly hard, but anyone can be fooled. These scams work because they exploit stress, not intelligence.
A victim may be tired, distracted, unfamiliar with browser scams, or worried about online banking, family photos, work files, or identity theft. If the page suddenly blares warnings and claims access has been denied, even a cautious person may panic.
Scammers know this. They are not trying to convince a calm, analytical person in ideal conditions. They are targeting people in moments of confusion and urgency.
That is why these scams continue to spread. The criminal model is simple, scalable, and profitable.
Key red flags that expose the scam
There are several signs that the Safety Services pop-up is fraudulent:
- It appears in a browser, not as a genuine Windows security interface
- The wording is unnatural and unprofessional
- It uses fear-heavy language
- It displays a phone number and pushes you to call immediately
- It references suspicious file names without context
- It pretends to be Microsoft while using an unrelated URL
- It pressures users into urgency rather than giving standard security guidance
Any one of those would be concerning. Together, they clearly point to a scam.
The bottom truth about this pop-up
The Safety Services alert is not warning you about a real Microsoft issue. It is not a legitimate Windows security block. It is a staged browser scam designed to funnel victims into a fake support call.
That call can lead to remote access abuse, financial theft, credential exposure, gift card fraud, and continued victimization later. The page is fake, the alert is fake, and the support line is fake.
The danger is real only after the victim follows the scammer’s instructions.
How The Scam Works
The Safety Services pop-up scam follows a pattern seen across many fake Microsoft and Windows support schemes. It starts with a fraudulent web page and escalates through fear, live phone manipulation, remote access, and theft.
Below is a step-by-step breakdown of how the scam usually unfolds.
Step 1: The victim is led to a malicious or deceptive page
Most victims do not go looking for this scam. They are redirected to it.
This can happen in several ways:
- Clicking a malicious ad
- Visiting a shady streaming or download site
- Landing on a compromised website
- Clicking a deceptive browser notification
- Following a link in spam or a misleading message
- Typing a mistyped URL and landing somewhere unsafe
Sometimes the redirect happens so quickly that the victim believes the warning came directly from Windows or from the website they were visiting. In reality, the browser has simply opened or been redirected to a scam page.
The page often loads full-screen or mimics a support portal. It may display logos, support menus, security graphics, or browser-blocking overlays to make the user feel trapped.
Step 2: The fake alert creates panic
Once the page loads, the scam enters its most important phase: fear induction.
The victim sees messages like:
- Windows – Safety Alert System
- App: track(2).dll
- Unsafety Detected: track(2).dll
- Access has been Denied for safety reasons
- Call Windows Agent: +1-983-220-2263
Some versions add claims that the victim’s email credentials, banking information, photos, or personal files have been breached. Others say the system has been blocked because of suspicious activity.
This is deliberate psychological pressure.
The scammers want the victim to believe three things immediately:
- Something is seriously wrong
- The device is no longer safe to use
- Calling the number is the only way to fix it
That is why the wording is so aggressive. The goal is not accuracy. The goal is panic.
Step 3: The page tries to keep the victim from leaving
Scam pages often use browser tricks to make escape harder.
These may include:
- Repeated pop-ups
- Full-screen mode
- Fake system sounds or voice warnings
- Mouse traps
- Fake loading screens
- Dialog boxes that reopen
- Scripts that make the page appear locked
Victims sometimes believe their entire computer has frozen or been disabled. In many cases, only the browser is being abused. The page creates enough noise and friction that users stop trying to think clearly and focus instead on making the problem go away.
The visible phone number becomes the path of least resistance.
This is why these scams work so well. They create a stressful moment, then immediately offer a supposed solution.
Step 4: The victim calls the fake support number
Once the victim calls, the browser scam becomes a phone scam.
The person answering may sound calm, polished, and highly trained. They often introduce themselves as a Windows technician, Microsoft support representative, or certified security agent.
They may ask for:
- The warning text shown on the screen
- The victim’s name
- Whether the device is used for banking
- Whether passwords or sensitive files are stored on the computer
- Whether the machine is used for work
- Whether the victim has seen strange activity before
This is not technical diagnosis. It is profiling.
The scammer is gathering information about how valuable the target may be and which fear angles are most effective. If the victim mentions online banking, tax records, work documents, or family photos, the scammer will use that to intensify the threat.
Step 5: The scammer instructs the victim to install remote access software
This is the turning point.
The scammer typically says they need to inspect the system or secure it remotely. They guide the victim to install a remote support tool such as:
- AnyDesk
- TeamViewer
- UltraViewer
- Zoho Assist
- RemotePC
- Other screen-sharing or remote-control applications
The request is framed as normal technical support procedure. Victims who are already frightened often comply.
After installation, the victim is told to read out a session code or approve access. At that moment, the scammer gains direct control over the device.
This is where the risk becomes serious. The scammers are no longer limited to displaying fake warnings. They can now interact with the victim’s actual system.
Step 6: The scammer stages a fake diagnosis
Once connected, the scammer usually performs a dramatic but misleading “inspection.”
They may open built-in Windows utilities such as:
- Event Viewer
- Command Prompt
- Task Manager
- System configuration tools
- Network settings
- Security settings
- Prefetch or temp folders
Then they misinterpret normal entries as proof of infection.
For example, they may point to harmless warnings in Event Viewer and call them evidence of hackers. They may list network connections and say foreign attackers are inside the machine. They may show ordinary background processes and label them as spyware. They may say temporary files prove the system has been breached.
This stage is designed to overwhelm the victim with unfamiliar information.
Because the screen is being controlled by someone who sounds authoritative, many victims stop questioning what they are seeing. The scammer uses technical theater to manufacture credibility.
Step 7: The scammer demands money for a fake fix
After the fake diagnosis, the scammer proposes the solution.
They may offer one or more of the following:
- A one-time cleaning service
- A security plan
- A firewall update
- A premium antivirus subscription
- A long-term support package
- A data recovery service
- A refund-related procedure that requires account verification
The language varies, but the pressure remains the same. The victim is told that immediate action is necessary.
The scammer may ask for card details over the phone, direct the victim to a payment portal, or even open the victim’s online banking page while connected remotely. In some cases, they instruct victims to visit stores and buy gift cards. They may say the gift cards are needed for secure activation, identity validation, or a refund process.
That is completely fraudulent.
Legitimate support providers do not ask users to resolve security alerts by purchasing gift cards and reading the codes aloud.
A common twist: the refund scam angle
Some tech support scammers combine the fake alert scam with a fake refund scam.
Here is how that version works:
The scammer claims there was an accidental refund, overpayment, or account crediting error. While remotely connected, they manipulate the victim’s screen or bank view to make it appear that too much money was sent. Then they pressure the victim to “return” the difference through gift cards, bank transfer, or cash transfer methods.
This tactic is especially dangerous because it exploits honesty. Victims believe they are fixing a billing mistake. In reality, they are sending their own money to criminals.
What scammers may do while connected to the device
During the remote session, scammers may not limit themselves to the scripted fake repair.
They may also:
- Search for financial documents
- Check whether password managers are installed
- Access email inboxes
- Install persistence software
- Copy files
- Note down personal details
- Change settings that make future scams easier
- Disable antivirus or browser protections
- Leave behind tools for future access
- Watch the victim log into banks or email services
Some victims only realize later that multiple accounts were compromised after the call ended.
That is why even a short remote session with a scammer should be treated as a serious exposure event.
Why gift cards are so often requested
Gift cards remain popular in scam operations because they are fast, hard to reverse, and easy to liquidate.
The scammer may tell the victim to buy cards from:
- Apple
- Google Play
- Target
- Walmart
- Steam
- Other major retail brands
They then ask the victim to read the code over the phone or send photos of the cards.
Once the code is redeemed, the money is usually gone. The scammer may still demand more, claiming the first payment did not process or another fee is required.
Victims should remember one simple rule: no legitimate Microsoft or Windows support interaction ends with gift card payments.
The scam does not always end after one call
A victim who has paid once may be targeted again.
Scammers often keep notes on cooperative victims and may:
- Call back later pretending to be a supervisor
- Claim the issue returned
- Offer a refund to trigger a new scam
- Sell the victim’s details to other scam groups
- Pose as bank fraud teams or security recovery agents
This secondary wave can be even more damaging because the victim is already unsettled and may still believe they were dealing with real support.
How to tell the warning is fake before calling
Several clues can help users identify the scam early:
The alert appears inside a browser
Real browser pages cannot directly diagnose your Windows system in the way the scam claims. A web page saying your PC is infected and telling you to call a number is a massive warning sign.
The wording is poor
Phrases like “Unsafety Detected” are not standard Microsoft language. Sloppy wording often appears in scam pages because authenticity is not the real priority. Fear is.
A phone number is prominently displayed
Authentic security warnings do not typically tell users to call a random number immediately from a pop-up page.
The URL is suspicious
If the page is not clearly on an official Microsoft domain, do not trust it.
It creates panic instead of offering normal guidance
Legitimate alerts are usually more measured. Scam pages rely on urgency, not clarity.
Why this scam continues to succeed
Tech support scams persist because they are cheap to run and extremely profitable. A single convincing page can be shown to thousands of users through ad networks, redirects, browser abuse, or compromised sites.
Only a small number of victims need to call for the scam to be worthwhile.
Once a scammer gets someone on the phone, the odds of extracting money rise sharply. Fear makes people compliant. Live conversation builds false trust. Remote access opens the door to account theft and payment manipulation.
That combination is why scams like the Safety Services pop-up remain dangerous even when the warning itself looks clumsy in hindsight.
What To Do If You Have Fallen Victim to This Scam
If you encountered the Safety Services pop-up, called the number, gave remote access, shared payment details, or bought gift cards, take action quickly. Do not panic. Many victims can limit the damage by moving fast and methodically.
1. Disconnect the device from the internet immediately
If a scammer had remote access to your computer, disconnect it from Wi-Fi or unplug the network cable right away.
This helps cut off any active session and can stop further remote interaction. If the scammer is still connected, power off the device if necessary.
Do this first before logging into anything sensitive from that same machine.
2. Uninstall any remote access software you installed during the scam
Remove tools such as:
- AnyDesk
- TeamViewer
- UltraViewer
- Zoho Assist
- RemotePC
- Any other remote desktop or screen-sharing apps you were told to install
If you are not confident that uninstalling is enough, treat the device as potentially compromised until it has been fully checked.
Also review whether the software was set to start automatically with Windows or had unattended access enabled. Scam operators sometimes configure persistent access so they can reconnect later.
3. Run a full malware and security scan
Use a reputable security product to perform a full scan of the device. If possible, use more than one trusted scanner to increase the chance of detecting unwanted software.
Check for:
- Remote access tools left behind
- Trojans or info-stealers
- Suspicious startup entries
- Browser hijackers
- New user accounts
- Unknown installed programs
If the scammer had significant access, a full system reset or clean reinstall may be the safest option, especially if banking or work credentials were exposed.
4. Change your passwords from a clean device
Do not start by changing passwords on the same computer if you suspect it may still be compromised.
Use a different, clean device and change passwords for:
- Email accounts
- Banking accounts
- Credit card portals
- Shopping accounts
- PayPal or digital wallet accounts
- Cloud storage
- Social media accounts
- Work accounts
- Any password manager you use
Start with email and financial accounts first. Email access is especially important because it can be used to reset other accounts.
Choose strong, unique passwords and enable two-factor authentication wherever possible.
5. Contact your bank and card providers immediately
If you gave the scammers card details, logged into banking while they were connected, or sent money in any form, contact your bank right away.
Explain clearly that you were targeted by a remote tech support scam. Ask them to:
- Review recent transactions
- Flag fraudulent activity
- Freeze or replace affected cards
- Monitor for unauthorized transfers
- Advise on securing online banking access
- Place extra verification on your account if available
The sooner you report it, the better your chances of limiting losses.
6. Report gift card fraud right away
If you bought gift cards and shared the codes, contact the gift card issuer immediately. Recovery is difficult, but it is still worth reporting fast.
Provide:
- Receipts
- Card numbers if available
- Time of purchase
- Amount loaded
- Any phone number or email used by the scammer
Some issuers may not be able to recover the funds, but prompt reporting creates a record and may help investigations.
7. Check your email and financial accounts for suspicious activity
Look for:
- Password reset emails you did not request
- New login alerts
- Unrecognized purchases
- New payees or transfer recipients
- Changes to account settings
- Forwarding rules added to email
- Recovery phone numbers or backup emails you do not recognize
Scammers often aim for more than the initial payment. They may use stolen information later, so ongoing vigilance matters.
8. Review browser extensions, downloads, and startup items
Scammers sometimes install unwanted software or leave traces behind. Check for:
- Unknown browser extensions
- Unfamiliar downloads
- Programs installed recently
- Startup apps you do not recognize
- New scheduled tasks
- New user accounts on the computer
If anything looks suspicious, remove it or get professional help from a trusted local technician, not a phone number from a pop-up.
9. Document everything
Save any evidence you have, including:
- Screenshots of the pop-up
- The scam phone number
- Receipts
- Bank transaction records
- Gift card purchase slips
- Email confirmations
- Names or fake employee IDs used by the scammers
- Dates and times of calls
This can help when reporting the scam to your bank, law enforcement, consumer protection agencies, or cybersecurity forums.
10. Warn others in your household
If the scam occurred on a family computer or shared device, tell others what happened.
Make sure nobody else in the home:
- Calls the same number back
- Trusts follow-up calls
- Clicks related links
- Logs into sensitive services on the affected machine until it is secured
Scammers sometimes reconnect or call again pretending to continue the support case.
11. Watch for follow-up scams
After a victim has engaged once, they may receive more calls or emails from people claiming to be:
- Microsoft
- Bank fraud departments
- Refund specialists
- Recovery companies
- Government agencies
- Cybersecurity investigators
These can be second-stage scams.
Be skeptical of anyone who contacts you unexpectedly and references the earlier incident. Do not trust inbound calls. Use official contact channels you locate independently.
12. Consider a full system reset if remote access was extensive
If the scammer had long remote access, saw you log into important accounts, or installed unknown tools, wiping the device and reinstalling the operating system may be the safest path.
That may sound drastic, but in some cases it is the cleanest way to remove uncertainty.
Before doing that, back up important personal files carefully, avoiding programs or scripts you do not trust.
13. Report the scam
Reporting helps build awareness and can protect others. Consider reporting the incident to:
- Your bank or card issuer
- Local consumer protection agencies
- Relevant cybercrime reporting channels
- The website platform or browser if relevant
- Trusted scam-reporting communities
Even if recovery is limited, reporting creates useful intelligence about the scam phone number, page wording, and tactics used.
14. Do not feel embarrassed
This matters more than many people realize.
Tech support scammers are skilled manipulators. They use urgency, fake authority, branding, confusion, and fear. People from every age group and background have fallen for these scams.
The right response is not shame. It is containment and recovery.
The faster you act, the better your chances of reducing the impact.
How to Remove Unwanted Apps and Malware
If a pop-up scam tricked you into downloading an unwanted program — or you suspect your device is infected — follow the free, step-by-step removal guide below to find and remove it.
Please follow the steps in order. If you get stuck or have doubts at any point, stop and ask for help in our free support forum — our team will guide you personally.
 Remove Unwanted Apps and Malware from Windows
-
 Remove Unwanted Apps and Malware from Mac
 Remove Unwanted Apps and Malware from Android
- Remove Unwanted Apps and Malware from iPhone and iPad
Remove Unwanted Apps and Malware from Windows
- STEP 1: Uninstall malicious programs from Windows
- STEP 2: Reset browsers back to default settings
- STEP 3: Use Malwarebytes Anti-Malware to remove malware and unwanted programs
- STEP 4: Use HitmanPro to scan your computer for badware
- STEP 5: Use AdwCleaner to remove adware and malicious browser policies
STEP 1: Uninstall malicious programs from Windows
In this first step, we will manually check if any unknown or malicious programs are installed on the computer. Sometimes adware and browser hijackers can have a usable Uninstall entry that can be used to remove them.
-
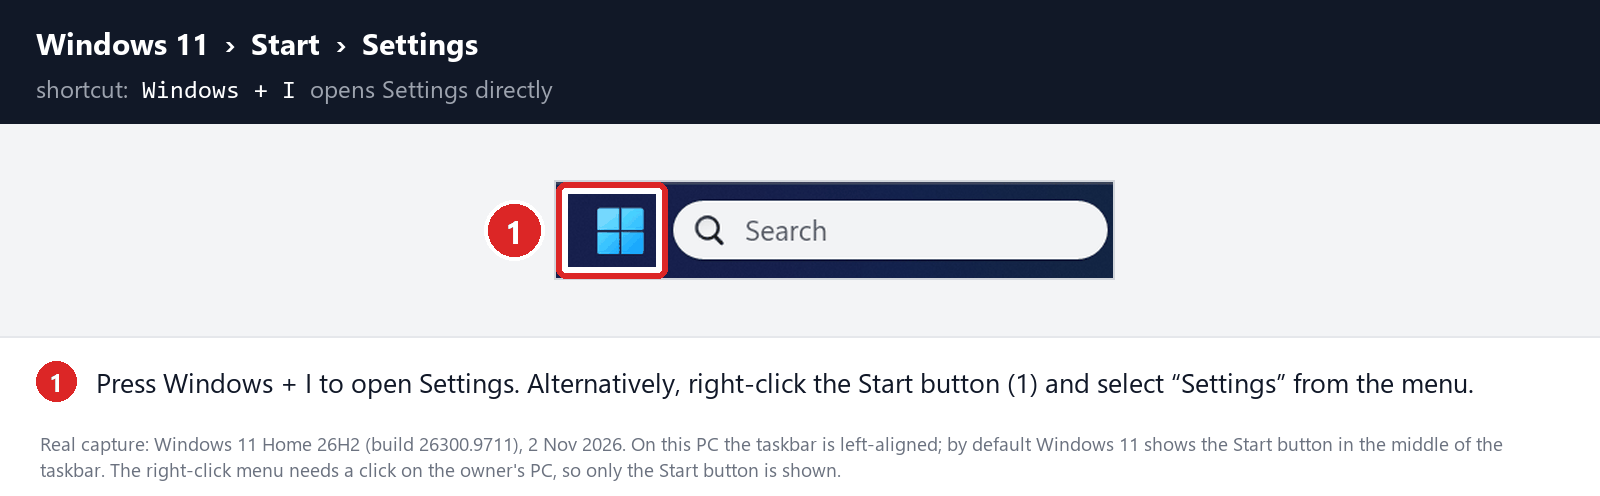
Open the Settings app
Press Windows + I on your keyboard to open Settings. Alternatively, right-click the Start button and select “Settings” from the menu.
-
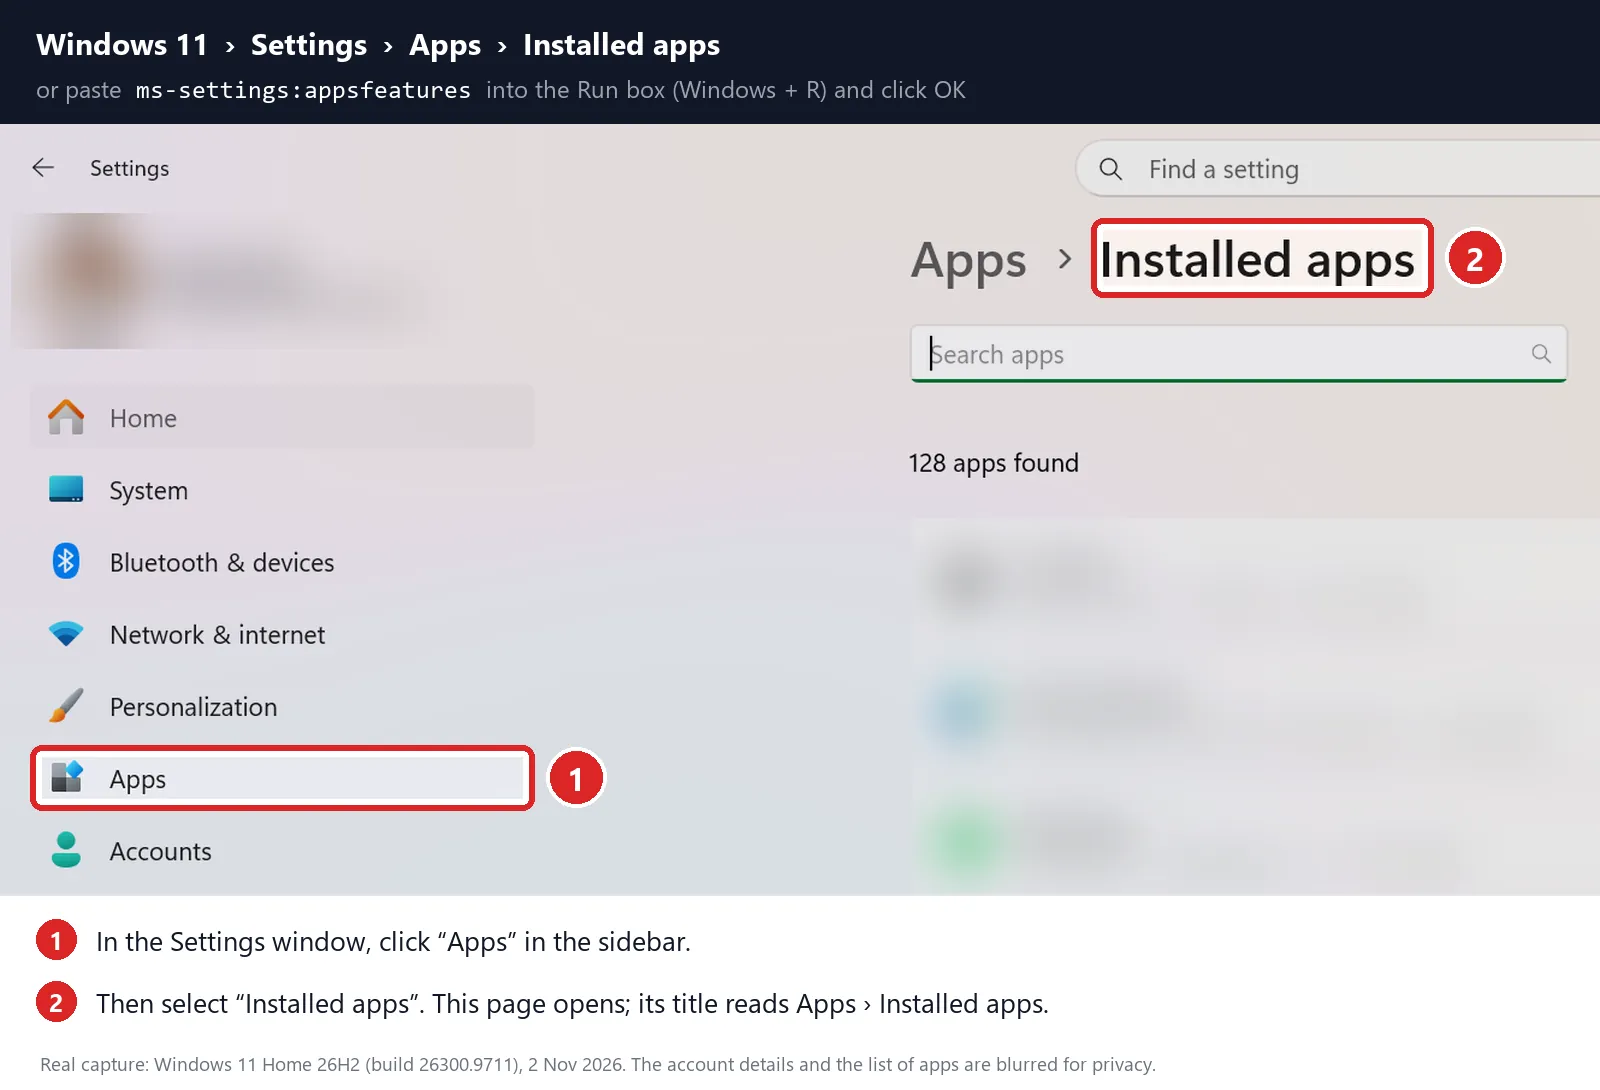
Go to “Installed apps”
In the Settings window, click “Apps” in the sidebar, then select “Installed apps“.
-
Find and uninstall the malicious program
Scroll through the list of installed apps and look for anything suspicious — a program you don’t remember installing, or one with a strange or generic name.
Quick tip: click “Sort by” and choose “Date installed“. Malware is usually one of the most recently installed programs, so it will appear near the top.
When you find the malicious program, click the three dots next to it and select “Uninstall“.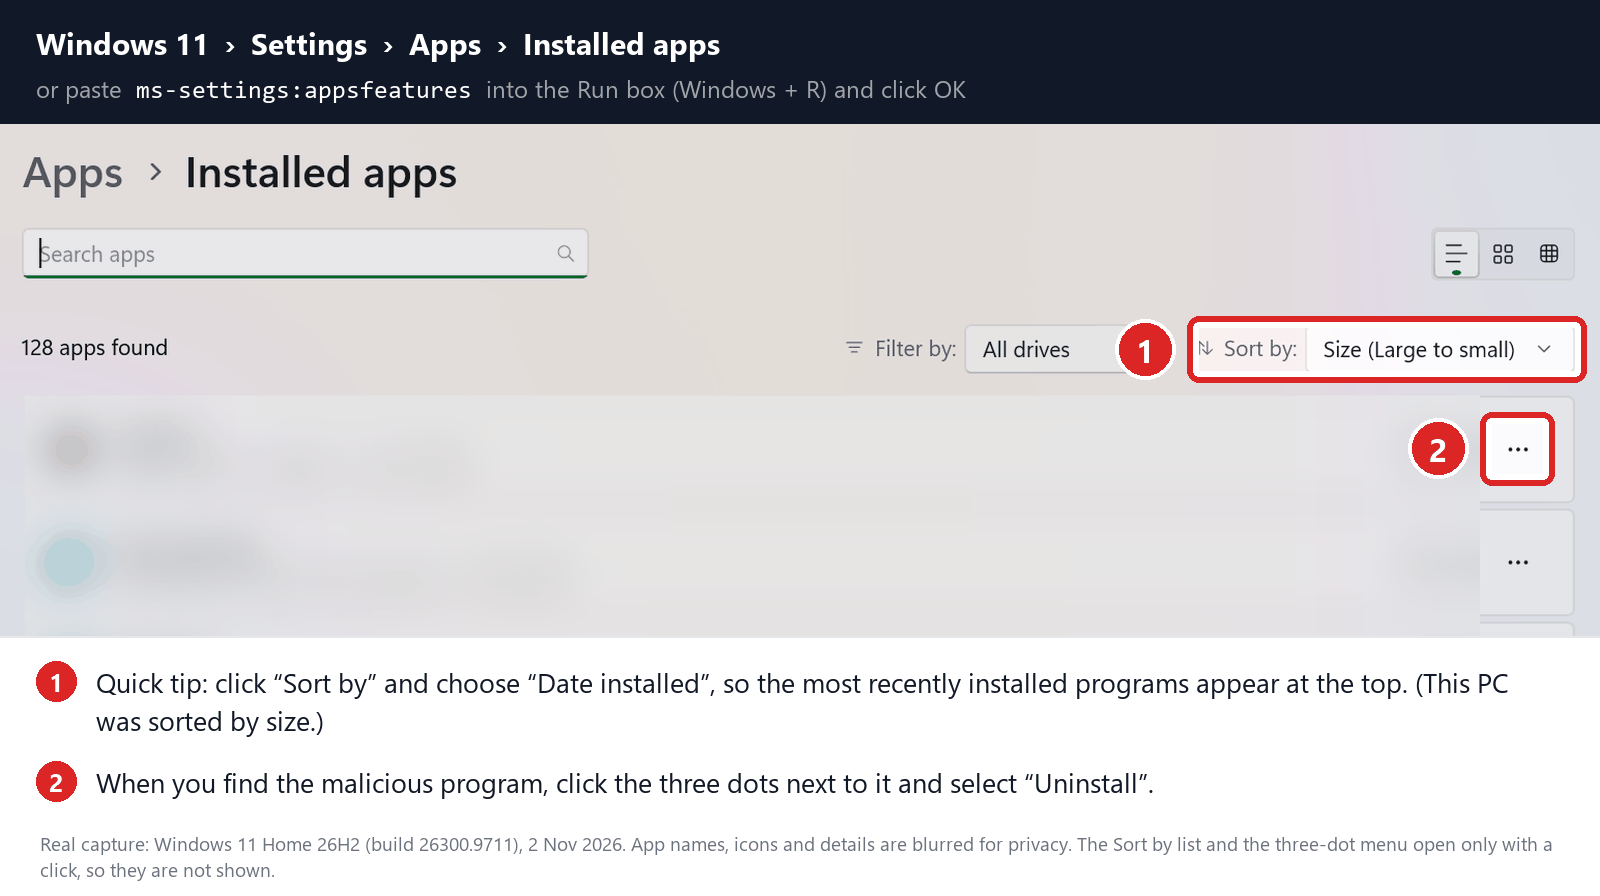 Didn’t find any suspicious programs? That’s fine — not all infections install visible apps. Just continue with the next step in this guide.
-
Complete the uninstall
Confirm by clicking Uninstall in the message box, then follow the remaining prompts.
Read each prompt carefully — some malicious programs use confusing wording or pre-ticked boxes hoping you’ll click through without looking.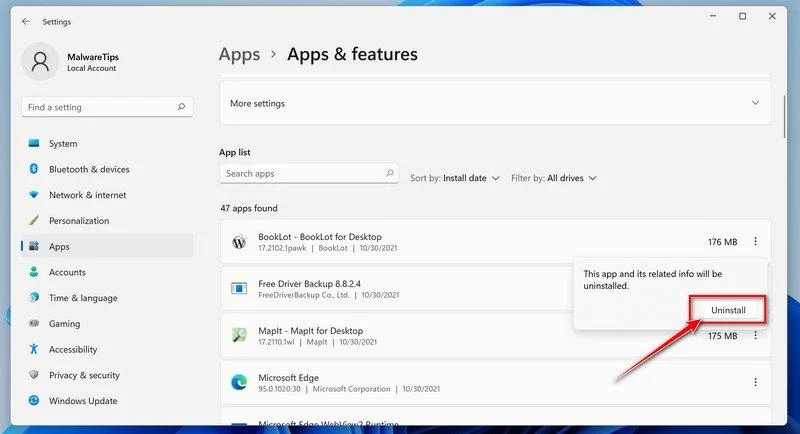
-
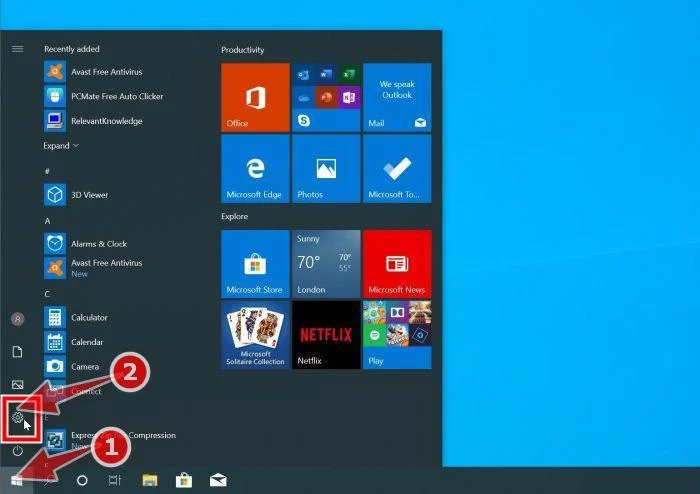
Open the Settings app
Press Windows + I on your keyboard to open Settings. Alternatively, click the Start button on the taskbar and select “Settings” (the gear icon).
-
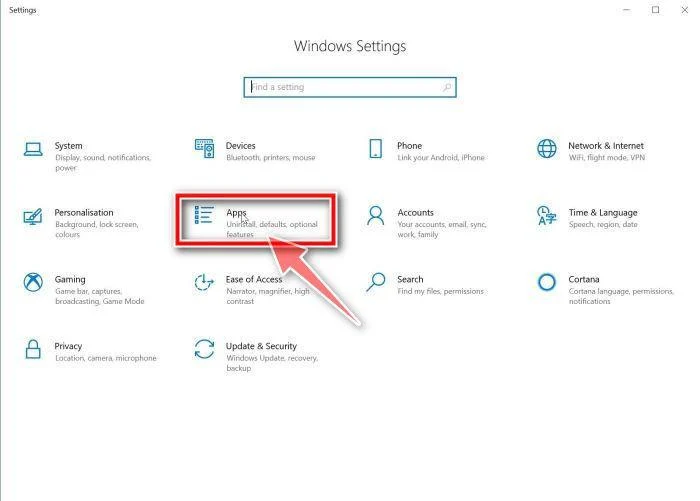
Click on “Apps”
In the “Windows Settings” window, click “Apps“. The “Apps & Features” section should open by default — if it doesn’t, select it from the list on the left.
-
Find and uninstall the malicious program
Scroll through the list of installed apps and look for anything suspicious — a program you don’t remember installing, or one with a strange or generic name.
Quick tip: click “Sort by” and choose “Install date“. Malware is usually one of the most recently installed programs, so it will appear near the top.
When you find the malicious program, click on it and select “Uninstall“.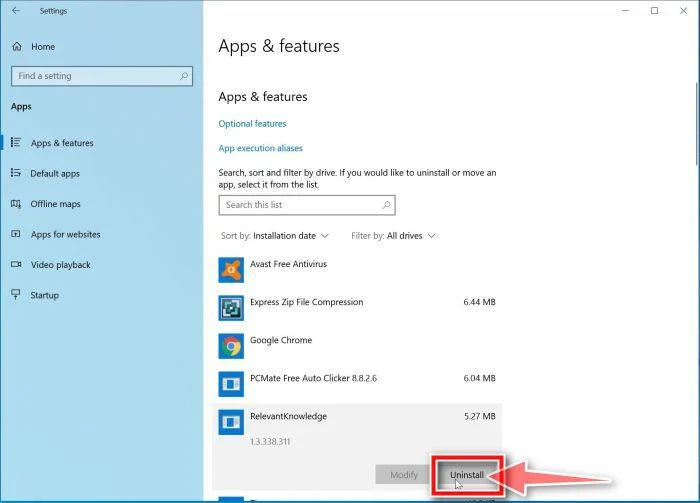 Didn’t find any suspicious programs? That’s fine — not all infections install visible apps. Just continue with the next step in this guide.
-
Complete the uninstall
Confirm by clicking Uninstall in the message box, then follow the remaining prompts.
Read each prompt carefully — some malicious programs use confusing wording or pre-ticked boxes hoping you’ll click through without looking.
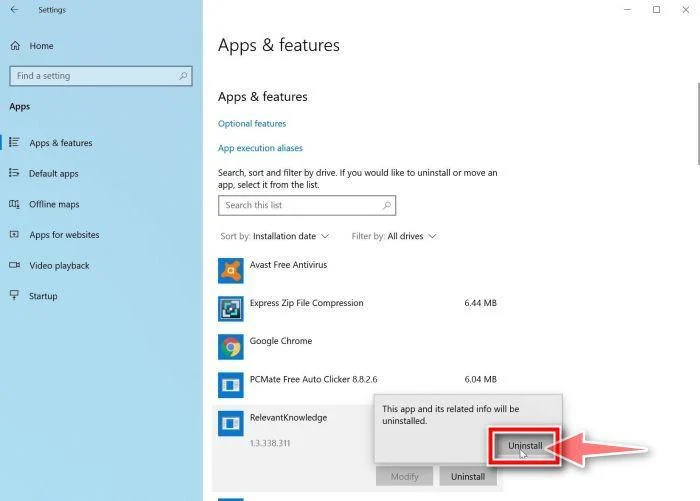
With the malicious programs removed, you’re ready for the next step in this guide.
STEP 2: Reset browsers back to default settings
In this step, we will remove spam notifications, malicious extensions, and change to default any settings that might have been changed by malware.
Please note that a Chrome or Edge reset turns off all your extensions, and a Firefox refresh removes them. Your bookmarks and favorites stay intact. For each browser that you have installed on your computer, please click on the browsers tab below and follow the displayed steps to reset that browser.
Reset Chrome for Windows to default settings
We will now reset your Chrome browser settings to their original defaults. This will reset your startup page, new tab page, search engine, and pinned tabs. It will also disable all extensions and clear temporary data like cookies. Your favorites, history, and saved passwords will not be cleared.
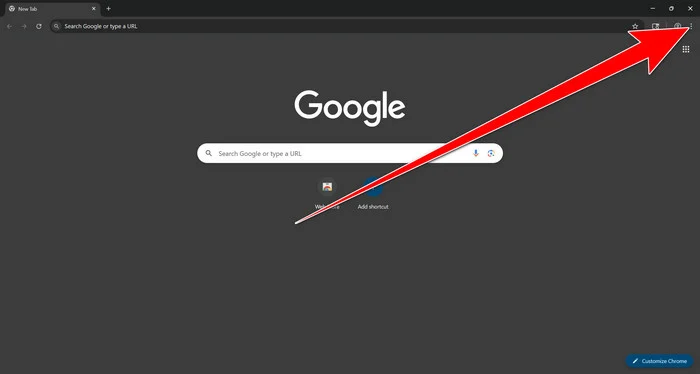
Open the Chrome menu
Open Google Chrome and click the three-dot (⋮) icon in the top-right corner.
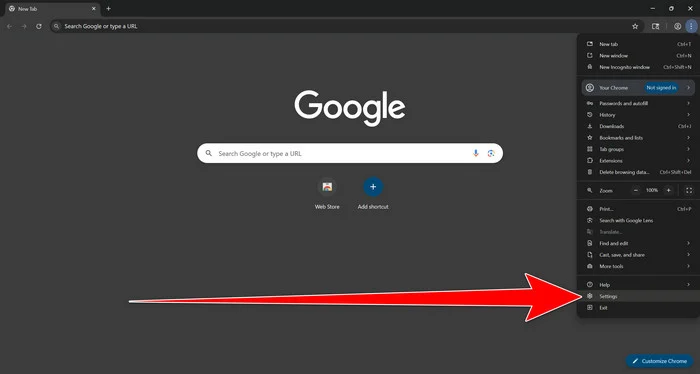
Open Chrome Settings
Select Settings from the Chrome menu.
Select “Reset settings”
Look at the menu on the left side of the Settings page. Scroll down and click Reset settings.
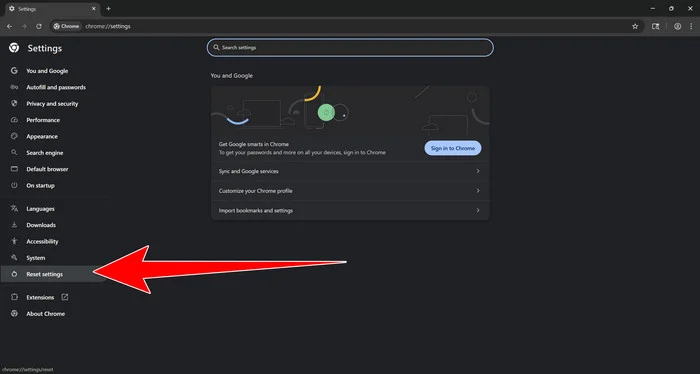
Restore Chrome’s original settings
Click Restore settings to their original defaults.
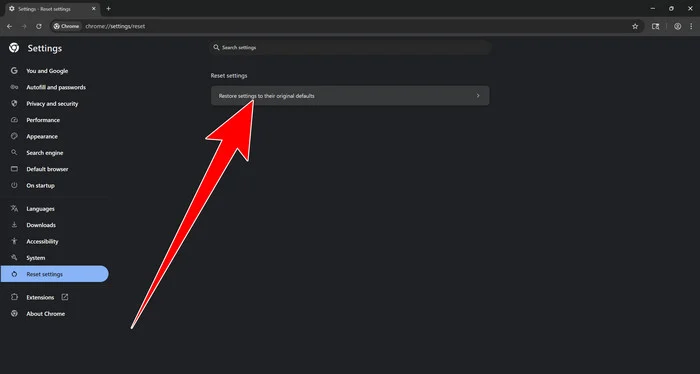
Confirm the Chrome reset
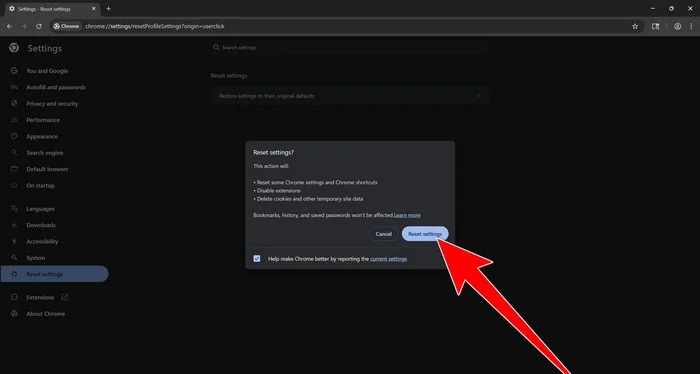
A confirmation window will appear. Click Reset settings.
This will:
- Restore the default search engine, homepage, and new tab page
- Reset startup pages and pinned tabs
- Reset site permissions, such as notifications and pop-ups
- Disable installed extensions
- Clear temporary cookies and website data
Don’t worry: Chrome will not delete your bookmarks, browsing history, or saved passwords. If you’re signed in to Chrome, the reset applies on all devices where you’re signed in.
Restart Chrome and perform a test search. If your searches now open normally in Google, you can stop here.
If searches are still redirected through shady domains complete the additional step below.
Remove persistent search hijacker data
Only complete this step if the redirect continues after resetting Chrome.
Some browser hijackers hide inside Chrome’s local search-engine database. A standard Chrome reset may not remove this database, which is why searches can continue to pass through shady sites.
The following procedure creates a backup of the affected database and allows Chrome to build a new, clean version. This is safer and less disruptive than deleting the entire Chrome profile.
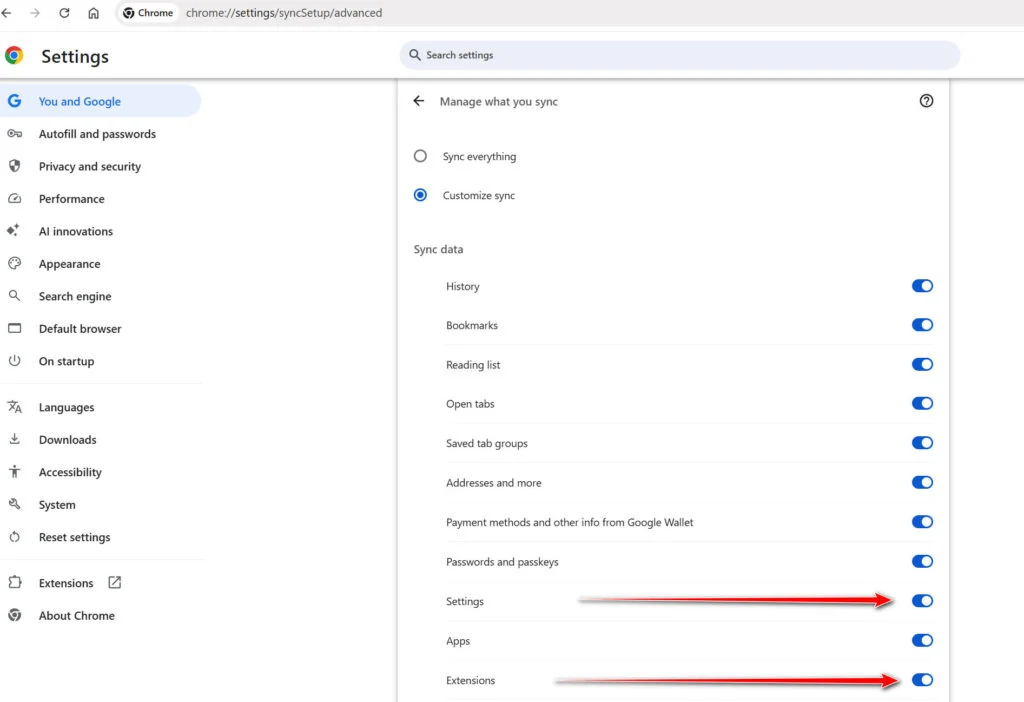
First, prevent Chrome Sync from restoring the hijacked settings:
- Open a new Chrome tab.
- Copy the following address, paste it into Chrome’s address bar, and press Enter:
chrome://settings/syncSetup/advanced - Under Manage what you sync, select Customize sync.
- Turn off Settings and Extensions.
- You can leave Bookmarks and Passwords enabled so your important data remains synchronized.
Note: Some newer Chrome versions may automatically redirect this address to the Google Account settings page. If that happens, locate the list of synchronized Chrome data and turn off Settings and Extensions there.
Now save anything you are working on and close every Chrome window.
Run the cleanup command:
- Press the Windows key on your keyboard.
- Type PowerShell.
- Open Windows PowerShell. Administrator access is not required.
- Copy the entire command shown below.
- Right-click inside the PowerShell window to paste the command, then press Enter.
- If Windows warns you about pasting multiple lines, select the option to continue.
$stamp = Get-Date -Format "yyyyMMdd-HHmmss"

Get-Process chrome -ErrorAction SilentlyContinue |
 Stop-Process -Force

$root = "$env:LOCALAPPDATA\Google\Chrome\User Data"

if (Test-Path $root) {
 $profiles = Get-ChildItem $root -Directory |
 Where-Object {
 $_.Name -eq "Default" -or
 $_.Name -match "^Profile \d+$"
 }

 foreach ($profile in $profiles) {
 foreach ($name in @(
 "Web Data",
 "Web Data-journal",
 "Web Data-wal",
 "Web Data-shm"
 )) {
 $file = Join-Path $profile.FullName $name

 if (Test-Path $file) {
 $backup = "$file.search-hijacker-backup-$stamp"
 Move-Item -LiteralPath $file -Destination $backup
 Write-Host "Backup created: $backup"
 }
 }
 }
}

Write-Host ""
Write-Host "Chrome search data has been cleaned."
Write-Host "You can now reopen Chrome."
Wait until PowerShell displays the following message:
Chrome search data has been cleaned.
You can now reopen Chrome.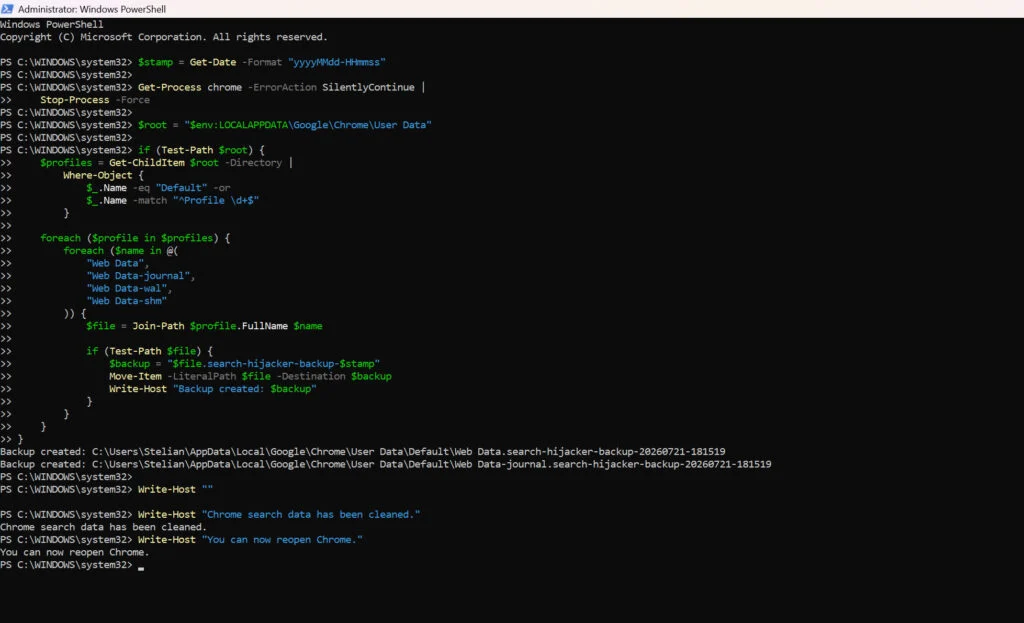
Close PowerShell and reopen Google Chrome. Chrome will automatically create a clean search database for every local profile.
Next, copy the following address, paste it into Chrome’s address bar, and press Enter:
chrome://settings/searchEngines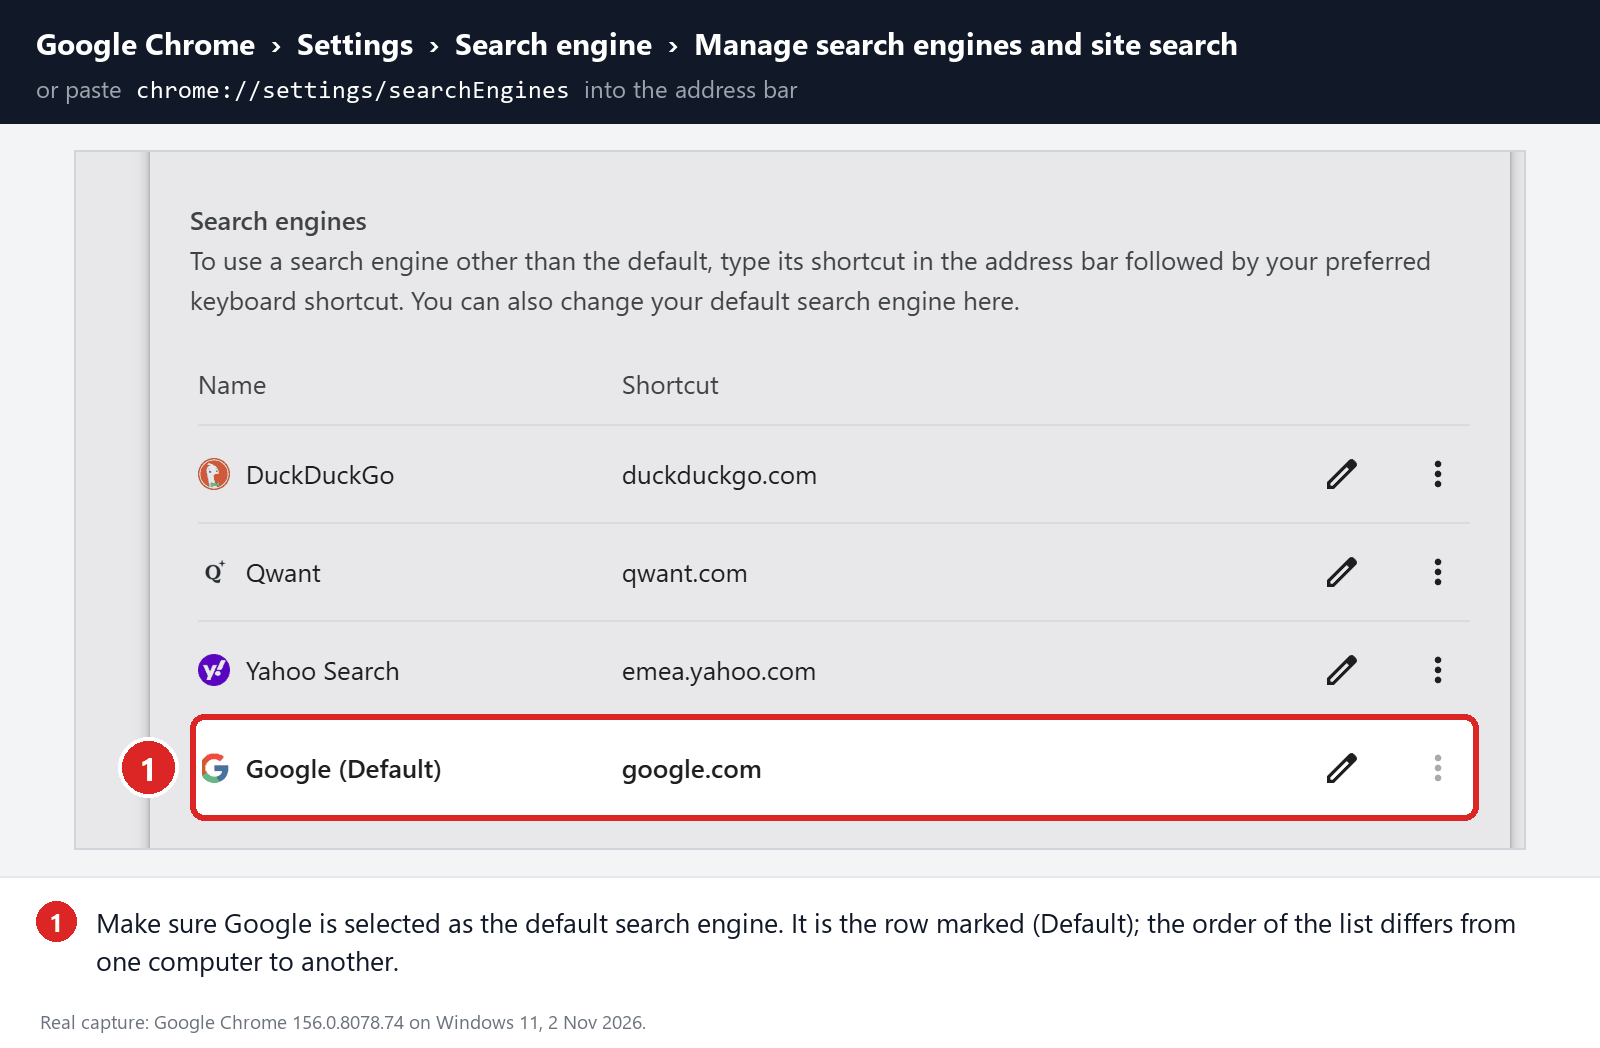
Make sure Google is selected as the default search engine. Test several searches from the address bar and confirm that they no longer pass through shady search engines.
Your important Chrome data is protected: the PowerShell cleanup does not remove bookmarks, saved passwords, browsing history, cookies, or installed extensions. However, it may reset locally stored Autofill addresses, payment cards saved only on this computer, and form suggestions.
The original search database is not deleted. PowerShell renames it and adds
search-hijacker-backupto its filename so it can be recovered if necessary.Keep Settings and Extensions synchronization disabled while testing Chrome. Do not enable every extension at once. Enable only the extensions you recognize, one at a time, and test Chrome after each one.
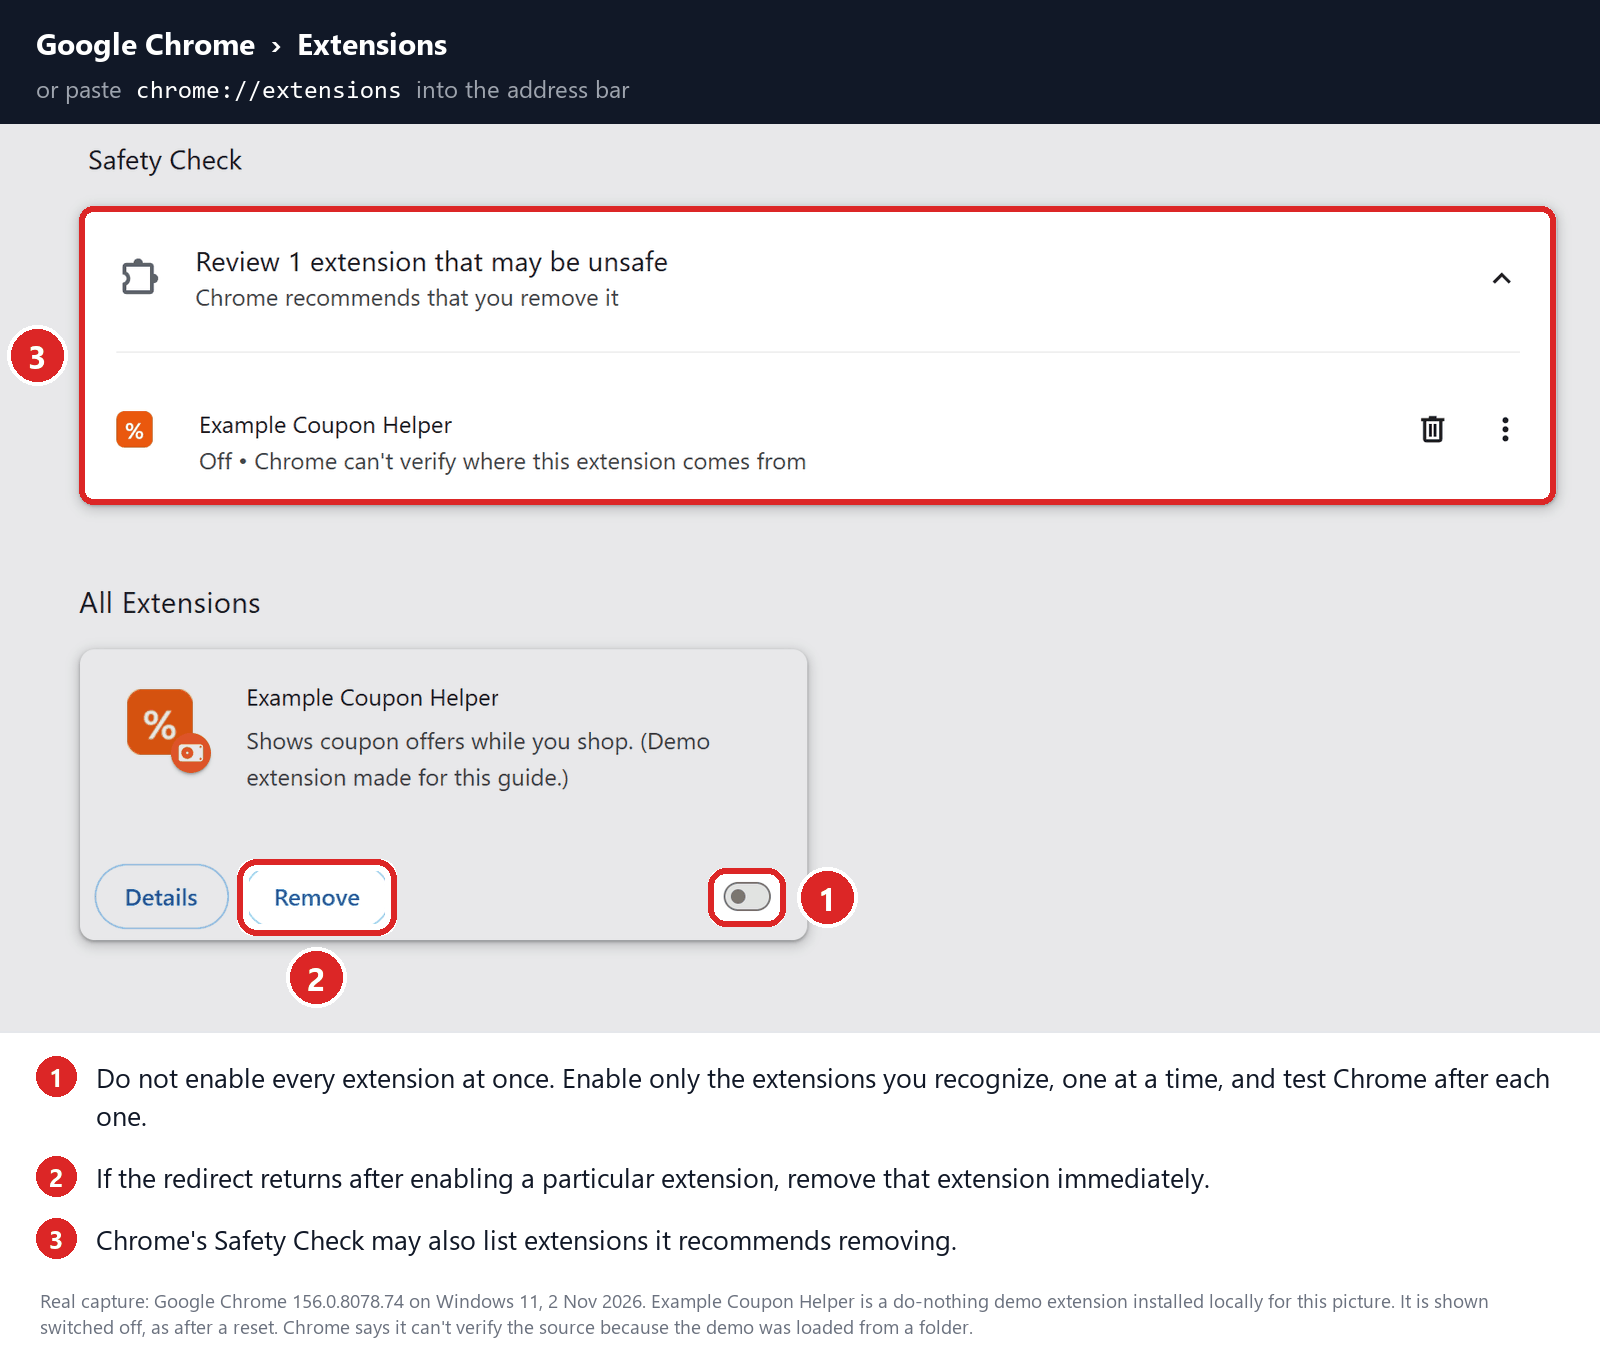
If the redirect returns after enabling a particular extension, remove that extension immediately.
Reset Firefox for Windows to default settings
We will now reset your Firefox browser settings to their default. The reset feature fixes many issues by restoring Firefox to its factory default state while saving your essential information like bookmarks, passwords, web form auto-fill information, browsing history, and open tabs.
-
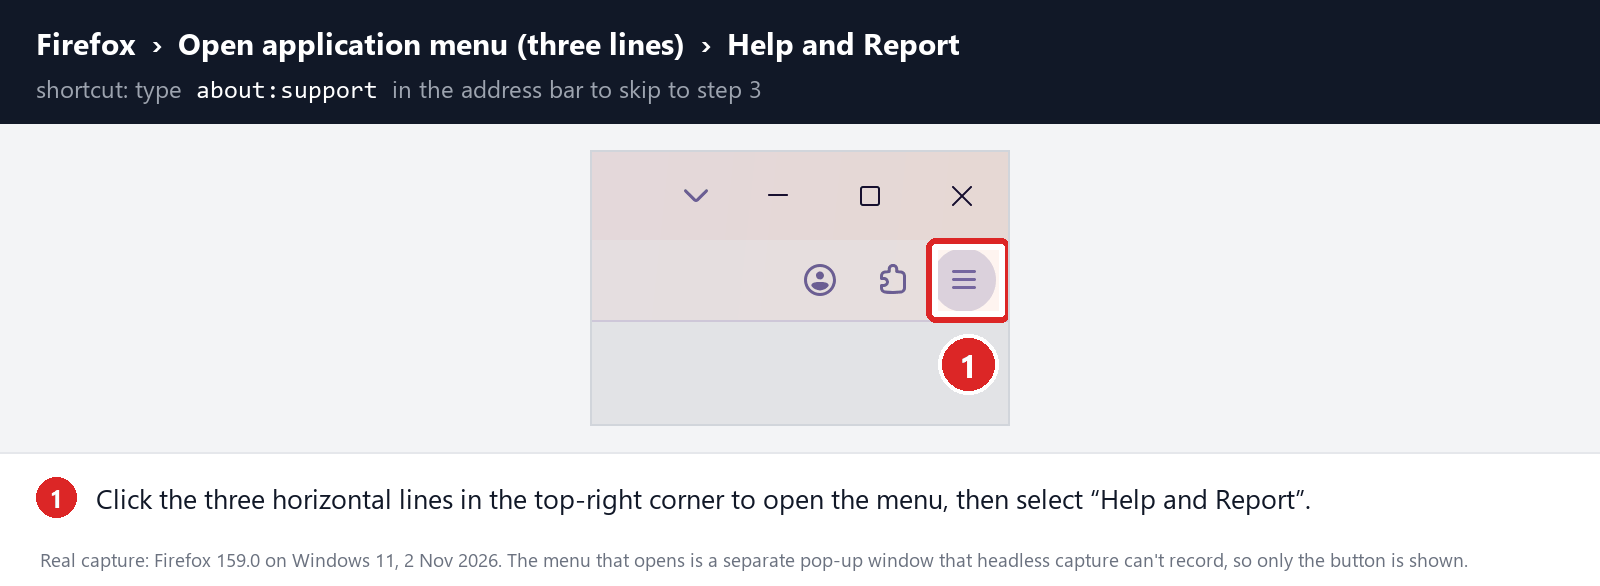
Open the Firefox menu and click “Help and Report”
Click the three horizontal lines in the top-right corner of Firefox to open the main menu, then select “Help and Report“.
-
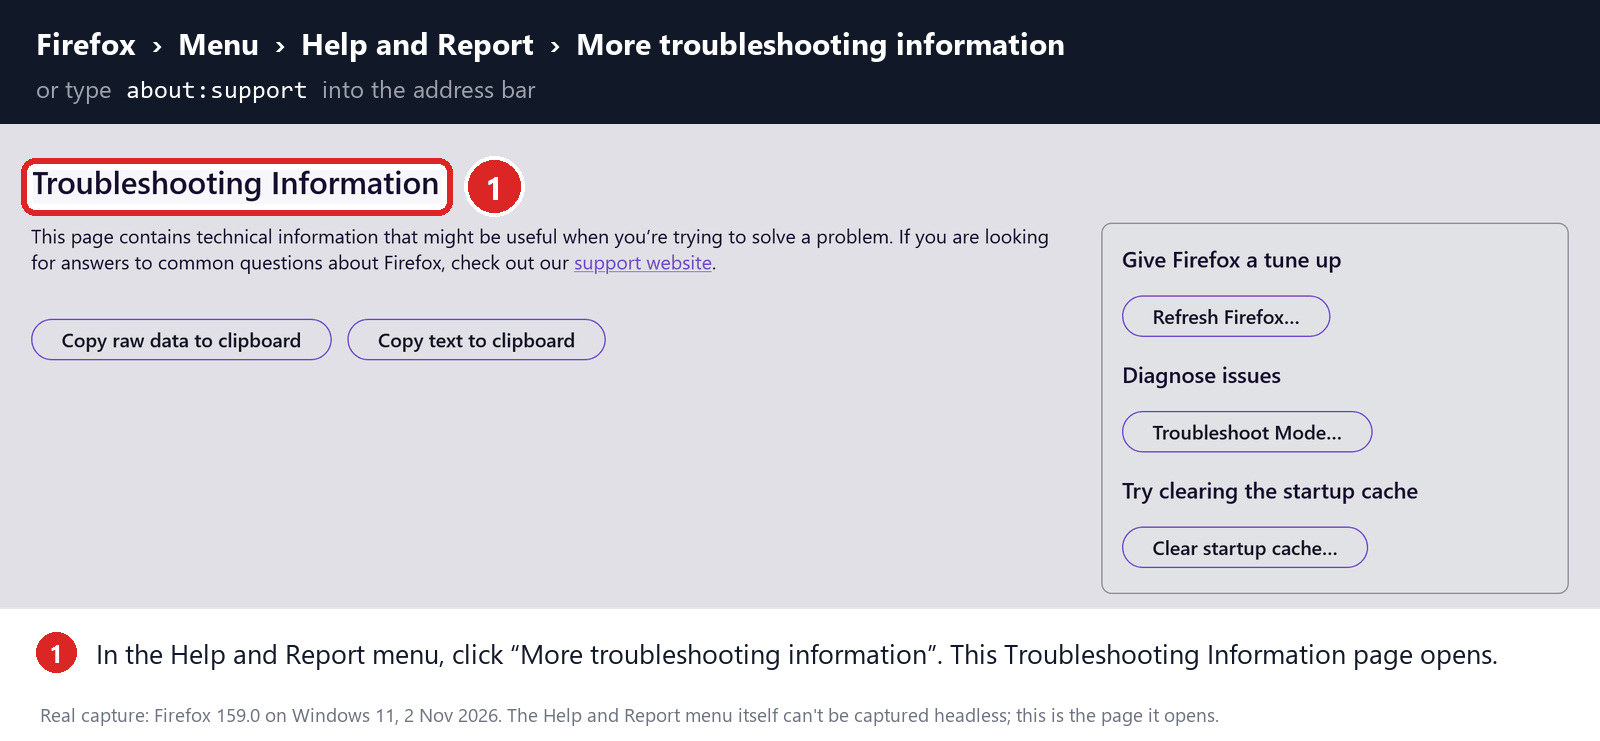
Click “More troubleshooting information”
In the Help and Report menu, click “More troubleshooting information“.
-
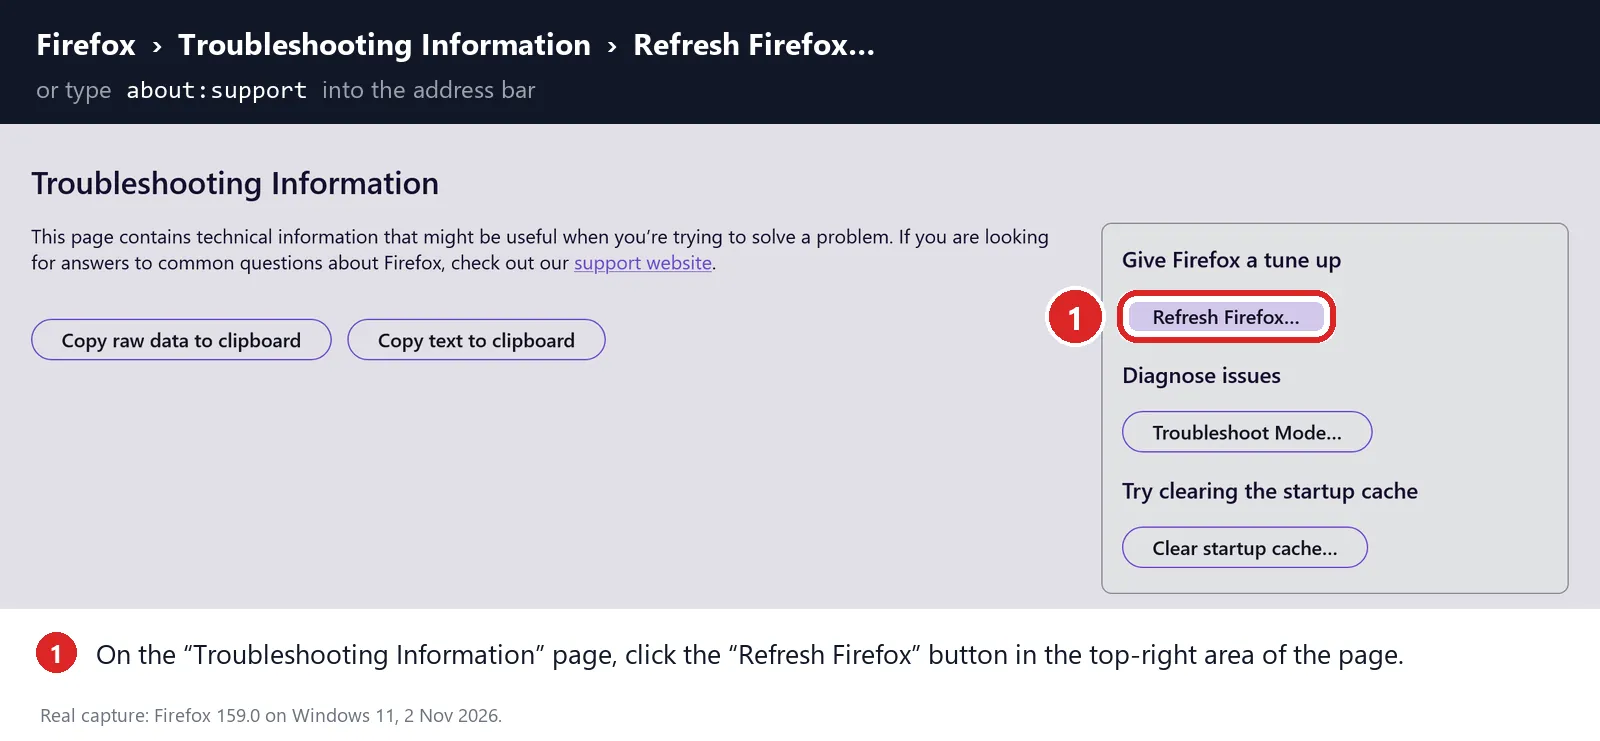
Click “Refresh Firefox”
On the “Troubleshooting Information” page, click the “Refresh Firefox” button in the “Give Firefox a tune up” box in the top-right area of the page.
-
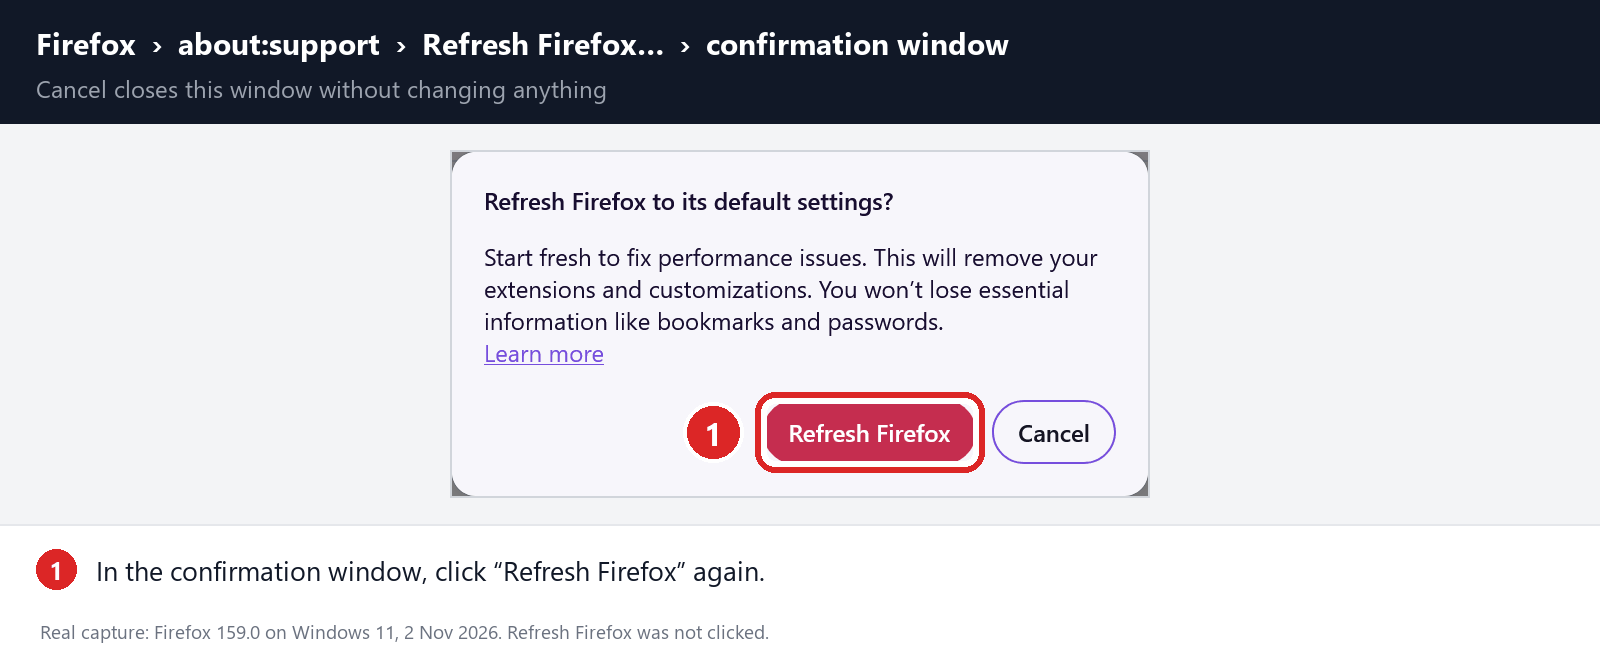
Confirm the refresh
In the confirmation window, click “Refresh Firefox” again. This removes extensions, themes, and customized settings — the usual hiding places for browser hijackers — while keeping your bookmarks, history, and saved passwords safe.
-
Click “Finish”
Firefox will close, reset itself to default settings, and reopen with a window listing the information that was restored. Click “Finish“. Then test Firefox before you add back any extensions.
About the “Old Firefox Data” folder: Firefox saves a copy of your old profile on your desktop. If something you need is missing after the reset, you can recover it from this folder. Otherwise, delete the folder — it contains sensitive data like passwords and cookies, and may also still hold the malicious files you just removed.
Reset Microsoft Edge to default settings
We will now reset your Microsoft Edge browser settings to their default. This will reset your startup page, new tab page, search engine, and pinned tabs. It will also disable all extensions and clear temporary data like cookies. Your favorites, history, and saved passwords will not be cleared.
Updated for Microsoft Edge on Windows 10 and Windows 11 — July 2026.
-
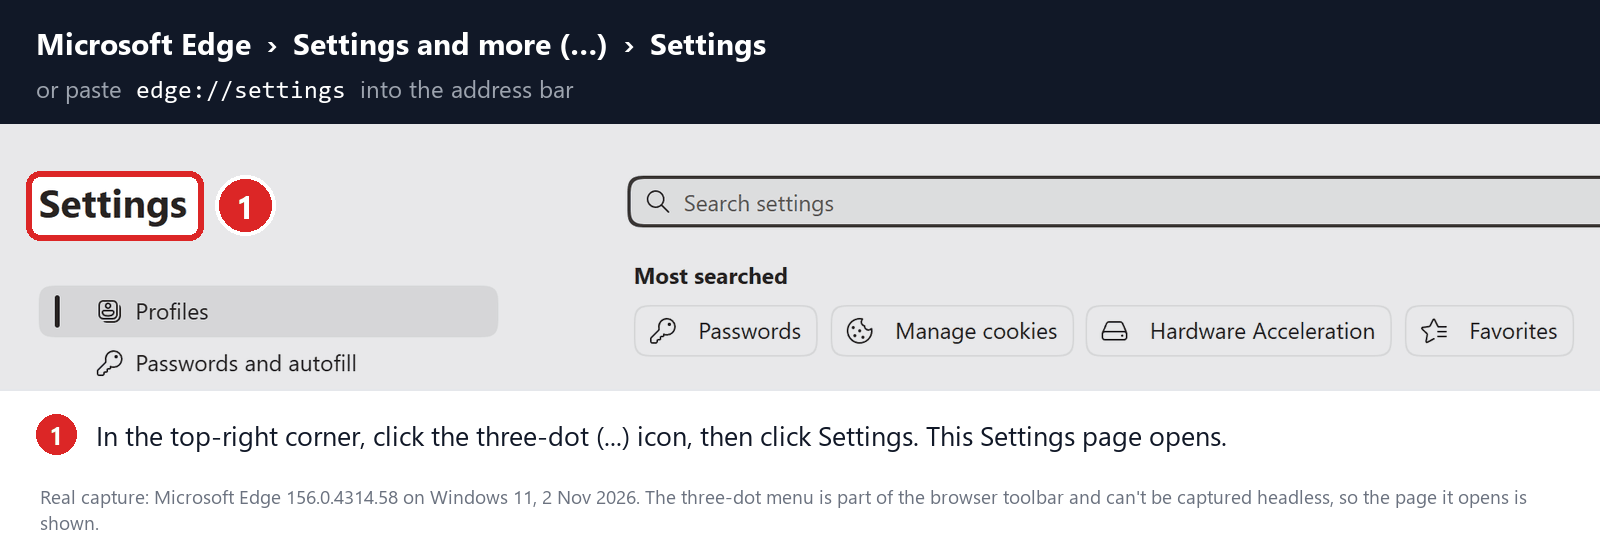
Open the Edge menu and click “Settings”
Open Microsoft Edge. In the top-right corner, click the three-dot (…) icon, then click Settings.
-
Prevent the unwanted settings from returning through Edge Sync
If you are signed in to Microsoft Edge, a bad setting or extension may be stored in your Microsoft account and return after the reset.
Copy the following address, paste it into the Edge address bar, and press Enter:
edge://settings/profiles/syncOn the Sync page, turn off these two options:
- Settings
- Extensions
You can leave Favorites and Passwords turned on.
If Edge says that sync is already off, simply continue to the next step.
Important: Edge Sync settings are separate for each profile. If you use more than one Edge profile, switch to each affected profile and repeat this step.
You do not need to sign out of your Microsoft account or delete the Edge profile.
-
Open “Reset settings”
In the left sidebar, click Reset settings.
You can also open the reset page directly. Copy the following address, paste it into the Edge address bar, and press Enter:
edge://settings/reset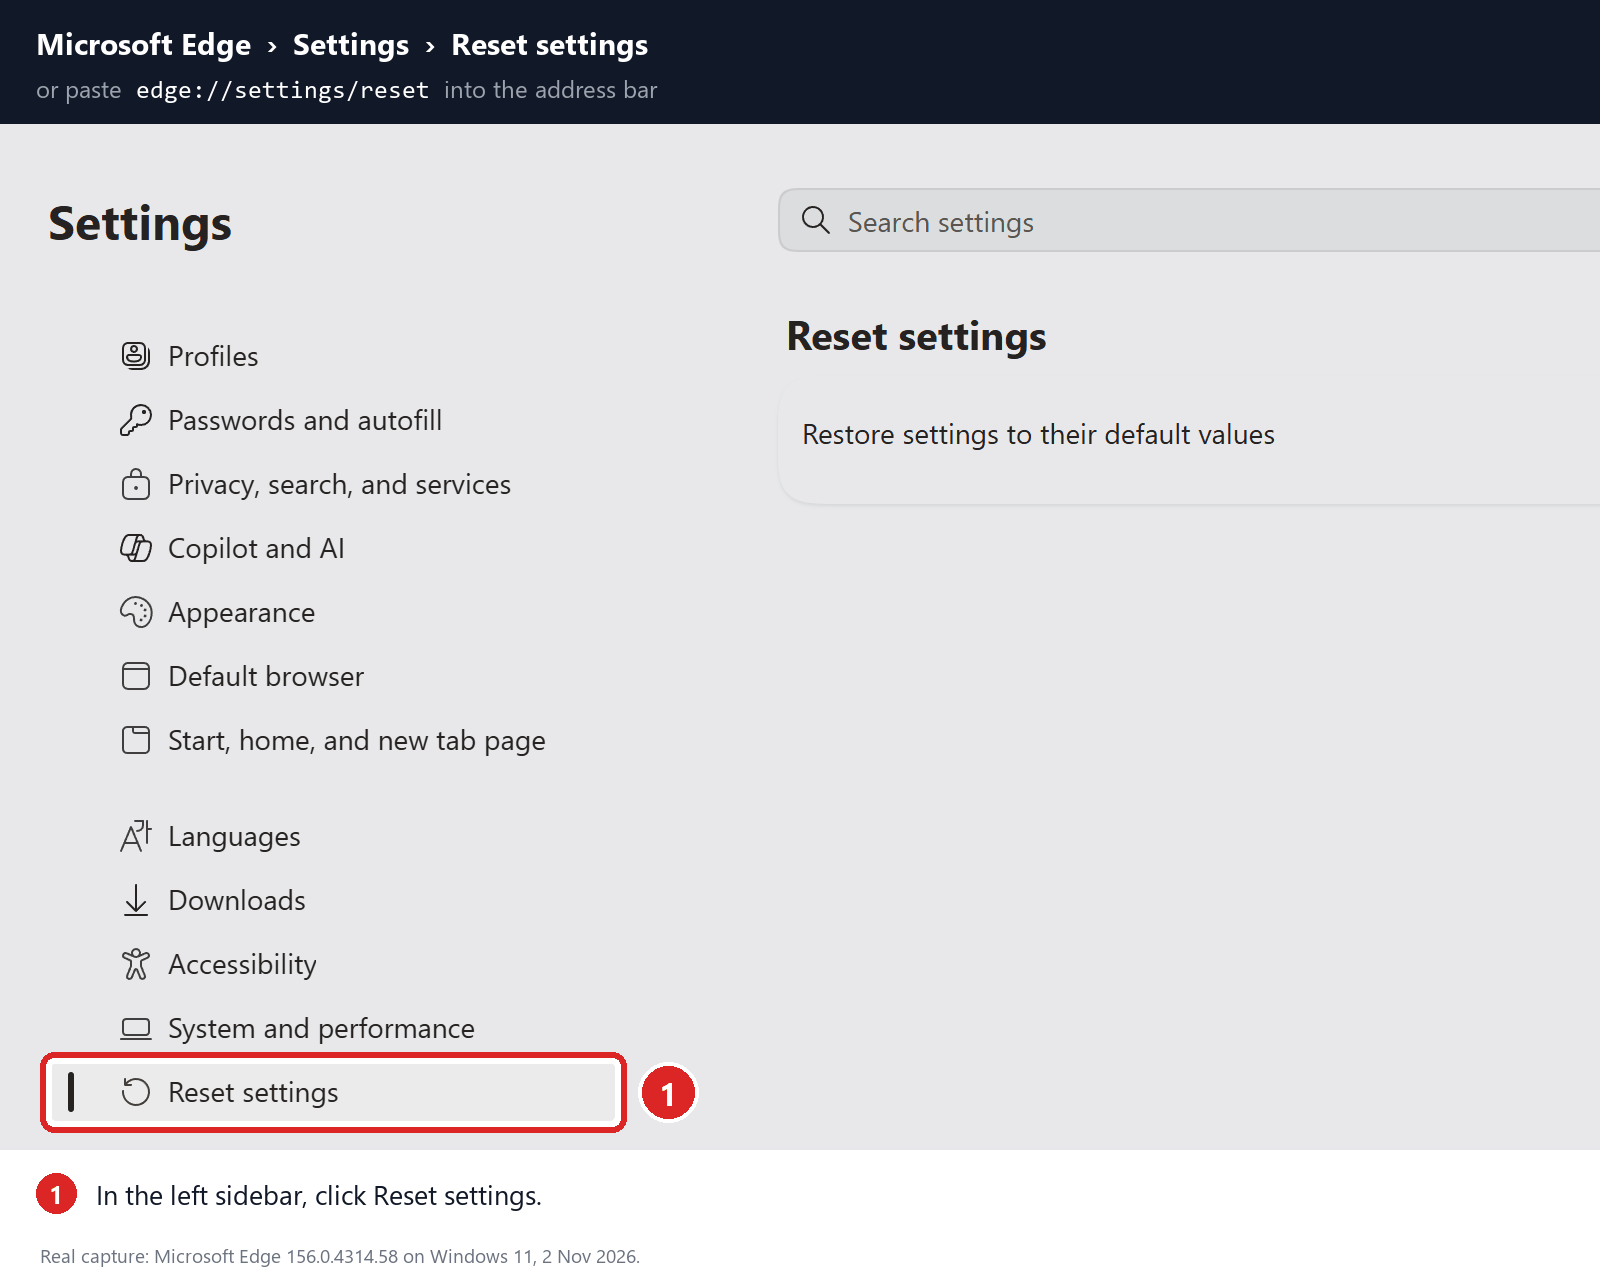
-
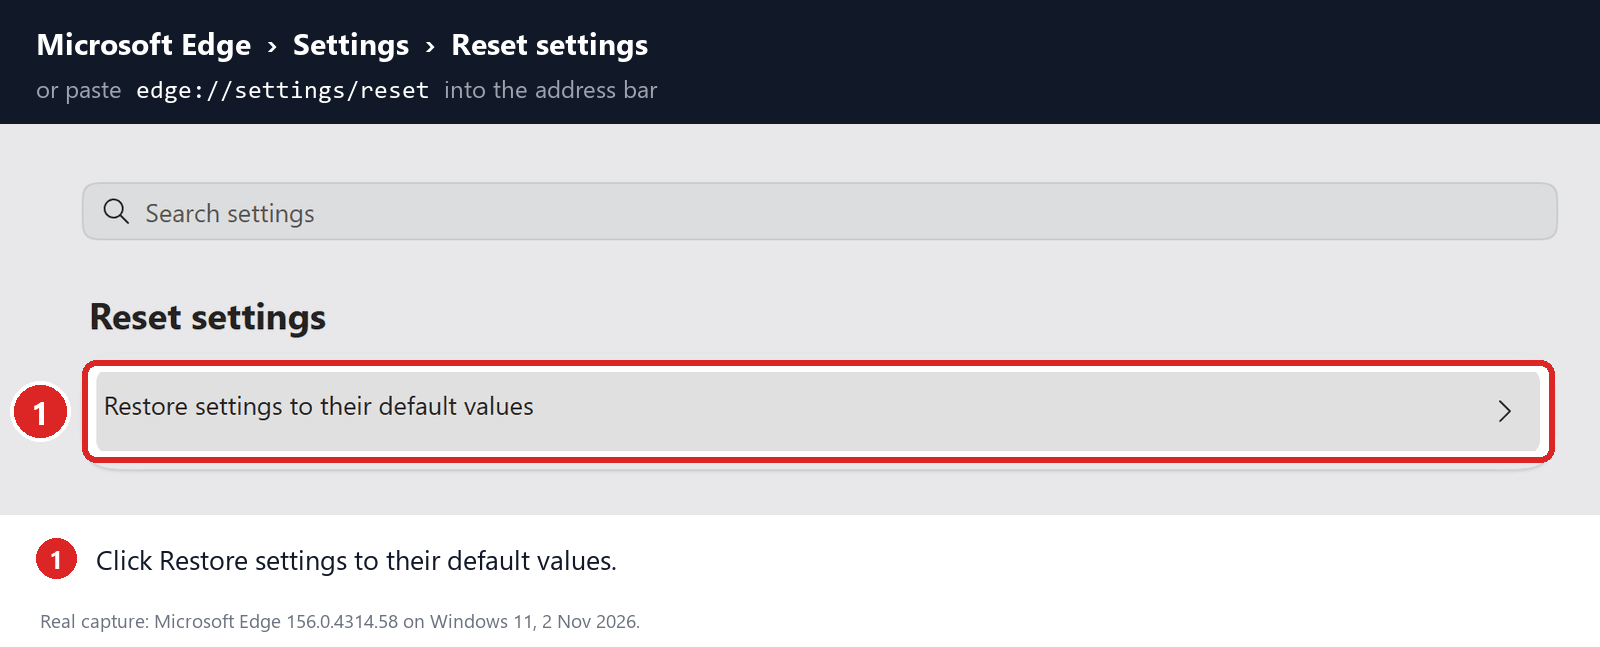
Click “Restore settings to their default values”
Click Restore settings to their default values.
-
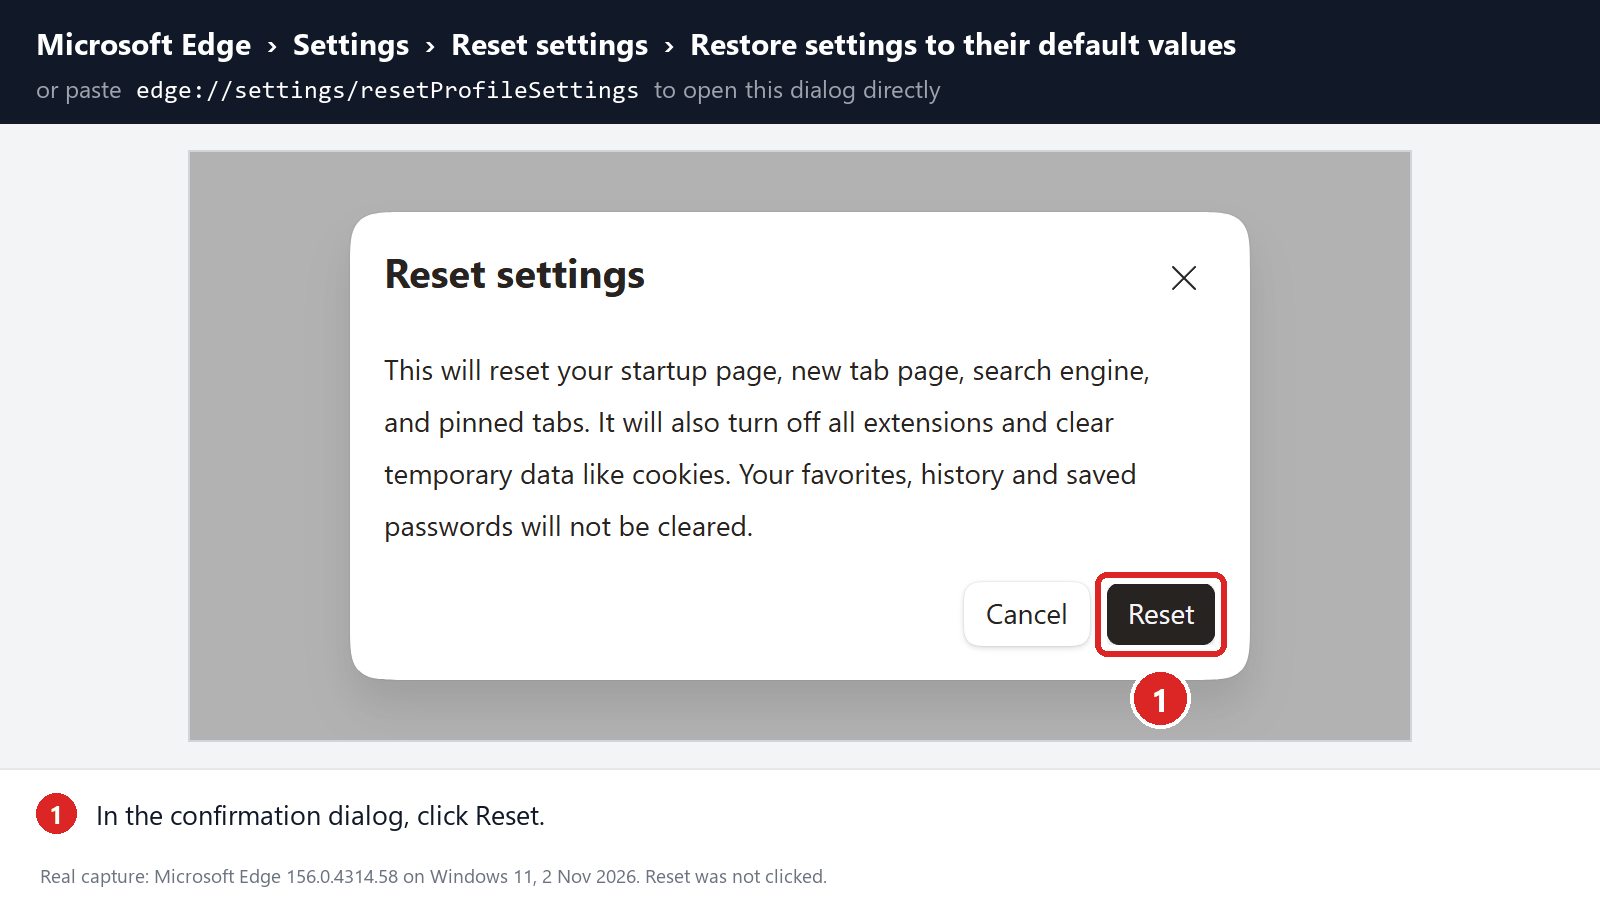
Confirm the reset
In the confirmation dialog, click Reset.
This resets the startup page, new tab page, search engine, and pinned tabs. It also disables all extensions and clears temporary site data, such as cookies.
Don’t worry: your favorites, browsing history, and saved passwords will not be deleted.
-
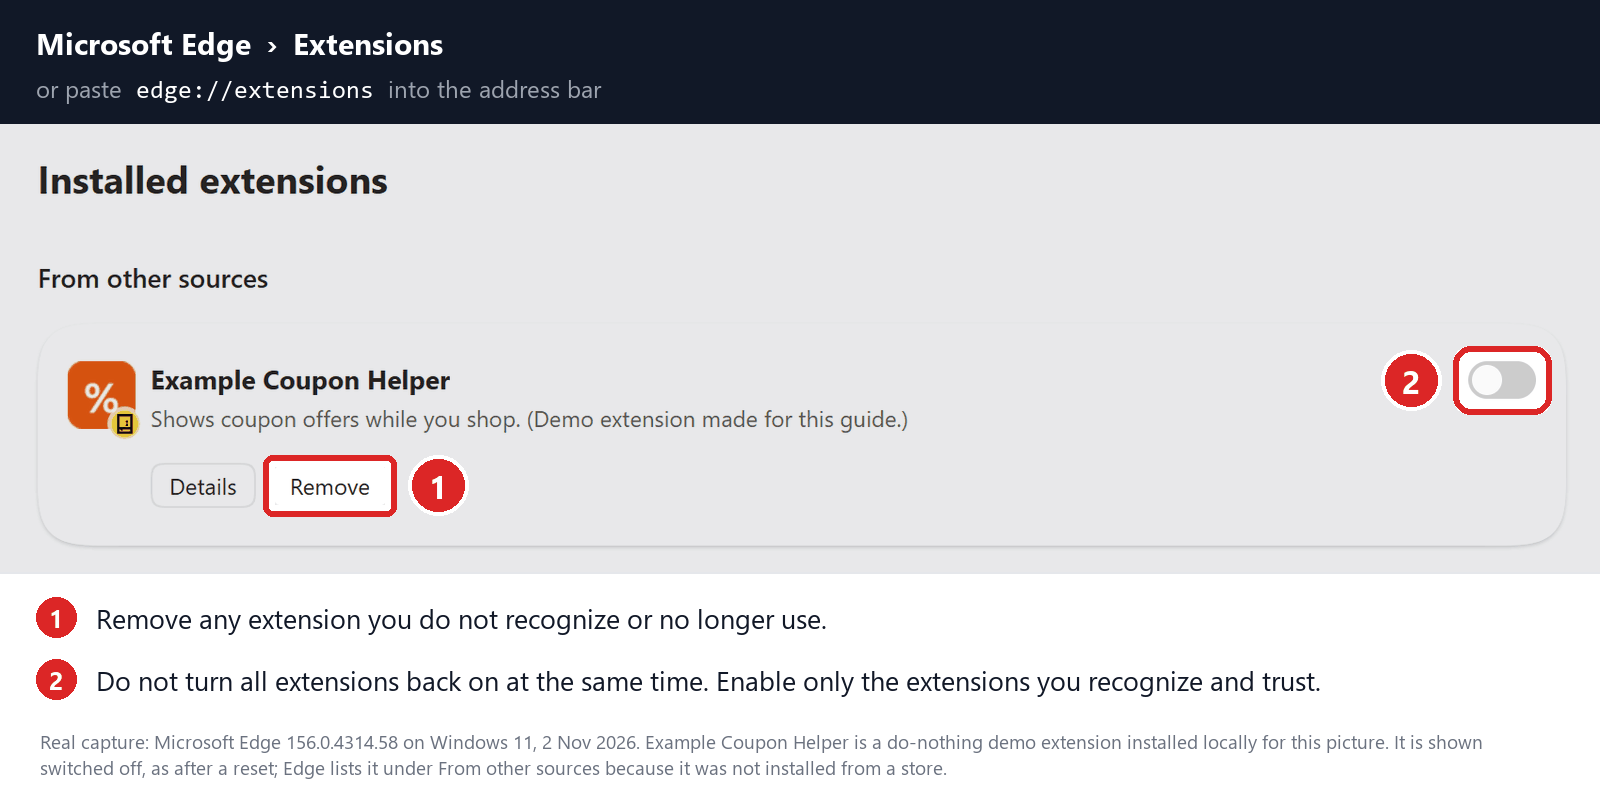
Check your extensions before turning them back on
Copy the following address, paste it into the Edge address bar, and press Enter:
edge://extensionsRemove any extension you do not recognize or no longer use. Pay particular attention to extensions related to search, coupons, shopping, PDF conversion, browser protection, new tabs, or video downloading.
Do not turn all extensions back on at the same time. Enable only the extensions you recognize and trust.
-
Select a trusted search engine
Copy the following address, paste it into the Edge address bar, and press Enter:
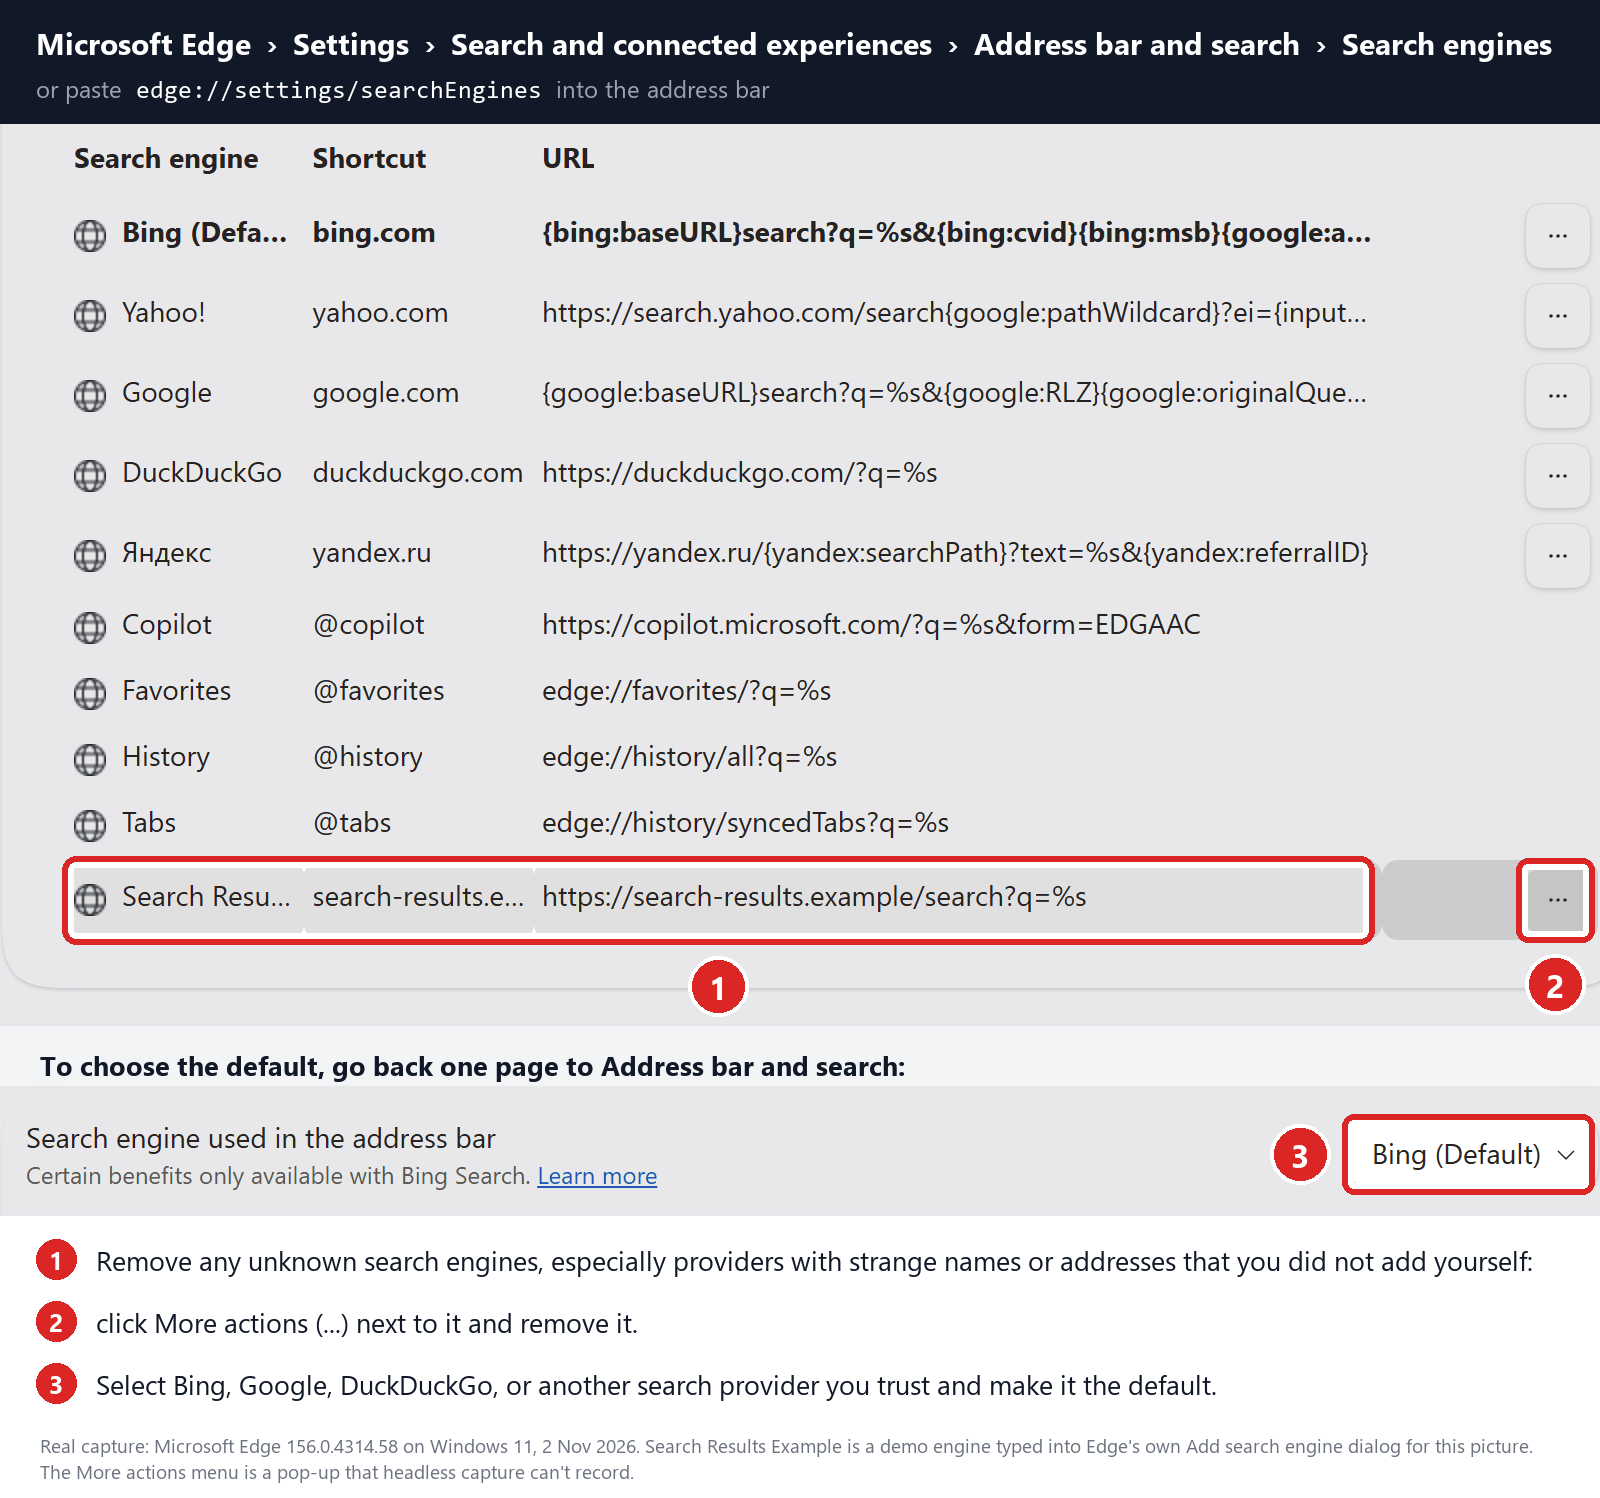
edge://settings/searchEnginesSelect Bing, Google, DuckDuckGo, or another search provider you trust and make it the default. This address opens the list of search engines; the default is set one page back, on Address bar and search, under Search engine used in the address bar.
Remove any unknown search engines from the list, especially providers with strange names or addresses that you did not add yourself: click More actions (…) next to the engine and remove it.
Restart Edge and perform a search from the address bar. If searches are no longer redirected, you can stop here.
-
If the redirect remains, clean the corrupted search data without deleting the Edge profile
Use this additional step only if Edge continues to redirect searches after the normal reset.
This command cleans the search-engine database from every local Edge profile while keeping your favorites, saved passwords, browsing history, cookies, and profiles.
Before continuing: save anything you are working on because the command will close Microsoft Edge.
- Open the Windows Start menu.
- Type PowerShell.
- Open Windows PowerShell. Administrator access is not required.
- Copy the entire command below.
- Paste it into PowerShell and press Enter.
$stamp = Get-Date -Format "yyyyMMdd-HHmmss"
$root = Join-Path $env:LOCALAPPDATA "Microsoft\Edge\User Data"

Get-Process -Name msedge -ErrorAction SilentlyContinue |
    Stop-Process -Force -ErrorAction SilentlyContinue

Start-Sleep -Seconds 2

if (-not (Test-Path -LiteralPath $root)) {
    Write-Host "The Microsoft Edge profile folder was not found:"
    Write-Host $root
    return
}

$profiles = Get-ChildItem -LiteralPath $root -Directory |
    Where-Object {
        $_.Name -eq "Default" -or
        $_.Name -match "^Profile \d+$"
    }

$movedFiles = 0

foreach ($profile in $profiles) {
    foreach ($name in @(
        "Web Data",
        "Web Data-journal",
        "Web Data-wal",
        "Web Data-shm"
    )) {
        $file = Join-Path $profile.FullName $name

        if (Test-Path -LiteralPath $file) {
            $backup = "$file.search-reset-backup-$stamp"

            try {
                Move-Item -LiteralPath $file -Destination $backup -ErrorAction Stop
                Write-Host "Cleaned: $($profile.Name)\$name"
                $movedFiles++
            }
            catch {
                Write-Warning "Could not clean: $file"
            }
        }
    }
}

Write-Host ""

if ($movedFiles -gt 0) {
    Write-Host "Microsoft Edge search data has been cleaned." -ForegroundColor Green
    Write-Host "You can now reopen Microsoft Edge."
}
else {
    Write-Host "No Edge search database files were found." -ForegroundColor Yellow
}
The command does not permanently delete the original files. It renames them as backup files, and Edge creates a clean search database when it starts again.
Note: this additional cleanup may also reset saved form-fill suggestions, saved addresses, payment cards saved only on this computer, and manually added search engines. It does not delete favorites, passwords, or browsing history.
-
Reopen Edge and test the browser
Open Microsoft Edge again, visit edge://settings/searchEngines, and select your preferred search engine (one page back, on Address bar and search, under Search engine used in the address bar).
Perform several searches from the address bar to confirm that the redirect is gone.
Keep synchronization for Settings and Extensions turned off until you are certain that the computer and extensions are clean. If you enable them again, turn them on one at a time and test Edge after each change.
-
If Edge still redirects your searches
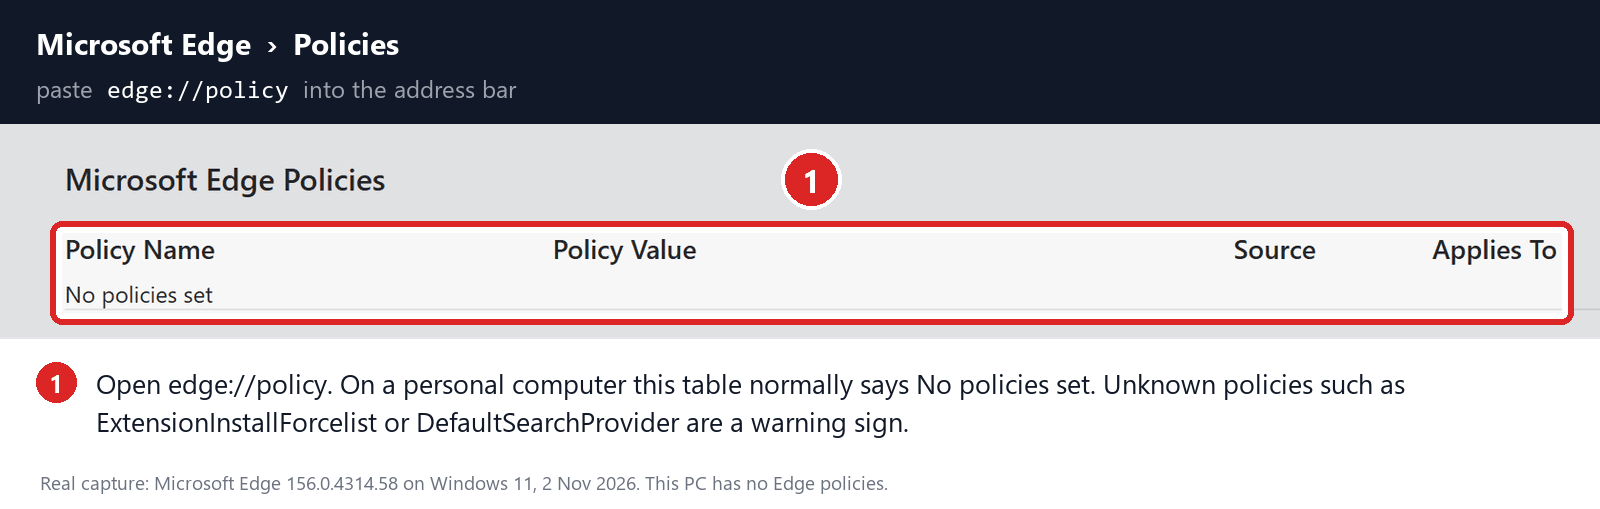
Open edge://policy. If this is your personal computer and Edge displays unknown policies such as ExtensionInstallForcelist or DefaultSearchProvider, the hijacker may be installed outside the browser profile.
In that situation, continue with the next malware-removal steps and run a complete antivirus scan. If the computer belongs to a company or school, contact its IT administrator before changing any policies.
STEP 3: Use Malwarebytes Anti-Malware to remove malware and unwanted programs
In this third step, we will install Malwarebytes to scan and remove any infections, adware, or potentially unwanted programs that may be present on your computer.
Malwarebytes is one of the most popular and trusted anti-malware tools for Windows — and it’s completely free for removing infections. It catches threats that many antivirus programs miss, including adware, browser hijackers, and trojans. Follow the steps below to scan your PC and remove what Malwarebytes finds.
Download Malwarebytes
Click the button below to download the latest version of Malwarebytes for Windows from the official source. The free version is all you need — it will scan your computer and remove adware, browser hijackers, and other malicious software at no cost.
Download MalwarebytesOfficial installer for Windows 11 and 10. Your download starts right away.Want real-time protection? See Malwarebytes Premium Malwarebytes Free for WindowsScans and removes malware at no cost
-
Install Malwarebytes
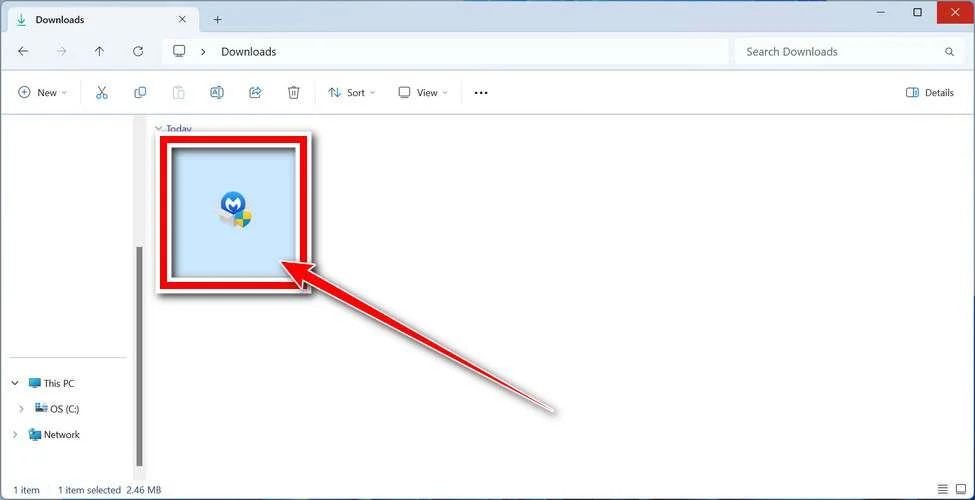
When the download finishes, open your Downloads folder and double-click the MBSetup file. If Windows shows a User Account Control pop-up, click “Yes” to allow the installation.
Follow the On-Screen Prompts to Install Malwarebytes
The setup wizard will walk you through a few quick screens:
-
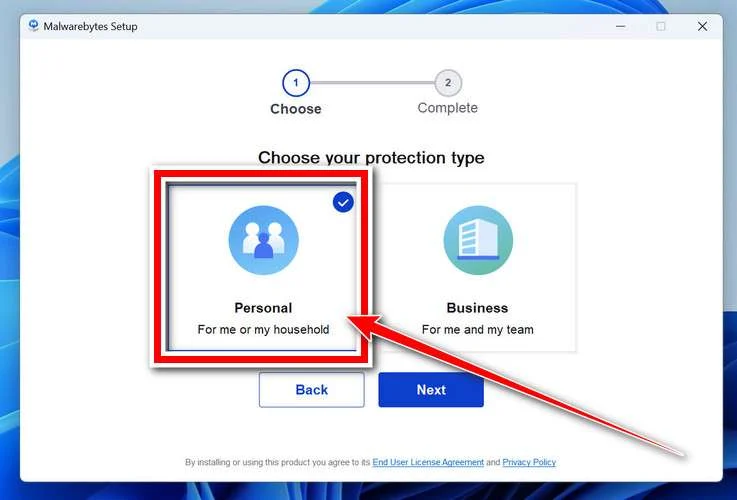
Choose where you’re installing the program — “Personal Computer” or “Work Computer” — then click Next.
-
Malwarebytes will now install on your device. This usually takes under a minute.
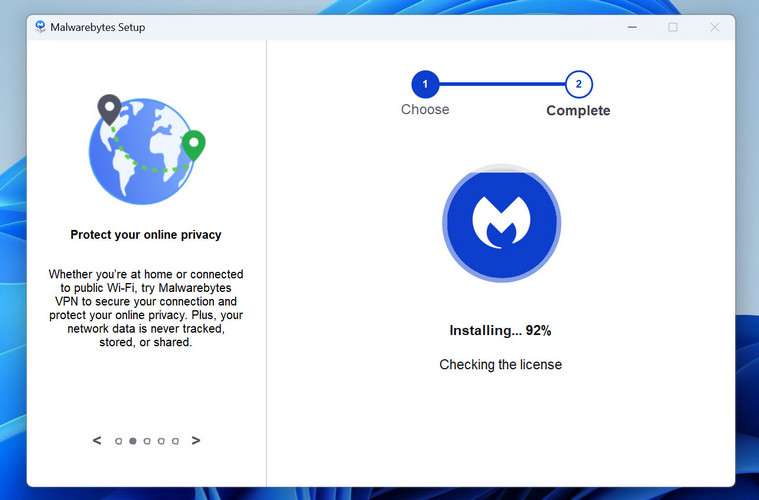
-
When installation is complete, the “Welcome to Malwarebytes” screen will open automatically.
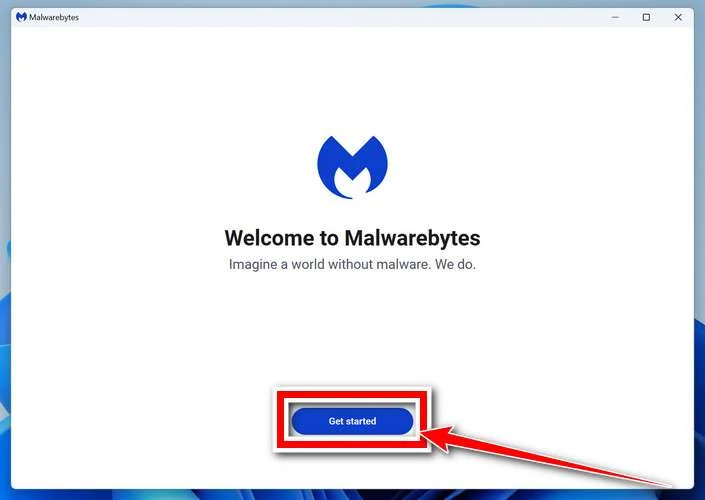
-
On the final screen, click Open Malwarebytes to launch the program.
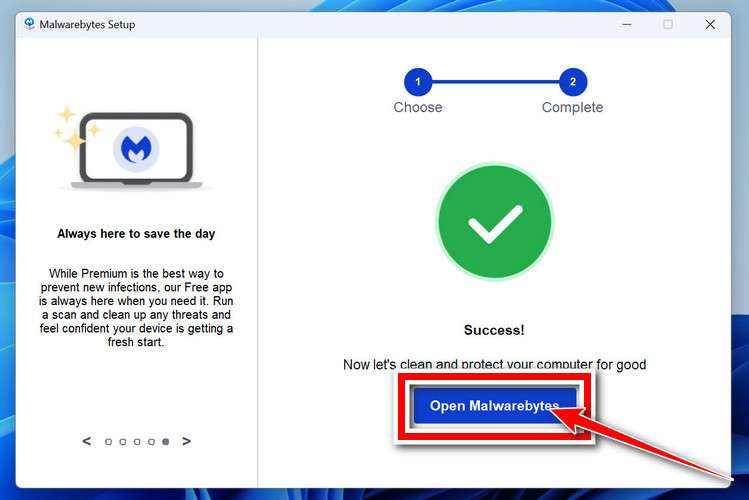
-
Optional: Check for rootkits with a Custom Scan
You don’t need to change any settings for a normal scan. The standard Threat Scan in the next step is enough for most problems, so you can go straight to it.
If you also want to check for rootkits, use a Custom Scan. In current versions of Malwarebytes, rootkit scanning is only available there:
- On the Scanner tile, click the three-dot menu and select Advanced Scan.
- Choose Custom Scan. In its options, check Scan for rootkits.
- Select your system drive (usually C:\) as the location to scan, then start the scan. It takes longer than a Threat Scan.
- When it finishes, review and quarantine the results as described in the steps below.
Rootkit scanning isn’t available on Windows devices with ARM processors.
Start the Scan
Click the blue Scan button. Malwarebytes will automatically update its virus database and start checking your computer for malware.
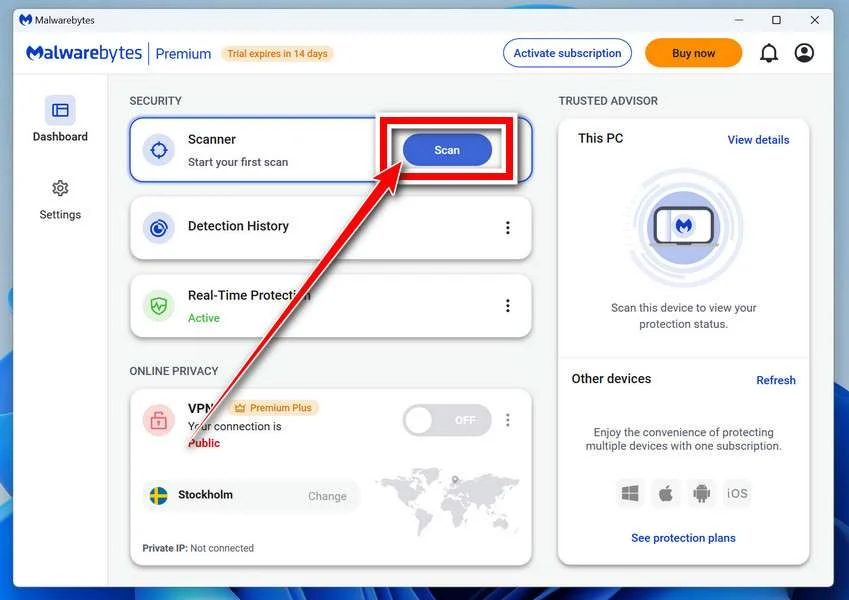
-
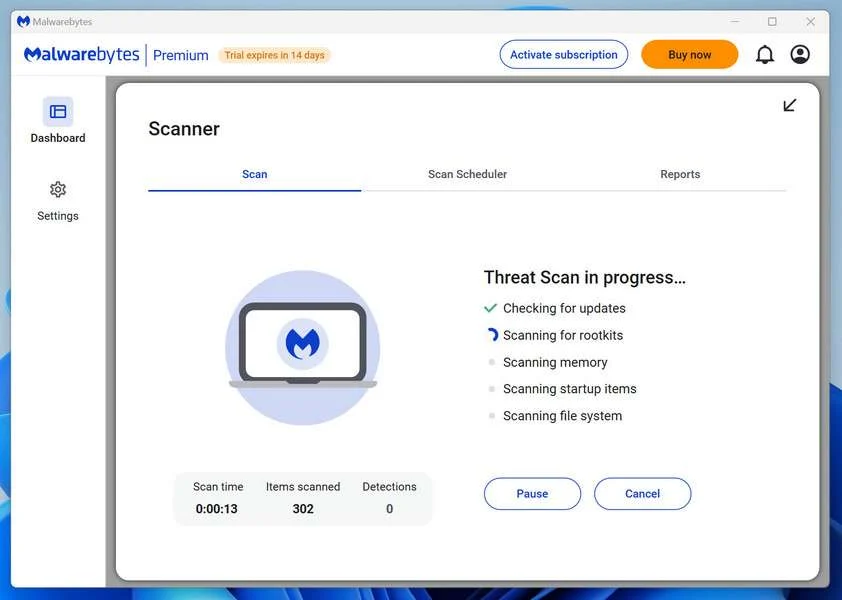
Wait for the Scan to Finish
The scan checks your entire system for browser hijackers and other malicious programs, so it can take 5 to 20 minutes depending on your computer. Feel free to do something else — just check back occasionally to see the progress.
-
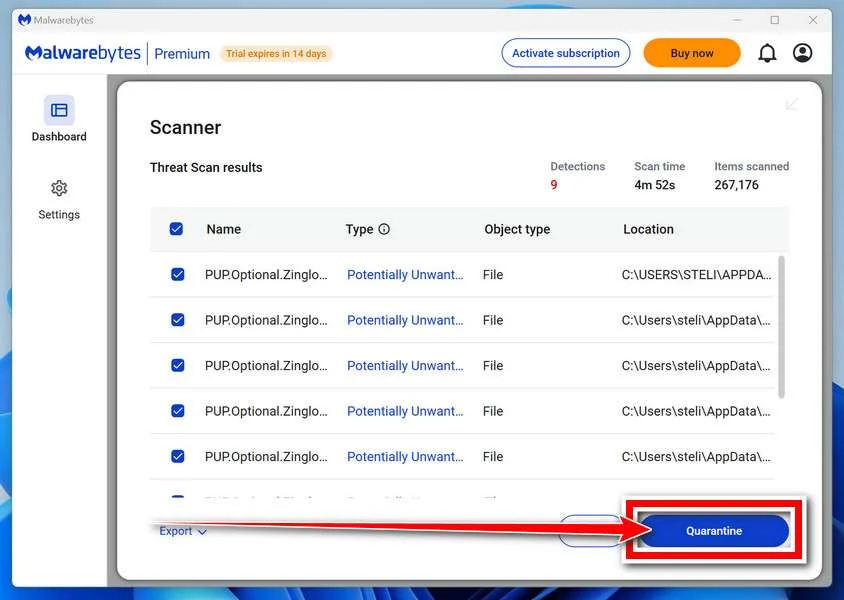
Quarantine the Detected Threats
When the scan is done, you’ll see a list of everything Malwarebytes found — malware, adware, and potentially unwanted programs. Click the “Quarantine” button to remove all of them at once.
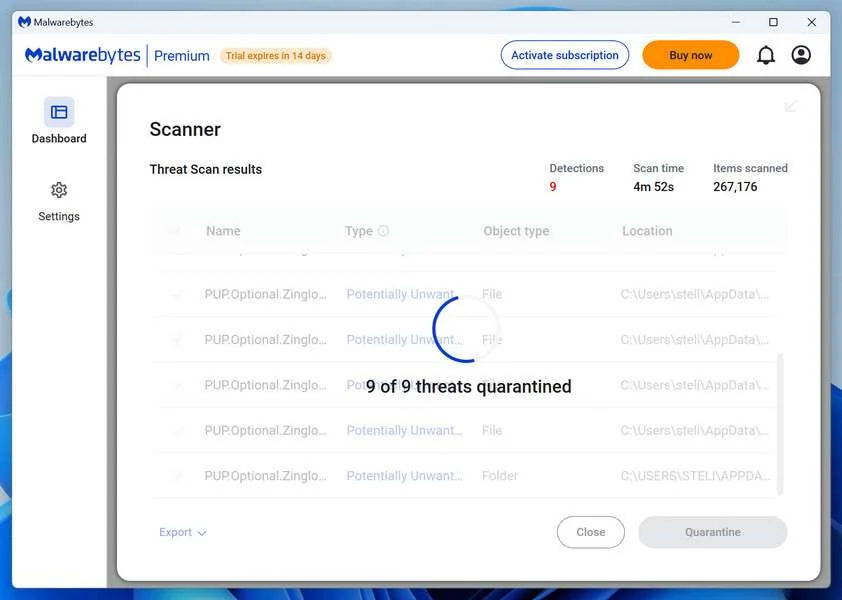
Malwarebytes will now remove the malicious files and registry entries and move them safely into quarantine.
-
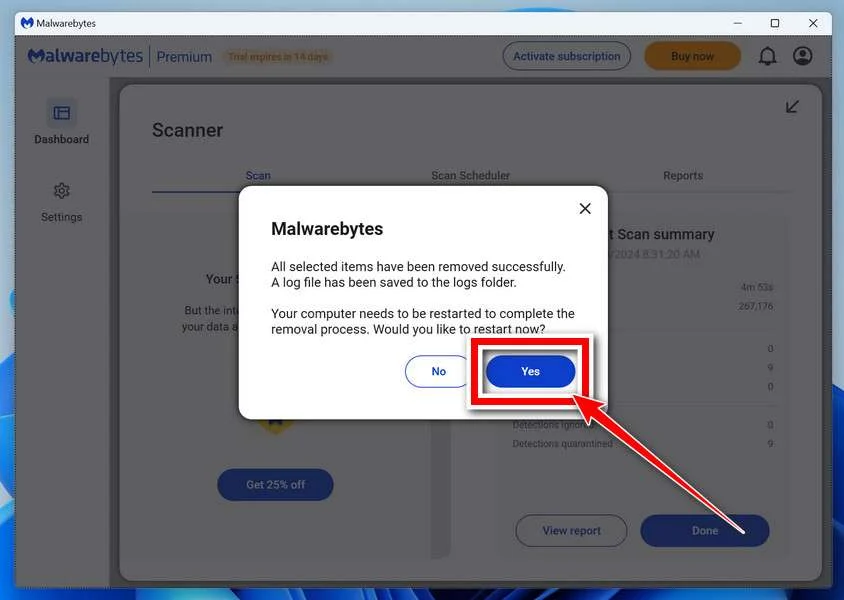
Restart Your Computer
Some threats can only be fully removed after a reboot. If Malwarebytes asks you to restart, click Yes. Once you’re logged back in, Malwarebytes has finished removing the threats it found.
STEP 4: Use HitmanPro to scan your computer for badware
In this next step, we will scan the computer with HitmanPro to check for any other malicious programs that may be installed on your device.
HitmanPro is a second-opinion scanner — it’s designed to catch what your main antivirus might have missed. Instead of relying on a single detection engine, it checks the behavior of files in the locations where malware usually hides. Anything suspicious is checked online, where it’s analyzed by several antivirus engines in HitmanPro’s Scan Cloud.
Good news: scanning is completely free, with no limits. You only need a license when it’s time to remove what was found — and even then, you can activate a free one-time 30-day trial to remove what it finds at no cost. The trial works once per computer. After that, removal needs a paid license, and the purchase screen shows the current price.
-
Download HitmanPro
Click the button below to download HitmanPro. Remember — the scan is free, so you have nothing to lose by checking your PC.
Download HitmanProFree scan. Removing threats needs the free 30-day trial. Opens the official HitmanPro page in a new tab. HitmanProSecond-opinion malware scanner from Sophos
-
Install HitmanPro
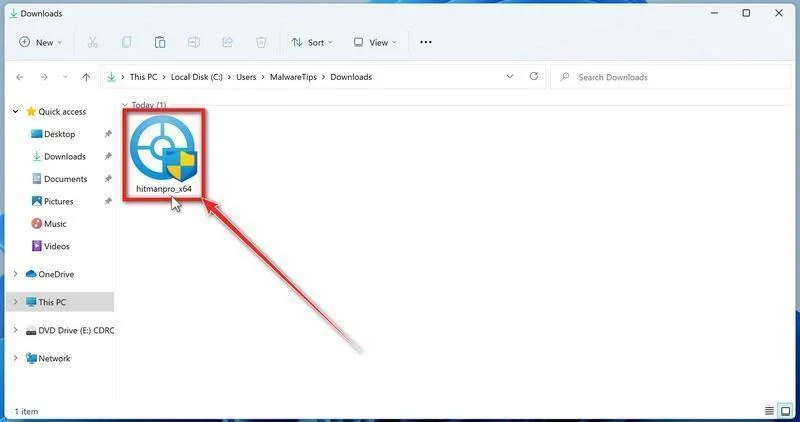
When the download finishes, open your Downloads folder and double-click the file “hitmanpro_x64.exe”. (On 32-bit Windows 10, the file is named “hitmanpro.exe”.)
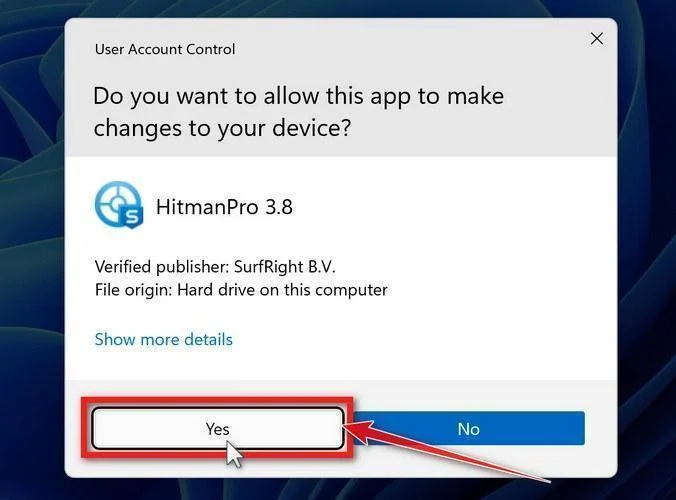
If a User Account Control pop-up asks whether HitmanPro can make changes to your device, click “Yes” to continue.
-
Follow the On-Screen Prompts
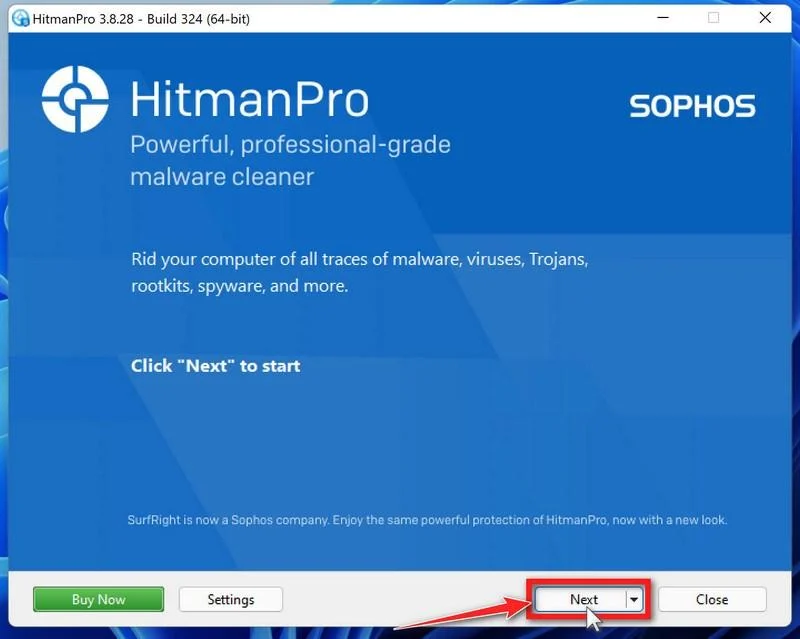
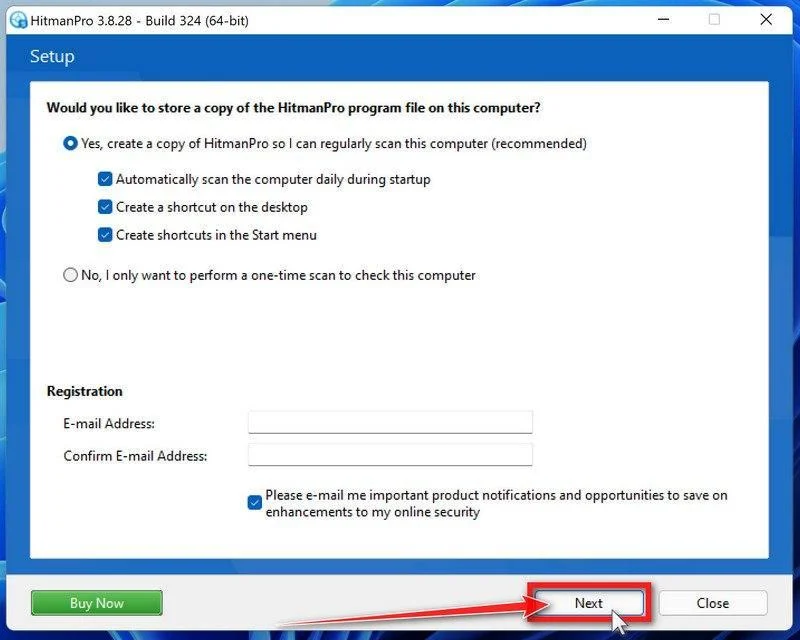
On the HitmanPro start screen, click “Next” to begin the system scan. No lengthy setup required — it goes straight to work.
-
Wait for the Scan to Finish
HitmanPro will now check your computer for malicious programs. This usually takes just a few minutes thanks to its cloud-based scanning.
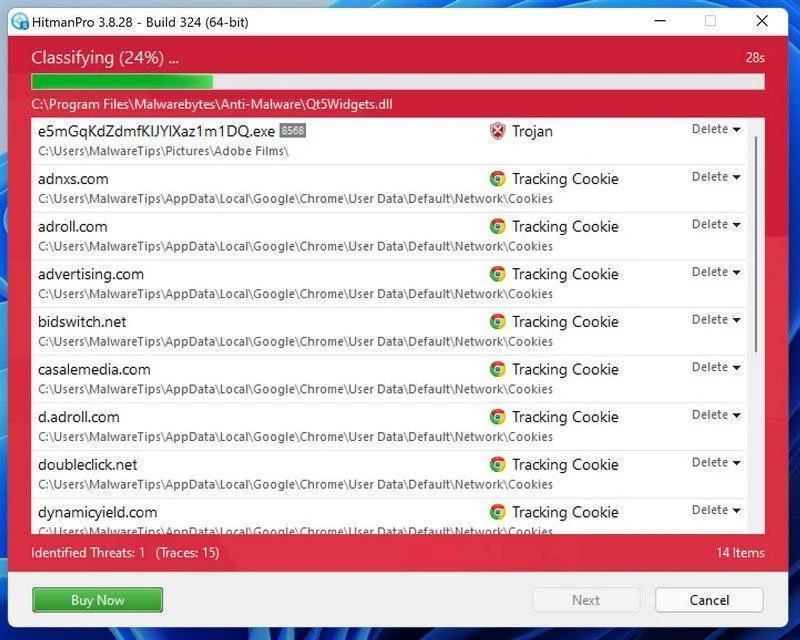
-
Review the Results and Click “Next”
When the scan is done, HitmanPro will show you everything it found. Click “Next” to remove the detected threats.
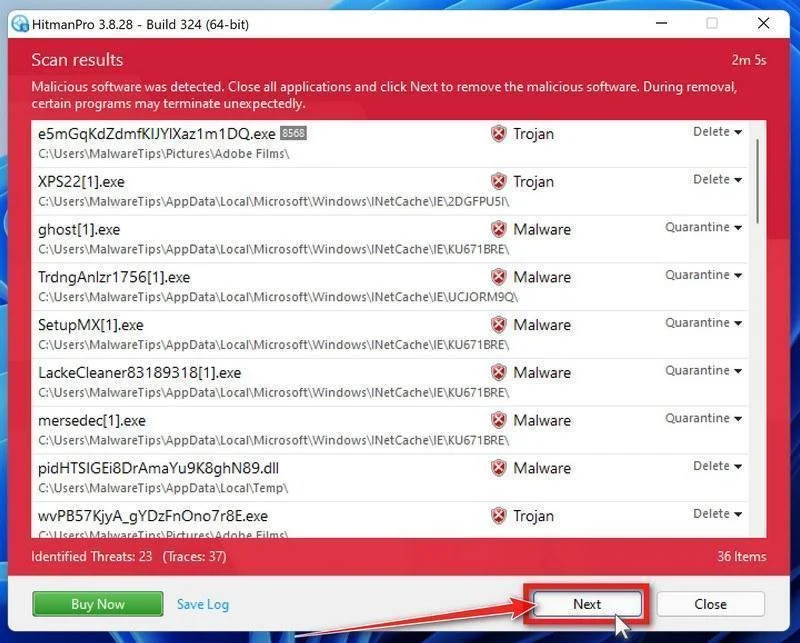
-
Click “Activate Free License”
To remove the malicious files, click the “Activate free license” button. This starts your free 30-day trial — no payment details needed — and unlocks the full cleanup.
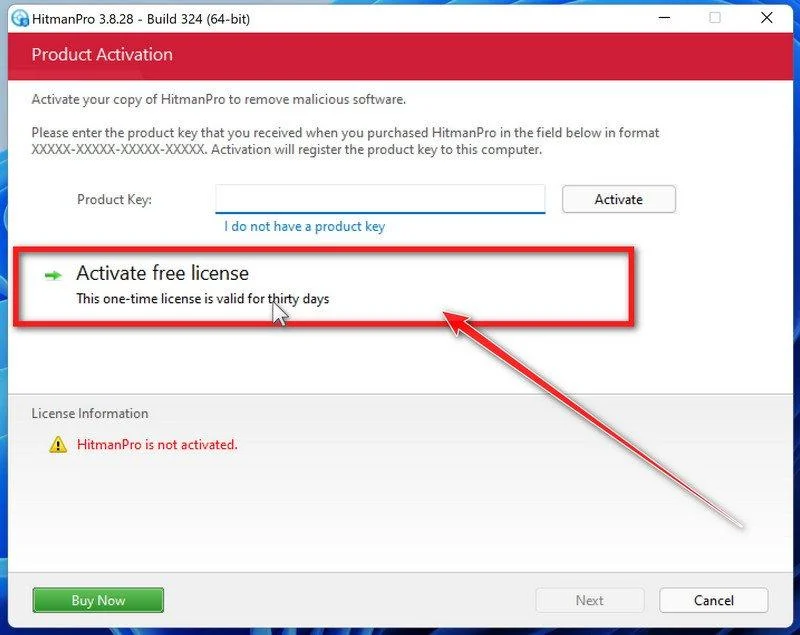
When the removal is complete, HitmanPro will show a summary of everything it cleaned. Click Next, then click Reboot if prompted. If there’s no reboot prompt, click Close. Then check whether the problems you noticed have stopped. If they come back, save the HitmanPro log and ask for help in our forum.
STEP 5: Use AdwCleaner to remove adware and malicious browser policies
In this final step, we will use AdwCleaner to remove the malicious browser policies that were set by browser hijackers on your computer and delete malicious browser extensions.
AdwCleaner is a free on-demand scanner that specializes in adware, browser hijackers, and unwanted toolbars — the exact threats that mainstream antivirus programs often miss. It also includes tools that repair the damage malware leaves behind, like hijacked browser settings and malicious policies. It’s a quick scan that’s well worth running.
-
Download AdwCleaner
Click the button below to download AdwCleaner — it’s free, portable, and requires no installation.
Download AdwCleanerOpens the official download page in a new tab. Malwarebytes AdwCleanerRemoves adware and unwanted programs at no cost
-
Run AdwCleaner
Open your Downloads folder and double-click the file named “adwcleaner.exe“. There’s no installation — the program starts right away.
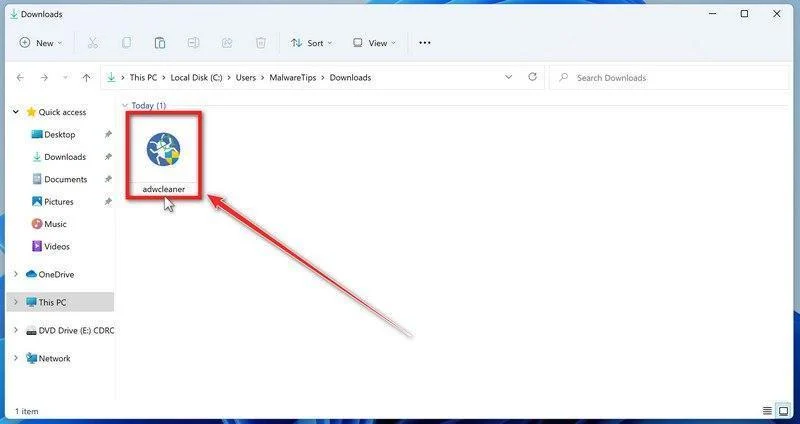
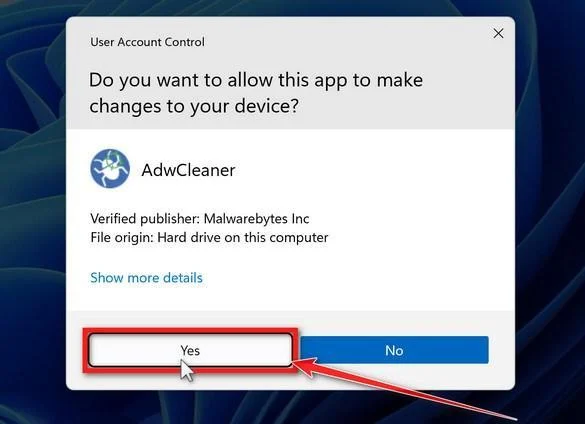
If Windows asks whether you want to allow AdwCleaner to run, click “Yes“. When the license agreement appears, click I agree to continue.
-
Leave “Reset Chrome policies” off unless you need it
AdwCleaner can reset Chrome policies, the settings that malware sometimes uses to lock your browser so you can’t change it back. This option removes every Chrome policy, including legitimate ones set by an employer, a school, or parental-control software, so leave it off for a normal scan.
AdwCleaner applies this option only if you run Basic Repair at the end of the cleanup. Malwarebytes advises running Basic Repair only when a support agent asks you to, and it also runs every other repair action that is turned on in the same list. If this is your own personal PC and chrome://policy in Chrome lists policies you didn’t set, ask for help in our forum instead. On a work or school computer, ask the IT administrator.
-
Start the Scan
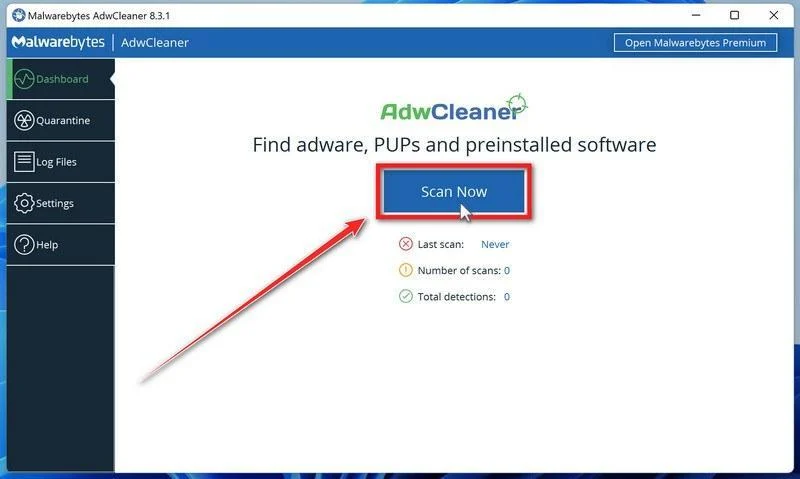
Click “Dashboard” on the left side of the window, then click the “Scan Now” button.
-
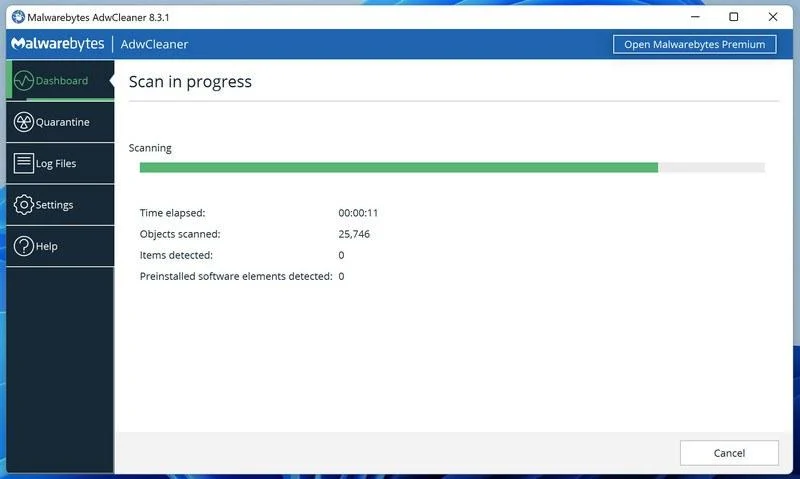
Wait for the Scan to Finish
AdwCleaner will now check your computer for adware and other malware. This usually takes only a few minutes — it’s one of the fastest scanners around.
-
Quarantine the Detected Threats
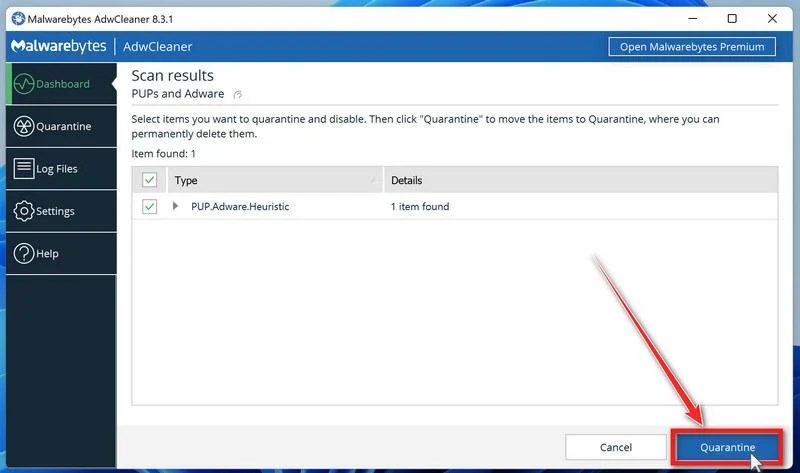
When the scan finishes, AdwCleaner lists everything it found. Review the list and uncheck any program you installed on purpose and want to keep, then click Next. If AdwCleaner also found preinstalled software, it shows that list next. Review it the same way, then click “Quarantine“. Older versions show the Quarantine button on the first list, as in the image below.
-
Click “Continue” to Finish the Cleanup
Save any open work first — AdwCleaner needs to close your open programs before it can clean. When you’re ready, click the “Continue” button.
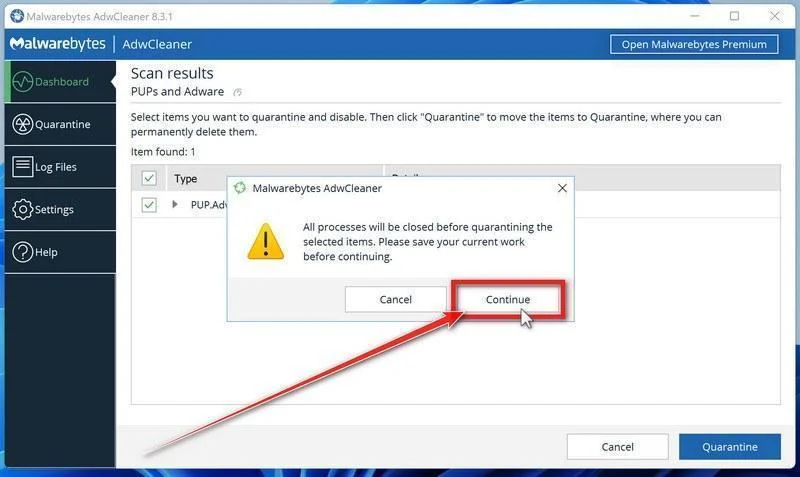
AdwCleaner will now move the selected items to quarantine. If it asks you to restart your PC, allow it. When you’re back in Windows, AdwCleaner may offer a Basic Repair. Click Skip Basic Repair. Malwarebytes recommends running Basic Repair only when a support agent asks you to. Then check whether the problems you noticed have stopped.
When you’ve finished these steps, check whether the problems you noticed have stopped. If they continue, see the options below.
If you are still having problems with your computer after completing these instructions, then please follow one of the steps:
- Run a computer scan with ESET Online Scanner
- Ask for help in our Windows Malware Removal Help & Support forum.
Remove Unwanted Apps and Malware from Mac
- STEP 1: Remove malicious profiles
- STEP 2: Delete malicious apps
- STEP 3: Reset browsers back to default settings
- STEP 4: Run a scan with Malwarebytes for Mac to remove malware
STEP 1: Remove malicious profiles
Profiles are used by IT admins in businesses to control the behavior of their Macs. These profiles can configure a Mac to do many different things, some of which are not otherwise possible.
When it comes to home users, adware and browser hijackers are using the configuration profile to prevent users from removing malicious programs from the computer. This also prevents the user from changing that behavior in the browser’s settings.
In this first step, we will check your computer to see if any configuration profiles are installed. To do this, follow the below steps:
-
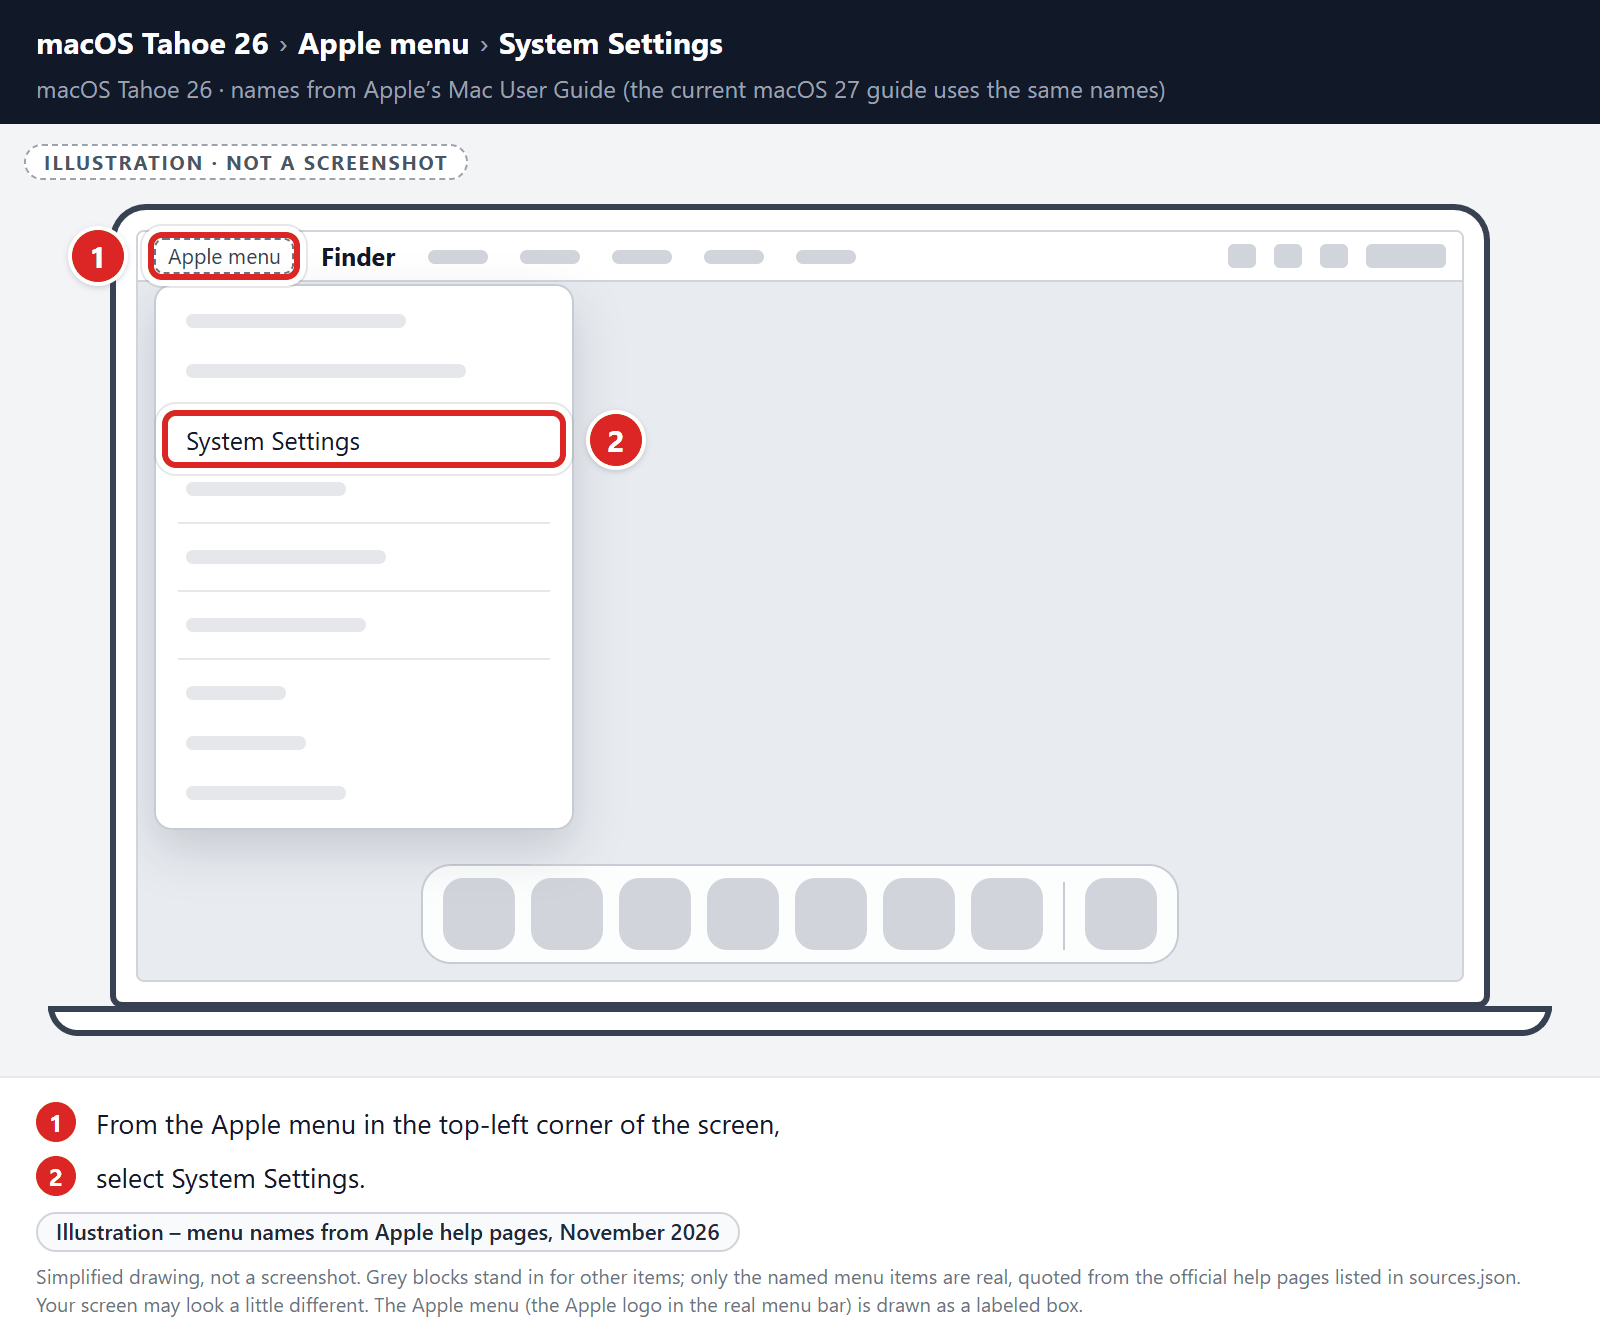
Open “System Settings”
From the Apple menu () in the top-left corner of the screen, select System Settings. (On macOS Monterey and earlier, this is called System Preferences.)
-
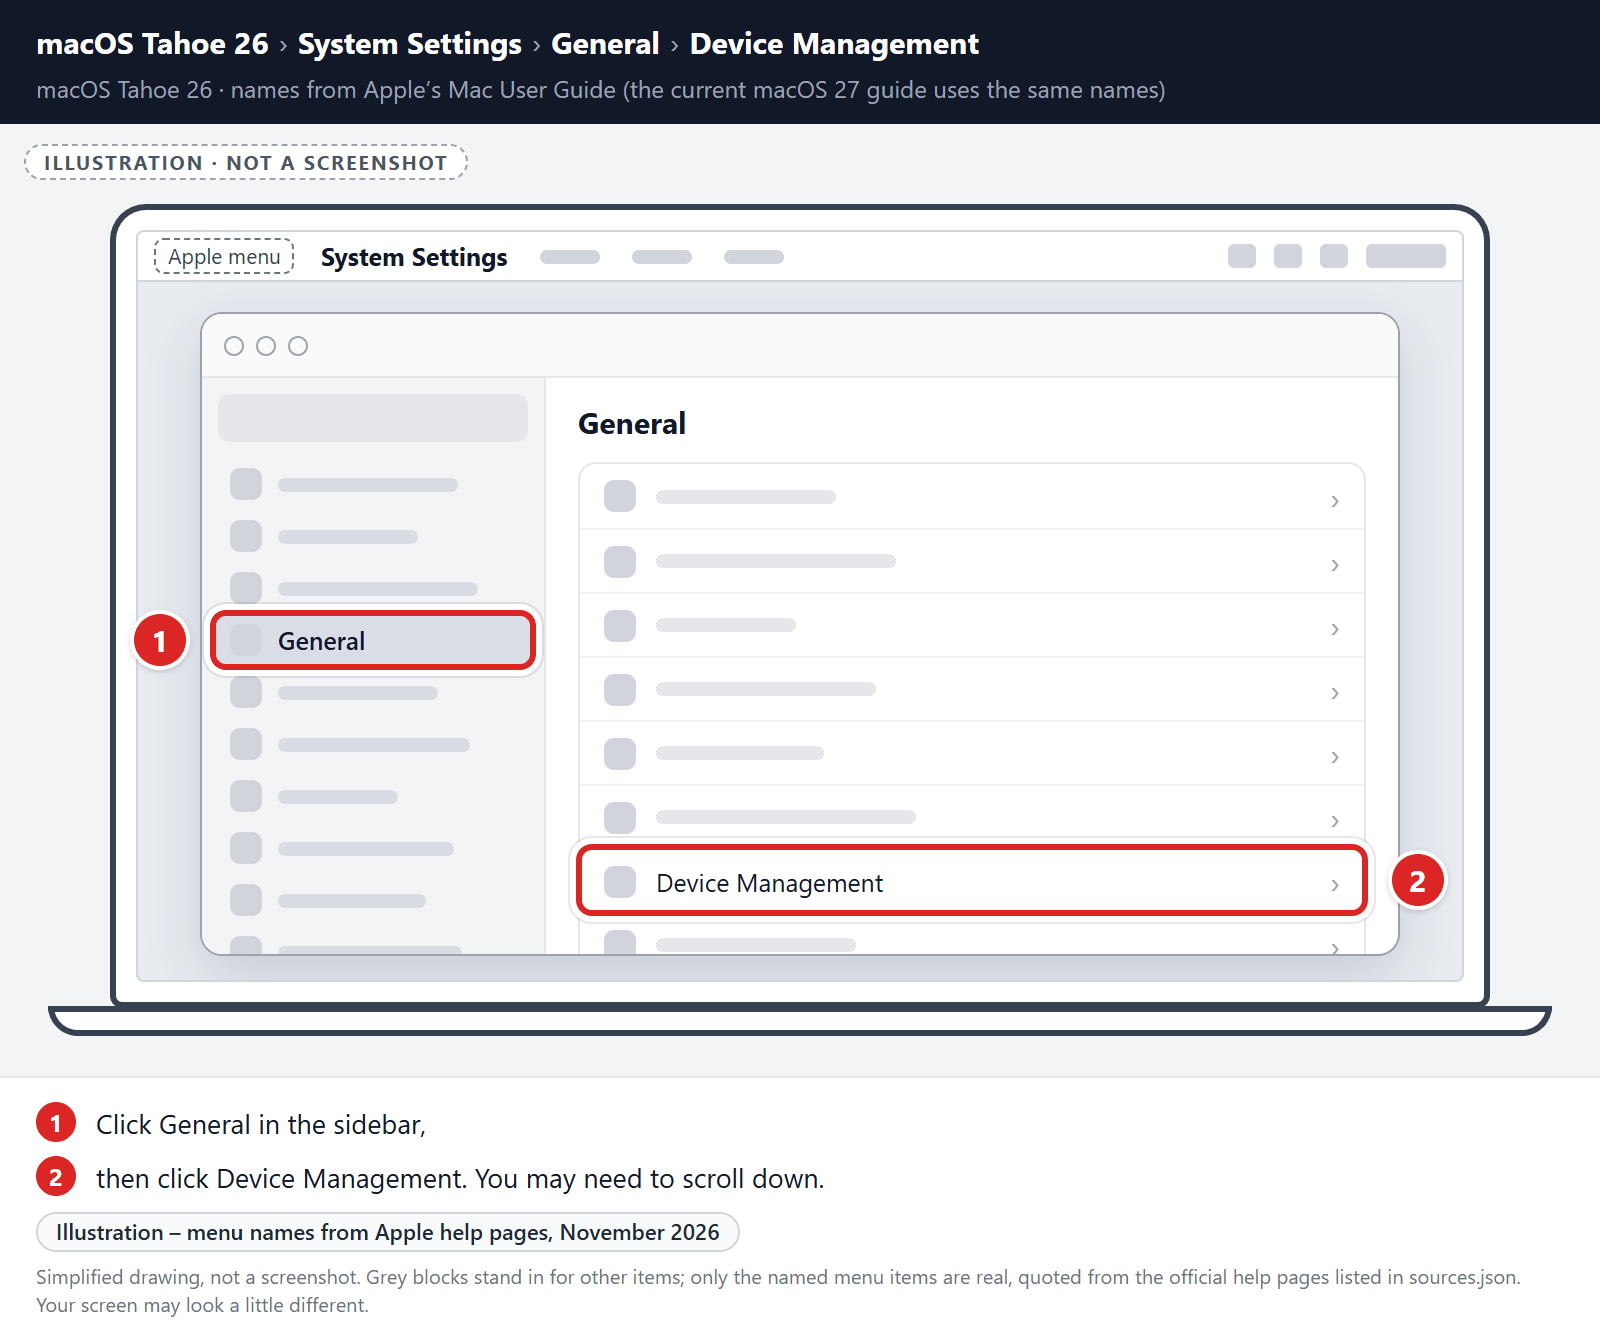
Look for “Profiles”
Where you find configuration profiles depends on your version of macOS:
macOS Sequoia (15) and later: click General in the sidebar, then click Device Management. You may need to scroll down.
macOS Ventura (13) and Sonoma (14): click Privacy & Security in the sidebar, then click Profiles near the bottom.
macOS Monterey (12) and earlier: in System Preferences, click Profiles.
You can also type “Profiles” in the search box.
No profiles listed, or no Profiles section at all? That means no configuration profiles are installed on your Mac, which is completely normal. Skip ahead to the next step of this guide. -
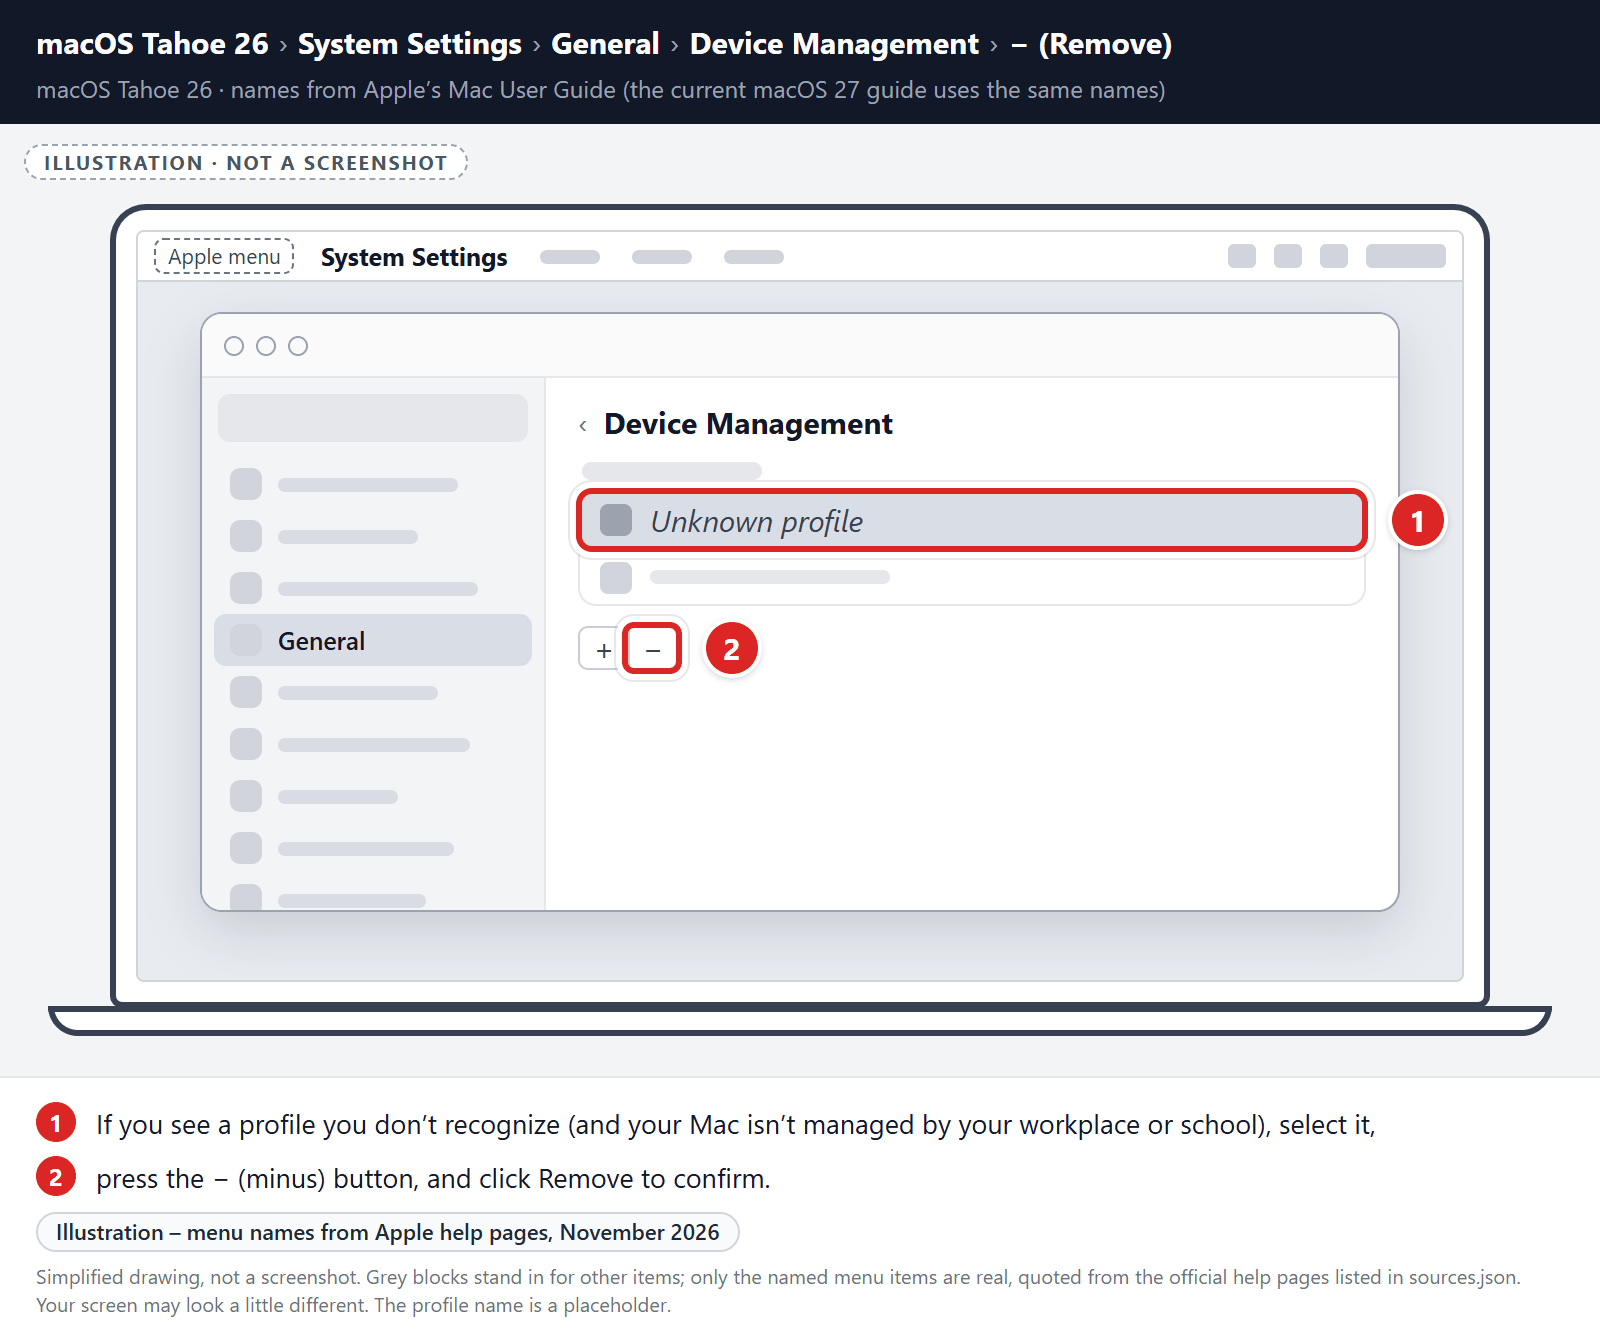
Remove the malicious profiles
Malware uses configuration profiles to lock your browser settings — forcing a fake search engine or homepage on you and preventing you from changing it back. If you see a profile you don’t recognize (and your Mac isn’t managed by your workplace or school), select it, press the − (minus) button, and click Remove to confirm.
STEP 2: Delete malicious apps
In this second step, we will try to identify and remove any malicious apps and files that might be installed on your computer. Sometimes redirects or adware programs can have usable Uninstall entries that can be used to remove these programs.
-
Quit the malicious programs
Check the Apple menu bar in the top-right corner of your screen. If you see an icon you don’t recognize, click it and select Quit. This stops the malware from running so it can’t interfere while we remove it.
-
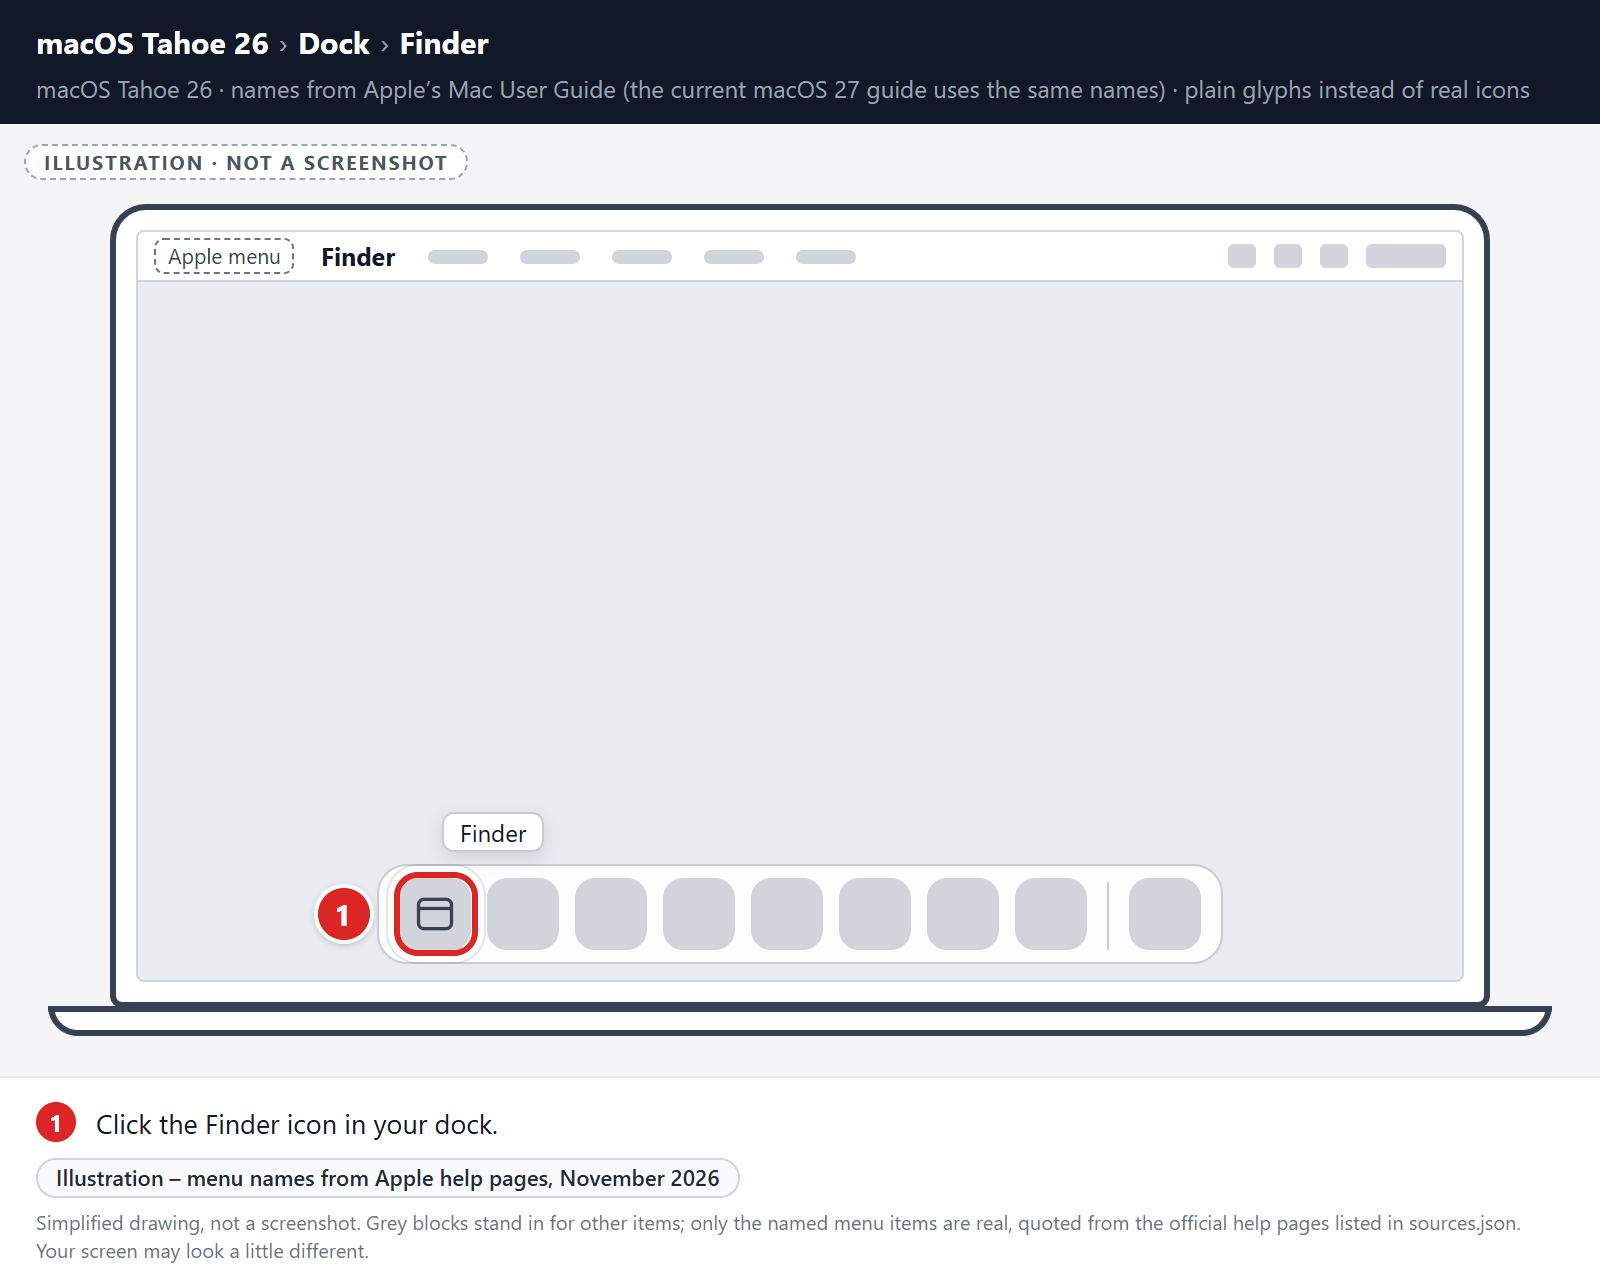
Open “Finder”
Click the Finder icon in your dock.
-
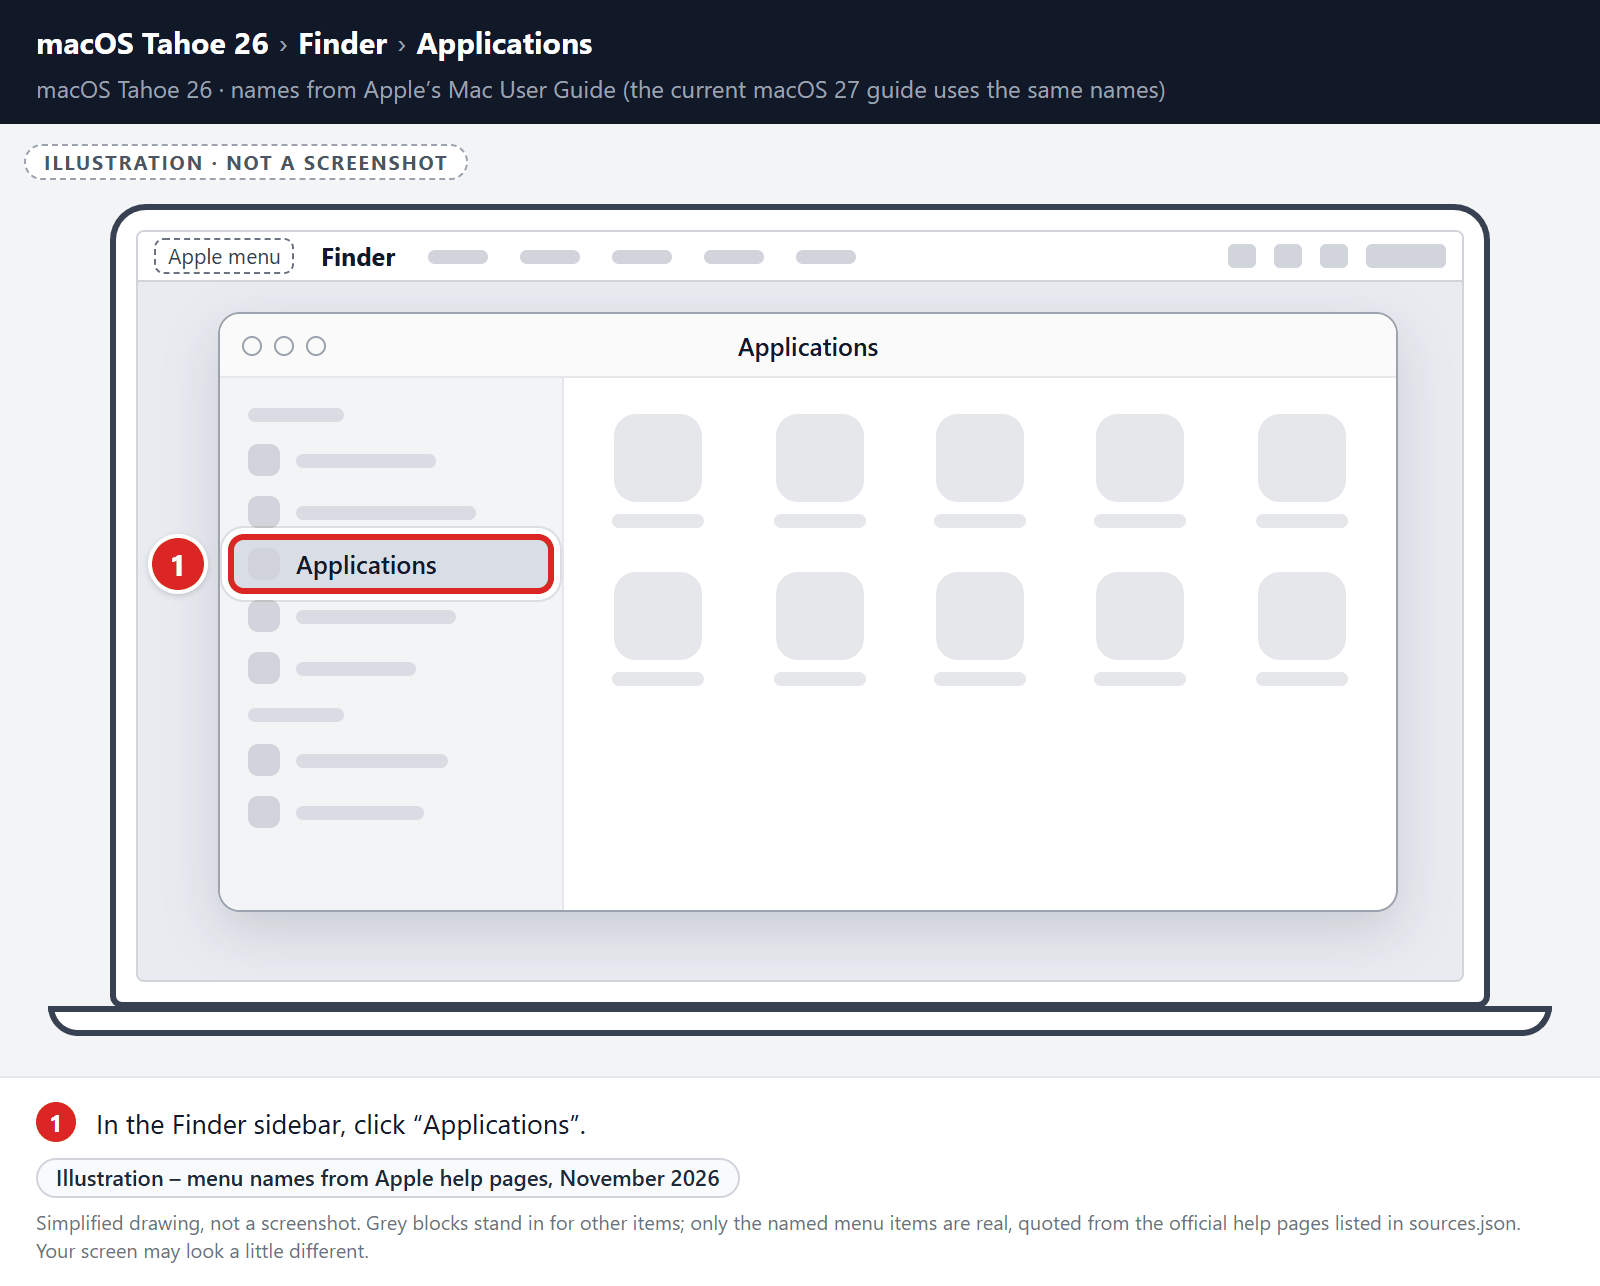
Click on “Applications”
In the Finder sidebar, click “Applications“.
-
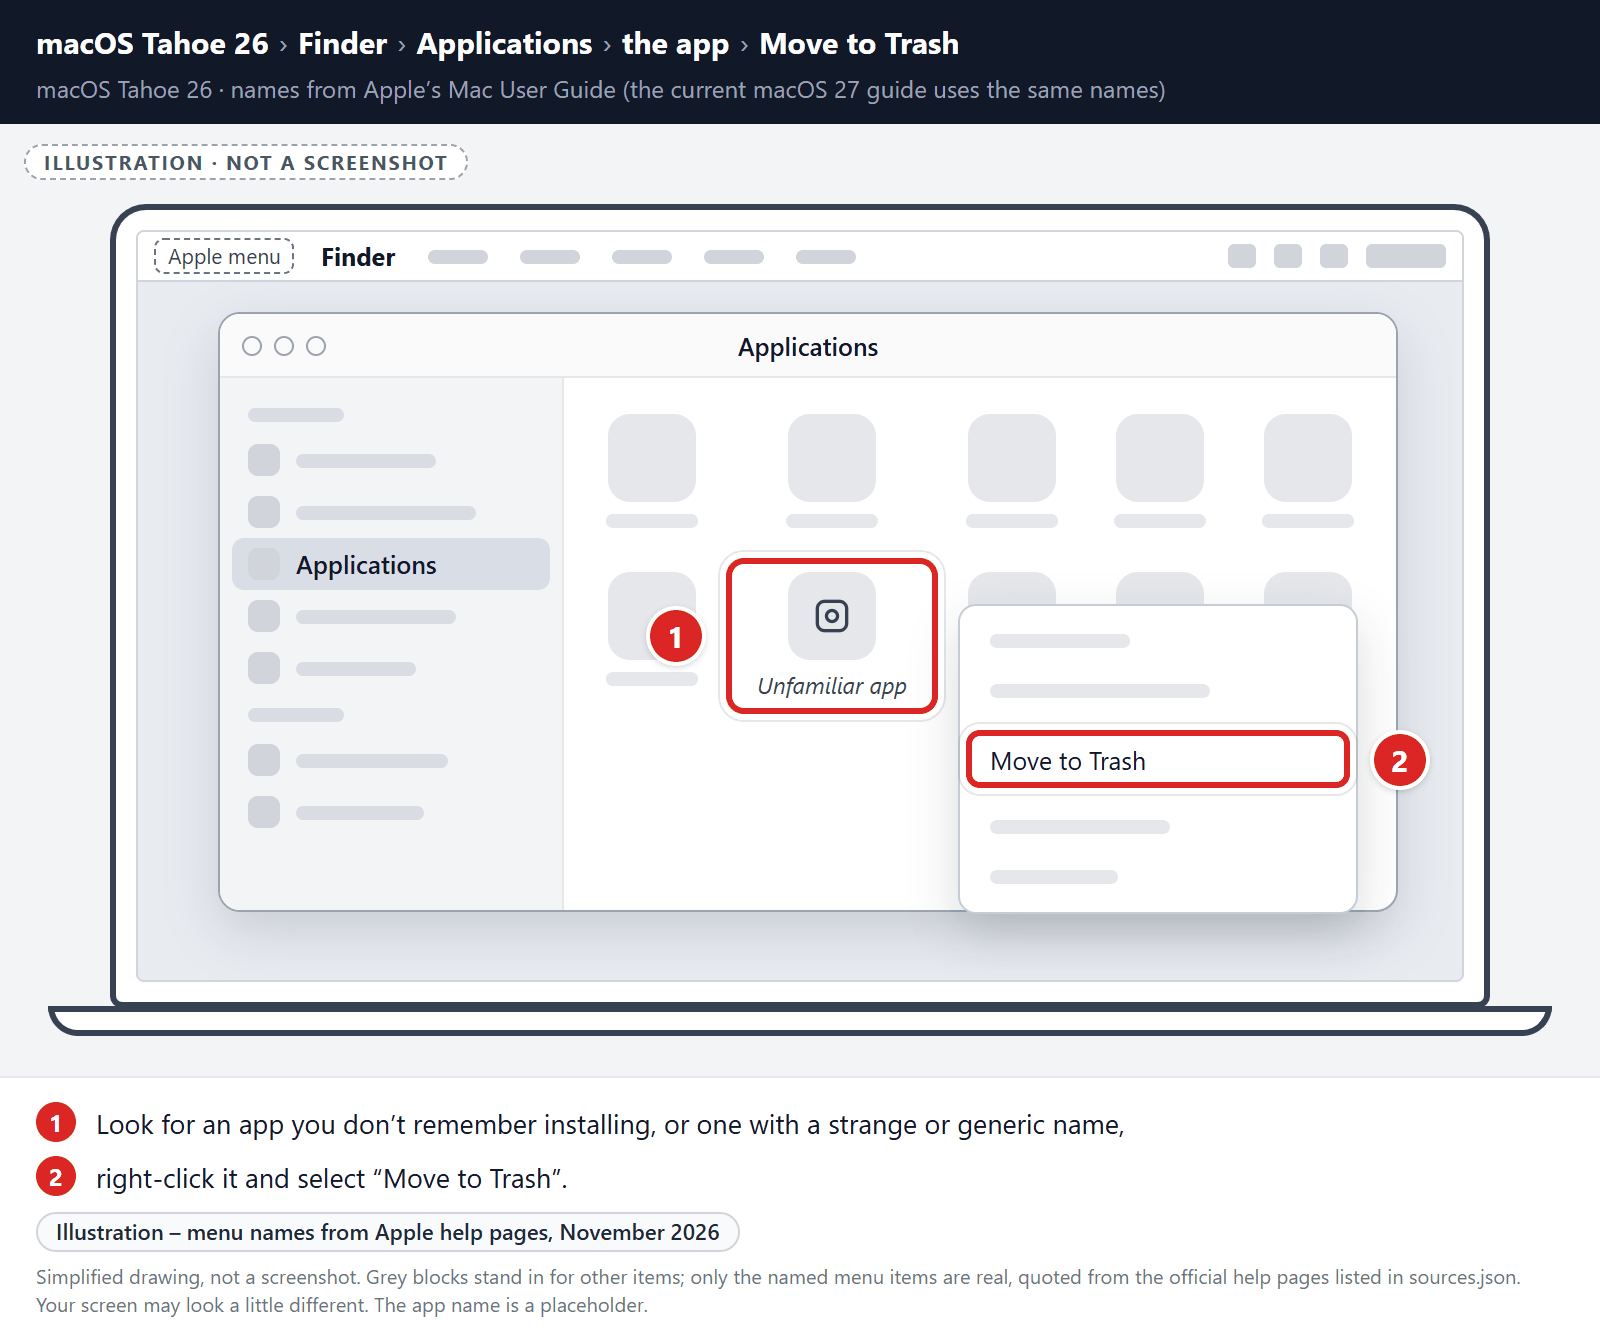
Find and remove the malicious app
Scroll through the list of installed apps and look for anything suspicious — an app you don’t remember installing, or one with a strange or generic name. When you find it, right-click it and select “Move to Trash“.
Some known malicious programs to look for: SearchMine, TakeFresh, TopResults, FeedBack, ApplicationEvents, GeneralOpen, PowerLog, MessengerNow, ImagePrime, GeneralNetSearch, Reading Cursors, GlobalTechSearch, PDFOnline-express, See Scenic Elf, MatchKnowledge, Easy Speedtest, and WebDiscover. The names change constantly, though — so treat any app you can’t account for as suspect.
-
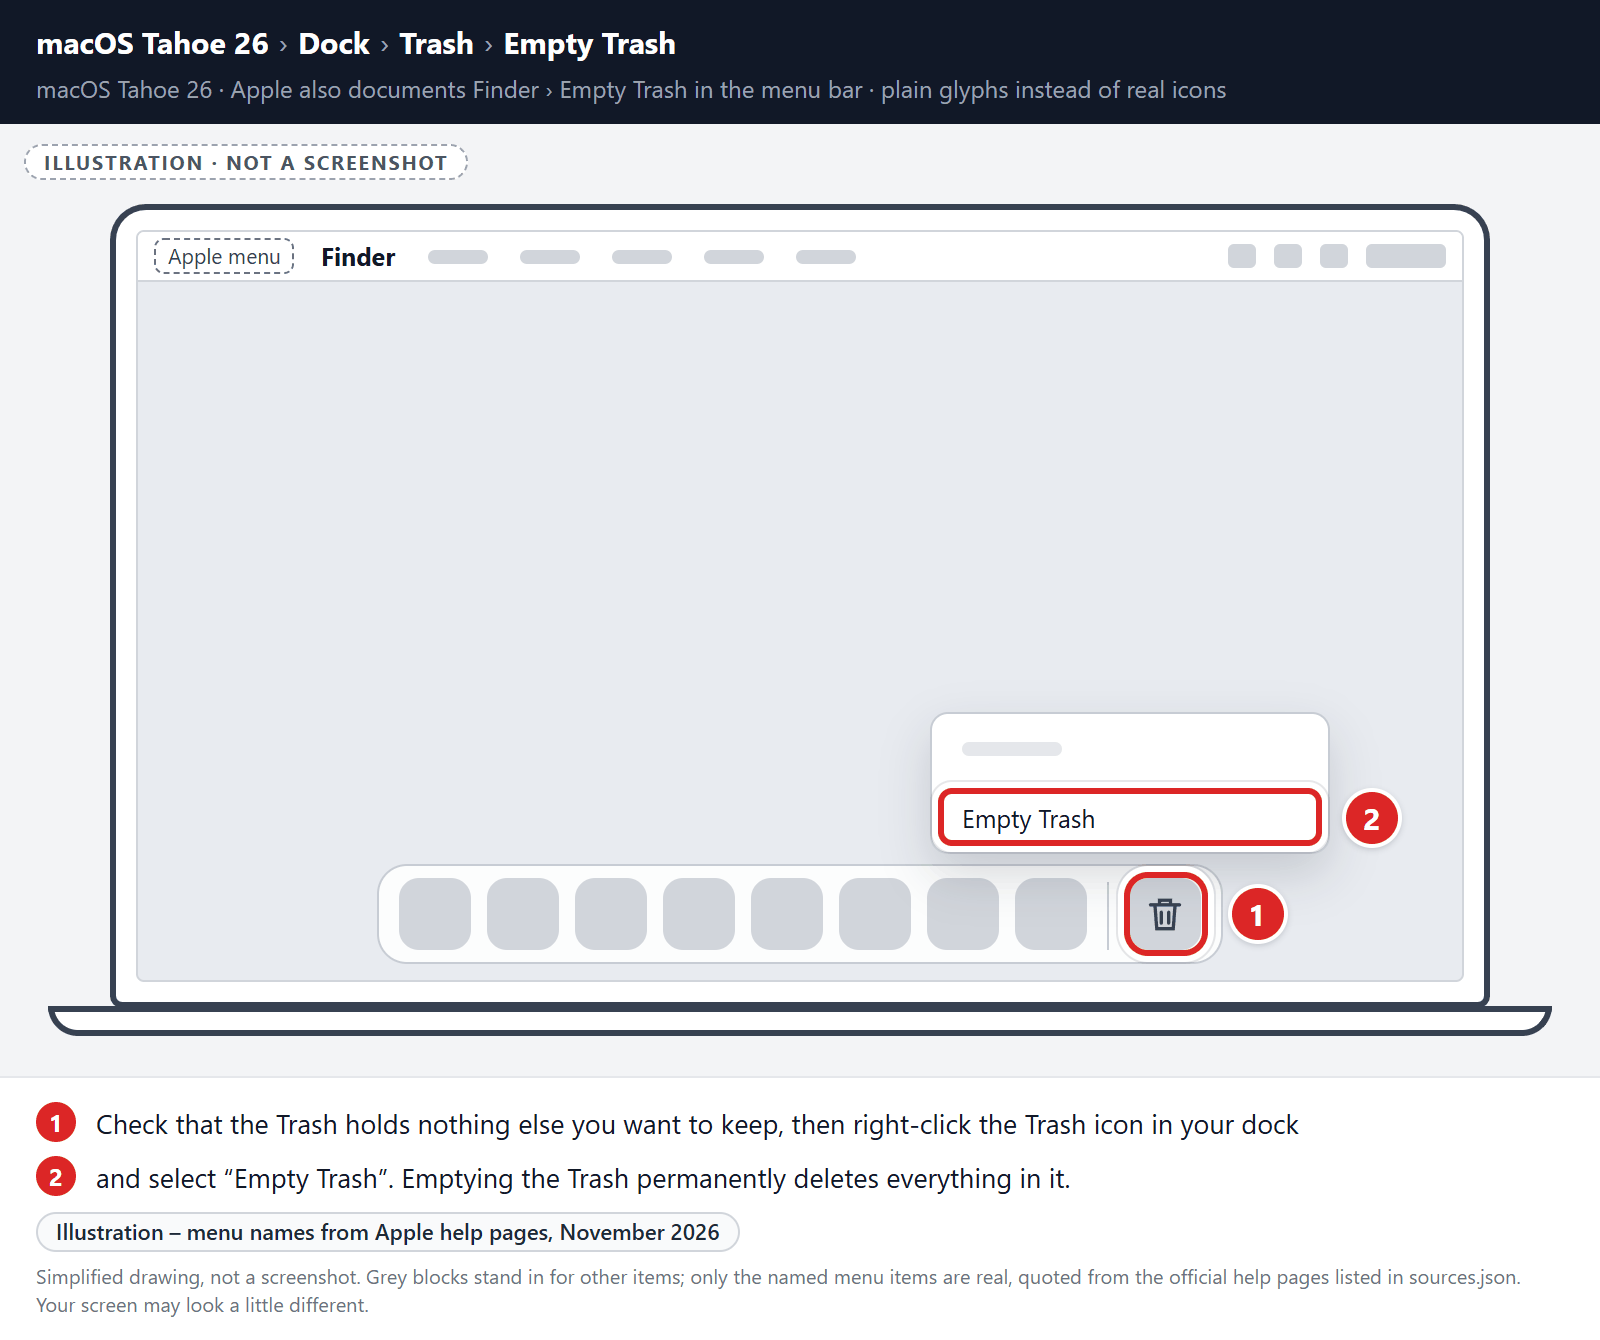
Empty the Trash
Before you empty the Trash, check that it doesn’t hold anything else you want to keep, because emptying it permanently deletes everything in it. Then right-click the Trash icon in your dock and select “Empty Trash“.
Check login items and background apps
Malware often sets itself to start automatically. Open the Apple menu > System Settings, click General, then click Login Items & Extensions (called Login Items in macOS Ventura and Sonoma). Look for apps you don’t recognize in the list of items that open at login and in the list of apps allowed to run in the background. Select an unwanted item and click the Remove (−) button, or turn off its switch.
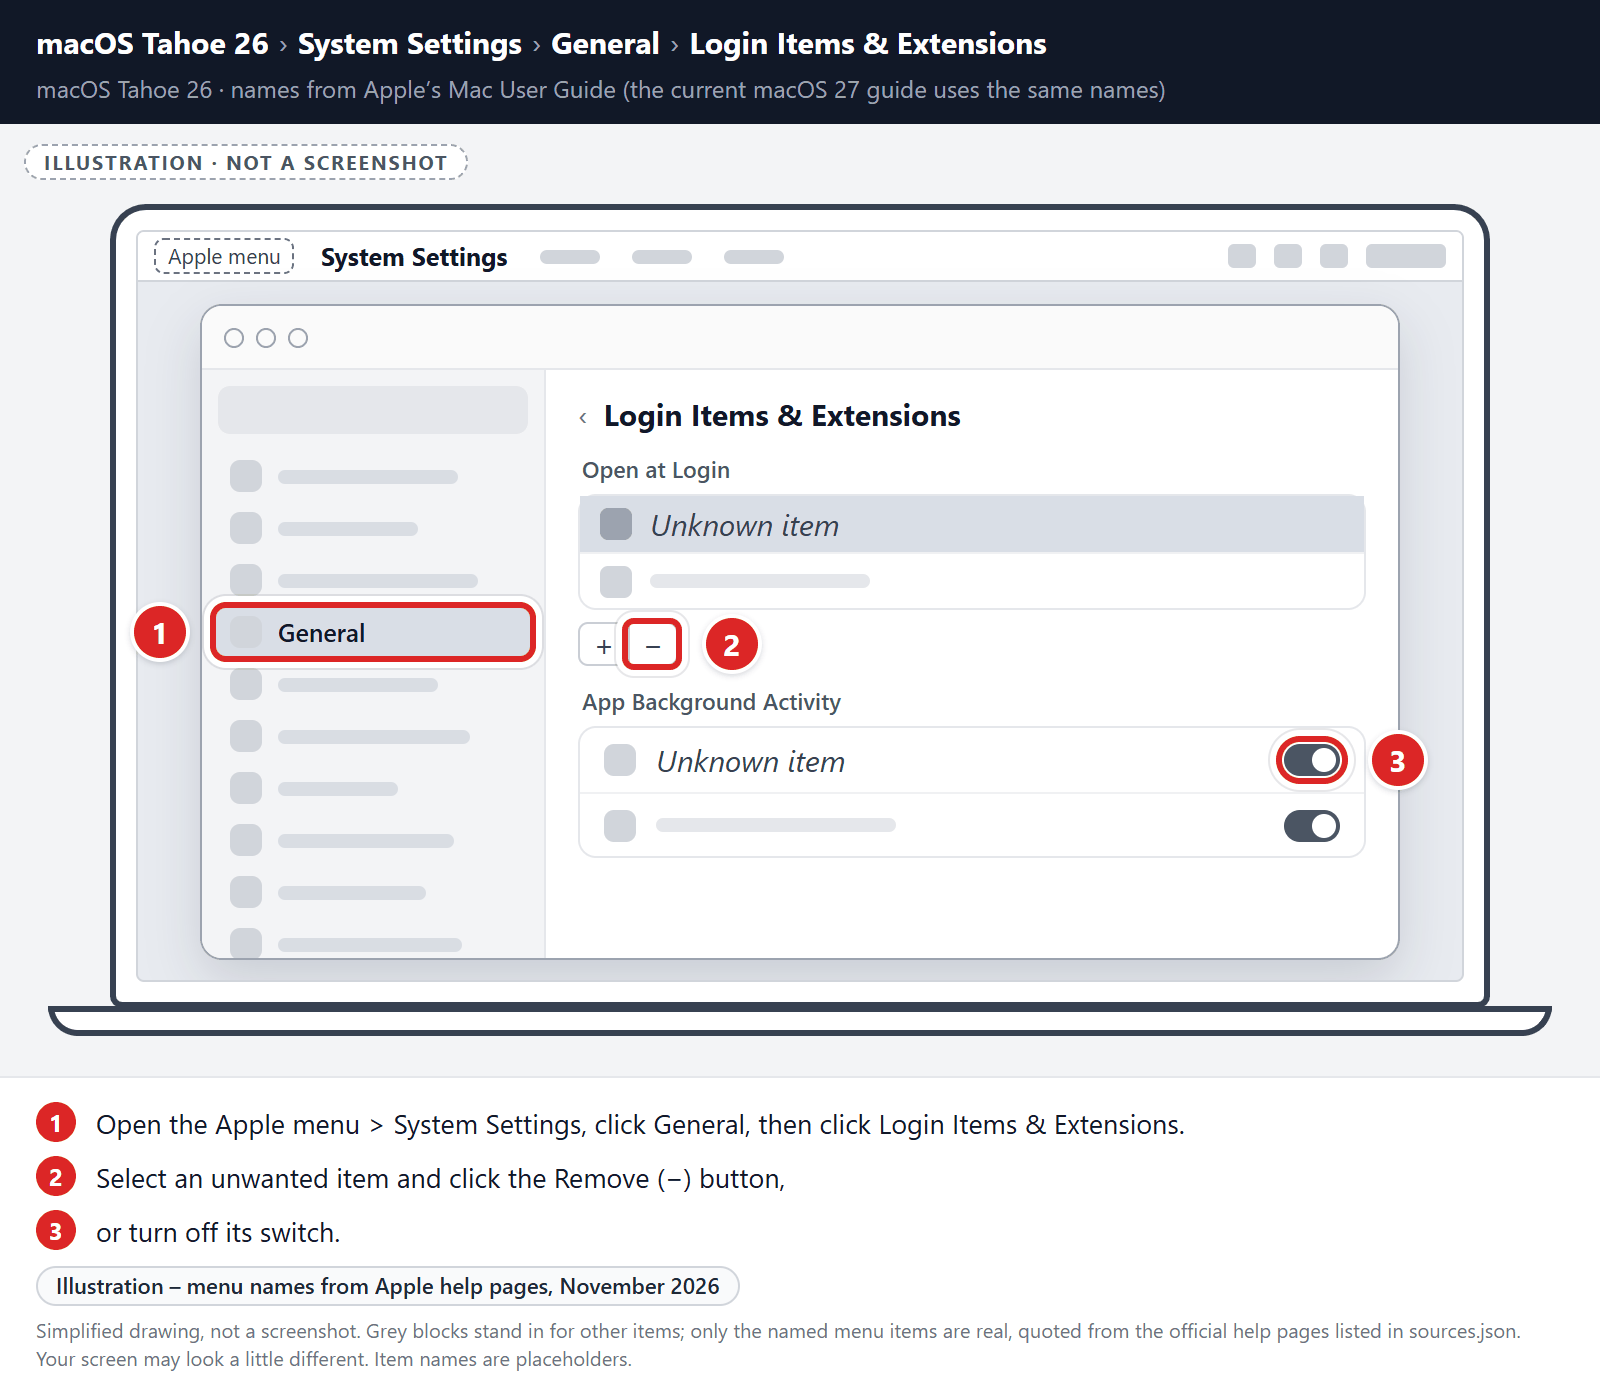
This check doesn’t delete any files. Note the names you find, because they help you spot related files in the next step.
Find and remove the malicious files
Malware on Mac uses launch agents and launch daemons — small files that automatically restart the malware every time you boot your Mac. We’ll check the four folders where they hide:
- Click the desktop to make sure you’re in Finder, then open the “Go” menu and click “Go to Folder“.
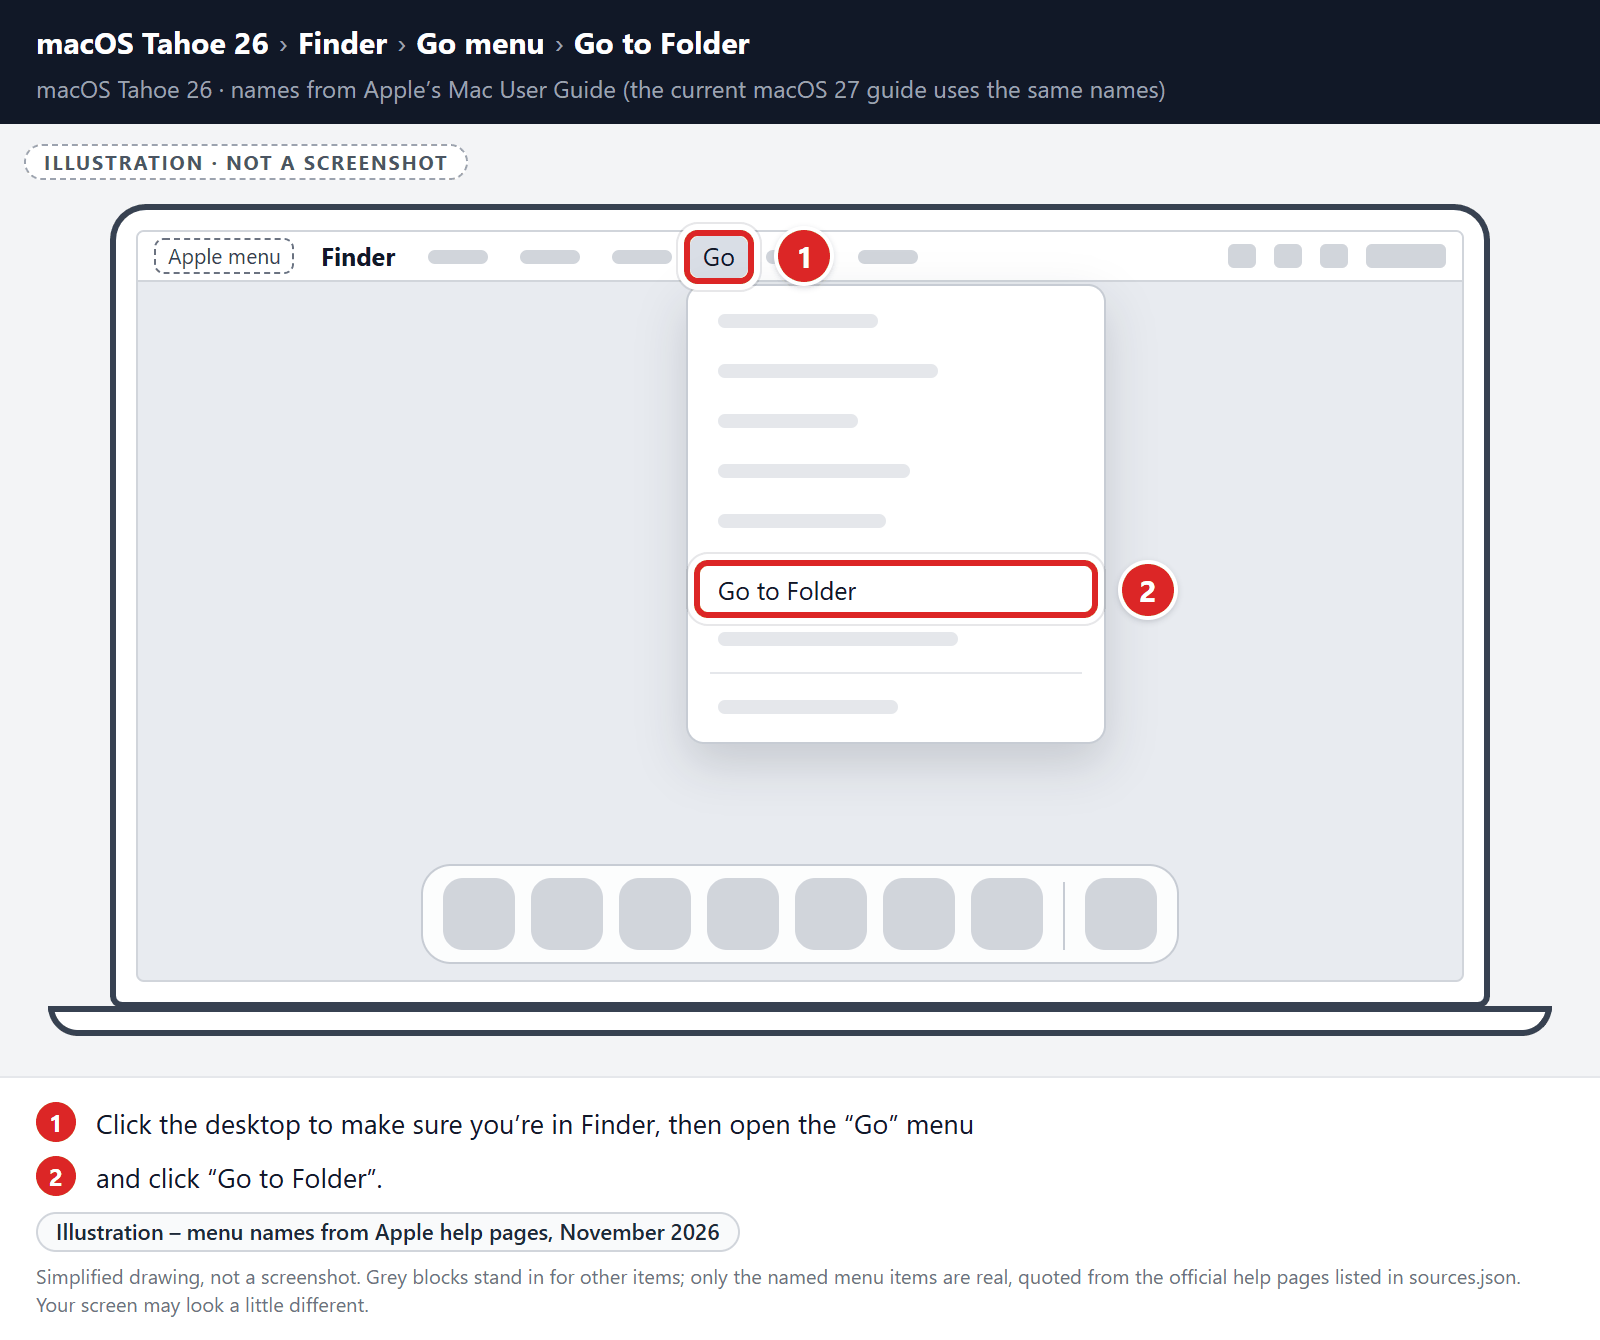
- Copy and paste each of the paths below into the window, one at a time, then double-click the matching folder that appears:
- /Library/LaunchAgents
- ~/Library/LaunchAgents
- /Library/Application Support
- /Library/LaunchDaemons
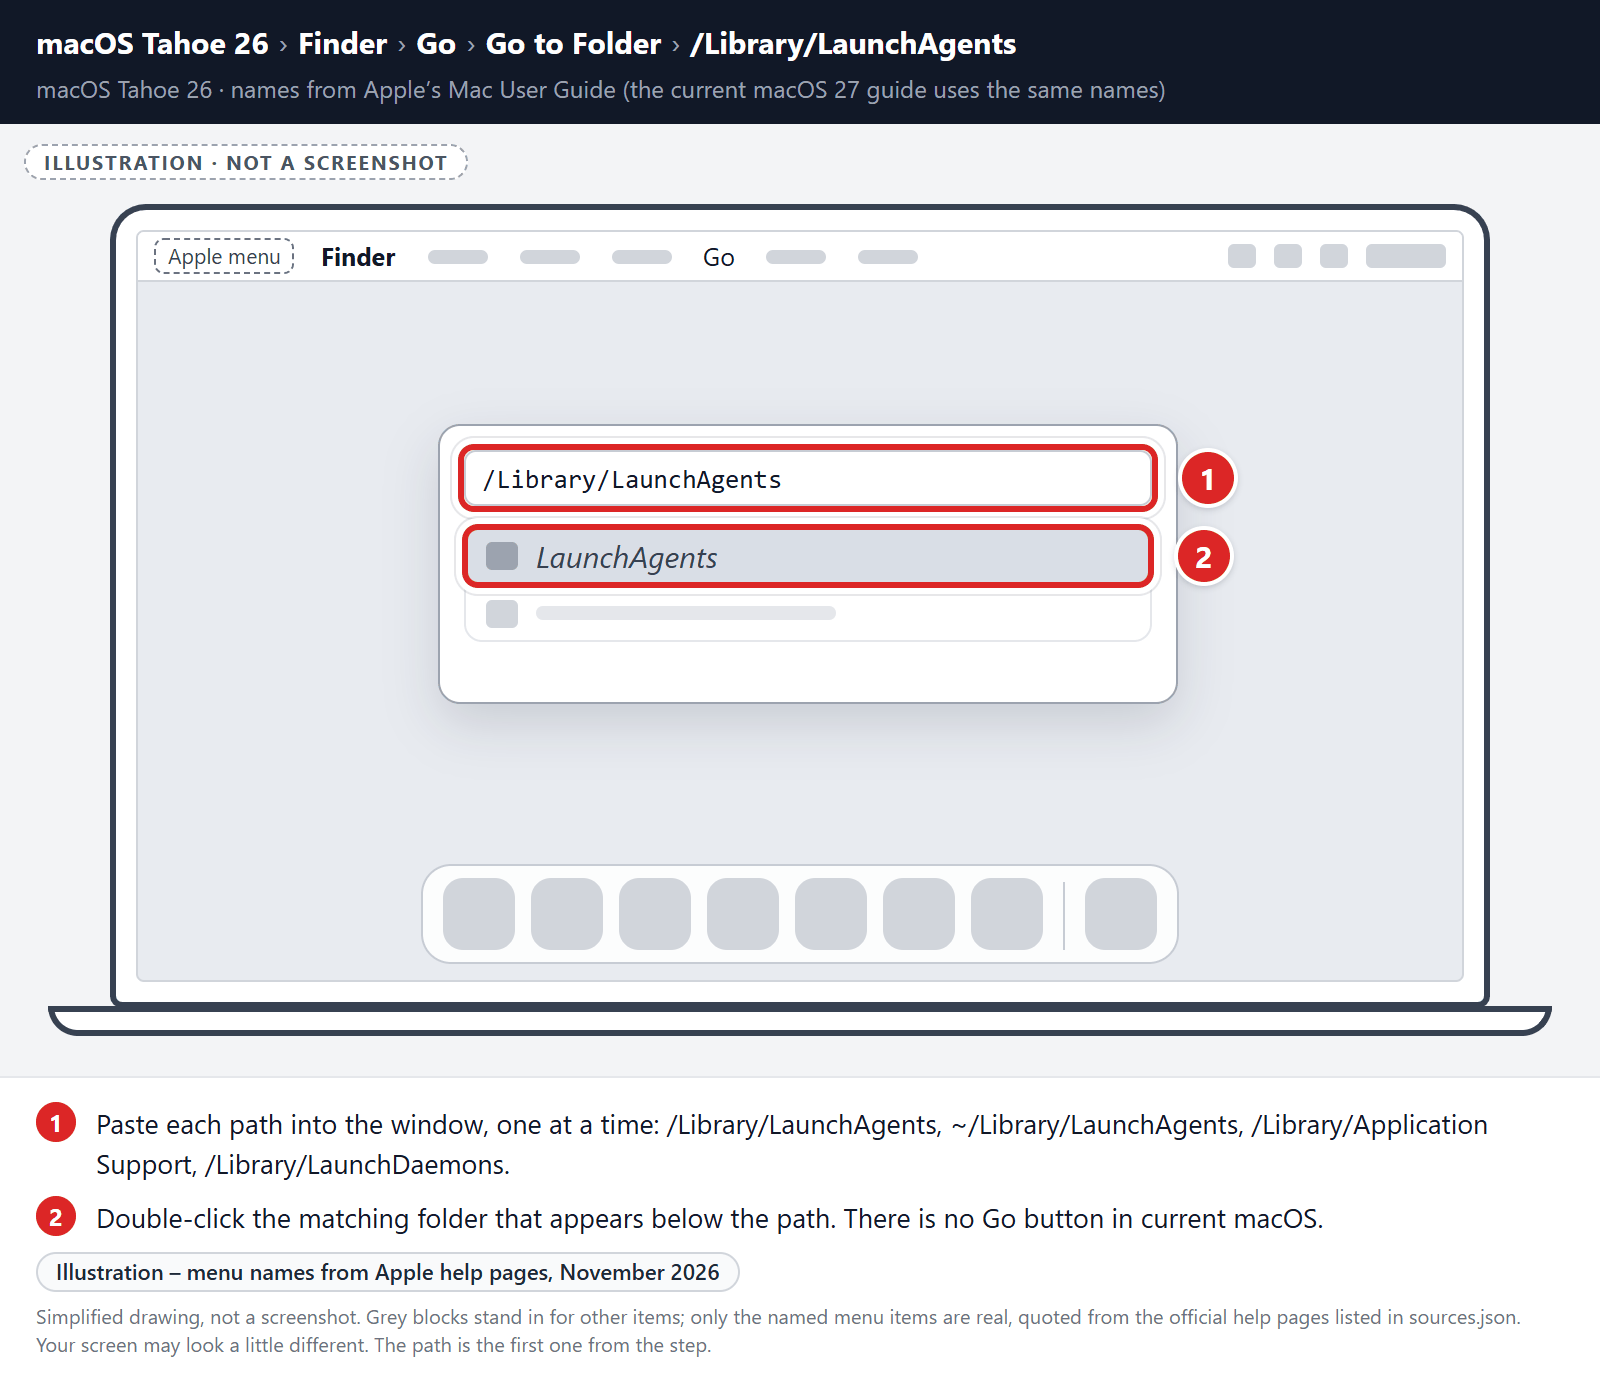
- In each folder, look for suspicious .plist files — typically named after the malware or with odd, random-looking names. Examples seen in past infections include “installmac.AppRemoval.plist”, “myppes.download.plist”, “mykotlerino.ltvbit.plist”, and “com.myppes.net-preferences.plist”. A name alone is not proof. For example, “com.adobe.fpsaud.plist” belongs to Adobe’s own Flash Player updater. When you find a malicious file, move it to the Trash — then empty the Trash again when you’re done.
Be careful: these folders also contain files belonging to legitimate apps — especially /Library/Application Support, where programs like Adobe, Google, and Microsoft store their data. Only delete files you’re confident are malicious. If you’re unsure about a file, search its exact name online first, or leave it in place and continue with the Malwarebytes scan later in this guide.
- Click the desktop to make sure you’re in Finder, then open the “Go” menu and click “Go to Folder“.
STEP 3: Reset browsers back to default settings
In this third step, we will remove spam push notifications and malicious extensions, and change to default any settings that might have been changed by malware.
For each browser that you have installed on your computer, please click on the tab below and follow the displayed steps to reset that browser.
Remove malicious extensions and settings from Safari
To remove malware from Safari we will check if there are any malicious extensions installed on your browser and what settings have been changed by this malicious program.
-
Go to Safari’s “Settings”.
On the menu bar, click the “Safari” menu and select “Settings”. In older versions of Safari, this menu item is called “Preferences”.
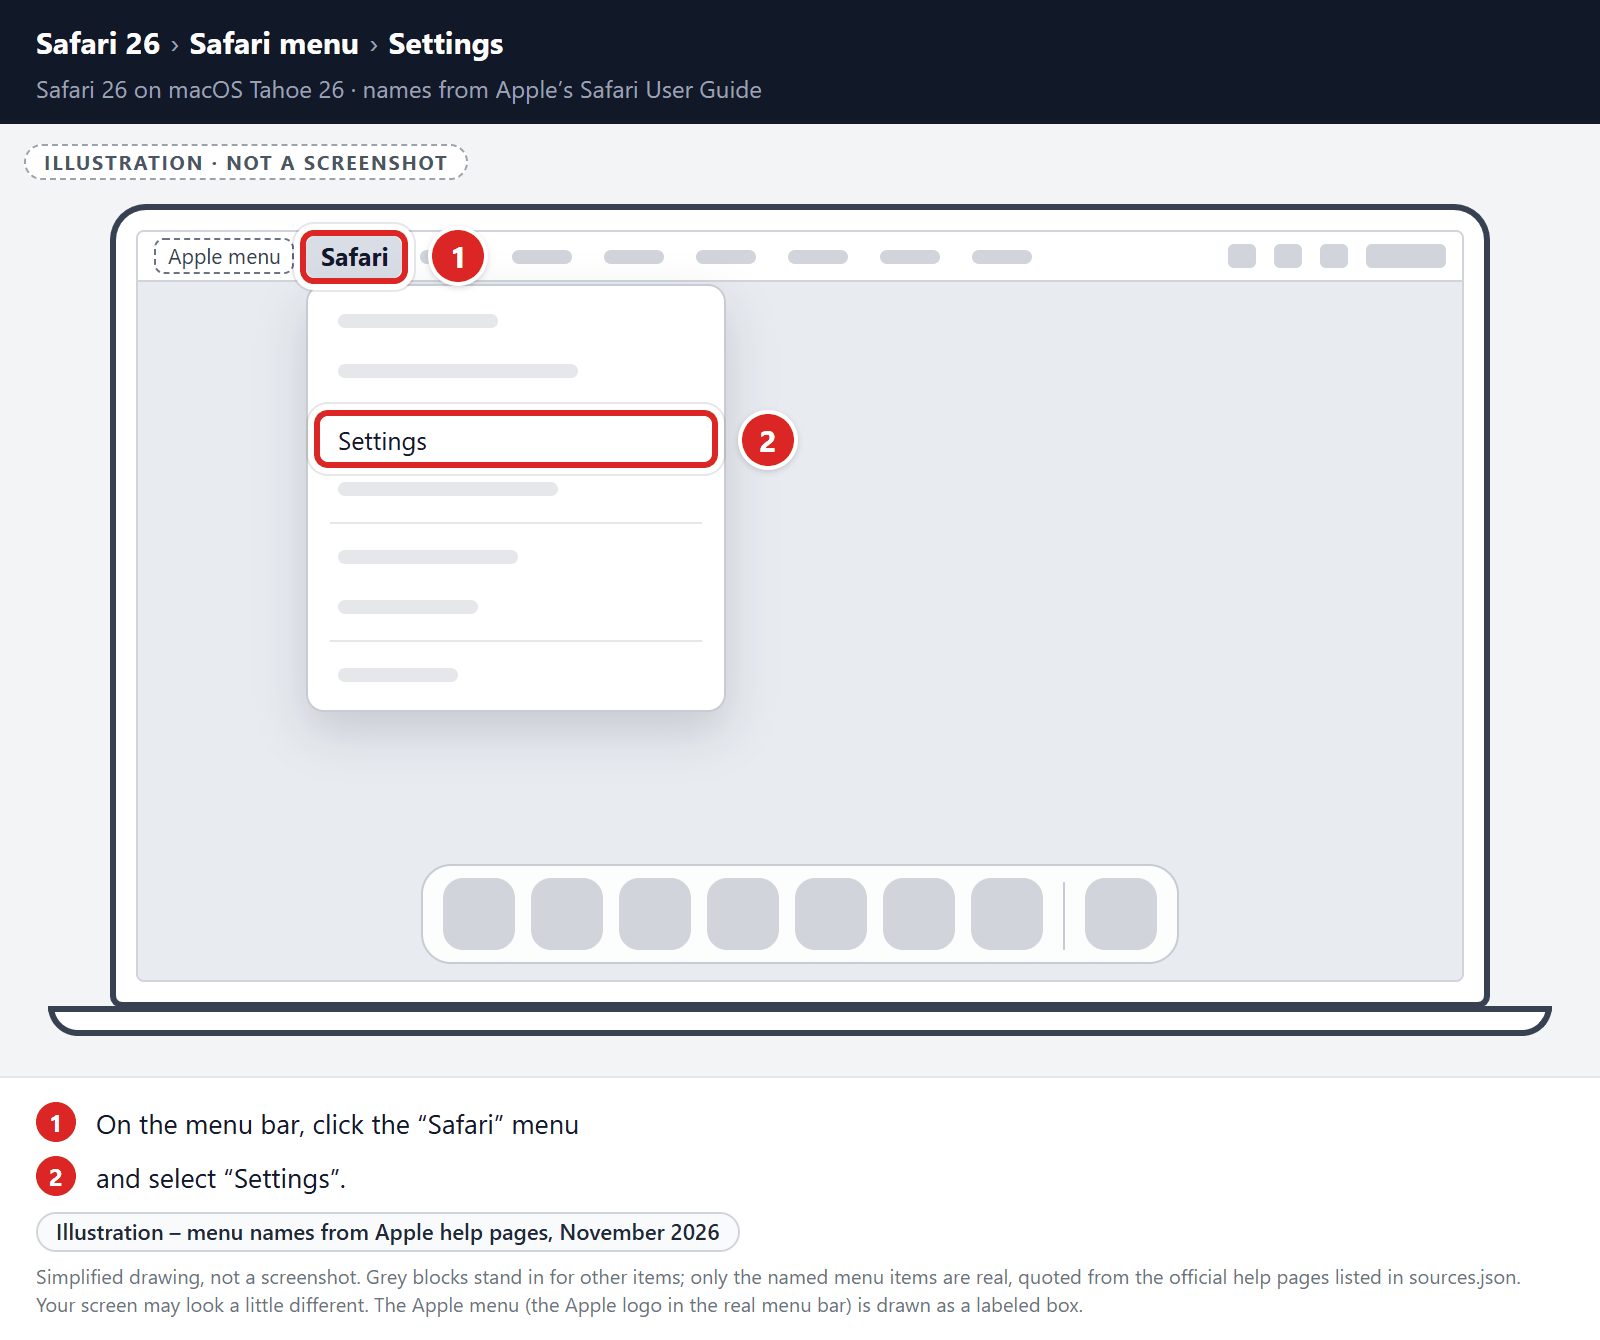
-
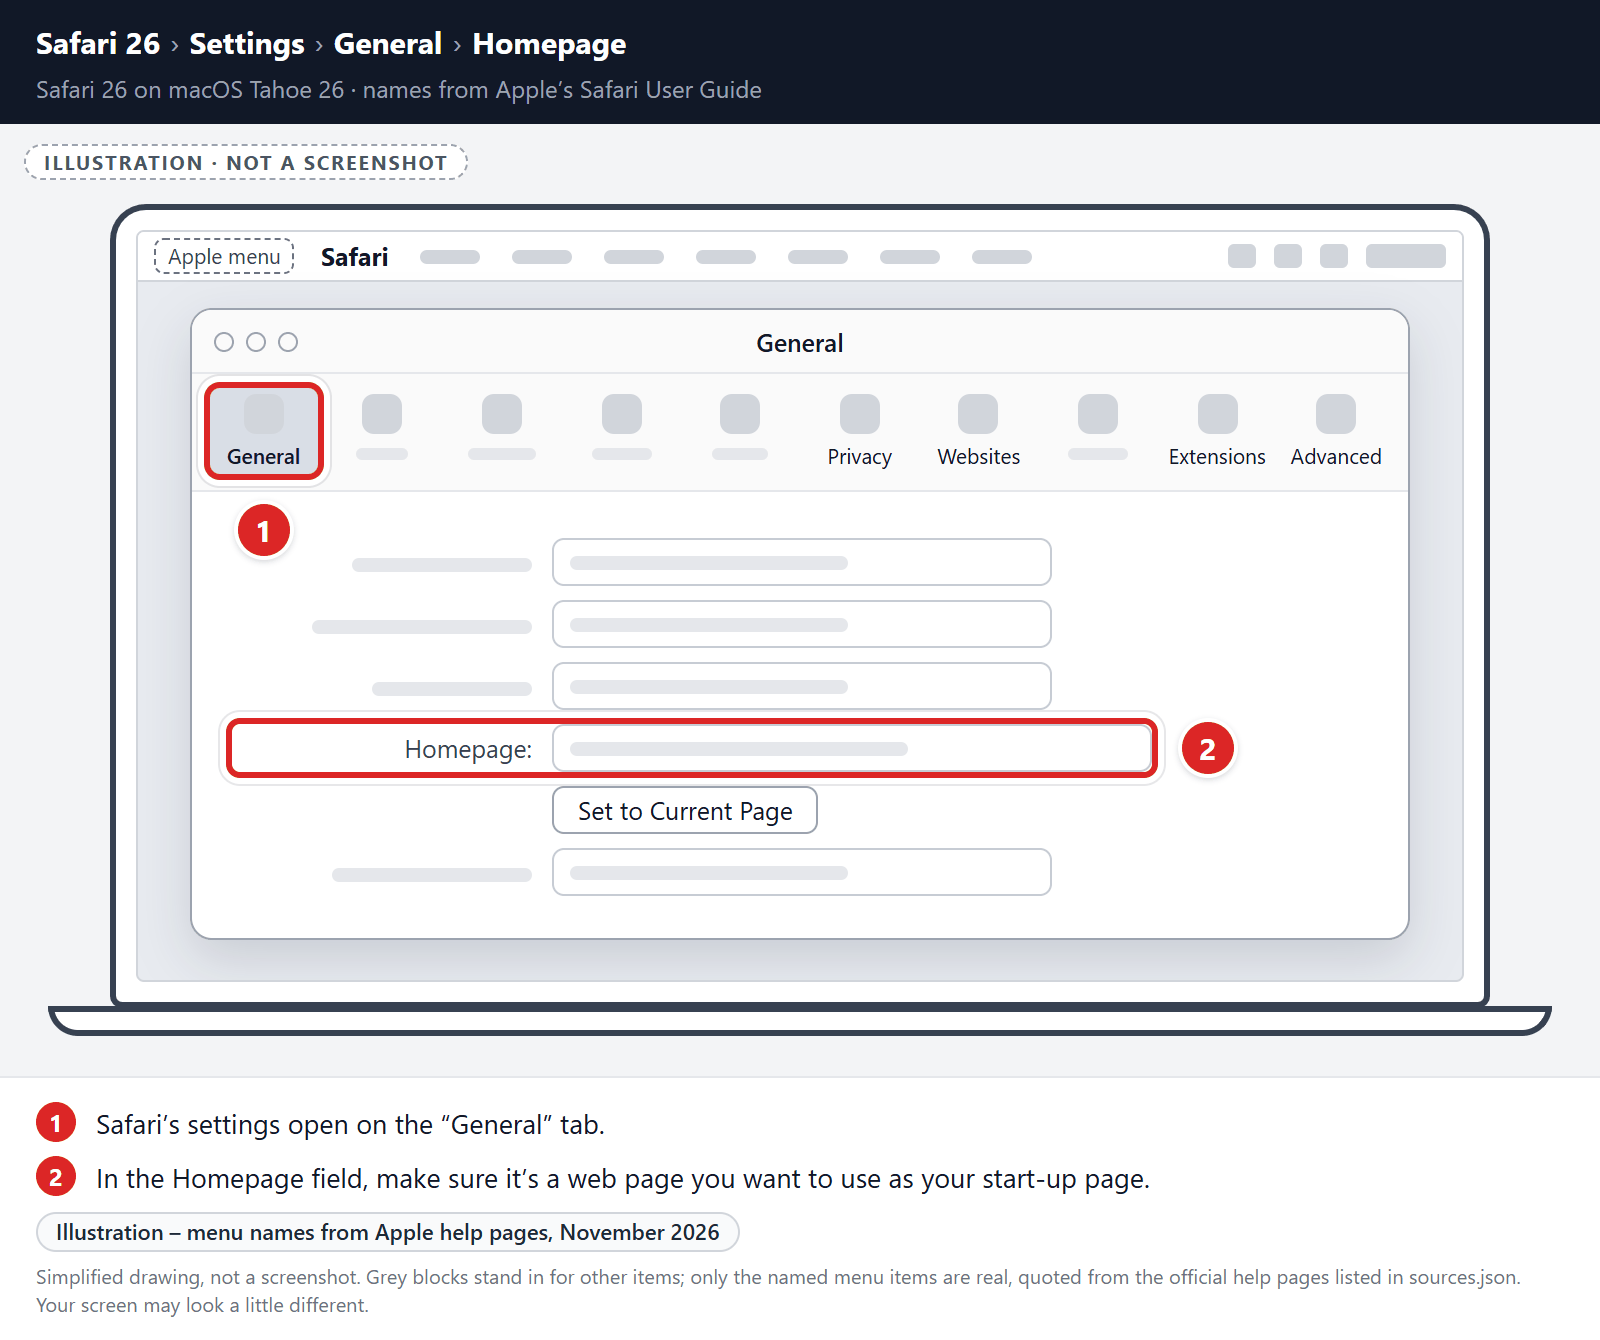
Check Homepage.
This will open a new window with your Safari settings, opened to the “General” tab. Some browser hijackers may change your default homepage, so in the Homepage field make sure it’s a web page you want to use as your start-up page.
-
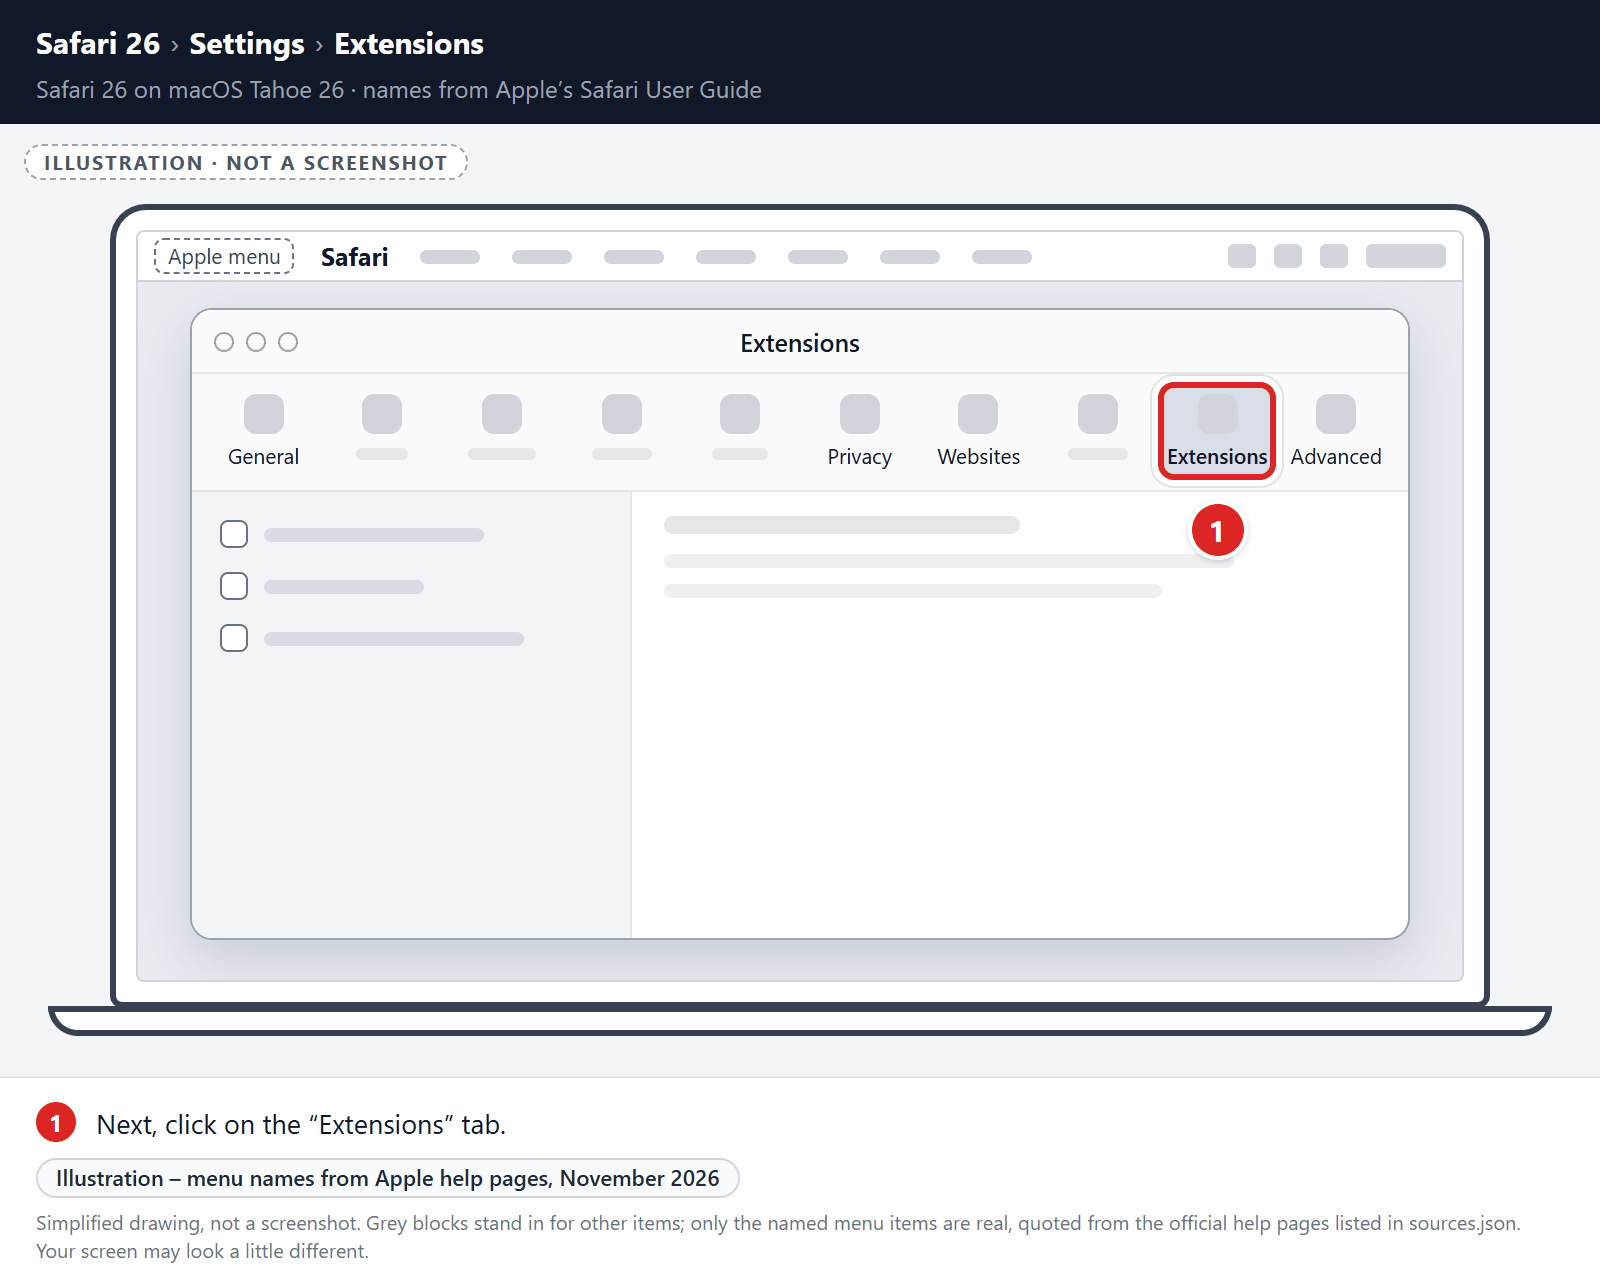
Click “Extensions”
Next, click on the “Extensions” tab.
-
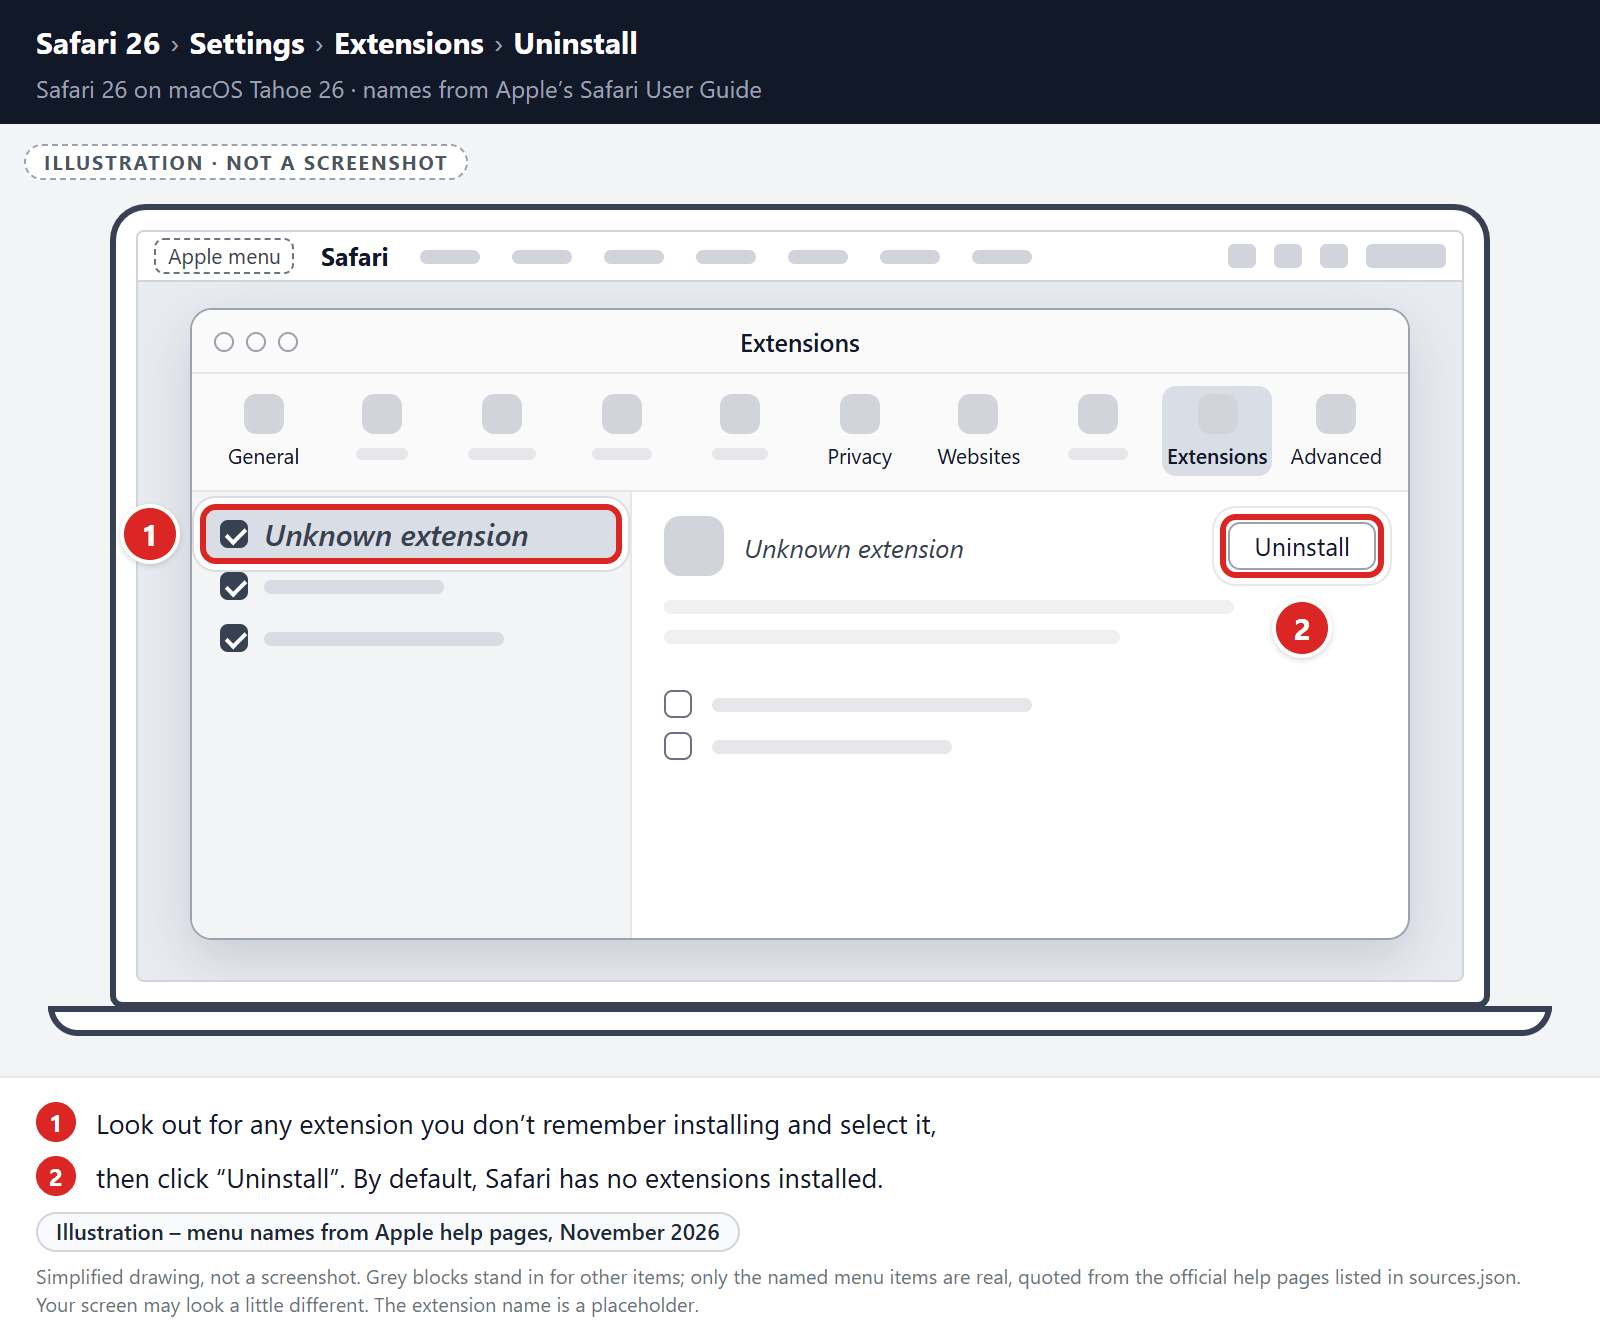
Find and uninstall malicious extensions.
The “Extensions” screen will be displayed with a list of all the extensions installed on Safari. Look out for any suspicious browser extension that could be behind all the drama – anything you don’t remember downloading or that doesn’t sound like a genuine extension. By default, there are no extensions installed on Safari so it’s safe to remove an extension
-
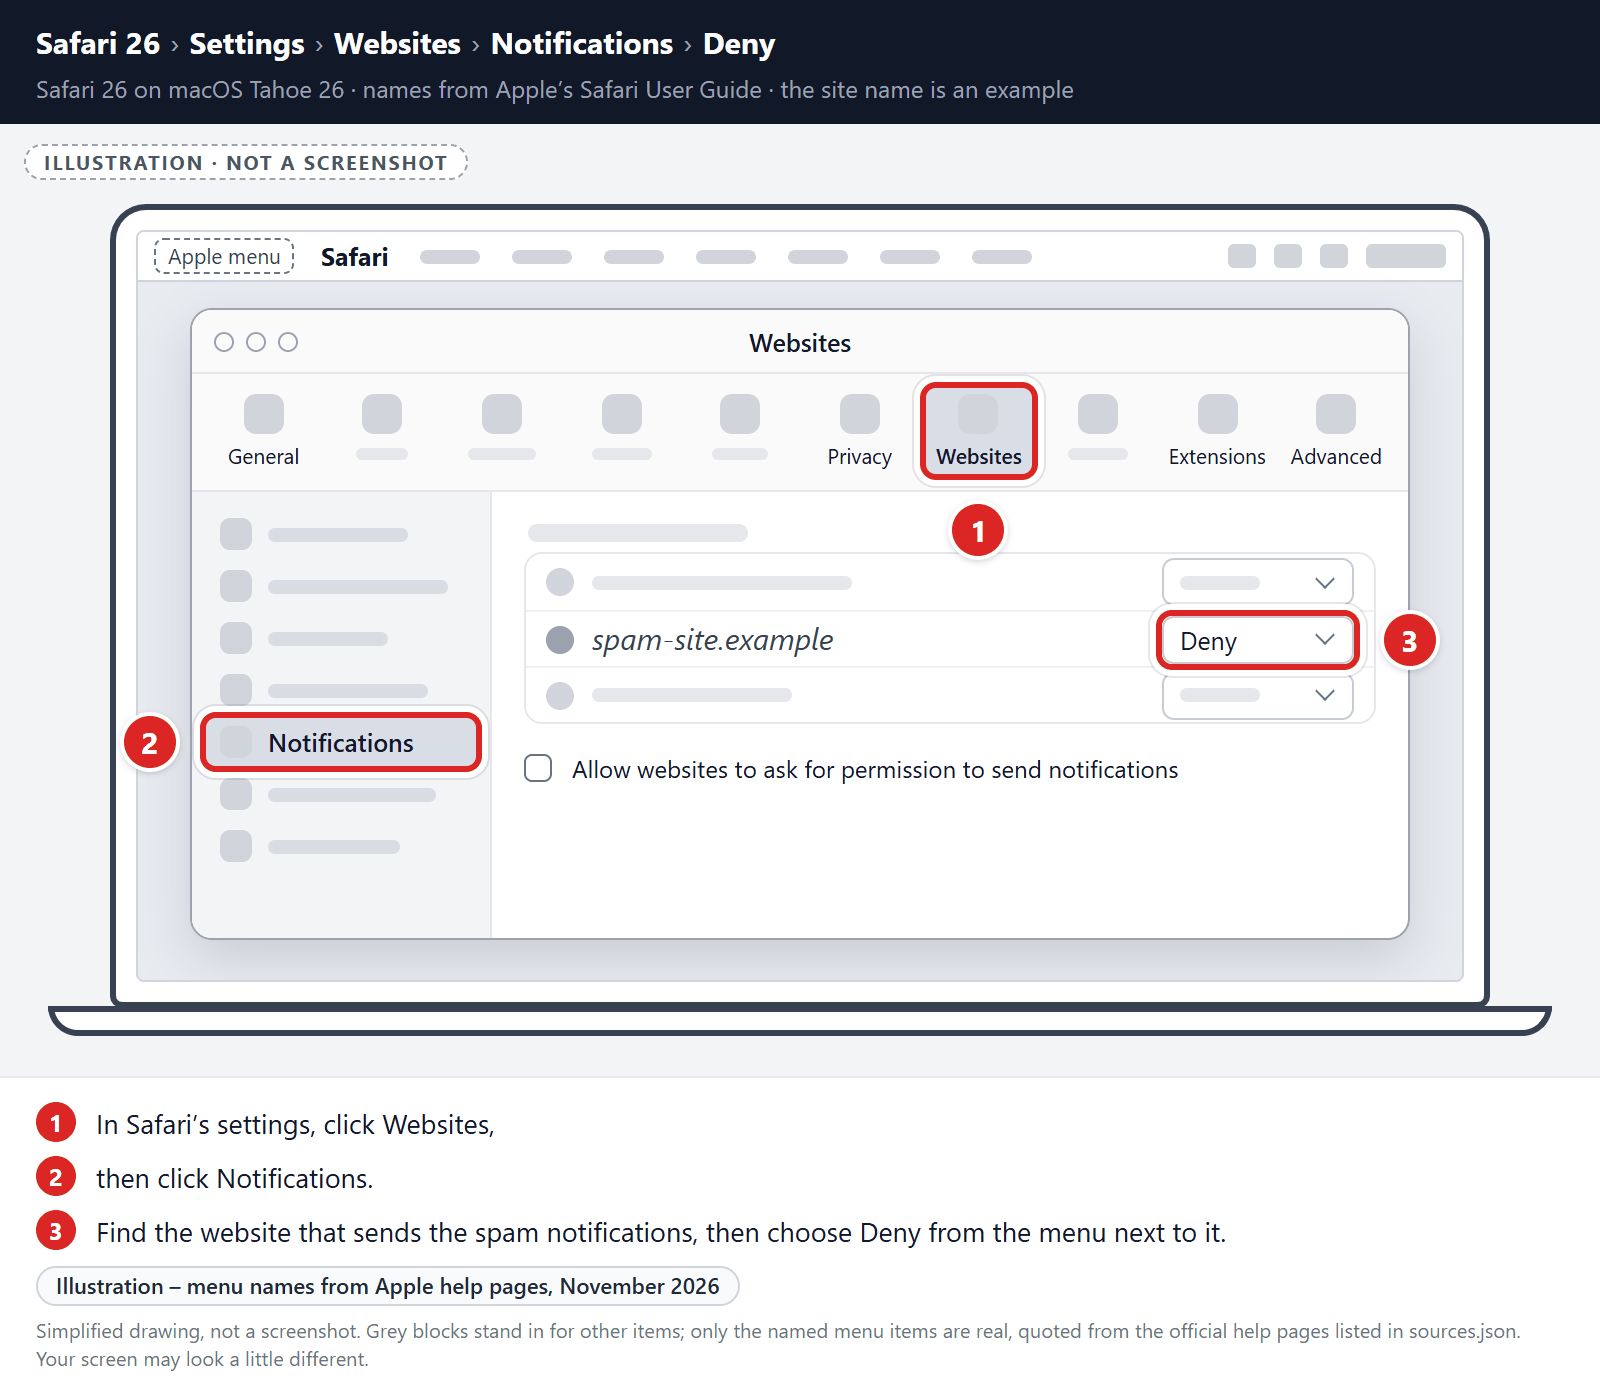
Remove spam notifications ads
In Safari’s settings, click Websites, then click Notifications. Find the website that sends the spam notifications, then choose Deny from the menu next to it.
To stop other websites from asking, you can also deselect “Allow websites to ask for permission to send notifications“. This only blocks new requests. It doesn’t turn off websites you already allowed, so deny those websites as well.
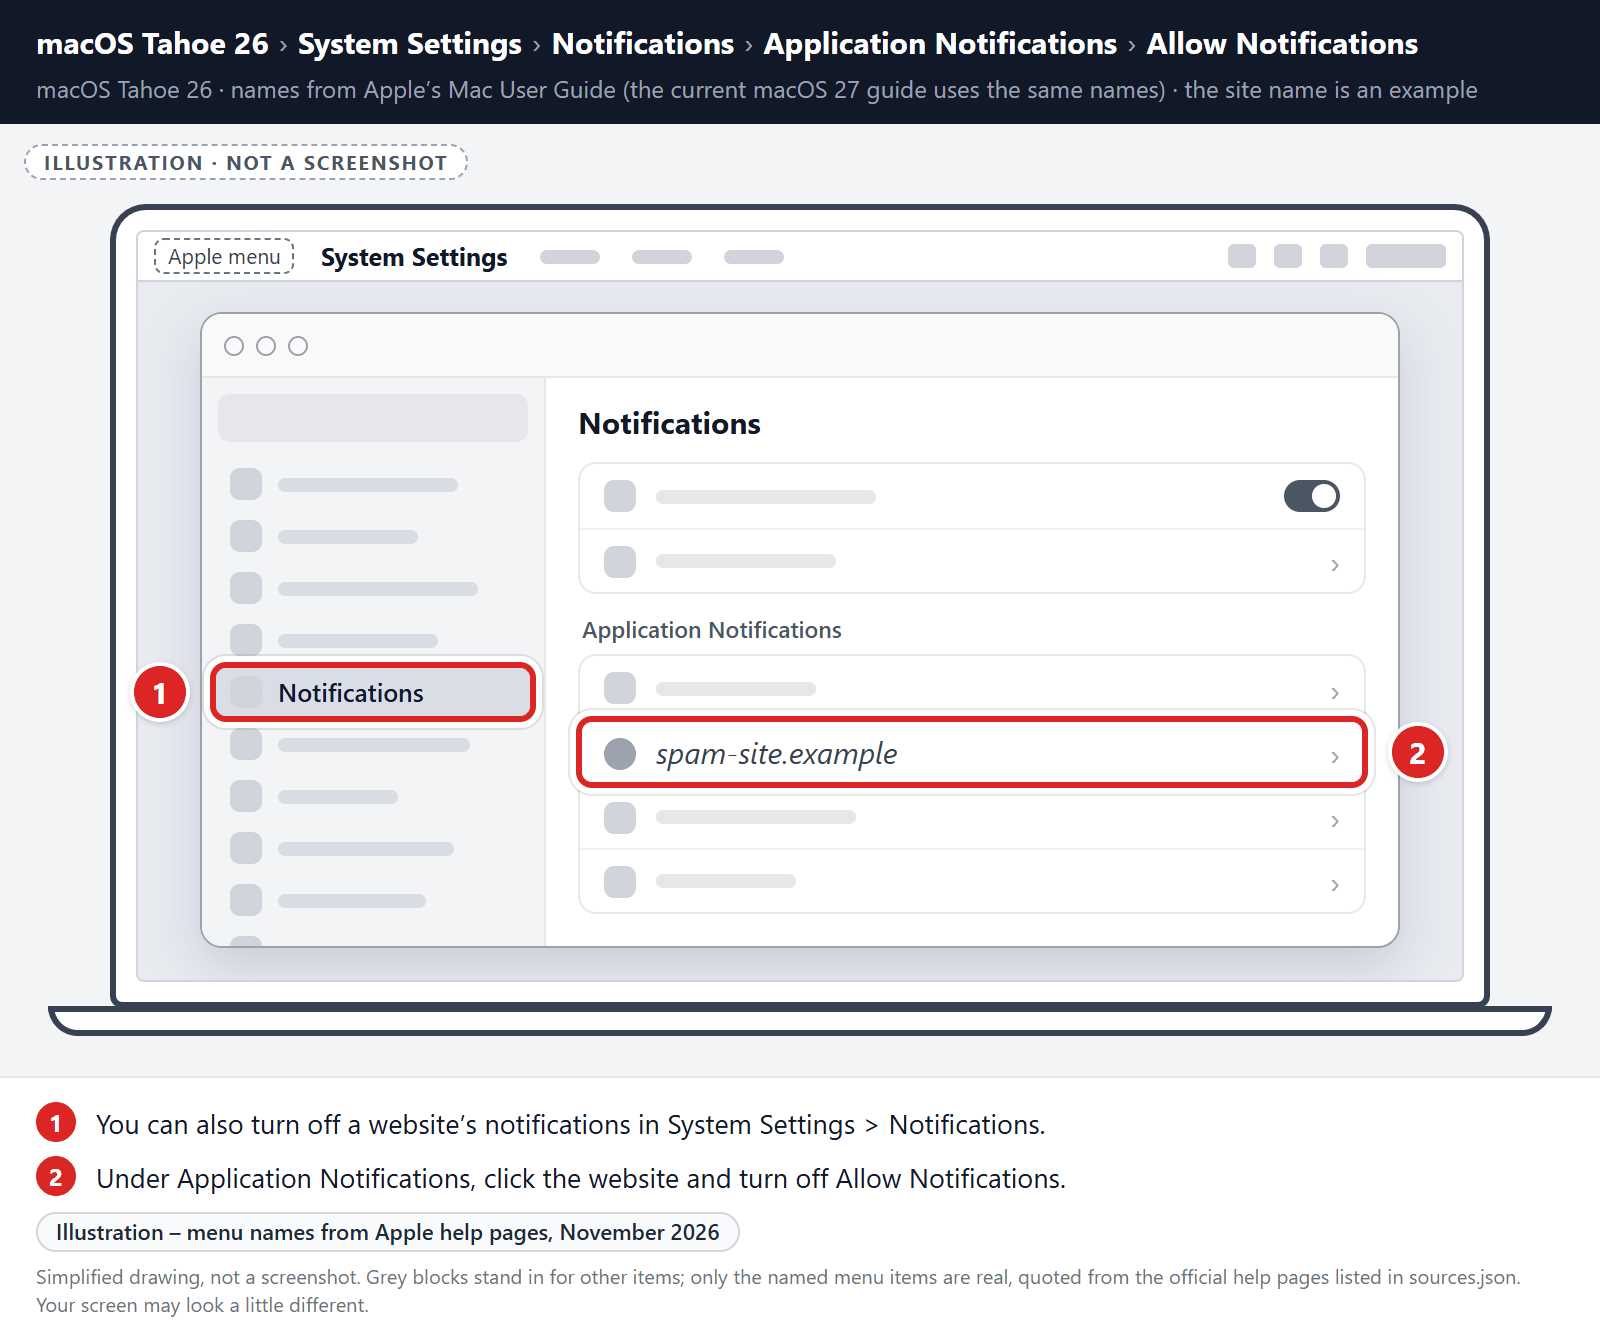
You can also turn off a website’s notifications in System Settings > Notifications. Under Application Notifications, click the website and turn off Allow Notifications.
-
Remove the data stored by the unwanted website.
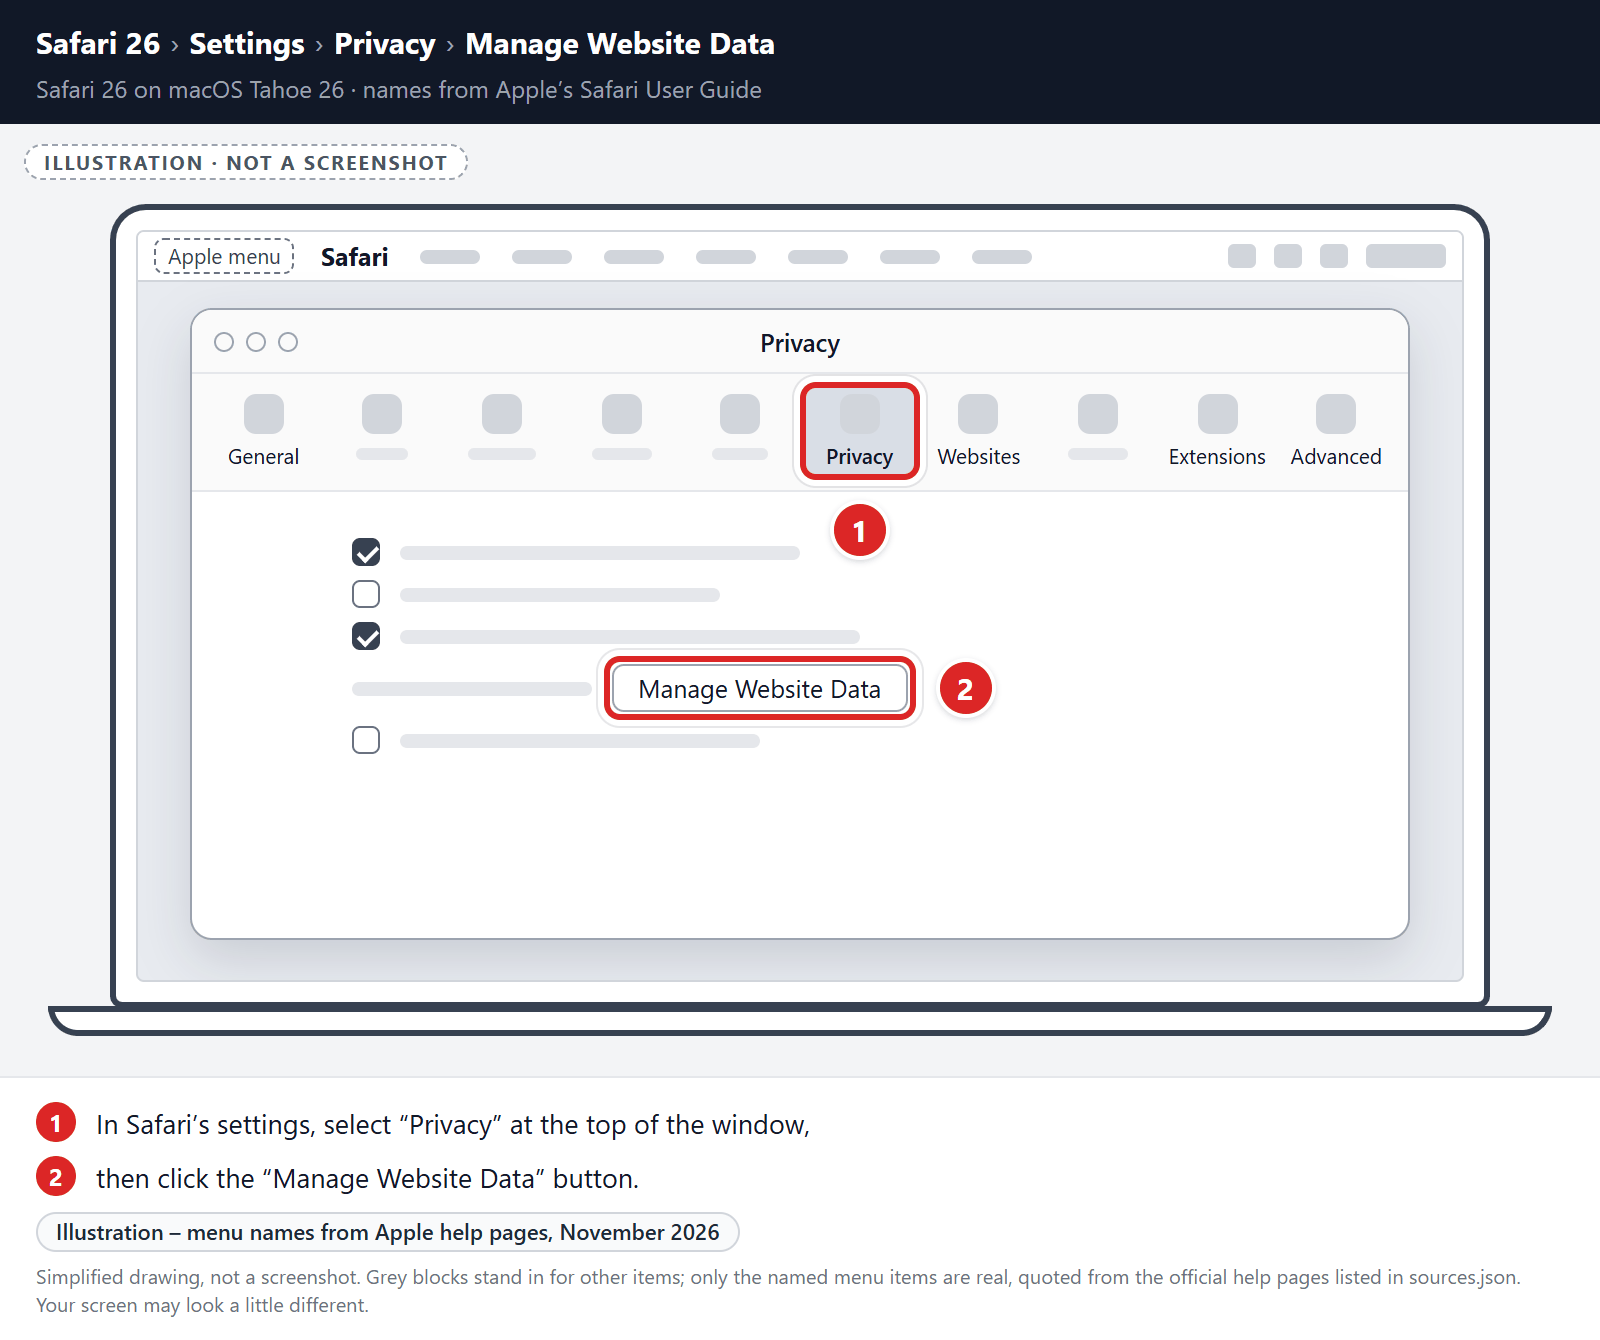
In the Safari menu, choose “Settings…”, select “Privacy” at the top of the new window that appears, and then click the “Manage Website Data” button.
In the next dialog box, search for or select the website that showed the spam or redirects, then click “Remove“. Click Done when you’re finished.
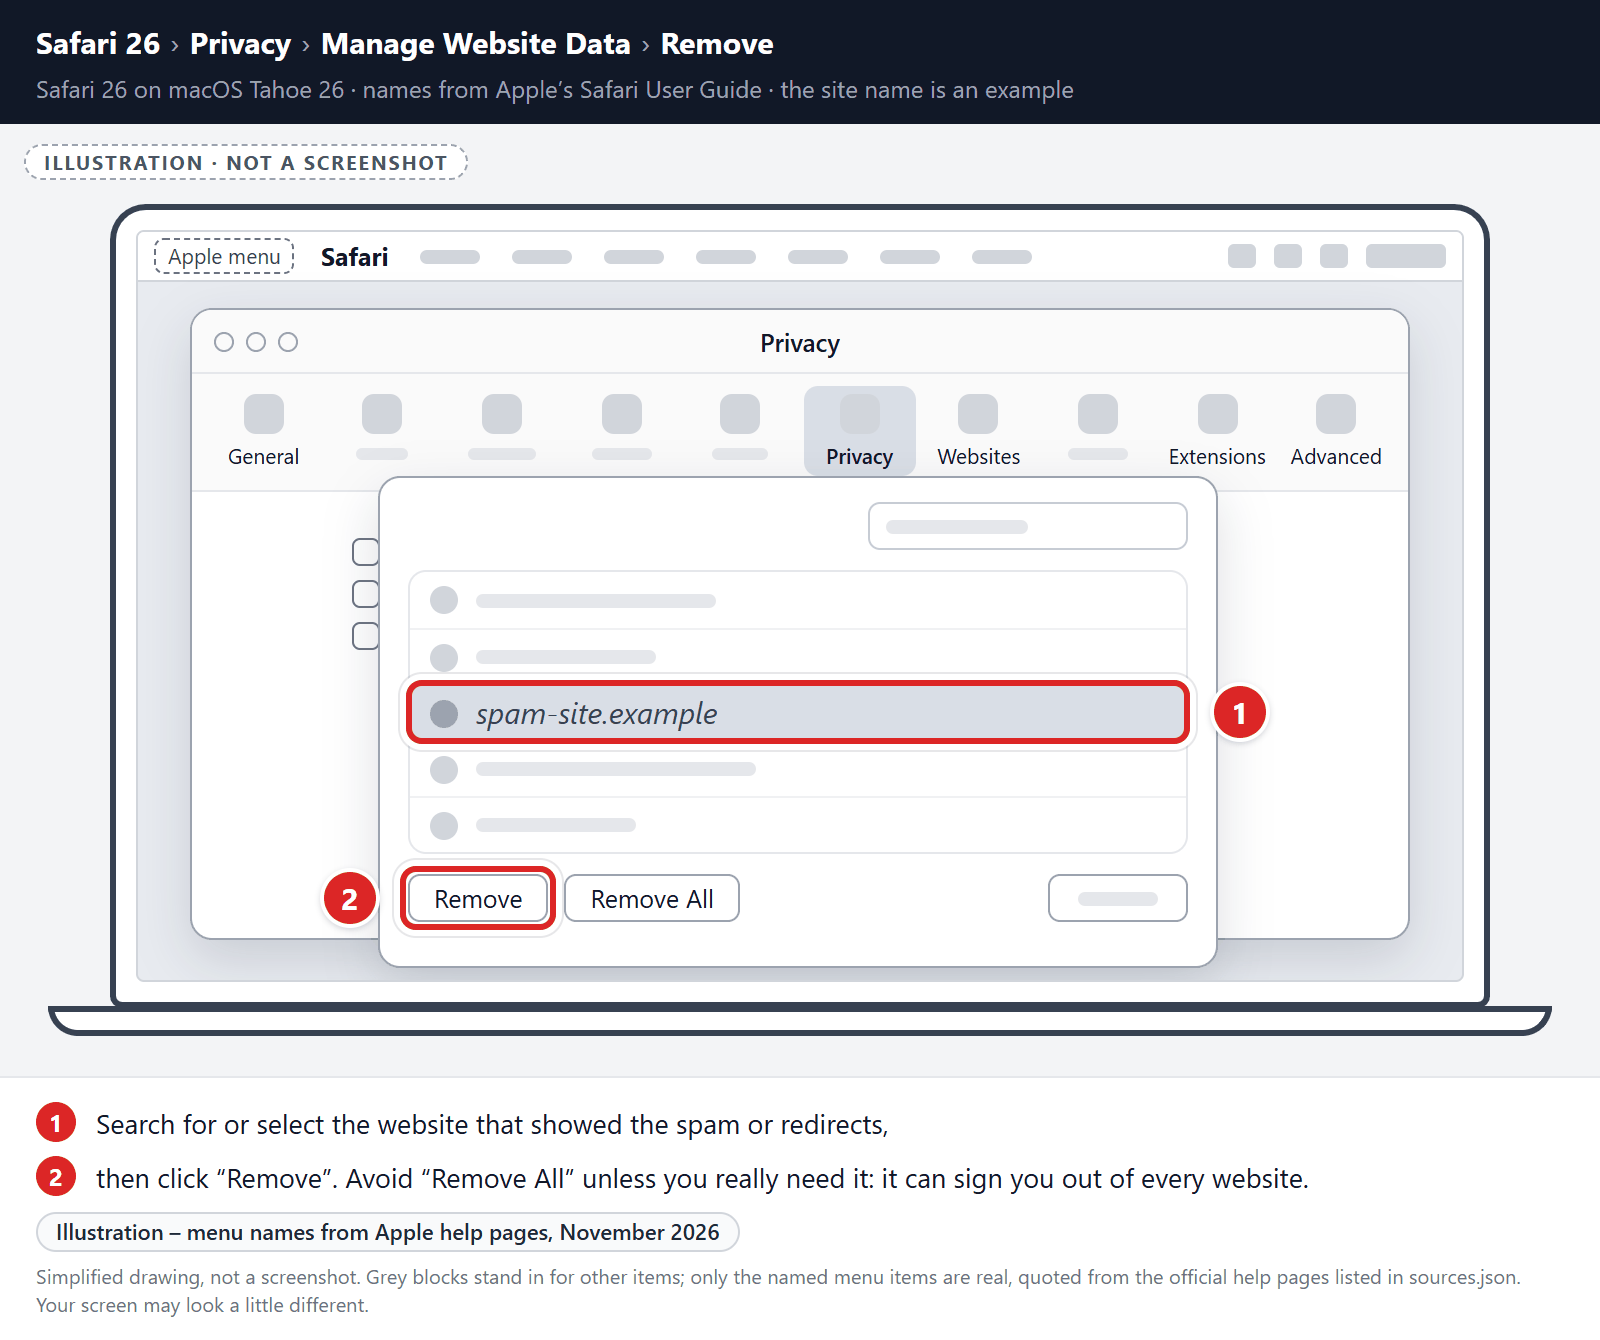
Avoid “Remove All” unless you really need it. It deletes the data of every website and can sign you out of all of them.
-
Empty Safari Caches.
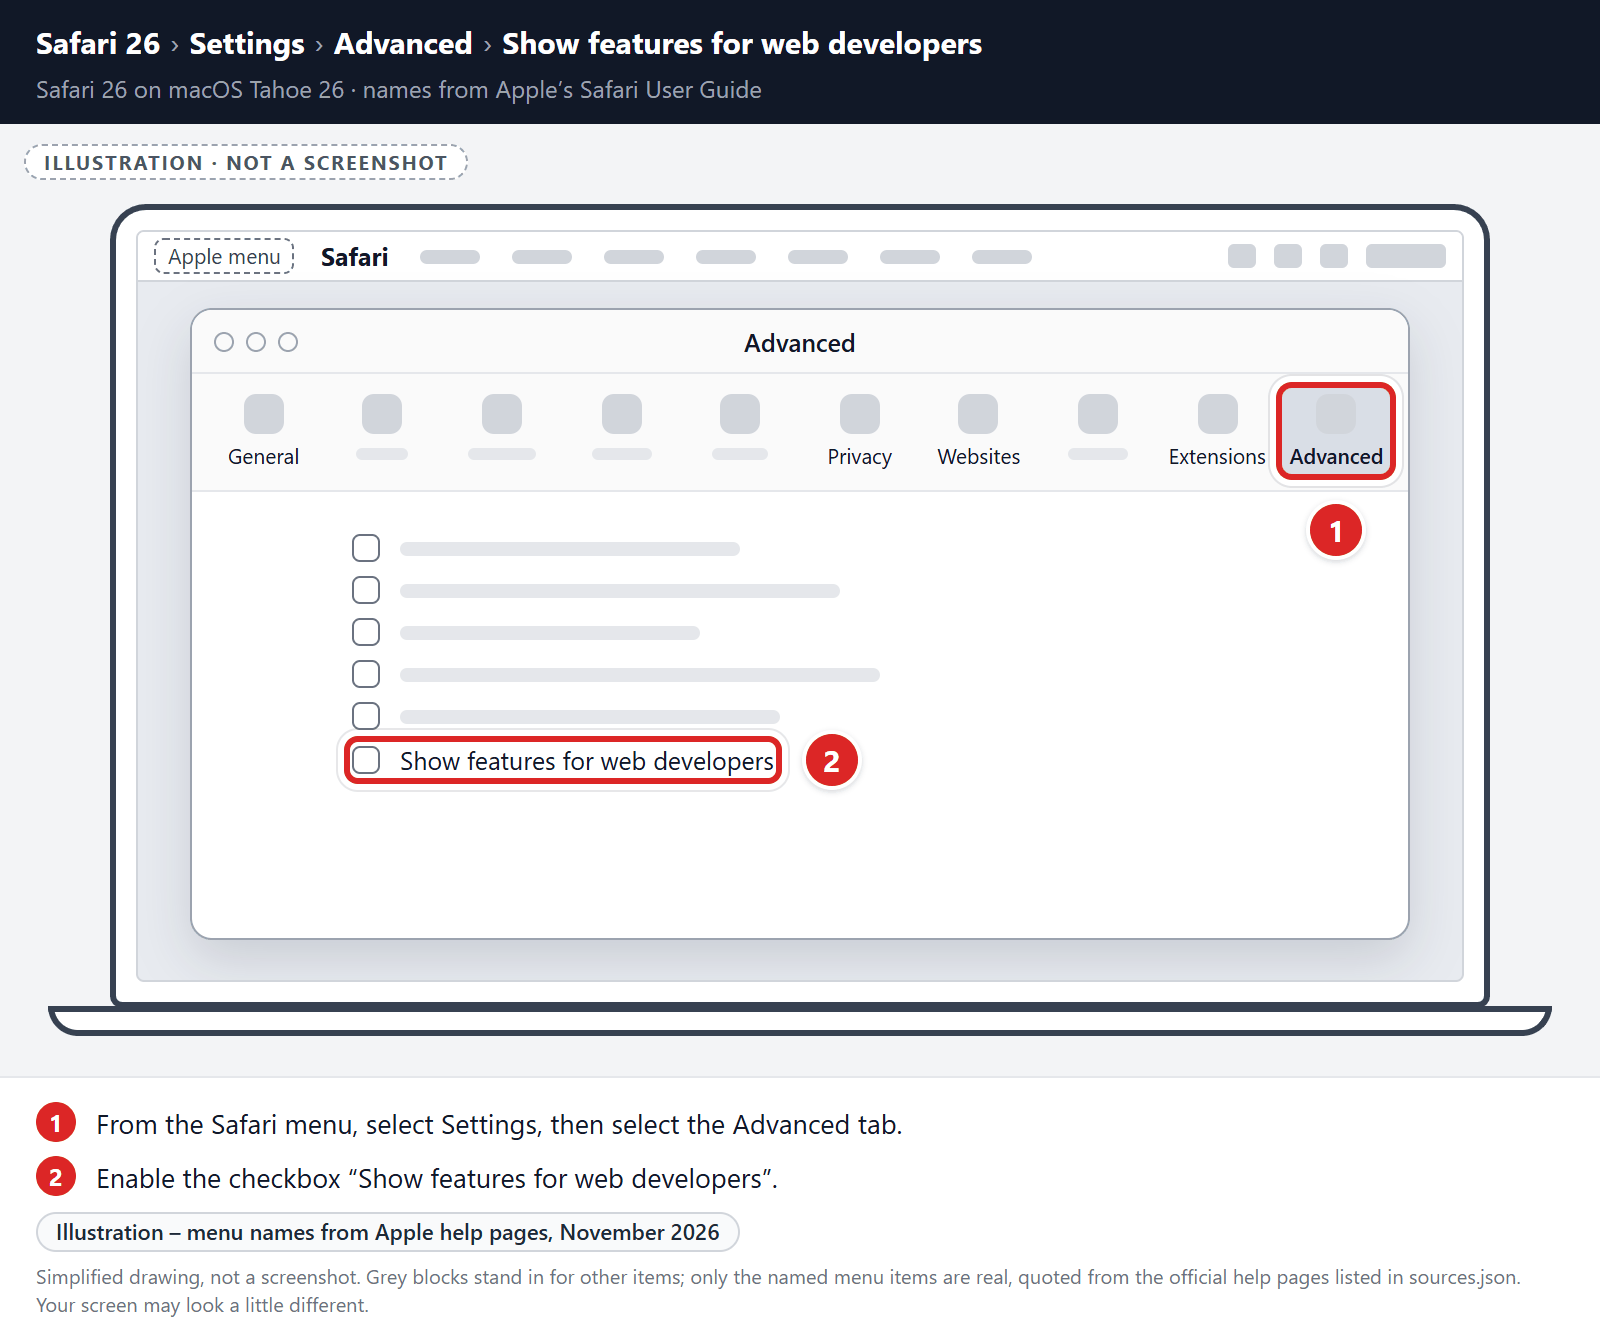
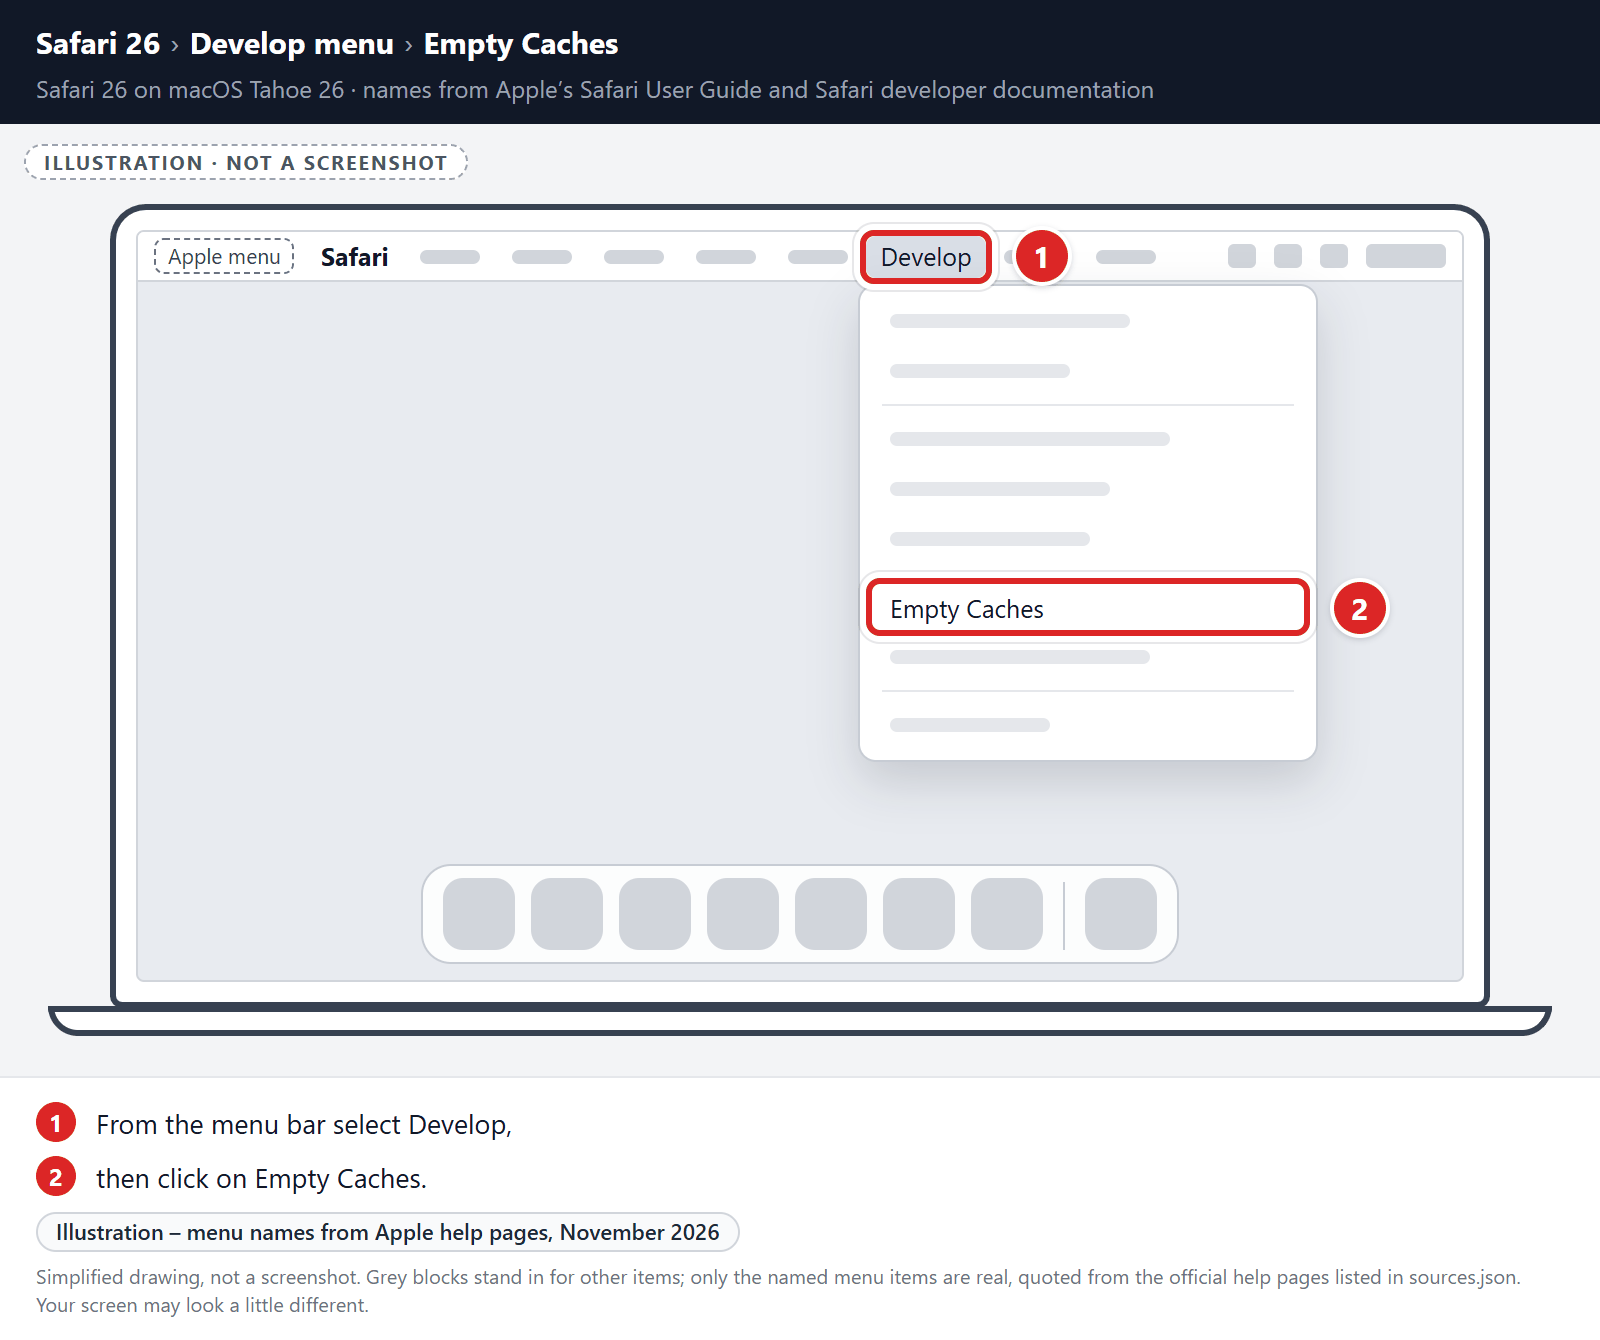
From your Safari menu bar, click Safari and select Settings, then select the Advanced tab. Enable the checkbox “Show features for web developers“. In older versions of Safari, this checkbox is called “Show Develop menu in menu bar”.
From the menu bar select Develop, then click on Empty Caches as seen in the image below.
Remove malware from Chrome for Mac
To remove malware from Chrome for Mac we will reset the browser settings to their defaults. This restores the default search engine, homepage, new tab page, and pinned tabs. It also resets site permissions, clears cookies and site data, and turns off your extensions and themes. Your bookmarks and saved passwords are not deleted. If you’re signed in to Chrome, the reset applies on all devices where you’re signed in.
-
Click on the three dots at the top right and go to Settings.
Click on Chrome’s main menu button, represented by three dots at the top right corner. Now click on the menu option labeled Settings, which will open the basic settings screen, as shown by the numbered box in the picture below.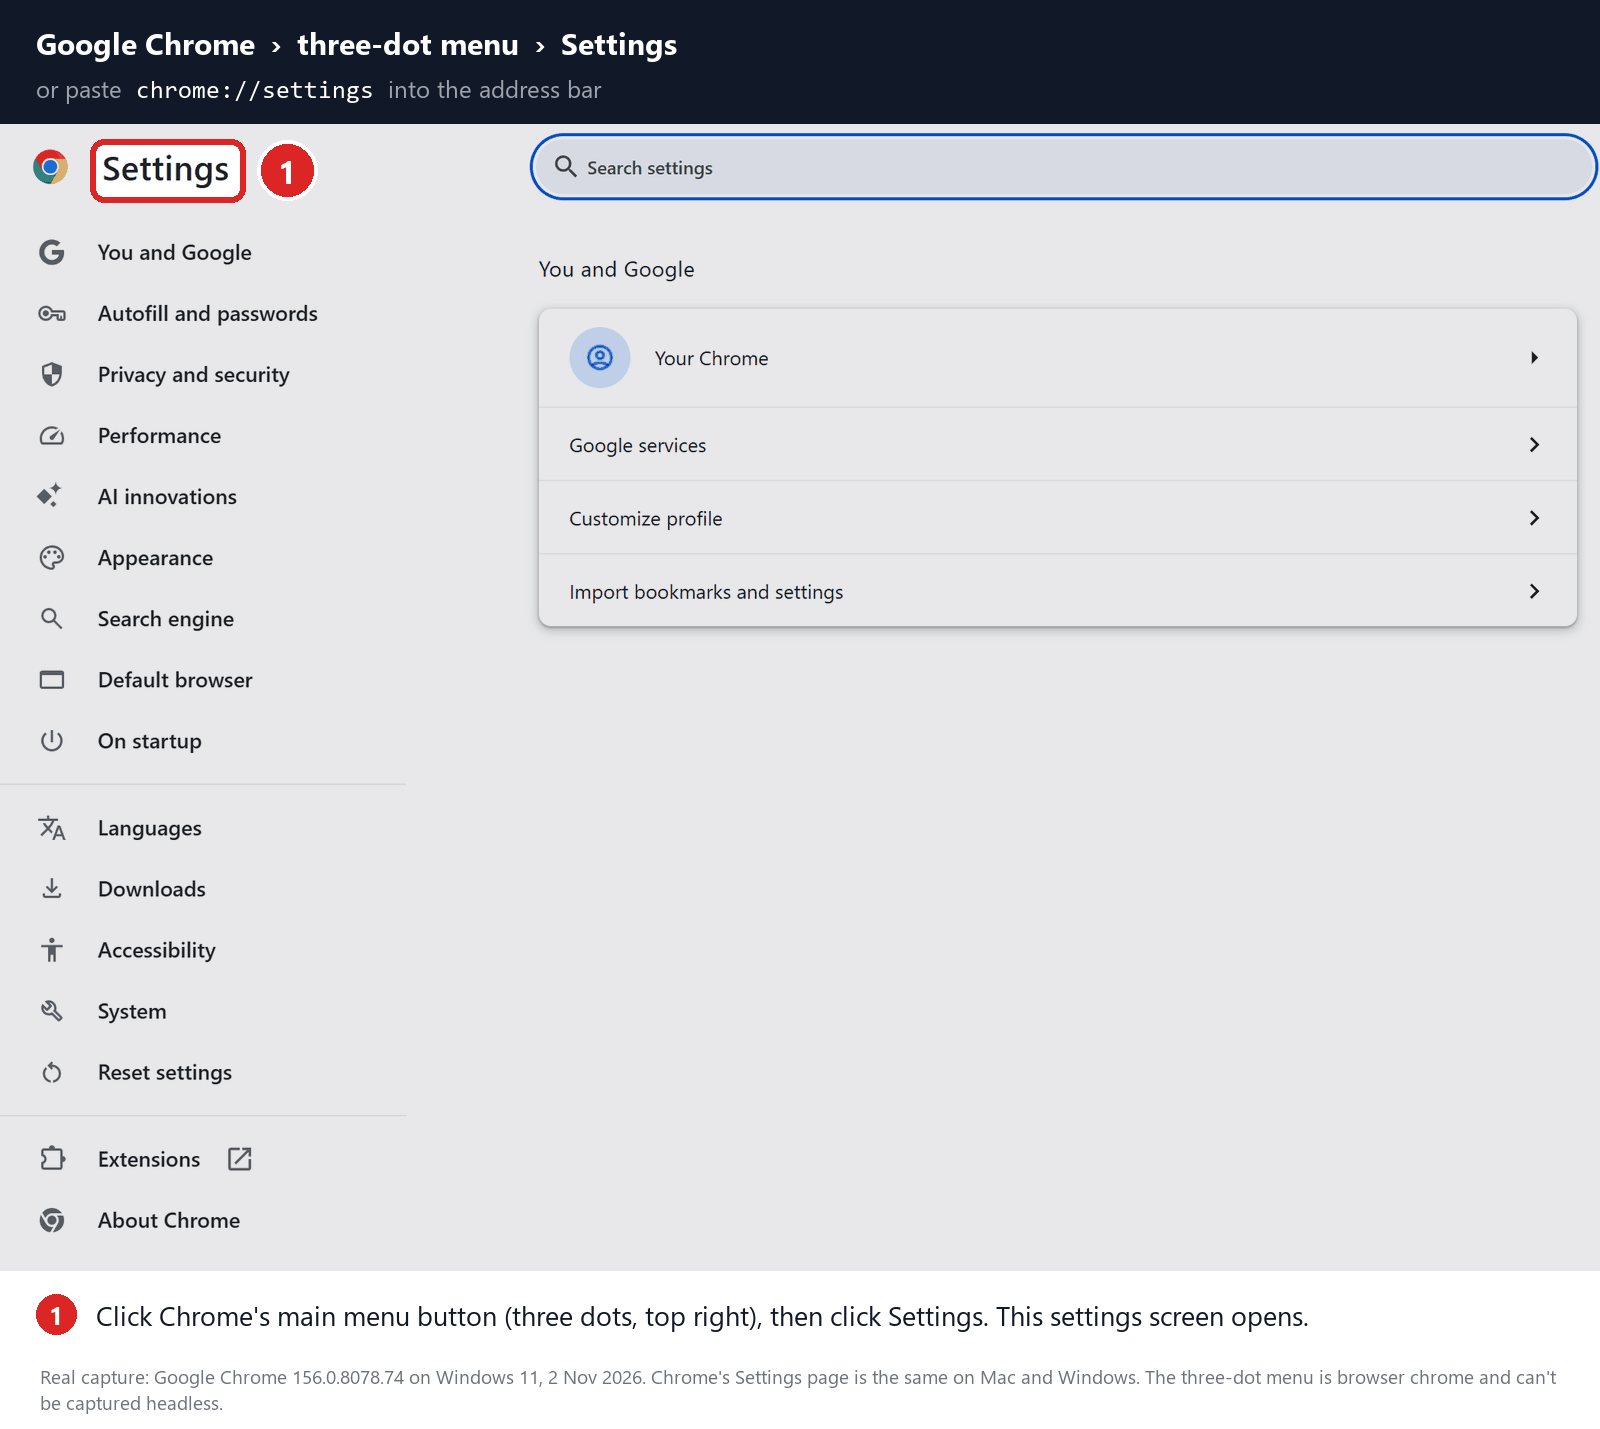
-
In the left sidebar, click on the “Reset settings” option.
In the left sidebar, click on “Reset settings“.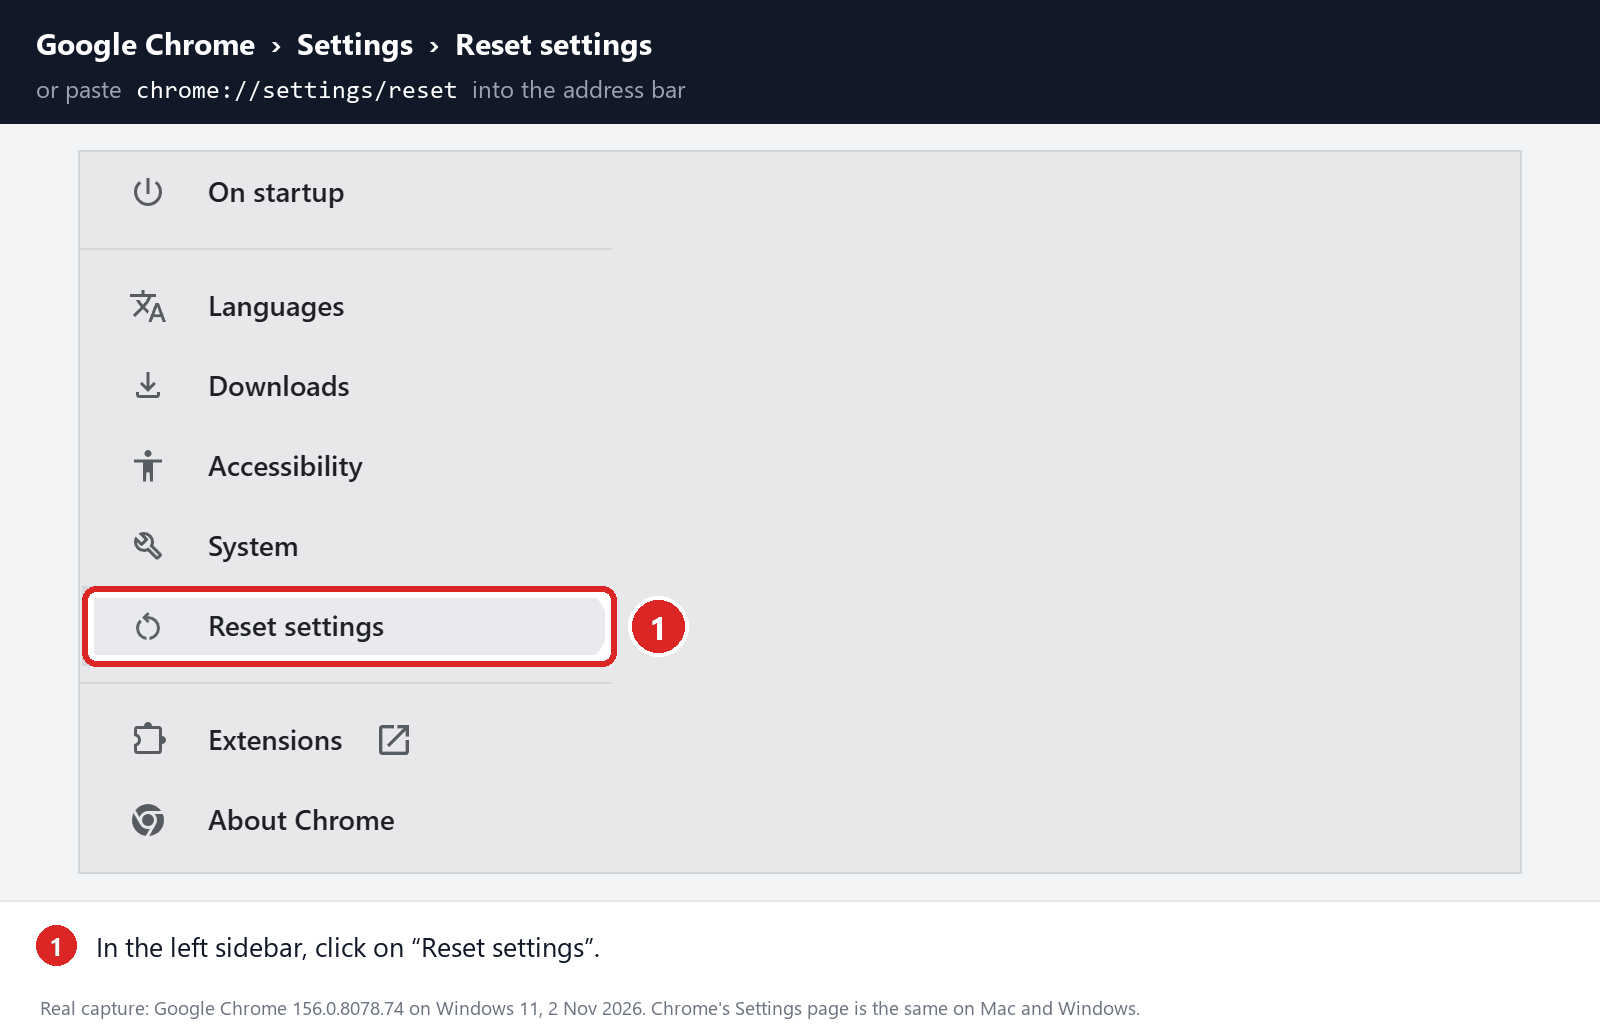
-
Click “Restore settings to their original defaults”.
Now click on “Restore settings to their original defaults” as shown in the image below.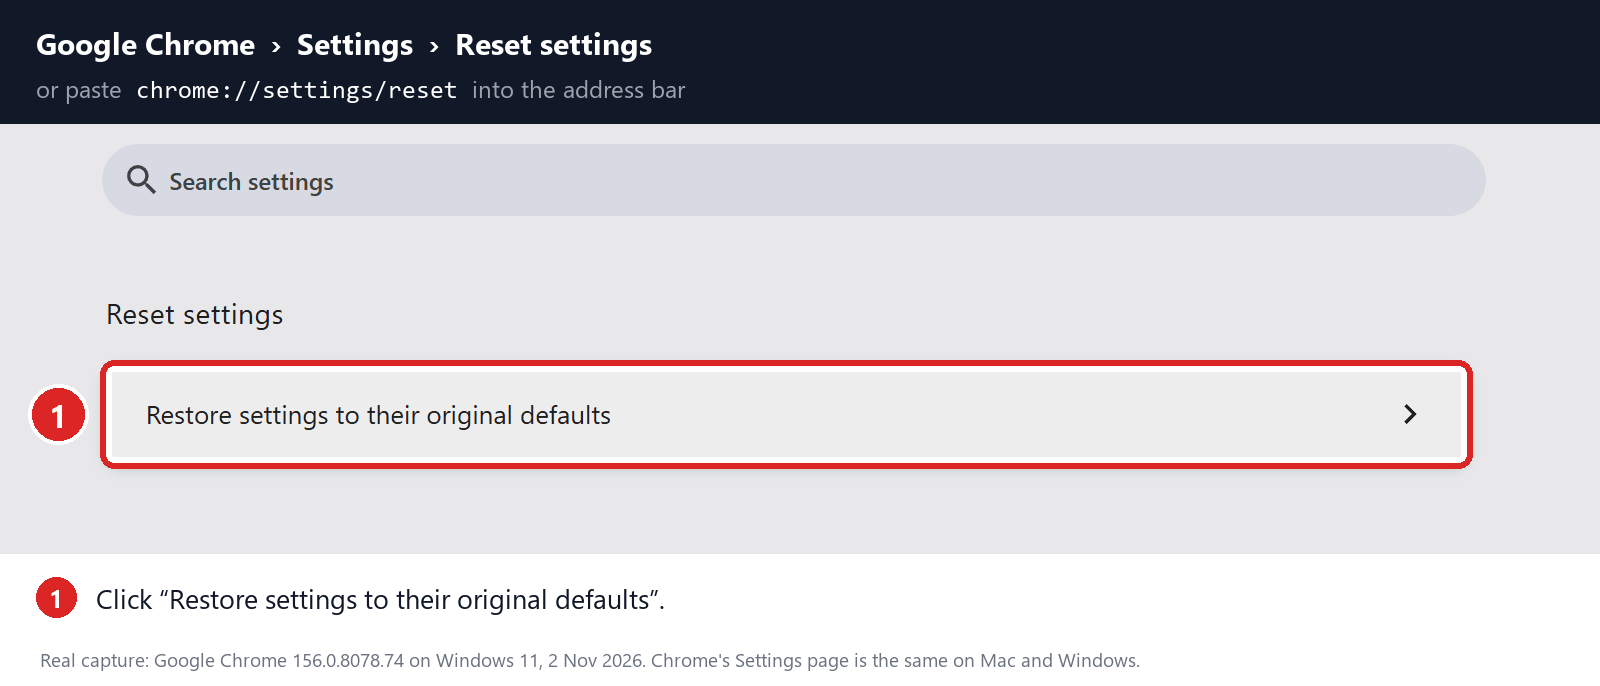
-
Click “Reset settings” button.
A confirmation dialog should now be displayed, detailing the components that will be restored to their default state should you continue with the reset process. To complete the restoration process, click on the “Reset settings” button.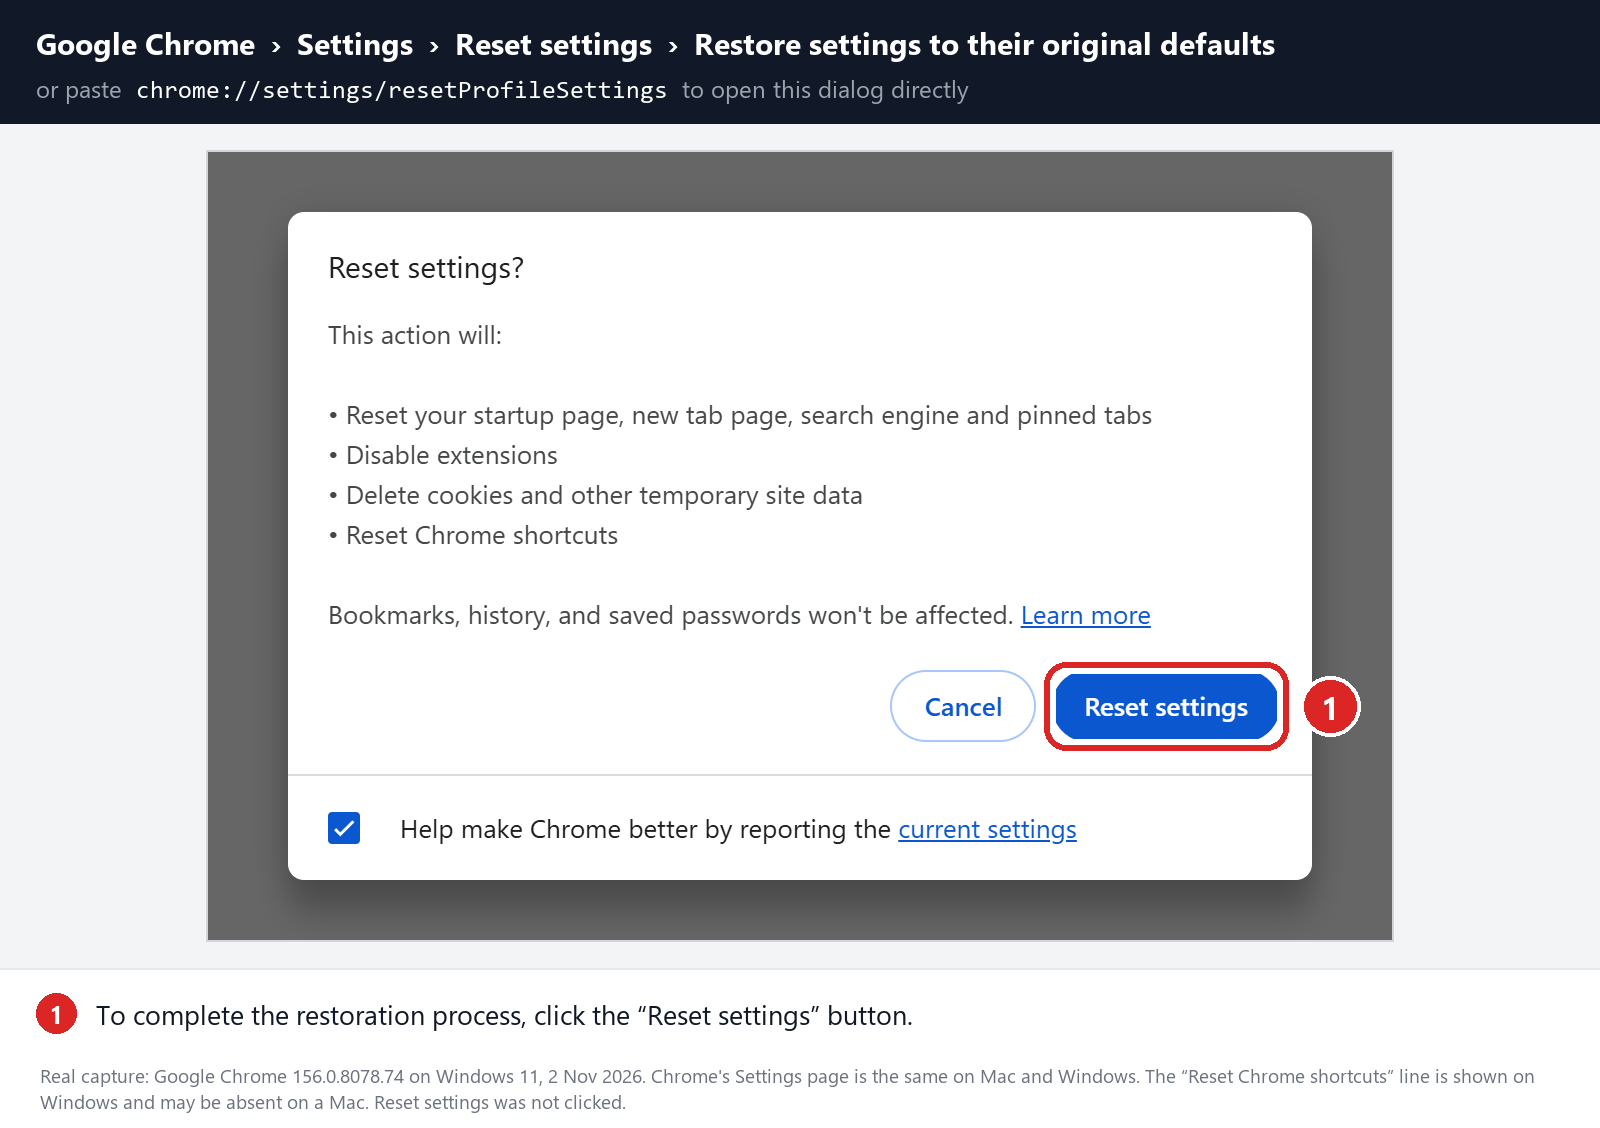
-
(Optional) Stop sync from bringing the problem back.
If a malicious extension or setting comes back after the reset, Chrome sync may be restoring it from your Google Account. Open Chrome Settings > You and Google. If you see Sync and Google services > Manage what you sync, choose Customize sync and turn off Settings and Extensions. In newer versions of Chrome, click your account name, then Choose what to save in your Google Account, and turn off the same two items. Then remove the unwanted extension again.Don’t use the “Delete data” or “Clear data” option on your Google Account’s Chrome data page to fix this. It deletes the Chrome data saved in your Google Account, such as synced bookmarks, passwords, and history, and you don’t need it to remove an extension.
Remove malware from Firefox for Mac
To remove malware from Firefox for Mac we will reset the browser settings to its default. The reset feature fixes many issues by restoring Firefox to its factory default state while saving your essential information like bookmarks, passwords, web form auto-fill information, browsing history, and open tabs.
-
Go to the “Help and Report” menu.
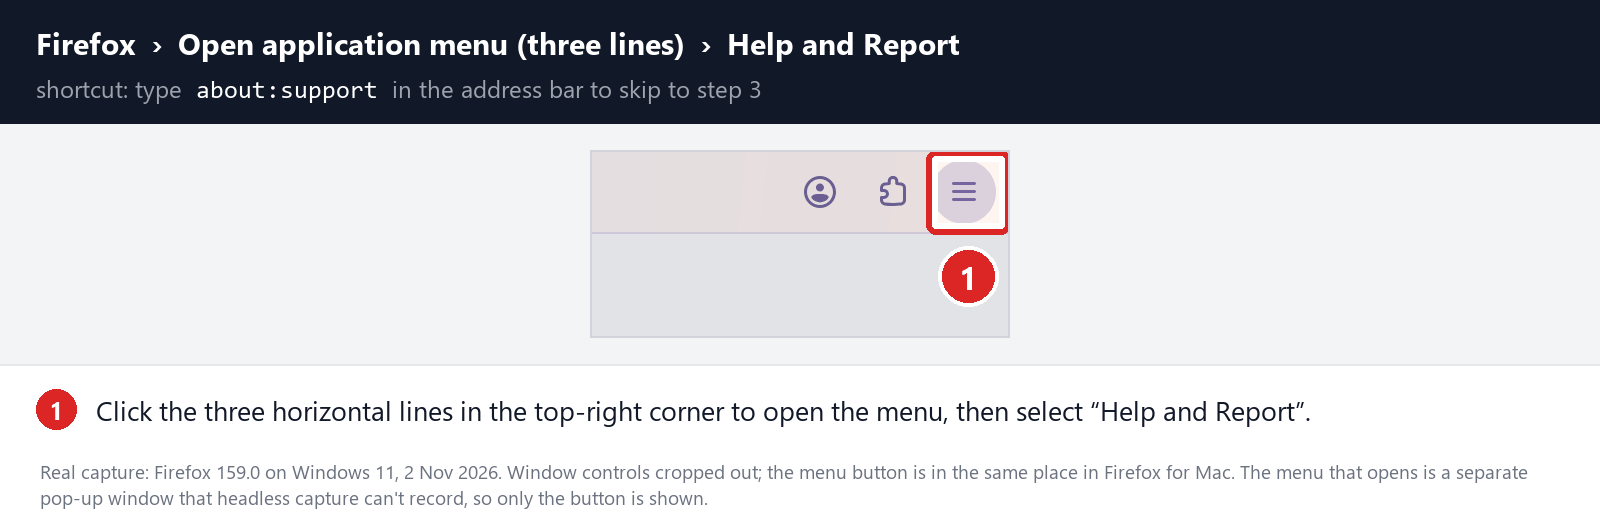
Click on Firefox’s main menu button, represented by three horizontal lines. When the drop-down menu appears, select the option labeled “Help and Report“.
-
Click “More troubleshooting information”.
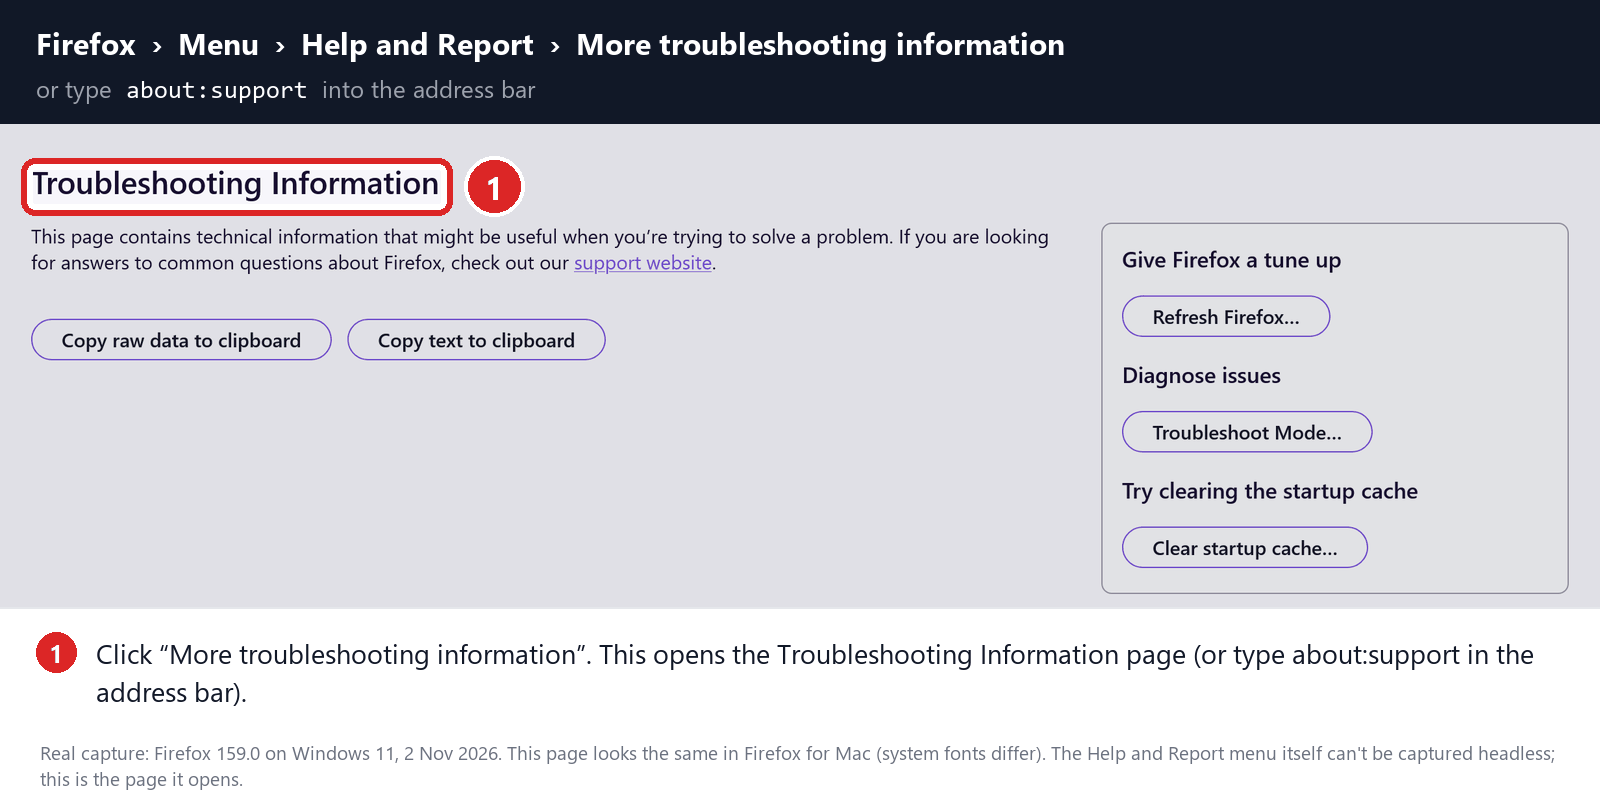
Next click on the “More troubleshooting information” option. This opens the Troubleshooting Information page, as shown by the numbered box in the image below. You can also open it by typing about:support in the address bar.
-
Click on “Refresh Firefox”
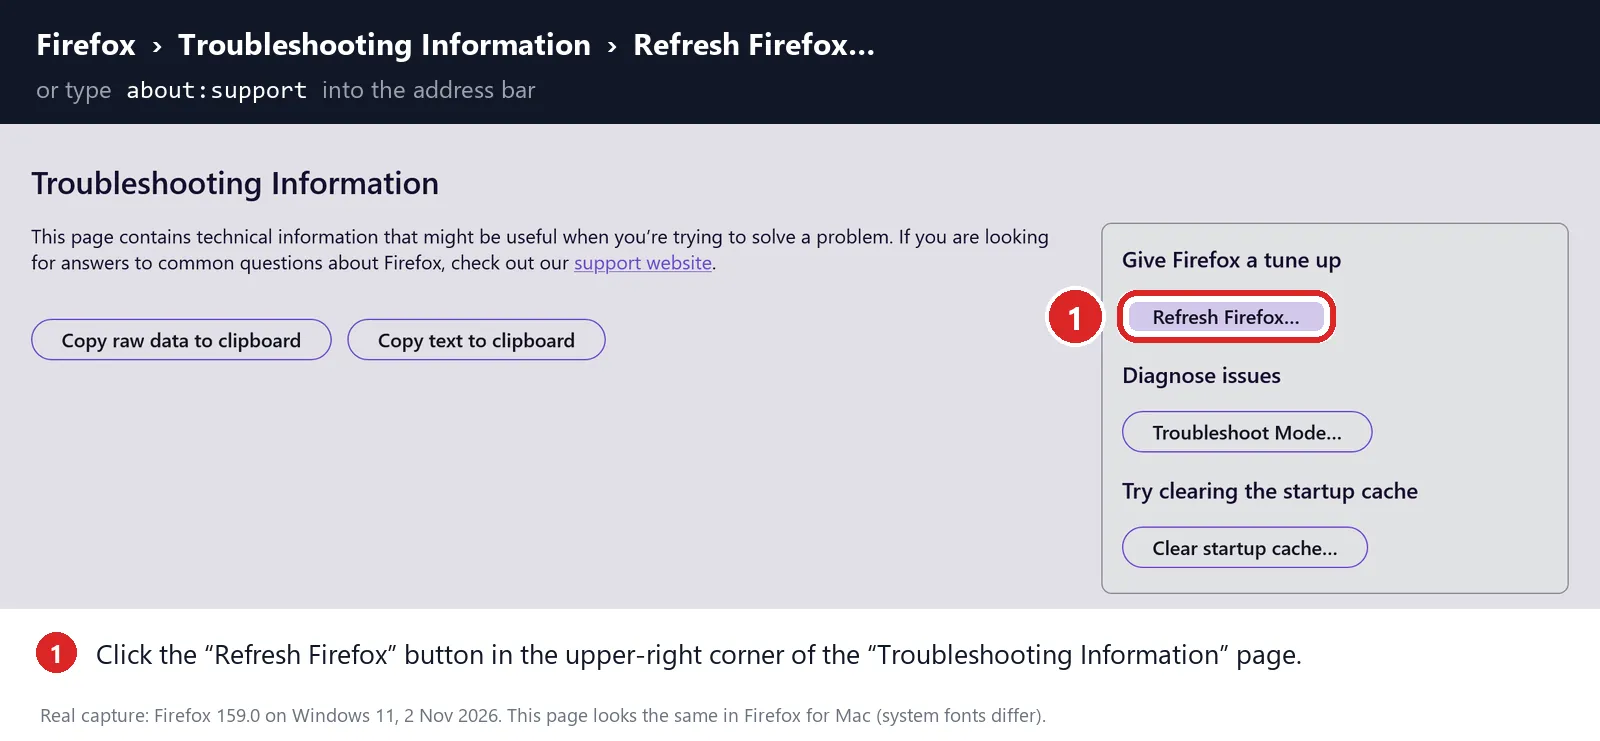
Click the “Refresh Firefox” button in the “Give Firefox a tune up” box in the upper-right corner of the “Troubleshooting Information” page.
-
Confirm.
To continue, click on the “Refresh Firefox” button in the new confirmation window that opens.
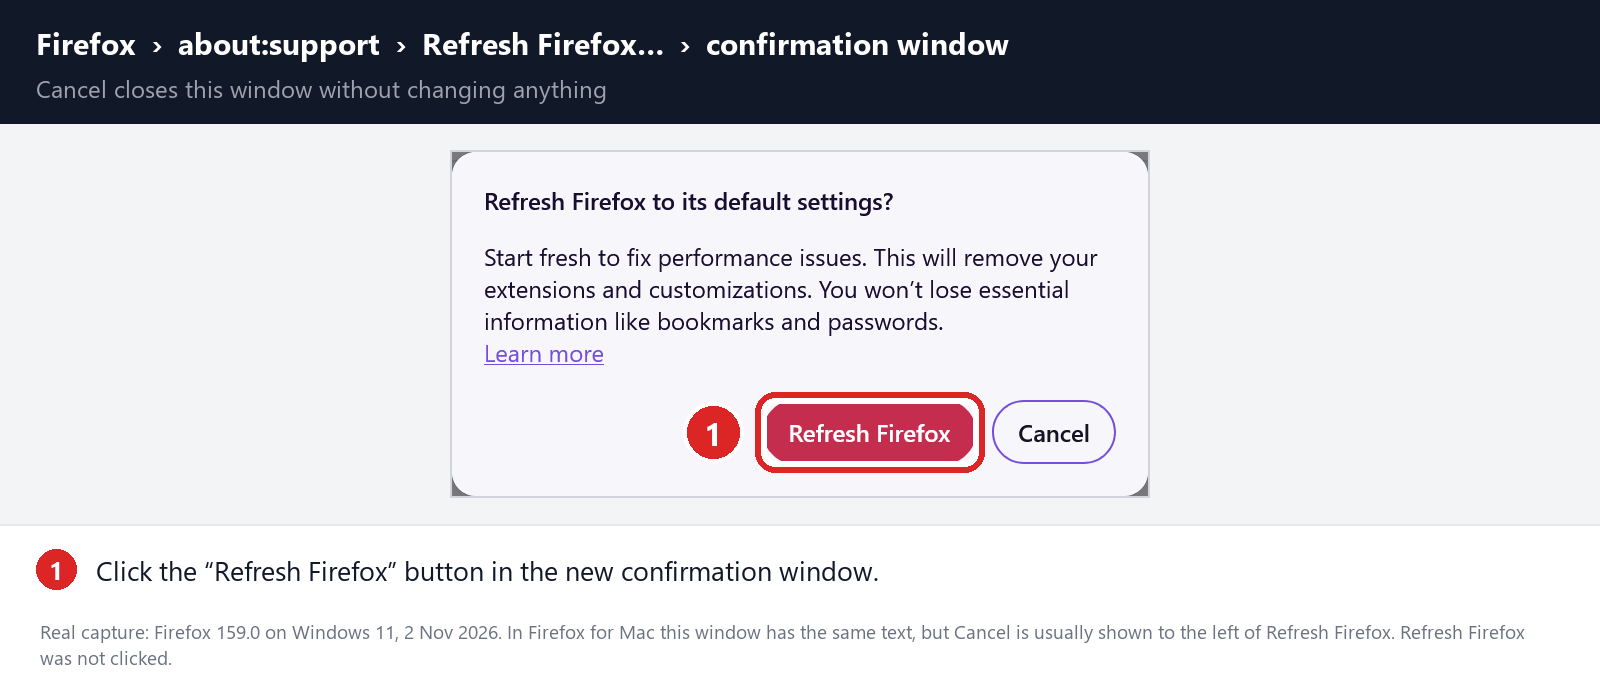
-
Click on “Finish”.
Firefox will close itself and will revert to its default settings. When it’s done, a window will list the information that was imported. Click on the “Finish“.
STEP 4: Run a scan with Malwarebytes for Mac to remove malware
In this final step, we will scan the computer with Malwarebytes for Mac to find and remove any malicious programs that might be installed on your Mac.
Malwarebytes for Mac is a free on-demand scanner that removes the malware other security software tends to miss — adware, browser hijackers, and unwanted programs included. Cleaning an infected Mac with Malwarebytes has always been completely free, and it’s our go-to recommendation. Follow the steps below to scan your Mac and remove what Malwarebytes finds.
-
Download Malwarebytes for Mac
Click the button below to download the latest version of Malwarebytes for Mac.
Download MalwarebytesOfficial installer for macOS. Your download starts right away.Want real-time protection? See Malwarebytes PremiumMalwarebytes Free for MacScans and removes malware at no cost -
Open the Malwarebytes setup file
When the download finishes, open your Downloads folder and double-click the setup file to begin the installation.
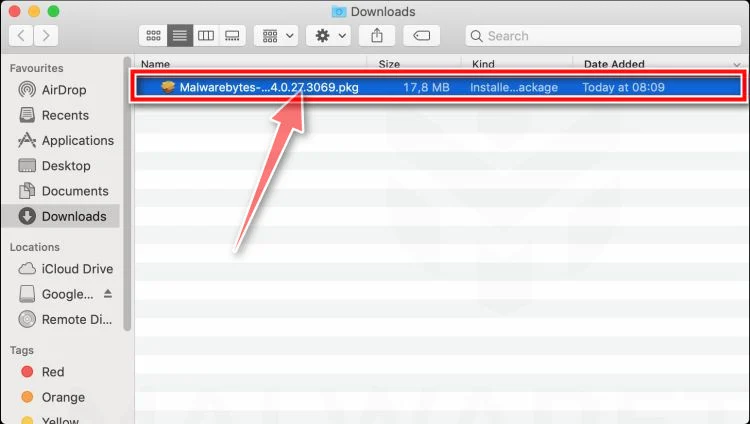
-
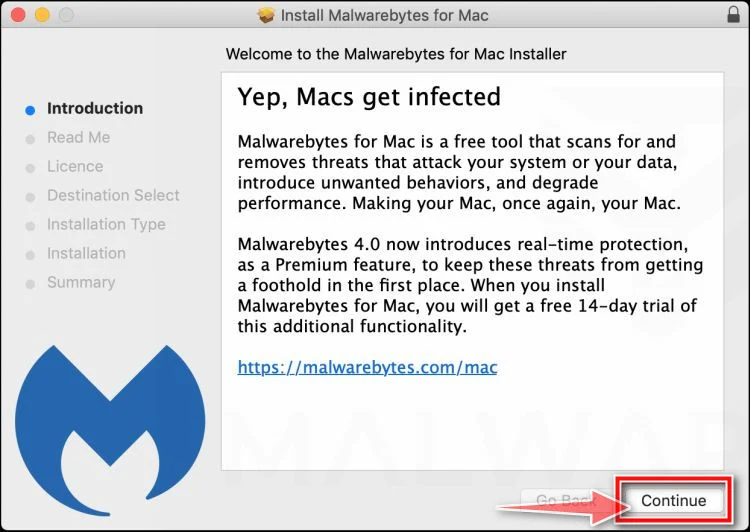
Follow the On-Screen Prompts to Install Malwarebytes
The Malwarebytes for Mac Installer will guide you through a few quick screens. Click “Continue” and keep following the prompts until the installation completes.
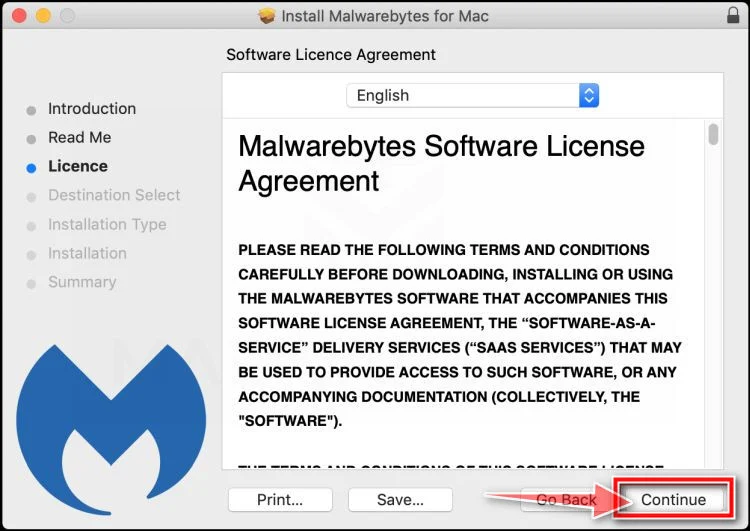
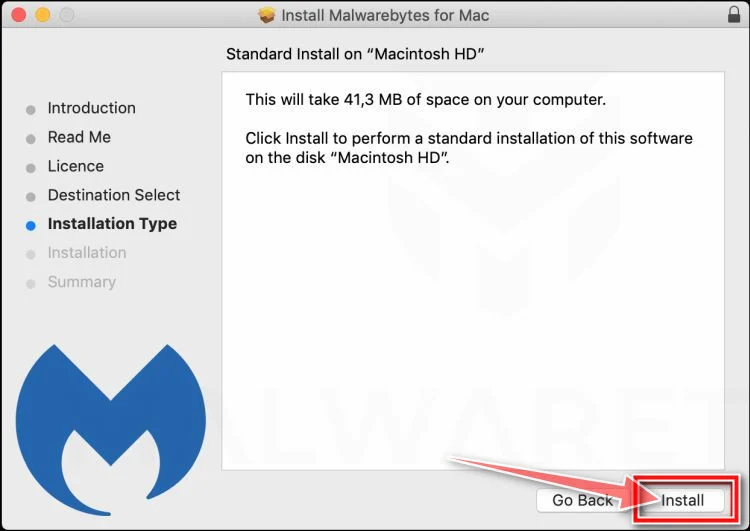
When the installation is complete, Malwarebytes opens to the Welcome to Malwarebytes screen. Click “Get started“.
Malwarebytes needs Full Disk Access to check your whole Mac. When it asks, open System Settings > Privacy & Security > Full Disk Access, turn on Malwarebytes (it may be listed as Malwarebytes Protection), and confirm with your password or Touch ID. Then return to Malwarebytes. On macOS Monterey and earlier, this setting is in System Preferences > Security & Privacy > Privacy.
-
Select “Personal Computer” or “Work Computer”
Malwarebytes will ask what type of computer you’re installing it on. Click either Personal Computer or Work Computer, whichever applies.
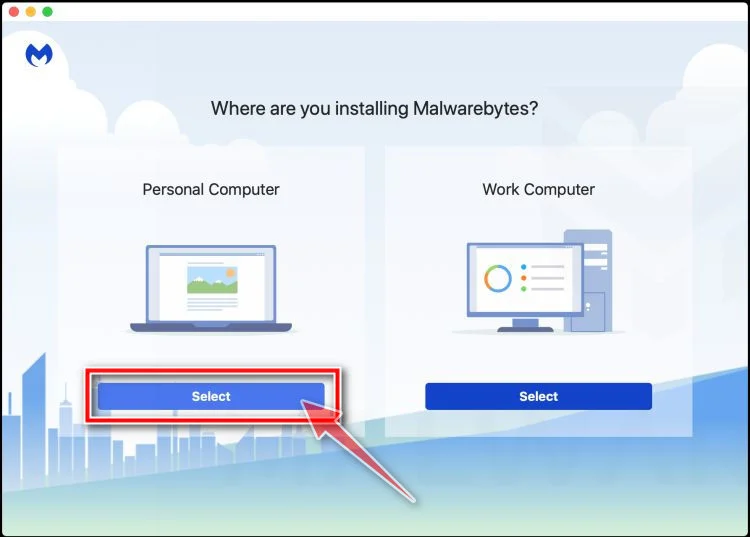
-
Start the Scan
Click the “Scan” button. Malwarebytes will automatically update its detection database and begin checking your Mac for malware.
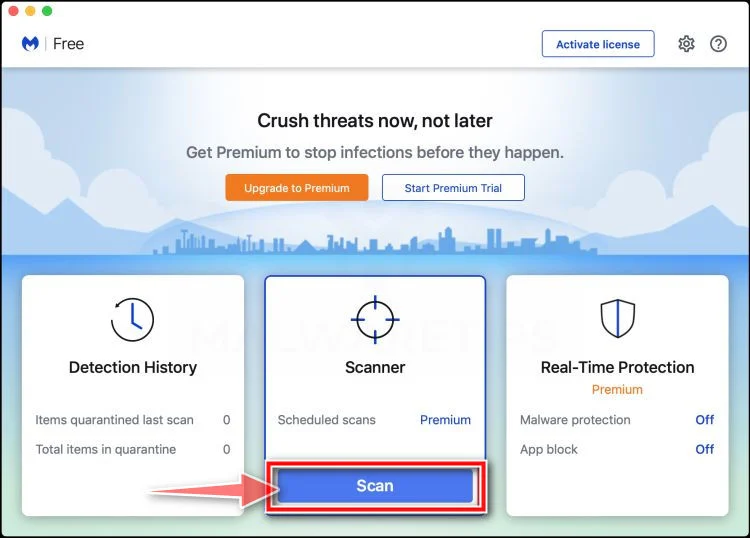
-
Wait for the Scan to Finish
Malwarebytes will scan your Mac for adware, browser hijackers, and other malicious programs. This can take a few minutes, so feel free to do something else — just check back occasionally to see the progress.
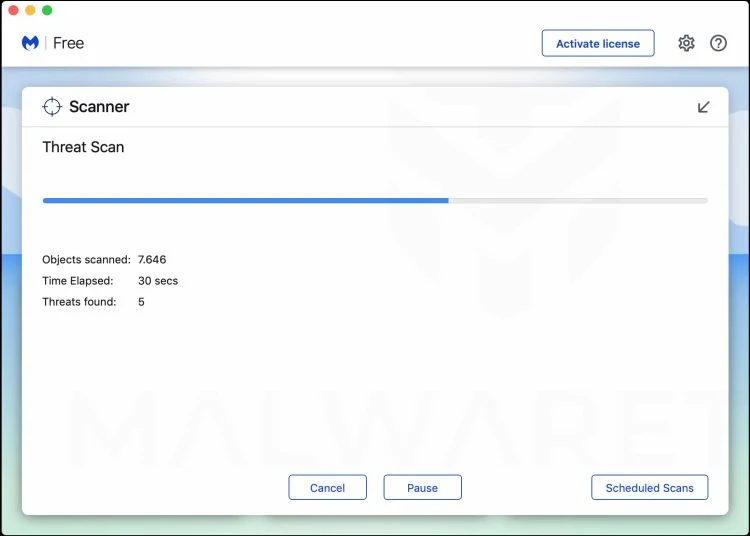
-
Quarantine the Detected Threats
When the scan is done, you’ll see a list of everything Malwarebytes found. Click the “Quarantine” button to remove all the threats at once.
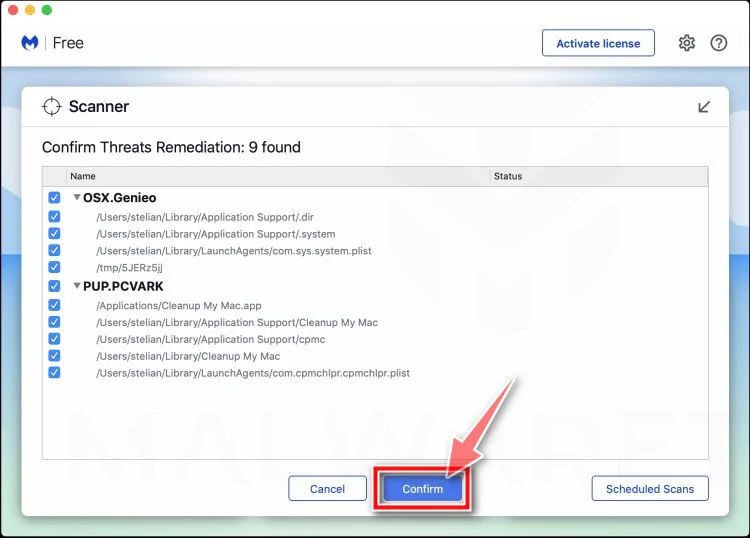
-
Restart Your Mac
Malwarebytes will now remove all the malicious files it found. Some threats can only be fully removed after a reboot — if Malwarebytes asks you to restart, allow it. Once you’re logged back in, check whether the problems you noticed have stopped. If they come back, save the scan report and ask for help in our forum.
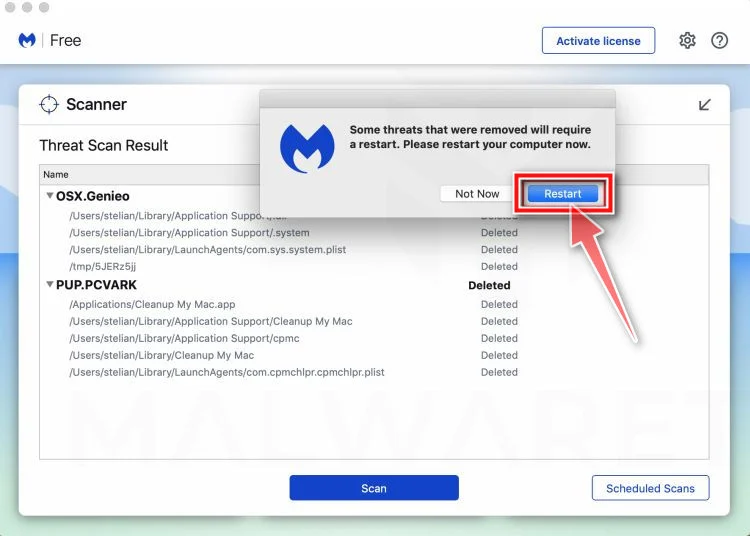
When you’ve finished these steps, check whether the problems you noticed have stopped. If they continue, see the options below.
If you are still experiencing problems while trying to remove a malicious program from your computer, please ask for help in our Mac Malware Removal Help & Support forum.
Remove Unwanted Apps and Malware from Android
- STEP 1: Uninstall malicious apps
- STEP 2: Stop spam notifications and redirects in your browser
- STEP 3: Use Malwarebytes for Android to remove malicious apps
STEP 1: Uninstall malicious apps
In this first step, we will check if any malicious apps are installed on your phone. Sometimes browser hijackers or adware apps can have usable Uninstall entries that can be used to remove these apps.
-
Open the “Settings” menu.
Tap on the “Settings” app from your phone menu or home screen.
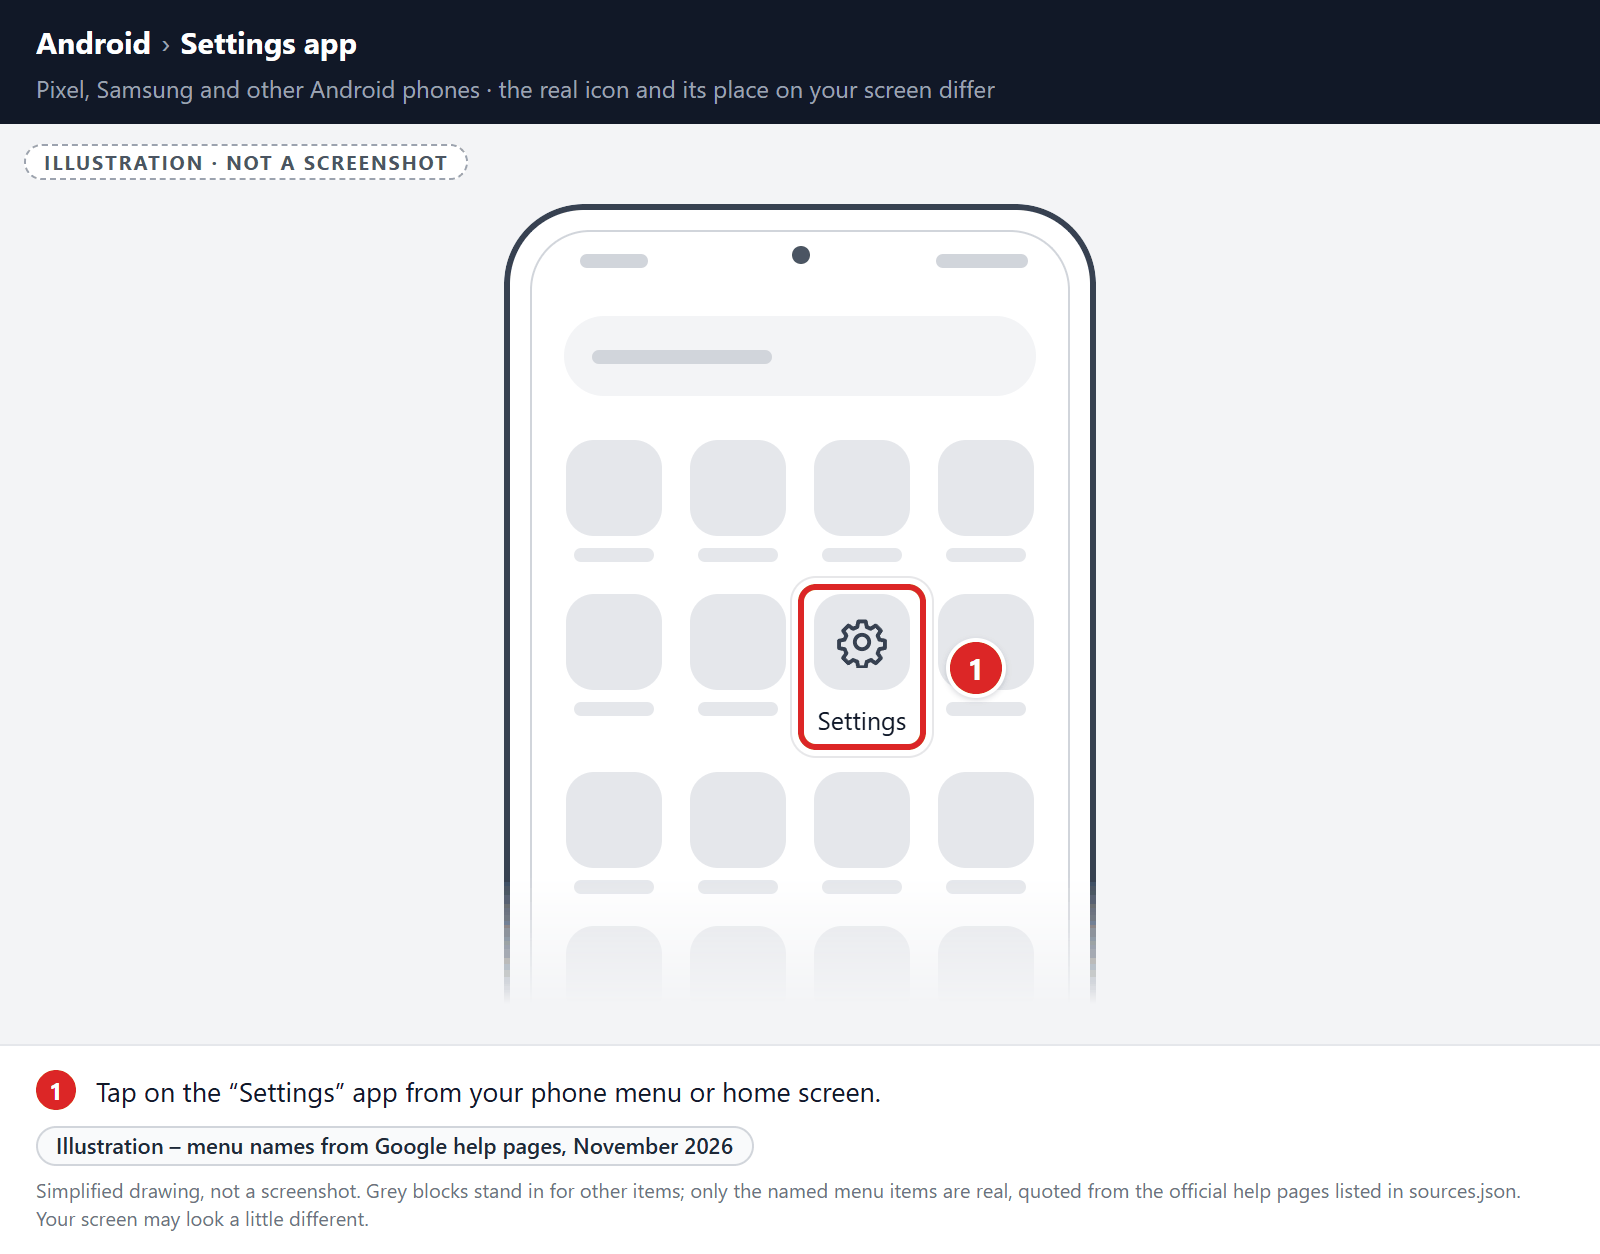
-
Tap on “Apps”.
When the “Settings” menu opens, tap on “Apps” to see all the installed applications on your phone. On Pixel and some other phones, tap “See all apps” next.
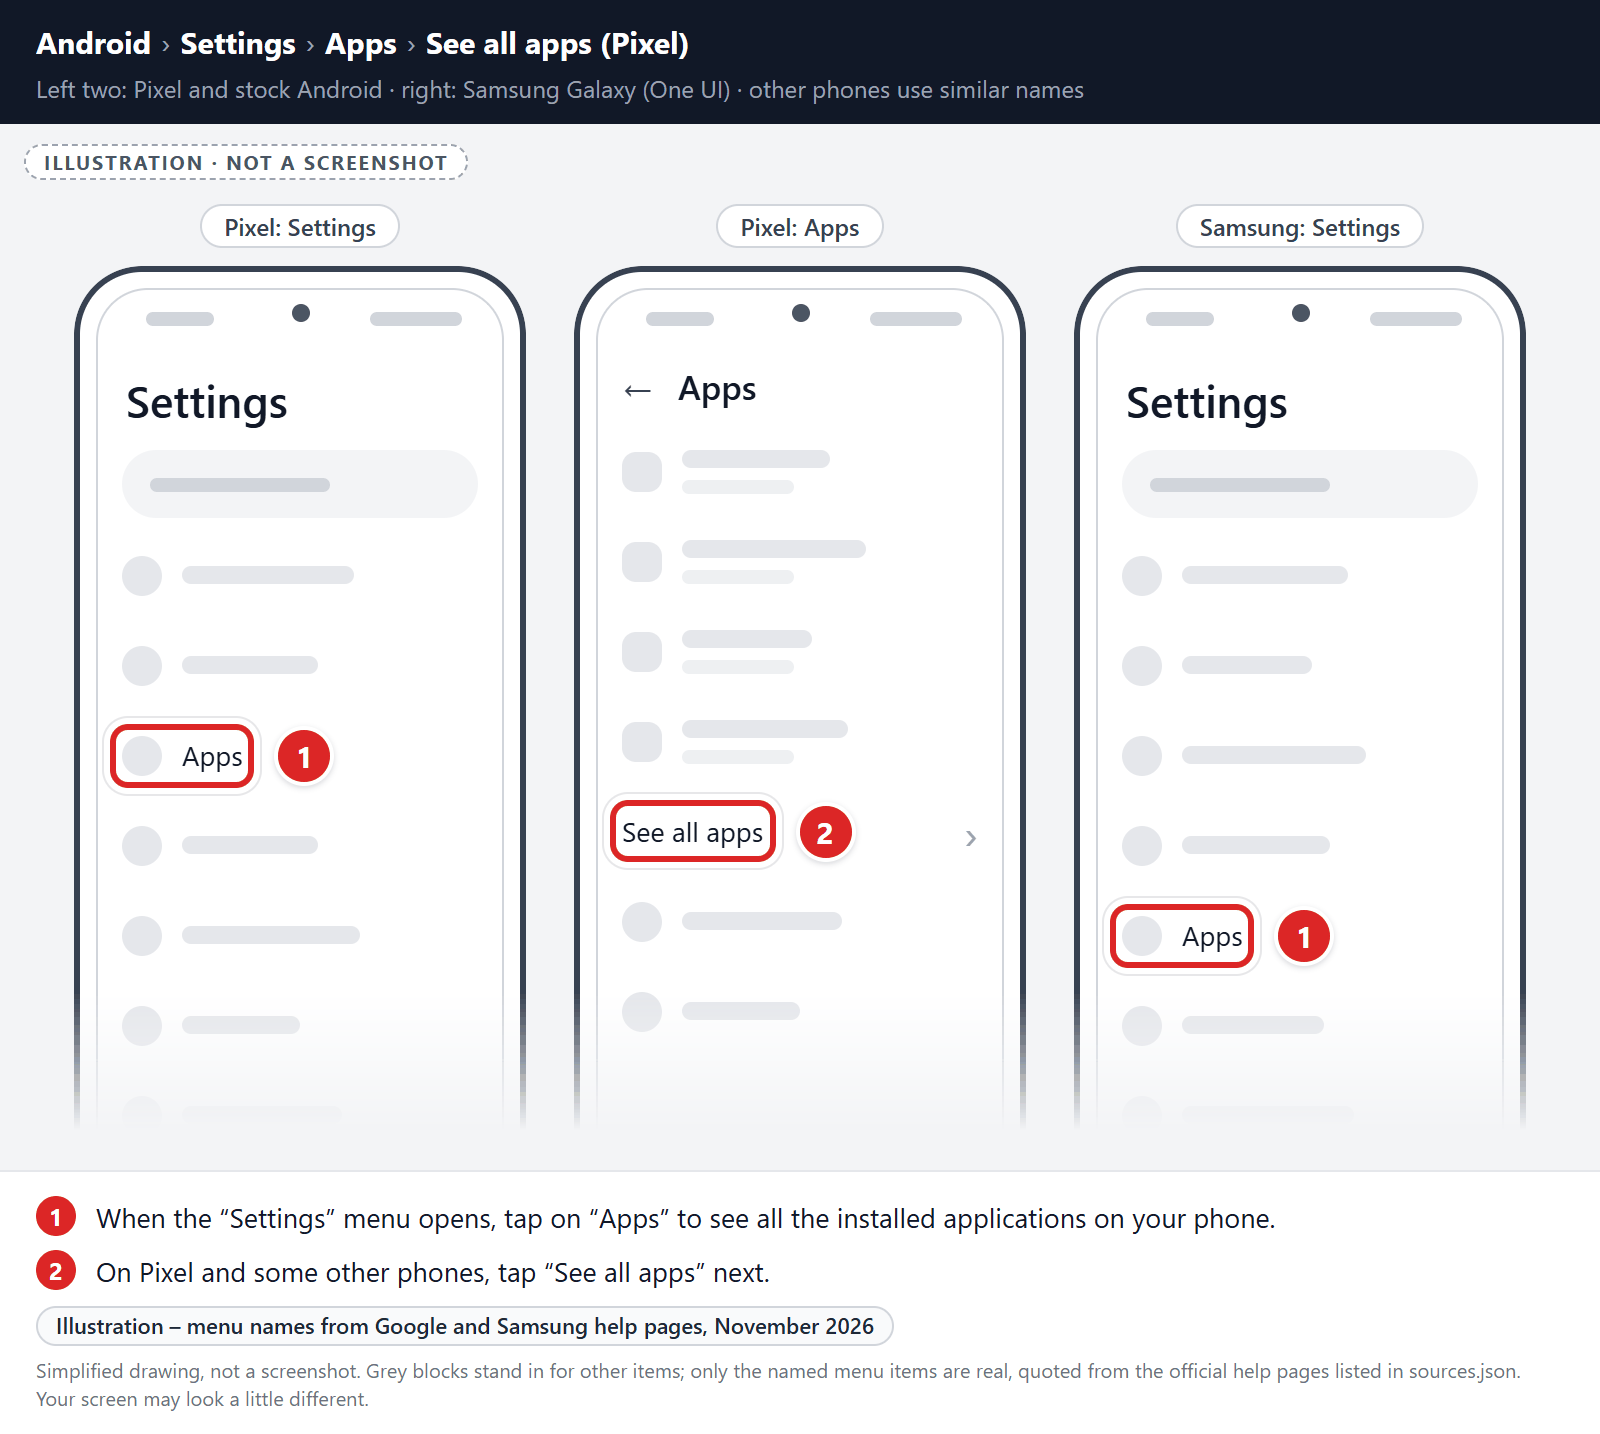
-
Find the malicious app.
The “Apps” screen will be displayed with a list of all the applications that are installed on your phone. Scroll through the list and look out for any suspicious app that could be behind all the drama – anything you don’t remember downloading or that doesn’t sound like a genuine program.
Most often, cyber criminals hide malware inside video or photo editing apps, weather apps, and camera apps.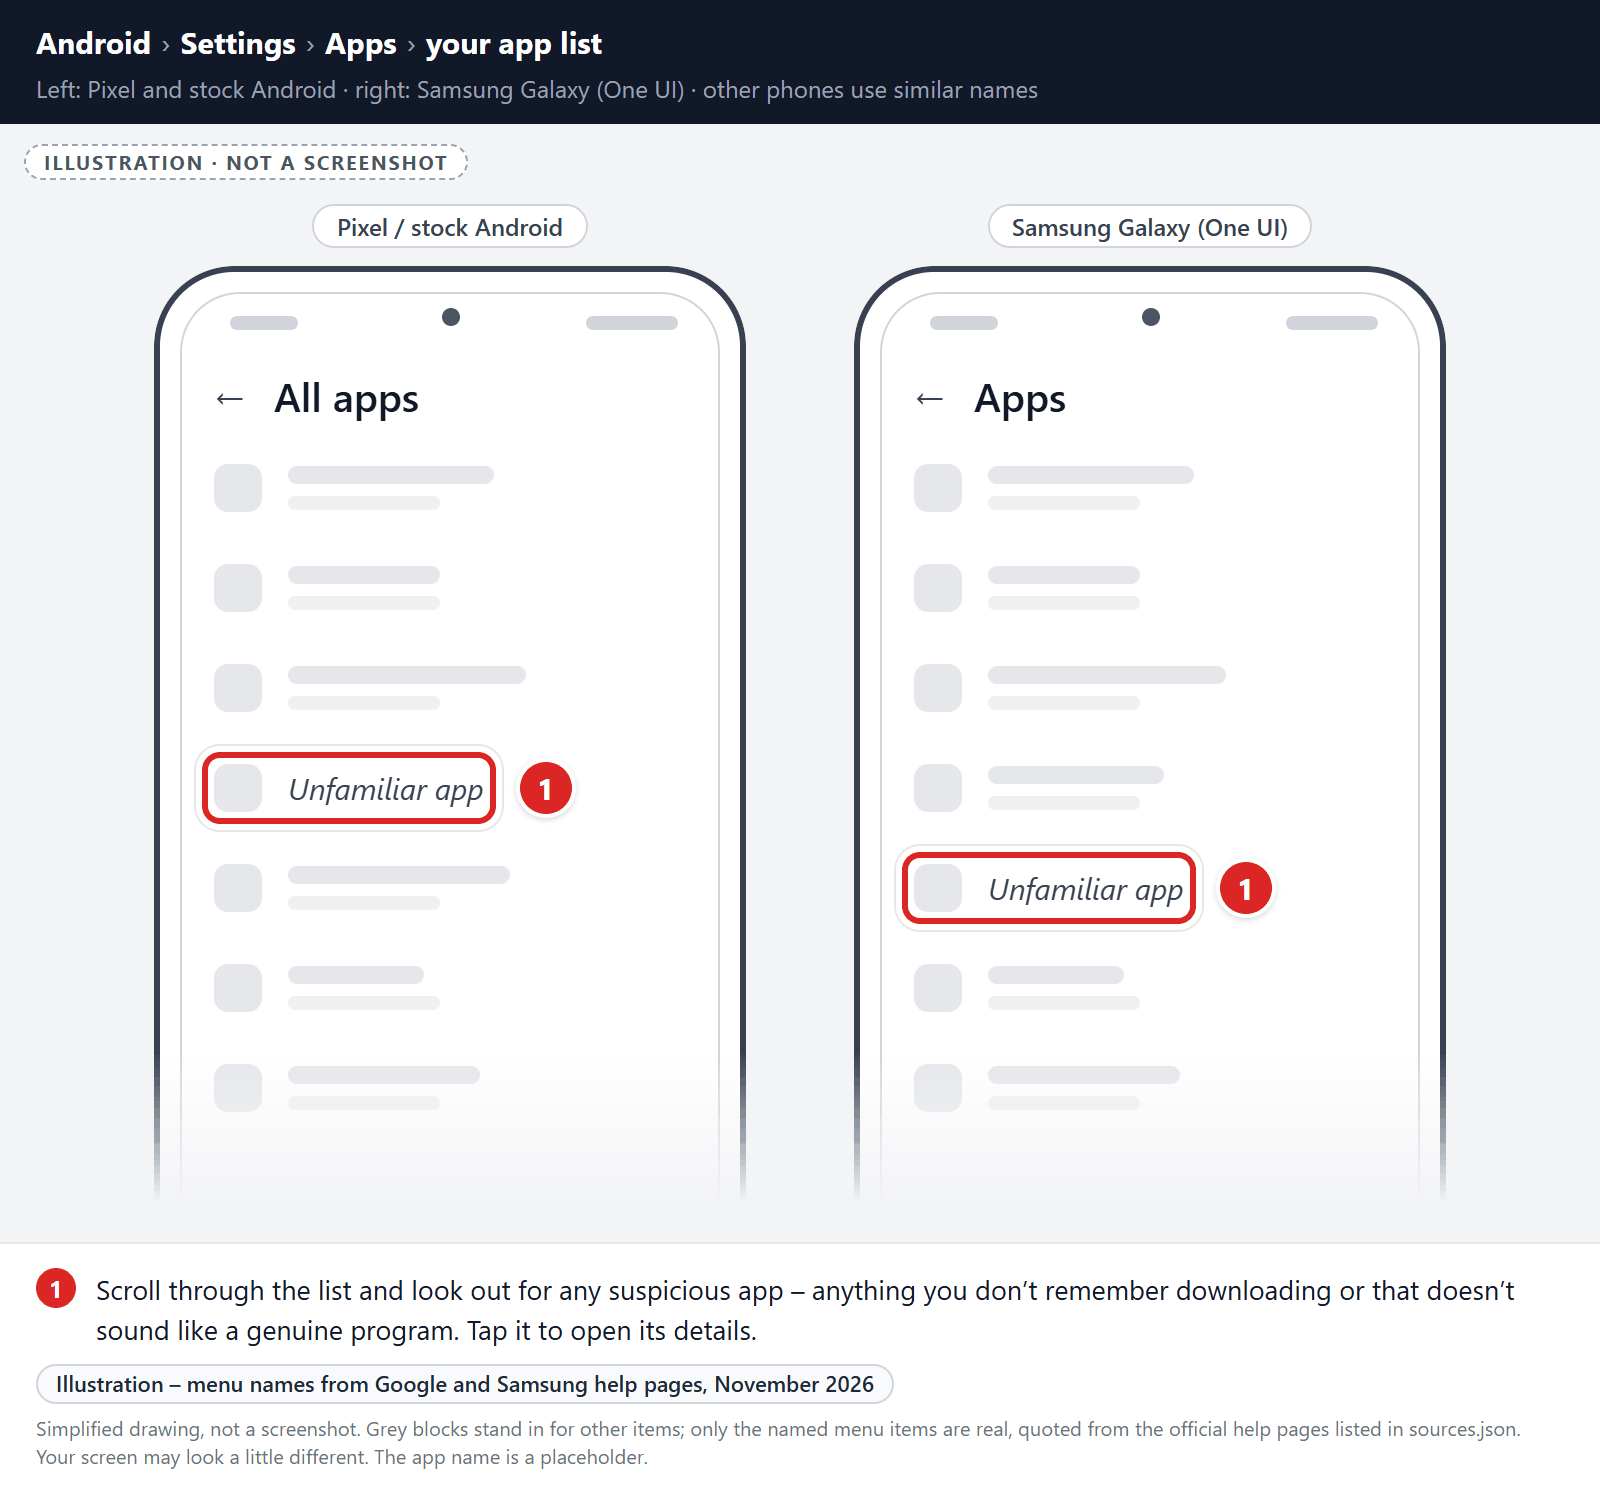
-
Uninstall the malicious app
When you find a suspicious or malicious app, tap on it to uninstall it. This won’t start the app but will open up the app details screen. If the app is currently running press the “Force stop” button, then tap on “Uninstall”.
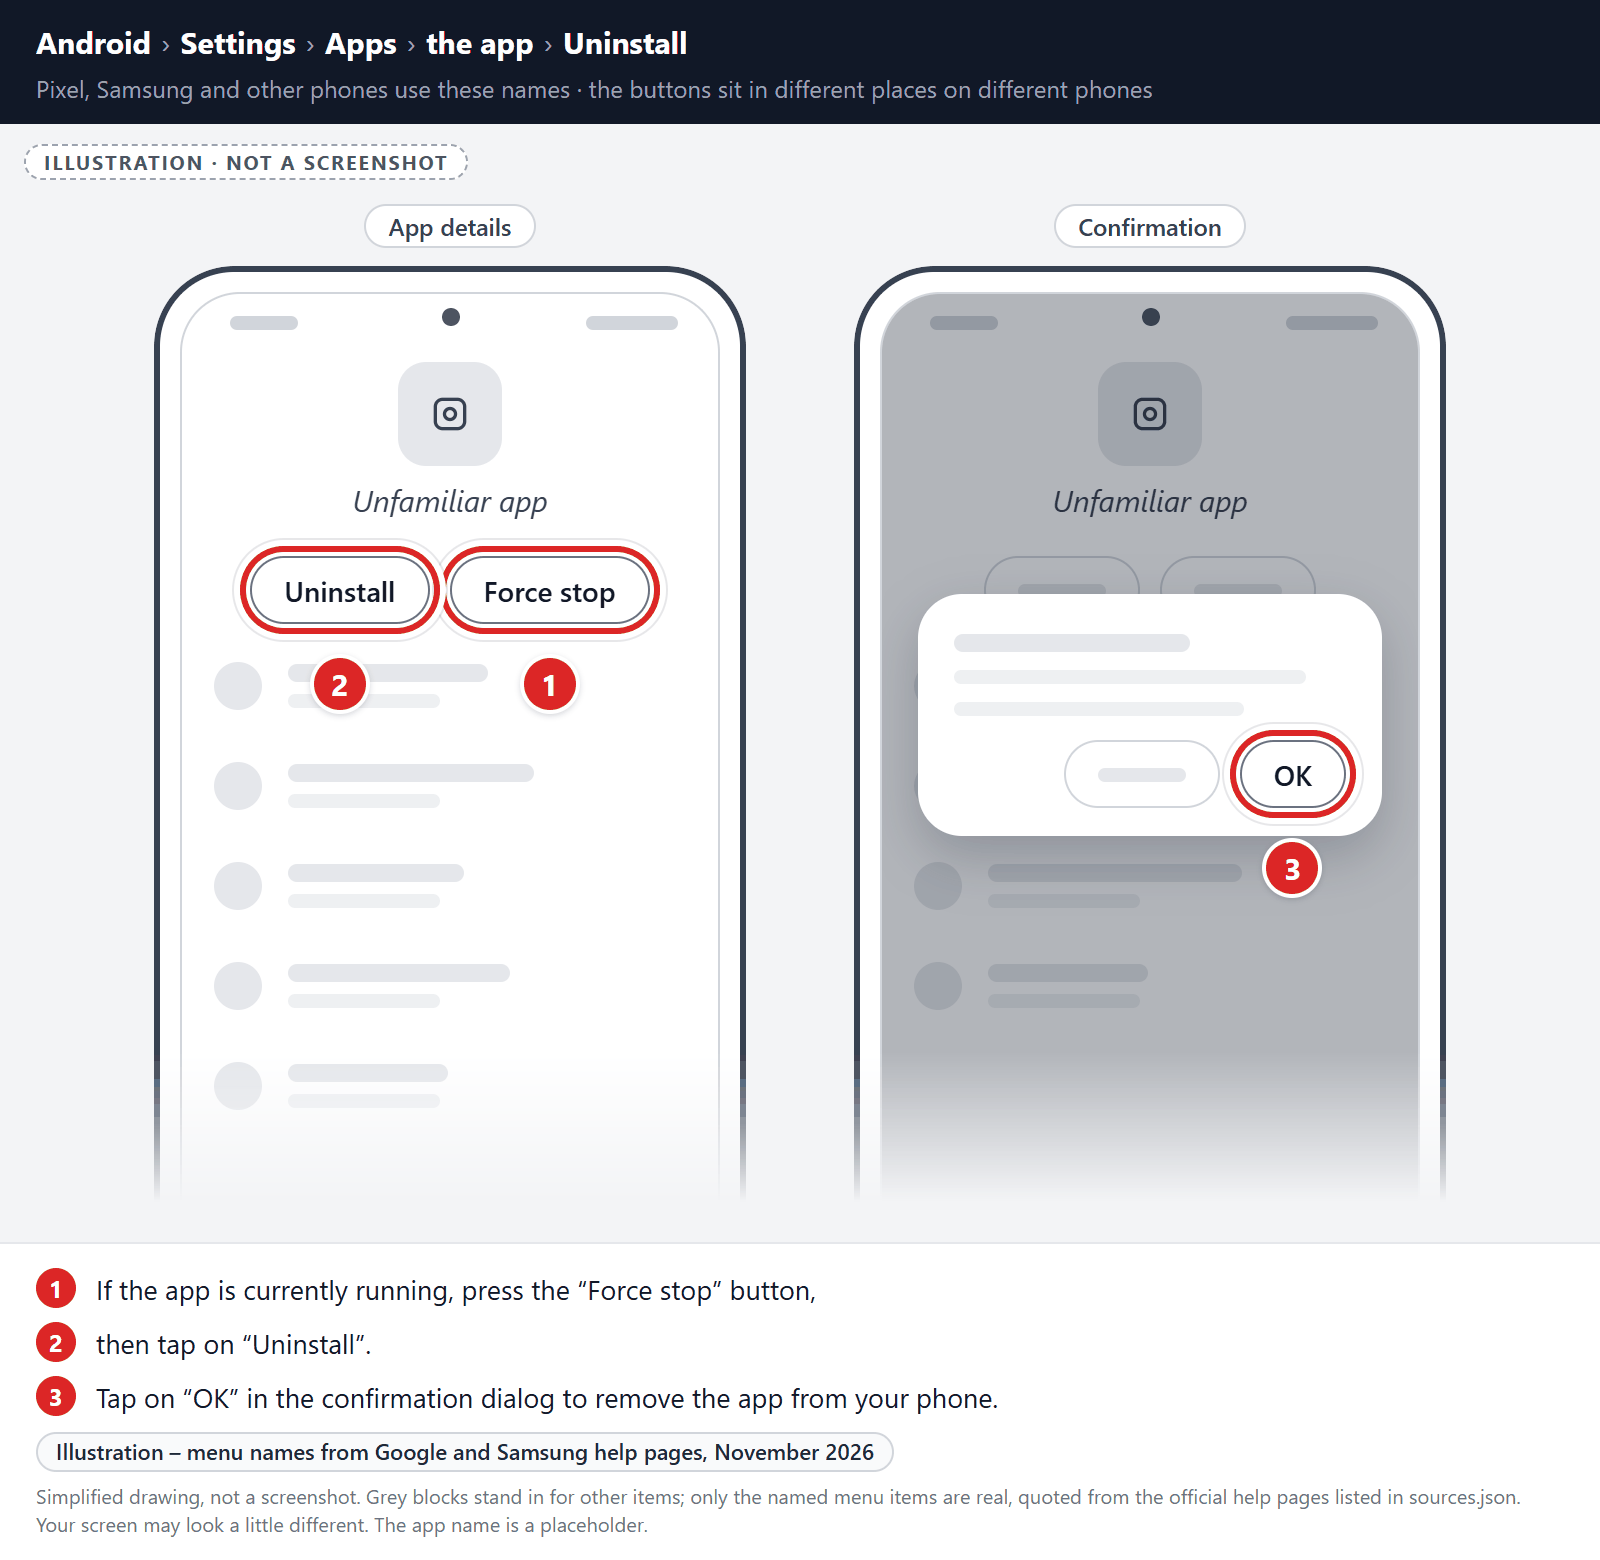
A confirmation dialog should be displayed to confirm you want to uninstall the app, tap on “OK” to remove the malicious app from your phone.
STEP 2: Stop spam notifications and redirects in your browser
In this second step, we will stop spam notifications in your browser. If unwanted pages or redirects still appear after that, we will reset the browser by clearing its app storage. That is a last resort, because it can delete data that isn’t synced.
Android browsers don’t have a single “reset settings” button like browsers on a computer, but they do let you control what each website is allowed to do. Start with the least disruptive fix: block the spam site’s notifications in the browser’s settings. In Chrome, you can also delete cookies and site data: tap More (three dots) > Delete browsing data.
Clear the browser’s app storage only if unwanted pages or redirects keep coming back. It works like a full reset, but it also deletes data that isn’t synced, so treat it as a last resort.
Remove malware from Chrome for Android
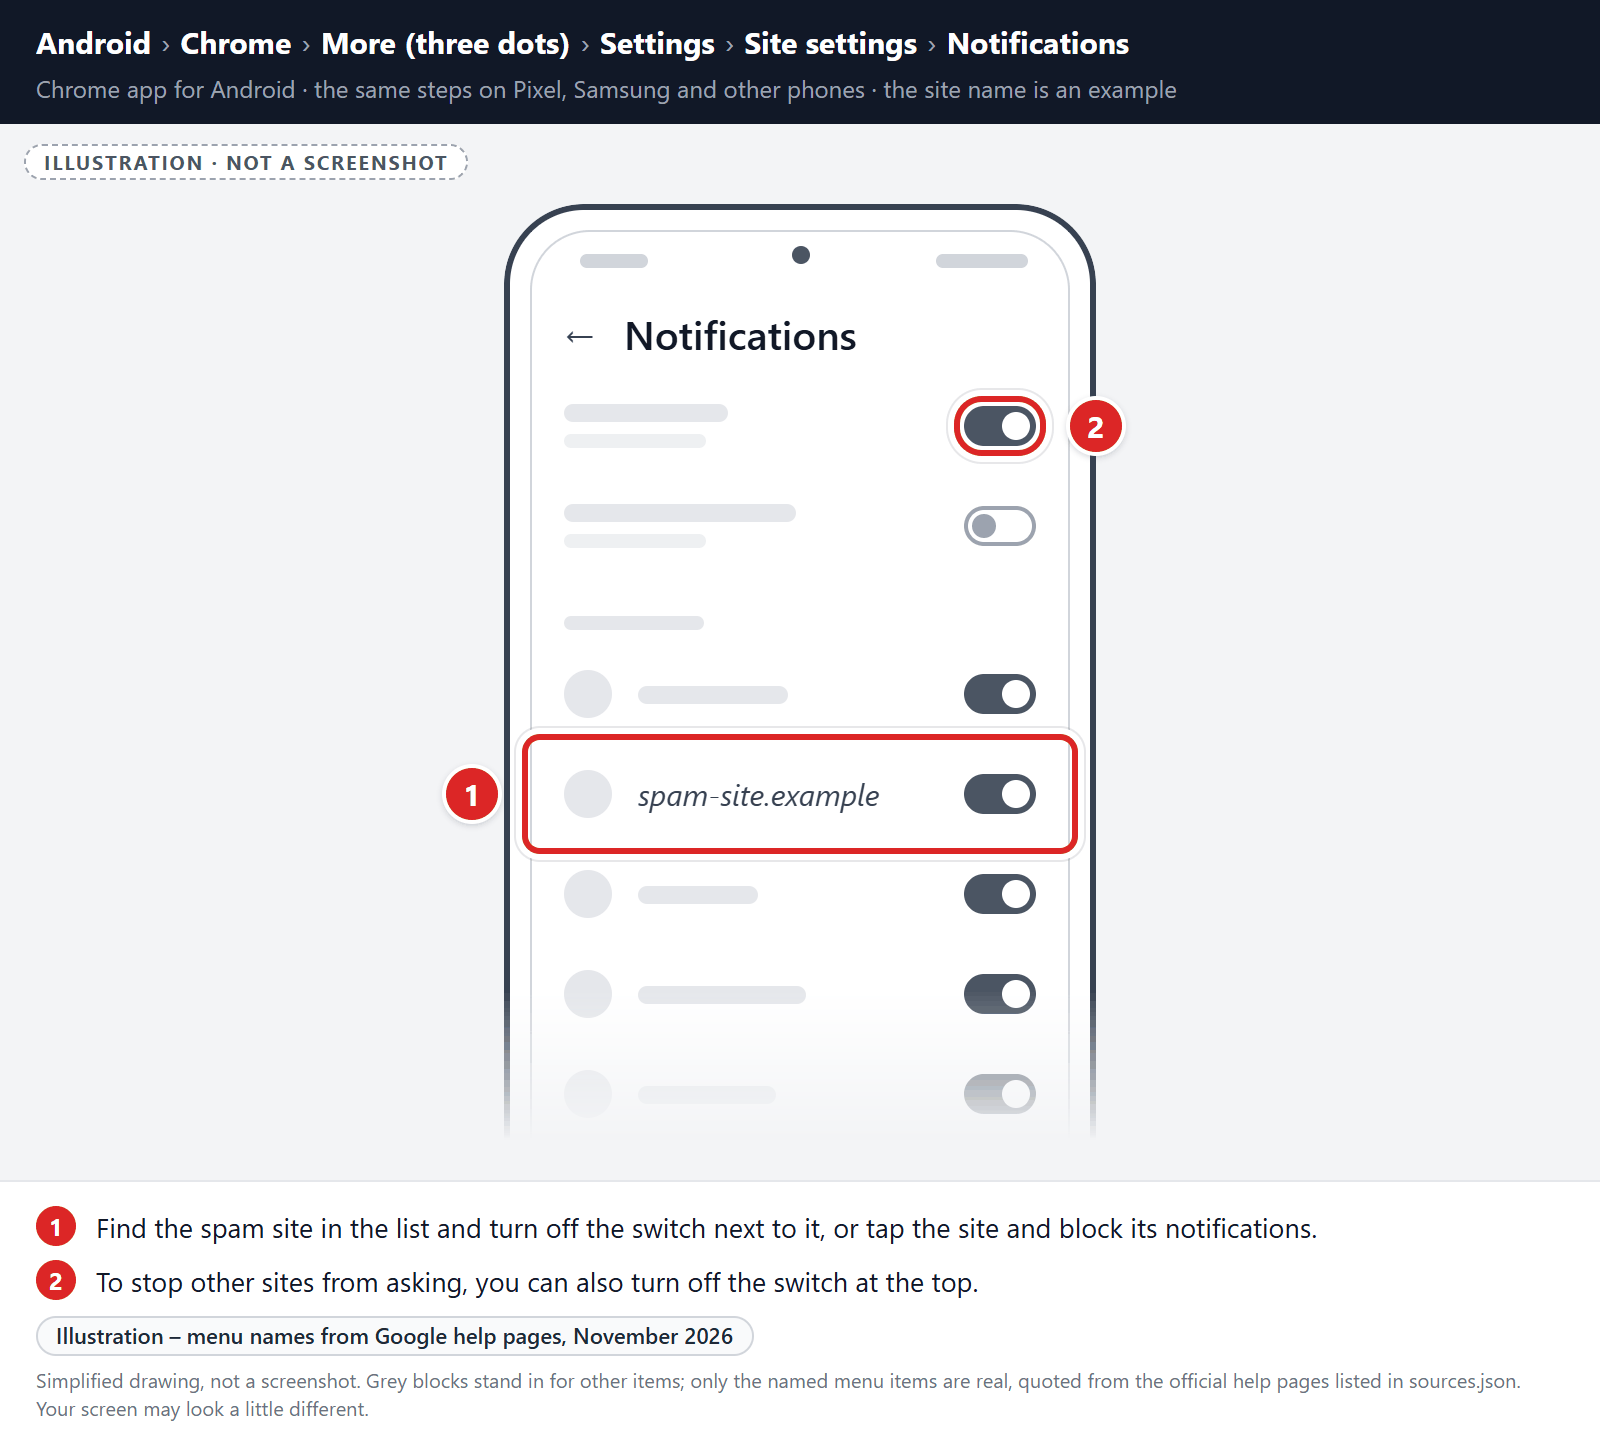
First, block the spam site’s notifications:
- Open Chrome, tap the More button (three dots) in the top-right corner, and tap Settings.
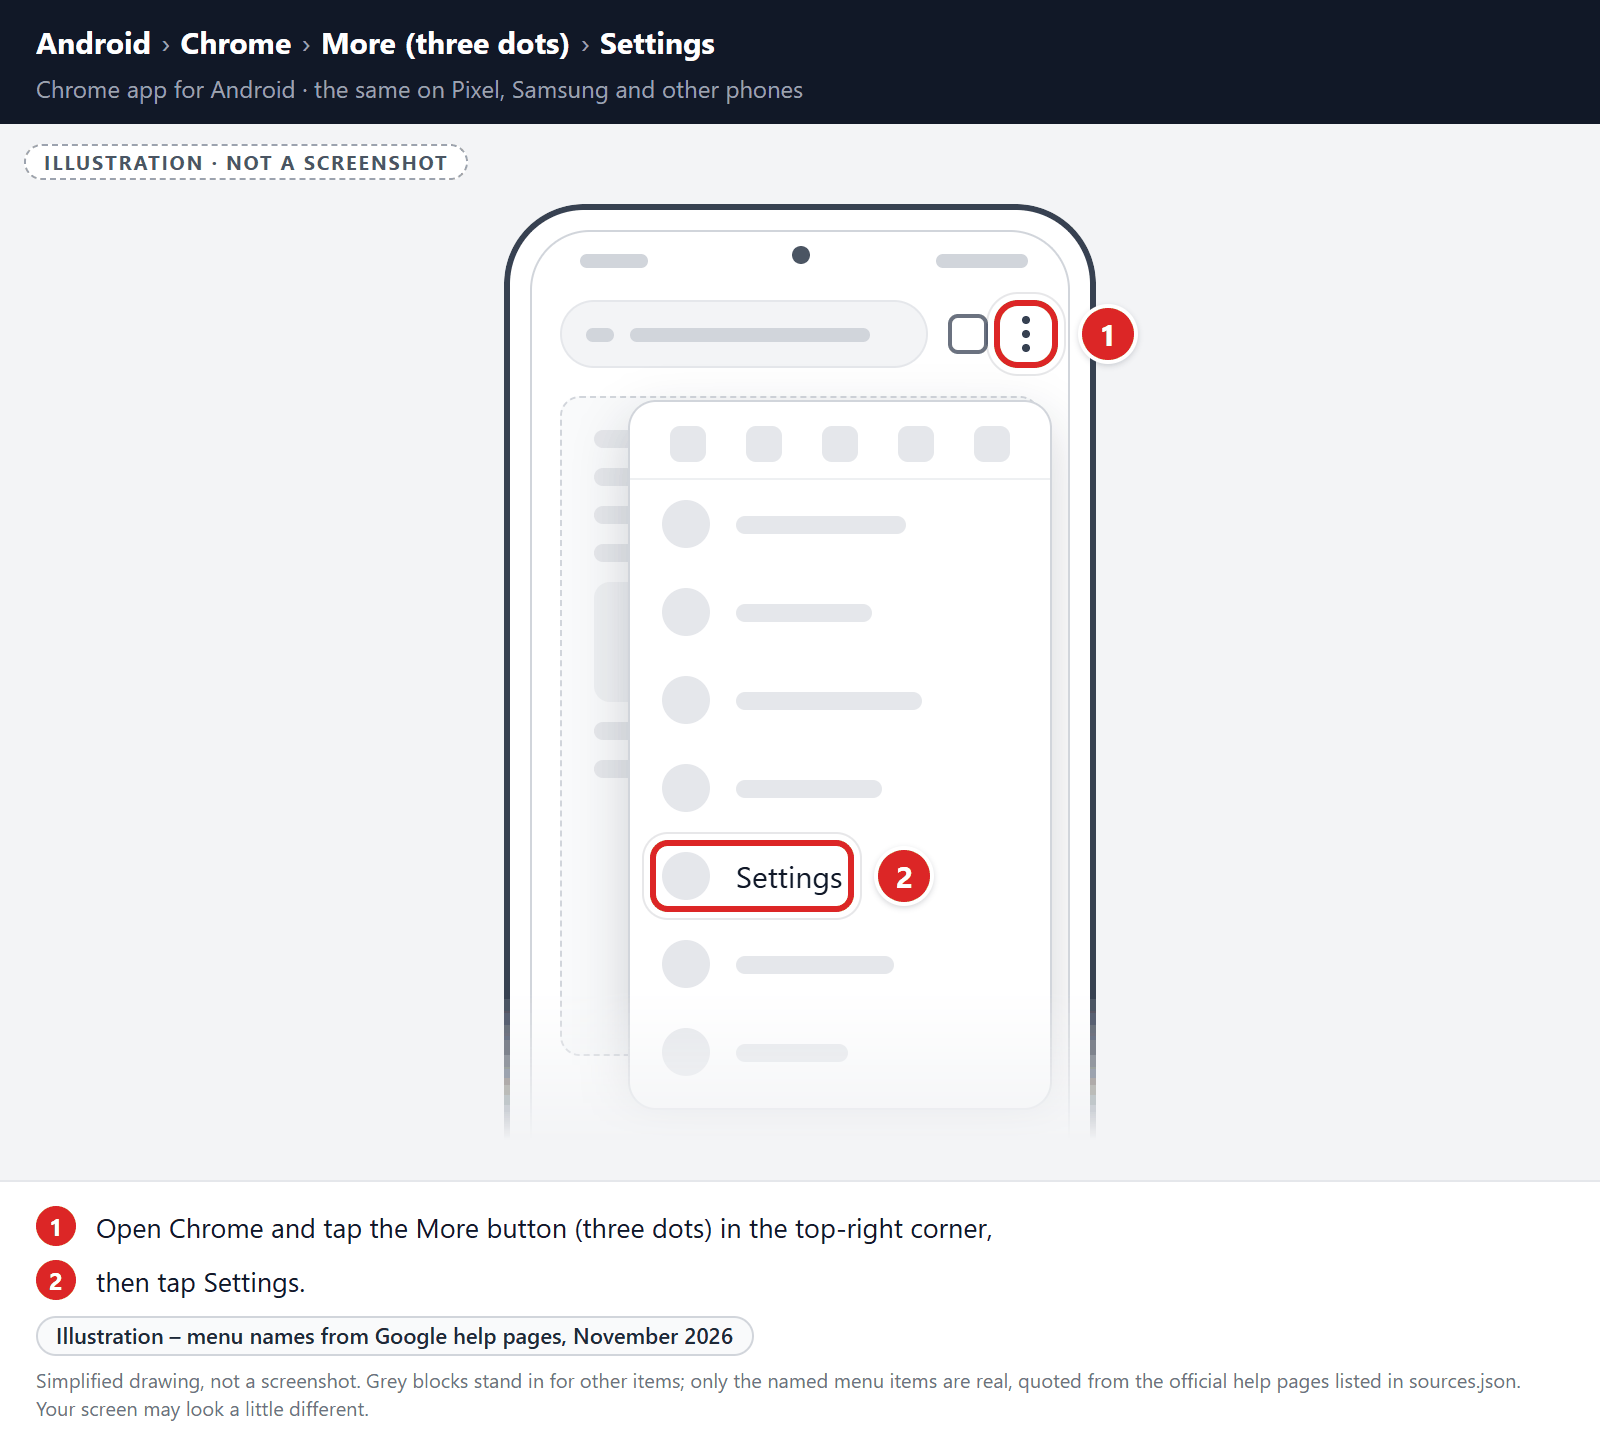
- Tap Site settings, then tap Notifications.
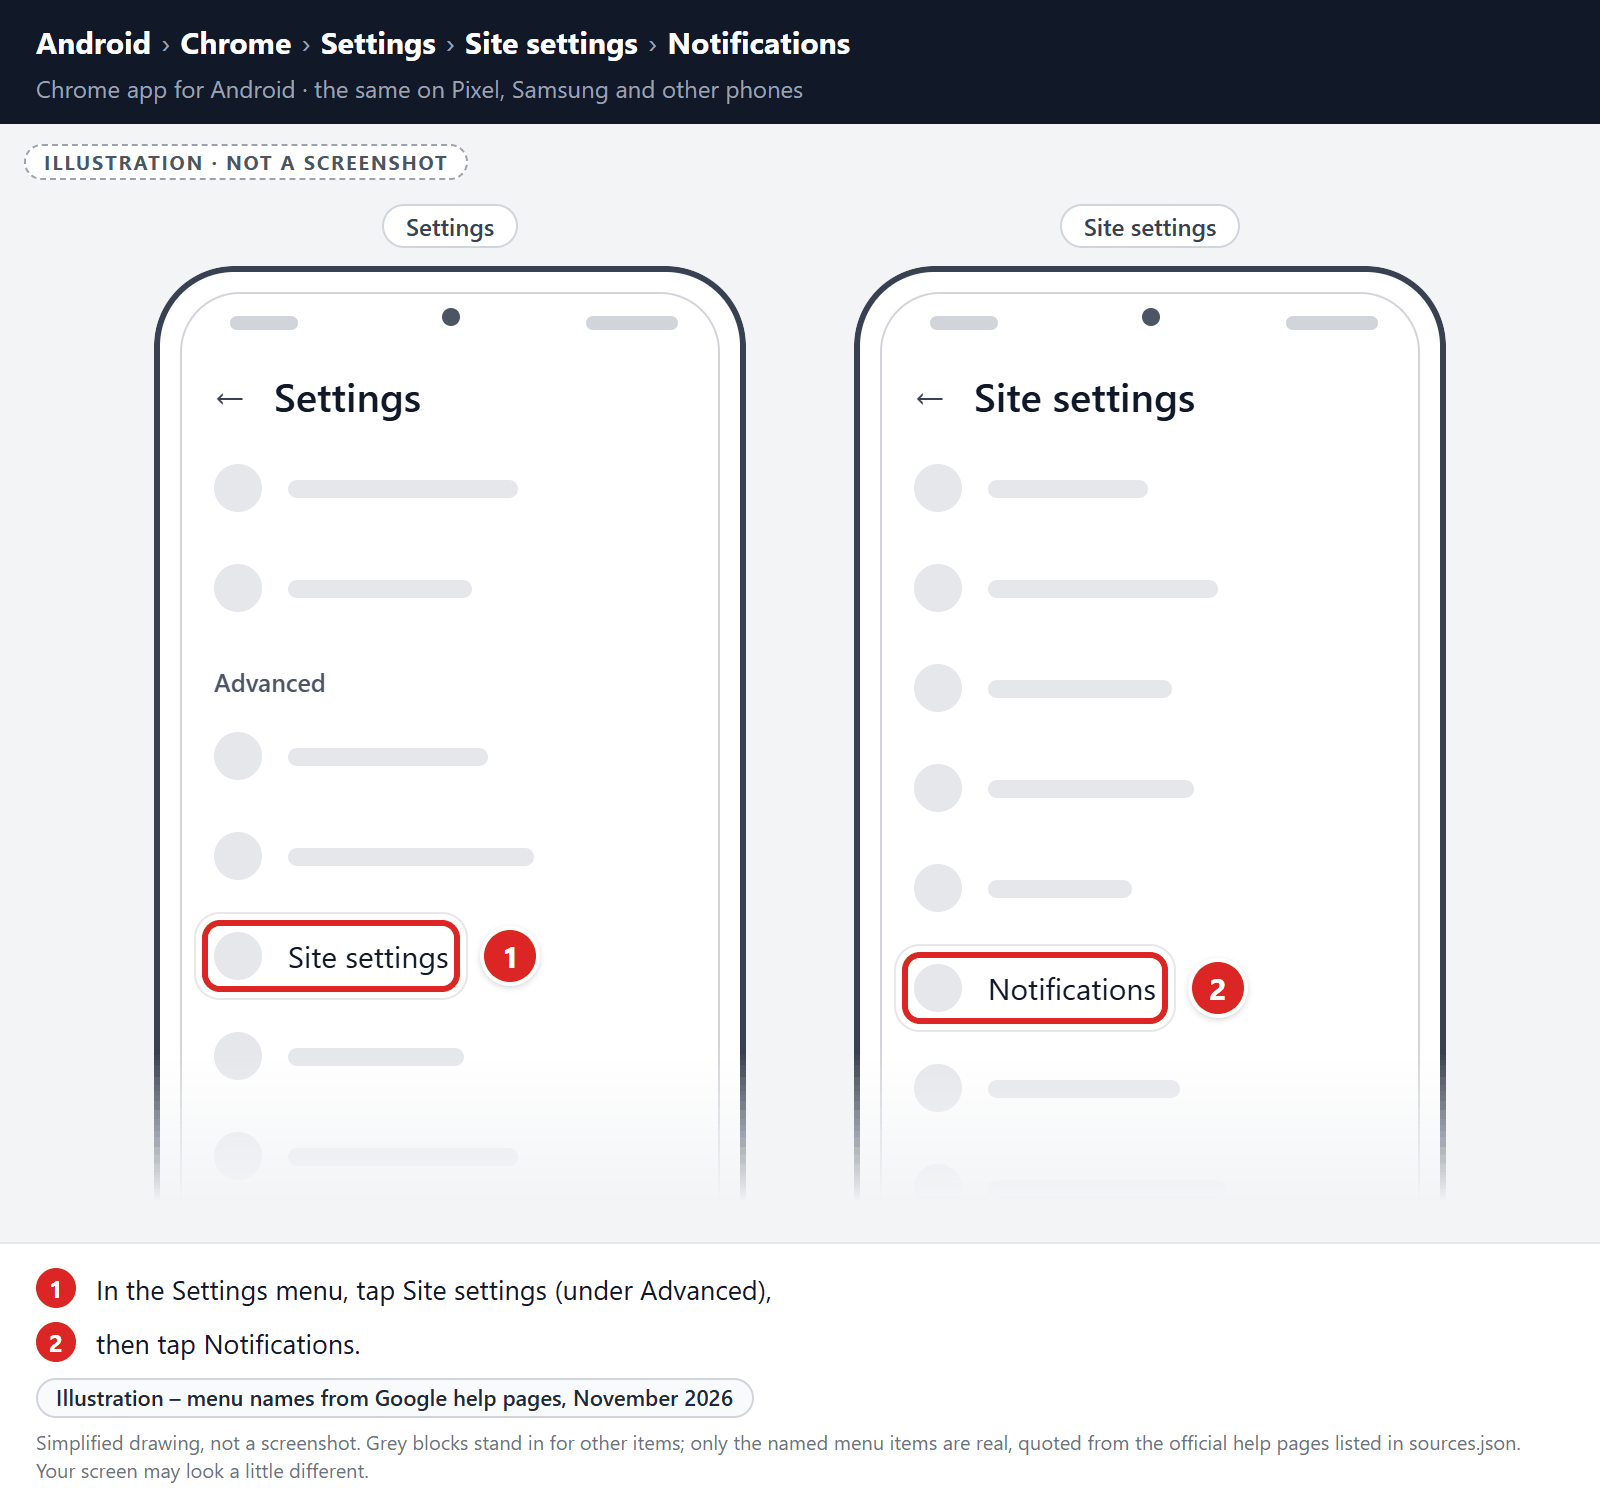
- Find the spam site in the list and turn off the switch next to it, or tap the site and block its notifications. To stop other sites from asking, you can also turn off the switch at the top.
If unwanted pages or redirects keep appearing, clear Chrome’s storage (last resort):
-
Open the “Settings” menu.
Tap on the “Settings” app from your phone menu or home screen.
-
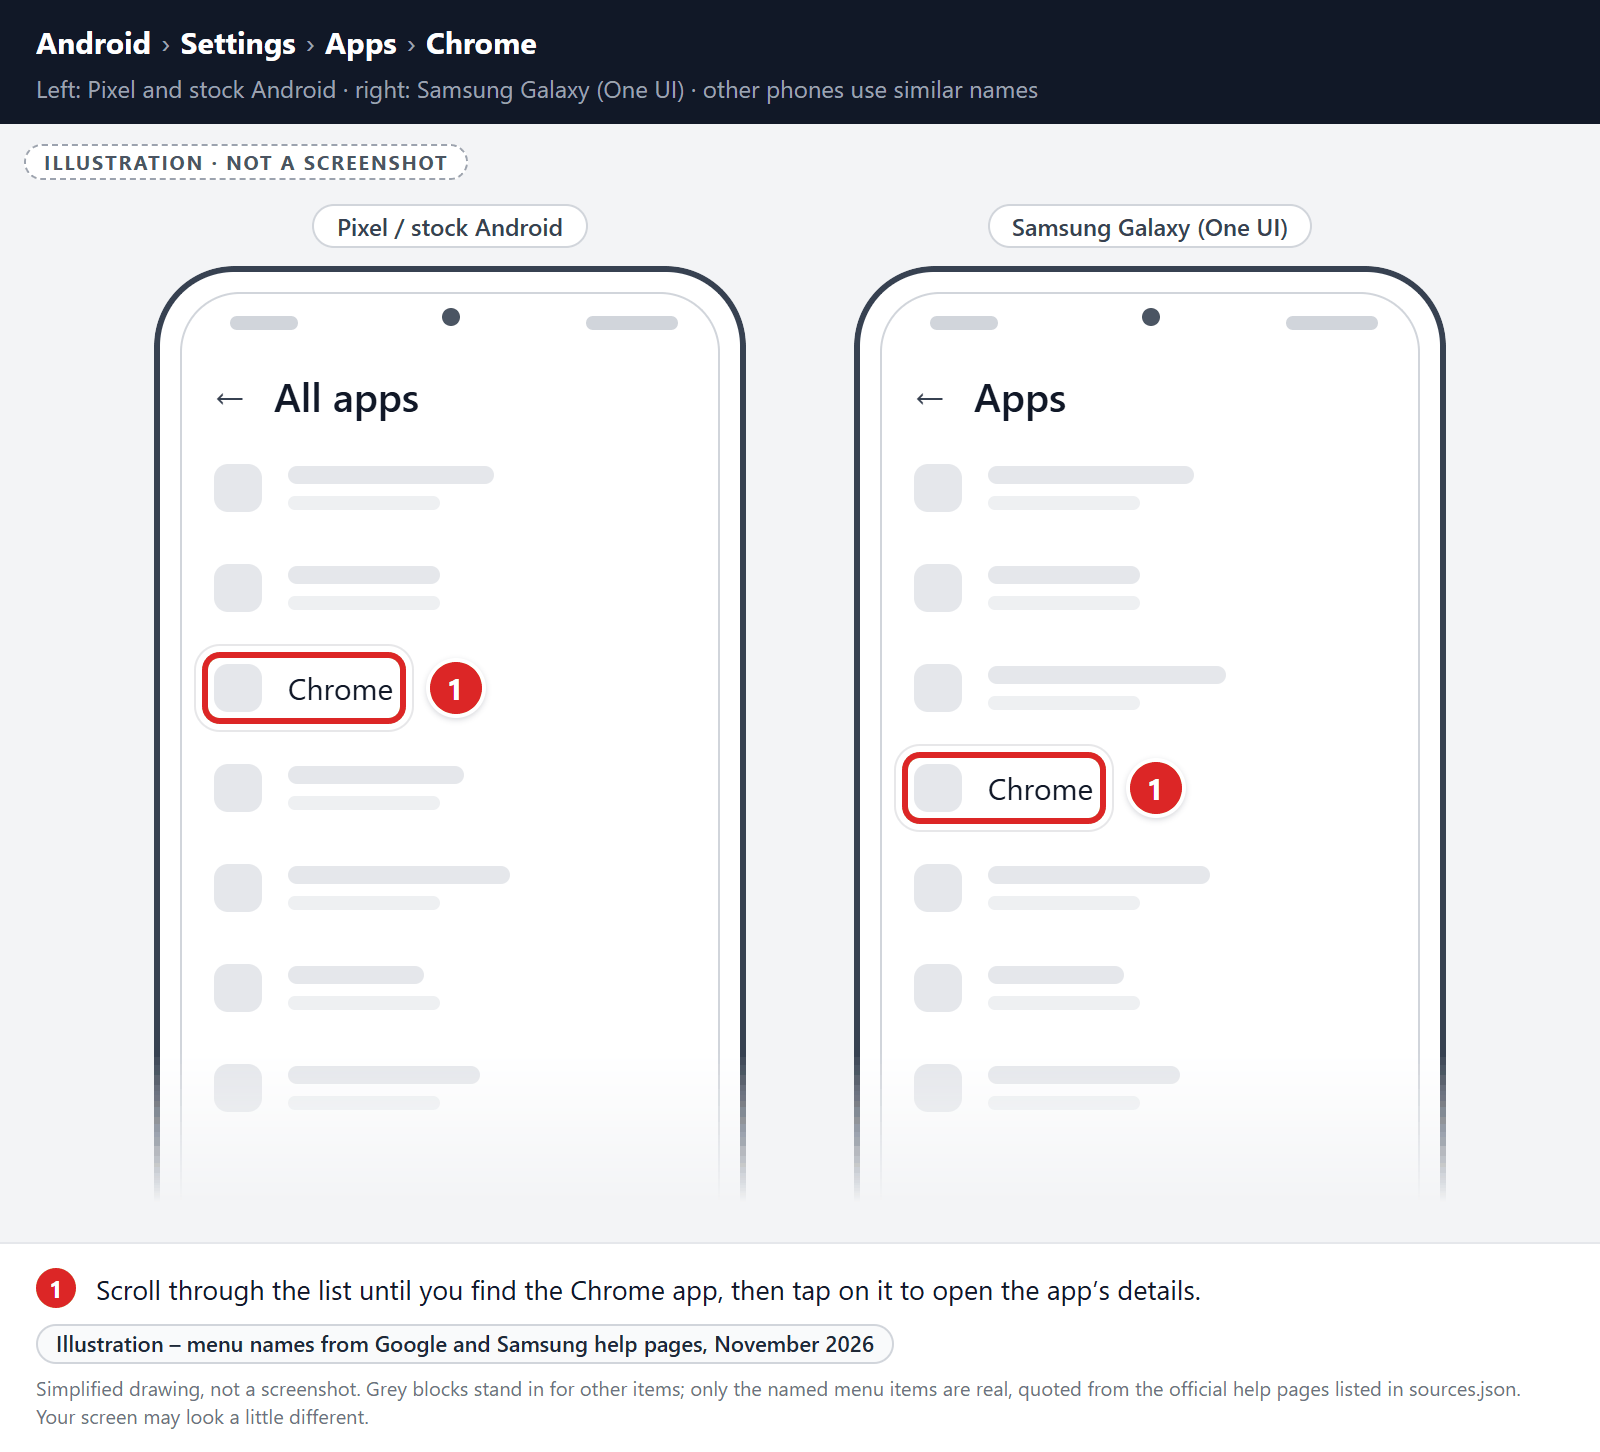
Tap on “Apps”.
When the “Settings” menu opens, tap on “Apps” to see all the installed applications on your phone.
-
Find and tap on Chrome.
The “Apps” screen will be displayed with a list of all the apps installed on your phone. Scroll through the list until you find the Chrome app, then tap on it to open the app’s details.
-
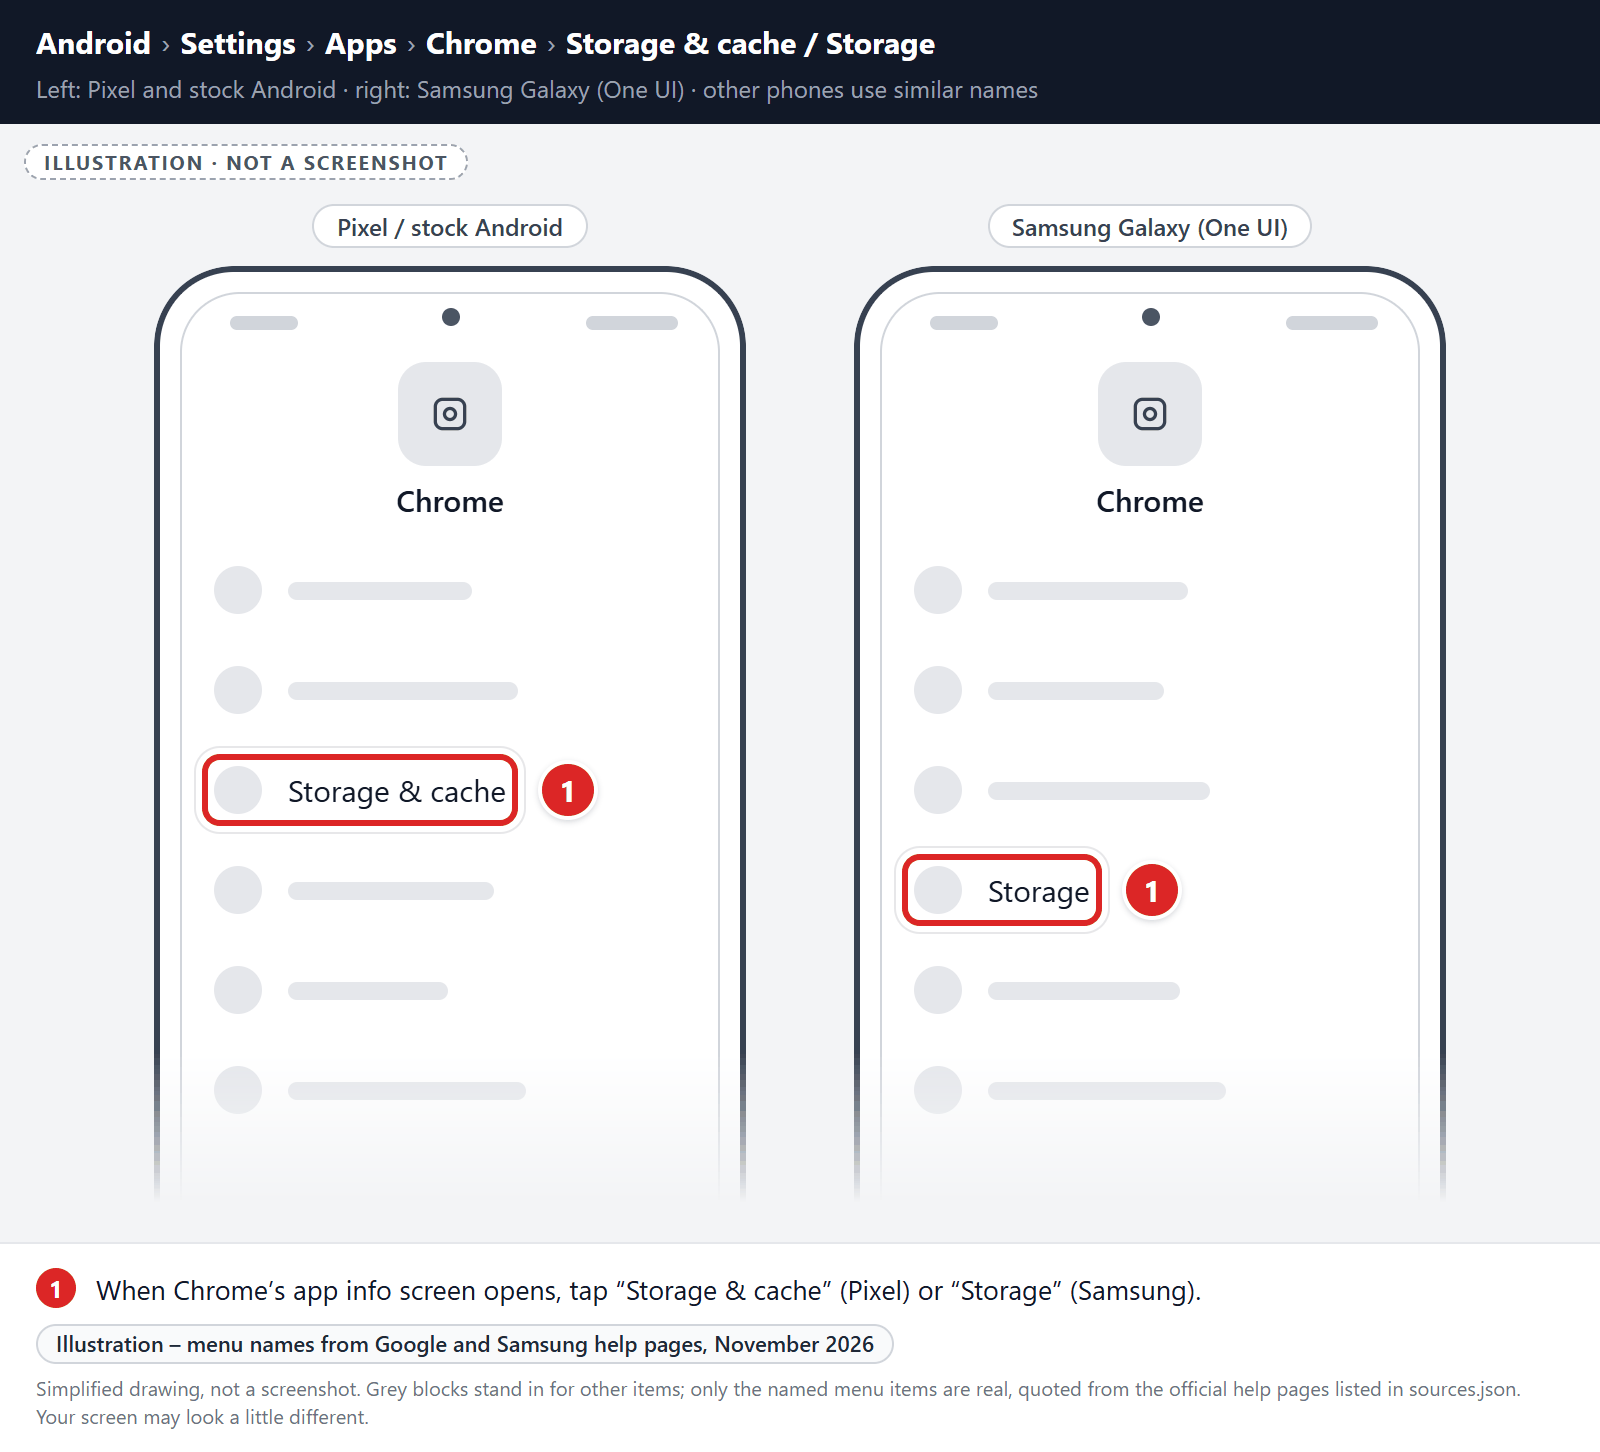
Tap “Storage”.
When Chrome’s app info menu is displayed, tap on “Storage” (on Pixel phones, “Storage & cache“).
-
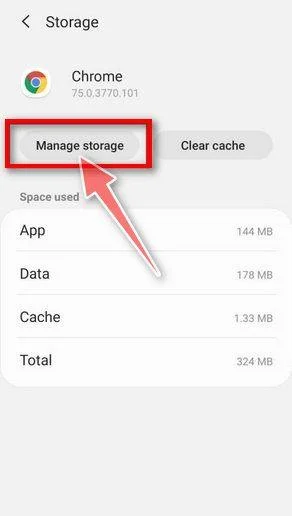
Tap “Manage Space”.
Under the storage settings, tap “Manage space” (called “Manage storage” on some phones). Don’t tap “Clear cache”, because it doesn’t reset Chrome.
-
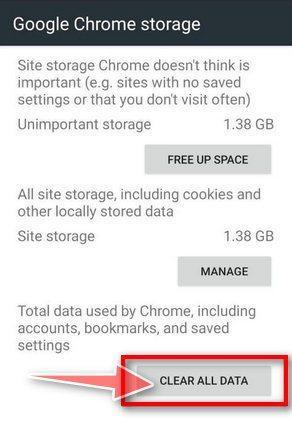
Tap “Clear all data”.
Tap “Clear all data” to delete all Chrome’s data including accounts, bookmarks, and your settings to reset the default settings.
-
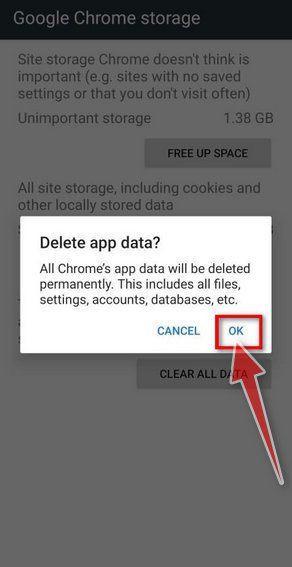
Confirm by tapping “Ok”.
A confirmation dialog should now be displayed, detailing the components that will be restored to their default state should you continue with the reset process. To complete the restoration process, tap “Ok“.
Remove malware from Firefox for Android
First, block the spam site’s notifications:
- Open Firefox, tap the menu button (three dots), and tap Settings.
- Tap Site permissions, then tap Exceptions.
- Tap the spam site, then set Notification to Blocked.
- Optional: to stop other sites from asking, go back to Site permissions, tap Notification, and choose Blocked.
If unwanted pages or redirects keep appearing, clear Firefox’s storage (last resort):
-
Open the “Settings” menu.
Tap on the “Settings” app from your phone menu or home screen.
-
Tap on “Apps”.
When the “Settings” menu opens, tap on “Apps” to see all the installed applications on your phone.
-
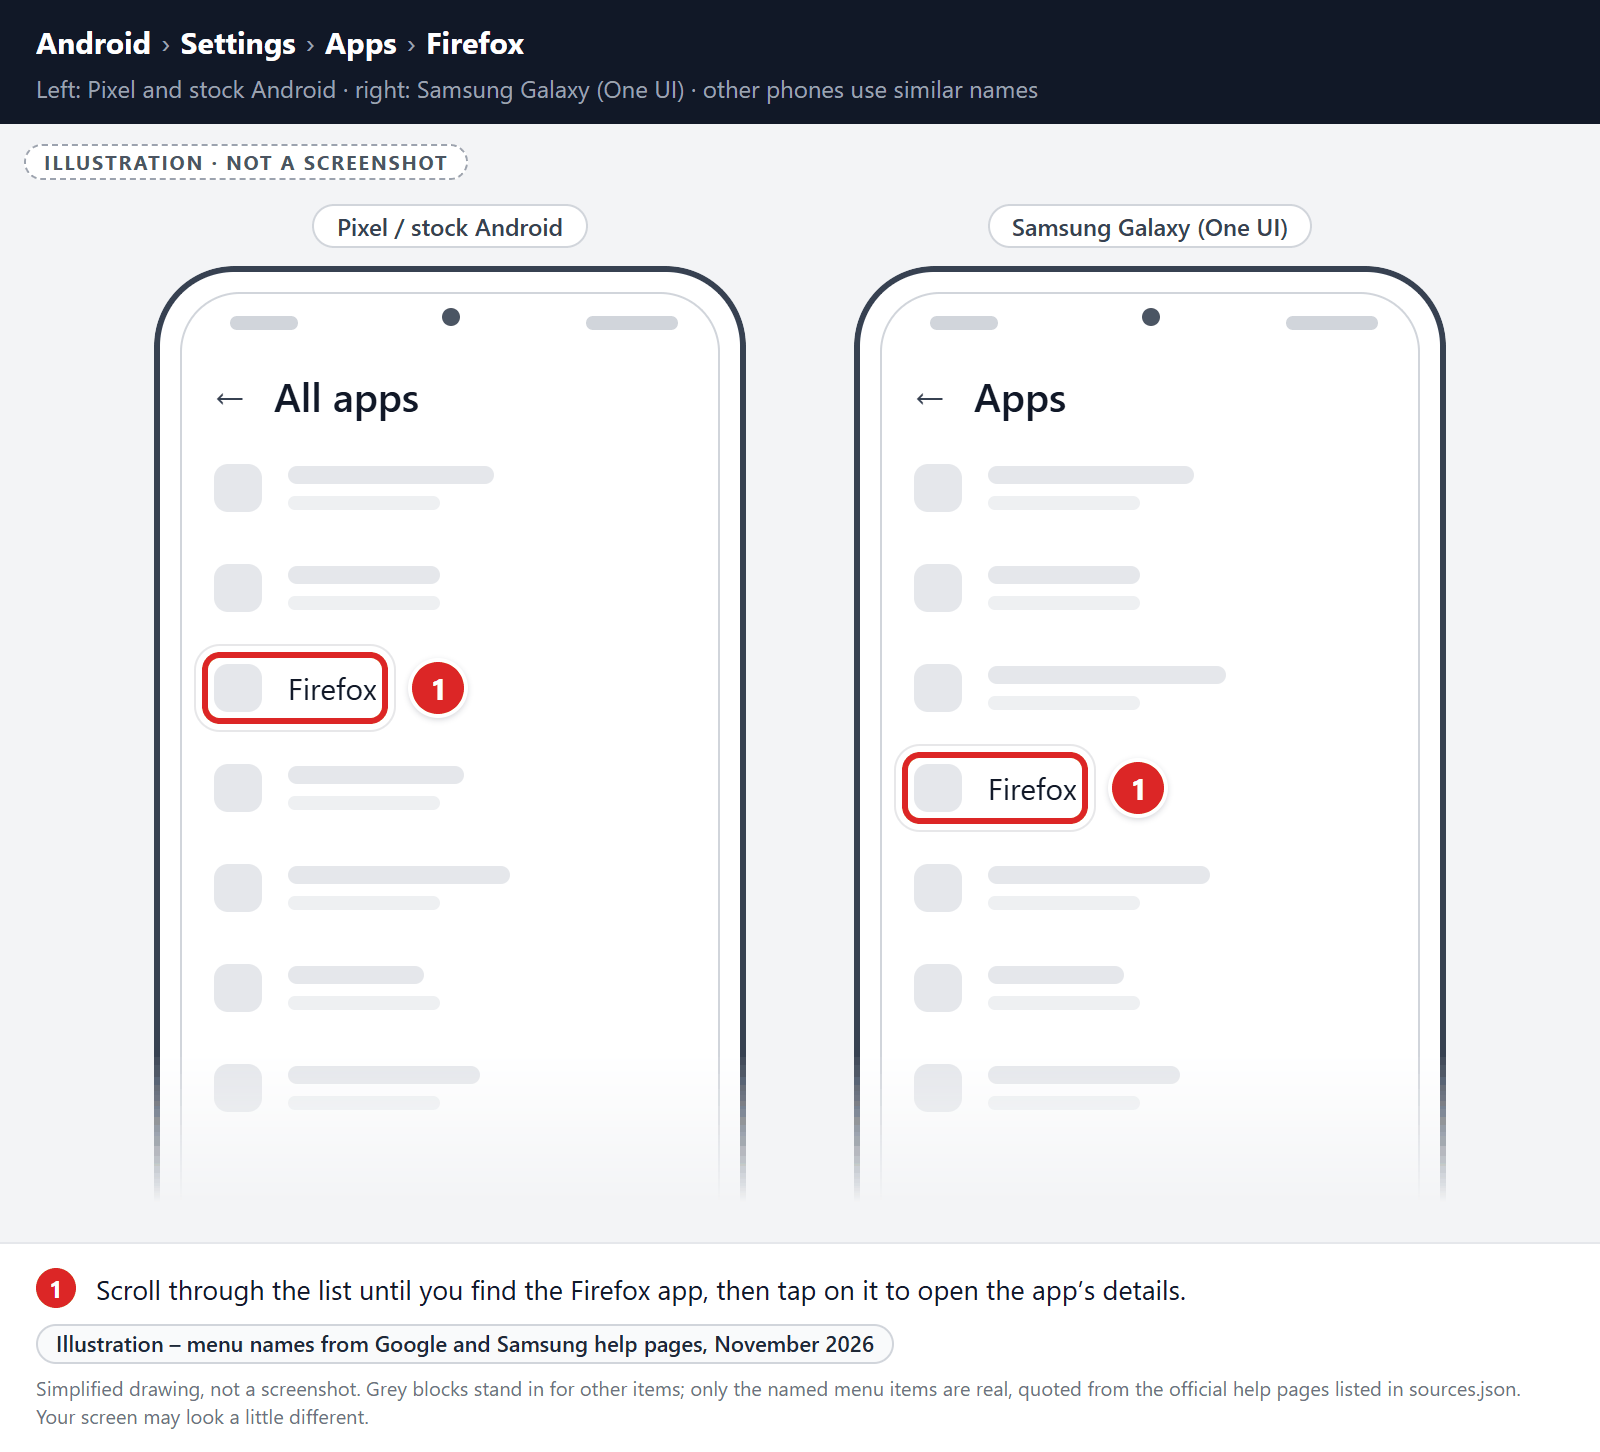
Find and tap on Firefox.
The “Apps” screen will be displayed with a list of all the apps installed on your phone. Scroll through the list until you find the Firefox app, then tap on it to open the app’s details.
-
Tap “Storage”.
When Firefox’s app info menu is displayed, tap on “Storage” (on Pixel phones, “Storage & cache“).
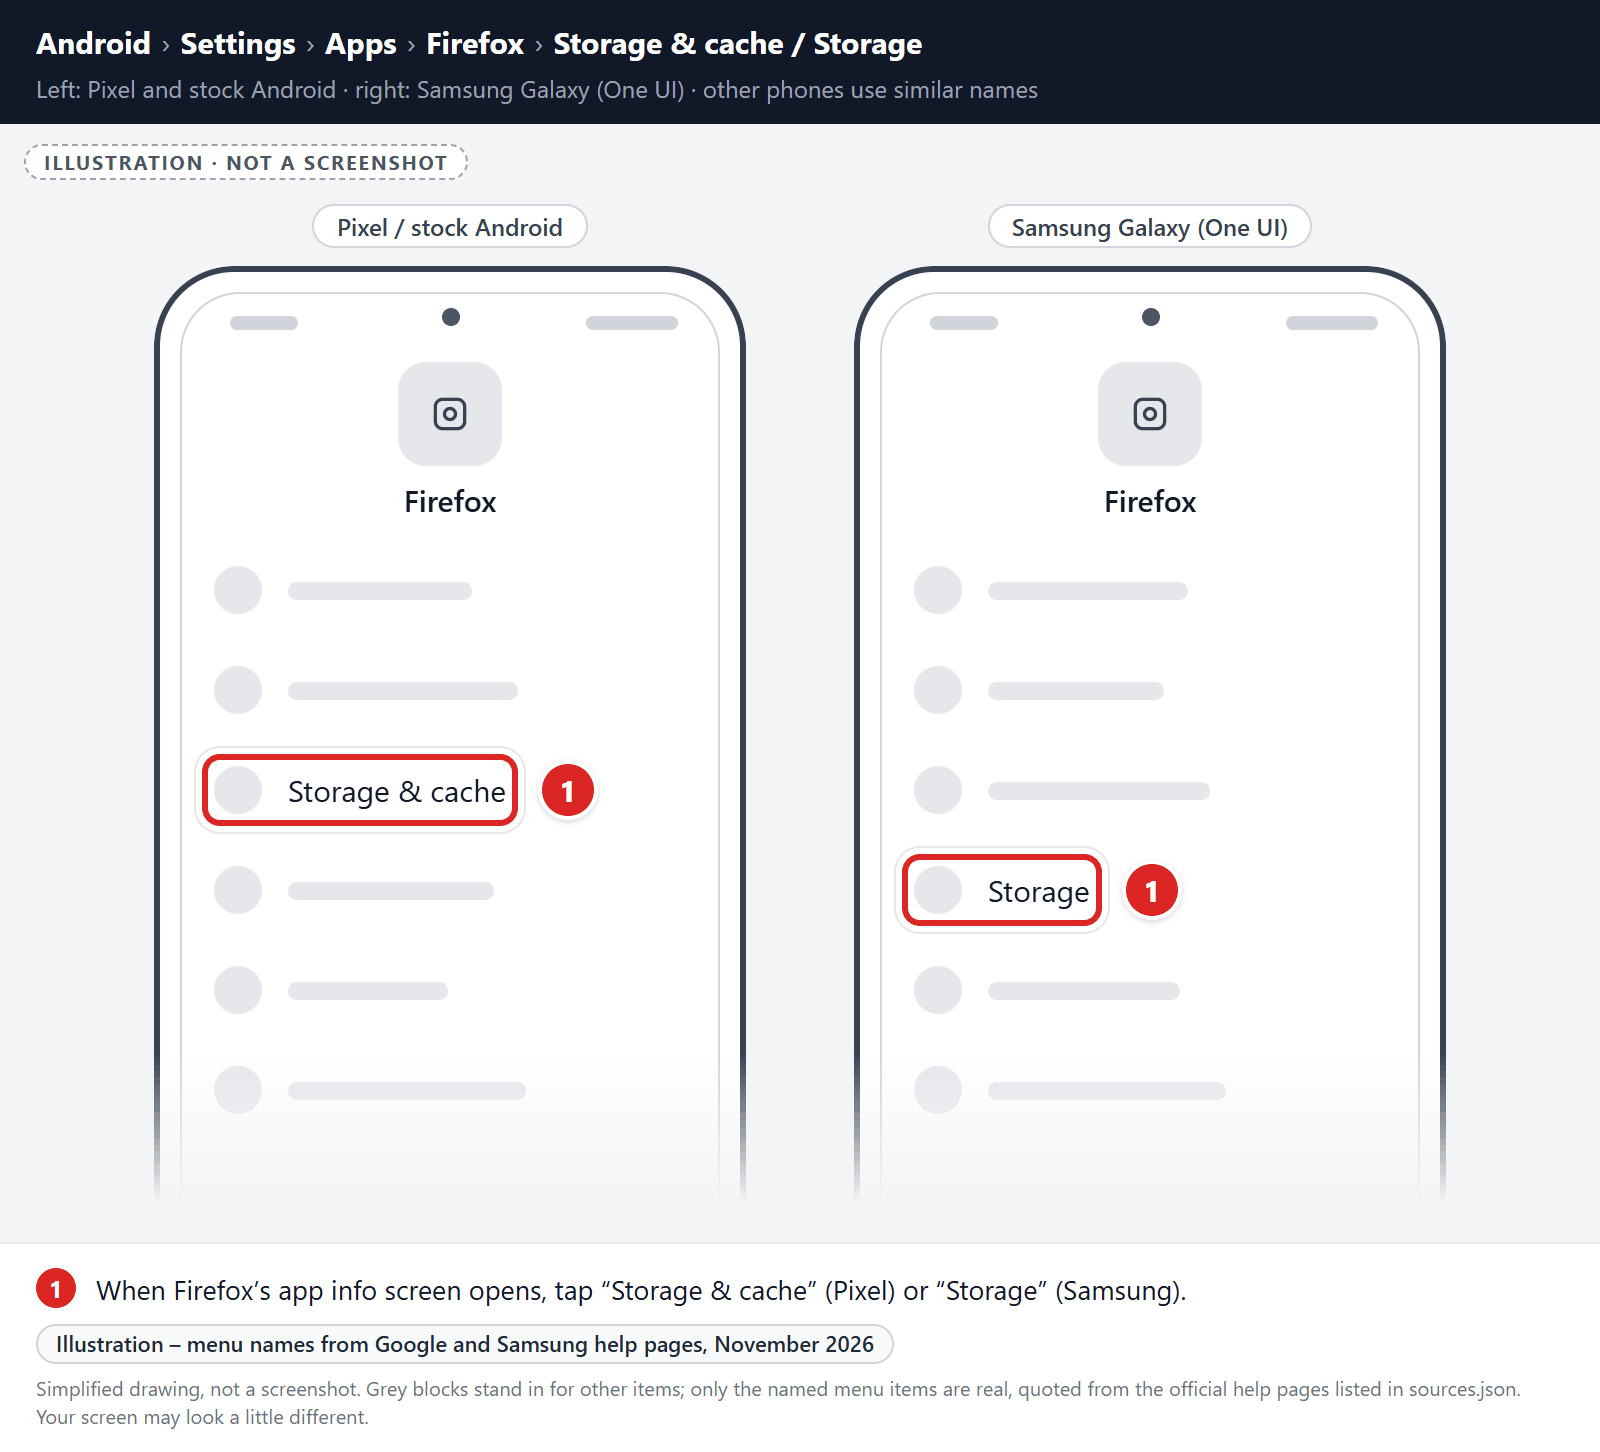
-
Tap “Clear storage” or “Clear data”.
Tap “Clear storage” (called “Clear data” on Samsung phones). If you see “Manage space” or “Manage storage” instead, tap it, then tap “Clear all data“. Don’t use “Clear cache” for this step, because it doesn’t reset the browser.
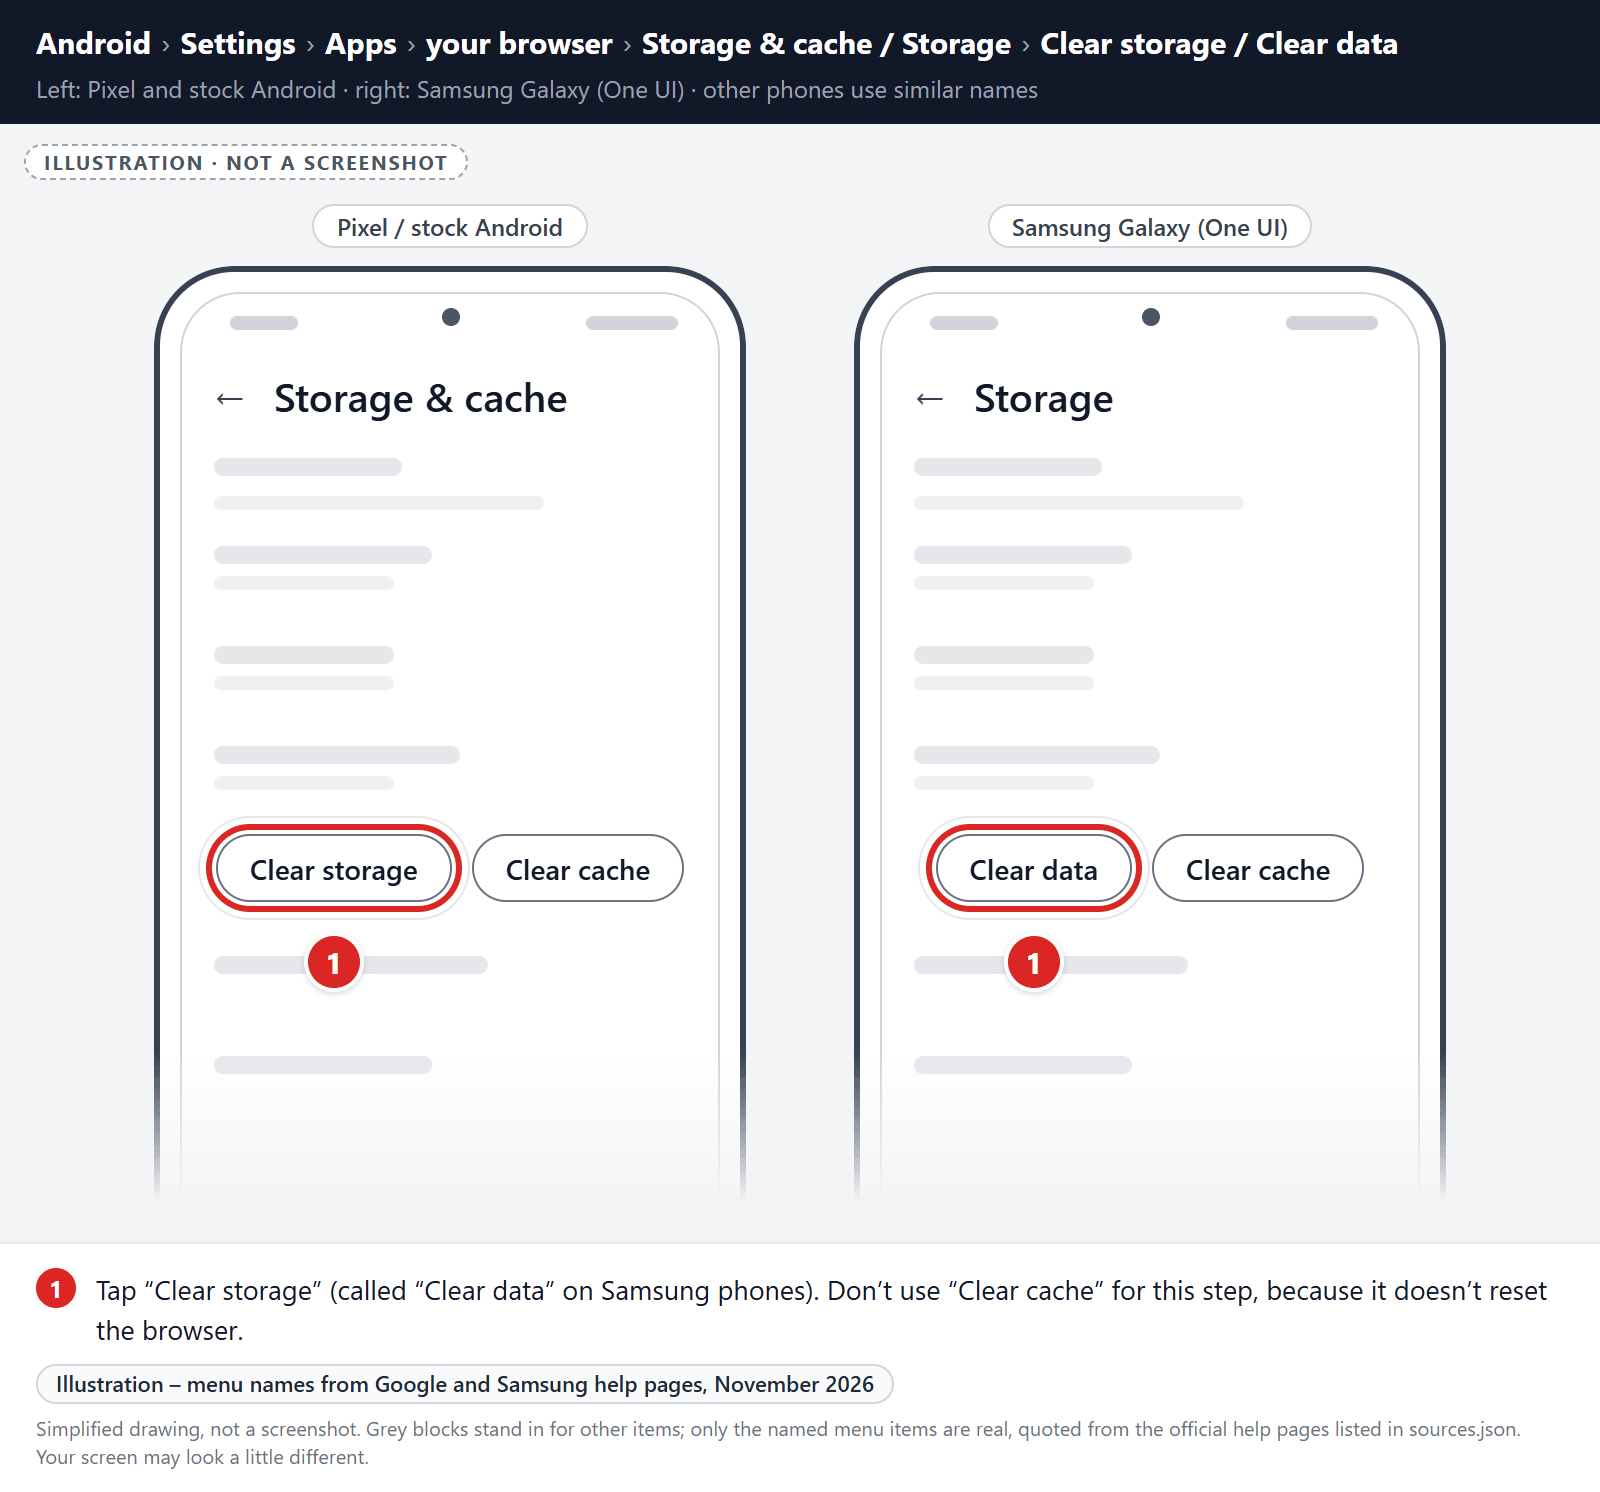
-
Confirm by tapping “OK”.
A confirmation dialog will appear. Tap “OK” or “Delete” to finish. When you open Firefox again, sign back in and turn sync back on if you use it.
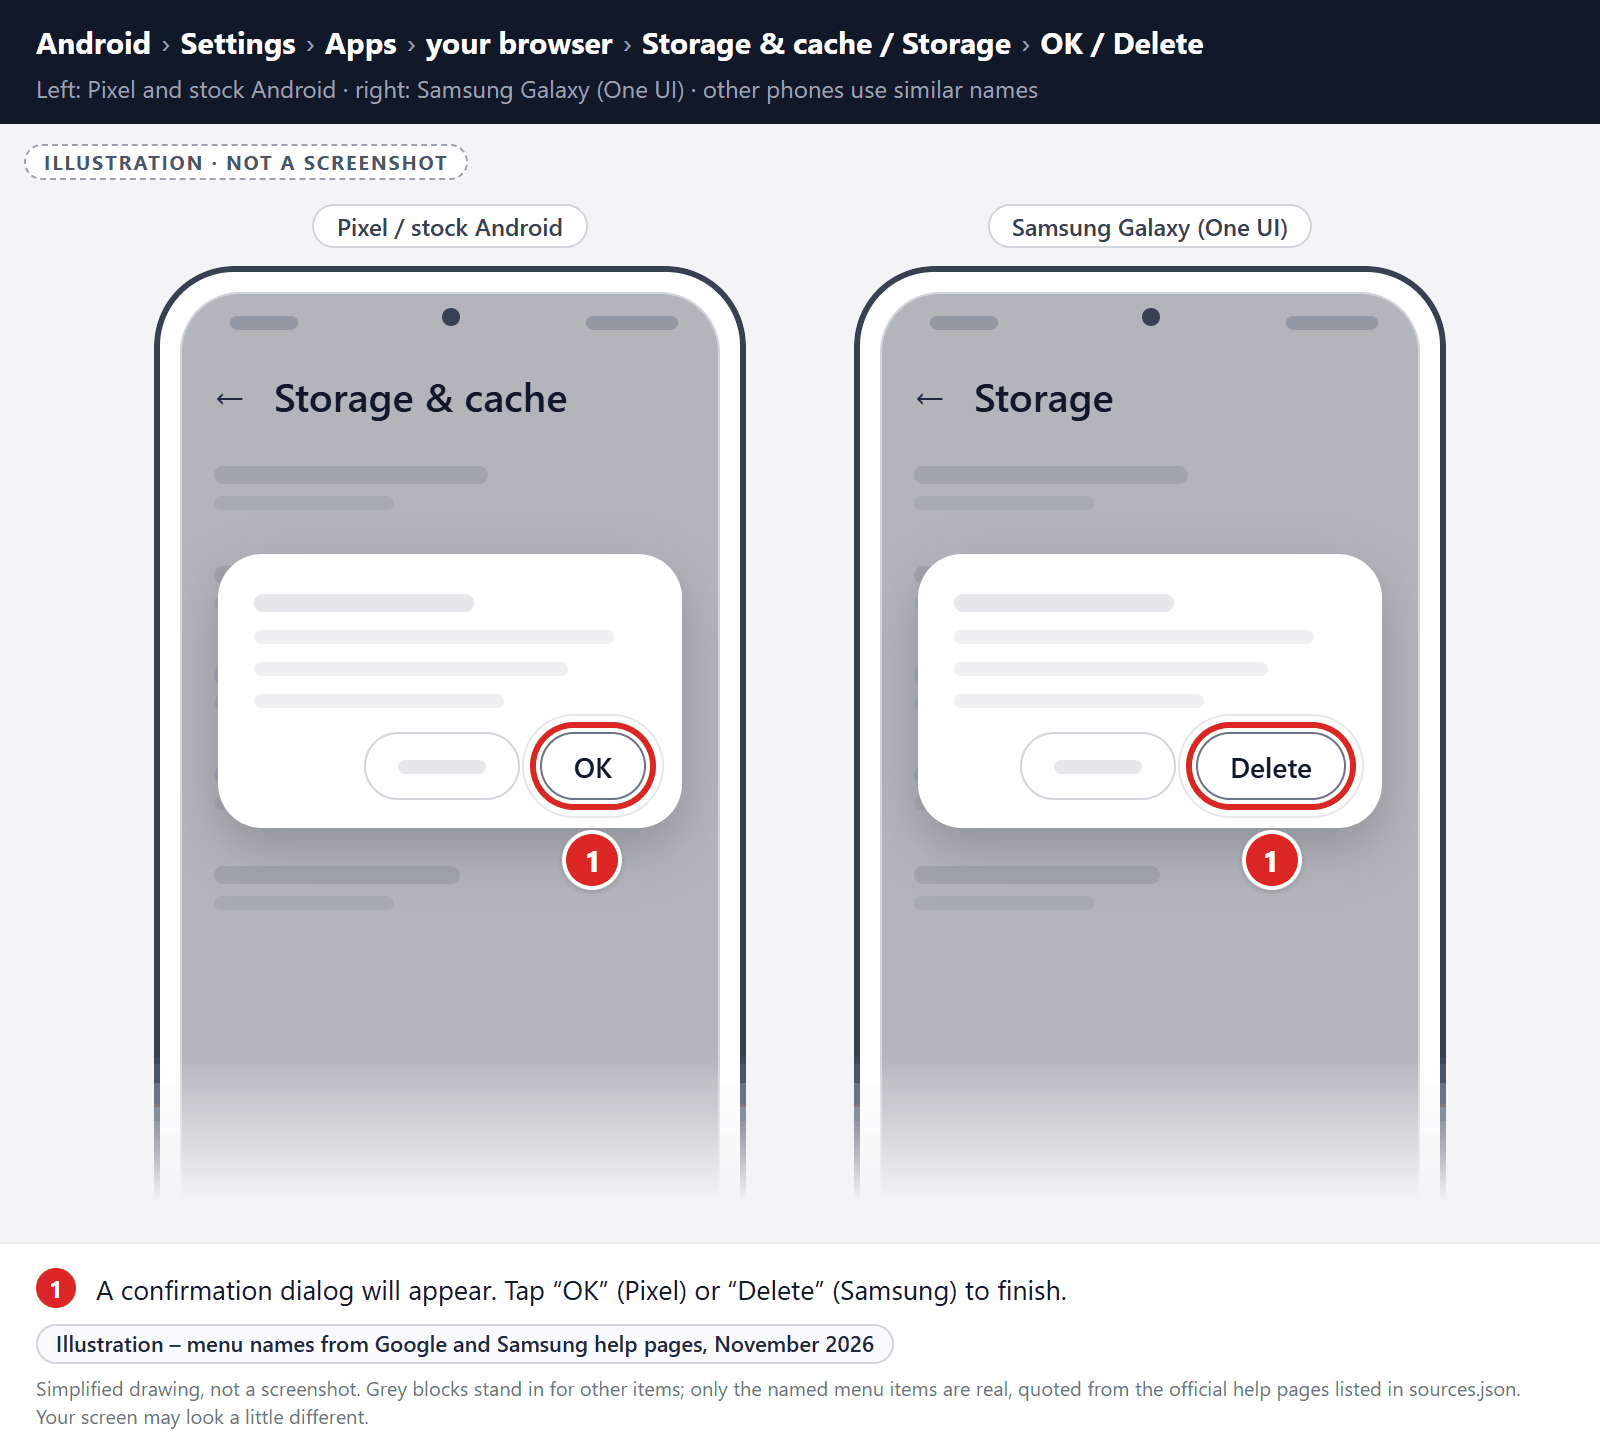
Remove malware from the Opera browser
First, block the spam site’s notifications:
- Open Opera, open the Opera menu, and tap Settings.
- Tap Site settings, then tap Notifications.
- Find the spam site and block it. Don’t just remove it from the list, because a removed site can ask again.
If unwanted pages or redirects keep appearing, clear Opera’s storage (last resort):
-
Open the “Settings” menu.
Tap on the “Settings” app from your phone menu or home screen.
-
Tap on “Apps”.
When the “Settings” menu opens, tap on “Apps” to see all the installed applications on your phone.
-
Find and tap on Opera.
The “Apps” screen will be displayed with a list of all the apps installed on your phone. Scroll through the list until you find the Opera app, then tap on it to open the app’s details.
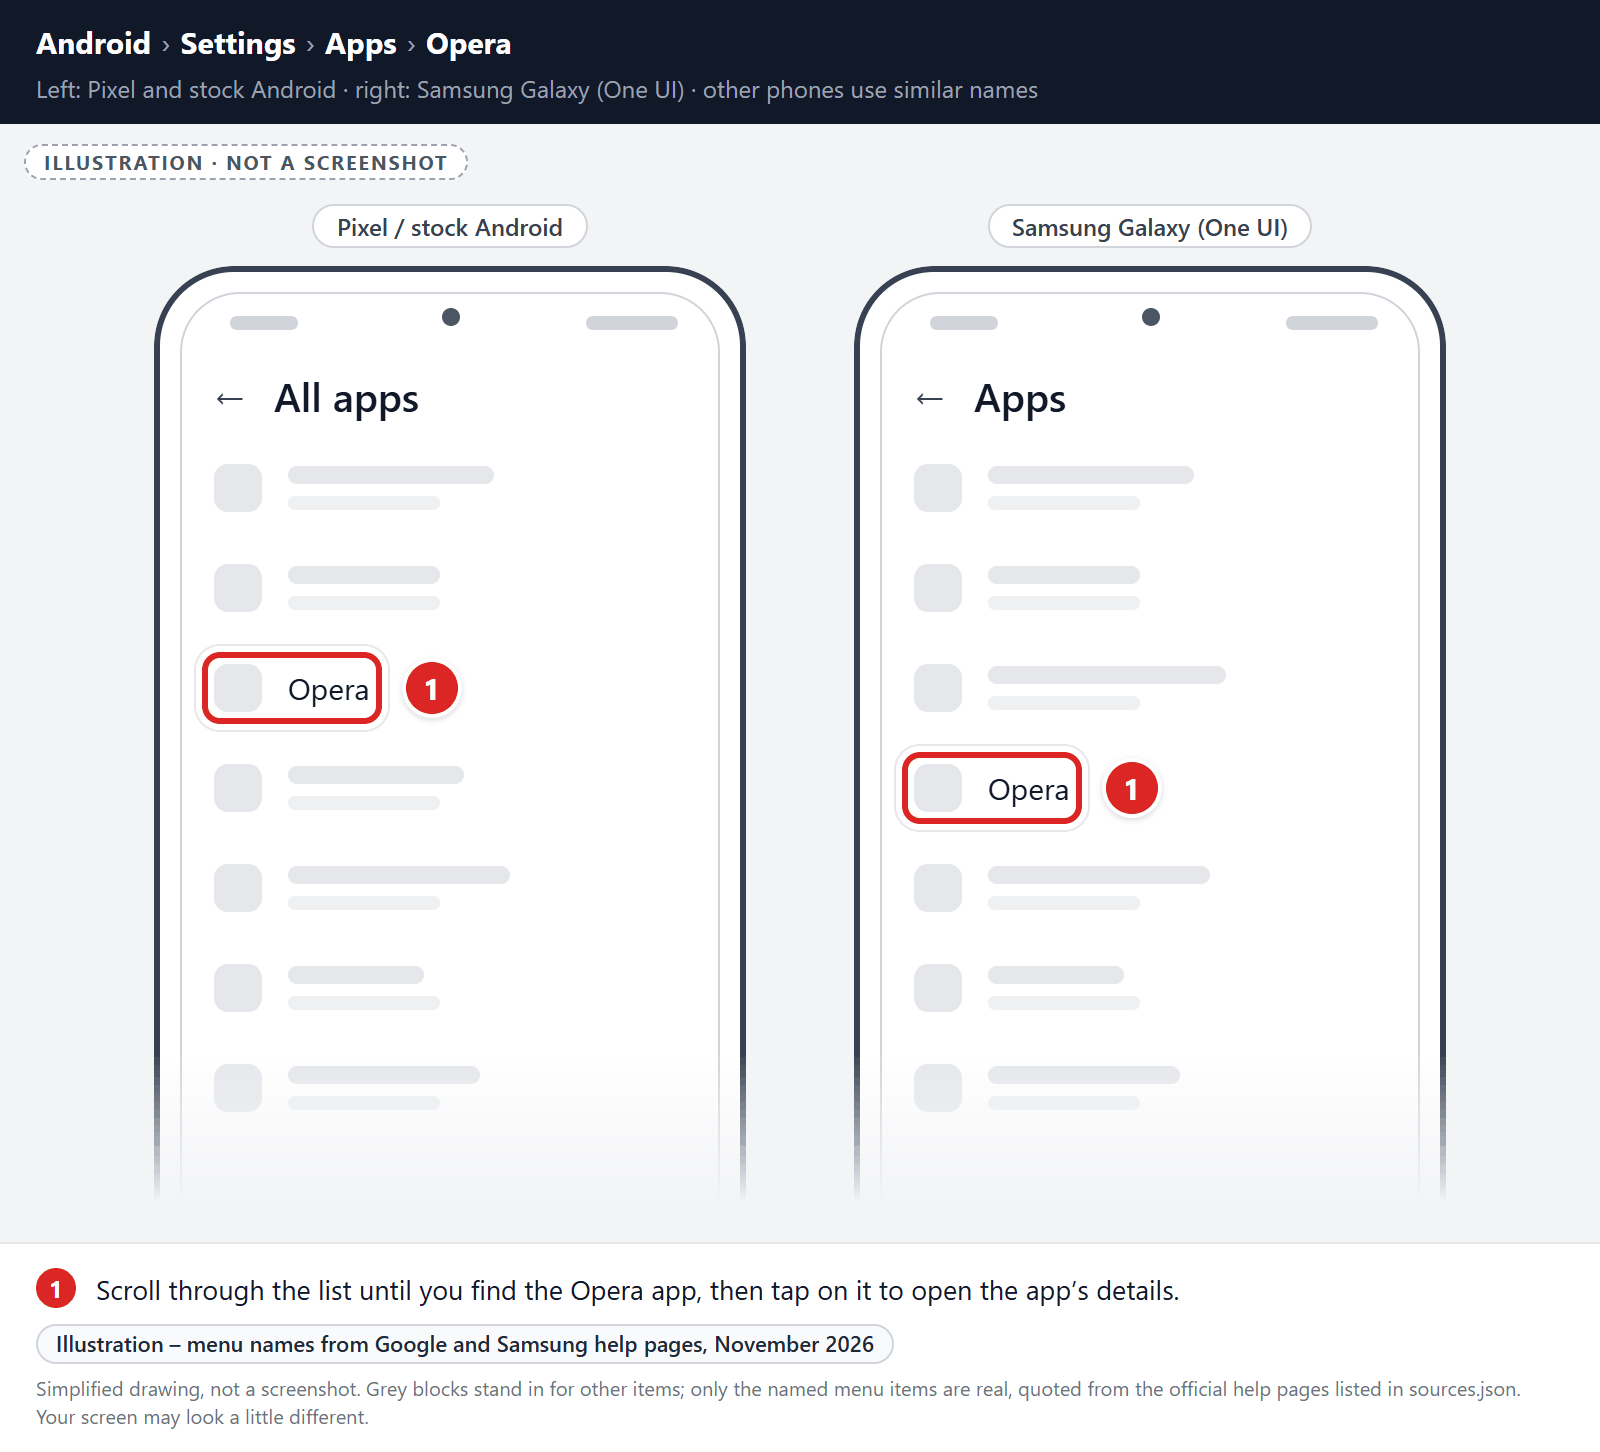
-
Tap “Storage”.
When Opera’s app info menu is displayed, tap on “Storage” (on Pixel phones, “Storage & cache“).
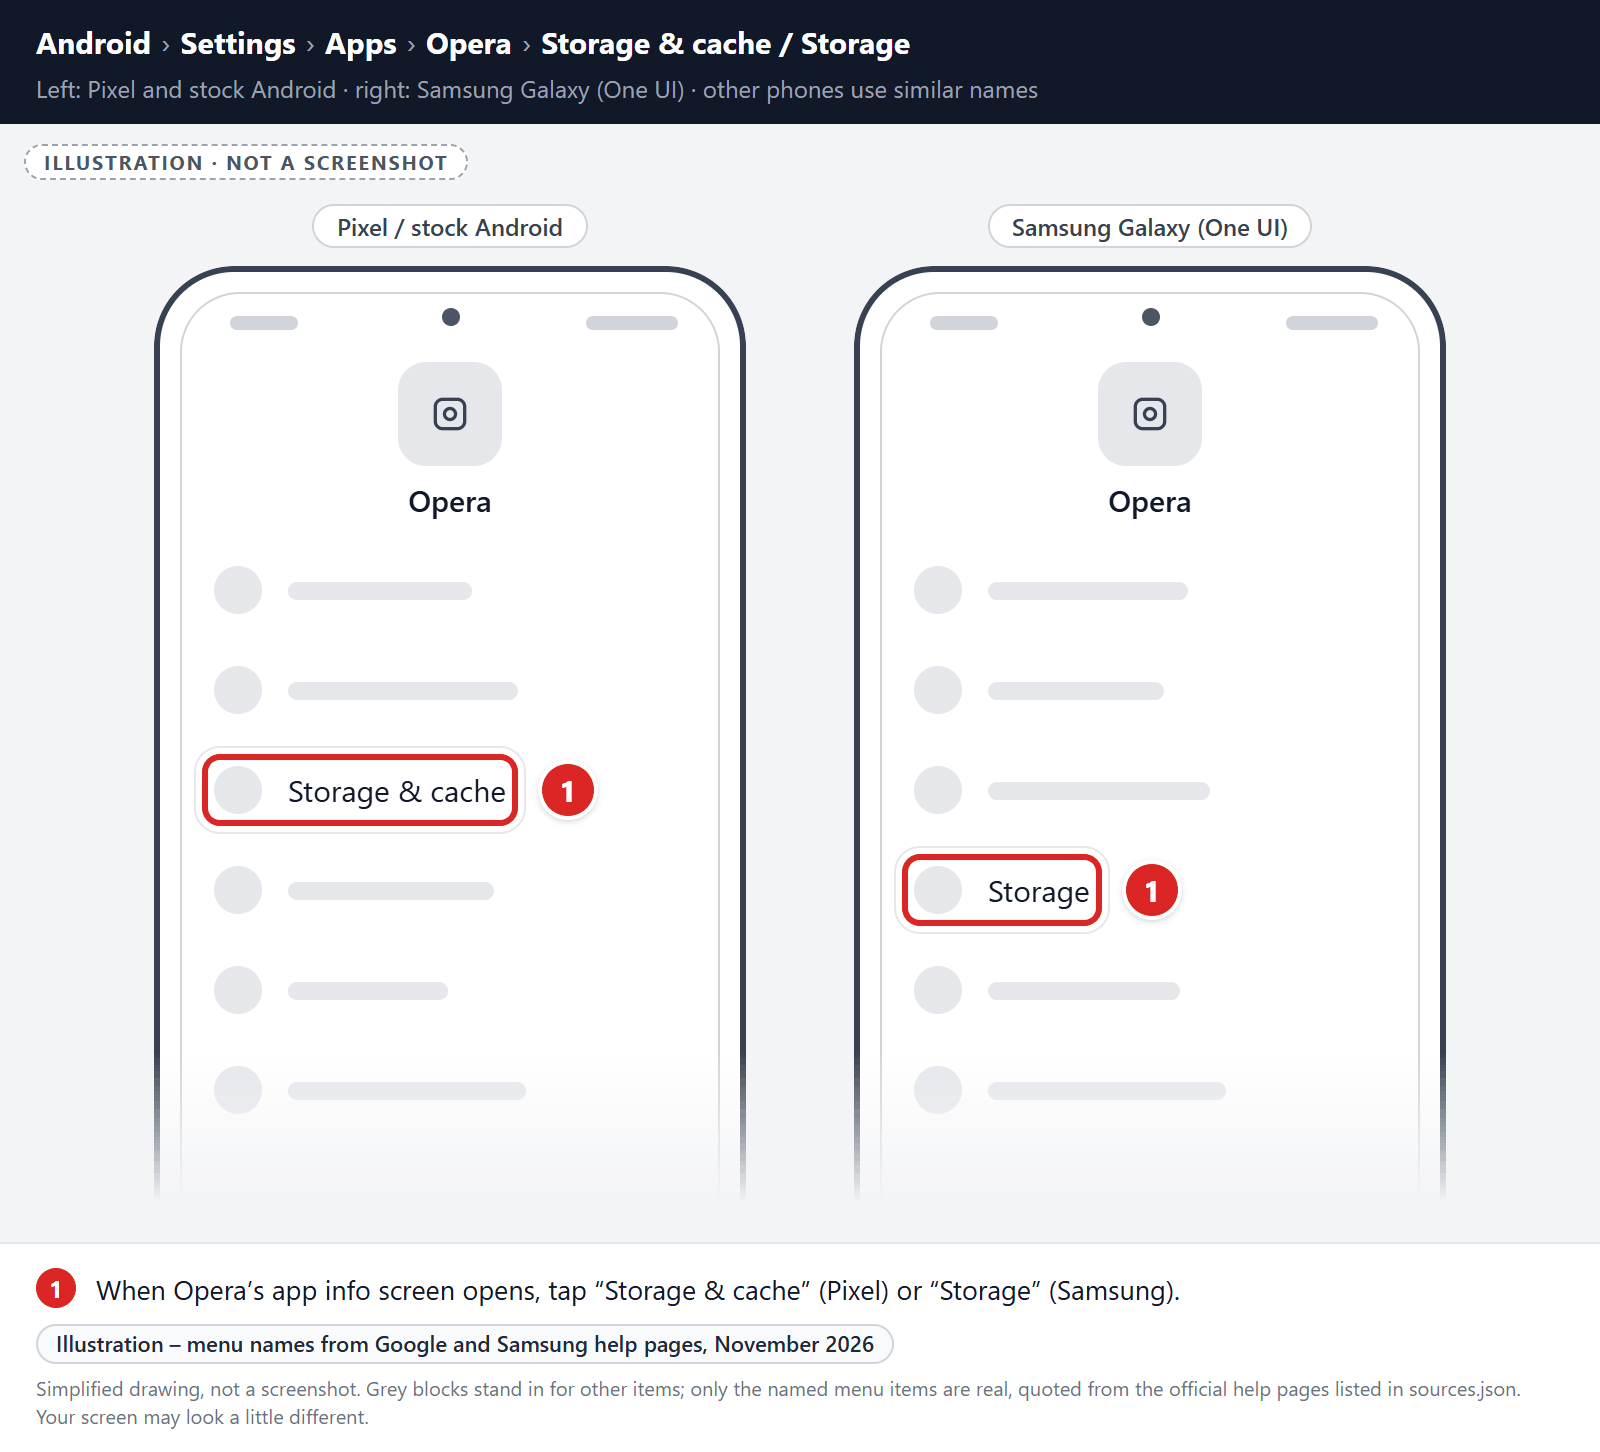
-
Tap “Clear storage” or “Clear data”.
Tap “Clear storage” (called “Clear data” on Samsung phones). If you see “Manage space” or “Manage storage” instead, tap it, then tap “Clear all data“. Don’t use “Clear cache” for this step, because it doesn’t reset the browser.
-
Confirm by tapping “OK”.
A confirmation dialog will appear. Tap “OK” or “Delete” to finish. When you open Opera again, sign back in and turn sync back on if you use it.
Remove malware from Samsung Internet
First, block the spam site’s notifications:
- Open your phone’s Settings app and tap Notifications.
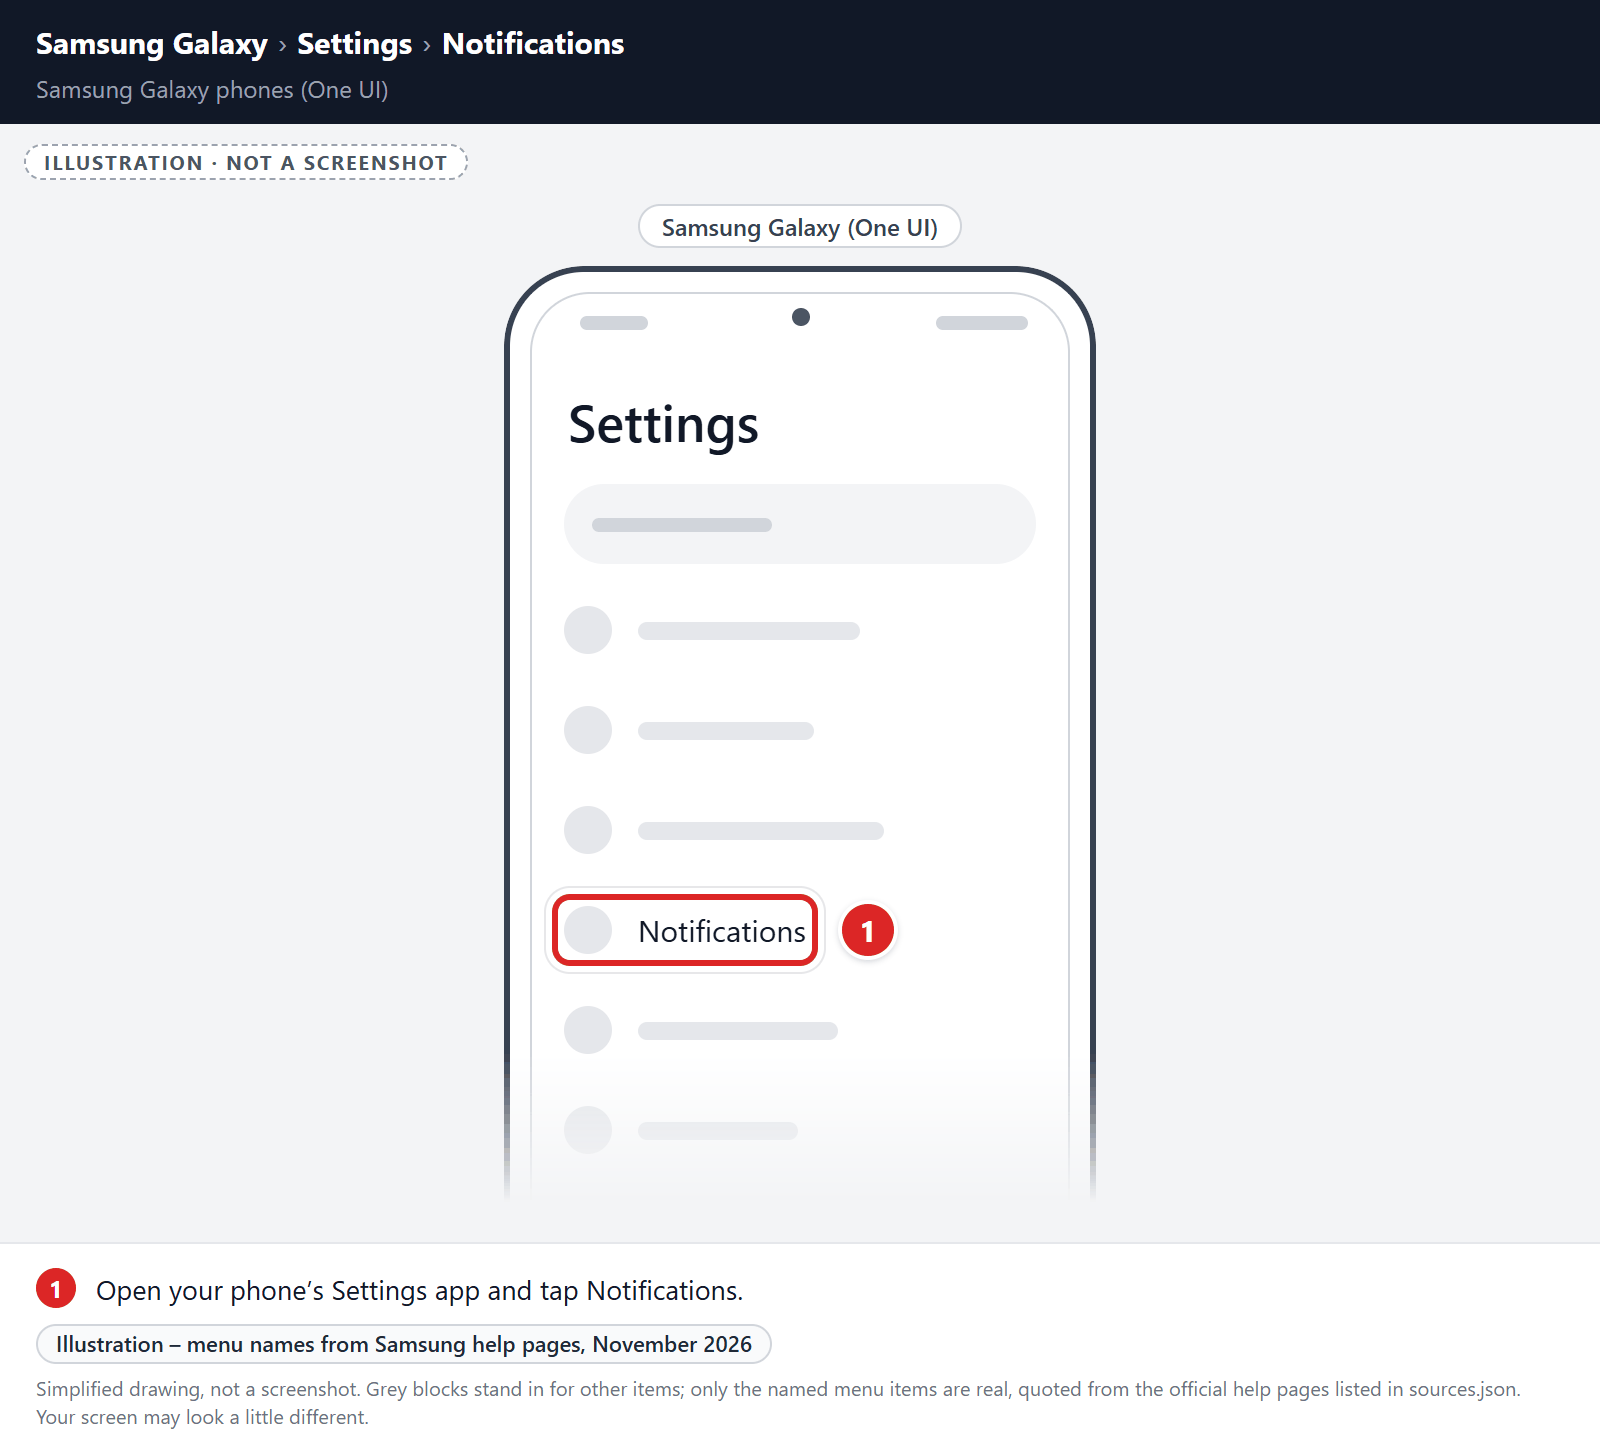
- Tap App notifications, then tap Samsung Internet.
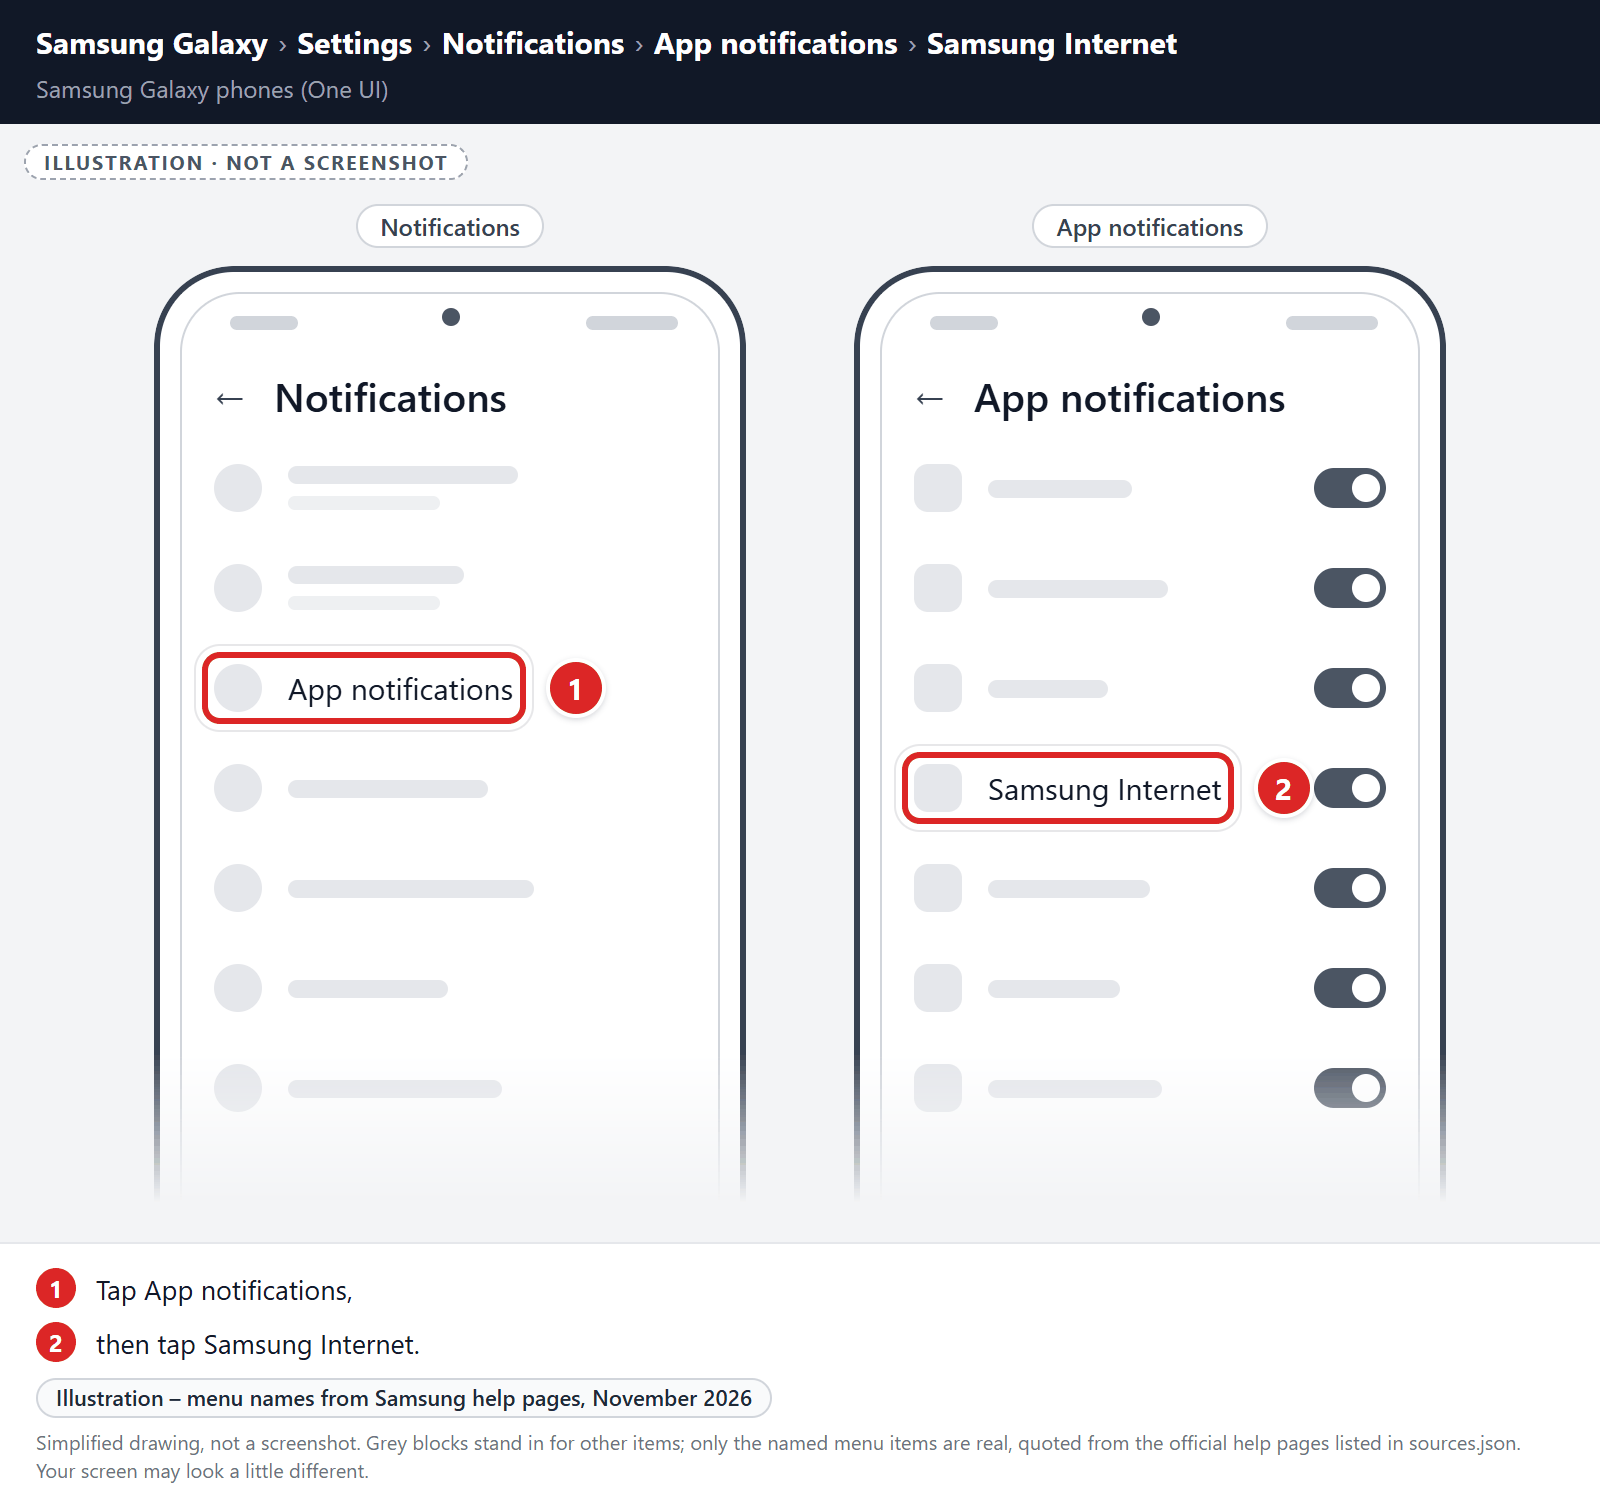
- Under Sites, turn off the switch for the spam website.
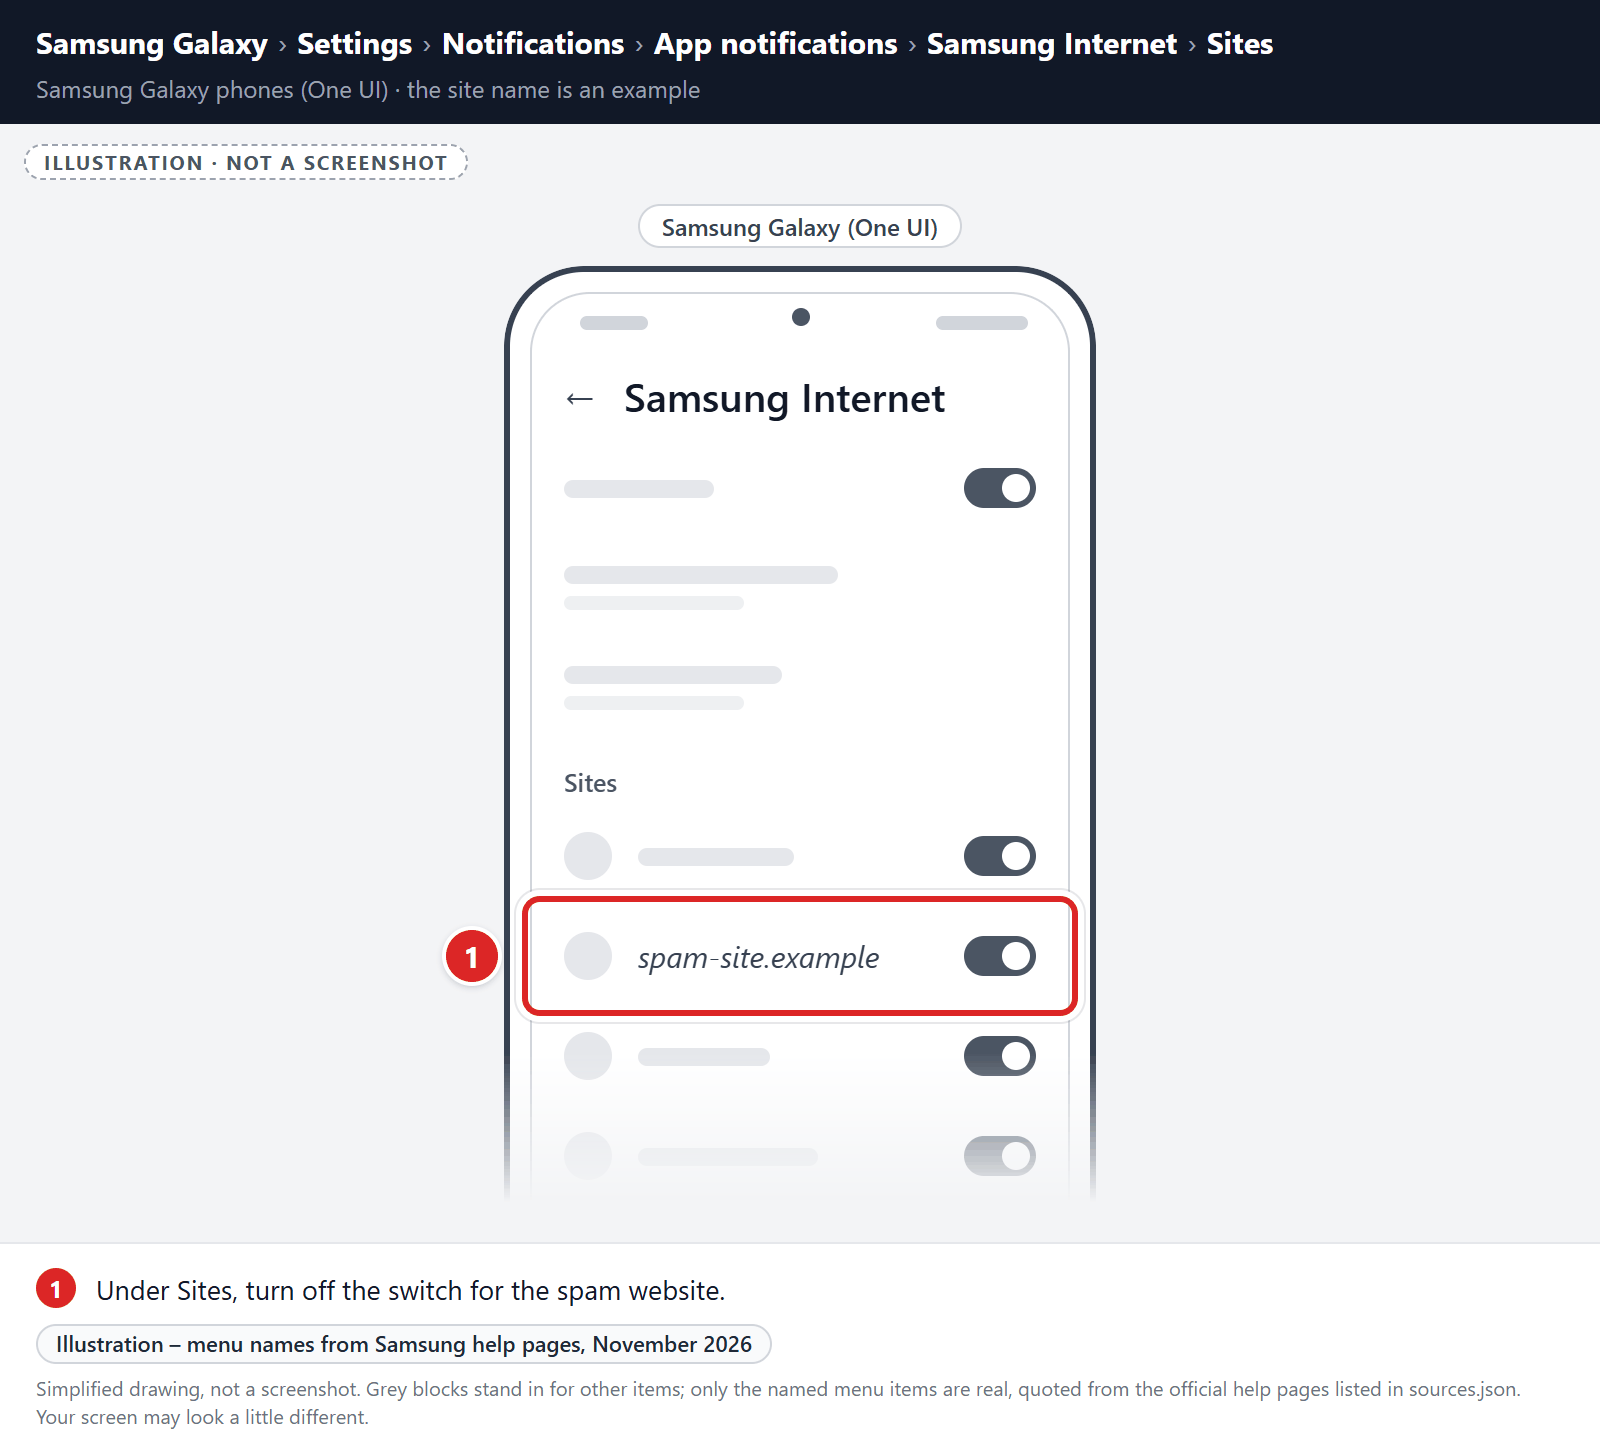
If unwanted pages or redirects keep appearing, clear Samsung Internet’s storage (last resort):
-
Open the “Settings” menu.
Tap on the “Settings” app from your phone menu or home screen.
-
Tap on “Apps”.
When the “Settings” menu opens, tap on “Apps” to see all the installed applications on your phone.
-
Find and tap on Samsung Internet.
The “Apps” screen will be displayed with a list of all the apps installed on your phone. Scroll through the list until you find the Samsung Internet app, then tap on it to open the app’s details.
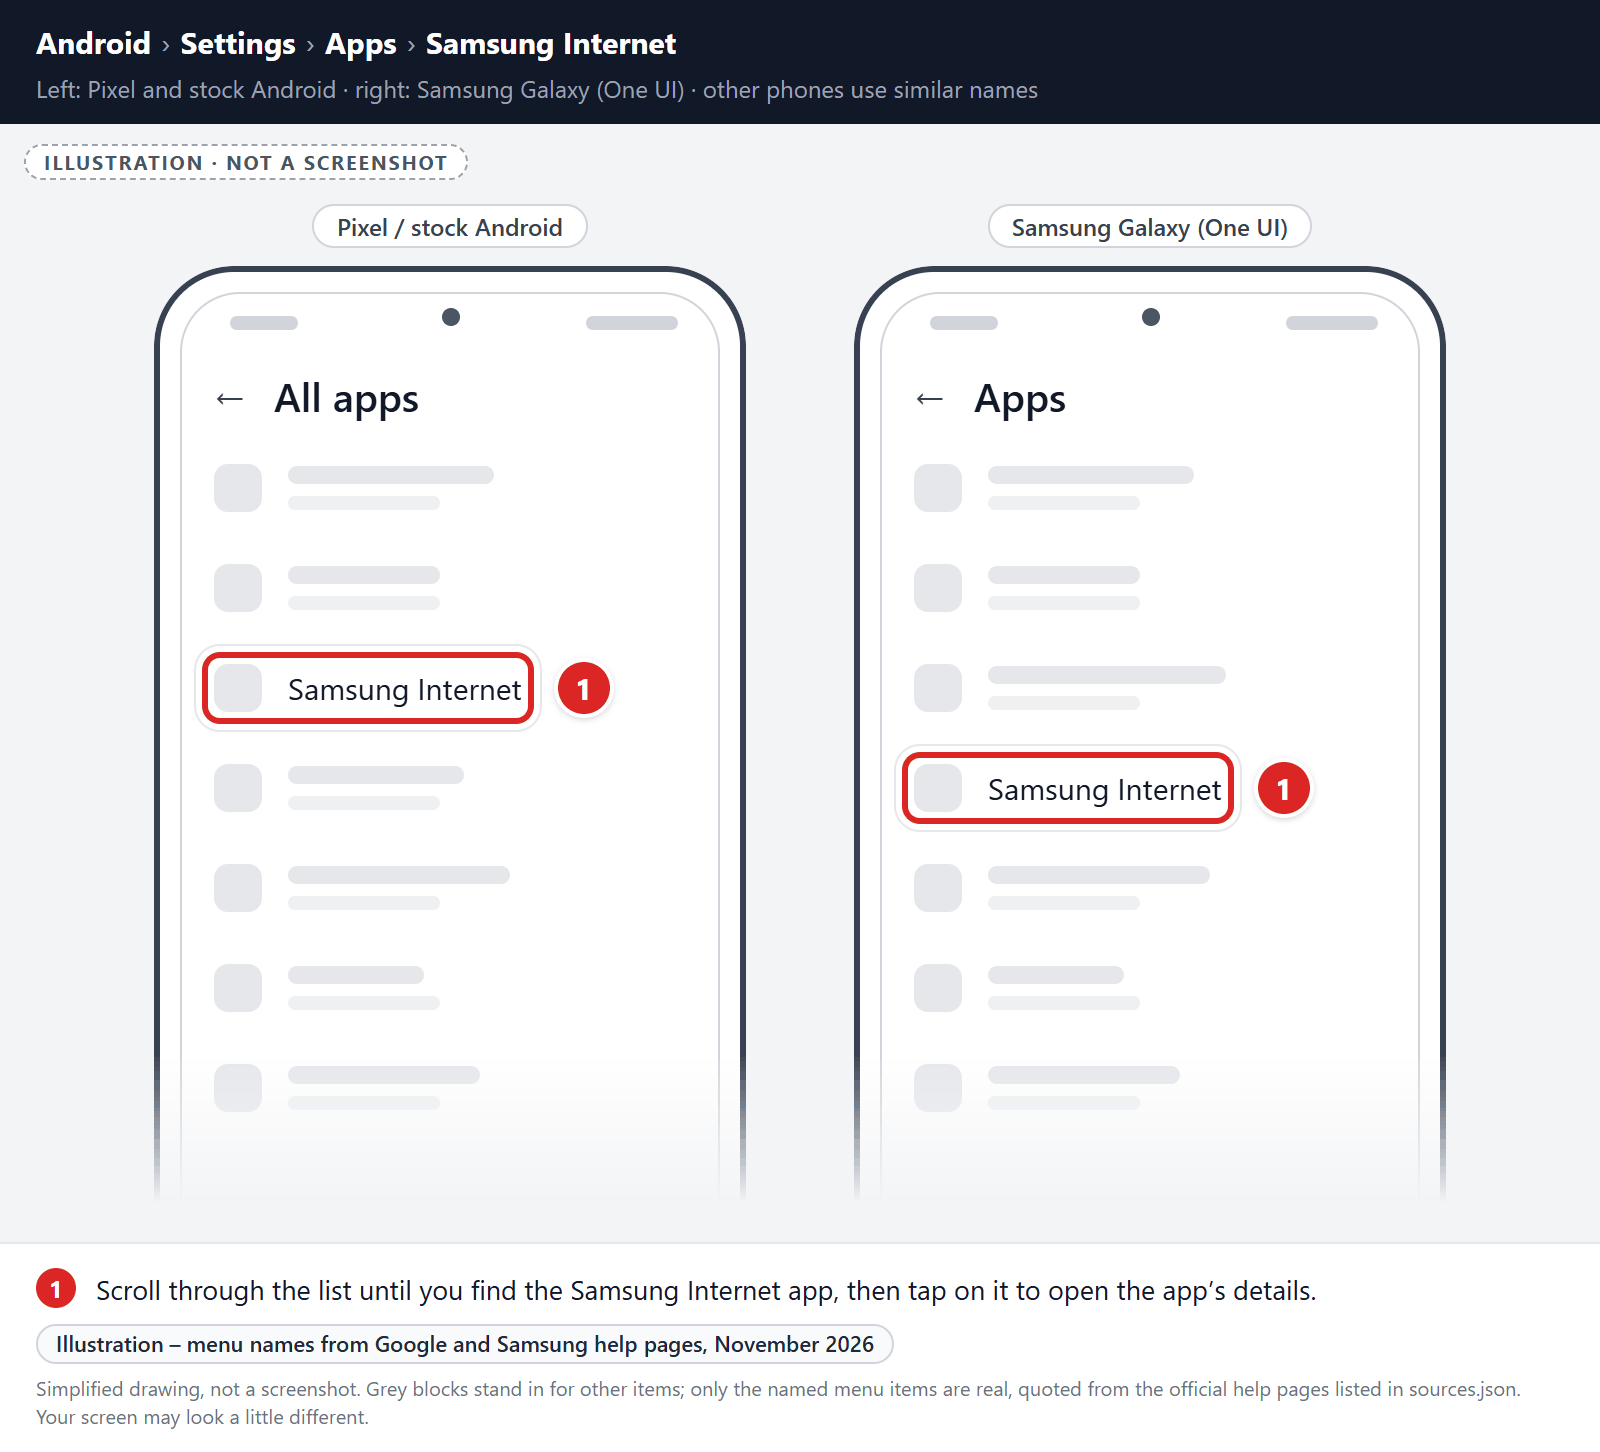
-
Tap “Storage”.
When Samsung Internet’s app info menu is displayed, tap on “Storage” (on Pixel phones, “Storage & cache“).
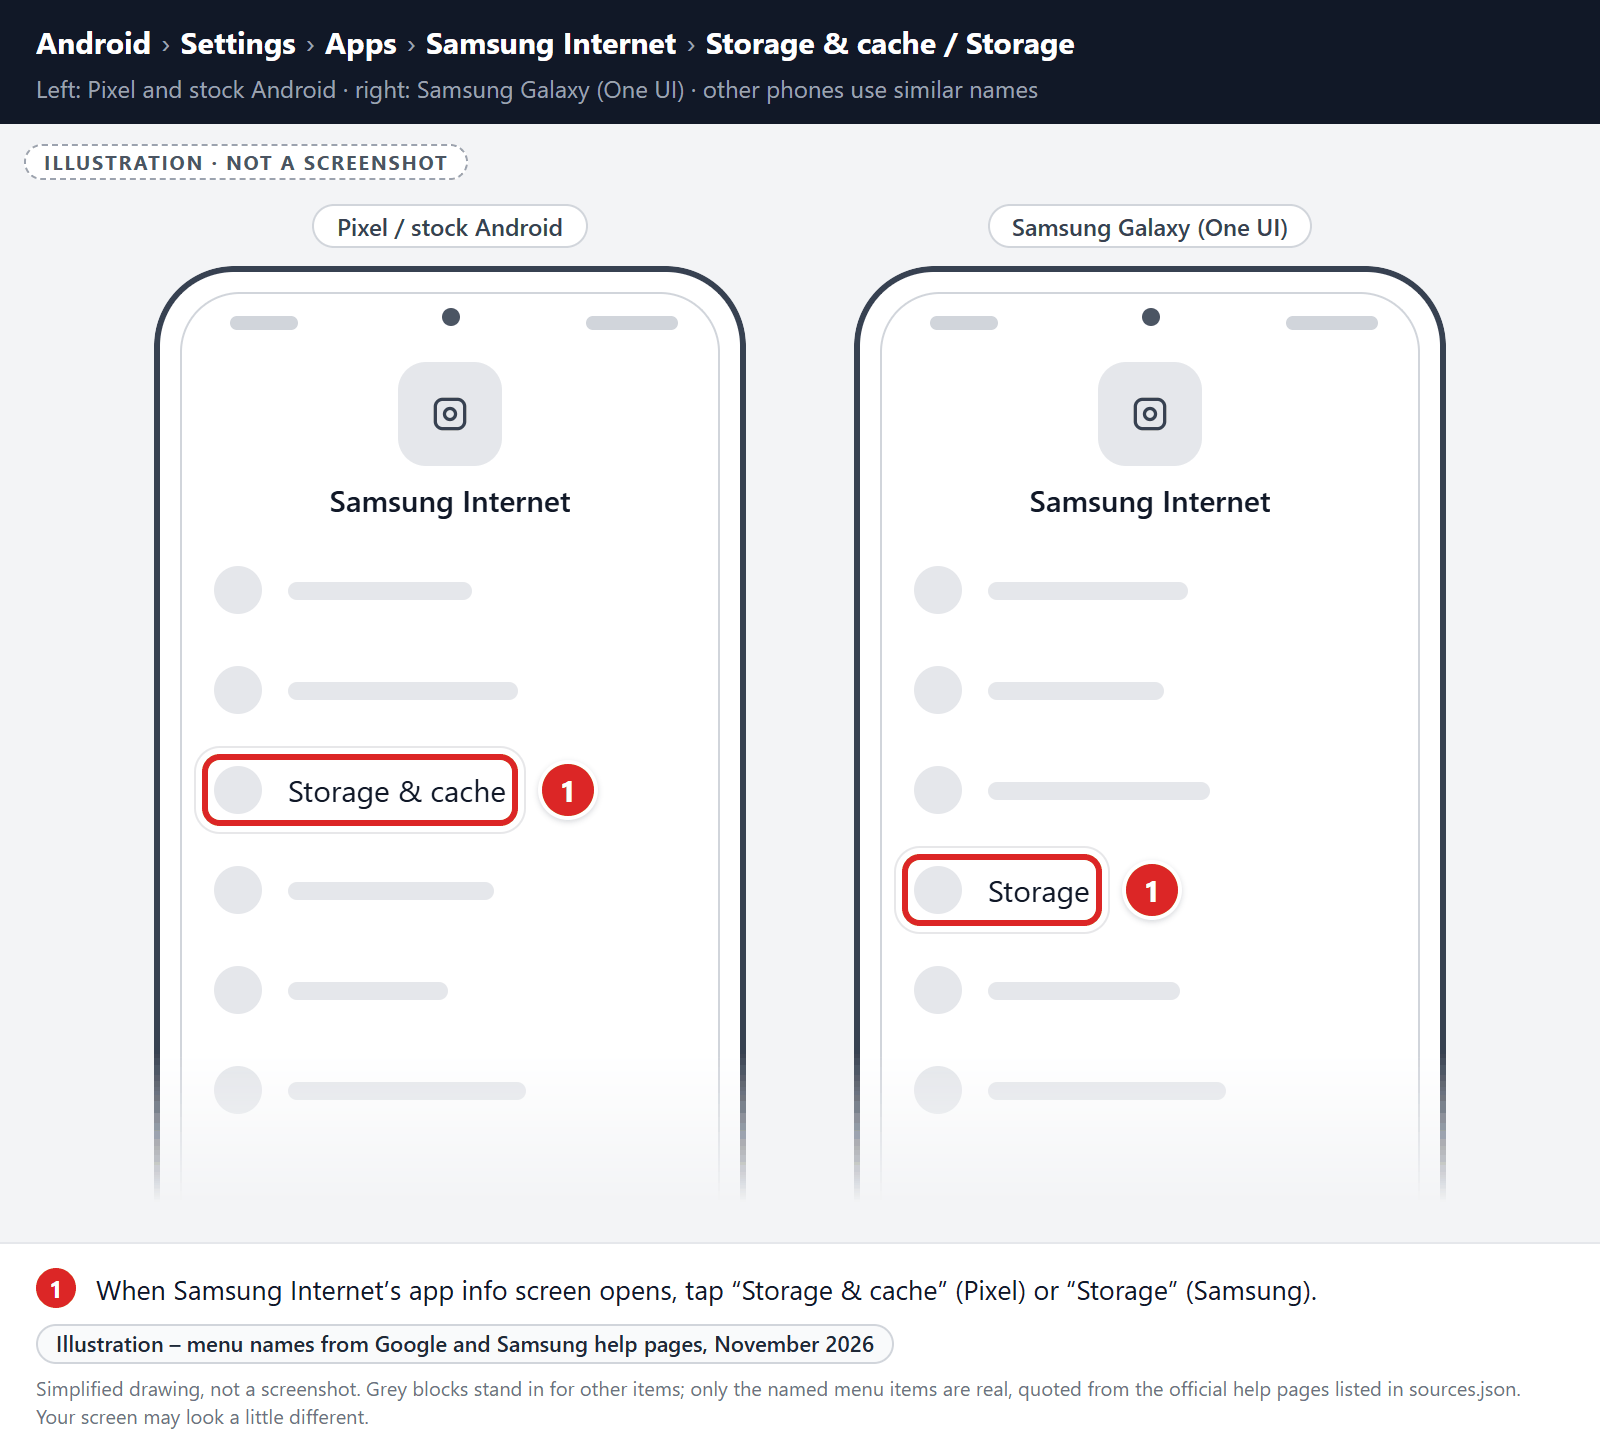
-
Tap “Clear storage” or “Clear data”.
Tap “Clear storage” (called “Clear data” on Samsung phones). If you see “Manage space” or “Manage storage” instead, tap it, then tap “Clear all data“. Don’t use “Clear cache” for this step, because it doesn’t reset the browser.
-
Confirm by tapping “OK”.
A confirmation dialog will appear. Tap “OK” or “Delete” to finish. When you open Samsung Internet again, sign back in and turn sync back on if you use it.
Remove malware from Microsoft Edge for Android
First, block the spam site’s notifications:
- Open Microsoft Edge, tap the menu button (three dots) at the bottom of the screen, and tap Settings.
- Tap Site permissions, then tap Notifications. In some versions, Site permissions is inside Privacy and security.
- Find the spam site in the list of allowed sites and switch it to Block.
If unwanted pages or redirects keep appearing, clear Microsoft Edge’s storage (last resort):
-
Open the “Settings” menu.
Tap on the “Settings” app from your phone menu or home screen.
-
Tap on “Apps”.
When the “Settings” menu opens, tap on “Apps” to see all the installed applications on your phone.
-
Find and tap on Microsoft Edge.
The “Apps” screen will be displayed with a list of all the apps installed on your phone. Scroll through the list until you find the Microsoft Edge app, then tap on it to open the app’s details.
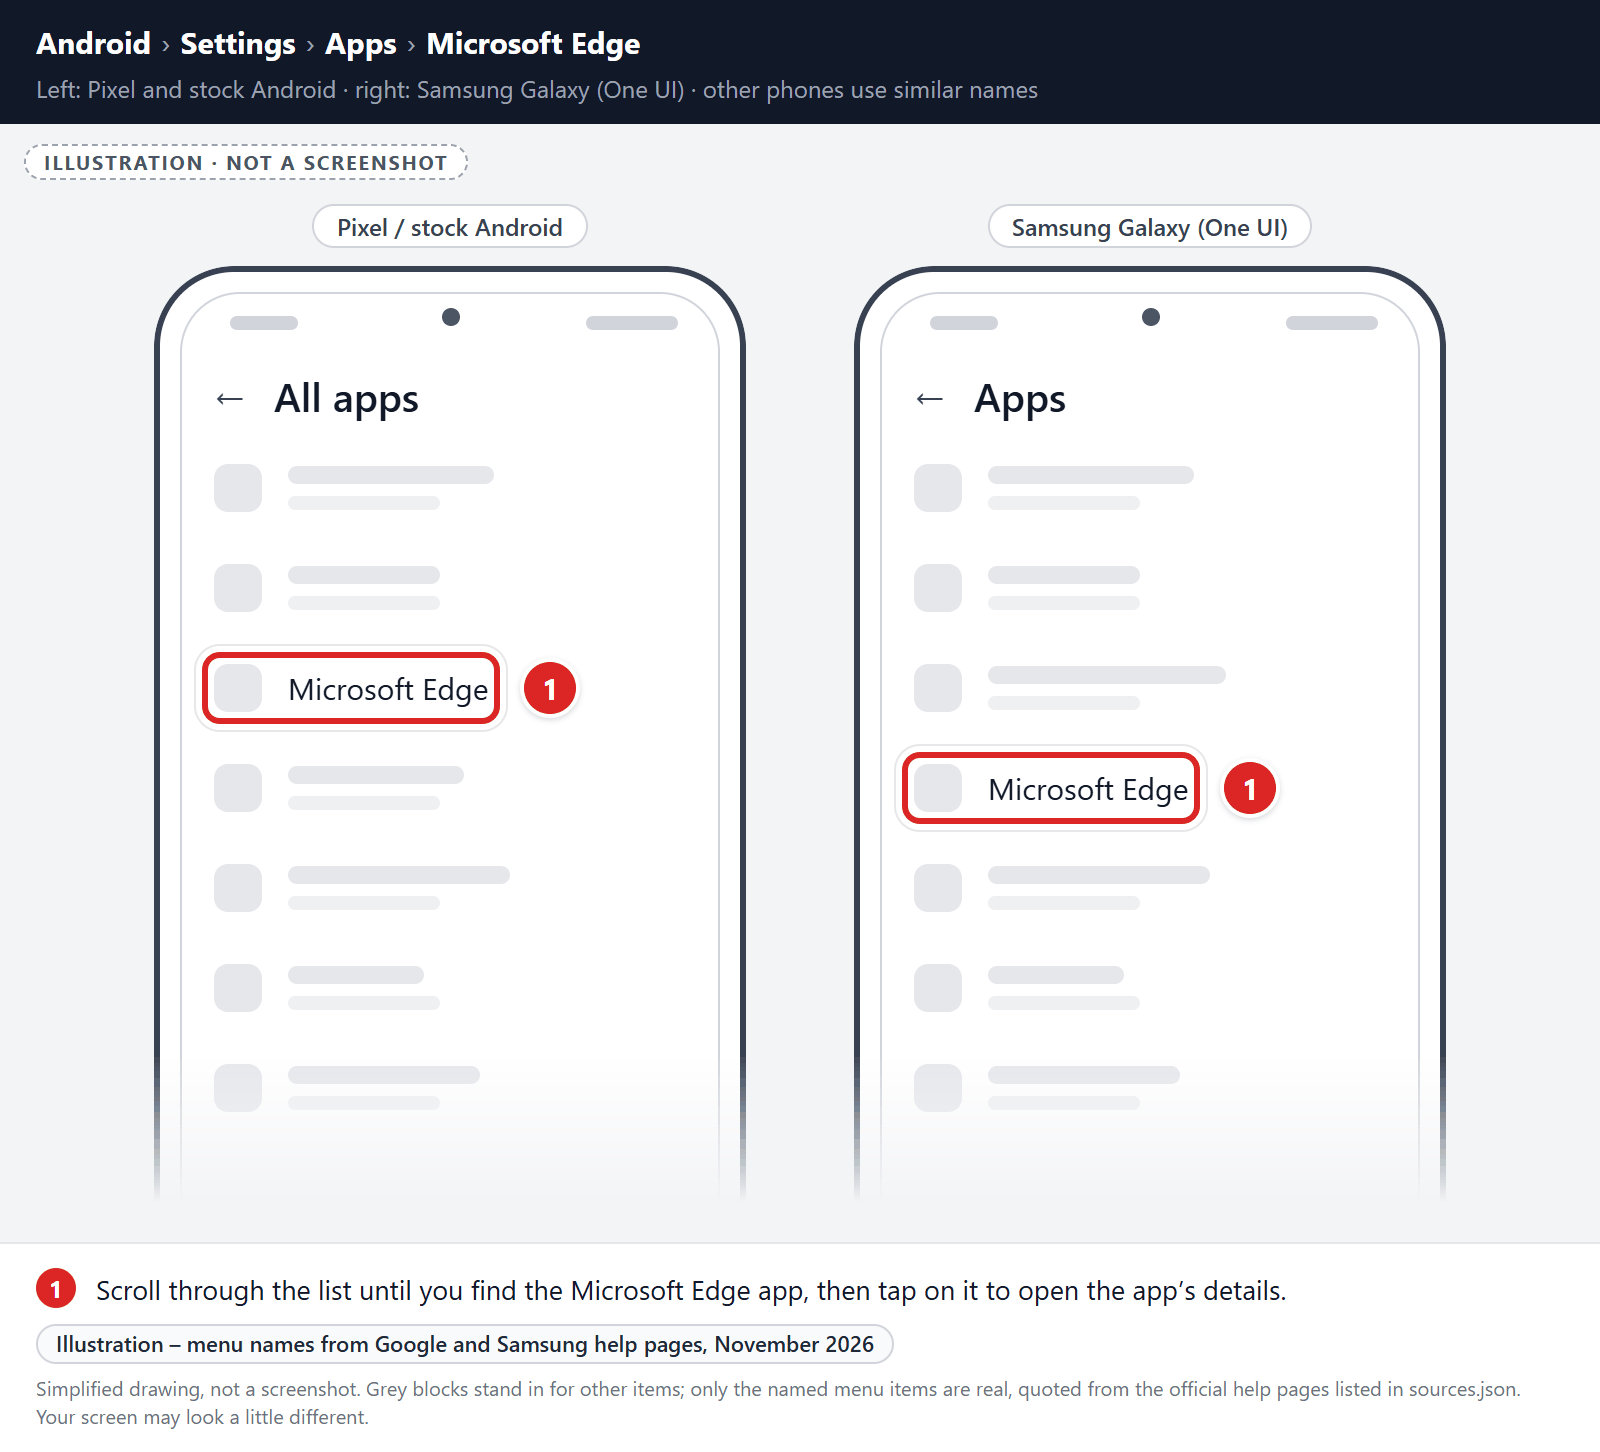
-
Tap “Storage”.
When the Microsoft Edge’s app info menu is displayed, tap on “Storage” (on Pixel phones, “Storage & cache“).
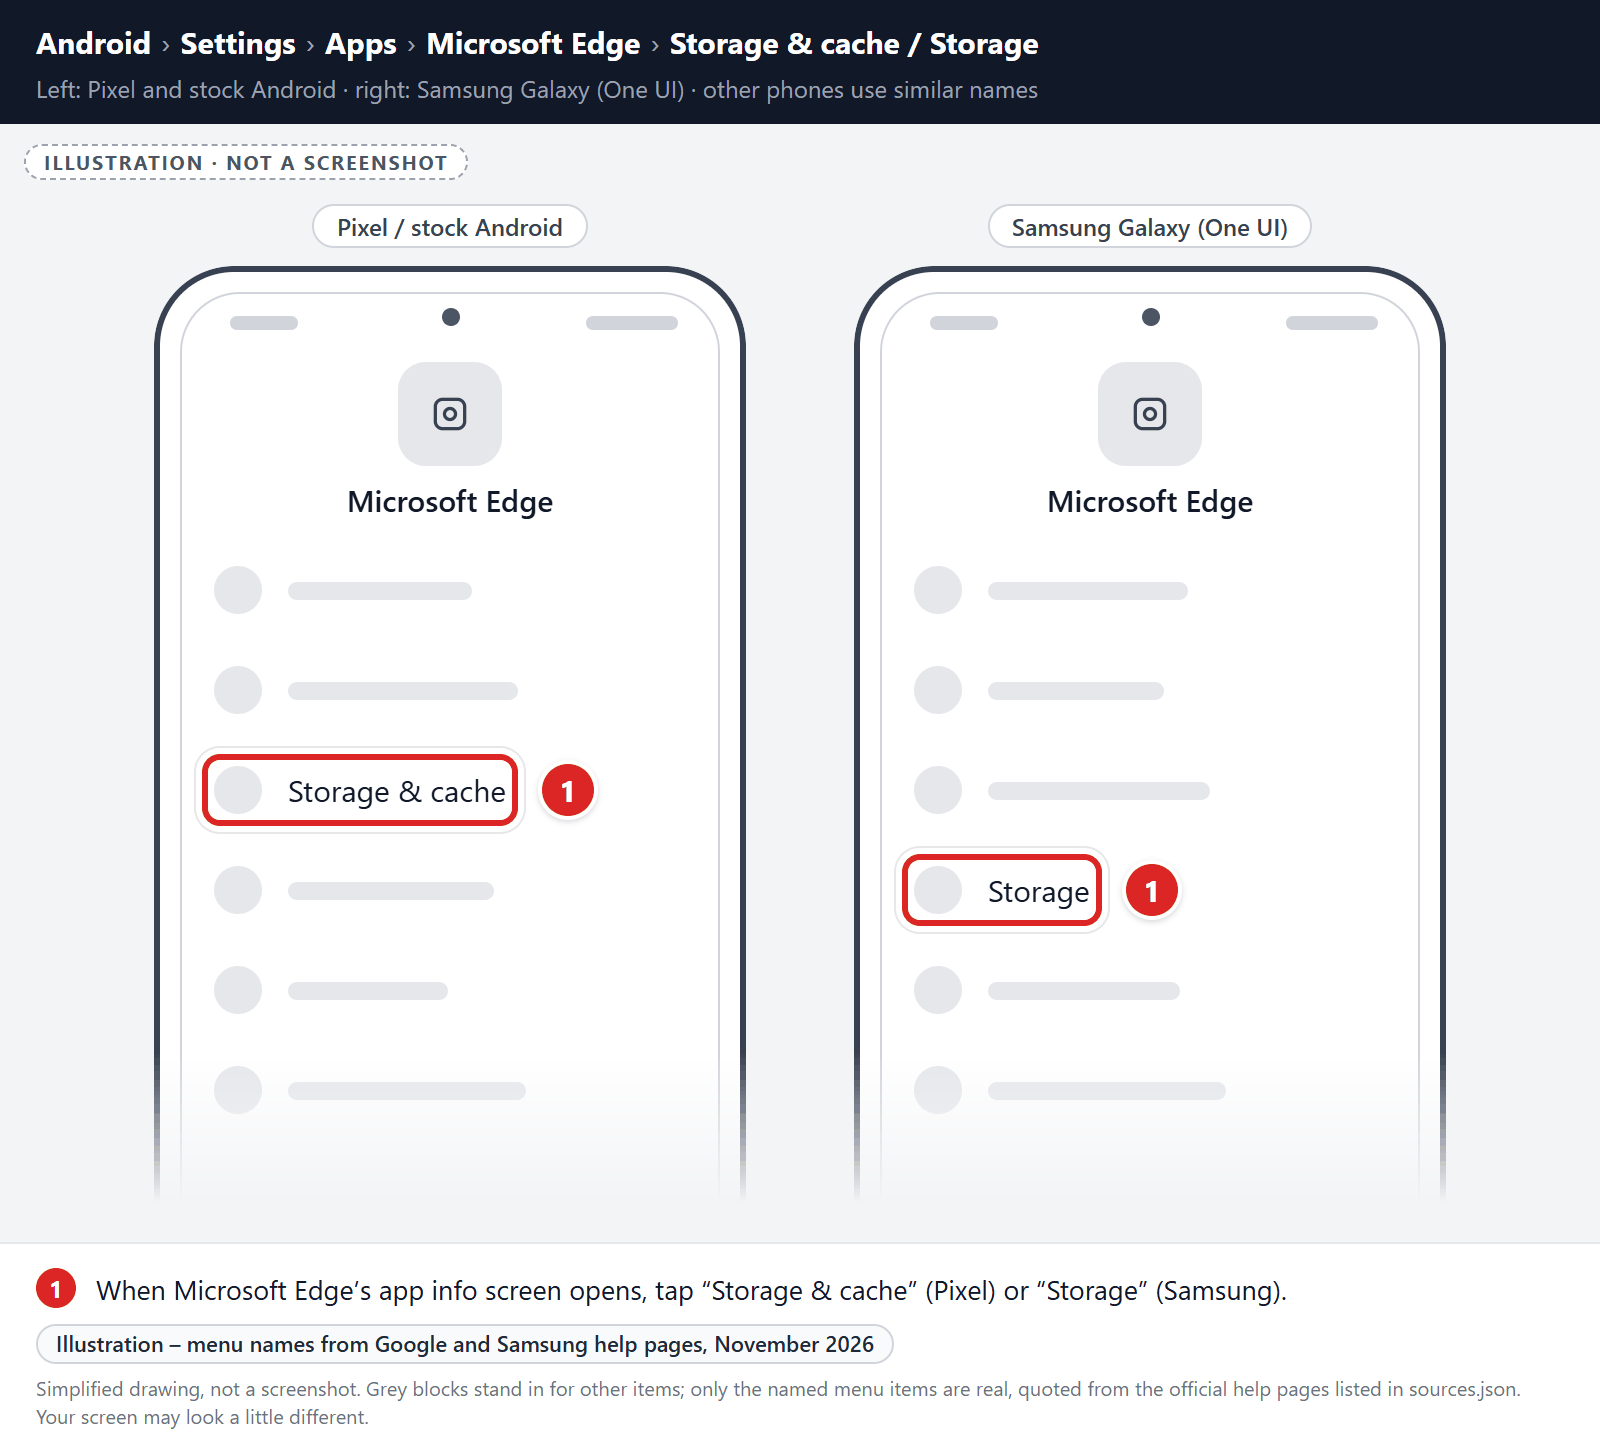
-
Tap “Clear storage” or “Clear data”.
Tap “Clear storage” (called “Clear data” on Samsung phones). If you see “Manage space” or “Manage storage” instead, tap it, then tap “Clear all data“. Don’t use “Clear cache” for this step, because it doesn’t reset the browser.
-
Confirm by tapping “OK”.
A confirmation dialog will appear. Tap “OK” or “Delete” to finish. When you open Microsoft Edge again, sign back in and turn sync back on if you use it.
STEP 3: Use Malwarebytes for Android to remove malicious apps
In this final step, we will install Malwarebytes for Android to scan and remove malicious apps from your phone or tablet.
Malwarebytes for Android scans your phone or tablet for malware, adware, and potentially unwanted apps. The free version scans only when you start a scan. Real-time protection, which checks apps automatically, is part of the paid Premium version.
-
Download Malwarebytes for Android.
You can download Malwarebytes for Android by clicking the link below.
Get Malwarebytes for AndroidOpens Google Play in a new tab.Want real-time protection? See Malwarebytes Premium for AndroidMalwarebytes for AndroidScans your phone and removes malware at no cost -
Install Malwarebytes for Android on your phone.
In the Google Play Store, tap “Install” to install Malwarebytes for Android on your device.
When the installation process has finished, tap “Open” to begin using Malwarebytes for Android. You can also open Malwarebytes by tapping on its icon in your phone menu or home screen.
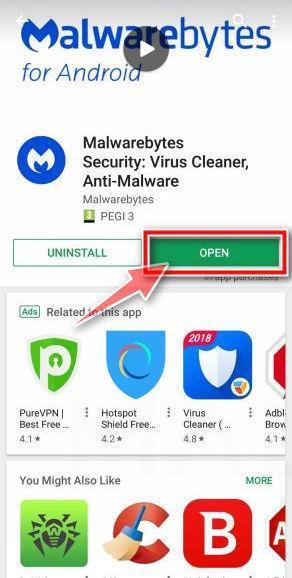
-
Follow the on-screen prompts to complete the setup process
When Malwarebytes opens, it walks you through a short setup. Tap Get started and follow the prompts. If you see an offer for a trial or a paid plan, read it before you accept. You can skip it and keep using the free scanner.
Malwarebytes will ask for permission to access the files on your phone so it can scan them. Tap Allow, or turn on the permission in the Android screen that opens, then return to Malwarebytes.
-
Run a scan with Malwarebytes for Android
On the main screen, tap Scan now. In some versions, you open the menu, tap Scanner, and then tap Run a scan.
-
Wait for the Malwarebytes scan to complete.
Malwarebytes will now start scanning your phone for adware and other malicious apps. This process can take a few minutes, so we suggest you do something else and periodically check on the status of the scan to see when it is finished.
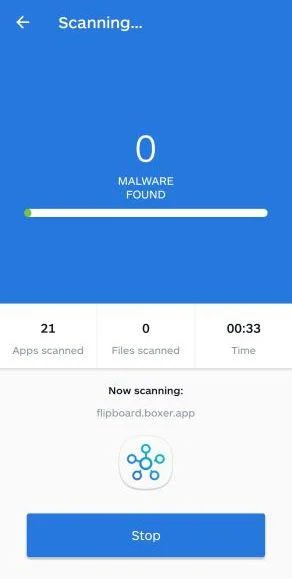
-
Remove the detected apps.
When the scan has been completed, you will see a list of the threats that Malwarebytes for Android has detected. Next to each detected item, tap the menu icon (three dots), then choose to uninstall the app or delete the file. Android then asks you to confirm. Tap OK or Uninstall to remove the app.
-
Restart your phone.
When the detected apps are removed, restart your phone if Malwarebytes asks you to. Then check whether the problems you noticed have stopped.
When you’ve finished these steps, check whether the problems you noticed have stopped. If they continue, see the options below.
If you are still having problems with your phone after completing these instructions, then please follow one of the steps:
- Ask for help in our Mobile Malware Removal Help & Support forum.
- Only as a last resort, reset your phone to factory settings. Read the warning below first.
- Back up your photos, videos, files, and messages, for example to your Google account or a computer.
- Make sure you know your Google account email and password. The phone asks for them after the reset. If you changed the password recently, Google recommends waiting 24 hours before you reset.
- On a Samsung phone, also make sure you know your Samsung account password.
- If you use an authenticator app for two-step verification, move your accounts to another device or save your backup codes first.
Remove Unwanted Apps and Malware from iPhone and iPad
STEP 1: Clean your browser
First, we’ll clean Safari using the built-in “Clear History and Website Data” feature. This removes your browsing history, cookies, and cached data — including the stored data that scam sites use to keep showing you pop-ups and redirects. Don’t worry: this won’t delete your photos, apps, or saved passwords, but it will sign you out of websites. To keep other sites signed in, you can remove only the scam site’s data instead: go to Settings > Apps > Safari > Advanced > Website Data, swipe left on the site, and tap Delete.
- Don’t tap anything inside the scam page or pop-up — the buttons are designed to trick you. Instead, tap the tabs icon in the lower-right corner of Safari, as shown below.
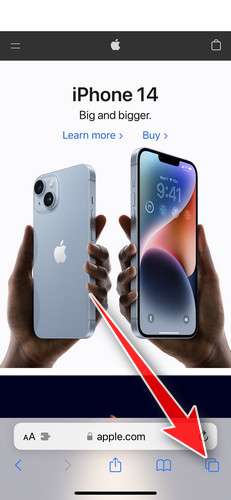
- Tap the X on the malicious tab (or swipe it up) to close it safely.
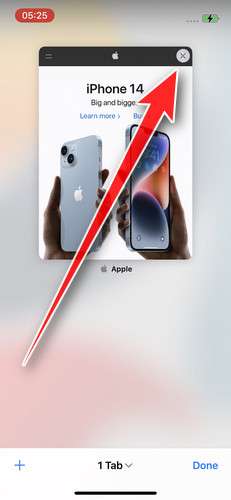
- Open the Settings app.
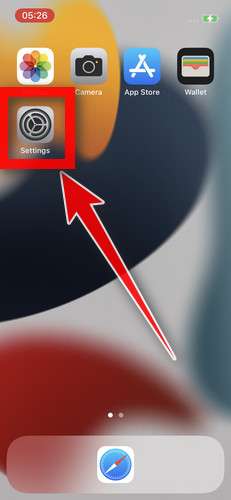
- Turn on Airplane Mode. This temporarily disconnects your iPhone from the internet, so the scam site can’t load anything while we clean up. We’ll turn it back off at the end.
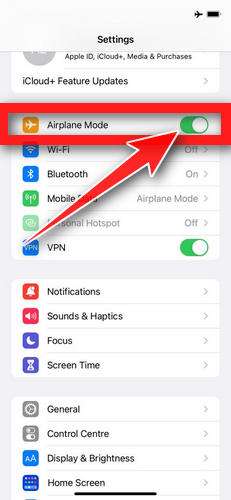
- Scroll down and tap Apps, then tap Safari. On iOS 17 and earlier, Safari is listed directly in Settings.
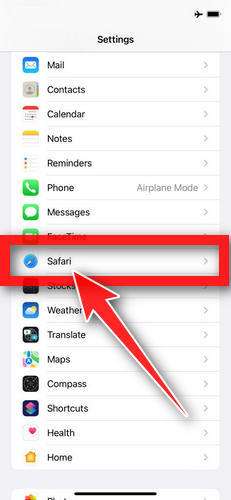
- Tap Clear History and Website Data.
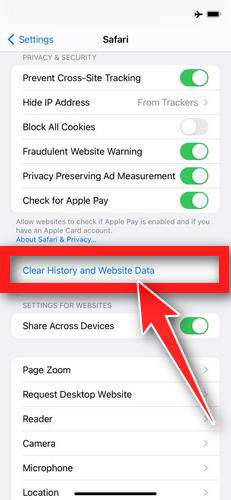
- If you’re asked to choose a timeframe, choose All history, then tap Clear History. On older iOS versions, tap “Clear History and Data” in the pop-up.
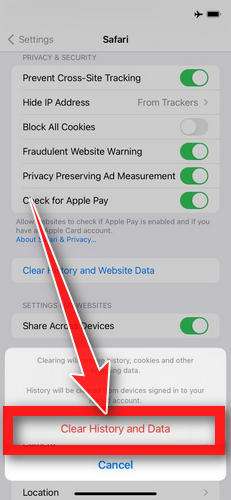
- While you’re still in Safari settings, turn on Block Pop-ups and Fraudulent Website Warning. These two switches stop most scam pages before they can even load.
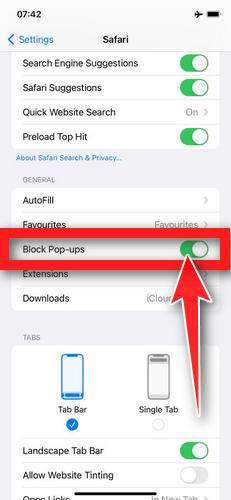
- Tap Settings in the upper-left corner to return to the main Settings menu.
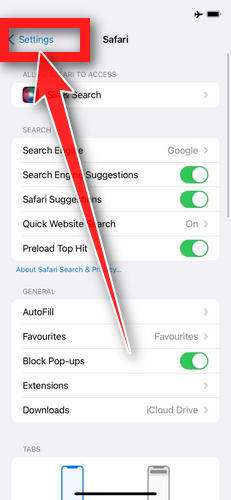
- Turn Airplane Mode back off to reconnect your iPhone to the internet.
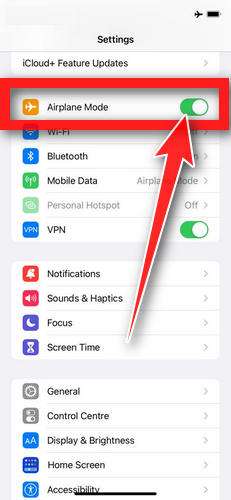
STEP 2: Delete unwanted apps
Next, we’ll remove any suspicious apps from your iPhone. If a shady website redirected you to the App Store and you installed an app — or you spot an app you don’t remember downloading — delete it now:
-
On the home screen, tap and hold the unwanted app’s icon until the icons start to wiggle.
-
Tap the minus (–) badge in the corner of the app icon, then tap Delete App. (On older iOS versions, this badge appears as an “X”.)
-
Confirm by tapping “Delete“.
Now reopen Safari and check whether the pop-ups have stopped.
To stop these scam pages from coming back, we recommend installing an ad blocker like AdGuard. It blocks the malicious ads and redirects that cause these pop-ups in the first place.
Still having issues after completing these steps? Try one of the following:
- Run a scan with Malwarebytes for iOS
- Ask for help in our free Mobile Malware Removal Help & Support forum — our team will assist you personally.
When you’ve finished these steps, check whether the pop-ups or other problems have stopped.
The Bottom Line
The Safety Services pop-up is a fake Microsoft-style tech support scam built to scare users into calling scam phone numbers. The warning about track(2).dll, denied access, and urgent system danger is not real. It is a scripted deception designed to move victims into a phone conversation with scammers.
Once that call happens, the criminals may ask for remote access through tools like AnyDesk, claim the device is infected or hacked, and then push for money through card payments, bank transfers, or gift cards. Some victims also expose personal information, financial accounts, and passwords during the process.
If you see this pop-up, do not call the number, do not trust the message, and do not grant remote access. Close the page, secure your device, and treat the alert as what it is: a fraudulent scare tactic.
The scam alert is fake. The support line is fake. The danger comes from engaging with the people behind it.

Join the discussion
2 commentsShare your experience or ask a question about this article.
Discussion
This is a very complete guide. Instructions on how to activate Malwarebytes permanent free status would be helpful.
In reply to Steve
Thanks, Steve. Malwarebytes Free does not require a paid license key, and the free features are separate from the temporary trial of paid protection. The current Windows/Mac documentation lists Quick Scan and Custom Scan as free, while Threat Scan and real-time protection require a paid subscription. You can see the current feature list here: https://help.malwarebytes.com/hc/en-us/articles/49849786059035-Free-vs-Paid-Malwarebytes-Security-features
If you entered payment details for a trial or subscription, turn off auto-renewal in your Malwarebytes account if you do not want to be charged; simply stopping use of the app does not cancel billing. If your copy will not let you access the free features, please tell us your operating system and Malwarebytes version so we can give you the right steps for that interface. Please do not post your license key or account details.