

Microsoft Edge adopts robust security measures to keep malware at bay. But like any browser, it is still vulnerable to crafty infections from browser hijackers, redirect malware, spyware and more.
If your Edge starts misbehaving with constant pop-ups, frequent crashing, or unwanted changes, it likely has a malicious infection. The good news is you can fully disinfect Edge and restore its performance.
This comprehensive guide covers the common Edge malware threats, how to identify compromised browsers, and proven steps to eliminate infections. With the right approach, you can clean up Edge and take back control of your browsing experience.

Types of Malware That Infect Edge
While Microsoft Edge has robust built-in security, some crafty malware still sneaks through its defenses. Being aware of the most common threats helps you recognize and eliminate infections. Here are the top varieties to watch for:
Browser Hijackers
Browser hijackers covertly modify Edge’s settings and insert unwanted changes without permission. They often switch the default search engine so that Edge uses something unreliable or ad-heavy like Yahoo Search. Hijackers also change the default homepage and new tab page.
For example, the SmartBar hijacker replaces search with Ask.com and loads shady new tabs riddled with ads. Hijackers may also change omnibox results so searches redirect to ad pages regardless of what you type. Stranger toolbars like ShopperPro often accompany hijackers.
Redirect Malware
This nasty malware causes Edge to silently redirect you to phishing, scam and malicious pages when clicking legitimate links. A normal redirect changes the destination shown in the address bar. An injected overlay or a lookalike page may instead hide what is happening, so check the complete address before entering information.
Redirectors pose serious threats because they canalize traffic to dangerous sites where drive-by-downloads and zero-day exploits await. Banking trojans like Qbot often leverage redirectors to steal credentials.
Adware
As the name suggests, adware bombards users with excessive pop-up, banner, text and video ads when browsing in Edge. Ads may seem harmless at first but quickly escalate to intrusive and inappropriate content. Adware can dramatically slow browsing speeds as well.
Some adware auto-clicks and interacts with ads to fraudulently inflate affiliate commissions. Adware often sneaks onto systems bundled with “free” software like video converters and download managers that users install without reading carefully.
Cryptojacking Scripts
This emerging threat uses Edge to hijack your device’s resources to mine cryptocurrency without permission. The scripts run complex calculations on your CPU and GPU to verify blockchain transactions, minting digital coins for the attackers. This strains your hardware and causes Edge to lag.
In severe cases, the strain can actually degrade components like GPUs over time leading to premature failure. Laptops in particular overheat and slow down significantly once infected with cryptojacking scripts.
Information Stealing Malware
As the name suggests, this malware secretly logs your activity and snoops data entered into Edge like passwords and credit cards. Using tools like hidden keyloggers, it records everything you type into forms. The data gets sent back to attackers for identity theft or sold on the dark web.
Information stealing malware poses a huge privacy violation and identity theft risk. There are also varieties that switch on your webcam to record you without consent. Monitoring antivirus to disable it is common as well.
Now that you know the most common Edge malware threats, staying vigilant for infection warnings becomes much easier. But ideal defense is preventing malware in the first place with secure computing habits.
How to Tell if Microsoft Edge Has Malware
Microsoft Edge malware infections start off subtle but quickly escalate and seriously hurt browser performance. Being able to recognize the symptoms of a compromised browser early is key so you can take swift action.
Watch out for these common signs indicating your Microsoft Edge has picked up malware:
Frequent Crashes and Freezes
As malware strains system resources, Edge will begin crashing or freezing frequently, especially when opening multiple tabs or pages simultaneously. Web pages also take forever to load or fail to load completely. Videos buffer endlessly even on fast connections.
Redirection to Suspicious Sites
When clicking legitimate site links or typing URLs directly into the address bar, Edge will instead redirect you to odd pages and domains against your will. For example, microsoft.com redirects to an error page instead of the real Microsoft site.
Barrage of Pop-up Ads
If you suddenly start seeing tons of intrusive pop-up ads appear on every site, that likely indicates adware has infected Edge. The relentless pop-ups are difficult to close faster than they spawn. They promote questionable products, services, and suspicious downloads.
New Unknown Extensions
Pull up the Extensions page in Edge and look for any recently added extensions or toolbars you don’t remember installing yourself. Malware often secretly installs unwanted extensions to inject more ads, steal data, and redirect traffic.
Settings Changes
If Edge’s default search engine, homepage, or new tab page have been changed without your knowledge, that points to browser hijacker malware modifying settings.
Overheating and Loud Fan Noise
Excessive heat and loud fan spin ups are signs cryptojacking malware may be running mining scripts in the background, overworking your hardware’s resources via the browser.
Edge Opens Itself at Startup
Edge can start with Windows because of its startup settings or a Windows feature. That behavior alone is not a malware diagnosis. Check Windows Settings → Apps → Startup and the pages Edge opens; an unsolicited scam page or unwanted extension is a more useful clue.
Noticing any of these symptoms means your Edge browser has likely been compromised by malware. But prompt action can fully remove the infections before they create serious issues. Stay vigilant for any shady browser behavior!
Removing Malware from Microsoft Edge
Here’s how to remove all malware from your Windows and Microsoft Edge:
- STEP 1: Use Rkill to terminate malicious processes
- STEP 2: Uninstall malicious programs from your computer
- STEP 3: Remove malicious browser policies from Windows
- STEP 4: Remove malicious files and folders from Windows
- STEP 5: Reset your browser settings to their defaults
- STEP 6: Use Malwarebytes to remove trojans and browser hijackers
- STEP 7: Use HitmanPro to scan your computer for rootkits and other malware
- STEP 8: Use AdwCleaner to remove adware and malicious browser policies
STEP 1: Use Rkill to terminate malicious processes
In this first step, we will download and run Rkill to terminate malicious processes that may be running on your computer.
RKill is a program that was developed at BleepingComputer.com that attempts to terminate known malware processes so that your normal security software can then run and clean your computer of infections. When RKill runs it will kill malware processes and then removes incorrect executable associations and fixes policies that stop us from using certain tools.
-
Download Rkill.
You can download RKill to your computer from the below link. When at the download page, click on the Download Now button labeled iExplore.exe. We are downloading a renamed version of Rkill (iExplore.exe) because some malware will not allow processes to run unless they have a certain filename.
Download RKillOpens the BleepingComputer download page in a new tab. RKillStops malware processes so other tools can run
 -
Run RKill.
After downloading, double-click the iExplore.exe icon to kill malicious processes. In most cases, downloaded files are saved to the Downloads folder.
The program may take some time to search for and end various malware programs.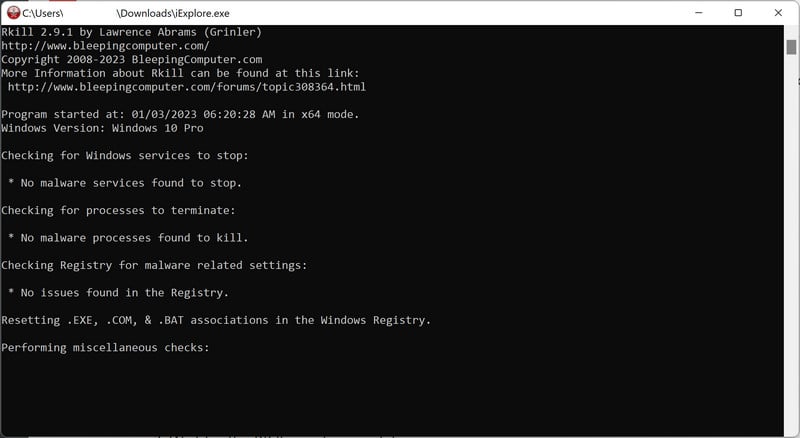
When it is finished, the black window will close automatically and a log file will open. Do not restart your computer. Proceed to the next step in this guide.
STEP 2: Uninstall malicious programs from your computer
In this second step, we will manually check if any unknown or malicious programs are installed on the computer. Sometimes adware and browser hijackers can have a usable Uninstall entry that can be used to remove them.
Use the tab for your Windows version. Windows 7 and 8 are legacy systems; some current scanners no longer support them. On Windows 10, check your Extended Security Updates enrollment after cleanup.
-
Open the Settings app
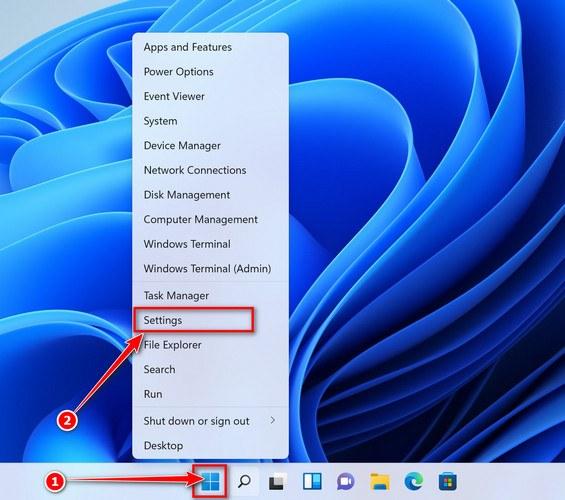
Press Windows + I on your keyboard to open Settings. Alternatively, right-click the Start button and select “Settings” from the menu.
-
Go to “Installed apps”
In the Settings window, click “Apps” in the sidebar, then select “Installed apps“.
-
Find and uninstall the malicious program
Scroll through the list of installed apps and look for anything suspicious — a program you don’t remember installing, or one with a strange or generic name.
Quick tip: click “Sort by” and choose “Install date“. Malware is usually one of the most recently installed programs, so it will appear near the top.
When you find the malicious program, click the three dots next to it and select “Uninstall“.Didn’t find any suspicious programs? That’s fine — not all infections install visible apps. Just continue with the next step in this guide. -
Complete the uninstall
Confirm by clicking Uninstall in the message box, then follow the remaining prompts.
Read each prompt carefully — some malicious programs use confusing wording or pre-ticked boxes hoping you’ll click through without looking.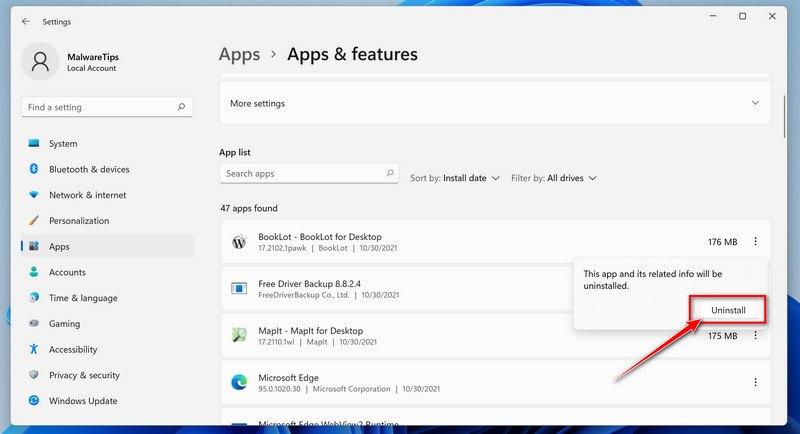
-
Open the Settings app
Press Windows + I on your keyboard to open Settings. Alternatively, click the Start button on the taskbar and select “Settings” (the gear icon).
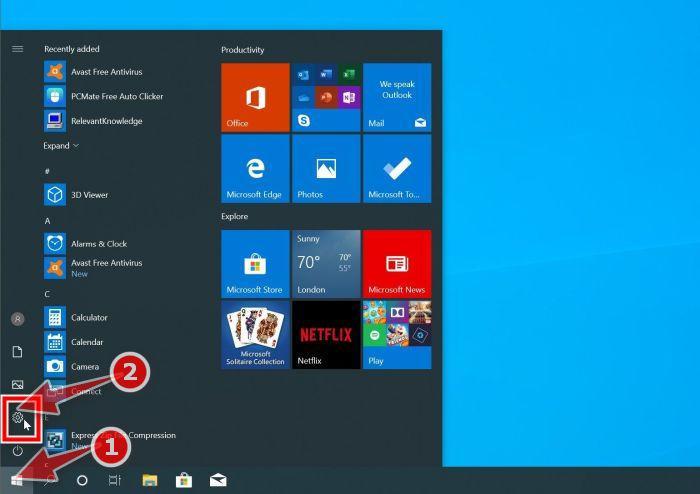
-
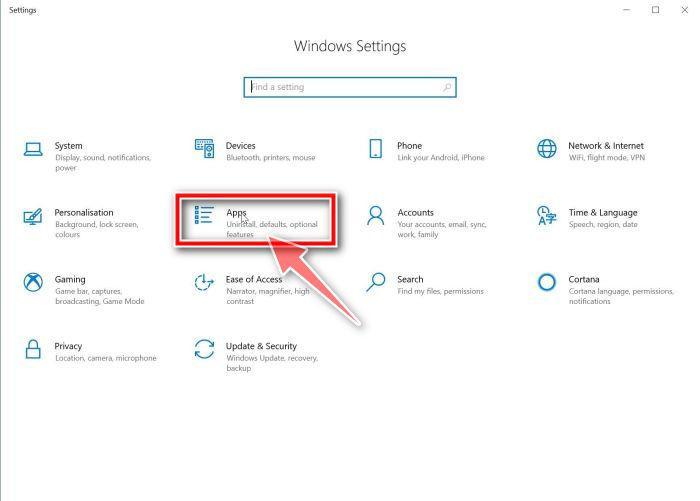
Click on “Apps”
In the “Windows Settings” window, click “Apps“. The “Apps & Features” section should open by default — if it doesn’t, select it from the list on the left.
-
Find and uninstall the malicious program
Scroll through the list of installed apps and look for anything suspicious — a program you don’t remember installing, or one with a strange or generic name.
Quick tip: click “Sort by” and choose “Install date“. Malware is usually one of the most recently installed programs, so it will appear near the top.
When you find the malicious program, click on it and select “Uninstall“.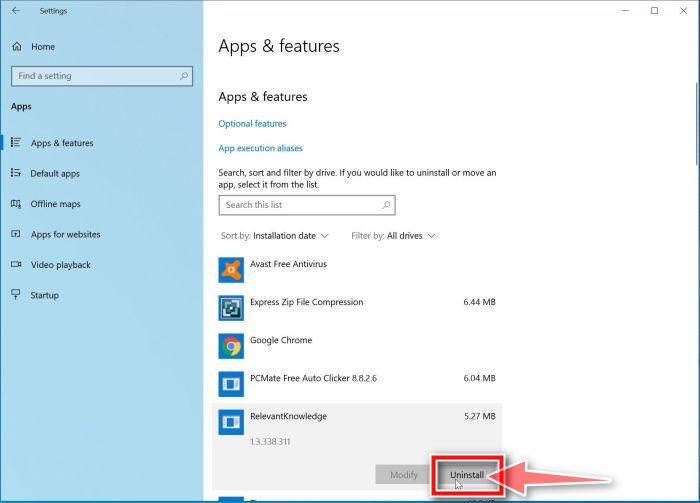 Didn’t find any suspicious programs? That’s fine — not all infections install visible apps. Just continue with the next step in this guide.
 -
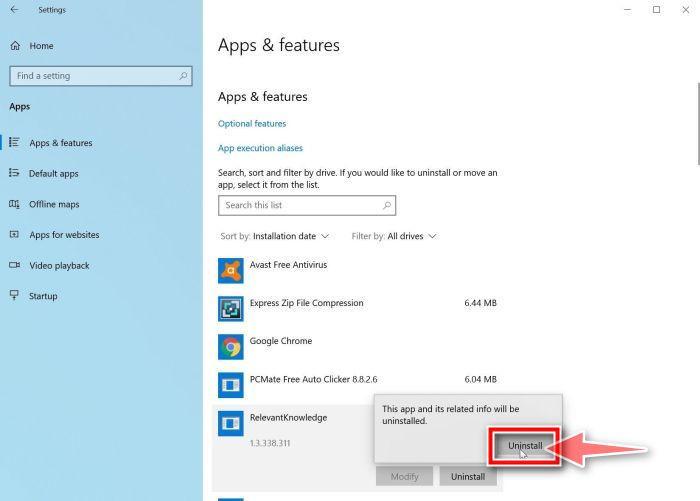
Complete the uninstall
Confirm by clicking Uninstall in the message box, then follow the remaining prompts.
Read each prompt carefully — some malicious programs use confusing wording or pre-ticked boxes hoping you’ll click through without looking.
-
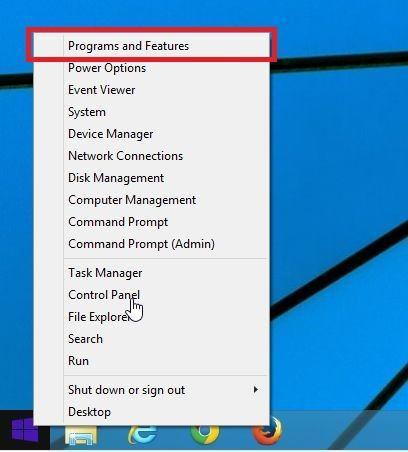
Open “Programs and Features”
Right-click the Start button in the taskbar, then select “Programs and Features“. This takes you straight to the list of installed programs.
-
Find and uninstall the malicious program
Scroll through the list of installed programs and look for anything suspicious — a program you don’t remember installing, or one with a strange or generic name. Click to highlight it, then click the “Uninstall” button.
Didn’t find any suspicious programs? That’s fine — not all infections install visible apps. Just continue with the next step in this guide.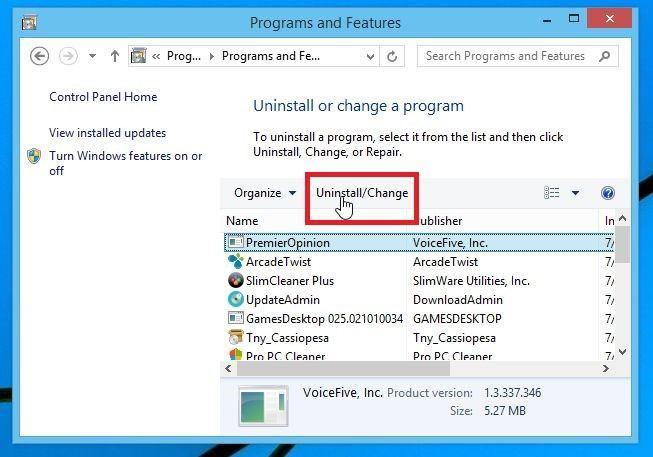
-
Complete the uninstall
Confirm by clicking Yes in the message box, then follow the remaining prompts. Read each prompt carefully — some malicious programs use confusing wording or pre-ticked boxes hoping you’ll click through without looking.
-
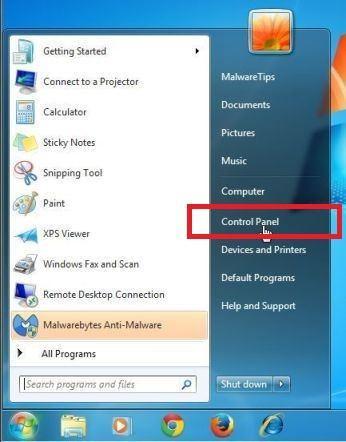
Open the Control Panel
Click the “Start” button, then click “Control Panel“.
-
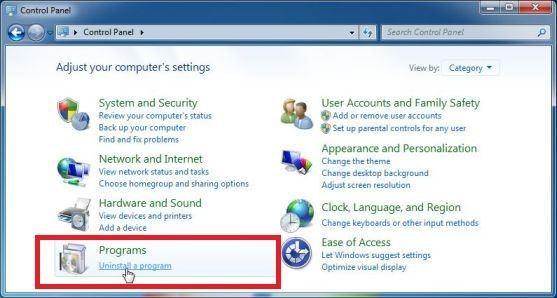
Click on “Uninstall a Program”
In the Control Panel, click “Uninstall a Program” under the Programs category.
-
Find and uninstall the malicious program
Scroll through the list of installed programs and look for anything suspicious — a program you don’t remember installing, or one with a strange or generic name. Click to highlight it, then click the “Uninstall” button.
Didn’t find any suspicious programs? That’s fine — not all infections install visible apps. Just continue with the next step in this guide.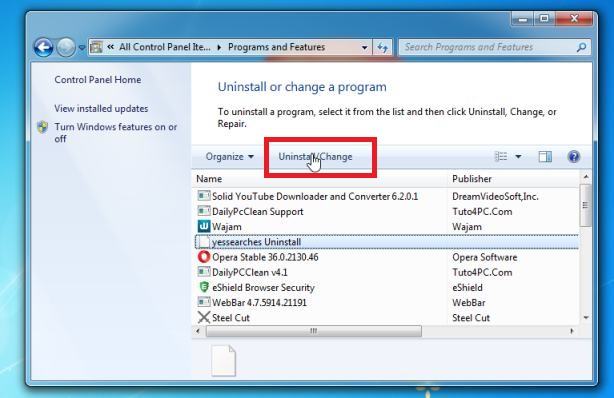
-
Complete the uninstall
Confirm by clicking Yes in the message box, then follow the remaining prompts. Read each prompt carefully — some malicious programs use confusing wording or pre-ticked boxes hoping you’ll click through without looking.
With the malicious programs removed, you’re ready for the next step in this guide.
STEP 3: Remove malicious browser policies from Windows
This step applies only to Chrome policies that you have confirmed are unwanted on a personal computer. It does not reset Edge policies. For Edge, check edge://policy and continue with the Edge reset tab and malware scans below; ask for help with a policy that keeps returning.
Optional, for confirmed malicious Chrome policies: do not run this on a work or school computer. “Managed by your organization” can be legitimate. Inspect chrome://policy first; resetting all policies can remove settings you intentionally configured.
-
Download the Chrome Policy Remover
Click the button below to download the Chrome Policy Remover for Windows — a small batch script that automatically removes the malicious policies that malware uses to lock your Chrome settings.
Download Chrome Policy RemoverDownloads the delete_chrome_policies file from the developer’s site. Chrome Policy RemoverFree script that removes the policies malware adds to ChromeSeeing a security warning? Stop and check the download source and the script’s contents. Windows warnings are not proof that a file is harmless. Use this policy reset only on your own PC with confirmed unwanted policies; ask for help if you cannot verify the script.
 -
Run the file as administrator
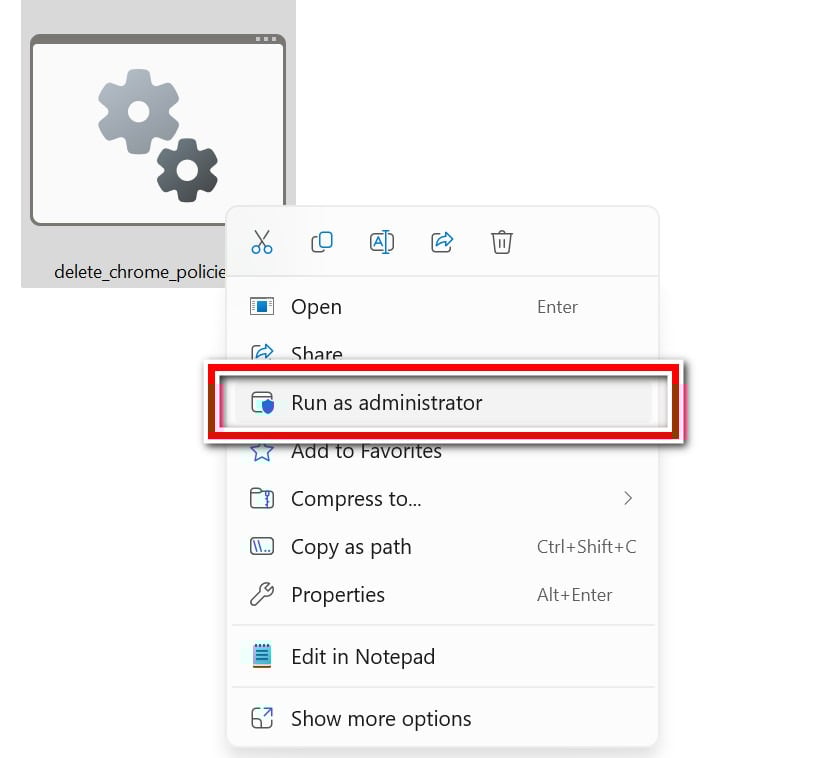
Right-click the “delete_chrome_policies.bat” file (usually in your Downloads folder) and select Run as administrator. Administrator rights are required because Chrome policies are stored in protected system settings — without them, the tool can’t remove the policies.
Confirm and let the script finish
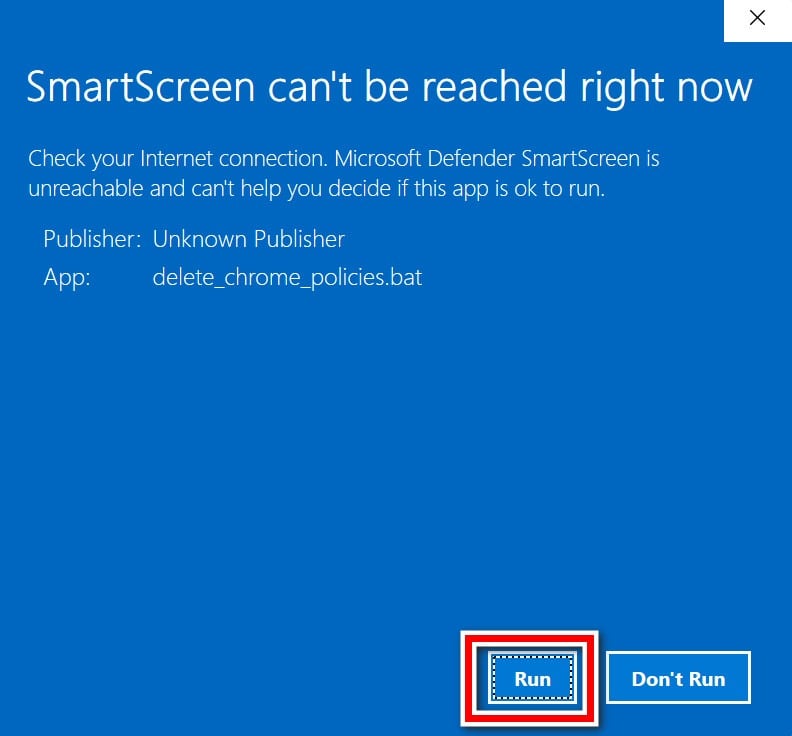
Windows will ask for confirmation before allowing the script to make changes — click “Yes” (or “Run“, depending on your Windows version). A Command Prompt window will open and the script will remove the policies automatically; this only takes a few seconds. When it’s done, close the window.
With the malicious policies removed, Chrome’s settings are unlocked again. In the next step, we’ll reset the browser to its defaults.
STEP 4: Remove malicious files and folders from Windows
In this fourth step, we will manually search and remove malicious scheduled tasks and folders on your computer.
1. Delete Malicious Scheduled Tasks
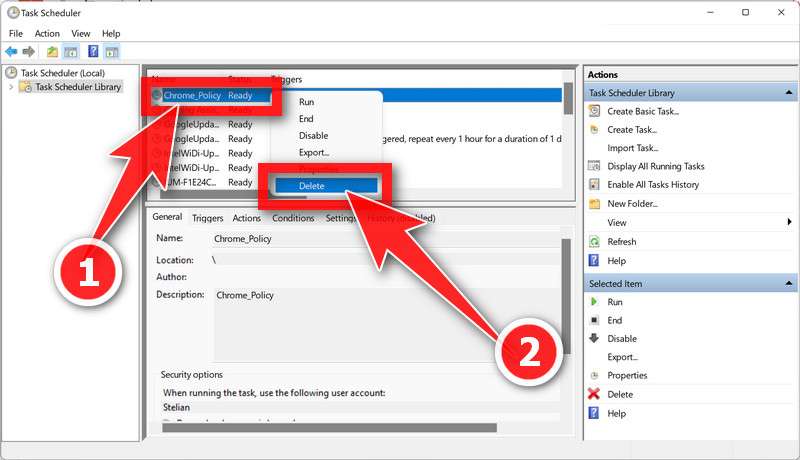
This infection often creates a scheduled task in the Windows Task Scheduler that reinstalls the malware every few minutes after you delete it. That’s why the redirects keep coming back even after a cleanup — until this task is removed, the infection will keep restoring itself.
- Type “Task Scheduler” in the Windows search bar and open the app, as shown below.
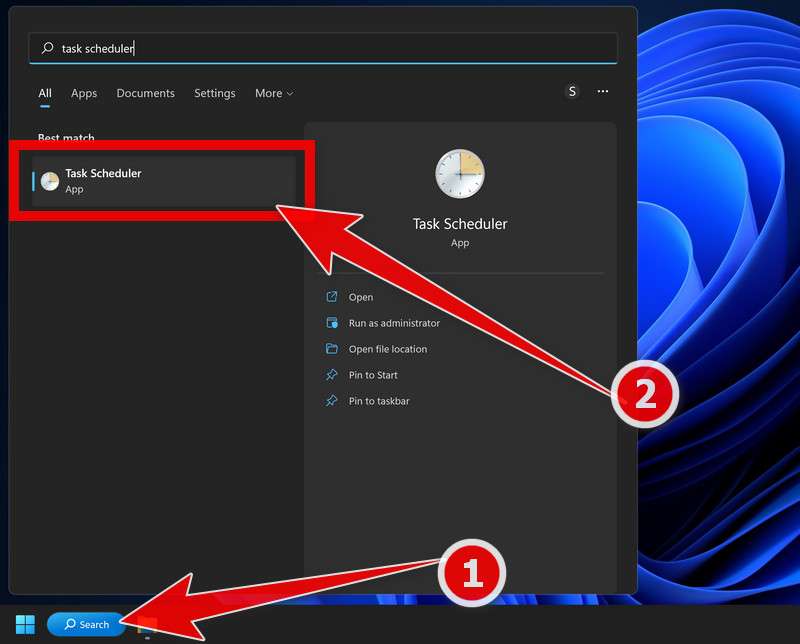 Alternatively, press Windows + R, type “taskschd.msc“, and press Enter.
 - In the Task Scheduler window, click Task Scheduler Library in the left pane.
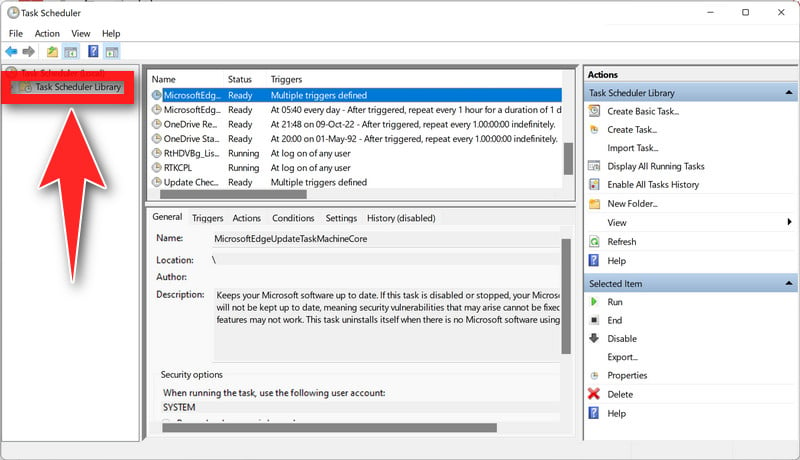
- Inspect the task’s Actions tab and the exact file it starts. Many legitimate apps run from AppData, so the folder or a generic task name is not enough to identify malware. Delete a task only after tying its action to the detected infection; export a copy first if you need to preserve the details.
2. Delete Malicious Files from the AppData\Roaming Folder
Next, we’ll delete the malicious files the infection stores in the AppData\Roaming folder.
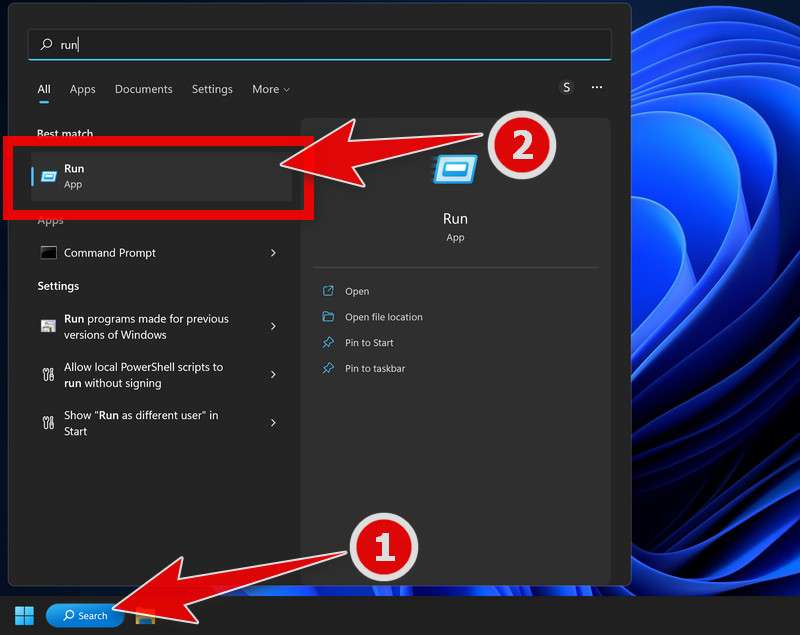
- Press Windows + R to open the Run app (or type “Run” in the Windows search bar).
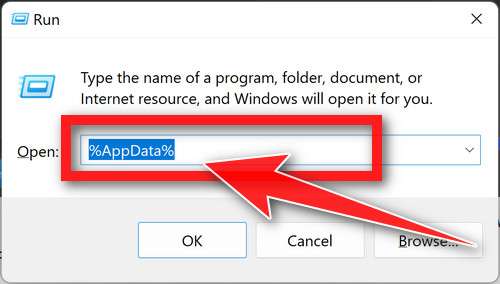
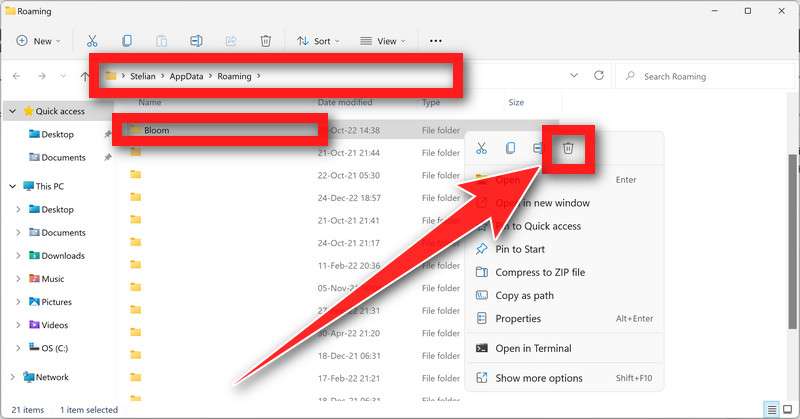
- In the Run box, type “%AppData%” and click OK. Windows will open the Roaming folder directly.
- Inspect folders such as Default, Chrome32, Energy, Bloom, or Travel only if the detection report or scheduled task points there. These names are examples, not a deletion list. Keep unrelated folders and remove only files confirmed to belong to the infection.
Be careful: only delete folders you’re confident don’t belong to a real program. Legitimate apps (Adobe, Spotify, Discord, etc.) also store their data here. If you’re unsure about a folder, search its name online first — or skip it; continue with the scanners later in this guide and seek help if the problem persists.
3. Delete Malicious Files from the AppData\Local Folder
Now we’ll do the same in the AppData\Local folder, and also remove the malicious Chrome extension the infection installed.
- Press Windows + R to open the Run app (or type “Run” in the Windows search bar).
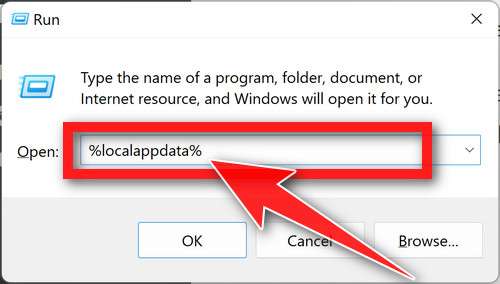
- In the Run box, type “%localappdata%” and click OK. Windows will open the AppData\Local folder directly.
- Apply the same check to Default, WindowsApp, and ServiceApp if present. A matching folder name alone does not make it malicious. Do not delete it unless its contents are tied to the unwanted program.
Next, open the Google folder and navigate to Google > Chrome > User Data > Default (or Profile) > Extensions. Inside the Extensions folder, find and delete the malicious extension’s folder — it will have a long, random-looking name. If you’re not sure which one it is, you can check each folder’s contents, or compare the names against the extensions visible at chrome://extensions in Chrome.
Important: inside User Data, the folder named “Default” is your legitimate Chrome profile — do not delete it. Only delete the individual extension folder inside Extensions.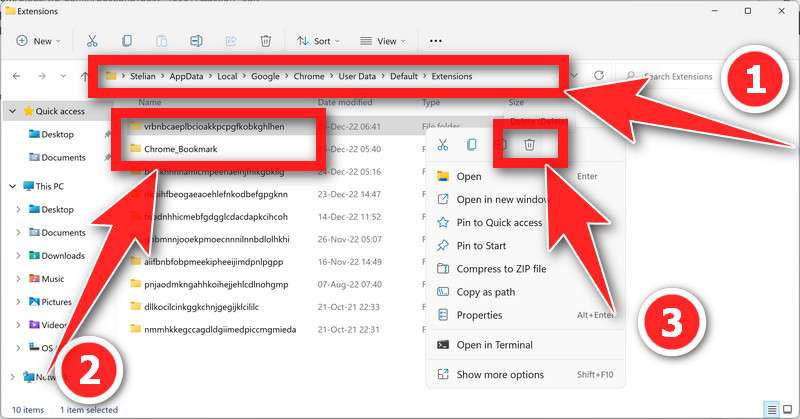
4. Fix the Hijacked Chrome Shortcut
This malware often modifies your Chrome shortcut so that every time you open the browser, the malicious extension loads with it. Here’s how to clean the shortcut:
- Right-click the Google Chrome shortcut on your desktop or Start Menu and select “Properties“.
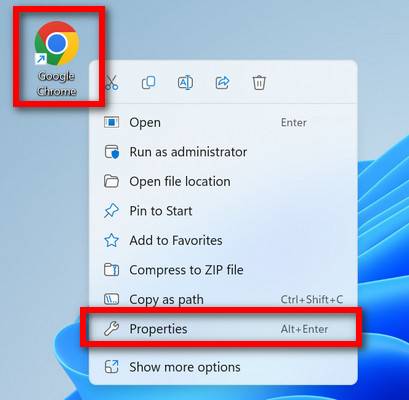
- On the Shortcut tab, check the “Target” field. It should end with chrome.exe” and nothing more. Delete any extra text appended after it — especially anything referencing the AppData folder, such as:
–load-extension=C:\Users\%USERNAME%\AppData\Local\Default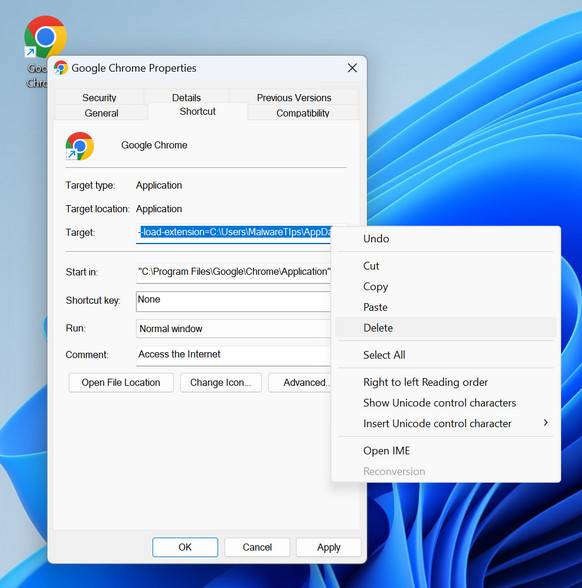
- Click OK to save the changes.
- Open Chrome from the shortcut as usual — the malicious extension should no longer load at startup.
Tip: if you’d rather not edit the Target field, there’s an easier fix — right-click the shortcut, select “Open File Location“, then drag chrome.exe to your taskbar to create a fresh, clean shortcut. Delete the old one.
With the malicious tasks, folders, and shortcut modifications removed, we can continue with the next step of this guide.
STEP 5: Reset your browser settings to their defaults
In this step, we will remove spam notifications, malicious extensions, and change to default any settings that might have been changed by malware.
Please note that this method will remove all extensions, toolbars, and other customizations but will leave your bookmarks and favorites intact. For each browser that you have installed on your computer, please click on the browsers tab below and follow the displayed steps to reset that browser.
Reset Chrome for Windows to default settings
We will now reset your Chrome browser settings to their original defaults. This will reset your startup page, new tab page, search engine, and pinned tabs. It will also disable all extensions and clear temporary data like cookies. Your favorites, history, and saved passwords will not be cleared.
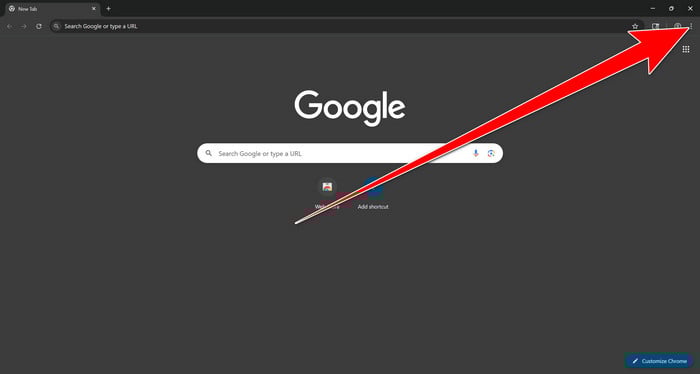
Open the Chrome menu
Open Google Chrome and click the three-dot (⋮) icon in the top-right corner.
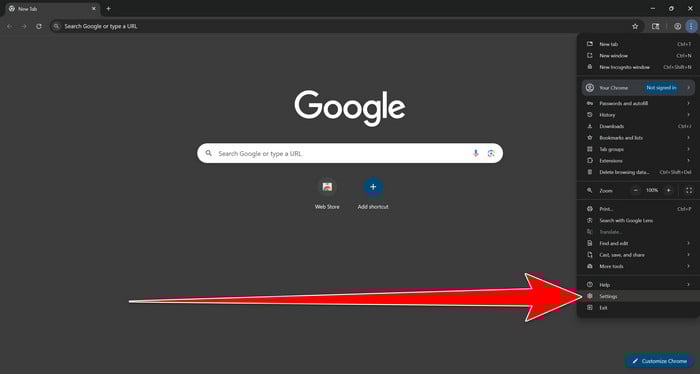
Open Chrome Settings
Select Settings from the Chrome menu.
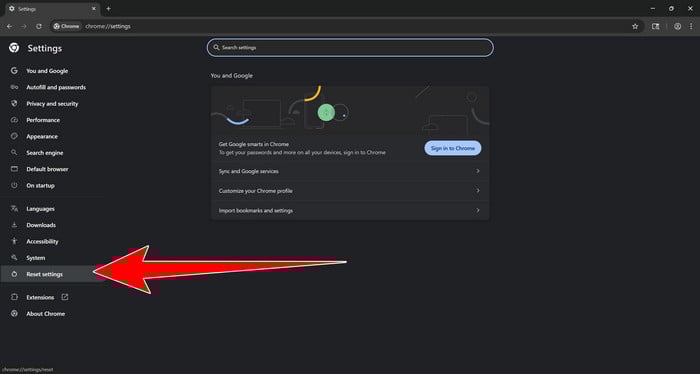
Select “Reset settings”
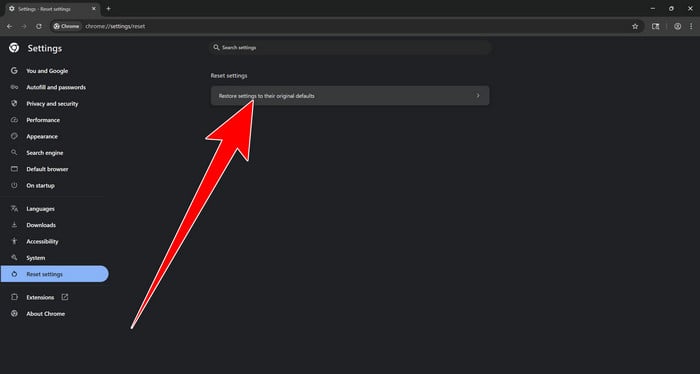
Look at the menu on the left side of the Settings page. Scroll down and click Reset settings.
Restore Chrome’s original settings
Click Restore settings to their original defaults.
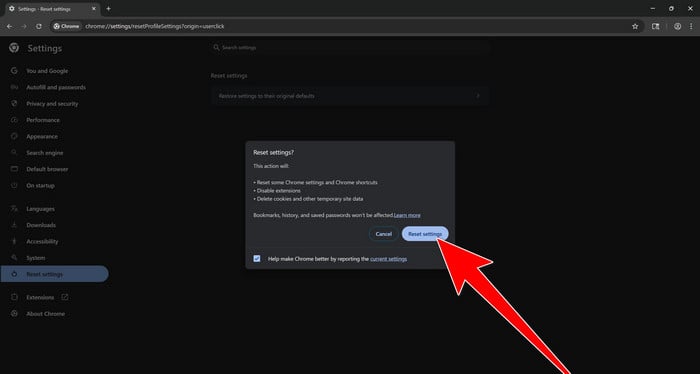
Confirm the Chrome reset
A confirmation window will appear. Click Reset settings.
This will:
- Restore the default search engine, homepage, and new tab page
- Reset startup pages and pinned tabs
- Disable installed extensions
- Clear temporary cookies and website data
Don’t worry: Chrome will not delete your bookmarks, browsing history, or saved passwords.
Restart Chrome and perform a test search. If your searches now open normally in Google, you can stop here.
If searches are still redirected through shady domains complete the additional step below.
Remove persistent search hijacker data
Only complete this step if the redirect continues after resetting Chrome.
Some browser hijackers hide inside Chrome’s local search-engine database. A standard Chrome reset may not remove this database, which is why searches can continue to pass through shady sites.
The following procedure creates a backup of the affected database and allows Chrome to build a new, clean version. This is safer and less disruptive than deleting the entire Chrome profile.
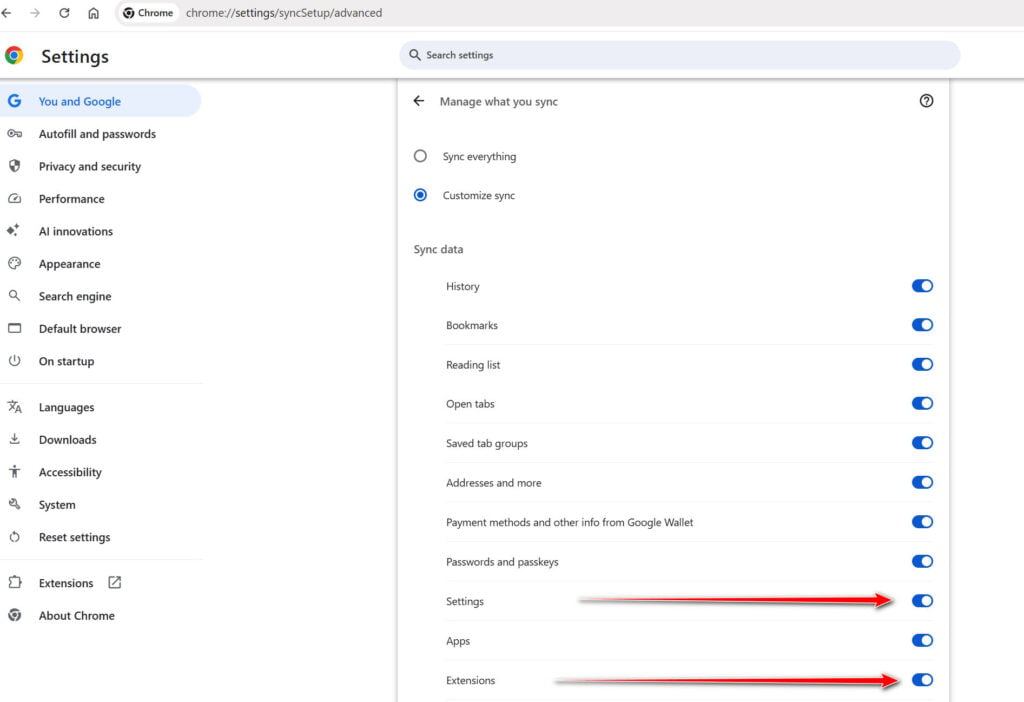
First, prevent Chrome Sync from restoring the hijacked settings:
- Open a new Chrome tab.
- Copy the following address, paste it into Chrome’s address bar, and press Enter:
chrome://settings/syncSetup/advanced - Under Manage what you sync, select Customize sync.
- Turn off Settings and Extensions.
- You can leave Bookmarks and Passwords enabled so your important data remains synchronized.
Note: Some newer Chrome versions may automatically redirect this address to the Google Account settings page. If that happens, locate the list of synchronized Chrome data and turn off Settings and Extensions there.
Now save anything you are working on and close every Chrome window.
Run the cleanup command:
- Press the Windows key on your keyboard.
- Type PowerShell.
- Open Windows PowerShell. Administrator access is not required.
- Copy the entire command shown below.
- Right-click inside the PowerShell window to paste the command, then press Enter.
- If Windows warns you about pasting multiple lines, select the option to continue.
$stamp = Get-Date -Format "yyyyMMdd-HHmmss"

Get-Process chrome -ErrorAction SilentlyContinue |
 Stop-Process -Force

$root = "$env:LOCALAPPDATA\Google\Chrome\User Data"

if (Test-Path $root) {
 $profiles = Get-ChildItem $root -Directory |
 Where-Object {
 $_.Name -eq "Default" -or
 $_.Name -match "^Profile \d+$"
 }

 foreach ($profile in $profiles) {
 foreach ($name in @(
 "Web Data",
 "Web Data-journal",
 "Web Data-wal",
 "Web Data-shm"
 )) {
 $file = Join-Path $profile.FullName $name

 if (Test-Path $file) {
 $backup = "$file.search-hijacker-backup-$stamp"
 Move-Item -LiteralPath $file -Destination $backup
 Write-Host "Backup created: $backup"
 }
 }
 }
}

Write-Host ""
Write-Host "Chrome search data has been cleaned."
Write-Host "You can now reopen Chrome."
Wait until PowerShell displays the following message:
Chrome search data has been cleaned.
You can now reopen Chrome.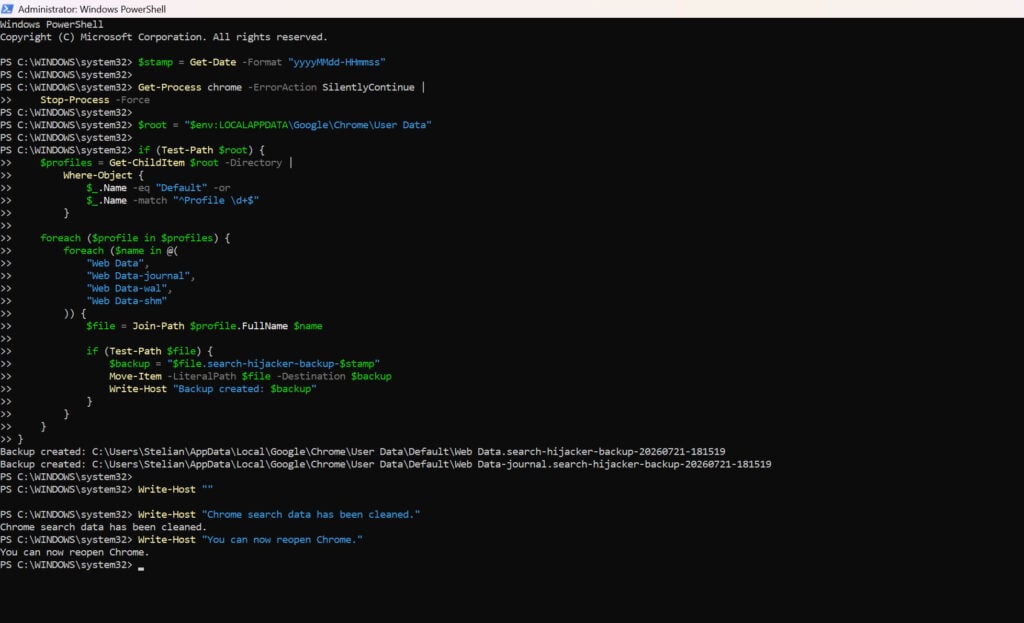
Close PowerShell and reopen Google Chrome. Chrome will automatically create a clean search database for every local profile.
Next, copy the following address, paste it into Chrome’s address bar, and press Enter:
chrome://settings/searchEnginesMake sure Google is selected as the default search engine. Test several searches from the address bar and confirm that they no longer pass through shady search engines.
Your important Chrome data is protected: the PowerShell cleanup does not remove bookmarks, saved passwords, browsing history, cookies, or installed extensions. However, it may reset locally stored Autofill addresses and form suggestions.
The original search database is not deleted. PowerShell renames it and adds
search-hijacker-backupto its filename so it can be recovered if necessary.Keep Settings and Extensions synchronization disabled while testing Chrome. Do not enable every extension at once. Enable only the extensions you recognize, one at a time, and test Chrome after each one.
If the redirect returns after enabling a particular extension, remove that extension immediately.
Reset Firefox for Windows to default settings
We will now reset your Firefox browser settings to their default. The reset feature fixes many issues by restoring Firefox to its factory default state while saving your essential information like bookmarks, passwords, web form auto-fill information, browsing history, and open tabs.
-
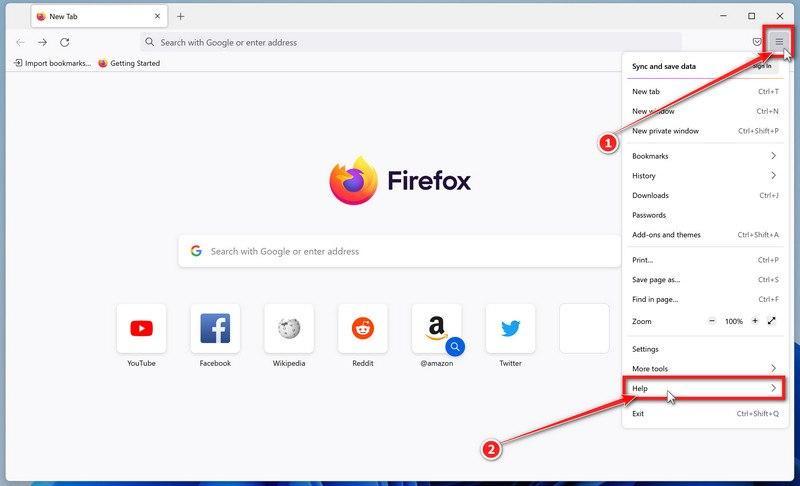
Open the Firefox menu and click “Help”
Click the three horizontal lines in the top-right corner of Firefox to open the main menu, then select “Help“.
-
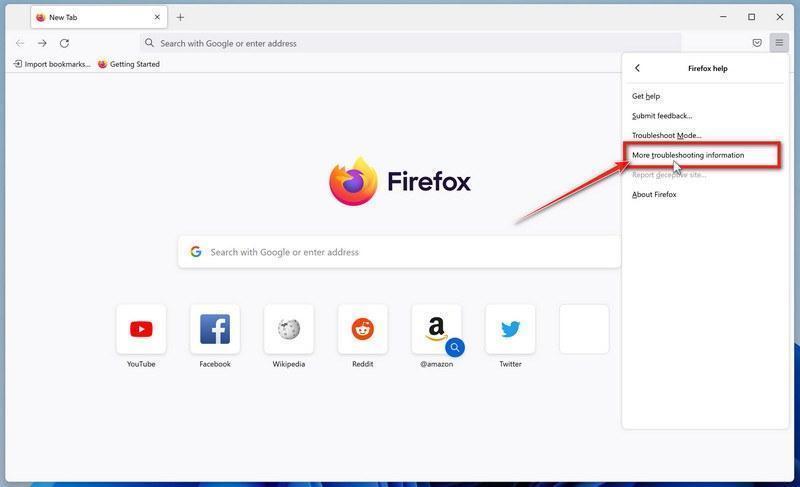
Click “More troubleshooting information”
In the Help menu, click “More troubleshooting information“.
-
Click “Refresh Firefox”
On the “Troubleshooting Information” page, click the “Refresh Firefox” button in the top-right area of the page.
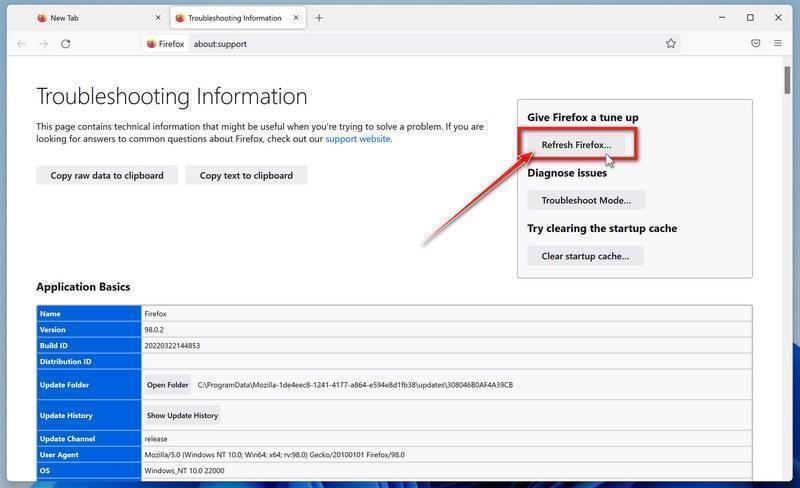
You can also type about:support in the address bar. If Refresh Firefox is missing with the newer profile manager, update Firefox; Mozilla restored that option for those profiles in version 150.
-
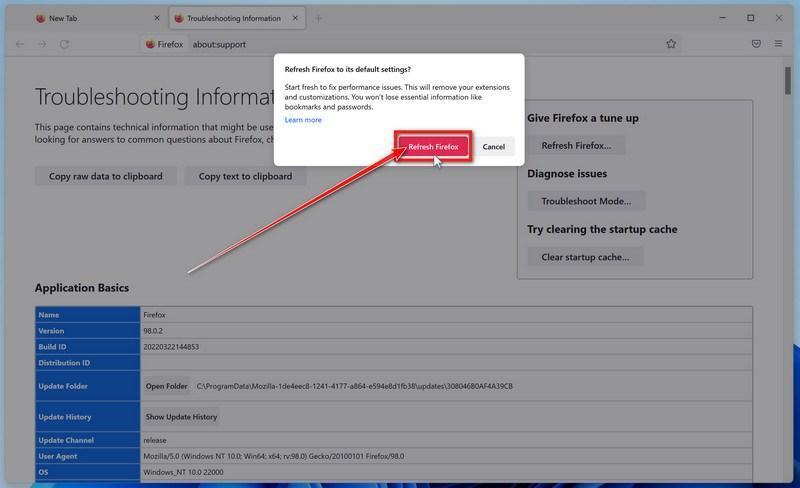
Confirm the refresh
In the confirmation window, click “Refresh Firefox” again. This removes extensions, themes, and customized settings — the usual hiding places for browser hijackers — while keeping your bookmarks, history, and saved passwords safe.
-
Click “Finish”
Firefox will close, reset itself to default settings, and reopen with a window listing the information that was restored. Click “Finish” to finish restoring your Firefox profile. Test the browser before reinstalling extensions.
About the “Old Firefox Data” folder: Firefox saves a copy of your old profile on your desktop. If something you need is missing after the reset, you can recover it from this folder. Otherwise, delete the folder — it contains sensitive data like passwords and cookies, and may also still hold the malicious files you just removed.
Reset Microsoft Edge to default settings
We will now reset your Microsoft Edge browser settings to their default. This will reset your startup page, new tab page, search engine, and pinned tabs. It will also disable all extensions and clear temporary data like cookies. Your favorites, history, and saved passwords will not be cleared.
Updated for Microsoft Edge on Windows 10 and Windows 11 — July 2026.
-
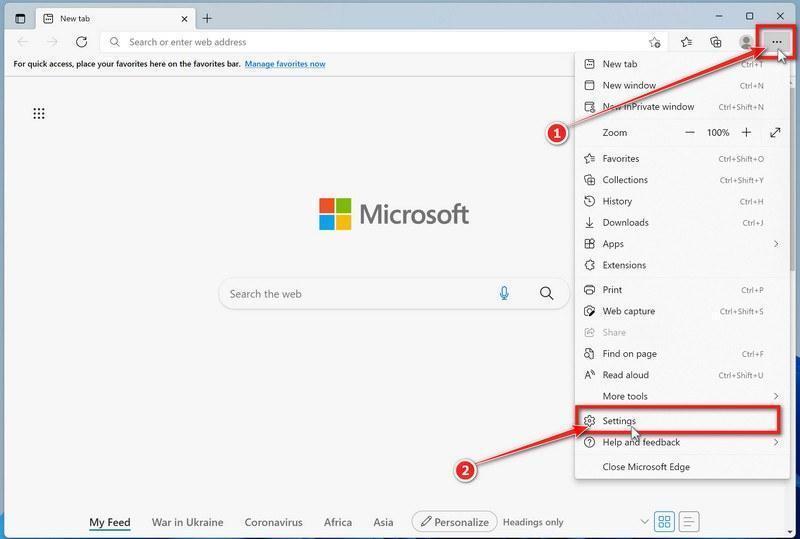
Open the Edge menu and click “Settings”
Open Microsoft Edge. In the top-right corner, click the three-dot (…) icon, then click Settings.
-
Prevent the unwanted settings from returning through Edge Sync
If you are signed in to Microsoft Edge, a bad setting or extension may be stored in your Microsoft account and return after the reset.
Copy the following address, paste it into the Edge address bar, and press Enter:
edge://settings/profiles/syncOn the Sync page, turn off these two options:
- Settings
- Extensions
You can leave Favorites and Passwords turned on.
If Edge says that sync is already off, simply continue to the next step.
Important: Edge Sync settings are separate for each profile. If you use more than one Edge profile, switch to each affected profile and repeat this step.
You do not need to sign out of your Microsoft account or delete the Edge profile.
-
Open “Reset settings”
In the left sidebar, click Reset settings.
You can also open the reset page directly. Copy the following address, paste it into the Edge address bar, and press Enter:
edge://settings/reset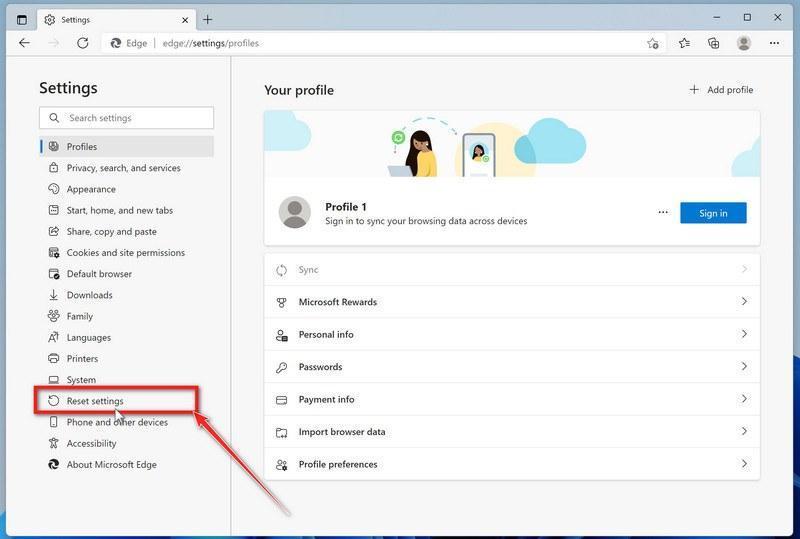
-
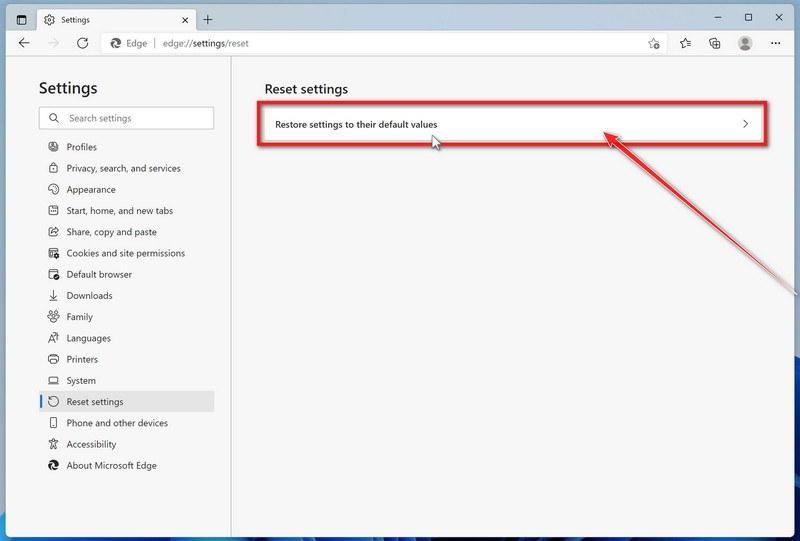
Click “Restore settings to their default values”
Click Restore settings to their default values.
-
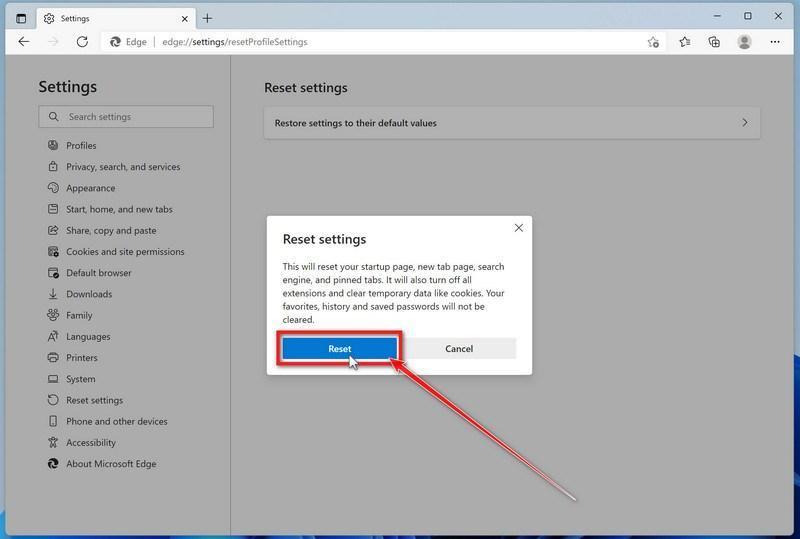
Confirm the reset
In the confirmation dialog, click Reset.
This resets the startup page, new tab page, search engine, and pinned tabs. It also disables all extensions and clears temporary site data, such as cookies.
Don’t worry: your favorites, browsing history, and saved passwords will not be deleted.
-
Check your extensions before turning them back on
Copy the following address, paste it into the Edge address bar, and press Enter:
edge://extensionsRemove any extension you do not recognize or no longer use. Pay particular attention to extensions related to search, coupons, shopping, PDF conversion, browser protection, new tabs, or video downloading.
Do not turn all extensions back on at the same time. Enable only the extensions you recognize and trust.
-
Select a trusted search engine
Copy the following address, paste it into the Edge address bar, and press Enter:
edge://settings/searchEnginesSelect Bing, Google, DuckDuckGo, or another search provider you trust and make it the default.
Remove any unknown search engines, especially providers with strange names or addresses that you did not add yourself.
Restart Edge and perform a search from the address bar. If searches are no longer redirected, you can stop here.
-
If the redirect remains, clean the corrupted search data without deleting the Edge profile
Use this additional step only if Edge continues to redirect searches after the normal reset.
This optional repair renames the Web Data database in one affected Edge profile. It may reset form-fill information, saved addresses, and custom search engines. Back up the profile first. Favorites, passwords, and browsing history are stored separately, but do not use a database repair as your first troubleshooting step.
Before continuing: save anything you are working on because the command will close Microsoft Edge.
Before closing Edge, open edge://version in the affected profile and copy its Profile path. The command asks for that path and checks it is inside Edge’s profile folder. Do not select another person’s profile or paste a folder suggested by an unverified caller.
- Open the Windows Start menu.
- Type PowerShell.
- Open Windows PowerShell. Administrator access is not required.
- Copy the entire command below.
- Paste it into PowerShell and press Enter.
$stamp = Get-Date -Format "yyyyMMdd-HHmmss"
$root = Join-Path $env:LOCALAPPDATA "Microsoft\Edge\User Data"

Get-Process -Name msedge -ErrorAction SilentlyContinue |
    Stop-Process -Force -ErrorAction SilentlyContinue

Start-Sleep -Seconds 2

if (-not (Test-Path -LiteralPath $root)) {
    Write-Host "The Microsoft Edge profile folder was not found:"
    Write-Host $root
    return
}

$profilePath = Read-Host "Paste the affected Profile path from edge://version"
$profilePath = [System.IO.Path]::GetFullPath($profilePath.Trim().Trim('"'))
$profileParent = [System.IO.Path]::GetDirectoryName($profilePath.TrimEnd('\'))
if ($profileParent -ne [System.IO.Path]::GetFullPath($root)) {
    Write-Warning "The selected folder is not a direct Edge profile folder. No files were moved."
    return
}
$profiles = @(Get-Item -LiteralPath $profilePath -ErrorAction Stop)
$movedFiles = 0

foreach ($profile in $profiles) {
    foreach ($name in @(
        "Web Data",
        "Web Data-journal",
        "Web Data-wal",
        "Web Data-shm"
    )) {
        $file = Join-Path $profile.FullName $name

        if (Test-Path -LiteralPath $file) {
            $backup = "$file.search-reset-backup-$stamp"

            try {
                Move-Item -LiteralPath $file -Destination $backup -ErrorAction Stop
                Write-Host "Cleaned: $($profile.Name)\$name"
                $movedFiles++
            }
            catch {
                Write-Warning "Could not clean: $file"
            }
        }
    }
}

Write-Host ""

if ($movedFiles -gt 0) {
    Write-Host "Microsoft Edge search data has been cleaned." -ForegroundColor Green
    Write-Host "You can now reopen Microsoft Edge."
}
else {
    Write-Host "No Edge search database files were found." -ForegroundColor Yellow
}
The command does not permanently delete the original files. It renames them as backup files, and Edge creates a clean search database when it starts again.
Note: this additional cleanup may also reset saved form-fill suggestions, saved addresses, and manually added search engines. It does not delete favorites, passwords, or browsing history.
-
Reopen Edge and test the browser
Open Microsoft Edge again, visit edge://settings/searchEngines, and select your preferred search engine.
Perform several searches from the address bar to confirm that the redirect is gone.
Keep synchronization for Settings and Extensions turned off until you are certain that the computer and extensions are clean. If you enable them again, turn them on one at a time and test Edge after each change.
-
If Edge still redirects your searches
Open edge://policy. If this is your personal computer and Edge displays unknown policies such as ExtensionInstallForcelist or DefaultSearchProvider, the hijacker may be installed outside the browser profile.
In that situation, continue with the next malware-removal steps and run a complete antivirus scan. If the computer belongs to a company or school, contact its IT administrator before changing any policies.
Reset Internet Explorer to default settings
We will now reset your Internet Explorer browser settings to their default. You can reset Internet Explorer settings to return them to the state they were in when Internet Explorer was first installed on your computer.
Legacy Internet Explorer only: the retired desktop app is unavailable on many Windows 10 PCs and is not included with Windows 11. Skip this tab if you use Edge. Resetting Edge and configuring IE mode are separate procedures.
-
Go to “Internet Options”.
Open Internet Explorer, click on the gear icon in the upper-right part of your browser, then select “Internet Options“.
If Internet Explorer will not open, press Windows + R, type inetcpl.cpl, and press Enter. Continue only if the Advanced tab actually has a Reset button. Do not reinstall an obsolete browser to obtain it.
-
Select the “Advanced” tab, then click “Reset”
In the “Internet Options” dialog box, select the “Advanced” tab, then click on the “Reset” button.
-
Click on “Reset”.
In the “Reset Internet Explorer settings” section, select the “Delete personal settings” checkbox, then click on the “Reset” button.
-
Click on “Close”.
When Internet Explorer has completed its task, click on the “Close” button in the confirmation dialogue box.
Close your browser and then you can open Internet Explorer again.
STEP 6: Use Malwarebytes to remove trojans and browser hijackers
In this step, we will install and run a scan with Malwarebytes Free to remove any infections, adware, or potentially unwanted programs that may be present on your computer.
Malwarebytes is one of the most popular and trusted anti-malware tools for Windows — and it’s completely free for removing infections. It catches threats that many antivirus programs miss, including adware, browser hijackers, and trojans. Follow the steps below to scan and clean your PC in just a few minutes.
Download Malwarebytes
Click the button below to download the latest version of Malwarebytes for Windows from the official source. The free version is all you need — it will scan your computer and remove adware, browser hijackers, and other malicious software at no cost.
Download MalwarebytesOfficial installer for Windows 11 and 10. Your download starts right away.Want real-time protection? See Malwarebytes Premium Malwarebytes Free for WindowsScans and removes malware at no cost
-
Install Malwarebytes
When the download finishes, open your Downloads folder and double-click the MBSetup file. If Windows shows a User Account Control pop-up, click “Yes” to allow the installation.

Follow the On-Screen Prompts to Install Malwarebytes
The setup wizard will walk you through a few quick screens:
Current installers may offer Browser Guard, a trial, or a paid plan. Read each screen; use Skip for optional offers you do not want. Manual Windows scans and quarantine remain available in the free version.
-
Choose where you’re installing the program — “Personal Computer” or “Work Computer” — then click Next.

-
Malwarebytes will now install on your device. This usually takes under a minute.

-
When installation is complete, the “Welcome to Malwarebytes” screen will open automatically.

-
On the final screen, click Open Malwarebytes to launch the program.

-
Choose the scan type and optional rootkit check
Start with the normal Threat Scan. For an additional rootkit check, click the three dots on the Scanner tile, choose Advanced Scan, then Custom Scan.
In the Custom Scan options, enable Scan for rootkits and select the entire C:\ system drive. Click Start Custom Scan when you have reviewed the remaining options. This option is unavailable on Windows ARM devices; do not change Windows security settings to make it appear.
Run the Custom Scan if you selected it. Otherwise, return to the Dashboard and follow the Threat Scan steps below. You do not need rootkit scanning enabled to run a normal scan.
Start the Scan
Click the blue Scan button. Malwarebytes will automatically update its virus database and start checking your computer for malware.

-
Wait for the Scan to Finish
A Threat Scan checks memory, startup items, the registry, and common malware locations; it does not inspect every file on every drive. Allow it to finish. Use a Custom Scan if you also need to check a particular drive or folder.

-
Quarantine the Detected Threats
When the scan finishes, review the detected items and leave the threats you want removed selected. Click Quarantine. If you are unsure about a detection, save the report and ask for help before excluding it.

Malwarebytes will now remove the malicious files and registry entries and move them safely into quarantine.

-
Restart Your Computer
Some threats can only be fully removed after a reboot. If Malwarebytes asks you to restart, click Yes. Once you’re logged back in, Malwarebytes has finished removing the threats it found.

STEP 7: Use HitmanPro to scan your computer for rootkits and other malware
In this next step, we will scan the computer with HitmanPro to ensure that no other malicious programs are installed on your device.
HitmanPro is a second-opinion scanner designed to check for threats your usual antivirus may have missed. It examines suspicious files and uses cloud analysis from several security labs, including SophosLabs. An internet connection is needed for that cloud check.
Scanning is free. Removing detected threats requires an eligible one-time 30-day trial or a paid license. If this computer already used its trial, do not expect another free activation; the purchase screen shows the current price.
-
Download HitmanPro
Click the button below to download HitmanPro. Remember — the scan is free, so you have nothing to lose by checking your PC.
Download HitmanProFree scan. Removal requires an eligible 30-day trial or a paid license. Opens the official HitmanPro page in a new tab. HitmanProSecond-opinion malware scanner from Sophos
 -
Install HitmanPro
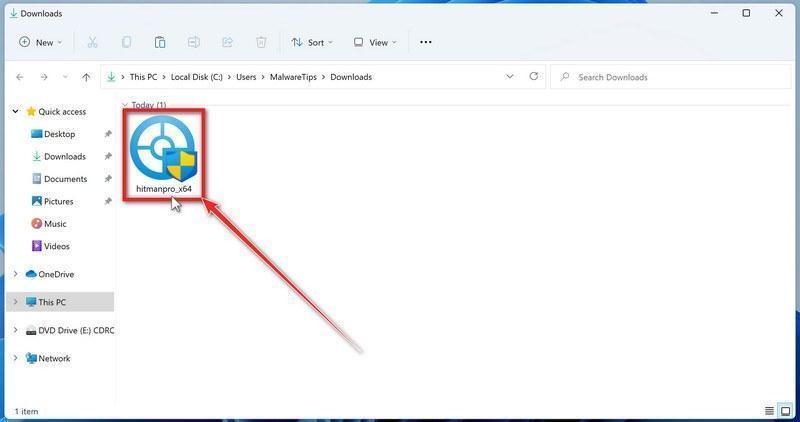
When the download finishes, open your Downloads folder and double-click the file: “hitmanpro.exe” on 32-bit Windows, or “hitmanpro_x64.exe” on 64-bit Windows.
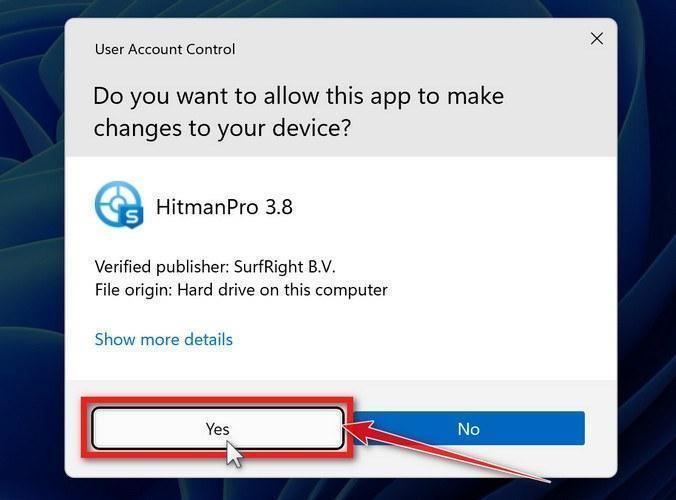
If a User Account Control pop-up asks whether HitmanPro can make changes to your device, click “Yes” to continue.
-
Follow the On-Screen Prompts
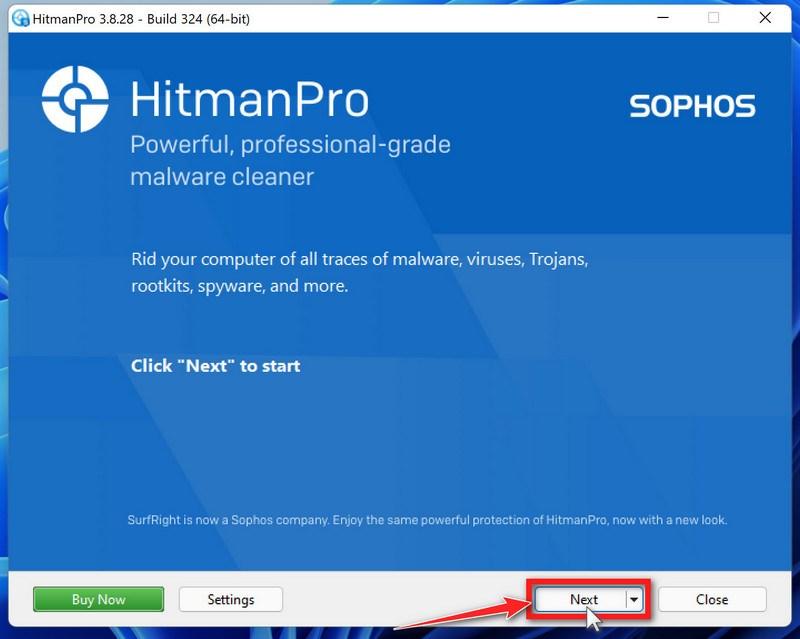
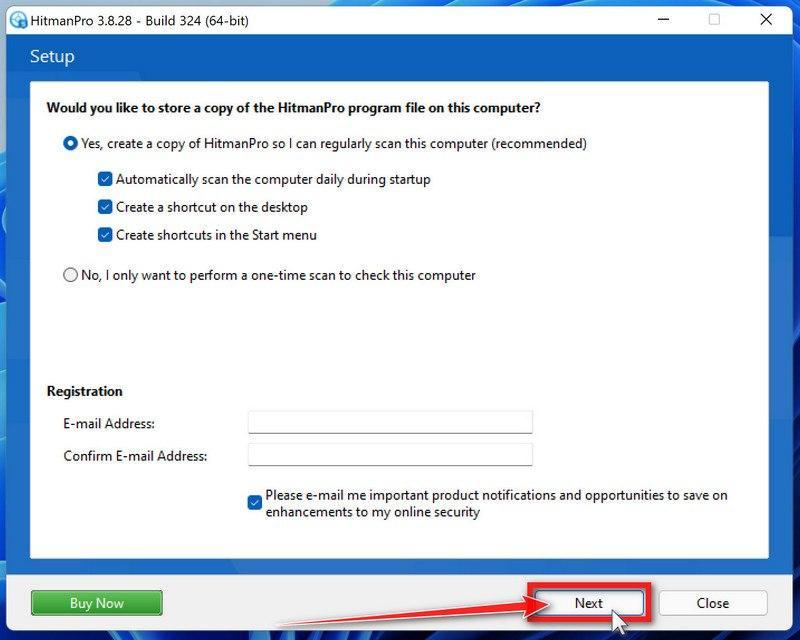
On the HitmanPro start screen, click “Next” to begin the system scan. No lengthy setup required — it goes straight to work.
-
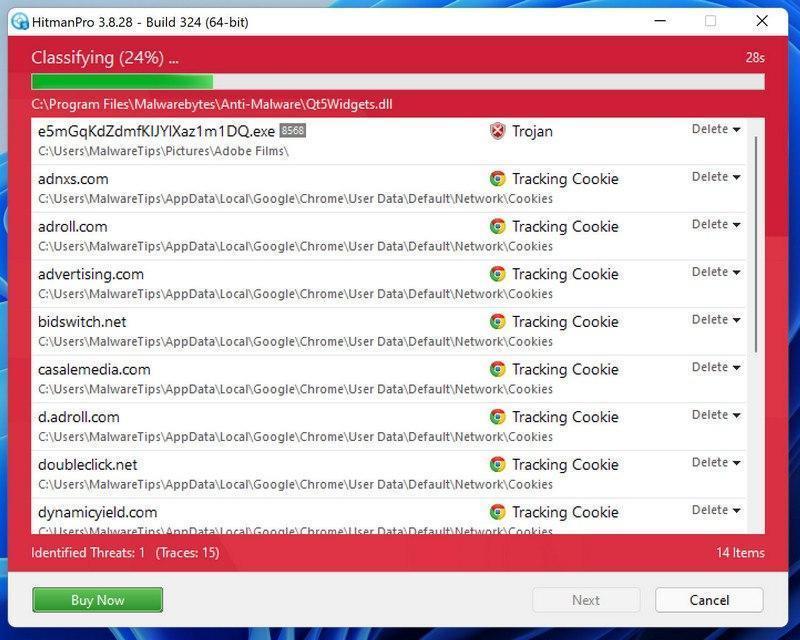
Wait for the Scan to Finish
HitmanPro will now check your computer for malicious programs. This usually takes just a few minutes thanks to its cloud-based scanning.
-
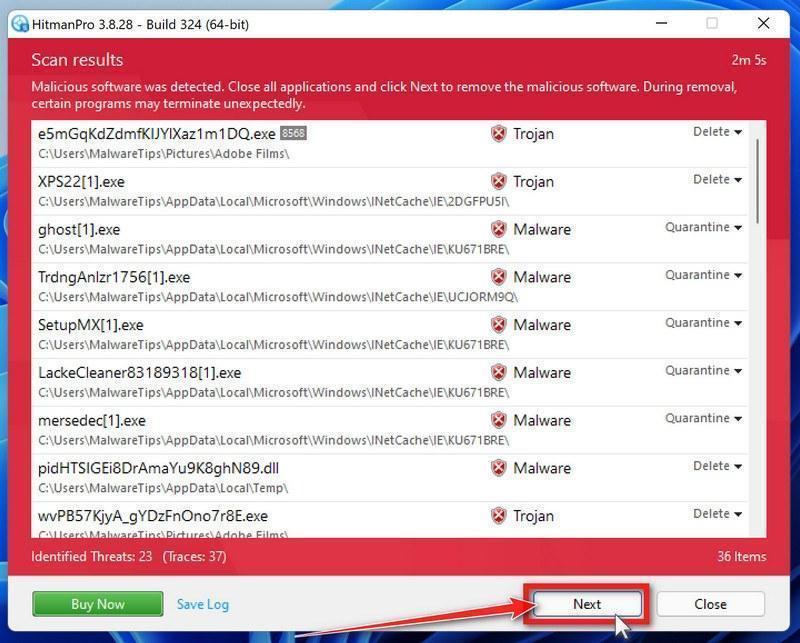
Review the Results and Click “Next”
When the scan is done, HitmanPro will show you everything it found. Click “Next” to remove the detected threats.
-
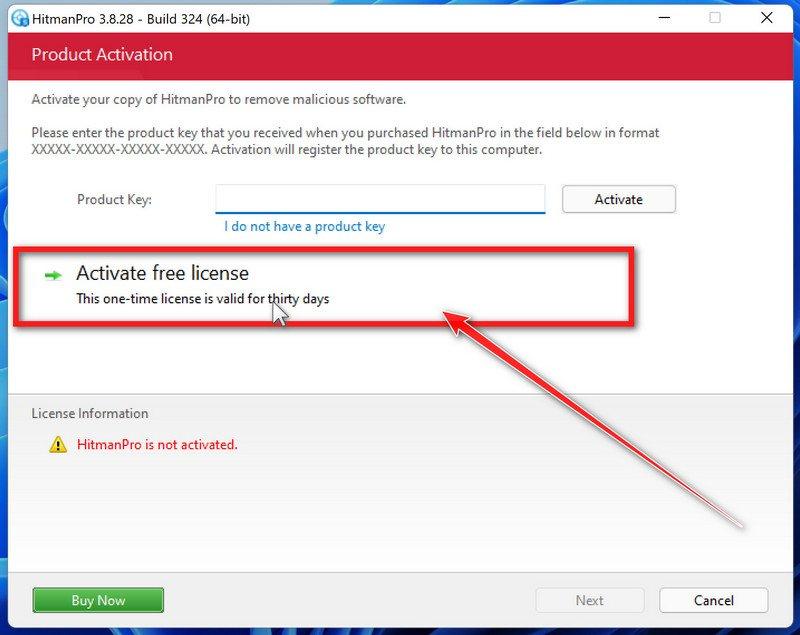
Click “Activate Free License”
If the trial is available on this computer, click Activate free license and follow the activation prompts. If it is unavailable, use an existing paid license or keep the report for assistance; do not buy through an unexpected pop-up.
When the removal is complete, HitmanPro will show a summary of everything it cleaned. Click Next, then click Reboot if prompted. If there’s no reboot prompt, just click Close and check whether the original symptoms have stopped. A clean scan cannot rule out every threat.
STEP 8: Use AdwCleaner to remove adware and malicious browser policies
In this final step, we will download and install AdwCleaner to remove the malicious browser policies that were set by browser hijackers on your computer and delete malicious browser extensions.
AdwCleaner is a free on-demand scanner that specializes in adware, browser hijackers, and unwanted toolbars — the exact threats that mainstream antivirus programs often miss. It also includes tools that repair the damage malware leaves behind, like hijacked browser settings and malicious policies. It’s a quick scan that’s well worth running.
-
Download AdwCleaner
Click the button below to download AdwCleaner — it’s free, portable, and requires no installation.
Download AdwCleanerOpens the official download page in a new tab. Malwarebytes AdwCleanerRemoves adware and unwanted programs at no cost
 -
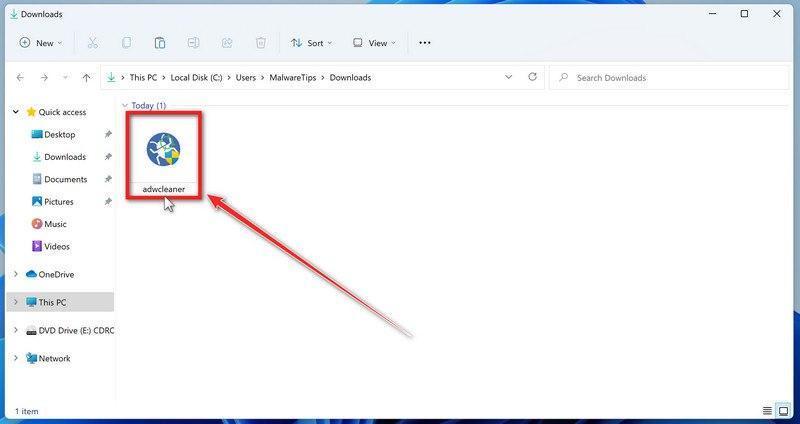
Run AdwCleaner
Open your Downloads folder and double-click the file named “adwcleaner.exe“. There’s no installation — the program starts right away.
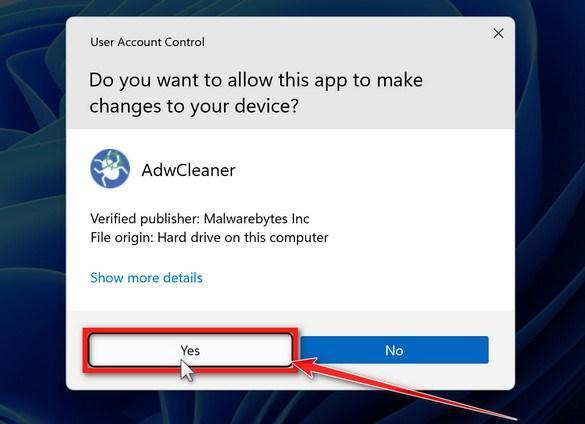
If Windows asks whether you want to allow AdwCleaner to run, click “Yes“. When the license agreement appears, click I agree to continue.
-
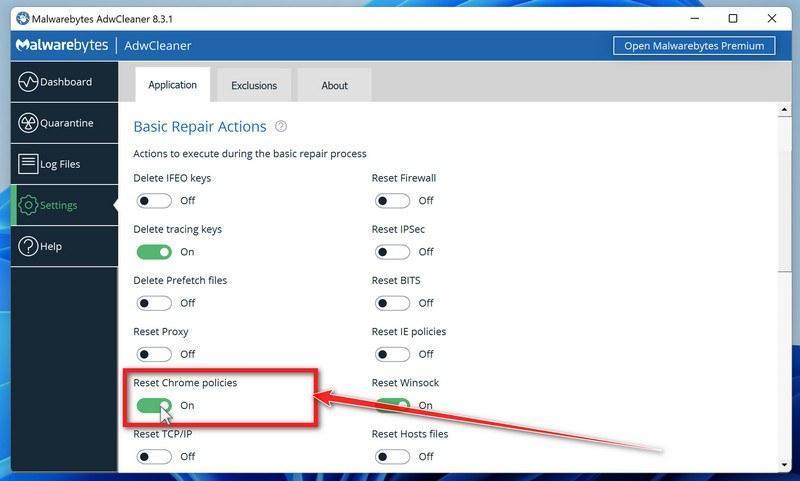
Check whether a Chrome policy reset is needed
Leave policy resets off for an ordinary scan. On a personal PC with confirmed unwanted Chrome policies, open Settings and enable Reset Chrome policies only if needed. On a work or school device, ask its administrator first.
-
Start the Scan
Return to Dashboard and click Scan Now.
-
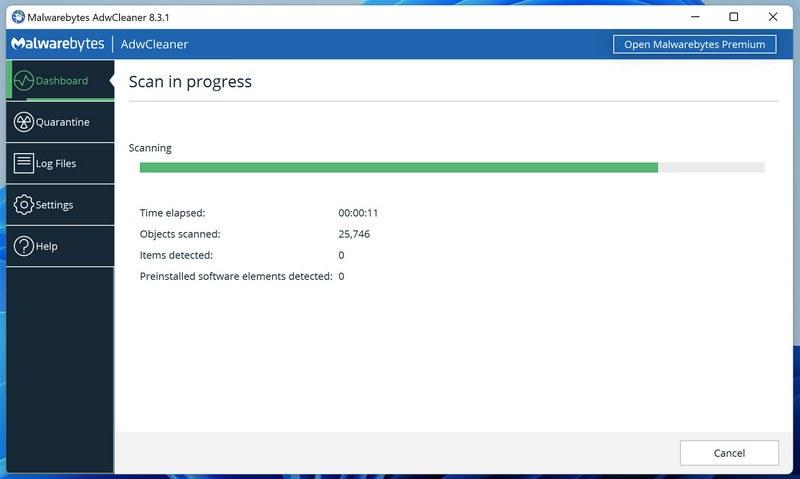
Wait for the Scan to Finish
AdwCleaner will now check your computer for adware and other malware. This usually takes only a few minutes — it’s one of the fastest scanners around.
-
Quarantine the Detected Threats
Review the detected adware and potentially unwanted programs, select the items to remove, and click Next. If a separate preinstalled-software list appears, review it too, then click Quarantine. Leave programs you intentionally use unselected.
-
Click “Continue” to Finish the Cleanup
Save any open work first — AdwCleaner needs to close your open programs before it can clean. When you’re ready, click the “Continue” button.
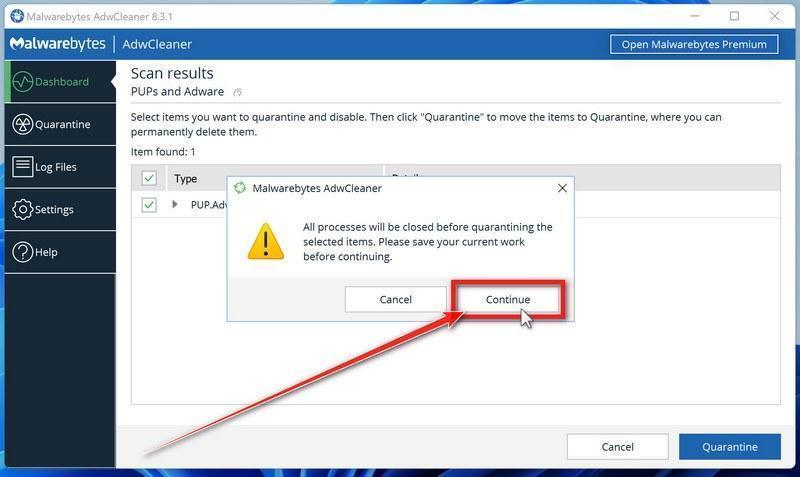
AdwCleaner quarantines the selected items. Restart when prompted, then review the cleanup log. Click Skip Basic Repair to finish; use Run Basic Repair only when a support agent has instructed you to do so.
Better Secure Microsoft Edge Against Malware
Removing existing infections is important. But preventing future malware is ideal. Here are ways to secure Edge after cleaning it:
- Only install browser extensions from the official Microsoft Edge Add-ons store. Avoid third-party sites teeming with malware-laced extensions.
- Always keep Edge and Windows updated so you get the latest security fixes right away. Enable auto-updates if possible.
- Use Windows Defender Antivirus and keep it active to catch any malware that slips through Edge.
- Run occasional Malwarebytes scans to detect and remove any nasty malware that may bypass antivirus.
- Avoid suspicious downloads that may contain malware installers bundled in. Read carefully before installing anything.
- Never click random links in emails or messages. Visit sites directly by typing their verified URL.
With secure computing habits, you lower the chances of malware ever infecting your Edge browser again. But if it happens, this guide has you covered to remove infections and restore peak performance fast.
Frequently Asked Questions About Cleansing Malware From Microsoft Edge
Removing pesky malware from Microsoft Edge brings up many questions for users. As an expert in malware removal, here I provide answers to some frequently asked questions about properly cleaning infected Edge browsers.
What is the best way to check if Edge has malware?
The easiest way is to open Edge’s extensions page and task manager to look for any unknown processes or recently added extensions. Also scan with trusted antivirus software and Malwarebytes to detect more sophisticated threats.
Where does Edge store browsing data that could be affected by malware?
Current Chromium-based Edge uses a profile directory such as %LOCALAPPDATA%\Microsoft\Edge\User Data. To see the exact location for your profile, open edge://version and read Profile path. Do not delete the folder as a routine cleanup: it contains personal browser data.
Should I be concerned about malware logging my passwords in Edge?
Absolutely. If Edge was infected, immediately change any passwords that were entered in the browser during that time. Turn on two-factor authentication as well on sensitive accounts to secure them. Assume credentials were compromised.
Does Microsoft Defender Antivirus automatically remove malware from Edge?
Defender is decent at catching common threats, but sophisticated malware can evade it. Running extra scans with Malwarebytes or HitmanPro after will detect more stealthy infections Defender misses. Don’t rely on Defender alone.
What’s the best way to isolate Edge from other browsers and data?
Collections and separate browser profiles organize content; they do not isolate a malicious program from Windows. Remove the unwanted extension or app, then follow the scans below. Use another clean device for sensitive accounts while you investigate a suspected information stealer.
What should I do if malware keeps reinfecting Edge?
Try fully reinstalling Edge instead of just resetting it. Check that antivirus is active and scan the full system for malware that may be re-compromising Edge. Severe infections require total removal.
How can I better prevent future malware infections in Edge?
Stay vigilant – avoid suspicious downloads, don’t install random extensions, keep Windows and Edge updated, run periodic Malwarebytes scans in addition to antivirus, and enable security options like SmartScreen filtering.
Let me know if you have any other Edge malware removal questions!
The Bottom Line: Cleansing Malware From Microsoft Edge
While Edge employs robust security measures, it is still vulnerable to sneaky malware like redirect viruses, information stealers, and annoying adware.
Left unaddressed, malware seriously degrades browser performance, slows computers to a crawl, and can steal sensitive personal data. Removing infections quickly is mission-critical.
The great news is that with the right approach, you can completely clean malware out of Edge and restore the fast, secure browsing experience you expect. Reset browser settings, delete shady extensions, run comprehensive scans, update Windows, and reinstall Edge for a fresh start.
Coupled with enhanced security practices moving forward, you can keep Edge running at maximum speed for years while keeping malware at bay. Don’t settle for a sluggish browser. Use this guide to clean infections and take back control of your web experience!
Summary: Key Takeaways
- Browser hijackers and redirect malware pose the biggest threats to Edge. Watch for performance issues and unwanted redirects.
- Resetting Edge and deleting suspicious extensions clears a lot of malware. But full scans are still needed to purge infections fully.
- Reinstalling Edge does not guarantee removal of an unwanted policy, extension, or program that restores the changes. Back up personal browser data and investigate recurring changes before reinstalling.
- Update Windows frequently and use tools like Malwarebytes to spot any residual malware other scanners miss.
With a clean and secure Edge browser, you can comfortably surf the web knowing performance won’t suffer and your data will remain safe.
