

A message about an ACH payment on hold can feel urgent before you even know which transaction it means. The email may mention a refund, an electronic signature, and a document that expires in three days—just enough financial detail to make the button tempting.
The “Your ACH Payment Is On Hold” email is not a payment notice. It is a phishing scam that leads to a counterfeit cloud login and steals the credentials entered there.
Overview
The Your ACH Payment Is On Hold email scam impersonates Fiserv and other familiar financial or document-service brands. It falsely claims that an ACH payment, merchant credit, or refund cannot be completed until the recipient reviews an electronic document.
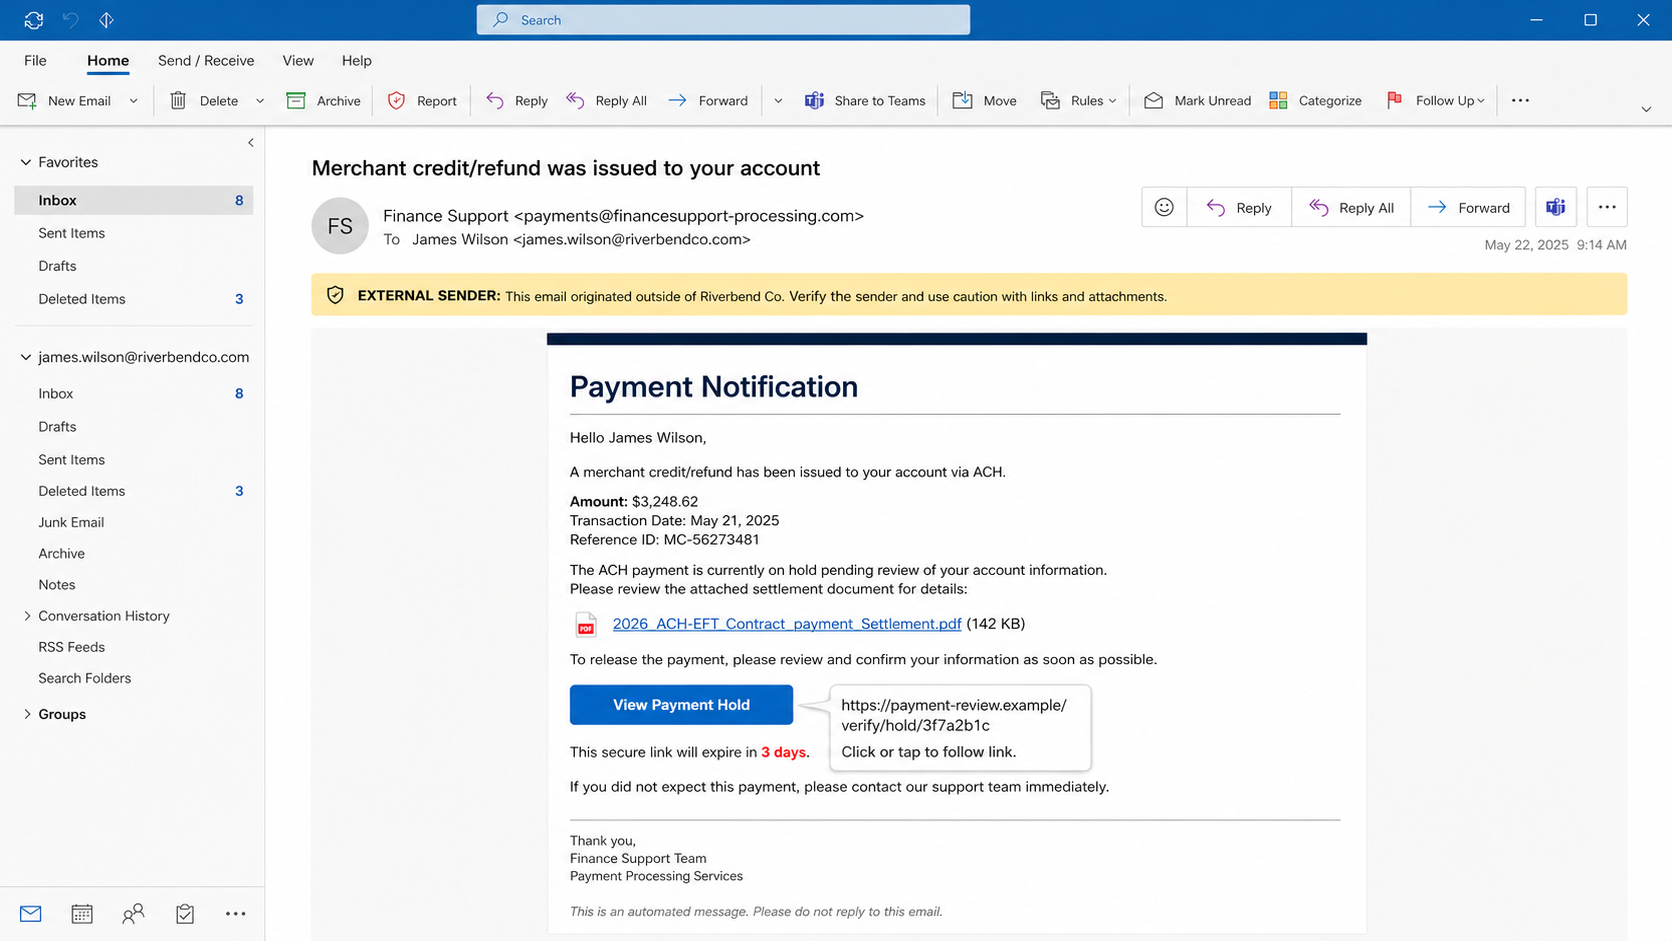
An observed version used the subject “Merchant credit/refund was issued to your account.” The body said an eSign process had been completed for a file named 2026_ACH/EFT_Contract_payment_Settlement.pdf and warned that access would expire in three days.
A “View Payment Hold” button directed recipients to a compromised website at bariyerservisi[.]net. The destination then displayed a counterfeit Citrix Cloud sign-in page using Microsoft and Citrix branding.
Fiserv, Citrix, Microsoft, and the organizations named in the footer are not responsible for the scam. The message is a patchwork of trusted names designed to capture corporate login credentials.
What the fake payment email claims
The message suggests that money is waiting but unavailable. It may describe an ACH transfer, EFT contract, merchant credit, settlement, or refund and imply that the recipient must view a document to release or understand the payment.
Some versions mix references to eSign, accounting firms, mobile apps, payment processors, and cloud workspaces. That mixture may look sophisticated at a glance, but it often reveals that no single legitimate service owns the workflow.
The three-day expiration is not a neutral detail. It creates a short decision window so the recipient acts before contacting accounting, checking the bank, or examining the link.
What the attackers want
The phishing page primarily seeks a Microsoft, Citrix, or workplace username and password. It may also ask for a multifactor code or trigger approval requests after the initial credentials are captured.
Cloud workspace access can expose company files, virtual applications, remote desktops, internal portals, and business email. Even if the fake page only captures one password, reuse can give attackers opportunities across several services.
Financial wording also identifies recipients who work with payments. A compromised account belonging to finance or accounts receivable can support invoice fraud and fraudulent bank-detail changes.
How the Your ACH Payment Is On Hold Email Scam Works
Step 1: A fake refund or settlement notice arrives
The email appears to come from Fiserv Merchants, an accounting team, an e-signature service, or a payment department. The sender display name may be convincing even when the actual address is unrelated.
The subject is designed to attract both finance staff and ordinary recipients. Someone expecting a merchant credit may think it is routine, while someone who recognizes no payment may open it to investigate unexpected money.
Step 2: The message combines several trusted business concepts
ACH, EFT, merchant settlement, eSign, and PDF are all familiar terms. Combining them makes the email sound like part of a complex financial workflow that the recipient may not fully understand.
That uncertainty benefits the attacker. Instead of rejecting the message because it is unfamiliar, the victim may click to discover which customer, vendor, or account is involved.
Step 3: An expiring document creates urgency
The email says the payment document or link will expire in three days. It may warn that the payment remains on hold until the file is reviewed.
Legitimate services can use expiration dates, but urgency does not validate a message. In phishing, the deadline is a social-engineering tool that competes with normal verification.
Step 4: The “View Payment Hold” button conceals the destination
The button looks as though it opens a secure payment portal. In reality, it routes the visitor to a domain that does not belong to Fiserv, Citrix, Microsoft, or the named accounting company.
In the observed campaign, the link used a compromised website. Criminals favor compromised domains because they may be older, have a valid HTTPS certificate, and avoid the immediate suspicion caused by a newly registered address.
Step 5: The website presents a fake Citrix Cloud login
Instead of displaying an ACH record, the page asks the visitor to sign in. It copies Citrix and Microsoft visual elements to suggest that the payment document is protected inside a corporate cloud workspace.
This transition makes little business sense. A payment allegedly sent by Fiserv should not require an unsolicited Microsoft or Citrix password on an unrelated domain.
Step 6: Submitted credentials go to the scammer
The counterfeit form records the username and password. It may show an error and ask again, forward the victim to a genuine page, or display a generic document-unavailable notice.
The victim may conclude that the link expired or the portal is temporarily broken. That delay gives the attacker more time to test the credentials.
Step 7: The attacker attempts cloud and email access
Criminals can try the password on Microsoft 365, Citrix, webmail, VPN portals, and other business services. If the organization uses single sign-on, one successful account may reach multiple applications.
An attacker may also send repeated multifactor prompts, hoping the user approves one to stop the notifications. A fake follow-up page can ask for a current verification code.
Step 8: The account is searched for financial opportunities
After gaining access, the criminal can look for invoices, payment schedules, vendor conversations, customer refunds, and bank details. They may create inbox rules that hide replies or security alerts.
A finance mailbox lets the attacker imitate normal tone and timing. Fraudulent instructions are more likely to succeed when inserted into an authentic conversation.
Step 9: The fraud may move from credential theft to money theft
The original email does not necessarily ask the victim to send money. Instead, it steals the access needed to prepare a more tailored financial request later.
That second stage might change a vendor’s bank account, request a wire, redirect payroll, or send a fake refund. Organizations should therefore review recent transactions after any finance-related account compromise.
Warning Signs in the ACH Payment Email
- The payment is unexpected. No internal ledger, bank notice, customer, or vendor matches the claimed ACH transaction.
- The subject and body describe different events. A merchant credit, refund, eSign document, and payment hold are blended into one vague story.
- Too many brands appear. Fiserv, an accounting practice, eSign, Microsoft, and Citrix are presented without a clear relationship.
- The sender domain is unrelated. The display name looks financial, but the address does not belong to the named company.
- The link expires quickly. The deadline pressures the recipient to bypass normal payment verification.
- The button leads to a compromised or unrelated site. A valid HTTPS padlock does not make that destination a Fiserv or Citrix property.
- The page asks for workplace credentials. A PDF settlement notice should not require a Microsoft or Citrix password on an unfamiliar domain.
Why the Fake Citrix Login Is So Effective
Many businesses legitimately use Citrix to provide access to remote applications and protected documents. Employees may therefore accept an extra sign-in step when a file appears to live outside the mail system.
Attackers exploit the brand’s association with secure corporate access. They are not breaking Citrix Cloud; they are copying the appearance of its login page and placing that copy on infrastructure they control.
The domain remains the decisive clue. A real sign-in flow should use the organization’s known Citrix workspace address, an approved identity-provider domain, or another location documented by IT.
If a page was opened from an unexpected payment email, close it and launch Citrix through the usual company shortcut. Any legitimate document or task should be visible through the normal workspace or confirmable by the finance team.
How to Verify an ACH Payment Safely
Check the organization’s accounting platform and bank portal from saved bookmarks. Search by the claimed amount, customer, vendor, reference, and date rather than trusting the details in the email.
Contact the supposed sender using a telephone number or address already stored in company records. Do not reply to the suspicious message or call a number printed inside it.
Ask whether the organization normally delivers settlement documents through that exact portal. An unusual switch from a payment processor to a generic cloud sign-in deserves verification even when the message uses correct terminology.
The FTC advises people not to open links or attachments in unexpected messages and to contact the company or bank using a website or number known to be real.
Why Correct ACH Terminology Does Not Prove the Email Is Real
Scammers do not need access to a banking network to write about ACH payments. Terms such as settlement, merchant credit, EFT, remittance, and payment hold are widely available in public documents and legitimate email examples.
Modern phishing kits can also produce polished layouts and insert a recipient’s company name, email address, or current date. A message may be grammatically correct and still have no relationship to a real transaction.
The strongest evidence lives outside the email. A valid payment should correspond to an entry in the accounting system, a known customer or vendor, a bank record, and an established document-delivery process.
When those independent records do not match, the safest assumption is that the message is unverified. Forward it to the finance or security team and let them investigate without opening the supplied link.
Even when the amount and sender seem familiar, verify unusual instructions through a second channel. A criminal who has compromised one participant’s mailbox may know real transaction details and place a fraudulent link inside an authentic conversation.
What to Do if You Have Fallen Victim to This Scam
- Close the fraudulent page. Do not re-enter credentials, approve a sign-in request, or download any alleged payment file.
- Tell your organization’s IT or security team immediately. Provide the original email, phishing URL, time of interaction, and every field or code you submitted.
- Change the exposed password from a trusted device. Go directly to the genuine Microsoft, Citrix, or identity-provider portal and use a unique replacement.
- Change reused passwords. Update any other account that shared the same or a similar credential, especially email, VPN, financial, and administrator services.
- Revoke sessions and tokens. Sign out all devices, remove unfamiliar app passwords and connected applications, and ask administrators to revoke cloud refresh tokens.
- Reset multifactor authentication if necessary. Remove unknown methods, replace exposed backup codes, and enable a passkey or security key where available.
- Review sign-in and application logs. Look for unfamiliar countries, devices, IP addresses, impossible travel, new application consent, and access to sensitive files.
- Inspect mailbox rules and forwarding. Attackers may hide security notifications or divert replies. Check delegates, automatic responses, deleted items, and sent messages.
- Alert finance and accounts teams. Independently confirm recent bank-detail changes, refunds, ACH instructions, and vendor requests associated with the account.
- Contact the bank’s fraud team if money moved. Ask about stopping, recalling, or tracing the transfer. Speed matters, and cryptocurrency or completed transfers can be difficult to reverse.
- Scan the device if anything downloaded. Update security software and run a full scan if the page delivered a file or browser extension.
- Report the scam. Use the email provider’s phishing report and notify the impersonated companies and appropriate fraud authority.
Is Your Device Infected? Run a Free Malware Scan
Slow performance, constant pop-ups, or strange behavior? These are classic signs of a malware infection. The fastest way to find out is to scan your device with Malwarebytes Free — one of the most trusted malware removal tools available.
The free version detects and removes the most common threats, including:
- Adware — the cause of those annoying pop-ups
- Browser hijackers — unwanted redirects and changed homepages
- Trojans and spyware — hidden programs stealing your data
- Potentially unwanted programs (PUPs) — software you never asked for
👉 Select your device below — Windows, Mac, or Android — then follow the simple steps to download Malwarebytes, scan your system, and remove any threats it finds. The scan usually takes 5 to 20 minutes.
Run a Malware Scan with Malwarebytes for Windows
Malwarebytes is one of the most popular and trusted anti-malware tools for Windows — and it’s completely free for removing infections. It catches threats that many antivirus programs miss, including adware, browser hijackers, and trojans. Follow the steps below to scan and clean your PC in just a few minutes.
Download Malwarebytes
Click the button below to download the latest version of Malwarebytes for Windows from the official source. The free version is all you need — it will scan your computer and remove adware, browser hijackers, and other malicious software at no cost.
Download MalwarebytesOfficial installer for Windows 11 and 10. Your download starts right away.Want real-time protection? See Malwarebytes Premium Malwarebytes Free for WindowsScans and removes malware at no cost
-
Install Malwarebytes
When the download finishes, open your Downloads folder and double-click the MBSetup file. If Windows shows a User Account Control pop-up, click “Yes” to allow the installation.

Follow the On-Screen Prompts to Install Malwarebytes
The setup wizard will walk you through a few quick screens:
-
Choose where you’re installing the program — “Personal Computer” or “Work Computer” — then click Next.

-
Malwarebytes will now install on your device. This usually takes under a minute.

-
When installation is complete, the “Welcome to Malwarebytes” screen will open automatically.

-
On the final screen, click Open Malwarebytes to launch the program.

-
Enable “Scan for Rootkits”
Before scanning, turn on rootkit detection so Malwarebytes can find even the most hidden threats. Click the Settings gear icon on the left side of the screen.

In the settings menu, find “Scan for rootkits” and click the toggle so it turns blue.

Done? Click “Dashboard” in the left pane to return to the main screen.
Start the Scan
Click the blue Scan button. Malwarebytes will automatically update its virus database and start checking your computer for malware.

-
Wait for the Scan to Finish
The scan checks your entire system for browser hijackers and other malicious programs, so it can take 5 to 20 minutes depending on your computer. Feel free to do something else — just check back occasionally to see the progress.

-
Quarantine the Detected Threats
When the scan is done, you’ll see a list of everything Malwarebytes found — malware, adware, and potentially unwanted programs. Click the “Quarantine” button to remove all of them at once.

Malwarebytes will now remove the malicious files and registry entries and move them safely into quarantine.

-
Restart Your Computer
Some threats can only be fully removed after a reboot. If Malwarebytes asks you to restart, click Yes. Once you’re logged back in, Malwarebytes has finished removing the threats it found.

That’s it — your Windows PC is now clean of trojans, adware, and other malware, and should be back to running smoothly.
If you are still having problems with your computer after completing these instructions, then please follow one of the steps:
- Run a computer scan with ESET Online Scanner
- Ask for help in our Windows Malware Removal Help & Support forum.
Run a Malware Scan with Malwarebytes for Mac
Malwarebytes for Mac is a free on-demand scanner that removes the malware other security software tends to miss — adware, browser hijackers, and unwanted programs included. Cleaning an infected Mac with Malwarebytes has always been completely free, and it’s our go-to recommendation. Follow the steps below to scan and clean your Mac in just a few minutes.
-
Download Malwarebytes for Mac
Click the button below to download the latest version of Malwarebytes for Mac.
Download MalwarebytesOfficial installer for macOS. Your download starts right away.Want real-time protection? See Malwarebytes PremiumMalwarebytes Free for MacScans and removes malware at no cost -
Open the Malwarebytes setup file
When the download finishes, open your Downloads folder and double-click the setup file to begin the installation.

-
Follow the On-Screen Prompts to Install Malwarebytes
The Malwarebytes for Mac Installer will guide you through a few quick screens. Click “Continue” and keep following the prompts until the installation completes.



When the installation is complete, Malwarebytes opens to the Welcome to Malwarebytes screen. Click “Get started“.
-
Select “Personal Computer” or “Work Computer”
Malwarebytes will ask what type of computer you’re installing it on. Click either Personal Computer or Work Computer, whichever applies.

-
Start the Scan
Click the “Scan” button. Malwarebytes will automatically update its detection database and begin checking your Mac for malware.

-
Wait for the Scan to Finish
Malwarebytes will scan your Mac for adware, browser hijackers, and other malicious programs. This can take a few minutes, so feel free to do something else — just check back occasionally to see the progress.

-
Quarantine the Detected Threats
When the scan is done, you’ll see a list of everything Malwarebytes found. Click the “Quarantine” button to remove all the threats at once.

-
Restart Your Mac
Malwarebytes will now remove all the malicious files it found. Some threats can only be fully removed after a reboot — if Malwarebytes asks you to restart, allow it. Once you’re logged back in, your Mac is clean.

That’s it — your Mac is now free of adware, rogue browser extensions, and other potentially harmful software.
If you are still experiencing problems while trying to remove a malicious program from your computer, please ask for help in our Mac Malware Removal Help & Support forum.
Run a Malware Scan with Malwarebytes for Android
Malwarebytes for Android automatically detects and removes dangerous threats like malware and ransomware so you don’t have to worry about your most-used device being compromised. Aggressive detection of adware and potentially unwanted programs keeps your Android phone or tablet running smooth.
-
Download Malwarebytes for Android.
You can download Malwarebytes for Android by clicking the link below.
Get Malwarebytes for AndroidOpens Google Play in a new tab.Want real-time protection? See Malwarebytes Premium for AndroidMalwarebytes for AndroidScans your phone and removes malware at no cost -
Install Malwarebytes for Android on your phone.
In the Google Play Store, tap “Install” to install Malwarebytes for Android on your device.

When the installation process has finished, tap “Open” to begin using Malwarebytes for Android. You can also open Malwarebytes by tapping on its icon in your phone menu or home screen.

-
Follow the on-screen prompts to complete the setup process
When Malwarebytes will open, you will see the Malwarebytes Setup Wizard which will guide you through a series of permissions and other setup options.
This is the first of two screens that explain the difference between the Premium and Free versions. Swipe this screen to continue.
Tap on “Got it” to proceed to the next step.
Malwarebytes for Android will now ask for a set of permissions that are required to scan your device and protect it from malware. Tap on “Give permission” to continue.
Tap on “Allow” to permit Malwarebytes to access the files on your phone.
-
Update database and run a scan with Malwarebytes for Android
You will now be prompted to update the Malwarebytes database and run a full system scan.

Click on “Update database” to update the Malwarebytes for Android definitions to the latest version, then click on “Run full scan” to perform a system scan.

-
Wait for the Malwarebytes scan to complete.
Malwarebytes will now start scanning your phone for adware and other malicious apps. This process can take a few minutes, so we suggest you do something else and periodically check on the status of the scan to see when it is finished.

-
Click on “Remove Selected”.
When the scan has been completed, you will be presented with a screen showing the malware infections that Malwarebytes for Android has detected. To remove the malicious apps that Malwarebytes has found, tap on the “Remove Selected” button.

-
Restart your phone.
Malwarebytes for Android will now remove all the malicious apps that it has found. To complete the malware removal process, Malwarebytes may ask you to restart your device.
That’s it — your Android phone is now clean — no more malicious apps, adware, or browser redirects.
If you are still having problems with your phone after completing these instructions, then please follow one of the steps:
- Restore your phone to factory settings by going to Settings > General management > Reset > Factory data reset.
- Ask for help in our Mobile Malware Removal Help & Support forum.
Stay Protected: Block Ads and Malicious Sites
Now that your device is clean, keep it that way. Most infections start with a malicious ad or a fake download button — so blocking them at the source is your best defense.
We recommend AdGuard, which blocks malicious ads, phishing pages, and dangerous redirects before they can reach you.
👉 Download AdGuard and browse safely
How Businesses Can Prevent Payment-Themed Phishing
Define a separate verification process for payment holds, bank-detail changes, refunds, and settlement documents. No email button should replace reconciliation in the bank or accounting system.
Protect finance users with phishing-resistant multifactor authentication and conditional-access controls. Monitor suspicious forwarding rules, consent grants, new devices, and unusual downloads.
Require a second trusted channel for any financial change. The person confirming a request should use contact information from existing records and should not rely on the same email thread that introduced the change.
Train employees to recognize brand stacking. A message becomes less credible, not more, when it jumps among unrelated payment, document, accounting, and cloud-login services without a clear workflow.
Frequently Asked Questions
Is the ACH payment really on hold?
Not because this email says so. The campaign is fraudulent. Verify any real ACH status through your bank, accounting system, or known payment contact.
Are Fiserv, Citrix, or Microsoft involved in the scam?
No. Their names and visual branding are used without authorization. The phishing site is not evidence that those services were breached.
I clicked the button but entered nothing. Am I safe?
Credential theft is less likely if nothing was submitted. Close the page, report it, check for downloads, and notify IT if the message reached a work account.
What if I approved a multifactor prompt?
Treat the account as compromised. Contact IT, change the password, revoke sessions, reset authentication methods, and review activity immediately.
The Bottom Line
The Your ACH Payment Is On Hold email scam uses a fake settlement and expiring document to deliver a counterfeit cloud login. Check payments in your bank and accounting systems, never through an unexpected email link, and respond quickly if you submitted credentials.

Join the discussion
0 commentsShare your experience or ask a question about this article.
Discussion
Start the conversation
Have a question or something useful to share? Add the first comment.