Geek Squad Scams: How They Work and How to Avoid Them
Written by: Stelian
Published on:
Geek Squad is a popular tech support service from electronics retailer Best Buy, helping customers with repairs, installations, and technical issues across a wide range of devices. However, with Geek Squad’s trusted brand reputation also comes more frequent impersonator scams that try to take advantage of unsuspecting consumers. Scammers use clever social engineering and urgent threats about non-existent issues to steal money and sensitive personal data from victims. Stay vigilant about these fraudulent schemes that falsely claim to be from Geek Squad. This article will examine the most common Geek Squad scams, how they work, tips to avoid becoming a victim, and steps to take if you were already deceived by an imposter. Forewarned is forearmed against these tech support scams.
Scam Overview
Geek Squad, a subsidiary of Best Buy, offers various technical support services for electronics and appliances. Unfortunately, scammers often try to take advantage of Geek Squad’s reputation by running elaborate scams targeting unsuspecting customers. These scams aim to steal money, personal information, or install malware on victims’ devices.
Common Geek Squad scams include:
Geek Squad Auto-Renewal Scam
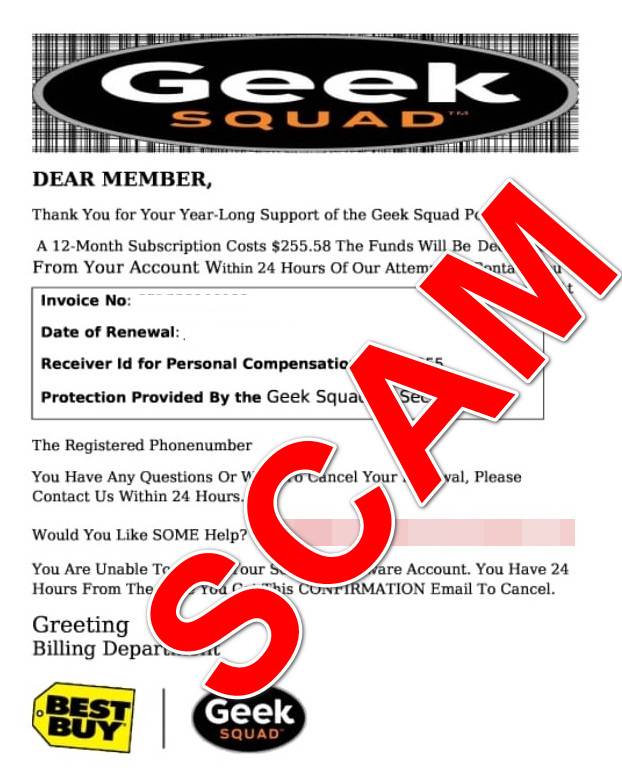
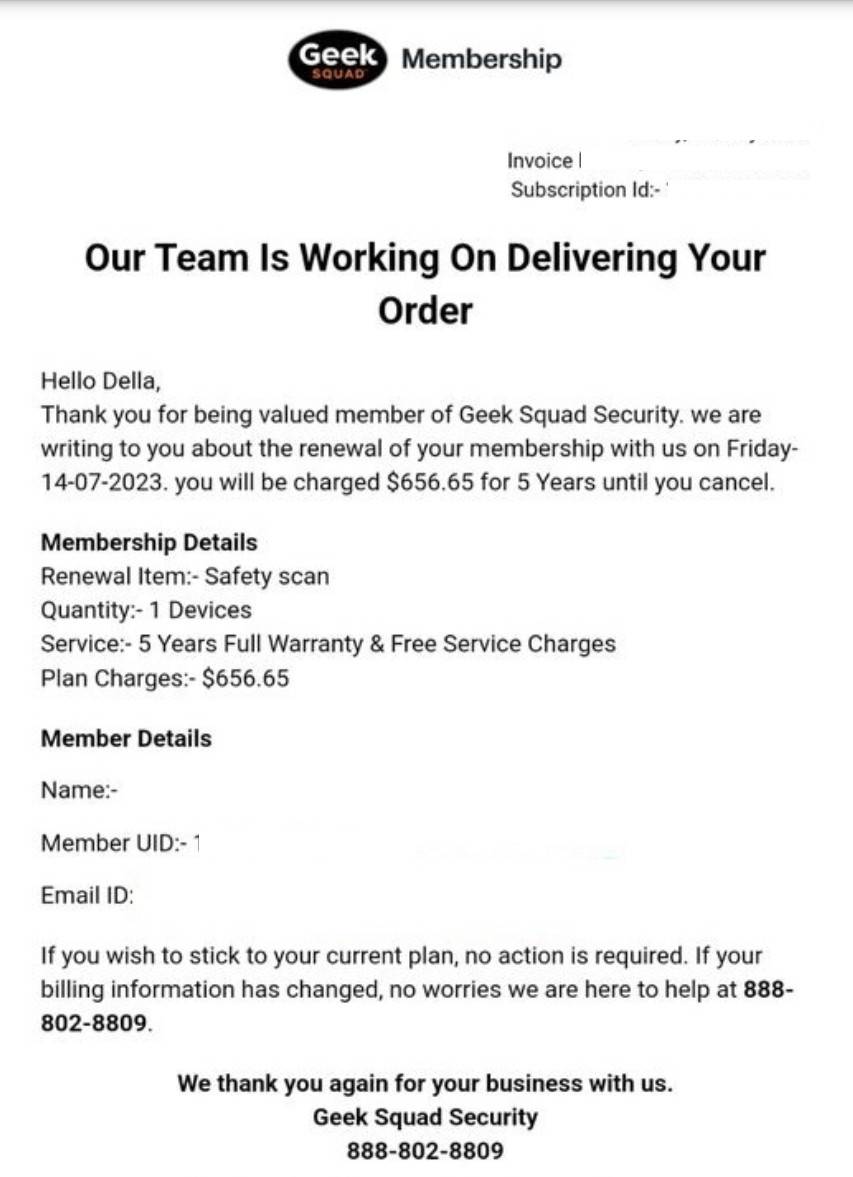
Scammers send fake emails or texts claiming your Geek Squad membership will auto-renew at a high cost. They tell you to call a number to cancel. When you call, they demand remote access to your computer to “cancel” and steal your data.
Geek Squad Protection Plan Scam
Scammers call or email pretending your device protection plan is expiring. They try to get you to pay to renew it. In reality, they pocket the money without providing any actual protection.
Geek Squad Phishing Emails
Fraudsters send fake Geek Squad emails urging you to provide personal information or download malware disguised as “security software.”
Geek Squad Overpayment Scam
Scammers email you posing as Geek Squad, telling you that you’re owed a refund. When you provide your information for the “refund,” they drain your accounts.
Geek Squad Tech Support Scam
Scammers call claiming to be from Geek Squad tech support. They try to sell you useless or malware-infected “antivirus software.”
Geek Squad Password Reset Scam
Scammers contact you pretending your Geek Squad password needs to be reset immediately. They steal account info and data when you reset it.
Geek Squad Pop-ups Scam
Malicious pop-up ads pretend to be Geek Squad, telling you that you have a virus. They try to get you to buy fake “anti-virus software” that is actually a virus.
How the Scams Work
Geek Squad scammers are cunning social engineers who manipulate psychological triggers to take advantage of unsuspecting people. Here is an in-depth look at how the main scams operate:
Geek Squad Auto-Renewal Scam
You receive an email or text claiming your Geek Squad membership will auto-renew, costing several hundred dollars.
The message urges you to call a number within 24 hours to cancel the charge.
When you call, the scammer claims they need remote access to your computer to cancel the service.
If you grant them access, they secretly install malware that steals your personal data and bank account info.
They use the stolen details to drain your accounts and commit identity theft.
Geek Squad Protection Plan Scam
You get a call or email that your device protection plan is expiring.
The scammer says you need to renew it and pay immediately to maintain coverage.
If you pay, they simply take your money without actually renewing anything.
In other cases, they trick you into downloading malware disguised as “protection software.”
Geek Squad Phishing Emails
You receive an email pretending to be from Geek Squad.
The email urges you to click links to verify account details, offering enticing promotions.
The links lead to fake login pages that steal your Geek Squad credentials.
Other emails attach or direct you to malware disguised as “security software.”
Once installed, the malware compromises your data and spies on your activity.
Geek Squad Overpayment Scam
You get an email claiming you’re owed a refund from Geek Squad.
To get the “refund,” it asks you to provide bank account information.
When you provide your details, the scammers drain your account instead of paying you.
Geek Squad Tech Support Scam
You receive a call from someone claiming to be Geek Squad tech support.
They falsely claim that your computer sent them an error code or alert.
They insist you have a virus and need to buy their “antivirus software.”
If you comply, they scam you out of money and install malware.
Geek Squad Password Reset Scam
You get a call or email that your Geek Squad password has been compromised.
They claim you must immediately reset it to protect your account.
If you reset it, the scammer gains access and steals all your personal data.
Geek Squad Pop-ups Scam
A fake pop-up ad appears warning that viruses were detected on your computer.
The pop-up pretends to be Geek Squad, offering to scan for threats if you call a number.
If you call, they try to get you to pay for worthless “anti-virus software.”
In other cases, clicking anything on the pop-up infects you with actual malware.
How to Spot and Avoid Geek Squad Scams
Here are some tips to help you recognize and avoid falling for Geek Squad scams:
Be suspicious of unsolicited calls, emails, texts and pop-up ads claiming to be from Geek Squad. Legitimate messages will not make urgent threats or demands.
Look for poor grammar, spelling errors and stylistic red flags in emails. This indicates scammers, not the professional Geek Squad.
Verify the sender’s email address. Scammers often spoof legitimate addresses.
Never provide personal information or remote computer access to unsolicited callers claiming to be tech support. Real Geek Squad employees won’t call asking for this.
Don’t trust any pop-up ads claiming you have a virus. Geek Squad does not send these kinds of messages.
Be wary of “limited time offers” pressuring you to buy antivirus software or protection plans. This is a common scam tactic.
Never make payments via wire transfer, prepaid debit cards, gift cards or other unusual methods. Real Geek Squad transactions only use credit cards.
Avoid clicking links in emails and text messages. Type geeksquad.com directly into your browser if you want to access your account.
Keep your device and security software up-to-date. This prevents vulnerabilities that scammers exploit.
Use strong, unique passwords for all your important accounts. Password reuse allows scammers to access multiple accounts.
What to Do if You Fall Victim to a Geek Squad Scam
If you fear you’ve fallen prey to a Geek Squad scam, remain calm and take these steps immediately:
Contact your bank and credit card companies to halt payments and report unauthorized charges. Cancel any compromised cards.
Change online account passwords and security questions that may have been exposed. Enable two-factor authentication wherever possible.
Scan all your devices with legitimate security software to find and remove any malware the scammers may have installed.
Place fraud alerts and freezes on your credit reports to protect against identity theft.
Report the scam to the Federal Trade Commission (FTC) and Internet Crime Complaint Center (IC3).
File a complaint about the incident with the Better Business Bureau and your state attorney general’s office.
Document details about the scam – phone numbers used, account details requested, payment methods, etc. This aids investigations.
Let contacts know to disregard any communications scammers may have sent using your compromised accounts.
Consider involving law enforcement if losses are significant. They may be able to trace some payments or build a case.
Is Your Device Infected? Run a Free Malware Scan
Slow performance, constant pop-ups, or strange behavior? These are classic signs of a malware infection. The fastest way to find out is to scan your device with Malwarebytes Anti-Malware Free — one of the most trusted malware removal tools available.
The free version detects and removes the most common threats, including:
Adware — the cause of those annoying pop-ups
Browser hijackers — unwanted redirects and changed homepages
Trojans and spyware — hidden programs stealing your data
Potentially unwanted programs (PUPs) — software you never asked for
👉 Select your device below — Windows, Mac, or Android — then follow the simple steps to download Malwarebytes, scan your system, and remove any threats it finds. The whole process takes about 5 minutes.
Malwarebytes for WindowsMalwarebytes for MacMalwarebytes for Android
Run a Malware Scan with Malwarebytes for Windows
Malwarebytes is one of the most popular and trusted anti-malware tools for Windows — and it’s completely free for removing infections. It catches threats that many antivirus programs miss, including adware, browser hijackers, and trojans. Follow the steps below to scan and clean your PC in just a few minutes.
Download Malwarebytes
Click the button below to download the latest version of Malwarebytes for Windows from the official source. The free version is all you need — it will scan your computer and remove adware, browser hijackers, and other malicious software at no cost.
(The link opens in a new page where your download will start)
Install Malwarebytes
When the download finishes, open your Downloads folder and double-click the MBSetup file. If Windows shows a User Account Control pop-up, click “Yes” to allow the installation.
Follow the On-Screen Prompts to Install Malwarebytes
The setup wizard will walk you through a few quick screens:
Choose where you’re installing the program — “Personal Computer” or “Work Computer” — then click Next.
Malwarebytes will now install on your device. This usually takes under a minute.
When installation is complete, the “Welcome to Malwarebytes” screen will open automatically.
On the final screen, click Open Malwarebytes to launch the program.
Enable “Scan for Rootkits”
Before scanning, turn on rootkit detection so Malwarebytes can find even the most hidden threats. Click the Settings gear icon on the left side of the screen.
In the settings menu, find “Scan for rootkits” and click the toggle so it turns blue.
Done? Click “Dashboard” in the left pane to return to the main screen.
Start the Scan
Click the blue Scan button. Malwarebytes will automatically update its virus database and start checking your computer for malware.
Wait for the Scan to Finish
The scan checks your entire system for browser hijackers and other malicious programs, so it can take several minutes. Feel free to do something else — just check back occasionally to see the progress.
Quarantine the Detected Threats
When the scan is done, you’ll see a list of everything Malwarebytes found — malware, adware, and potentially unwanted programs. Click the “Quarantine” button to remove all of them at once.
Malwarebytes will now remove the malicious files and registry entries and move them safely into quarantine.
Restart Your Computer
Some threats can only be fully removed after a reboot. If Malwarebytes asks you to restart, click Yes. Once you’re logged back in, your PC is clean and you can continue with the next steps in this guide.
When the scan finishes, click Quarantine to remove everything Malwarebytes found. That’s it — your Windows PC is now clean of trojans, adware, and other malware, and should be back to running smoothly.
If your current antivirus allowed this malicious program on your computer, you may want to consider purchasing Malwarebytes Premium to protect against these types of threats in the future. If you are still having problems with your computer after completing these instructions, then please follow one of the steps:
Malwarebytes for Mac is a free on-demand scanner that removes the malware other security software tends to miss — adware, browser hijackers, and unwanted programs included. Cleaning an infected Mac with Malwarebytes has always been completely free, and it’s our go-to recommendation. Follow the steps below to scan and clean your Mac in just a few minutes.
Download Malwarebytes for Mac
Click the button below to download the latest version of Malwarebytes for Mac.
When the download finishes, open your Downloads folder and double-click the setup file to begin the installation.
Follow the On-Screen Prompts to Install Malwarebytes
The Malwarebytes for Mac Installer will guide you through a few quick screens. Click “Continue” and keep following the prompts until the installation completes.
When the installation is complete, Malwarebytes opens to the Welcome to Malwarebytes screen. Click “Get started“.
Select “Personal Computer” or “Work Computer”
Malwarebytes will ask what type of computer you’re installing it on. Click either Personal Computer or Work Computer, whichever applies.
Start the Scan
Click the “Scan” button. Malwarebytes will automatically update its detection database and begin checking your Mac for malware.
Wait for the Scan to Finish
Malwarebytes will scan your Mac for adware, browser hijackers, and other malicious programs. This can take a few minutes, so feel free to do something else — just check back occasionally to see the progress.
Quarantine the Detected Threats
When the scan is done, you’ll see a list of everything Malwarebytes found. Click the “Quarantine” button to remove all the threats at once.
Restart Your Mac
Malwarebytes will now remove all the malicious files it found. Some threats can only be fully removed after a reboot — if Malwarebytes asks you to restart, allow it. Once you’re logged back in, your Mac is clean.
Once the scan is done, remove every threat it detected. Your Mac is now free of adware, rogue browser extensions, and other potentially harmful software.
If your current antivirus allowed a malicious program on your computer, you might want to consider purchasing the full-featured version of Malwarebytes Anti-Malware to protect against these types of threats in the future. If you are still experiencing problems while trying to remove a malicious program from your computer, please ask for help in our Mac Malware Removal Help & Support forum.
Run a Malware Scan with Malwarebytes for Android
Malwarebytes for Android automatically detects and removes dangerous threats like malware and ransomware so you don’t have to worry about your most-used device being compromised. Aggressive detection of adware and potentially unwanted programs keeps your Android phone or tablet running smooth.
Download Malwarebytes for Android.
You can download Malwarebytes for Android by clicking the link below.
In the Google Play Store, tap “Install” to install Malwarebytes for Android on your device.
When the installation process has finished, tap “Open” to begin using Malwarebytes for Android. You can also open Malwarebytes by tapping on its icon in your phone menu or home screen.
Follow the on-screen prompts to complete the setup process
When Malwarebytes will open, you will see the Malwarebytes Setup Wizard which will guide you through a series of permissions and other setup options. This is the first of two screens that explain the difference between the Premium and Free versions. Swipe this screen to continue. Tap on “Got it” to proceed to the next step. Malwarebytes for Android will now ask for a set of permissions that are required to scan your device and protect it from malware. Tap on “Give permission” to continue. Tap on “Allow” to permit Malwarebytes to access the files on your phone.
Update database and run a scan with Malwarebytes for Android
You will now be prompted to update the Malwarebytes database and run a full system scan.
Click on “Update database” to update the Malwarebytes for Android definitions to the latest version, then click on “Run full scan” to perform a system scan.
Wait for the Malwarebytes scan to complete.
Malwarebytes will now start scanning your phone for adware and other malicious apps. This process can take a few minutes, so we suggest you do something else and periodically check on the status of the scan to see when it is finished.
Click on “Remove Selected”.
When the scan has been completed, you will be presented with a screen showing the malware infections that Malwarebytes for Android has detected. To remove the malicious apps that Malwarebytes has found, tap on the “Remove Selected” button.
Restart your phone.
Malwarebytes for Android will now remove all the malicious apps that it has found. To complete the malware removal process, Malwarebytes may ask you to restart your device.
After the scan, tap Remove Selected to delete all detected threats. Your Android phone is now clean — no more malicious apps, adware, or browser redirects.
If your current antivirus allowed a malicious app on your phone, you may want to consider purchasing the full-featured version of Malwarebytes to protect against these types of threats in the future. If you are still having problems with your phone after completing these instructions, then please follow one of the steps:
Restore your phone to factory settings by going to Settings > General management > Reset > Factory data reset.
Now that your device is clean, keep it that way. Most infections start with a malicious ad or a fake download button — so blocking them at the source is your best defense.
We recommend AdGuard, which blocks malicious ads, phishing pages, and dangerous redirects before they can reach you.
Legitimate Geek Squad technicians won’t call unexpectedly about alleged problems on your computer. Be very wary if callers demand immediate payment or remote access to your device. Ask for their name and credentials, hang up and call back using Best Buy’s official number to verify their identity.
I got a suspicious Geek Squad email, what should I do?
Don’t click any links or attachments. Send the email as an attachment to phishing@geeksquad.com. Geek Squad reviews these emails to improve scam detection and shut down fraudulent domains.
Are Geek Squad phishing emails really common?
Yes, Geek Squad is frequently impersonated in phishing emails because it’s a well-known, trusted brand. Scammers exploit that familiarity. Be on high alert for telltale signs of phishing like bad grammar, threats and requests for information.
Can real Geek Squad techs remote into my computer?
Genuine Geek Squad staff can remote into your device, but only during active support sessions initiated by you. They will never cold call demanding immediate remote access – that’s a huge red flag for scams.
I got a browser pop-up ad from “Geek Squad” about a virus. What should I do?
This is definitely a scam. Geek Squad does not send pop-up notifications. Call them directly if you have concerns. Close out the web browser pop-up without clicking anything on it. Run full antivirus scans to check for and remove any malware.
How can I report a Geek Squad scam?
Contact the FTC and IC3 to file an official scam report. Submit details to the BBB and your state attorney general. Call Best Buy corporate and ask to report fraudulent activity involving Geek Squad. The more reports they receive about a specific scam, the better able they are to address it.
What are signs my device has Geek Squad scam malware?
Unusual pop-ups, new toolbars/extensions, crashes, sluggish performance, password prompts, unauthorized requests for permissions, and mystery charges could indicate malware installed by scammers impersonating Geek Squad techs. Run thorough antivirus scans.
How do I remove malware installed by a fake Geek Squad call?
Disconnect the infected device from networks immediately. Backup data and then perform a complete reset/factory restore if possible. If not, use legitimate antivirus software to scan for and quarantine threats. Examine browser extensions closely for anything suspicious. You may need professional help removing some threats.
In Conclusion
Geek Squad scams can seem convincing and even tech-savvy people let their guard down. Always apply critical thinking before providing any sensitive information or payments. Verify identities over the phone and double check email senders. Avoid clicking suspicious links or downloading unsolicited files. With vigilance and caution, you can protect yourself and your devices from these criminal schemes.
10 Rules to Avoid Online Scams
Here are 10 practical safety rules to help you avoid malware, online shopping scams, crypto scams, and other online fraud. Each tip includes a quick “if you already got hit” action.
Stop and verify before you click, log in, download, or pay.
Most scams win by creating urgency. Verify using a trusted method: type the website address yourself, use the official app, or call a known number (not the one in the message).
If you already clicked: close the page, do not enter passwords, and run a malware scan.
Keep your operating system, browser, and apps updated.
Updates patch security holes used by malware and malicious ads. Turn on automatic updates where possible.
If you saw a scary “update now” pop-up: close it and update only through your device settings or the official app store.
Use layered protection: antivirus plus an ad blocker.
Antivirus helps block malware. An ad blocker reduces scam redirects, phishing pages, and malvertising.
If your browser is acting weird: remove unknown extensions, reset the browser, then run a full scan.
Install apps, software, and extensions only from official sources.
Avoid cracked software, “keygens,” and random downloads. During installs, choose Custom/Advanced and decline bundled offers you do not recognize.
If you already installed something suspicious: uninstall it, restart, and scan again.
Treat links and attachments as untrusted by default.
Phishing often impersonates delivery services, banks, and popular brands. If it is unexpected, do not open attachments or log in through the message.
If you entered credentials: change the password immediately and enable 2FA.
Shop safely: research the store, then pay with protection.
Be cautious with brand-new stores, “closing sale” stories, and prices that make no sense. Prefer credit cards or PayPal for dispute options. Avoid wire transfers, gift cards, and crypto payments.
If you already paid: contact your card issuer or PayPal quickly to dispute the transaction.
Crypto rule: never pay a “fee” to withdraw or recover money.
Common patterns include fake profits, then “tax,” “gas,” or “verification” fees. Another is a “recovery agent” who demands upfront crypto.
If you already sent crypto: stop paying, save evidence (wallet addresses, TXIDs, chats), and report the scam to the platform used.
Secure your accounts with unique passwords and 2FA (start with email).
Use a password manager and unique passwords for every account. Enable 2FA using an authenticator app when possible.
If you suspect an account takeover: change passwords, sign out of all devices, and review recent logins and recovery settings.
Back up important files and keep one backup offline.
Backups protect you from ransomware and device failure. Keep at least one backup on an external drive that is not always connected.
If you suspect infection: do not connect backup drives until the system is clean.
If you think you are a victim: stop losses, document evidence, and escalate fast.
Move quickly. Speed matters for disputes, account recovery, and limiting damage.
Stop payments and contact: do not send more money or respond to the scammer.
Call your bank or card issuer: block transactions, replace the card if needed, and start a dispute or chargeback.
Secure your email first: change the email password, enable 2FA, and remove unfamiliar recovery options.
Secure other accounts: change passwords, enable 2FA, and log out of all sessions.
Scan your device: remove suspicious apps or extensions, then run a full malware scan.
Save evidence: screenshots, emails, order pages, tracking pages, wallet addresses, TXIDs, and chat logs.
Report it: to the payment provider, marketplace, social platform, exchange, or wallet service involved.
These rules are intentionally simple. Most online losses happen when decisions are rushed. Slow down, verify independently, and use payment methods and account controls that give you recourse.
Stelian leverages over a decade of cybersecurity expertise to lead malware analysis and removal, uncover scams, and educate people. His experience provides insightful analysis and valuable perspective.