

You copy a wallet address, paste it into a transfer, and notice something looks different. A small browser extension may be closer to the problem than you expect.
A tool called Google Notes can seem too ordinary to question. Here is what to check before trusting the next address you paste.
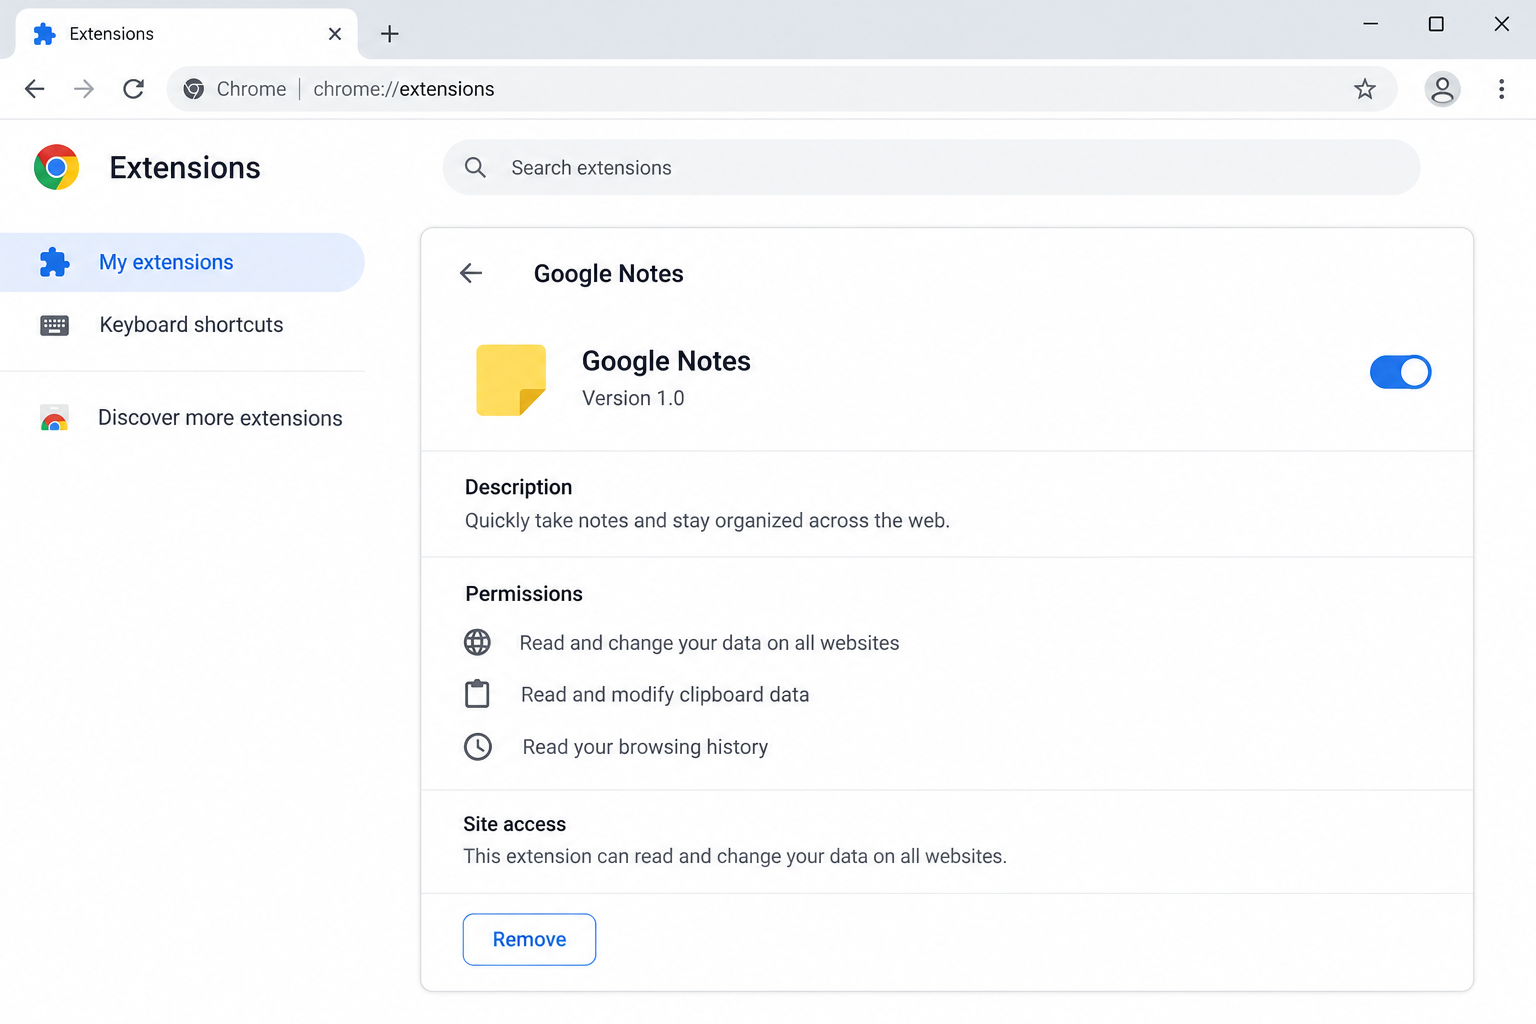
Overview
The notes tool used as a disguise
Silent Swap is a malware campaign documented by McAfee Labs. It installs a malicious browser extension presented as a simple utility named Google Notes.
The extension can display a working notes interface. Its harmful purpose is separate: interfere with cryptocurrency addresses during copy-and-paste activity.
The campaign uses unsigned installers to place the extension into Chromium browsers, including Chrome, Brave, and Microsoft Edge. It is not a normal Google product installation.
The name alone cannot identify every extension with certainty. Check the installation history and security findings rather than accusing unrelated software because it shares a common name.
How an address swap turns into a loss
A crypto clipper recognizes a copied wallet address and substitutes an address controlled by an attacker. You may then authorize a transfer to that substituted destination.
You can remain in control of the wallet while losing the payment. The attacker benefits from the transfer you approve, with the destination quietly changed.
A correct amount and familiar wallet screen do not resolve the risk. The receiving address must also match the intended recipient.
- Unexpected address changes are a reason to stop the transfer.
- An extension that works as a notes app can still have harmful background behavior.
- Broad website and clipboard access deserves scrutiny in a simple utility.
- Removing an extension may leave the installer or another component behind.
What to do before the next transaction
Pause crypto transfers on the affected computer. Use another trusted device to compare the original address with anything you already submitted.
Inspect installed extensions through the browser’s own settings. Record the suspicious extension’s details, then arrange removal and a malware scan.
If money has moved, save the transaction identifier immediately. Cleaning the browser can protect future activity, but it does not reverse a confirmed blockchain payment.
Why a Working Notes Window Does Not Settle the Question
Most people test a new extension by opening it. If it saves a note and looks tidy, the quick test feels complete.
That test answers whether one visible feature works. It does not show everything the extension can do when you visit other websites.
Browser extensions can have permissions beyond their visible popup. Those permissions deserve the same attention you would give an application’s access to your files.
A note-taking feature does not explain unrestricted access to every page you visit. Ask why the requested access fits the feature you wanted.
There are legitimate applications with similar words in their names. The reported malicious extension’s branding should not become a warning against all Google services or all note tools.
Google Keep is a separate legitimate service. A third-party download calling itself Google Notes does not inherit Google’s identity because it uses that wording.
If you cannot remember installing an extension, check when it appeared and what software you installed around the same time. That history can be more revealing than its icon.
How the Silent Swap Crypto Clipper Works
Step 1: An installer brings the browser component onto the PC
McAfee’s Silent Swap research describes installers that introduce the extension outside the ordinary browser store flow.
A person may think they installed a different utility. The unwanted browser component can therefore appear without a memorable decision to add a notes extension.
For your case, record recent downloads and installers. A browser card tells you what is present now, while the installation trail helps explain how it arrived.
Do not reinstall the suspicious package to reproduce the behavior. A security professional can work from the file and logs without exposing another device.
Step 2: The extension obtains access beyond its visible feature
The reported component uses access to websites and clipboard activity. Its notes interface provides a benign reason for the user to keep it installed.
The installer also tampers with browser preference files. A normal-looking extension entry is therefore not proof that it came through the browser’s approved installation process.
Inspect permissions in the browser itself. Be especially careful when an unfamiliar utility can read or change data across all visited websites.
Do not enable developer mode at a stranger’s request. If your workplace requires it for a legitimate task, verify the instruction with its actual support team.
Step 3: A payment address passes through copy and paste
The attack looks for text matching cryptocurrency addresses. That can happen during a task that otherwise feels normal, such as copying a deposit destination.
You do not need to reveal a seed phrase for an address substitution to work. The receiving string itself is the target.
Keep the original address available on a trusted source while preparing a transfer. A saved screenshot from an unknown sender is not a reliable reference.
If a recipient sends a corrected address during a suspicious exchange, verify it separately. A changed address can also come from account compromise outside your browser.
Step 4: The destination changes before approval
The malicious component replaces the intended address with the attacker’s destination. A hurried person may review the amount and approve without checking the complete string.
Compare every character of the final destination against the trusted original. Do not rely only on a recognizable beginning, a nickname, or a previously copied entry.
A hardware wallet can protect a private key, but its confirmation screen still requires attention. Verify the destination presented for the transaction.
If the address changes, cancel the operation. There is no need to send a test payment to establish that something is wrong.
Step 5: The confirmed payment goes to the wrong recipient
Once a transfer is confirmed, the blockchain generally does not offer a card-style chargeback. This makes prevention at the approval stage especially valuable.
If an exchange was involved, contact its official support promptly. It may be able to assess account activity or an unprocessed withdrawal, depending on the situation.
Do not believe a stranger who promises to reverse the chain by charging a tracing fee. Preserve the record and report through legitimate channels.
Is It the Extension, Another Clipper, or a Wrong Address?
A mismatched address is a strong reason to stop, but it does not by itself name the malware responsible.
Check whether the trusted source address was correct to begin with. An impersonated recipient can send the wrong destination without changing your clipboard at all.
Look at the transaction you actually approved. The destination on the chain matters more than the address you remember intending to paste.
Record where the mismatch first became visible: source page, clipboard, wallet input, or confirmation screen. That narrows what a technician should investigate.
A transfer on the wrong network is another separate issue. Write down the asset, network, destination, and transaction identifier before asking for help.
Avoid publishing your balances or private wallet material while seeking assistance. Support can investigate a public transaction without your recovery phrase.
What to Do If You Installed the Fake Google Notes Extension
Start by stopping the activity that could produce another loss. Then remove the browser component and assess the computer that installed it.
Pause all transfers from the affected browser. Cancel pending operations you have not approved. Keep the computer away from further wallet activity while investigating.
Do not copy another destination into the same browser to test it. Use an unaffected device for checking addresses and communicating with providers.
Preserve useful extension details. Record its name, identifier, permissions, and any source information visible in browser settings.
Save recent installer filenames too. A screenshot can be useful, but avoid sharing account addresses or private tabs unnecessarily.
Remove the unwanted extension. Open the browser’s extension manager directly. Select Remove for the component you have identified as unwanted.
Google’s extension management instructions explain Chrome’s controls. Check other browser profiles and Chromium browsers you use as well.
Scan the Windows installation. Update your security application and examine the system for the installer and associated threats.
Use Malwarebytes for an additional malware check if needed. Quarantine findings and follow required restart instructions before returning to financial activity.
Escalate a returning or unremovable extension. An entry that reappears may indicate a remaining component or management policy that needs examination.
On a work computer, ask IT to investigate. Do not remove organization policies blindly or follow a random command that promises to unlock the browser.
Review transfers already made. Compare the destination in your wallet history with the intended recipient’s trusted address.
Keep transaction identifiers, timestamps, asset names, and the network. Contact any exchange involved through its real app or known website.
Recover other access when evidence warrants it. If scans find credential theft or you exposed secrets, change affected account access from a clean device.
A seed phrase stored on a compromised PC calls for a new wallet. An address substitution alone does not prove that the seed was stolen.
Verify the fix before using the browser again. Confirm the extension stays removed after restarting and review the final scan report.
Keep Windows and the browser updated. Reinstall legitimate utilities from their actual publishers and review the permissions of anything you add.
Is Your Device Infected? Run a Free Malware Scan
Slow performance, constant pop-ups, or strange behavior? These are classic signs of a malware infection. The fastest way to find out is to scan your device with Malwarebytes Free — one of the most trusted malware removal tools available.
The free version detects and removes the most common threats, including:
- Adware — the cause of those annoying pop-ups
- Browser hijackers — unwanted redirects and changed homepages
- Trojans and spyware — hidden programs stealing your data
- Potentially unwanted programs (PUPs) — software you never asked for
👉 Select your device below — Windows, Mac, or Android — then follow the simple steps to download Malwarebytes, scan your system, and remove any threats it finds. The scan usually takes 5 to 20 minutes.
Run a Malware Scan with Malwarebytes for Windows
Malwarebytes is one of the most popular and trusted anti-malware tools for Windows — and it’s completely free for removing infections. It catches threats that many antivirus programs miss, including adware, browser hijackers, and trojans. Follow the steps below to scan and clean your PC in just a few minutes.
Download Malwarebytes
Click the button below to download the latest version of Malwarebytes for Windows from the official source. The free version is all you need — it will scan your computer and remove adware, browser hijackers, and other malicious software at no cost.
Download MalwarebytesOfficial installer for Windows 11 and 10. Your download starts right away.Want real-time protection? See Malwarebytes Premium Malwarebytes Free for WindowsScans and removes malware at no cost
-
Install Malwarebytes
When the download finishes, open your Downloads folder and double-click the MBSetup file. If Windows shows a User Account Control pop-up, click “Yes” to allow the installation.

Follow the On-Screen Prompts to Install Malwarebytes
The setup wizard will walk you through a few quick screens:
-
Choose where you’re installing the program — “Personal Computer” or “Work Computer” — then click Next.

-
Malwarebytes will now install on your device. This usually takes under a minute.

-
When installation is complete, the “Welcome to Malwarebytes” screen will open automatically.

-
On the final screen, click Open Malwarebytes to launch the program.

-
Enable “Scan for Rootkits”
Before scanning, turn on rootkit detection so Malwarebytes can find even the most hidden threats. Click the Settings gear icon on the left side of the screen.

In the settings menu, find “Scan for rootkits” and click the toggle so it turns blue.

Done? Click “Dashboard” in the left pane to return to the main screen.
Start the Scan
Click the blue Scan button. Malwarebytes will automatically update its virus database and start checking your computer for malware.

-
Wait for the Scan to Finish
The scan checks your entire system for browser hijackers and other malicious programs, so it can take 5 to 20 minutes depending on your computer. Feel free to do something else — just check back occasionally to see the progress.

-
Quarantine the Detected Threats
When the scan is done, you’ll see a list of everything Malwarebytes found — malware, adware, and potentially unwanted programs. Click the “Quarantine” button to remove all of them at once.

Malwarebytes will now remove the malicious files and registry entries and move them safely into quarantine.

-
Restart Your Computer
Some threats can only be fully removed after a reboot. If Malwarebytes asks you to restart, click Yes. Once you’re logged back in, Malwarebytes has finished removing the threats it found.

That’s it — your Windows PC is now clean of trojans, adware, and other malware, and should be back to running smoothly.
If you are still having problems with your computer after completing these instructions, then please follow one of the steps:
- Run a computer scan with ESET Online Scanner
- Ask for help in our Windows Malware Removal Help & Support forum.
Run a Malware Scan with Malwarebytes for Mac
Malwarebytes for Mac is a free on-demand scanner that removes the malware other security software tends to miss — adware, browser hijackers, and unwanted programs included. Cleaning an infected Mac with Malwarebytes has always been completely free, and it’s our go-to recommendation. Follow the steps below to scan and clean your Mac in just a few minutes.
-
Download Malwarebytes for Mac
Click the button below to download the latest version of Malwarebytes for Mac.
Download MalwarebytesOfficial installer for macOS. Your download starts right away.Want real-time protection? See Malwarebytes PremiumMalwarebytes Free for MacScans and removes malware at no cost -
Open the Malwarebytes setup file
When the download finishes, open your Downloads folder and double-click the setup file to begin the installation.

-
Follow the On-Screen Prompts to Install Malwarebytes
The Malwarebytes for Mac Installer will guide you through a few quick screens. Click “Continue” and keep following the prompts until the installation completes.



When the installation is complete, Malwarebytes opens to the Welcome to Malwarebytes screen. Click “Get started“.
-
Select “Personal Computer” or “Work Computer”
Malwarebytes will ask what type of computer you’re installing it on. Click either Personal Computer or Work Computer, whichever applies.

-
Start the Scan
Click the “Scan” button. Malwarebytes will automatically update its detection database and begin checking your Mac for malware.

-
Wait for the Scan to Finish
Malwarebytes will scan your Mac for adware, browser hijackers, and other malicious programs. This can take a few minutes, so feel free to do something else — just check back occasionally to see the progress.

-
Quarantine the Detected Threats
When the scan is done, you’ll see a list of everything Malwarebytes found. Click the “Quarantine” button to remove all the threats at once.

-
Restart Your Mac
Malwarebytes will now remove all the malicious files it found. Some threats can only be fully removed after a reboot — if Malwarebytes asks you to restart, allow it. Once you’re logged back in, your Mac is clean.

That’s it — your Mac is now free of adware, rogue browser extensions, and other potentially harmful software.
If you are still experiencing problems while trying to remove a malicious program from your computer, please ask for help in our Mac Malware Removal Help & Support forum.
Run a Malware Scan with Malwarebytes for Android
Malwarebytes for Android automatically detects and removes dangerous threats like malware and ransomware so you don’t have to worry about your most-used device being compromised. Aggressive detection of adware and potentially unwanted programs keeps your Android phone or tablet running smooth.
-
Download Malwarebytes for Android.
You can download Malwarebytes for Android by clicking the link below.
Get Malwarebytes for AndroidOpens Google Play in a new tab.Want real-time protection? See Malwarebytes Premium for AndroidMalwarebytes for AndroidScans your phone and removes malware at no cost -
Install Malwarebytes for Android on your phone.
In the Google Play Store, tap “Install” to install Malwarebytes for Android on your device.

When the installation process has finished, tap “Open” to begin using Malwarebytes for Android. You can also open Malwarebytes by tapping on its icon in your phone menu or home screen.

-
Follow the on-screen prompts to complete the setup process
When Malwarebytes will open, you will see the Malwarebytes Setup Wizard which will guide you through a series of permissions and other setup options.
This is the first of two screens that explain the difference between the Premium and Free versions. Swipe this screen to continue.
Tap on “Got it” to proceed to the next step.
Malwarebytes for Android will now ask for a set of permissions that are required to scan your device and protect it from malware. Tap on “Give permission” to continue.
Tap on “Allow” to permit Malwarebytes to access the files on your phone.
-
Update database and run a scan with Malwarebytes for Android
You will now be prompted to update the Malwarebytes database and run a full system scan.

Click on “Update database” to update the Malwarebytes for Android definitions to the latest version, then click on “Run full scan” to perform a system scan.

-
Wait for the Malwarebytes scan to complete.
Malwarebytes will now start scanning your phone for adware and other malicious apps. This process can take a few minutes, so we suggest you do something else and periodically check on the status of the scan to see when it is finished.

-
Click on “Remove Selected”.
When the scan has been completed, you will be presented with a screen showing the malware infections that Malwarebytes for Android has detected. To remove the malicious apps that Malwarebytes has found, tap on the “Remove Selected” button.

-
Restart your phone.
Malwarebytes for Android will now remove all the malicious apps that it has found. To complete the malware removal process, Malwarebytes may ask you to restart your device.
That’s it — your Android phone is now clean — no more malicious apps, adware, or browser redirects.
If you are still having problems with your phone after completing these instructions, then please follow one of the steps:
- Restore your phone to factory settings by going to Settings > General management > Reset > Factory data reset.
- Ask for help in our Mobile Malware Removal Help & Support forum.
Stay Protected: Block Ads and Malicious Sites
Now that your device is clean, keep it that way. Most infections start with a malicious ad or a fake download button — so blocking them at the source is your best defense.
We recommend AdGuard, which blocks malicious ads, phishing pages, and dangerous redirects before they can reach you.
👉 Download AdGuard and browse safely
Malware scanning addresses the harmful installation. AdGuard can reduce malicious advertising exposure, but it cannot correct a cryptocurrency transfer sent to a substituted destination.
When Browser Cleanup Needs a Wider Device Check
Removing one extension is useful, but the installer lived outside the browser. That package deserves investigation even if the extension card disappears.
Use a full device scan when suspicious software ran. Microsoft describes the available options in its Windows Security guidance.
If detections continue, preserve their locations and ask for help. Repeating an identical cleanup step without checking the result can leave the underlying installation untouched.
Be careful about restoring a saved browser profile immediately. Bringing back the same unwanted component defeats the purpose of cleanup.
Inspect what your browser account synchronizes and review extensions after signing in again. Restore only the tools you recognize and still need.
Browser resets can change settings and extensions, but they do not automatically remove every program on Windows. Treat those as related, separate checks.
If you use several browsers, write down which ones were examined. It is easy to clean Chrome and later resume transfers through an unchecked Edge profile.
For sensitive systems, a technician may recommend a fresh profile or a system rebuild. Keep useful documents while avoiding unknown executable files in the restore.
A Safer Routine for Future Wallet Transfers
Use a dedicated browser profile with few extensions for financial tasks. Each additional tool is another component whose permissions and origin you need to understand.
Start from a trusted recipient record rather than an old chat reply. Verify changes in payment instructions through a separate communication channel.
Read the complete final destination before approving. For a large transfer, have the reference address visible on another device where the suspected clipper cannot alter it.
Do not let a countdown, urgent message, or crowded screen shorten that check. Address review is part of the transaction, not an optional extra.
Keep clear records of transfers, particularly when an exchange or business recipient is involved. Correct network and destination information makes a later support request more useful.
Retire extensions you do not use. A utility that seemed harmless last year should not keep broad website access indefinitely without a reason.
If you encounter another mismatch, stop again. One successful payment after cleanup is reassuring, but it does not justify ignoring a new warning sign.
Frequently Asked Questions
Is Google Notes an official Google extension?
The component in this campaign uses that name as a disguise. Verify a tool’s actual publisher and source; the word Google in a title is not authentication.
Can a notes extension work and still be malicious?
Yes. A visible notes feature can coexist with harmful background logic. Permissions and installation history matter alongside what the popup displays.
Does Silent Swap need my wallet recovery phrase?
No. Its address-swap mechanism targets the payment destination you paste. You can approve the resulting transfer while your wallet keys remain in your possession.
Will a hardware wallet stop an address substitution?
It helps isolate keys, but you must still verify the destination on the confirmation screen. Do not approve an address that differs from your trusted reference.
Is clicking Remove enough to clean my PC?
It removes the identified browser component, but an installer or other malware may remain. Scan the device and investigate anything that recreates the extension.
Can a completed crypto payment be charged back?
Confirmed blockchain transfers generally cannot be reversed like card charges. Contact relevant providers promptly, save the transaction record, and avoid anyone promising guaranteed recovery.
The Bottom Line
Stop transfers if an address changes or the malicious Google Notes extension appears. Remove the component, scan the PC, and inspect the installer that brought it in.
For an existing loss, preserve the exact transaction and contact the involved provider. Resume wallet activity only from a trusted environment with a complete destination check.








