

A security alert names Warden Stealer, and suddenly the browser you use for everything feels less familiar. Which accounts need attention first?
Start with the file you ran and the information stored on that computer. A clear recovery order will help you handle the next few decisions.
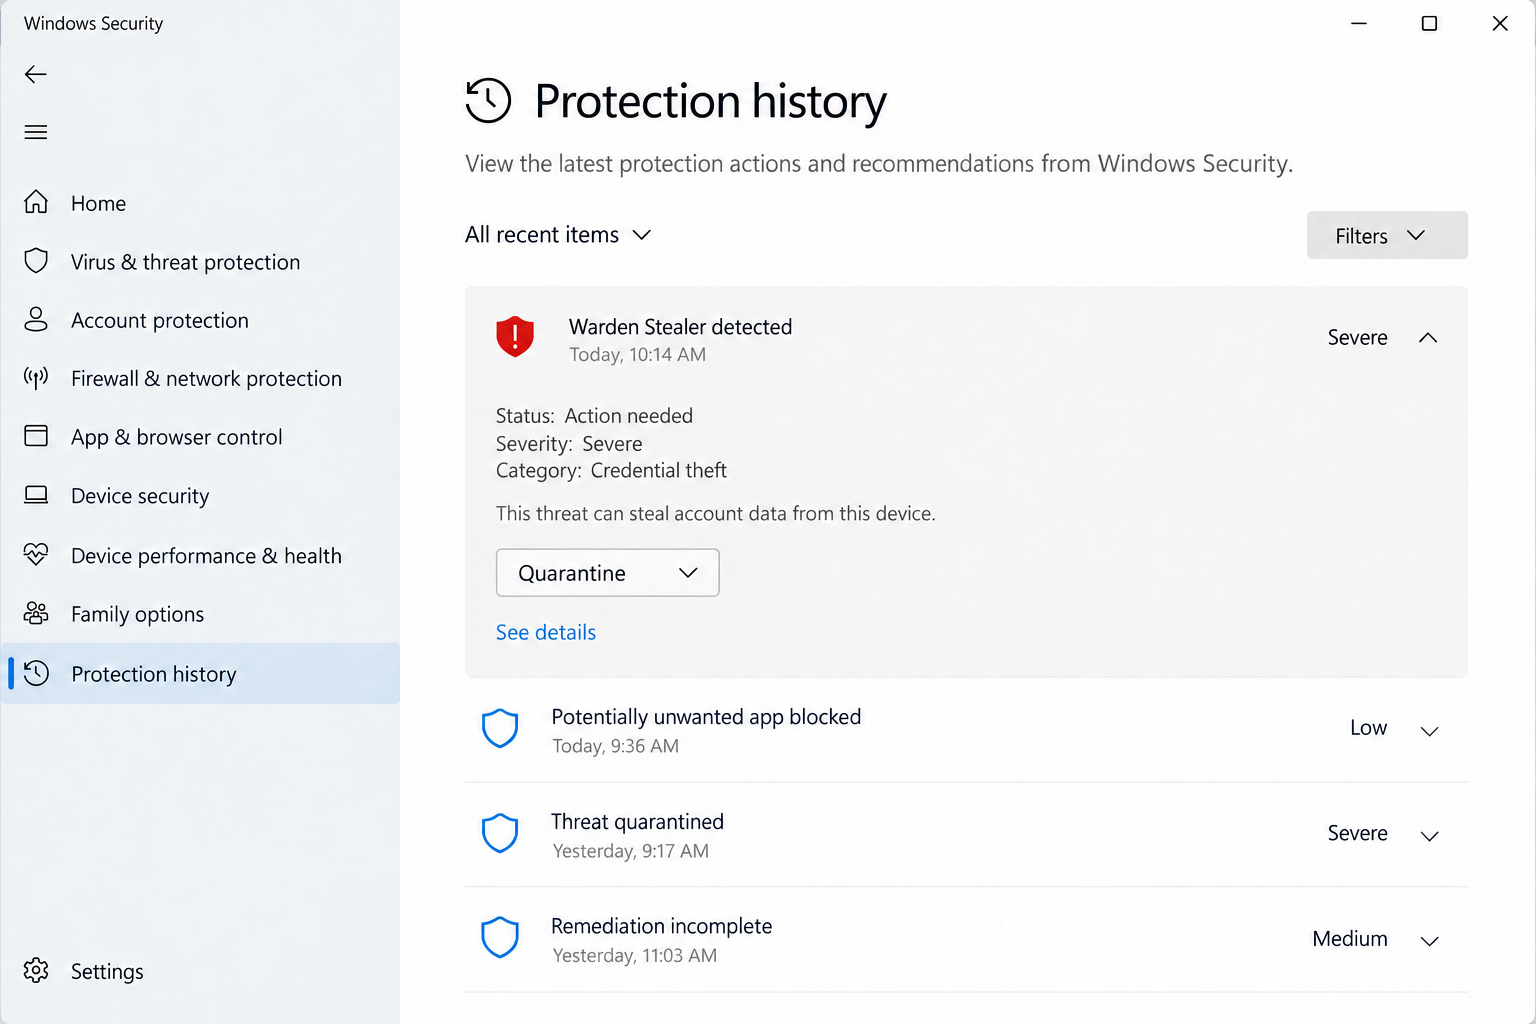
Overview
A stealer that reaches beyond browser passwords
Warden Stealer is Windows malware built to collect sensitive information. Its operators can also use a cryptocurrency address clipper and a loader for additional malicious software.
Gen Threat Labs analyzed working samples and connected the family with malware it previously called CallbackBeaver. That distinction helps explain why different reports use different names.
The newer research also identifies collection of local data belonging to AI assistants and coding tools, including Claude, Codex, Grok, and Cursor.
That makes this a device and account incident. The important question is which secrets were available while the program ran, rather than whether everything still looks normal.
The information that could be exposed
A browser profile can hold saved logins, cookies, payment information, and wallet extensions. Losing a session cookie can matter even when the password itself remains unknown.
Developer tools create another pool of sensitive material. Local configuration and conversation files may contain service tokens, connected account details, or information about private projects.
The collection scope depends on the particular build. Long lists in criminal advertisements should not be treated as proof that every infected machine lost every listed item.
- Browser credentials and active sessions deserve an immediate review.
- Wallet keys or recovery phrases stored locally require a separate response.
- Developer credentials may affect company systems beyond the original PC.
- A clipboard substitution can redirect a transfer you authorize yourself.
The first decision after a credible detection
Stop using the affected PC for sensitive tasks. Disconnect it from the network and make account changes through a separate device you trust.
Record the alert before clearing it. The threat name, file location, detection time, and action taken can help you or a technician reconstruct the exposure.
If this is a work computer, contact your security team promptly. An employee may be able to change a password, but organization tokens need an administrator’s attention.
Why a Clean-Looking Browser Can Still Be a Problem
Information stealers do not need to lock the screen or break Windows to cause damage. Quiet access to useful data can be enough.
Think about a normal morning: email opens without a password, a work dashboard remembers you, and a payment service recognizes your device.
Those conveniences rely on stored information. Some of it represents a current session, which may let an intruder use an account until that session is invalidated.
Changing a password is an important step, but check the service’s controls for signing out other devices, revoking sessions, and removing unfamiliar connected applications.
Likewise, an antivirus quarantine cannot pull back a file already copied elsewhere. Cleanup stops a threat on the computer; recovery addresses the information it could have exposed.
A familiar name in a process list does not settle the issue. Malware can run inside legitimate-looking processes, so guessing which Windows file to delete is risky.
Use the security product’s finding and recorded activity as your starting point. If those findings are unclear, get help rather than improvising registry changes.
How Warden Stealer Reaches a PC and Creates Risk
Step 1: A useful-looking download gets executed
Gen describes Warden delivery through routes including cracked software, game cheats, malicious advertising, and ClickFix campaigns. Different operators can choose different lures.
A ClickFix lure asks someone to carry out a supposed repair, often by copying and running instructions. The person believes they are solving a routine problem.
For your own incident, focus on what actually happened. Did you run an installer, permit an unknown executable, or follow a website’s instructions in a command window?
Save the download name and the page or message that led to it. Do not run the file again to check whether it is dangerous.
A file sitting unopened in Downloads is a different exposure from an executed program. Tell your technician which of those situations applies.
Step 2: The stealer starts with little visible explanation
Warden’s loader can reconstruct its payload in memory. Gen also documents different execution arrangements, so there is no single ordinary window every victim would see.
The practical consequence is simple: a stalled installer or missing application icon does not prove the attempted installation failed safely.
If you approved a suspicious download and then received a detection, treat both events as relevant. Do not dismiss the alert because the promised software never appeared.
Keep real-time protection enabled. A download that demands disabling antivirus is asking you to remove a control precisely when it is needed.
Step 3: Stored account data becomes accessible
The malware searches for information its configuration tells it to collect. Browser data and application files can offer several paths into the same person’s online life.
An email session is especially valuable because that inbox receives password resets for other services. Secure it before chasing lower-priority accounts.
For developers, a credential used by an application can carry permissions of its own. It might remain valid after you change the password for your main login.
List the services used on the PC, including repositories, hosting, work chat, and cloud storage. That inventory gives your recovery work a defined scope.
Step 4: A copied payment address can change
The clipper component can replace a copied cryptocurrency address with one controlled by an attacker. The victim may then approve a payment to the wrong destination.
That is why a wallet password alone does not prevent every loss. You can keep control of the wallet while being tricked about where the transfer goes.
Stop transfers from the affected machine. Compare the complete destination address with a trusted original on another device before using any remaining funds.
Do not send a small test payment to investigate suspected malware. Preserve any transaction you already made and inspect its destination through a reliable explorer.
Step 5: The exposure continues after the original file disappears
The loader can introduce other malware. Meanwhile, credentials or sessions already collected may be used remotely, without the original program remaining visible.
This creates two tasks that can overlap: verify the endpoint has been cleaned, and withdraw access that may have escaped from it.
Someone who contacts you offering to recover stolen crypto may be exploiting the same incident. Do not pay a stranger to unlock funds they claim to have found.
AI Tools and Developer Accounts Need Their Own Recovery List
Start with credentials, then consider the project data
Gen’s Warden analysis and AI agent research explain why local tool data attracts stealers.
Do not assume every saved conversation contains a password. Instead, identify whether you placed secrets, customer records, or internal project information in those conversations.
For each affected service, use its official account controls to revoke credentials and create replacements. Changing a local configuration file does not invalidate a copied token.
Update the applications that legitimately use the replacement credentials afterward. Otherwise, a failed connection can tempt you to restore a secret you meant to retire.
Tell the right administrator what was stored
If company credentials were present, give your security team the names of the services involved. Share actual secrets only through the organization’s approved secure channel.
An administrator can inspect access logs and reduce permissions while investigating. You do not need to prove a completed intrusion before reporting a plausible exposure.
Keep a timeline of the download, execution, detection, and account changes. This can help distinguish ordinary activity from access that needs investigation.
Review permissions when issuing replacements
A replacement credential should have only the permissions its application needs. This is a useful moment to retire forgotten integrations and overly broad access.
Separate personal and organization accounts where possible. One home computer should not become the only place where all important recovery methods are stored.
What to Do If Warden Stealer Ran on Your Computer
You can work through this calmly. Begin with containment and the accounts that can unlock other accounts, then move through the rest of the exposure.
Isolate the Windows PC. Unplug Ethernet and switch off Wi-Fi. Stop opening banking, work, email, and wallet services on that device.
For a managed computer, ask IT how to preserve evidence. Avoid a factory reset before they have assessed whether they need logs or the original drive.
Keep the detection details. Save the security alert, suspicious filename, download address, and approximate execution time. Keep the original message without reopening its links.
Record whether the file merely downloaded or actually ran. Include any request to bypass a warning, enable software, or paste a command.
Clean the system with trusted tools. Update your existing antivirus, run its full scan, and quarantine detected threats. Review the scan report afterward.
Malwarebytes can provide an additional check. If cleanup fails or detections return, consider Microsoft Defender Offline and help from a qualified technician.
Recover important accounts elsewhere. Use a clean device to change exposed passwords, beginning with email and any password manager used on the PC.
End other sessions where the provider allows it. Inspect recovery details, forwarding rules, recent logins, and connected apps for changes you did not make.
Rotate application and developer secrets. Revoke potentially exposed tokens, keys, and access grants through each provider. Notify the administrators responsible for company resources.
Ask them to examine account activity during the exposure period. A new password does not automatically retire every credential attached to a developer service.
Protect wallets according to the exposure. If private keys or a recovery phrase were accessible locally, create a fresh wallet on a clean device.
Transfer remaining assets only after independently checking the destination. If a transfer went to a substituted address, keep its transaction identifier and report it.
Contact financial providers when needed. Tell your bank or card issuer about suspicious activity using the number on your card or official account page.
Ask what access, payment, or card controls fit your situation. Do not follow instructions from someone who calls claiming they have already fixed the incident.
Verify recovery before resuming normal use. Confirm security protection remains active and the detection no longer returns. Update Windows, browsers, and the software you use.
If administrator access or repeated malware prevents confidence in cleanup, discuss a clean reinstall. Preserve personal files carefully and scan backups before restoring them.
Is Your Device Infected? Run a Free Malware Scan
Slow performance, constant pop-ups, or strange behavior? These are classic signs of a malware infection. The fastest way to find out is to scan your device with Malwarebytes Free — one of the most trusted malware removal tools available.
The free version detects and removes the most common threats, including:
- Adware — the cause of those annoying pop-ups
- Browser hijackers — unwanted redirects and changed homepages
- Trojans and spyware — hidden programs stealing your data
- Potentially unwanted programs (PUPs) — software you never asked for
👉 Select your device below — Windows, Mac, or Android — then follow the simple steps to download Malwarebytes, scan your system, and remove any threats it finds. The scan usually takes 5 to 20 minutes.
Run a Malware Scan with Malwarebytes for Windows
Malwarebytes is one of the most popular and trusted anti-malware tools for Windows — and it’s completely free for removing infections. It catches threats that many antivirus programs miss, including adware, browser hijackers, and trojans. Follow the steps below to scan and clean your PC in just a few minutes.
Download Malwarebytes
Click the button below to download the latest version of Malwarebytes for Windows from the official source. The free version is all you need — it will scan your computer and remove adware, browser hijackers, and other malicious software at no cost.
Download MalwarebytesOfficial installer for Windows 11 and 10. Your download starts right away.Want real-time protection? See Malwarebytes Premium Malwarebytes Free for WindowsScans and removes malware at no cost
-
Install Malwarebytes
When the download finishes, open your Downloads folder and double-click the MBSetup file. If Windows shows a User Account Control pop-up, click “Yes” to allow the installation.

Follow the On-Screen Prompts to Install Malwarebytes
The setup wizard will walk you through a few quick screens:
-
Choose where you’re installing the program — “Personal Computer” or “Work Computer” — then click Next.

-
Malwarebytes will now install on your device. This usually takes under a minute.

-
When installation is complete, the “Welcome to Malwarebytes” screen will open automatically.

-
On the final screen, click Open Malwarebytes to launch the program.

-
Enable “Scan for Rootkits”
Before scanning, turn on rootkit detection so Malwarebytes can find even the most hidden threats. Click the Settings gear icon on the left side of the screen.

In the settings menu, find “Scan for rootkits” and click the toggle so it turns blue.

Done? Click “Dashboard” in the left pane to return to the main screen.
Start the Scan
Click the blue Scan button. Malwarebytes will automatically update its virus database and start checking your computer for malware.

-
Wait for the Scan to Finish
The scan checks your entire system for browser hijackers and other malicious programs, so it can take 5 to 20 minutes depending on your computer. Feel free to do something else — just check back occasionally to see the progress.

-
Quarantine the Detected Threats
When the scan is done, you’ll see a list of everything Malwarebytes found — malware, adware, and potentially unwanted programs. Click the “Quarantine” button to remove all of them at once.

Malwarebytes will now remove the malicious files and registry entries and move them safely into quarantine.

-
Restart Your Computer
Some threats can only be fully removed after a reboot. If Malwarebytes asks you to restart, click Yes. Once you’re logged back in, Malwarebytes has finished removing the threats it found.

That’s it — your Windows PC is now clean of trojans, adware, and other malware, and should be back to running smoothly.
If you are still having problems with your computer after completing these instructions, then please follow one of the steps:
- Run a computer scan with ESET Online Scanner
- Ask for help in our Windows Malware Removal Help & Support forum.
Run a Malware Scan with Malwarebytes for Mac
Malwarebytes for Mac is a free on-demand scanner that removes the malware other security software tends to miss — adware, browser hijackers, and unwanted programs included. Cleaning an infected Mac with Malwarebytes has always been completely free, and it’s our go-to recommendation. Follow the steps below to scan and clean your Mac in just a few minutes.
-
Download Malwarebytes for Mac
Click the button below to download the latest version of Malwarebytes for Mac.
Download MalwarebytesOfficial installer for macOS. Your download starts right away.Want real-time protection? See Malwarebytes PremiumMalwarebytes Free for MacScans and removes malware at no cost -
Open the Malwarebytes setup file
When the download finishes, open your Downloads folder and double-click the setup file to begin the installation.

-
Follow the On-Screen Prompts to Install Malwarebytes
The Malwarebytes for Mac Installer will guide you through a few quick screens. Click “Continue” and keep following the prompts until the installation completes.



When the installation is complete, Malwarebytes opens to the Welcome to Malwarebytes screen. Click “Get started“.
-
Select “Personal Computer” or “Work Computer”
Malwarebytes will ask what type of computer you’re installing it on. Click either Personal Computer or Work Computer, whichever applies.

-
Start the Scan
Click the “Scan” button. Malwarebytes will automatically update its detection database and begin checking your Mac for malware.

-
Wait for the Scan to Finish
Malwarebytes will scan your Mac for adware, browser hijackers, and other malicious programs. This can take a few minutes, so feel free to do something else — just check back occasionally to see the progress.

-
Quarantine the Detected Threats
When the scan is done, you’ll see a list of everything Malwarebytes found. Click the “Quarantine” button to remove all the threats at once.

-
Restart Your Mac
Malwarebytes will now remove all the malicious files it found. Some threats can only be fully removed after a reboot — if Malwarebytes asks you to restart, allow it. Once you’re logged back in, your Mac is clean.

That’s it — your Mac is now free of adware, rogue browser extensions, and other potentially harmful software.
If you are still experiencing problems while trying to remove a malicious program from your computer, please ask for help in our Mac Malware Removal Help & Support forum.
Run a Malware Scan with Malwarebytes for Android
Malwarebytes for Android automatically detects and removes dangerous threats like malware and ransomware so you don’t have to worry about your most-used device being compromised. Aggressive detection of adware and potentially unwanted programs keeps your Android phone or tablet running smooth.
-
Download Malwarebytes for Android.
You can download Malwarebytes for Android by clicking the link below.
Get Malwarebytes for AndroidOpens Google Play in a new tab.Want real-time protection? See Malwarebytes Premium for AndroidMalwarebytes for AndroidScans your phone and removes malware at no cost -
Install Malwarebytes for Android on your phone.
In the Google Play Store, tap “Install” to install Malwarebytes for Android on your device.

When the installation process has finished, tap “Open” to begin using Malwarebytes for Android. You can also open Malwarebytes by tapping on its icon in your phone menu or home screen.

-
Follow the on-screen prompts to complete the setup process
When Malwarebytes will open, you will see the Malwarebytes Setup Wizard which will guide you through a series of permissions and other setup options.
This is the first of two screens that explain the difference between the Premium and Free versions. Swipe this screen to continue.
Tap on “Got it” to proceed to the next step.
Malwarebytes for Android will now ask for a set of permissions that are required to scan your device and protect it from malware. Tap on “Give permission” to continue.
Tap on “Allow” to permit Malwarebytes to access the files on your phone.
-
Update database and run a scan with Malwarebytes for Android
You will now be prompted to update the Malwarebytes database and run a full system scan.

Click on “Update database” to update the Malwarebytes for Android definitions to the latest version, then click on “Run full scan” to perform a system scan.

-
Wait for the Malwarebytes scan to complete.
Malwarebytes will now start scanning your phone for adware and other malicious apps. This process can take a few minutes, so we suggest you do something else and periodically check on the status of the scan to see when it is finished.

-
Click on “Remove Selected”.
When the scan has been completed, you will be presented with a screen showing the malware infections that Malwarebytes for Android has detected. To remove the malicious apps that Malwarebytes has found, tap on the “Remove Selected” button.

-
Restart your phone.
Malwarebytes for Android will now remove all the malicious apps that it has found. To complete the malware removal process, Malwarebytes may ask you to restart your device.
That’s it — your Android phone is now clean — no more malicious apps, adware, or browser redirects.
If you are still having problems with your phone after completing these instructions, then please follow one of the steps:
- Restore your phone to factory settings by going to Settings > General management > Reset > Factory data reset.
- Ask for help in our Mobile Malware Removal Help & Support forum.
Stay Protected: Block Ads and Malicious Sites
Now that your device is clean, keep it that way. Most infections start with a malicious ad or a fake download button — so blocking them at the source is your best defense.
We recommend AdGuard, which blocks malicious ads, phishing pages, and dangerous redirects before they can reach you.
👉 Download AdGuard and browse safely
Use the scan instructions above for device cleanup. AdGuard can reduce exposure to malicious advertising, while account sessions and stolen credentials still need separate attention.
How to Check That Recovery Is Actually Progressing
A completed scan is one useful result. The stronger picture combines the scan report, stable security settings, and successful withdrawal of exposed account access.
Microsoft explains the available scans in Windows Security. Follow those controls rather than a website’s unsolicited cleanup commands.
Keep the reports from each scan. If an alert returns, its location and time can tell a technician whether the same threat persists or another file is involved.
Review the sessions that remain on your important accounts. A device name you recognize can still represent an old session worth ending after an incident.
Check inbox rules and recovery contact details again after access has been restored. These settings can remain useful to an intruder even after a password change.
For organization accounts, let the security team decide when the endpoint can reconnect. A clean home scan is not a substitute for their investigation.
Write down what is complete and what remains open. This prevents an unfinished token rotation or wallet migration from being lost among dozens of account changes.
Do not announce publicly that you lost access to a wallet or a valuable account. That can attract recovery fraud and targeted follow-up messages.
Frequently Asked Questions
Is Warden Stealer the same as CallbackBeaver?
Gen says its earlier CallbackBeaver tracking corresponds to Warden Stealer. A security alert may use a different detection label, so keep the exact label you received.
Does a Warden detection prove every password was stolen?
No. Collection varies by build and available data. Treat stored credentials as potentially exposed and recover them, while distinguishing that risk from confirmed account activity.
Can Warden affect cryptocurrency without stealing my seed phrase?
Yes. Clipboard substitution can redirect a transfer you approve. Compare the full destination through a trusted device and stop transfers from the affected PC.
Are AI assistants themselves the malware?
No. The malware targets data stored by legitimate tools. Their names appear because the attacker wants associated tokens and information, not because those products distribute Warden.
Will changing my password revoke every stolen token?
Not necessarily. Session and application credentials have their own controls. Review active sessions and revoke exposed keys or grants through the relevant provider.
Should I delete browser profiles or reinstall Windows immediately?
Get guidance first when evidence or work data matters. A rebuild may be appropriate, but it must accompany account recovery and a safe plan for restoring files.
The Bottom Line
Treat a credible Warden Stealer detection as a possible loss of account access and local secrets. Isolate the PC and complete trusted malware removal.
Then revoke exposed sessions and credentials from a clean device. Give wallets and developer services their own checklist, because a removed program cannot retire access already copied elsewhere.








