

An email says money you lost has finally been recovered. It sounds like the message you hoped would arrive, even if you never requested help.
Before replying, take a moment to check who is making that promise and what they expect you to do next.
Overview
A recovery claim aimed at hope rather than fear
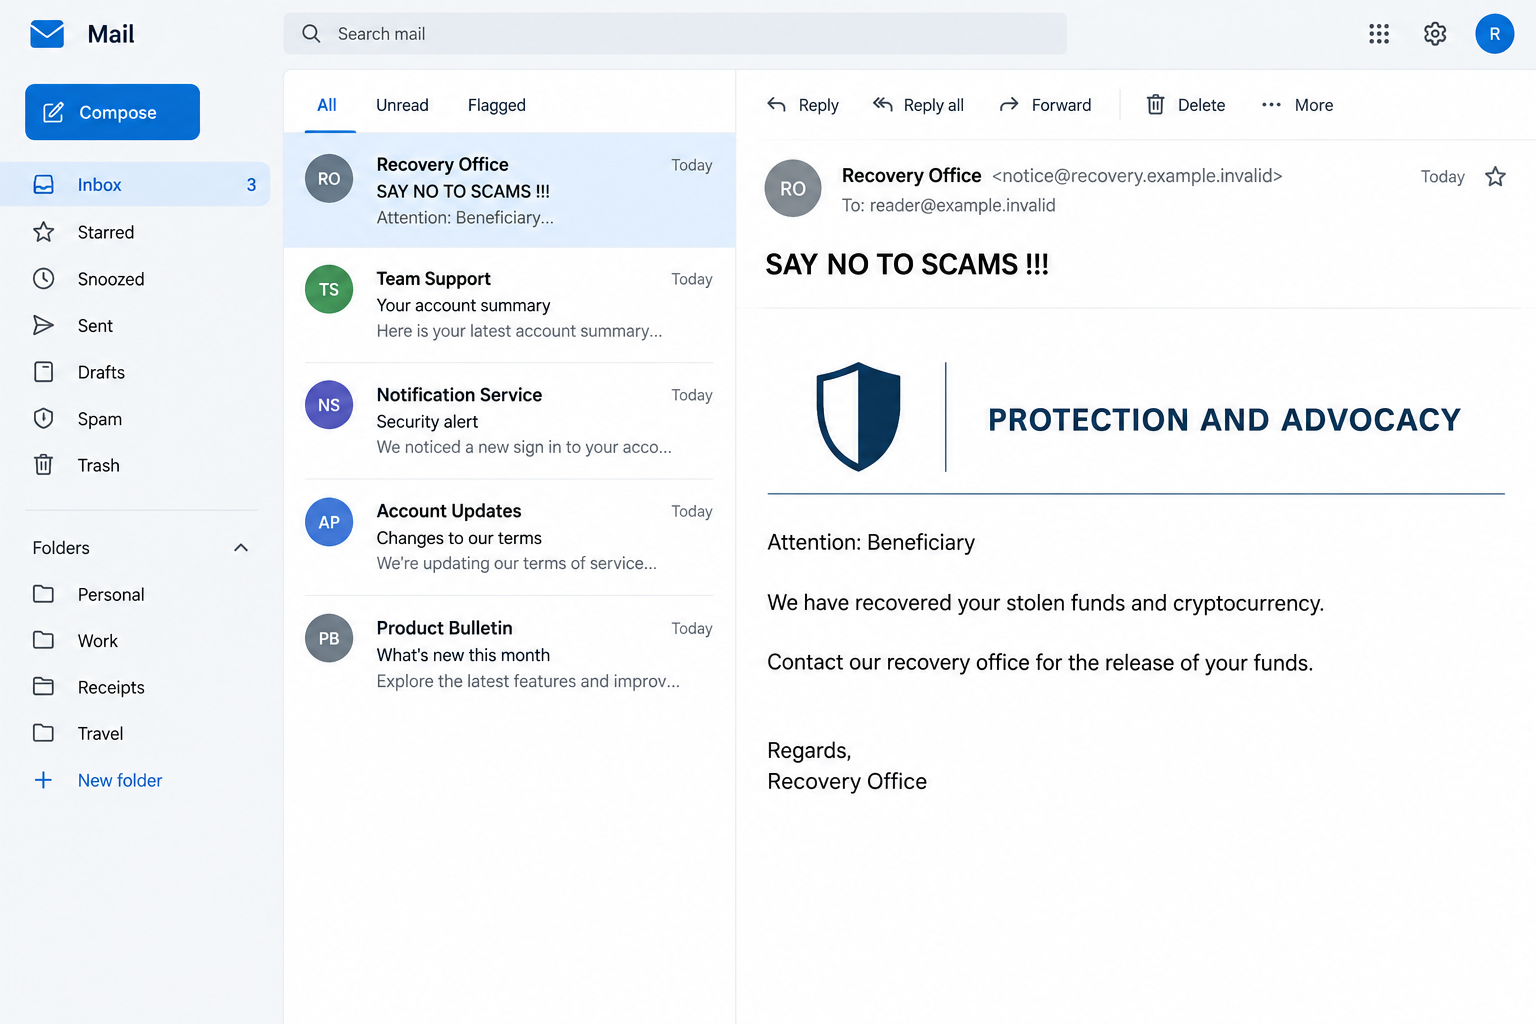
The Recovered Stolen Funds and Crypto Currency email campaign claims that money or Bitcoin has been located and can be released to the recipient.
One version uses the subject SAY NO TO SCAMS and an organization name resembling National Un-Recovered Financial Services, sometimes shortened to NURFS.
The anti-fraud language is part of the disguise. It does not establish that the sender investigated your loss, holds your funds, or represents an authority.
This is a recovery scam, not a genuine refund notice. Do not reply to the supplied contact or provide information to arrange the claimed release.
Variants change the paperwork, not the central demand
Messages can present an advocacy office, legal representative, international agency, or payment administrator. The names and apparent letterhead vary between versions.
Some seek identity documents or contact details. Others introduce a fee or direct the recipient toward an untrusted sign-in or wallet interaction.
- The sender announces recovery without a verifiable case you recognize.
- The message directs you to its own release contact.
- Official-sounding language substitutes for independently checkable authority.
- The next request can expose more information or cost more money.
You do not need to know which version comes next to reject the invitation. An unsupported claim of recovered funds is not a reason to enter negotiations.
The response depends on what you shared
Receiving the email does not mean your money was recovered or your device was infected. The urgent work begins if you supplied secrets, documents, access, or payment.
A reply exposes different information from a wallet recovery phrase. An executed attachment requires another response again. Identify your actual interaction before deciding what to repair.
If you already lost money once, you deserve help without blame. Pause the conversation, preserve the records, and use verified reporting and support channels.
Why an Anti-Scam Message Can Be a Scam
A person waiting for news about a loss may be willing to hear an unexpected recovery offer. The promise addresses a real need.
The message also changes the apparent role of the sender. Instead of asking you to invest, it claims to be protecting you from dishonest people.
That framing can make sensible caution feel like rejecting assistance. You may worry that ignoring the email will prevent a legitimate payment from reaching you.
There is no need to choose between blind trust and abandoning your case. Independently contact the organization or authority you actually reported the loss to.
Use the contact route from that original report, not the recovery email. Ask whether this communication belongs to your case.
The FTC’s recovery-scam guidance warns about unsolicited offers that turn an earlier loss into another demand for money or information.
Knowing about a previous loss does not prove legitimacy. Consider what you disclosed publicly, to the original operation, or in later conversations.
Keep reporting details private. A public complaint containing your contact information and transaction history may make it easier for another sender to sound informed.
How the Recovered Stolen Funds Email Scam Works
Step 1: The email announces a result you never verified
The opening claim is that recovery has already happened. It asks you to accept the result before establishing who recovered the funds or where they are.
A generic beneficiary greeting can make a mass message look like formal correspondence. It does not connect the sender to your actual transaction.
Ask what verifiable case exists. A name on an email is weaker than a reference you can confirm through a known authority’s independently obtained contact.
Do not volunteer the missing information to help the sender complete its story. Your explanation of the loss can supply details for a more convincing follow-up.
If you never lost money, the invitation is no more credible. A surprise claim does not become yours simply because it reached your inbox.
Step 2: The sender borrows the appearance of authority
The message may display a protection office, financial-services label, legal title, or references to international organizations. The presentation asks you to trust its role.
Official names are not credentials. A document can mention the FBI or United Nations without being issued, approved, or supervised by either.
Check the named body’s own website and established contact information. Do not ask the suspicious sender to provide another contact that confirms its first claim.
An apparent office address also cannot authenticate the email. A real building or copied institutional address does not prove that its occupant sent the message.
Keep the distinction precise: the correspondence is fraudulent. That does not establish the identity or nationality of the person operating it.
Step 3: A reply moves you into a tailored conversation
The initial message can be short because the next stage happens by email or another messaging channel. Replying creates an opportunity for more specific persuasion.
The sender may ask about your loss, preferred payment method, personal circumstances, or identification. Those questions can sound like ordinary administrative preparation.
Look at whether the information is necessary for a verified case. An untrusted correspondent should not receive a government ID merely to support an unexplained windfall.
Do not send wallet screenshots containing sensitive details. Even a conversation that begins with harmless questions can gradually turn into requests for control.
If you already replied, stop adding information. Save the exchange and consider what it disclosed instead of continuing because the sender now knows your name.
Step 4: Release conditions turn hope into payment pressure
One reported variant paired an alleged $500,000 refund with an $82 notarization demand. A small fee can seem acceptable beside a much larger promised amount.
The comparison is misleading. The promised amount is unverified; the payment you make is real. A modest initial charge can still produce a loss.
Other explanations may involve processing, courier delivery, verification, or tax. The label does not establish that the sender can release anything.
Never send cryptocurrency to demonstrate that you can receive cryptocurrency. A public receiving address does not need a test payment to an unknown recovery operator.
If a new condition follows each payment, stop. Paying more to protect money already sent can deepen the loss rather than bring release closer.
Step 5: Verification can become credential or identity theft
An untrusted link may imitate a financial sign-in. A document may request information that belongs only in a verified provider’s secure account process.
Read the destination independently before entering anything. A recovery page does not become a genuine exchange login because the email describes it as verification.
Never provide a wallet recovery phrase or private key. Those secrets can give another person control of assets rather than prove your identity safely.
Files deserve separate care. Do not execute an attachment, enable macros, install a recovery utility, or accept remote support to complete this email’s release procedure.
The campaign’s possible routes are not evidence that every recipient received malware. Record the exact file or request if your interaction reached this point.
Step 6: The next recovery offer may target the new loss
After payment, an operator can continue promising progress or another correspondent may claim to have found the funds again. A new name is not independent verification.
The FBI warns that private recovery companies cannot issue cryptocurrency seizure orders. A technical tracing claim should not be mistaken for authority to return funds.
Tracing a public transaction and controlling its destination are different abilities. A chart showing movement does not establish possession of your assets.
Use the FBI’s recovery-fraud warning to recognize that distinction. Do not buy certainty from a stranger offering a guaranteed result.
A fresh demand for payment should end the exchange, not extend your original commitment. Preserve it as part of the incident record.
Sender and Release-Request Checks
Verify the case through a route you already trust
Find the original complaint number or transaction report. Contact the responsible organization using details obtained independently from the recovery message.
Ask whether a payment process exists and how communications are authenticated. A legitimate process should not rely on a stranger keeping you inside one email chain.
If a lawyer is named, verify that individual through the relevant professional register and established office contact. A copied name does not authenticate the correspondent.
Separate wallet ownership from wallet control
A genuine support interaction may need a public transaction reference. It should not need your private keys to understand which payment you are reporting.
Keep secret recovery material offline according to your wallet provider’s instructions. Do not send it as an attachment, photograph, or supposedly encrypted chat message.
With an exchange account, use the exchange’s established support system. Any password reset or identity check should be tied to that verified account process.
Do not mistake technical detail for a recovered balance
An email can contain real transaction information yet make a false claim about recovery. The factual detail and the promised outcome require separate verification.
A screenshot of a balance is also only a display. Ask the verified provider about the actual account or legal process rather than paying to unlock it.
These checks are useful when an authority genuinely contacts you. They are not an invitation to keep negotiating with this known fraudulent campaign.
What to Do if You Have Fallen Victim to This Scam
Stop the recovery conversation. Do not reply, send further documents, or pay another release charge. Save the correspondence before blocking the sender.
Export the message if your mail service allows it, preserving its headers. Keep the original record rather than relying only on a cropped screenshot.
Contact the provider involved in any payment. Tell your bank, card issuer, payment service, or exchange what happened, using its established support route.
Provide the time, amount, destination, and transaction reference. Ask about available fraud action promptly, without assuming that a confirmed cryptocurrency transfer can simply be canceled.
Recover exposed account access. Replace credentials supplied to an imitation sign-in from a trusted device. Review active sessions, recovery details, and unfamiliar account changes.
If the same password was reused elsewhere, change those affected logins too. Secure email early because it may control recovery for other services.
Treat shared wallet secrets as compromised. If a recovery phrase or private key was disclosed, obtain verified guidance for moving remaining assets to fresh keys.
A new password on a wallet application does not invalidate a phrase already copied by another person. Do not send more funds into that wallet as a test.
Address documents and personal information separately. Record which ID images or financial details were sent. Use your country’s identity-theft reporting and protective services where appropriate.
In the US, IdentityTheft.gov provides a recovery route. Watch for new requests that use the disclosed information to sound official.
Check the device only when the exposure calls for it. If you ran a file, installed software, or permitted remote access, use trusted security tools such as Malwarebytes.
AdGuard can reduce some malicious advertising encounters. Neither tool retrieves a payment or replaces account recovery, and receiving an email alone does not establish infection.
Report both losses and reject further rescue offers. Include the original incident and the recovery attempt in a complaint to the relevant authorities, such as IC3.
Keep transaction hashes, messages, and provider case numbers together. Do not publish wallet secrets or pay someone promising privileged access to investigators.
Is Your Device Infected? Run a Free Malware Scan
Slow performance, constant pop-ups, or strange behavior? These are classic signs of a malware infection. The fastest way to find out is to scan your device with Malwarebytes Free — one of the most trusted malware removal tools available.
The free version detects and removes the most common threats, including:
- Adware — the cause of those annoying pop-ups
- Browser hijackers — unwanted redirects and changed homepages
- Trojans and spyware — hidden programs stealing your data
- Potentially unwanted programs (PUPs) — software you never asked for
👉 Select your device below — Windows, Mac, or Android — then follow the simple steps to download Malwarebytes, scan your system, and remove any threats it finds. The scan usually takes 5 to 20 minutes.
Run a Malware Scan with Malwarebytes for Windows
Malwarebytes is one of the most popular and trusted anti-malware tools for Windows — and it’s completely free for removing infections. It catches threats that many antivirus programs miss, including adware, browser hijackers, and trojans. Follow the steps below to scan and clean your PC in just a few minutes.
Download Malwarebytes
Click the button below to download the latest version of Malwarebytes for Windows from the official source. The free version is all you need — it will scan your computer and remove adware, browser hijackers, and other malicious software at no cost.
Download MalwarebytesOfficial installer for Windows 11 and 10. Your download starts right away.Want real-time protection? See Malwarebytes Premium Malwarebytes Free for WindowsScans and removes malware at no cost
-
Install Malwarebytes
When the download finishes, open your Downloads folder and double-click the MBSetup file. If Windows shows a User Account Control pop-up, click “Yes” to allow the installation.

Follow the On-Screen Prompts to Install Malwarebytes
The setup wizard will walk you through a few quick screens:
-
Choose where you’re installing the program — “Personal Computer” or “Work Computer” — then click Next.

-
Malwarebytes will now install on your device. This usually takes under a minute.

-
When installation is complete, the “Welcome to Malwarebytes” screen will open automatically.

-
On the final screen, click Open Malwarebytes to launch the program.

-
Enable “Scan for Rootkits”
Before scanning, turn on rootkit detection so Malwarebytes can find even the most hidden threats. Click the Settings gear icon on the left side of the screen.

In the settings menu, find “Scan for rootkits” and click the toggle so it turns blue.

Done? Click “Dashboard” in the left pane to return to the main screen.
Start the Scan
Click the blue Scan button. Malwarebytes will automatically update its virus database and start checking your computer for malware.

-
Wait for the Scan to Finish
The scan checks your entire system for browser hijackers and other malicious programs, so it can take 5 to 20 minutes depending on your computer. Feel free to do something else — just check back occasionally to see the progress.

-
Quarantine the Detected Threats
When the scan is done, you’ll see a list of everything Malwarebytes found — malware, adware, and potentially unwanted programs. Click the “Quarantine” button to remove all of them at once.

Malwarebytes will now remove the malicious files and registry entries and move them safely into quarantine.

-
Restart Your Computer
Some threats can only be fully removed after a reboot. If Malwarebytes asks you to restart, click Yes. Once you’re logged back in, Malwarebytes has finished removing the threats it found.

That’s it — your Windows PC is now clean of trojans, adware, and other malware, and should be back to running smoothly.
If you are still having problems with your computer after completing these instructions, then please follow one of the steps:
- Run a computer scan with ESET Online Scanner
- Ask for help in our Windows Malware Removal Help & Support forum.
Run a Malware Scan with Malwarebytes for Mac
Malwarebytes for Mac is a free on-demand scanner that removes the malware other security software tends to miss — adware, browser hijackers, and unwanted programs included. Cleaning an infected Mac with Malwarebytes has always been completely free, and it’s our go-to recommendation. Follow the steps below to scan and clean your Mac in just a few minutes.
-
Download Malwarebytes for Mac
Click the button below to download the latest version of Malwarebytes for Mac.
Download MalwarebytesOfficial installer for macOS. Your download starts right away.Want real-time protection? See Malwarebytes PremiumMalwarebytes Free for MacScans and removes malware at no cost -
Open the Malwarebytes setup file
When the download finishes, open your Downloads folder and double-click the setup file to begin the installation.

-
Follow the On-Screen Prompts to Install Malwarebytes
The Malwarebytes for Mac Installer will guide you through a few quick screens. Click “Continue” and keep following the prompts until the installation completes.



When the installation is complete, Malwarebytes opens to the Welcome to Malwarebytes screen. Click “Get started“.
-
Select “Personal Computer” or “Work Computer”
Malwarebytes will ask what type of computer you’re installing it on. Click either Personal Computer or Work Computer, whichever applies.

-
Start the Scan
Click the “Scan” button. Malwarebytes will automatically update its detection database and begin checking your Mac for malware.

-
Wait for the Scan to Finish
Malwarebytes will scan your Mac for adware, browser hijackers, and other malicious programs. This can take a few minutes, so feel free to do something else — just check back occasionally to see the progress.

-
Quarantine the Detected Threats
When the scan is done, you’ll see a list of everything Malwarebytes found. Click the “Quarantine” button to remove all the threats at once.

-
Restart Your Mac
Malwarebytes will now remove all the malicious files it found. Some threats can only be fully removed after a reboot — if Malwarebytes asks you to restart, allow it. Once you’re logged back in, your Mac is clean.

That’s it — your Mac is now free of adware, rogue browser extensions, and other potentially harmful software.
If you are still experiencing problems while trying to remove a malicious program from your computer, please ask for help in our Mac Malware Removal Help & Support forum.
Run a Malware Scan with Malwarebytes for Android
Malwarebytes for Android automatically detects and removes dangerous threats like malware and ransomware so you don’t have to worry about your most-used device being compromised. Aggressive detection of adware and potentially unwanted programs keeps your Android phone or tablet running smooth.
-
Download Malwarebytes for Android.
You can download Malwarebytes for Android by clicking the link below.
Get Malwarebytes for AndroidOpens Google Play in a new tab.Want real-time protection? See Malwarebytes Premium for AndroidMalwarebytes for AndroidScans your phone and removes malware at no cost -
Install Malwarebytes for Android on your phone.
In the Google Play Store, tap “Install” to install Malwarebytes for Android on your device.

When the installation process has finished, tap “Open” to begin using Malwarebytes for Android. You can also open Malwarebytes by tapping on its icon in your phone menu or home screen.

-
Follow the on-screen prompts to complete the setup process
When Malwarebytes will open, you will see the Malwarebytes Setup Wizard which will guide you through a series of permissions and other setup options.
This is the first of two screens that explain the difference between the Premium and Free versions. Swipe this screen to continue.
Tap on “Got it” to proceed to the next step.
Malwarebytes for Android will now ask for a set of permissions that are required to scan your device and protect it from malware. Tap on “Give permission” to continue.
Tap on “Allow” to permit Malwarebytes to access the files on your phone.
-
Update database and run a scan with Malwarebytes for Android
You will now be prompted to update the Malwarebytes database and run a full system scan.

Click on “Update database” to update the Malwarebytes for Android definitions to the latest version, then click on “Run full scan” to perform a system scan.

-
Wait for the Malwarebytes scan to complete.
Malwarebytes will now start scanning your phone for adware and other malicious apps. This process can take a few minutes, so we suggest you do something else and periodically check on the status of the scan to see when it is finished.

-
Click on “Remove Selected”.
When the scan has been completed, you will be presented with a screen showing the malware infections that Malwarebytes for Android has detected. To remove the malicious apps that Malwarebytes has found, tap on the “Remove Selected” button.

-
Restart your phone.
Malwarebytes for Android will now remove all the malicious apps that it has found. To complete the malware removal process, Malwarebytes may ask you to restart your device.
That’s it — your Android phone is now clean — no more malicious apps, adware, or browser redirects.
If you are still having problems with your phone after completing these instructions, then please follow one of the steps:
- Restore your phone to factory settings by going to Settings > General management > Reset > Factory data reset.
- Ask for help in our Mobile Malware Removal Help & Support forum.
Stay Protected: Block Ads and Malicious Sites
Now that your device is clean, keep it that way. Most infections start with a malicious ad or a fake download button — so blocking them at the source is your best defense.
We recommend AdGuard, which blocks malicious ads, phishing pages, and dangerous redirects before they can reach you.
👉 Download AdGuard and browse safely
What a Useful Incident Record Contains
Organize evidence around actions: the original loss, the recovery message, information supplied, payments made, and the support contacts used afterward.
Separate the two financial events. A report that combines them into one unexplained total can make the sequence harder for a provider to understand.
Keep full destination details privately and redact personal information when warning others. Your public warning should not give another operator material for targeting you.
Ask a trusted person to review any further unexpected contact before you respond. That provides another perspective when hope or urgency makes verification difficult.
Frequently Asked Questions
Is the SAY NO TO SCAMS recovery email genuine?
The campaign described here is fraudulent. Its anti-scam subject and recovery claim do not authenticate the sender or establish that funds are waiting for you.
What is NURFS in these messages?
It is an official-sounding identity used in versions of the correspondence. Do not treat the abbreviation or financial-services name as proof of a verified recovery authority.
Does knowing my previous loss prove the sender is helping?
No. Verify the contact through the authority or provider handling your real report. Accurate personal details can be used to make another fraudulent approach more convincing.
Should I pay a small charge to release a large refund?
Not through this unsolicited recovery offer. The large promised balance is unverified, while the fee creates a real payment to an untrusted recipient.
Can a recovery company require my seed phrase?
Do not give it one. A recovery phrase can provide control of your wallet, not merely evidence that a particular transaction belongs to you.
What if I only received or read the email?
Report it as phishing and delete it. Receiving or reading the message alone does not establish account theft, an authorized transfer, or a malware installation.
The Bottom Line
Do not reply or pay to release the funds promised by this email. Its protective language disguises an unsupported recovery claim and another opportunity to exploit you.
If you shared information or money, stop the exchange, contact the real providers involved, and preserve the evidence. Refuse the next person promising guaranteed recovery for a fee.








