

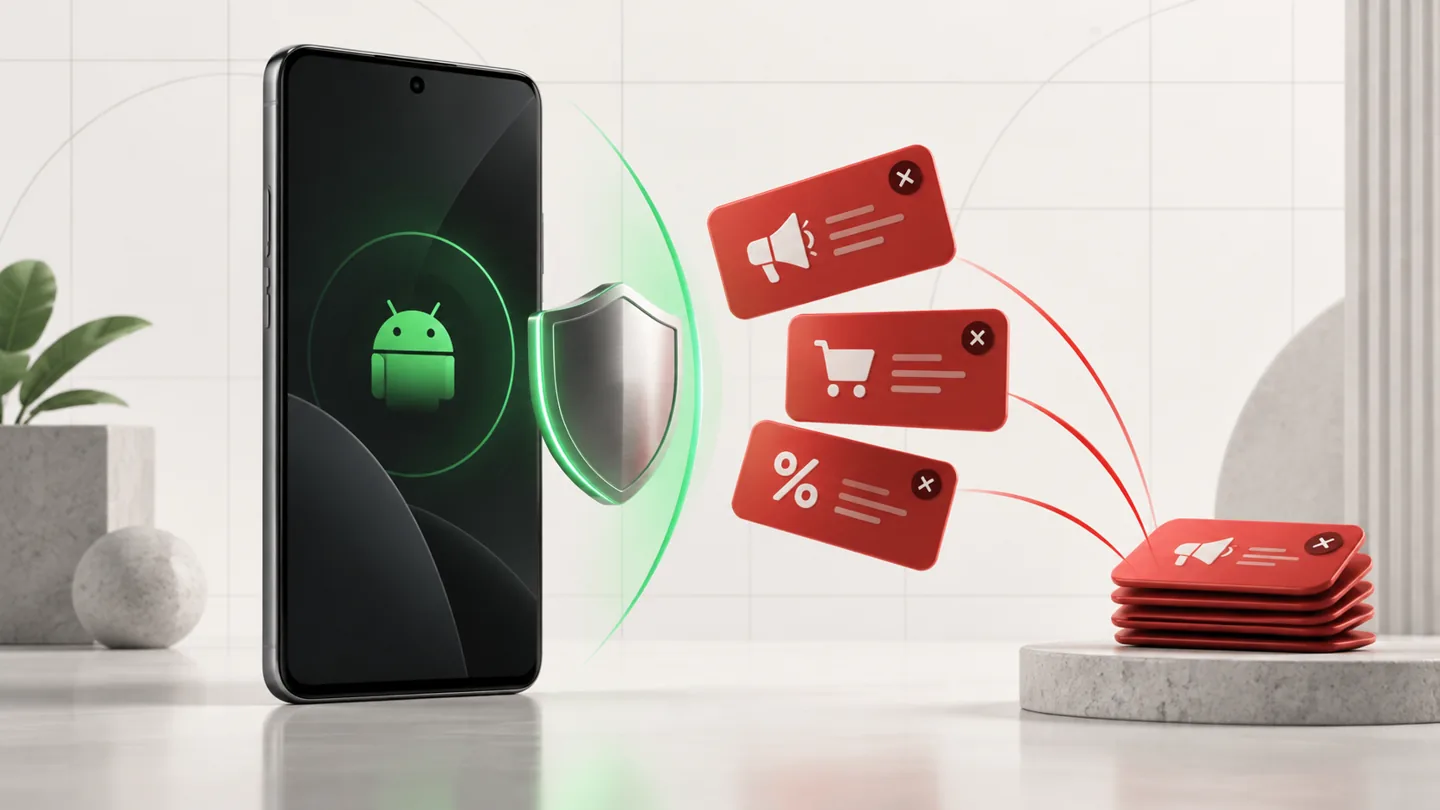
Pop-ups, redirects, and spam can be annoying and distracting when using your Android phone or tablet. These types of unwanted advertisements can also potentially compromise your device’s security and privacy.
How did my phone get infected with malware?
There are several ways that malware can infect your Android phone. Some common ways include:
-
Downloading malicious apps: If you download apps from untrusted sources, you may accidentally install malware on your device. It is important to only download apps from the Google Play Store or reputable app stores.
-
Visiting malicious websites: a page can trick you into installing an app, granting notification permission, or entering a password. A browser vulnerability can also be exploited, so keep Android and the browser updated. A pop-up alone does not establish that malware was installed.
-
Opening spam emails or text messages: a link may lead to a fake sign-in page or an APK download. Do not install an app or grant Accessibility or device-administrator access because a message asks you to. If you entered credentials, change them from a clean device.
-
Using public Wi-Fi networks: an unfamiliar network can expose you to deceptive sign-in pages and other network risks, but connecting alone is not proof of malware. Do not install a certificate or app offered as a requirement for free Wi-Fi unless you have verified the network operator.
To remove malicious apps and check your phone for other malware, please use the free malware removal guide below.
Remove Pop-ups, Redirects & Spam From Your Android Phone
This malware removal guide may appear overwhelming due to the number of steps and numerous programs that are being used. We have only written it this way to provide clear, detailed, and easy-to-understand instructions that anyone can use to remove malware for free.
Please perform all the steps in the correct order. If you have any questions or doubts at any point, stop and ask for our assistance.
- STEP 1: Uninstall malicious apps
- STEP 2: Reset browsers back to default settings
- STEP 3: Use Malwarebytes for Android to remove malicious apps
STEP 1: Uninstall malicious apps
In this first step, we will check if any malicious apps are installed on your phone. Sometimes browser hijackers or adware apps can have usable Uninstall entries that can be used to remove these apps.
-
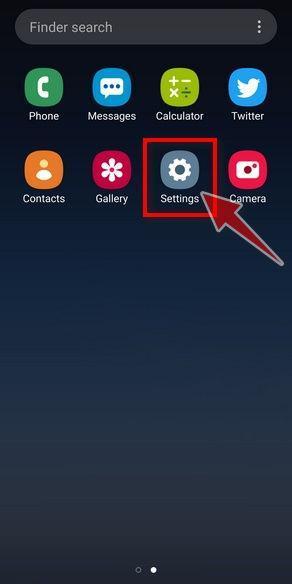
Open the “Settings” menu.
Tap on the “Settings” app from your phone menu or home screen.
-
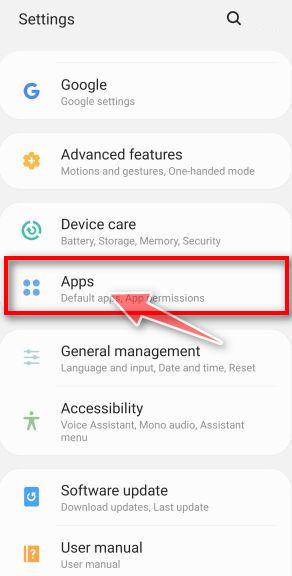
Tap on “Apps”.
When the “Settings” menu opens, tap on “Apps” (or “App Manager”) to see all the installed applications on your phone.
-
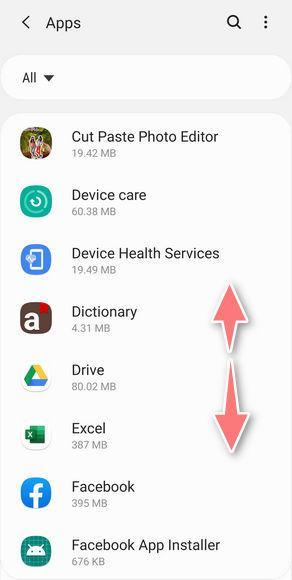
Find the malicious app.
The “Apps” screen will be displayed with a list of all the applications that are installed on your phone. Scroll through the list and look out for any suspicious app that could be behind all the drama – anything you don’t remember downloading or that doesn’t sound like a genuine program.
Most often, cyber criminals hide malware inside video or photo editing apps, weather apps, and camera apps.Check the developer, installation source, and any scanner detection before removing an app. A generic name or unfamiliar icon is not enough. If Android will not let you uninstall a confirmed unwanted app, check Device admin apps in Settings or restart in Safe Mode; do not remove a work or school management app without its administrator.
-
Uninstall the malicious app
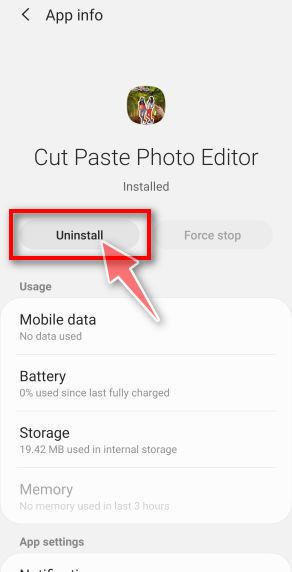
When you find a suspicious or malicious app, tap on it to uninstall it. This won’t start the app but will open up the app details screen. If the app is currently running press the “Force stop” button, then tap on “Uninstall”.
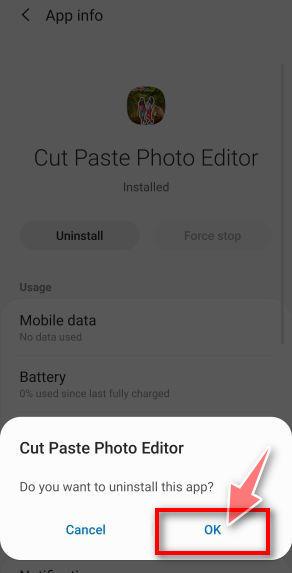
A confirmation dialog should be displayed to confirm you want to uninstall the app, tap on “OK” to remove the malicious app from your phone.
STEP 2: Reset browsers back to default settings
In this second step, we will reset your browser to its default settings to remove spam notifications, unwated search redirects, and restore its factory settings
Before clearing app storage: save important tabs and check that any bookmarks or passwords you need are backed up. This resets local browser data and signs you out of sites; it does not delete your Google or Mozilla account. For notification spam alone, first revoke that site’s notification permission.
Resetting the browser settings to their default it’s an easy task on Windows or Mac computers; however, when it comes to Android, this can’t be done directly because it’s not an option built-in into the browser settings. Restoring the browser settings on Android can be done by clearing the application data. This will remove all the cookies, cache, and other site settings that may have been saved. So let’s see how we can restore your browser to its factory settings.
Remove malware from Chrome for Android
To reset Chrome for Android to its default settings, follow the below steps:
-
Open the “Settings” menu.
Tap on the “Settings” app from your phone menu or home screen.
-
Tap on “Apps”.
When the “Settings” menu opens, tap on “Apps” (or “App Manager”) to see all the installed applications on your phone.
-
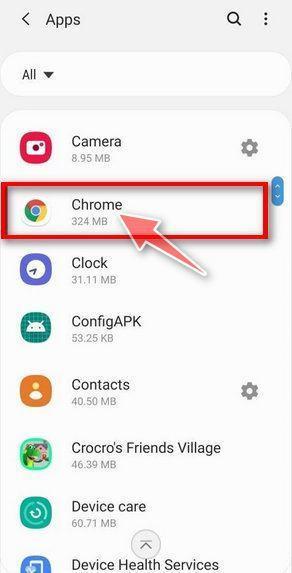
Find and tap on Chrome.
The “Apps” screen will be displayed with a list of all the apps installed on your phone. Scroll through the list until you find the Chrome app, then tap on it to open the app’s details.
-
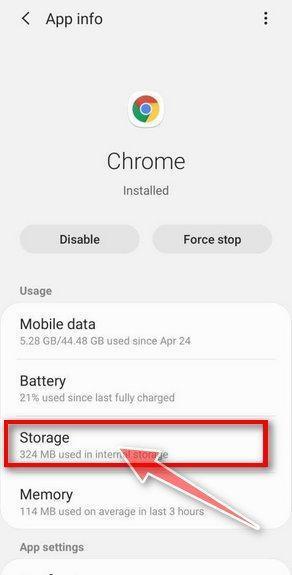
Tap “Storage”.
When Chrome’s app info menu is displayed, tap on “Storage“.
-
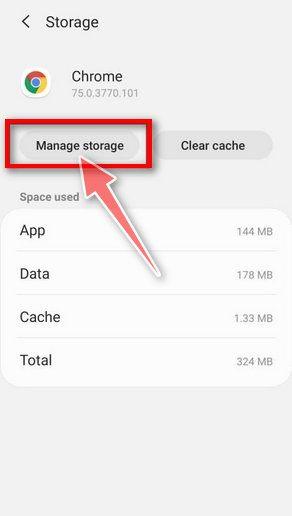
Tap “Manage Space” or “Clear storage”.
Tap Clear storage (Clear data on Samsung). If Chrome instead shows Manage space, tap it to reach Clear all data. Do not choose Clear cache when you need to reset the app’s local data.
-
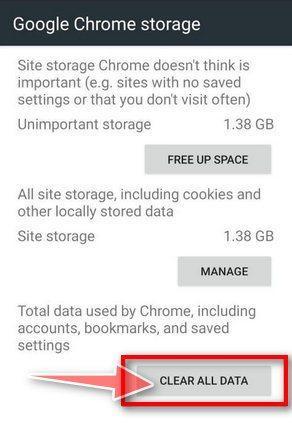
Tap “Clear all data”.
Tap “Clear all data” to delete all Chrome’s data including local sign-ins, unsynced bookmarks, and settings to reset the default settings.
-
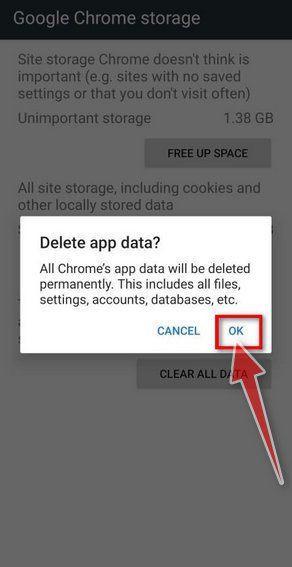
Confirm by tapping “Ok”.
A confirmation dialog should now be displayed, detailing the components that will be restored to their default state should you continue with the reset process. To complete the restoration process, tap “Ok“.
Remove malware from Firefox for Android
To reset Firefox for Android to its default settings, follow the below steps:
-
Open the “Settings” menu.
Tap on the “Settings” app from your phone menu or home screen.
-
Tap on “Apps”.
When the “Settings” menu opens, tap on “Apps” (or “App Manager”) to see all the installed applications on your phone.
-
Find and tap on Firefox.
The “Apps” screen will be displayed with a list of all the apps installed on your phone. Scroll through the list until you find the Firefox app, then tap on it to open the app’s details.
-
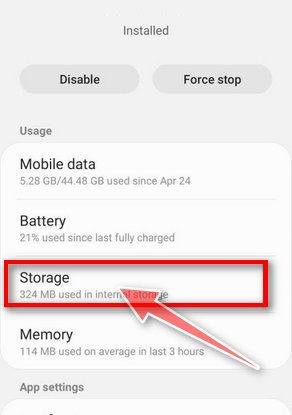
Tap “Storage”.
When Firefox’s app info menu is displayed, tap on “Storage“.
-
Tap “Manage Space” or “Clear storage”.
Tap Clear storage (Clear data on Samsung). If Chrome instead shows Manage space, tap it to reach Clear all data. Do not choose Clear cache when you need to reset the app’s local data.
-
Tap “Clear all data”.
Tap “Clear all data” to delete all Firefox data including local sign-ins, unsynced bookmarks, and settings to reset the default settings.
-
Confirm by tapping “Ok”.
A confirmation dialog should now be displayed, detailing the components that will be restored to their default state should you continue with the reset process. To complete the restoration process, tap “Ok“.
Remove malware from the Opera browser
To reset the Opera browser to its default settings, follow the below steps:
-
Open the “Settings” menu.
Tap on the “Settings” app from your phone menu or home screen.
-
Tap on “Apps”.
When the “Settings” menu opens, tap on “Apps” (or “App Manager”) to see all the installed applications on your phone.
-
Find and tap on Opera.
The “Apps” screen will be displayed with a list of all the apps installed on your phone. Scroll through the list until you find the Opera app, then tap on it to open the app’s details.
-
Tap “Storage”.
When Opera’s app info menu is displayed, tap on “Storage“.
-
Tap “Manage Space” or “Clear storage”.
Tap Clear storage (Clear data on Samsung). If Chrome instead shows Manage space, tap it to reach Clear all data. Do not choose Clear cache when you need to reset the app’s local data.
-
Tap “Clear all data”.
Tap “Clear all data” to delete all Opera’s data including local sign-ins, unsynced bookmarks, and settings to reset the default settings.
-
Confirm by tapping “Ok”.
A confirmation dialog should now be displayed, detailing the components that will be restored to their default state should you continue with the reset process. To complete the restoration process, tap “Ok“.
Remove malware from Samsung Internet Browser
To reset the Samsung Internet Browser to its default settings, follow the below steps:
-
Open the “Settings” menu.
Tap on the “Settings” app from your phone menu or home screen.
-
Tap on “Apps”.
When the “Settings” menu opens, tap on “Apps” (or “App Manager”) to see all the installed applications on your phone.
-
Find and tap on Samsung Internet Browser.
The “Apps” screen will be displayed with a list of all the apps installed on your phone. Scroll through the list until you find the Samsung Internet Browser app, then tap on it to open the app’s details.
-
Tap “Storage”.
When the Samsung Internet Browser’s app info menu is displayed, tap on “Storage“.
-
Tap “Manage Space” or “Clear storage”.
Tap Clear storage (Clear data on Samsung). If Chrome instead shows Manage space, tap it to reach Clear all data. Do not choose Clear cache when you need to reset the app’s local data.
-
Tap “Clear all data”.
Tap “Clear all data” to delete all Samsung Internet Browser’s data including local sign-ins, unsynced bookmarks, and settings to reset the default settings.
-
Confirm by tapping “Ok”.
A confirmation dialog should now be displayed, detailing the components that will be restored to their default state should you continue with the reset process. To complete the restoration process, tap “Ok“.
Remove malware from Microsoft Edge for Android
To reset the Microsoft Edge for Android to its default settings, follow the below steps:
-
Open the “Settings” menu.
Tap on the “Settings” app from your phone menu or home screen.
-
Tap on “Apps”.
When the “Settings” menu opens, tap on “Apps” (or “App Manager”) to see all the installed applications on your phone.
-
Find and tap on Microsoft Edge.
The “Apps” screen will be displayed with a list of all the apps installed on your phone. Scroll through the list until you find the Microsoft Edge app, then tap on it to open the app’s details.
-
Tap “Storage”.
When the Microsoft Edge’s app info menu is displayed, tap on “Storage“.
-
Tap “Manage Space” or “Clear storage”.
Tap Clear storage (Clear data on Samsung). If Chrome instead shows Manage space, tap it to reach Clear all data. Do not choose Clear cache when you need to reset the app’s local data.
-
Tap “Clear all data”.
Tap “Clear all data” to delete all Microsoft Edge’s data including local sign-ins, unsynced bookmarks, and settings to reset the default settings.
-
Confirm by tapping “Ok”.
A confirmation dialog should now be displayed, detailing the components that will be restored to their default state should you continue with the reset process. To complete the restoration process, tap “Ok“.
STEP 3: Use Malwarebytes for Android to remove malicious apps
In this final step, we will install Malwarebytes for Android to scan and remove malicious apps from your phone or tablet.
Malwarebytes for Android can check installed apps and accessible files for threats. The free version supports manual scanning. Review the results and confirm Android’s uninstall prompts for detected malicious apps; automatic and real-time protection features depend on the plan.
-
Download Malwarebytes for Android.
You can download Malwarebytes for Android by clicking the link below.
Get Malwarebytes for AndroidOpens Google Play in a new tab.Want real-time protection? See Malwarebytes Premium for Android Malwarebytes for AndroidManual malware scan; optional paid protection features
 -
Install Malwarebytes for Android on your phone.
In the Google Play Store, tap “Install” to install Malwarebytes for Android on your device.

When the installation process has finished, tap “Open” to begin using Malwarebytes for Android. You can also open Malwarebytes by tapping on its icon in your phone menu or home screen.

-
Follow the on-screen prompts to complete the setup process
When Malwarebytes will open, you will see the Malwarebytes Setup Wizard which will guide you through a series of permissions and other setup options.
Tap Get Started, or I have a Subscription if you already pay for the app. Review any plan or trial offer before accepting it.
Follow the setup prompts to reach the dashboard. The free version supports manual scans; real-time protection and scheduled scans depend on the plan. Choose only the optional features you want.
Malwarebytes for Android will now ask for a set of permissions that are required to scan your device and protect it from malware. Tap on “Give permission” to continue.
Tap on “Allow” to permit Malwarebytes to access the files on your phone. -
Run a scan with Malwarebytes for Android
On the current dashboard, find the Device section and tap Scan now.
Allow storage access when prompted so Malwarebytes can check files as well as apps. Let the scan finish and open its results. Keep the app updated through Google Play.
-
Wait for the Malwarebytes scan to complete.
Malwarebytes will now start scanning your phone for adware and other malicious apps. This process can take a few minutes, so we suggest you do something else and periodically check on the status of the scan to see when it is finished.

-
Review the results and uninstall detected malicious apps.
On the current results screen, tap the menu next to a detected app and choose Uninstall app, then confirm Android’s uninstall prompt. Do not choose Always allow for an app you have not verified.
-
Restart your phone.
Confirm that the selected apps were uninstalled. Restart if requested, then check whether the original problem has stopped. Keep the detection details and ask for help if an app cannot be removed or comes back.
Your phone should now be free of pop-ups, spam, redirects and other malware.
If you are still having problems with your phone after completing these instructions, then please follow one of the steps:
- Restore your phone to factory settings by going to Settings > General management > Reset > Factory data reset.
- Ask for help in our Mobile Malware Removal Help & Support forum.
