

An invoice can look routine enough to survive a busy morning. That is precisely why an unfamiliar SEO bill deserves a deliberate pause.
Blue Rocket SEO notices have prompted questions from businesses that say they never ordered the listed service.
Overview
The bill arrives without a matching order
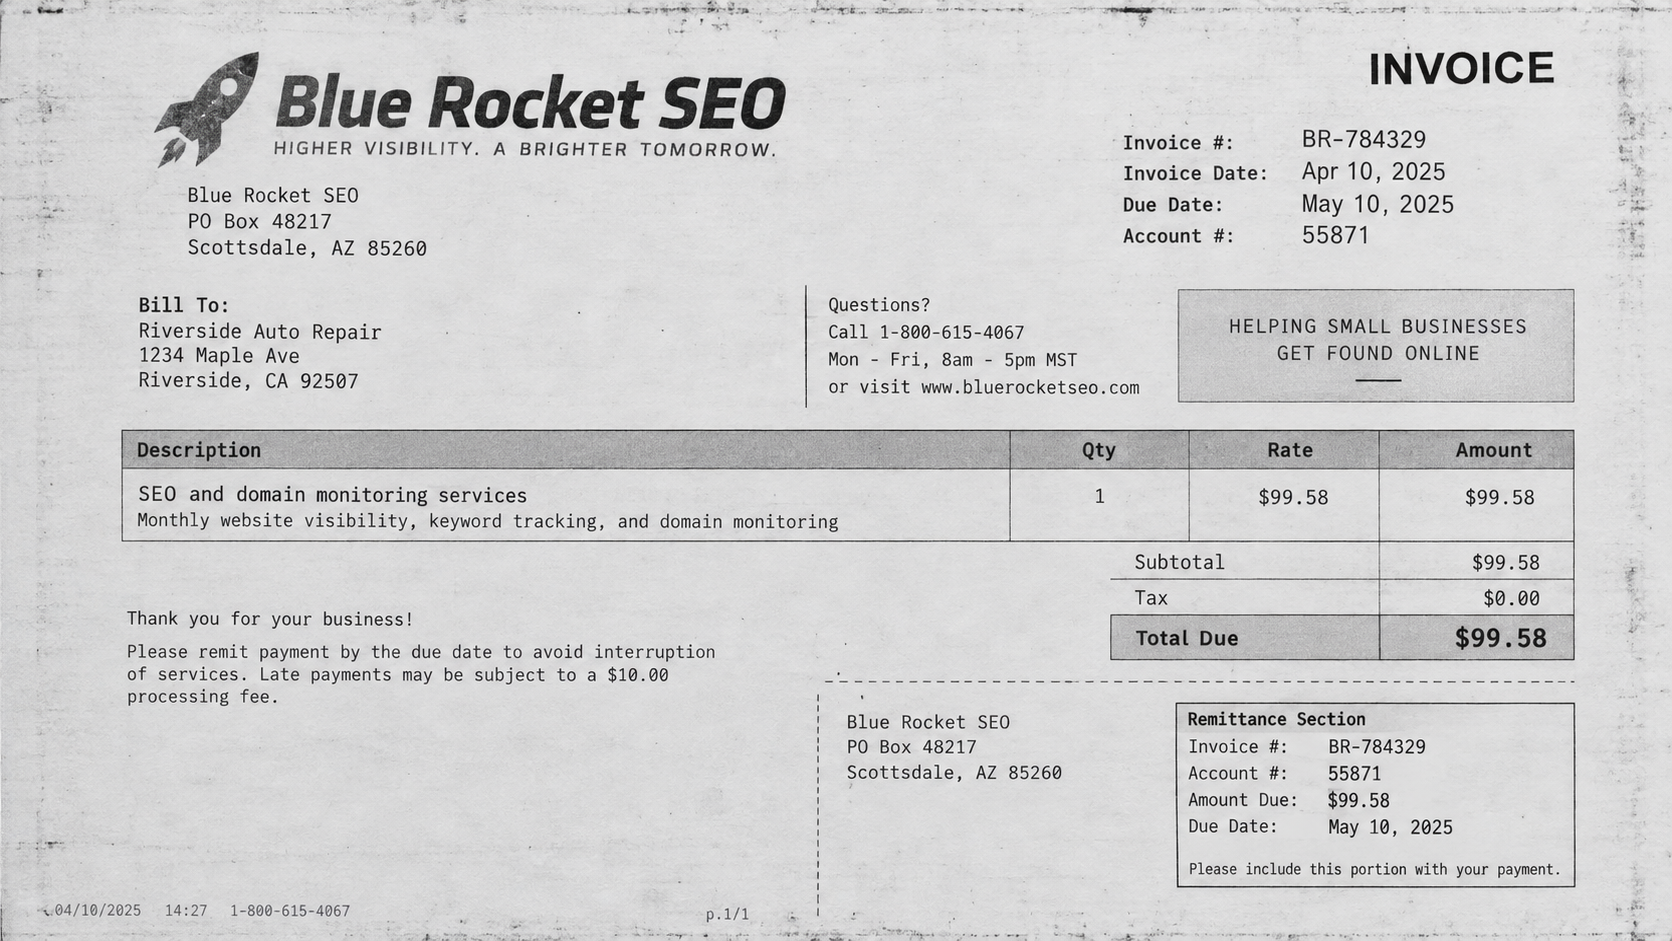
Reports describe invoices carrying the Blue Rocket SEO name and charges for search visibility, domain monitoring, or related website services.
The critical problem is not that SEO services exist. It is that recipients say their companies never approved the work.
A document can contain an invoice number, due date, remittance address, and support line while still lacking a valid purchase behind it.
The format exploits ordinary accounting habits
Accounts-payable teams process stacks of familiar-looking bills. A modest amount may receive less scrutiny than an unusually large request.
Terms like renewal, monitoring, or annual service can suggest an existing relationship that nobody wants to interrupt accidentally.
That ambiguity is useful to a deceptive sender. The document needs only one hurried employee to assume another department authorized it.
Independent warnings justify refusing automatic payment
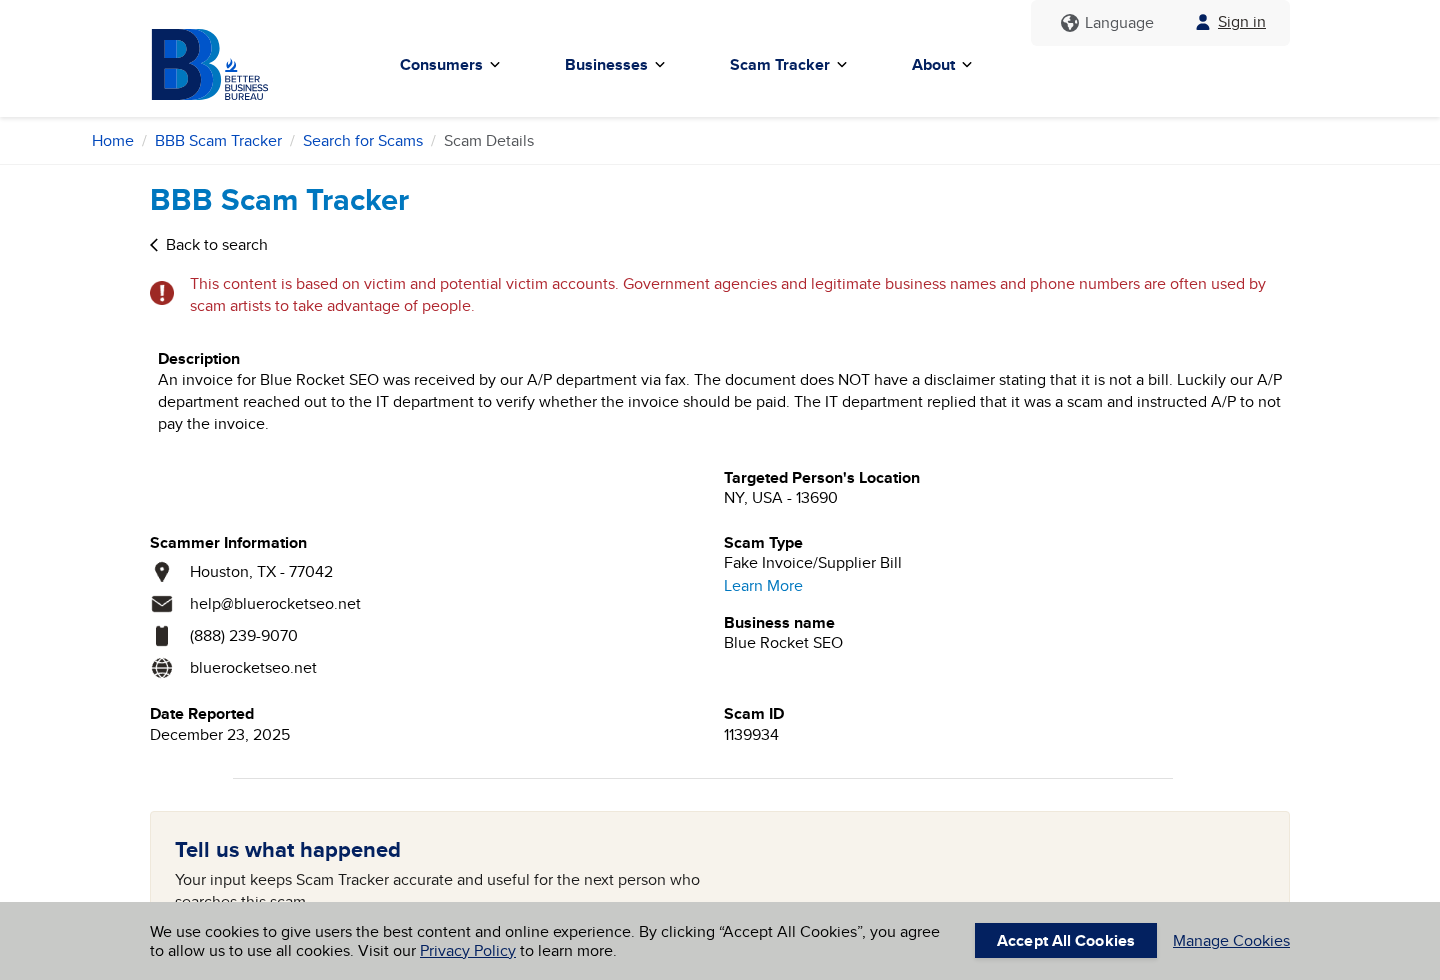
A Better Business Bureau Scam Tracker entry records a business reporting an unsolicited Blue Rocket SEO faxed invoice.
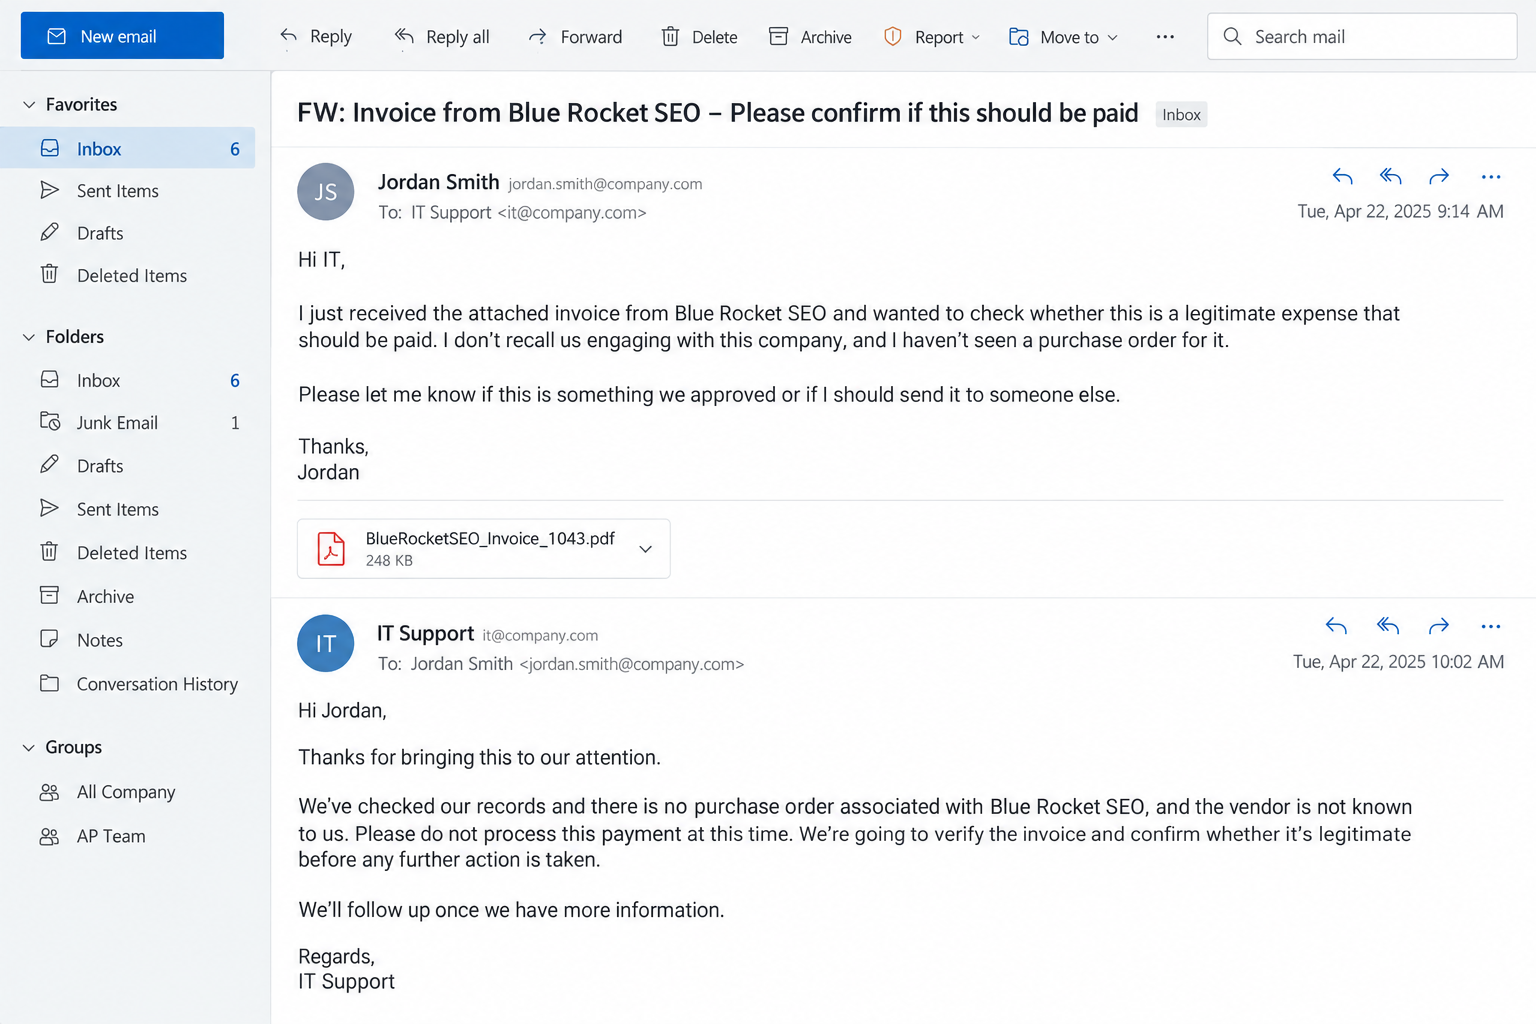
The reporting company said its accounts-payable staff checked with information technology, which instructed them not to pay.
The strongest practical conclusions are:
- An invoice is a request for payment, not evidence of a contract.
- Every unfamiliar vendor should match an approved purchase order.
- Contact details printed on the bill should be verified elsewhere.
- Low-value charges can be chosen to avoid senior review.
- Attachments may also carry phishing links or malicious files.
- Staff should report questionable bills instead of quietly discarding them.
What We Found About the Blue Rocket SEO Invoice
The available record supports a fake-invoice warning, but careful wording matters. A shared name alone cannot connect every similarly named business to one sender.
The relevant question is whether a particular invoice corresponds to a service knowingly ordered by the recipient.
If the answer is no, the document should not enter the normal payment queue, regardless of how polished it appears.
The BBB report identifies a fake supplier bill
The public report classifies the incident as a fake invoice or supplier bill and names Blue Rocket SEO.
It states that the invoice arrived by fax and lacked wording clarifying that it was merely a solicitation.
The entry lists Houston, Texas, contact details, and a website supplied by the reporter. Those fields document an allegation, not a court finding.
Public invoice material uses familiar service language
Documents circulating online present website monitoring and SEO-style line items that sound plausible to a company with an active domain.
The language is broad enough that an employee may not know whether marketing, information technology, or an outside agency requested it.
That organizational gap is the opening. A real vendor should be able to produce the order, scope, acceptance, and responsible customer contact.
The FTC describes the same broader pattern
The Federal Trade Commission warns that businesses receive bills for products or services they never ordered.
Its examples specifically include technology support, domain registration, and search engine optimization, the same categories that can confuse office staff.
The agency also notes that emailed invoices may be phishing attempts seeking access to business data or networks.
How the Blue Rocket SEO Invoice Scam Works
Step 1: The sender identifies a functioning business
Company names, addresses, domain records, staff emails, and fax numbers are often publicly available.
A sender can collect enough details to personalize a bill without ever speaking to an authorized buyer.
Small businesses are attractive because purchasing responsibilities may be shared informally across several employees.
Step 2: A modest invoice is created
The charge is often large enough to be profitable but small enough to resemble a routine operating expense.
Generic services such as monitoring, listing management, or optimization are difficult for an accounts clerk to confirm by inspection.
An invoice number and due date create administrative legitimacy without proving that any work occurred.
Step 3: The document suggests an existing relationship
Words like account, renewal, service period, and previous balance can imply that the company has paid before.
A late notice adds discomfort. Employees may fear that ignoring it could interrupt the website or create a collection issue.
That fear encourages payment first and investigation later.
Step 4: The bill reaches the department most likely to pay
Fax, postal mail, and generic billing inboxes can bypass the employees who would know whether a project was commissioned.
The sender relies on fragmented approval. Marketing assumes technology ordered it, while technology assumes an owner approved it.
A purchase-order requirement breaks that chain by forcing every invoice back to a documented decision.
Step 5: Printed contact details control verification
An employee who calls the number on the invoice reaches the same operation that sent it.
The representative may describe a verbal authorization, online enrollment, trial conversion, or directory listing that is difficult to disprove quickly.
Independent contact research is essential because the invoice cannot authenticate itself.
Step 6: Payment or data is collected
A mailed check reveals banking details and confirms the business will pay unfamiliar requests.
An online portal can collect card information, employee credentials, or a reusable business login.
An attached document may redirect to a fake Microsoft sign-in page, turning an invoice scam into a network compromise.
Step 7: Follow-up notices increase pressure
Unpaid bills may be followed by overdue statements, collection language, or phone calls claiming the account is delinquent.
Once a company pays, it may receive additional charges or appear on lists of responsive targets.
Recovery offers can emerge later, demanding another fee to cancel a service that never existed.
Why This Tactic Still Works on Experienced Businesses
Fake invoices do not need to fool everyone. They need to blend into normal office traffic long enough to reach one approval.
Remote work, staff turnover, outside contractors, and decentralized purchasing make it harder to recognize every vendor name.
SEO is especially useful camouflage because many companies use several web tools, agencies, directories, and hosting services.
The amount may stay below an approval threshold
Organizations often require extra authorization only above a fixed amount. A smaller charge can pass through a simplified workflow.
Criminals and deceptive billers understand that a $99 or $249 request may receive less attention than a $9,000 transfer.
Frequency can replace size. Sending thousands of modest invoices can produce substantial returns from a small response rate.
The service cannot be seen physically
Office supplies can be counted, and repairs can be inspected. Search optimization is intangible, ongoing, and unfamiliar to many approvers.
A vague report about keywords or monitoring may look like evidence even when it contains only public information.
Real SEO work should have a scope, access record, deliverables, responsible contact, and measurable reporting agreed before billing.
Employees are trained to avoid late payments
Paying vendors promptly is normally good practice. The invoice scam turns that discipline against the organization.
A bold due date or warning about interruption can make verification feel like an unnecessary delay.
Strong controls protect conscientious employees by making verification mandatory, not optional.
How to Check an Unfamiliar SEO Invoice
Begin with internal records. Search purchase orders, contracts, card statements, help-desk tickets, and emails for the vendor and exact service.
Ask the departments that control the website, domain, advertising, and finance. Do not assume silence means approval.
Compare the invoice name with the legal entity on any contract. Similar branding can conceal an entirely different payee.
Demand the underlying authorization
Request the signed order, date of acceptance, sales representative, customer contact, service scope, and proof of delivery.
A recording of verbal consent should include the whole conversation, not a clipped confirmation detached from its context.
If the sender cannot identify who ordered the service, the invoice has no sound basis for payment.
Inspect the technical claims
Ask the website administrator whether the alleged vendor has analytics, hosting, search-console, content-management, or domain access.
Review DNS changes, account invitations, reports, and deliverables. Search work usually leaves a trail.
Do not grant access merely so the vendor can demonstrate value after an unsolicited bill arrives.
Verify contact routes independently
Search the company name, address, phone, domain age, and complaint history without using links printed on the invoice.
Look for a consistent legal identity across the website, privacy policy, terms, state registration, and payment recipient.
Conflicting addresses or unrelated support lines should pause the process until a responsible person resolves them.
Examine email and attachment details
Hover over links, inspect the sender domain, and compare reply addresses. A display name can conceal an unrelated mailbox.
Open questionable files only within an approved security process. Invoice attachments can exploit curiosity and urgency.
Forward suspected phishing to the security team as an attachment so headers and original routing data are preserved.
What the Address, Phone, and Website Do Not Prove
An address on a bill may be a mailbox, shared office, payment processor, or location copied from another organization.
A phone number may route through a call service. A friendly representative can repeat invoice details without establishing a contract.
A professional website can be created quickly. The important question is whether its ownership, policies, and operational history remain consistent.
Public records require careful interpretation
A business registration proves an entity filed paperwork. It does not validate the truth of an individual bill.
Likewise, a missing record may reflect a trade name or different jurisdiction rather than automatically proving fraud.
Use records as pieces of a larger verification process, not as a single verdict.
Similar names can belong to unrelated businesses
Search marketing firms frequently use common words such as blue, rocket, digital, web, and SEO.
Do not accuse another company solely because its name resembles the invoice sender. Compare domain, address, phone, payee, and legal entity.
That distinction protects legitimate firms while keeping the warning focused on the documented invoice pattern.
Company, Address, and Fulfillment Checks
The legal seller must match the bill
Identify the exact entity requesting payment. Compare it with the name on the website, tax form, remittance account, and written agreement.
If those identities change across documents, require a written explanation before any funds move.
A brand label without a legal payee leaves the customer unable to determine who is responsible.
The address may be only a collection point
Search the address and inspect other occupants. Mailboxes and virtual suites can receive checks without hosting the claimed service team.
A valid commercial building still does not prove the sender performed work. It only confirms that the location exists.
Send no sensitive documents to an address until its relationship with the billing entity is established.
The support number may lead back to the sender
Calling the printed line is not independent verification. Search for contact information through a known contract or established vendor file.
Ask for a supervisor, written authorization, and a traceable service record. Record the date and substance of every response.
Silence, evasive answers, or threats without documentation strengthen the case for rejection and reporting.
SEO fulfillment should produce evidence
Legitimate work creates deliverables: audits, change logs, content, access invitations, ranking reports, invoices tied to milestones, and named account contacts.
Generic public metrics do not prove a vendor performed them. Neither does adding a business to a low-value directory without authorization.
No organization should pay for an unsolicited service merely because the sender claims some activity occurred.
How Businesses Can Stop the Next Fake Invoice
Require a purchase-order number on every invoice except narrowly documented exceptions. Configure accounting systems to reject missing references.
Maintain an approved-vendor directory with verified payment instructions. Changes should require a callback to a known contact.
Separate purchasing, receiving, and payment approval when staffing allows. One employee should not create and pay a new vendor alone.
Train staff with real examples of domain, directory, toner, utility, and SEO invoices. Familiarity makes the format less intimidating.
Create an easy internal reporting route. Employees should feel rewarded for pausing a questionable bill, even when it proves legitimate.
Review recurring payments quarterly. Small unauthorized charges can remain unnoticed when nobody owns the subscription list.
Use mailbox rules cautiously. A criminal can exploit automatic forwarding or vendor folders to keep a fake invoice away from security review.
Protect email accounts with phishing-resistant multifactor authentication where possible. Invoice fraud often begins after a mailbox compromise.
Verify bank-detail changes through a previously known telephone number. Never approve them solely from an email thread.
Preserve rejected invoices. Patterns across names, addresses, amounts, and routing can help other branches recognize future attempts.
What to Do if Your Business Paid the Invoice
- Notify the bank immediately. Request a recall, stop payment, card dispute, or fraud review based on the payment method used.
- Secure the mailbox involved. Reset credentials, review forwarding rules, revoke unknown sessions, and preserve message headers.
- Inspect the payment workflow. Determine who received, approved, and transmitted the bill without blaming the reporting employee.
- Block further transactions. Remove the payee, cancel recurring authority, and alert staff that follow-up demands may arrive.
- Document the complete record. Save the invoice, envelope, fax header, emails, check image, call notes, and bank confirmation.
- Report the incident. Submit evidence to the FTC, postal inspectors when mail was involved, and relevant state authorities.
- Warn impersonated parties. If another established company was copied, contact it through independently verified channels.
- Check systems for compromise. Run Malwarebytes on devices that opened attachments and have administrators review security logs.
- Reduce exposure to repeat ads. AdGuard can limit malicious advertising and tracking, while business controls address the payment failure.
- Expect recovery approaches. Refuse any stranger promising guaranteed reimbursement after another upfront payment.
Is Your Device Infected? Run a Free Malware Scan
Slow performance, constant pop-ups, or strange behavior? These are classic signs of a malware infection. The fastest way to find out is to scan your device with Malwarebytes Free — one of the most trusted malware removal tools available.
The free version detects and removes the most common threats, including:
- Adware — the cause of those annoying pop-ups
- Browser hijackers — unwanted redirects and changed homepages
- Trojans and spyware — hidden programs stealing your data
- Potentially unwanted programs (PUPs) — software you never asked for
👉 Select your device below — Windows, Mac, or Android — then follow the simple steps to download Malwarebytes, scan your system, and remove any threats it finds. The scan usually takes 5 to 20 minutes.
Run a Malware Scan with Malwarebytes for Windows
Malwarebytes is one of the most popular and trusted anti-malware tools for Windows — and it’s completely free for removing infections. It catches threats that many antivirus programs miss, including adware, browser hijackers, and trojans. Follow the steps below to scan and clean your PC in just a few minutes.
Download Malwarebytes
Click the button below to download the latest version of Malwarebytes for Windows from the official source. The free version is all you need — it will scan your computer and remove adware, browser hijackers, and other malicious software at no cost.
Download MalwarebytesOfficial installer for Windows 11 and 10. Your download starts right away.Want real-time protection? See Malwarebytes Premium Malwarebytes Free for WindowsScans and removes malware at no cost
-
Install Malwarebytes
When the download finishes, open your Downloads folder and double-click the MBSetup file. If Windows shows a User Account Control pop-up, click “Yes” to allow the installation.

Follow the On-Screen Prompts to Install Malwarebytes
The setup wizard will walk you through a few quick screens:
-
Choose where you’re installing the program — “Personal Computer” or “Work Computer” — then click Next.

-
Malwarebytes will now install on your device. This usually takes under a minute.

-
When installation is complete, the “Welcome to Malwarebytes” screen will open automatically.

-
On the final screen, click Open Malwarebytes to launch the program.

-
Enable “Scan for Rootkits”
Before scanning, turn on rootkit detection so Malwarebytes can find even the most hidden threats. Click the Settings gear icon on the left side of the screen.

In the settings menu, find “Scan for rootkits” and click the toggle so it turns blue.

Done? Click “Dashboard” in the left pane to return to the main screen.
Start the Scan
Click the blue Scan button. Malwarebytes will automatically update its virus database and start checking your computer for malware.

-
Wait for the Scan to Finish
The scan checks your entire system for browser hijackers and other malicious programs, so it can take 5 to 20 minutes depending on your computer. Feel free to do something else — just check back occasionally to see the progress.

-
Quarantine the Detected Threats
When the scan is done, you’ll see a list of everything Malwarebytes found — malware, adware, and potentially unwanted programs. Click the “Quarantine” button to remove all of them at once.

Malwarebytes will now remove the malicious files and registry entries and move them safely into quarantine.

-
Restart Your Computer
Some threats can only be fully removed after a reboot. If Malwarebytes asks you to restart, click Yes. Once you’re logged back in, Malwarebytes has finished removing the threats it found.

That’s it — your Windows PC is now clean of trojans, adware, and other malware, and should be back to running smoothly.
If you are still having problems with your computer after completing these instructions, then please follow one of the steps:
- Run a computer scan with ESET Online Scanner
- Ask for help in our Windows Malware Removal Help & Support forum.
Run a Malware Scan with Malwarebytes for Mac
Malwarebytes for Mac is a free on-demand scanner that removes the malware other security software tends to miss — adware, browser hijackers, and unwanted programs included. Cleaning an infected Mac with Malwarebytes has always been completely free, and it’s our go-to recommendation. Follow the steps below to scan and clean your Mac in just a few minutes.
-
Download Malwarebytes for Mac
Click the button below to download the latest version of Malwarebytes for Mac.
Download MalwarebytesOfficial installer for macOS. Your download starts right away.Want real-time protection? See Malwarebytes PremiumMalwarebytes Free for MacScans and removes malware at no cost -
Open the Malwarebytes setup file
When the download finishes, open your Downloads folder and double-click the setup file to begin the installation.

-
Follow the On-Screen Prompts to Install Malwarebytes
The Malwarebytes for Mac Installer will guide you through a few quick screens. Click “Continue” and keep following the prompts until the installation completes.



When the installation is complete, Malwarebytes opens to the Welcome to Malwarebytes screen. Click “Get started“.
-
Select “Personal Computer” or “Work Computer”
Malwarebytes will ask what type of computer you’re installing it on. Click either Personal Computer or Work Computer, whichever applies.

-
Start the Scan
Click the “Scan” button. Malwarebytes will automatically update its detection database and begin checking your Mac for malware.

-
Wait for the Scan to Finish
Malwarebytes will scan your Mac for adware, browser hijackers, and other malicious programs. This can take a few minutes, so feel free to do something else — just check back occasionally to see the progress.

-
Quarantine the Detected Threats
When the scan is done, you’ll see a list of everything Malwarebytes found. Click the “Quarantine” button to remove all the threats at once.

-
Restart Your Mac
Malwarebytes will now remove all the malicious files it found. Some threats can only be fully removed after a reboot — if Malwarebytes asks you to restart, allow it. Once you’re logged back in, your Mac is clean.

That’s it — your Mac is now free of adware, rogue browser extensions, and other potentially harmful software.
If you are still experiencing problems while trying to remove a malicious program from your computer, please ask for help in our Mac Malware Removal Help & Support forum.
Run a Malware Scan with Malwarebytes for Android
Malwarebytes for Android automatically detects and removes dangerous threats like malware and ransomware so you don’t have to worry about your most-used device being compromised. Aggressive detection of adware and potentially unwanted programs keeps your Android phone or tablet running smooth.
-
Download Malwarebytes for Android.
You can download Malwarebytes for Android by clicking the link below.
Get Malwarebytes for AndroidOpens Google Play in a new tab.Want real-time protection? See Malwarebytes Premium for AndroidMalwarebytes for AndroidScans your phone and removes malware at no cost -
Install Malwarebytes for Android on your phone.
In the Google Play Store, tap “Install” to install Malwarebytes for Android on your device.

When the installation process has finished, tap “Open” to begin using Malwarebytes for Android. You can also open Malwarebytes by tapping on its icon in your phone menu or home screen.

-
Follow the on-screen prompts to complete the setup process
When Malwarebytes will open, you will see the Malwarebytes Setup Wizard which will guide you through a series of permissions and other setup options.
This is the first of two screens that explain the difference between the Premium and Free versions. Swipe this screen to continue.
Tap on “Got it” to proceed to the next step.
Malwarebytes for Android will now ask for a set of permissions that are required to scan your device and protect it from malware. Tap on “Give permission” to continue.
Tap on “Allow” to permit Malwarebytes to access the files on your phone.
-
Update database and run a scan with Malwarebytes for Android
You will now be prompted to update the Malwarebytes database and run a full system scan.

Click on “Update database” to update the Malwarebytes for Android definitions to the latest version, then click on “Run full scan” to perform a system scan.

-
Wait for the Malwarebytes scan to complete.
Malwarebytes will now start scanning your phone for adware and other malicious apps. This process can take a few minutes, so we suggest you do something else and periodically check on the status of the scan to see when it is finished.

-
Click on “Remove Selected”.
When the scan has been completed, you will be presented with a screen showing the malware infections that Malwarebytes for Android has detected. To remove the malicious apps that Malwarebytes has found, tap on the “Remove Selected” button.

-
Restart your phone.
Malwarebytes for Android will now remove all the malicious apps that it has found. To complete the malware removal process, Malwarebytes may ask you to restart your device.
That’s it — your Android phone is now clean — no more malicious apps, adware, or browser redirects.
If you are still having problems with your phone after completing these instructions, then please follow one of the steps:
- Restore your phone to factory settings by going to Settings > General management > Reset > Factory data reset.
- Ask for help in our Mobile Malware Removal Help & Support forum.
Stay Protected: Block Ads and Malicious Sites
Now that your device is clean, keep it that way. Most infections start with a malicious ad or a fake download button — so blocking them at the source is your best defense.
We recommend AdGuard, which blocks malicious ads, phishing pages, and dangerous redirects before they can reach you.
👉 Download AdGuard and browse safely
Frequently Asked Questions
Is every Blue Rocket SEO business connected to this invoice?
No. Similar names may belong to unrelated organizations. Match the domain, address, phone, payee, and document before drawing conclusions.
This warning concerns unsolicited invoices matching the reported pattern.
Can an invoice create a legal obligation by itself?
An invoice normally reflects an underlying agreement; it does not create one simply by arriving.
Businesses should seek legal advice for disputed demands, especially when collection threats appear.
What if the sender says an employee approved by phone?
Request the full recording, date, number called, employee identity, disclosed terms, and proof that the person had purchasing authority.
Do not accept a short edited clip as complete evidence.
Should we call the telephone number on the bill?
Use independently located contact information first. The printed number returns you to the party whose identity is under review.
If you call, disclose no credentials or banking data.
Could an emailed SEO invoice contain malware?
Yes. Attachments and payment links can deliver malicious files or credential-stealing pages.
Submit suspicious messages through the company’s security process rather than opening them on a production workstation.
What is the fastest internal check?
Match the bill to an approved purchase order and a known business owner. If neither exists, place it on hold.
That single rule stops many supplier-bill schemes.
The Bottom Line
A polished Blue Rocket SEO invoice does not prove that services were ordered. Public reporting shows why businesses should demand the underlying authorization.
Pause the bill, verify every detail independently, preserve the evidence, and strengthen purchasing controls before another modest charge slips through.








