


A supplier-looking email says a deposit has been made against a signed contract. A PDF preview and familiar cloud-storage wording make the message feel operational.
For someone handling projects, sales, or accounts, opening the receipt seems responsible. The document’s locked appearance gives that instinct a dangerous direction.
Overview
The email impersonates an ordinary contract payment exchange
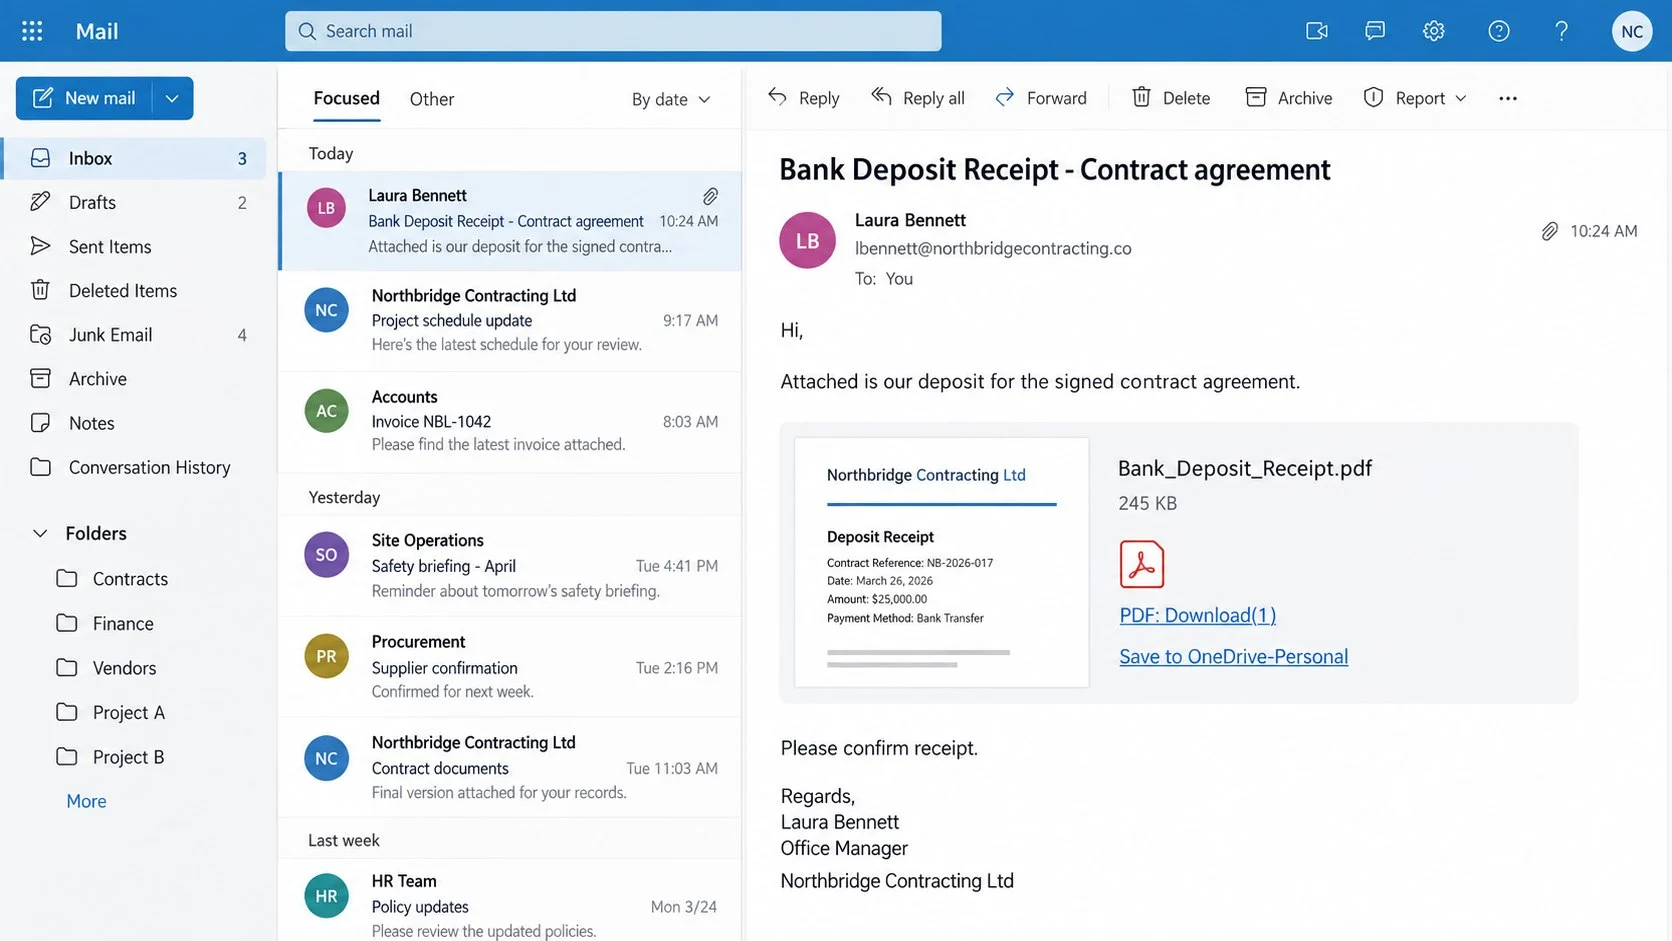
The Contract Deposit Receipt email claims to come from an office manager sending proof of payment for a signed agreement.
Its subject resembles routine business correspondence: “Bank Deposit Receipt – Contract agreement.”
The body asks the recipient to confirm receipt and invites questions, language that fits naturally inside purchasing, construction, consulting, and supplier workflows.
An inline bank-transfer preview, PDF label, and “Save to OneDrive-Personal” link supply visual detail without delivering a genuine document.
The supposed PDF opens an outside document page
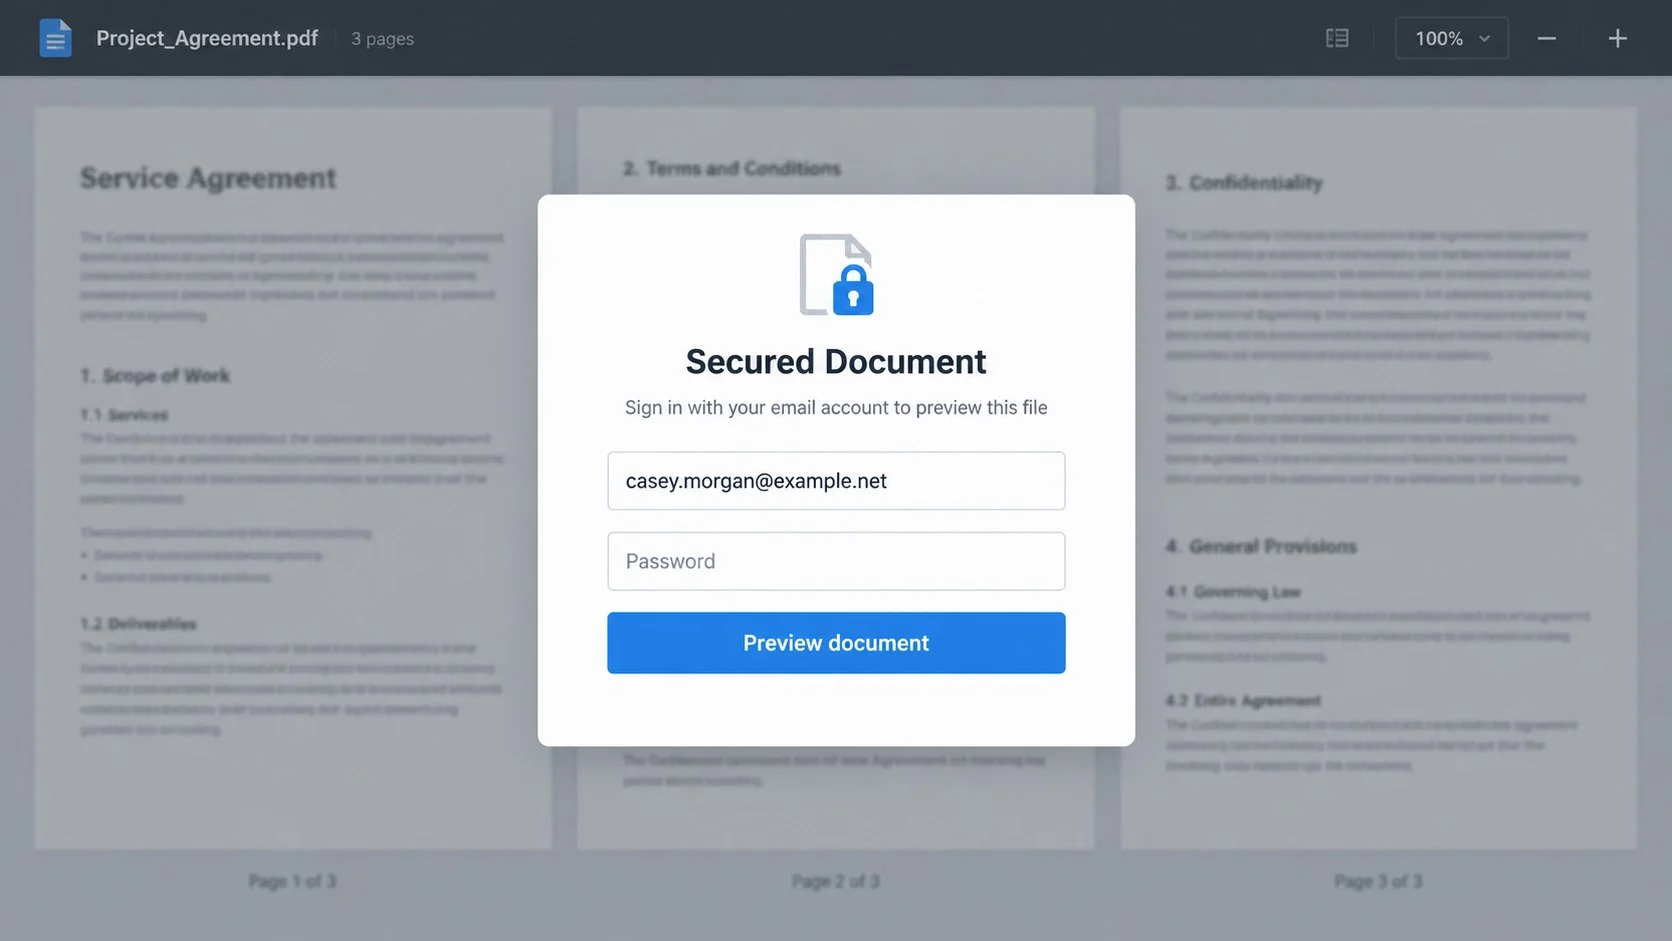
Clicking the download control does not simply retrieve a neutral PDF. It opens a web page that presents a blurred, multi-page contract viewer.
One observed campaign used sharemyhtml[.]com, a legitimate HTML-sharing service that was abused to display deceptive content.
A “Secured Document” dialog blocks the preview and says the visitor must sign in with an email account.
The page requests an email address and password, even though opening an ordinary shared contract should not require surrendering mailbox credentials to an unrelated host.
The professional details support a credential trap
The campaign borrows the name of a real contracting firm, but that does not connect the company to the message.
Abused company names and legitimate hosting platforms can make a phishing chain appear safer than an obviously random website.
Key warning signs include:
- An unexpected payment tied to no recognized contract.
- A sender domain that does not match the named company.
- A document preview presented as a link rather than an attached receipt.
- Cloud-storage language that does not open the named service.
- An outside HTML-sharing page used as the document host.
- A locked preview requiring an email password.
- No independent confirmation from the alleged sender or finance contact.
Why Contract and Deposit Messages Receive Fast Attention
Business email is filled with attachments, signatures, payment notices, purchase orders, and links to shared documents.
That normal traffic gives phishers cover. A message can look unfamiliar while still seeming plausible to someone managing several customers or projects.
The word “deposit” suggests money has already moved. Recipients may worry that delaying acknowledgment could hold an order or damage a commercial relationship.
A bank-transfer preview adds implied evidence without requiring the scammer to produce a usable financial record.
The request to confirm receipt creates social pressure. A conscientious employee may open the document before checking whether anyone expected it.
Separating the business claim from the technical link is essential. A convincing transaction story does not authenticate the page collecting credentials.
How the Contract Deposit Receipt Email Scam Works
Step 1: The message enters a business workflow
The campaign targets addresses likely to handle sales, accounts, procurement, administration, estimates, or general inquiries.
Public company websites often list these mailboxes because customers and suppliers genuinely need them.
The sender adopts an office-manager identity and a plausible contracting company name.
Nothing in the opening paragraph sounds sensational. That restraint helps the message resemble everyday commercial correspondence.
Step 2: A financial document supplies urgency and authority
The email says a deposit was made for a signed contract connected to an order request.
An apparent SWIFT or bank-transfer preview encourages the recipient to assume that a financial institution has already processed the payment.
The message may list a file size and use a PDF icon to imitate a normal attachment.
However, the “download” element is a web link. The visual representation does not prove that a PDF exists.
Step 3: Familiar cloud language disguises the destination
Labels such as “Save to OneDrive-Personal” borrow trust from a known cloud product even when the underlying link leads elsewhere.
The visible text and destination can be entirely different. Email HTML allows any label to point to any URL.
Redirects may further conceal the final host and make the first link appear temporary or harmless.
Hovering can reveal a mismatch, but the safer response is to verify the transaction with the sender through established contact information.
Step 4: A fake viewer makes the document appear protected
The landing page displays blurred contract pages behind a modal window, creating the impression that useful content exists just out of reach.
The “Secured Document” label reframes the password request as document protection rather than account sign-in.
A legitimate shared file might require authentication to the actual storage provider. It should not collect the mailbox password through an unrelated HTML page.
The locked preview is stage scenery. It keeps the visitor focused on overcoming access rather than questioning the host.
Step 5: The form captures business email credentials
The dialog asks for an email address and password to unlock the preview.
After submission, the page may claim the password was wrong, show a loading animation, or redirect to a harmless site.
Those responses can be scripted after the entered values are transmitted. A second attempt may capture an additional password.
Business credentials are particularly valuable because the inbox contains real contracts, suppliers, payment conversations, and organizational relationships.
Step 6: Mailbox access enables payment and document fraud
An attacker can monitor conversations until a genuine invoice or transfer is expected.
They may then insert new bank details, send revised documents, or impersonate the employee to customers and suppliers.
Hidden forwarding and message rules can preserve visibility while suppressing warnings and replies.
The original fake deposit is only the entry point. The larger risk is fraud conducted inside authentic business conversations.
Sender, Company, Document Host, and Payment Verification Checks
Match the sender to a real commercial relationship
Search internal records for the named company, contact, contract number, order, project, and expected deposit before opening anything.
Compare the full sender domain with the organization’s verified website and prior correspondence.
A correct company name in the signature is not proof. Names, titles, addresses, and logos are easy to copy from public pages.
Contact the organization using a known telephone number or an existing email thread, not the details introduced by the suspicious message.
Verify the named business without blaming the impersonated firm
A real business may be mentioned without its involvement. The scammer benefits when the recipient mistakes name recognition for sender verification.
Do not publish accusations or confront an employee before confirming whether the address, domain, and transaction are genuine.
Ask the known company contact whether a deposit was sent and which secure method they normally use for document exchange.
If the answer is no, provide the impersonated company with the message headers so it can warn staff and customers.
Treat an unexpected document host as a separate identity
A legitimate platform can be abused by users, compromised accounts, or deceptive pages. Platform familiarity does not authenticate uploaded content.
Check whether the link truly opens the service named in the message and whether that service ordinarily requests this type of sign-in.
An HTML-sharing page is not a bank, contracting company, email provider, or standard protected-document system.
Never enter organizational credentials simply because the host uses HTTPS or displays a convincing viewer.
Confirm the payment through financial records
Finance staff should verify the deposit against the bank ledger, accounting platform, contract schedule, and known customer reference.
A picture of a transfer is not settlement. Even authentic receipts can be altered, canceled, or associated with another transaction.
Do not release goods, start work, issue refunds, or change account balances based solely on an emailed preview.
When payment details differ from established records, pause the process and use a second communication channel.
Why a Locked Document Should Increase Caution
Security language can make a strange request appear more responsible. “Protected,” “encrypted,” and “secured” are descriptions, not evidence.
A legitimate encrypted attachment may require a separate password shared through another channel. It should not request the password protecting your email account.
A real cloud service authenticates users on its own recognized domain and can be opened independently before accepting an invitation.
Blurred pages do not prove a file exists. A single background image can simulate a complete document library.
Ask four questions before signing in:
- Was this document expected from this person?
- Does the sender domain match verified company records?
- Does the link open the service named in the message?
- Why would this host need the mailbox password?
- Can the transaction be confirmed without the link?
Business Damage After a Mailbox Takeover
A compromised business inbox gives attackers context unavailable in a random email list.
They can learn invoice timing, payment approval routines, supplier language, project names, employee roles, and customer expectations.
Existing threads allow subtle interference. A one-line change to bank details can appear inside months of authentic correspondence.
Attackers may register a lookalike domain for replies while monitoring the real inbox for resistance.
They can also send additional credential traps from the genuine address, extending the compromise to partners.
Potential consequences include:
- Payments redirected to attacker-controlled accounts.
- Confidential contracts and customer records stolen.
- Fraudulent files sent to trusted partners.
- Password resets for cloud and financial services.
- Reputational damage from messages sent through the account.
- Regulatory and contractual notification obligations.
What Finance and Security Teams Should Check
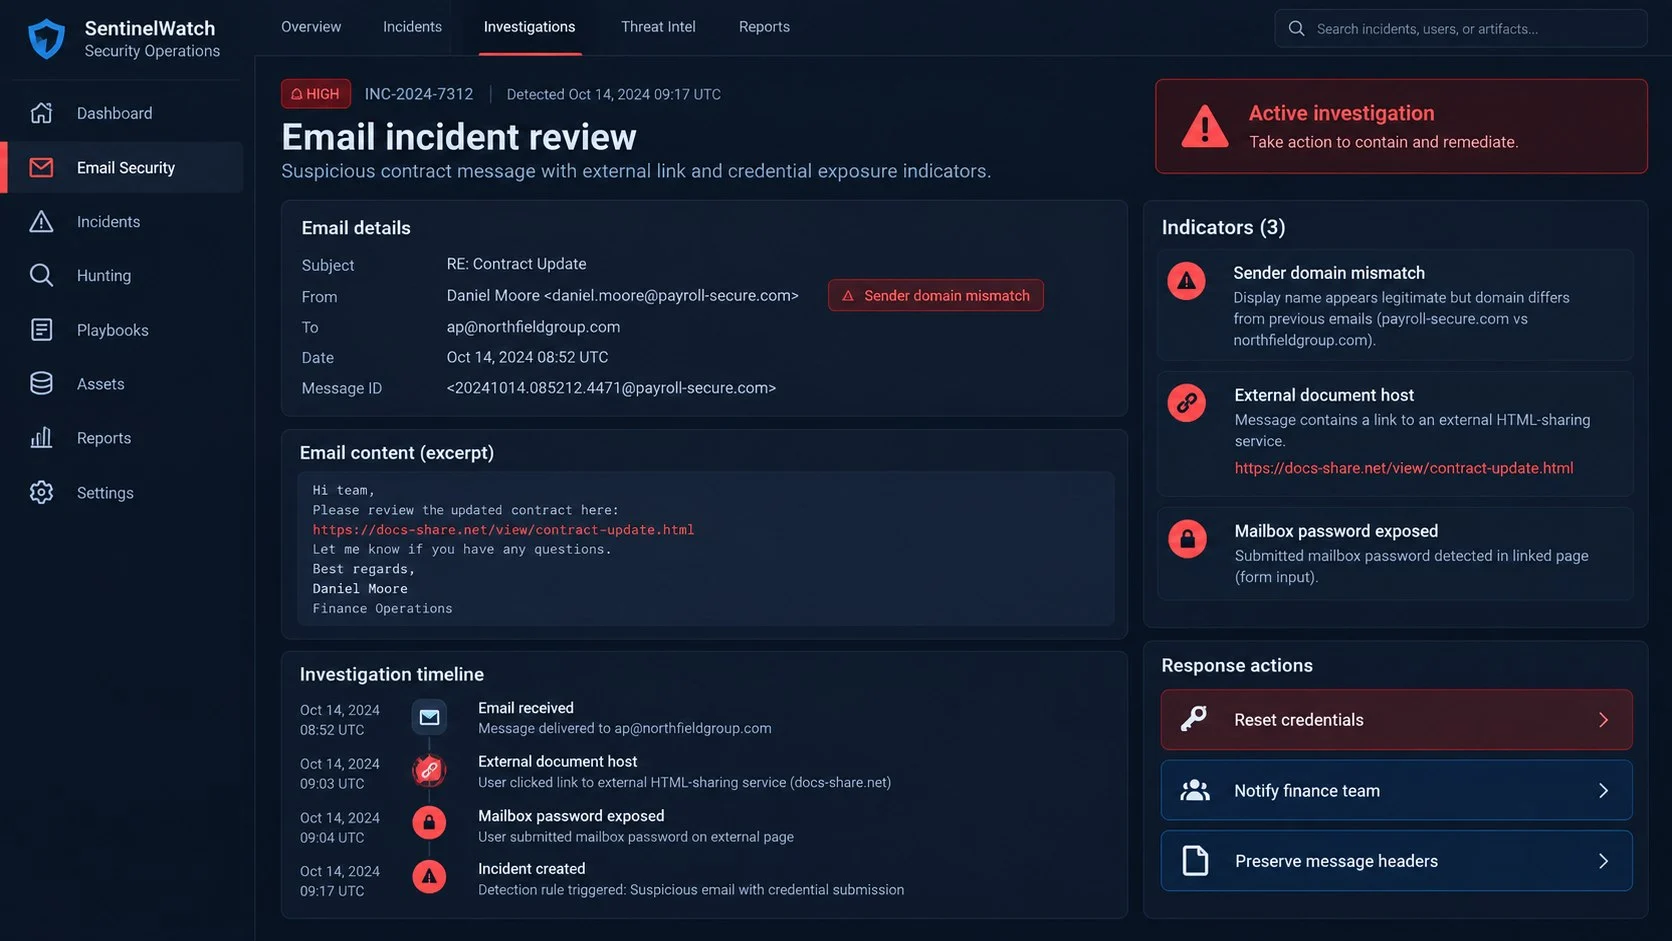
Preserve the original email in a format retaining complete headers. Screenshots alone omit routing and authentication evidence.
Identify everyone who received, opened, forwarded, or interacted with the link. Do not assume only the reporting user was targeted.
Review sign-ins, session tokens, forwarding, inbox rules, OAuth grants, delegates, application passwords, and recovery changes around the interaction time.
Search for messages from the compromised account and related domains. Determine whether payment instructions or documents were sent externally.
Finance should pause unusual transfers and confirm recent changes through established telephone contacts.
Notify legal, privacy, insurers, customers, or authorities when the exposed data and applicable obligations require it.
What to Do if You Have Fallen Victim to This Scam
- Stop interacting with the viewer. Close the page and record the URL. Do not submit another password to overcome an invented error.
- Change the business email password. Use the official provider from a trusted device and create a unique credential with no relationship to the exposed one.
- Revoke active access. End sessions, remove unknown devices, delete app passwords, and revoke unfamiliar connected applications or OAuth grants.
- Audit the mailbox thoroughly. Inspect forwarding, inbox rules, delegates, recovery methods, signatures, automatic replies, Sent, Trash, Archive, and deleted items.
- Escalate inside the organization. Notify security, IT, finance, management, privacy, and legal teams according to the incident-response plan.
- Protect payment processes. Review recent invoices, bank-detail changes, approvals, transfers, and supplier communications for unauthorized activity.
- Contact partners through trusted channels. Warn affected customers or suppliers if deceptive messages were sent from the account or inserted into active threads.
- Change reused passwords. Secure cloud storage, accounting platforms, collaboration tools, remote access, and any service sharing the exposed credential.
- Run Malwarebytes where file exposure occurred. Scan devices that downloaded content, opened unusual files, installed extensions, or displayed unexpected behavior.
- Block repeat malicious routes. AdGuard can filter many known phishing pages and harmful advertisements, complementing mail, browser, and endpoint defenses.
- Preserve evidence and report quickly. Save headers, logs, URLs, screenshots, transaction records, and affected correspondence for providers, banks, insurers, and investigators.
Is Your Device Infected? Run a Free Malware Scan
Slow performance, constant pop-ups, or strange behavior? These are classic signs of a malware infection. A quick way to check is to scan your device with Malwarebytes Free, one of the most trusted malware removal tools available. If you only visited a scam page and didn’t download or install anything, this scan is optional.
The free version detects and removes the most common threats, including:
- Adware — the cause of those annoying pop-ups
- Browser hijackers — unwanted redirects and changed homepages
- Trojans and spyware — hidden programs stealing your data
- Potentially unwanted programs (PUPs) — software you never asked for
👉 Select your device below — Windows, Mac, or Android — then follow the simple steps to download Malwarebytes, scan your system, and remove any threats it finds. The scan usually takes 5 to 20 minutes.
Run a Malware Scan with Malwarebytes for Windows
Malwarebytes is one of the most popular and trusted anti-malware tools for Windows — and it’s completely free for removing infections. It catches threats that many antivirus programs miss, including adware, browser hijackers, and trojans. Follow the steps below to scan your PC and remove what Malwarebytes finds.
Download Malwarebytes
Click the button below to download the latest version of Malwarebytes for Windows from the official source. The free version is all you need — it will scan your computer and remove adware, browser hijackers, and other malicious software at no cost.
Download MalwarebytesOfficial installer for Windows 11 and 10. Your download starts right away.Want real-time protection? See Malwarebytes Premium Malwarebytes Free for WindowsScans and removes malware at no cost
-
Install Malwarebytes
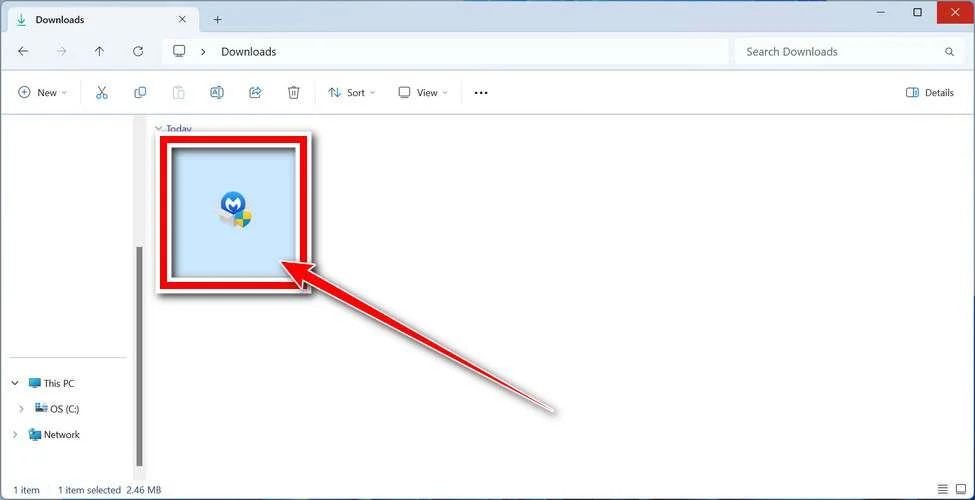
When the download finishes, open your Downloads folder and double-click the MBSetup file. If Windows shows a User Account Control pop-up, click “Yes” to allow the installation.
Follow the On-Screen Prompts to Install Malwarebytes
The setup wizard will walk you through a few quick screens:
-
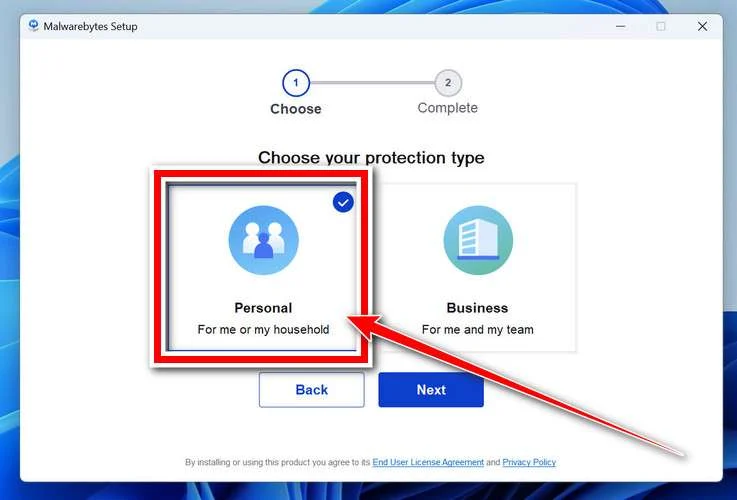
Choose where you’re installing the program — “Personal Computer” or “Work Computer” — then click Next.
-
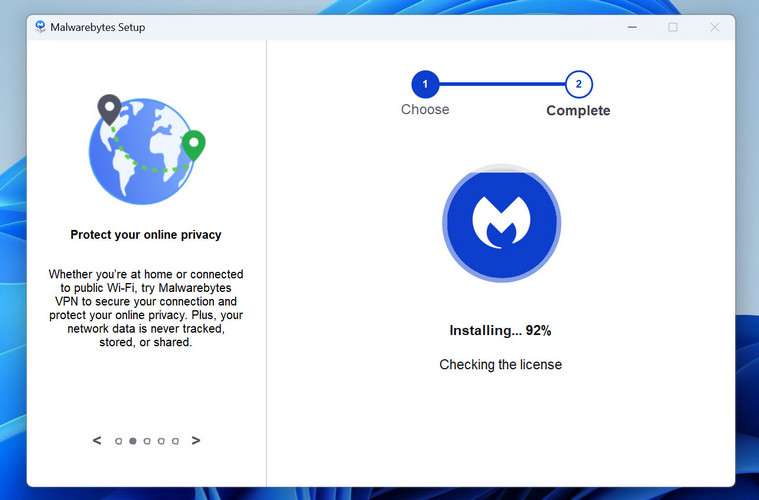
Malwarebytes will now install on your device. This usually takes under a minute.
-
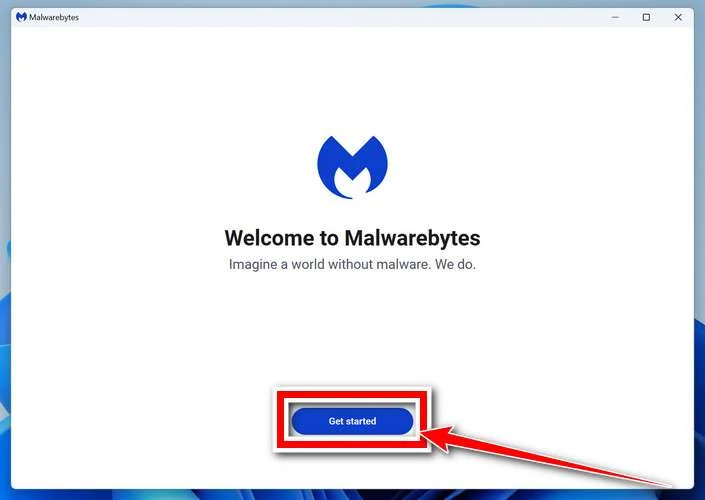
When installation is complete, the “Welcome to Malwarebytes” screen will open automatically.
-
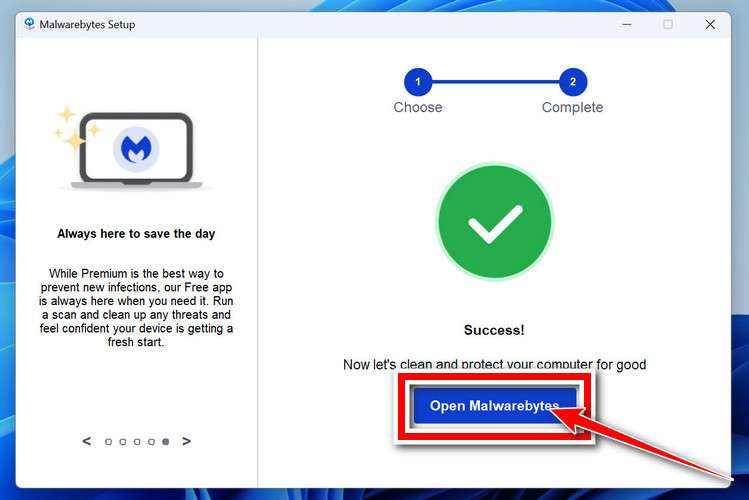
On the final screen, click Open Malwarebytes to launch the program.
-
Optional: Check for rootkits with a Custom Scan
You don’t need to change any settings for a normal scan. The standard Threat Scan in the next step is enough for most problems, so you can go straight to it.
If you also want to check for rootkits, use a Custom Scan. In current versions of Malwarebytes, rootkit scanning is only available there:
- On the Scanner tile, click the three-dot menu and select Advanced Scan.
- Choose Custom Scan. In its options, check Scan for rootkits.
- Select your system drive (usually C:\) as the location to scan, then start the scan. It takes longer than a Threat Scan.
- When it finishes, review and quarantine the results as described in the steps below.
Rootkit scanning isn’t available on Windows devices with ARM processors.
Start the Scan
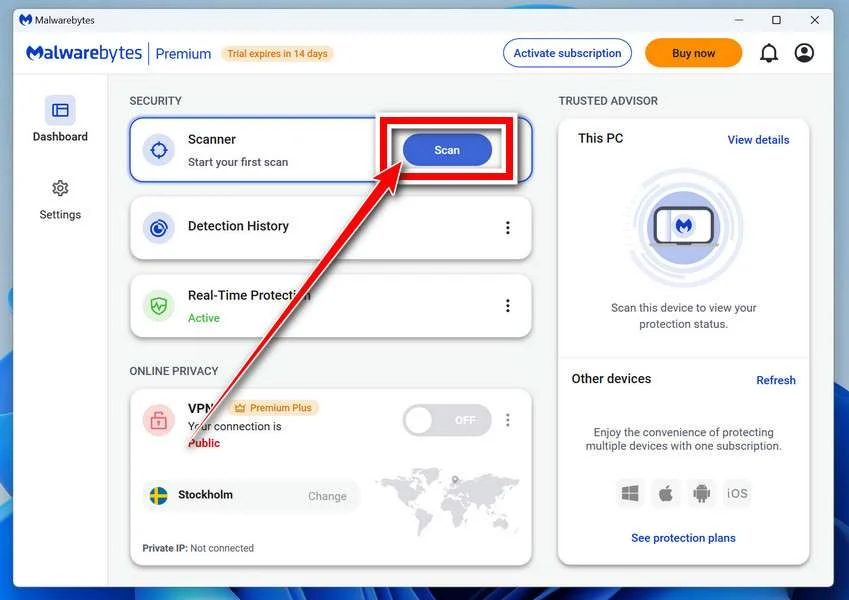
Click the blue Scan button. Malwarebytes will automatically update its virus database and start checking your computer for malware.
-
Wait for the Scan to Finish
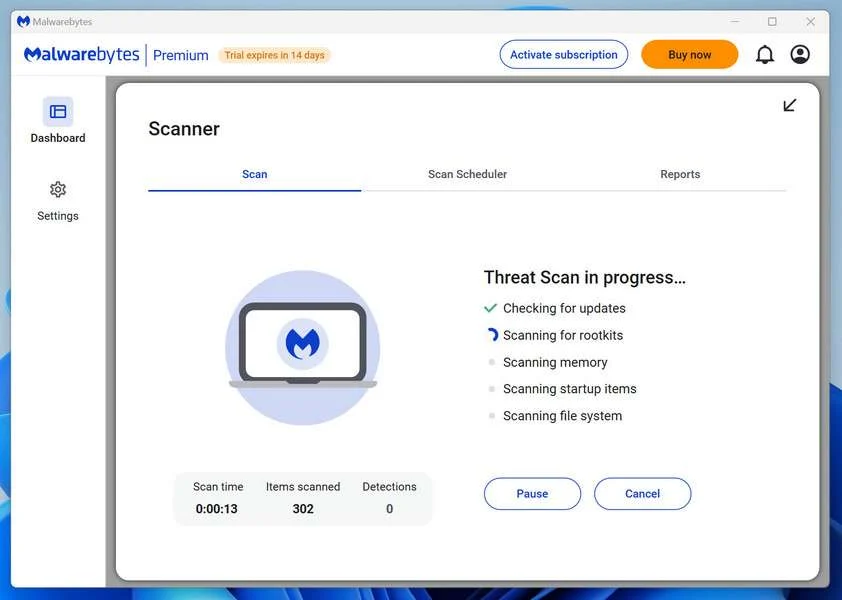
The scan checks your entire system for browser hijackers and other malicious programs, so it can take 5 to 20 minutes depending on your computer. Feel free to do something else — just check back occasionally to see the progress.
-
Quarantine the Detected Threats
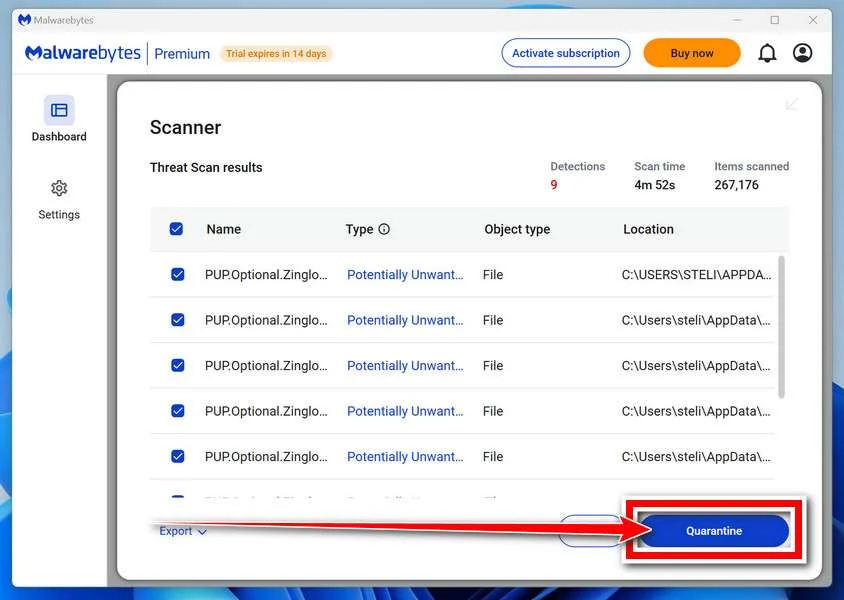
When the scan is done, you’ll see a list of everything Malwarebytes found — malware, adware, and potentially unwanted programs. Click the “Quarantine” button to remove all of them at once.
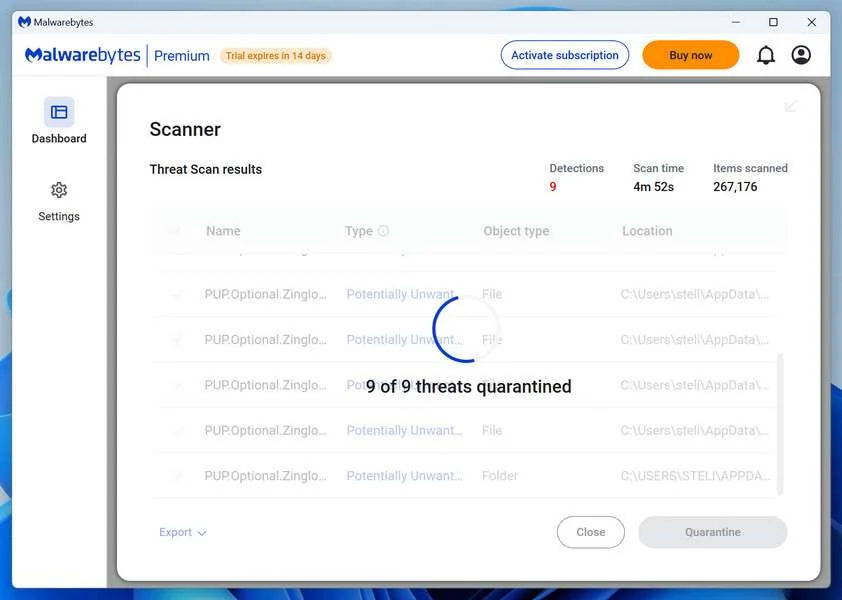
Malwarebytes will now remove the malicious files and registry entries and move them safely into quarantine.
-
Restart Your Computer
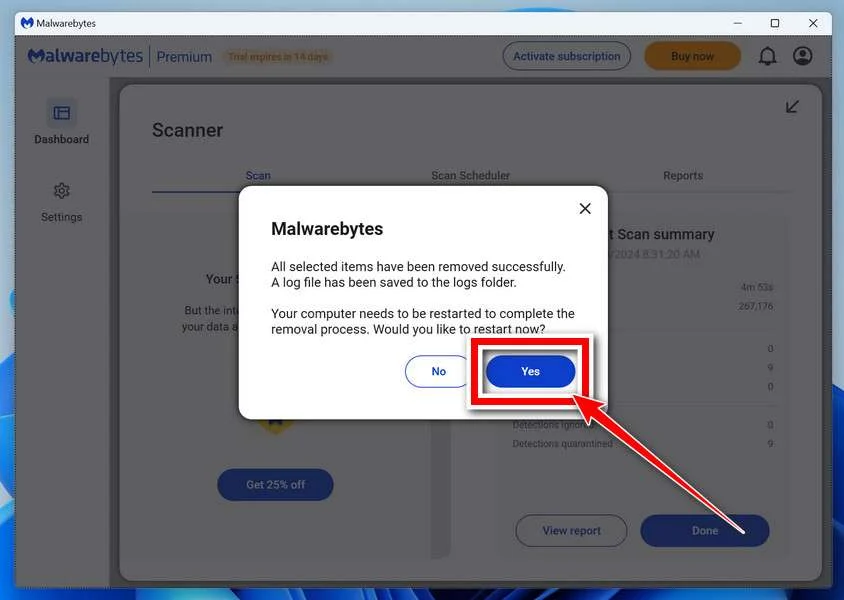
Some threats can only be fully removed after a reboot. If Malwarebytes asks you to restart, click Yes. Once you’re logged back in, Malwarebytes has finished removing the threats it found.
When the scan is done, check whether the problems you noticed have stopped. If they continue, see the options below.
If you are still having problems with your computer after completing these instructions, then please follow one of the steps:
- Run a computer scan with ESET Online Scanner
- Ask for help in our Windows Malware Removal Help & Support forum.
Run a Malware Scan with Malwarebytes for Mac
Malwarebytes for Mac is a free on-demand scanner that removes the malware other security software tends to miss — adware, browser hijackers, and unwanted programs included. Cleaning an infected Mac with Malwarebytes has always been completely free, and it’s our go-to recommendation. Follow the steps below to scan your Mac and remove what Malwarebytes finds.
-
Download Malwarebytes for Mac
Click the button below to download the latest version of Malwarebytes for Mac.
Download MalwarebytesOfficial installer for macOS. Your download starts right away.Want real-time protection? See Malwarebytes PremiumMalwarebytes Free for MacScans and removes malware at no cost -
Open the Malwarebytes setup file
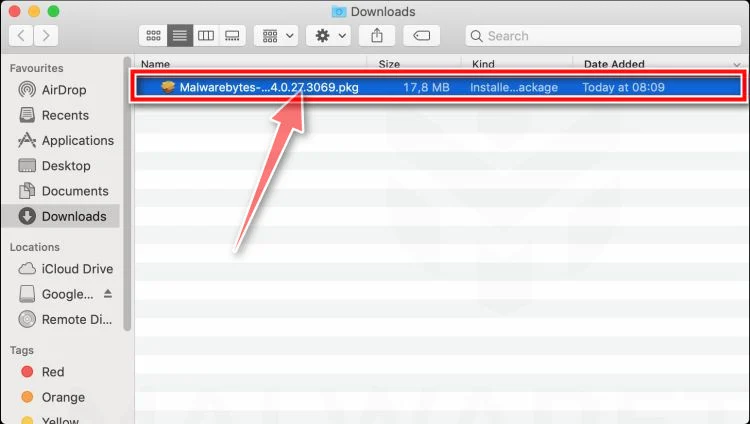
When the download finishes, open your Downloads folder and double-click the setup file to begin the installation.
-
Follow the On-Screen Prompts to Install Malwarebytes
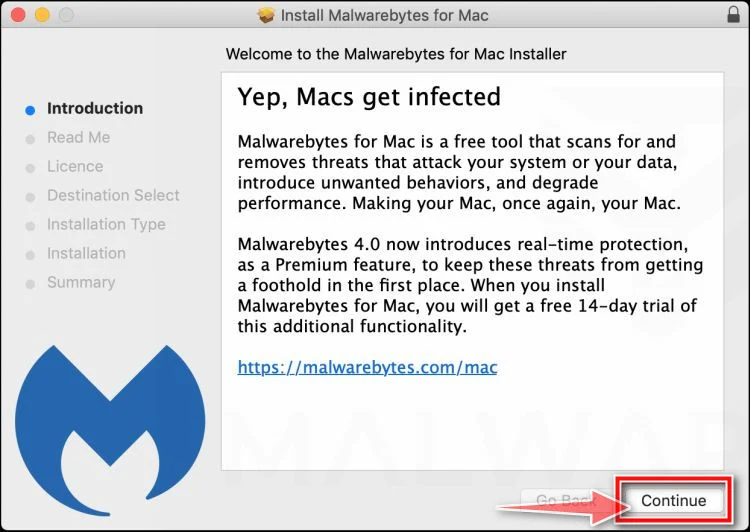
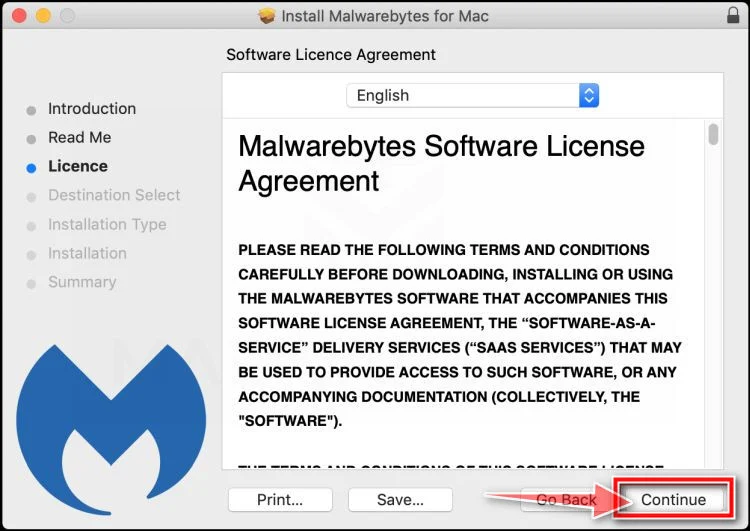
The Malwarebytes for Mac Installer will guide you through a few quick screens. Click “Continue” and keep following the prompts until the installation completes.
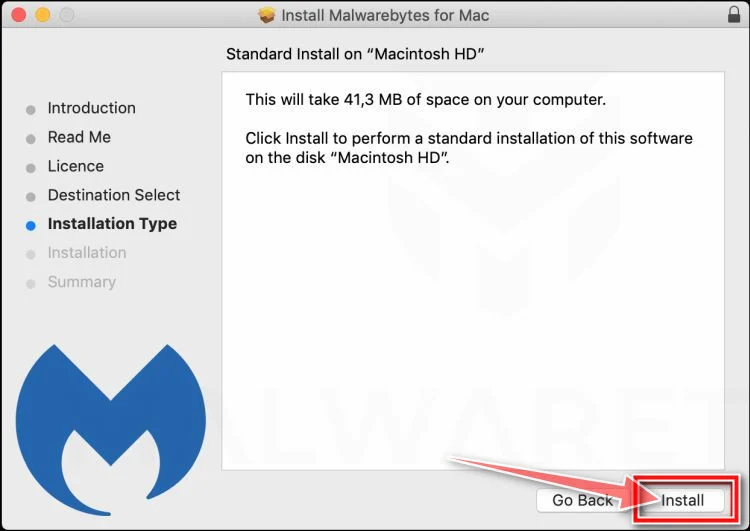
When the installation is complete, Malwarebytes opens to the Welcome to Malwarebytes screen. Click “Get started“.
Malwarebytes needs Full Disk Access to check your whole Mac. When it asks, open System Settings > Privacy & Security > Full Disk Access, turn on Malwarebytes (it may be listed as Malwarebytes Protection), and confirm with your password or Touch ID. Then return to Malwarebytes. On macOS Monterey and earlier, this setting is in System Preferences > Security & Privacy > Privacy.
-
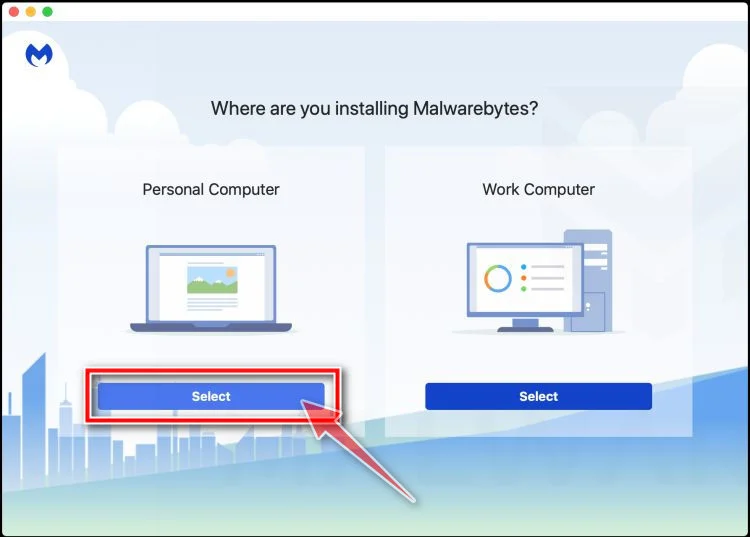
Select “Personal Computer” or “Work Computer”
Malwarebytes will ask what type of computer you’re installing it on. Click either Personal Computer or Work Computer, whichever applies.
-
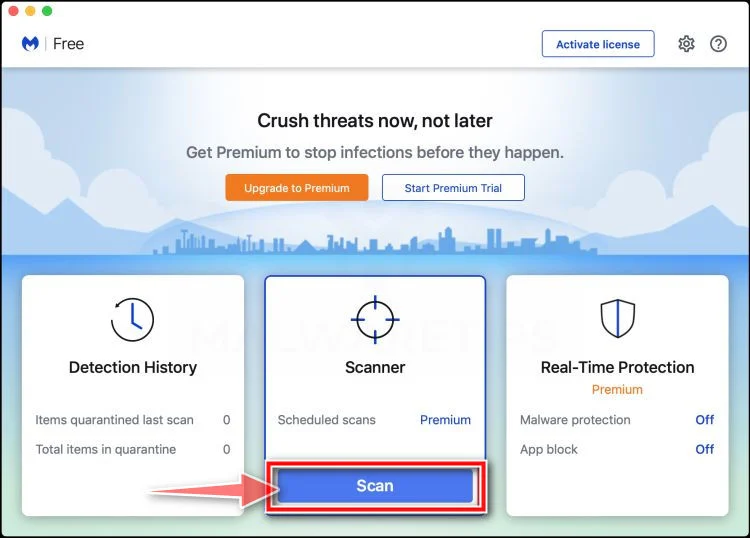
Start the Scan
Click the “Scan” button. Malwarebytes will automatically update its detection database and begin checking your Mac for malware.
-
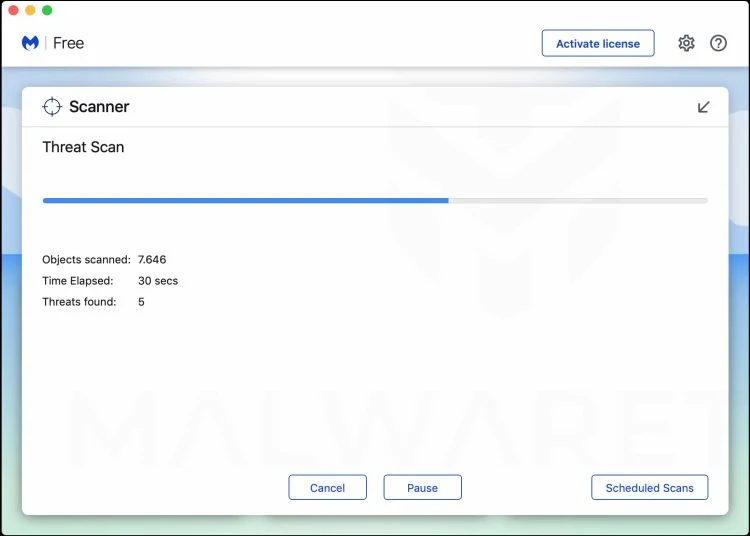
Wait for the Scan to Finish
Malwarebytes will scan your Mac for adware, browser hijackers, and other malicious programs. This can take a few minutes, so feel free to do something else — just check back occasionally to see the progress.
-
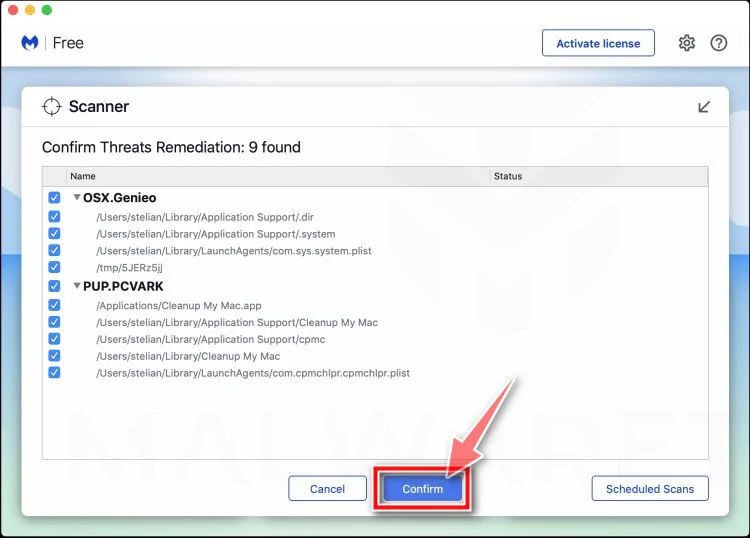
Quarantine the Detected Threats
When the scan is done, you’ll see a list of everything Malwarebytes found. Click the “Quarantine” button to remove all the threats at once.
-
Restart Your Mac
Malwarebytes will now remove all the malicious files it found. Some threats can only be fully removed after a reboot — if Malwarebytes asks you to restart, allow it. Once you’re logged back in, check whether the problems you noticed have stopped. If they come back, save the scan report and ask for help in our forum.
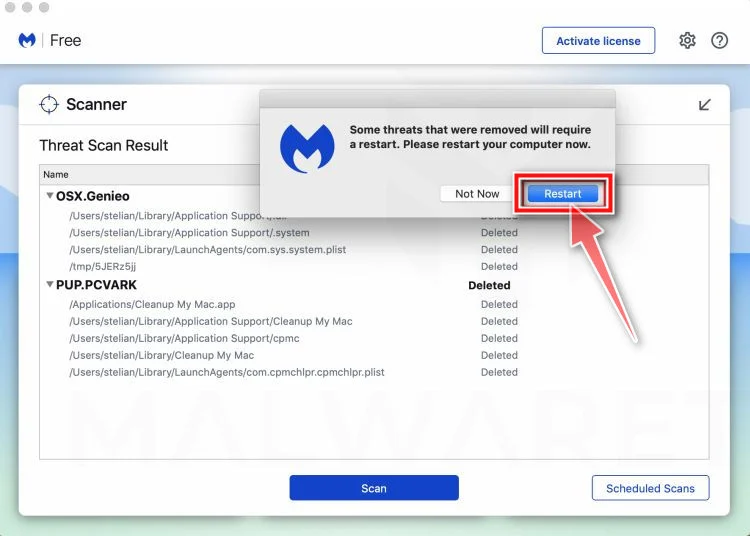
If the problems you noticed continue after the scan, see the options below.
If you are still experiencing problems while trying to remove a malicious program from your computer, please ask for help in our Mac Malware Removal Help & Support forum.
Run a Malware Scan with Malwarebytes for Android
Malwarebytes for Android scans your phone or tablet for malware, adware, and potentially unwanted apps. The free version scans only when you start a scan. Real-time protection, which checks apps automatically, is part of the paid Premium version.
-
Download Malwarebytes for Android.
You can download Malwarebytes for Android by clicking the link below.
Get Malwarebytes for AndroidOpens Google Play in a new tab.Want real-time protection? See Malwarebytes Premium for AndroidMalwarebytes for AndroidScans your phone and removes malware at no cost -
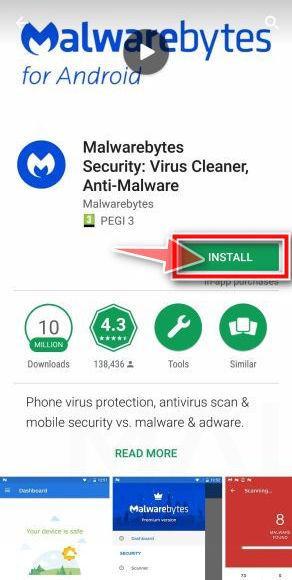
Install Malwarebytes for Android on your phone.
In the Google Play Store, tap “Install” to install Malwarebytes for Android on your device.
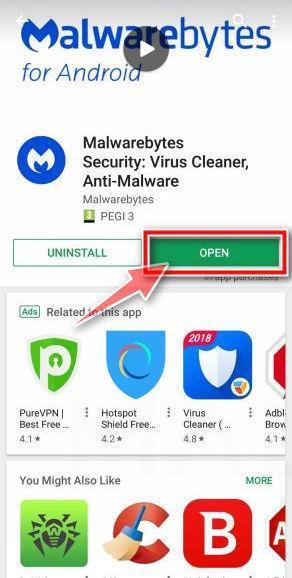
When the installation process has finished, tap “Open” to begin using Malwarebytes for Android. You can also open Malwarebytes by tapping on its icon in your phone menu or home screen.
-
Follow the on-screen prompts to complete the setup process
When Malwarebytes opens, it walks you through a short setup. Tap Get started and follow the prompts. If you see an offer for a trial or a paid plan, read it before you accept. You can skip it and keep using the free scanner.
Malwarebytes will ask for permission to access the files on your phone so it can scan them. Tap Allow, or turn on the permission in the Android screen that opens, then return to Malwarebytes.
-
Run a scan with Malwarebytes for Android
On the main screen, tap Scan now. In some versions, you open the menu, tap Scanner, and then tap Run a scan.
-
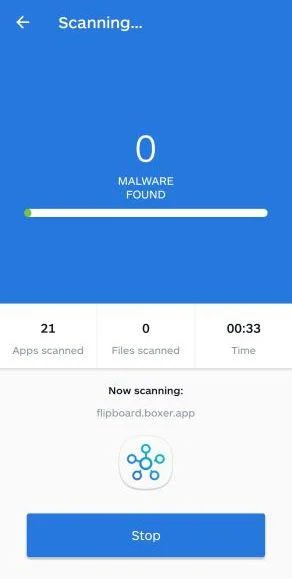
Wait for the Malwarebytes scan to complete.
Malwarebytes will now start scanning your phone for adware and other malicious apps. This process can take a few minutes, so we suggest you do something else and periodically check on the status of the scan to see when it is finished.
-
Remove the detected apps.
When the scan has been completed, you will see a list of the threats that Malwarebytes for Android has detected. Next to each detected item, tap the menu icon (three dots), then choose to uninstall the app or delete the file. Android then asks you to confirm. Tap OK or Uninstall to remove the app.
-
Restart your phone.
When the detected apps are removed, restart your phone if Malwarebytes asks you to. Then check whether the problems you noticed have stopped.
If the problems you noticed continue after the scan, see the options below.
If you are still having problems with your phone after completing these instructions, then please follow one of the steps:
- Ask for help in our Mobile Malware Removal Help & Support forum.
- Only as a last resort, reset your phone to factory settings. Read the warning below first.
- Back up your photos, videos, files, and messages, for example to your Google account or a computer.
- Make sure you know your Google account email and password. The phone asks for them after the reset. If you changed the password recently, Google recommends waiting 24 hours before you reset.
- On a Samsung phone, also make sure you know your Samsung account password.
- If you use an authenticator app for two-step verification, move your accounts to another device or save your backup codes first.
Stay Protected: Block Ads and Malicious Sites
No scan can prove a device is completely clean, so it helps to block threats before they reach you. Most infections start with a malicious ad or a fake download button — so blocking them at the source is your best defense.
We recommend AdGuard, which blocks malicious ads, phishing pages, and dangerous redirects before they can reach you.
👉 Download AdGuard and browse safely
How to Prevent Document-Themed Credential Theft
Require employees to confirm unexpected payment documents with the sender through a known channel before opening links.
Use a shared, approved document platform and teach recipients exactly which domain hosts legitimate files.
Configure stronger authentication for email and financial systems. Passkeys and hardware security keys resist ordinary password collection pages.
Separate payment approval from email alone. Bank-detail changes should require independent verification and documented dual control.
Make phishing reporting faster than forwarding. A visible reporting button reduces accidental redistribution and gives security the original message.
Practice incident response with finance and IT together. The critical question is not only who clicked, but what business process attackers could now influence.
Frequently Asked Questions
Was a real deposit sent with this email?
No evidence inside the message proves settlement. Verify the transaction through the bank, accounting records, contract schedule, and known customer contact.
Is the named contracting company responsible?
Not necessarily. Scammers commonly impersonate legitimate organizations and employees. Confirm the sender independently before drawing conclusions about the named business.
Is an HTML-sharing service automatically malicious?
No. A legitimate platform can be abused to host deceptive content. The problem is the fraudulent page and credential request, not every platform user.
Why does the fake document look blurred?
The blurred background creates curiosity and implies protected content. It can be a static image rather than a real contract waiting behind the form.
What if I entered the password only once?
One submission is enough. Change it immediately, revoke sessions, inspect mailbox settings, and secure every service where that password was reused.
Should I contact my bank after opening the page?
Contact the bank when payment data, account access, or transfers may be affected. Opening alone does not prove financial loss, but credentials require immediate response.
The Bottom Line
The Contract Deposit Receipt email wraps a mailbox password form inside a believable business payment story and a simulated secured-document viewer.
Verify the company, contract, host, and deposit separately. If credentials were submitted, treat the mailbox and every connected payment conversation as potentially exposed.

Join the discussion
0 commentsShare your experience or ask a question about this article.
Discussion
Start the conversation
Have a question or something useful to share? Add the first comment.