


A storage warning arrives just when you are waiting for an important reply. It offers extra room and a simple way to keep messages moving.
The promise is specific: another 15GB after a quick verification. Before accepting, check whether the account in the warning matches the service you actually use.
Overview
A mailbox-capacity warning that offers a reward for verification
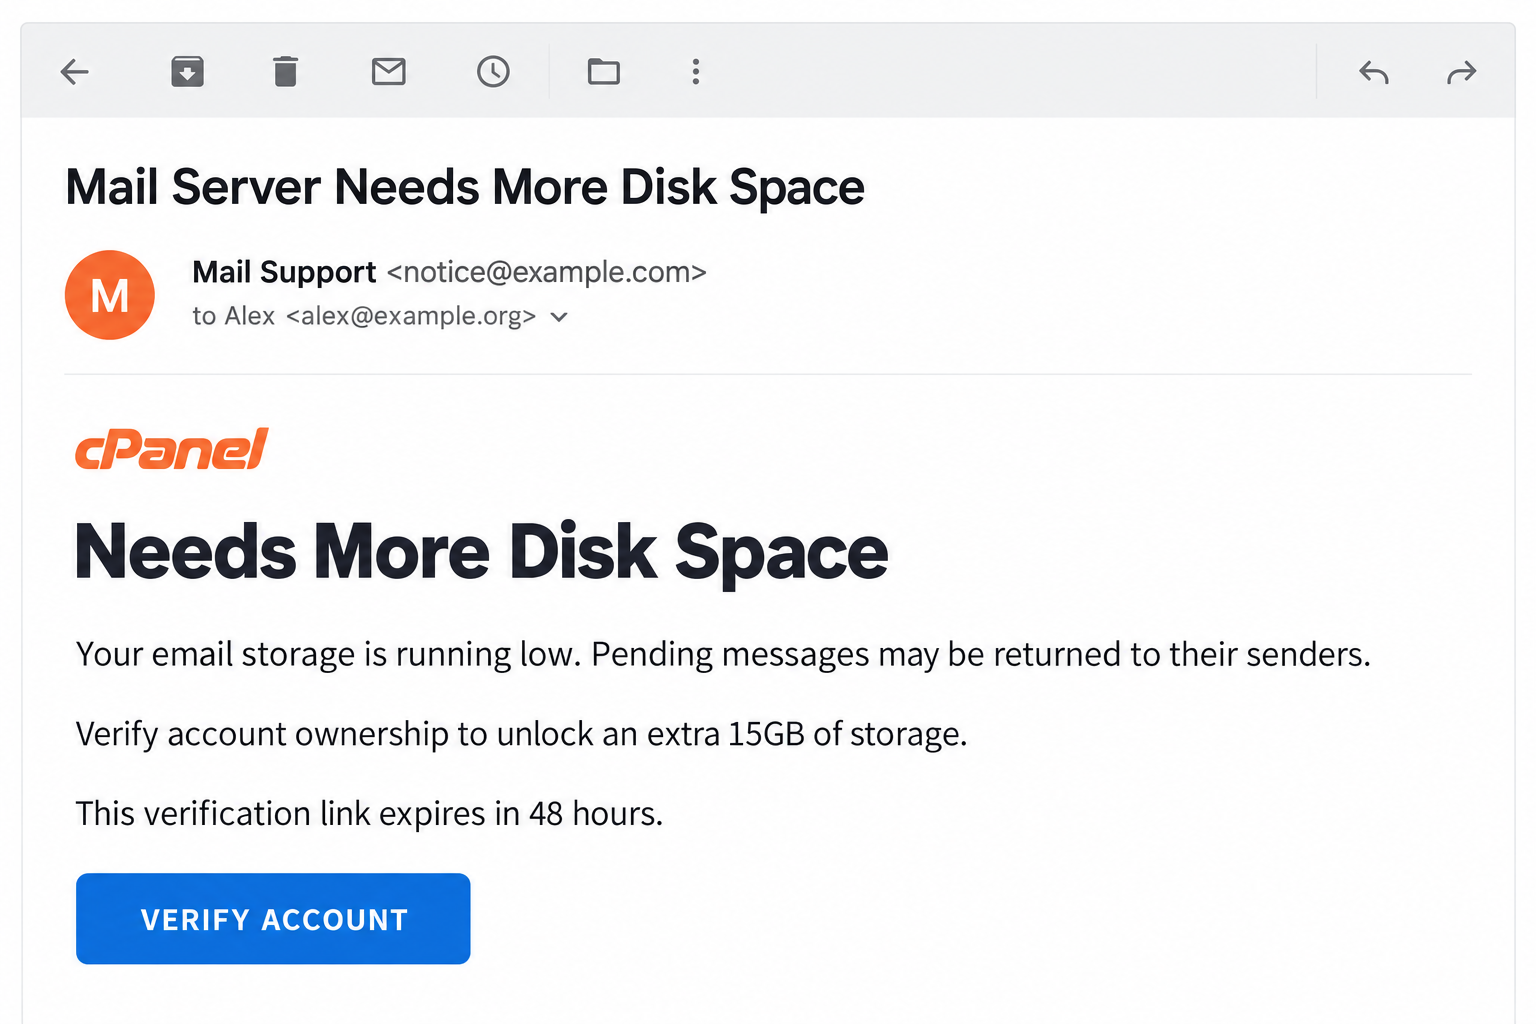
The cPanel needs more disk space email scam claims the recipient’s mail storage is running low. It warns that pending messages could bounce back.
The proposed solution is an extra 15GB, supposedly unlocked by verifying ownership. A VERIFY ACCOUNT button introduces that task.
The email says the link expires in 48 hours. That deadline belongs to the message, not an independently confirmed condition in the recipient’s mailbox.
The destination adapts the login design to the recipient
The reported host is haxe293-jusd392-kim.runtztempfloss[.]su. The campaign presents a copied provider login rather than an authenticated storage-management action.
A described example showed a Dutch-language Google-style sign-in over a consent-looking page. Other reported versions used a cPanel-style Webmail login.
The central exposure is the credential entered into that imitation. The surrounding consent design does not establish a genuine Google authorization process.
A real quota problem should be checked through the real account
cPanel and Google are legitimate services whose appearance is being borrowed. Neither brand establishes the authenticity of this email or the offered capacity.
- The warning claims a storage problem before showing account evidence.
- The extra 15GB makes the requested verification sound beneficial.
- The 48-hour limit encourages quick action.
- The copied login can vary by the address being targeted.
- The password request occurs on an unrelated destination.
The image is an original email illustration with invented contact details. It demonstrates the offer without pretending to show your account or measured storage usage.
Mailbox Storage, Hosting Space, and a Password Are Different Things
A full mailbox is a capacity issue
A mailbox can genuinely approach its assigned quota. The provider may then restrict delivery or require an administrator to adjust the allocation.
That possibility makes the warning plausible, but it does not verify the sender. Anyone can describe a common account problem in an email.
The useful evidence is inside the service you already use: the relevant account, its limit, its measured usage, and any genuine delivery information.
Do not assume every missed reply is a bounced message. The sender may not have replied yet, or the issue may concern a different stage of delivery.
A hosting account can contain more than one mailbox
cPanel is hosting-management software used by providers. The hosting account, an individual mailbox, and a personal Google account are not interchangeable identities.
A hosting plan may contain several mailboxes with separate limits. Someone responsible for one address may not have permission to change the entire hosting account.
If you do not know which arrangement applies, ask your usual administrator. Do not supply whichever password you remember just to make an unfamiliar form continue.
A provider can explain the actual quota and available options. That conversation should start through an established support relationship, not the email’s verification screen.
A password submission does not demonstrate new capacity
The copied form’s immediate function is collecting sign-in information. It does not show a verified change to the storage associated with your real mailbox.
Even a success message would need confirmation inside the genuine account. Text displayed by the same untrusted page cannot independently certify that storage increased.
Do not compare only the promised number with a familiar plan. Similar capacity figures across different services do not connect those services or authorize a login.
Keep the questions separate: is the mailbox actually full, who can manage its quota, and where are you being asked to authenticate?
How the cPanel Needs More Disk Space Email Scam Works
Step 1: The email links storage anxiety to missed communication
The warning says important messages may be returned. That makes the storage issue sound like an immediate threat to work, customers, or personal correspondence.
It does not need to identify a real bounced message to provoke concern. The recipient may supply their own example of a reply they expected.
Start by checking the mailbox through its usual app or portal. A genuine account notice should be assessed there rather than inferred from the email’s wording.
If delivery really is failing, ask the administrator to examine that problem. Do not let a real inconvenience authenticate a separate unsolicited verification offer.
Step 2: Extra storage makes the requested action look helpful
The promised 15GB changes the emotional direction of the notice. Instead of merely threatening trouble, the sender appears to supply a convenient benefit.
Ownership verification can sound like a reasonable requirement before receiving that benefit. This makes a password request feel connected to account maintenance.
However, the offer has not established who can allocate the space or which account receives it. Those missing details matter more than the appealing quantity.
A genuine upgrade should be confirmed through the actual provider, including any cost or plan change. The email’s promise is not a substitute for that record.
Step 3: The link changes the apparent provider at sign-in
The reported page can present the sign-in style associated with the recipient’s address. Familiar branding helps carry the original storage story into the password request.
An address entered into a link or template can identify a likely provider. That does not demonstrate access to the mailbox or knowledge of its storage.
The Google-looking example also used consent-style surroundings. Do not infer that a real third-party access grant occurred simply because the page resembled an authorization screen.
Check the actual destination and use your established sign-in route. Visual continuity between two pages is not evidence that either belongs to the real provider.
Step 4: The submitted credential becomes useful outside the storage story
An exposed password can be tested against the actual service. Successful access depends on its controls and any further information or approval the user provides.
A page error does not show that entered information was discarded. If you used a real secret, treat that secret as potentially disclosed.
The risk can extend to other accounts if the same password is reused. It does not mean every service connected to the mailbox is automatically compromised.
Respond to the precise exposure. An email address alone, a password, and an accepted account approval require different recovery decisions.
The Spam-Folder Instruction Is Part of the Pitch
The reported email also tells recipients to move it from Spam to the inbox. It describes that action as allowing propagation.
Moving a message between folders does not validate a hosting upgrade. The wording gives the user an administrative explanation for overriding their mail client’s treatment of the notice.
Do not rescue this message from Spam merely because it requests it. Use the client’s reporting feature and investigate the storage claim independently.
Spam filtering is not infallible, so a message’s folder is not the entire verdict. The unrelated credential destination and unverified storage offer are the more important concerns.
For a workplace mailbox, follow the reporting process without changing filtering rules globally. One questionable notice should not lead to allowing every message from a suspicious sender.
How to Check Real Storage Without Deleting Important Mail
Read the quota from the trusted dashboard
Open the hosting portal or Webmail address already supplied by your provider. Find the relevant account and distinguish its assigned limit from current usage.
cPanel’s Email Disk Usage documentation describes viewing mailbox information. It also notes that cached values may not immediately reflect recent changes.
This means a delayed number after legitimate cleanup is not proof of another problem. Ask the host about its reporting behavior before repeatedly deleting messages.
The provider can enable or disable particular interfaces. If the documented screen is absent, use support rather than a third-party page claiming to unlock it.
Identify who can change the allocation
The official Manage Email Accounts guide explains quota controls. The changes available to you depend on the hosting plan and permissions.
Ask whether the limit concerns one mailbox or the overall hosting account. Increasing one allocation may not solve a separate total-capacity issue.
Do not give a personal Google password to a supposed host so they can investigate. Use the authorized support process and appropriate account identity.
For business mail, have the administrator coordinate any plan change. A genuine upgrade should not be made outside the organization’s normal purchasing and access controls.
Preserve important messages before real cleanup
Deleting mail is a separate decision from rejecting phishing. Do not empty folders because this notice says an urgent verification deadline is approaching.
If actual cleanup is needed, understand whether the action permanently removes server copies. Keep required business records and a suitable backup first.
A local mail client’s behavior can differ depending on how it synchronizes. Ask for help if you are unsure whether deleting locally also deletes the server message.
The goal is enough reliable storage without losing information. Running an unknown script or surrendering a password is not part of that process.
When a Customer Reports a Real Bounced Message
A genuine delivery failure deserves attention even if the storage offer is fraudulent. Ask the sender for the actual non-delivery report through an established channel.
The failure may concern a full mailbox, an incorrect address, or another delivery condition. Your administrator can interpret its status rather than accepting the phishing email’s explanation.
Share only the relevant technical details privately. Delivery reports can contain addresses or portions of correspondence that should not be posted publicly.
Record whether the problem affects one sender or several, and which destination address they used. That helps narrow the issue without changing account settings blindly.
If the host confirms a quota problem, follow its normal remediation process. The existence of that problem still does not validate the offered verification link.
Keep the incident report and the delivery-support ticket separate. A resolved mailbox-capacity issue does not establish that an exposed password has been secured.
What to Do If You Fell Victim
Leave the storage-verification page. Do not try another password or accept a new prompt claiming the extra space needs one final confirmation.
Reading the email alone does not show that a password escaped. Report the message, then inspect storage through your established provider.
Replace any real password entered. Go directly to the relevant service and use its account-recovery process if you can no longer sign in.
Address the secret on other accounts where it was reused. An incorrect password for this mailbox may still be valid somewhere else.
Review continuing account access. Check unfamiliar sessions, recovery methods, connected apps, forwarding, and mail rules using the provider’s supported controls.
Google users can follow its compromised-account guidance. Managed accounts should be reported to the responsible administrator promptly.
Describe any approval as well as the password. Tell support if you accepted a device prompt, shared a code, or granted access on another page.
A consent-looking background alone does not establish a real grant. Explain the action you actually performed so the provider can assess it.
Report the message and preserve useful details. Keep the original email, destination, time, and any actual account changes through a private reporting route.
Google’s phishing instructions explain its reporting controls. Avoid forwarding a live verification button as an informal warning to coworkers.
Assess downloads separately. If the interaction involved an installer, extension, or another suspicious file, Malwarebytes can help examine the affected device.
AdGuard can reduce exposure to malicious ads and known unsafe sites. Neither product adds mailbox storage or revokes access to an online account.
Resolve a genuine quota issue through the host. After securing exposed access, check the actual limit and preserve important mail before authorized cleanup.
Do not pay a stranger to activate the promised 15GB or recover the account. Use the institution or provider with which you already have a relationship.
Is Your Device Infected? Run a Free Malware Scan
Slow performance, constant pop-ups, or strange behavior? These are classic signs of a malware infection. The fastest way to find out is to scan your device with Malwarebytes Free — one of the most trusted malware removal tools available.
The free version detects and removes the most common threats, including:
- Adware — the cause of those annoying pop-ups
- Browser hijackers — unwanted redirects and changed homepages
- Trojans and spyware — hidden programs stealing your data
- Potentially unwanted programs (PUPs) — software you never asked for
👉 Select your device below — Windows, Mac, or Android — then follow the simple steps to download Malwarebytes, scan your system, and remove any threats it finds. The scan usually takes 5 to 20 minutes.
Run a Malware Scan with Malwarebytes for Windows
Malwarebytes is one of the most popular and trusted anti-malware tools for Windows — and it’s completely free for removing infections. It catches threats that many antivirus programs miss, including adware, browser hijackers, and trojans. Follow the steps below to scan and clean your PC in just a few minutes.
Download Malwarebytes
Click the button below to download the latest version of Malwarebytes for Windows from the official source. The free version is all you need — it will scan your computer and remove adware, browser hijackers, and other malicious software at no cost.
Download MalwarebytesOfficial installer for Windows 11 and 10. Your download starts right away.Want real-time protection? See Malwarebytes Premium Malwarebytes Free for WindowsScans and removes malware at no cost
-
Install Malwarebytes
When the download finishes, open your Downloads folder and double-click the MBSetup file. If Windows shows a User Account Control pop-up, click “Yes” to allow the installation.
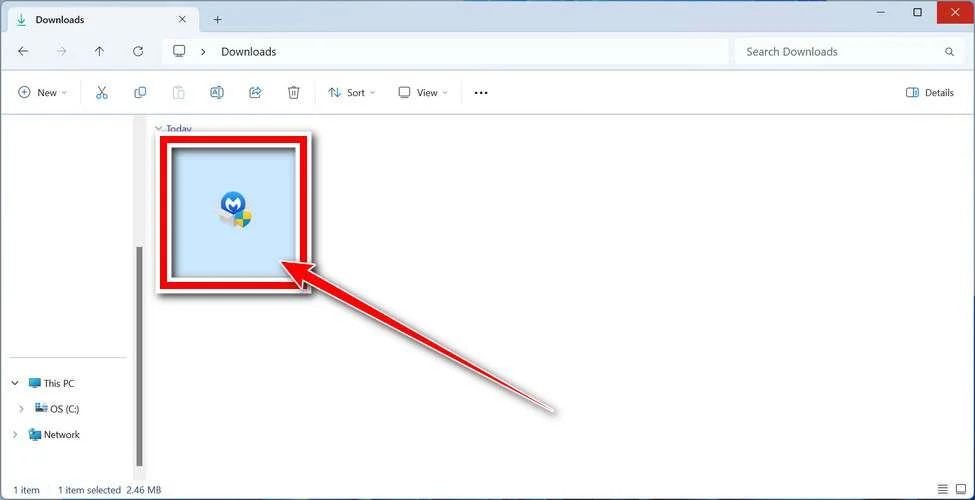
Follow the On-Screen Prompts to Install Malwarebytes
The setup wizard will walk you through a few quick screens:
-
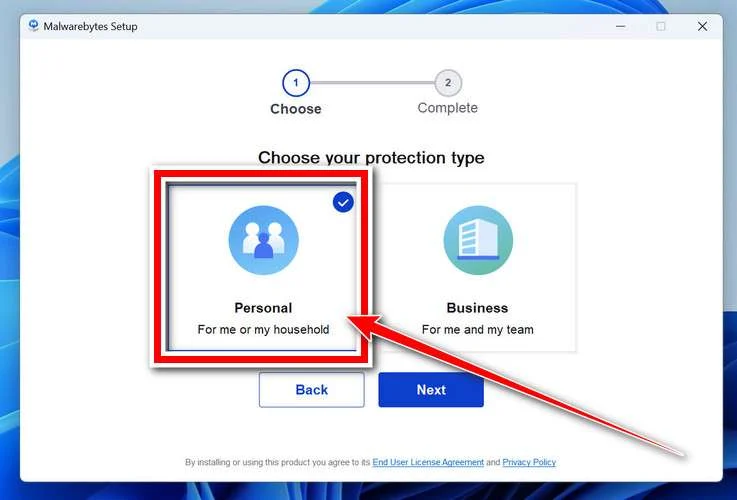
Choose where you’re installing the program — “Personal Computer” or “Work Computer” — then click Next.
-
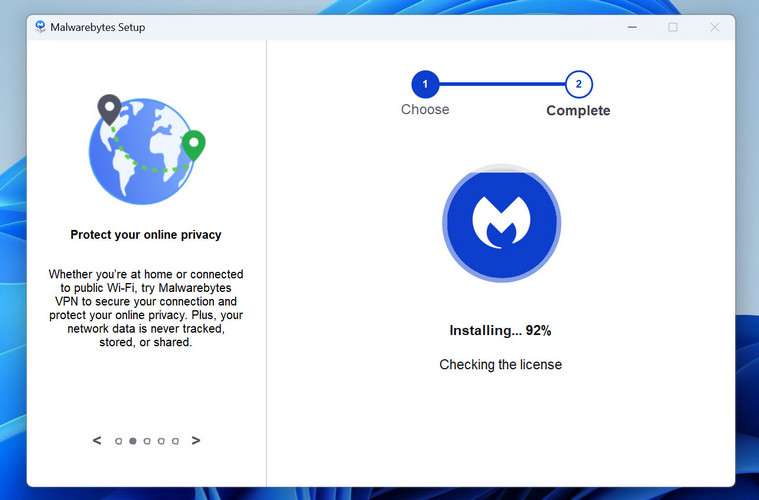
Malwarebytes will now install on your device. This usually takes under a minute.
-
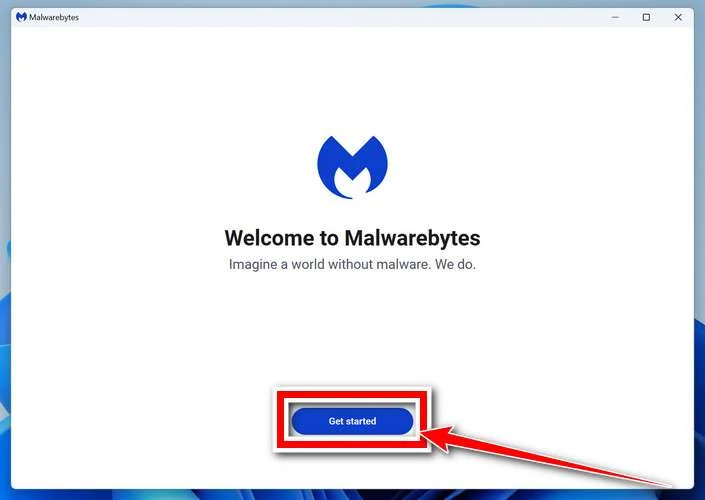
When installation is complete, the “Welcome to Malwarebytes” screen will open automatically.
-
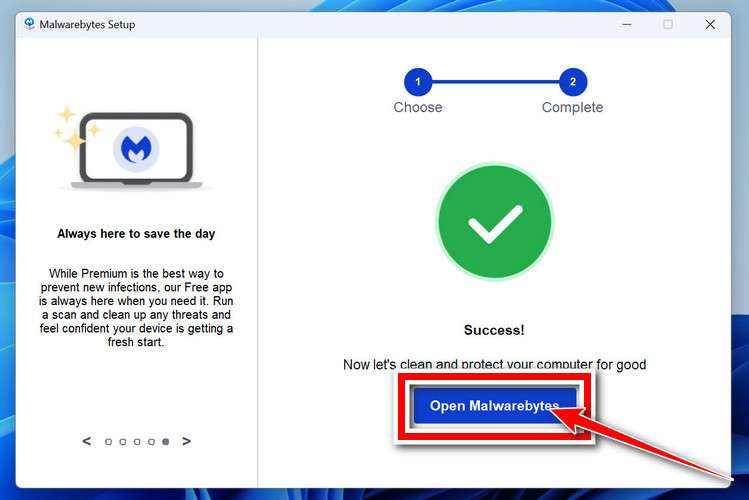
On the final screen, click Open Malwarebytes to launch the program.
-
Enable “Scan for Rootkits”
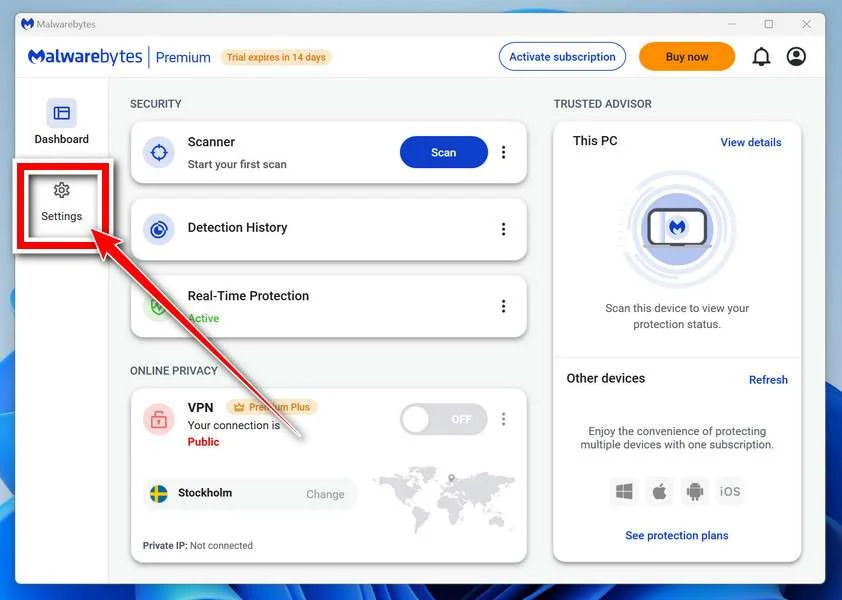
Before scanning, turn on rootkit detection so Malwarebytes can find even the most hidden threats. Click the Settings gear icon on the left side of the screen.
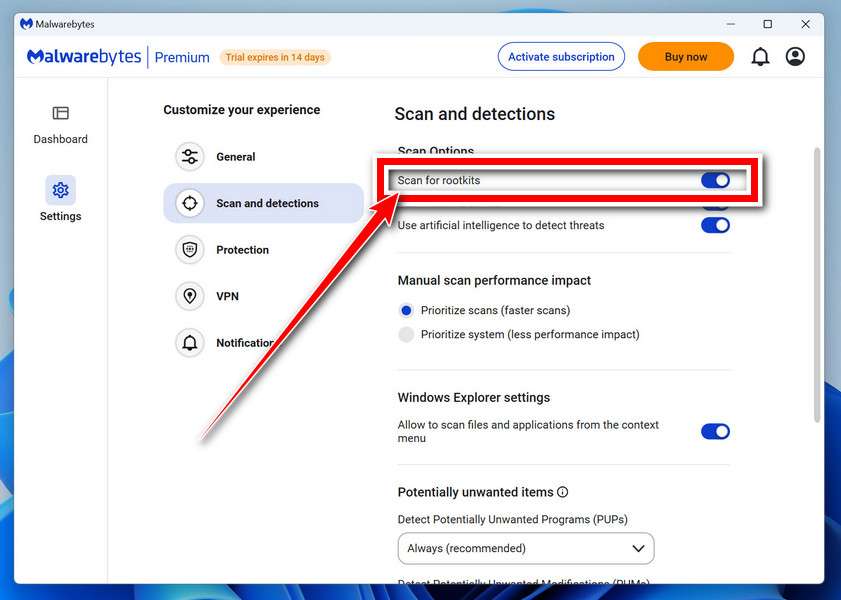
In the settings menu, find “Scan for rootkits” and click the toggle so it turns blue.
Done? Click “Dashboard” in the left pane to return to the main screen.
Start the Scan
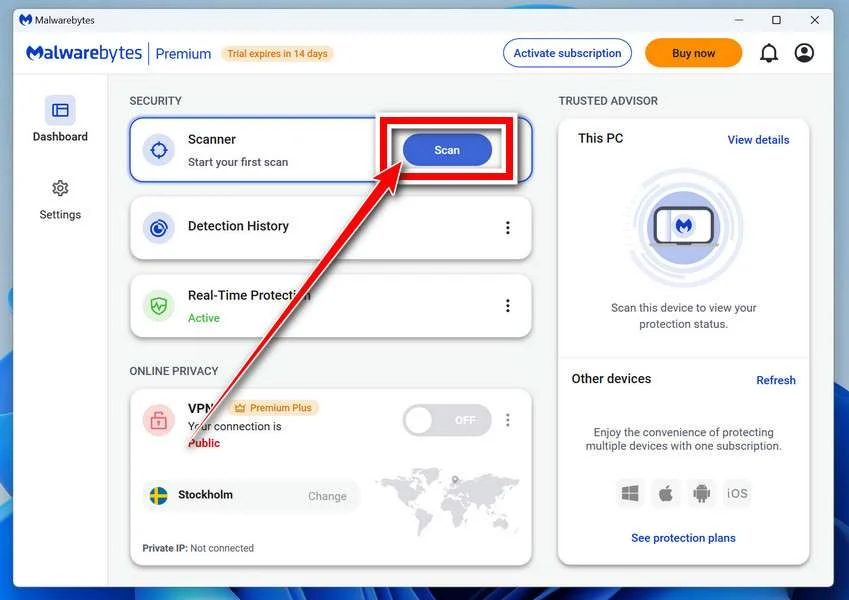
Click the blue Scan button. Malwarebytes will automatically update its virus database and start checking your computer for malware.
-
Wait for the Scan to Finish
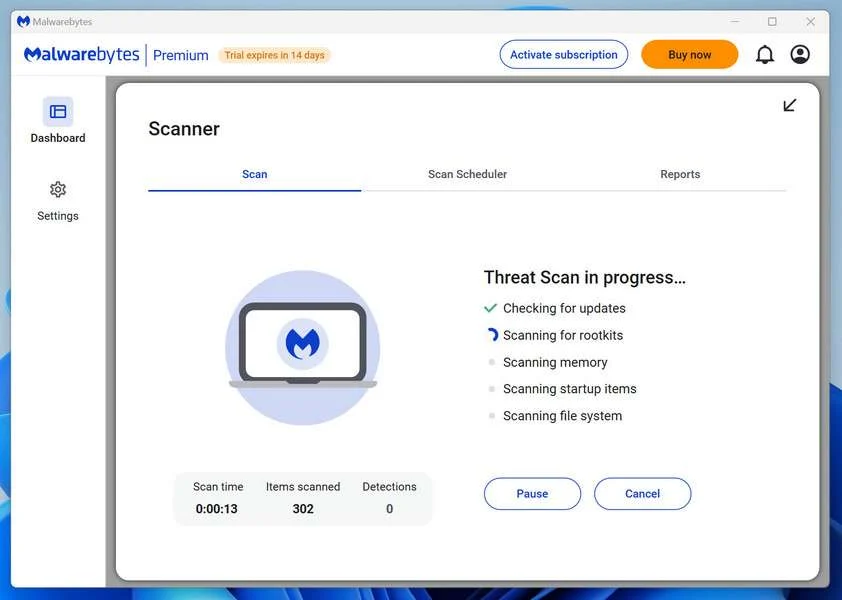
The scan checks your entire system for browser hijackers and other malicious programs, so it can take 5 to 20 minutes depending on your computer. Feel free to do something else — just check back occasionally to see the progress.
-
Quarantine the Detected Threats
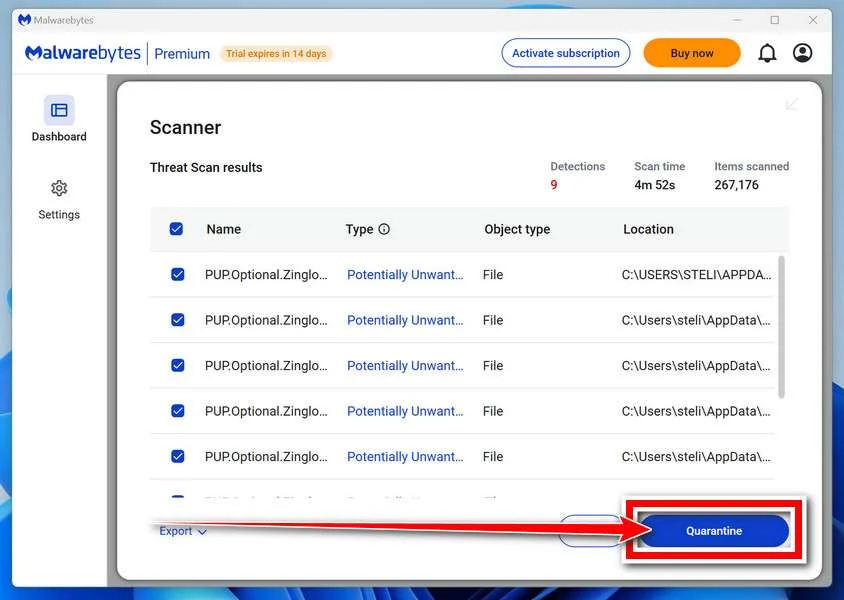
When the scan is done, you’ll see a list of everything Malwarebytes found — malware, adware, and potentially unwanted programs. Click the “Quarantine” button to remove all of them at once.
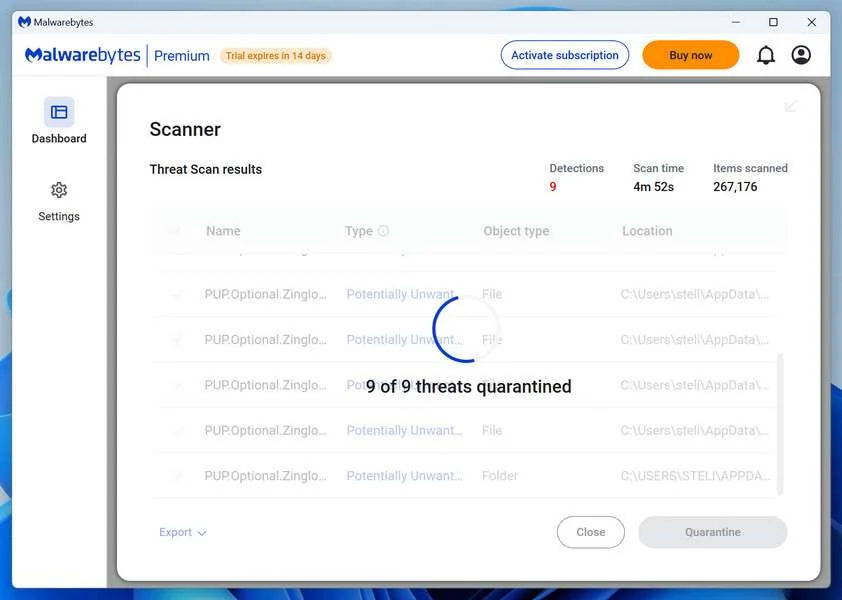
Malwarebytes will now remove the malicious files and registry entries and move them safely into quarantine.
-
Restart Your Computer
Some threats can only be fully removed after a reboot. If Malwarebytes asks you to restart, click Yes. Once you’re logged back in, Malwarebytes has finished removing the threats it found.
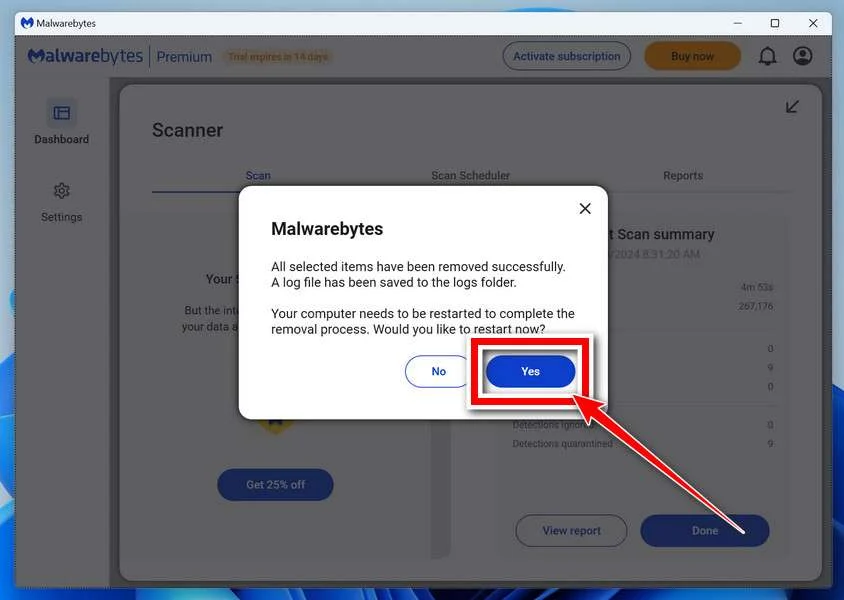
That’s it — your Windows PC is now clean of trojans, adware, and other malware, and should be back to running smoothly.
If you are still having problems with your computer after completing these instructions, then please follow one of the steps:
- Run a computer scan with ESET Online Scanner
- Ask for help in our Windows Malware Removal Help & Support forum.
Run a Malware Scan with Malwarebytes for Mac
Malwarebytes for Mac is a free on-demand scanner that removes the malware other security software tends to miss — adware, browser hijackers, and unwanted programs included. Cleaning an infected Mac with Malwarebytes has always been completely free, and it’s our go-to recommendation. Follow the steps below to scan and clean your Mac in just a few minutes.
-
Download Malwarebytes for Mac
Click the button below to download the latest version of Malwarebytes for Mac.
Download MalwarebytesOfficial installer for macOS. Your download starts right away.Want real-time protection? See Malwarebytes PremiumMalwarebytes Free for MacScans and removes malware at no cost -
Open the Malwarebytes setup file
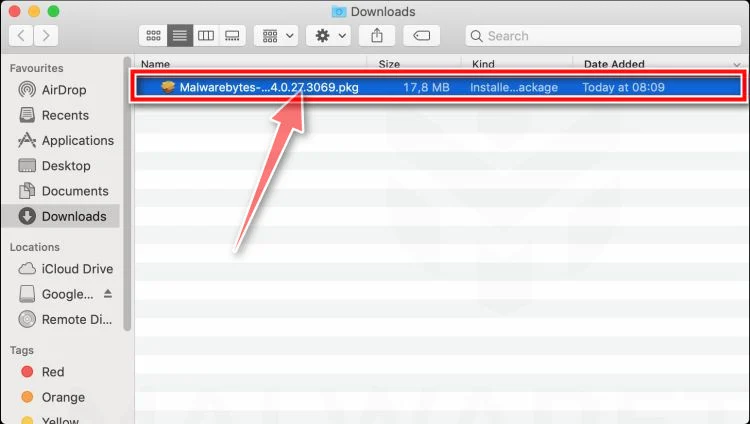
When the download finishes, open your Downloads folder and double-click the setup file to begin the installation.
-
Follow the On-Screen Prompts to Install Malwarebytes
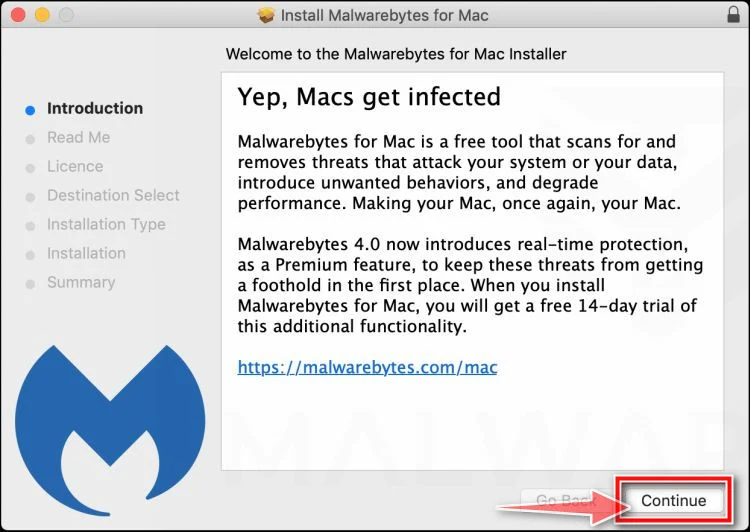
The Malwarebytes for Mac Installer will guide you through a few quick screens. Click “Continue” and keep following the prompts until the installation completes.
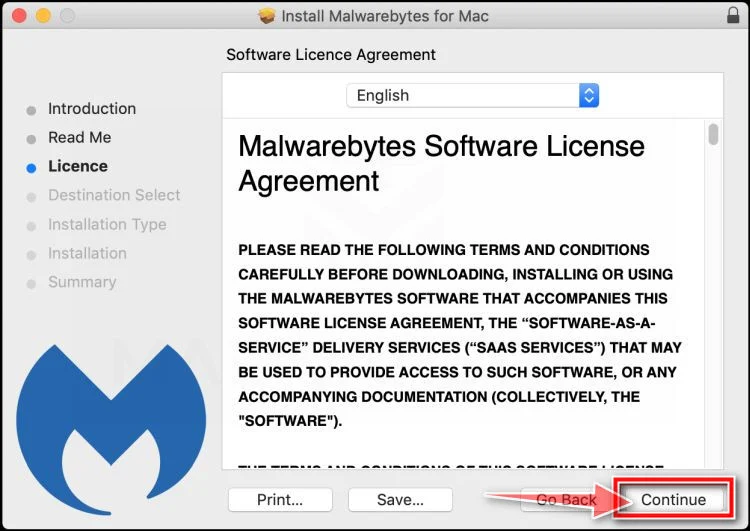
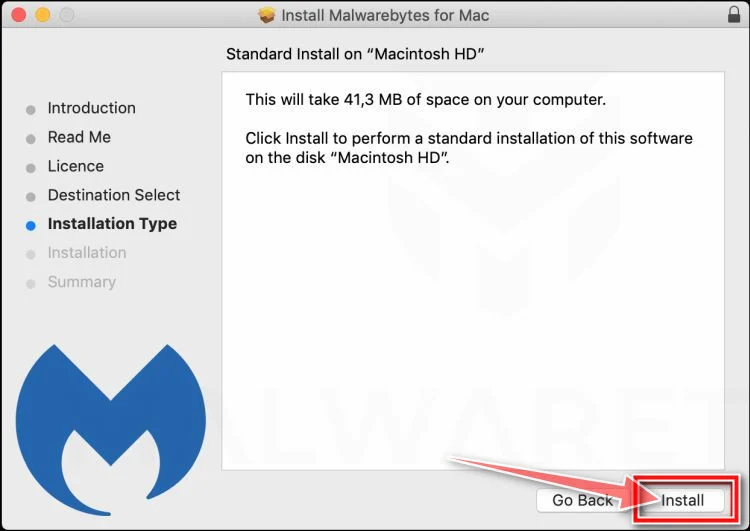
When the installation is complete, Malwarebytes opens to the Welcome to Malwarebytes screen. Click “Get started“.
-
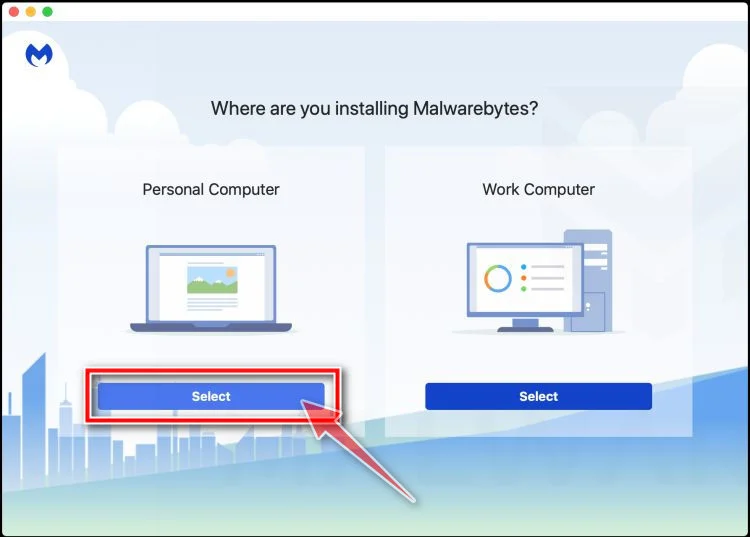
Select “Personal Computer” or “Work Computer”
Malwarebytes will ask what type of computer you’re installing it on. Click either Personal Computer or Work Computer, whichever applies.
-
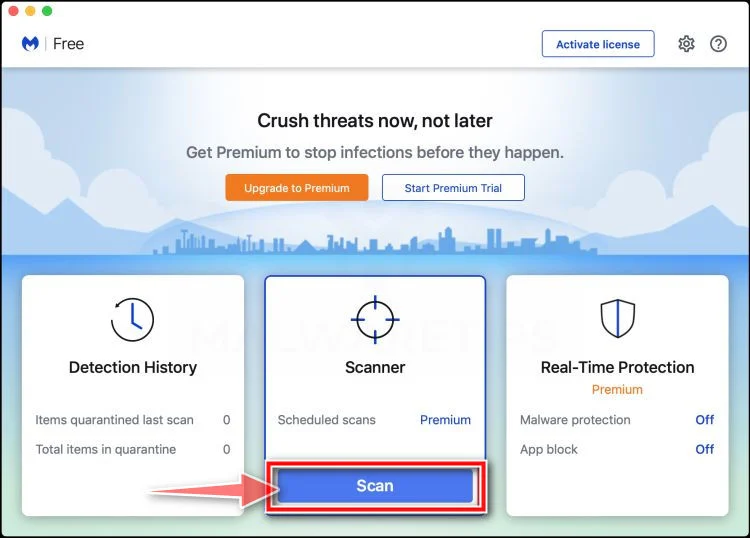
Start the Scan
Click the “Scan” button. Malwarebytes will automatically update its detection database and begin checking your Mac for malware.
-
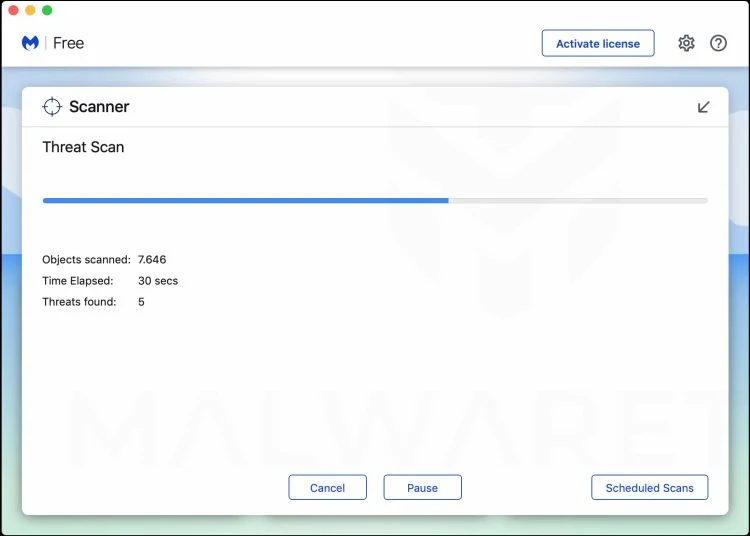
Wait for the Scan to Finish
Malwarebytes will scan your Mac for adware, browser hijackers, and other malicious programs. This can take a few minutes, so feel free to do something else — just check back occasionally to see the progress.
-
Quarantine the Detected Threats
When the scan is done, you’ll see a list of everything Malwarebytes found. Click the “Quarantine” button to remove all the threats at once.
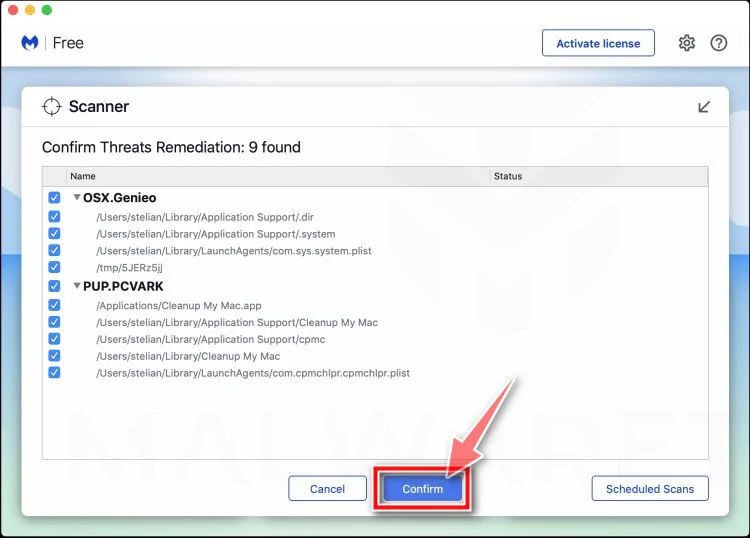
-
Restart Your Mac
Malwarebytes will now remove all the malicious files it found. Some threats can only be fully removed after a reboot — if Malwarebytes asks you to restart, allow it. Once you’re logged back in, your Mac is clean.
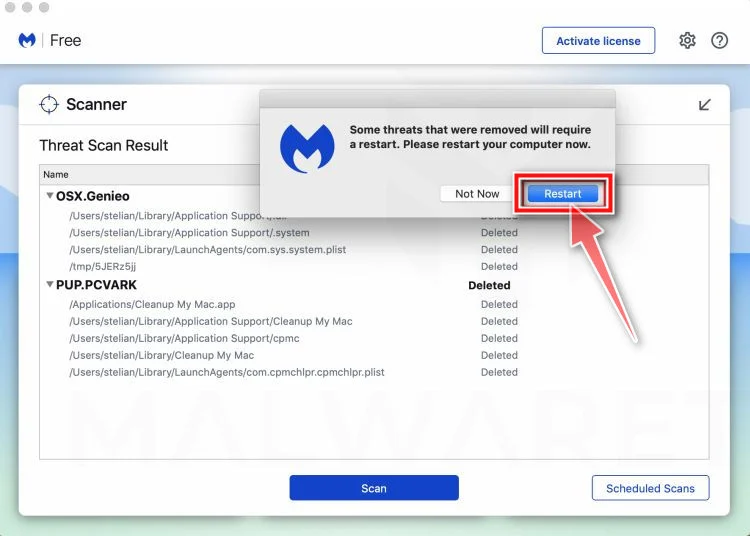
That’s it — your Mac is now free of adware, rogue browser extensions, and other potentially harmful software.
If you are still experiencing problems while trying to remove a malicious program from your computer, please ask for help in our Mac Malware Removal Help & Support forum.
Run a Malware Scan with Malwarebytes for Android
Malwarebytes for Android automatically detects and removes dangerous threats like malware and ransomware so you don’t have to worry about your most-used device being compromised. Aggressive detection of adware and potentially unwanted programs keeps your Android phone or tablet running smooth.
-
Download Malwarebytes for Android.
You can download Malwarebytes for Android by clicking the link below.
Get Malwarebytes for AndroidOpens Google Play in a new tab.Want real-time protection? See Malwarebytes Premium for AndroidMalwarebytes for AndroidScans your phone and removes malware at no cost -
Install Malwarebytes for Android on your phone.
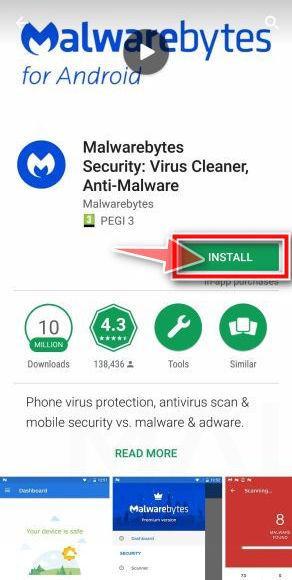
In the Google Play Store, tap “Install” to install Malwarebytes for Android on your device.
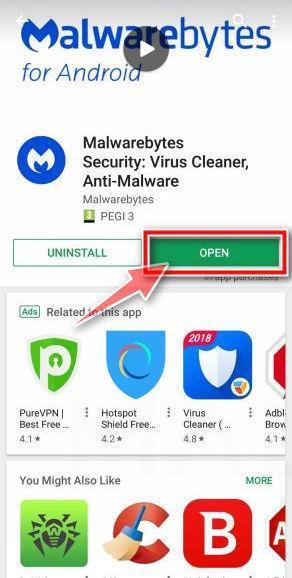
When the installation process has finished, tap “Open” to begin using Malwarebytes for Android. You can also open Malwarebytes by tapping on its icon in your phone menu or home screen.
-
Follow the on-screen prompts to complete the setup process
When Malwarebytes will open, you will see the Malwarebytes Setup Wizard which will guide you through a series of permissions and other setup options.
This is the first of two screens that explain the difference between the Premium and Free versions. Swipe this screen to continue.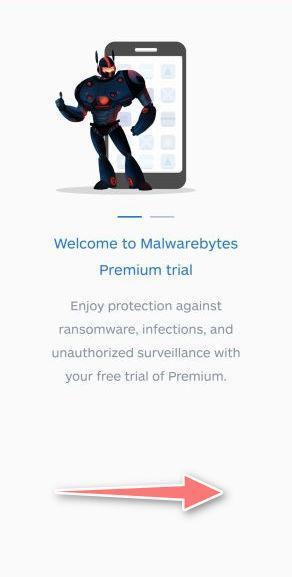
Tap on “Got it” to proceed to the next step.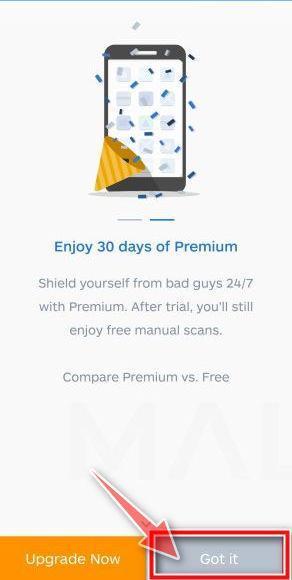
Malwarebytes for Android will now ask for a set of permissions that are required to scan your device and protect it from malware. Tap on “Give permission” to continue.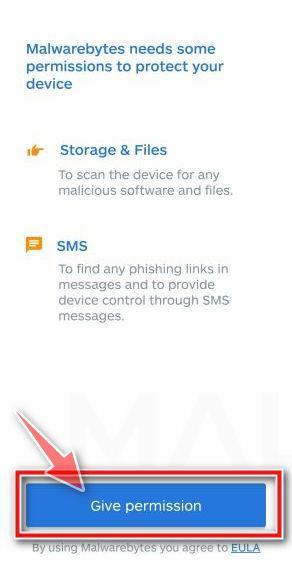
Tap on “Allow” to permit Malwarebytes to access the files on your phone.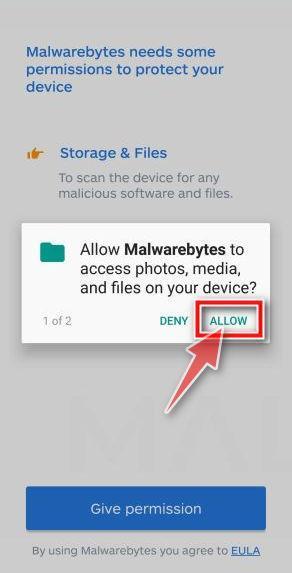
-
Update database and run a scan with Malwarebytes for Android
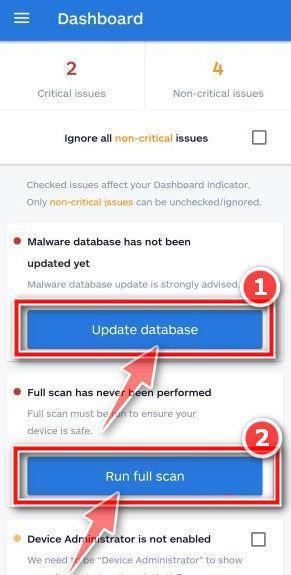
You will now be prompted to update the Malwarebytes database and run a full system scan.
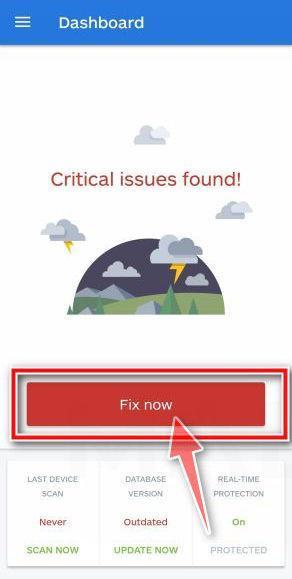
Click on “Update database” to update the Malwarebytes for Android definitions to the latest version, then click on “Run full scan” to perform a system scan.
-
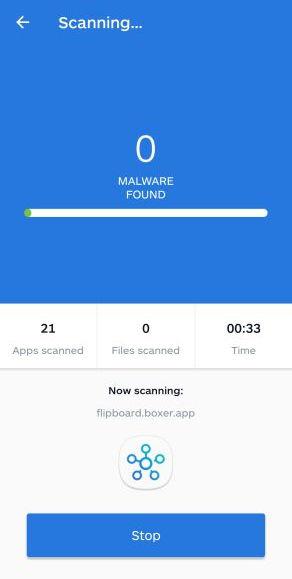
Wait for the Malwarebytes scan to complete.
Malwarebytes will now start scanning your phone for adware and other malicious apps. This process can take a few minutes, so we suggest you do something else and periodically check on the status of the scan to see when it is finished.
-
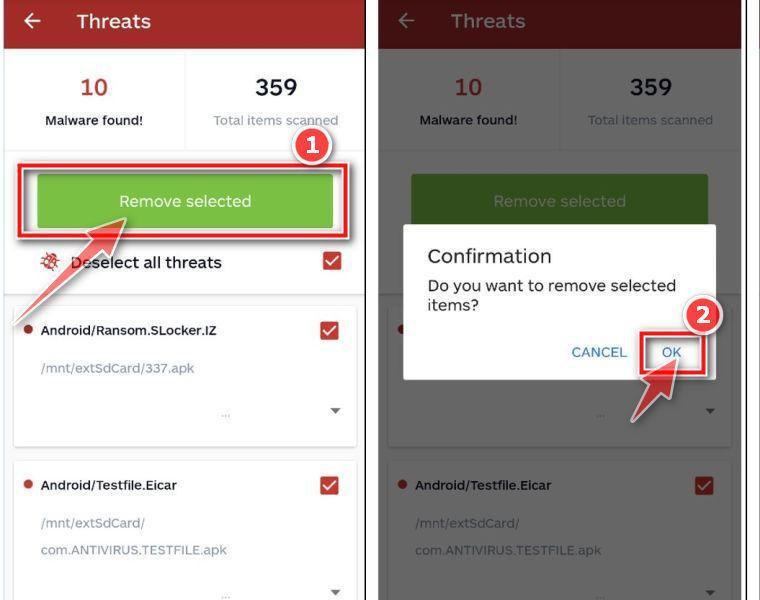
Click on “Remove Selected”.
When the scan has been completed, you will be presented with a screen showing the malware infections that Malwarebytes for Android has detected. To remove the malicious apps that Malwarebytes has found, tap on the “Remove Selected” button.
-
Restart your phone.
Malwarebytes for Android will now remove all the malicious apps that it has found. To complete the malware removal process, Malwarebytes may ask you to restart your device.
That’s it — your Android phone is now clean — no more malicious apps, adware, or browser redirects.
If you are still having problems with your phone after completing these instructions, then please follow one of the steps:
- Restore your phone to factory settings by going to Settings > General management > Reset > Factory data reset.
- Ask for help in our Mobile Malware Removal Help & Support forum.
Stay Protected: Block Ads and Malicious Sites
Now that your device is clean, keep it that way. Most infections start with a malicious ad or a fake download button — so blocking them at the source is your best defense.
We recommend AdGuard, which blocks malicious ads, phishing pages, and dangerous redirects before they can reach you.
👉 Download AdGuard and browse safely
Frequently Asked Questions
Is the extra 15GB a verified cPanel offer?
No. The reported message uses that promise to introduce a credential request. Confirm real storage options through the actual hosting provider.
Does cPanel manage every email account?
No. Providers use different systems, and a cPanel hosting account is not the same as a personal Google identity. Identify your actual service first.
Why might the page look like Google instead?
The reported phishing design adapts to the targeted address. A copied provider interface can make an unrelated destination feel familiar without authenticating it.
Should I move the email out of Spam?
Not because the sender asks you to. Folder placement cannot verify an upgrade. Report the notice and inspect account status independently.
Does clicking mean my mailbox was taken over?
No. Determine what you entered, approved, or installed. A visit alone is different from exposing a password or accepting a sensitive account action.
Should I delete old messages immediately?
Only after confirming a genuine storage problem and protecting records you need. Some deletion controls permanently remove server messages.
The Bottom Line
Do not use this cPanel-themed verification offer to obtain more storage. Its 15GB promise leads toward a copied login, not a verified quota change.
Check actual capacity through your host. If you supplied a password or approval, secure the genuine account and review access before returning to routine mailbox maintenance.

Join the discussion
0 commentsShare your experience or ask a question about this article.
Discussion
Start the conversation
Have a question or something useful to share? Add the first comment.