


The files are still there, but their names have changed. Next to them sits a note with a deadline and instructions you weren’t expecting.
If the new names end in .crpx0, make your first decision about the computer, not the ransom demand. What you do now can protect any copies that remain.
Overview
The extension ends in a zero
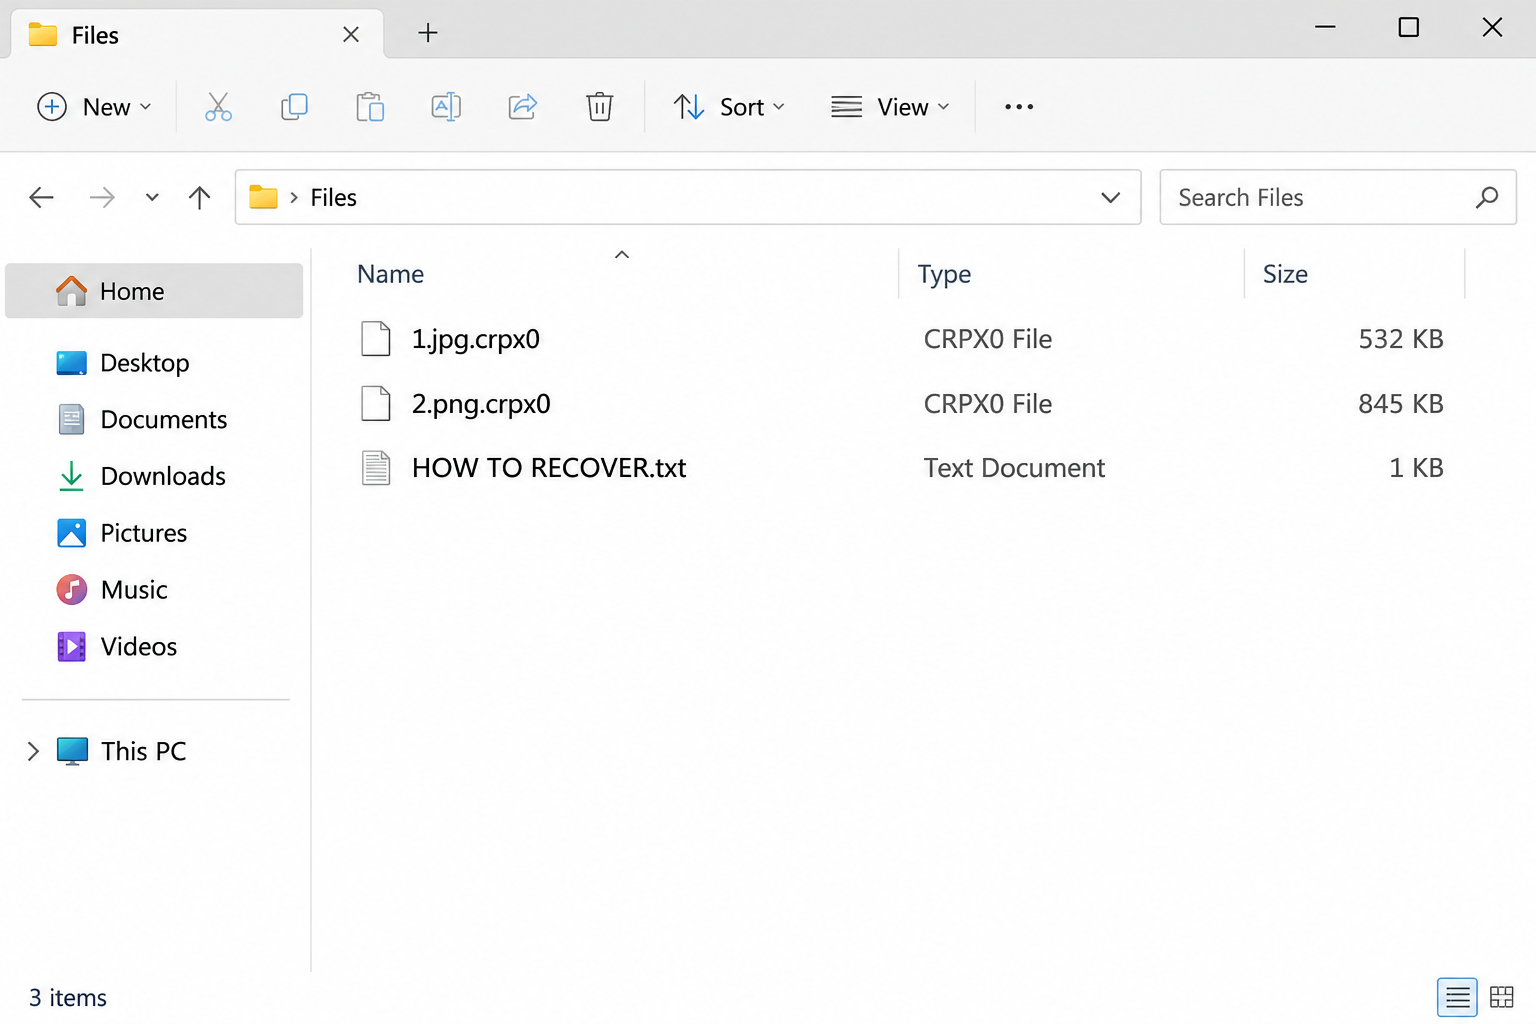
CRPxO ransomware is associated with files renamed to end in .crpx0, with a zero as the final character. That suffix is attached after the original extension.
For example, a photo named 1.jpg was shown as 1.jpg.crpx0. Changing the visible filename back to 1.jpg does not change the scrambled contents.
The reported sample created HOW TO RECOVER.txt and HOW TO RECOVER.html and changed the desktop wallpaper. The file-list image recreates those indicators without reproducing the attackers’ contact instructions.
An extension is a useful clue, not a family identification by itself. Preserve the ransom note and file examples together rather than basing a recovery attempt on the suffix alone.
The note uses a price deadline and a leak threat
The note promises a 50% discount for early contact and threatens publication after 48 hours. Those deadlines are pressure from the sender, not a recovery plan.
It also claims the operators copied data before encrypting it and names encryption methods. Those are statements in the ransom note, not independently confirmed findings about your machine.
File recovery and possible data exposure therefore need different checks. Restoring an older copy can make a file readable without telling you whether somebody elsewhere obtained another copy.
For a workplace or managed computer, report possible data exposure promptly. Let responders determine who may be affected based on actual evidence and applicable rules.
Separate containment, cleanup, and file recovery
The immediate priorities follow a different order from the note. Start with these decisions rather than giving the attackers a faster answer:
- Cut the affected computer’s network connection so it can’t keep touching shared resources.
- Keep unplugged backup drives unplugged until you have a separate trusted recovery environment.
- Preserve the note, sample filenames, and affected locations without opening the HTML note to follow its instructions.
- Stop trying different tools against the original files, especially when they are the only copy.
- Escalate a work, server, or shared-drive incident before restarting, scanning, or making changes that could remove evidence.
CISA’s #StopRansomware guide treats containment and recovery as separate decisions. The actions below adapt that distinction to the file and note indicators reported for CRPxO.
What the CRPxO Note Can and Cannot Tell You
The text and HTML notes present a similar demand. The HTML version adds a countdown, which can make an invented deadline feel like a system event.
You don’t need to load it to stop the deadline. Photograph the screen or record the existing note locations if responders ask, and keep the originals for professional review.
The note mentions sample decryption as reassurance. An offer to restore a few files does not establish that payment will restore everything or that copied material would be deleted.
Don’t send private files as a test to prove the operator has a key. A test file could reveal information the sender did not already possess.
The attack route isn’t established by the note. Don’t blame a particular email or employee without corroboration. Give responders a timeline of what you actually saw.
What to Do if Your Files End in .crpx0
-
Isolate the affected computer from the network. Disconnect Ethernet and Wi-Fi without moving files first. Keep unplugged backup drives away from the affected computer.
On a managed computer, notify the incident team from another device. Preserve power state where practical and follow its directions before rebooting or powering the machine off.
-
Save the incident details without changing the encrypted originals. Record the first time you noticed renamed files, the folders involved, and both reported note names.
If the incident team asks for samples, provide them through its approved process. Avoid posting customer documents, private identifiers, or an unredacted note publicly.
-
Check whether more than one device or share is affected. Ask administrators to inspect affected storage and accounts from a separate trusted system.
A drive letter can point to a network share, not a disk inside the machine. Record which device displayed the renamed files and where those files were stored.
-
Protect replacement passwords from the affected computer. Use a known-clean system for password resets or support sign-ins. Have administrators handle privileged accounts and active sessions in the right order.
A rushed reset from the same device can expose the new password. Take advice first if one account manages backups or several affected services.
-
Use verified help rather than the contacts in the note. A business may need its incident responders, insurer, legal team, or relevant reporting authority before deciding how to proceed.
A home user can ask the MalwareTips removal help forum for guidance. Leave confidential files and ransom contact details out of public posts.
-
Plan where recovered material will go before restoring it. Choose clean storage and leave the original encrypted set untouched. Don’t reconnect a backup to see whether it works.
Inventory critical files first. A verified partial restore can be useful even if you cannot yet recover every folder.
Remove CRPxO From a Personal Windows Computer
Step 1: Decide whether the original installation can be trusted
For a managed system, stop here and let your incident team direct cleanup. The instructions below are for a personal Windows computer after important evidence and recovery copies are protected.
If files are still changing or more computers may be affected, ask for help before experimenting. A managed rebuild may be safer than repeated scans.
Before using a recovery drive, decide what evidence or data needs to be preserved. Do not choose a reset option until you understand which files it removes.
Step 2: Obtain and open the Windows scanner carefully
Use a known-clean computer to obtain a scanner if the affected machine can’t safely connect. Ask for help choosing a transfer method that won’t expose your backup media.
The site’s Windows scanner guide distinguishes manual scanning from optional paid protection. You do not need to purchase a product to check whether a backup opens.
The free scan is enough for this step. The optional Premium link is sponsored and isn’t required to run the scan or review the findings.
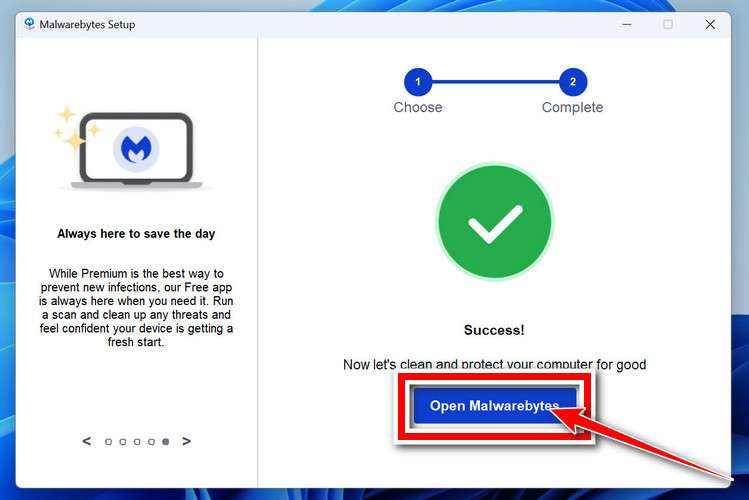
On the PC, open the verified installer and confirm the publisher before granting permission. Decline optional offers you don’t want and choose Open Malwarebytes when installation finishes.
Step 3: Run a Threat Scan and read the result
After opening Malwarebytes, find Scanner on its dashboard and select Scan to start the standard Threat Scan. Current labels may differ slightly from the example screen.
Make sure the scanner has current definitions when it can be safely updated. Don’t reconnect a live incident to a production network just to obtain updates.
Leave the scan running until it reports the result. The standard scan covers common threat locations but does not check every file on every drive.
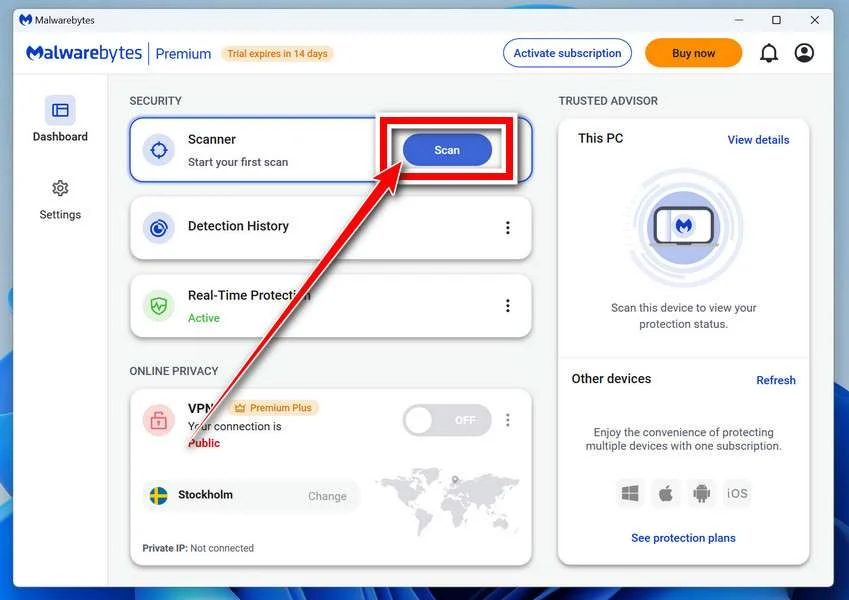
Review what was detected and save the report before choosing what to quarantine. If you don’t recognize an item and its removal could affect evidence, ask for help first.
Select the confirmed unwanted items and choose Quarantine. If Malwarebytes asks for a restart, wait until evidence is preserved and no responder needs the current state.
Step 4: Verify cleanup or switch to a planned rebuild
After a permitted restart, open Malwarebytes and review its detection history and quarantine. Run a follow-up scan and check whether new encrypted files or unexpected changes appear.
Microsoft documents Windows Security scan options and protection history. Use them where appropriate and follow managed-device rules on approved tools.
On a personal PC, open Windows Security, then choose Virus & threat protection and Scan options. The Microsoft Defender Offline scan is a separate option from Malwarebytes.
Defender Offline restarts the computer before it scans, so save your work first. Don’t use a restart-based scan while a responder needs evidence from the running system.
Once Windows comes back, check Protection history for the scan result. Keep any alert report with your notes so you can tell which scanner detected what.
A scan with no detections does not prove that an installation is trustworthy. Repeated alerts, unexplained changes, or uncertainty about privileged access are reasons to seek help before restoring data.
If rebuilding is the right decision, use trusted installation media and a verified restore plan. Preserve affected originals separately if they may still be needed for recovery or investigation.
Recover .crpx0 Files Without Overwriting the Only Copy
Check an offline or protected backup first
Find a backup from before the earliest suspected compromise, not merely before the first filename you noticed. The encryption date may not be the first day the system was exposed.
Use a clean device or recovery environment to test the backup. Restore a small set to separate clean storage, then open copies of representative documents and photos.
Use your backup tool’s history to check dates and retention. Don’t overwrite a known-good backup with the affected machine’s current files.
After a successful test, prioritize important folders before a full restore. Keep the tested source intact until you are sure the recovered copy is complete enough.
Look for versions that survive outside the encrypted folder
If File History was configured before the incident, Microsoft’s File History guide explains how to browse earlier versions of files and folders.
Inspect an older copy and restore to a safe destination when that option is available. Do not overwrite the encrypted originals to see whether the selected copy works.
If files were synced, sign in from a trusted device and check the provider’s version history or recovery controls. An administrator may need to pause synchronization before restoring shared material.
Version history may be absent, expired, or incomplete. If you can’t find a usable version, preserve what you have instead of repeatedly writing to the affected drive.
Verify any decryptor against the exact case
Check the No More Ransom decryptor catalog from a clean device. No specific CRPxO decryptor was verified for this guide.
Do not substitute a tool intended for a similarly named ransomware. The .crpx0 suffix is not enough to show that a key or decryptor matches.
If an expert confirms a matching tool, test it on copies with a clean output location. Keep the original encrypted files and note in case a better option appears later.
A deleted-file recovery tool looks for old unencrypted files, not a key. If that could matter, consult a specialist before installing software or writing more data to the affected drive.
Keep a recovery log before you restore everything
Write down the source and date of each copy you find. One backup may have newer photos while another holds the only intact version of a spreadsheet.
Use filenames and modified dates to compare copies, then try opening samples. A thumbnail or familiar filename does not tell you whether the full file opens.
If you’re using File History, find an earlier version. Right-click Restore and choose Restore to if you need a separate location instead of replacing the current copy.
Document the folders you couldn’t recover. That list helps when a colleague offers an attachment or you discover another backup with some of the missing files.
Don’t dispose of the encrypted files as soon as one backup opens. Confirm that the restore covers the dates and locations you need before deciding what to retain.
If a restored file opens but looks incomplete, leave the encrypted original alone. Note which version you tried so you can compare it against anything you recover later.
Frequently Asked Questions
Is the ending .crpx0 a letter or a number?
The last character in the reported extension is a zero. CRPxO is the name used for the case, but the filenames use .crpx0.
Does deleting the note or changing the extension fix the file?
Those actions do not decrypt the data. Keep the note and encrypted originals for identification, then test a backup or genuinely matching tool on copies.
Does the note prove that data was stolen?
The note claims that data was copied, but it is not independent proof. Preserve the evidence and let responders assess possible exposure separately from file restoration.
Should I reconnect my USB backup to run a test?
Not on an untrusted Windows installation. Check the backup through an isolated, trusted recovery environment and restore test copies to separate storage first.
Can a completed scan decrypt files or certify the PC?
Removing detected malware does not decrypt historical files or prove the machine is clean. Ask for expert help if you still see changes, alerts, or unexplained account activity.
What if no verified decryptor or good backup exists?
Keep the encrypted set and relevant notes untouched. A qualified recovery specialist can assess surviving copies and whether any later recovery option matches the exact case.
The Bottom Line
Isolate the affected system and preserve the note and encrypted files instead of following the CRPxO payment instructions. Treat the claimed data theft as a separate question for responders.
Clean or rebuild the PC before restoring anything. Test earlier backups or a verified recovery tool on copies, and keep the encrypted originals away from the restore destination.

Join the discussion
0 commentsShare your experience or ask a question about this article.
Your progress
Did these steps help?
Let us know how the guide worked for you.
Describe what you see and the step you reached. Keep passwords and other private information out.
Discussion
Start the conversation
Have a question or something useful to share? Add the first comment.