


A message in the corner of your screen says it found a Trojan. Before you can take that in, a second window appears to say something similar.
When the warnings seem to agree, it feels like time to do whatever they suggest. The small sender line tells a different story.
Overview
The warning was delivered by a website
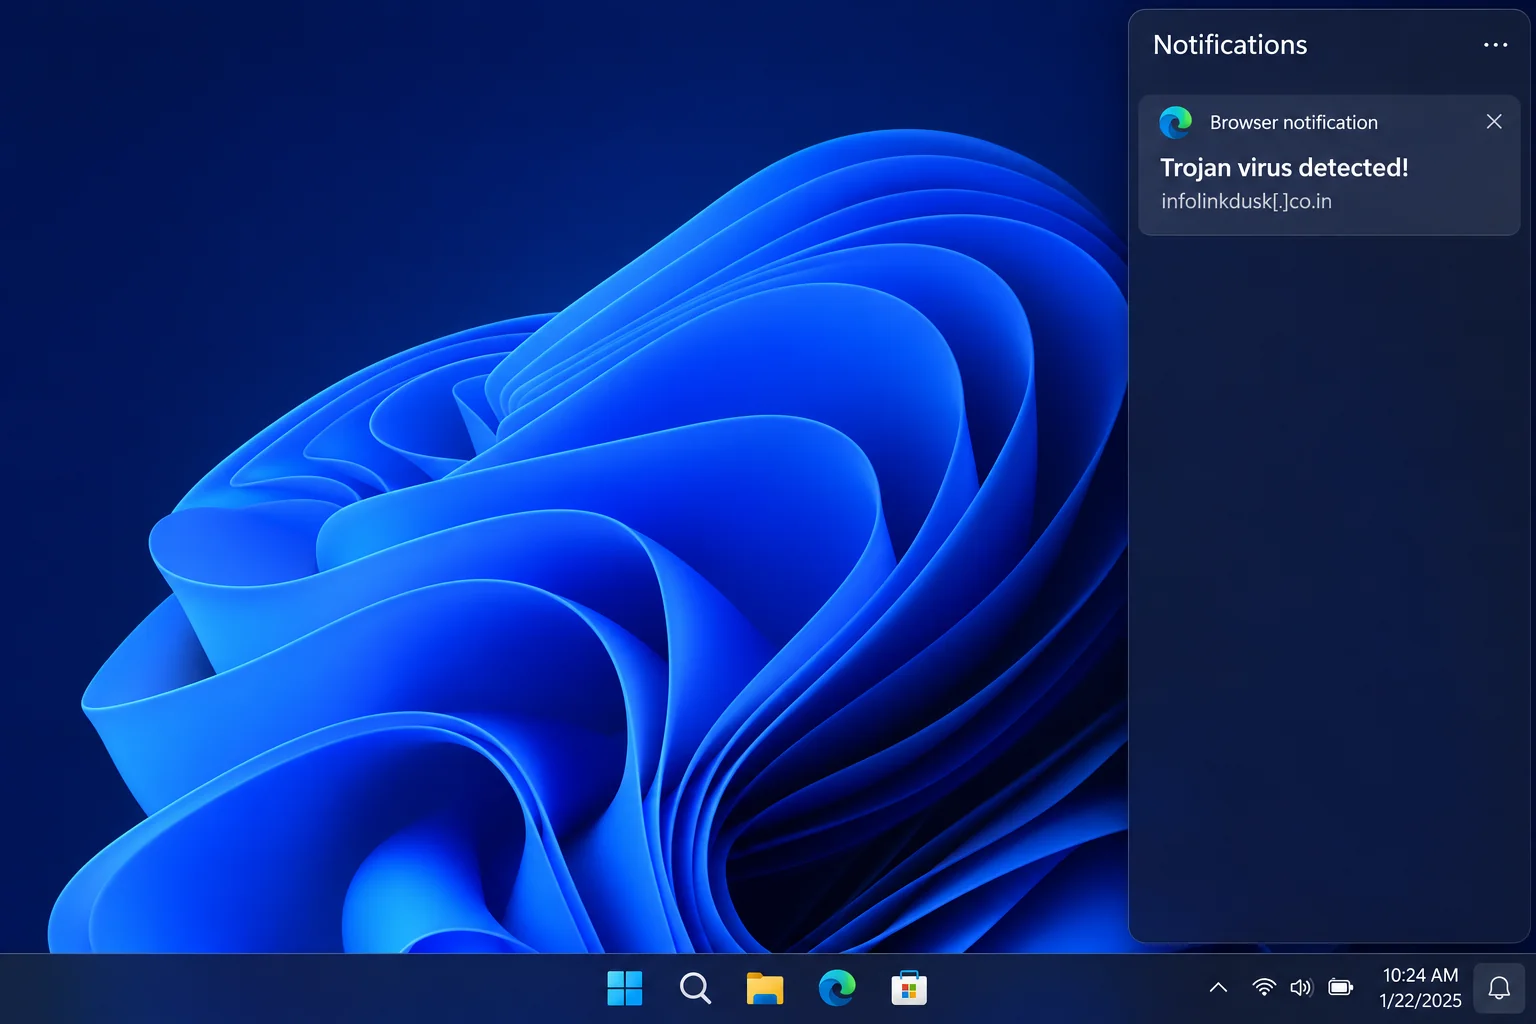
Infolinkdusk.co.in has been documented sending browser notifications that mimic security alerts. One reported notice claimed a Trojan had been detected and used the McAfee name.
The same case showed a Windows Defender lookalike in the browser. Microsoft and McAfee did not issue those copied messages.
Don’t count two warning panels as two independent findings. One browsing session can show several pieces of misleading content, each dressed up as a different security product.
The image above recreates the notification stage. It’s not a scan result, and it doesn’t establish which layout you’ll see on your own device.
The original permission can outlast the original visit
The page was observed presenting a false human verification check. It sought permission from the browser to send notices after the visitor moved on.
That permission is a real browser feature. What isn’t real is the page’s explanation that agreeing to receive notifications is part of proving you’re human.
Website notifications can appear outside the original tab in your system’s notification area. Seeing one there doesn’t make it a Windows Security result.
Separate browser spam from anything you did next
If the only thing you did was allow a website to send notices, start by taking that permission away. Don’t buy an antivirus subscription to stop one site notifying you.
Check which of these happened:
- You saw a web page claiming to run a scan, then closed it.
- You granted a site permission and saw repeated desktop notices afterward.
- You followed a notice and entered account or payment information.
- You ran a download or let someone control the device remotely.
Each item describes a different exposure. Deal with the permission in all relevant cases, but don’t expect that change to undo a purchase or close a stolen account session.
How the Infolinkdusk.co.in Notification Scam Works
Step 1: A redirect interrupts what you were doing
The verification page might interrupt a video or appear when you’re following another link. It needn’t have any genuine connection to the service you were using.
Close the suspicious tab without completing its test. If you can’t reach the tab control, use your operating system’s window controls instead of the page’s buttons.
When you reopen your browser, skip restoring the suspicious tab if prompted. Doing so keeps the page closed without touching bookmarks or account settings.
Step 2: The site tries to turn a web permission into a verification step
A browser may ask permission in its own small panel. The page’s design can make the browser question look like part of its instructions.
Read what the browser actually says. A request to show notifications concerns future messages from that site, not the validity of a password, a download, or a human verification.
If the request came from an unfamiliar site, deny or dismiss it. A genuine verification task doesn’t gain meaning just because a browser button appeared at the same time.
Step 3: The notice borrows the authority of security software
The reported Trojan warning referenced McAfee, while a separate panel copied Windows Defender. A familiar name might make someone skip checking which browser sent the message.
Use the actual security app if you’re worried. On Windows, open Windows Security from Start and check Protection history for a matching detection without following the alert.
The reported warning text isn’t a reliable malware name or file path. Don’t delete system components to address an accusation made only by a web notification.
Step 4: Following an alert can create another problem
A scare alert may lead to a sales page or another unsafe destination. That doesn’t mean every visitor sees the same page or owes a real renewal for a product.
A real product can be advertised through misleading means. Verify whether you subscribed and who charged you from the actual billing record, rather than the brand on the alert.
If the next page asks you to call support or install anything, stop. Handle that interaction as a new exposure, not as a necessary stage of removing the notification.
Revoke the Site’s Notification Permission
Find the browser that is actually receiving the messages
Read the small app or site line on any notification that’s still visible. Note it without tapping the notice. The app name helps you decide which browser settings to check.
If you use several browsers, look at the one that displayed the alert first. In a browser with separate profiles, check the profile you were using at the time.
The site name may be unfamiliar even if you’ve never typed it. A page can come up after a redirect from another site you did intend to visit.
Block the saved permission without opening the site
In Chrome, open Settings, go to Privacy and security, then open Site settings and Notifications. Find the unfamiliar site in the list of allowed senders.
Use the row’s menu to block the site. Chrome’s notification guide shows the permission list and its allow or block options.
In Edge, search its Settings for website notifications. Use Microsoft’s Edge instructions to find the allowed site and change its permission.
In Firefox, open Privacy & Security settings. Find Notifications under Permissions, open its settings, and set the site’s status to Block. Save your changes.
On Safari for Mac, select Safari, then Settings, then Websites. Open Notifications, find the site, and set the permission to Deny.
On your phone, check the settings in the browser that sent the notice. Use the site’s permission where available instead of silencing every notification from the app.
Test the change by looking for new alerts
Dismiss old notices after changing the permission. Existing items in the notification center don’t necessarily mean the site can still send new ones.
Check whether the origin is now blocked in the specific browser profile. You don’t have to visit it again to prove the change worked.
If alerts continue, check the latest sender line. Another site or profile might still be allowed, or the message might be coming from another application.
What to Do if You Have Fallen Victim to This Scam
The scan guide after this list is for suspicious software execution or remote access. If all you did was allow notifications, change the browser permission first.
If you only saw the page, close it. Don’t click its verification controls, run a fake scan, or call anyone it recommends. Note which browser showed it.
If there was no notification permission and nothing downloaded, don’t reopen the page to see whether a different message appears.
If you allowed notifications, remove the site’s access. Find it in the browser’s allowed-site list and block it. Close old desktop messages from that origin without opening them.
If it was a managed browser and the setting is unavailable, give your administrator the visible sender name and profile.
If you paid for something, check the real transaction. Contact the issuer through the number on your card or your banking app. Ask about the charge and possible renewal.
Save the payment date, amount, and merchant descriptor. Don’t hand over card details to a support page reached through the alert.
If you submitted a login, recover that account independently. Change the exposed password at the official service and arrange a review of current sessions or recent access.
If the request was for your employer’s credentials, notify IT even if you think the login didn’t go through.
If someone had remote access or you launched software, stop sensitive activity. Disconnect the affected machine if safe and contact your IT team or a trusted technician.
Use a clean device to report what happened. Include the program name if you know it, but don’t run it again to identify it.
Is Your Device Infected? Run a Free Malware Scan
Slow performance, constant pop-ups, or strange behavior? These are classic signs of a malware infection. A quick way to check is to scan your device with Malwarebytes Free, one of the most trusted malware removal tools available. If you only visited a scam page and didn’t download or install anything, this scan is optional.
The free version detects and removes the most common threats, including:
- Adware — the cause of those annoying pop-ups
- Browser hijackers — unwanted redirects and changed homepages
- Trojans and spyware — hidden programs stealing your data
- Potentially unwanted programs (PUPs) — software you never asked for
👉 Select your device below — Windows, Mac, or Android — then follow the simple steps to download Malwarebytes, scan your system, and remove any threats it finds. The scan usually takes 5 to 20 minutes.
Run a Malware Scan with Malwarebytes for Windows
Malwarebytes is one of the most popular and trusted anti-malware tools for Windows — and it’s completely free for removing infections. It catches threats that many antivirus programs miss, including adware, browser hijackers, and trojans. Follow the steps below to scan your PC and remove what Malwarebytes finds.
Download Malwarebytes
Click the button below to download the latest version of Malwarebytes for Windows from the official source. The free version is all you need — it will scan your computer and remove adware, browser hijackers, and other malicious software at no cost.
Download MalwarebytesOfficial installer for Windows 11 and 10. Your download starts right away.Want real-time protection? See Malwarebytes Premium Malwarebytes Free for WindowsScans and removes malware at no cost
-
Install Malwarebytes
When the download finishes, open your Downloads folder and double-click the MBSetup file. If Windows shows a User Account Control pop-up, click “Yes” to allow the installation.
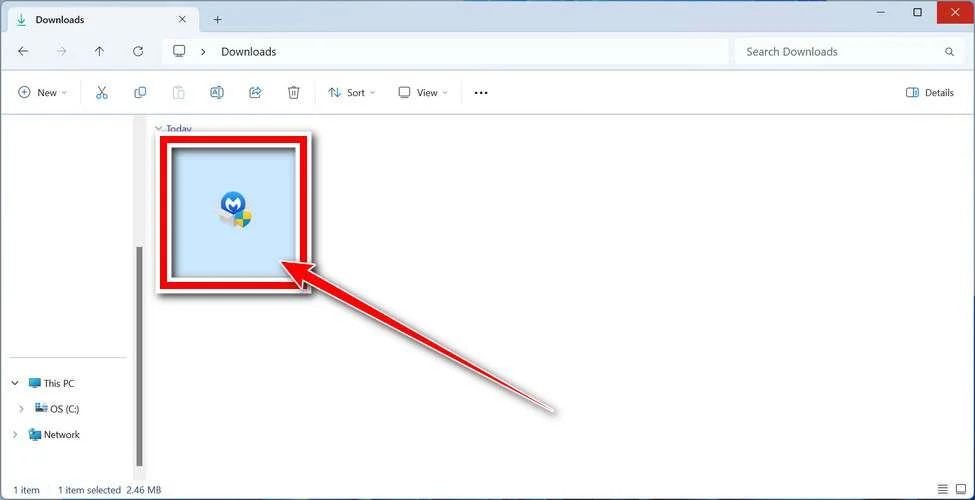
Follow the On-Screen Prompts to Install Malwarebytes
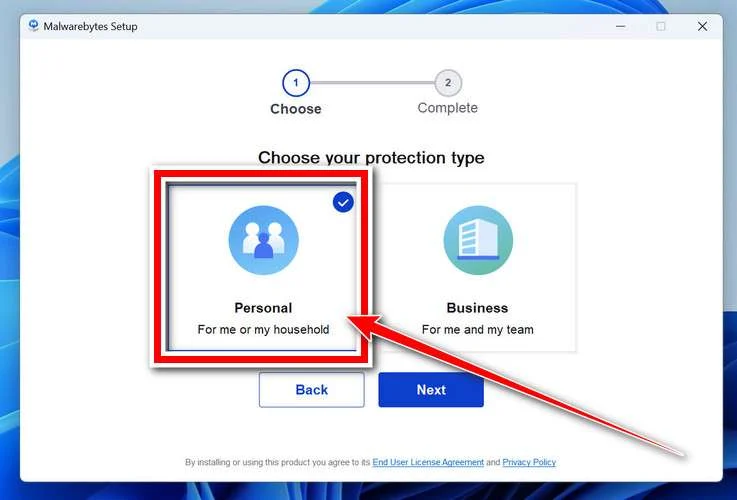
The setup wizard will walk you through a few quick screens:
-
Choose where you’re installing the program — “Personal Computer” or “Work Computer” — then click Next.
-
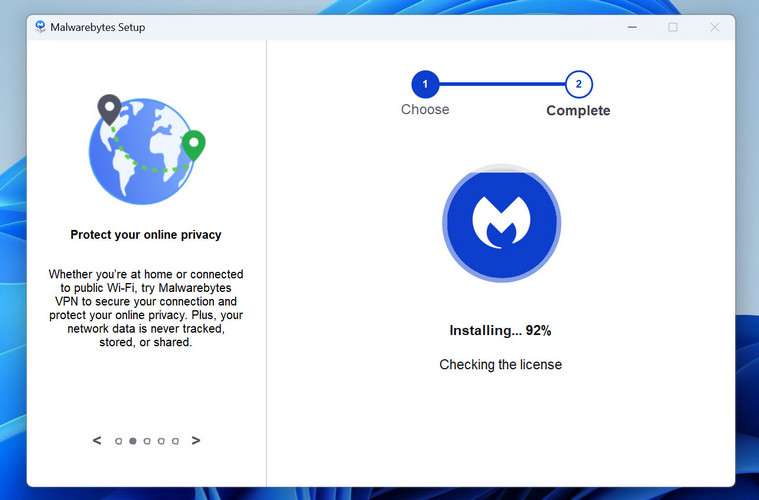
Malwarebytes will now install on your device. This usually takes under a minute.
-
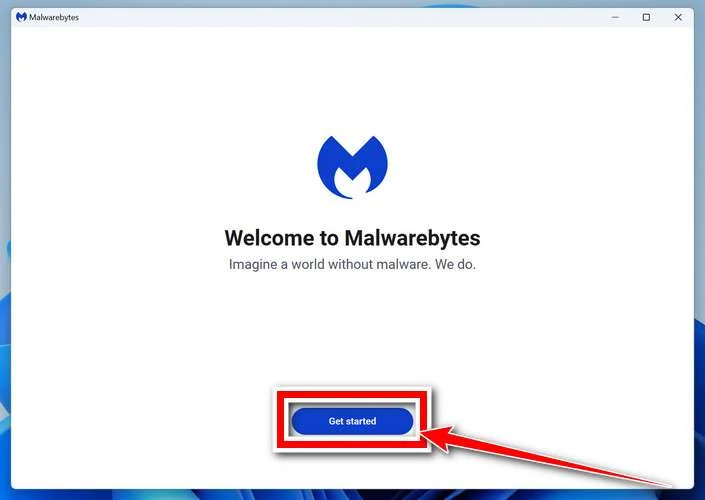
When installation is complete, the “Welcome to Malwarebytes” screen will open automatically.
-
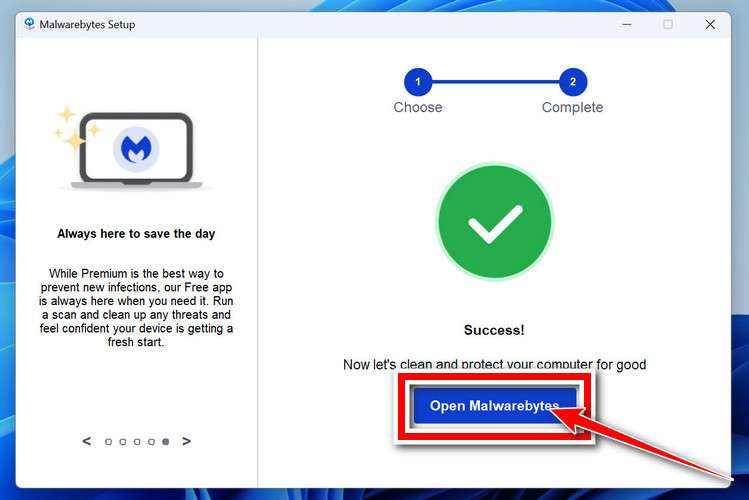
On the final screen, click Open Malwarebytes to launch the program.
-
Optional: Check for rootkits with a Custom Scan
You don’t need to change any settings for a normal scan. The standard Threat Scan in the next step is enough for most problems, so you can go straight to it.
If you also want to check for rootkits, use a Custom Scan. In current versions of Malwarebytes, rootkit scanning is only available there:
- On the Scanner tile, click the three-dot menu and select Advanced Scan.
- Choose Custom Scan. In its options, check Scan for rootkits.
- Select your system drive (usually C:\) as the location to scan, then start the scan. It takes longer than a Threat Scan.
- When it finishes, review and quarantine the results as described in the steps below.
Rootkit scanning isn’t available on Windows devices with ARM processors.
Start the Scan
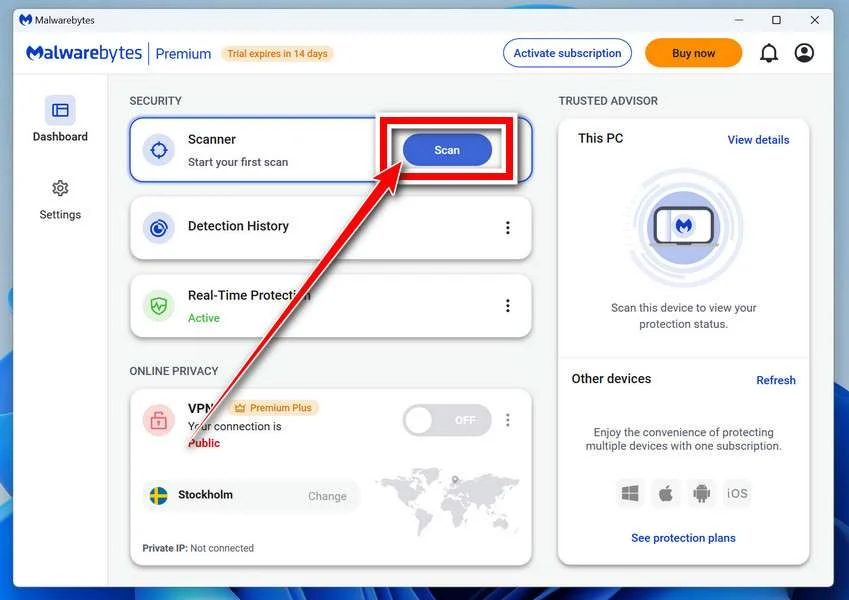
Click the blue Scan button. Malwarebytes will automatically update its virus database and start checking your computer for malware.
-
Wait for the Scan to Finish
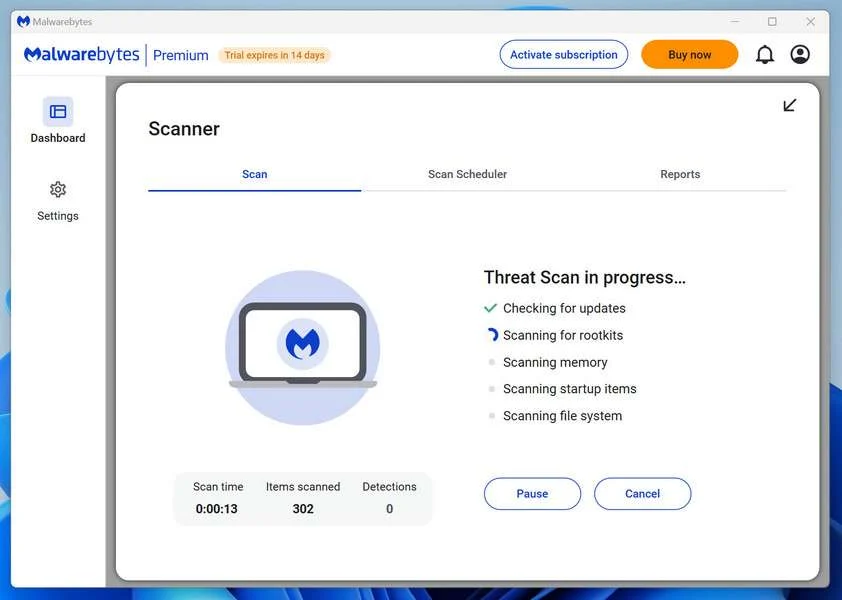
The scan checks your entire system for browser hijackers and other malicious programs, so it can take 5 to 20 minutes depending on your computer. Feel free to do something else — just check back occasionally to see the progress.
-
Quarantine the Detected Threats
When the scan is done, you’ll see a list of everything Malwarebytes found — malware, adware, and potentially unwanted programs. Click the “Quarantine” button to remove all of them at once.
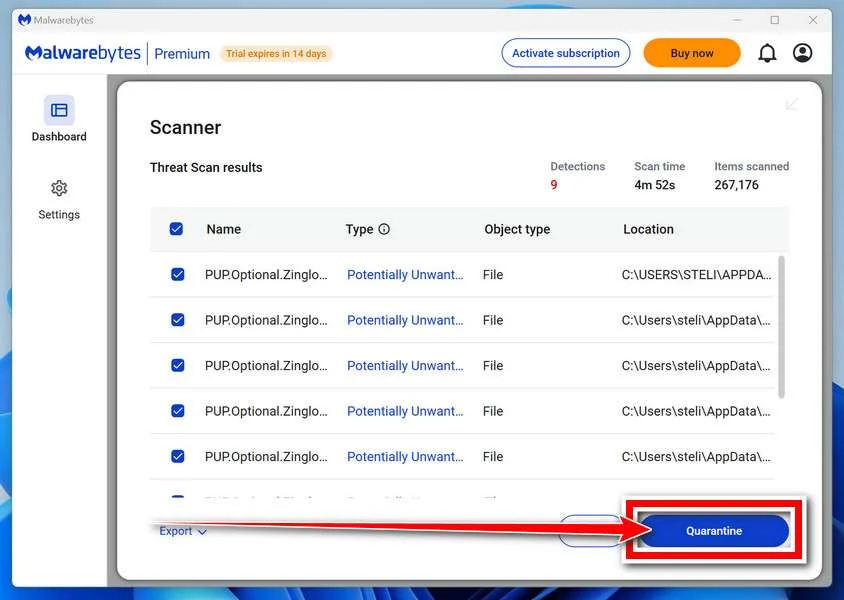
Malwarebytes will now remove the malicious files and registry entries and move them safely into quarantine.
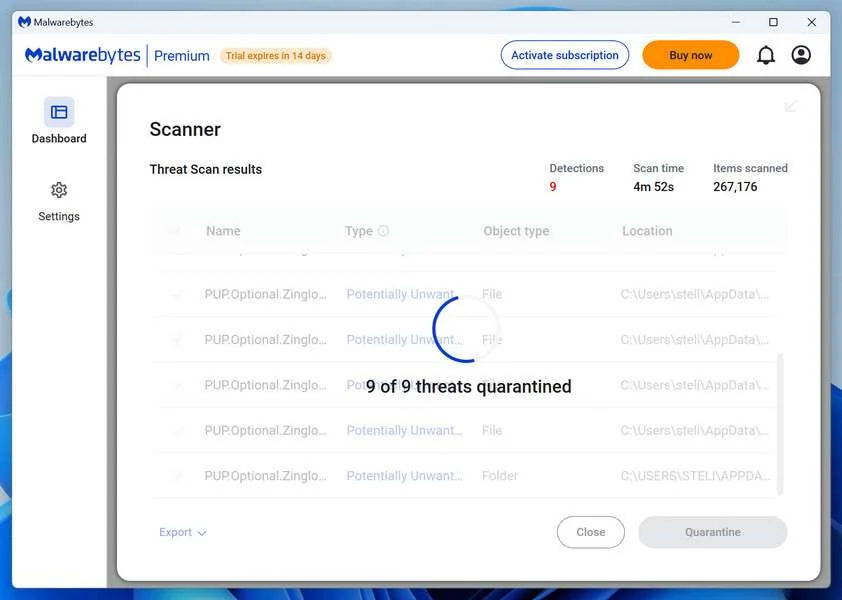
-
Restart Your Computer
Some threats can only be fully removed after a reboot. If Malwarebytes asks you to restart, click Yes. Once you’re logged back in, Malwarebytes has finished removing the threats it found.
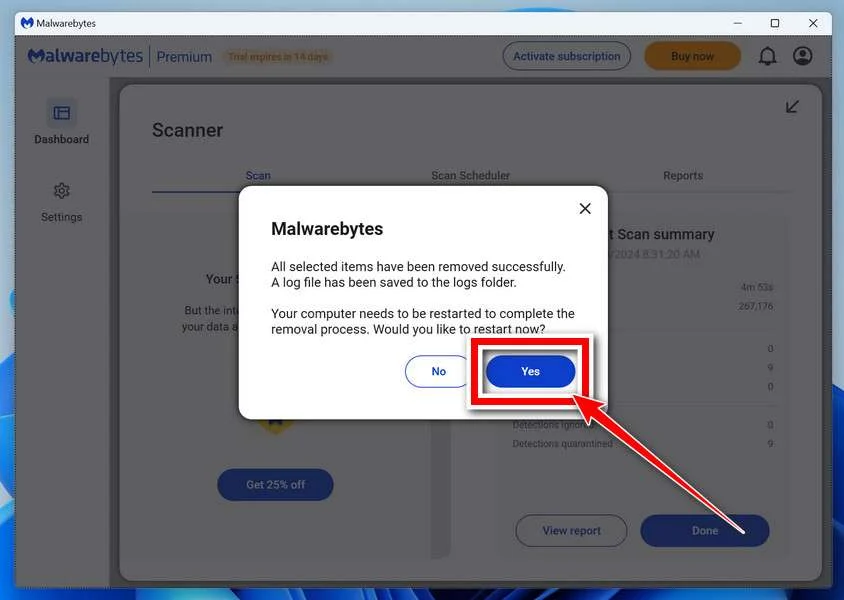
When the scan is done, check whether the problems you noticed have stopped. If they continue, see the options below.
If you are still having problems with your computer after completing these instructions, then please follow one of the steps:
- Run a computer scan with ESET Online Scanner
- Ask for help in our Windows Malware Removal Help & Support forum.
Run a Malware Scan with Malwarebytes for Mac
Malwarebytes for Mac is a free on-demand scanner that removes the malware other security software tends to miss — adware, browser hijackers, and unwanted programs included. Cleaning an infected Mac with Malwarebytes has always been completely free, and it’s our go-to recommendation. Follow the steps below to scan your Mac and remove what Malwarebytes finds.
-
Download Malwarebytes for Mac
Click the button below to download the latest version of Malwarebytes for Mac.
Download MalwarebytesOfficial installer for macOS. Your download starts right away.Want real-time protection? See Malwarebytes PremiumMalwarebytes Free for MacScans and removes malware at no cost -
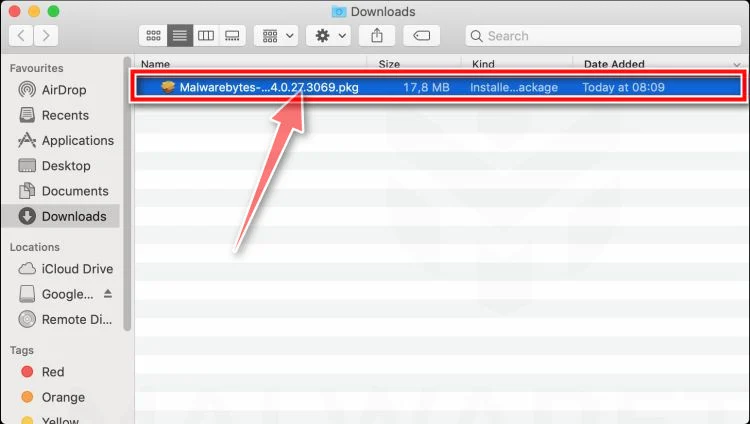
Open the Malwarebytes setup file
When the download finishes, open your Downloads folder and double-click the setup file to begin the installation.
-
Follow the On-Screen Prompts to Install Malwarebytes
The Malwarebytes for Mac Installer will guide you through a few quick screens. Click “Continue” and keep following the prompts until the installation completes.
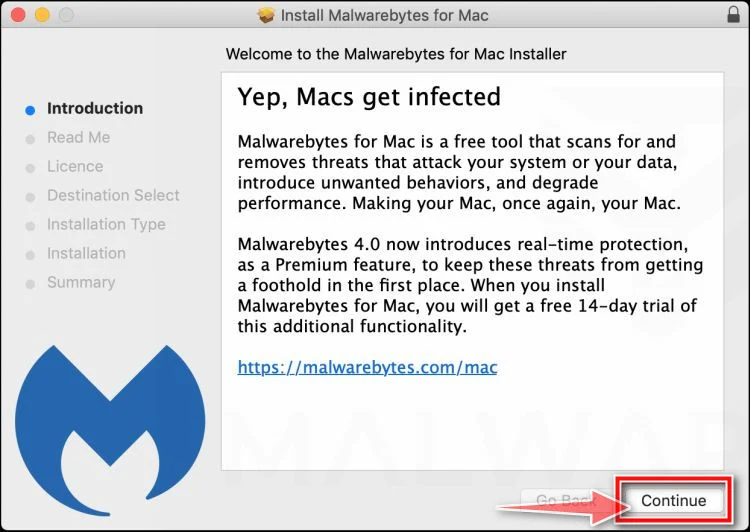
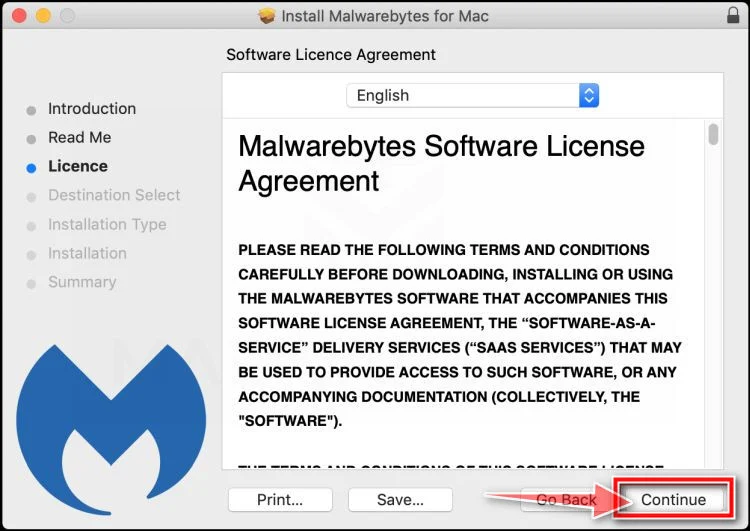
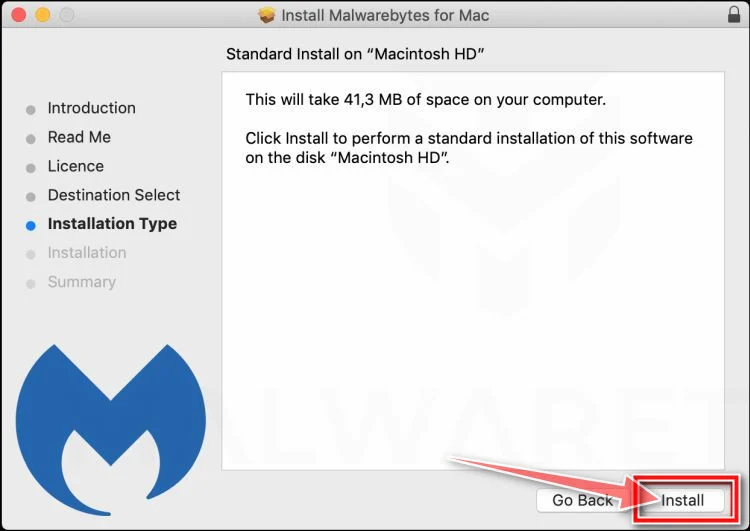
When the installation is complete, Malwarebytes opens to the Welcome to Malwarebytes screen. Click “Get started“.
Malwarebytes needs Full Disk Access to check your whole Mac. When it asks, open System Settings > Privacy & Security > Full Disk Access, turn on Malwarebytes (it may be listed as Malwarebytes Protection), and confirm with your password or Touch ID. Then return to Malwarebytes. On macOS Monterey and earlier, this setting is in System Preferences > Security & Privacy > Privacy.
-
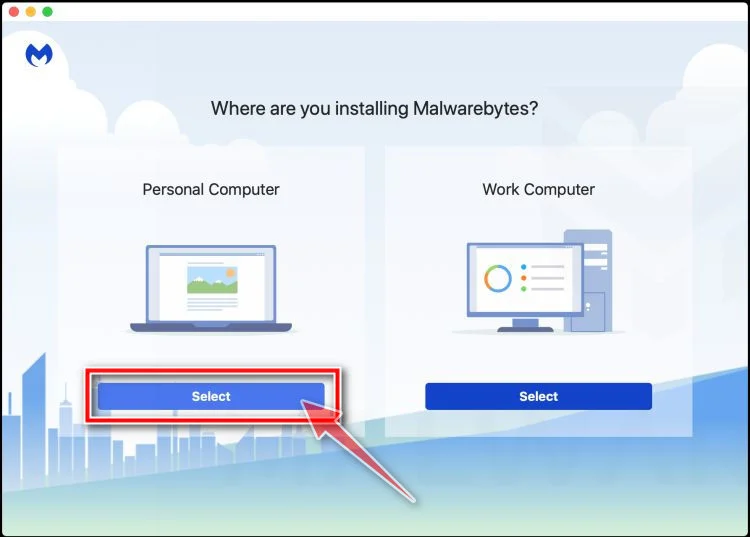
Select “Personal Computer” or “Work Computer”
Malwarebytes will ask what type of computer you’re installing it on. Click either Personal Computer or Work Computer, whichever applies.
-
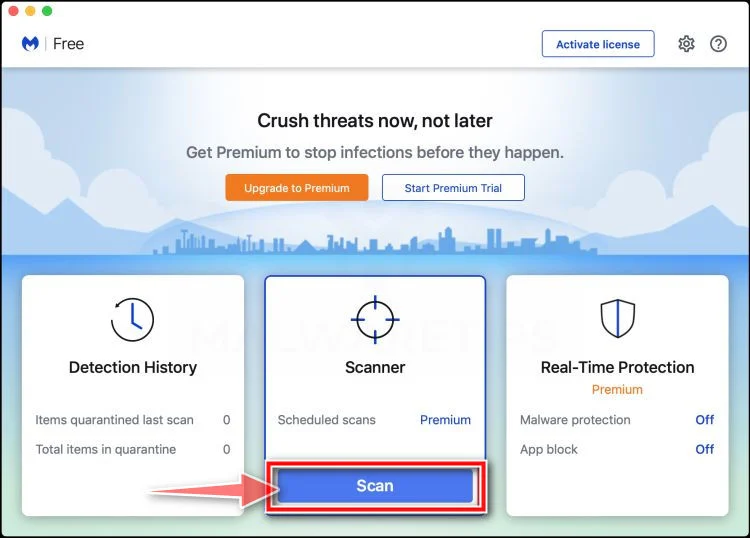
Start the Scan
Click the “Scan” button. Malwarebytes will automatically update its detection database and begin checking your Mac for malware.
-
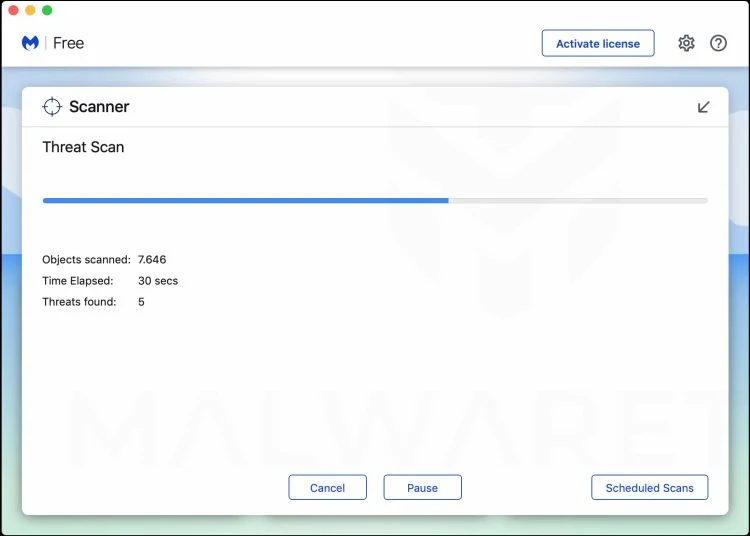
Wait for the Scan to Finish
Malwarebytes will scan your Mac for adware, browser hijackers, and other malicious programs. This can take a few minutes, so feel free to do something else — just check back occasionally to see the progress.
-
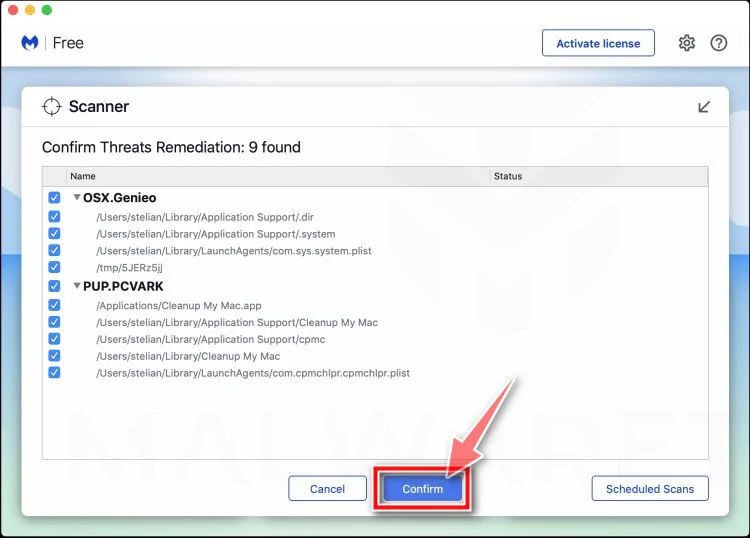
Quarantine the Detected Threats
When the scan is done, you’ll see a list of everything Malwarebytes found. Click the “Quarantine” button to remove all the threats at once.
-
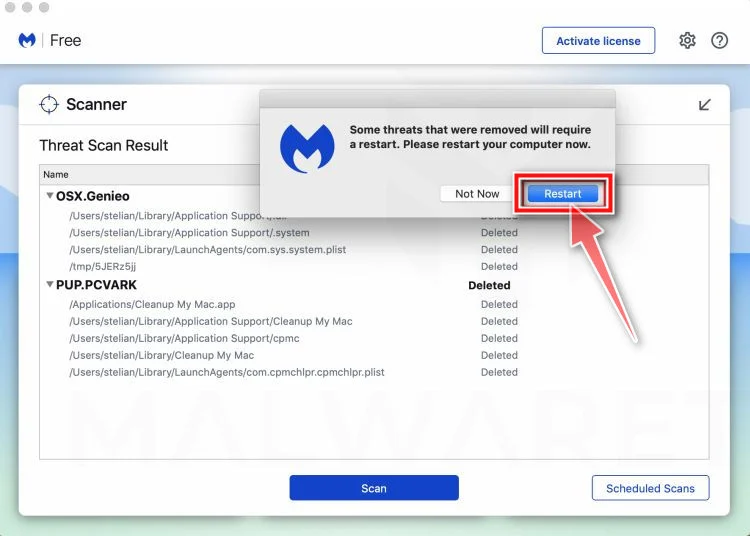
Restart Your Mac
Malwarebytes will now remove all the malicious files it found. Some threats can only be fully removed after a reboot — if Malwarebytes asks you to restart, allow it. Once you’re logged back in, check whether the problems you noticed have stopped. If they come back, save the scan report and ask for help in our forum.
If the problems you noticed continue after the scan, see the options below.
If you are still experiencing problems while trying to remove a malicious program from your computer, please ask for help in our Mac Malware Removal Help & Support forum.
Run a Malware Scan with Malwarebytes for Android
Malwarebytes for Android scans your phone or tablet for malware, adware, and potentially unwanted apps. The free version scans only when you start a scan. Real-time protection, which checks apps automatically, is part of the paid Premium version.
-
Download Malwarebytes for Android.
You can download Malwarebytes for Android by clicking the link below.
Get Malwarebytes for AndroidOpens Google Play in a new tab.Want real-time protection? See Malwarebytes Premium for AndroidMalwarebytes for AndroidScans your phone and removes malware at no cost -
Install Malwarebytes for Android on your phone.
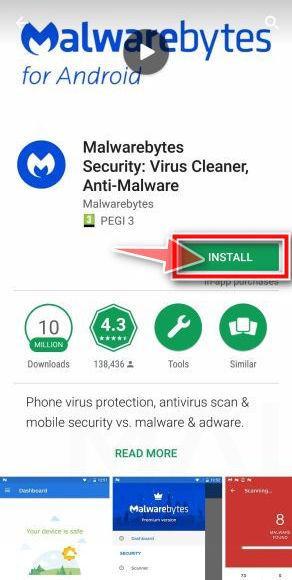
In the Google Play Store, tap “Install” to install Malwarebytes for Android on your device.
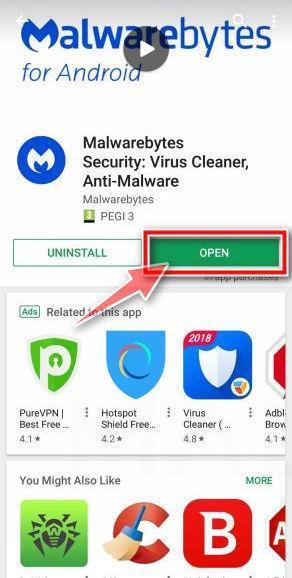
When the installation process has finished, tap “Open” to begin using Malwarebytes for Android. You can also open Malwarebytes by tapping on its icon in your phone menu or home screen.
-
Follow the on-screen prompts to complete the setup process
When Malwarebytes opens, it walks you through a short setup. Tap Get started and follow the prompts. If you see an offer for a trial or a paid plan, read it before you accept. You can skip it and keep using the free scanner.
Malwarebytes will ask for permission to access the files on your phone so it can scan them. Tap Allow, or turn on the permission in the Android screen that opens, then return to Malwarebytes.
-
Run a scan with Malwarebytes for Android
On the main screen, tap Scan now. In some versions, you open the menu, tap Scanner, and then tap Run a scan.
-
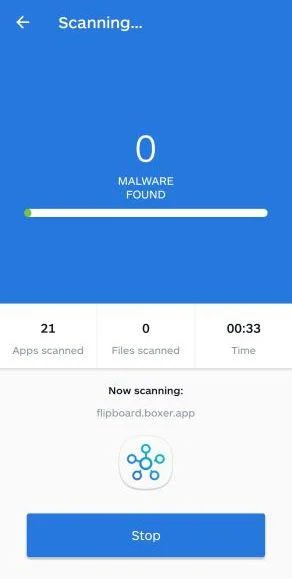
Wait for the Malwarebytes scan to complete.
Malwarebytes will now start scanning your phone for adware and other malicious apps. This process can take a few minutes, so we suggest you do something else and periodically check on the status of the scan to see when it is finished.
-
Remove the detected apps.
When the scan has been completed, you will see a list of the threats that Malwarebytes for Android has detected. Next to each detected item, tap the menu icon (three dots), then choose to uninstall the app or delete the file. Android then asks you to confirm. Tap OK or Uninstall to remove the app.
-
Restart your phone.
When the detected apps are removed, restart your phone if Malwarebytes asks you to. Then check whether the problems you noticed have stopped.
If the problems you noticed continue after the scan, see the options below.
If you are still having problems with your phone after completing these instructions, then please follow one of the steps:
- Ask for help in our Mobile Malware Removal Help & Support forum.
- Only as a last resort, reset your phone to factory settings. Read the warning below first.
- Back up your photos, videos, files, and messages, for example to your Google account or a computer.
- Make sure you know your Google account email and password. The phone asks for them after the reset. If you changed the password recently, Google recommends waiting 24 hours before you reset.
- On a Samsung phone, also make sure you know your Samsung account password.
- If you use an authenticator app for two-step verification, move your accounts to another device or save your backup codes first.
Stay Protected: Block Ads and Malicious Sites
No scan can prove a device is completely clean, so it helps to block threats before they reach you. Most infections start with a malicious ad or a fake download button — so blocking them at the source is your best defense.
We recommend AdGuard, which blocks malicious ads, phishing pages, and dangerous redirects before they can reach you.
👉 Download AdGuard and browse safely
Malwarebytes may help find unwanted software after credible device exposure. AdGuard can reduce later exposure to some advertising and risky destinations, but neither replaces blocking this specific sender.
When Two Warnings Look Like Two Separate Problems
Compare the messages with Security’s own record
Use the Windows Security app you opened independently to look at its recent detections. A legitimate security result should leave evidence in the relevant product, not just an unsolicited headline.
If you use another antivirus, check its own dashboard. Avoid clicking a browser message simply because it names the same software you already have installed.
If the real tool has a detection, investigate that event on its own terms. You can have a genuine security issue at the same time as misleading advertising.
Escalate differences that blocking alone won’t explain
If the site stops notifying you but new tabs keep opening on ordinary sites, check for unfamiliar browser changes or recently installed software. Don’t randomly remove operating system files.
If another browser displays the alert, check that browser’s permissions instead of changing the first one again. A managed machine may need an administrator to apply the block.
Don’t remove all of your browser data just to test this. A targeted permission change can fix one sender without clearing legitimate accounts, preferences, or work sessions.
If the Warning Pushed You Toward a Purchase
Check who took the payment, not just whose logo appeared
Open your card statement independently. If you see a charge, record the merchant descriptor and amount. Those details may not match the name used by the notification.
Look for a receipt using your normal inbox, but don’t follow new links from the same source. Confirm the subscription from the vendor account you reached independently.
If a real subscription exists and you didn’t want it, ask that vendor how to cancel and request a refund. A real purchase doesn’t make the browser warning truthful.
If you can’t identify the charge or believe it was unauthorized, contact the issuer. It can explain how to report it without relying on the seller’s support claims.
Treat unexpected support calls as a separate event
Someone who offers to fix the Trojan warning by taking control of your desktop isn’t verifying the notification source. Don’t let them direct you into banking or password settings.
If the session already happened, note when it started and what the person could see. Tell a trusted responder if bank, work, or email accounts were open at the time.
If you can confirm authorization to remove remote-support software, use your technician’s instructions. On managed devices, let IT handle it so you don’t remove a legitimate company tool.
If the person calls again to offer a refund, hang up and contact the payment provider yourself. A refund doesn’t require the original caller to see your screen.
Keep the useful notifications you actually chose
Blocking all site notifications can make sense if you don’t use the feature. If you rely on calendar alerts or a work app, start with a targeted block.
If you’re helping someone else, show them the allowed-site list and point out the difference between that list and operating system notification settings.
That way, if another warning appears with a different origin, they can check the browser again without reopening the original tab or buying another product.
Give your technician a usable record
Write down the browser, account profile, and time a new alert appeared. If possible, collect the displayed sender without exposing any personal messages visible in Notification Center.
Record what changed after you blocked the origin. That before-and-after comparison is useful when the technician needs to distinguish a browser permission from persistent software.
If you also bought a product, don’t send your full card number to prove it. A merchant name, approximate time, and case number usually communicate the situation more safely.
Frequently Asked Questions
Is the Trojan warning from Infolinkdusk.co.in a real antivirus detection?
No. The reported warning was delivered through the browser and imitated security products. Open your existing security software independently to check genuine detections.
Why did I see both McAfee and Windows Defender names?
Both names appeared in the reported deceptive presentation. Two familiar brands appearing in browser content don’t establish two scans or corroborate one another.
Can I block the site without returning to it?
Yes. Open notification permissions in the browser that delivered the alerts and select the saved origin there. Don’t navigate to the site to change its permission.
Why can the notice appear after the original page is gone?
Web notification permission can continue working after the original tab closes. Block the site’s permission to stop new messages from that sender.
Should I reinstall Windows if the notifications keep coming?
Not on this symptom alone. Check the browser profiles, permission lists, and actual sender. Seek device help if something ran or security software reports a separate issue.
What if a page asked me to renew real antivirus software?
Check your actual product account or payment records through an independent route. A web alert isn’t proof that a subscription expired or that you owe a fee.
The Bottom Line
Block Infolinkdusk.co.in in your browser’s notification settings. Don’t follow its Trojan warnings to buy software, start a scan, or speak with supposed support.
If you installed anything, allowed remote access, or shared account details, report that action to the relevant provider or trusted technician. Removing notifications is only the first part.

Join the discussion
0 commentsShare your experience or ask a question about this article.
Your progress
Did these steps help?
Let us know how the guide worked for you.
Describe what you see and the step you reached. Keep passwords and other private information out.
Discussion
Start the conversation
Have a question or something useful to share? Add the first comment.