


Your documents are still in their folders, but their names suddenly look unfamiliar. Opening one brings an error instead of the work you expected.
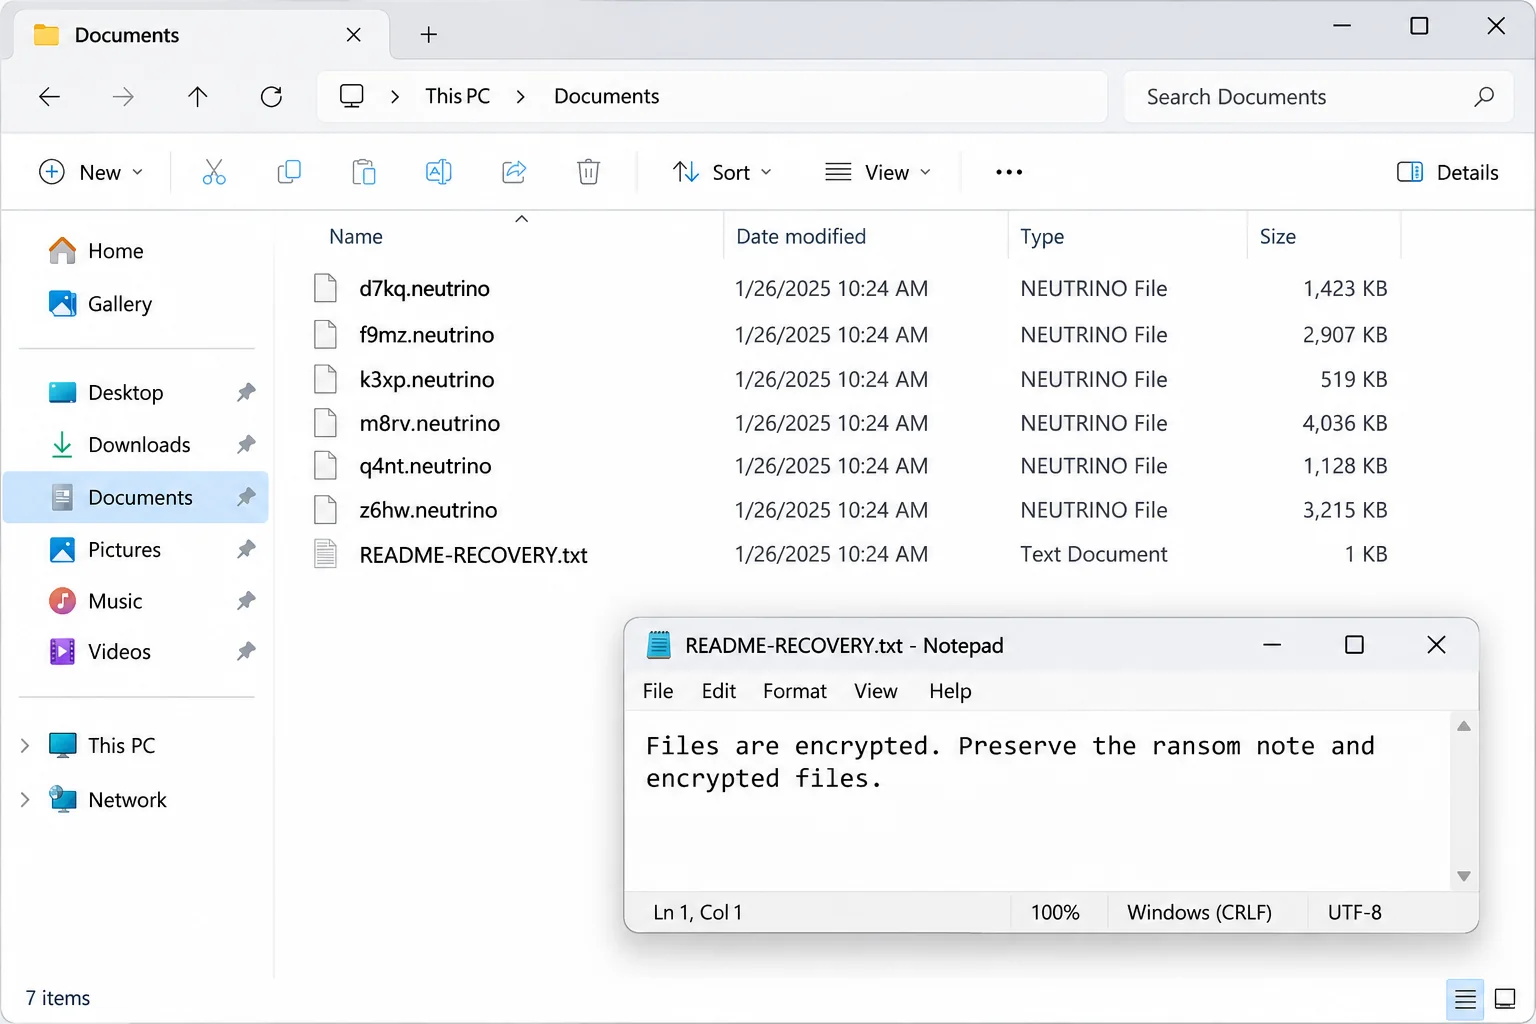
Then you notice README-RECOVERY.txt beside those .neutrino files. Before following its instructions, it helps to understand what the changed names can tell you.
Overview
The File Extension Is Only Part of the Damage
Neutrino ransomware encrypts files and replaces their names with short, random-looking strings ending in .neutrino. A text note named README-RECOVERY.txt accompanies the damage.
A matching extension, inaccessible contents, and the note together are stronger identification clues than the extension alone. Keep them intact for assessment.
A public ransomware support case describes this combination. Its initial automated identification was inconclusive, which matters when somebody offers an instant decryptor.
The Note Adds a Threat About Stolen Data
The extortion message claims a network intrusion and stolen company records. It threatens disclosure and directs communication through a Telegram bot.
That claim needs a separate breach investigation. A threatening note does not reveal which documents left the network, if any, or who accessed them.
Equally, working backups do not settle a possible confidentiality incident. Restoring a spreadsheet and finding out whether it was copied are different jobs.
There Are Three Separate Recovery Problems
- Contain affected computers and protect remaining storage.
- Remove malicious access or rebuild compromised systems.
- Recover usable files without damaging the remaining evidence.
Do not pay on the strength of the note’s promises. A successful demonstration on one file would not guarantee complete recovery or deletion of stolen information.
This guide covers Windows containment, illustrated malware cleanup, and realistic recovery choices. On an organization-managed device, let incident responders direct changes first.
How Neutrino Ransomware Works
Step 1: An Intrusion Happens Before the Files Change
The ransom message blames security weaknesses, but the message is not a forensic account of the entry point. Do not assume a particular vulnerability was exploited.
Investigators need the earliest relevant alerts, remote sign-ins, suspicious downloads, and file-change times. Those records can distinguish an isolated endpoint from wider network access.
A recent email may be relevant, but opening its attachment again is not a useful test. Preserve the message without executing anything it delivered.
Step 2: Encryption and Renaming Break Ordinary Access
The reported file changes combine encrypted contents with randomized names. Restoring the old extension changes a label, not the underlying data.
That is why switching document applications or selecting a different default program usually misses the problem. The application no longer has readable input.
Randomized names also make recovery harder to organize. Keep the original folder structure and any directory listings instead of combining everything into one folder.
Step 3: The Ransom Note Tries to Control the Response
The attackers offer a small-file demonstration and promise recovery after payment. They also claim they can suppress a leak and erase stolen copies.
These promises ask you to trust the same party holding the files hostage. Neither a countdown nor a confident technical phrase supplies that trust.
Keep any messages already received, but do not send sensitive business documents to prove they matter. A responder can choose suitable, nonconfidential identification material.
Step 4: Pressure Continues While Recovery Decisions Are Made
Once ordinary work stops, paying can start to look like the fastest route back. That urgency can also attract unrelated recovery fraudsters.
Anyone claiming a guaranteed private solution should explain the actual recovery method. A person quietly negotiating a ransom is not providing independent decryption.
Do not publish the organization’s confidential samples or incident details to attract help. Share the minimum necessary through an appropriate trusted channel.
What to Do After Discovering .neutrino Files
-
Separate affected equipment. Disconnect Ethernet and Wi-Fi, and detach backup drives. Avoid connecting another computer to the same affected shares.
If several business systems are involved, contact your IT response team from a clean device. Coordinated isolation is safer than unplanned changes across the network.
-
Preserve what identifies the incident. Keep the ransom note, encrypted samples, file-change times, and relevant security logs. Record what was already clicked or installed.
Avoid unnecessary shutdowns before professional evidence collection. If isolation is impossible and damage continues, discuss the competing risks with your responder immediately.
-
Protect backup access. Keep backup credentials and administration consoles away from the affected endpoint. Ask whether earlier versions or offline copies remain available.
Do not reconnect a backup drive merely to see whether it works. First decide where restoration can happen without exposing that copy.
-
Secure accounts through a clean system. Have administrators revoke suspicious sessions and replace exposed credentials. Include backup accounts, remote-access services, and privileged identities.
Changing passwords from a compromised desktop can reveal the replacements. Coordinate the account work with containment rather than waiting for every file to return.
-
Report the incident and possible data exposure. Preserve a timeline for your security team, insurer, and relevant authorities. Describe the leak threat as a claim until investigated.
If personal or customer records may be involved, obtain qualified advice about notification responsibilities. A ransom deadline does not define those responsibilities.
-
Choose a documented recovery plan. Inventory clean backups, available versions, and affected machines. Put the highest-priority data first and keep a record of each attempt.
Do not let a stranger remotely access backup systems in exchange for a promised miracle. Ask who will handle your data and what they will change.
Remove Neutrino Ransomware From Windows
Preserve recovery evidence before cleanup. If this is a managed workstation or server, do not replace your organization’s response procedure with consumer scanning instructions.
Step 1: Decide Whether Cleanup or Rebuilding Is Appropriate
For a personal Windows computer, reputable scanning can help locate malicious components. A network intrusion may instead require a planned rebuild and wider investigation.
Back up essential, nonexecutable data only under a safe plan. Do not copy suspicious installers or reconnect business shares to make the machine easier to scan.
Where recovery depends on deleted originals, avoid further writes to the affected storage. Ask a specialist about imaging it before installing tools.
Step 2: Follow the Illustrated Windows Scan Procedure
Download the Correct Windows Installer
Use the download below for Malwarebytes for Windows. Obtain the installer on a trusted computer if the affected machine cannot browse safely.
Download MalwarebytesOpens the official free-scanner page. Choose the Windows download.Optional real-time protection: Malwarebytes Premium
On the official page, choose the free scanner download for Windows. Save the installer; manual scanning and quarantine do not require a Premium purchase.
MalwareTips may earn a commission through its product links. Buying ongoing protection is optional and is not a condition for following this cleanup procedure.
Do not run an installer supplied by the suspicious message, a remote caller, or a search advertisement pretending to offer urgent technical help.
Install and Open Malwarebytes
Open Downloads and double-click the MBSetup installer. Approve the Windows permission prompt only after confirming that it belongs to the installer you obtained.
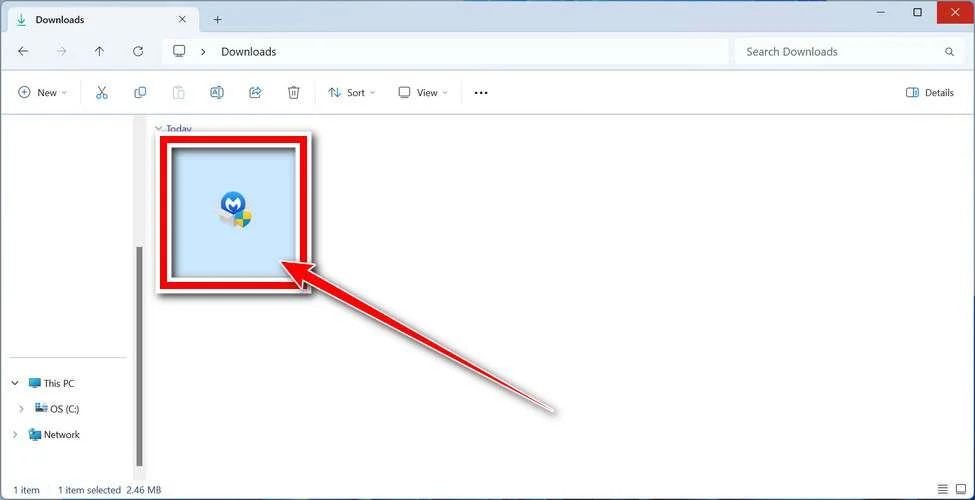
Follow the setup screens and choose the appropriate personal or work option. On a managed computer, obtain your security team’s approval before installing another tool.
Read optional offers carefully. You can skip an unwanted trial, browser add-on, or paid plan without abandoning a normal manual Windows scan.
Open the application when installation finishes. Let its detection information update if safe connectivity is available; do not reconnect an isolated business endpoint without authorization.
Run a Threat Scan, Then Check Other Affected Locations
From the dashboard, select Scan to start a Threat Scan. This checks common infection locations, memory, startup items, and the registry.
A Threat Scan is not a complete inspection of every drive. Use the Scanner tile’s three-dot menu and Advanced Scan for additional scanning choices.
Choose Custom Scan to inspect specific drives or folders. Select the Windows system drive and any other affected location your responder has approved.
Rootkit scanning is an optional Custom Scan setting on supported systems. Its absence on Windows ARM is not a reason to disable Windows protection.
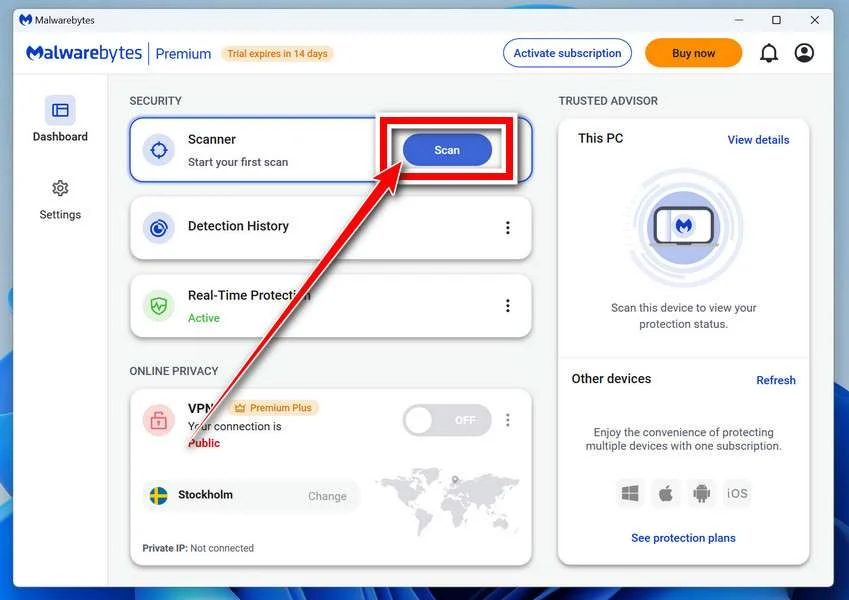
Allow the selected scan to finish. The duration depends on its scope, available storage, and the computer’s condition, so avoid a promised completion time.
If the application cannot update, start, or finish, save its error message. Repeatedly forcing a broken scanner is not a substitute for incident-response help.
When a report becomes available, review the detected names, locations, and actions. Keep a copy for whoever is helping investigate the compromise.
Review Detections and Quarantine Threats
Leave confirmed malicious items selected and choose Quarantine. Do not create an exclusion simply because a familiar program or system-looking filename appears in the report.
If a finding is unclear, record the detection and ask for advice. Do not manually delete random Windows files based only on their names.
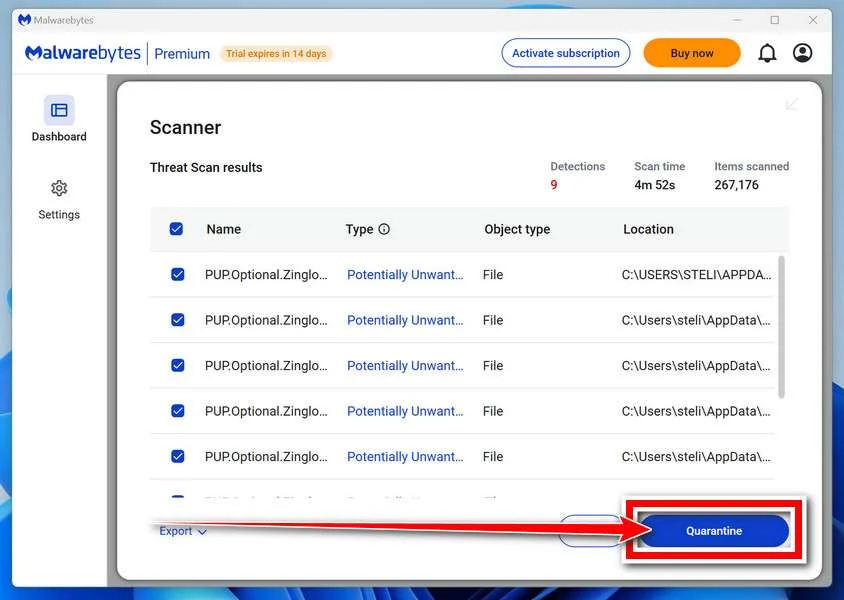
Quarantine isolates the items the tool identifies. Keep them there while the incident is assessed rather than restoring a suspicious file to test it.
Save the scan report after applying the actions. It can show a responder whether the original threat, related components, or potentially unwanted software was found.
A clean result does not undo earlier data theft. Continue the account and recovery actions relevant to this incident even when no active threat remains.
Restart if Requested and Review the Result
Save open work and allow a restart if Malwarebytes requests one. A managed-system responder may need to preserve evidence before approving that restart.
Keep backup storage disconnected during cleanup. Do not interpret a restart as permission to restore files or resume sensitive sign-ins immediately.
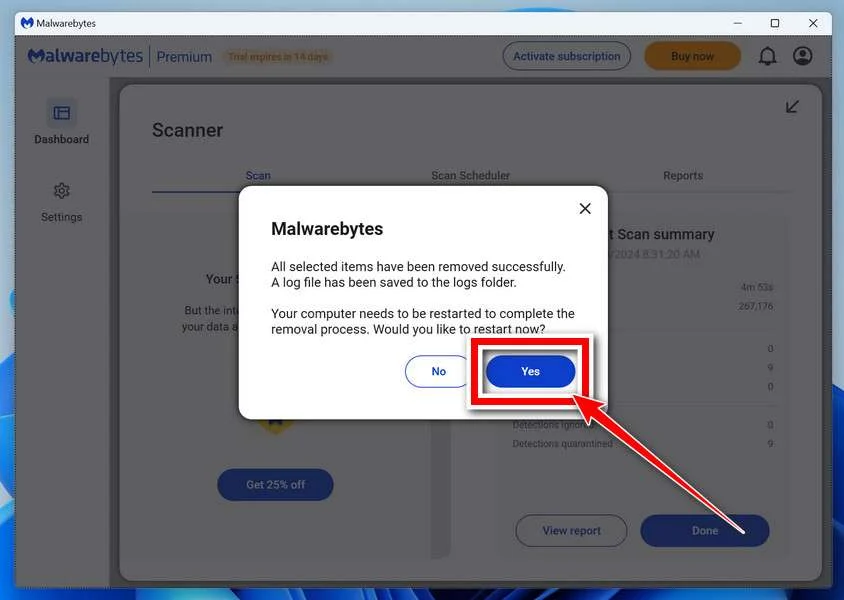
After Windows returns, reopen Malwarebytes and check the report. Run the follow-up scan appropriate to the affected locations and note any recurring detections.
Keep Windows Security and other established protection enabled. If threats return, stop ordinary use and obtain help rather than repeatedly excluding or deleting files.
For unresolved personal-device infections, ask in the MalwareTips malware-removal help forum. Do not post passwords, private logs, or confidential work documents publicly.
Step 3: Check for Continuing Access Before Restoring
An empty scan result is not a network investigation. Have a qualified helper assess recurring detections, unexpected startup entries, and unauthorized remote access.
Do not repeatedly reconnect storage while testing whether encryption has stopped. Restore to a trusted, updated environment only after the containment plan allows it.
If the computer cannot be trusted, use verified installation media for a planned rebuild. Preserve the information needed for recovery before wiping or reinstalling.
Recover Files Encrypted by Neutrino
Start With Backups That Predate the Attack
Choose a backup version from before the first suspicious activity, not simply the newest available copy. A recent backup may contain already damaged files.
Restore a small selection to a clean, separate destination first. Open different document types and check their contents before restoring an entire collection.
Compare names, dates, and expected folder contents. With randomized filenames, a recovery log helps prevent readable files from being overwritten by encrypted copies.
Check Trusted Decryptor Resources Without Assuming a Match
Use No More Ransom’s decryption tools directory to check for a genuinely matching solution. Similar names do not establish compatibility.
No verified matching Neutrino decryptor is established here. Treat an identification service’s unknown result as unknown, not as evidence that a paid advertisement has the answer.
Keep originals untouched and test any verified tool on copies. Read its supported family, limitations, required samples, and output destination before starting.
Do not upload confidential documents to an unfamiliar decryptor site. Use a nonsensitive sample and follow your organization’s disclosure rules.
Look for Surviving Windows Snapshots
Windows shadow copies can help only when a usable pre-attack snapshot survives. Their absence cannot be fixed by installing a snapshot browser.
Download ShadowExplorer from its official website. Install or use its appropriate edition on a system your responder has cleared.
Open the application and select the affected drive. Choose an available date from before the incident, then browse for the needed folder.
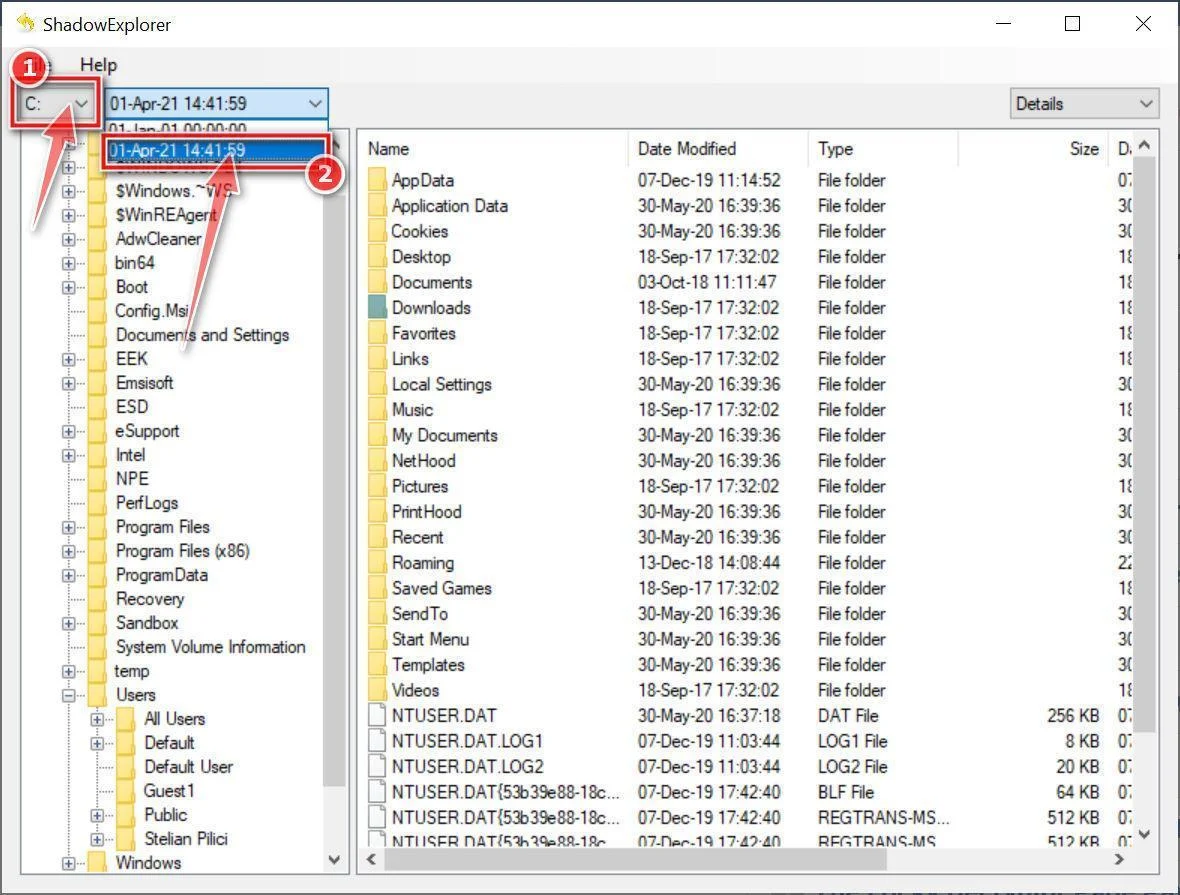
If no suitable date appears, stop this route rather than trying random repair commands. The application cannot rebuild deleted snapshots.
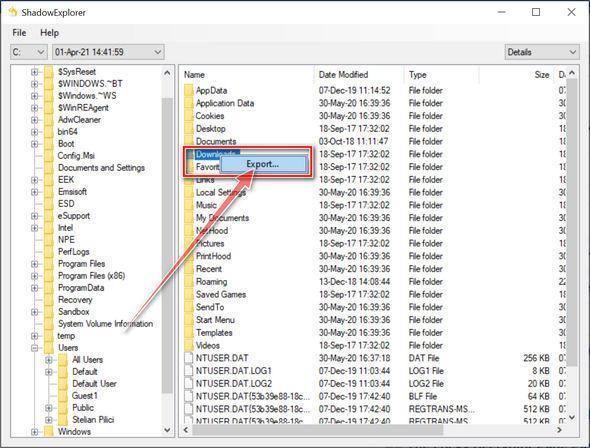
When a suitable version exists, right-click the folder or file and choose Export. Pick a separate clean destination, not the encrypted source.
Open exported copies to confirm they are readable. Keep the snapshot and encrypted originals until you know which files have actually been recovered.
Use Deleted-File Recovery Only for the Right Problem
A recovery utility may locate deleted original files. It cannot turn properly encrypted contents back into plaintext without the required cryptographic information.
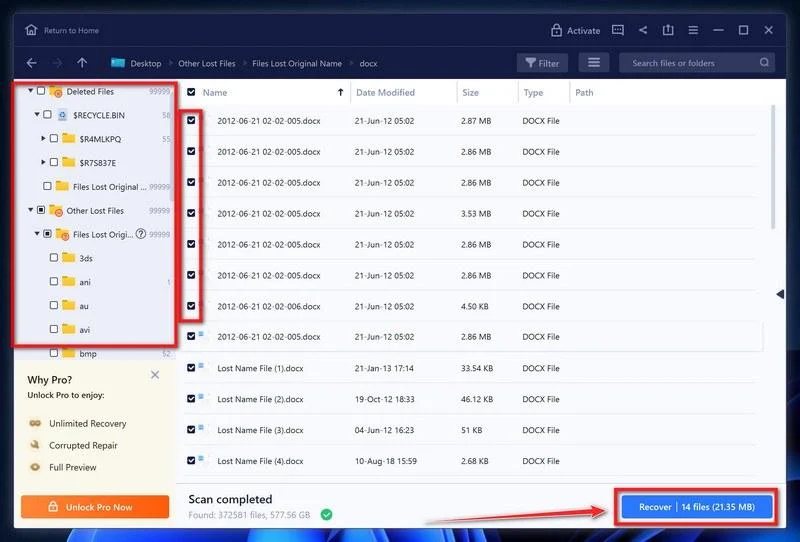
Consider EaseUS Data Recovery Wizard only when deleted originals might remain. Check the current free allowance before committing time or money.
Install it somewhere other than the affected drive. If that is your only system drive, obtain help first to avoid overwriting recoverable data.
Open the program, select the storage location holding the lost originals, and start its scan. Selecting an encrypted file does not decrypt it.
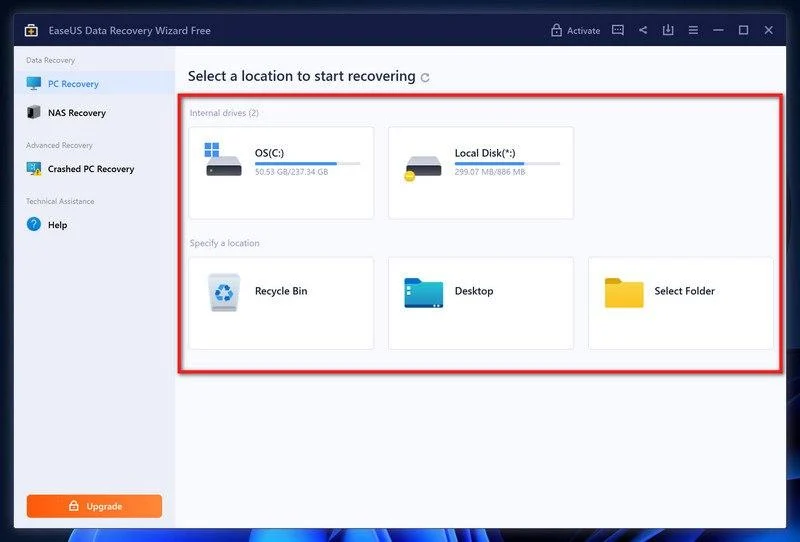
Review the scan results and preview candidate files. A familiar name or thumbnail does not establish that the full document is intact.
Select readable candidates and choose Recover. Save them to a different clean drive, then check their contents before restoring them to ordinary use.
If previews show only damaged data, purchasing a larger recovery allowance will not supply a ransomware key. Preserve the source and reassess the options.
Frequently Asked Questions
Does .neutrino Definitely Identify This Ransomware?
Not by itself. Compare the note name, its contents, file behavior, and technical findings. Extensions can be reused by unrelated programs.
Can I Rename the Files to Open Them?
No. Changing an extension cannot reverse encrypted contents, and randomized names may have replaced the original names. Work with preserved copies.
Will Malwarebytes Restore My Documents?
Malwarebytes can help detect and remove malicious software. File restoration needs a separate backup, surviving version, or genuinely compatible decryption method.
Does the Leak Threat Prove My Data Was Stolen?
The threat is not proof of successful theft. It is still serious enough to investigate access logs, affected records, and possible data transfers.
Should I Send a File for the Free Demonstration?
Do not send confidential information to the attackers. A responder can assess identification evidence without accepting the note’s negotiation process.
What If None of the Recovery Options Works?
Keep untouched encrypted copies and the note, obtain reputable assistance, and rebuild safely where needed. Do not buy guaranteed recovery from an unsolicited contact.
The Bottom Line
Do not follow Neutrino’s payment instructions as a recovery plan. Isolate affected systems, protect backups, and preserve the evidence needed to understand the intrusion.
Remove malicious access before restoring data. Start with verified backups, test recovery on copies, and investigate any stolen-data claim separately from the encrypted files.

Join the discussion
0 commentsShare your experience or ask a question about this article.
Your progress
Did these steps help?
Let us know how the guide worked for you.
Describe what you see and the step you reached. Keep passwords and other private information out.
Discussion
Start the conversation
Have a question or something useful to share? Add the first comment.