

Browser extensions live close to the accounts people use every day. That convenience becomes a serious weakness when an extension was placed there without informed consent.
PEEP deserves attention for precisely that reason. It blends into Chromium as a bookmark utility while maintaining capabilities far beyond ordinary browser customization.
Overview
PEEP is a post-compromise browser RAT
PEEP is a remote-access toolkit built around a Chromium extension and a native Windows component. Together, they bridge browser data and operating-system control.
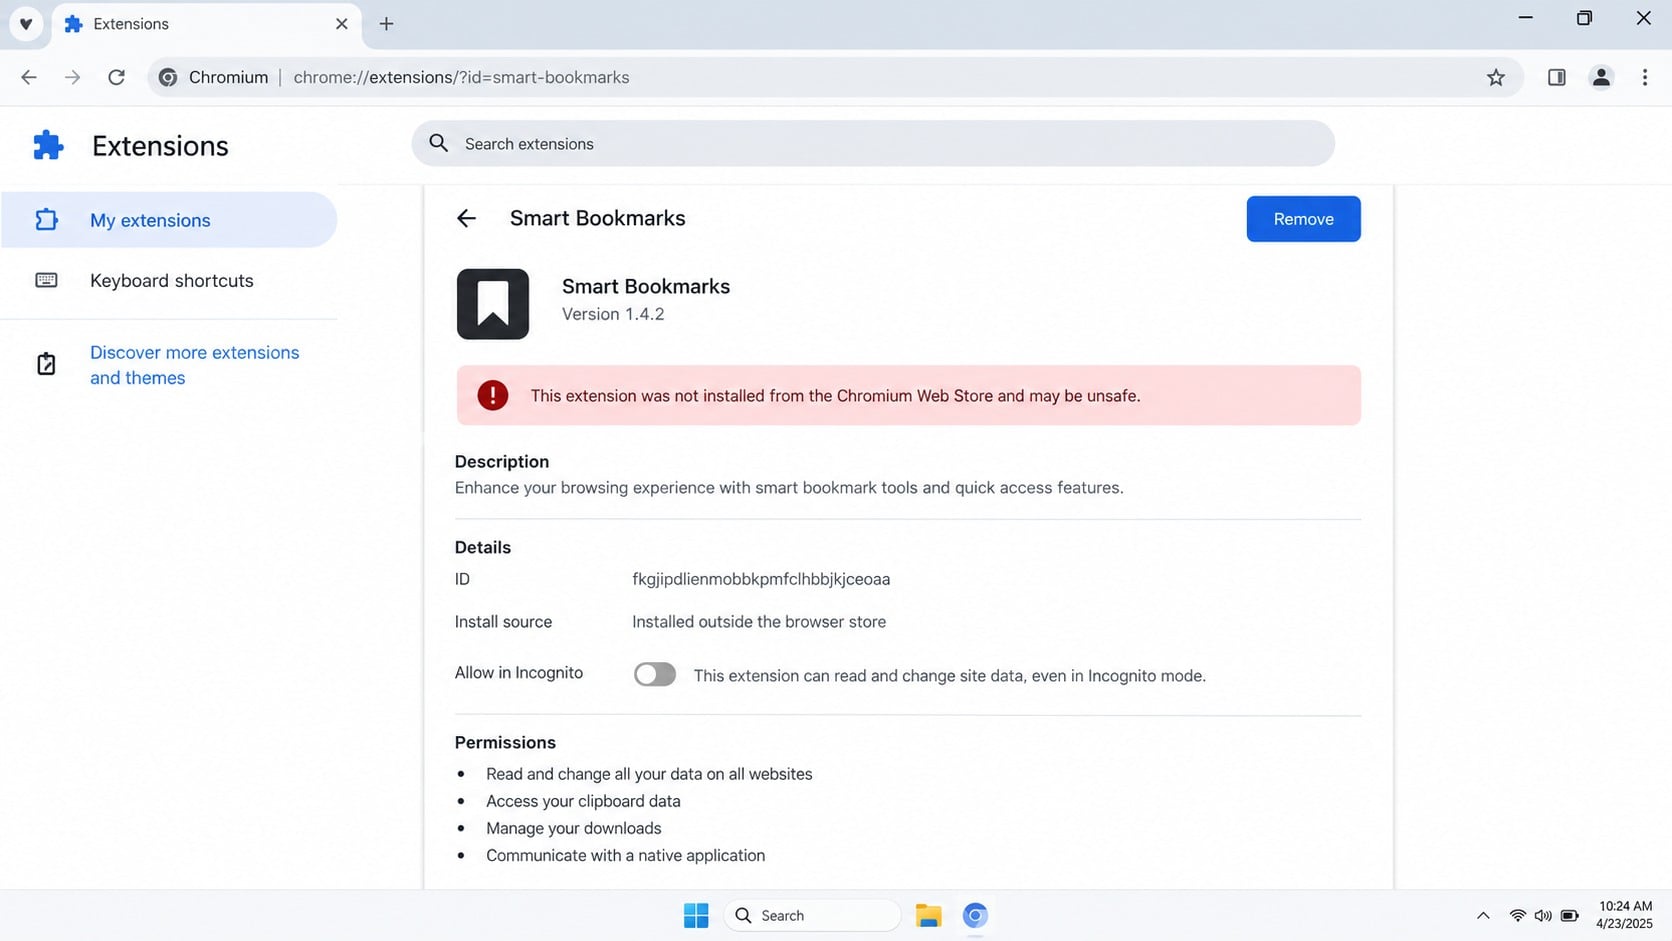
The extension presents itself as “Smart Bookmarks,” a deliberately ordinary name that can disappear among legitimate add-ons.
Researchers have not identified a standalone consumer installation campaign. PEEP appears intended for use after an attacker already gains administrative or code-execution access.
The extension reaches far beyond bookmarks
Its browser permissions can expose tabs, history, session cookies, forms, downloads, bookmarks, storage, clipboard contents, page structure, and screenshots.
A companion native-messaging host expands that reach to files, processes, services, shell commands, and other information outside the browser sandbox.
This distinction is important. Removing the visible extension alone may leave the native helper, policy entries, installation scripts, or stolen sessions unresolved.
What the available evidence does and does not prove
- Recovered packages show iterative PEEP builds and silent-install research.
- The interface name differs from internal PEEP naming.
- Some builds attempt to modify Chromium integrity-protected preferences.
- The native host supports broad file and command operations.
- Server telemetry suggested testing or activity, but did not identify confirmed victims.
- The toolkit claims authorized laboratory use, yet standard authorization records were absent.
These facts support treating PEEP as dangerous tooling. They do not justify guessing how many devices were infected or who operated every recovered build.
How the PEEP Browser RAT Works
Step 1: An attacker first obtains privileged access
PEEP is not a normal browser-store extension that spreads by persuading people to click “Add.” Its installation routines expect substantial local access.
An attacker could reach that position through another malware family, remote administration abuse, stolen credentials, an exposed management tool, or hands-on access.
The exact initial path is not contained in the recovered PEEP toolkit. Treat any confident claim about one universal delivery email or website cautiously.
Once privileged, the operator can target Chrome or another Chromium profile. Installation code identifies user data locations and existing profile configuration.
This makes PEEP a second-stage capability. The computer may already have suffered a separate compromise before “Smart Bookmarks” appears.
Incident response must therefore investigate earlier entry evidence rather than starting and ending with the extension directory.
Step 2: Smart Bookmarks is inserted into the browser profile
The malicious add-on uses a benign label and bookmark icon. Nothing in that presentation explains its ability to monitor pages or contact a native program.
Recovered installers include methods for copying extension files, registering them externally, and restarting the browser so the add-on becomes active.
Some routines enable developer mode and alter protected preference records. Chromium uses integrity values to notice unauthorized configuration changes.
PEEP’s tools attempt to calculate matching integrity data so manipulated entries look internally consistent when the browser starts.
Another path re-registers the add-on through user-level configuration without directly editing protected preferences. Enterprise-style force-install ideas were also explored.
An extension that reappears after removal may be restored by an external policy, registry entry, native installer, or synchronized profile.
Step 3: The extension watches browser activity
PEEP can inject scripts across broadly permitted pages rather than limiting itself to a small set of websites.
That position allows collection of page text, form fields, storage values, clipboard contents, active tabs, browsing history, and screenshots.
Session cookies are particularly sensitive because they can represent an already authenticated login. Possession may let an intruder bypass an ordinary password prompt.
Form monitoring can expose credentials as they are entered, even when the website itself uses an encrypted connection.
The extension can also execute JavaScript in page context, redirect requests, manage downloads, alter proxy settings, and relay browser-originated traffic.
A secure padlock protects data between browser and website. It cannot protect information from a malicious component already running inside the browser.
Step 4: The native host escapes browser-only limits
Chromium native messaging lets an approved extension exchange structured data with a local application. Legitimate products use it for desktop integration.
PEEP registers a helper associated with com.peep.lab. The recovered Windows executable embeds a Node.js runtime and accepts requests from the extension.
Supported operations include listing directories, reading or writing files, creating folders, renaming paths, calculating hashes, and searching storage.
The helper can enumerate system information, running processes, and services. It also exposes shell execution through Windows command interpreters.
That capability turns a browser foothold into broader remote control. Files outside browser profiles can become accessible to the operator.
Removing only “Smart Bookmarks” does not guarantee the native executable, manifest, policy fragments, or created files are gone.
Step 5: Regular beacons retrieve tasks
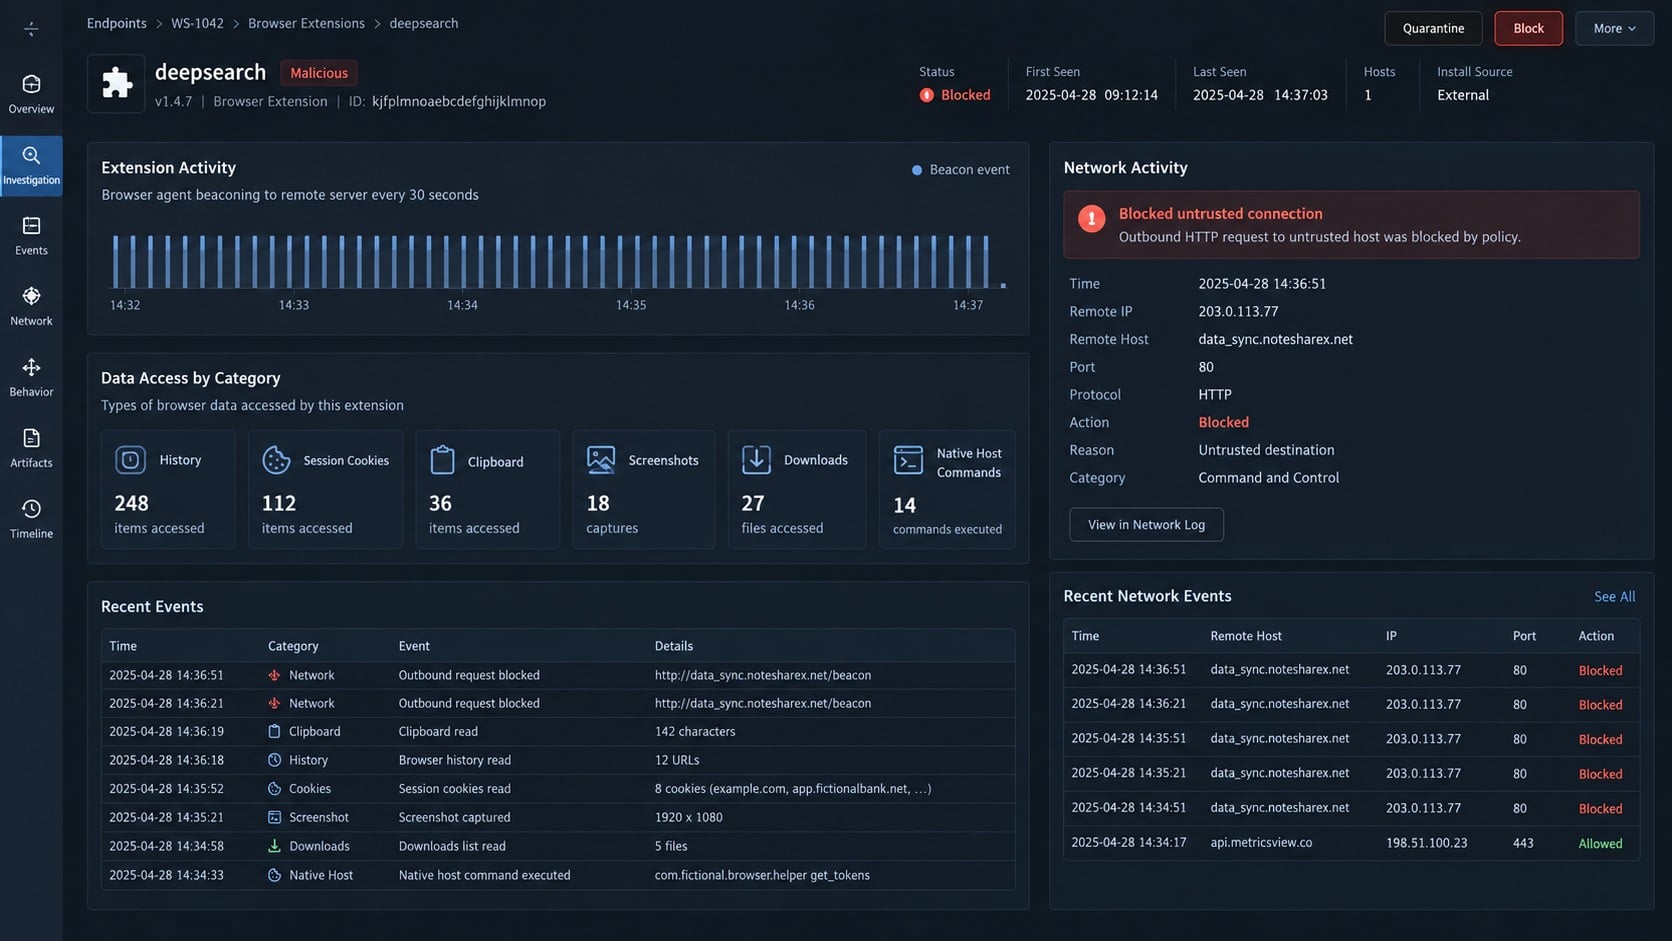
The extension schedules recurring contact with its controller, targeting roughly 30-second intervals while browser service-worker behavior allows it.
Each connection can announce the agent’s status, request a task, and return collected results. Actual timing may vary when Chromium suspends background workers.
Traffic observed in recovered code used ordinary HTTP rather than guaranteed encrypted transport. That does not make the stolen material harmless.
Data can include public IP, language, time zone, browser context, task output, and information collected from websites or the host.
The command set contains standard labels and undocumented aliases. Defenders should not rely on a single command name when reviewing logs.
Blocking a controller interrupts communication, but the local components can remain installed and reconnect if configuration or infrastructure changes.
Step 6: Stolen sessions and host access outlive removal
Once cookies or credentials leave the computer, deleting the extension cannot pull those copies back from an attacker.
Active sessions must be revoked from each important service. Password changes alone may leave existing tokens valid until they expire.
Files written through the native host may include additional tools, persistence, or modified configuration. A browser reinstall will not necessarily touch them.
Similarly, browser synchronization can restore settings or extensions to another endpoint if the affected profile remains trusted.
A complete response combines endpoint containment, extension removal, native-host cleanup, policy review, credential repair, and investigation of the original breach.
For managed systems, administrators should search the fleet. A privileged attacker may have used the same deployment method on more than one browser profile.
How to Identify the PEEP Browser RAT
Inspect every Chromium extension
Open the browser’s extension page and enable details. Look for “Smart Bookmarks,” unknown IDs, outside-store installation, or add-ons the user never approved.
Examine permissions instead of trusting names. Reading all website data and communicating with native applications are disproportionate for a bookmark organizer.
Record the extension ID, version, installation source, and profile path before removal. Those details can guide a broader endpoint search.
Review policies and external registration
Browser policy pages can show force-installed extensions, external extension entries, and settings applied outside the normal user interface.
An entry labeled “managed by your organization” is normal on a company device only when administrators recognize the corresponding policy.
Unexpected registry or external JSON registration can explain why an extension returns after the user presses Remove.
Search for native-messaging artifacts
Check native-messaging manifests and their referenced executable paths. The PEEP-related host name com.peep.lab is a notable indicator.
Investigate large unsigned executables, helper folders, copied CRX files, private keys, and PowerShell installation scripts associated with the same timeline.
Do not launch a suspicious helper to see what it does. Preserve it for security analysis and calculate hashes without executing it.
Correlate browser and endpoint behavior
Review connections occurring at regular short intervals, unusual plain-HTTP traffic, proxy changes, unexplained browser restarts, and command-shell processes started by helpers.
Look for login alerts across services visited in that browser. Session reuse from a different network can occur without a failed-password event.
Because PEEP assumes prior compromise, search for remote tools, new administrator accounts, unusual scripts, and security exclusions created before extension installation.
What to Do If the PEEP Browser RAT Infected Your Computer
- Isolate the endpoint. Disconnect network access without browsing through the suspected profile. Managed environments should isolate through their security console when available.
- Preserve the timeline. Record extension details, policy entries, native-host paths, recent alerts, and the first time the browser behaved unexpectedly.
- Use a clean device for accounts. Revoke active sessions, change important passwords, rotate recovery codes, and enable phishing-resistant multifactor authentication where possible.
- Remove extension persistence. Delete the unauthorized add-on, then remove the external registration, forced policy, copied package, and preference changes that can restore it.
- Remove the native host. Quarantine the referenced executable and manifest. Inspect scheduled tasks, startup locations, scripts, services, and recently created helper folders.
- Run layered scans. Start with an offline security scan, then run a full Malwarebytes scan to find associated payloads and persistence missed by browser cleanup.
- Reset the browser profile. Export only verified essentials, clear stored cookies and passwords, disable synchronization, and create a fresh profile after the endpoint is clean.
- Strengthen web filtering. Once recovery is complete, use AdGuard to reduce malicious advertisements, trackers, and known dangerous pages that can support initial compromise.
- Investigate the first breach. Check remote-access logs, administrator activity, downloads, PowerShell history, software deployments, and other accounts available to the affected user.
- Rebuild when assurance matters. For sensitive business systems, restore from a trusted image if responders cannot prove every native component and persistence path was removed.
Is Your Device Infected? Run a Free Malware Scan
Slow performance, constant pop-ups, or strange behavior? These are classic signs of a malware infection. The fastest way to find out is to scan your device with Malwarebytes Free — one of the most trusted malware removal tools available.
The free version detects and removes the most common threats, including:
- Adware — the cause of those annoying pop-ups
- Browser hijackers — unwanted redirects and changed homepages
- Trojans and spyware — hidden programs stealing your data
- Potentially unwanted programs (PUPs) — software you never asked for
👉 Select your device below — Windows, Mac, or Android — then follow the simple steps to download Malwarebytes, scan your system, and remove any threats it finds. The scan usually takes 5 to 20 minutes.
Run a Malware Scan with Malwarebytes for Windows
Malwarebytes is one of the most popular and trusted anti-malware tools for Windows — and it’s completely free for removing infections. It catches threats that many antivirus programs miss, including adware, browser hijackers, and trojans. Follow the steps below to scan and clean your PC in just a few minutes.
Download Malwarebytes
Click the button below to download the latest version of Malwarebytes for Windows from the official source. The free version is all you need — it will scan your computer and remove adware, browser hijackers, and other malicious software at no cost.
Download MalwarebytesOfficial installer for Windows 11 and 10. Your download starts right away.Want real-time protection? See Malwarebytes Premium Malwarebytes Free for WindowsScans and removes malware at no cost
-
Install Malwarebytes
When the download finishes, open your Downloads folder and double-click the MBSetup file. If Windows shows a User Account Control pop-up, click “Yes” to allow the installation.

Follow the On-Screen Prompts to Install Malwarebytes
The setup wizard will walk you through a few quick screens:
-
Choose where you’re installing the program — “Personal Computer” or “Work Computer” — then click Next.

-
Malwarebytes will now install on your device. This usually takes under a minute.

-
When installation is complete, the “Welcome to Malwarebytes” screen will open automatically.

-
On the final screen, click Open Malwarebytes to launch the program.

-
Enable “Scan for Rootkits”
Before scanning, turn on rootkit detection so Malwarebytes can find even the most hidden threats. Click the Settings gear icon on the left side of the screen.

In the settings menu, find “Scan for rootkits” and click the toggle so it turns blue.

Done? Click “Dashboard” in the left pane to return to the main screen.
Start the Scan
Click the blue Scan button. Malwarebytes will automatically update its virus database and start checking your computer for malware.

-
Wait for the Scan to Finish
The scan checks your entire system for browser hijackers and other malicious programs, so it can take 5 to 20 minutes depending on your computer. Feel free to do something else — just check back occasionally to see the progress.

-
Quarantine the Detected Threats
When the scan is done, you’ll see a list of everything Malwarebytes found — malware, adware, and potentially unwanted programs. Click the “Quarantine” button to remove all of them at once.

Malwarebytes will now remove the malicious files and registry entries and move them safely into quarantine.

-
Restart Your Computer
Some threats can only be fully removed after a reboot. If Malwarebytes asks you to restart, click Yes. Once you’re logged back in, Malwarebytes has finished removing the threats it found.

That’s it — your Windows PC is now clean of trojans, adware, and other malware, and should be back to running smoothly.
If you are still having problems with your computer after completing these instructions, then please follow one of the steps:
- Run a computer scan with ESET Online Scanner
- Ask for help in our Windows Malware Removal Help & Support forum.
Run a Malware Scan with Malwarebytes for Mac
Malwarebytes for Mac is a free on-demand scanner that removes the malware other security software tends to miss — adware, browser hijackers, and unwanted programs included. Cleaning an infected Mac with Malwarebytes has always been completely free, and it’s our go-to recommendation. Follow the steps below to scan and clean your Mac in just a few minutes.
-
Download Malwarebytes for Mac
Click the button below to download the latest version of Malwarebytes for Mac.
Download MalwarebytesOfficial installer for macOS. Your download starts right away.Want real-time protection? See Malwarebytes PremiumMalwarebytes Free for MacScans and removes malware at no cost -
Open the Malwarebytes setup file
When the download finishes, open your Downloads folder and double-click the setup file to begin the installation.

-
Follow the On-Screen Prompts to Install Malwarebytes
The Malwarebytes for Mac Installer will guide you through a few quick screens. Click “Continue” and keep following the prompts until the installation completes.



When the installation is complete, Malwarebytes opens to the Welcome to Malwarebytes screen. Click “Get started“.
-
Select “Personal Computer” or “Work Computer”
Malwarebytes will ask what type of computer you’re installing it on. Click either Personal Computer or Work Computer, whichever applies.

-
Start the Scan
Click the “Scan” button. Malwarebytes will automatically update its detection database and begin checking your Mac for malware.

-
Wait for the Scan to Finish
Malwarebytes will scan your Mac for adware, browser hijackers, and other malicious programs. This can take a few minutes, so feel free to do something else — just check back occasionally to see the progress.

-
Quarantine the Detected Threats
When the scan is done, you’ll see a list of everything Malwarebytes found. Click the “Quarantine” button to remove all the threats at once.

-
Restart Your Mac
Malwarebytes will now remove all the malicious files it found. Some threats can only be fully removed after a reboot — if Malwarebytes asks you to restart, allow it. Once you’re logged back in, your Mac is clean.

That’s it — your Mac is now free of adware, rogue browser extensions, and other potentially harmful software.
If you are still experiencing problems while trying to remove a malicious program from your computer, please ask for help in our Mac Malware Removal Help & Support forum.
Run a Malware Scan with Malwarebytes for Android
Malwarebytes for Android automatically detects and removes dangerous threats like malware and ransomware so you don’t have to worry about your most-used device being compromised. Aggressive detection of adware and potentially unwanted programs keeps your Android phone or tablet running smooth.
-
Download Malwarebytes for Android.
You can download Malwarebytes for Android by clicking the link below.
Get Malwarebytes for AndroidOpens Google Play in a new tab.Want real-time protection? See Malwarebytes Premium for AndroidMalwarebytes for AndroidScans your phone and removes malware at no cost -
Install Malwarebytes for Android on your phone.
In the Google Play Store, tap “Install” to install Malwarebytes for Android on your device.

When the installation process has finished, tap “Open” to begin using Malwarebytes for Android. You can also open Malwarebytes by tapping on its icon in your phone menu or home screen.

-
Follow the on-screen prompts to complete the setup process
When Malwarebytes will open, you will see the Malwarebytes Setup Wizard which will guide you through a series of permissions and other setup options.
This is the first of two screens that explain the difference between the Premium and Free versions. Swipe this screen to continue.
Tap on “Got it” to proceed to the next step.
Malwarebytes for Android will now ask for a set of permissions that are required to scan your device and protect it from malware. Tap on “Give permission” to continue.
Tap on “Allow” to permit Malwarebytes to access the files on your phone.
-
Update database and run a scan with Malwarebytes for Android
You will now be prompted to update the Malwarebytes database and run a full system scan.

Click on “Update database” to update the Malwarebytes for Android definitions to the latest version, then click on “Run full scan” to perform a system scan.

-
Wait for the Malwarebytes scan to complete.
Malwarebytes will now start scanning your phone for adware and other malicious apps. This process can take a few minutes, so we suggest you do something else and periodically check on the status of the scan to see when it is finished.

-
Click on “Remove Selected”.
When the scan has been completed, you will be presented with a screen showing the malware infections that Malwarebytes for Android has detected. To remove the malicious apps that Malwarebytes has found, tap on the “Remove Selected” button.

-
Restart your phone.
Malwarebytes for Android will now remove all the malicious apps that it has found. To complete the malware removal process, Malwarebytes may ask you to restart your device.
That’s it — your Android phone is now clean — no more malicious apps, adware, or browser redirects.
If you are still having problems with your phone after completing these instructions, then please follow one of the steps:
- Restore your phone to factory settings by going to Settings > General management > Reset > Factory data reset.
- Ask for help in our Mobile Malware Removal Help & Support forum.
Stay Protected: Block Ads and Malicious Sites
Now that your device is clean, keep it that way. Most infections start with a malicious ad or a fake download button — so blocking them at the source is your best defense.
We recommend AdGuard, which blocks malicious ads, phishing pages, and dangerous redirects before they can reach you.
👉 Download AdGuard and browse safely
Account Recovery After Browser Data Theft
Begin with the primary email account because it can reset passwords elsewhere. Review forwarding rules, recovery addresses, filters, and connected applications.
Next secure password managers, financial services, cloud storage, developer platforms, and business administration portals used in the affected browser.
Use each service’s “sign out everywhere” function. A fresh password does not always cancel existing session cookies or application tokens.
Remove unknown trusted devices, app passwords, OAuth grants, passkeys, and multifactor methods. Attackers often add persistence inside the account itself.
Check browser-saved payment information and notify card issuers when exposure is plausible. Watch for small authorization attempts as well as large purchases.
Developer users should rotate repository tokens, package-registry credentials, cloud keys, SSH keys, and secrets copied through the clipboard.
Business administrators should inspect sign-in logs by time, location, device, and token type. Successful access may occur without any visible password failure.
Document each rotation and revocation. A written checklist prevents overlooked accounts during a stressful recovery.
Continue monitoring after cleanup. Some services retain logs longer than endpoint tools and can reveal what the intruder accessed.
Notify affected organizations if regulated, customer, or employee data may have been exposed. Legal deadlines can begin before every technical detail is known.
Why a Browser Reset Alone Is Not Enough
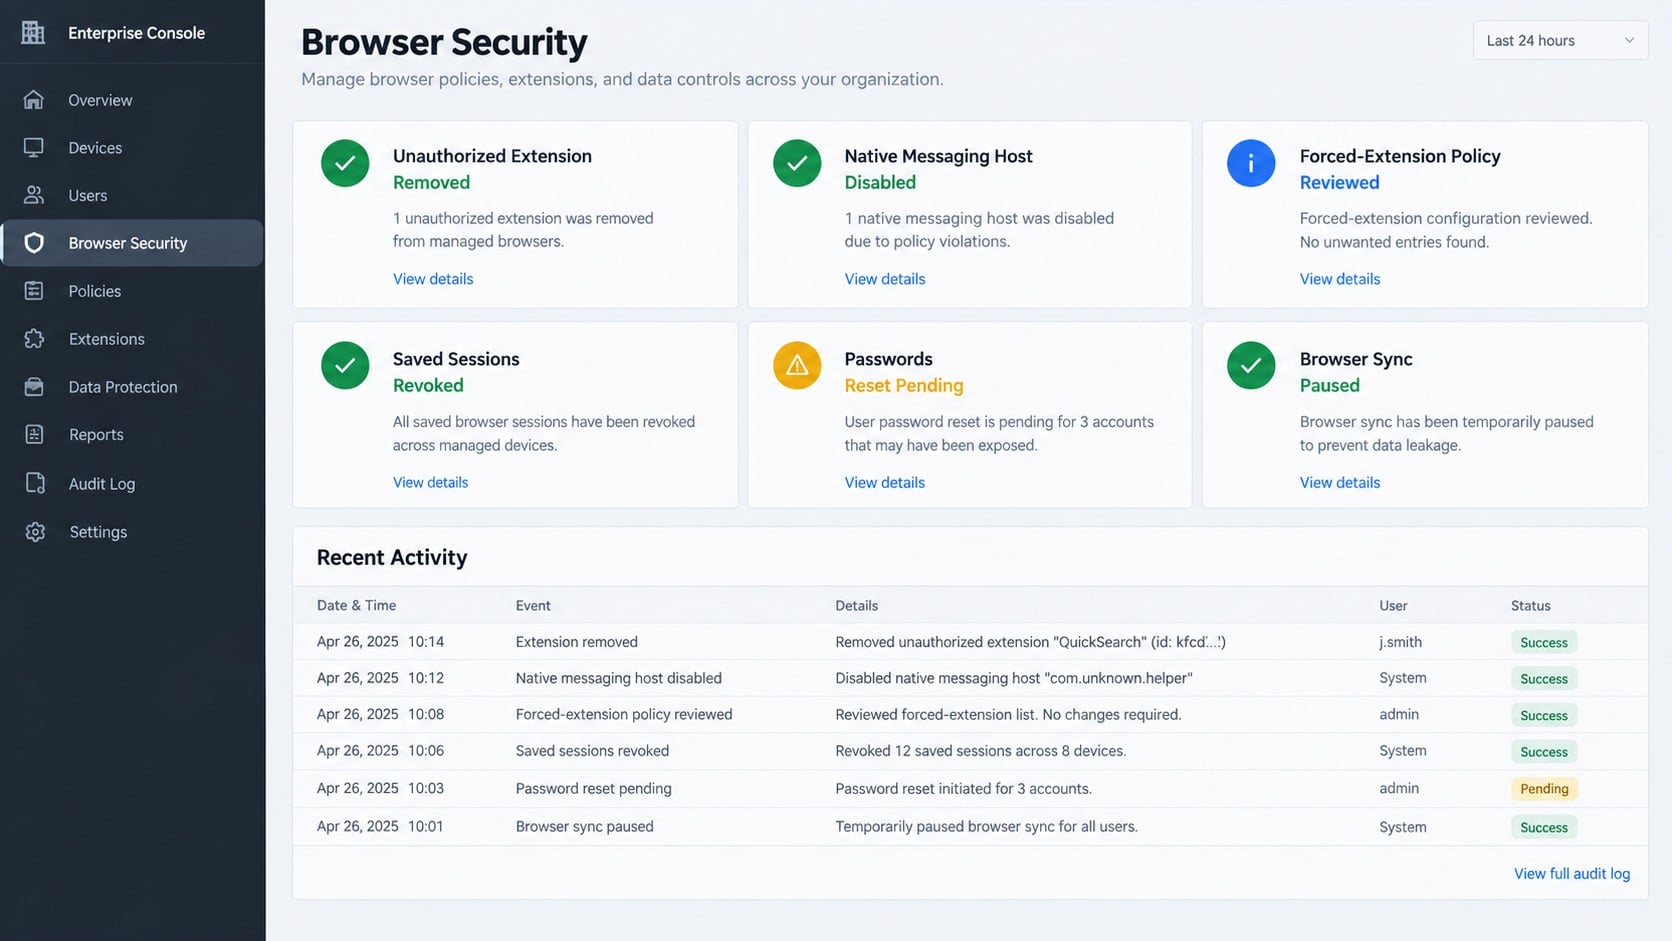
A profile reset removes settings and extensions from one browser context. It does not automatically delete a native executable registered in Windows.
It also cannot revoke cookies already copied to an outside server. Those sessions must be invalidated at their respective accounts.
External policies can reinstall an add-on after the reset. Administrators must verify registry, management, and JSON-based extension sources.
The initial attacker may still possess remote access. PEEP’s presence should trigger a search for the earlier compromise that made privileged installation possible.
Security teams should compare neighboring endpoints and browser profiles. Repeated extension IDs, helper hashes, or scheduled events can reveal a wider deployment.
Home users without reliable forensic support should consider a clean Windows reinstall when sensitive accounts and host-level commands were exposed.
After rebuilding, install only necessary extensions from verified publishers. Fewer add-ons create a smaller review surface and reduce permission fatigue.
Review extension permissions after browser updates. A legitimate tool that suddenly requests every site, downloads, and native communication deserves scrutiny.
Maintain a written extension inventory on sensitive systems. Unexpected additions, changed identifiers, or new native connections then stand out during routine security reviews.
Frequently Asked Questions
Is Smart Bookmarks always the PEEP browser RAT?
No. Similar names can belong to unrelated extensions. Confirm the extension ID, source, permissions, files, and native-host artifacts before making an attribution.
Can PEEP install itself from the browser store?
The analyzed toolkit focuses on privileged local installation, preference manipulation, and external registration. A normal store-install campaign has not been established.
Does removing the extension stop every capability?
Not necessarily. The native-messaging executable, policy entries, scripts, and stolen sessions require separate investigation and cleanup.
Can PEEP read passwords from secure websites?
A malicious extension with broad page access can observe form content inside the browser, while stolen cookies may expose authenticated sessions.
Why does the extension return after removal?
An outside policy, registry entry, external manifest, synchronized profile, or remaining installer can register it again when Chromium starts.
Should I reinstall Windows after finding PEEP?
Reinstallation is prudent when host commands ran, privileged access remains unexplained, or the computer handled sensitive business or financial accounts.
The Bottom Line
PEEP is more than a deceptive extension. Its native helper can connect invasive browser surveillance with file access and operating-system commands.
Treat discovery as a full endpoint breach: isolate, remove every component, revoke browser sessions, repair exposed accounts, and investigate how privileged access began.








