Yontoo Layers is an adware program that displays pop-up ads and unwanted advertisements on web pages that you visit. These advertisements will be shown as boxes containing coupons, as underlined keywords (in-text ads), pop-up ads or advertising banners.
![Yontoo Layers Ads [Image: Yontoo Layers virus]](https://malwaretips.com/blogs/wp-content/uploads/2013/05/Yontoo-Layers-virus.jpg)
What is Yontoo Layers?
Yontoo Layers is advertised as a “DNS service you can easily access Geo restricted content you like from around the world and unblock websites and Streaming services like Netflix, Hulu, BBC iPlayer or Pandora“. Though this may sound like a useful service, the Yontoo Layers program can be intrusive and will display advertisements whether you want them to or not.
The Yontoo Layers advertisements may have a different text under the pop-up: “Powered by Yontoo Layers“, “Brought to you by Yontoo Layers“, “RocketTab powered by Yontoo Layers“, “Ads by Yontoo Layers” or “Ads powered by Yontoo Layers“.
These ads are aimed to promote the installation of additional questionable content including web browser toolbars, optimization utilities and other products, all so the Yontoo Layers publisher can generate pay-per-click revenue.
Yontoo Layers changes your computer’s DNS servers to ones under their own control. This allows them to not only monitor what sites you are visiting, but to also replace requests from legitimate ad servers with their own ad servers.
These DNS servers are one of the main reasons that people find it difficult to disable Yontoo Layers ads from displaying on their browser. This is because if you uninstall the Yontoo Layers program, but do not disable their DNS servers, they will continue to hijack ads and display ones of their own choosing.
When your machine is infected with the Yontoo Layers adware, other common symptoms include:
- Advertising banners are injected with the web pages that you are visiting.
- Random web page text is turned into hyperlinks.
- Browser popups appear which recommend fake updates or other software.
- Other unwanted adware programs might get installed without the user’s knowledge.
To make matters worse, you will also find that Yontoo Layers will cause your computer to act more sluggish or for your web browser to freeze.
How did Yontoo Layers get on my computer?
Yontoo Layers is commonly bundled with other free programs that you download off of the Internet. Unfortunately, some free downloads do not adequately disclose that other software will also be installed and you may find that you have installed Yontoo Layers without your knowledge.
Always opt for the custom installation and deselect anything that is not familiar, especially optional software that you never wanted to download and install in the first place. It goes without saying that you should not install software that you don’t trust.
How to remove Ads by Yontoo Layers pop-ups (Virus Removal Guide)
Please perform all the steps in the correct order. If you have any questions or doubt at any point, STOP and ask for our assistance.
- To remove Ads by Yontoo Layers pop-ups, follow these steps:
- STEP 1: Uninstall malicious programs from Windows
- STEP 2: Use AdwCleaner to remove “Ads by Yontoo Layers” adware
- STEP 3: Scan and clean your computer with Malwarebytes
- STEP 4: Double-check for malicious programs with HitmanPro
- (OPTIONAL) STEP 5: Reset your browser to default settings
STEP 1 : Uninstall malicious programs from Windows
In this first step, we will try to identify and remove any malicious program that might be installed on your computer.
- Go to the uninstall menu.
Windows 10 or Windows 8
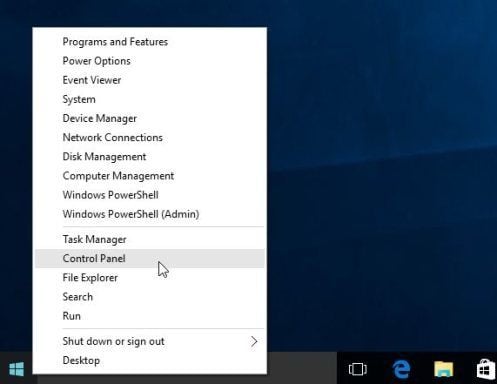
- To uninstall a program on Windows 10 or Windows 8, right-click on the Windows Start button and choose “Control Panel” from the pop-up menu.
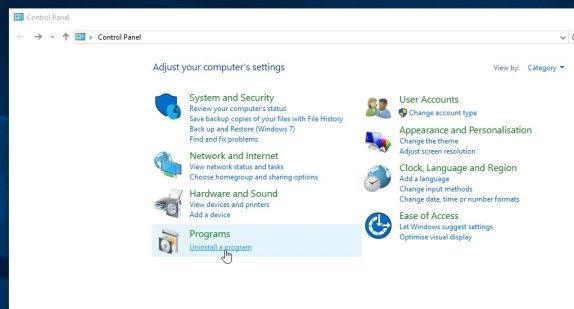
- When the “Control Panel” window opens click on the “Uninstall a program” option under “Programs” category.
Windows 7 or Windows Vista
- If you are using Windows XP, Windows Vista or Windows 7, click the “Start” button, then click on the “Control Panel” menu option.
![Control Panel in Windows Start Menu [Image: Control Panel in Windows Start Menu]](https://malwaretips.com/blogs/wp-content/uploads/2014/08/windows-start-menu-control-panel.jpg)
- When the “Control Panel” window opens click on the “Uninstall a program” option under “Programs” category.
![Click on Uninstall a program [Image: Uninstall a program]](https://malwaretips.com/blogs/wp-content/uploads/2013/03/uninstall-a-program-windows.jpg)
- To uninstall a program on Windows 10 or Windows 8, right-click on the Windows Start button and choose “Control Panel” from the pop-up menu.
- When the “Programs and Features” screen is displayed, scroll through the list of currently installed programs and uninstall any unwanted programs.Known malicious programs: Dns Unlocker, Cinema Plus, Price Minus, SalesPlus, New Player, MediaVideosPlayers, Browsers_Apps_Pro, PriceLEess, Pic Enhance, Sm23mS, Salus, Network System Driver, SS8, Save Daily Deals, Word Proser, Desktop Temperature Monitor, CloudScout Parental Control, Savefier, Savepass, HostSecurePlugin, CheckMeUp and HD-V2.2.The malicious program may have a different name on your computer. To view the most recently installed programs, you can click on the “Installed On” column to sort your program by the installation date. Scroll through the list, and uninstall any unwanted or unknown programs.
If you cannot find any unwanted programs on your computer, you can proceed with the next step.
If you are having issues while trying to uninstall a program, you can use Revo Uninstaller to completely remove this unwanted program from your machine.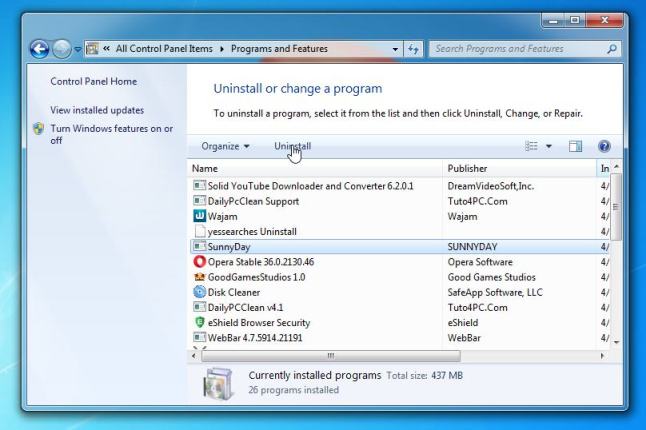
STEP 2: Use AdwCleaner to “Ads by Yontoo Layers” remove adware
Malwarebytes AdwCleaner is a free utility that will scan your computer for “Ads by Yontoo Layers” adware and other malicious programs that may be installed.
- You can download Malwarebytes AdwCleaner from the below link.
MALWAREBYTES ADWCLEANER DOWNLOAD LINK (This link will start the download of “Malwarebytes AdwCleaner” on your computer) - When Malwarebytes AdwCleaner has finished downloading, please double-click on the AdwCleaner icon to perform a system scan with this program.
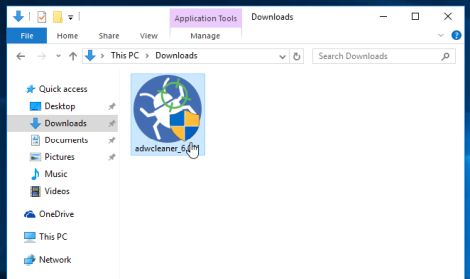
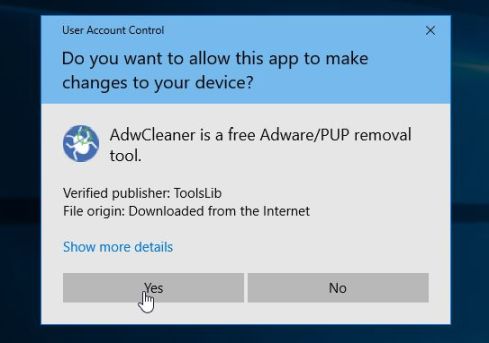
If Windows prompts you as to whether or not you wish to run Malwarebytes AdwCleaner, please allow it to run.
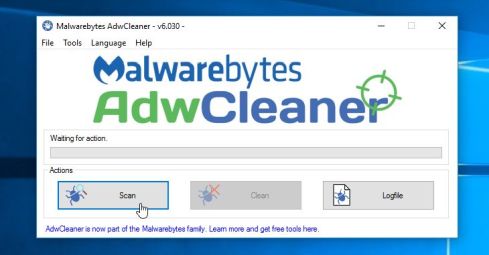
- When the Malwarebytes AdwCleaner program will open, click on the “Scan” button as shown below.
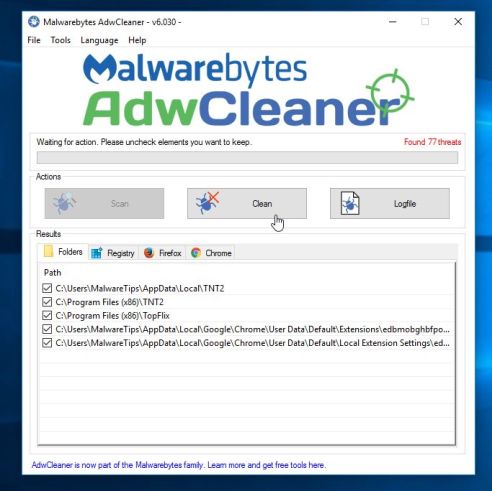
Malwarebytes AdwCleaner will now start to search for the Ads by Yontoo Layers adware and other malicious programs. - To remove the malicious files that were detected in the previous step, please click on the “Clean” button.
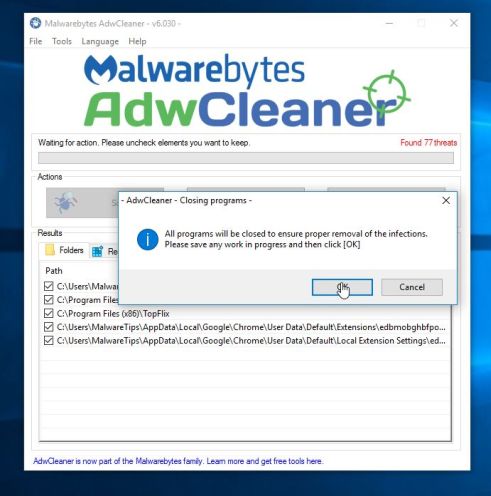
- Malwarebytes AdwCleaner will prompt you to save any open files or documents, as the program will need to reboot the computer to complete the cleaning process. Please do so, and then click on the “OK” button.
When your computer reboots and you are logged in, Malwarebytes AdwCleaner will automatically open a log file that contains the files, registry keys, and programs that were removed from your computer. Please review this log file and then close the notepad window. You can now continue with the rest of the instructions.
STEP 2: Scan and clean your computer with Malwarebytes
Malwarebytes Anti-Malware is a powerful on-demand scanner which should remove the Ads by Yontoo Layers pop-ups from your machine. It is important to note that Malwarebytes Anti-Malware will run alongside antivirus software without conflicts.
- You can download download Malwarebytes Anti-Malware from the below link.
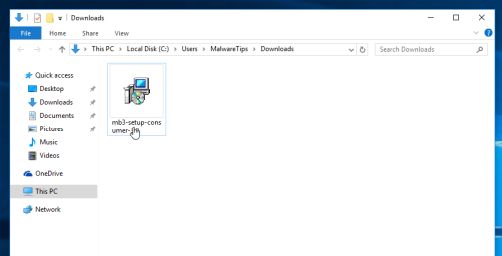
MALWAREBYTES ANTI-MALWARE DOWNLOAD LINK (This link open a new page from where you can download “Malwarebytes Anti-Malware”) - When Malwarebytes has finished downloading, double-click on the “mb3-setup-consumer” file to install Malwarebytes Anti-Malware on your computer.
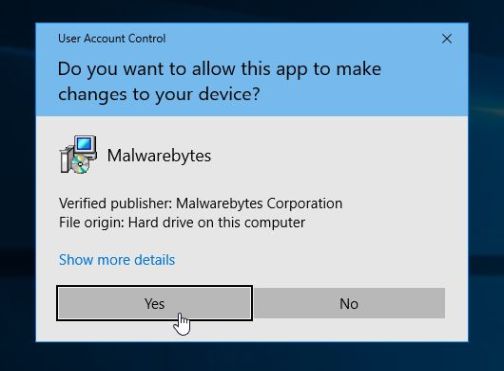
You may be presented with an User Account Control pop-up asking if you want to allow Malwarebytes to make changes to your device. If this happens, you should click “Yes” to continue with the installation.
- When the Malwarebytes installation begins, you will see the Malwarebytes Setup Wizard which will guide you through the installation process.
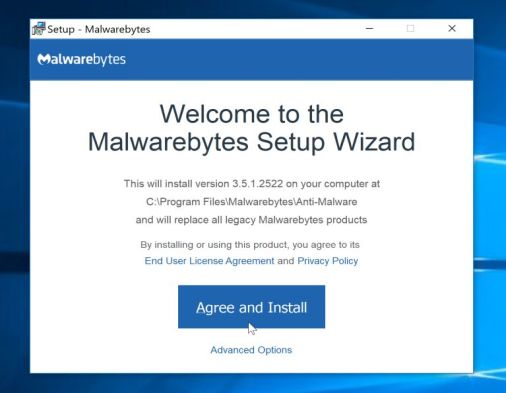
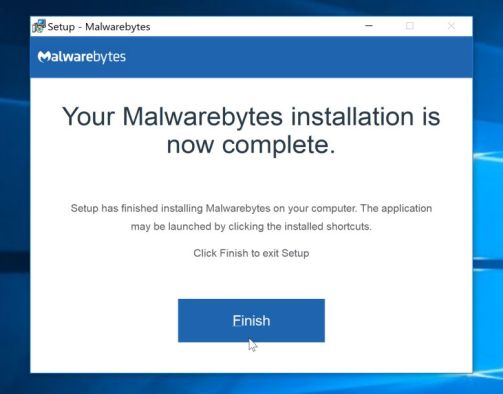
To install Malwarebytes Anti-Malware on your machine, keep following the prompts by clicking the “Next” button.
- Once installed, Malwarebytes will automatically start and update the antivirus database. To start a system scan you can click on the “Scan Now” button.
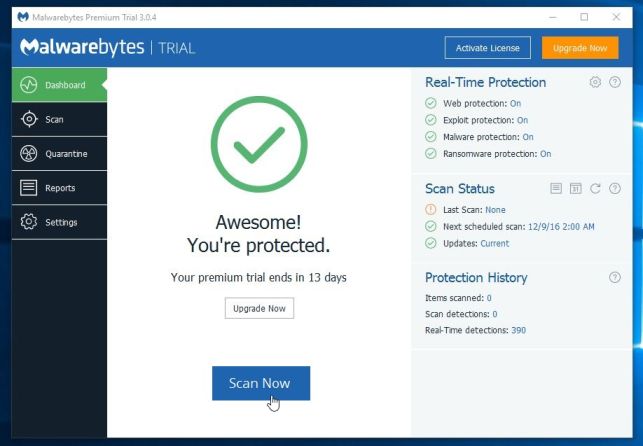
- Malwarebytes Anti-Malware will now start scanning your computer for malicious programs.
This process can take a few minutes, so we suggest you do something else and periodically check on the status of the scan to see when it is finished.
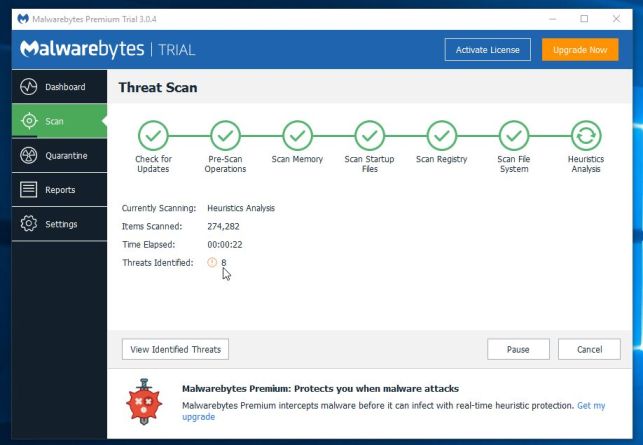
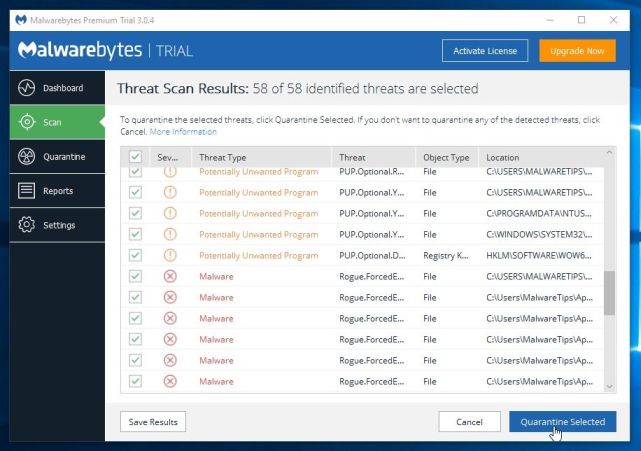
- When the scan has completed, you will be presented with a screen showing the malware infections that Malwarebytes Anti-Malware has detected.
To remove the malicious programs that Malwarebytes has found, click on the “Quarantine Selected” button.
- Malwarebytes Anti-Malware will now quarantine all the malicious files and registry keys that it has found.
To complete the malware removal process, Malwarebytes may ask you to restart your computer.
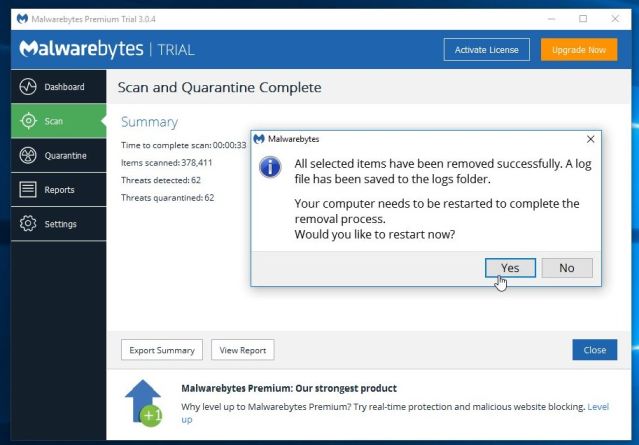
When the malware removal process is complete, you can close Malwarebytes Anti-Malware and continue with the rest of the instructions.
STEP 3: Double-check for malicious programs with HitmanPro
HitmanPro can find and remove malware, adware, bots, and other threats that even the best antivirus suite can oftentimes miss. HitmanPro is designed to run alongside your antivirus suite, firewall, and other security tools.
- You can download HitmanPro from the below link:
HITMANPRO DOWNLOAD LINK (This link will open a new web page from where you can download “HitmanPro”) - When HitmanPro has finished downloading, double-click on the “hitmanpro” file to install this program on your computer.
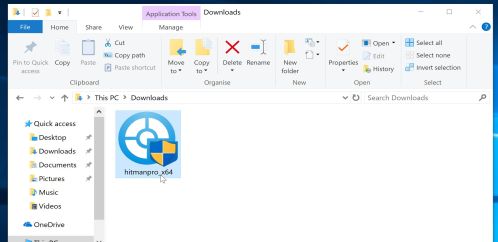
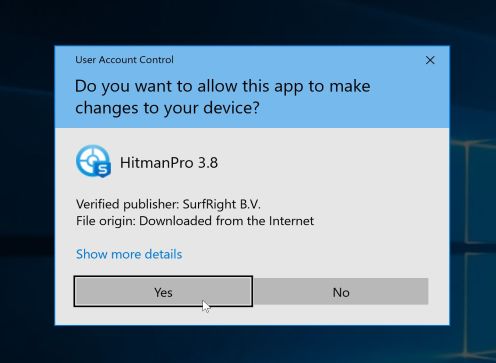
You may be presented with an User Account Control pop-up asking if you want to allow HitmanPro to make changes to your device. If this happens, you should click “Yes” to continue with the installation.
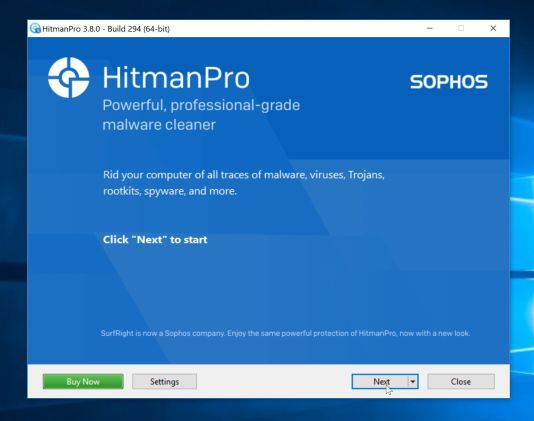
- When the program starts you will be presented with the start screen as shown below. Now click on the Next button to continue with the scan process.
- HitmanPro will now begin to scan your computer for malware.
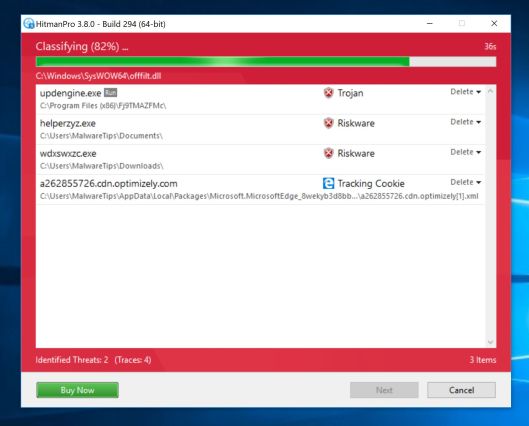
- When it has finished it will display a list of all the malware that the program found as shown in the image below. Click on the “Next” button, to remove malware.
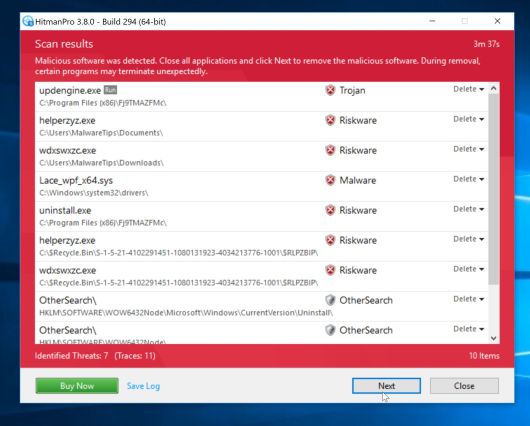
- Click on the “Activate free license” button to begin the free 30 days trial, and remove all the malicious files from your computer.
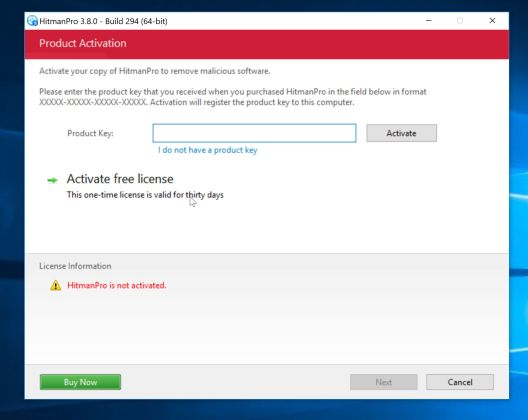
When the process is complete, you can close HitmanPro and continue with the rest of the instructions.
(OPTIONAL) STEP 4: Reset your browser to default settings
This step should be performed only if your issues have not been solved by the previous steps.
Google Chrome
- Click on Chrome’s main menu button, represented by three horizontal lines. When the drop-down menu appears, select the option labeled Settings.
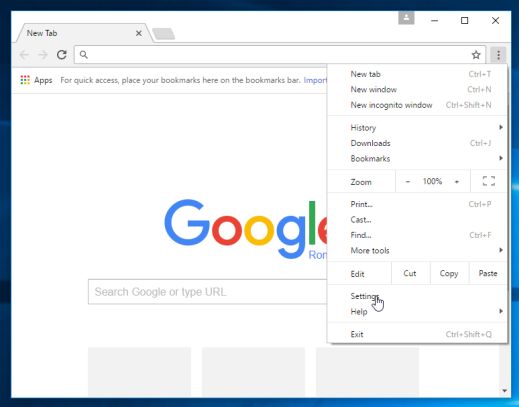
- Chrome’s Settings should now be displayed in a new tab or window, depending on your configuration. Next, scroll to the bottom of the page and click on the Show advanced settings link (as seen in the below example).
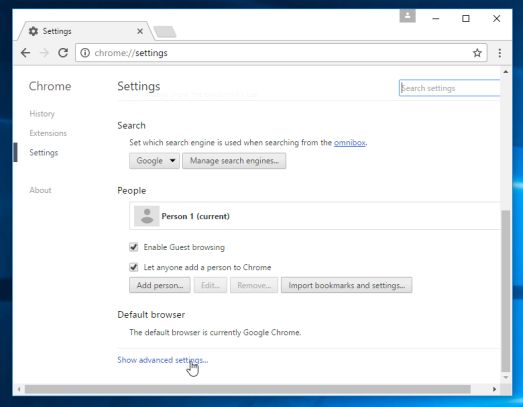
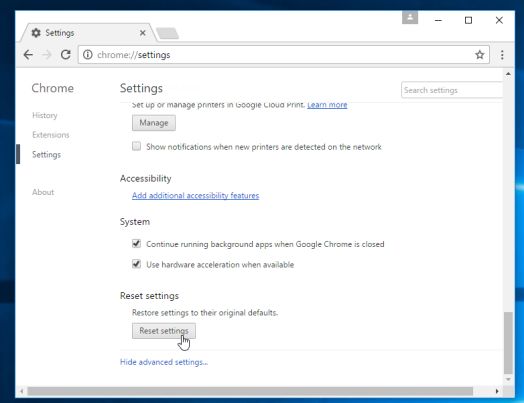
- Chrome’s advanced Settings should now be displayed. Scroll down until the Reset browser settings section is visible, as shown in the example below. Next, click on the Reset browser settings button.
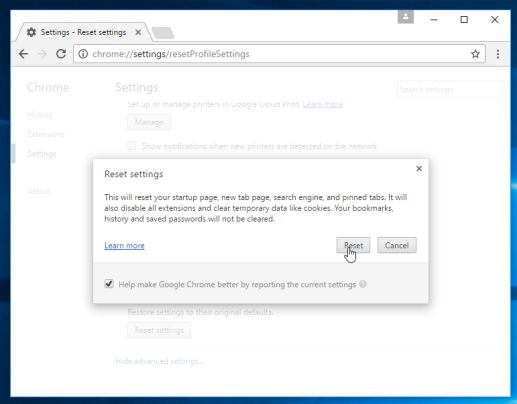
- A confirmation dialog should now be displayed, detailing the components that will be restored to their default state should you continue on with the reset process. To complete the restoration process, click on the Reset button.
Internet Explorer
- Open Internet Explorer, click on the “gear icon” in the upper right part of your browser, then click again on Internet Options.
![Click on the Gear Icon then on Internet Options [Image: Internet Options in Internet Explorer]](https://malwaretips.com/blogs/wp-content/uploads/2014/03/Internet-Options-Internet-Explorer.jpg)
- In the “Internet Options” dialog box, click on the “Advanced” tab, then click on the “Reset” button.
![In the Advanced tab click on the Reset button [Image: Reset Internet Explorer]](https://malwaretips.com/blogs/wp-content/uploads/2014/03/Reset-Internet-Explorer.jpg)
- In the “Reset Internet Explorer settings” section, select the “Delete personal settings” check box, then click on “Reset” button.
![Click on the Reset button to revert IE to its default settings [Image: Reset Internet Explorer to its default settings]](https://malwaretips.com/blogs/wp-content/uploads/2014/03/reset-button-Internet-Explorer.jpg)
- When Internet Explorer has completed its task, click on the “Close” button in the confirmation dialogue box. You will now need to close your browser, and then you can open Internet Explorer again.
![Click on the Close button [Image Reset Internet Explorer settings]](https://malwaretips.com/blogs/wp-content/uploads/2014/03/Close-button-Reset.jpg)
Mozilla Firefox
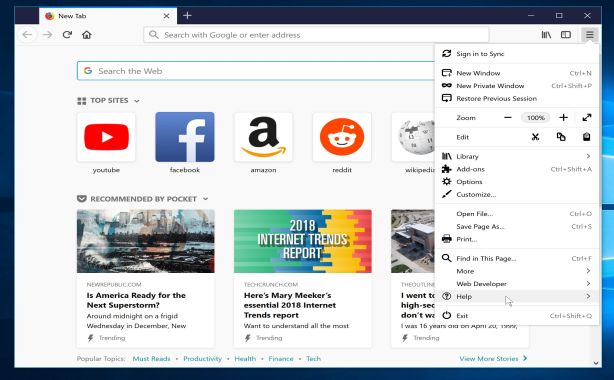
- In the upper-right corner of the Firefox window, click the Firefox menu button, then click on the “Help”
![Firefox Help button [Image: Firefox Help button]](https://malwaretips.com/blogs/wp-content/uploads/2014/04/Firefox-Help.png) button.
button.
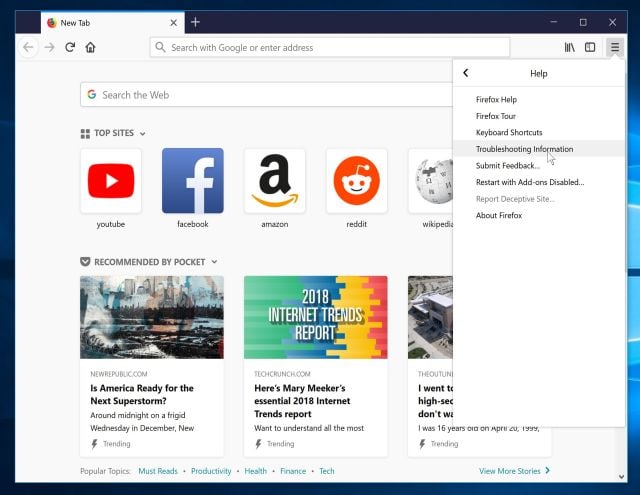
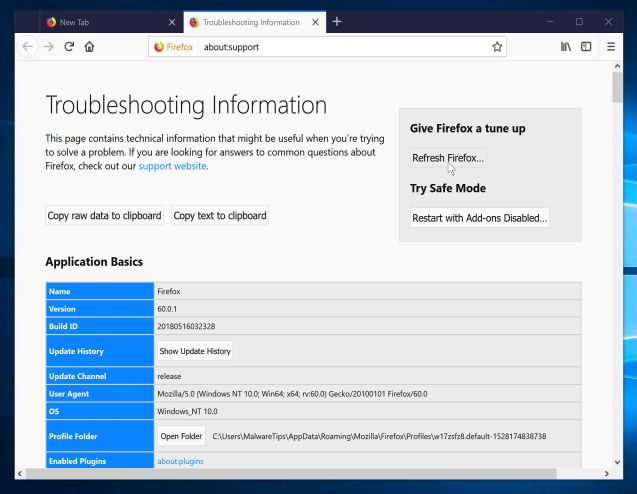
- From the Help menu, choose Troubleshooting Information.
If you’re unable to access the Help menu, type about:support in your address bar to bring up the Troubleshooting information page.
- Click the “Refresh Firefox” button in the upper-right corner of the “Troubleshooting Information” page.
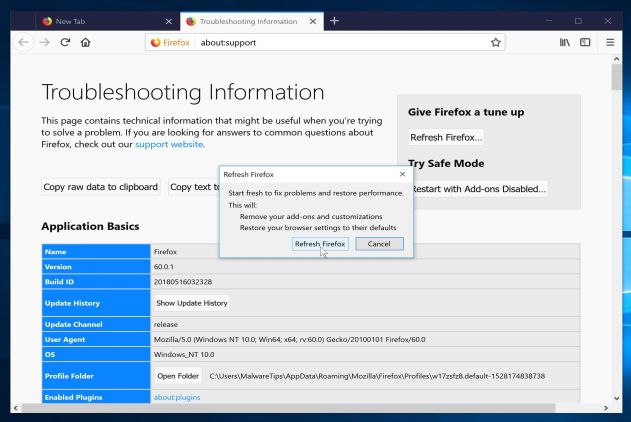
- To continue, click on the “Refresh Firefox” button in the new confirmation window that opens.
- Firefox will close itself and will revert to its default settings. When it’s done, a window will list the information that was imported. Click on the “Finish“.
If you are still experiencing problems while trying to remove Ads by Yontoo Layers adware from your computer, please do one of the following:
- Run a system scan with Zemana AntiMalware
- Ask for help in our Malware Removal Assistance forum.

