• Skip to primary navigation
  • Skip to main content
  • Skip to primary sidebar
  • Skip to footer
MalwareTips Blogs

MalwareTips Blogs

  • Blogs
    • Adware
    • Browser Hijackers
    • Unwanted Programs
    • Ransomware
    • Rogue Software
    • Guides
    • Trojans
  • Forums
  • News
    • Security News
    • Technology News
    • Hardware News
  • Giveaways
    • Giveaways, Promotions and Contests
    • Discounts & Deals
    • MalwareTips Giveaways
  • Reviews
    • Video Reviews
    • Users Reviews
  • Support
    • Windows Malware Removal Help & Support
    • Mac Malware Removal Help & Support
    • Mobile Malware Removal Help & Support
  • Malware Hub
    • Malware Samples
    • Statistics and Reports

Reset Mozilla Firefox to default settings (Step-by-Step Guide)

If Firefox starts to act slow, crashes, or displays unwanted advertisements, resetting it to the default settings can help. The reset feature fixes many issues by restoring Firefox to its factory default state while saving your essential information like bookmarks and open tabs.

Resetting your browser settings will impact the settings below:

  • Default search engine and saved search engines will be reset and to their original defaults.
  • Homepage button will be hidden and the URL that you previously set will be removed.
  • Default startup tabs will be cleared.
  • New Tab page will be empty unless you have a version of Firefox with an extension that controls it. In that case, your page may be preserved.
  • Pinned tabs will be unpinned.
  • Content settings will be cleared and reset to their installation defaults.
  • Cookies and site data will be cleared.
  • Extensions and themes will be disabled.

In the below steps, we’ll cover how to reset Firefox to its default settings on Windows, Mac, or Android.

How to reset Firefox to its Default Settings (Help Guide)

If you’re having problems with Firefox, resetting it can help. The reset feature fixes many issues by restoring Firefox to its factory default state while saving your essential information like bookmarks, passwords, web form auto-fill information, browsing history, and open tabs.

You can enter about:support into Firefox’s address bar to go directly to the “Troubleshooting Information” page. Click “Refresh Firefox” to reset the browser settings.

Reset Firefox on Windows

Here’s how to reset Firefox to the default settings if you’re using a Windows computer:

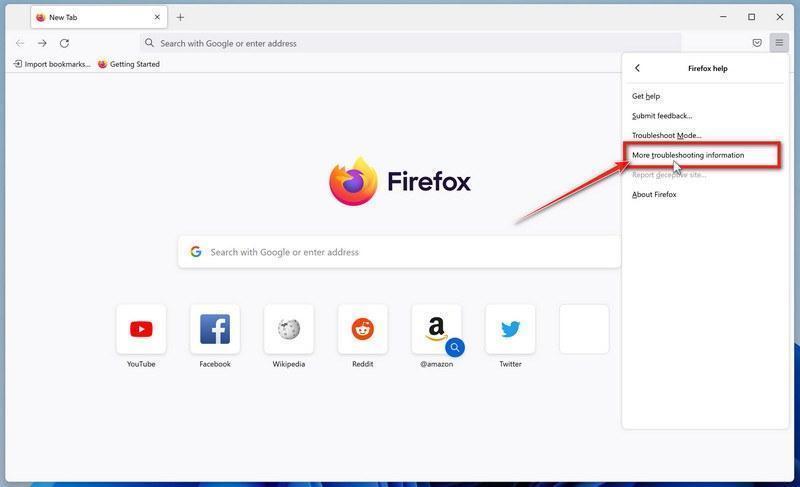
  1. Click the menu icon, then click on “Help”.

    Click on Firefox’s main menu button, represented by three horizontal lines. When the drop-down menu appears, select the option labeled “Help“.
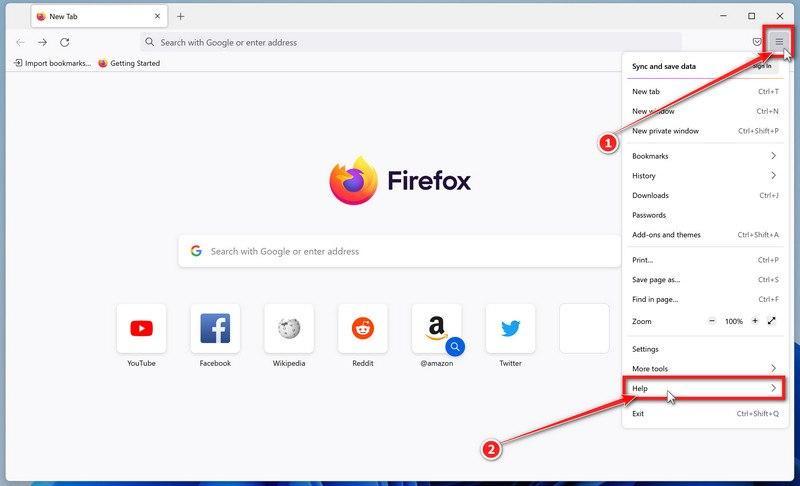
    Click on the Firefox Menu button then select Help button

  2. Click “Troubleshooting Information”.

    From the Help menu, click on “Troubleshooting Information“.
    Click on Troubleshooting Information button

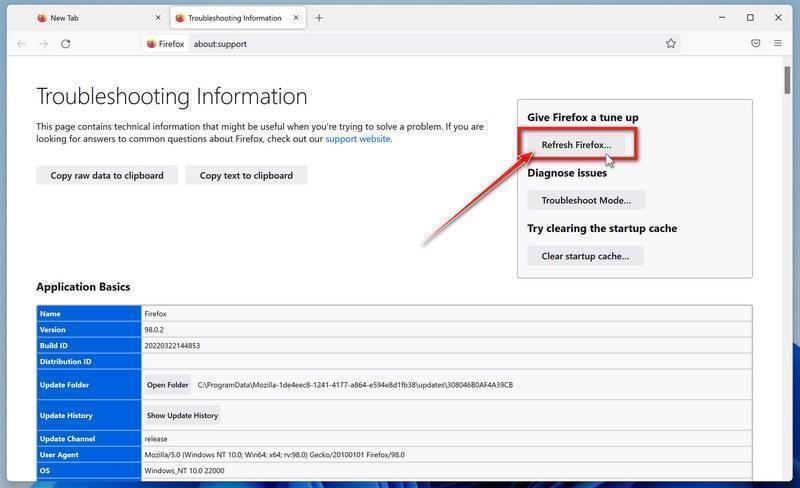
  3. Click on “Refresh Firefox”

    Click the “Refresh Firefox” button in the upper-right corner of the “Troubleshooting Information” page.
    Click on the Refresh Firefox button

  4. Confirm.

    To continue, click on the “Refresh Firefox” button in the new confirmation window that opens.
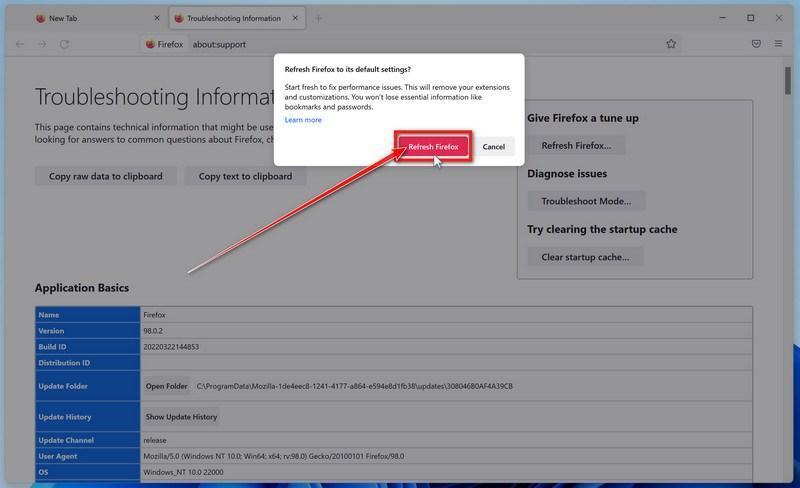
    Click again on Refresh Firefox

  5. Click “Finish”.

    Firefox will close itself and will revert to its default settings. When it’s done, a window will list the information that was imported. Click on “Finish“.

    Your old Firefox profile will be placed on your desktop in a folder named “Old Firefox Data“. If the reset didn’t fix your problem you can restore some of the information not saved by copying files to the new profile that was created. If you don’t need this folder any longer, you should delete it as it contains sensitive information.

Reset Firefox on Mac

Here’s how to reset Firefox to the default settings if you’re using a Mac computer:

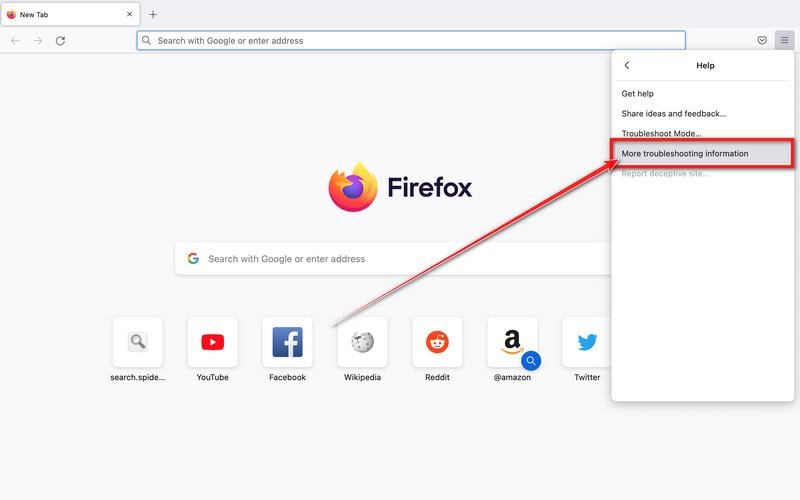
  1. Go to the “Help” menu.

    Click on Firefox’s main menu button, represented by three horizontal lines. When the drop-down menu appears, select the option labeled “Help“.
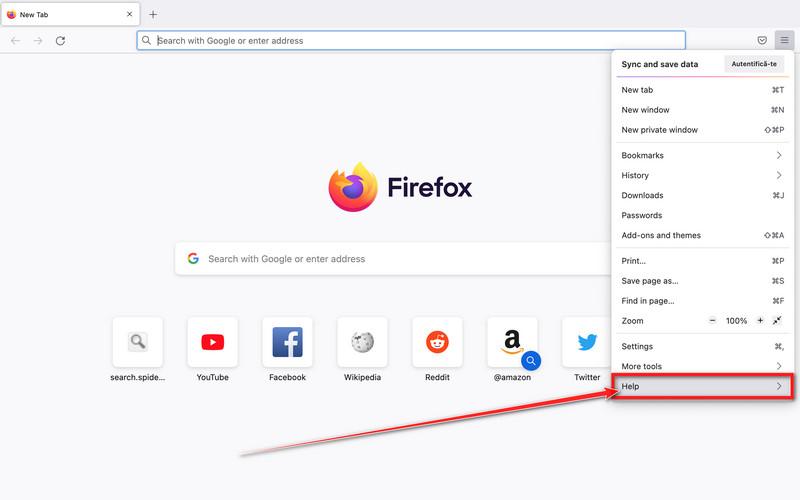
    Click on the Firefox Menu button then select Help MacOS

  2. Click “Troubleshooting Information”.

    From the Help menu, click on “Troubleshooting Information“.

    If you’re unable to access the “Help” menu, type about:support in your address bar to bring up the Troubleshooting information page.

    Troubleshooting Information option in Firefox MacOS

  3. Click on “Refresh Firefox”

    Click the “Refresh Firefox” button in the upper-right corner of the “Troubleshooting Information” page.
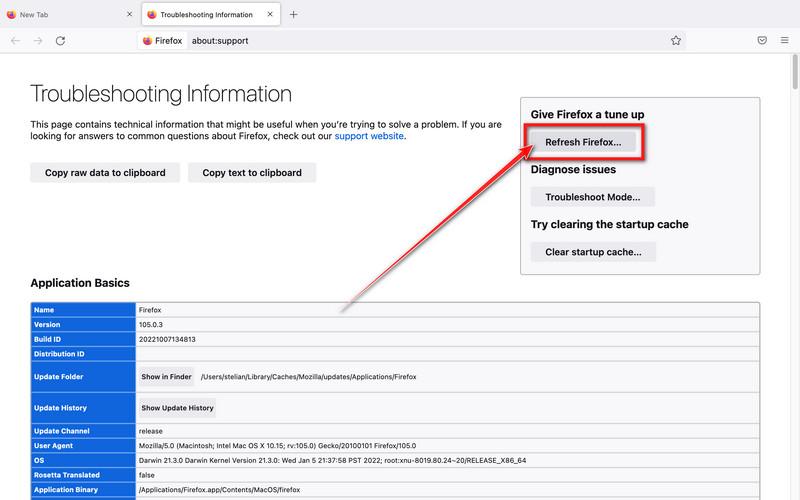
    Click on the Refresh Firefox button MacOS

  4. Confirm.

    To continue, click on the “Refresh Firefox” button in the new confirmation window that opens.
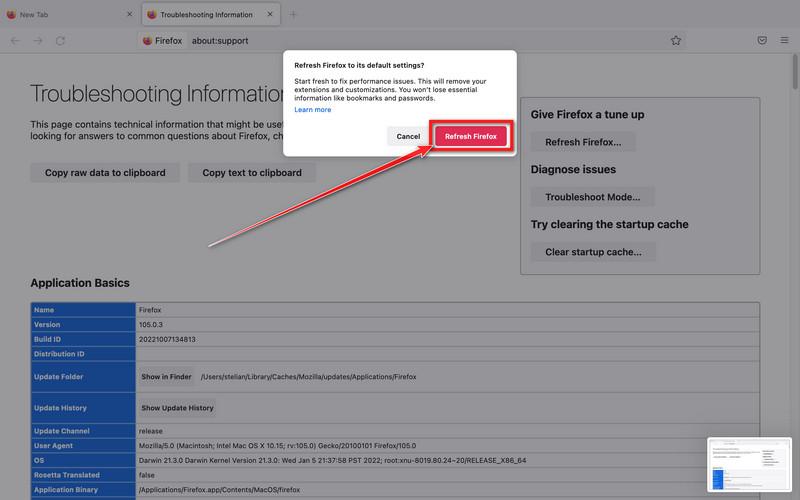
    Click again on Refresh Firefox button macos

  5. Click on “Finish”.

    Firefox will close itself and will revert to its default settings. When it’s done, a window will list the information that was imported. Click on the “Finish“.

Your old Firefox profile will be placed on your desktop in a folder named “Old Firefox Data“. If the reset didn’t fix your problem you can restore some of the information not saved by copying files to the new profile that was created. If you don’t need this folder any longer, you should delete it as it contains sensitive information.

Reset Firefox on Android

Here’s how to reset Firefox to the default settings if you’re using an Android phone:

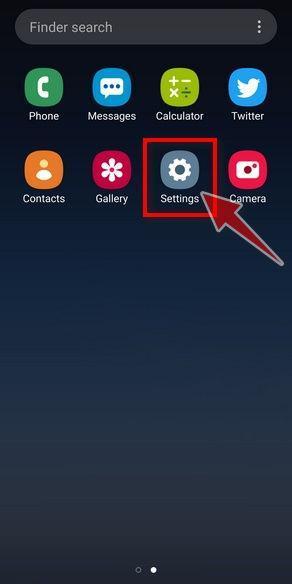
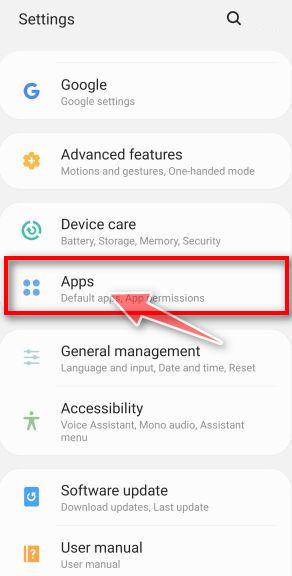
  1. Open your device’s “Settings” menu, then tap on “Apps”

    To reset Firefox’s settings from your Android device, go to the Settings menu, then tap on Apps or Application manager (this may differ depending on your device).

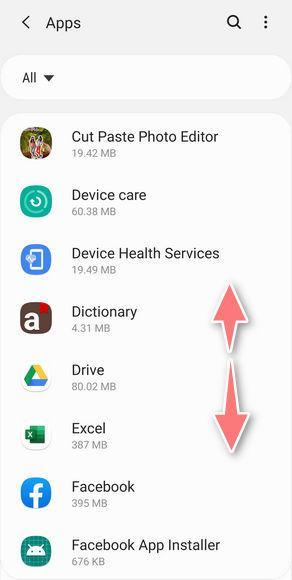
  2. Find and tap on the Firefox app.

    The “Apps” screen will be displayed with a list of all the apps installed on your device. Scroll through the list until you find the Firefox app.

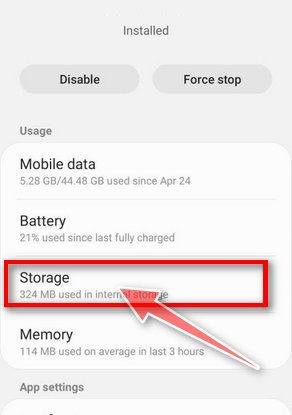
  3. Tap “Storage”.

    Firefox’s “App info” menu should now be displayed. Tap on “Storage“.

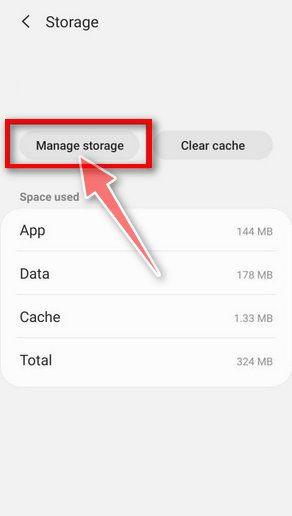
  4. Tap “Manage Space”.

    Under the storage settings, you will get two options — Manage Space and Clear Cache. Tap on “Manage Space”.

  5. Tap “Clear all data”.

    Tap “Clear all data” to delete all Firefox’s data including accounts, bookmarks and save the setting in order to reset it defaults.

  6. Confirm by tapping “Ok”.

    A confirmation dialog should now be displayed, detailing the components that will be restored to their default state should you continue on with the reset process. To complete the restoration process, tap “Ok”.

That’s it your browser settings should be set to their original defaults. To check your computer for adware and remove it for free, please use the guide below.

How to remove malware from Windows. Clean-up your PC from malware.

While resetting Firefox may remove the malware from the browser, your Windows may still be infected with adware, potentially unwanted programs or other forms of malware.
The below steps are optional and are meant to be used if you still having issues with adware, browser hijackers or any other form of malware after resetting Firefox.

The below instructions are for Windows users, however we also have an Android Guide and a Mac Guide which should help clean up your device.
This malware removal guide may appear overwhelming due to the amount of the steps and numerous programs that are being used. We have only written it this way to provide clear, detailed, and easy to understand instructions that anyone can use to remove malware for free.
Please perform all the steps in the correct order. If you have any questions or doubt at any point, STOP and ask for our assistance.

To remove adware, browser hijackers, or malware from Firefox, follow these steps:

  • STEP 1: Use Malwarebytes Free to remove adware and browser hijackers
  • STEP 2: Use HitmanPro to scan for malware and unwanted programs
  • STEP 3: Double-check for malicious programs with AdwCleaner

STEP 1: Use Malwarebytes Free to remove adware and browser hijackers

Malwarebytes Free is one of the most popular and most used anti-malware software for Windows, and for good reasons. It is able to destroy many types of malware that other software tends to miss, without costing you absolutely nothing. When it comes to cleaning up an infected device, Malwarebytes has always been free and we recommend it as an essential tool in the fight against malware.
It is important to note that Malwarebytes Free will run alongside antivirus software without conflicts.

  1. Download Malwarebytes Free.

    You can download Malwarebytes by clicking the link below.

    Malwarebytes LogoMALWAREBYTES DOWNLOAD LINK
    (The above link will open a new page from where you can download Malwarebytes)
  2. Double-click on the Malwarebytes setup file.

    When Malwarebytes has finished downloading, double-click on the MBSetup file to install Malwarebytes on your computer. In most cases, downloaded files are saved to the Downloads folder.

    Double-click on MBSetup installer to install Malwarebytes
    You may be presented with an User Account Control pop-up asking if you want to allow Malwarebytes to make changes to your device. If this happens, you should click “Yes” to continue with the Malwarebytes installation.
    Windows asking for permission to run the Malwarebytes installer

  3. Follow the on-screen prompts to install Malwarebytes.

    When the Malwarebytes installation begins, you will see the Malwarebytes setup wizard which will guide you through the installation process. The Malwarebytes installer will first ask you on what type of computer are you installing this program, click either Personal Computer or Work Computer.
    Malwarebytes setup: Click on Personal Computer step 1

    On the next screen, click “Install” to install Malwarebytes on your computer.
    Malwarebytes Setup: Click on Install

    When your Malwarebytes installation completes, the program opens to the Welcome to Malwarebytes screen. Click the “Get started” button.

  4. Select “Use Malwarebytes Free”.

    After installing Malwarebytes, you’ll be prompted to select between the Free and the Premium version. The Malwarebytes Premium edition includes preventative tools like real-time scanning and ransomware protection, however, we will use the Free version to clean up the computer.
    Click on “Use Malwarebytes Free“.
    Click on Use Malwarebytes Free to continue with the install

  5. Click on “Scan”.

    To scan your computer with Malwarebytes, click on the “Scan” button. Malwarebytes will automatically update the antivirus database and start scanning your computer for malware.
    Click on Scan button

  6. Wait for the Malwarebytes scan to complete.

    Malwarebytes will scan your computer for adware and other malicious programs. This process can take a few minutes, so we suggest you do something else and periodically check on the status of the scan to see when it is finished.
    Malwarebytes scanning for malicious programs

  7. Click on “Quarantine”.

    When the scan has completed, you will be presented with a screen showing the malware infections that Malwarebytes has detected. To remove the malicious programs that Malwarebytes has found, click on the “Quarantine” button.
    Review the malicious programs and click on Quarantine to remove adware

  8. Restart computer.

    Malwarebytes will now remove all the malicious files and registry keys that it has found. To complete the malware removal process, Malwarebytes may ask you to restart your computer.
    Malwarebytes requesting to restart computer to complete the removal process
    When the malware removal process is complete, you can close Malwarebytes and continue with the rest of the instructions.


STEP 2: Use HitmanPro to scan for malware and unwanted programs

HitmanPro is a second opinion scanner that takes a unique cloud-based approach to malware scanning. HitmanPro scans the behavior of active files and also files in locations where malware normally resides for suspicious activity. If it finds a suspicious file that’s not already known, HitmanPro sends it to their clouds to be scanned by two of the best antivirus engines today, which are Bitdefender and Kaspersky.

Although HitmanPro is shareware and costs $24.95 for 1 year on 1 PC, there is actually no limit in scanning. The limitation only kicks in when there is a need to remove or quarantine detected malware by HitmanPro on your system and by then, you can activate the one-time 30-day trial to enable the clean up.

  1. Download HitmanPro.

    You can download HitmanPro by clicking the link below.

    HitmanPro LogoHITMANPRO DOWNLOAD LINK
    (The above link will open a new web page from where you can download HitmanPro)
  2. Install HitmanPro.

    When HitmanPro has finished downloading, double-click on “hitmanpro.exe” (for 32-bit versions of Windows) or “hitmanpro_x64.exe” (for 64-bit versions of Windows) to install this program on your PC. In most cases, downloaded files are saved to the Downloads folder.
    Double-click on the HitmanPro setup file - Help Guide
    You may be presented with an User Account Control pop-up asking if you want to allow HitmanPro to make changes to your device. If this happens, you should click “Yes” to continue with the installation.Windows asking for permissions to run the HitmanPro setup file - Help Guide

  3. Follow the on-screen prompts.

    When HitmanPro starts you will be presented with the start screen as shown below. Click on the “Next” button to perform a system scan.
    Click Next to install HitmanProHitmanPro final installer screen

  4. Wait for the HitmanPro scan to complete.

    HitmanPro will now begin to scan your computer for malicious programs. This process will take a few minutes.
    HitmanPro while scanning for malware - Help Guide

  5. Click on “Next”.

    When HitmanPro has finished the scan, it will display a list of all the malware that the program has found. Click on the “Next” button to remove the malicious programs.
    HitmanPro scan summary. Click Next to remove malware - Help Guide

  6. Click on “Activate free license”.

    Click on the “Activate free license” button to begin the free 30 days trial and remove all the malicious files from your PC.
    Activate the free HitmanPro license keyEnter your email to complete the HitmanPro activation - Help Guide
    When the process is complete, you can close HitmanPro and continue with the rest of the instructions.


STEP 3: Double-check for malicious programs with AdwCleaner

AdwCleaner is a free popular on-demand scanner which can detect and remove malware that even the most well-known anti-virus and anti-malware applications fail to find.
While the Malwarebytes and HitmanPro scans are more than enough, we’re recommending AdwCleaner to users who still have malware related issues or just want to make sure their computer is 100% clean.

  1. Download AdwCleaner.

    You can download AdwCleaner by clicking the link below.

    AdwCleaner Icon ADWCLEANER DOWNLOAD LINK
    (The above link will open a new web page from where you can download AdwCleaner)
  2. Double-click on the setup file.

    Double-click on the file named “adwcleaner_7.x.x.exe” to start AdwCleaner. In most cases, downloaded files are saved to the Downloads folder.
    AdwCleaner Setup File
    You may be presented with a User Account Control dialog asking you if you want to run this file. If this happens, you should click “Yes” to continue with the installation.
    AdwCleaner and Windows User Account Control Pop-up

  3. Click on “Scan Now”.

    When AdwCleaner will start, click on the “Scan Now” button to perform a system scan.
    AdwCleaner Scan Now button

  4. Wait for the AdwCleaner scan to complete.

    AdwCleaner will now scan your PC for malicious files. This process can take a few minutes.
    AdwCleaner Scanning for adware

  5. Click on “Clean & Repair”.

    When AdwCleaner has finished it will display a list of all the malware that the program found. Click on the “Clean & Repair” button to remove the malicious files from your computer.
    Click Clean to remove adware

  6. Click on “Clean & Restart Now”

    When the malware removal process is complete, AdwCleaner may need to restart your device. Click on the “Clean & Restart Now” button to finish the removal process.
    Click Clean & Restart Now to remove virus


Firefox should now have the default settings, and your device should now be free of malware. If your current antivirus allowed this malicious program on your computer, you may want to consider purchasing the full-featured version of Malwarebytes Anti-Malware to protect against these types of threats in the future. If you are still having problems with your computer after completing these instructions, then please follow one of the steps:

  • Run a system scan with Zemana AntiMalware Free
  • Ask for help in our Malware Removal Assistance for Windows forum.

Primary Sidebar

ABOUT THE AUTHOR

Stelian Pilici is the creator and owner of MalwareTips.com. He created this community in 2010 to help people solve their computer problems.
Stelian's area of expertise includes malware removal and computer forensics. He's active in the various online anti-malware communities where he does research for new malware threats as they are released.

Helping people since 2010

We launched the MalwareTips community in 2010 with the sole purpose of helping people with malware-related issues.
Today, our community has more than 56.000 members and we pride ourselves on offering detailed, clear, and easy to understand guides that anyone can use to remove malware for free.

Join our community

Our community has more than 56.000 registered members, and we'd love to have you as a member. Join us and take part in our unbiased discussions among people of all different backgrounds about security and technology .

Join us

Follow us

More than 18.000 people like us on Facebook and 4.500 are following us on Twitter.
Join them and follow us on Facebook or Twitter to know first about the latest cybersecurity incidents and malware threats.
  • facebook icon18.5K
  • twitter icon4.7K

Recent Posts

  • Remove Websterd.online pop-up ads (Virus Removal Guide)
  • Remove Private Deep browser hijacker (Virus Removal Guide)
  • Remove Tableallist.online pop-up ads (Virus Removal Guide)
  • Remove WARNING CRITICAL MESSAGE scam (Virus Removal Guide)
  • Remove [Axitrun@cock.li].14x ransomware (Virus Removal Guide)
  • Remove Daisybuleonclock.com pop-up ads (Virus Removal Guide)
  • Remove Streaming Plus browser hijacker (Virus Removal Guide)

Reset browser to default settings

  • Reset Chrome for Android to default settings (Step-by-Step Guide)
  • Reset Microsoft Edge to default settings (Step-by-Step Guide)
  • Reset Google Chrome to default settings (Step-by-Step Guide)
  • Reset Mozilla Firefox to default settings (Step-by-Step Guide)
  • Reset Internet Explorer to default settings (Step-by-Step Guide)

Helpful Guides

  • How to remove “Update Flash Player” pop-ups (Virus Removal Guide)
  • How to remove malware from Android phone (Virus Removal Guide)
  • How to remove malware from Mac (Virus Removal Guide)
  • How to remove malware from Windows (Virus Removal Guide)
  • How To Remove Potentially Unwanted Programs (Virus Removal Guide)
  • Remove “Your Files Are Encrypted” ransomware (Virus Removal Guide)
  • Remove adware and pop-up ads from Windows (Virus Removal Guide)
  • Remove adware, pop-up ads and redirects from Android phone (Guide)
  • Remove Adware, Pop-up Ads and Viruses From Your Browser
  • Remove browser hijackers and redirects from Windows (Removal Guide)
  • Remove Browser Redirect Virus from Chrome, Firefox & Edge (Guide)
  • Remove Microsoft Tech Support pop-up scam (Virus Removal Guide)

We’re here to help!

If you neeed help completing a malware removal guide or remove malware from your device, you can ask for free support in our Malware Removal Help forum.
We offer free malware removal support for Windows, macOS, and Android devices. In these support forums, a trained staff member will help you clean-up your device by using advanced tools.
Never used a forum? Learn how.

Go to Support

Footer

  • Terms and rules
  • Privacy Policy
  • Cookies Policy
  • Contact us

Be part of our community!

Our community has more than 56.000 registered members, and we’d love to have you as a member.

Join us and take part in our unbiased discussions among people of all different backgrounds about security and technology .

Register Now (it’s free)

Copyright © 2020 · All Rights Reserved · MalwareTips SRL