

A request for quotation can look like an ordinary opportunity, especially when it asks about pricing, lead time, packaging, and private-label production.
The attached file appears to contain the product list. Before a salesperson opens it, the message deserves the same care as an unfamiliar payment request.
Overview
The email imitates a serious wholesale inquiry
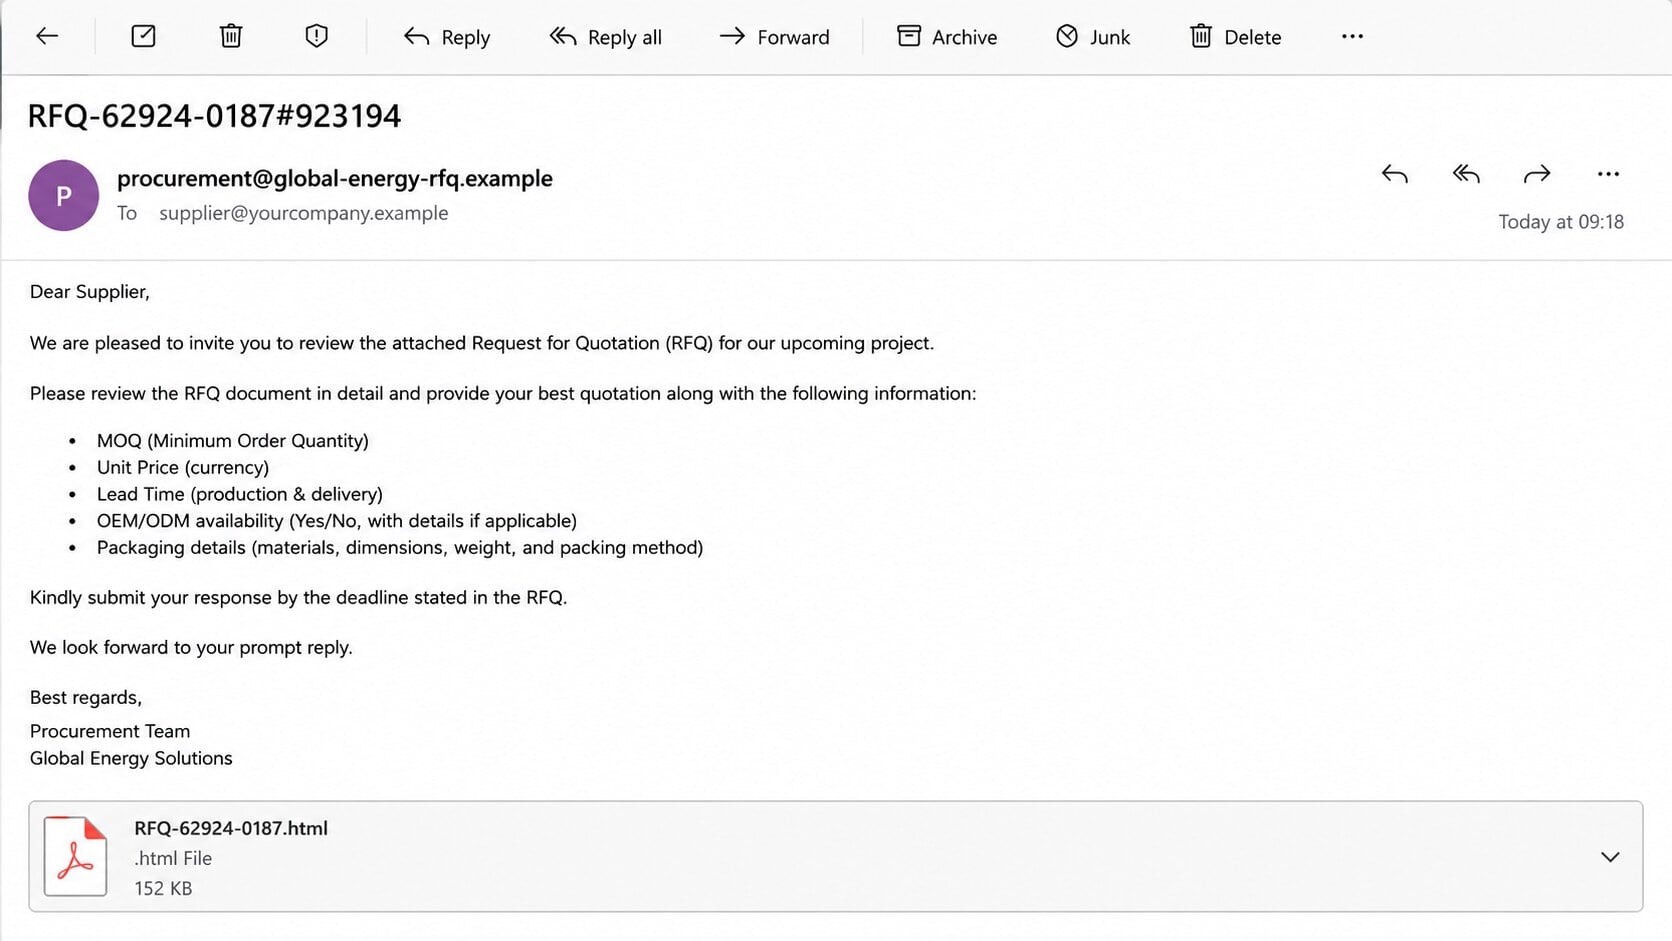
The RFQ Confirmation email introduces a supposed buyer and asks a supplier to review a new procurement request.
It may use a reference such as “RFQ-62924-0187#923194” and request the minimum order quantity, unit price, lead time, packaging, and OEM or ODM options.
Those questions are common in real sourcing conversations. Their familiarity helps the message pass as business correspondence rather than a conventional phishing alert.
- A buyer claims to be preparing a substantial order.
- The email asks realistic manufacturing or wholesale questions.
- An attachment supposedly contains specifications and quantities.
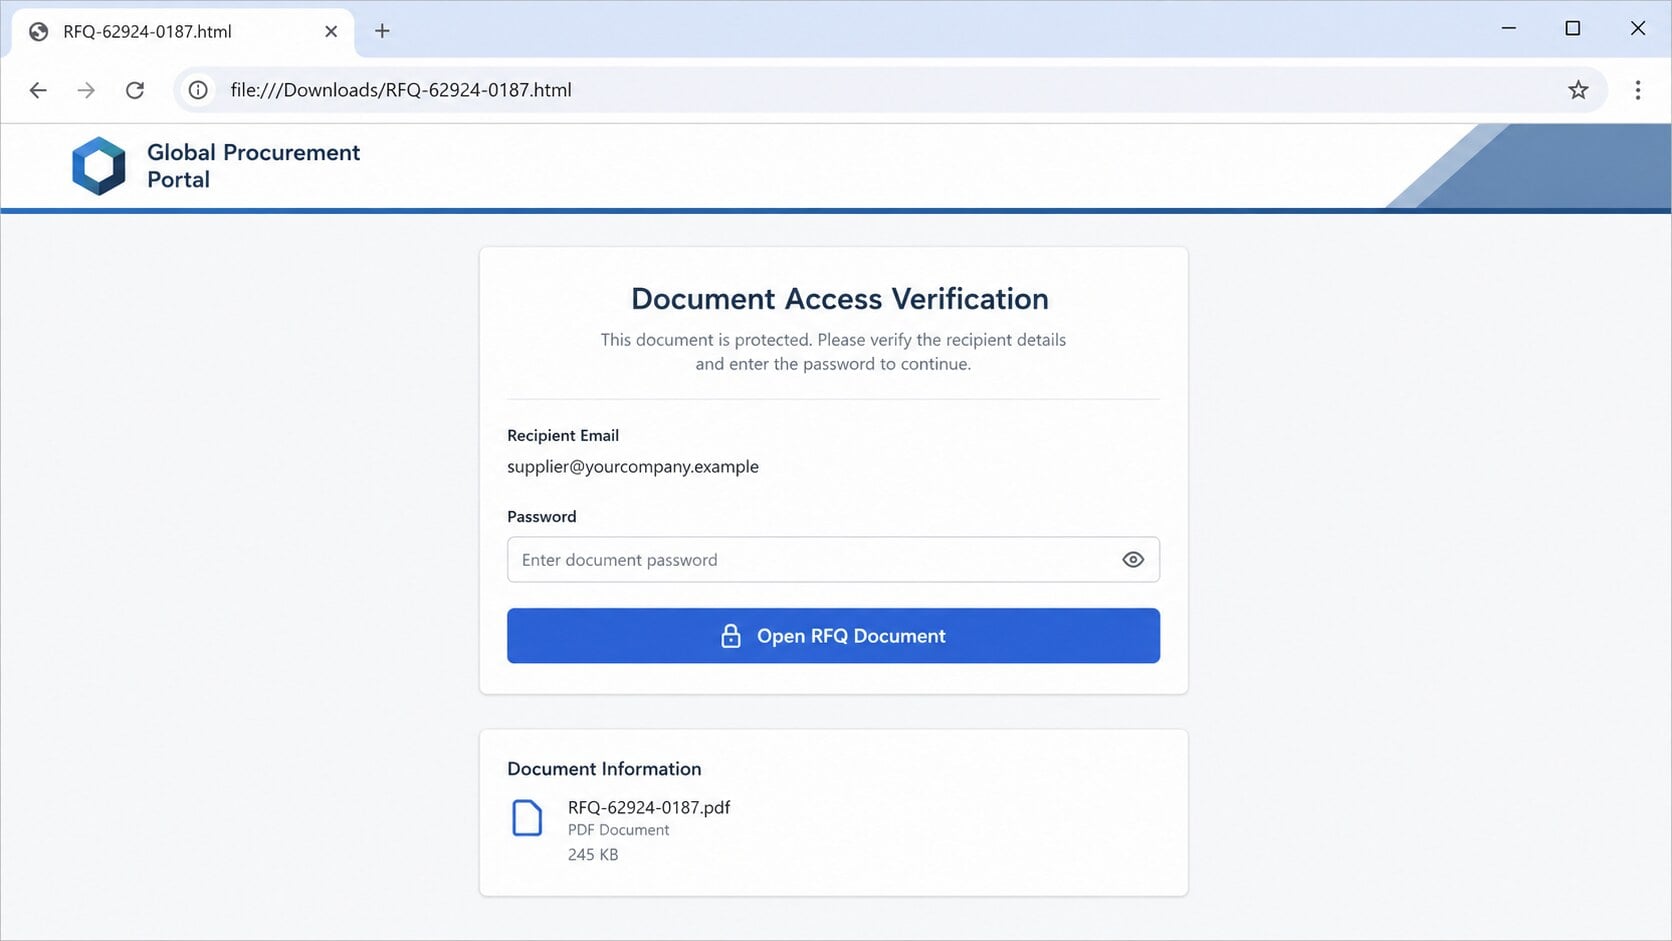
- The file opens a sign-in form instead of a document.
The attachment is not what its appearance suggests
The file may use a PDF-style icon or wording such as “RFQ Document,” while its real extension is HTML.
Opening an HTML attachment launches code in the browser. That code can draw a counterfeit document portal locally without visiting a familiar website first.
The page then claims that the quotation is protected and asks the recipient to sign in with an email password.
The target is usually a valuable business mailbox
Sales, procurement, and accounts employees receive attachments from new contacts as part of normal work. Attackers design the lure around that expectation.
A stolen business mailbox can expose price lists, customer records, purchase orders, invoices, and ongoing payment discussions.
It can also provide a trusted address for approaching coworkers and suppliers with altered banking details or additional malicious documents.
Why a Fake RFQ Can Feel Like a Real Sales Lead
Many phishing emails ask for something unusual. An RFQ does the opposite: it offers work that the recipient’s role may specifically require them to pursue.
The questions sound informed. MOQ, OEM, ODM, packaging, and lead time are terms used in legitimate manufacturing and distribution conversations.
A reference number adds administrative texture. It looks traceable, although the recipient has no independent system where that number can be verified.
The sender may claim urgency because a purchasing cycle is closing. Sales pressure can make a fast response feel commercially responsible.
The supposed buyer may borrow the name of a real company. Public staff pages and business directories provide enough detail for plausible impersonation.
The attachment also fits normal workflow. Suppliers routinely exchange spreadsheets, drawings, specifications, and purchase documents with unfamiliar prospects.
That does not make every unexpected file safe. The content, extension, sender, and requested authentication must agree with one another.
A genuine buyer can describe the requested products in the email or resend information through a verifiable company channel.
A prospect who insists on obtaining a mailbox password is not completing procurement. No ordinary quotation requires disclosure of that credential.
How the RFQ Confirmation Email Scam Works
Step 1: Criminals identify a business-facing employee
The campaign targets addresses associated with sales, exports, purchasing, administration, or accounts. Many are collected from company websites and trade directories.
Role-based addresses such as sales@ and info@ are useful because they are expected to receive messages from people the organization does not know.
The attacker may research the company’s products and region. Even a small amount of personalization can make the inquiry seem relevant.
Broader campaigns use generic wording that could apply to manufacturers, wholesalers, and service providers across several industries.
Step 2: A credible purchasing story is presented
The sender asks for prices, availability, samples, production capacity, or customized packaging. The request resembles the beginning of a normal commercial negotiation.
An RFQ number creates the appearance of a formal procurement system. A large potential order may be mentioned without enough detail to quote accurately.
The message might use a real executive or company name. That identity can be copied even when the sending domain has no connection to it.
The recipient is encouraged to open the attached list for quantities and specifications.
Step 3: The attachment disguises browser code as a document
The filename may end in `.html` or `.htm` despite resembling a PDF, spreadsheet, or protected document notification.
Windows can hide known extensions, making an icon and the earlier part of the filename especially persuasive.
HTML is not automatically malicious. In this campaign, however, it is used to construct a login form and avoid sending the victim directly to an obvious phishing URL.
The attachment can contain branding, the recipient’s address, and scripts that submit entered data elsewhere.
Step 4: A protected-document page requests authentication
When opened, the file displays a sign-in panel, blurred quotation, or message stating that identity verification is required.
The page may imitate Microsoft, Google, Adobe, Dropbox, or a generic email portal. It can claim that only the intended recipient may view the RFQ.
No legitimate document system is established merely because a familiar logo appears. The page originated from the downloaded attachment.
The form asks for the business email address and its current password.
Step 5: The credentials are transmitted to the operator
Selecting “View Document” or “Sign In” sends the submitted values to a remote endpoint chosen by the attacker.
The form may say the password was incorrect and request another attempt. This can capture a corrected entry or an alternative password.
A fake loading screen then displays an error, an empty file, or a genuine company website. The redirect gives the crime a less obvious ending.
The RFQ itself may never exist. Its commercial detail served only to bring the employee to the credential prompt.
Step 6: The mailbox is explored and persistence is added
The operator signs into the real service and searches for invoices, banking instructions, customers, and upcoming transactions.
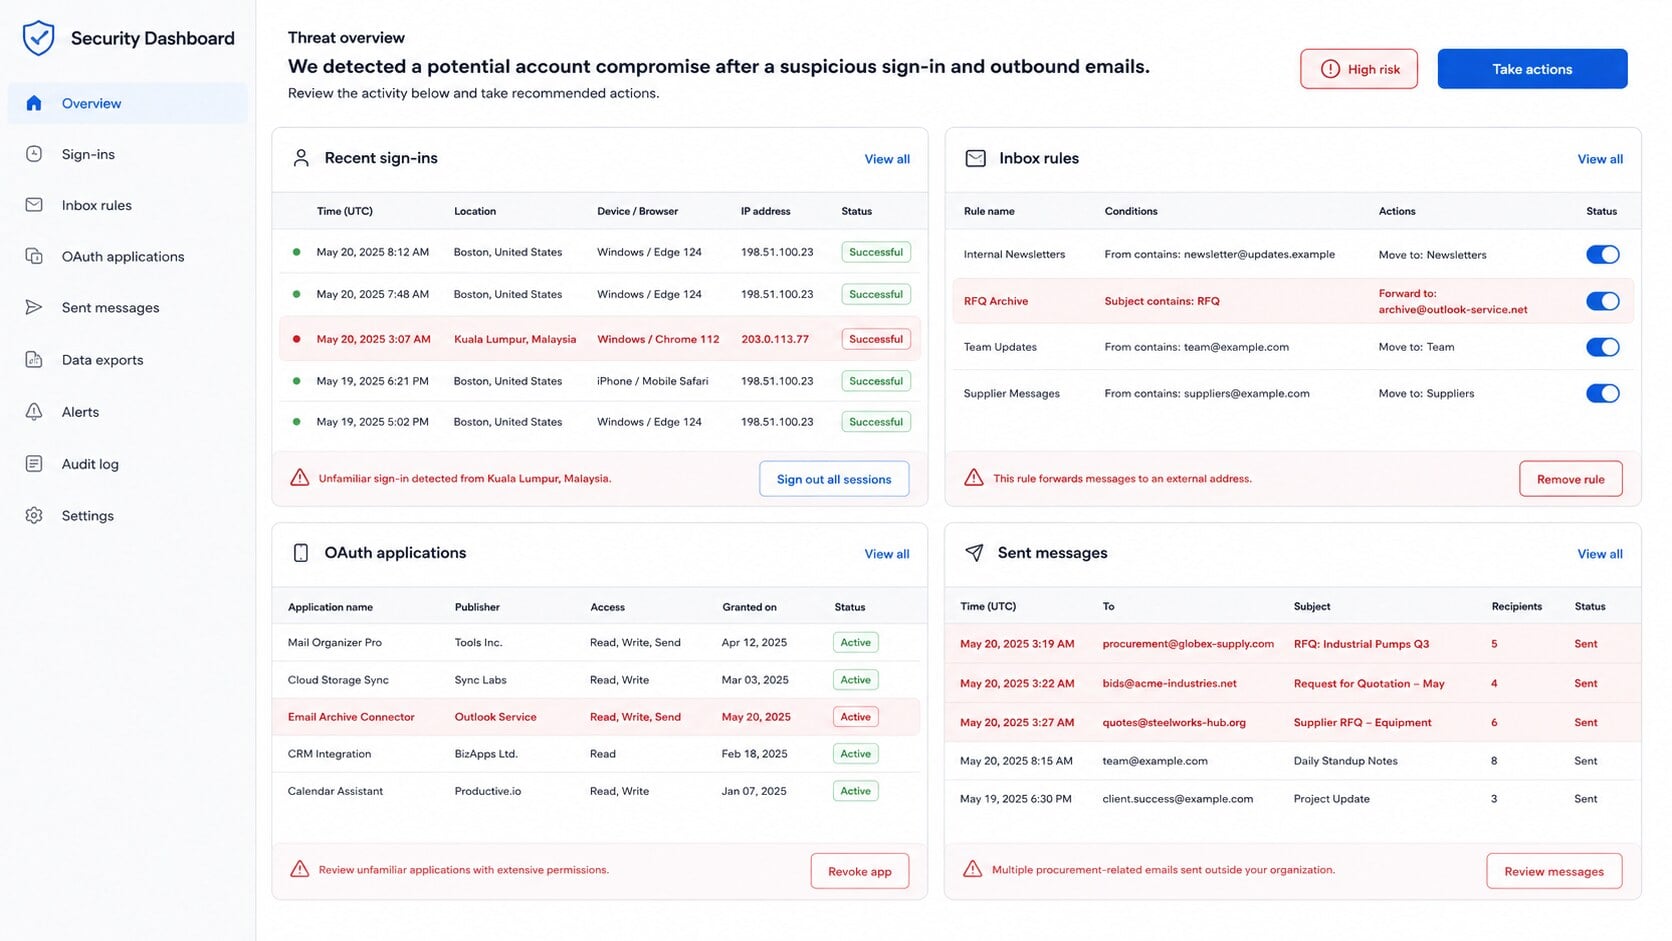
Mailbox rules can forward selected messages or hide warnings. Malicious application access may survive an ordinary password change if tokens are not revoked.
The attacker can learn writing style, usual approval language, and who authorizes payments. This reconnaissance supports a more targeted second stage.
Sent mail and existing threads also provide trusted routes to suppliers and customers.
Step 7: A business email compromise follows
Criminals may send revised bank details inside a real invoice thread. They can also request gift cards, payroll changes, or confidential files.
A supplier seeing the genuine address and conversation history may not realize that control of the mailbox has changed.
Follow-up phishing can spread internally. Coworkers are more likely to open a document that appears to come from the compromised employee.
The financial loss may occur weeks after the RFQ. That delay makes the original attachment harder to connect with the eventual fraudulent request.
How to Verify a New RFQ Before Opening Its Files
Confirm that the buyer exists
Search for the company independently and compare its official domain with the sender’s complete address. Similar spelling is not the same ownership.
Call the main number published on the company’s established website. Ask for the named employee or procurement department and quote the reference number.
Do not use a phone number supplied only inside the suspicious email. That number may lead directly back to the impersonator.
Evaluate the commercial request
Ask whether the products, quantities, destination, and customization needs make sense. Vague enthusiasm around a large order can be a warning sign.
Real buyers can answer practical questions about specifications, payment terms, delivery location, and their procurement process.
Watch for resistance when you request a short video call or an email from the company’s verified domain.
Inspect the attachment as a file
Check the complete filename and extension before opening. An `.html` attachment is a web page, regardless of its PDF-like icon.
Unexpected archives, disk images, executable files, and macro-enabled documents also require caution. Send questionable files to your security team.
Do not enable macros, bypass warnings, or install a viewer selected by the sender. Those requests fall outside a normal quotation exchange.
Refuse unrelated authentication
A prospective buyer does not need your mailbox password. A protected document should use a recognized service and an independently verified invitation.
If viewing a file requires authentication, open the service directly in a separate browser tab. Check whether the document appears in your real account.
When it does not, stop. Ask the buyer to send a conventional PDF or provide details in the body of a verified email.
Company, Sender, Attachment, and Login Checks
Company identity
Compare the claimed buyer with business registrations, the official website, and established contact information. A real company can still be impersonated.
Look closely at domain age, spelling, and email infrastructure when a new domain appears. Recently created lookalikes deserve additional verification.
- Does the company sell or buy the relevant goods?
- Can its switchboard confirm the named employee?
- Does the official domain match the sender exactly?
- Can the RFQ number be confirmed independently?
Sender behavior
Notice whether the sender avoids specific questions, redirects discussion to private messaging, or pressures staff to open the file immediately.
Check the reply-to separately from the visible sender. A response directed toward another domain can expose impersonation.
A professional signature is easy to copy. Verify its details rather than treating the signature itself as evidence.
Attachment properties
Reveal full extensions and inspect the file type. A document name ending in `.pdf.html` remains an HTML page.
Security teams can analyze the attachment in an isolated environment. Staff should not test a suspicious file on a production workstation.
A plain quotation request does not need scripts, browser redirects, executable content, or a mailbox login.
Authentication request
Check which organization would receive the credential. A local attachment or unrelated host has no authority to authenticate a Microsoft, Google, or webmail account.
Password managers may refuse to autofill on the counterfeit page. Treat that refusal as a reason to inspect the domain, not to paste manually.
Legitimate support and buyers never need to know the current mailbox password. No commercial opportunity justifies sharing it.
Warning Signs Inside a Fake Procurement Inquiry
No single clue proves fraud, but several inconsistencies can turn a promising lead into a high-risk message.
- The order is unusually large but the product request remains vague.
- The sender uses a free address or a lookalike company domain.
- The buyer avoids a telephone or video conversation.
- The attached “PDF” is actually HTML, an archive, or executable content.
- The document demands an email password before displaying specifications.
- The reply-to and sender domains do not match.
- The claimed employee cannot be confirmed through the real company.
- Urgency replaces normal discussion of payment, shipping, and technical needs.
Experienced salespeople can still be targeted successfully. The lure uses their responsiveness and knowledge of commercial terminology rather than simple inattention.
A short verification call protects both sides. Genuine buyers usually understand cautious handling of credentials and unexpected attachments.
If a prospect disappears after being asked to verify identity, the lost opportunity was unlikely to become a healthy customer relationship.
What to Do if You Have Fallen Victim to This Scam
- Disconnect from the fake workflow. Close the attachment and page. Do not reply, call numbers in the message, or submit additional information.
- Change the business email password. Use the genuine provider from a clean device. Choose a unique credential and revoke other active sessions.
- Enable phishing-resistant authentication. Prefer passkeys, security keys, or an authenticator application. Review every recent approval and remove unfamiliar devices.
- Report the incident internally. Notify IT, security, and management quickly. Provide the original email and attachment without forwarding them casually to coworkers.
- Inspect mailbox persistence. Check forwarding rules, filters, delegates, recovery details, app passwords, and connected applications. Remove anything unauthorized.
- Review business conversations. Search sent, deleted, and archive folders for unknown messages. Examine payment threads and supplier communications for tampering.
- Alert customers and suppliers when needed. Warn affected contacts through a verified channel. Tell them to reject unexpected payment changes and attachments.
- Protect reused credentials. Replace the exposed password anywhere else it appeared. Prioritize finance, CRM, cloud storage, payroll, and administrative systems.
- Scan the workstation. Use Malwarebytes to examine the device, especially if another file ran, macros were enabled, or software was installed.
- Add malicious-site protection. AdGuard can block many known phishing and advertising destinations. Keep email filtering and attachment controls active as additional layers.
- Contact financial partners rapidly. If bank details or payments changed, call the bank and recipient immediately. Preserve headers, logs, files, and transaction records.
Is Your Device Infected? Run a Free Malware Scan
Slow performance, constant pop-ups, or strange behavior? These are classic signs of a malware infection. The fastest way to find out is to scan your device with Malwarebytes Free — one of the most trusted malware removal tools available.
The free version detects and removes the most common threats, including:
- Adware — the cause of those annoying pop-ups
- Browser hijackers — unwanted redirects and changed homepages
- Trojans and spyware — hidden programs stealing your data
- Potentially unwanted programs (PUPs) — software you never asked for
👉 Select your device below — Windows, Mac, or Android — then follow the simple steps to download Malwarebytes, scan your system, and remove any threats it finds. The scan usually takes 5 to 20 minutes.
Run a Malware Scan with Malwarebytes for Windows
Malwarebytes is one of the most popular and trusted anti-malware tools for Windows — and it’s completely free for removing infections. It catches threats that many antivirus programs miss, including adware, browser hijackers, and trojans. Follow the steps below to scan and clean your PC in just a few minutes.
Download Malwarebytes
Click the button below to download the latest version of Malwarebytes for Windows from the official source. The free version is all you need — it will scan your computer and remove adware, browser hijackers, and other malicious software at no cost.
Download MalwarebytesOfficial installer for Windows 11 and 10. Your download starts right away.Want real-time protection? See Malwarebytes Premium Malwarebytes Free for WindowsScans and removes malware at no cost
-
Install Malwarebytes
When the download finishes, open your Downloads folder and double-click the MBSetup file. If Windows shows a User Account Control pop-up, click “Yes” to allow the installation.

Follow the On-Screen Prompts to Install Malwarebytes
The setup wizard will walk you through a few quick screens:
-
Choose where you’re installing the program — “Personal Computer” or “Work Computer” — then click Next.

-
Malwarebytes will now install on your device. This usually takes under a minute.

-
When installation is complete, the “Welcome to Malwarebytes” screen will open automatically.

-
On the final screen, click Open Malwarebytes to launch the program.

-
Enable “Scan for Rootkits”
Before scanning, turn on rootkit detection so Malwarebytes can find even the most hidden threats. Click the Settings gear icon on the left side of the screen.

In the settings menu, find “Scan for rootkits” and click the toggle so it turns blue.

Done? Click “Dashboard” in the left pane to return to the main screen.
Start the Scan
Click the blue Scan button. Malwarebytes will automatically update its virus database and start checking your computer for malware.

-
Wait for the Scan to Finish
The scan checks your entire system for browser hijackers and other malicious programs, so it can take 5 to 20 minutes depending on your computer. Feel free to do something else — just check back occasionally to see the progress.

-
Quarantine the Detected Threats
When the scan is done, you’ll see a list of everything Malwarebytes found — malware, adware, and potentially unwanted programs. Click the “Quarantine” button to remove all of them at once.

Malwarebytes will now remove the malicious files and registry entries and move them safely into quarantine.

-
Restart Your Computer
Some threats can only be fully removed after a reboot. If Malwarebytes asks you to restart, click Yes. Once you’re logged back in, Malwarebytes has finished removing the threats it found.

That’s it — your Windows PC is now clean of trojans, adware, and other malware, and should be back to running smoothly.
If you are still having problems with your computer after completing these instructions, then please follow one of the steps:
- Run a computer scan with ESET Online Scanner
- Ask for help in our Windows Malware Removal Help & Support forum.
Run a Malware Scan with Malwarebytes for Mac
Malwarebytes for Mac is a free on-demand scanner that removes the malware other security software tends to miss — adware, browser hijackers, and unwanted programs included. Cleaning an infected Mac with Malwarebytes has always been completely free, and it’s our go-to recommendation. Follow the steps below to scan and clean your Mac in just a few minutes.
-
Download Malwarebytes for Mac
Click the button below to download the latest version of Malwarebytes for Mac.
Download MalwarebytesOfficial installer for macOS. Your download starts right away.Want real-time protection? See Malwarebytes PremiumMalwarebytes Free for MacScans and removes malware at no cost -
Open the Malwarebytes setup file
When the download finishes, open your Downloads folder and double-click the setup file to begin the installation.

-
Follow the On-Screen Prompts to Install Malwarebytes
The Malwarebytes for Mac Installer will guide you through a few quick screens. Click “Continue” and keep following the prompts until the installation completes.



When the installation is complete, Malwarebytes opens to the Welcome to Malwarebytes screen. Click “Get started“.
-
Select “Personal Computer” or “Work Computer”
Malwarebytes will ask what type of computer you’re installing it on. Click either Personal Computer or Work Computer, whichever applies.

-
Start the Scan
Click the “Scan” button. Malwarebytes will automatically update its detection database and begin checking your Mac for malware.

-
Wait for the Scan to Finish
Malwarebytes will scan your Mac for adware, browser hijackers, and other malicious programs. This can take a few minutes, so feel free to do something else — just check back occasionally to see the progress.

-
Quarantine the Detected Threats
When the scan is done, you’ll see a list of everything Malwarebytes found. Click the “Quarantine” button to remove all the threats at once.

-
Restart Your Mac
Malwarebytes will now remove all the malicious files it found. Some threats can only be fully removed after a reboot — if Malwarebytes asks you to restart, allow it. Once you’re logged back in, your Mac is clean.

That’s it — your Mac is now free of adware, rogue browser extensions, and other potentially harmful software.
If you are still experiencing problems while trying to remove a malicious program from your computer, please ask for help in our Mac Malware Removal Help & Support forum.
Run a Malware Scan with Malwarebytes for Android
Malwarebytes for Android automatically detects and removes dangerous threats like malware and ransomware so you don’t have to worry about your most-used device being compromised. Aggressive detection of adware and potentially unwanted programs keeps your Android phone or tablet running smooth.
-
Download Malwarebytes for Android.
You can download Malwarebytes for Android by clicking the link below.
Get Malwarebytes for AndroidOpens Google Play in a new tab.Want real-time protection? See Malwarebytes Premium for AndroidMalwarebytes for AndroidScans your phone and removes malware at no cost -
Install Malwarebytes for Android on your phone.
In the Google Play Store, tap “Install” to install Malwarebytes for Android on your device.

When the installation process has finished, tap “Open” to begin using Malwarebytes for Android. You can also open Malwarebytes by tapping on its icon in your phone menu or home screen.

-
Follow the on-screen prompts to complete the setup process
When Malwarebytes will open, you will see the Malwarebytes Setup Wizard which will guide you through a series of permissions and other setup options.
This is the first of two screens that explain the difference between the Premium and Free versions. Swipe this screen to continue.
Tap on “Got it” to proceed to the next step.
Malwarebytes for Android will now ask for a set of permissions that are required to scan your device and protect it from malware. Tap on “Give permission” to continue.
Tap on “Allow” to permit Malwarebytes to access the files on your phone.
-
Update database and run a scan with Malwarebytes for Android
You will now be prompted to update the Malwarebytes database and run a full system scan.

Click on “Update database” to update the Malwarebytes for Android definitions to the latest version, then click on “Run full scan” to perform a system scan.

-
Wait for the Malwarebytes scan to complete.
Malwarebytes will now start scanning your phone for adware and other malicious apps. This process can take a few minutes, so we suggest you do something else and periodically check on the status of the scan to see when it is finished.

-
Click on “Remove Selected”.
When the scan has been completed, you will be presented with a screen showing the malware infections that Malwarebytes for Android has detected. To remove the malicious apps that Malwarebytes has found, tap on the “Remove Selected” button.

-
Restart your phone.
Malwarebytes for Android will now remove all the malicious apps that it has found. To complete the malware removal process, Malwarebytes may ask you to restart your device.
That’s it — your Android phone is now clean — no more malicious apps, adware, or browser redirects.
If you are still having problems with your phone after completing these instructions, then please follow one of the steps:
- Restore your phone to factory settings by going to Settings > General management > Reset > Factory data reset.
- Ask for help in our Mobile Malware Removal Help & Support forum.
Stay Protected: Block Ads and Malicious Sites
Now that your device is clean, keep it that way. Most infections start with a malicious ad or a fake download button — so blocking them at the source is your best defense.
We recommend AdGuard, which blocks malicious ads, phishing pages, and dangerous redirects before they can reach you.
👉 Download AdGuard and browse safely
Frequently Asked Questions
Is every unexpected request for quotation a scam?
No. New buyers routinely contact suppliers without an introduction. The risk comes from inconsistent identity, deceptive files, and unrelated password requests.
Verify the buyer before treating the opportunity as genuine.
Why would an RFQ arrive as an HTML file?
HTML can display a browser-based form directly from an attachment. Criminals use it to imitate a protected portal and collect credentials.
A legitimate buyer can usually provide a standard PDF or spreadsheet instead.
Can the company named in the email be real?
Yes. Impersonators frequently borrow genuine company and employee names.
Contact that organization through independently sourced details before trusting the sender.
What if I opened the file but entered nothing?
Close it and report it to your security team. Check downloads and scan the device, particularly if the browser produced unexpected prompts.
Credential theft is less likely if no information was submitted.
Does Microsoft or Google require a password to open shared documents?
Authentication can be required, but it should occur on the provider’s exact official domain or through its established application.
A local HTML attachment has no authority to collect that password.
Why do attackers want a sales mailbox?
Sales accounts contain customers, quotations, invoices, and active conversations. They also communicate naturally with many external contacts.
That access supports payment fraud and further targeted phishing.
The Bottom Line
The RFQ Confirmation scam disguises a credential trap as a valuable sales lead, using realistic purchasing language and a document-like HTML attachment.
Verify the buyer independently, inspect every file’s true type, and never enter a business email password into a portal reached through an unexpected quotation.

Join the discussion
0 commentsShare your experience or ask a question about this article.
Discussion
Start the conversation
Have a question or something useful to share? Add the first comment.