


The voicemail sounds polished, like it came from a real office with a real case file.
“Hi, this is Mary with Tax Abatement and Relief Office Scam… I’m calling to follow up on back taxes and missed filings… due to new resolution programs available for a limited time…”
You might not even remember doing anything wrong. That is what makes it so effective.
The message is vague on purpose, but it plants a specific feeling. If you ignore it, something bad might happen. If you call back, maybe you can “fix it” quickly.
That uneasy moment, right before you hit redial, is where this scam lives.

Scam Overview
What “Tax Abatement and Relief Office Scam” scam calls are
“Tax Abatement and Relief Office Scam” scam calls are fraudulent robocalls and live calls that use the name “Tax Abatement and Relief Office Scam” (or a very similar tax-sounding name) to pressure people into calling back about supposed tax problems.
These calls typically claim you have:
- back taxes
- missed filings
- “unresolved activity” on your account
- a time-sensitive eligibility window for “new resolution programs”
They often present the call as a final attempt, or an urgent opportunity to get a “fresh start.” Multiple phone-number complaint sites and call-transcript databases show nearly identical scripts using the “Tax Abatement and Relief Office Scam” name, including lines about “back taxes and missed filings” and “new resolution programs… for a limited time.”
Important clarification: scammers frequently use borrowed names. The existence of scam calls using a name does not automatically mean a legitimate business with a similar name is involved. The pattern to focus on is the behavior and script, not the branding.
Why the name sounds believable
Scammers choose names that do three things at once:
- Sound legitimate: “Professional,” “Associates,” “Agency,” “Resolution.”
- Sound generic: so they can reuse the same script on anyone, anywhere.
- Sound tax-adjacent: so your brain fills in “IRS” even if the message never says it.
This is why the voicemail can feel personal even when it is mass-dialed.
The core promise, and why it is a trap
The hook in most of these calls is a two-part story:
- You have a problem (back taxes, missed filings, unresolved activity).
- They have a shortcut (new programs, resolution options, fresh start, limited-time relief).
Real tax resolution does not work like a flash sale. It is documentation, notices, deadlines, and verification. Scammers use “limited-time programs” because urgency is how they keep you from checking anything.
What the calls typically sound like
Complaint logs and call transcripts show a repeating structure:
- A friendly first name, often “Mary”
- A company name, “Tax Abatement and Relief Office Scam”
- A specific day and date to sound authentic
- A claim about back taxes or missed filings
- A “limited time” resolution program
- A push to call back immediately
- Sometimes an opt-out prompt like “press 8”
You can see this pattern across multiple call transcript pages that quote nearly identical wording.
This consistency is not a coincidence. It is a campaign.
Why these messages feel scary even when you did nothing wrong
The script is engineered to trigger a mental spiral.
Most people are not tax experts. The words “missed filings” can hit hard because they sound like a mistake you could have made without realizing it.
Even if you are confident you are fine, the message creates uncertainty:
- What if someone used my identity?
- What if I missed a letter?
- What if a form got lost?
- What if this becomes garnishment?
Scammers rely on that uncertainty, because it pushes people into doing the one thing the scam needs.
Calling back.
How this connects to wider tax-season scam trends
Scam campaigns spike during tax season because attention is already high and stress is already baked in.
There is also a parallel scam that targets tax professionals directly: the “new client” email scam. The IRS has warned tax professionals about a surge of “new client” phishing emails where criminals pose as potential clients and include malicious links or attachments. (IRS)
While that “new client” scam is aimed at CPAs and preparers, it tells you something important: scammers actively exploit tax workflows, tax language, and tax-season timing.
The “Tax Abatement and Relief Office Scam” robocall script is the consumer-facing version of the same idea. It uses tax pressure to start a relationship that benefits the attacker.
The two most common goals: money or information
These scam calls usually go in one of two directions after you call back.
1) They want money, fast
They push fees for “enrollment,” “processing,” or “case initiation.” They may claim they can settle your “tax issue” if you pay today.
2) They want your personal data
They ask for identifying details under the excuse of “verification” or “pulling your file.” That data can be used for identity theft, account takeovers, or future targeted scams.
Many campaigns start with information gathering, then evolve into a money ask once they sense the victim is anxious and cooperative.
A key truth that helps you spot the scam
One of the easiest ways to cut through the fear is to remember how legitimate IRS contact usually starts.
The IRS generally contacts taxpayers by mail first.
So when you get a vague robocall about “back taxes and missed filings” with a pushy call-back request, treat it as suspicious by default.
The biggest red flags to watch for
If you want a quick checklist, these are the signs that show up again and again in “Tax Abatement and Relief Office Scam” style scam calls:
- A robocall or prerecorded voicemail, not a written notice
- Vague claims like “back taxes” or “missed filings” with no tax year, no notice number
- A “limited time” claim about new resolution programs (Robokiller Lookup)
- Pressure to call back today
- “Final attempt” language
- An insistence that they can fix it quickly if you follow steps immediately
If the message is designed to rush you, it is designed to control you.
How the scam can escalate into something worse
Some victims expect a simple “tax relief” sales pitch.
But scam operations frequently cross-pollinate. A call that begins as “tax resolution” can pivot into:
- identity theft attempts
- payment scams involving gift cards or wire transfers
- fake “account security” claims
- remote access scams where they try to get control of your device
That last one is especially damaging, because once someone has remote access, they can watch you log in to banking, push you into transfers, and capture verification codes.
This is why it is dangerous to treat the call as harmless “spam.” The risk is not the voicemail, it is what happens if you engage.
How The Scam Works
Step 1: The voicemail that creates urgency without anything you can verify
The first step is the voicemail.
It is written to sound specific, but not verifiable.
In the “Tax Abatement and Relief Office Scam” script, the core lines are usually:
- “following up on back taxes and missed filings”
- “new resolution programs available for a limited time”
- “call today for your best opportunity to get a fresh start”
- “this may be our only attempt”
Call transcript pages show these phrases almost word-for-word across multiple dates and phone numbers.
They do not give you a tax year. They do not give you an official notice identifier. They do not give you a document you can cross-check.
They give you a feeling.
Step 2: The call-back connects you to a live operator or call center script
If you call back, you typically reach a live person who follows a predictable pattern:
- They sound calm and professional.
- They use “case” language: file, record, eligibility, program.
- They ask quick questions to keep momentum.
This is where the scam becomes interactive. The operator can adjust the story to fit whatever you say.
If you say you never had tax issues, they might pivot to “unfiled returns” or “system mismatches.”
If you say you are self-employed, they might pivot to “common compliance problems.”
The scam does not need to be true. It only needs to feel plausible.
Step 3: “Verification” questions that collect valuable personal information
Early questions often sound like normal intake, but they can be data harvesting.
Common asks include:
- full name
- address
- date of birth
- last 4 digits of SSN
- current employer or business name
- estimated income range
- filing status
Even if they never get money, this information is valuable.
It can be used to:
- craft more convincing follow-up scams
- attempt account takeovers
- sell your profile to other scam operations
- target you with “tax debt relief” ads and calls
A real tax professional can explain what they need and why, and will not pressure you to disclose sensitive information on an unsolicited inbound call from a voicemail you did not expect.
Step 4: The pressure squeeze, consequences if you “wait”
Once they sense you are nervous, they push urgency harder.
Common pressure lines include:
- “This is time-sensitive.”
- “Programs are only available for a limited time.”
- “If you don’t handle it now, it becomes permanent.”
- “We are trying to help you before enforcement.”
This “limited time” framing is explicitly present in the widely reported script. (Robokiller Lookup)
The purpose is to block your most powerful defense: stepping away to verify.
Step 5: The pitch, “resolution programs,” “fresh start,” and upfront fees
Now comes the “solution.”
They tell you that you qualify for something. They make it sound exclusive, like you have been selected or flagged for assistance.
Then they introduce money.
It may be framed as:
- a “processing fee”
- an “enrollment fee”
- a “document preparation fee”
- a “case initiation payment”
- a “compliance retainer”
You might hear numbers that feel small enough to rationalize, like $199 or $399, especially if you are scared. Then once you pay, there is often another fee.
The scam works best when the payment feels like relief.
Step 6: The payment trap, steering you toward hard-to-reverse methods
Some versions push standard card payments. Others steer victims toward methods that are difficult to reverse.
Scammers frequently prefer:
- gift cards
- wire transfers
- prepaid debit cards
- payment apps
- crypto
If you hear “gift cards” in any tax context, stop immediately. No legitimate tax resolution process requires you to buy gift cards at a store and read codes over the phone.
Step 7: The escalation path, identity theft, device access, and repeat targeting
If you engage and do not pay, or if you pay once and hesitate later, scammers often try a second angle.
Common escalations:
- “We see suspicious activity, your identity may be compromised.”
- “We need to secure your account before we proceed.”
- “We need you to install a tool so we can help you complete verification.”
This is where remote access and tech-support style fraud can enter the picture.
It is also common for victims who respond to one campaign to get hit with more campaigns later. Once you are tagged as someone who calls back, your number becomes more valuable.
What To Do If You Have Fallen Victim to This Scam
- Stop contact immediately.
Hang up, stop replying, and block the numbers. Do not try to argue or “test” them. The goal is to cut off access to your attention. - Write down everything you remember.
Capture the callback number, what they claimed, what you shared, and any payment instructions. If you can, save the voicemail or screenshot the transcript. - If you paid money, contact your bank or card issuer right away.
Explain that you were victimized by a phone scam and ask about:
- chargebacks (for card payments)
- wire recall options (for wires)
- fraud claims and account monitoring
If you paid via gift cards, contact the gift card company immediately. If the codes have not been redeemed, there may be a narrow window to freeze funds.
- If you shared personal information, take identity protection steps.
If you gave SSN details, ID images, or bank information:
- change passwords (starting with email)
- turn on 2-factor authentication
- monitor accounts for new logins and password resets
- consider a fraud alert or credit freeze if you shared SSN data
- If you installed any software or clicked links, treat your device as at-risk.
Run a full scan with Malwarebytes to check for malware, adware, or unwanted programs, especially if the scam involved downloads or “verification” links. - Harden your browser and reduce scam exposure going forward.
Install AdGuard to reduce malicious ads, scam pop-ups, and redirect pages that often feed into phone scams and fake support numbers. - Report the incident.
Even if the scammer did not claim to be the IRS directly, tax-themed scams should be reported. Keep the number, the voicemail, and any texts or emails. Reporting helps pattern-tracking and takedowns. - Verify your real tax status safely, without using any number from the voicemail.
If you are genuinely concerned you may owe taxes or missed a filing, use official channels you find independently, or consult a licensed tax professional using verified contact information. Do not rely on information provided in a robocall.
How to Remove Unwanted Apps and Malware
If a pop-up scam tricked you into downloading an unwanted program — or you suspect your device is infected — follow the free, step-by-step removal guide below to find and remove it.
Please follow the steps in order. If you get stuck or have doubts at any point, stop and ask for help in our free support forum — our team will guide you personally.
 Remove Unwanted Apps and Malware from Windows
-
 Remove Unwanted Apps and Malware from Mac
 Remove Unwanted Apps and Malware from Android
- Remove Unwanted Apps and Malware from iPhone and iPad
Remove Unwanted Apps and Malware from Windows
- STEP 1: Uninstall malicious programs from Windows
- STEP 2: Reset browsers back to default settings
- STEP 3: Use Malwarebytes Anti-Malware to remove malware and unwanted programs
- STEP 4: Use HitmanPro to scan your computer for badware
- STEP 5: Use AdwCleaner to remove adware and malicious browser policies
STEP 1: Uninstall malicious programs from Windows
In this first step, we will manually check if any unknown or malicious programs are installed on the computer. Sometimes adware and browser hijackers can have a usable Uninstall entry that can be used to remove them.
-
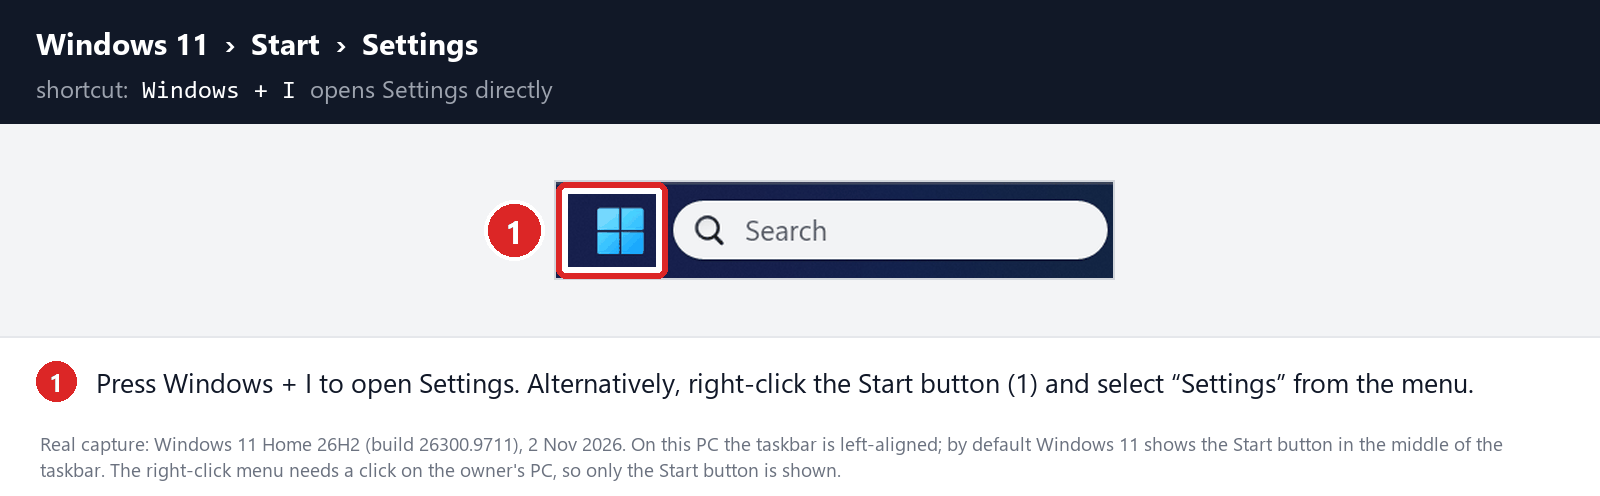
Open the Settings app
Press Windows + I on your keyboard to open Settings. Alternatively, right-click the Start button and select “Settings” from the menu.
-
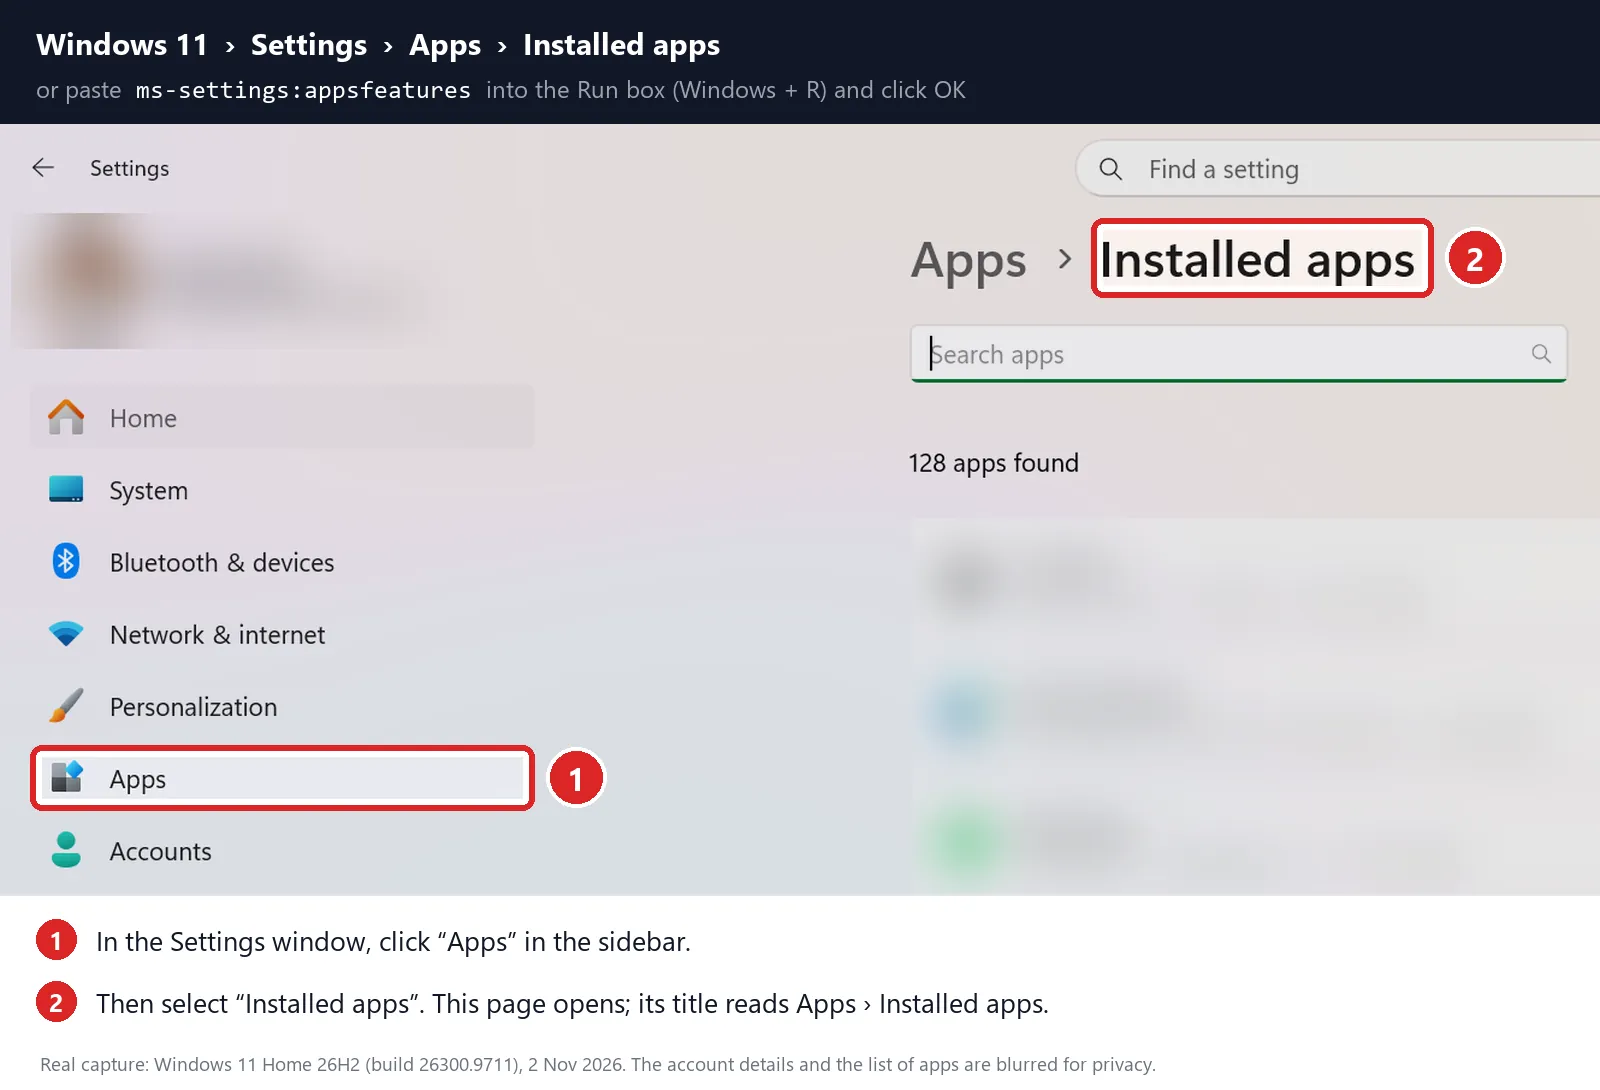
Go to “Installed apps”
In the Settings window, click “Apps” in the sidebar, then select “Installed apps“.
-
Find and uninstall the malicious program
Scroll through the list of installed apps and look for anything suspicious — a program you don’t remember installing, or one with a strange or generic name.
Quick tip: click “Sort by” and choose “Date installed“. Malware is usually one of the most recently installed programs, so it will appear near the top.
When you find the malicious program, click the three dots next to it and select “Uninstall“.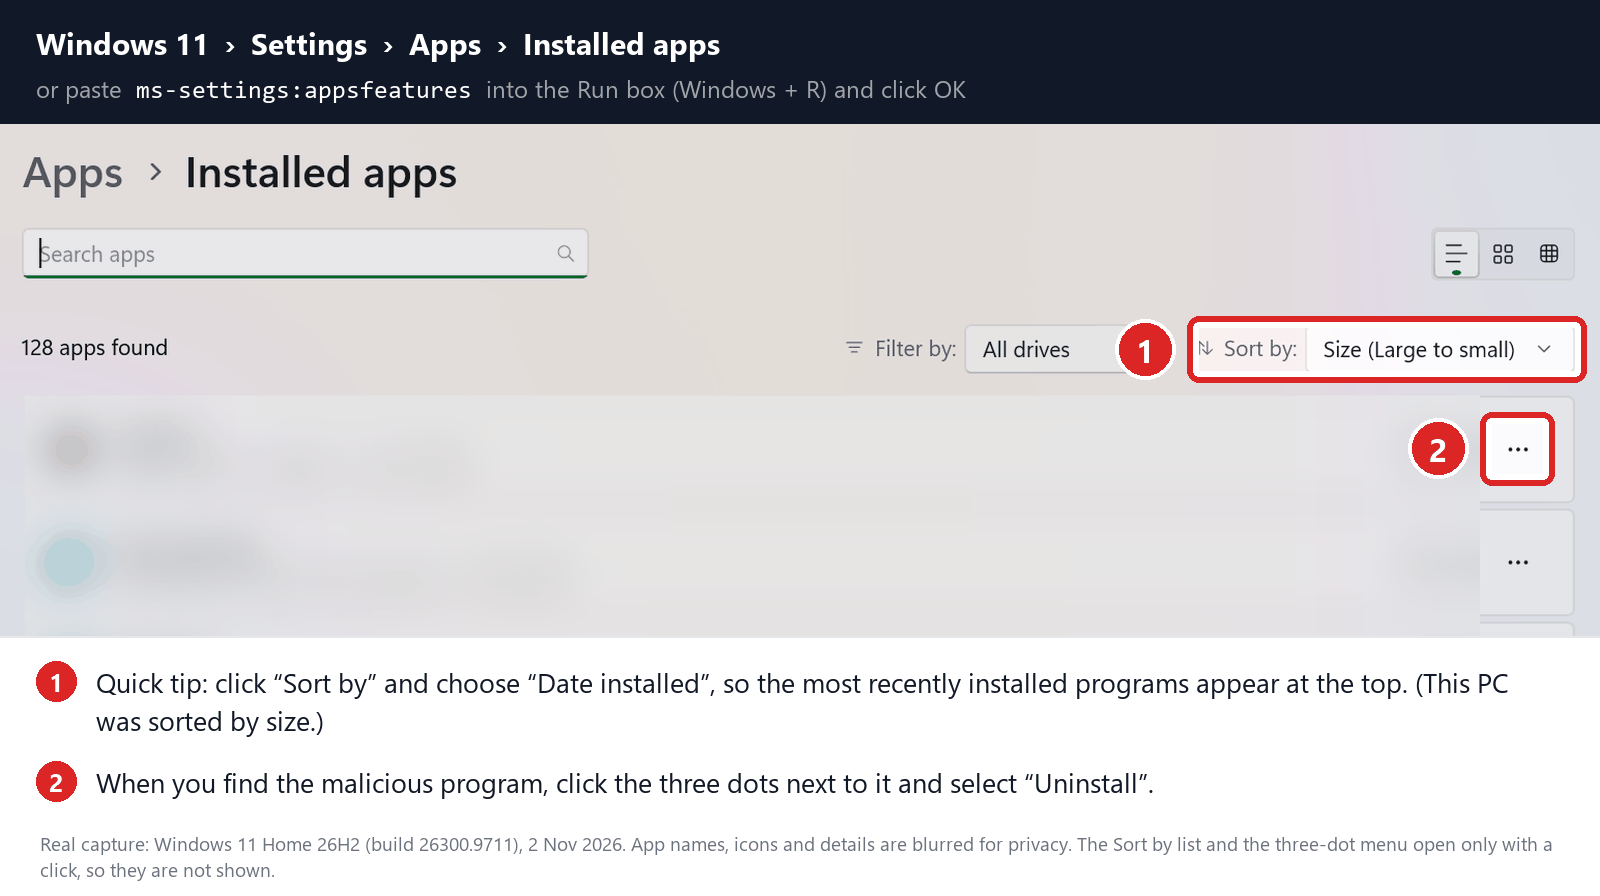 Didn’t find any suspicious programs? That’s fine — not all infections install visible apps. Just continue with the next step in this guide.
-
Complete the uninstall
Confirm by clicking Uninstall in the message box, then follow the remaining prompts.
Read each prompt carefully — some malicious programs use confusing wording or pre-ticked boxes hoping you’ll click through without looking.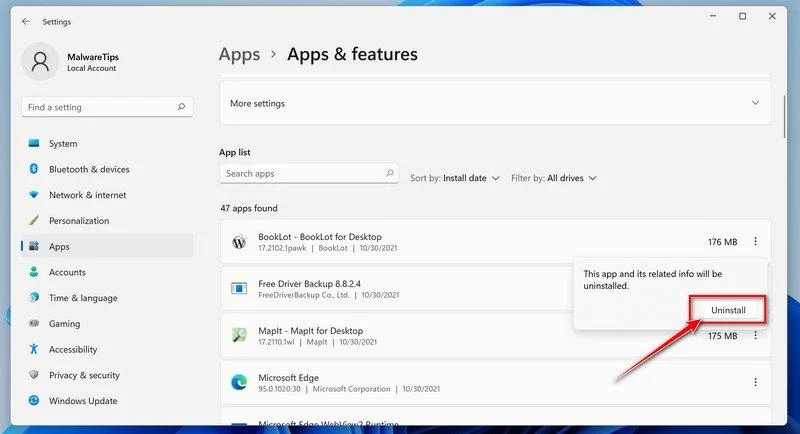
-
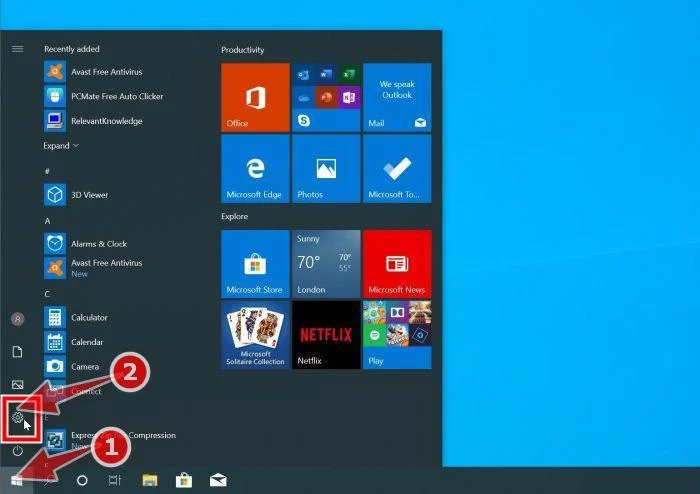
Open the Settings app
Press Windows + I on your keyboard to open Settings. Alternatively, click the Start button on the taskbar and select “Settings” (the gear icon).
-
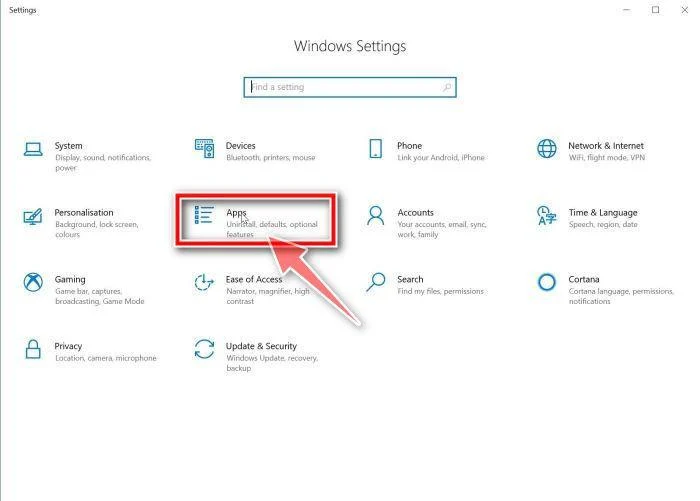
Click on “Apps”
In the “Windows Settings” window, click “Apps“. The “Apps & Features” section should open by default — if it doesn’t, select it from the list on the left.
-
Find and uninstall the malicious program
Scroll through the list of installed apps and look for anything suspicious — a program you don’t remember installing, or one with a strange or generic name.
Quick tip: click “Sort by” and choose “Install date“. Malware is usually one of the most recently installed programs, so it will appear near the top.
When you find the malicious program, click on it and select “Uninstall“.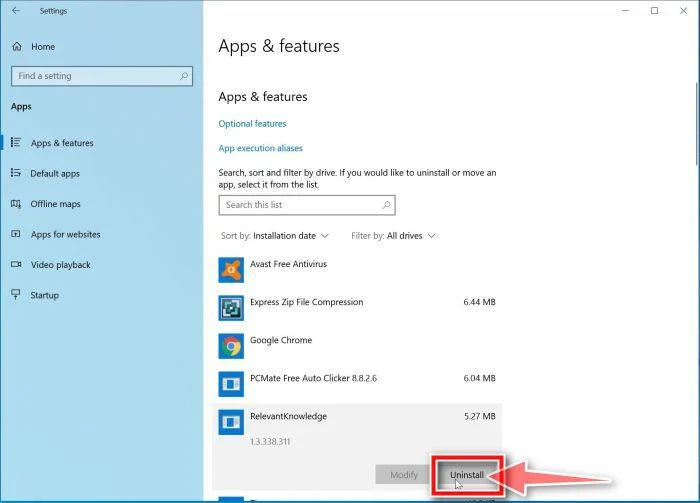 Didn’t find any suspicious programs? That’s fine — not all infections install visible apps. Just continue with the next step in this guide.
-
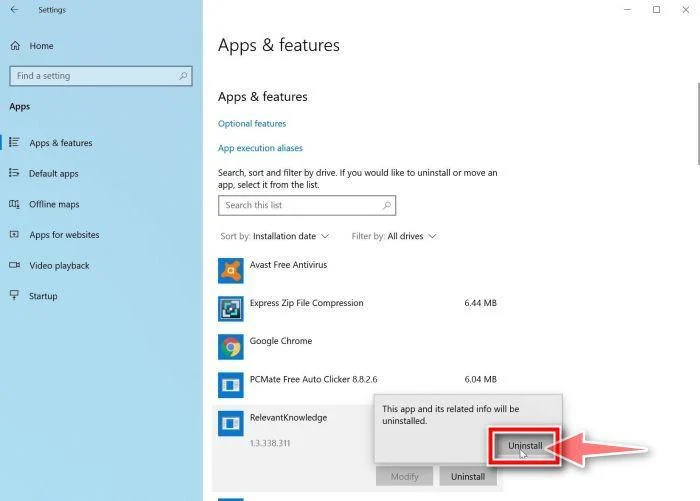
Complete the uninstall
Confirm by clicking Uninstall in the message box, then follow the remaining prompts.
Read each prompt carefully — some malicious programs use confusing wording or pre-ticked boxes hoping you’ll click through without looking.
With the malicious programs removed, you’re ready for the next step in this guide.
STEP 2: Reset browsers back to default settings
In this step, we will remove spam notifications, malicious extensions, and change to default any settings that might have been changed by malware.
Please note that a Chrome or Edge reset turns off all your extensions, and a Firefox refresh removes them. Your bookmarks and favorites stay intact. For each browser that you have installed on your computer, please click on the browsers tab below and follow the displayed steps to reset that browser.
Reset Chrome for Windows to default settings
We will now reset your Chrome browser settings to their original defaults. This will reset your startup page, new tab page, search engine, and pinned tabs. It will also disable all extensions and clear temporary data like cookies. Your favorites, history, and saved passwords will not be cleared.
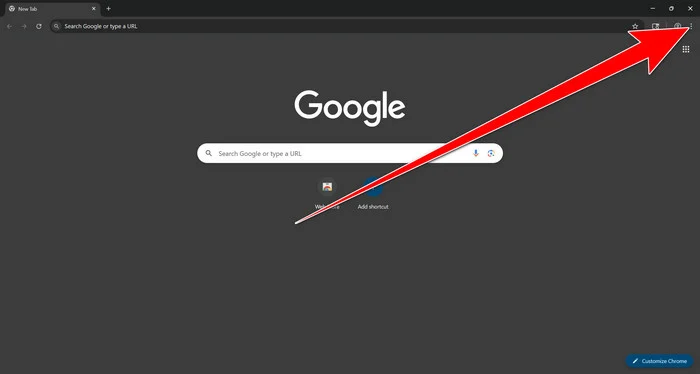
Open the Chrome menu
Open Google Chrome and click the three-dot (⋮) icon in the top-right corner.
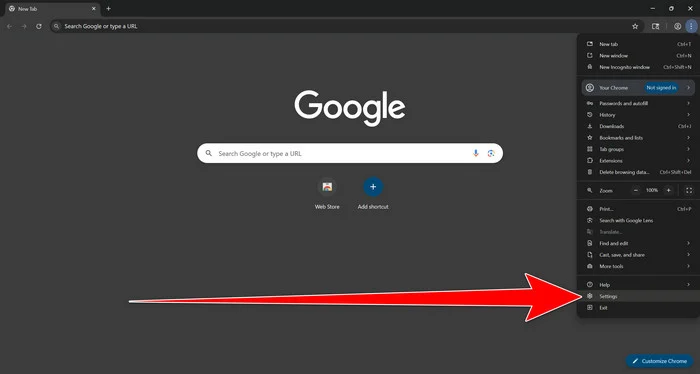
Open Chrome Settings
Select Settings from the Chrome menu.
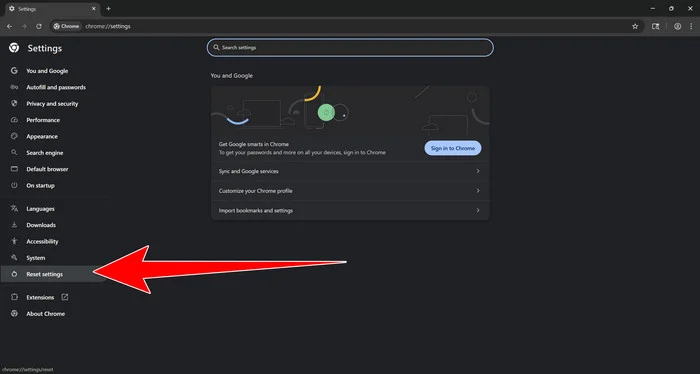
Select “Reset settings”
Look at the menu on the left side of the Settings page. Scroll down and click Reset settings.
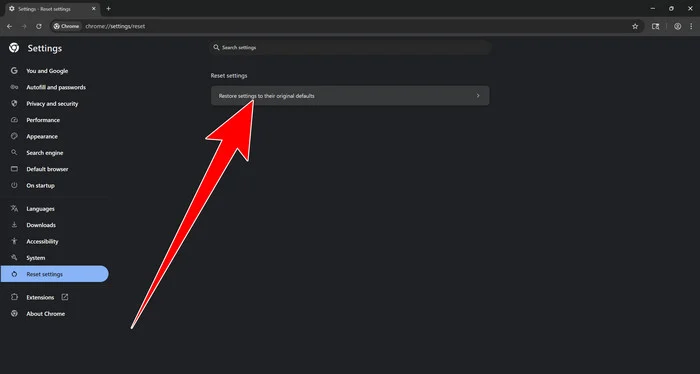
Restore Chrome’s original settings
Click Restore settings to their original defaults.
Confirm the Chrome reset
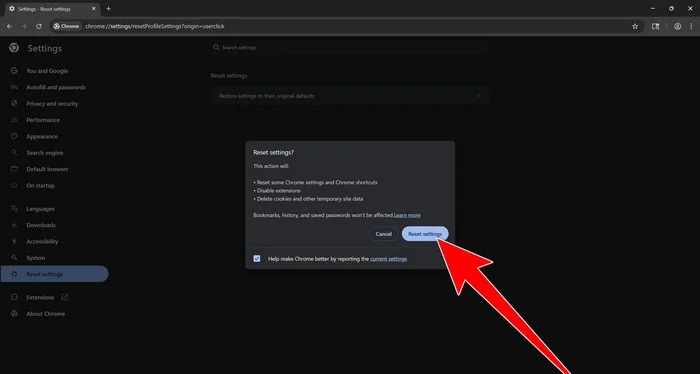
A confirmation window will appear. Click Reset settings.
This will:
- Restore the default search engine, homepage, and new tab page
- Reset startup pages and pinned tabs
- Reset site permissions, such as notifications and pop-ups
- Disable installed extensions
- Clear temporary cookies and website data
Don’t worry: Chrome will not delete your bookmarks, browsing history, or saved passwords. If you’re signed in to Chrome, the reset applies on all devices where you’re signed in.
Restart Chrome and perform a test search. If your searches now open normally in Google, you can stop here.
If searches are still redirected through shady domains complete the additional step below.
Remove persistent search hijacker data
Only complete this step if the redirect continues after resetting Chrome.
Some browser hijackers hide inside Chrome’s local search-engine database. A standard Chrome reset may not remove this database, which is why searches can continue to pass through shady sites.
The following procedure creates a backup of the affected database and allows Chrome to build a new, clean version. This is safer and less disruptive than deleting the entire Chrome profile.
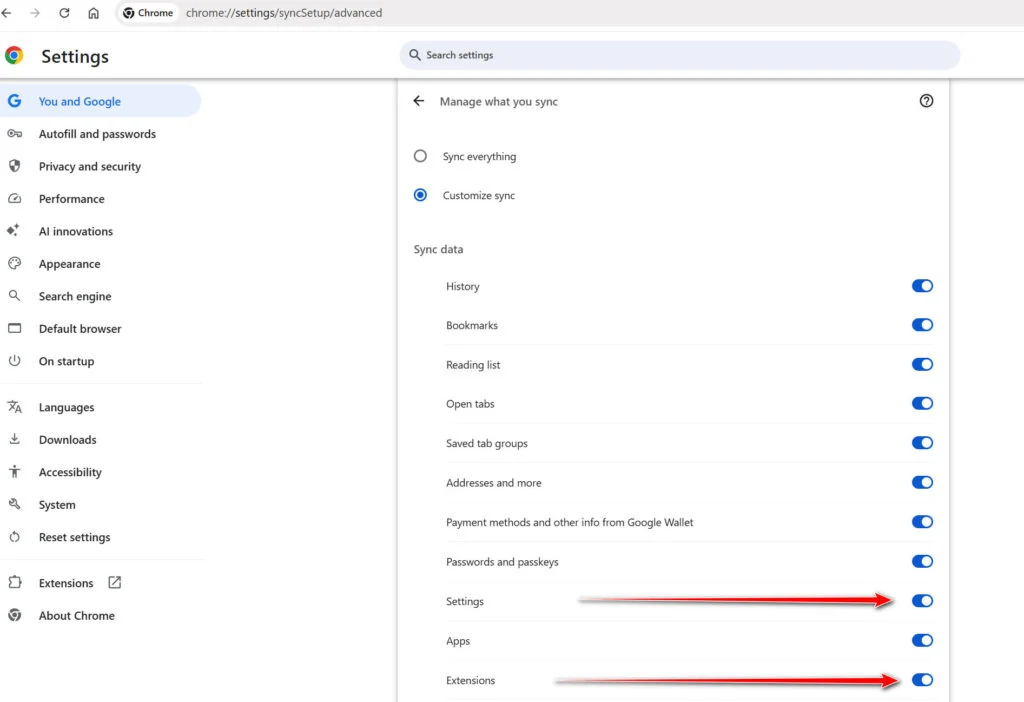
First, prevent Chrome Sync from restoring the hijacked settings:
- Open a new Chrome tab.
- Copy the following address, paste it into Chrome’s address bar, and press Enter:
chrome://settings/syncSetup/advanced - Under Manage what you sync, select Customize sync.
- Turn off Settings and Extensions.
- You can leave Bookmarks and Passwords enabled so your important data remains synchronized.
Note: Some newer Chrome versions may automatically redirect this address to the Google Account settings page. If that happens, locate the list of synchronized Chrome data and turn off Settings and Extensions there.
Now save anything you are working on and close every Chrome window.
Run the cleanup command:
- Press the Windows key on your keyboard.
- Type PowerShell.
- Open Windows PowerShell. Administrator access is not required.
- Copy the entire command shown below.
- Right-click inside the PowerShell window to paste the command, then press Enter.
- If Windows warns you about pasting multiple lines, select the option to continue.
$stamp = Get-Date -Format "yyyyMMdd-HHmmss"

Get-Process chrome -ErrorAction SilentlyContinue |
 Stop-Process -Force

$root = "$env:LOCALAPPDATA\Google\Chrome\User Data"

if (Test-Path $root) {
 $profiles = Get-ChildItem $root -Directory |
 Where-Object {
 $_.Name -eq "Default" -or
 $_.Name -match "^Profile \d+$"
 }

 foreach ($profile in $profiles) {
 foreach ($name in @(
 "Web Data",
 "Web Data-journal",
 "Web Data-wal",
 "Web Data-shm"
 )) {
 $file = Join-Path $profile.FullName $name

 if (Test-Path $file) {
 $backup = "$file.search-hijacker-backup-$stamp"
 Move-Item -LiteralPath $file -Destination $backup
 Write-Host "Backup created: $backup"
 }
 }
 }
}

Write-Host ""
Write-Host "Chrome search data has been cleaned."
Write-Host "You can now reopen Chrome."
Wait until PowerShell displays the following message:
Chrome search data has been cleaned.
You can now reopen Chrome.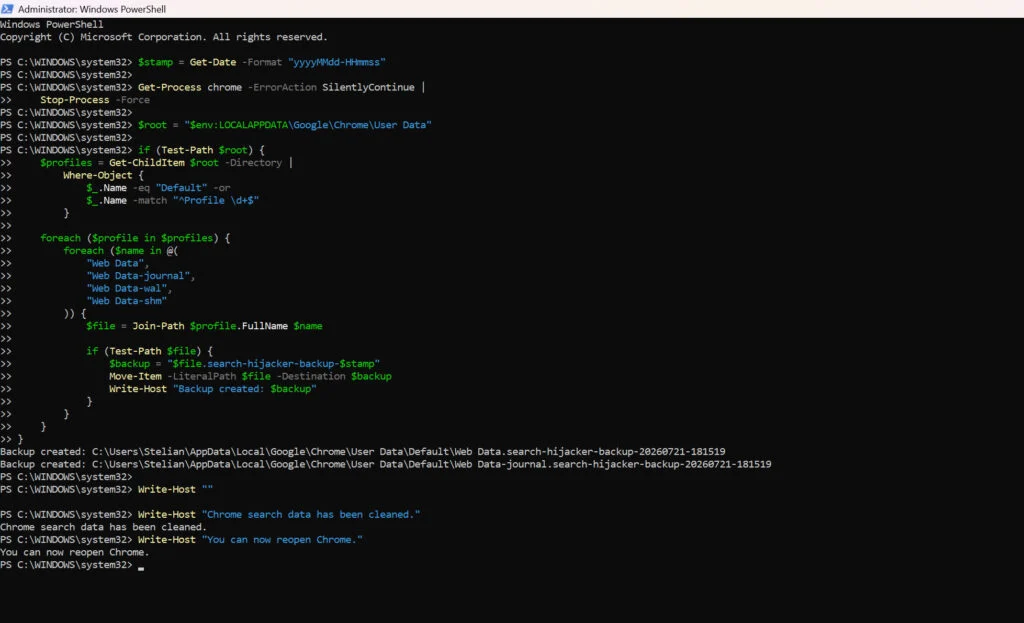
Close PowerShell and reopen Google Chrome. Chrome will automatically create a clean search database for every local profile.
Next, copy the following address, paste it into Chrome’s address bar, and press Enter:
chrome://settings/searchEngines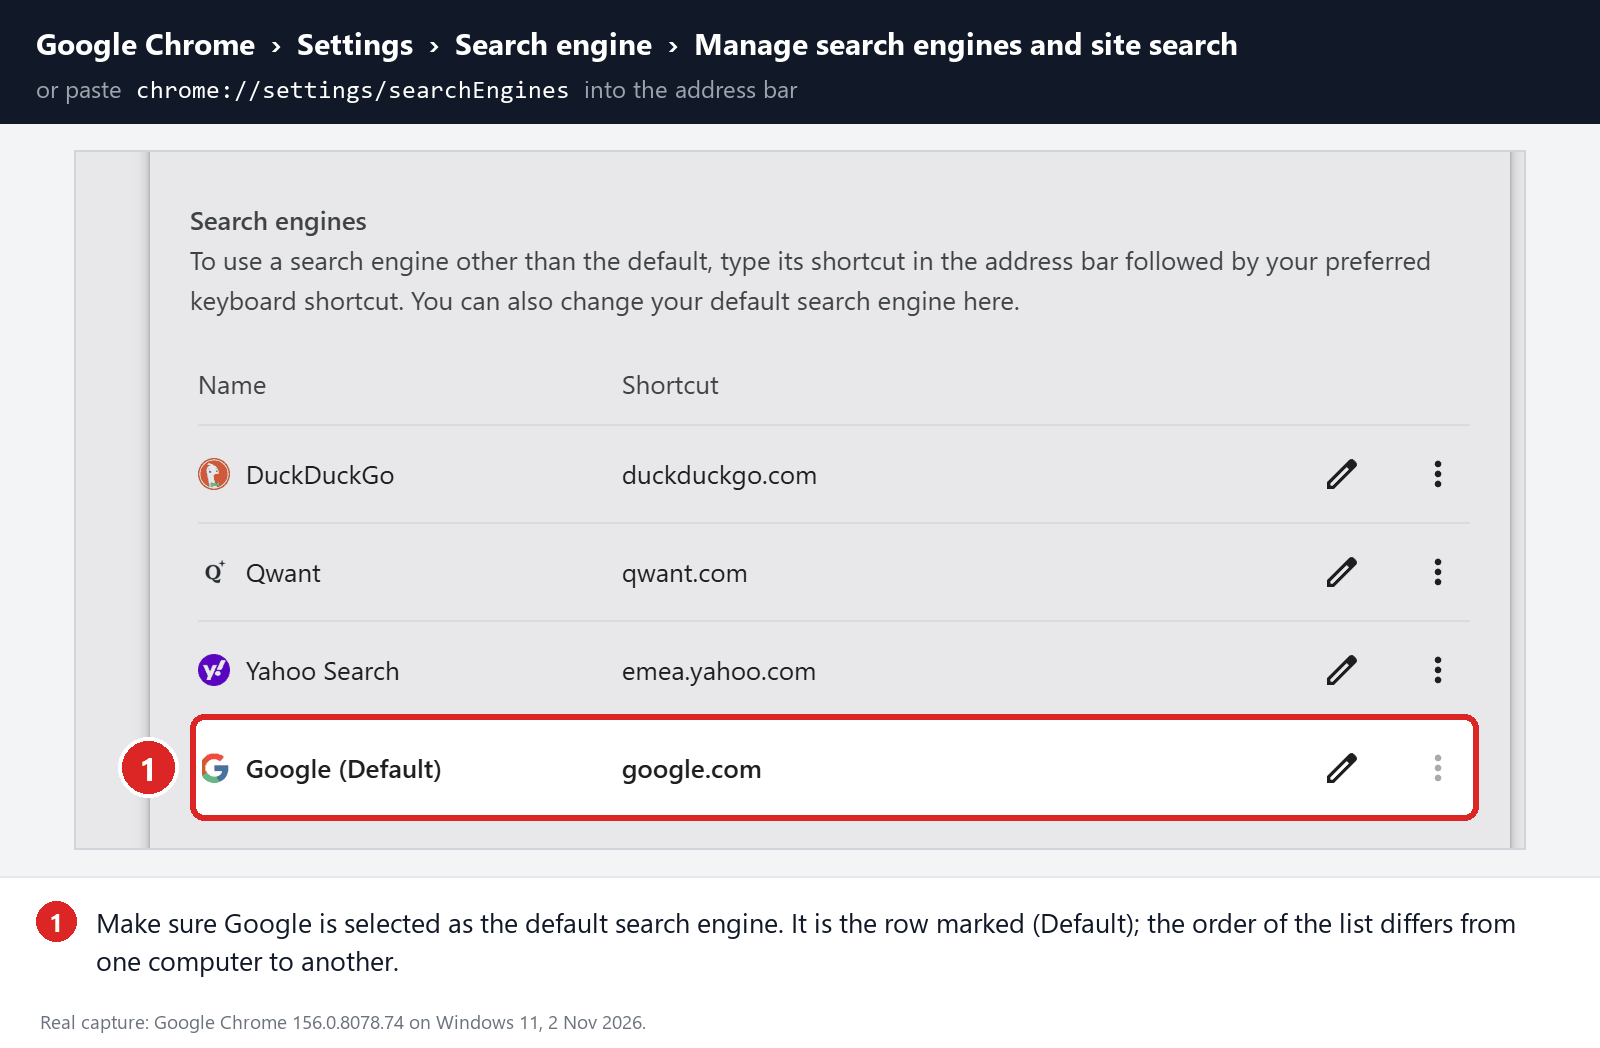
Make sure Google is selected as the default search engine. Test several searches from the address bar and confirm that they no longer pass through shady search engines.
Your important Chrome data is protected: the PowerShell cleanup does not remove bookmarks, saved passwords, browsing history, cookies, or installed extensions. However, it may reset locally stored Autofill addresses, payment cards saved only on this computer, and form suggestions.
The original search database is not deleted. PowerShell renames it and adds
search-hijacker-backupto its filename so it can be recovered if necessary.Keep Settings and Extensions synchronization disabled while testing Chrome. Do not enable every extension at once. Enable only the extensions you recognize, one at a time, and test Chrome after each one.
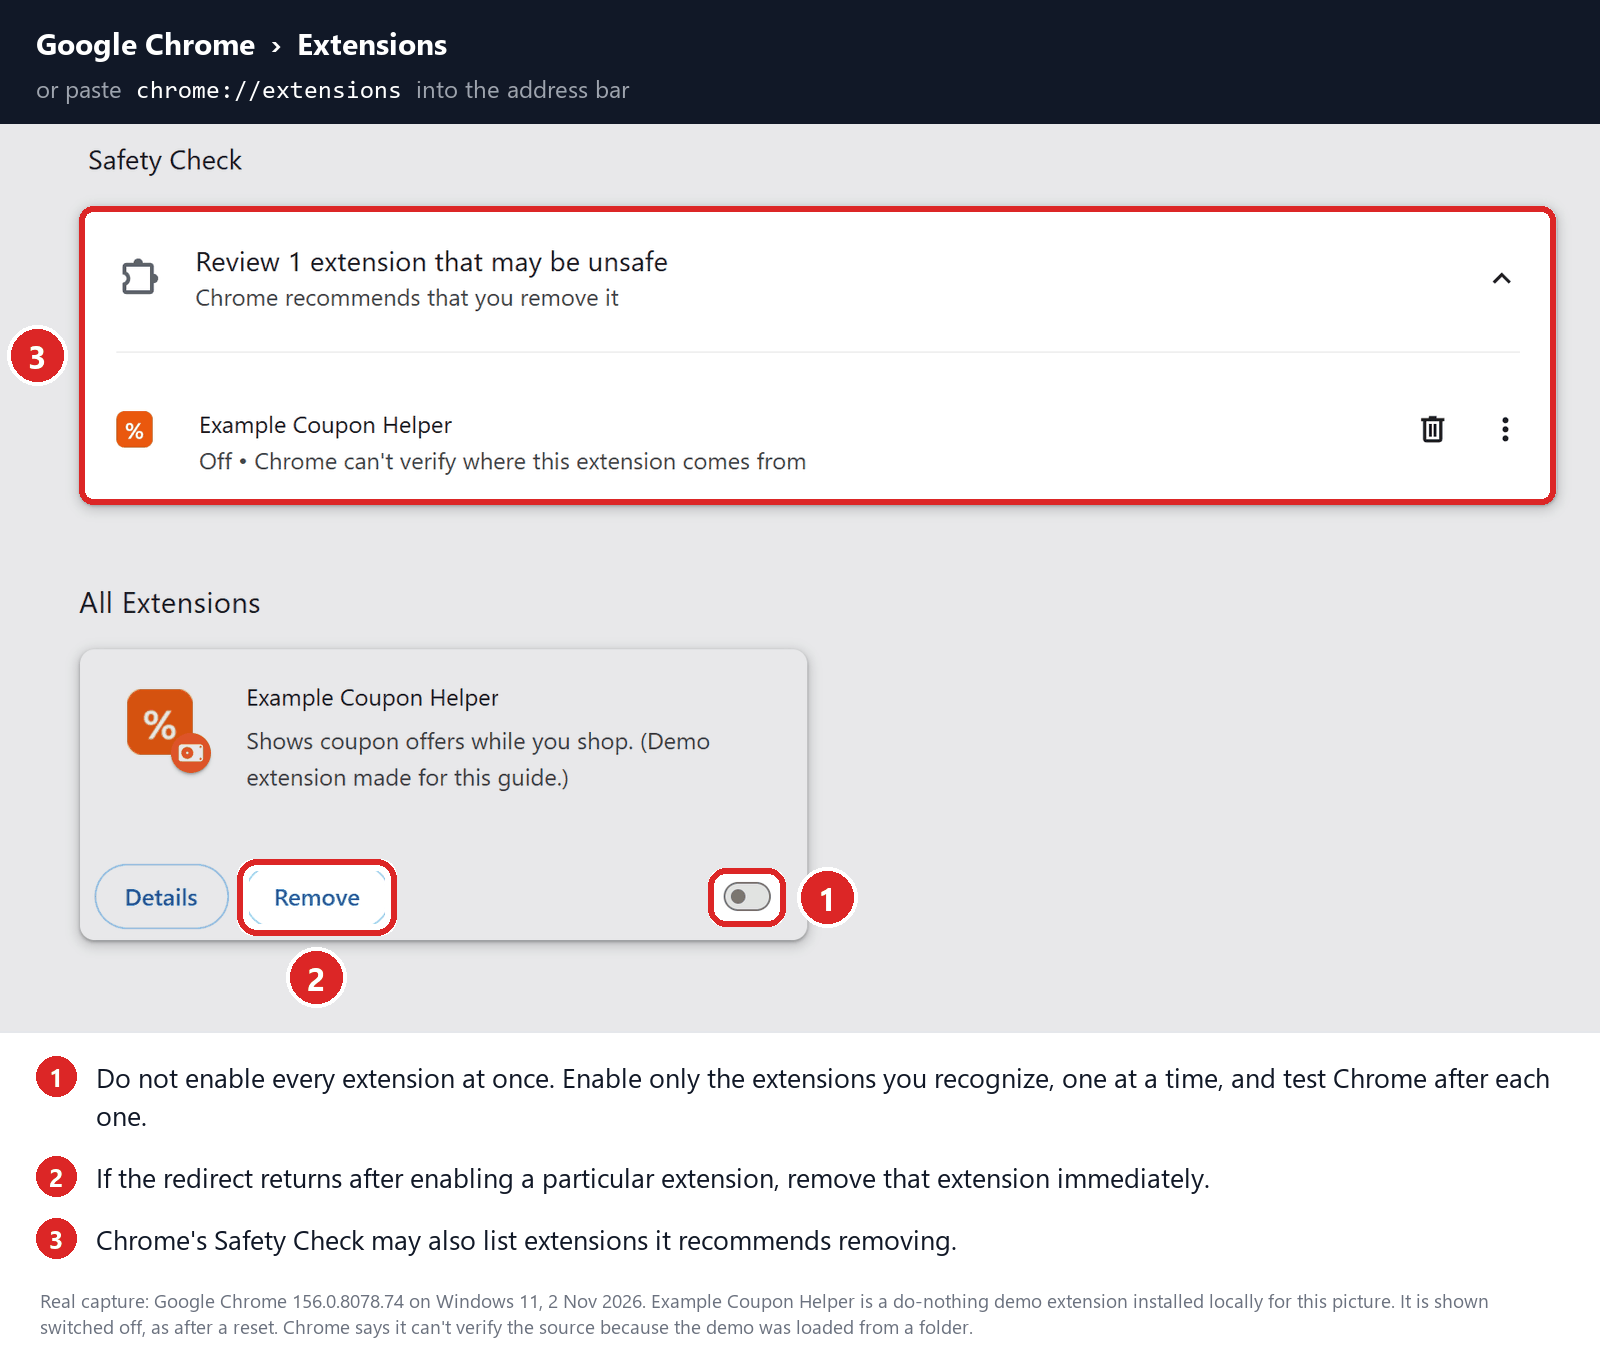
If the redirect returns after enabling a particular extension, remove that extension immediately.
Reset Firefox for Windows to default settings
We will now reset your Firefox browser settings to their default. The reset feature fixes many issues by restoring Firefox to its factory default state while saving your essential information like bookmarks, passwords, web form auto-fill information, browsing history, and open tabs.
-
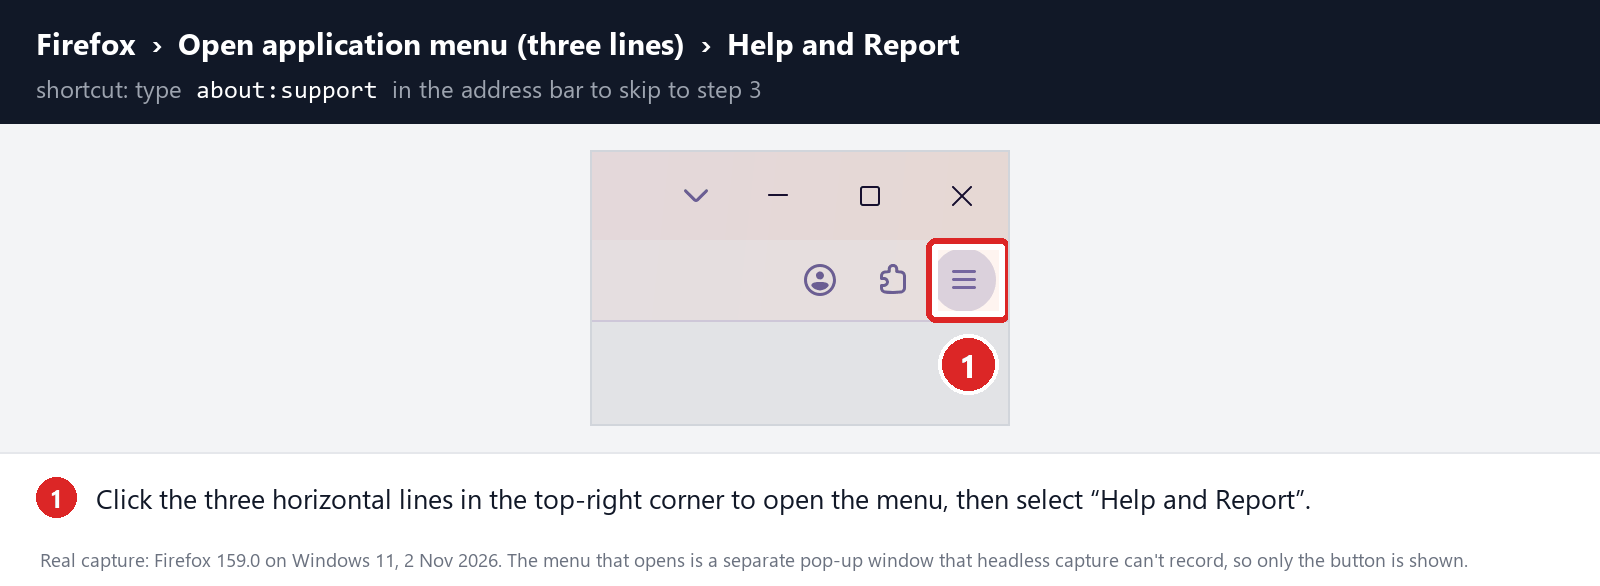
Open the Firefox menu and click “Help and Report”
Click the three horizontal lines in the top-right corner of Firefox to open the main menu, then select “Help and Report“.
-
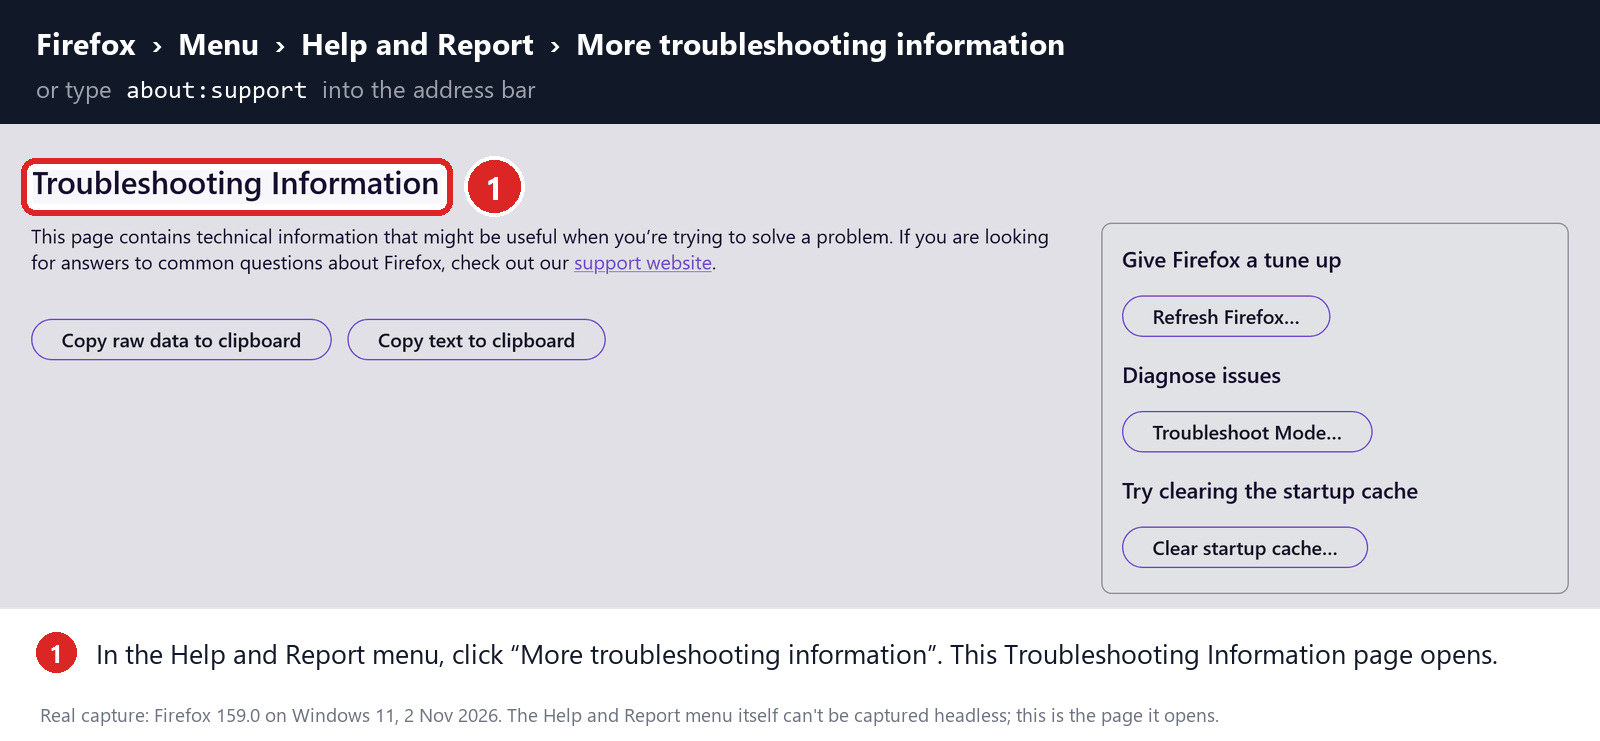
Click “More troubleshooting information”
In the Help and Report menu, click “More troubleshooting information“.
-
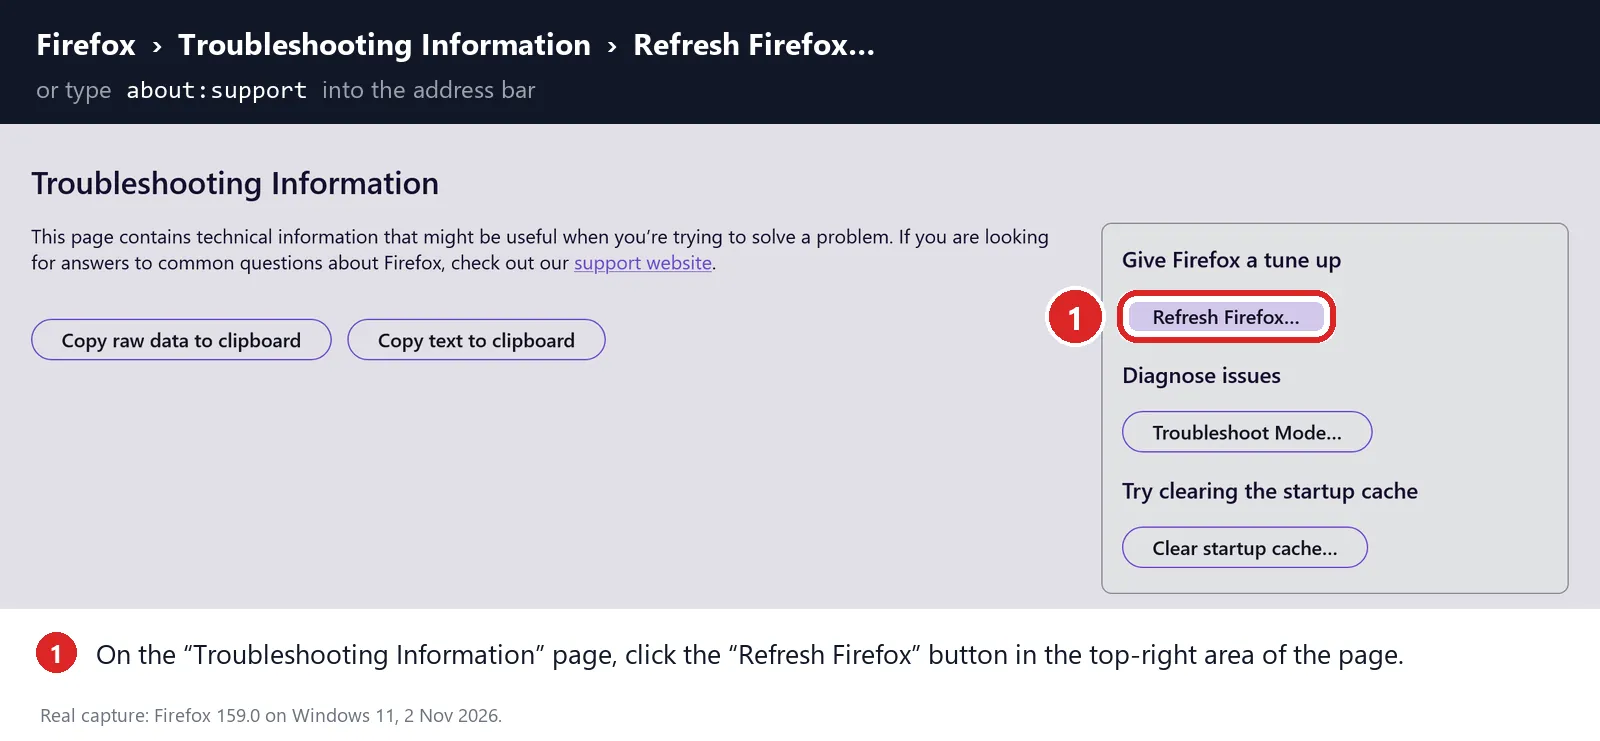
Click “Refresh Firefox”
On the “Troubleshooting Information” page, click the “Refresh Firefox” button in the “Give Firefox a tune up” box in the top-right area of the page.
-
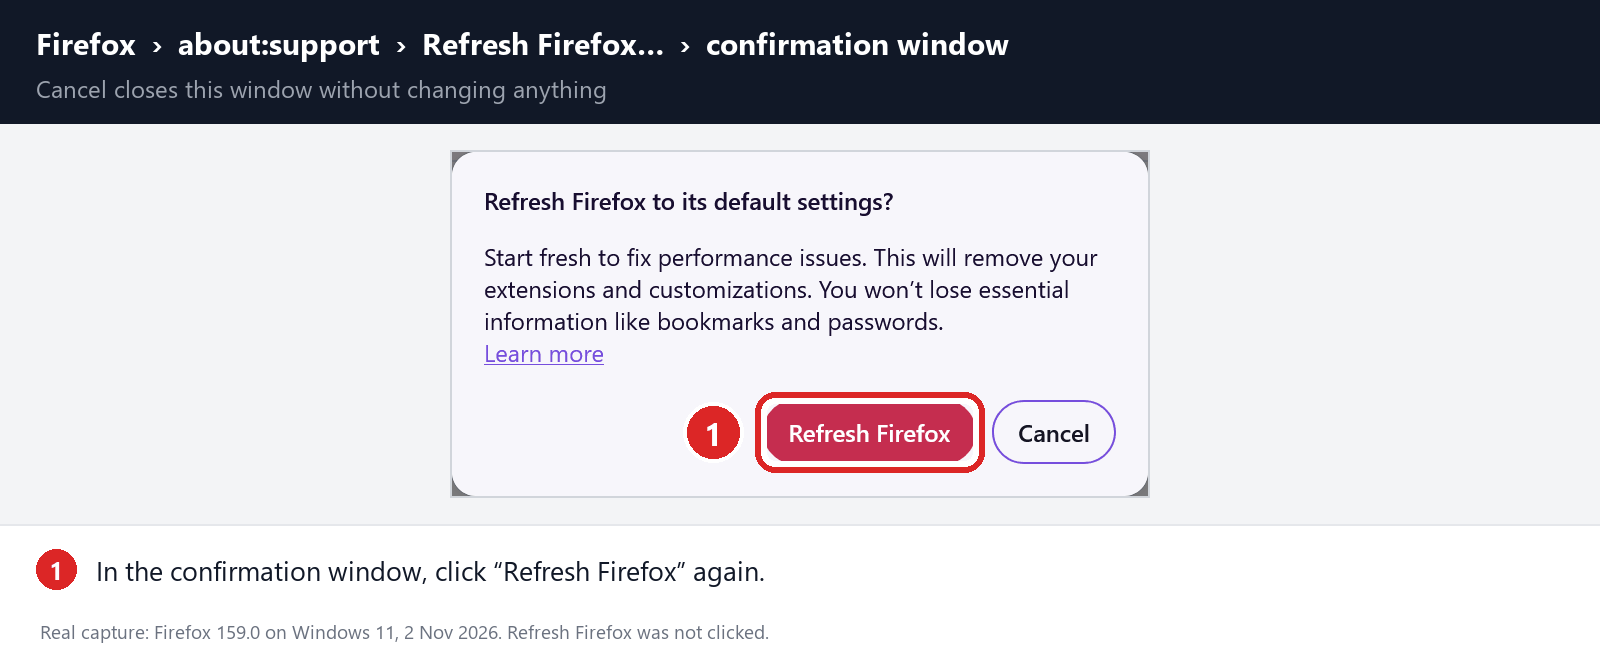
Confirm the refresh
In the confirmation window, click “Refresh Firefox” again. This removes extensions, themes, and customized settings — the usual hiding places for browser hijackers — while keeping your bookmarks, history, and saved passwords safe.
-
Click “Finish”
Firefox will close, reset itself to default settings, and reopen with a window listing the information that was restored. Click “Finish“. Then test Firefox before you add back any extensions.
About the “Old Firefox Data” folder: Firefox saves a copy of your old profile on your desktop. If something you need is missing after the reset, you can recover it from this folder. Otherwise, delete the folder — it contains sensitive data like passwords and cookies, and may also still hold the malicious files you just removed.
Reset Microsoft Edge to default settings
We will now reset your Microsoft Edge browser settings to their default. This will reset your startup page, new tab page, search engine, and pinned tabs. It will also disable all extensions and clear temporary data like cookies. Your favorites, history, and saved passwords will not be cleared.
Updated for Microsoft Edge on Windows 10 and Windows 11 — July 2026.
-
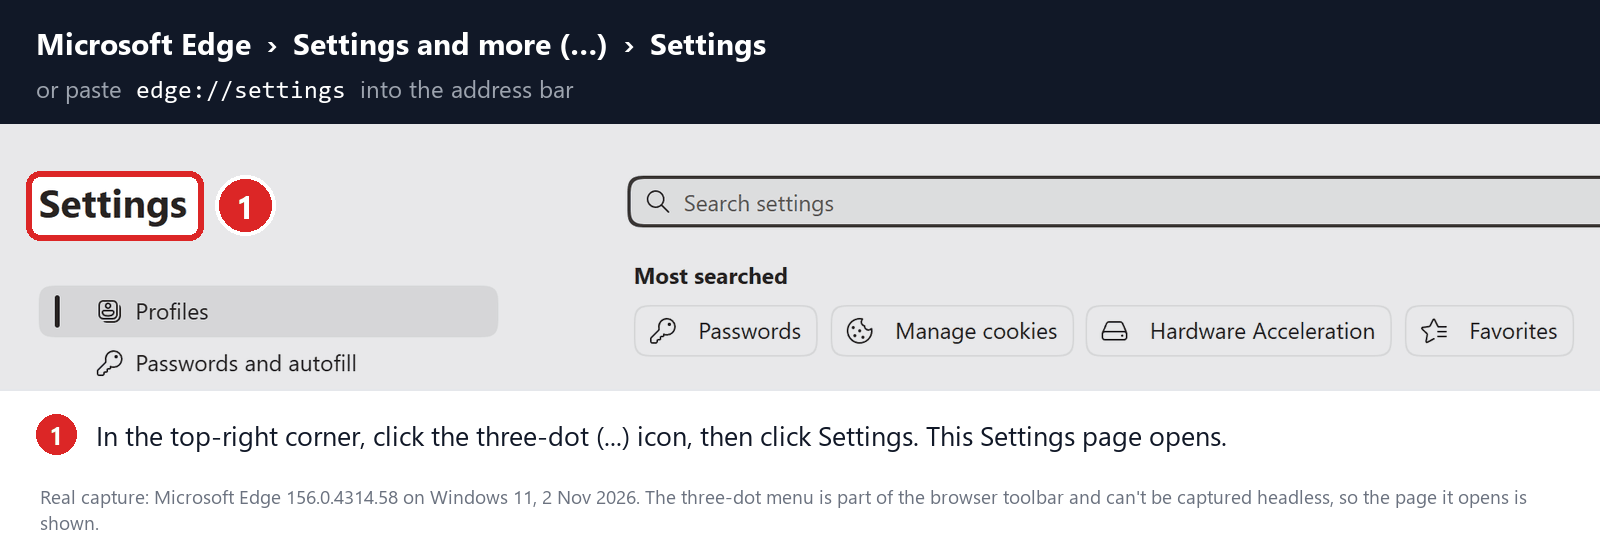
Open the Edge menu and click “Settings”
Open Microsoft Edge. In the top-right corner, click the three-dot (…) icon, then click Settings.
-
Prevent the unwanted settings from returning through Edge Sync
If you are signed in to Microsoft Edge, a bad setting or extension may be stored in your Microsoft account and return after the reset.
Copy the following address, paste it into the Edge address bar, and press Enter:
edge://settings/profiles/syncOn the Sync page, turn off these two options:
- Settings
- Extensions
You can leave Favorites and Passwords turned on.
If Edge says that sync is already off, simply continue to the next step.
Important: Edge Sync settings are separate for each profile. If you use more than one Edge profile, switch to each affected profile and repeat this step.
You do not need to sign out of your Microsoft account or delete the Edge profile.
-
Open “Reset settings”
In the left sidebar, click Reset settings.
You can also open the reset page directly. Copy the following address, paste it into the Edge address bar, and press Enter:
edge://settings/reset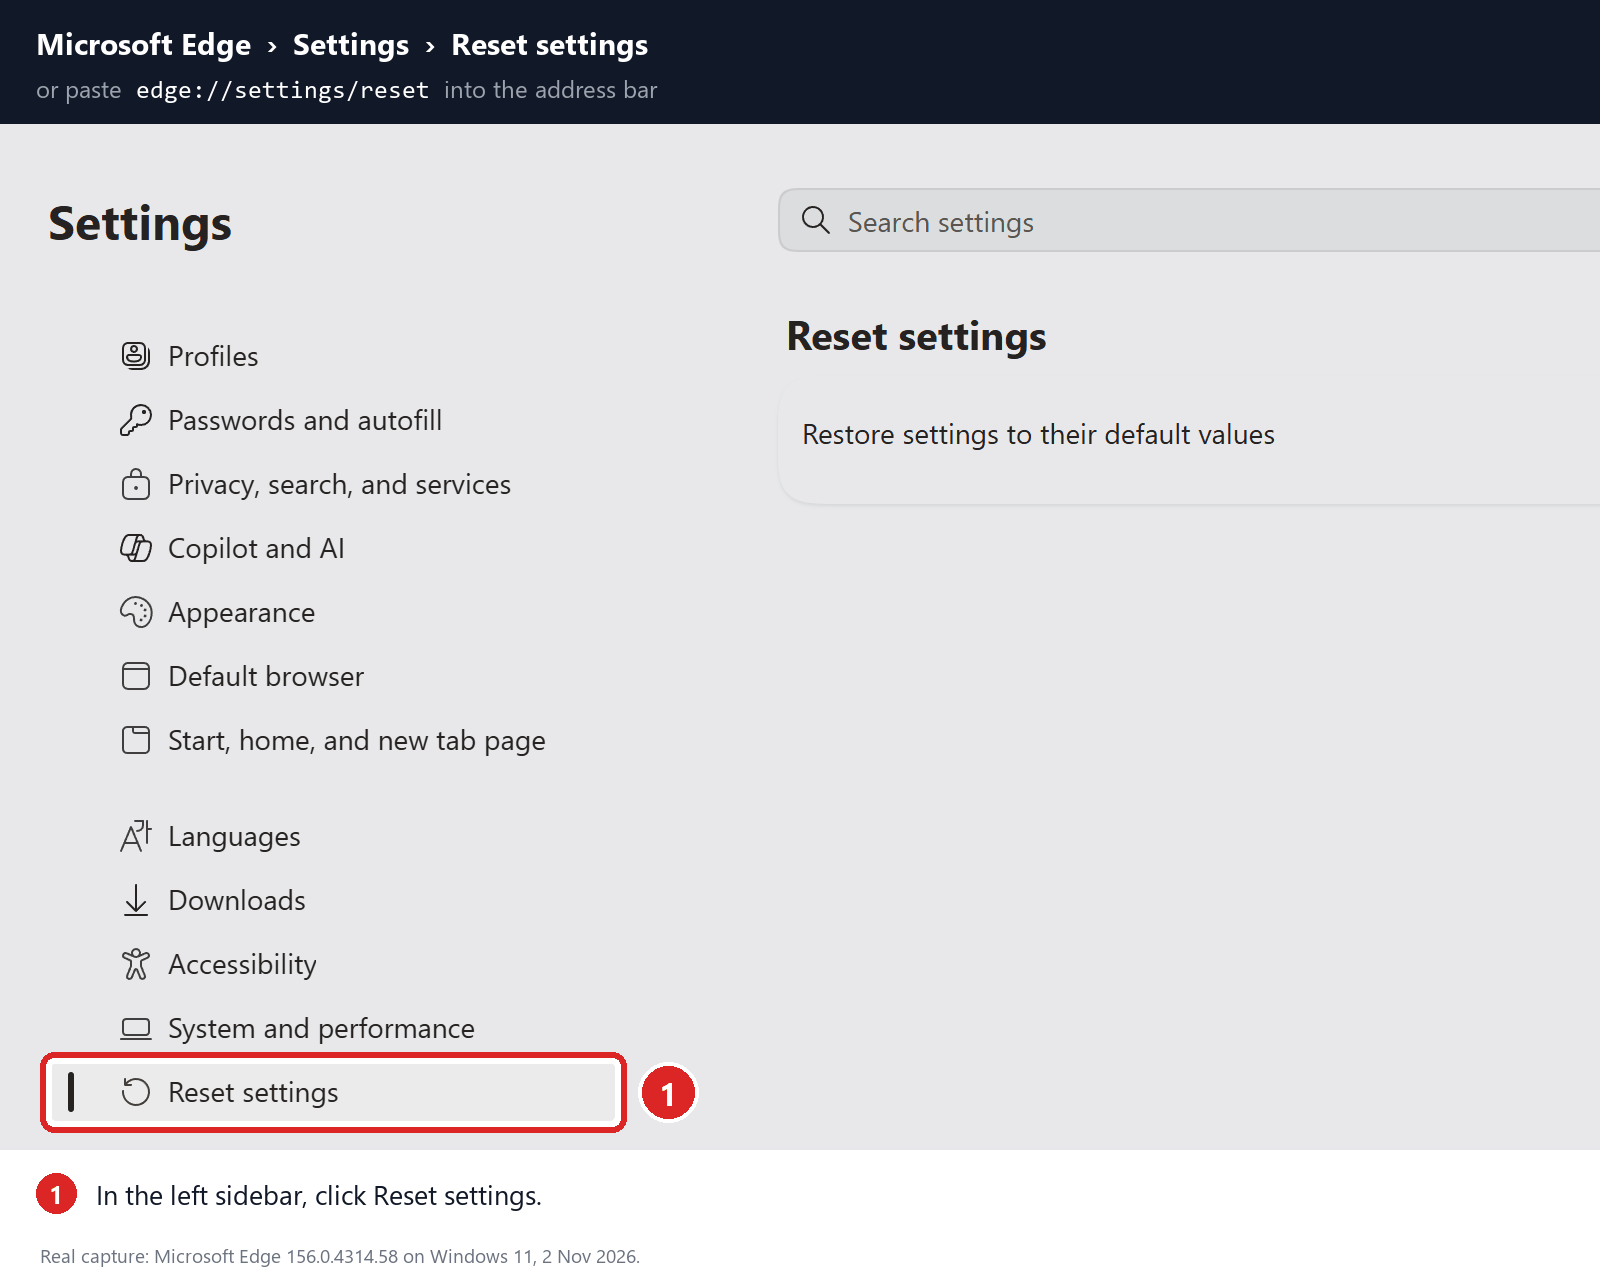
-
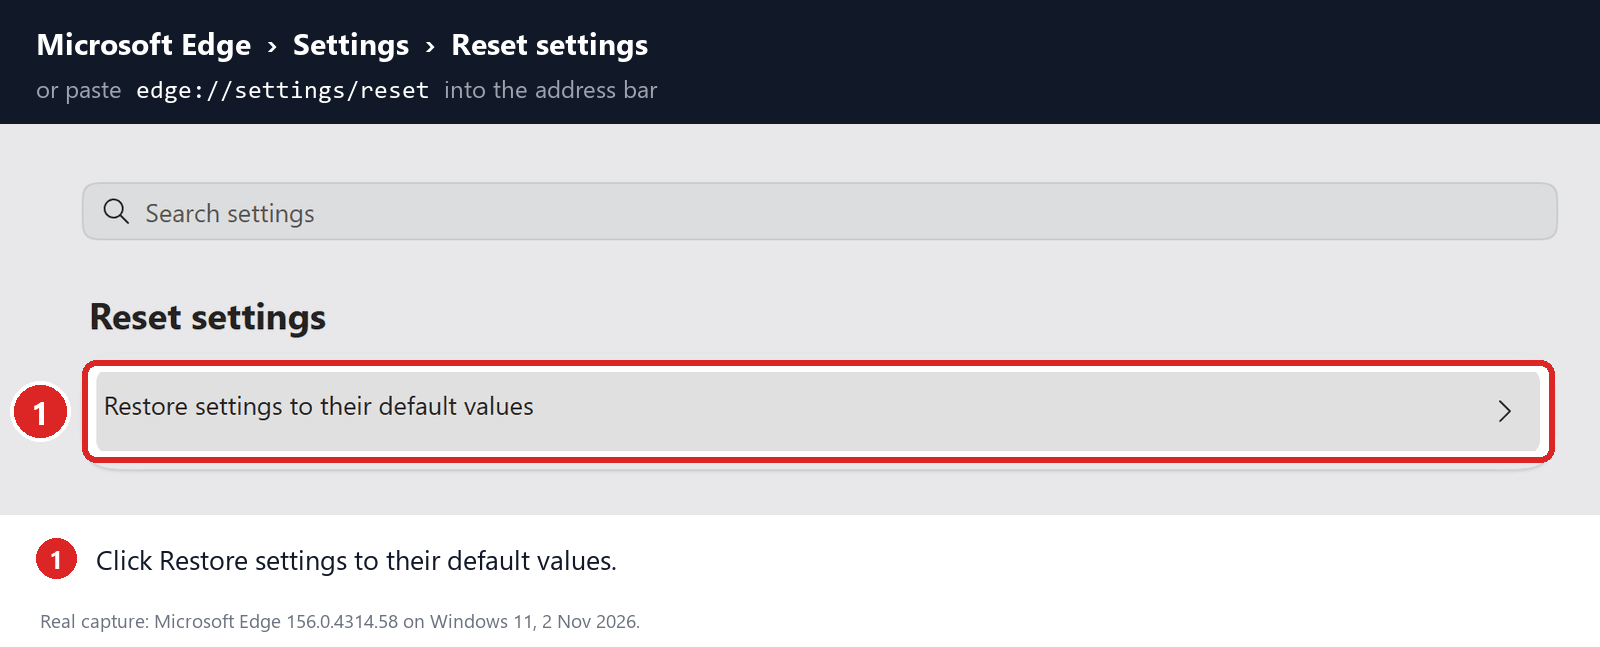
Click “Restore settings to their default values”
Click Restore settings to their default values.
-
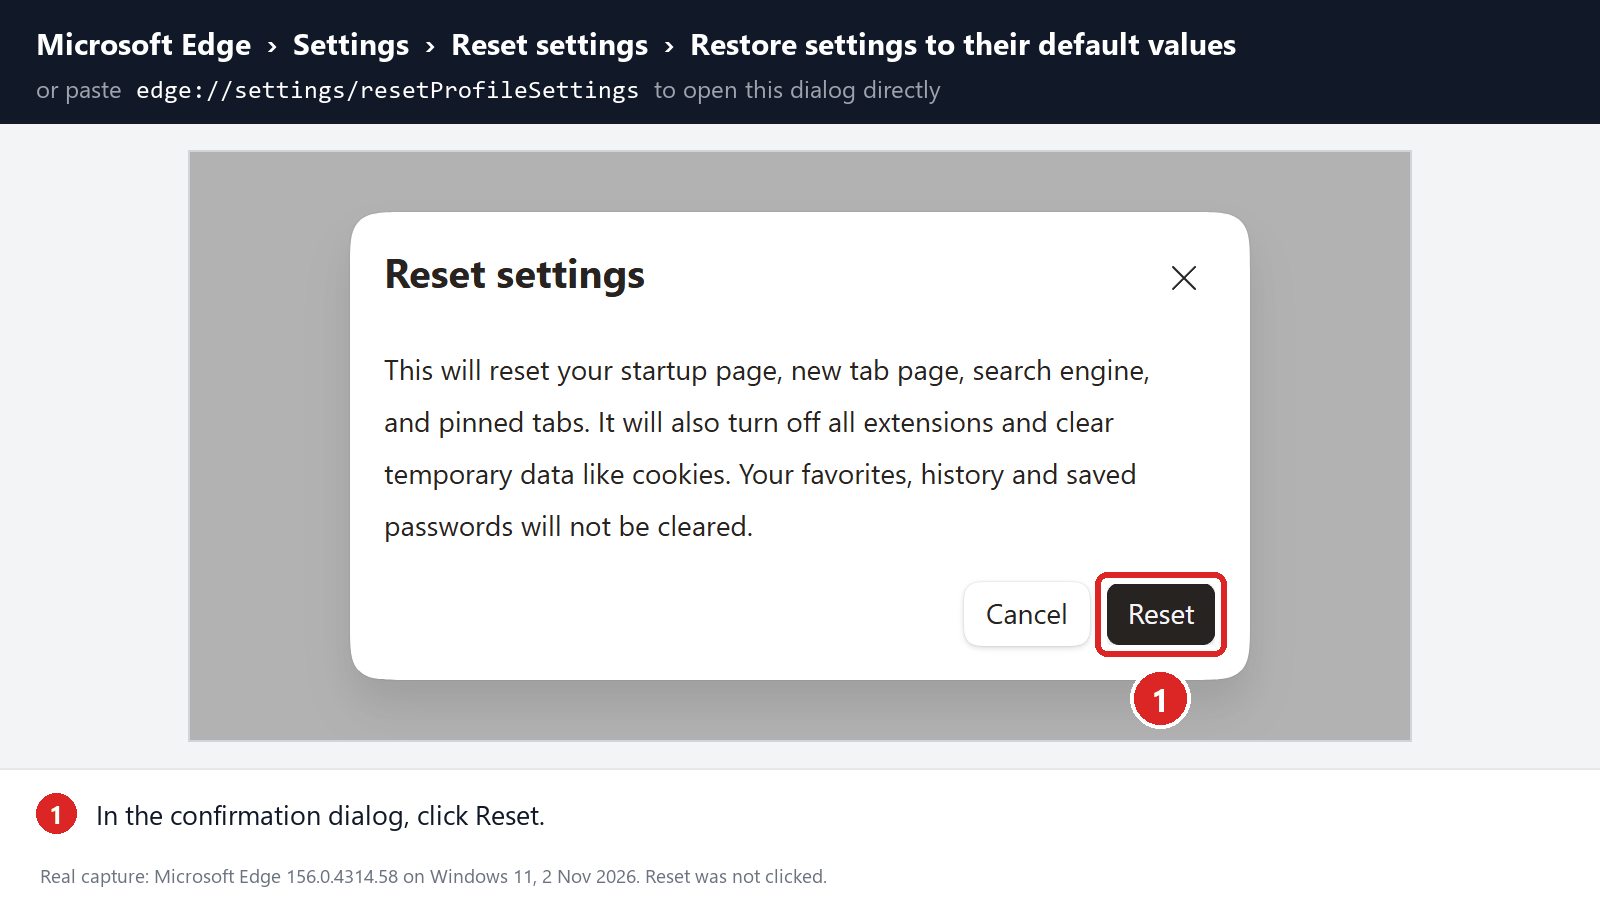
Confirm the reset
In the confirmation dialog, click Reset.
This resets the startup page, new tab page, search engine, and pinned tabs. It also disables all extensions and clears temporary site data, such as cookies.
Don’t worry: your favorites, browsing history, and saved passwords will not be deleted.
-
Check your extensions before turning them back on
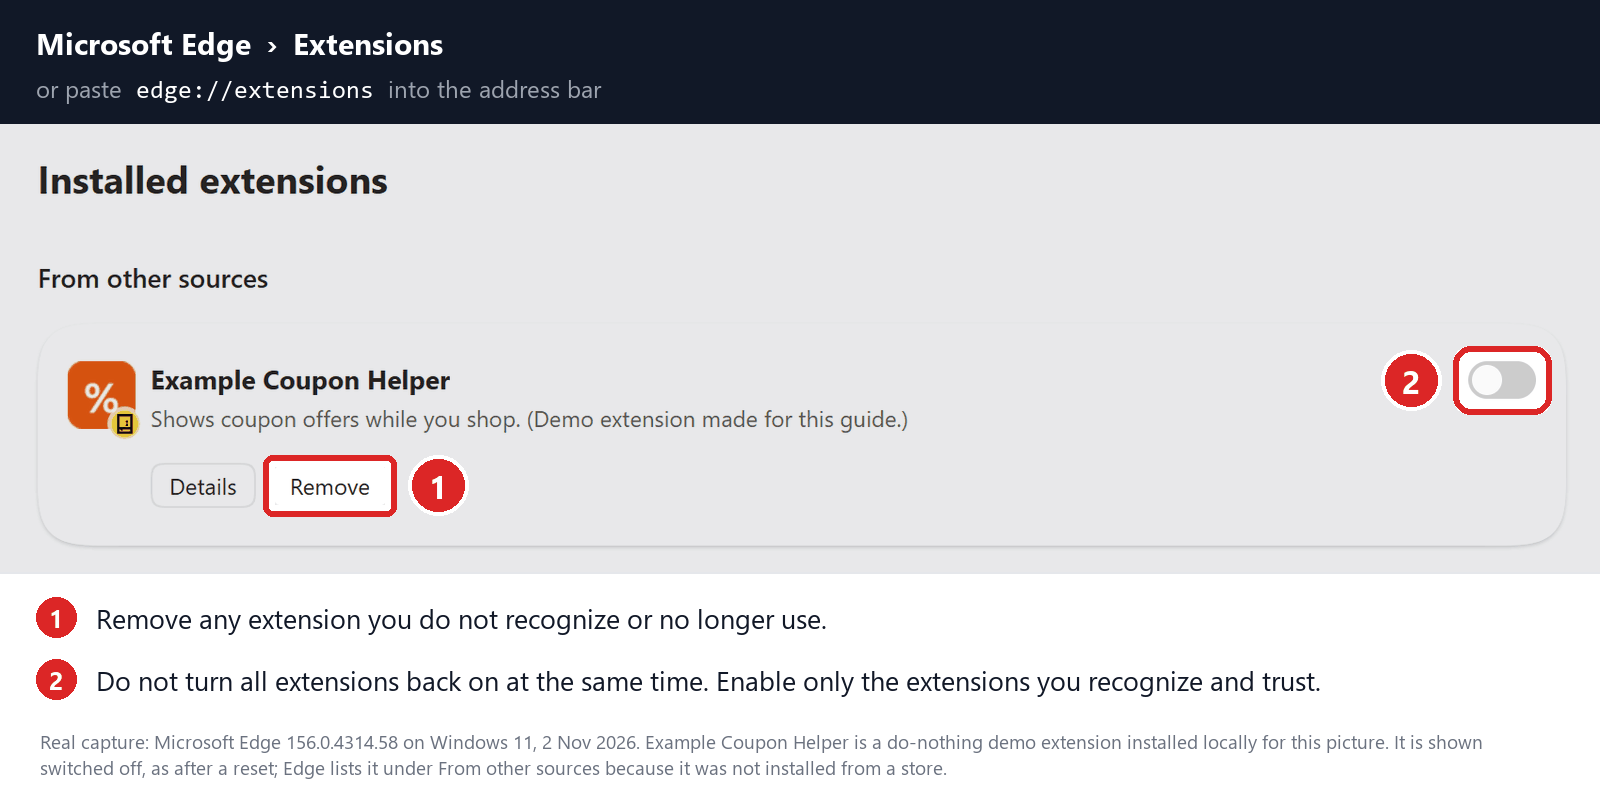
Copy the following address, paste it into the Edge address bar, and press Enter:
edge://extensionsRemove any extension you do not recognize or no longer use. Pay particular attention to extensions related to search, coupons, shopping, PDF conversion, browser protection, new tabs, or video downloading.
Do not turn all extensions back on at the same time. Enable only the extensions you recognize and trust.
-
Select a trusted search engine
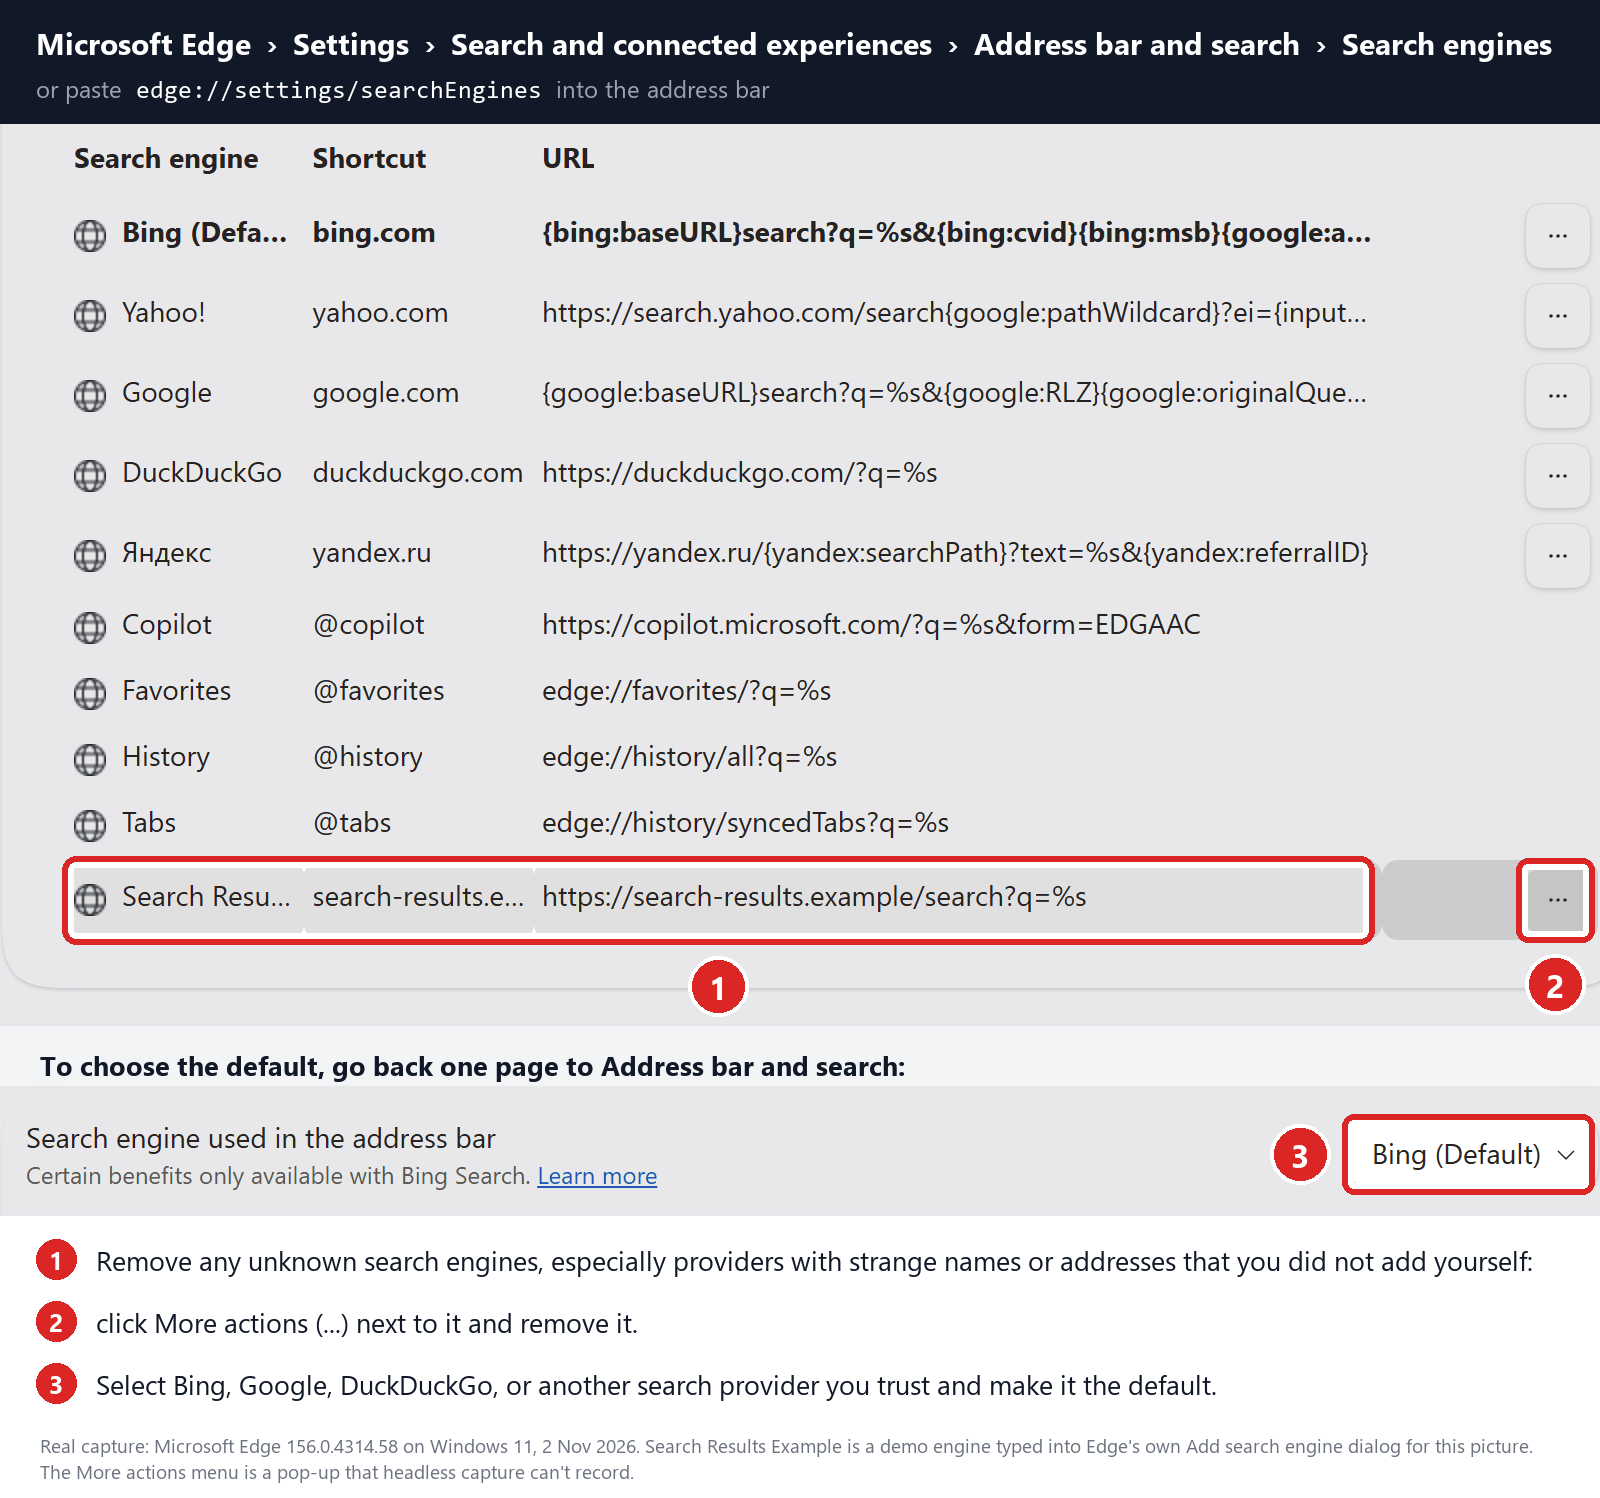
Copy the following address, paste it into the Edge address bar, and press Enter:
edge://settings/searchEnginesSelect Bing, Google, DuckDuckGo, or another search provider you trust and make it the default. This address opens the list of search engines; the default is set one page back, on Address bar and search, under Search engine used in the address bar.
Remove any unknown search engines from the list, especially providers with strange names or addresses that you did not add yourself: click More actions (…) next to the engine and remove it.
Restart Edge and perform a search from the address bar. If searches are no longer redirected, you can stop here.
-
If the redirect remains, clean the corrupted search data without deleting the Edge profile
Use this additional step only if Edge continues to redirect searches after the normal reset.
This command cleans the search-engine database from every local Edge profile while keeping your favorites, saved passwords, browsing history, cookies, and profiles.
Before continuing: save anything you are working on because the command will close Microsoft Edge.
- Open the Windows Start menu.
- Type PowerShell.
- Open Windows PowerShell. Administrator access is not required.
- Copy the entire command below.
- Paste it into PowerShell and press Enter.
$stamp = Get-Date -Format "yyyyMMdd-HHmmss"
$root = Join-Path $env:LOCALAPPDATA "Microsoft\Edge\User Data"

Get-Process -Name msedge -ErrorAction SilentlyContinue |
    Stop-Process -Force -ErrorAction SilentlyContinue

Start-Sleep -Seconds 2

if (-not (Test-Path -LiteralPath $root)) {
    Write-Host "The Microsoft Edge profile folder was not found:"
    Write-Host $root
    return
}

$profiles = Get-ChildItem -LiteralPath $root -Directory |
    Where-Object {
        $_.Name -eq "Default" -or
        $_.Name -match "^Profile \d+$"
    }

$movedFiles = 0

foreach ($profile in $profiles) {
    foreach ($name in @(
        "Web Data",
        "Web Data-journal",
        "Web Data-wal",
        "Web Data-shm"
    )) {
        $file = Join-Path $profile.FullName $name

        if (Test-Path -LiteralPath $file) {
            $backup = "$file.search-reset-backup-$stamp"

            try {
                Move-Item -LiteralPath $file -Destination $backup -ErrorAction Stop
                Write-Host "Cleaned: $($profile.Name)\$name"
                $movedFiles++
            }
            catch {
                Write-Warning "Could not clean: $file"
            }
        }
    }
}

Write-Host ""

if ($movedFiles -gt 0) {
    Write-Host "Microsoft Edge search data has been cleaned." -ForegroundColor Green
    Write-Host "You can now reopen Microsoft Edge."
}
else {
    Write-Host "No Edge search database files were found." -ForegroundColor Yellow
}
The command does not permanently delete the original files. It renames them as backup files, and Edge creates a clean search database when it starts again.
Note: this additional cleanup may also reset saved form-fill suggestions, saved addresses, payment cards saved only on this computer, and manually added search engines. It does not delete favorites, passwords, or browsing history.
-
Reopen Edge and test the browser
Open Microsoft Edge again, visit edge://settings/searchEngines, and select your preferred search engine (one page back, on Address bar and search, under Search engine used in the address bar).
Perform several searches from the address bar to confirm that the redirect is gone.
Keep synchronization for Settings and Extensions turned off until you are certain that the computer and extensions are clean. If you enable them again, turn them on one at a time and test Edge after each change.
-
If Edge still redirects your searches
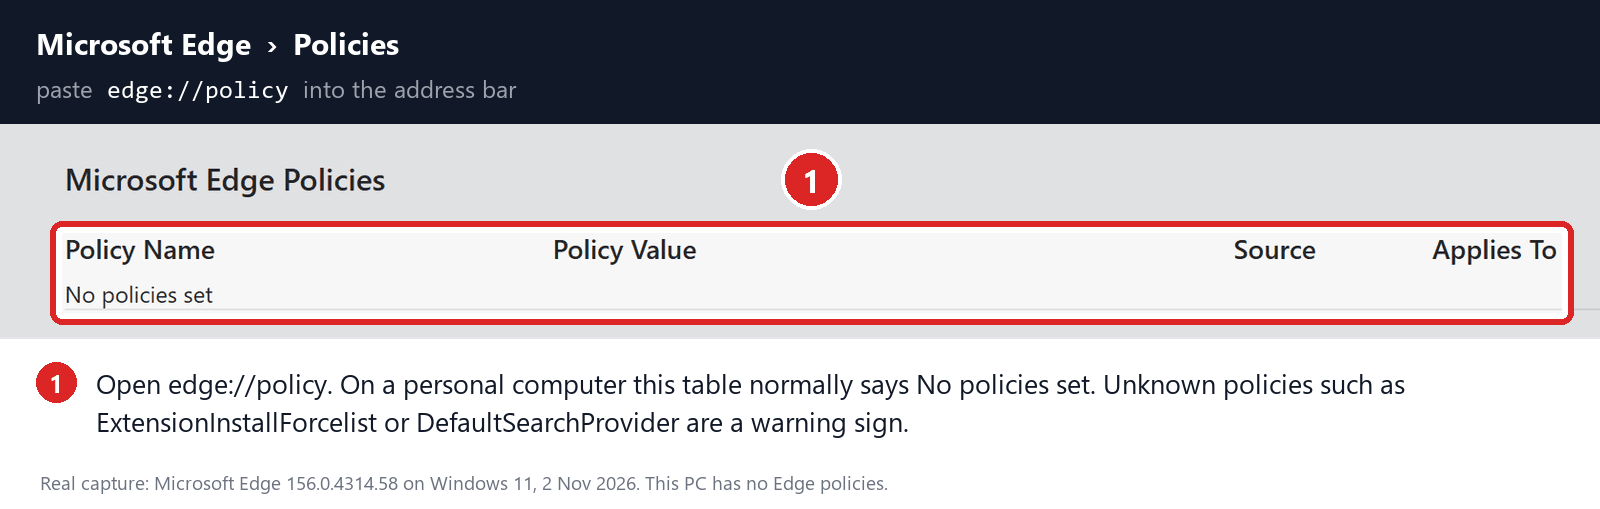
Open edge://policy. If this is your personal computer and Edge displays unknown policies such as ExtensionInstallForcelist or DefaultSearchProvider, the hijacker may be installed outside the browser profile.
In that situation, continue with the next malware-removal steps and run a complete antivirus scan. If the computer belongs to a company or school, contact its IT administrator before changing any policies.
STEP 3: Use Malwarebytes Anti-Malware to remove malware and unwanted programs
In this third step, we will install Malwarebytes to scan and remove any infections, adware, or potentially unwanted programs that may be present on your computer.
Malwarebytes is one of the most popular and trusted anti-malware tools for Windows — and it’s completely free for removing infections. It catches threats that many antivirus programs miss, including adware, browser hijackers, and trojans. Follow the steps below to scan your PC and remove what Malwarebytes finds.
Download Malwarebytes
Click the button below to download the latest version of Malwarebytes for Windows from the official source. The free version is all you need — it will scan your computer and remove adware, browser hijackers, and other malicious software at no cost.
Download MalwarebytesOfficial installer for Windows 11 and 10. Your download starts right away.Want real-time protection? See Malwarebytes Premium Malwarebytes Free for WindowsScans and removes malware at no cost
-
Install Malwarebytes
When the download finishes, open your Downloads folder and double-click the MBSetup file. If Windows shows a User Account Control pop-up, click “Yes” to allow the installation.
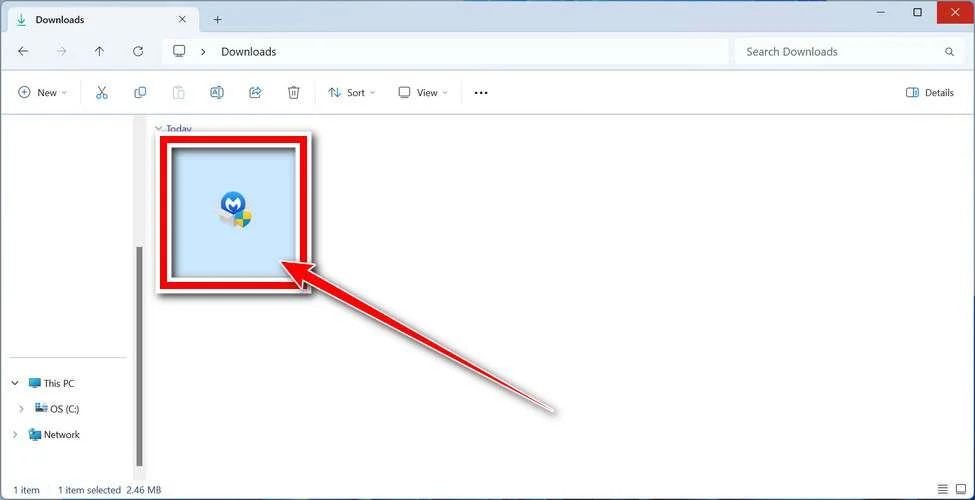
Follow the On-Screen Prompts to Install Malwarebytes
The setup wizard will walk you through a few quick screens:
-
Choose where you’re installing the program — “Personal Computer” or “Work Computer” — then click Next.
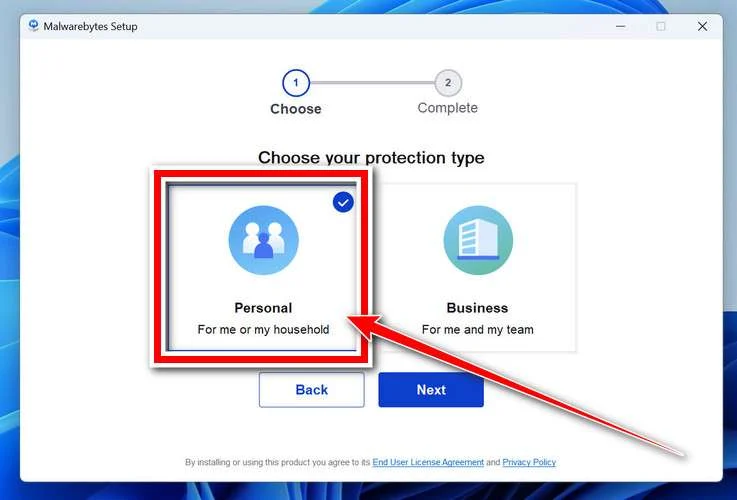
-
Malwarebytes will now install on your device. This usually takes under a minute.
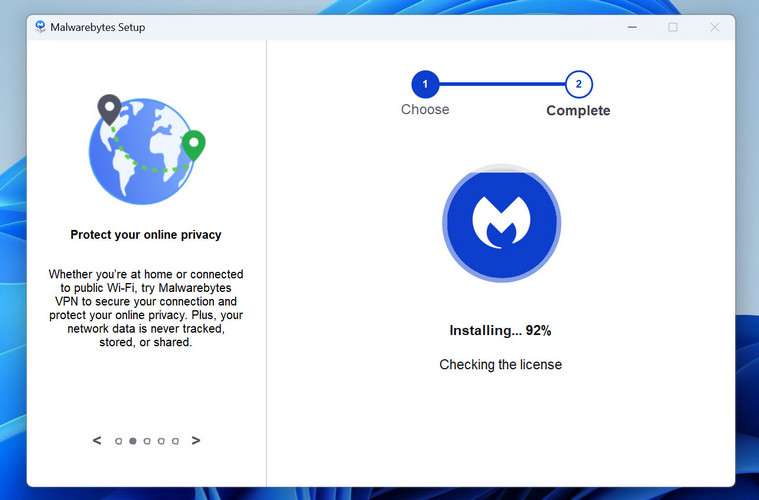
-
When installation is complete, the “Welcome to Malwarebytes” screen will open automatically.
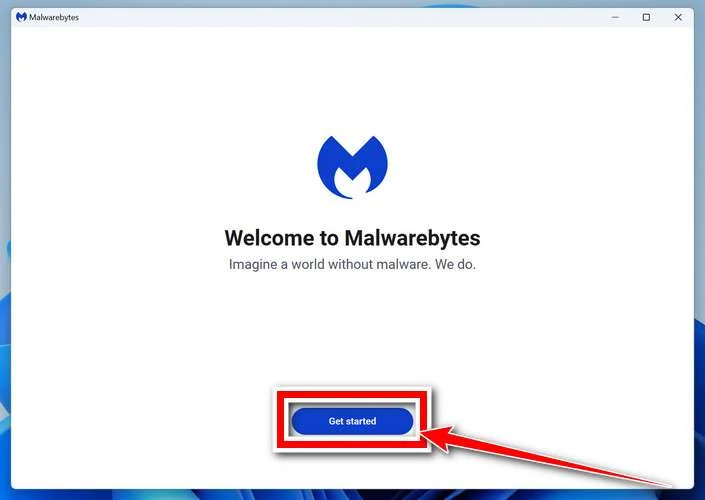
-
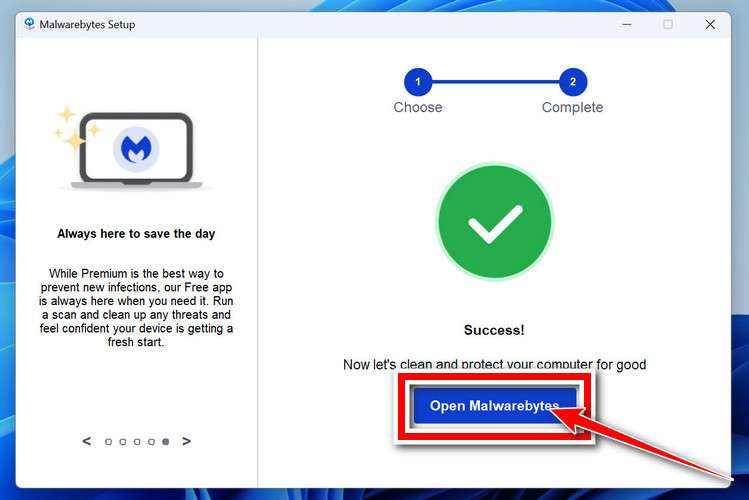
On the final screen, click Open Malwarebytes to launch the program.
-
Optional: Check for rootkits with a Custom Scan
You don’t need to change any settings for a normal scan. The standard Threat Scan in the next step is enough for most problems, so you can go straight to it.
If you also want to check for rootkits, use a Custom Scan. In current versions of Malwarebytes, rootkit scanning is only available there:
- On the Scanner tile, click the three-dot menu and select Advanced Scan.
- Choose Custom Scan. In its options, check Scan for rootkits.
- Select your system drive (usually C:\) as the location to scan, then start the scan. It takes longer than a Threat Scan.
- When it finishes, review and quarantine the results as described in the steps below.
Rootkit scanning isn’t available on Windows devices with ARM processors.
Start the Scan
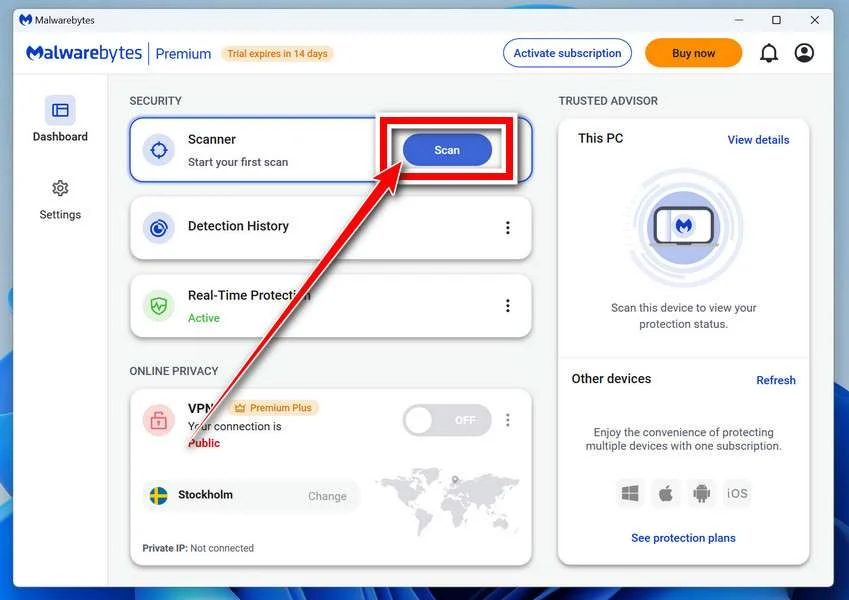
Click the blue Scan button. Malwarebytes will automatically update its virus database and start checking your computer for malware.
-
Wait for the Scan to Finish
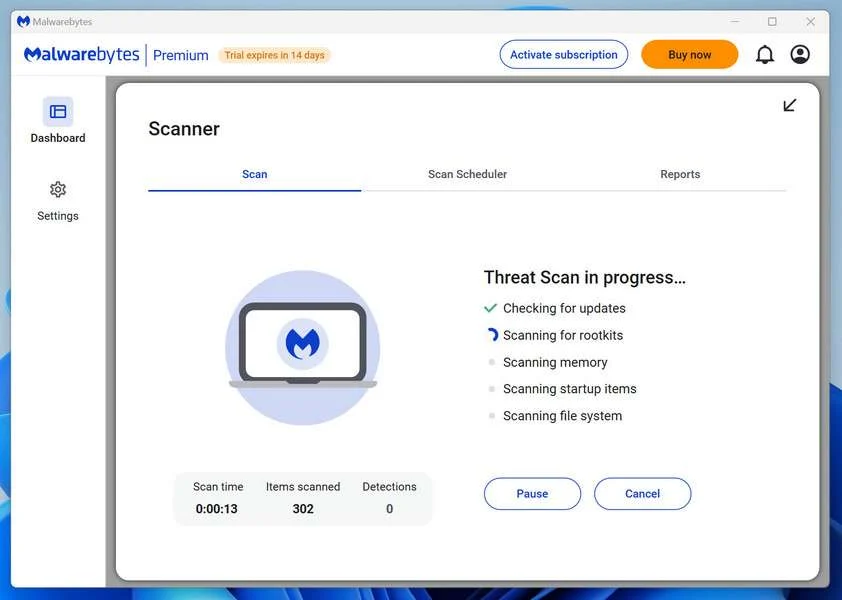
The scan checks your entire system for browser hijackers and other malicious programs, so it can take 5 to 20 minutes depending on your computer. Feel free to do something else — just check back occasionally to see the progress.
-
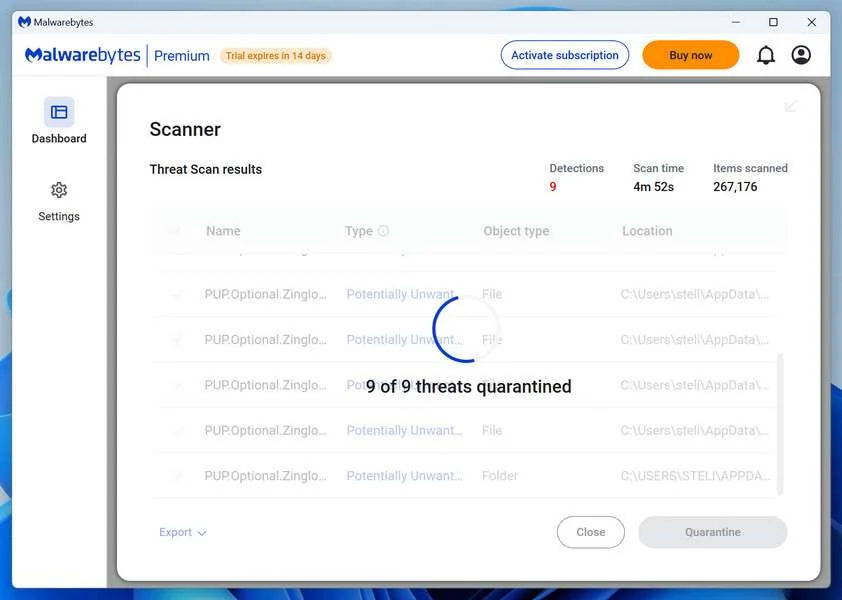
Quarantine the Detected Threats
When the scan is done, you’ll see a list of everything Malwarebytes found — malware, adware, and potentially unwanted programs. Click the “Quarantine” button to remove all of them at once.
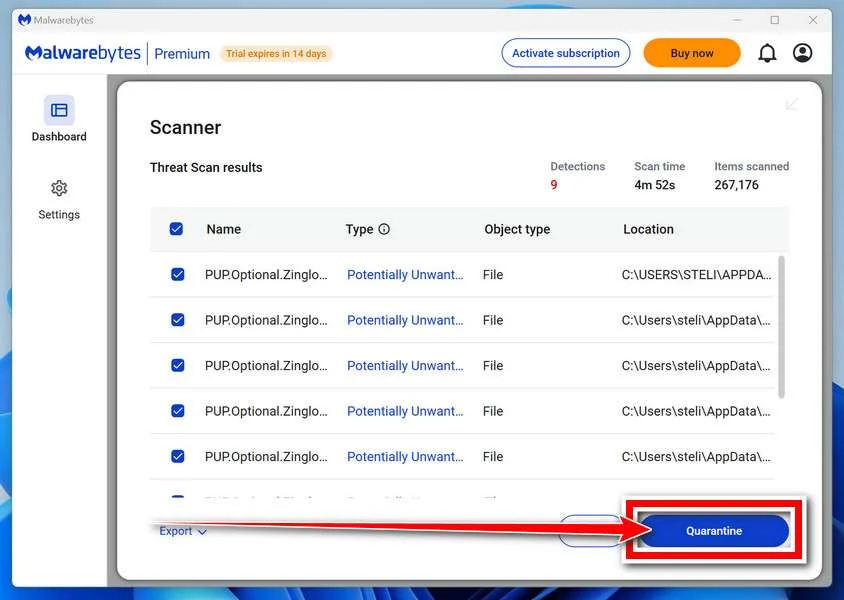
Malwarebytes will now remove the malicious files and registry entries and move them safely into quarantine.
-
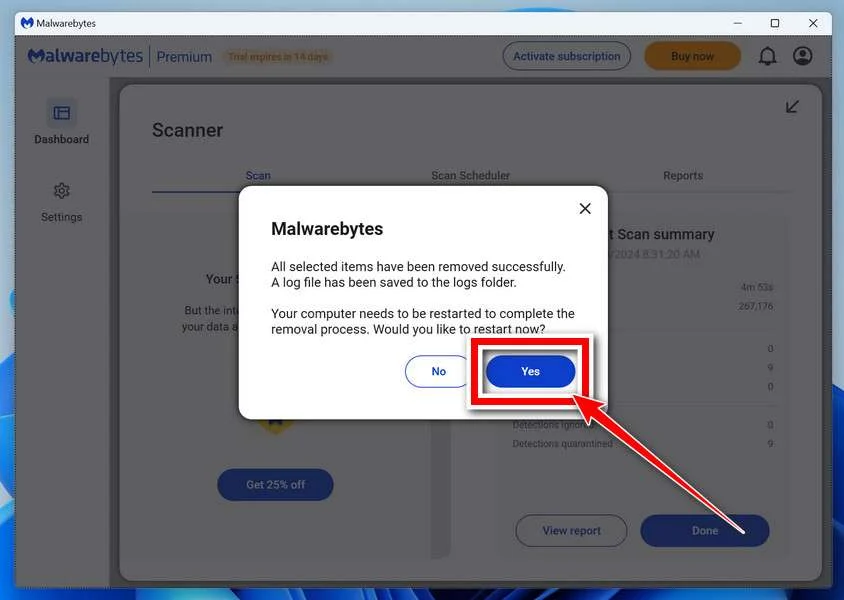
Restart Your Computer
Some threats can only be fully removed after a reboot. If Malwarebytes asks you to restart, click Yes. Once you’re logged back in, Malwarebytes has finished removing the threats it found.
STEP 4: Use HitmanPro to scan your computer for badware
In this next step, we will scan the computer with HitmanPro to check for any other malicious programs that may be installed on your device.
HitmanPro is a second-opinion scanner — it’s designed to catch what your main antivirus might have missed. Instead of relying on a single detection engine, it checks the behavior of files in the locations where malware usually hides. Anything suspicious is checked online, where it’s analyzed by several antivirus engines in HitmanPro’s Scan Cloud.
Good news: scanning is completely free, with no limits. You only need a license when it’s time to remove what was found — and even then, you can activate a free one-time 30-day trial to remove what it finds at no cost. The trial works once per computer. After that, removal needs a paid license, and the purchase screen shows the current price.
-
Download HitmanPro
Click the button below to download HitmanPro. Remember — the scan is free, so you have nothing to lose by checking your PC.
Download HitmanProFree scan. Removing threats needs the free 30-day trial. Opens the official HitmanPro page in a new tab. HitmanProSecond-opinion malware scanner from Sophos
-
Install HitmanPro
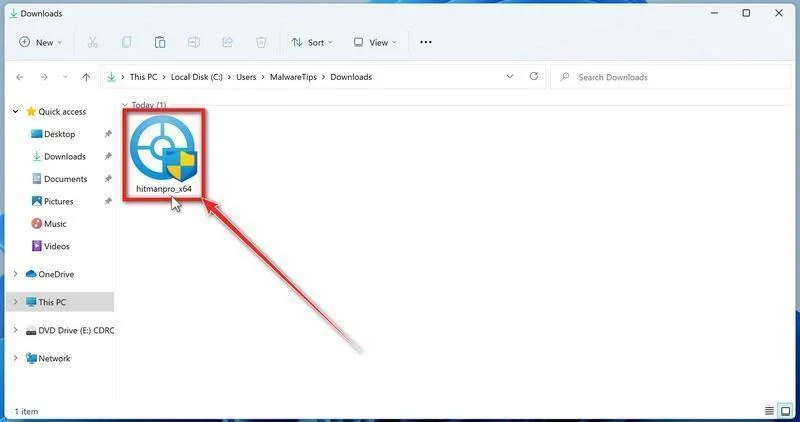
When the download finishes, open your Downloads folder and double-click the file “hitmanpro_x64.exe”. (On 32-bit Windows 10, the file is named “hitmanpro.exe”.)
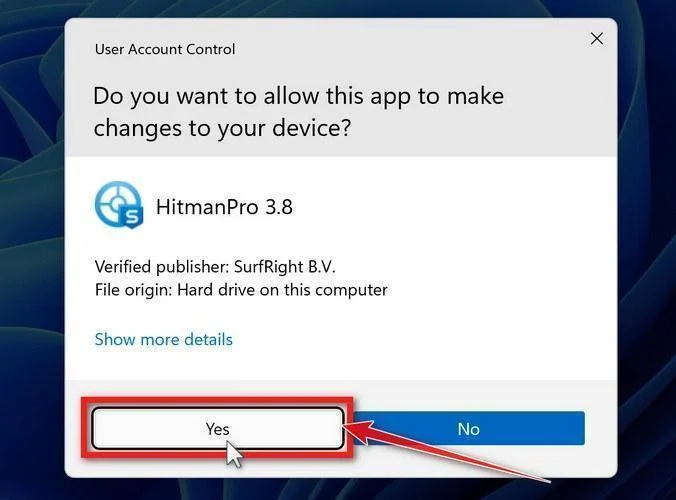
If a User Account Control pop-up asks whether HitmanPro can make changes to your device, click “Yes” to continue.
-
Follow the On-Screen Prompts
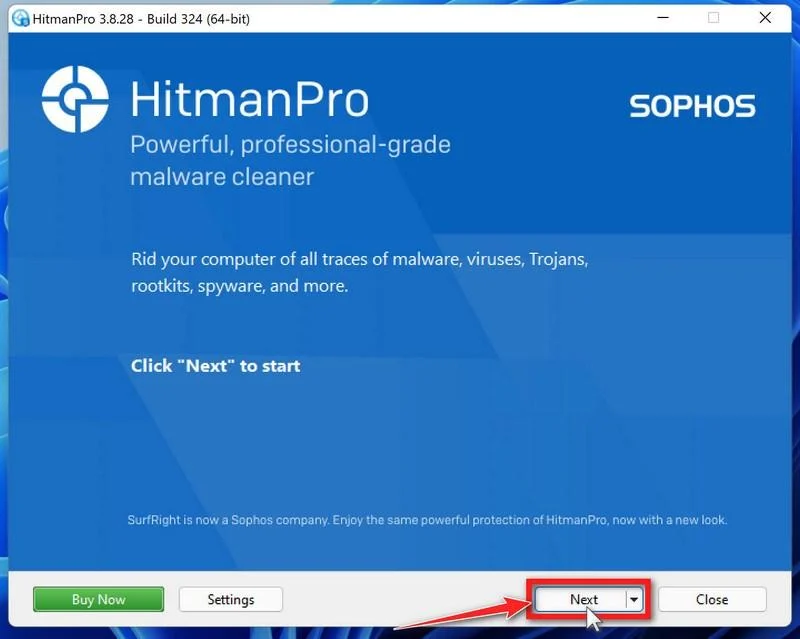
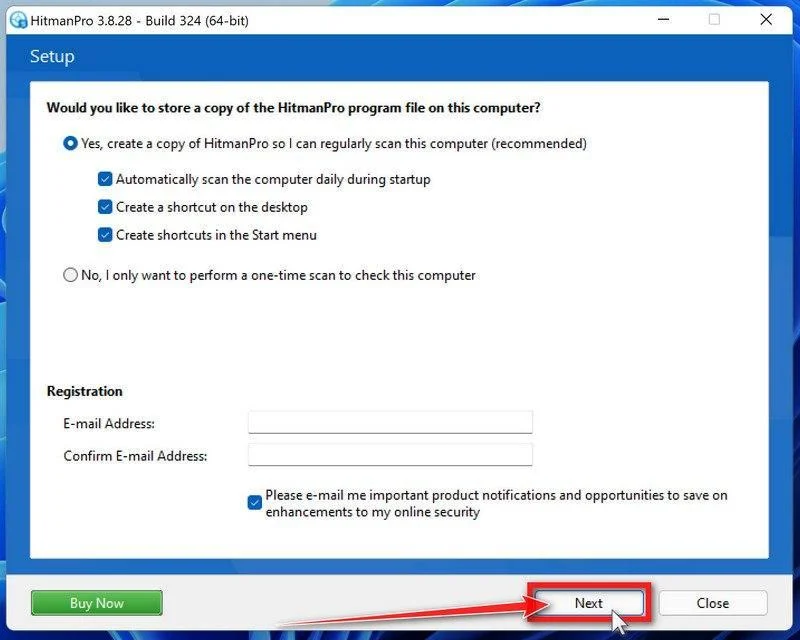
On the HitmanPro start screen, click “Next” to begin the system scan. No lengthy setup required — it goes straight to work.
-
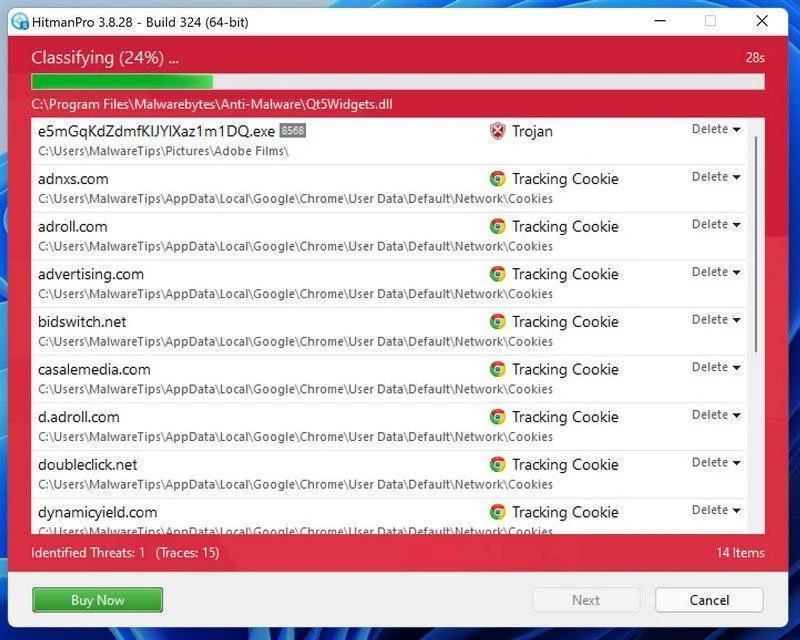
Wait for the Scan to Finish
HitmanPro will now check your computer for malicious programs. This usually takes just a few minutes thanks to its cloud-based scanning.
-
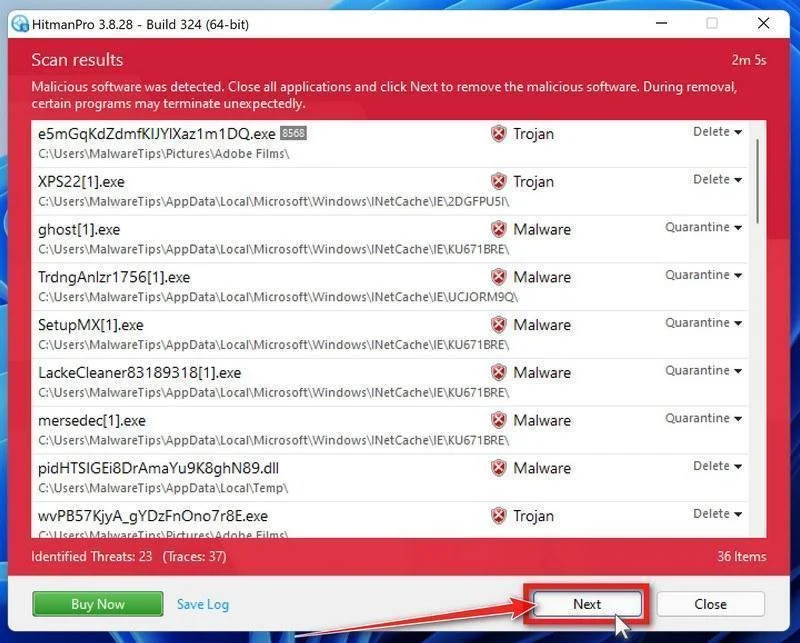
Review the Results and Click “Next”
When the scan is done, HitmanPro will show you everything it found. Click “Next” to remove the detected threats.
-
Click “Activate Free License”
To remove the malicious files, click the “Activate free license” button. This starts your free 30-day trial — no payment details needed — and unlocks the full cleanup.
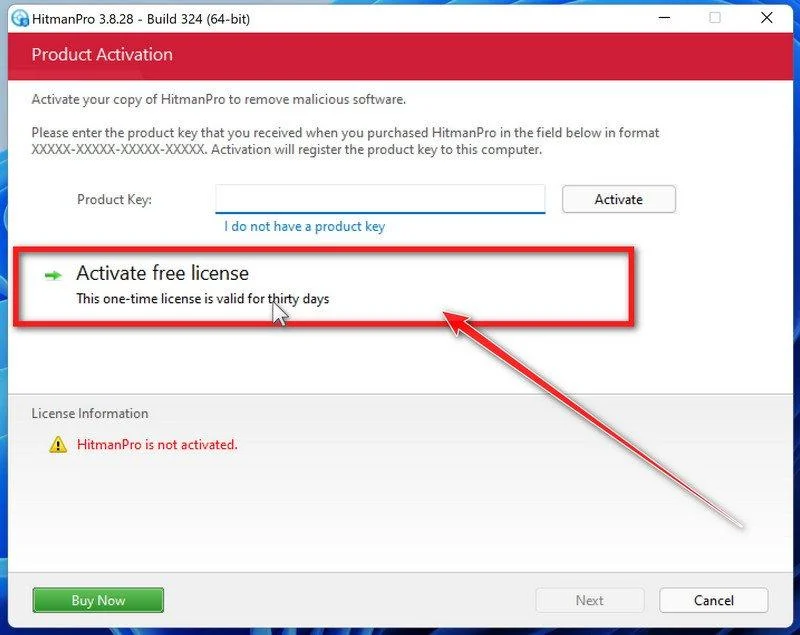
When the removal is complete, HitmanPro will show a summary of everything it cleaned. Click Next, then click Reboot if prompted. If there’s no reboot prompt, click Close. Then check whether the problems you noticed have stopped. If they come back, save the HitmanPro log and ask for help in our forum.
STEP 5: Use AdwCleaner to remove adware and malicious browser policies
In this final step, we will use AdwCleaner to remove the malicious browser policies that were set by browser hijackers on your computer and delete malicious browser extensions.
AdwCleaner is a free on-demand scanner that specializes in adware, browser hijackers, and unwanted toolbars — the exact threats that mainstream antivirus programs often miss. It also includes tools that repair the damage malware leaves behind, like hijacked browser settings and malicious policies. It’s a quick scan that’s well worth running.
-
Download AdwCleaner
Click the button below to download AdwCleaner — it’s free, portable, and requires no installation.
Download AdwCleanerOpens the official download page in a new tab. Malwarebytes AdwCleanerRemoves adware and unwanted programs at no cost
-
Run AdwCleaner
Open your Downloads folder and double-click the file named “adwcleaner.exe“. There’s no installation — the program starts right away.
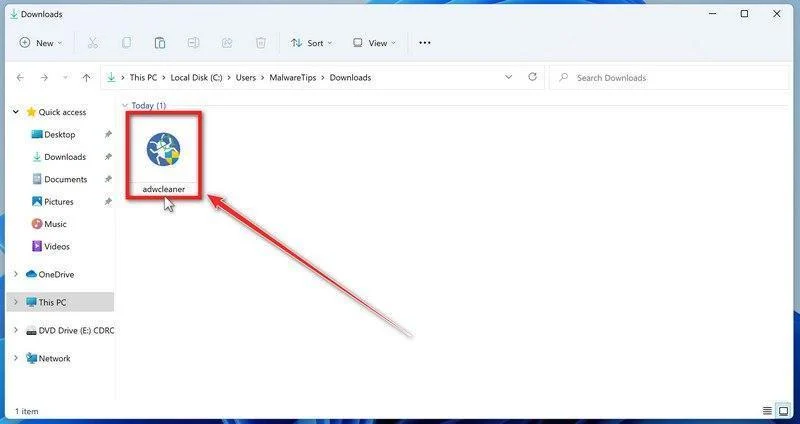
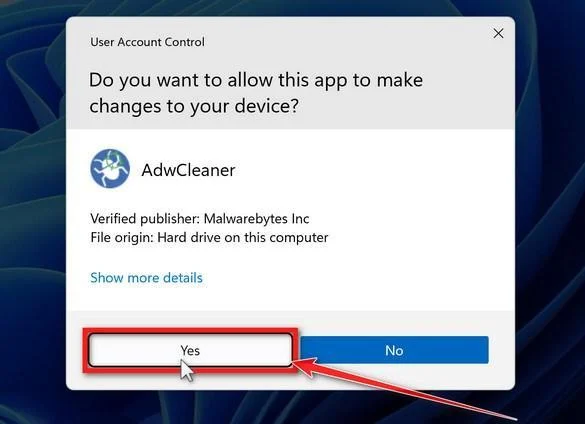
If Windows asks whether you want to allow AdwCleaner to run, click “Yes“. When the license agreement appears, click I agree to continue.
-
Leave “Reset Chrome policies” off unless you need it
AdwCleaner can reset Chrome policies, the settings that malware sometimes uses to lock your browser so you can’t change it back. This option removes every Chrome policy, including legitimate ones set by an employer, a school, or parental-control software, so leave it off for a normal scan.
AdwCleaner applies this option only if you run Basic Repair at the end of the cleanup. Malwarebytes advises running Basic Repair only when a support agent asks you to, and it also runs every other repair action that is turned on in the same list. If this is your own personal PC and chrome://policy in Chrome lists policies you didn’t set, ask for help in our forum instead. On a work or school computer, ask the IT administrator.
-
Start the Scan
Click “Dashboard” on the left side of the window, then click the “Scan Now” button.
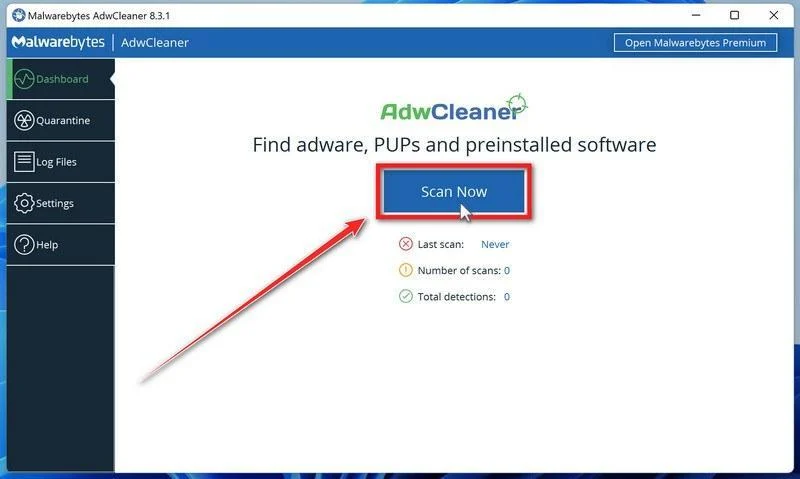
-
Wait for the Scan to Finish
AdwCleaner will now check your computer for adware and other malware. This usually takes only a few minutes — it’s one of the fastest scanners around.
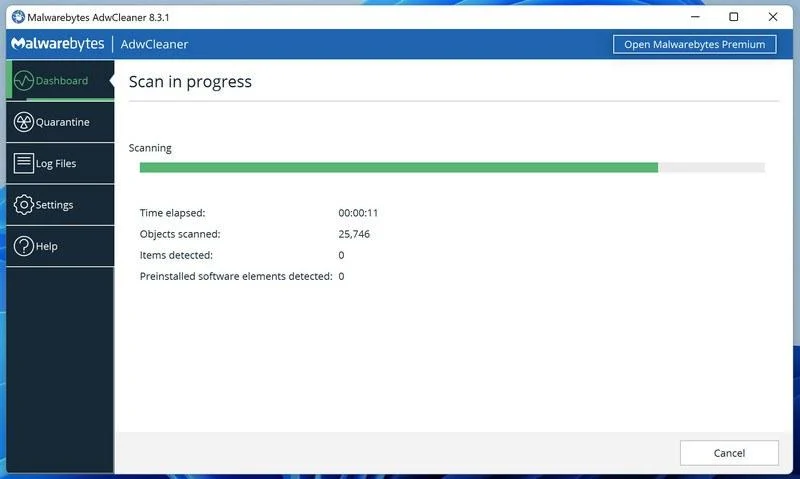
-
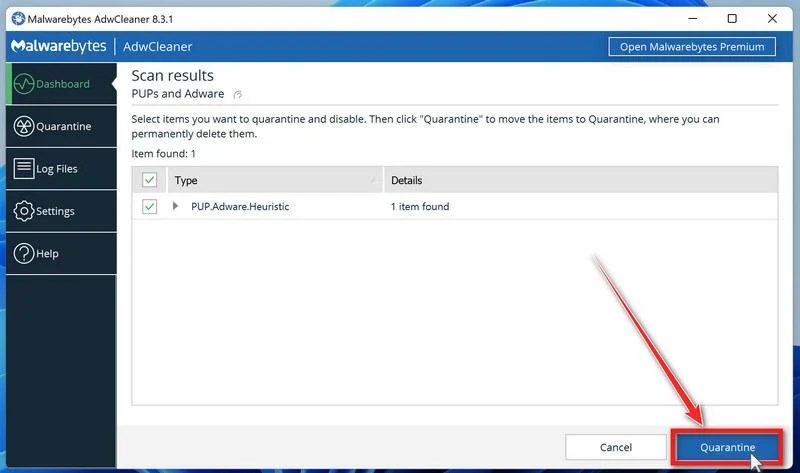
Quarantine the Detected Threats
When the scan finishes, AdwCleaner lists everything it found. Review the list and uncheck any program you installed on purpose and want to keep, then click Next. If AdwCleaner also found preinstalled software, it shows that list next. Review it the same way, then click “Quarantine“. Older versions show the Quarantine button on the first list, as in the image below.
-
Click “Continue” to Finish the Cleanup
Save any open work first — AdwCleaner needs to close your open programs before it can clean. When you’re ready, click the “Continue” button.
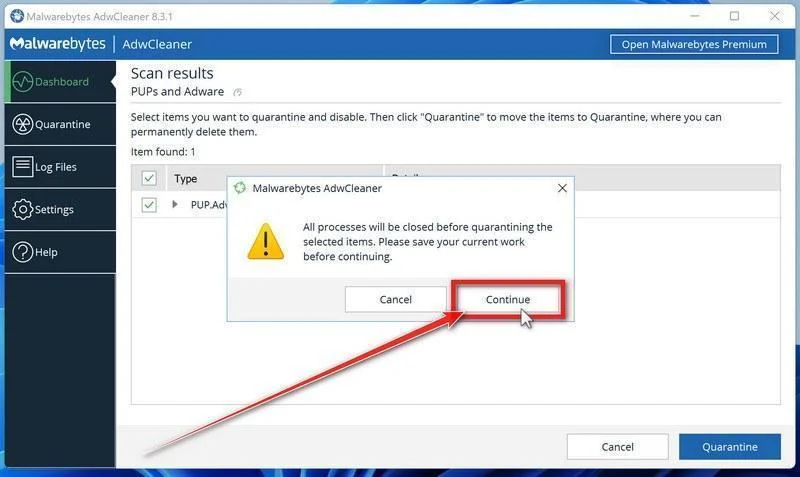
AdwCleaner will now move the selected items to quarantine. If it asks you to restart your PC, allow it. When you’re back in Windows, AdwCleaner may offer a Basic Repair. Click Skip Basic Repair. Malwarebytes recommends running Basic Repair only when a support agent asks you to. Then check whether the problems you noticed have stopped.
When you’ve finished these steps, check whether the problems you noticed have stopped. If they continue, see the options below.
If you are still having problems with your computer after completing these instructions, then please follow one of the steps:
- Run a computer scan with ESET Online Scanner
- Ask for help in our Windows Malware Removal Help & Support forum.
Remove Unwanted Apps and Malware from Mac
- STEP 1: Remove malicious profiles
- STEP 2: Delete malicious apps
- STEP 3: Reset browsers back to default settings
- STEP 4: Run a scan with Malwarebytes for Mac to remove malware
STEP 1: Remove malicious profiles
Profiles are used by IT admins in businesses to control the behavior of their Macs. These profiles can configure a Mac to do many different things, some of which are not otherwise possible.
When it comes to home users, adware and browser hijackers are using the configuration profile to prevent users from removing malicious programs from the computer. This also prevents the user from changing that behavior in the browser’s settings.
In this first step, we will check your computer to see if any configuration profiles are installed. To do this, follow the below steps:
-
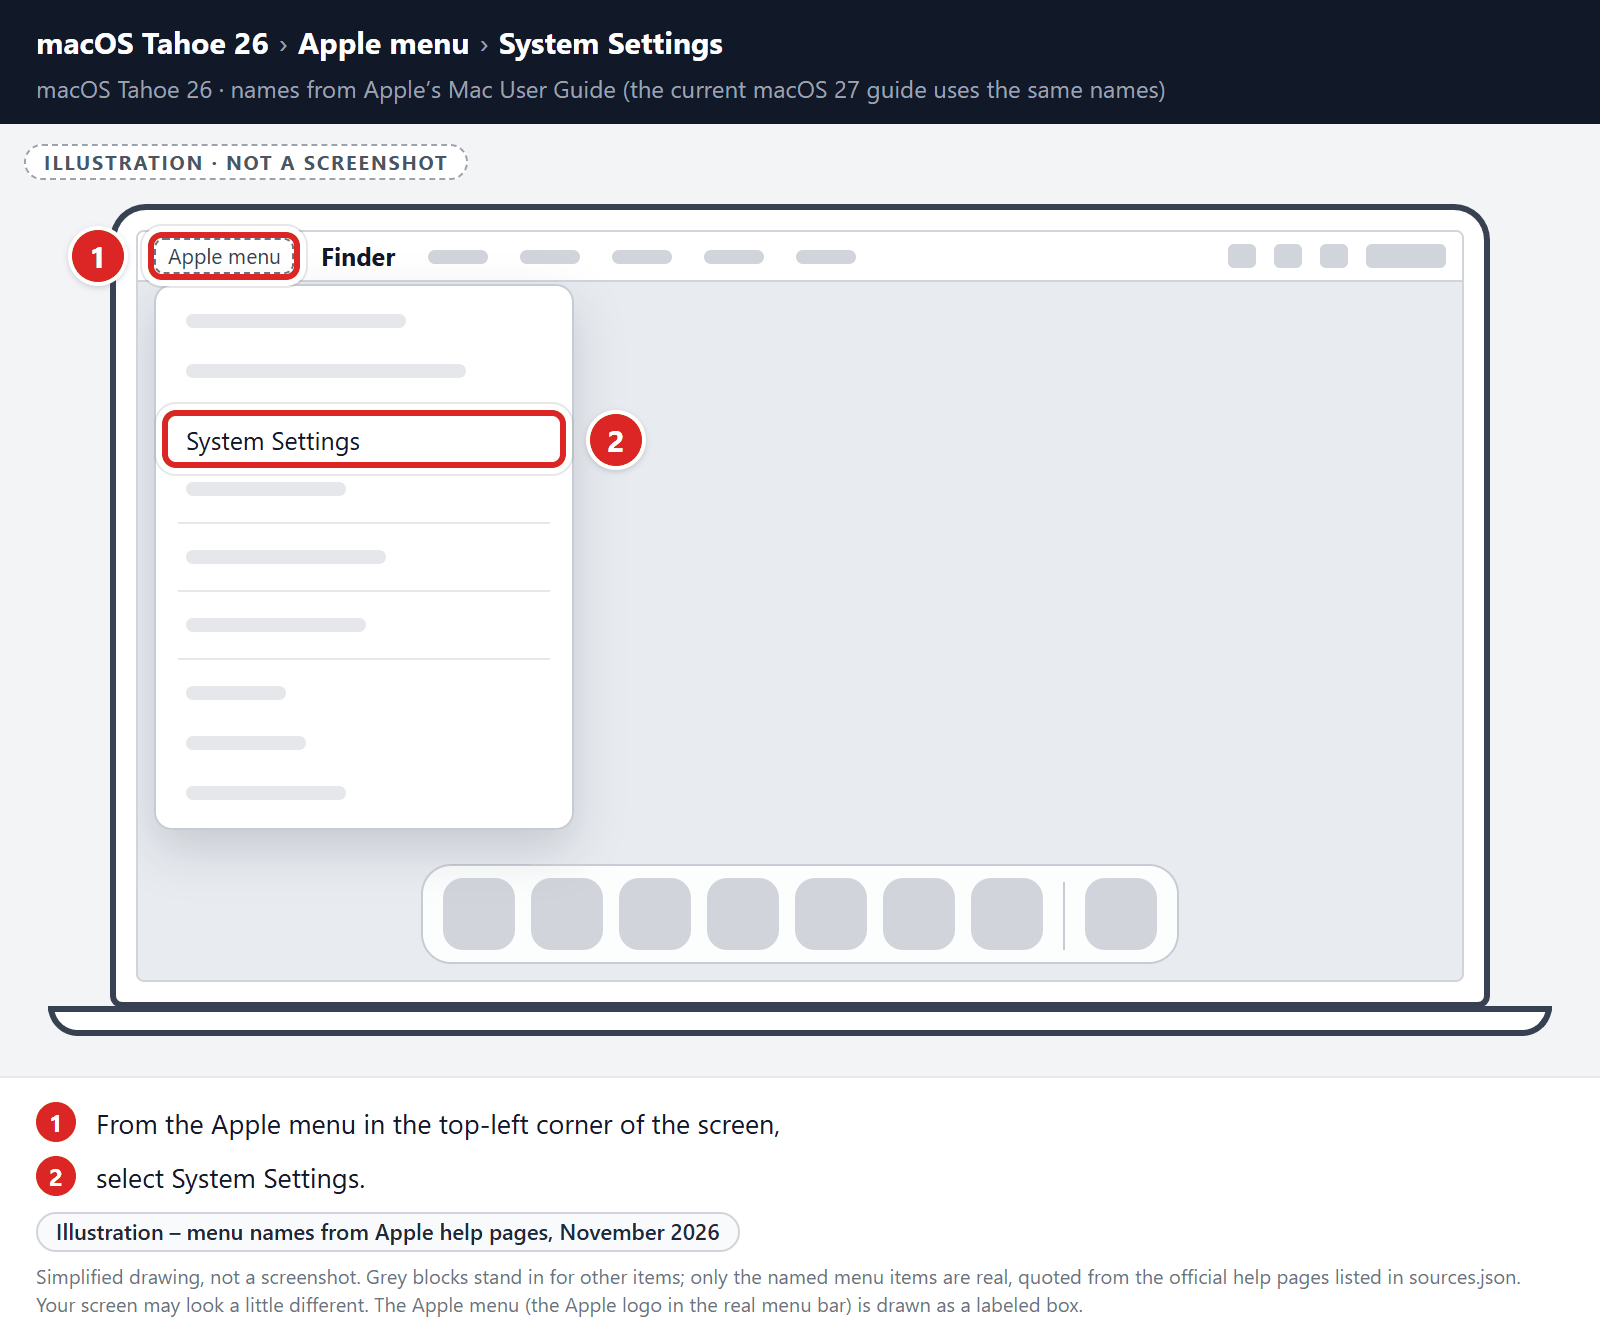
Open “System Settings”
From the Apple menu () in the top-left corner of the screen, select System Settings. (On macOS Monterey and earlier, this is called System Preferences.)
-
Look for “Profiles”
Where you find configuration profiles depends on your version of macOS:
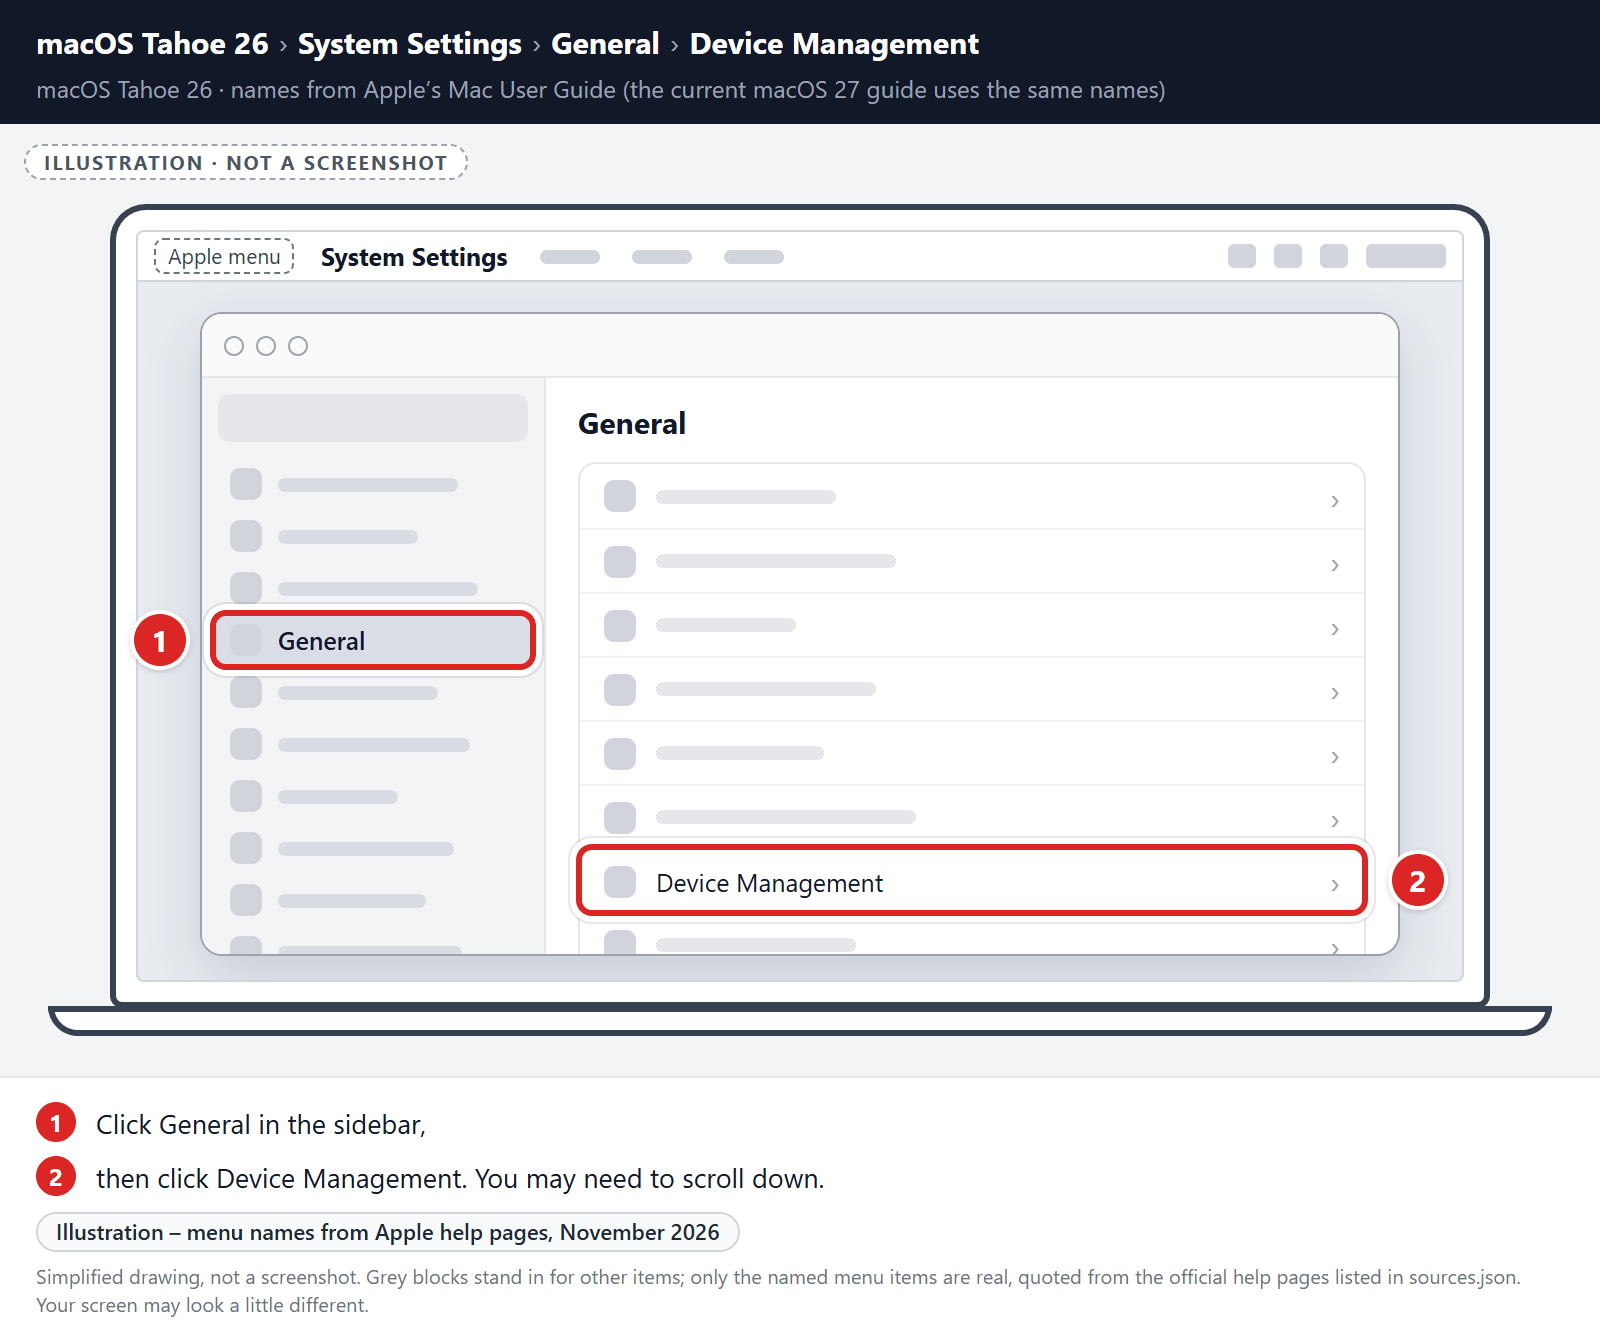
macOS Sequoia (15) and later: click General in the sidebar, then click Device Management. You may need to scroll down.
macOS Ventura (13) and Sonoma (14): click Privacy & Security in the sidebar, then click Profiles near the bottom.
macOS Monterey (12) and earlier: in System Preferences, click Profiles.
You can also type “Profiles” in the search box.
No profiles listed, or no Profiles section at all? That means no configuration profiles are installed on your Mac, which is completely normal. Skip ahead to the next step of this guide. -
Remove the malicious profiles
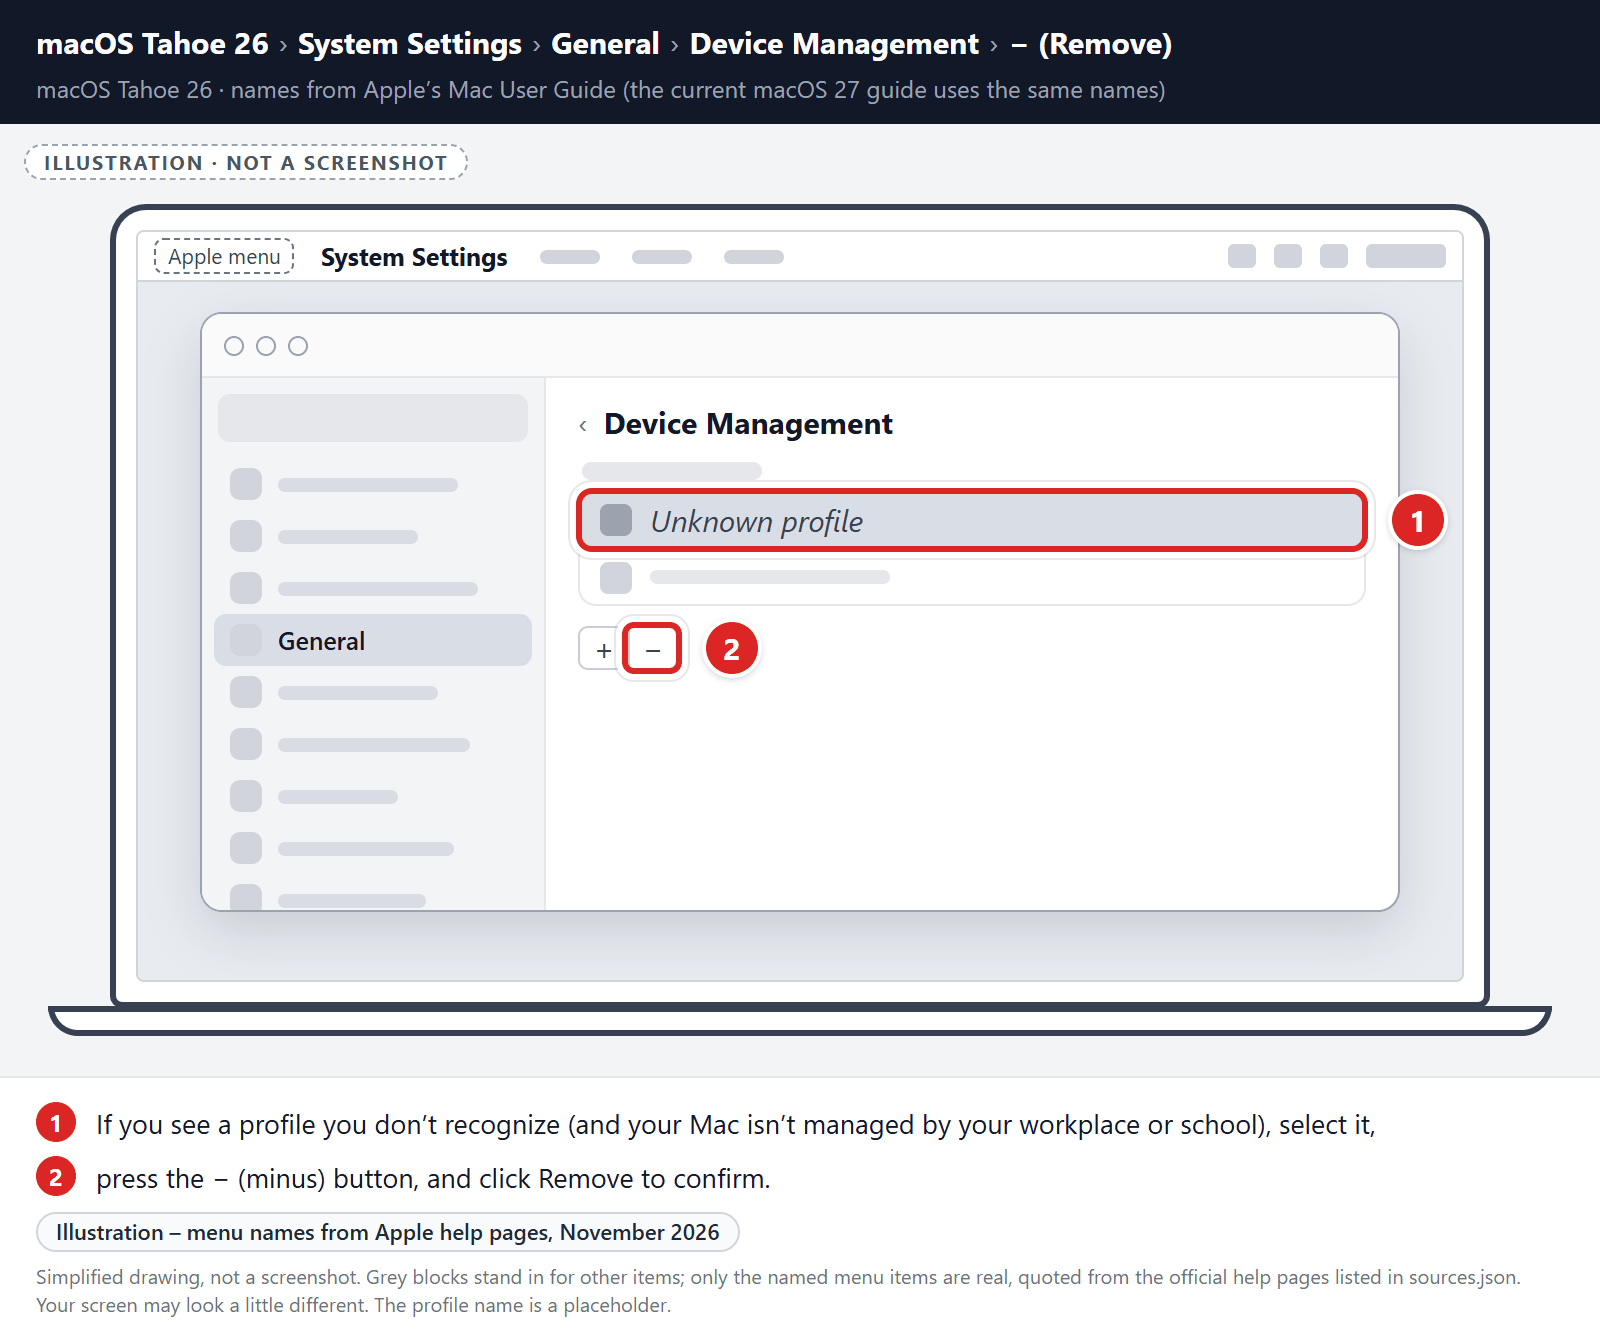
Malware uses configuration profiles to lock your browser settings — forcing a fake search engine or homepage on you and preventing you from changing it back. If you see a profile you don’t recognize (and your Mac isn’t managed by your workplace or school), select it, press the − (minus) button, and click Remove to confirm.
STEP 2: Delete malicious apps
In this second step, we will try to identify and remove any malicious apps and files that might be installed on your computer. Sometimes redirects or adware programs can have usable Uninstall entries that can be used to remove these programs.
-
Quit the malicious programs
Check the Apple menu bar in the top-right corner of your screen. If you see an icon you don’t recognize, click it and select Quit. This stops the malware from running so it can’t interfere while we remove it.
-
Open “Finder”
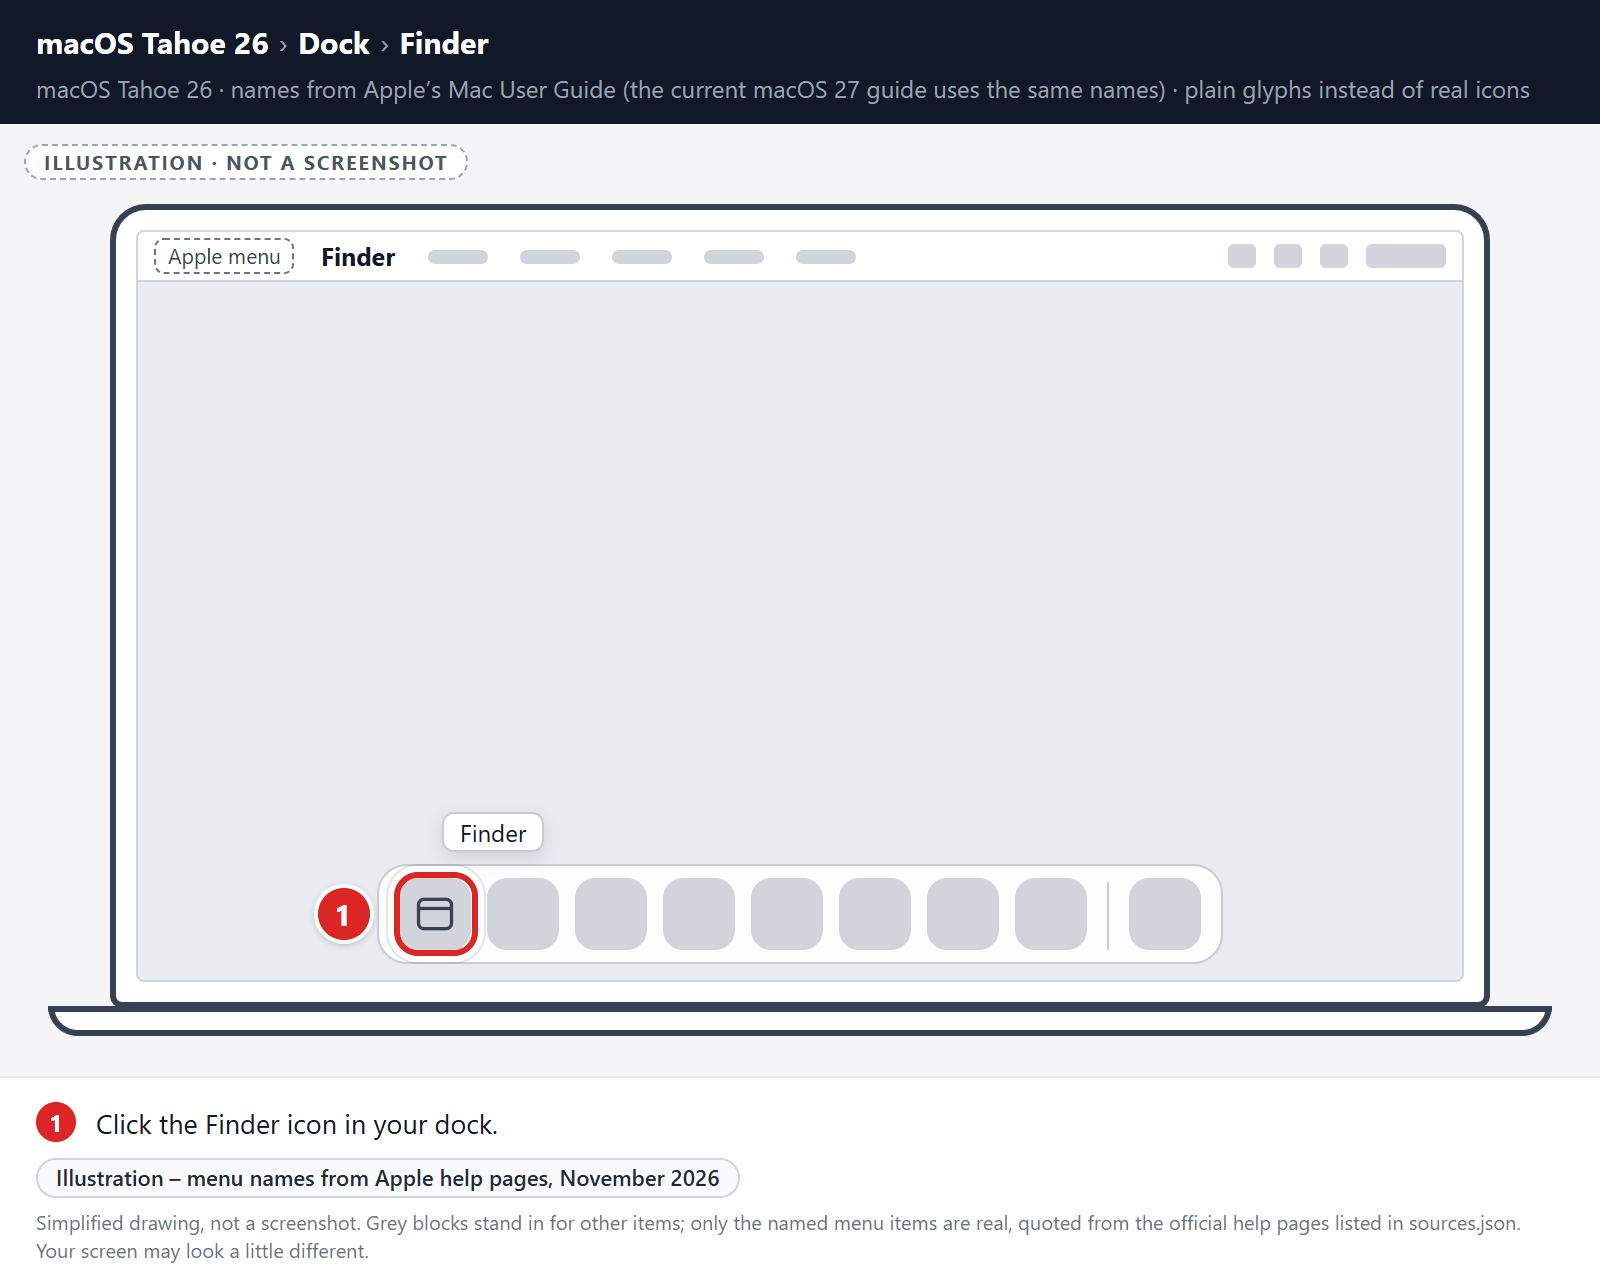
Click the Finder icon in your dock.
-
Click on “Applications”
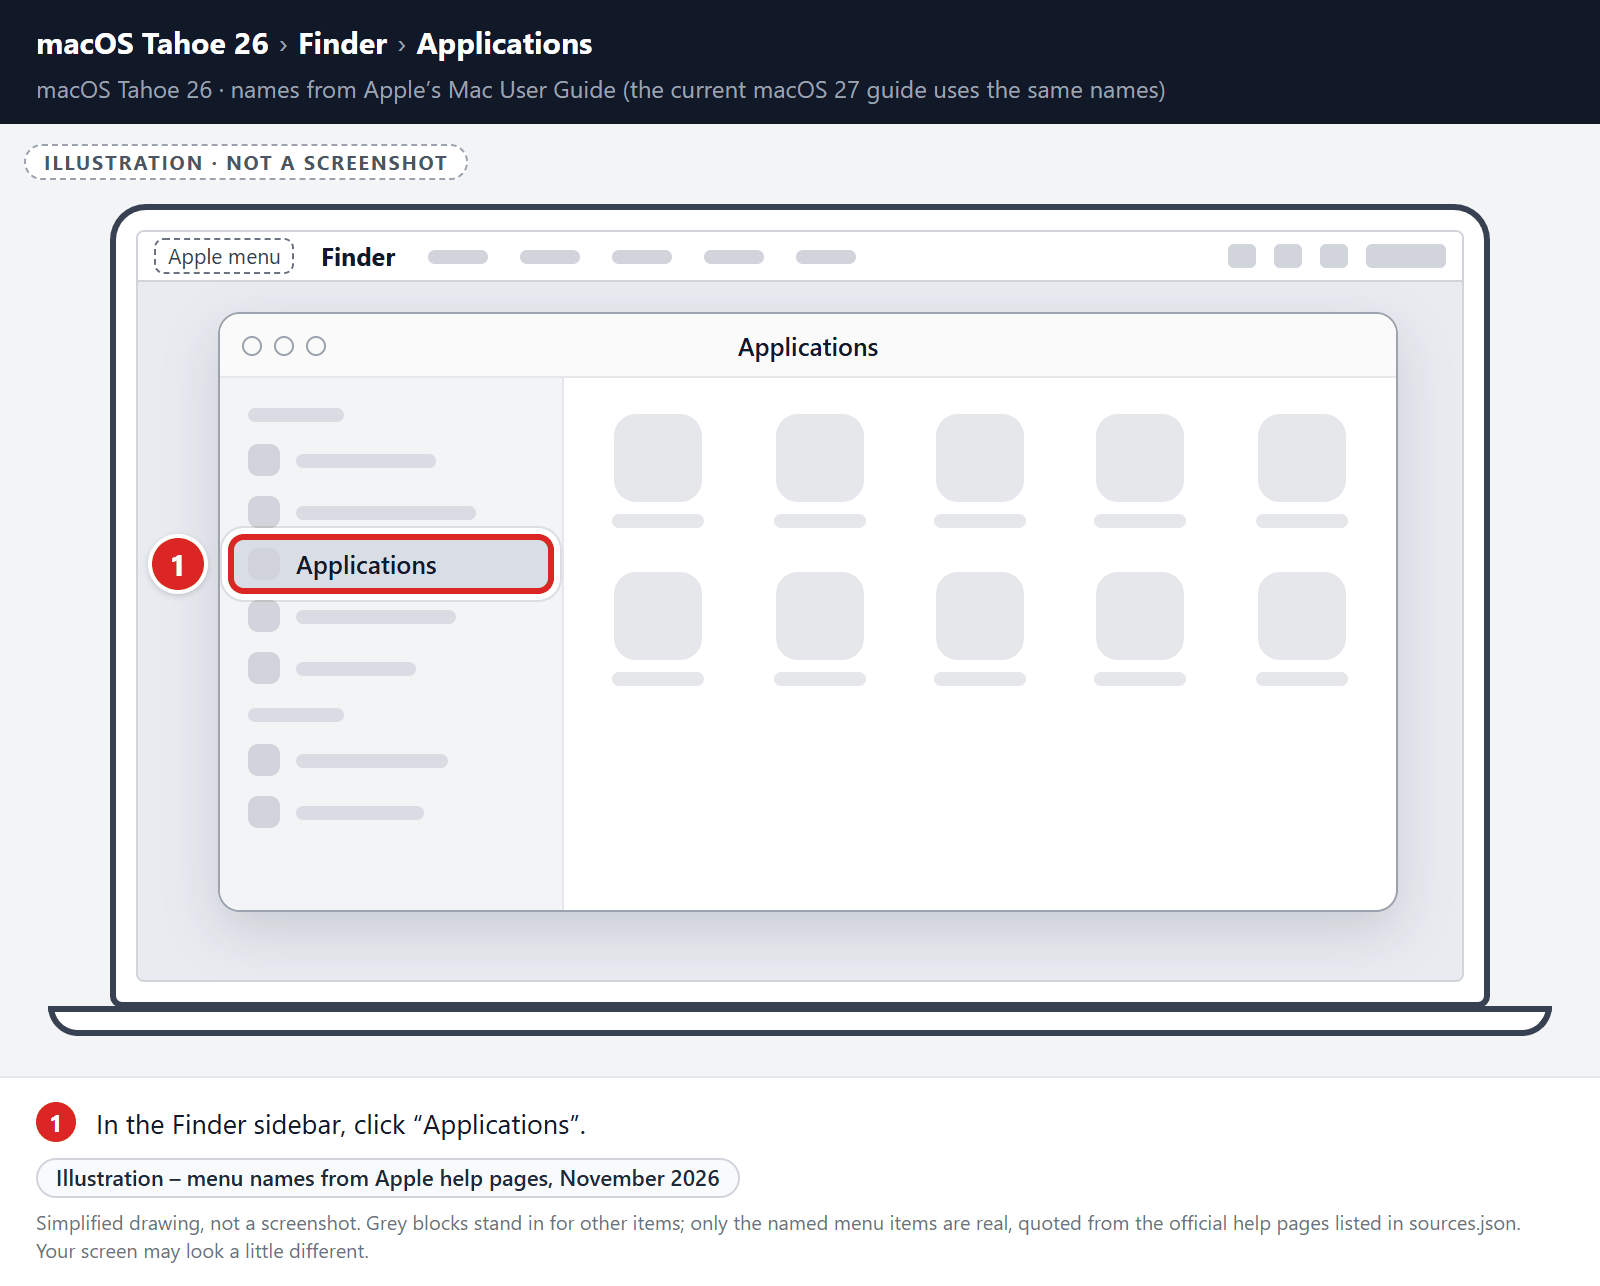
In the Finder sidebar, click “Applications“.
-
Find and remove the malicious app
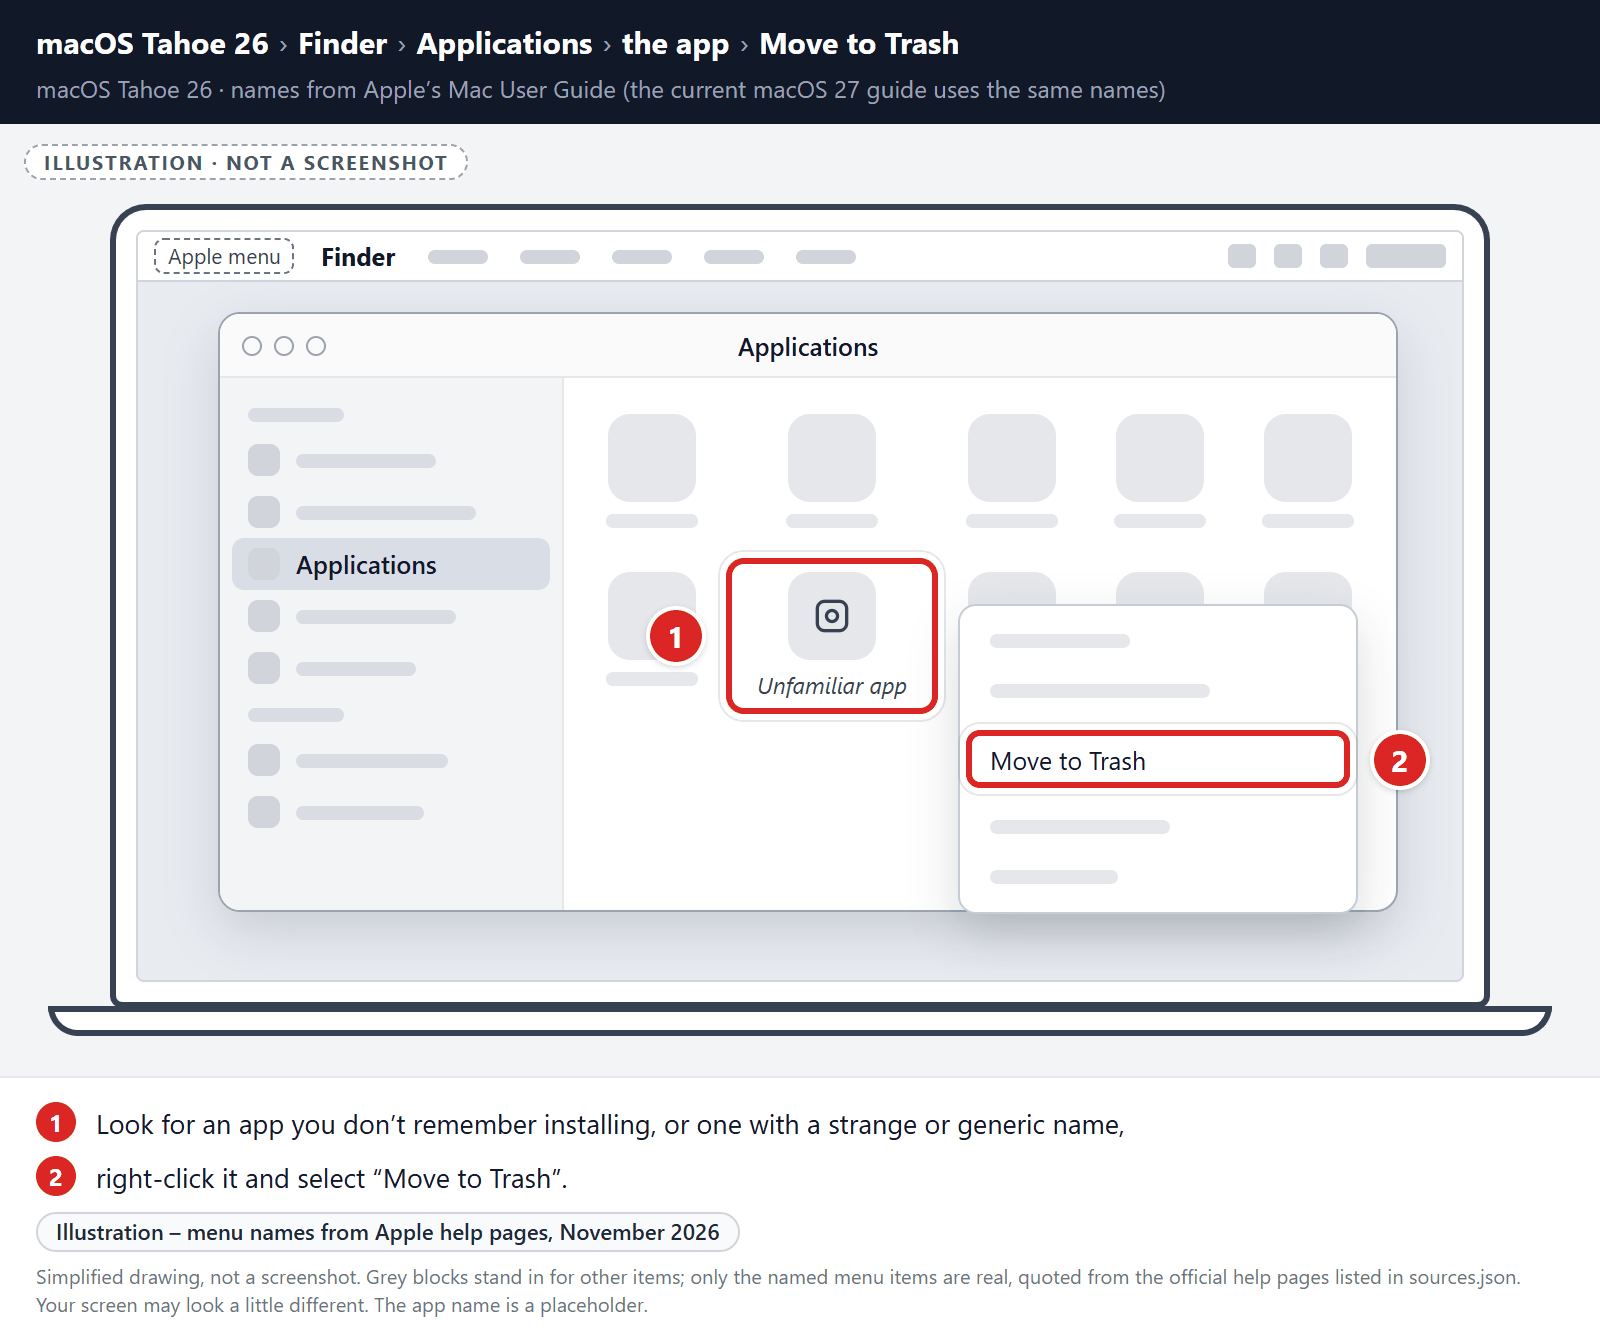
Scroll through the list of installed apps and look for anything suspicious — an app you don’t remember installing, or one with a strange or generic name. When you find it, right-click it and select “Move to Trash“.
Some known malicious programs to look for: SearchMine, TakeFresh, TopResults, FeedBack, ApplicationEvents, GeneralOpen, PowerLog, MessengerNow, ImagePrime, GeneralNetSearch, Reading Cursors, GlobalTechSearch, PDFOnline-express, See Scenic Elf, MatchKnowledge, Easy Speedtest, and WebDiscover. The names change constantly, though — so treat any app you can’t account for as suspect.
-
Empty the Trash
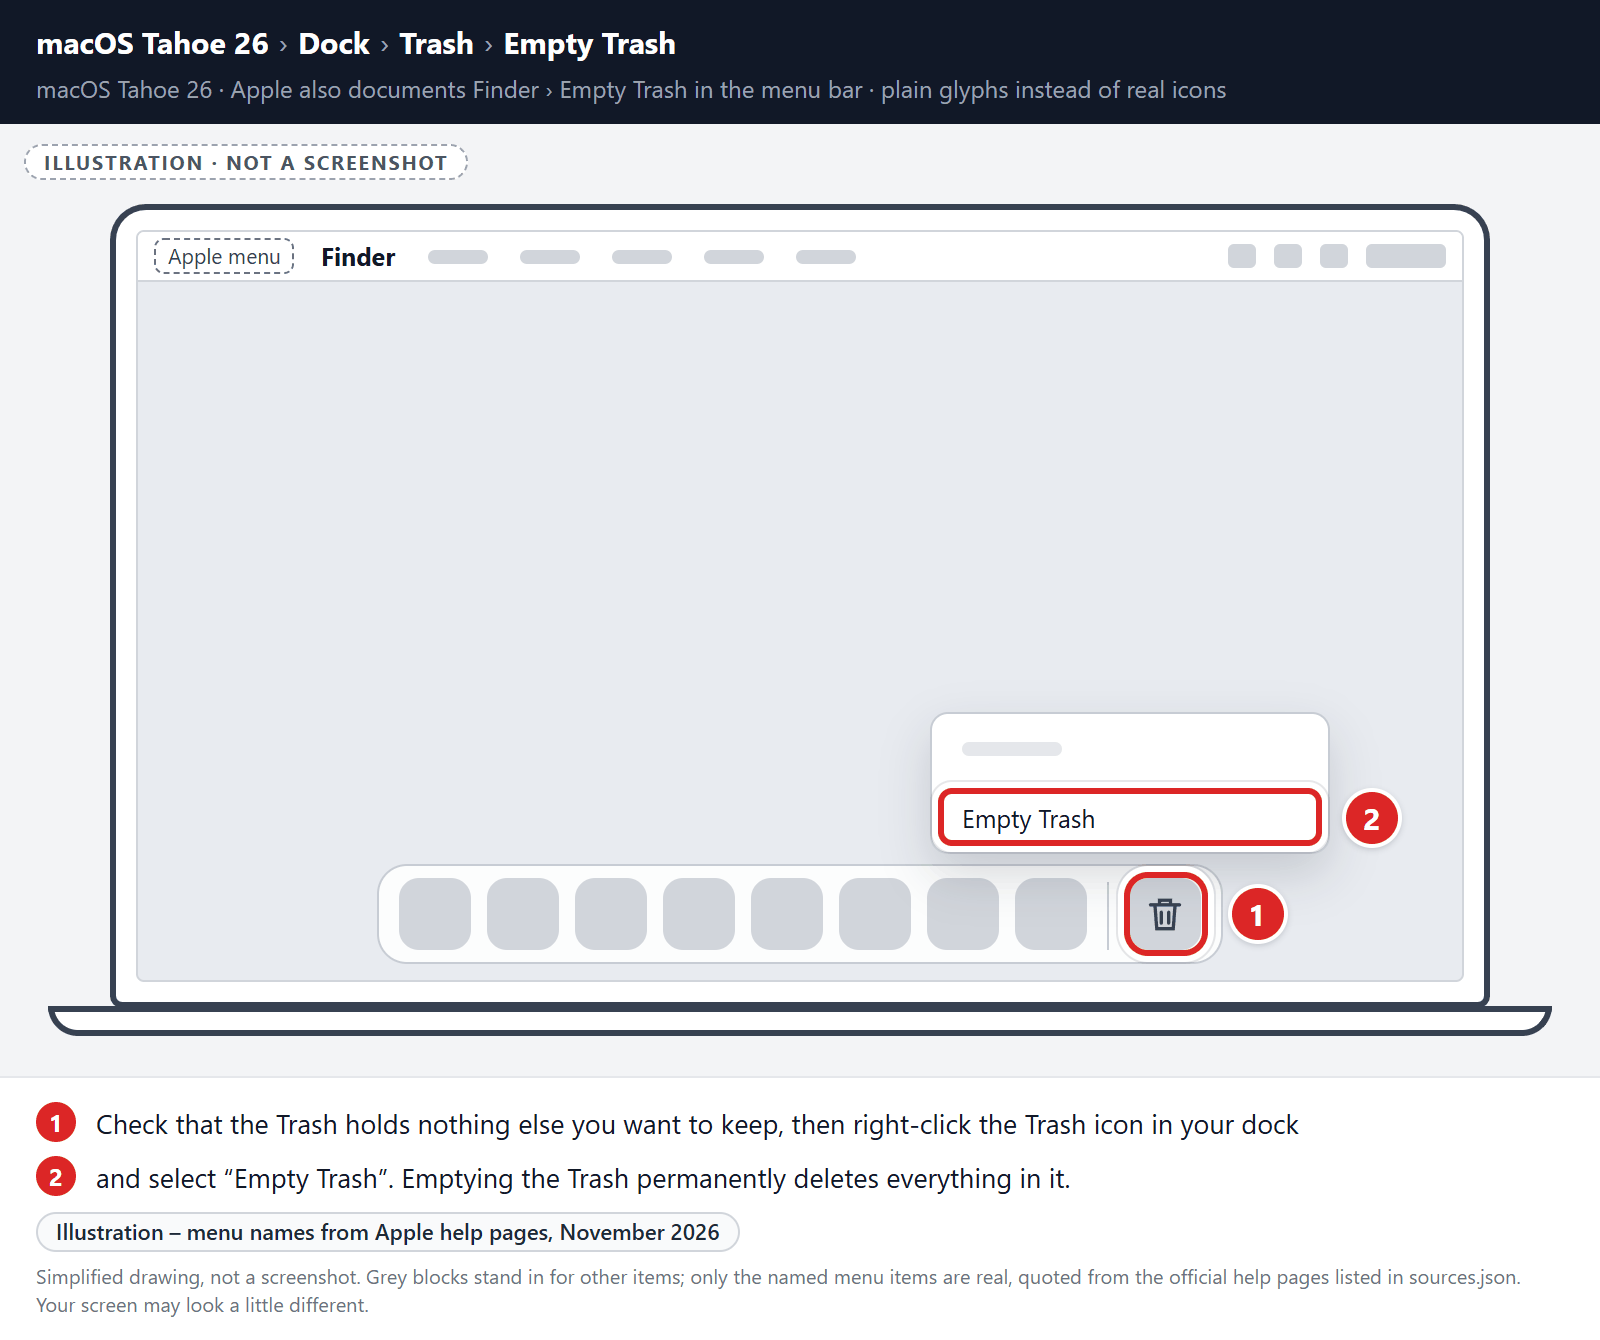
Before you empty the Trash, check that it doesn’t hold anything else you want to keep, because emptying it permanently deletes everything in it. Then right-click the Trash icon in your dock and select “Empty Trash“.
Check login items and background apps
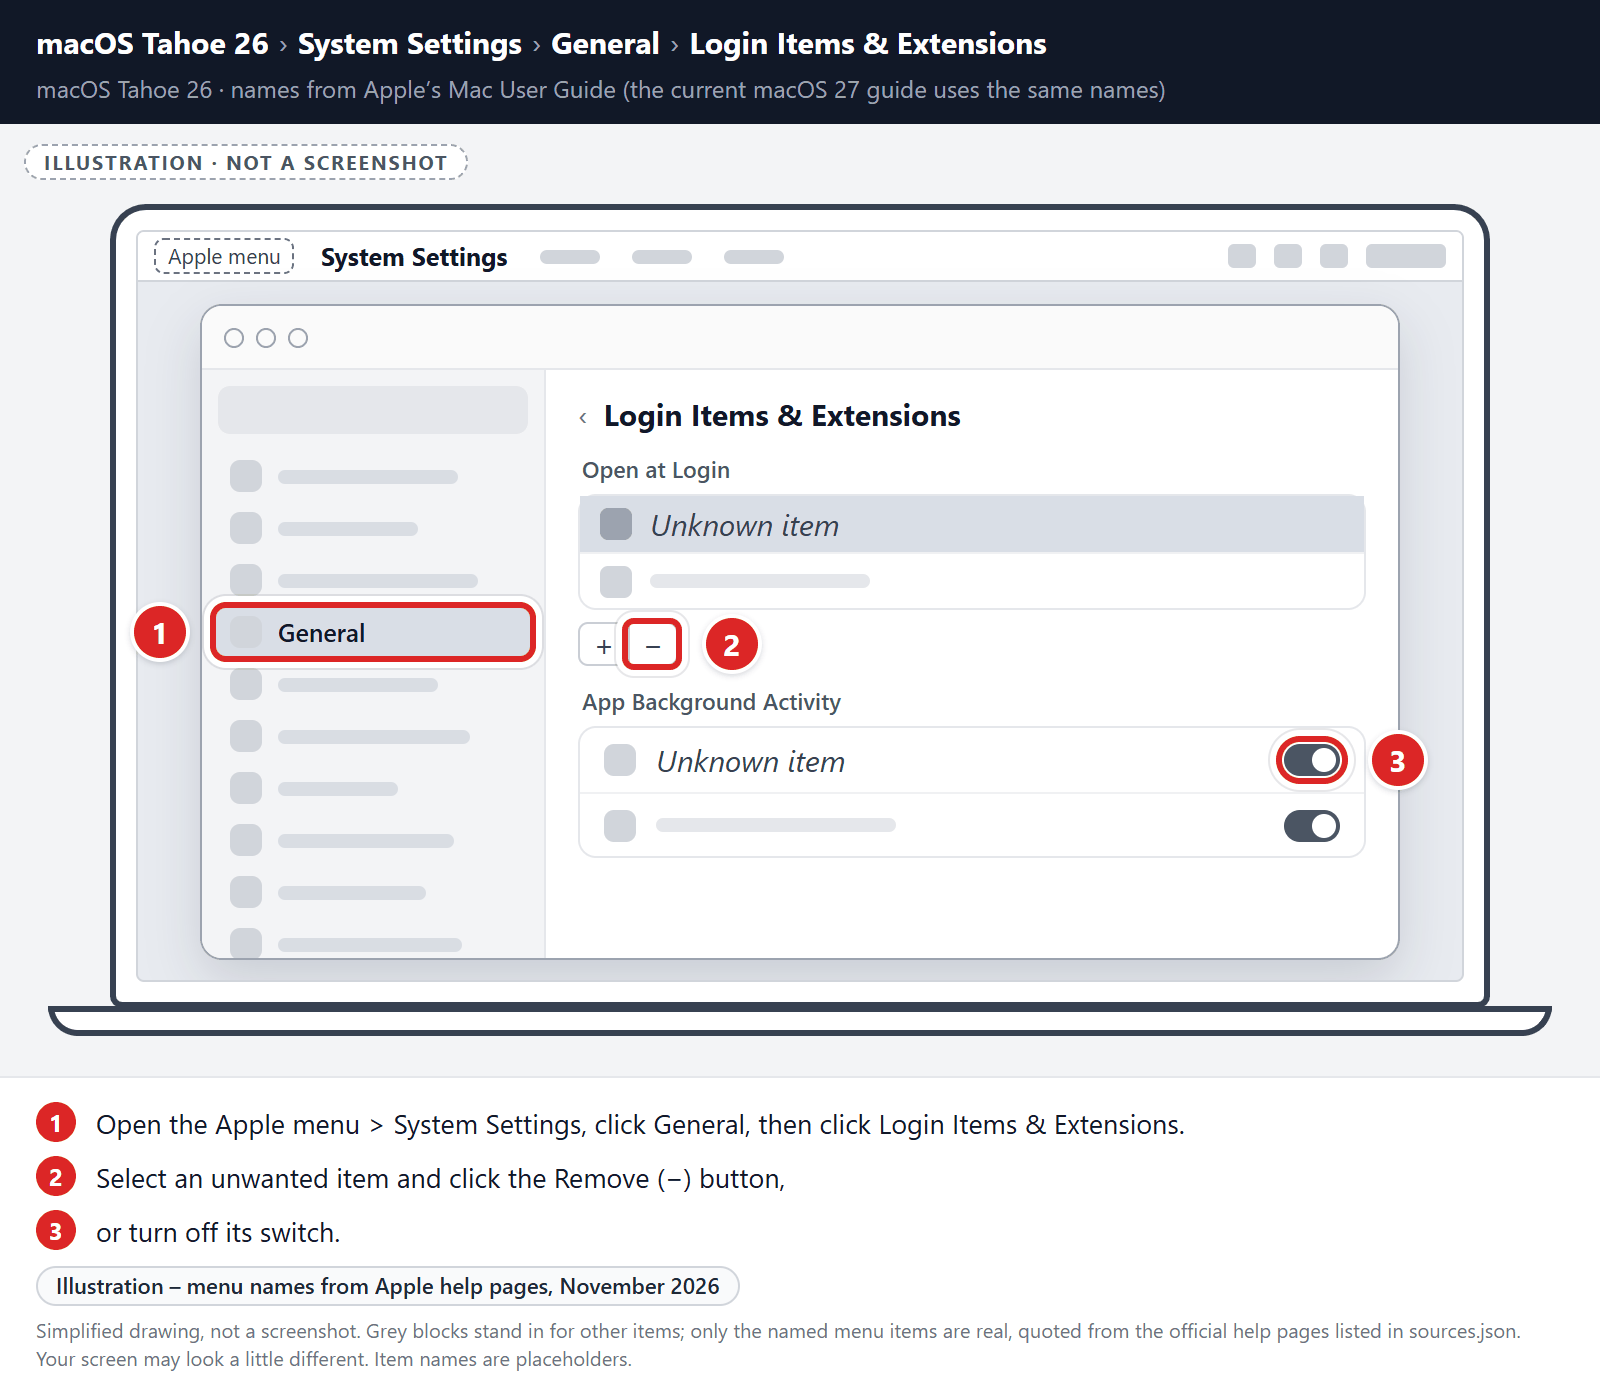
Malware often sets itself to start automatically. Open the Apple menu > System Settings, click General, then click Login Items & Extensions (called Login Items in macOS Ventura and Sonoma). Look for apps you don’t recognize in the list of items that open at login and in the list of apps allowed to run in the background. Select an unwanted item and click the Remove (−) button, or turn off its switch.
This check doesn’t delete any files. Note the names you find, because they help you spot related files in the next step.
Find and remove the malicious files
Malware on Mac uses launch agents and launch daemons — small files that automatically restart the malware every time you boot your Mac. We’ll check the four folders where they hide:
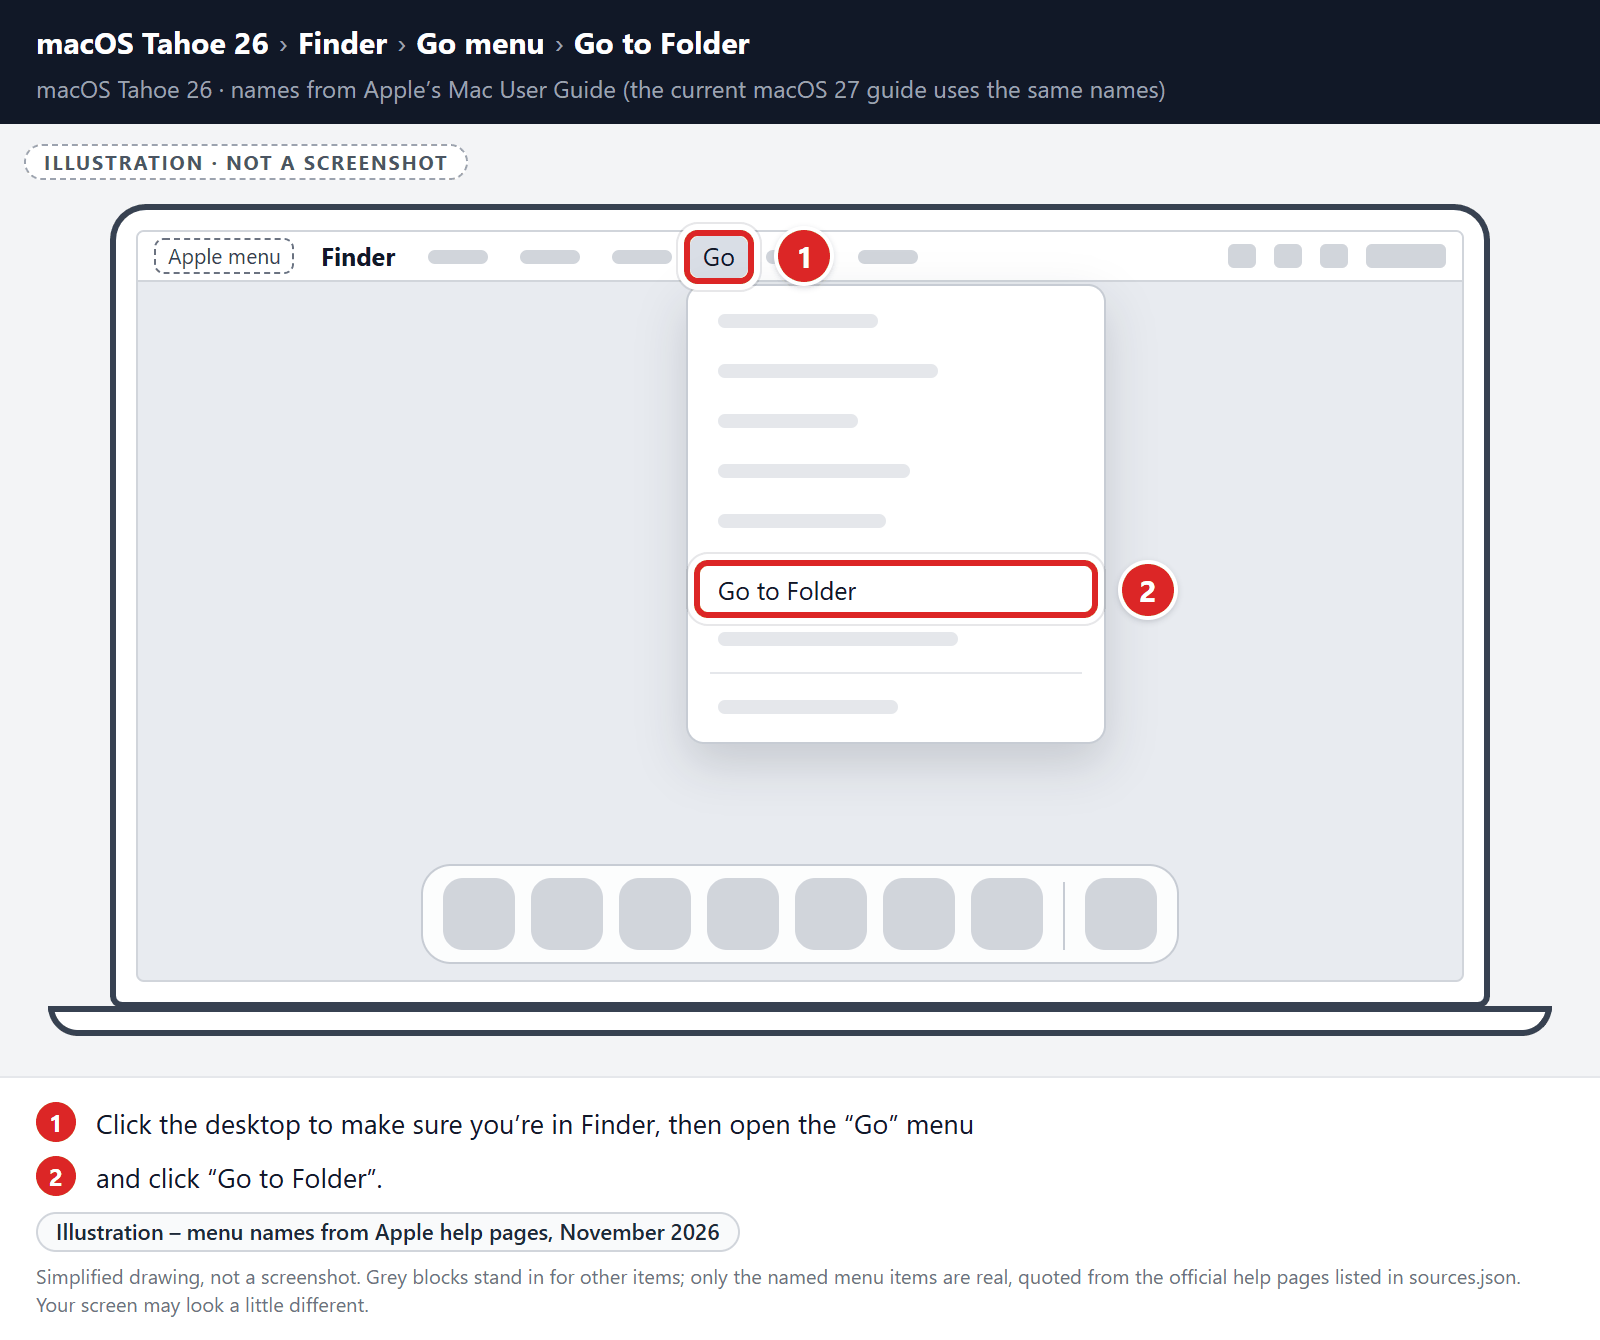
- Click the desktop to make sure you’re in Finder, then open the “Go” menu and click “Go to Folder“.
- Copy and paste each of the paths below into the window, one at a time, then double-click the matching folder that appears:
- /Library/LaunchAgents
- ~/Library/LaunchAgents
- /Library/Application Support
- /Library/LaunchDaemons
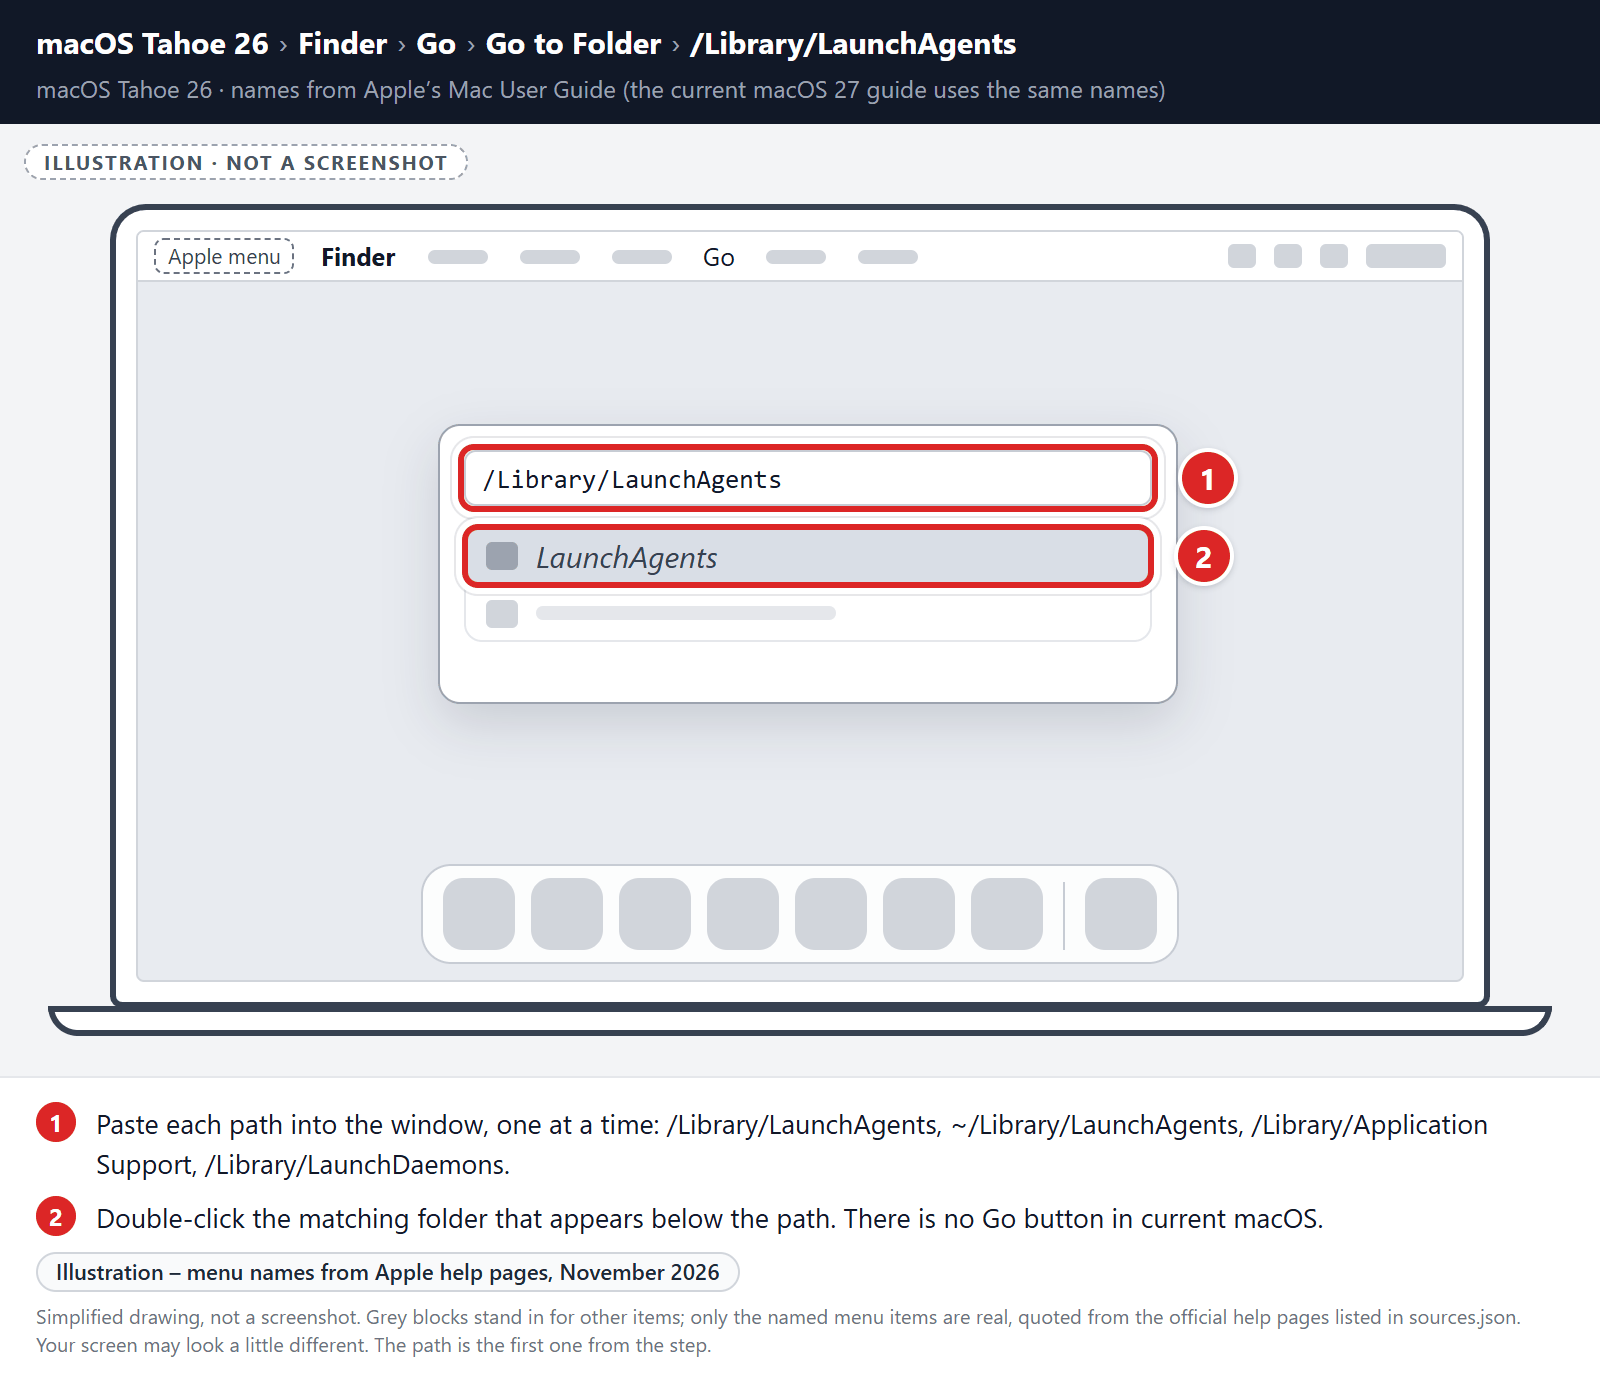
- In each folder, look for suspicious .plist files — typically named after the malware or with odd, random-looking names. Examples seen in past infections include “installmac.AppRemoval.plist”, “myppes.download.plist”, “mykotlerino.ltvbit.plist”, and “com.myppes.net-preferences.plist”. A name alone is not proof. For example, “com.adobe.fpsaud.plist” belongs to Adobe’s own Flash Player updater. When you find a malicious file, move it to the Trash — then empty the Trash again when you’re done.
Be careful: these folders also contain files belonging to legitimate apps — especially /Library/Application Support, where programs like Adobe, Google, and Microsoft store their data. Only delete files you’re confident are malicious. If you’re unsure about a file, search its exact name online first, or leave it in place and continue with the Malwarebytes scan later in this guide.
- Click the desktop to make sure you’re in Finder, then open the “Go” menu and click “Go to Folder“.
STEP 3: Reset browsers back to default settings
In this third step, we will remove spam push notifications and malicious extensions, and change to default any settings that might have been changed by malware.
For each browser that you have installed on your computer, please click on the tab below and follow the displayed steps to reset that browser.
Remove malicious extensions and settings from Safari
To remove malware from Safari we will check if there are any malicious extensions installed on your browser and what settings have been changed by this malicious program.
-
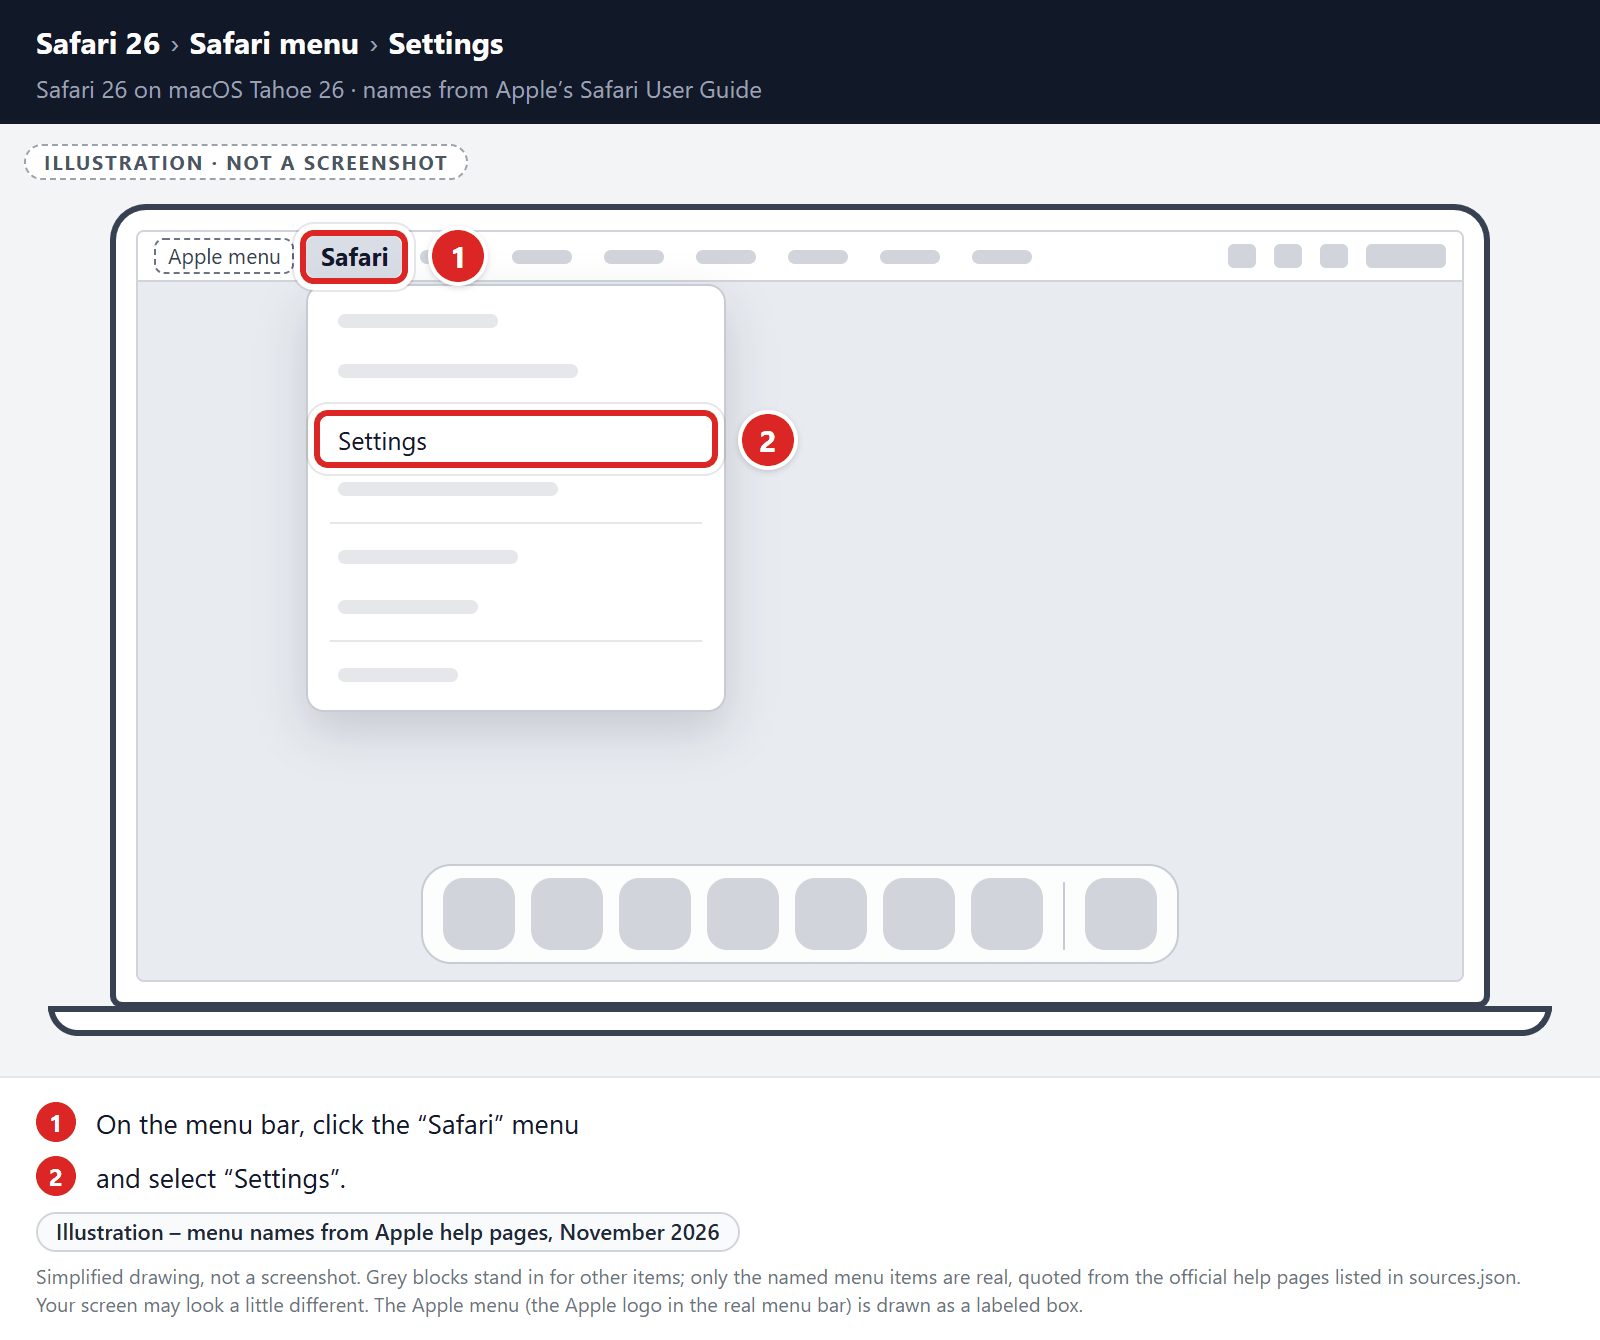
Go to Safari’s “Settings”.
On the menu bar, click the “Safari” menu and select “Settings”. In older versions of Safari, this menu item is called “Preferences”.
-
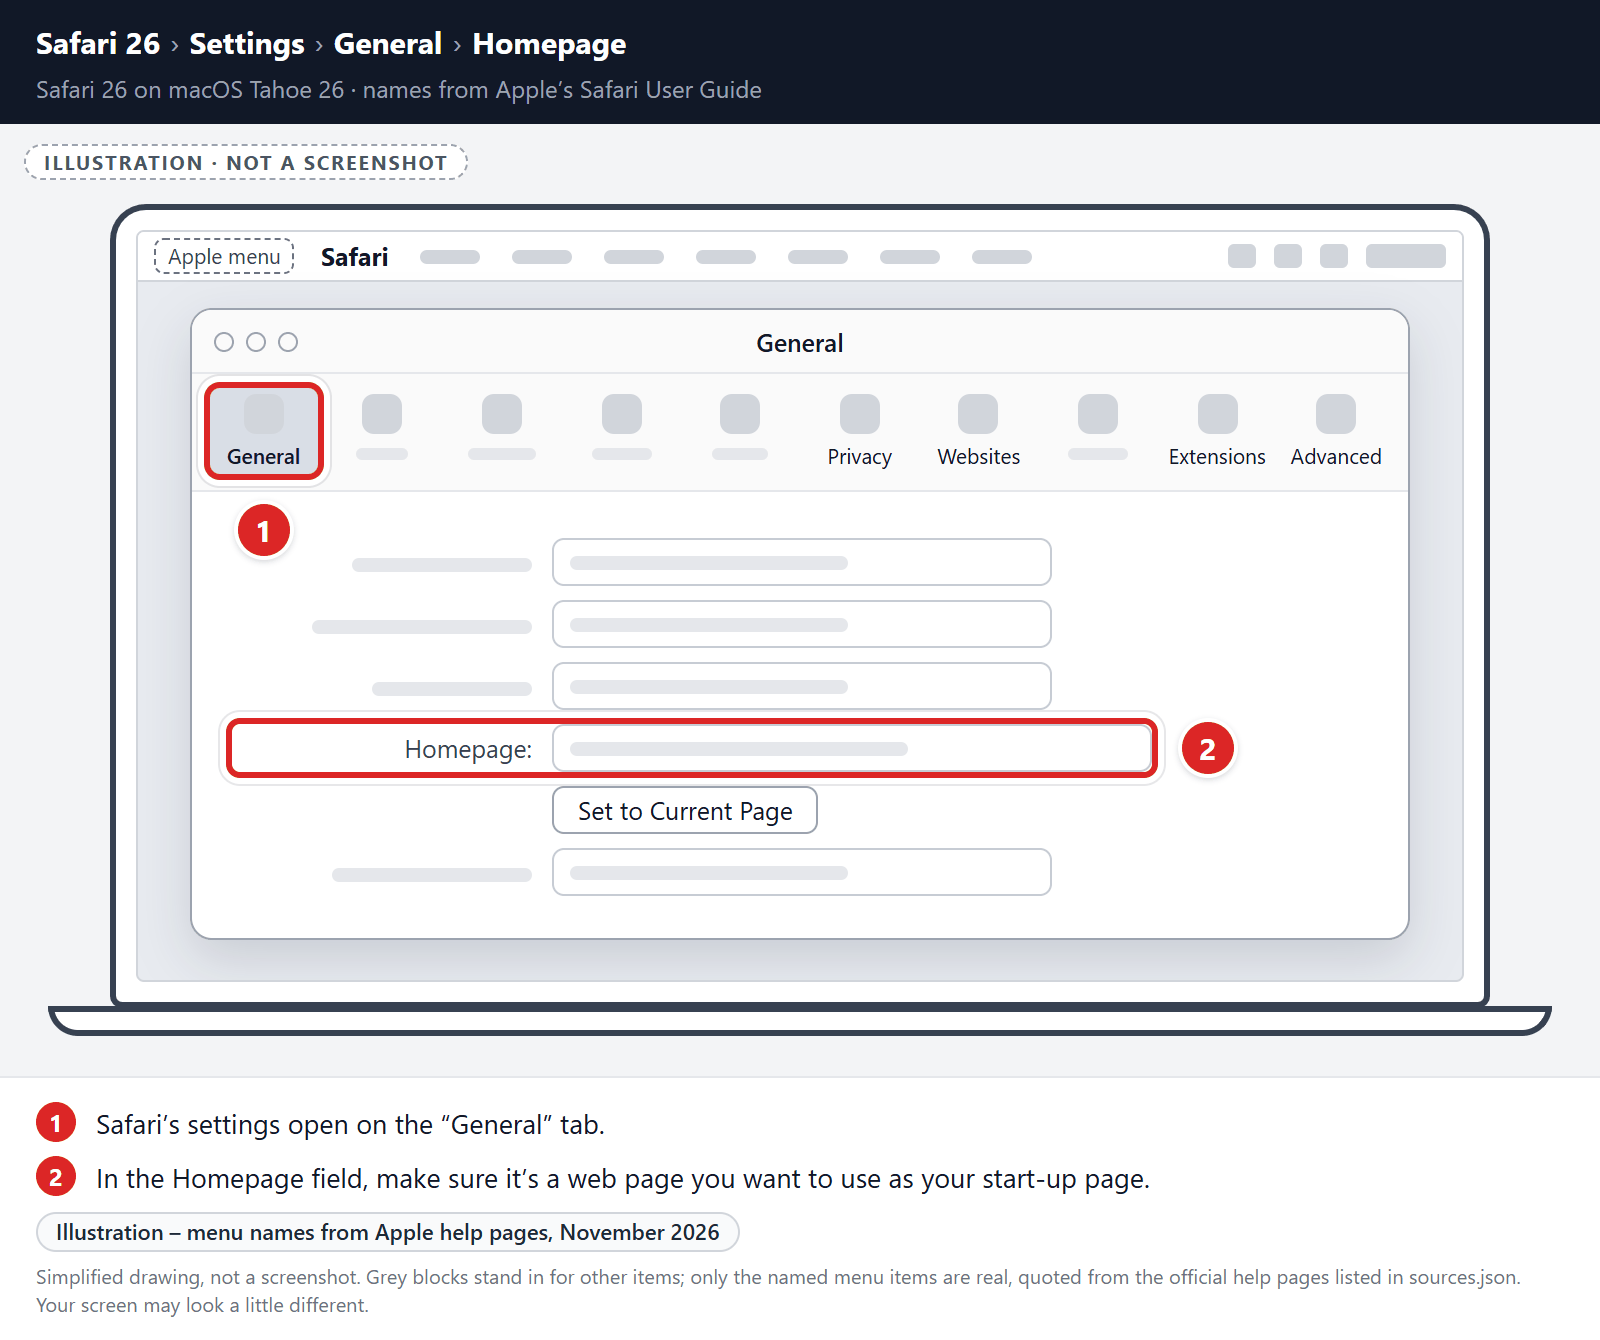
Check Homepage.
This will open a new window with your Safari settings, opened to the “General” tab. Some browser hijackers may change your default homepage, so in the Homepage field make sure it’s a web page you want to use as your start-up page.
-
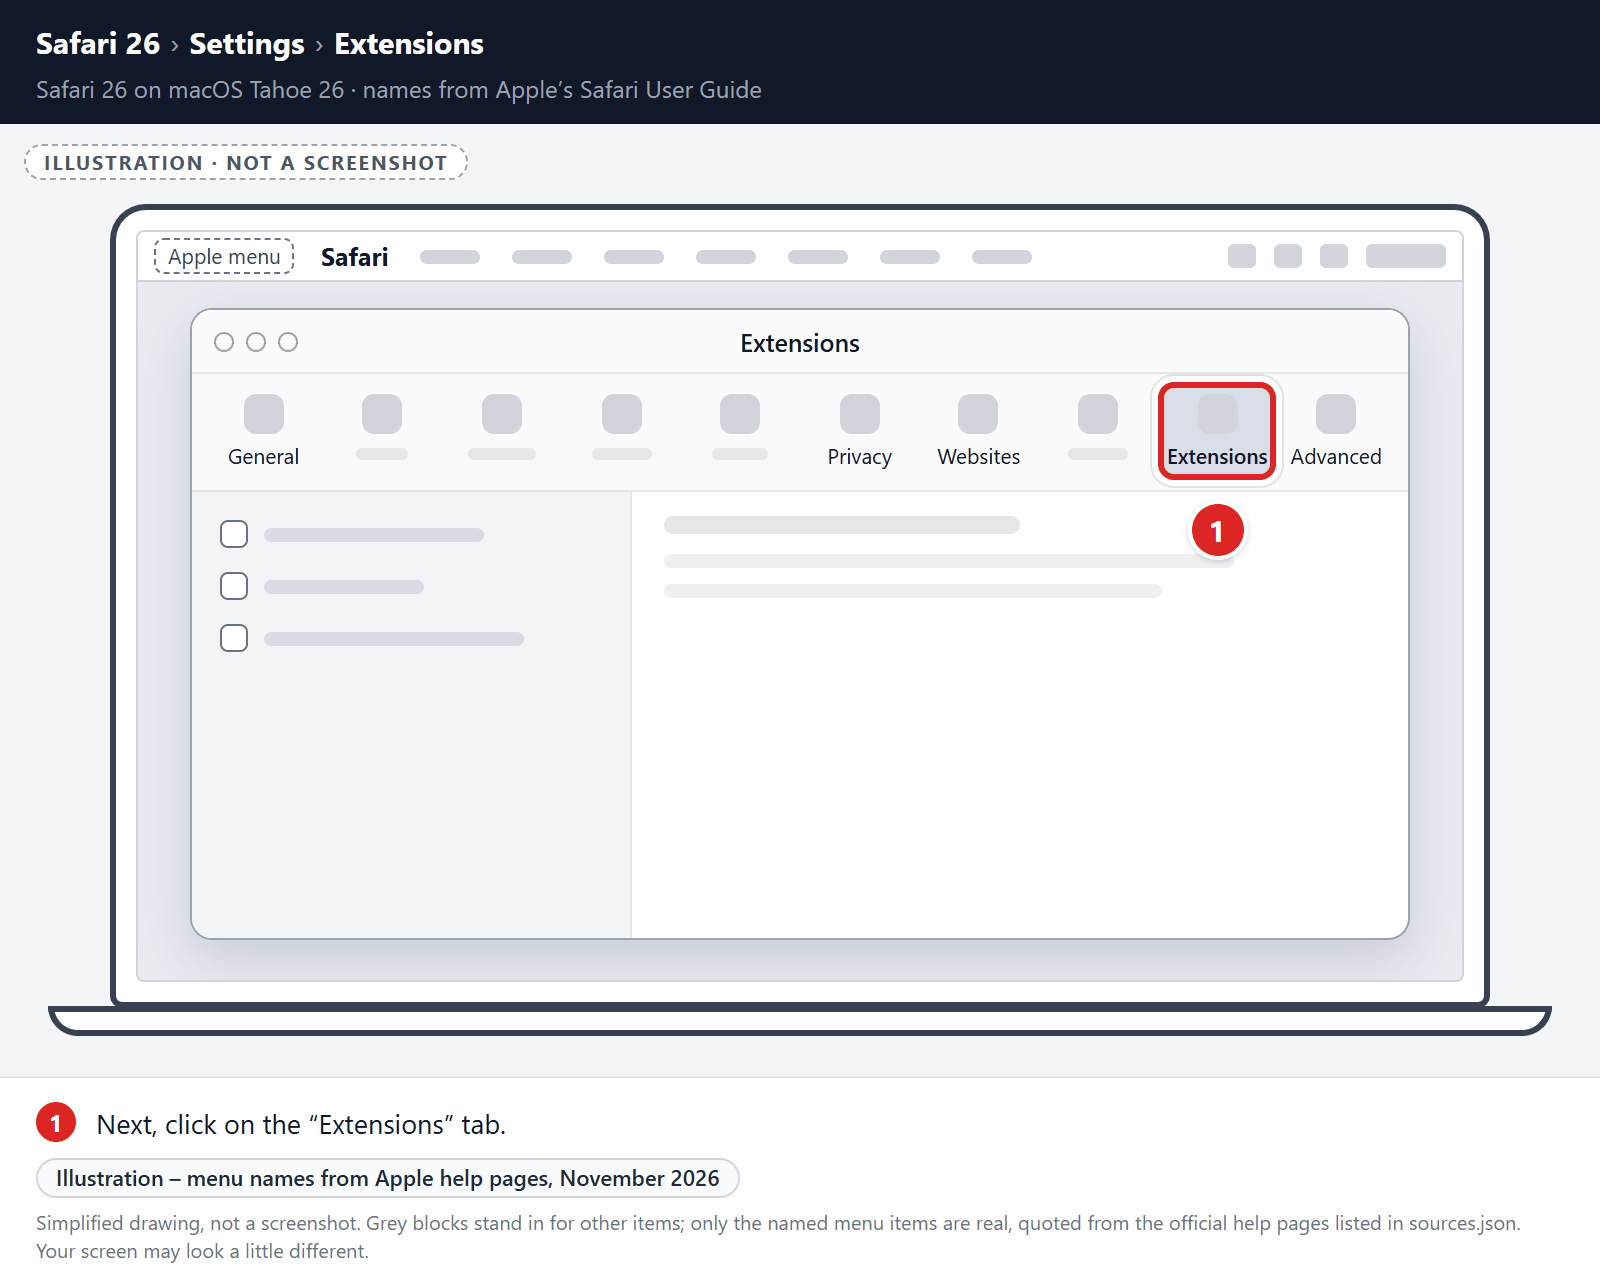
Click “Extensions”
Next, click on the “Extensions” tab.
-
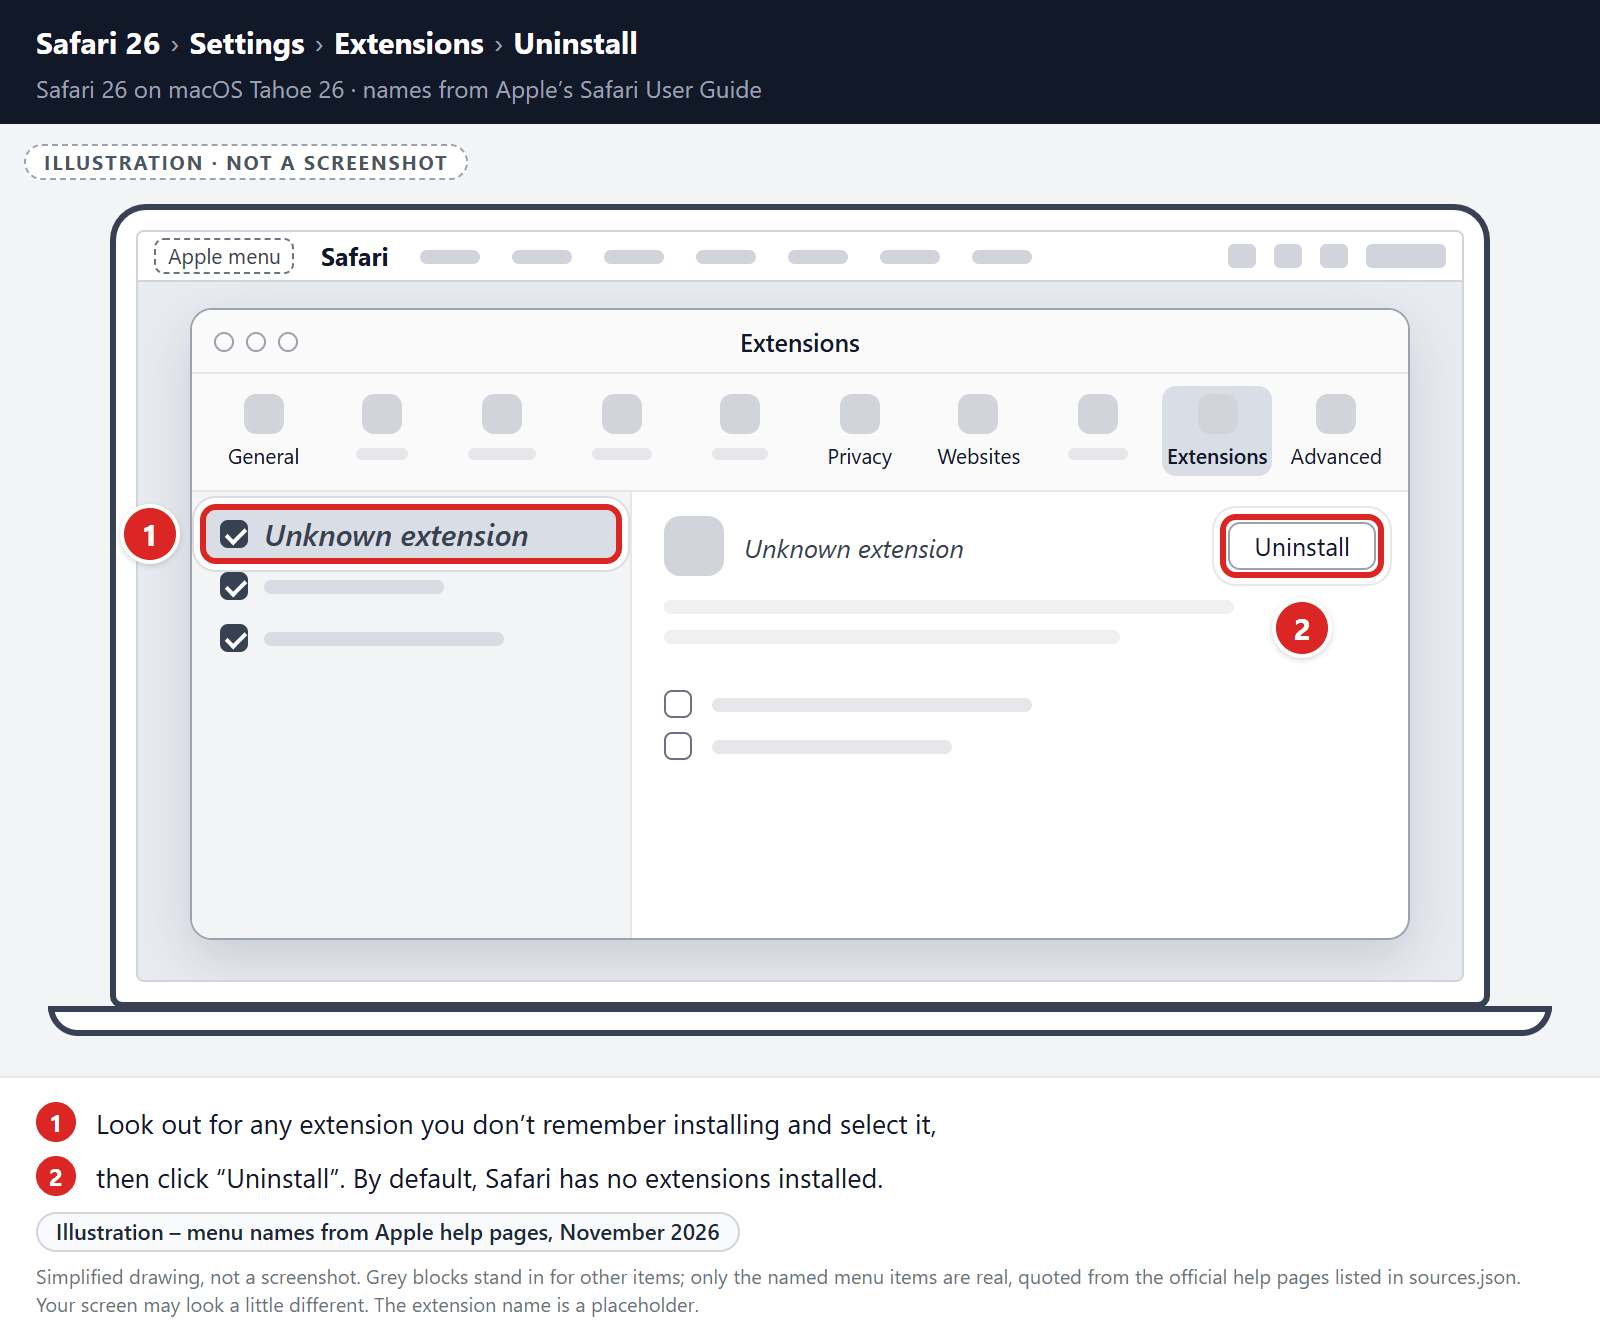
Find and uninstall malicious extensions.
The “Extensions” screen will be displayed with a list of all the extensions installed on Safari. Look out for any suspicious browser extension that could be behind all the drama – anything you don’t remember downloading or that doesn’t sound like a genuine extension. By default, there are no extensions installed on Safari so it’s safe to remove an extension
-
Remove spam notifications ads
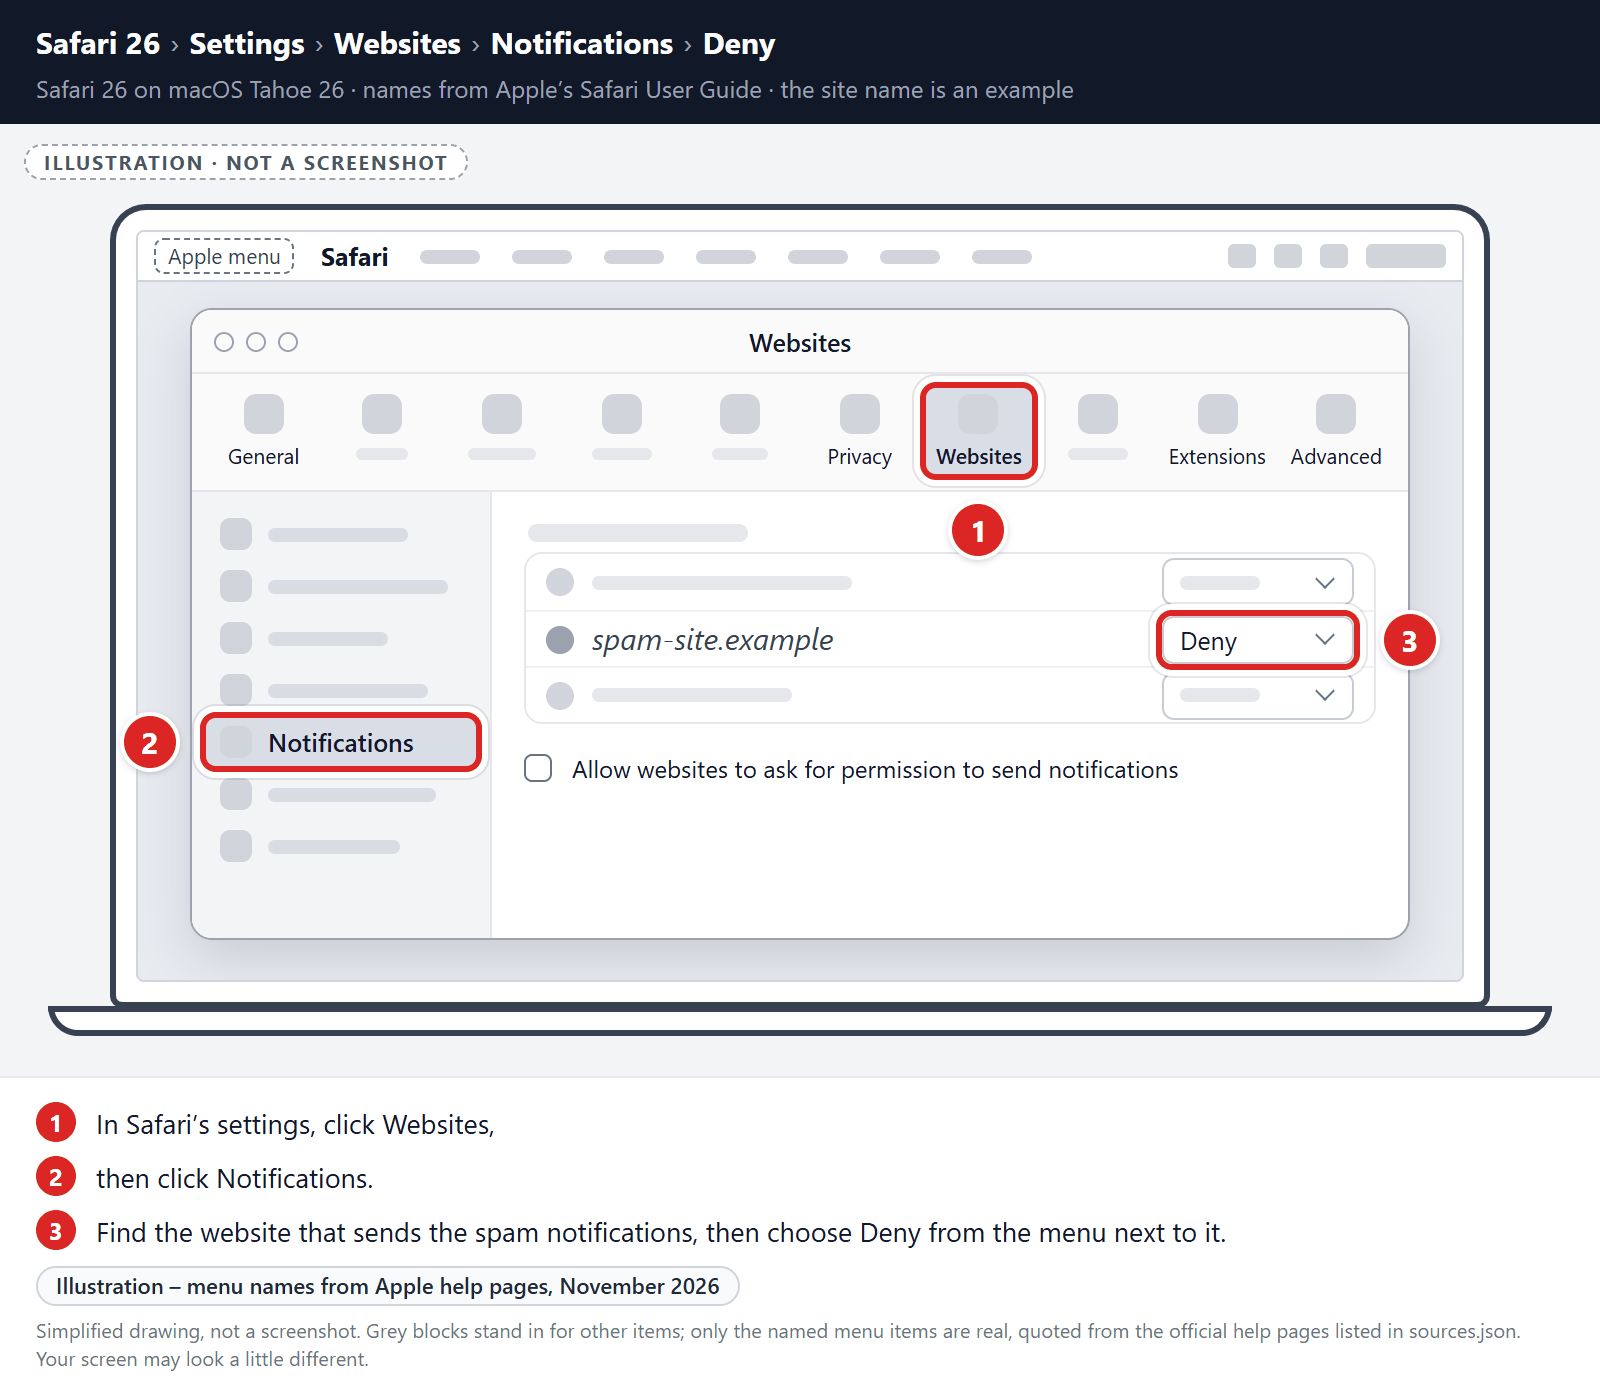
In Safari’s settings, click Websites, then click Notifications. Find the website that sends the spam notifications, then choose Deny from the menu next to it.
To stop other websites from asking, you can also deselect “Allow websites to ask for permission to send notifications“. This only blocks new requests. It doesn’t turn off websites you already allowed, so deny those websites as well.
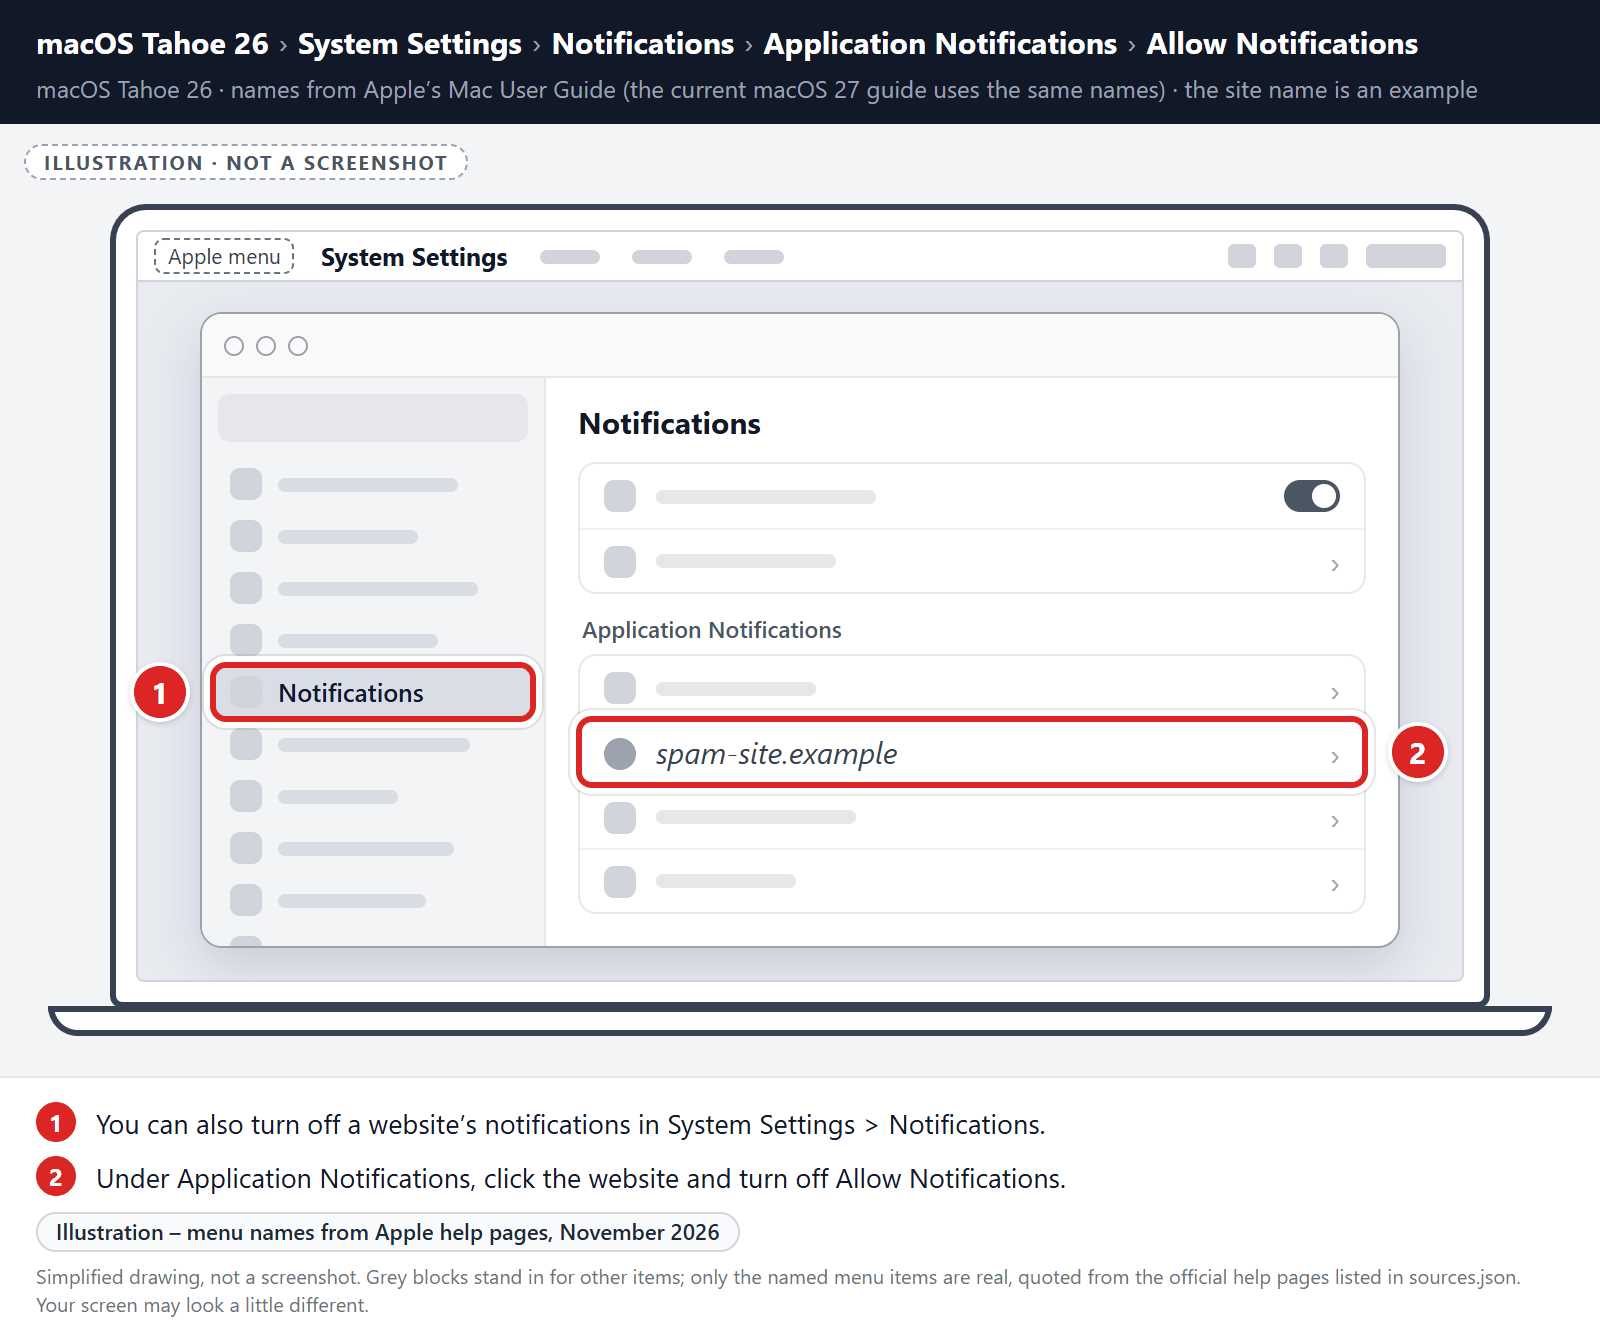
You can also turn off a website’s notifications in System Settings > Notifications. Under Application Notifications, click the website and turn off Allow Notifications.
-
Remove the data stored by the unwanted website.
In the Safari menu, choose “Settings…”, select “Privacy” at the top of the new window that appears, and then click the “Manage Website Data” button.
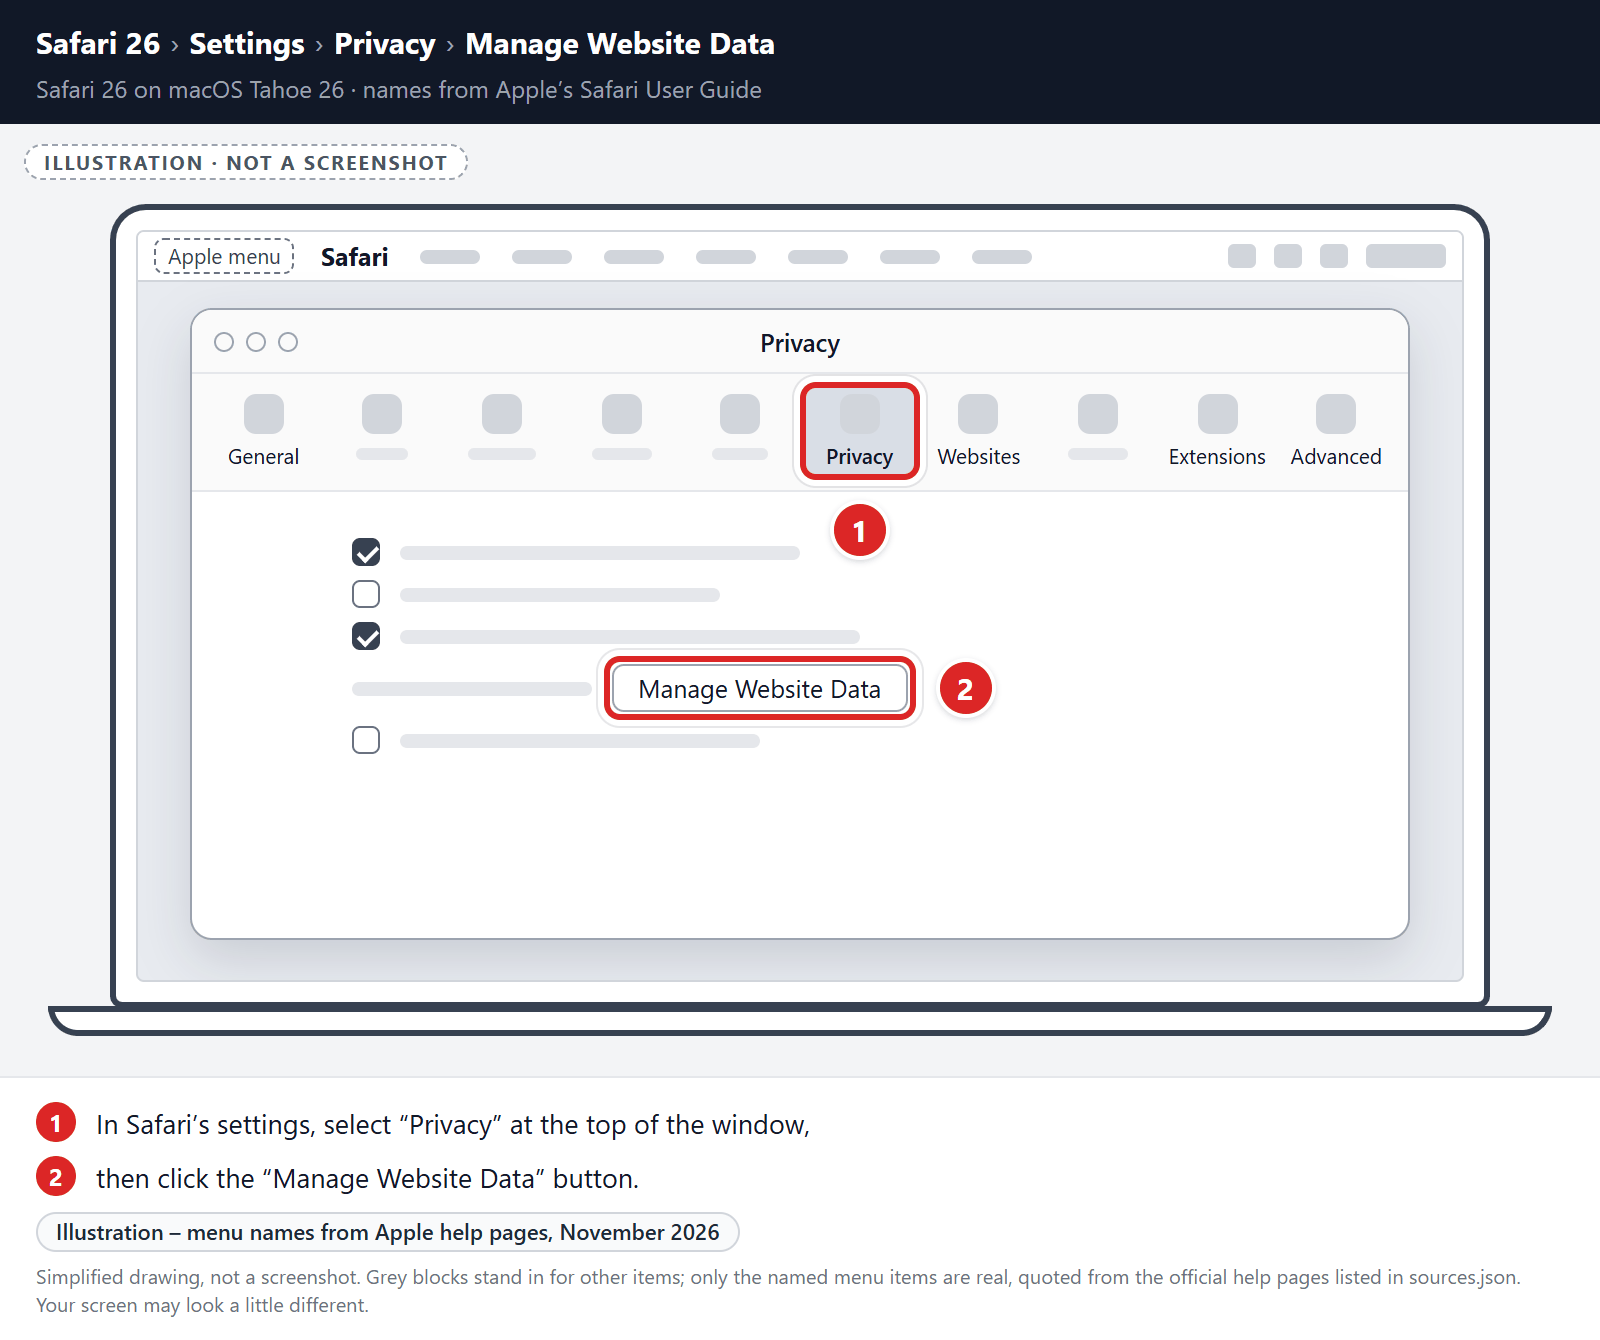
In the next dialog box, search for or select the website that showed the spam or redirects, then click “Remove“. Click Done when you’re finished.
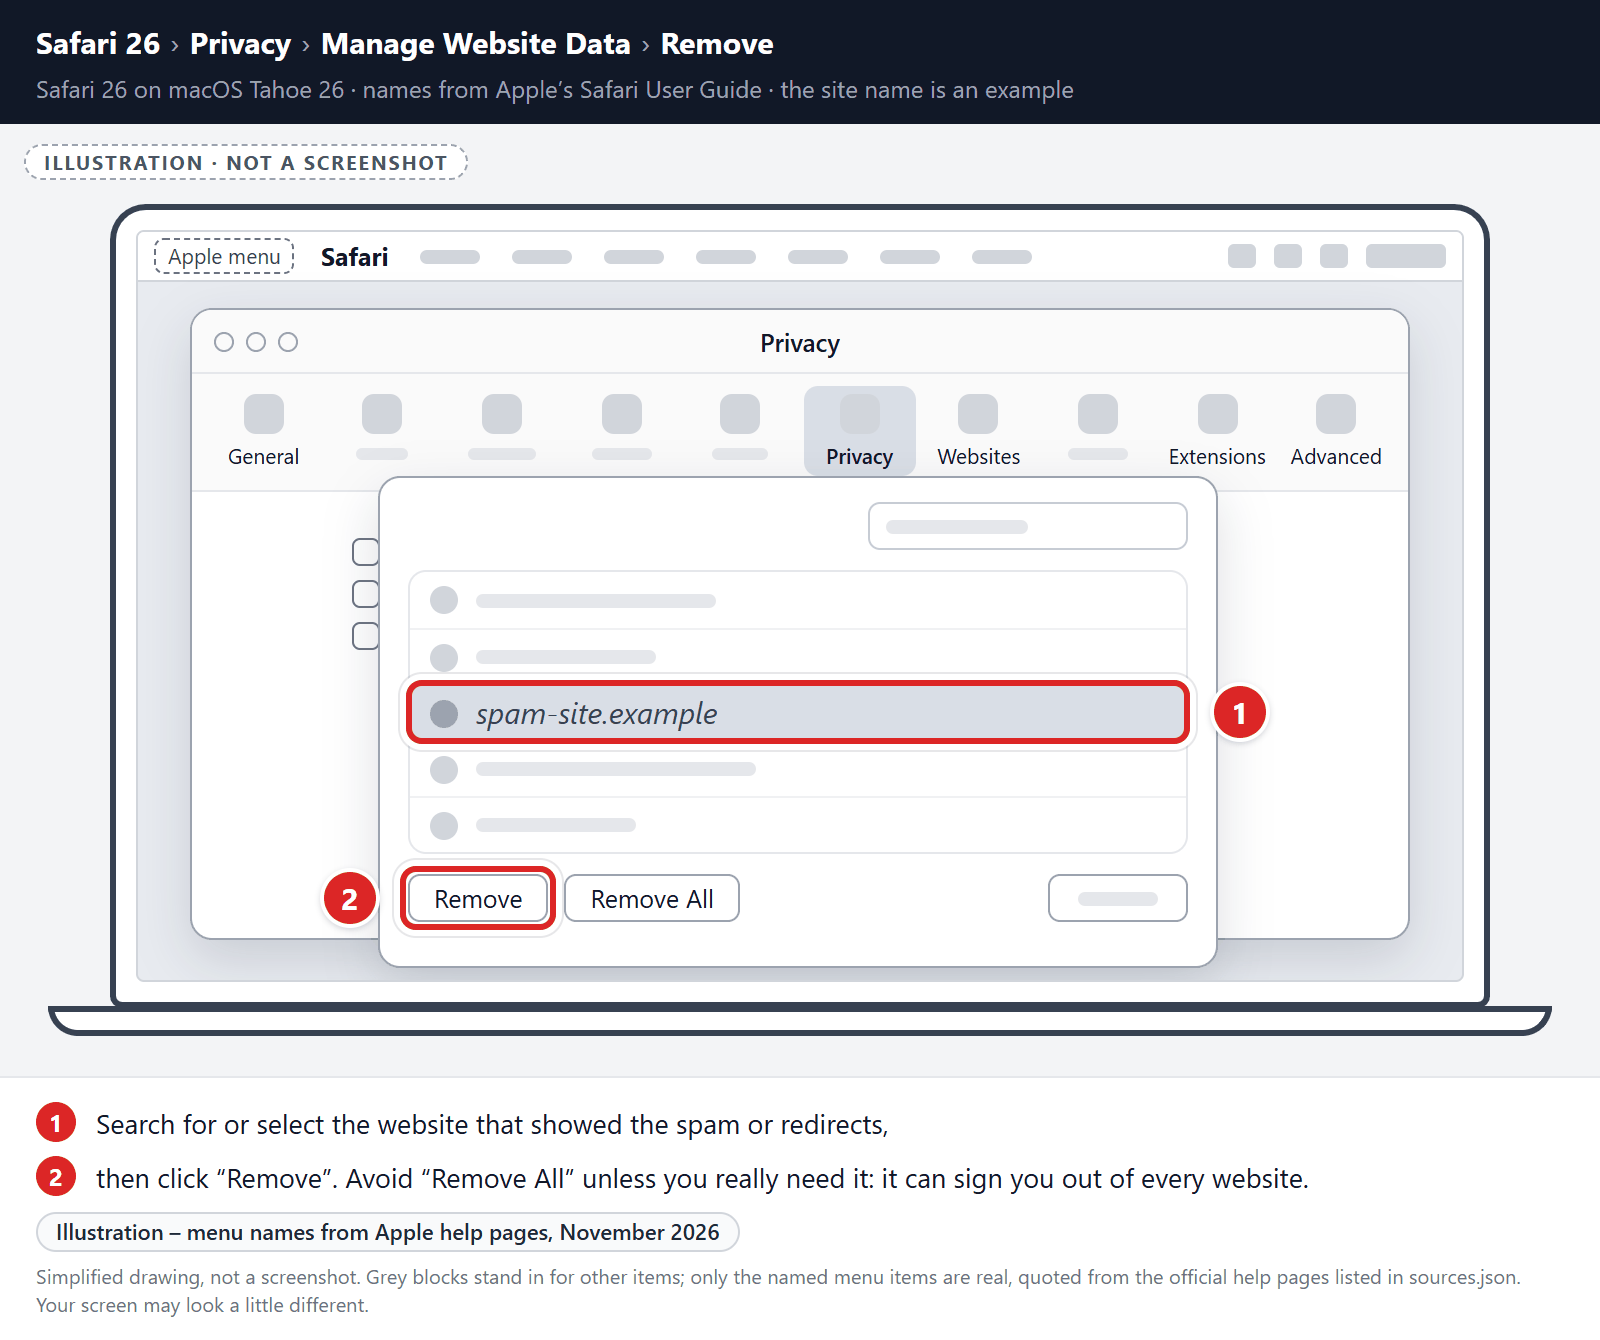
Avoid “Remove All” unless you really need it. It deletes the data of every website and can sign you out of all of them.
-
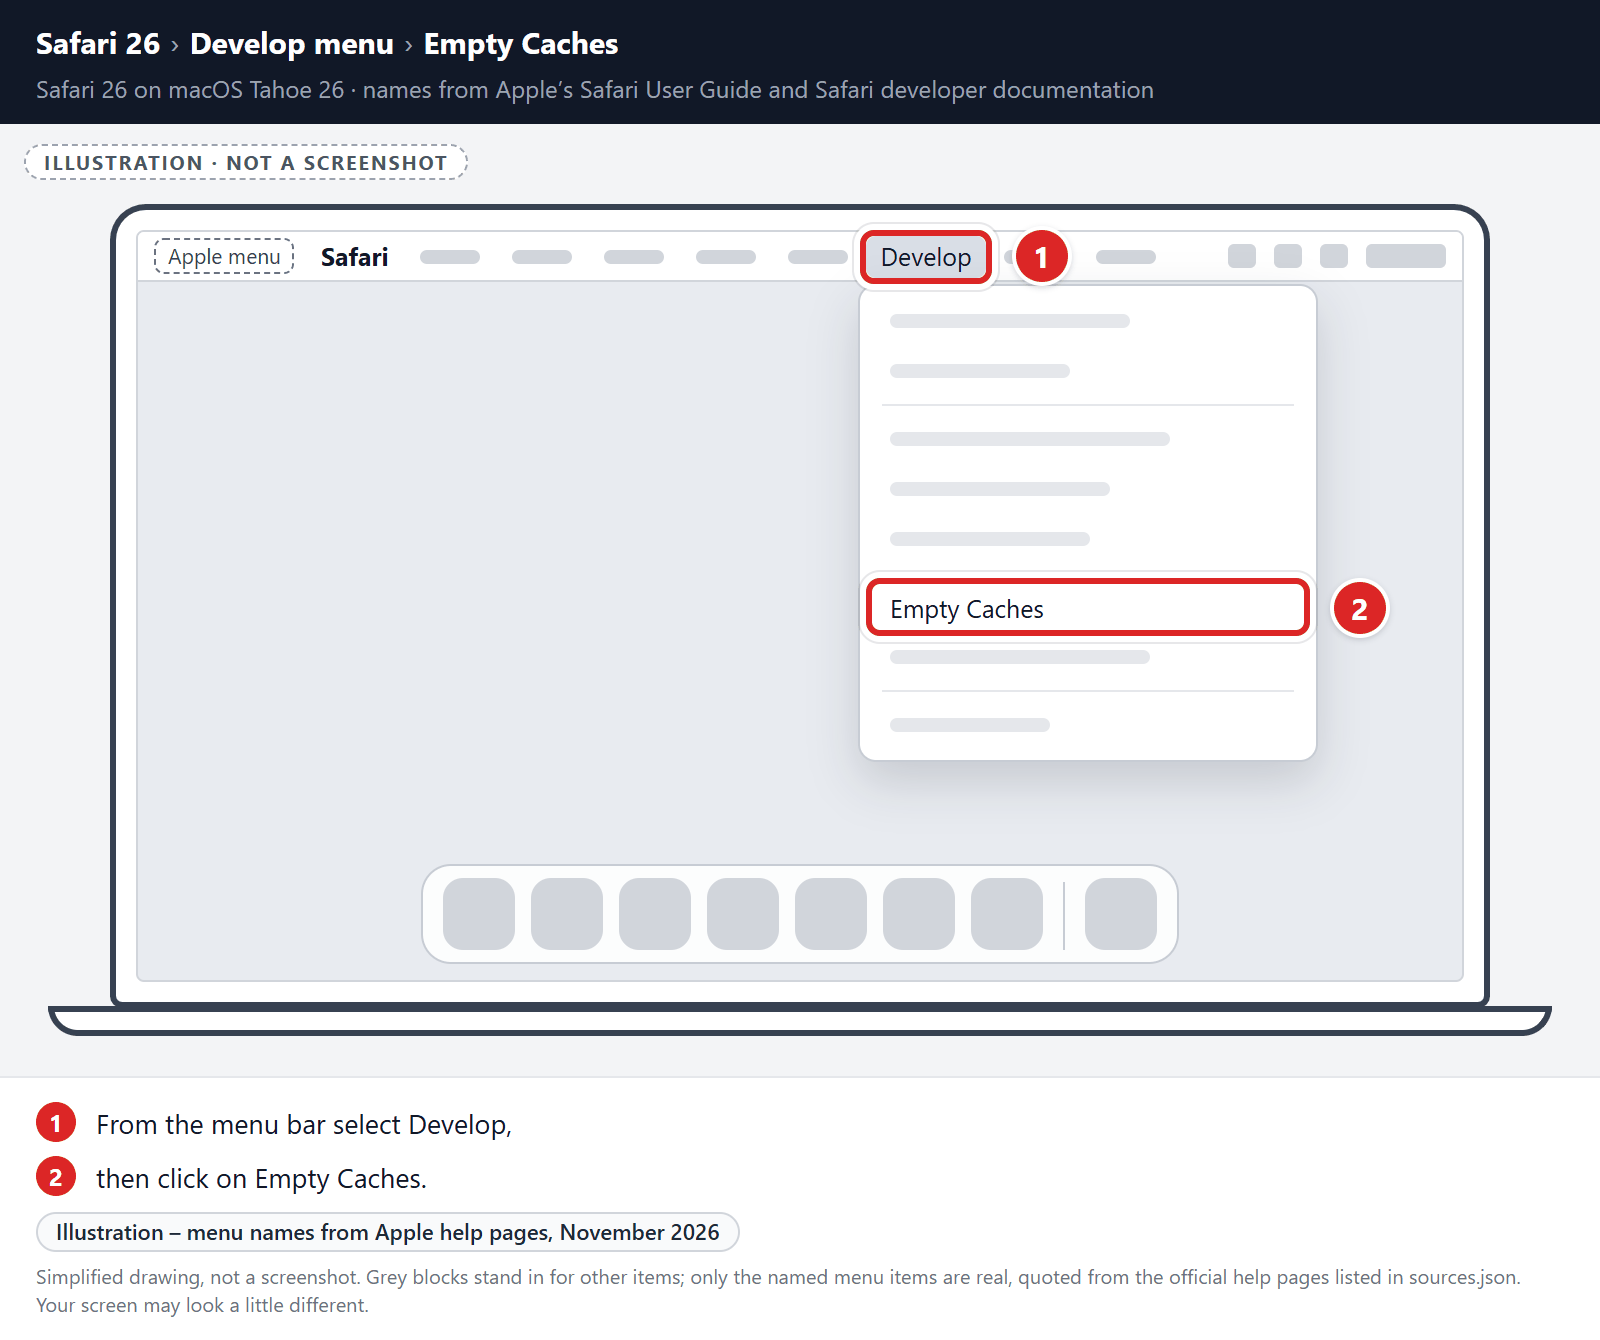
Empty Safari Caches.
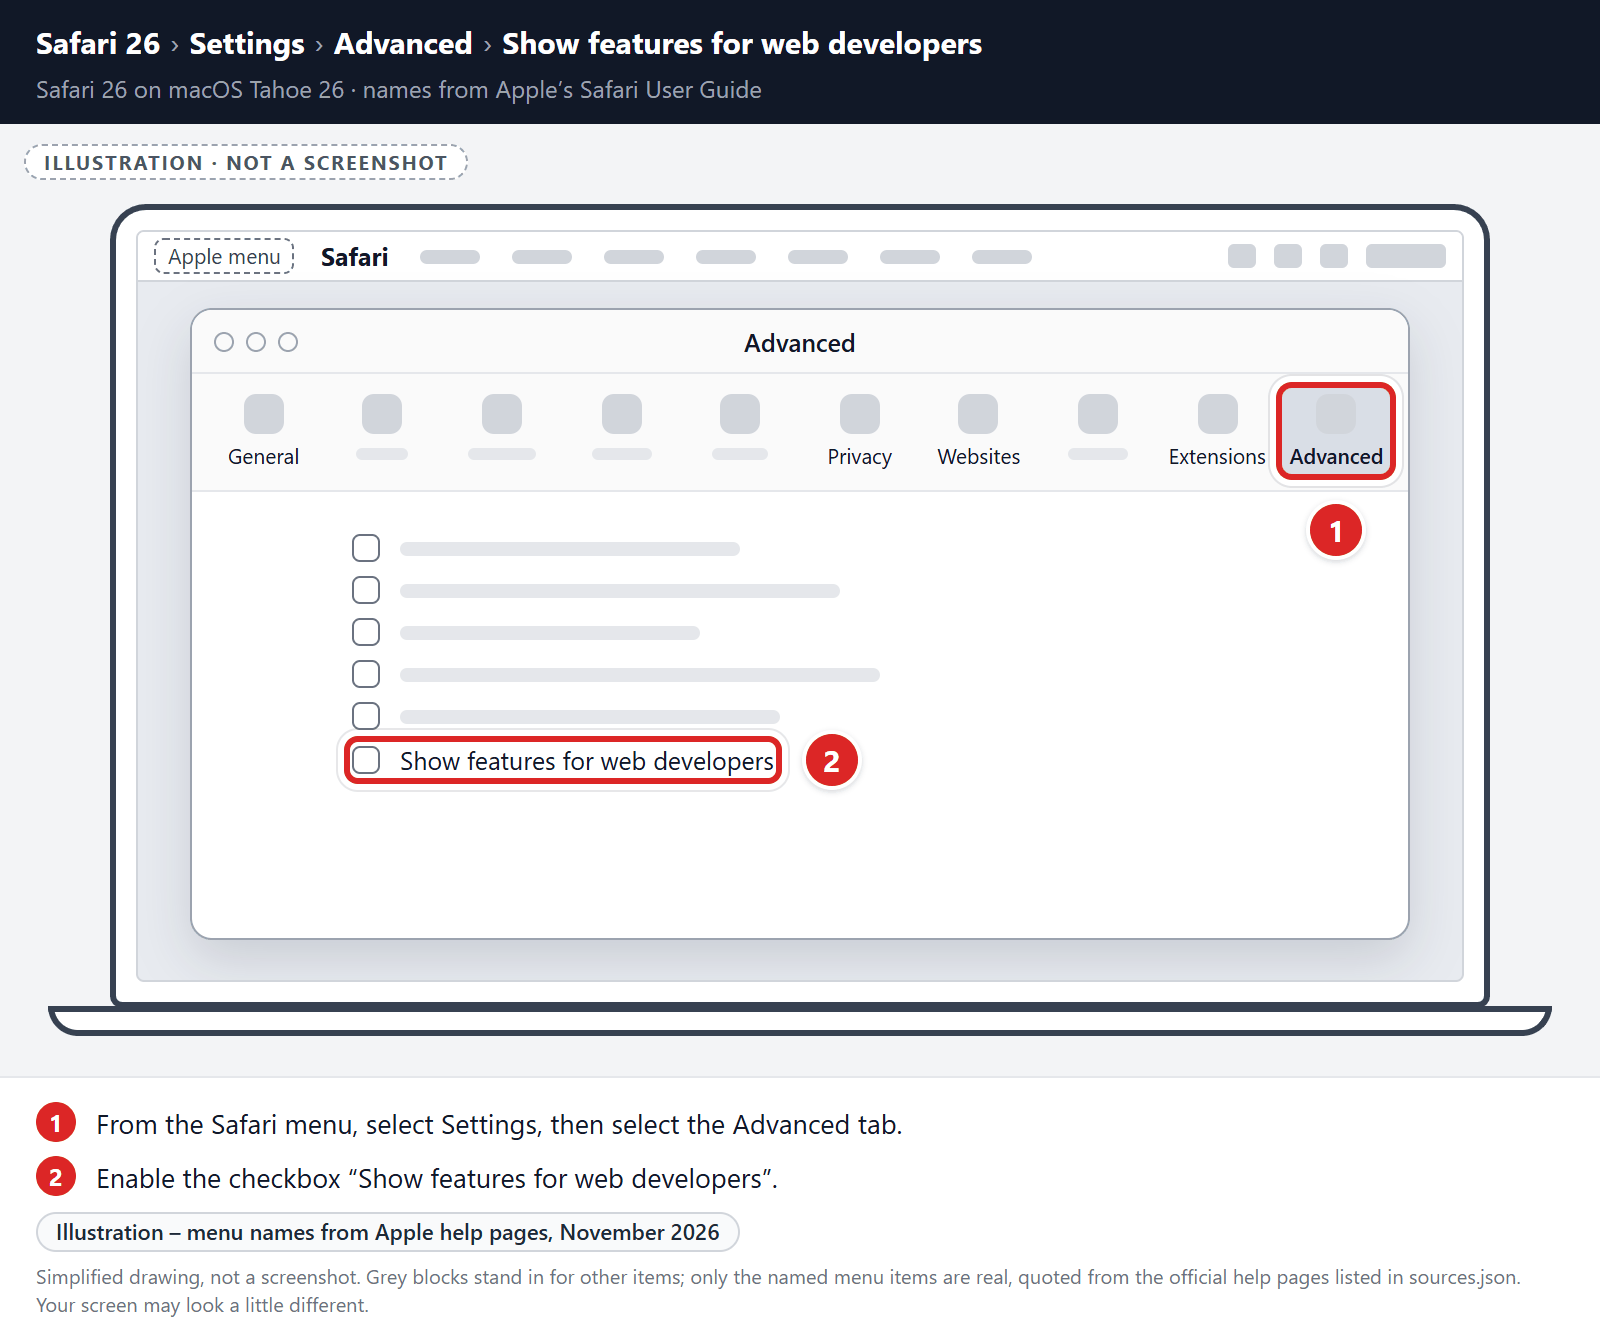
From your Safari menu bar, click Safari and select Settings, then select the Advanced tab. Enable the checkbox “Show features for web developers“. In older versions of Safari, this checkbox is called “Show Develop menu in menu bar”.
From the menu bar select Develop, then click on Empty Caches as seen in the image below.
Remove malware from Chrome for Mac
To remove malware from Chrome for Mac we will reset the browser settings to their defaults. This restores the default search engine, homepage, new tab page, and pinned tabs. It also resets site permissions, clears cookies and site data, and turns off your extensions and themes. Your bookmarks and saved passwords are not deleted. If you’re signed in to Chrome, the reset applies on all devices where you’re signed in.
-
Click on the three dots at the top right and go to Settings.
Click on Chrome’s main menu button, represented by three dots at the top right corner. Now click on the menu option labeled Settings, which will open the basic settings screen, as shown by the numbered box in the picture below.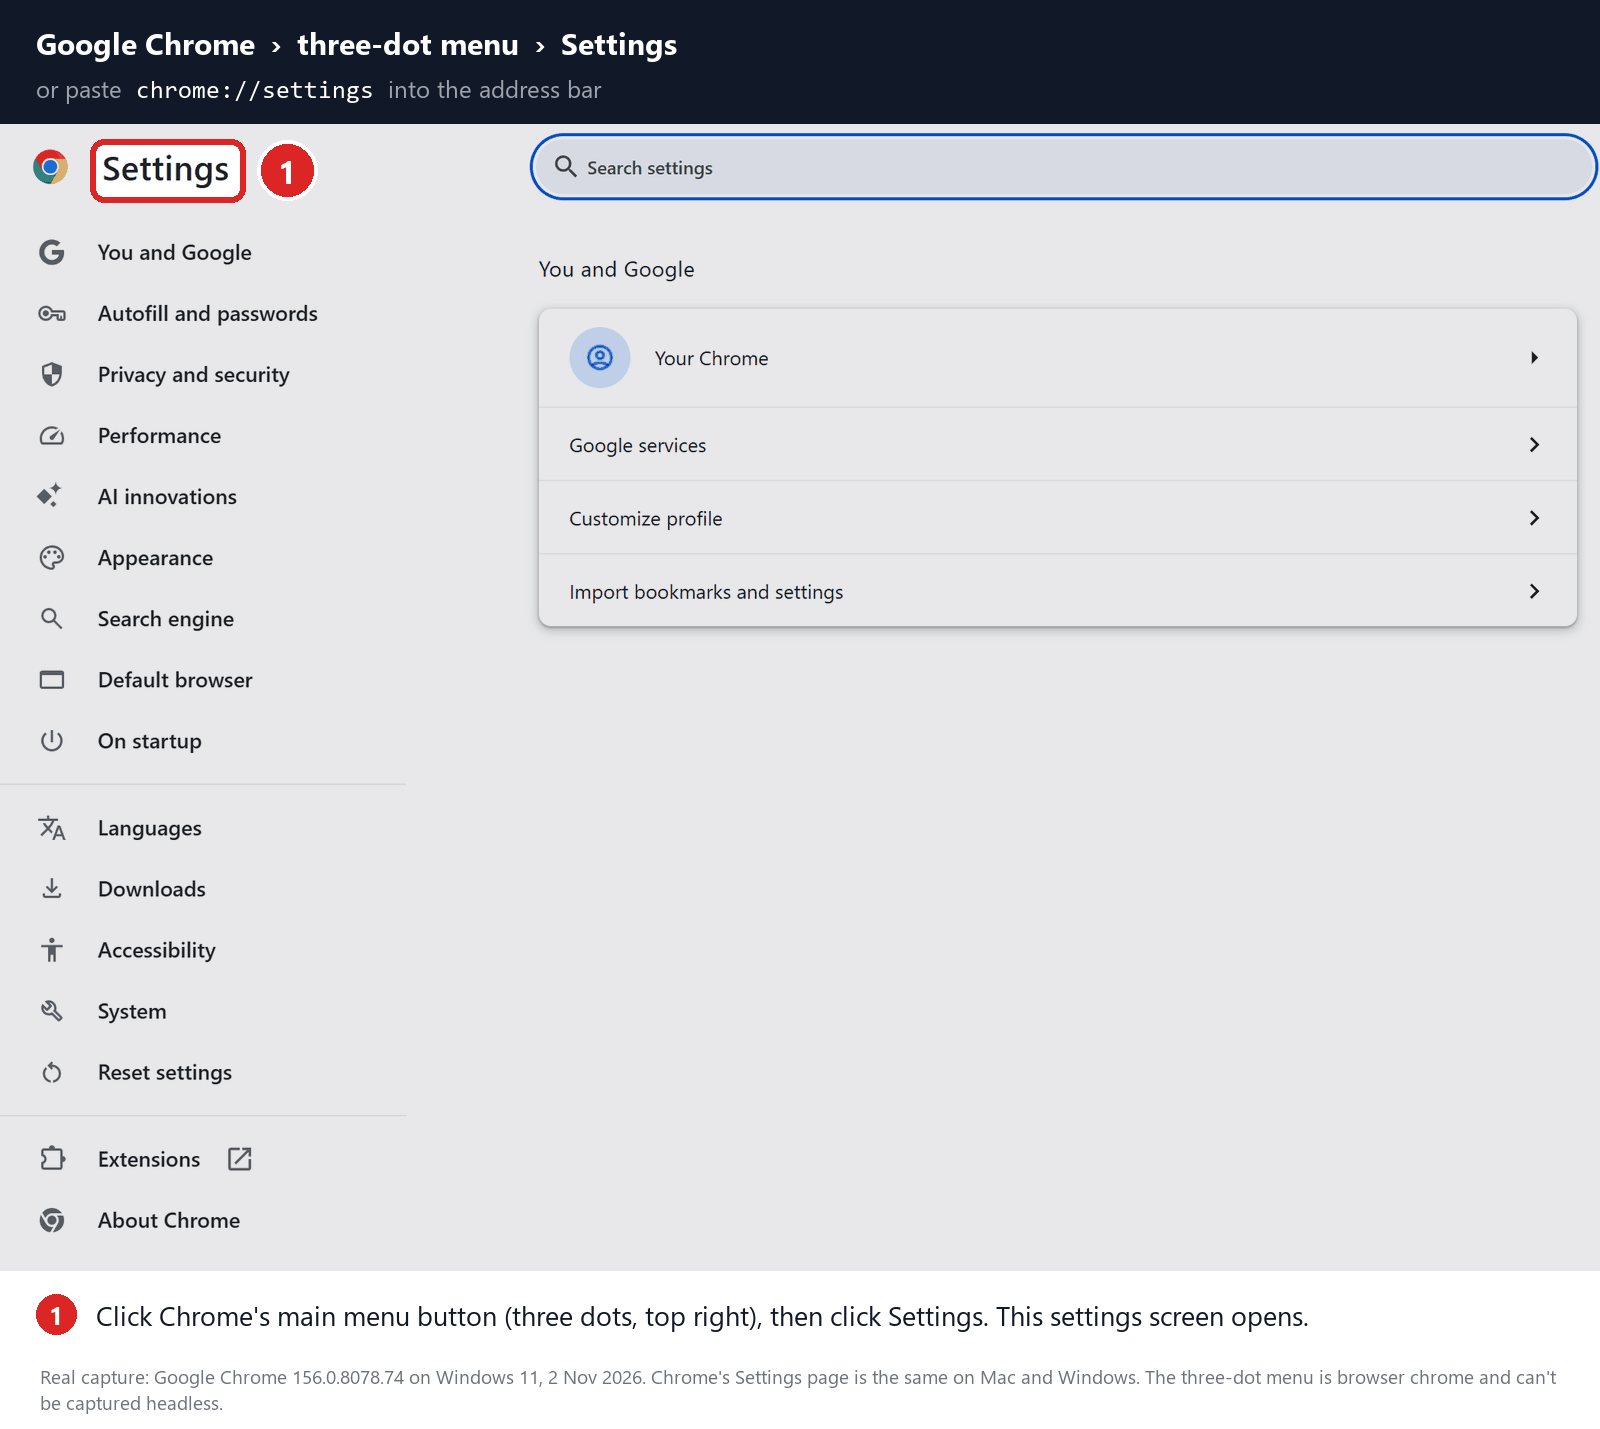
-
In the left sidebar, click on the “Reset settings” option.
In the left sidebar, click on “Reset settings“.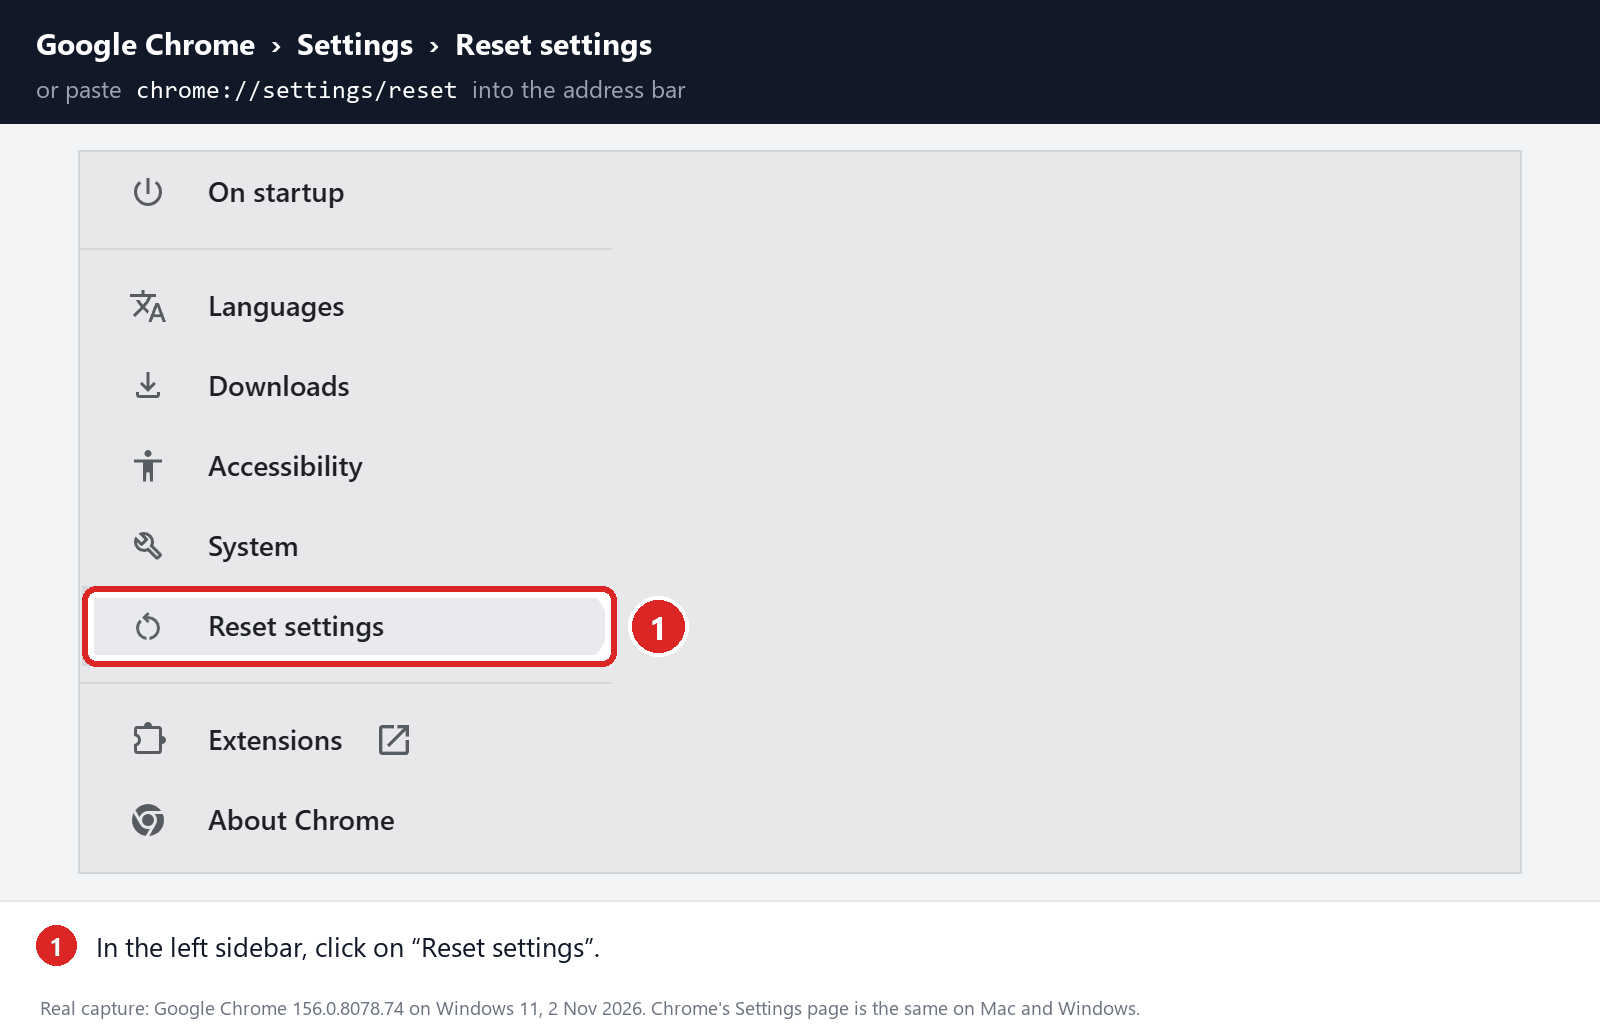
-
Click “Restore settings to their original defaults”.
Now click on “Restore settings to their original defaults” as shown in the image below.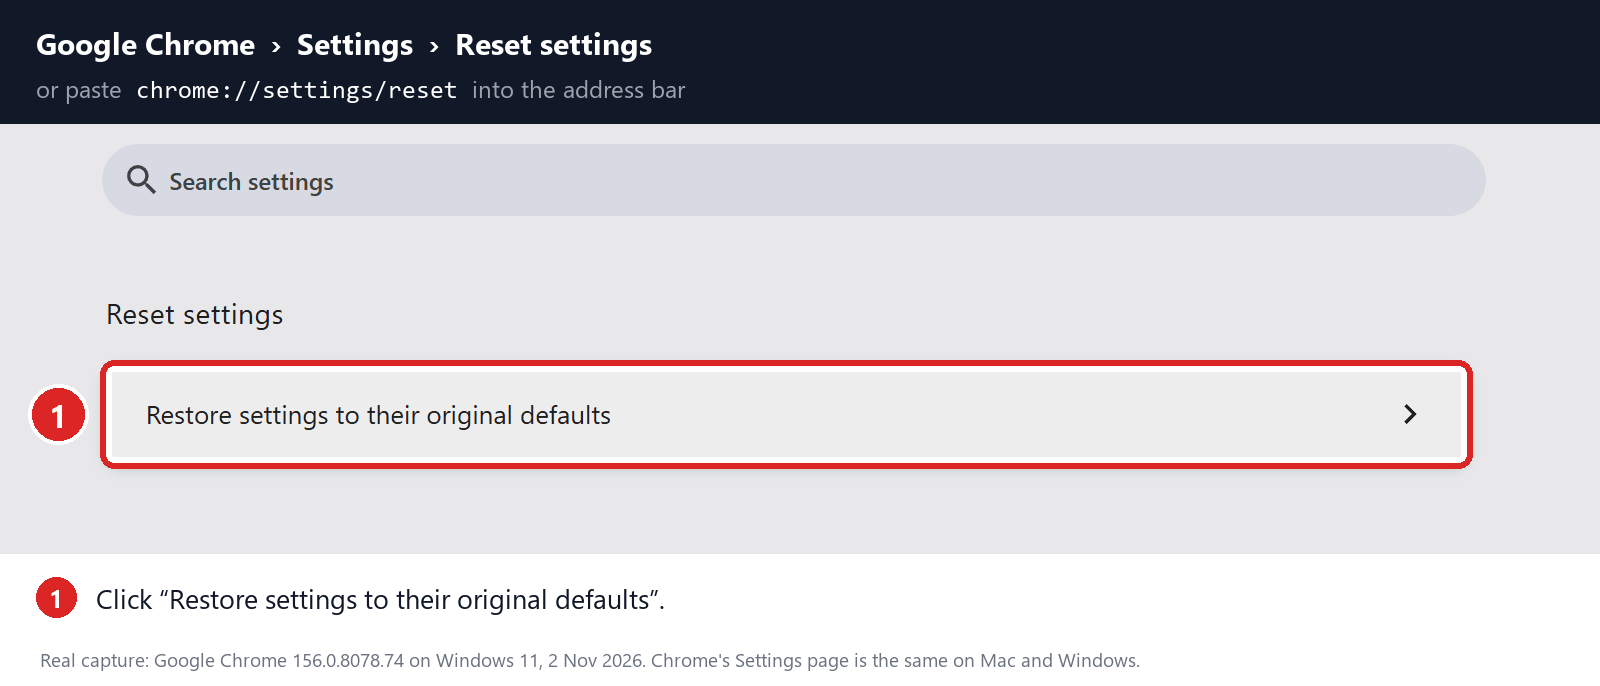
-
Click “Reset settings” button.
A confirmation dialog should now be displayed, detailing the components that will be restored to their default state should you continue with the reset process. To complete the restoration process, click on the “Reset settings” button.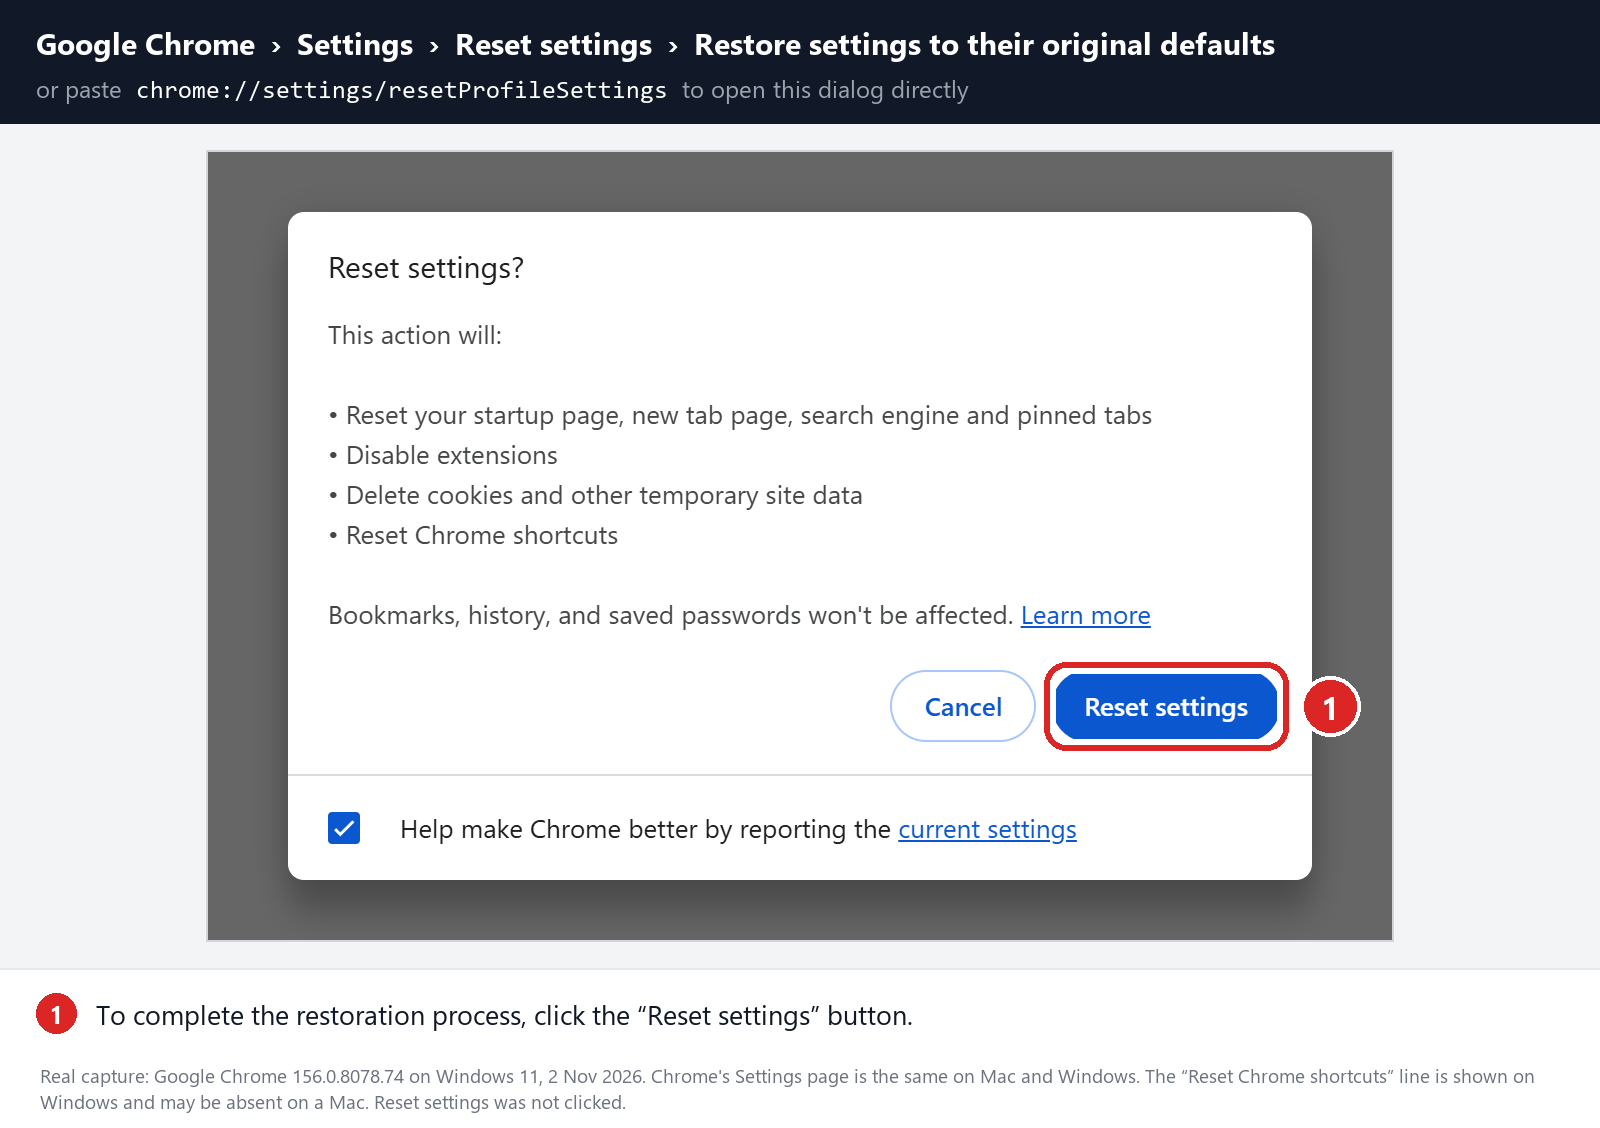
-
(Optional) Stop sync from bringing the problem back.
If a malicious extension or setting comes back after the reset, Chrome sync may be restoring it from your Google Account. Open Chrome Settings > You and Google. If you see Sync and Google services > Manage what you sync, choose Customize sync and turn off Settings and Extensions. In newer versions of Chrome, click your account name, then Choose what to save in your Google Account, and turn off the same two items. Then remove the unwanted extension again.Don’t use the “Delete data” or “Clear data” option on your Google Account’s Chrome data page to fix this. It deletes the Chrome data saved in your Google Account, such as synced bookmarks, passwords, and history, and you don’t need it to remove an extension.
Remove malware from Firefox for Mac
To remove malware from Firefox for Mac we will reset the browser settings to its default. The reset feature fixes many issues by restoring Firefox to its factory default state while saving your essential information like bookmarks, passwords, web form auto-fill information, browsing history, and open tabs.
-
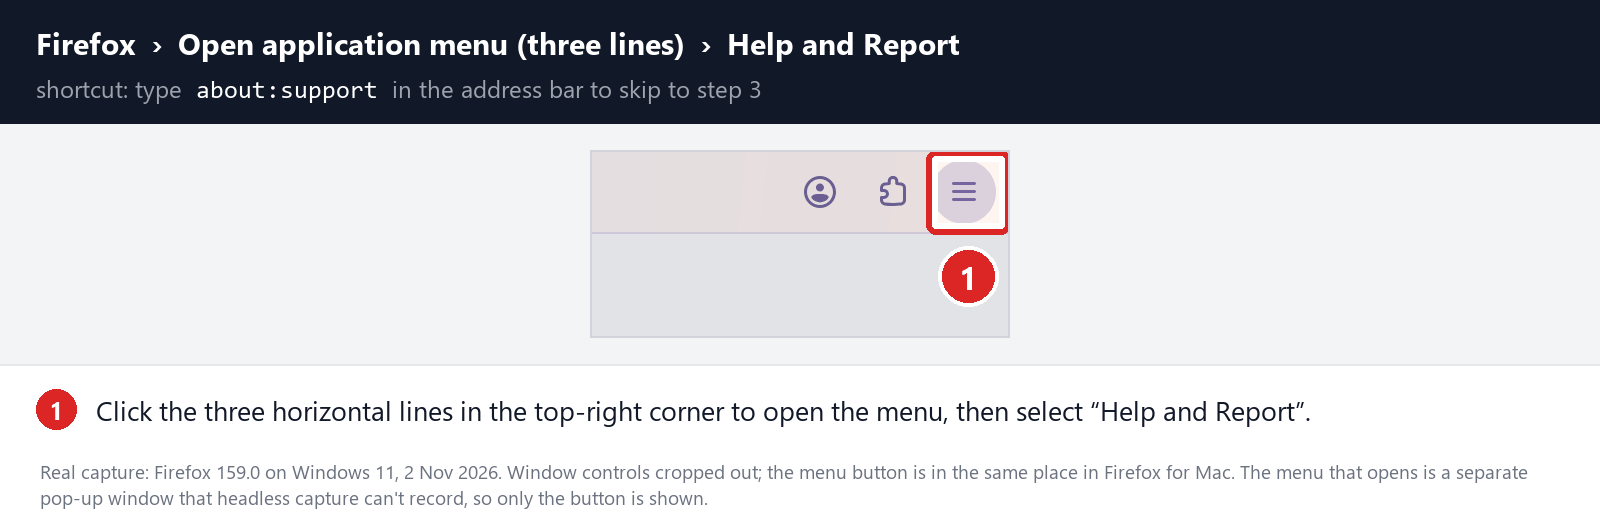
Go to the “Help and Report” menu.
Click on Firefox’s main menu button, represented by three horizontal lines. When the drop-down menu appears, select the option labeled “Help and Report“.
-
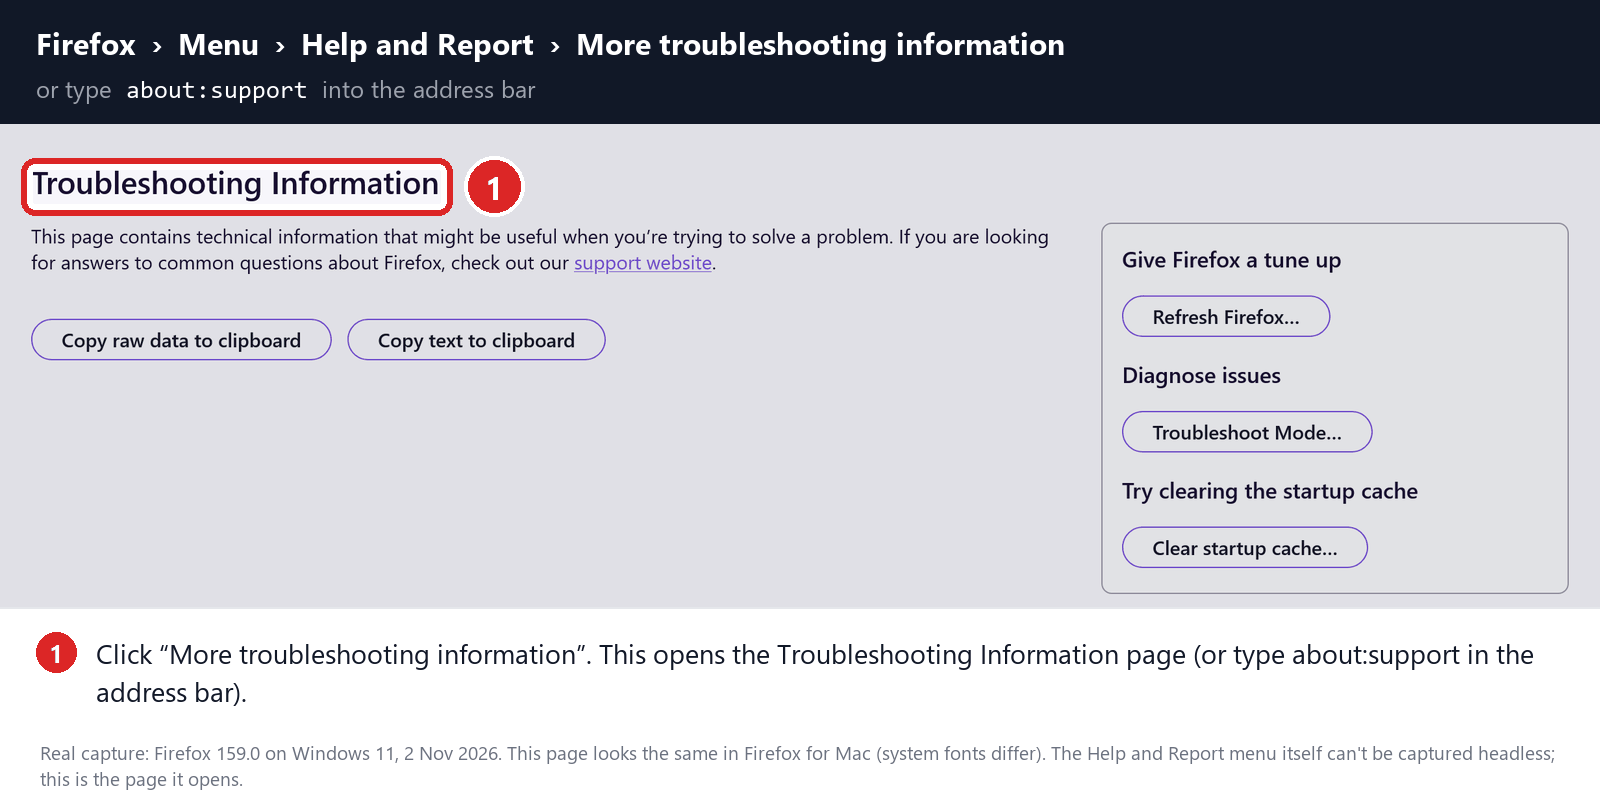
Click “More troubleshooting information”.
Next click on the “More troubleshooting information” option. This opens the Troubleshooting Information page, as shown by the numbered box in the image below. You can also open it by typing about:support in the address bar.
-
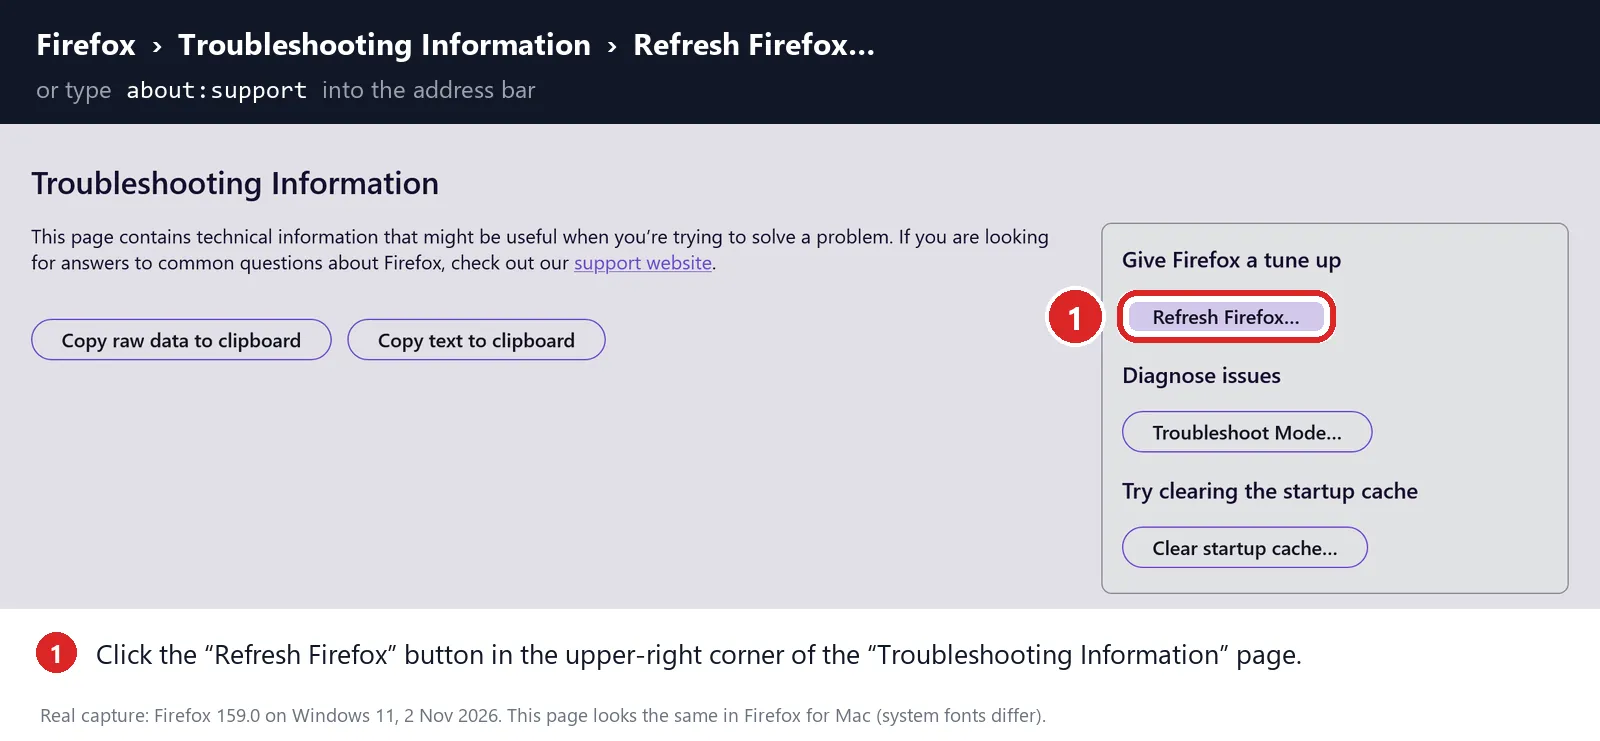
Click on “Refresh Firefox”
Click the “Refresh Firefox” button in the “Give Firefox a tune up” box in the upper-right corner of the “Troubleshooting Information” page.
-
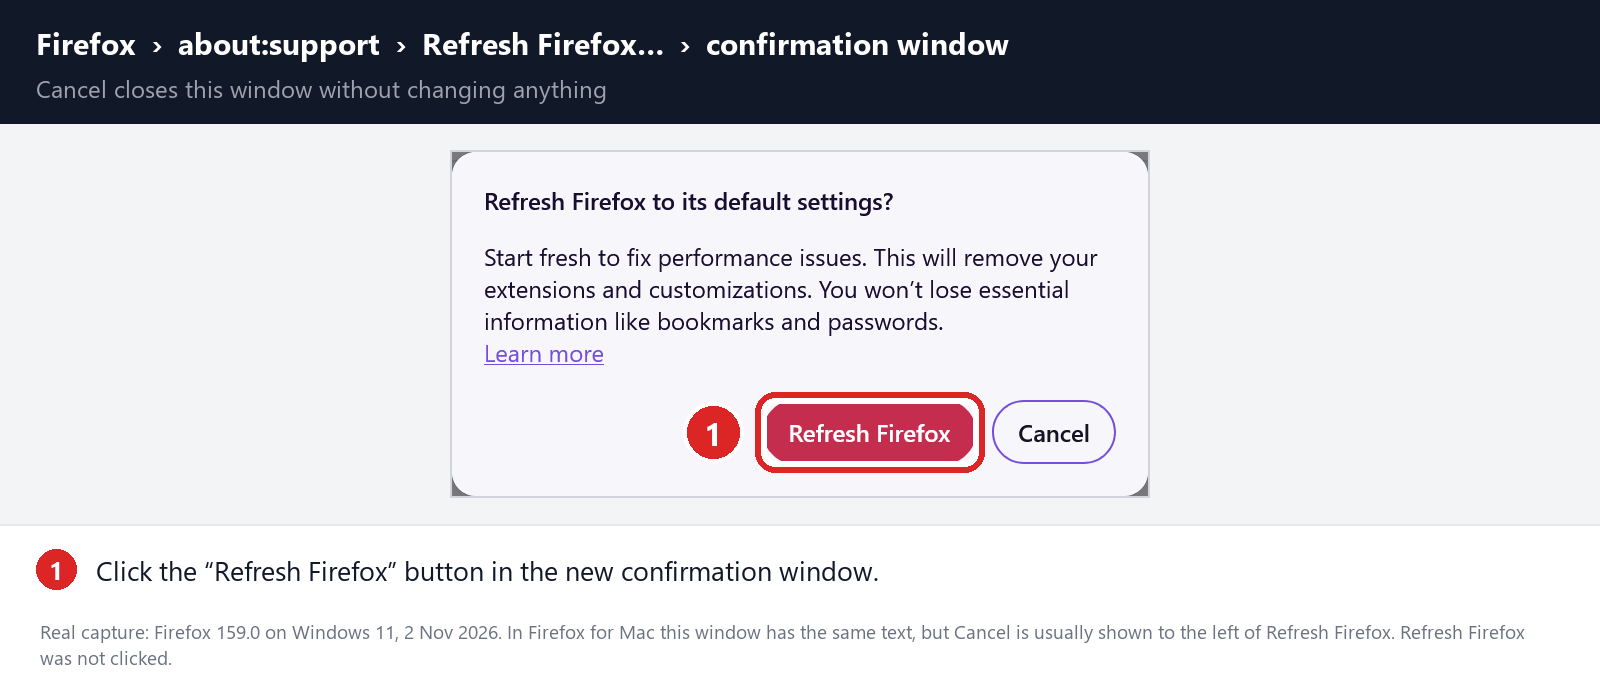
Confirm.
To continue, click on the “Refresh Firefox” button in the new confirmation window that opens.
-
Click on “Finish”.
Firefox will close itself and will revert to its default settings. When it’s done, a window will list the information that was imported. Click on the “Finish“.
STEP 4: Run a scan with Malwarebytes for Mac to remove malware
In this final step, we will scan the computer with Malwarebytes for Mac to find and remove any malicious programs that might be installed on your Mac.
Malwarebytes for Mac is a free on-demand scanner that removes the malware other security software tends to miss — adware, browser hijackers, and unwanted programs included. Cleaning an infected Mac with Malwarebytes has always been completely free, and it’s our go-to recommendation. Follow the steps below to scan your Mac and remove what Malwarebytes finds.
-
Download Malwarebytes for Mac
Click the button below to download the latest version of Malwarebytes for Mac.
Download MalwarebytesOfficial installer for macOS. Your download starts right away.Want real-time protection? See Malwarebytes PremiumMalwarebytes Free for MacScans and removes malware at no cost -
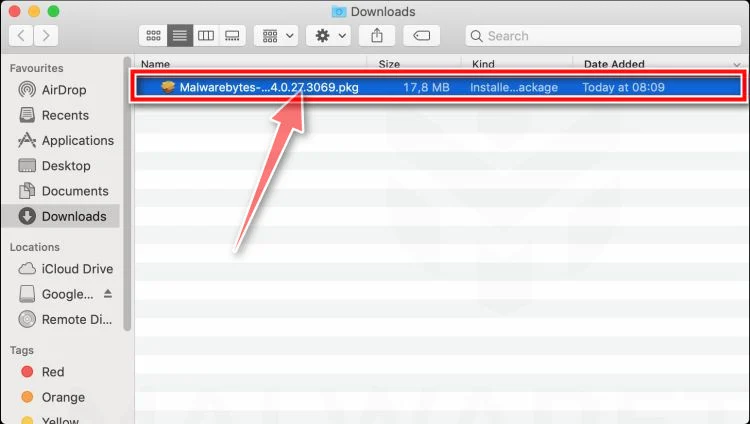
Open the Malwarebytes setup file
When the download finishes, open your Downloads folder and double-click the setup file to begin the installation.
-
Follow the On-Screen Prompts to Install Malwarebytes
The Malwarebytes for Mac Installer will guide you through a few quick screens. Click “Continue” and keep following the prompts until the installation completes.
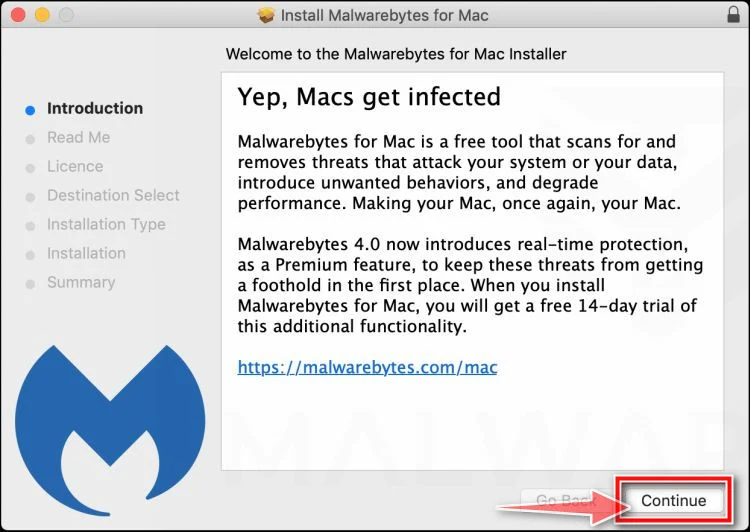
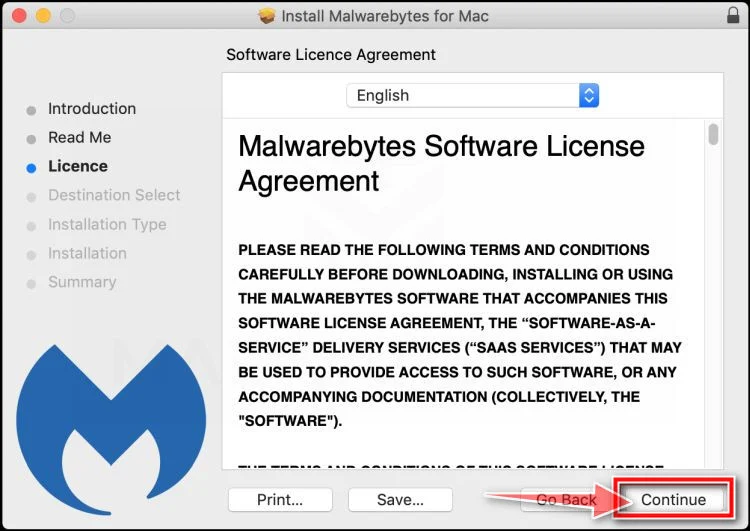
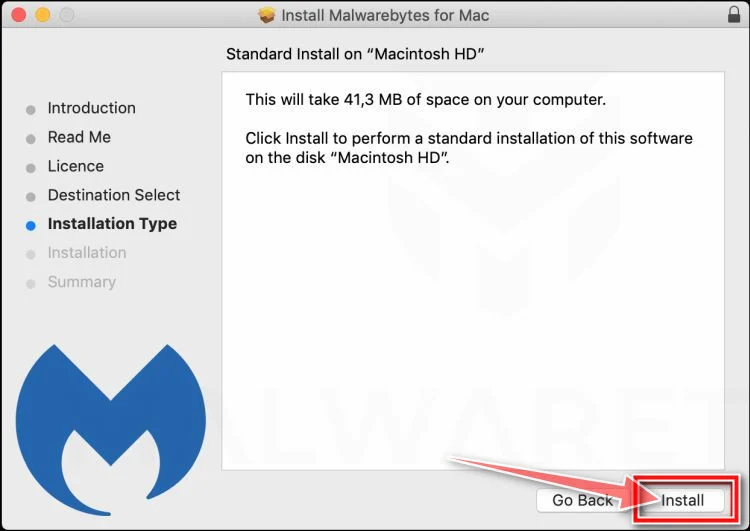
When the installation is complete, Malwarebytes opens to the Welcome to Malwarebytes screen. Click “Get started“.
Malwarebytes needs Full Disk Access to check your whole Mac. When it asks, open System Settings > Privacy & Security > Full Disk Access, turn on Malwarebytes (it may be listed as Malwarebytes Protection), and confirm with your password or Touch ID. Then return to Malwarebytes. On macOS Monterey and earlier, this setting is in System Preferences > Security & Privacy > Privacy.
-
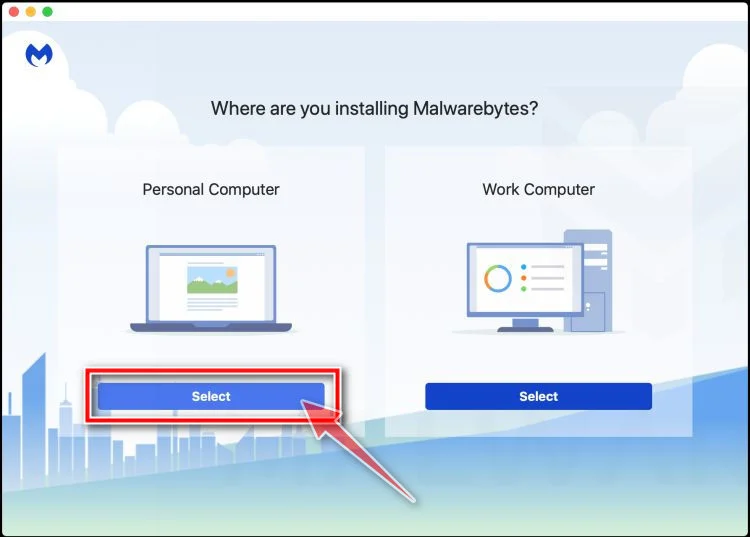
Select “Personal Computer” or “Work Computer”
Malwarebytes will ask what type of computer you’re installing it on. Click either Personal Computer or Work Computer, whichever applies.
-
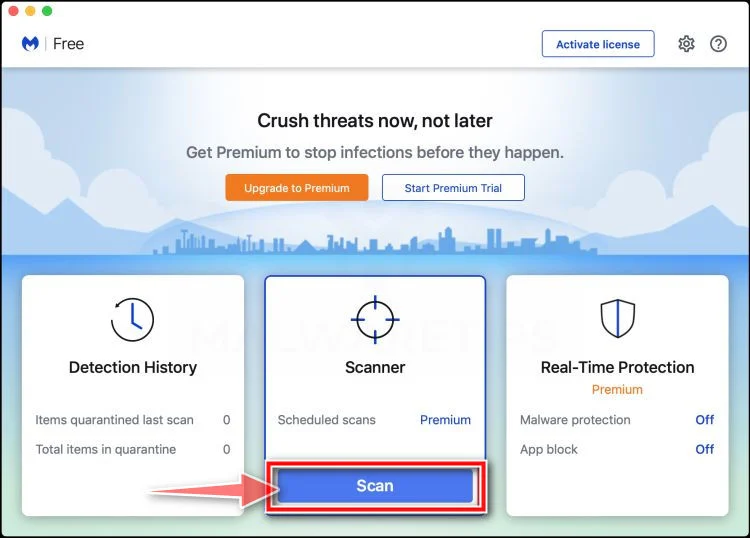
Start the Scan
Click the “Scan” button. Malwarebytes will automatically update its detection database and begin checking your Mac for malware.
-
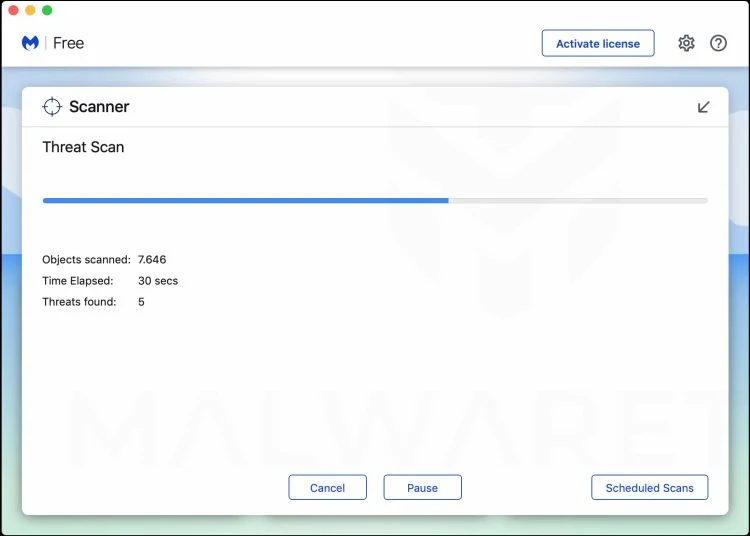
Wait for the Scan to Finish
Malwarebytes will scan your Mac for adware, browser hijackers, and other malicious programs. This can take a few minutes, so feel free to do something else — just check back occasionally to see the progress.
-
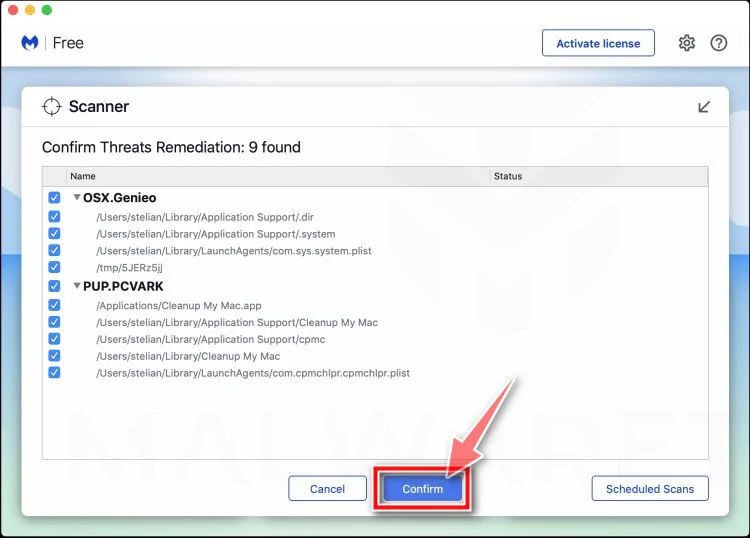
Quarantine the Detected Threats
When the scan is done, you’ll see a list of everything Malwarebytes found. Click the “Quarantine” button to remove all the threats at once.
-
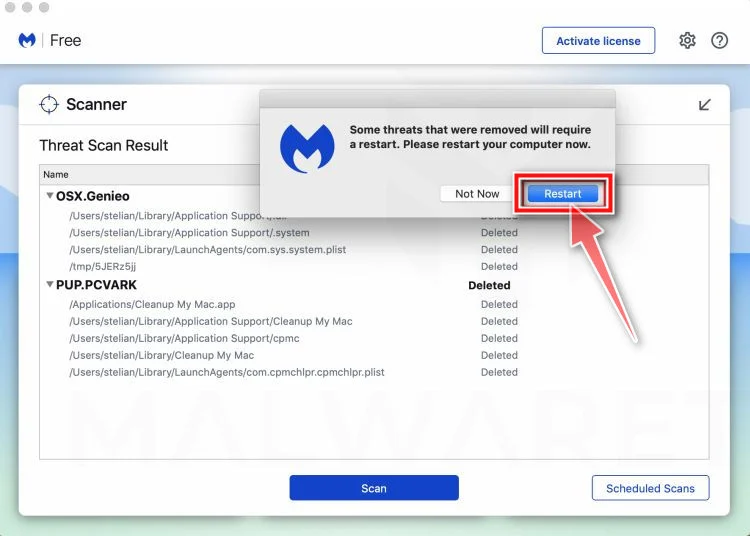
Restart Your Mac
Malwarebytes will now remove all the malicious files it found. Some threats can only be fully removed after a reboot — if Malwarebytes asks you to restart, allow it. Once you’re logged back in, check whether the problems you noticed have stopped. If they come back, save the scan report and ask for help in our forum.
When you’ve finished these steps, check whether the problems you noticed have stopped. If they continue, see the options below.
If you are still experiencing problems while trying to remove a malicious program from your computer, please ask for help in our Mac Malware Removal Help & Support forum.
Remove Unwanted Apps and Malware from Android
- STEP 1: Uninstall malicious apps
- STEP 2: Stop spam notifications and redirects in your browser
- STEP 3: Use Malwarebytes for Android to remove malicious apps
STEP 1: Uninstall malicious apps
In this first step, we will check if any malicious apps are installed on your phone. Sometimes browser hijackers or adware apps can have usable Uninstall entries that can be used to remove these apps.
-
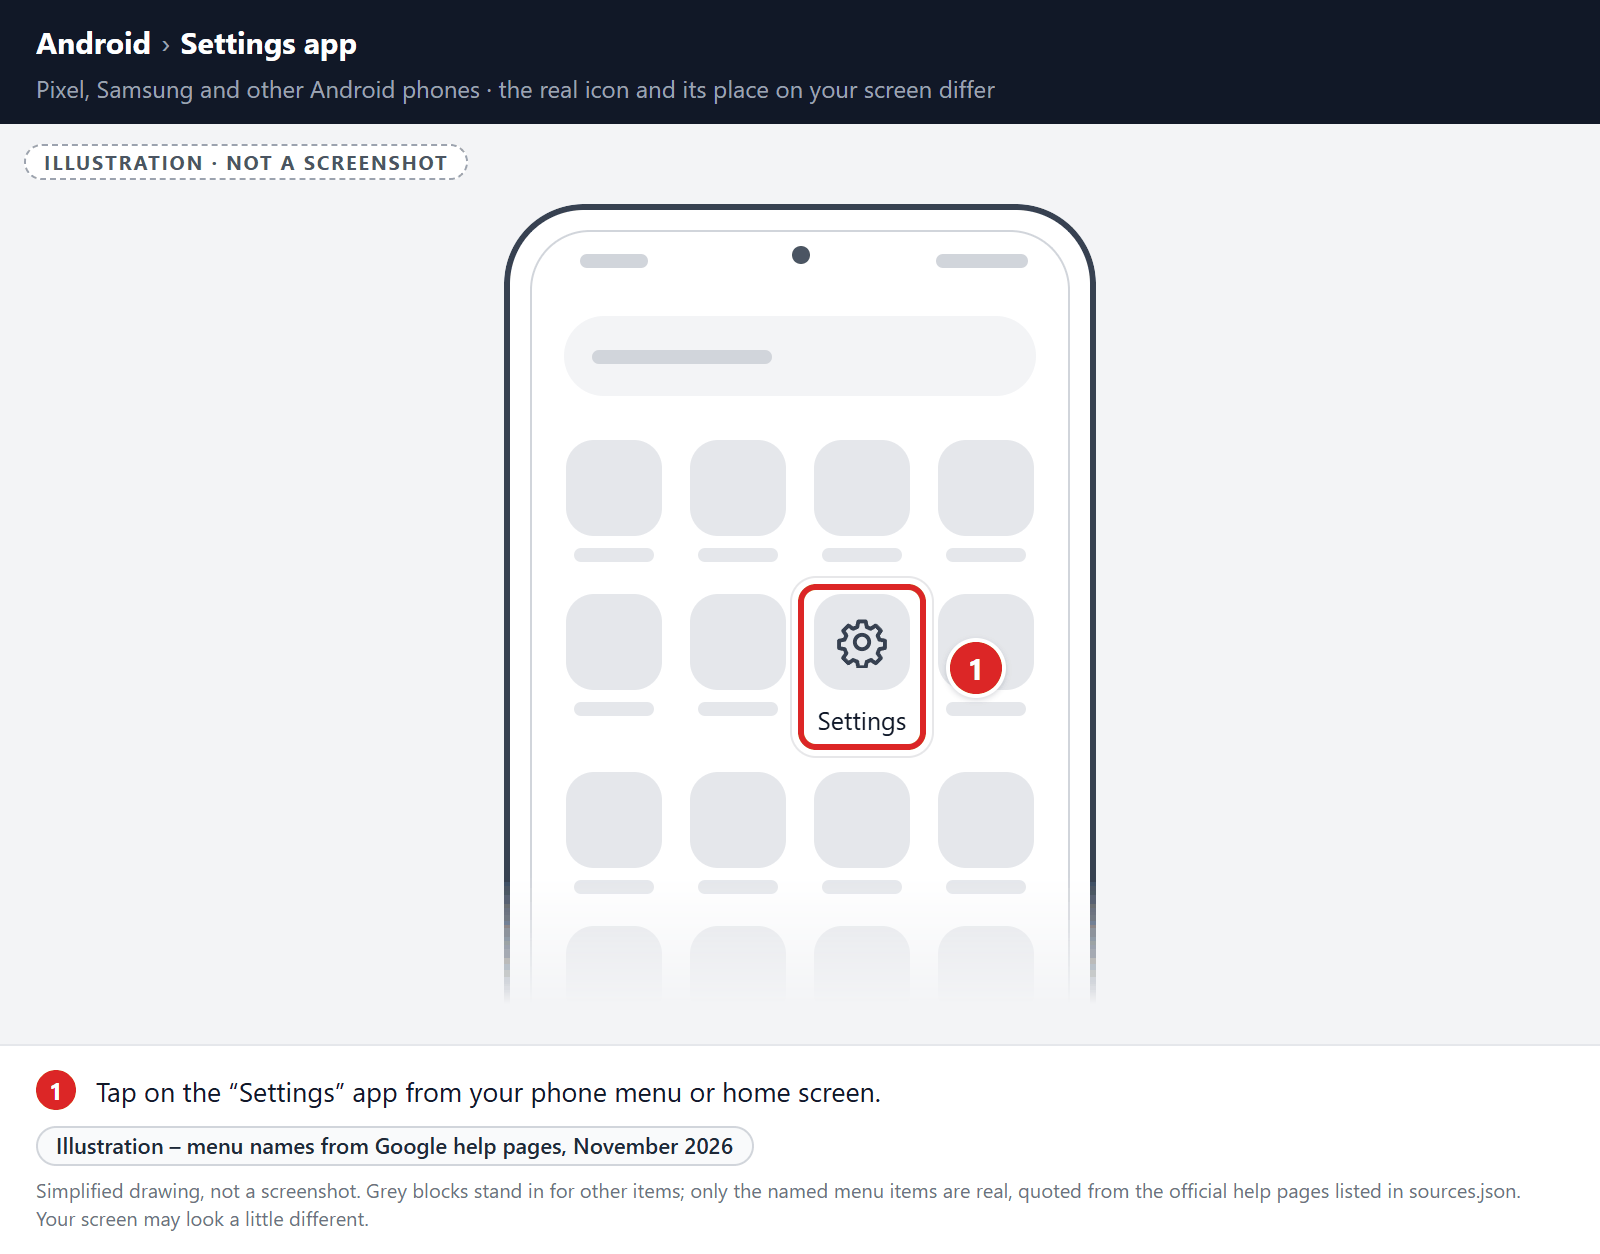
Open the “Settings” menu.
Tap on the “Settings” app from your phone menu or home screen.
-
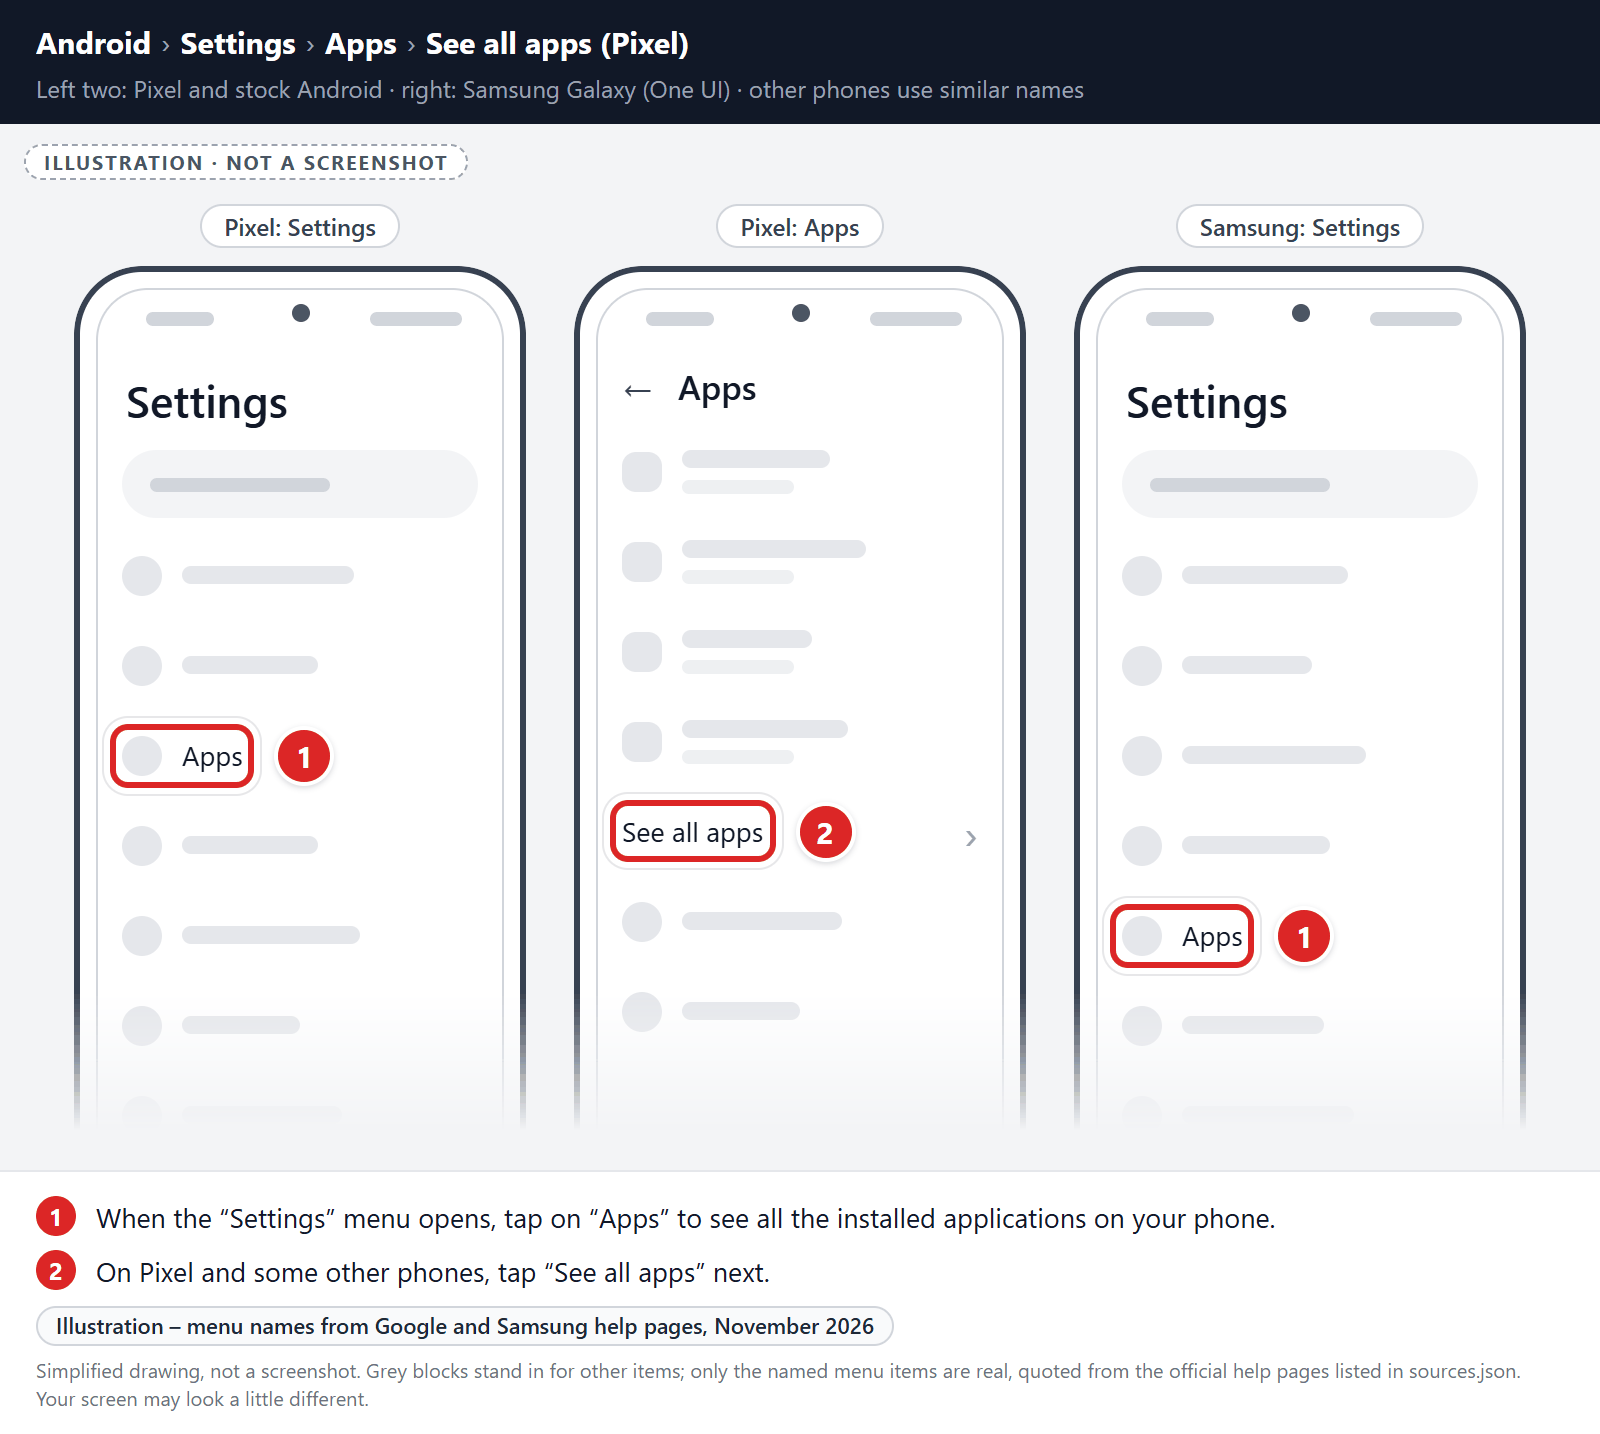
Tap on “Apps”.
When the “Settings” menu opens, tap on “Apps” to see all the installed applications on your phone. On Pixel and some other phones, tap “See all apps” next.
-
Find the malicious app.
The “Apps” screen will be displayed with a list of all the applications that are installed on your phone. Scroll through the list and look out for any suspicious app that could be behind all the drama – anything you don’t remember downloading or that doesn’t sound like a genuine program.
Most often, cyber criminals hide malware inside video or photo editing apps, weather apps, and camera apps.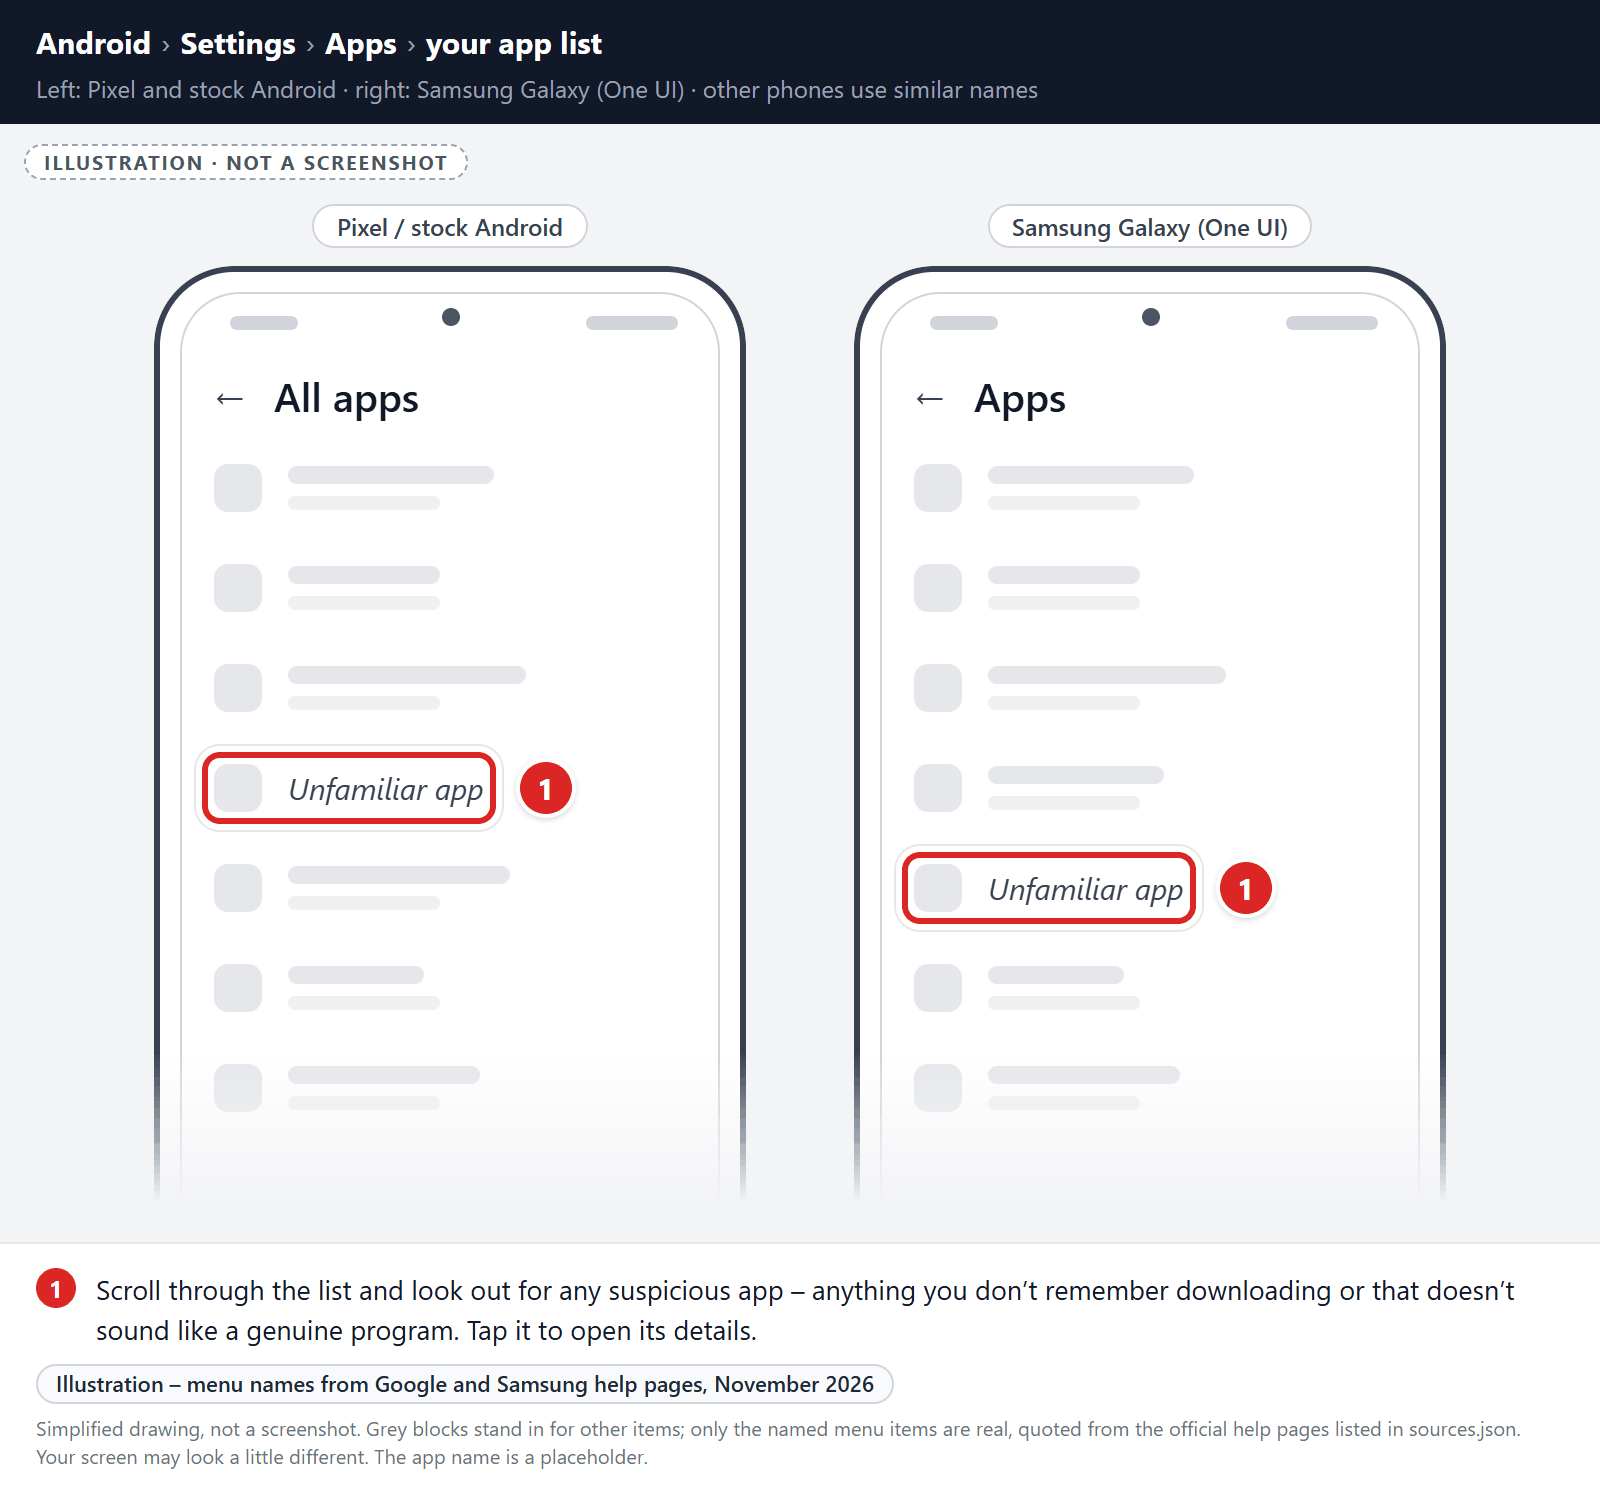
-
Uninstall the malicious app
When you find a suspicious or malicious app, tap on it to uninstall it. This won’t start the app but will open up the app details screen. If the app is currently running press the “Force stop” button, then tap on “Uninstall”.
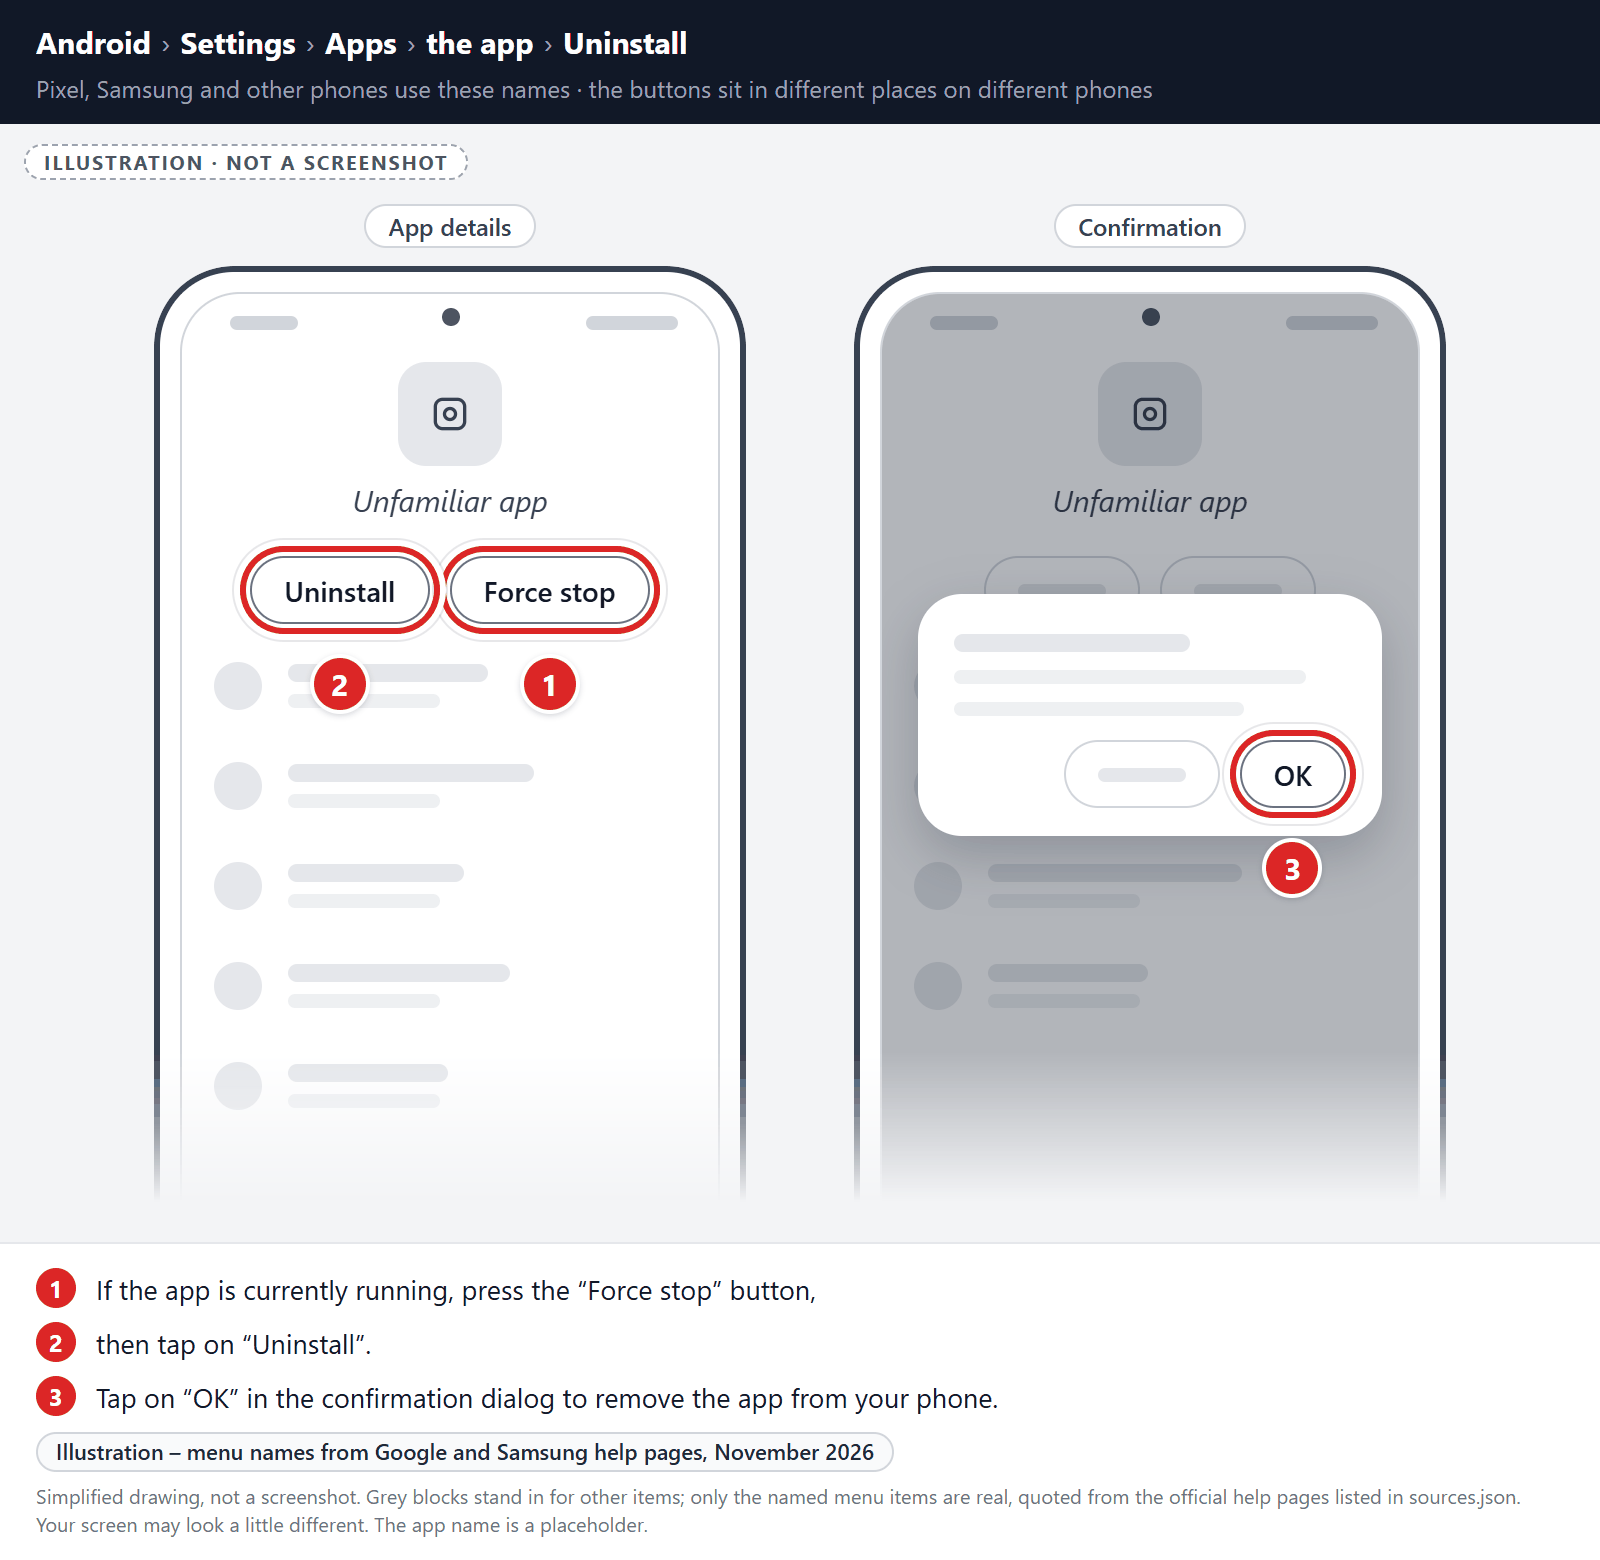
A confirmation dialog should be displayed to confirm you want to uninstall the app, tap on “OK” to remove the malicious app from your phone.
STEP 2: Stop spam notifications and redirects in your browser
In this second step, we will stop spam notifications in your browser. If unwanted pages or redirects still appear after that, we will reset the browser by clearing its app storage. That is a last resort, because it can delete data that isn’t synced.
Android browsers don’t have a single “reset settings” button like browsers on a computer, but they do let you control what each website is allowed to do. Start with the least disruptive fix: block the spam site’s notifications in the browser’s settings. In Chrome, you can also delete cookies and site data: tap More (three dots) > Delete browsing data.
Clear the browser’s app storage only if unwanted pages or redirects keep coming back. It works like a full reset, but it also deletes data that isn’t synced, so treat it as a last resort.
Remove malware from Chrome for Android
First, block the spam site’s notifications:
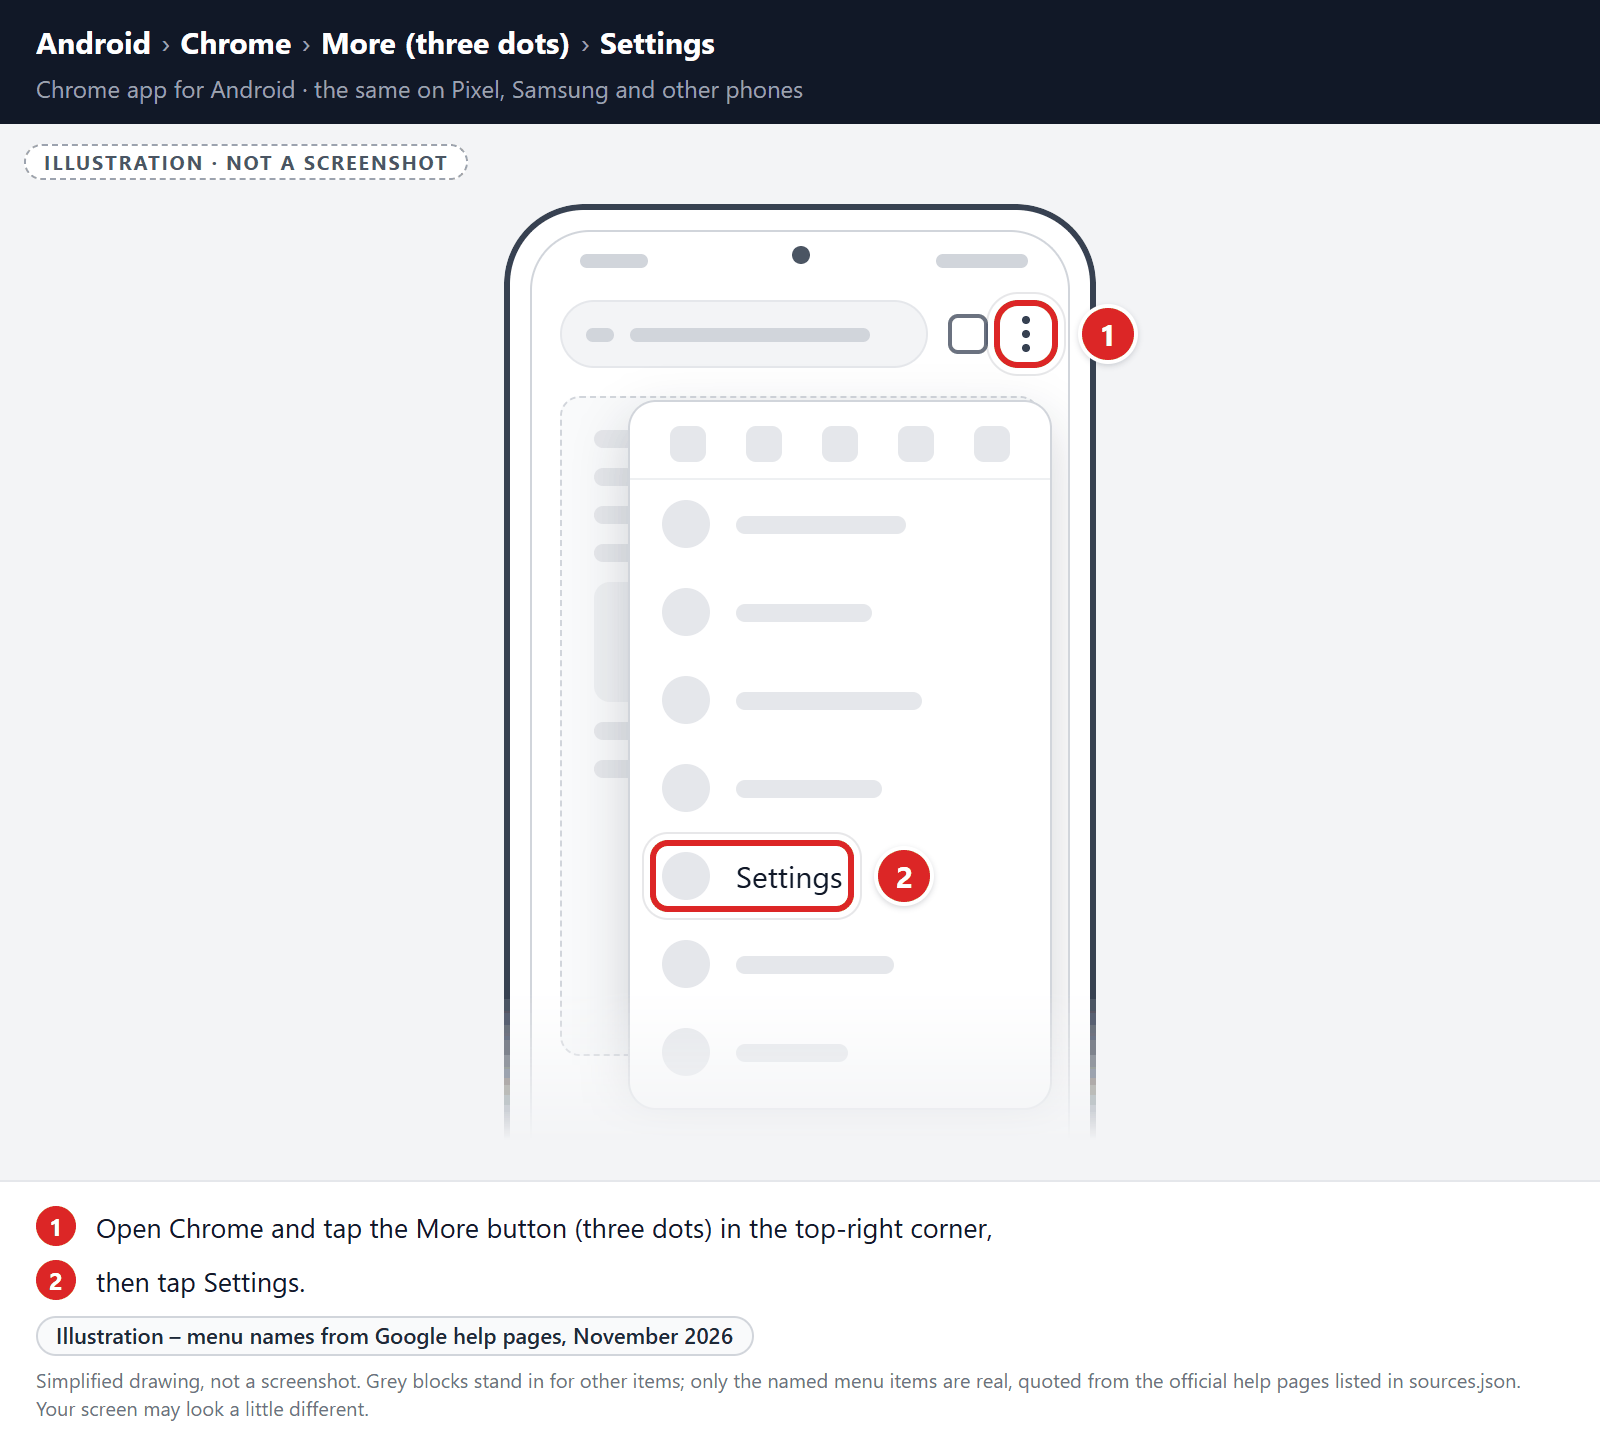
- Open Chrome, tap the More button (three dots) in the top-right corner, and tap Settings.
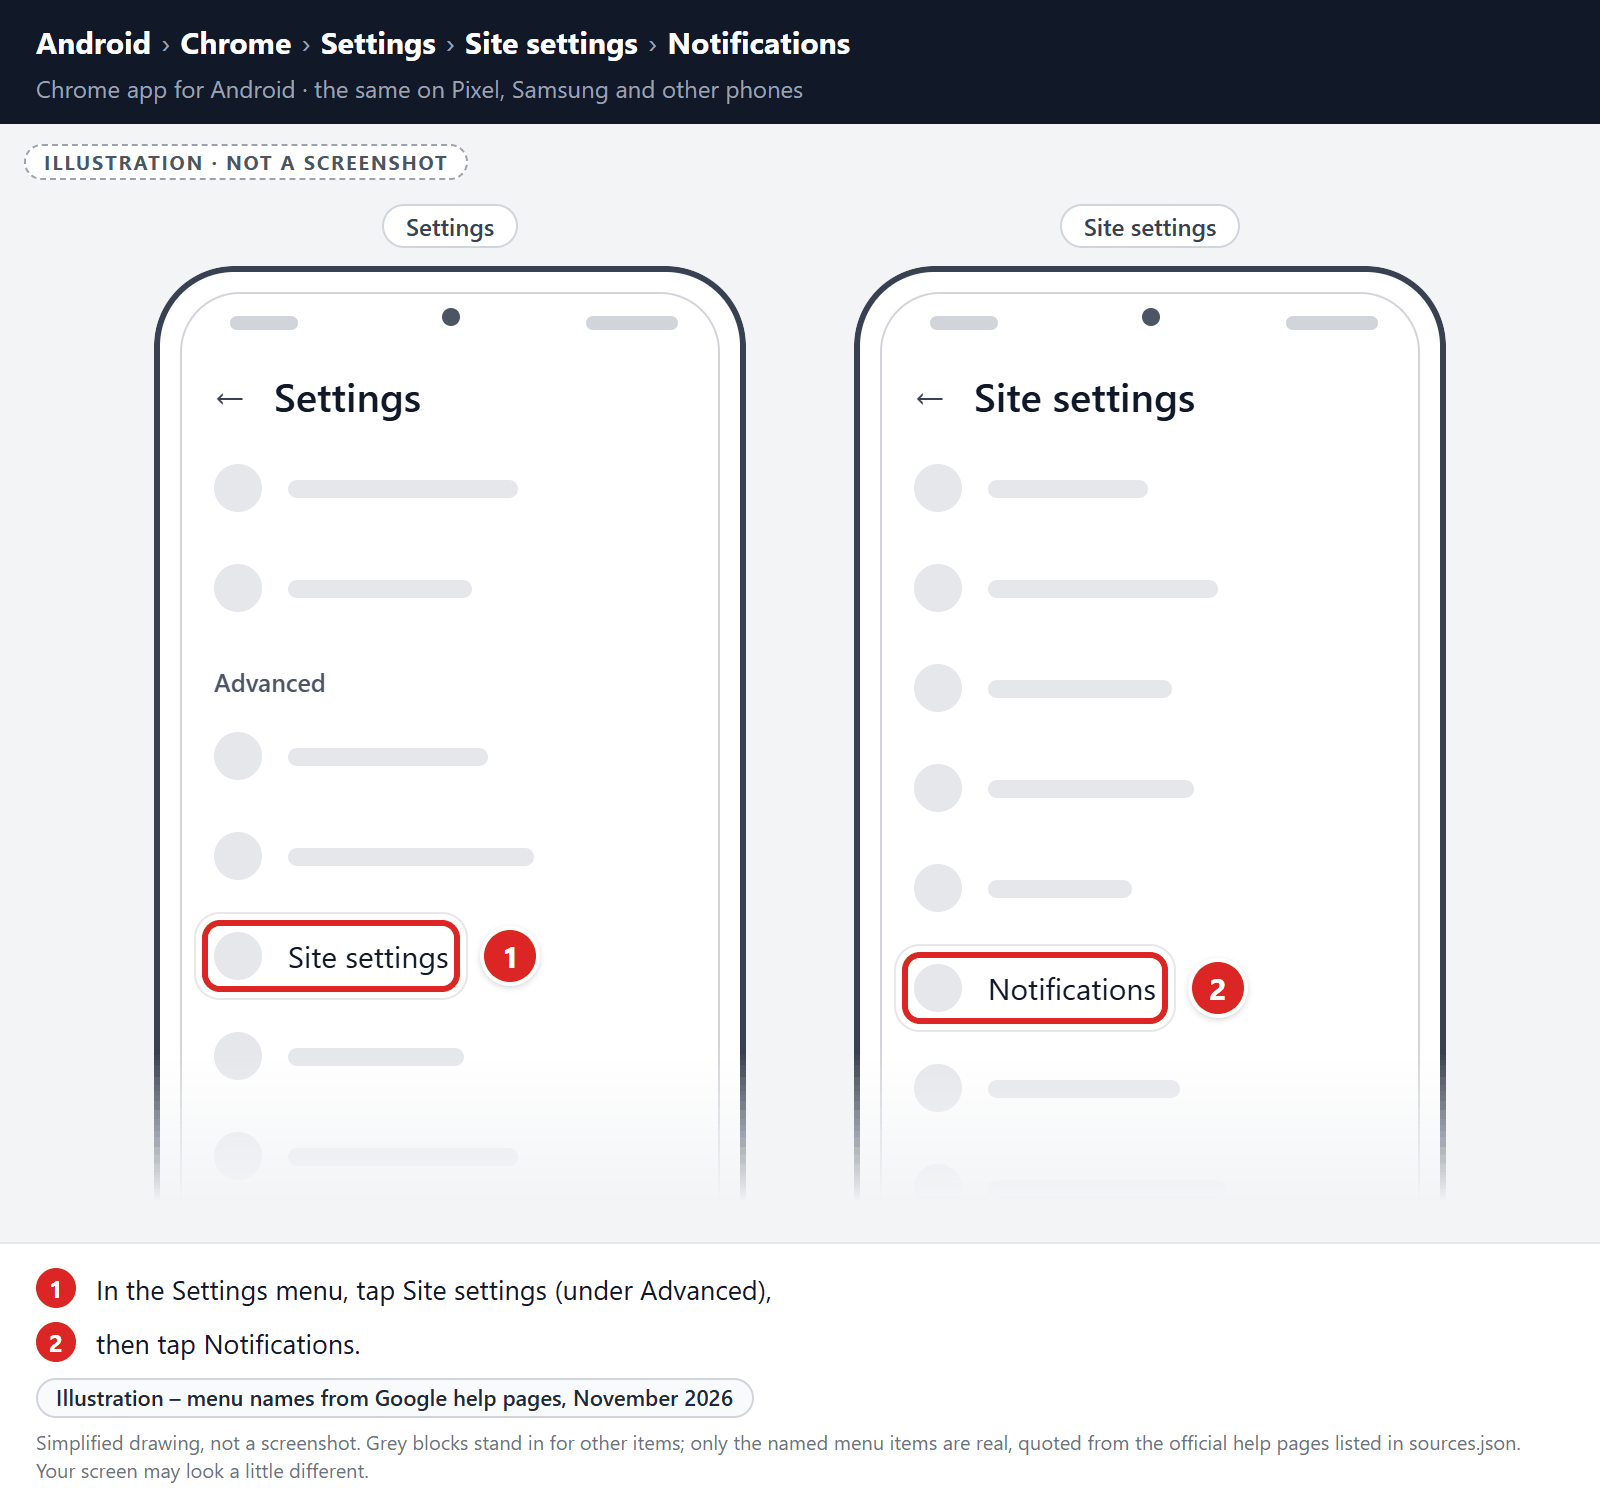
- Tap Site settings, then tap Notifications.
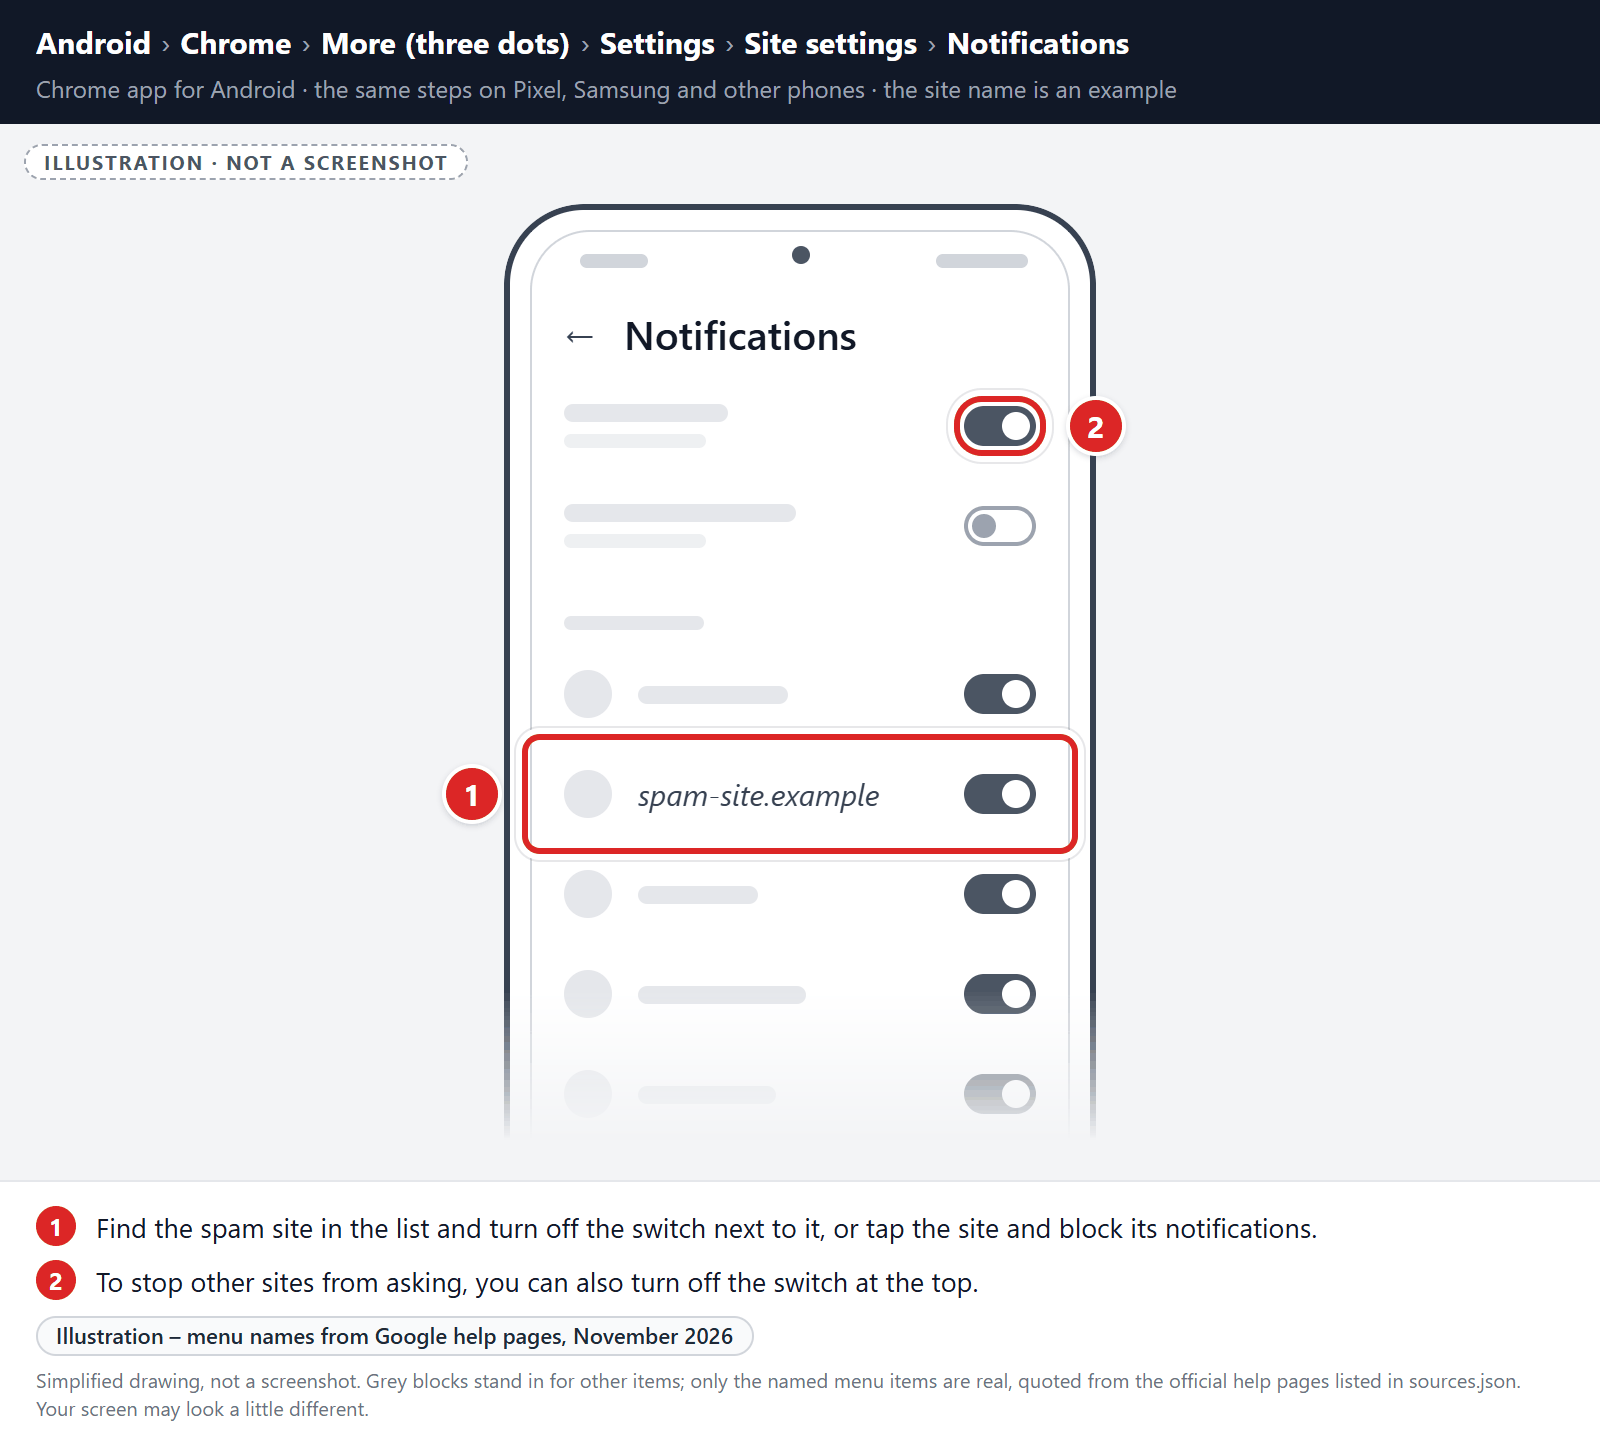
- Find the spam site in the list and turn off the switch next to it, or tap the site and block its notifications. To stop other sites from asking, you can also turn off the switch at the top.
If unwanted pages or redirects keep appearing, clear Chrome’s storage (last resort):
-
Open the “Settings” menu.
Tap on the “Settings” app from your phone menu or home screen.
-
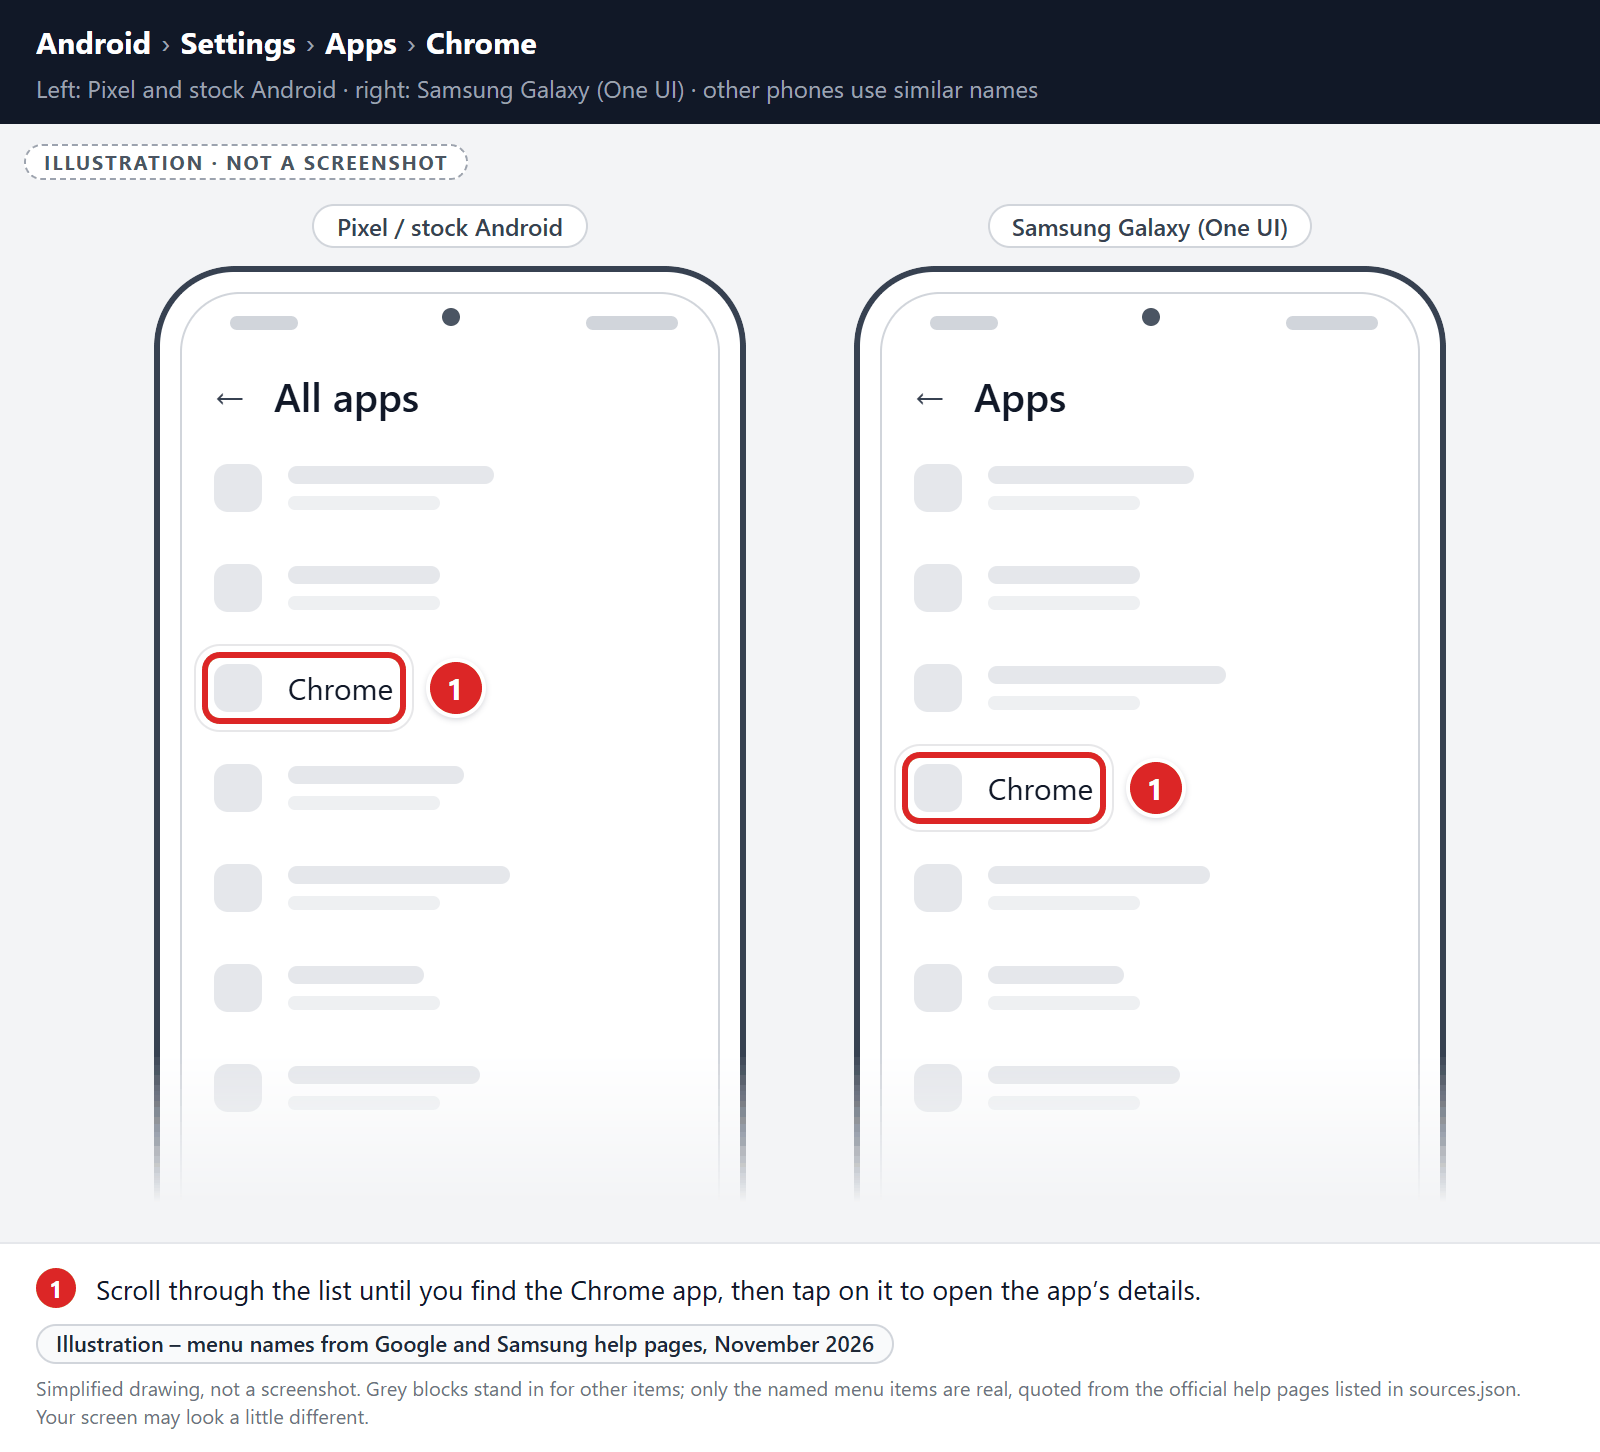
Tap on “Apps”.
When the “Settings” menu opens, tap on “Apps” to see all the installed applications on your phone.
-
Find and tap on Chrome.
The “Apps” screen will be displayed with a list of all the apps installed on your phone. Scroll through the list until you find the Chrome app, then tap on it to open the app’s details.
-
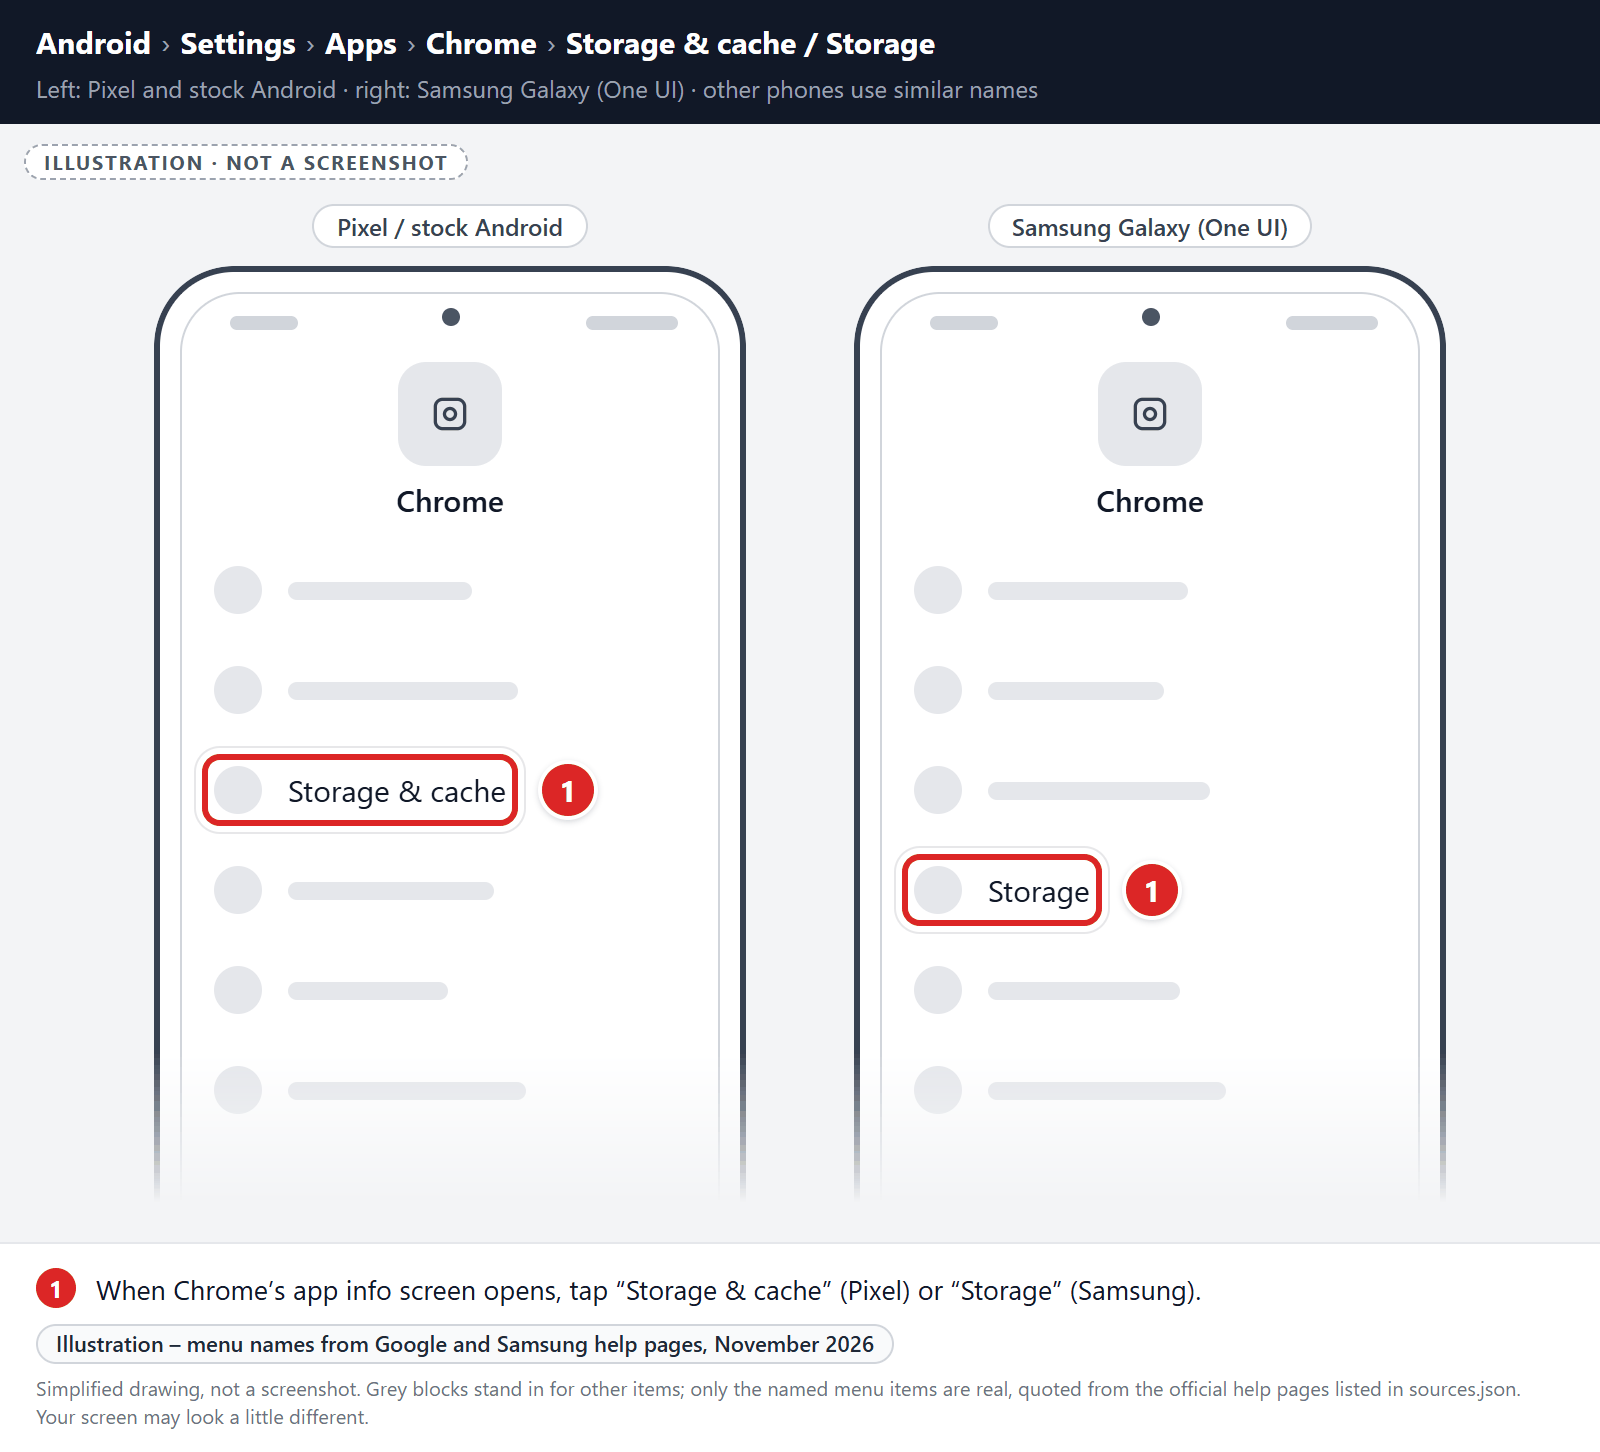
Tap “Storage”.
When Chrome’s app info menu is displayed, tap on “Storage” (on Pixel phones, “Storage & cache“).
-
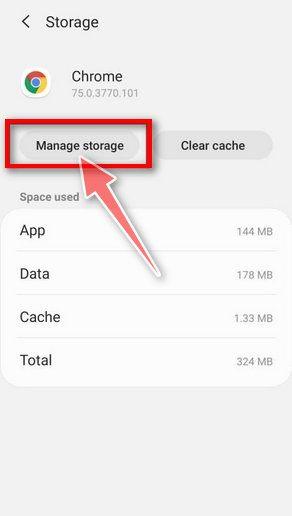
Tap “Manage Space”.
Under the storage settings, tap “Manage space” (called “Manage storage” on some phones). Don’t tap “Clear cache”, because it doesn’t reset Chrome.
-
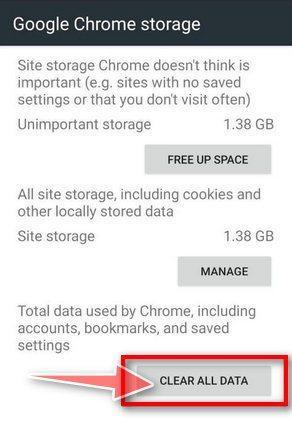
Tap “Clear all data”.
Tap “Clear all data” to delete all Chrome’s data including accounts, bookmarks, and your settings to reset the default settings.
-
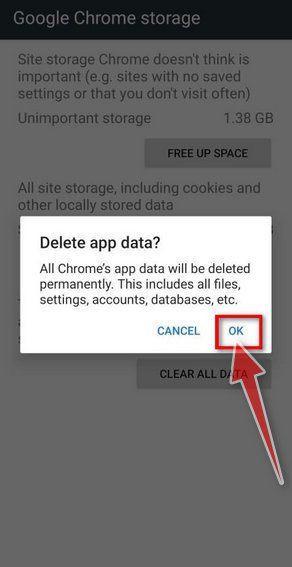
Confirm by tapping “Ok”.
A confirmation dialog should now be displayed, detailing the components that will be restored to their default state should you continue with the reset process. To complete the restoration process, tap “Ok“.
Remove malware from Firefox for Android
First, block the spam site’s notifications:
- Open Firefox, tap the menu button (three dots), and tap Settings.
- Tap Site permissions, then tap Exceptions.
- Tap the spam site, then set Notification to Blocked.
- Optional: to stop other sites from asking, go back to Site permissions, tap Notification, and choose Blocked.
If unwanted pages or redirects keep appearing, clear Firefox’s storage (last resort):
-
Open the “Settings” menu.
Tap on the “Settings” app from your phone menu or home screen.
-
Tap on “Apps”.
When the “Settings” menu opens, tap on “Apps” to see all the installed applications on your phone.
-
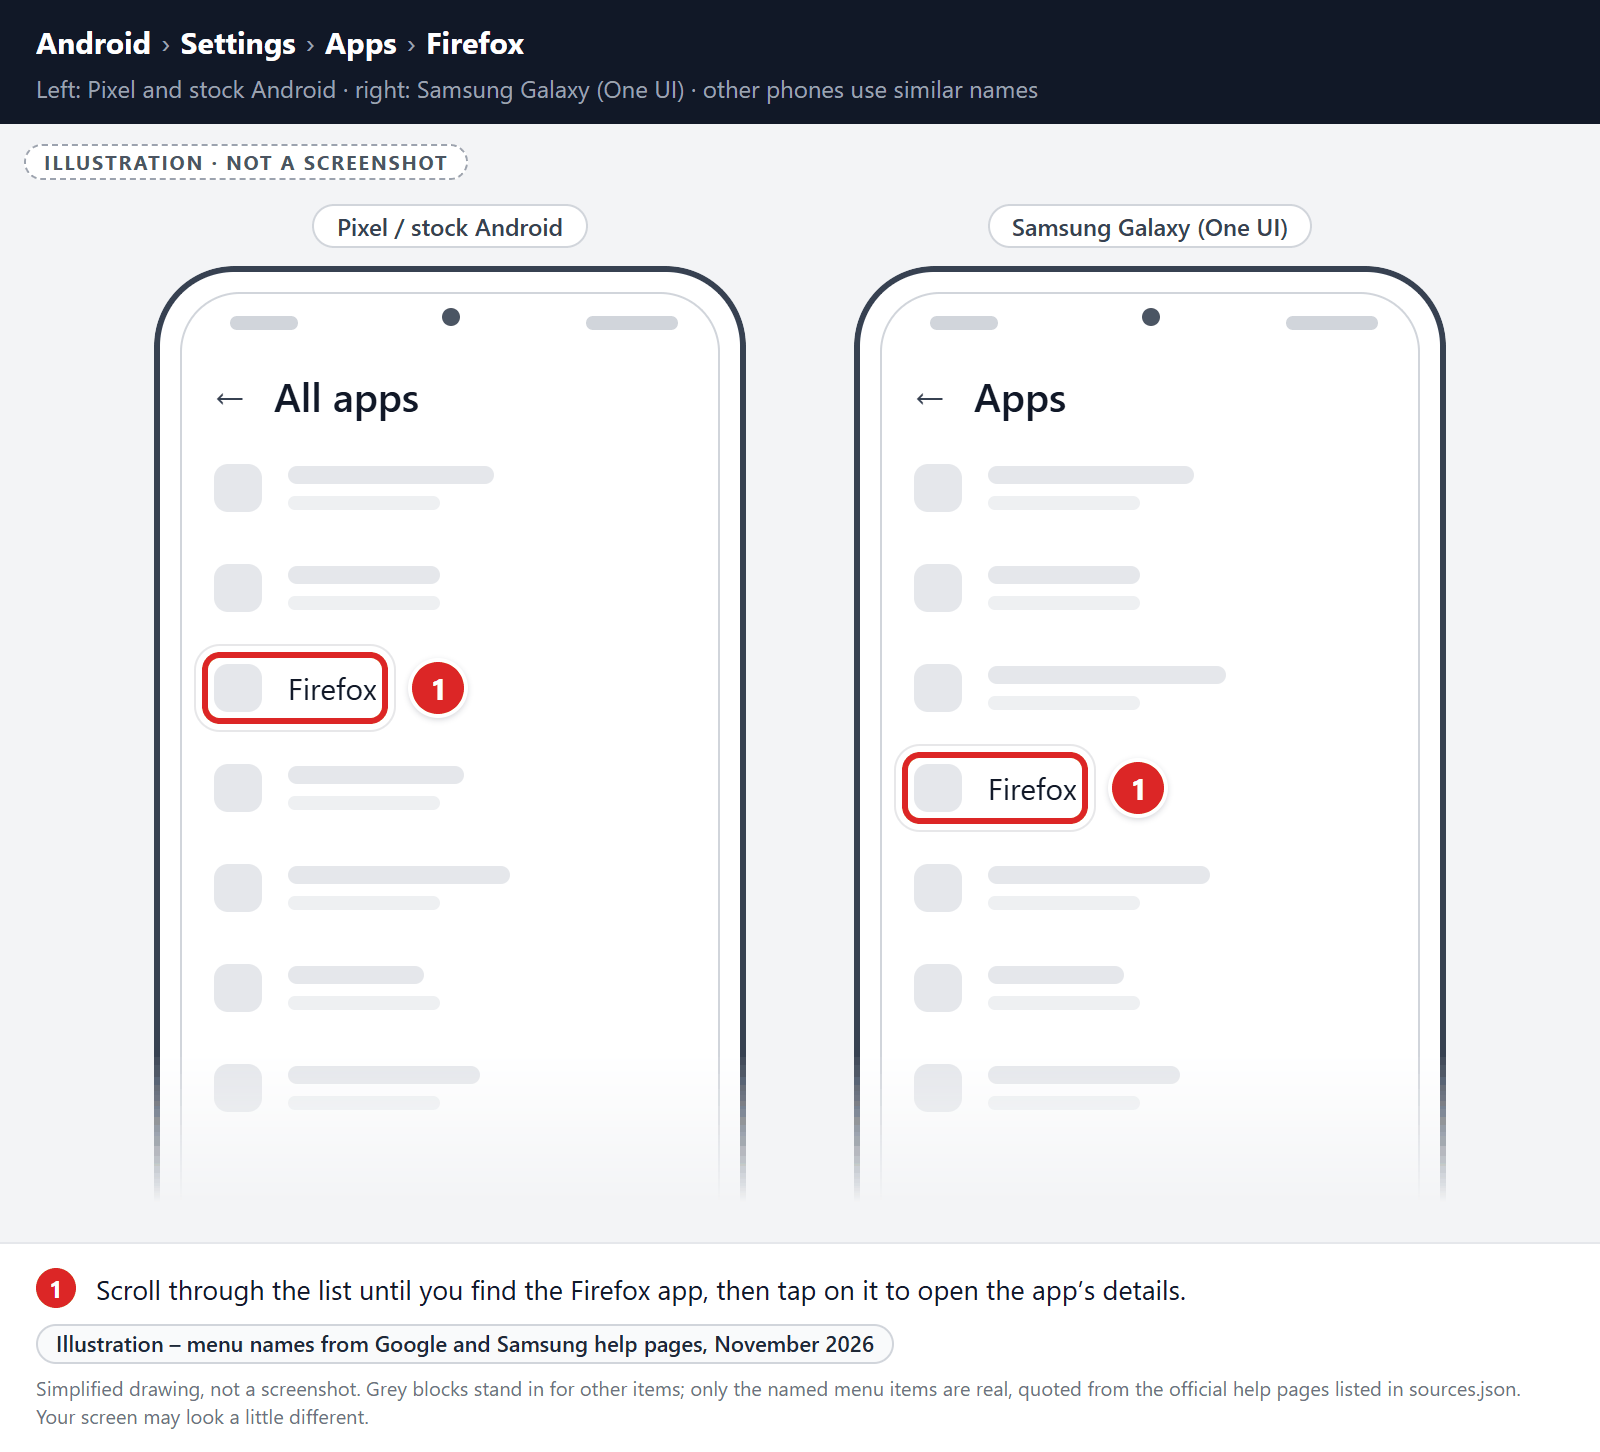
Find and tap on Firefox.
The “Apps” screen will be displayed with a list of all the apps installed on your phone. Scroll through the list until you find the Firefox app, then tap on it to open the app’s details.
-
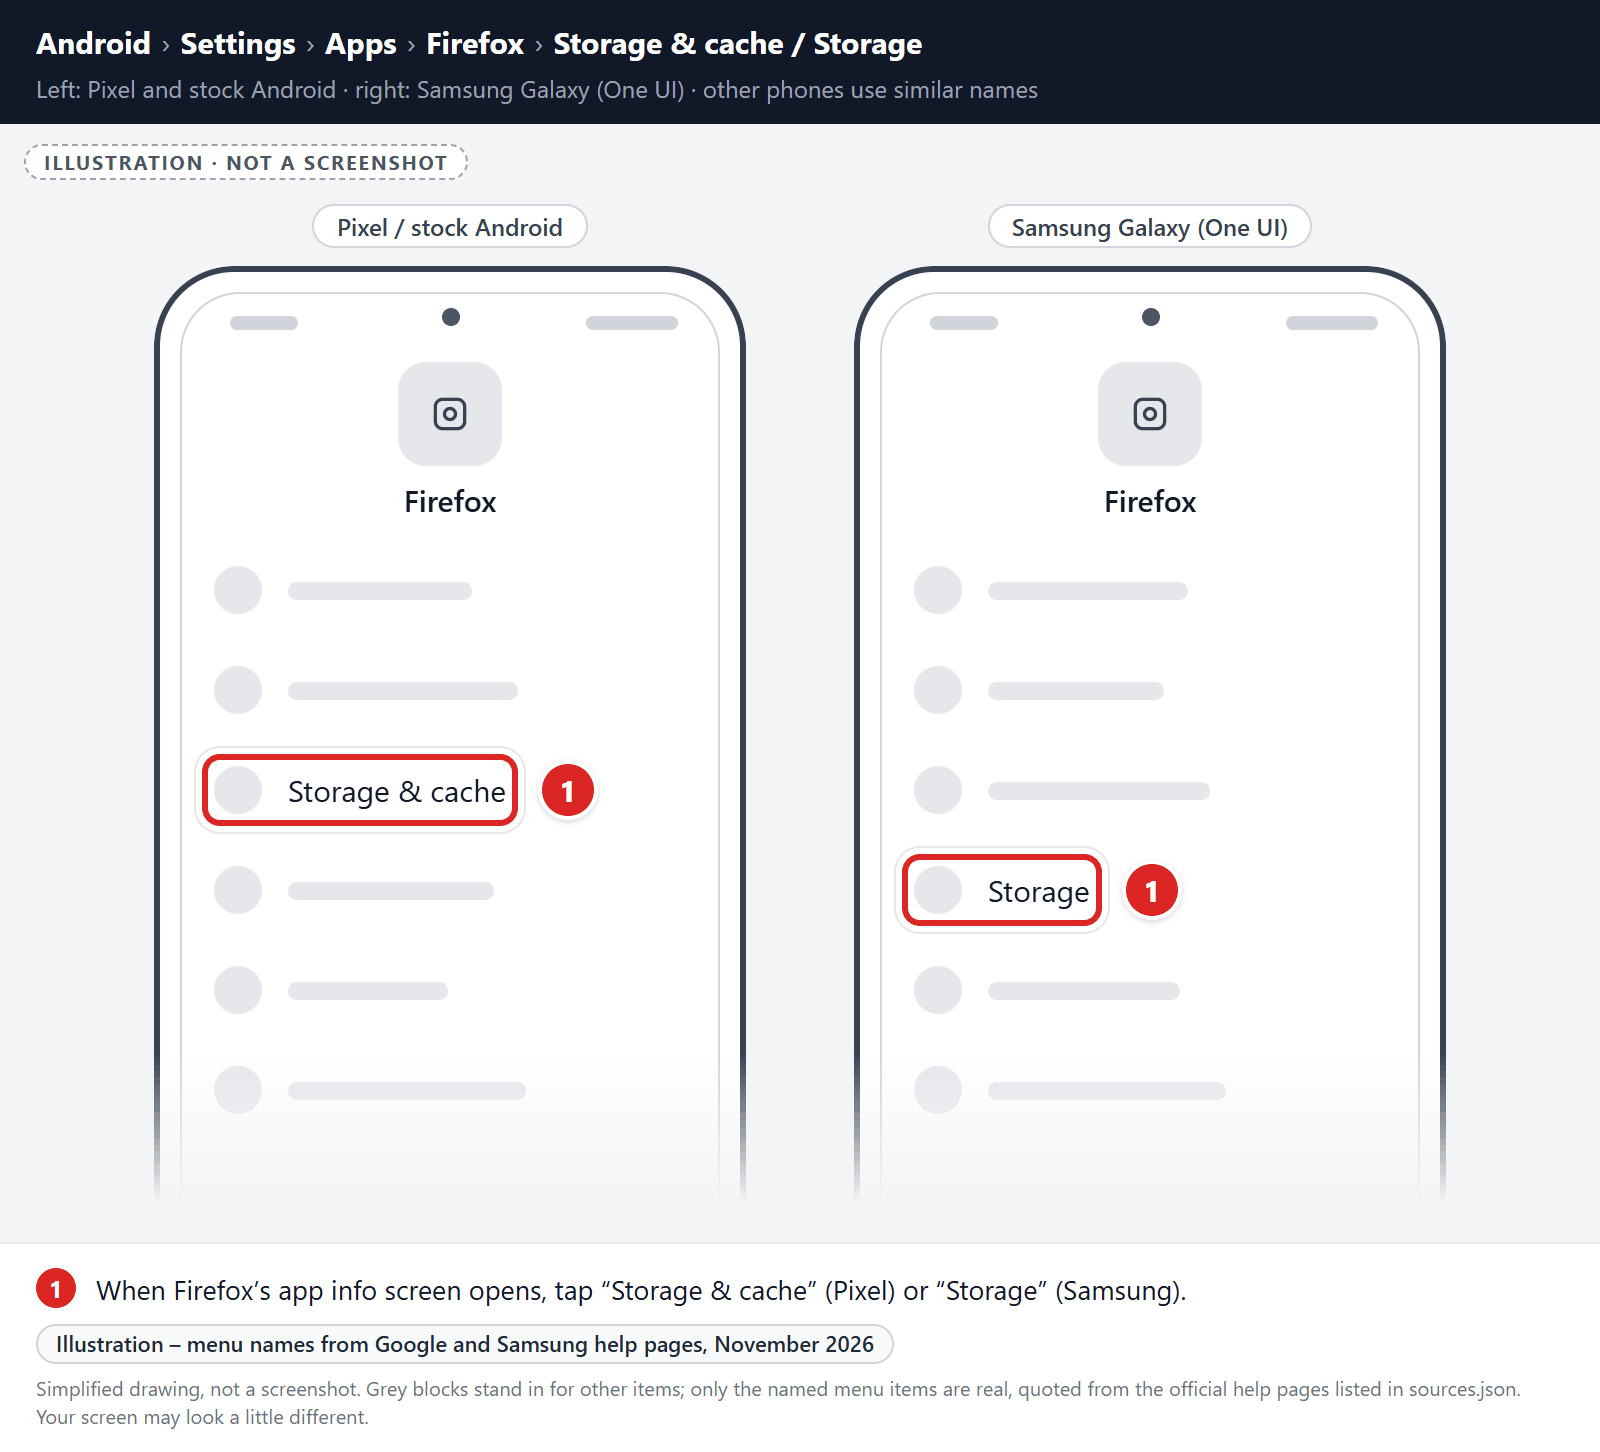
Tap “Storage”.
When Firefox’s app info menu is displayed, tap on “Storage” (on Pixel phones, “Storage & cache“).
-
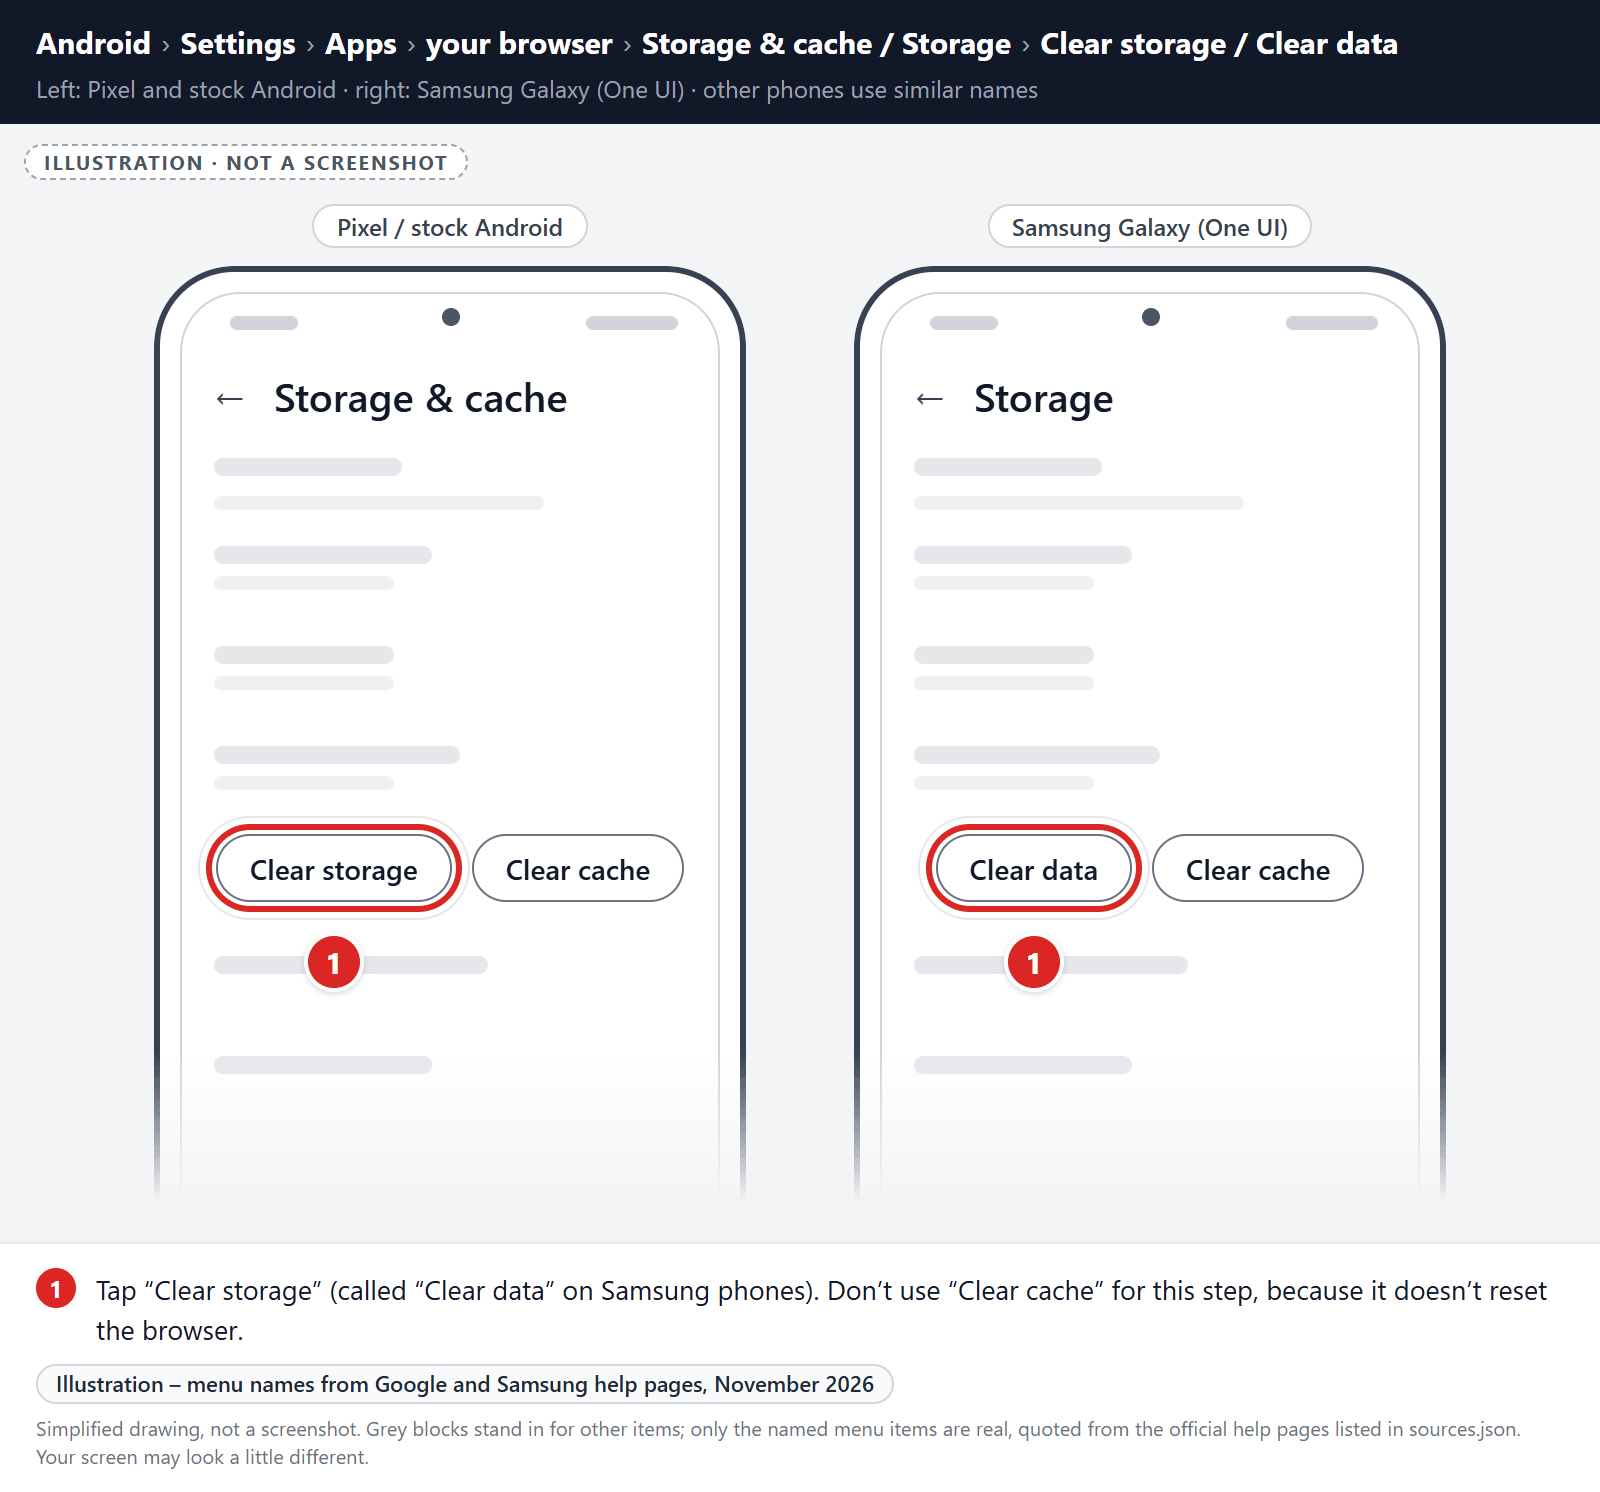
Tap “Clear storage” or “Clear data”.
Tap “Clear storage” (called “Clear data” on Samsung phones). If you see “Manage space” or “Manage storage” instead, tap it, then tap “Clear all data“. Don’t use “Clear cache” for this step, because it doesn’t reset the browser.
-
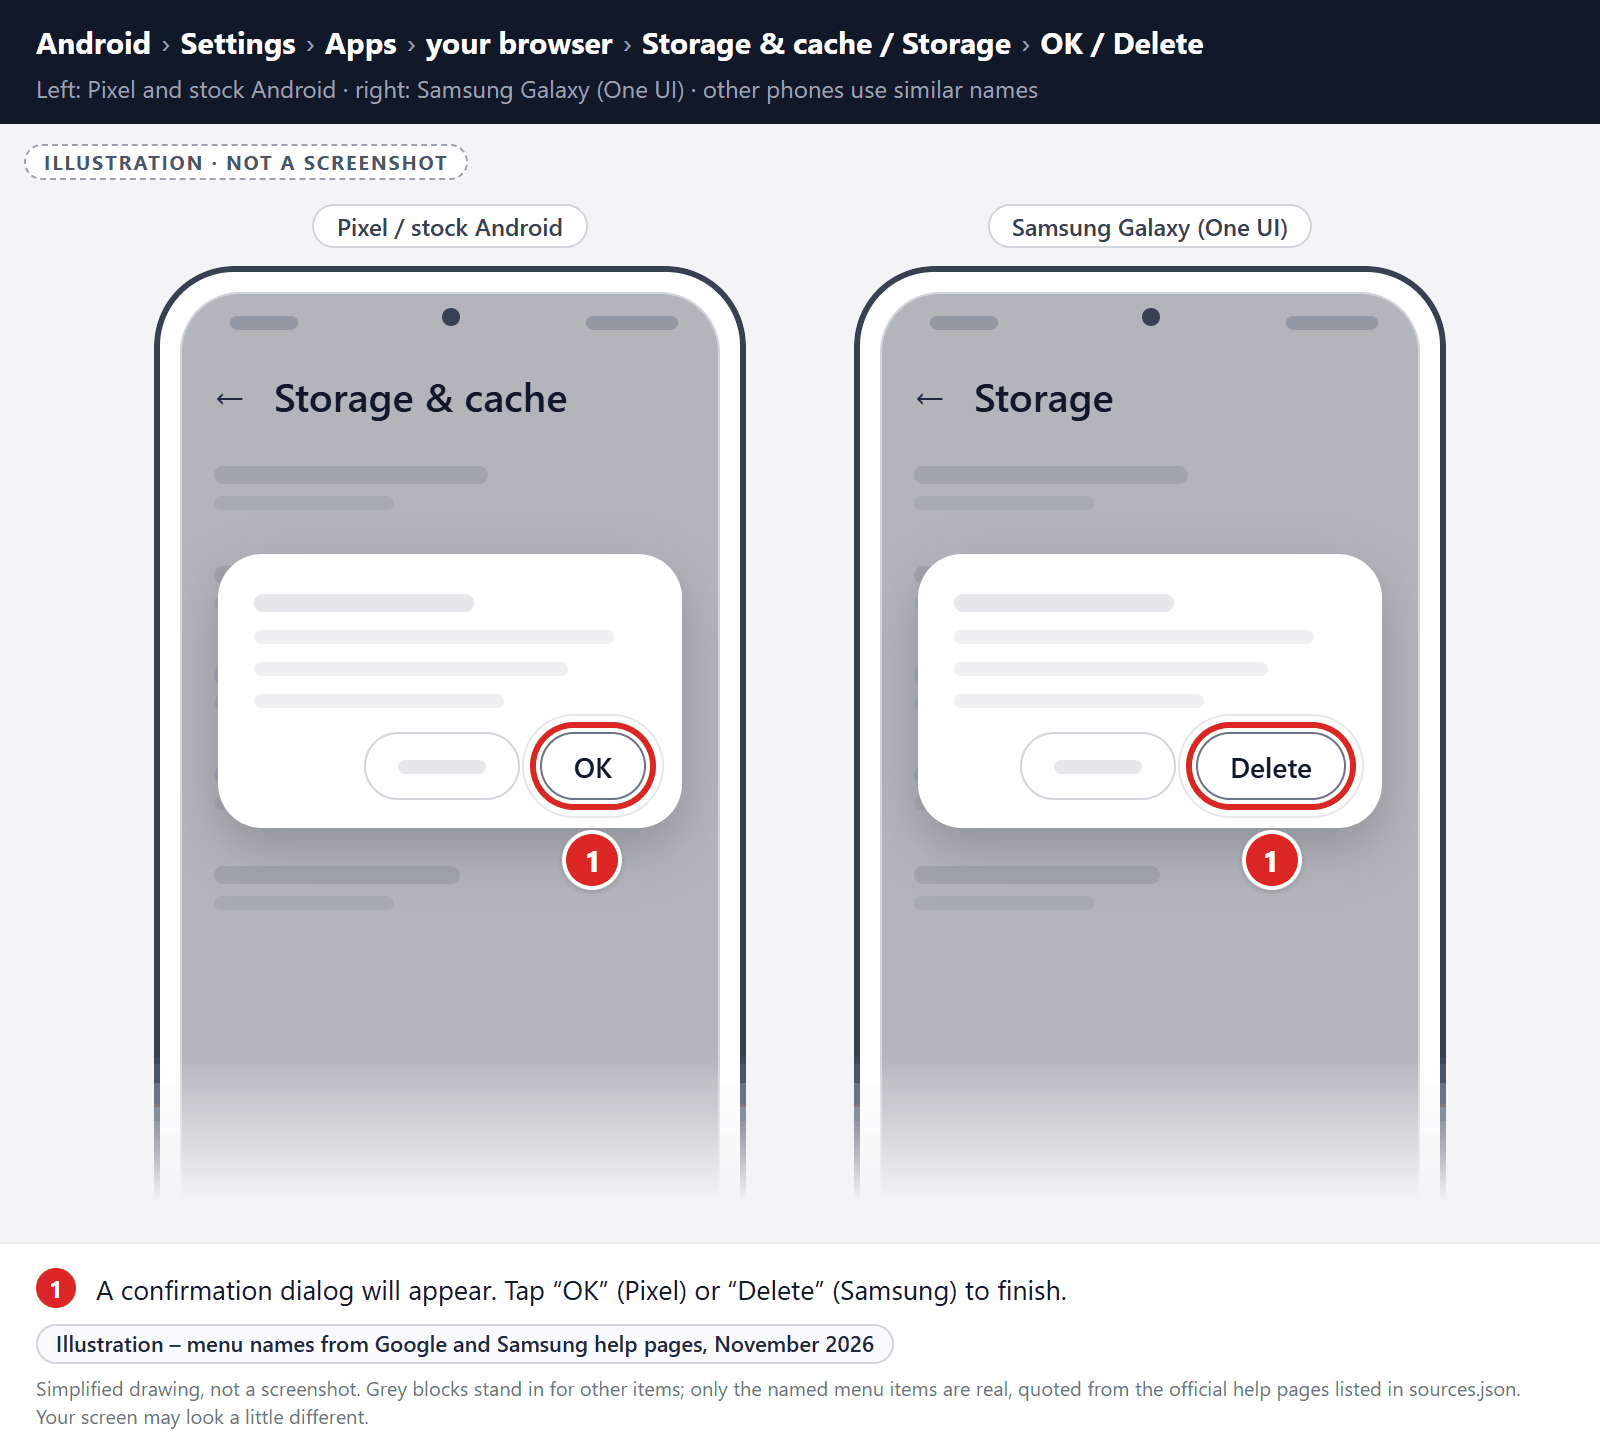
Confirm by tapping “OK”.
A confirmation dialog will appear. Tap “OK” or “Delete” to finish. When you open Firefox again, sign back in and turn sync back on if you use it.
Remove malware from the Opera browser
First, block the spam site’s notifications:
- Open Opera, open the Opera menu, and tap Settings.
- Tap Site settings, then tap Notifications.
- Find the spam site and block it. Don’t just remove it from the list, because a removed site can ask again.
If unwanted pages or redirects keep appearing, clear Opera’s storage (last resort):
-
Open the “Settings” menu.
Tap on the “Settings” app from your phone menu or home screen.
-
Tap on “Apps”.
When the “Settings” menu opens, tap on “Apps” to see all the installed applications on your phone.
-
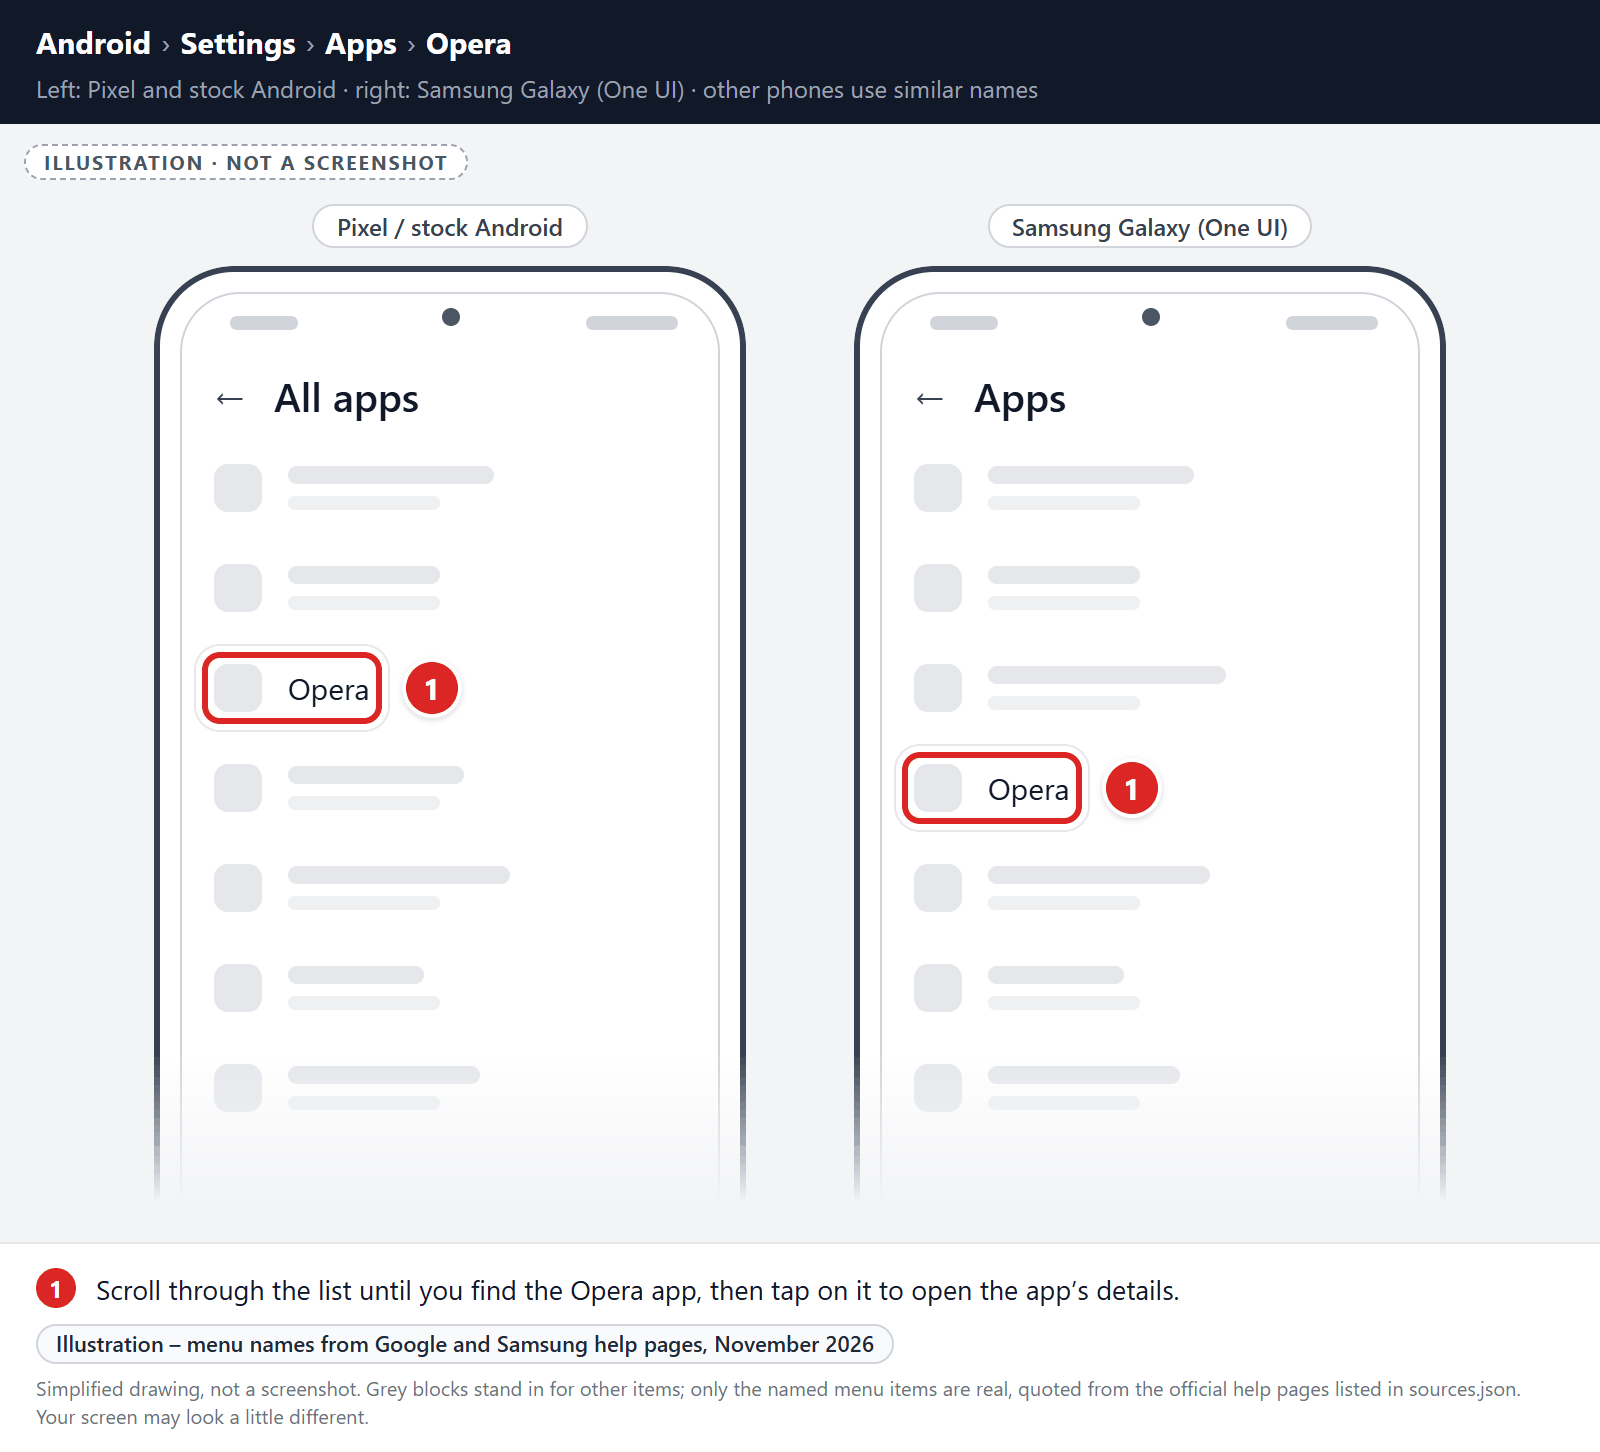
Find and tap on Opera.
The “Apps” screen will be displayed with a list of all the apps installed on your phone. Scroll through the list until you find the Opera app, then tap on it to open the app’s details.
-
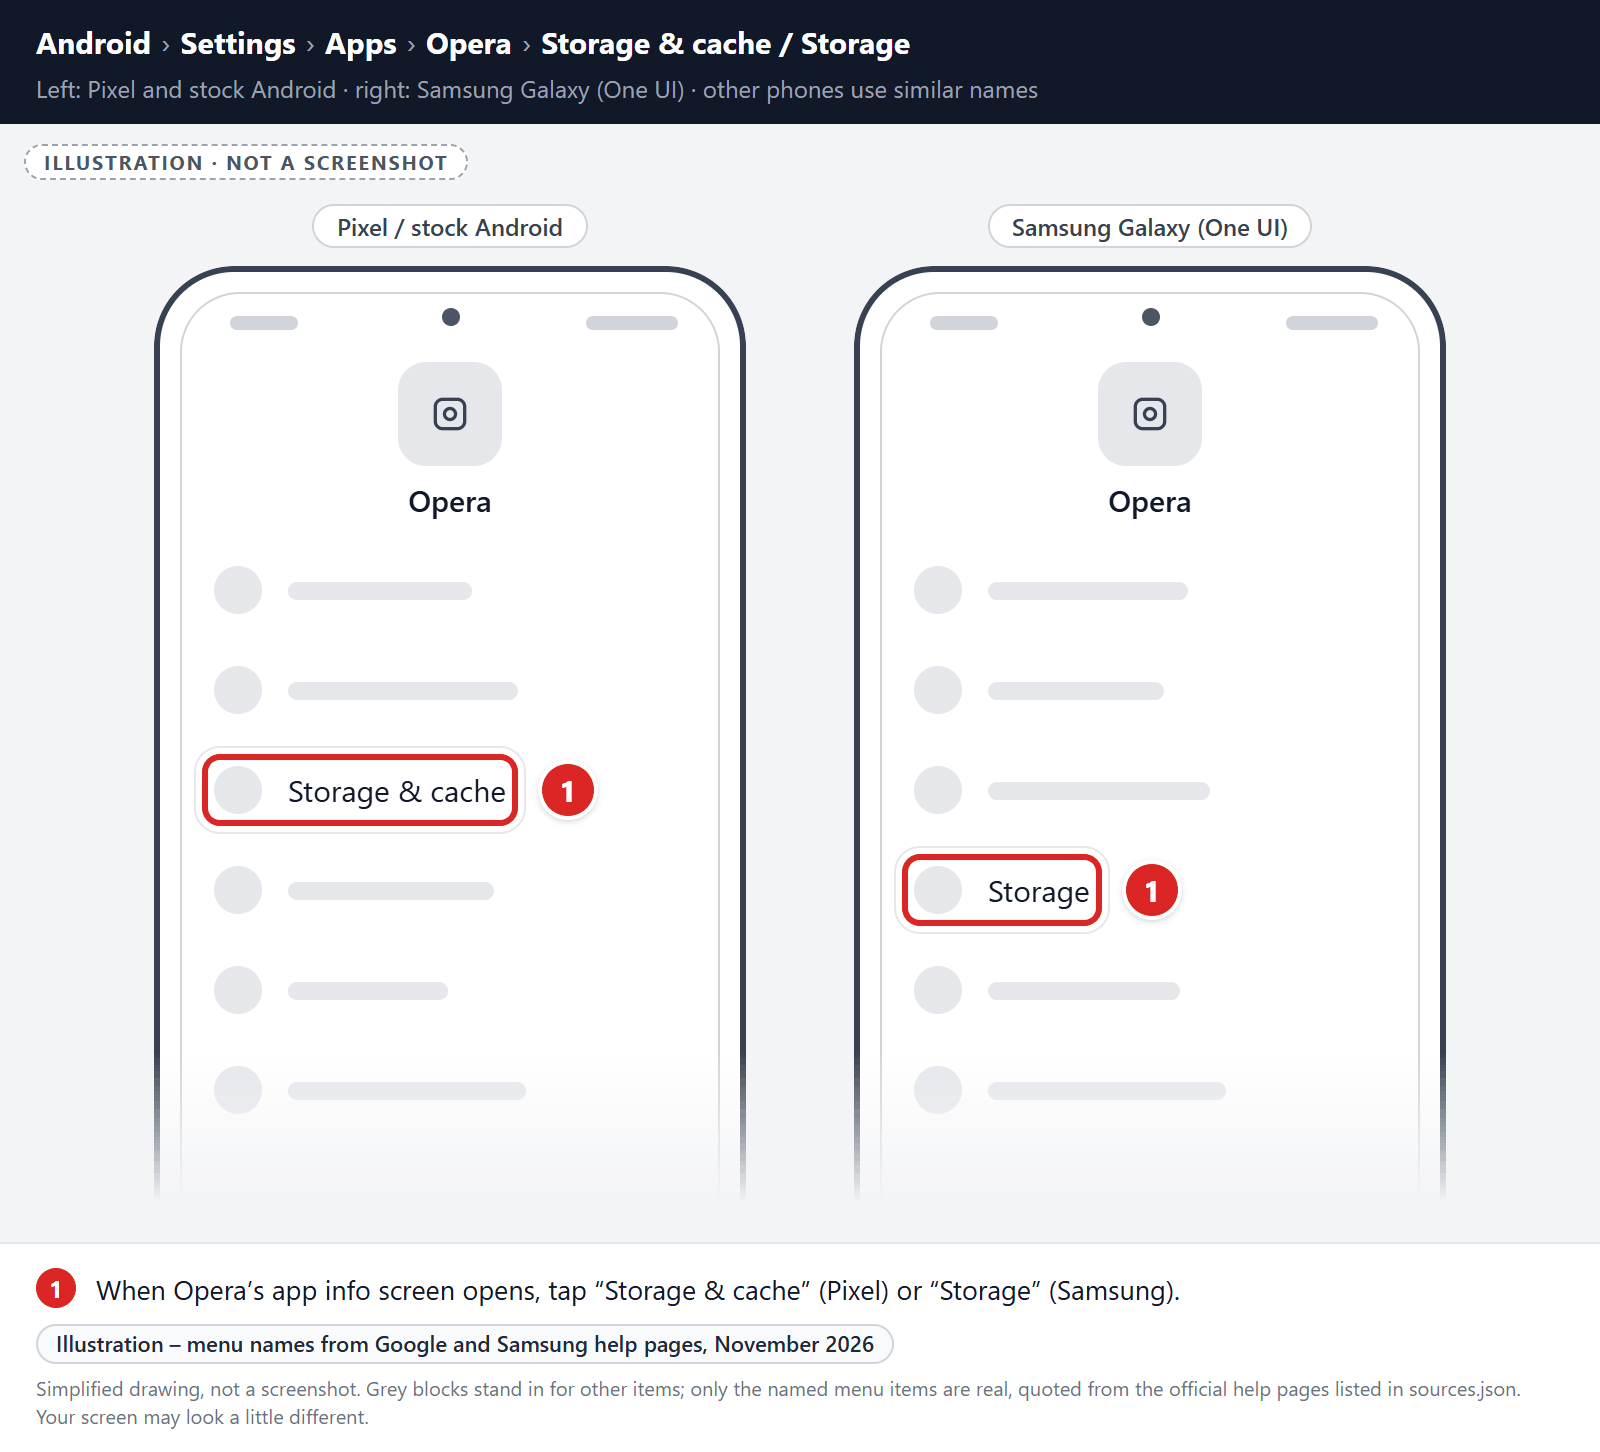
Tap “Storage”.
When Opera’s app info menu is displayed, tap on “Storage” (on Pixel phones, “Storage & cache“).
-
Tap “Clear storage” or “Clear data”.
Tap “Clear storage” (called “Clear data” on Samsung phones). If you see “Manage space” or “Manage storage” instead, tap it, then tap “Clear all data“. Don’t use “Clear cache” for this step, because it doesn’t reset the browser.
-
Confirm by tapping “OK”.
A confirmation dialog will appear. Tap “OK” or “Delete” to finish. When you open Opera again, sign back in and turn sync back on if you use it.
Remove malware from Samsung Internet
First, block the spam site’s notifications:
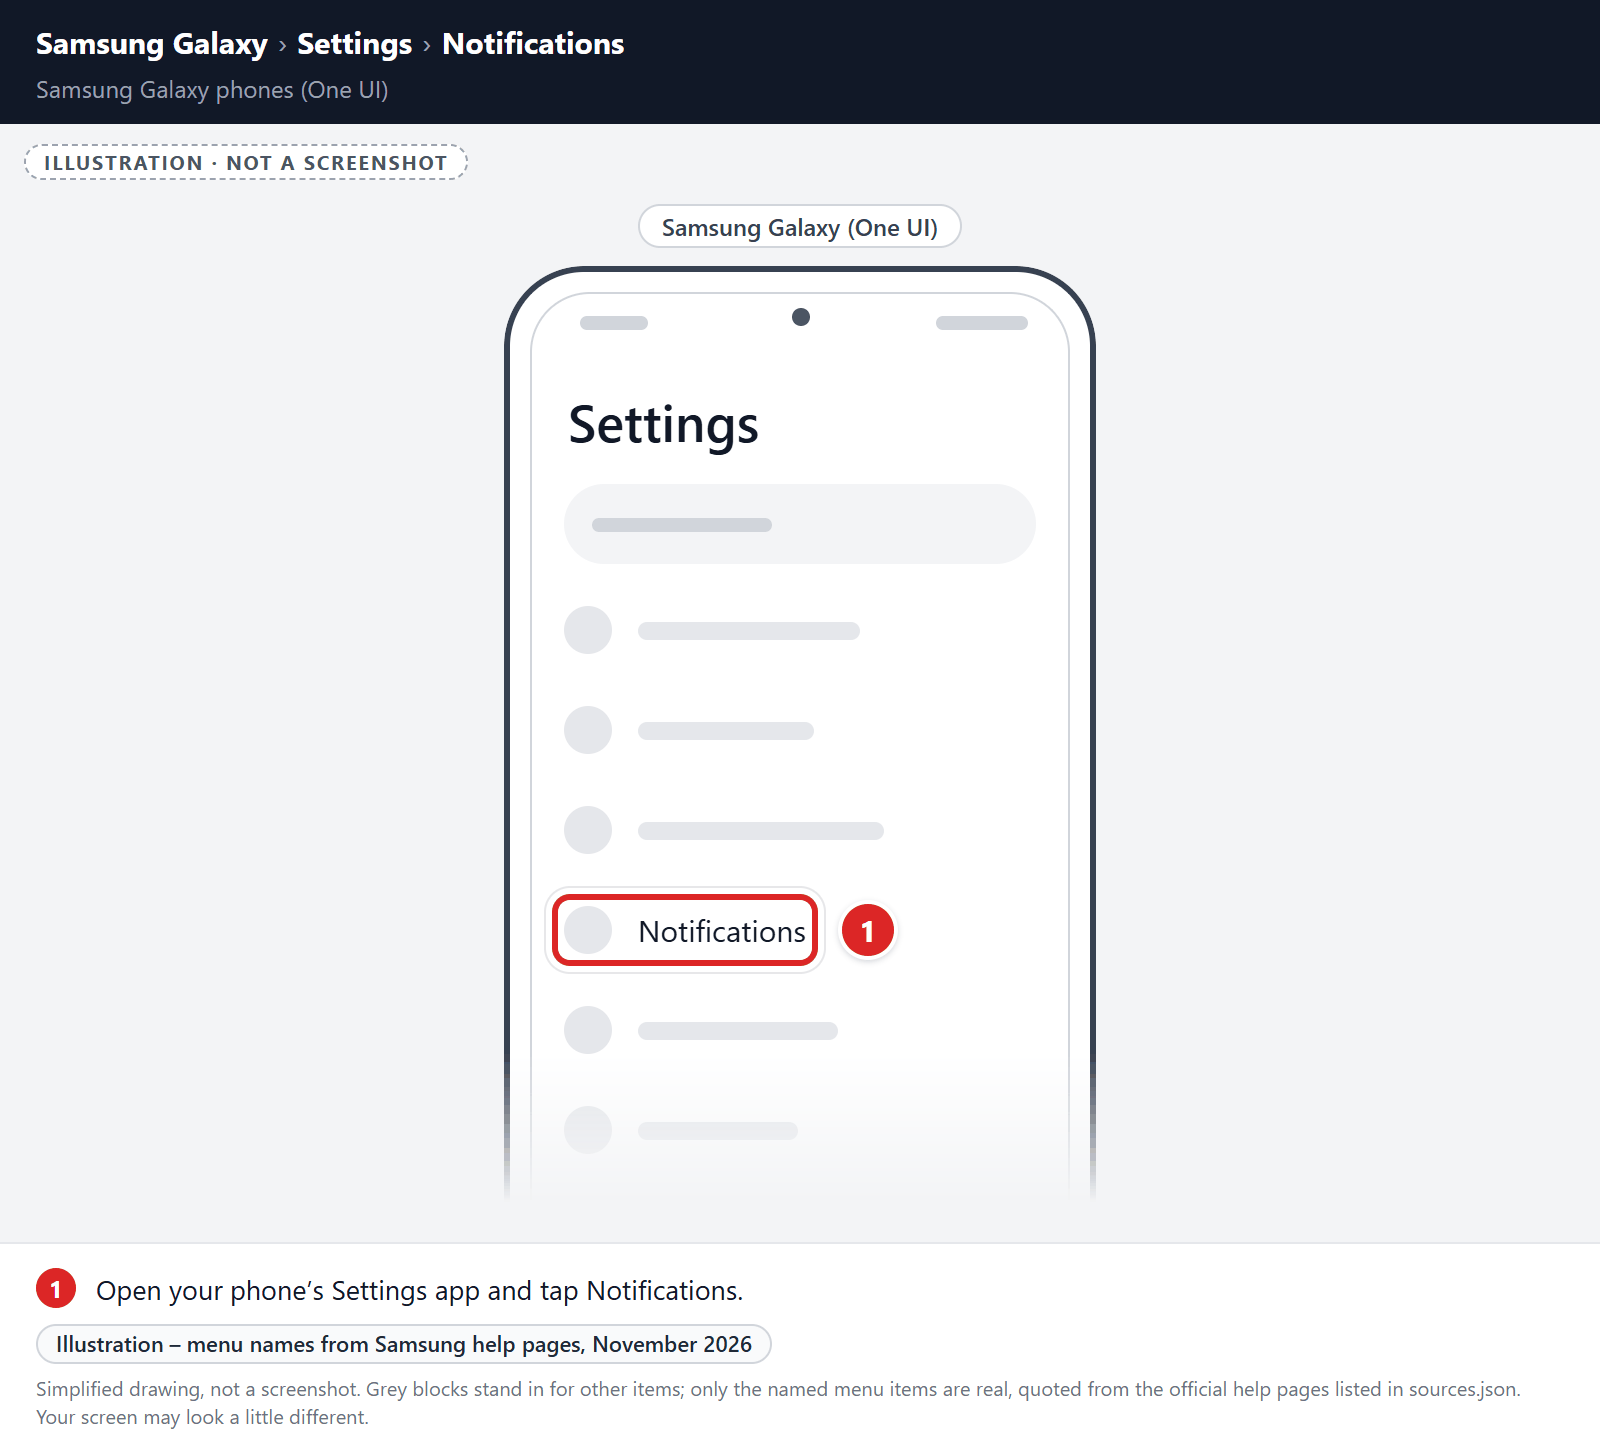
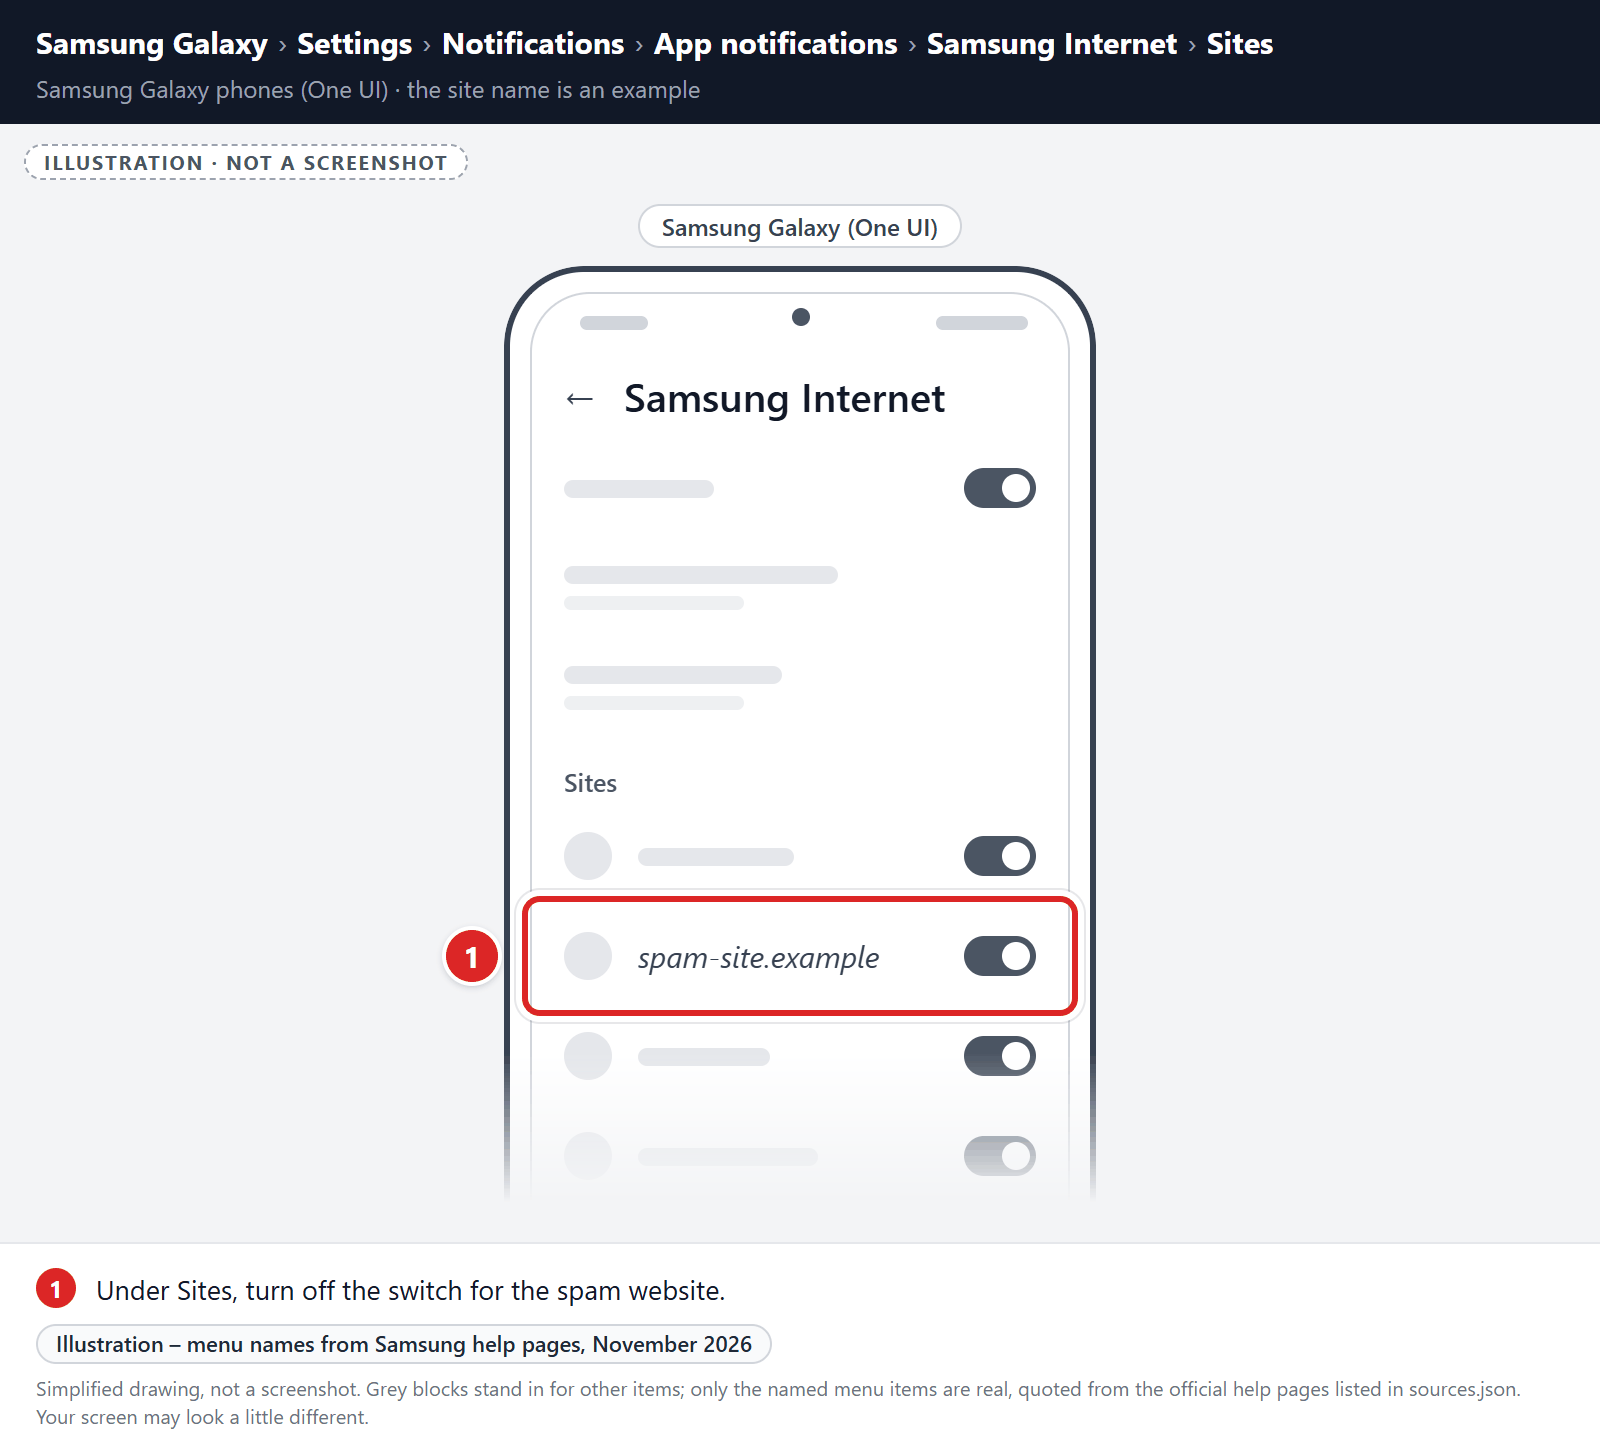
- Open your phone’s Settings app and tap Notifications.
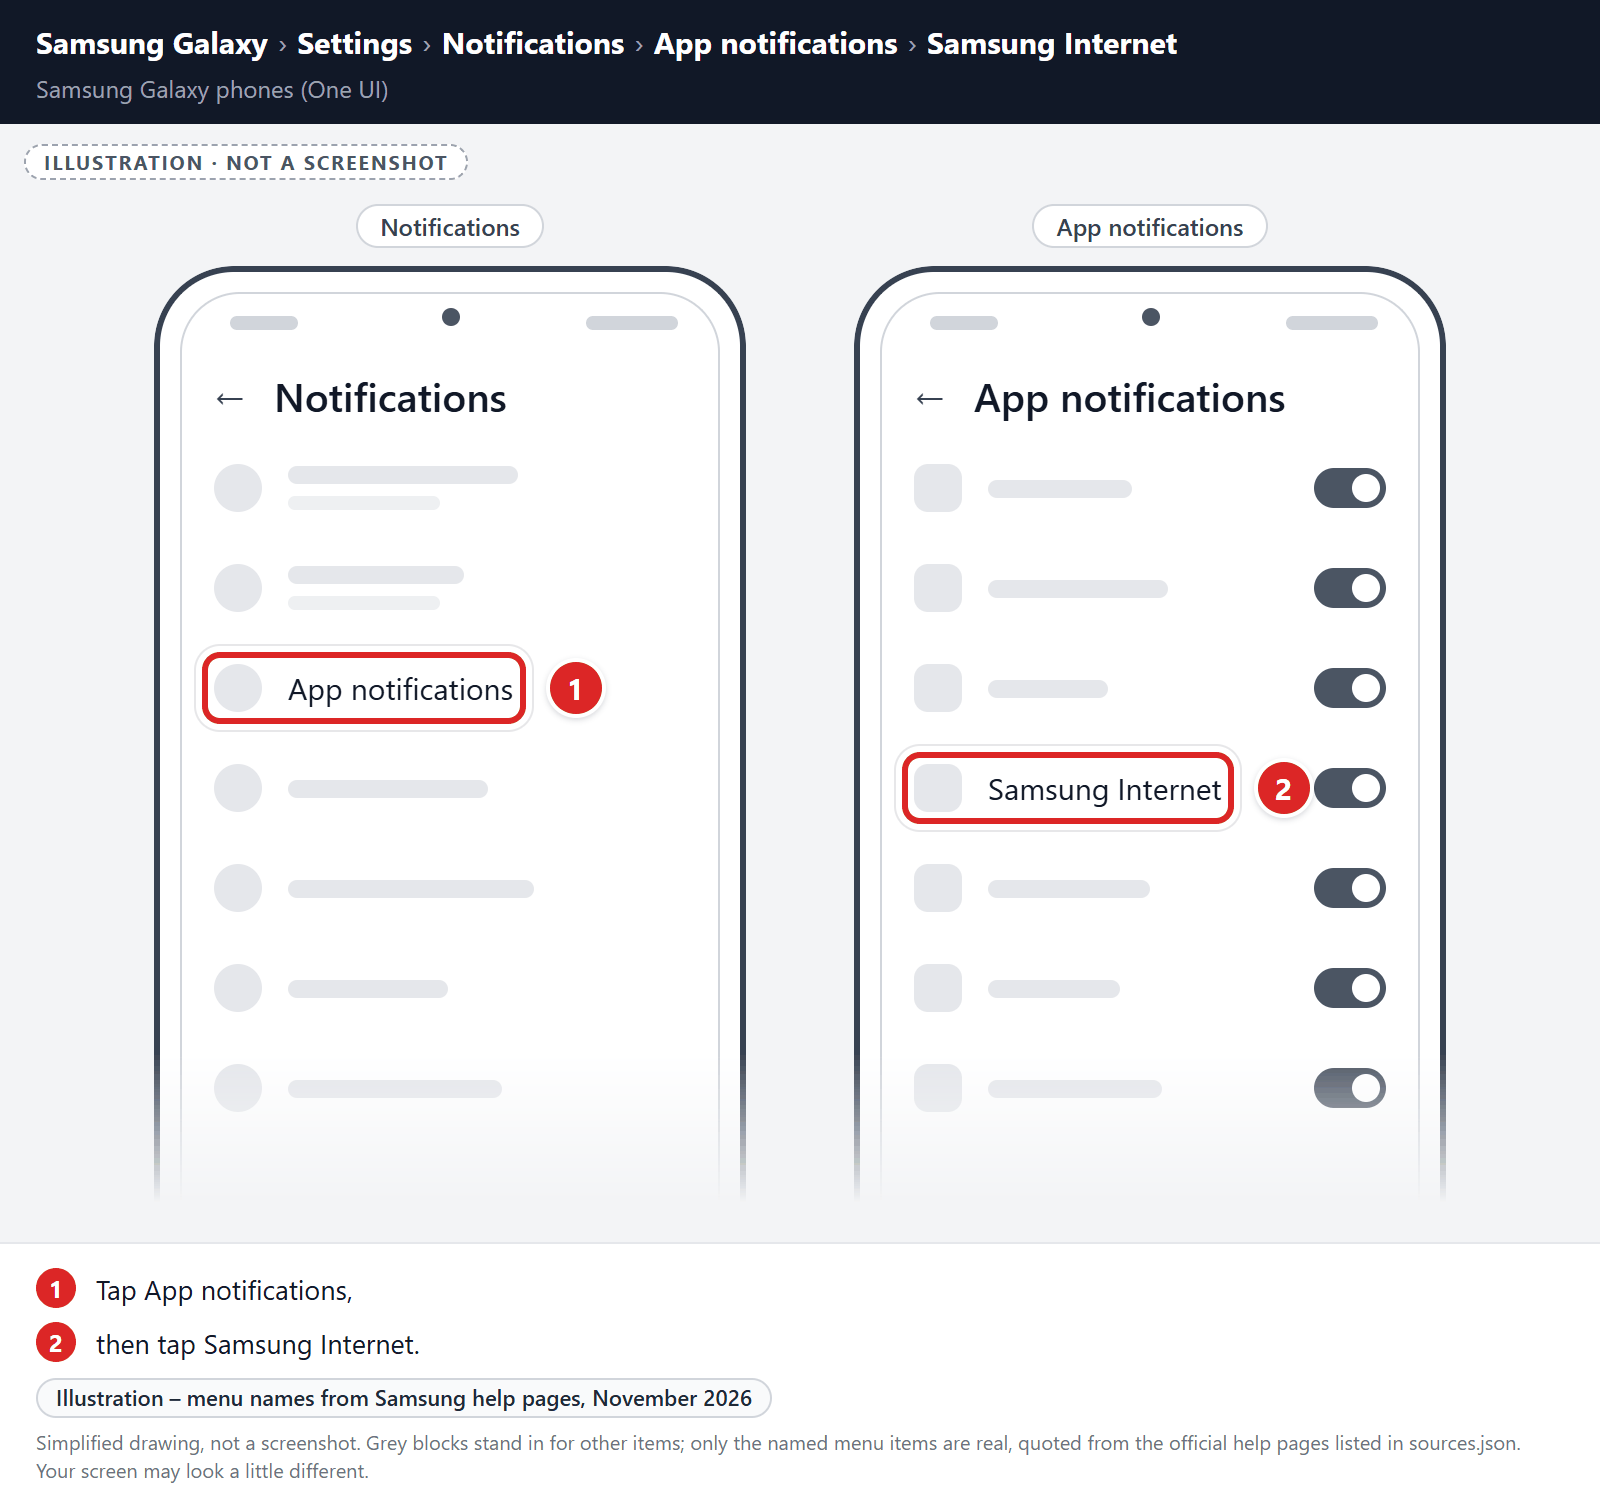
- Tap App notifications, then tap Samsung Internet.
- Under Sites, turn off the switch for the spam website.
If unwanted pages or redirects keep appearing, clear Samsung Internet’s storage (last resort):
-
Open the “Settings” menu.
Tap on the “Settings” app from your phone menu or home screen.
-
Tap on “Apps”.
When the “Settings” menu opens, tap on “Apps” to see all the installed applications on your phone.
-
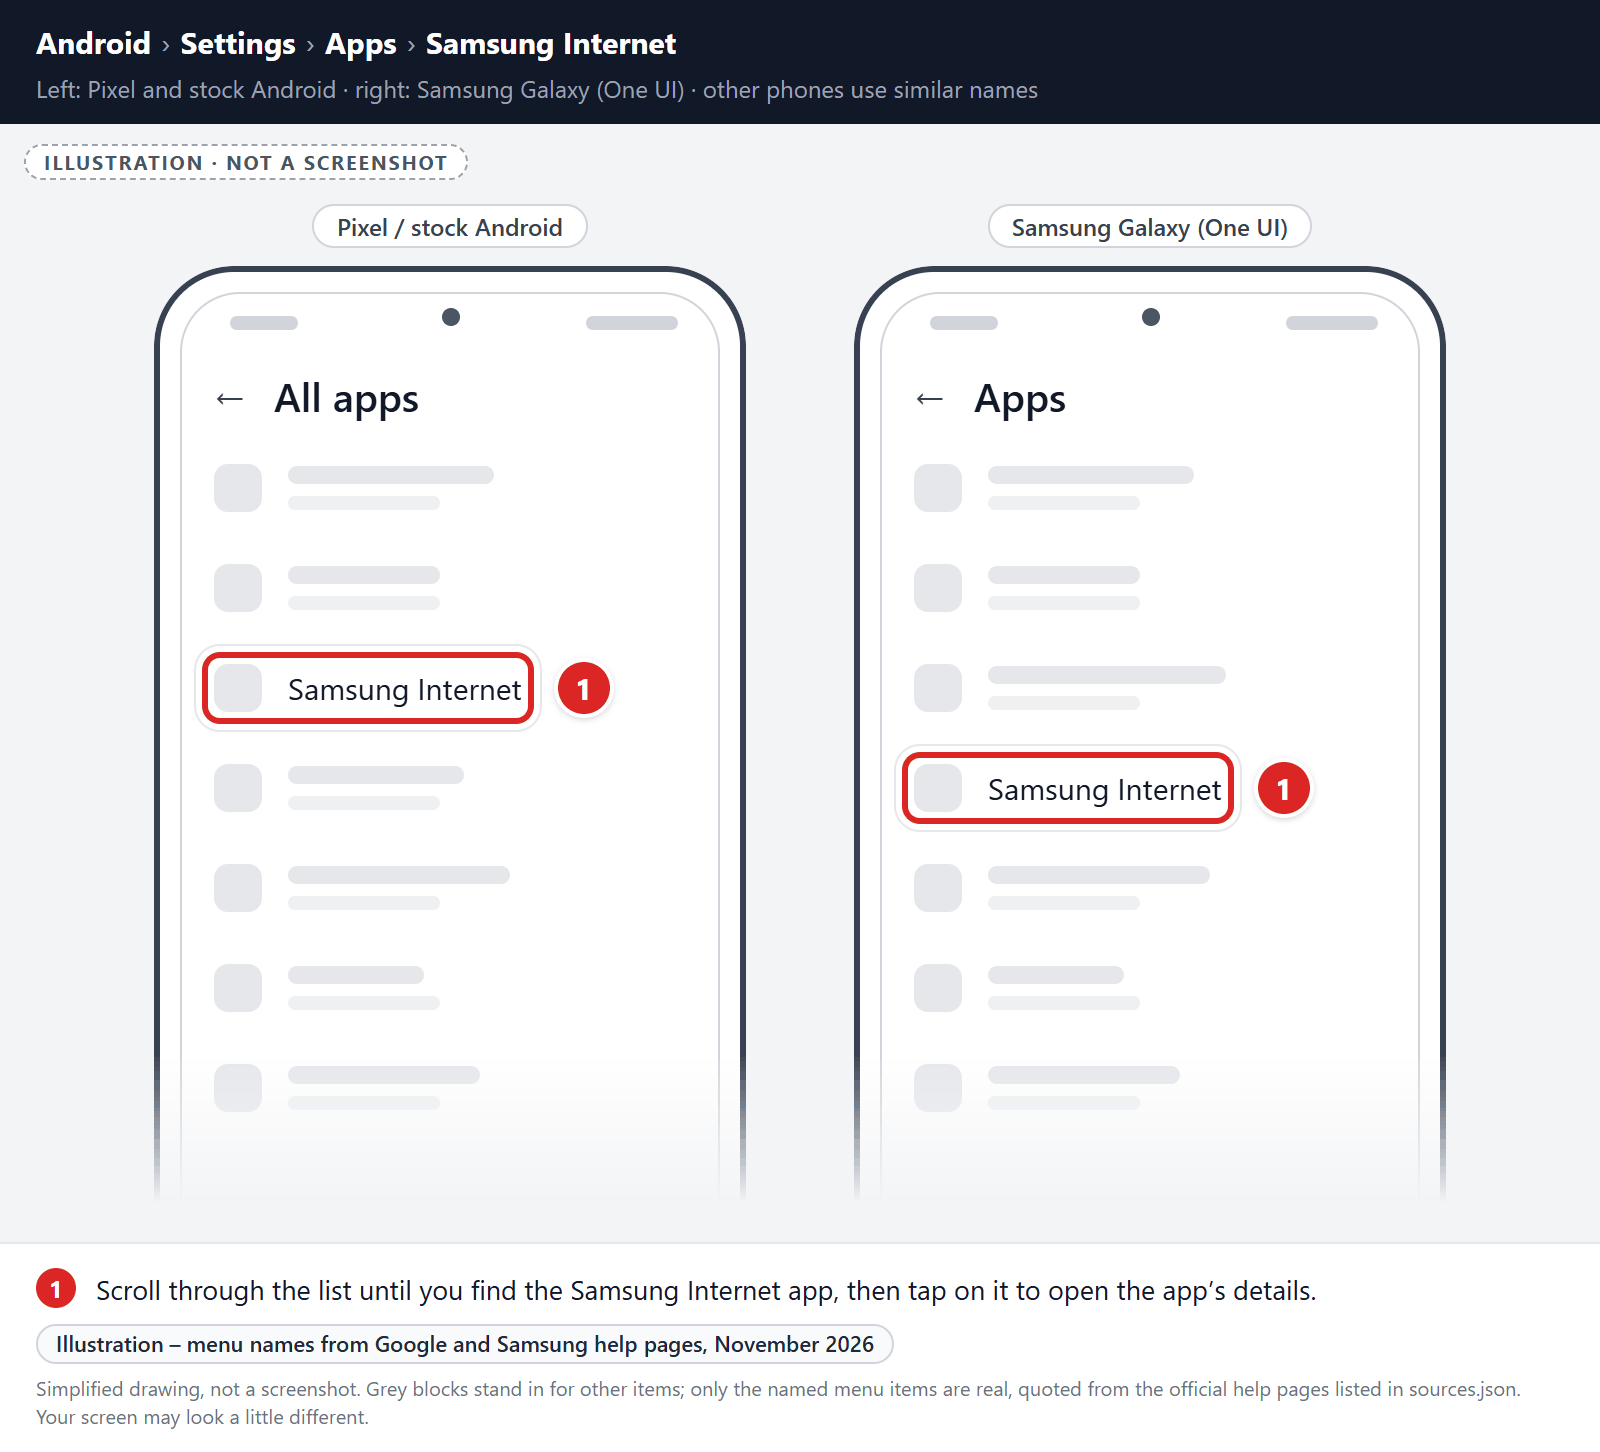
Find and tap on Samsung Internet.
The “Apps” screen will be displayed with a list of all the apps installed on your phone. Scroll through the list until you find the Samsung Internet app, then tap on it to open the app’s details.
-
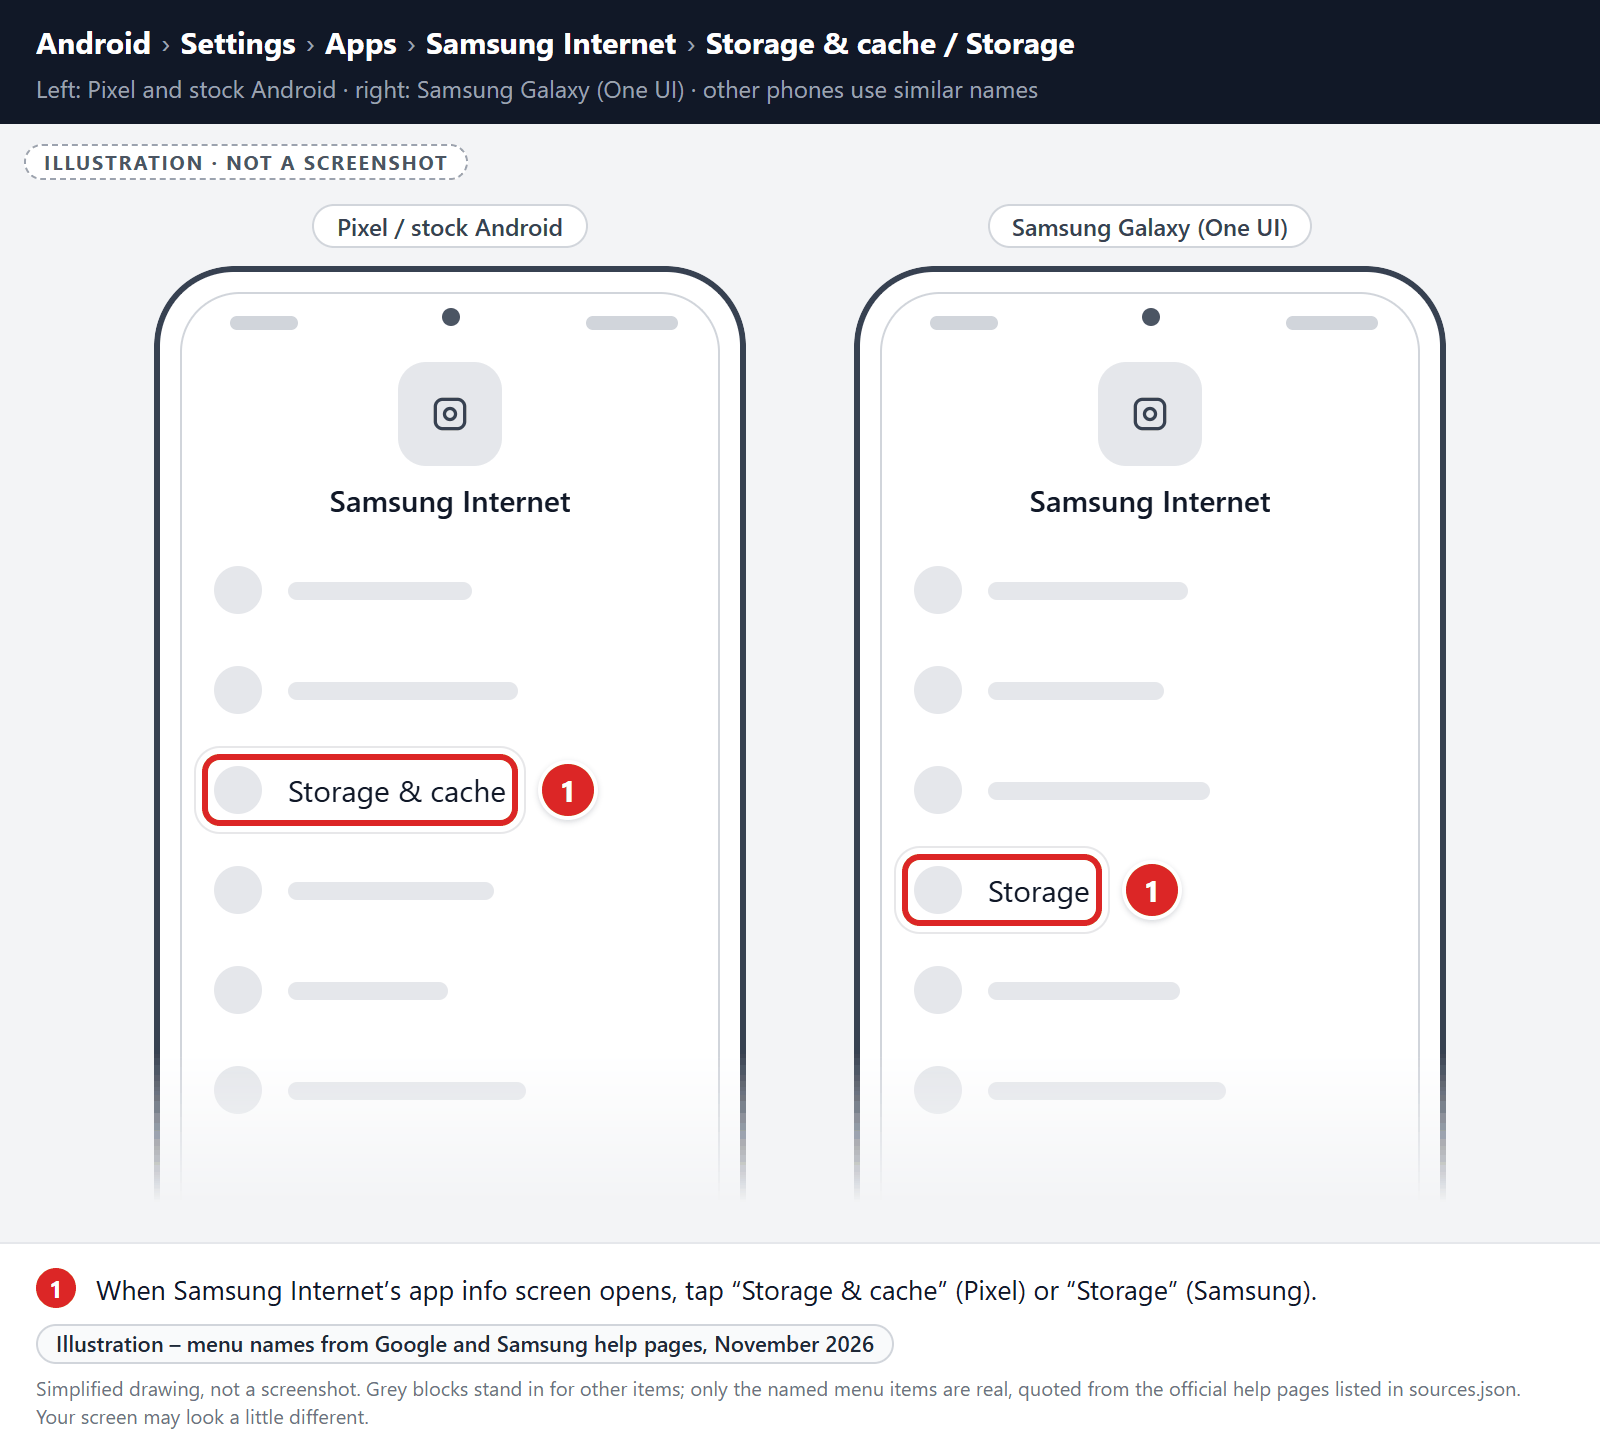
Tap “Storage”.
When Samsung Internet’s app info menu is displayed, tap on “Storage” (on Pixel phones, “Storage & cache“).
-
Tap “Clear storage” or “Clear data”.
Tap “Clear storage” (called “Clear data” on Samsung phones). If you see “Manage space” or “Manage storage” instead, tap it, then tap “Clear all data“. Don’t use “Clear cache” for this step, because it doesn’t reset the browser.
-
Confirm by tapping “OK”.
A confirmation dialog will appear. Tap “OK” or “Delete” to finish. When you open Samsung Internet again, sign back in and turn sync back on if you use it.
Remove malware from Microsoft Edge for Android
First, block the spam site’s notifications:
- Open Microsoft Edge, tap the menu button (three dots) at the bottom of the screen, and tap Settings.
- Tap Site permissions, then tap Notifications. In some versions, Site permissions is inside Privacy and security.
- Find the spam site in the list of allowed sites and switch it to Block.
If unwanted pages or redirects keep appearing, clear Microsoft Edge’s storage (last resort):
-
Open the “Settings” menu.
Tap on the “Settings” app from your phone menu or home screen.
-
Tap on “Apps”.
When the “Settings” menu opens, tap on “Apps” to see all the installed applications on your phone.
-
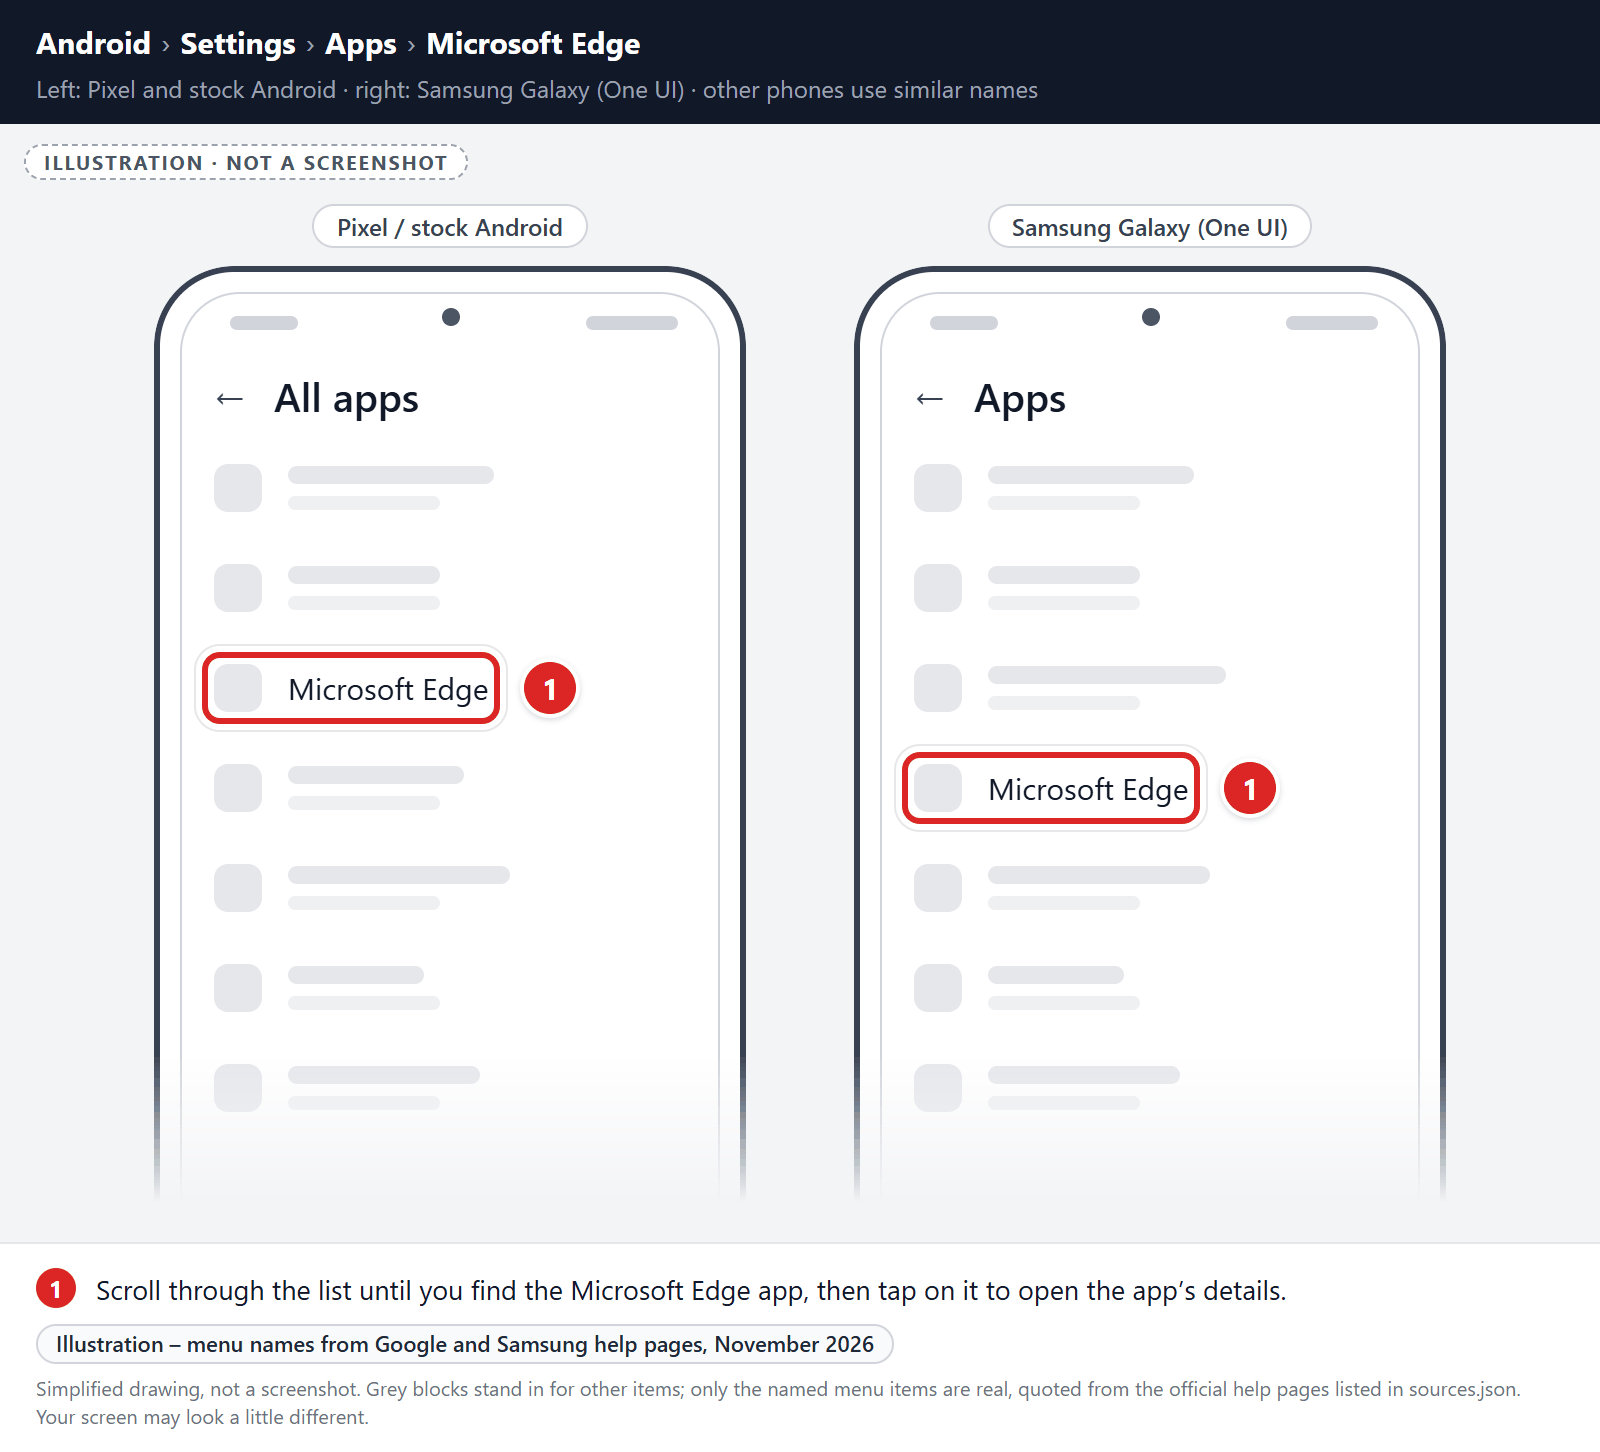
Find and tap on Microsoft Edge.
The “Apps” screen will be displayed with a list of all the apps installed on your phone. Scroll through the list until you find the Microsoft Edge app, then tap on it to open the app’s details.
-
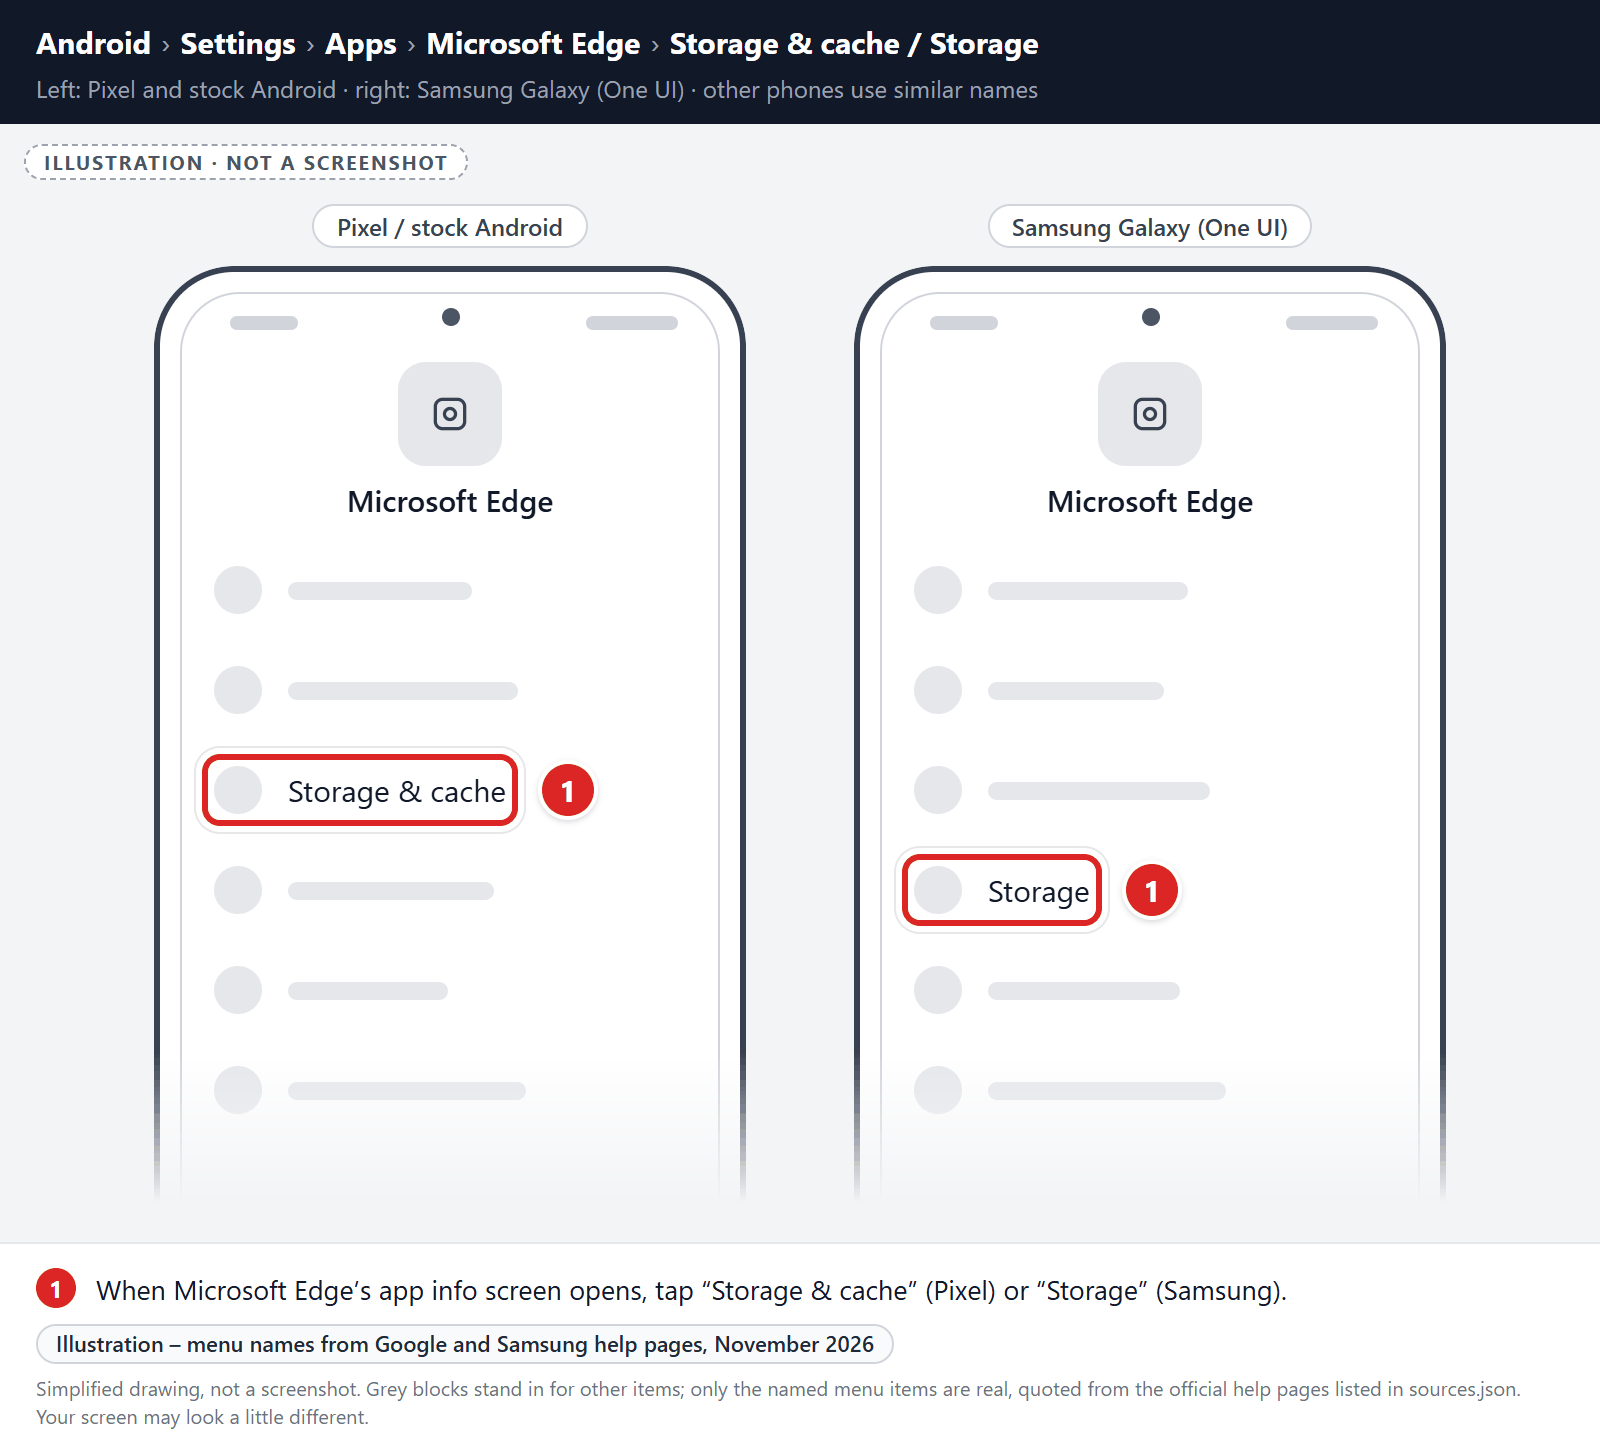
Tap “Storage”.
When the Microsoft Edge’s app info menu is displayed, tap on “Storage” (on Pixel phones, “Storage & cache“).
-
Tap “Clear storage” or “Clear data”.
Tap “Clear storage” (called “Clear data” on Samsung phones). If you see “Manage space” or “Manage storage” instead, tap it, then tap “Clear all data“. Don’t use “Clear cache” for this step, because it doesn’t reset the browser.
-
Confirm by tapping “OK”.
A confirmation dialog will appear. Tap “OK” or “Delete” to finish. When you open Microsoft Edge again, sign back in and turn sync back on if you use it.
STEP 3: Use Malwarebytes for Android to remove malicious apps
In this final step, we will install Malwarebytes for Android to scan and remove malicious apps from your phone or tablet.
Malwarebytes for Android scans your phone or tablet for malware, adware, and potentially unwanted apps. The free version scans only when you start a scan. Real-time protection, which checks apps automatically, is part of the paid Premium version.
-
Download Malwarebytes for Android.
You can download Malwarebytes for Android by clicking the link below.
Get Malwarebytes for AndroidOpens Google Play in a new tab.Want real-time protection? See Malwarebytes Premium for AndroidMalwarebytes for AndroidScans your phone and removes malware at no cost -
Install Malwarebytes for Android on your phone.
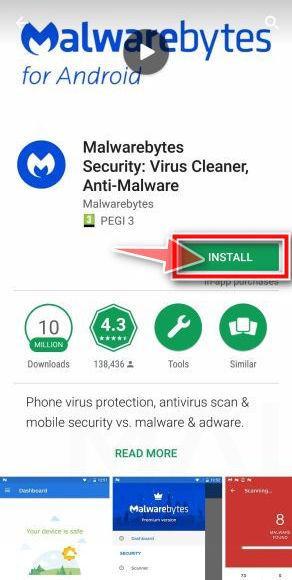
In the Google Play Store, tap “Install” to install Malwarebytes for Android on your device.
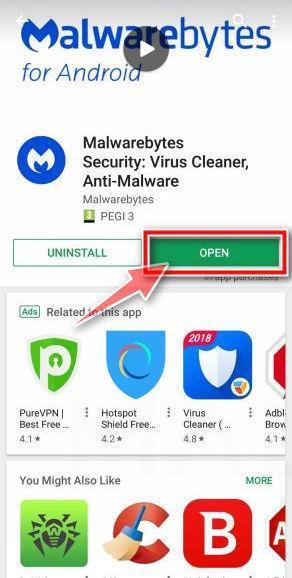
When the installation process has finished, tap “Open” to begin using Malwarebytes for Android. You can also open Malwarebytes by tapping on its icon in your phone menu or home screen.
-
Follow the on-screen prompts to complete the setup process
When Malwarebytes opens, it walks you through a short setup. Tap Get started and follow the prompts. If you see an offer for a trial or a paid plan, read it before you accept. You can skip it and keep using the free scanner.
Malwarebytes will ask for permission to access the files on your phone so it can scan them. Tap Allow, or turn on the permission in the Android screen that opens, then return to Malwarebytes.
-
Run a scan with Malwarebytes for Android
On the main screen, tap Scan now. In some versions, you open the menu, tap Scanner, and then tap Run a scan.
-
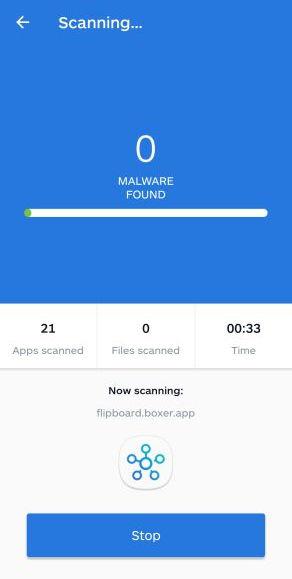
Wait for the Malwarebytes scan to complete.
Malwarebytes will now start scanning your phone for adware and other malicious apps. This process can take a few minutes, so we suggest you do something else and periodically check on the status of the scan to see when it is finished.
-
Remove the detected apps.
When the scan has been completed, you will see a list of the threats that Malwarebytes for Android has detected. Next to each detected item, tap the menu icon (three dots), then choose to uninstall the app or delete the file. Android then asks you to confirm. Tap OK or Uninstall to remove the app.
-
Restart your phone.
When the detected apps are removed, restart your phone if Malwarebytes asks you to. Then check whether the problems you noticed have stopped.
When you’ve finished these steps, check whether the problems you noticed have stopped. If they continue, see the options below.
If you are still having problems with your phone after completing these instructions, then please follow one of the steps:
- Ask for help in our Mobile Malware Removal Help & Support forum.
- Only as a last resort, reset your phone to factory settings. Read the warning below first.
- Back up your photos, videos, files, and messages, for example to your Google account or a computer.
- Make sure you know your Google account email and password. The phone asks for them after the reset. If you changed the password recently, Google recommends waiting 24 hours before you reset.
- On a Samsung phone, also make sure you know your Samsung account password.
- If you use an authenticator app for two-step verification, move your accounts to another device or save your backup codes first.
Remove Unwanted Apps and Malware from iPhone and iPad
STEP 1: Clean your browser
First, we’ll clean Safari using the built-in “Clear History and Website Data” feature. This removes your browsing history, cookies, and cached data — including the stored data that scam sites use to keep showing you pop-ups and redirects. Don’t worry: this won’t delete your photos, apps, or saved passwords, but it will sign you out of websites. To keep other sites signed in, you can remove only the scam site’s data instead: go to Settings > Apps > Safari > Advanced > Website Data, swipe left on the site, and tap Delete.
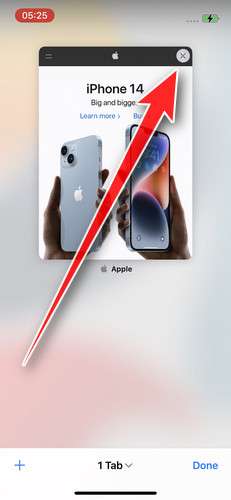
- Don’t tap anything inside the scam page or pop-up — the buttons are designed to trick you. Instead, tap the tabs icon in the lower-right corner of Safari, as shown below.

- Tap the X on the malicious tab (or swipe it up) to close it safely.
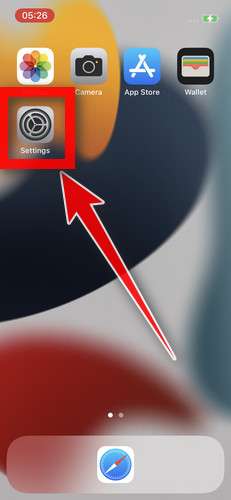
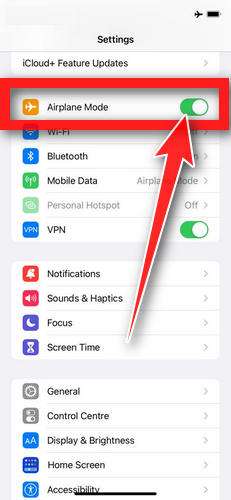
- Open the Settings app.
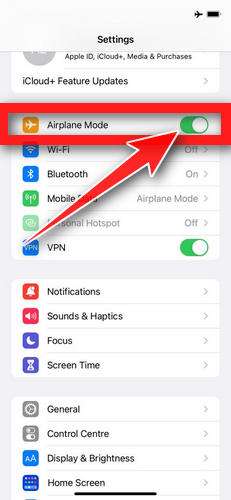
- Turn on Airplane Mode. This temporarily disconnects your iPhone from the internet, so the scam site can’t load anything while we clean up. We’ll turn it back off at the end.
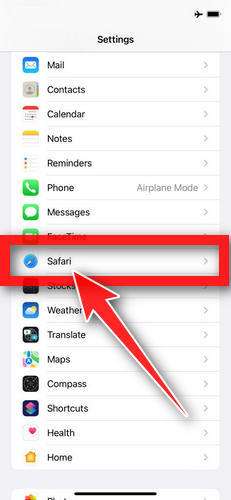
- Scroll down and tap Apps, then tap Safari. On iOS 17 and earlier, Safari is listed directly in Settings.
- Tap Clear History and Website Data.
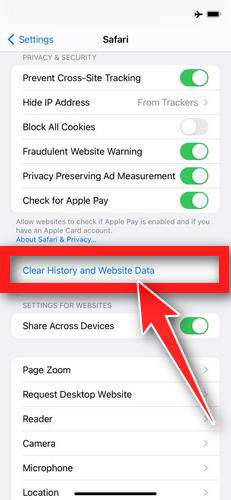
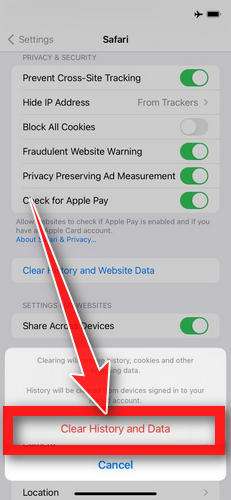
- If you’re asked to choose a timeframe, choose All history, then tap Clear History. On older iOS versions, tap “Clear History and Data” in the pop-up.
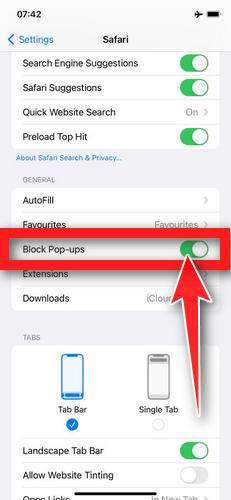
- While you’re still in Safari settings, turn on Block Pop-ups and Fraudulent Website Warning. These two switches stop most scam pages before they can even load.
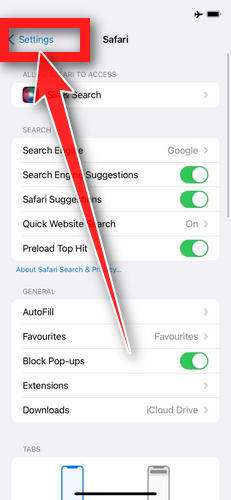
- Tap Settings in the upper-left corner to return to the main Settings menu.
- Turn Airplane Mode back off to reconnect your iPhone to the internet.
STEP 2: Delete unwanted apps
Next, we’ll remove any suspicious apps from your iPhone. If a shady website redirected you to the App Store and you installed an app — or you spot an app you don’t remember downloading — delete it now:
-
On the home screen, tap and hold the unwanted app’s icon until the icons start to wiggle.
-
Tap the minus (–) badge in the corner of the app icon, then tap Delete App. (On older iOS versions, this badge appears as an “X”.)
-
Confirm by tapping “Delete“.
Now reopen Safari and check whether the pop-ups have stopped.
To stop these scam pages from coming back, we recommend installing an ad blocker like AdGuard. It blocks the malicious ads and redirects that cause these pop-ups in the first place.
Still having issues after completing these steps? Try one of the following:
- Run a scan with Malwarebytes for iOS
- Ask for help in our free Mobile Malware Removal Help & Support forum — our team will assist you personally.
When you’ve finished these steps, check whether the pop-ups or other problems have stopped.
The Bottom Line
The “Tax Abatement and Relief Office Scam” scam calls work because they feel official while staying just vague enough to keep you uneasy.
They do not prove you owe anything. They do not need to. They only need you to call back, because the real scam begins after the voicemail.
If you got one of these messages, the safest move is simple: do not engage, do not call back, and verify any real tax concerns through official channels you look up yourself.
And if you already responded, you still have control. Cut contact, secure accounts, scan devices with Malwarebytes, reduce future exposure with AdGuard, and take practical steps to protect your identity and money.
FAQ
Is “Tax Abatement and Relief Office Scam” a real company?
Sometimes scammers use real business names, but most “Tax Abatement and Relief Office Scam” robocalls are not from a legitimate tax firm. The safer approach is to judge the behavior, not the name. A vague robocall about “back taxes” or “new resolution programs” is a major red flag.
Why do these calls say I have “back taxes and missed filings”?
Because it triggers fear and uncertainty without giving details you can verify. Scammers keep it broad so it can apply to almost anyone, then they rely on you calling back.
Are these calls actually from the IRS?
No. These scam calls often imply IRS involvement, but they are not official IRS outreach. If you did have a real issue, you would typically have written notices and specific identifiers, not a generic voicemail.
What does “new resolution programs available for a limited time” mean?
In scam calls, it is a pressure tactic. Real tax resolution is not a limited-time phone offer. Scammers use this line to make you act before you verify anything.
What are the biggest red flags that it’s a scam?
Common red flags include:
- A robocall or scripted voicemail
- Vague claims with no tax year, no notice number, and no documentation
- Pressure to act today or “before it escalates”
- Promises of guaranteed relief or unusually large refunds
- Requests for sensitive info right away (SSN, banking details, ID photos)
- Payment demands that feel urgent or unusual
Do legitimate tax professionals contact people with robocalls?
Legitimate firms may advertise, but they do not typically leave threatening or urgent voicemails about “missed filings” and then rush you into payment or sensitive disclosures. A credible tax professional will explain who they are, provide verifiable business details, and allow you to verify independently.
What happens if I call back?
Usually one of two things:
- They collect personal information under the excuse of “verifying your file.”
- They push a fee to “start your case,” “enroll you,” or “process paperwork.”
In some cases, the scam escalates into remote access or banking theft tactics.
Can scammers use this to steal my identity?
Yes. If you share your full name, address, date of birth, SSN, or ID images, scammers can attempt identity theft, open accounts, or use your data in future scams.
Can this turn into a remote access scam?
Yes. Some tax-themed scam calls pivot into fake security or tech support. They may claim your device is compromised and pressure you to install remote access tools (like AnyDesk) so they can “help.” That is a serious danger sign.
I gave them personal information. What should I do now?
Take practical steps right away:
- Stop contact and block the number.
- Change your email password first, then banking and payment passwords.
- Turn on 2-factor authentication wherever possible.
- Monitor bank activity and login alerts.
- Consider a fraud alert or credit freeze if you shared SSN or ID details.
I paid them. Can I get my money back?
It depends on the payment method:
- Card payments: call your bank and ask about chargebacks and fraud claims.
- Wire transfers: ask immediately about a wire recall.
- Gift cards: contact the gift card issuer quickly, there is sometimes a short window if codes were not redeemed.
Act fast. Speed matters for recovery.
I installed software or clicked a link they sent. What should I do?
- Disconnect from the internet if you suspect remote access was involved.
- Uninstall any remote access tools immediately.
- Run a full scan with Malwarebytes.
- Change passwords from a different, trusted device.
- Contact your bank if you logged in to financial accounts during the incident.
How can Malwarebytes and AdGuard help?
- Malwarebytes helps scan for malware, adware, and unwanted programs, especially if you installed anything or allowed remote access.
- AdGuard helps reduce malicious ads, scam pop-ups, and redirect pages that often push fake “support” numbers and phishing traps.
How do I verify if I actually owe taxes safely?
Do not use the callback number from the voicemail. Verify through official IRS channels you find independently, or speak with a licensed tax professional (CPA, EA, or tax attorney) using contact info you confirm yourself.

Join the discussion
0 commentsShare your experience or ask a question about this article.
Discussion
Start the conversation
Have a question or something useful to share? Add the first comment.