D
Deleted member 21043
Thread author
Hi everyone,
Previous article: Malware Analysis #2 - What is Entropy and how do I find the Entropy of a file?
In this thread, I will go through some information about reverse engineering/deobfuscation. This reply techniques will only be valid for a .NET executable. If you have a sample which is not based in the .NET Framework, soon I will mention using disassembler tools for analysis, which can be used with them (in another thread, the disassembler will be IDA... You could do some research first if you'd like and get on track with it. )
)
Part 1 – Understanding what reverse engineering and deobfuscation is
Having no prior experience with reverse engineering something (malware for example) and using deobfuscation techniques, this may be a bit tricky and daunting to get your head around at first. In the end, all will be okay, after some practise… So, don’t worry!
Before I go in the definitions/explanations, I will say that it is best you gain some experience in the Programming field for this. Otherwise, I don’t see how you will understand the code and what it does. This can be in VB.NET, C#.NET and C++.NET, since those 3 are .NET languages (don’t get mixed with native C++ and C++.NET). You aren’t required to be able to use your skills to make stable software for released, but maybe the basics and to be able to make some things, as this will give you the ability to attempt to understand the written code by malware writers in the sample.
So what is Reverse Engineering?
Reverse Engineering is basically stripping out information on how a certain object works. For example, if you had object A and you did Reverse Engineering with it, you could obtain things like parts of the code to see how it worked (after understanding it), and with this, you may see sensitive information from the code, such as URL links which may want to stay hidden and other information which may allow someone to attack your service or crack your product. This is one of the reasons why someone may attempt to “obfuscate” their .NET assembly. However, of course, no protection is bullet proof. If it was, there would be a pain for people who want to analyse the sample for good reasons (Malware Analysis), which sometimes it may very well be depending on how strong the obfuscation was.
So what is deobfuscation?
Deobfuscation is basically stripping off the obfuscation. Obfuscation is a term used by software engineers to refer to a .NET assembly which has added “protection” (not just .NET assemblies though can be obfuscated), to try to prevent reverse engineering of the sample. This may be used by both official and legit companies to protect their code from being stolen by another third party company or developer, to stop their product from being cracked or sensitive information on how their product works obtained by a hacker, and but not including malware writers on their sample. As a note, of course not every sample based in .NET is “obfuscated”.
Part 2 – Tools used for reverse engineering and deobfuscation of .NET assemblies
As noted down in my original post, we will be using some tools known as de4dot, .NET reflector. The download links are displayed below for you to easily download them:
.NET Reflector (by Redgate): .NET decompiler: decompile any .NET code | .NET Reflector (you can use a trial to start with at least, there are free reverse engineering software for .NET and I will include them sometime in this thread).
De4dot: de4dot - Free .NET Deobfuscator (download the ZIP package available on the site through one click on a button).
Part 3 – Using the software
Of course I cannot just leave you with the links to download the software, I must first teach you how to use the software, so I will briefly .
.
.NET Reflector:
De4dot:
Please bear in mind, for .NET reverse engineering to understand code and find out malicious code you will need at least some knowledge. You can learn some VB and understand a lot of code within a few weeks – a few months of learning. VB/C# isn’t too difficult, don’t worry!
Remember, de4dot cannot deobfuscate every .net obfuscation. It has a list of supported obfuscators listed on the website.
However, soon, there should be a tutorial on using a disassembler called IDA, which won’t be restricted to just .NET malware. A majority of malware is built from Assembly, C, C++, Python, Java etc… So that will be more useful.
I personally feel that this thread is certainly not as good as it should be. I will make a few more tutorials on other things, and then I will come back here and change some things.
As usual, spot anything incorrect, let me know ASAP to change it.
Before I end this thread, I will say that you are probably thinking: so how do I use any of this for malware analysis? Right now, I am pretty much just explaining some uses of the tools and brief instructions, but a few threads from now I will setup a thread where I will show how to use all the skills from the threads I have been creating to analyze malware. A thread about rootkit analysis, and so on will also be coming soon. That should be good, excited to write it up... But I can't for now until all the other threads necessary, as you must first be taught about things like the different types of hooking, what a rootkit will do to things like the SSDT (System Service Descripter Table), etc.
Next tutorial: Malware Analysis #4 - Lots of information, maybe more than you need
Cheers.
Previous article: Malware Analysis #2 - What is Entropy and how do I find the Entropy of a file?
In this thread, I will go through some information about reverse engineering/deobfuscation. This reply techniques will only be valid for a .NET executable. If you have a sample which is not based in the .NET Framework, soon I will mention using disassembler tools for analysis, which can be used with them (in another thread, the disassembler will be IDA... You could do some research first if you'd like and get on track with it.
Part 1 – Understanding what reverse engineering and deobfuscation is
Having no prior experience with reverse engineering something (malware for example) and using deobfuscation techniques, this may be a bit tricky and daunting to get your head around at first. In the end, all will be okay, after some practise… So, don’t worry!
Before I go in the definitions/explanations, I will say that it is best you gain some experience in the Programming field for this. Otherwise, I don’t see how you will understand the code and what it does. This can be in VB.NET, C#.NET and C++.NET, since those 3 are .NET languages (don’t get mixed with native C++ and C++.NET). You aren’t required to be able to use your skills to make stable software for released, but maybe the basics and to be able to make some things, as this will give you the ability to attempt to understand the written code by malware writers in the sample.
So what is Reverse Engineering?
Reverse Engineering is basically stripping out information on how a certain object works. For example, if you had object A and you did Reverse Engineering with it, you could obtain things like parts of the code to see how it worked (after understanding it), and with this, you may see sensitive information from the code, such as URL links which may want to stay hidden and other information which may allow someone to attack your service or crack your product. This is one of the reasons why someone may attempt to “obfuscate” their .NET assembly. However, of course, no protection is bullet proof. If it was, there would be a pain for people who want to analyse the sample for good reasons (Malware Analysis), which sometimes it may very well be depending on how strong the obfuscation was.
So what is deobfuscation?
Deobfuscation is basically stripping off the obfuscation. Obfuscation is a term used by software engineers to refer to a .NET assembly which has added “protection” (not just .NET assemblies though can be obfuscated), to try to prevent reverse engineering of the sample. This may be used by both official and legit companies to protect their code from being stolen by another third party company or developer, to stop their product from being cracked or sensitive information on how their product works obtained by a hacker, and but not including malware writers on their sample. As a note, of course not every sample based in .NET is “obfuscated”.
Part 2 – Tools used for reverse engineering and deobfuscation of .NET assemblies
As noted down in my original post, we will be using some tools known as de4dot, .NET reflector. The download links are displayed below for you to easily download them:
.NET Reflector (by Redgate): .NET decompiler: decompile any .NET code | .NET Reflector (you can use a trial to start with at least, there are free reverse engineering software for .NET and I will include them sometime in this thread).
De4dot: de4dot - Free .NET Deobfuscator (download the ZIP package available on the site through one click on a button).
Part 3 – Using the software
Of course I cannot just leave you with the links to download the software, I must first teach you how to use the software, so I will briefly
.NET Reflector:
Installation:
Once you have downloaded .NET reflector (filename should be ReflectorInstaller.exe (setup file), or it is at least now when I am making this thread), open it up to install it.
After the installer has opened, follow the on-screen instructions on the setup to complete the installation.
Once the installation has successfully completed, find .NET reflector on your system and open it up – this can be accomplished through searching for “.NET Reflector” in Start menu, without the “” of course.
Usage:
Open up .NET Reflector.
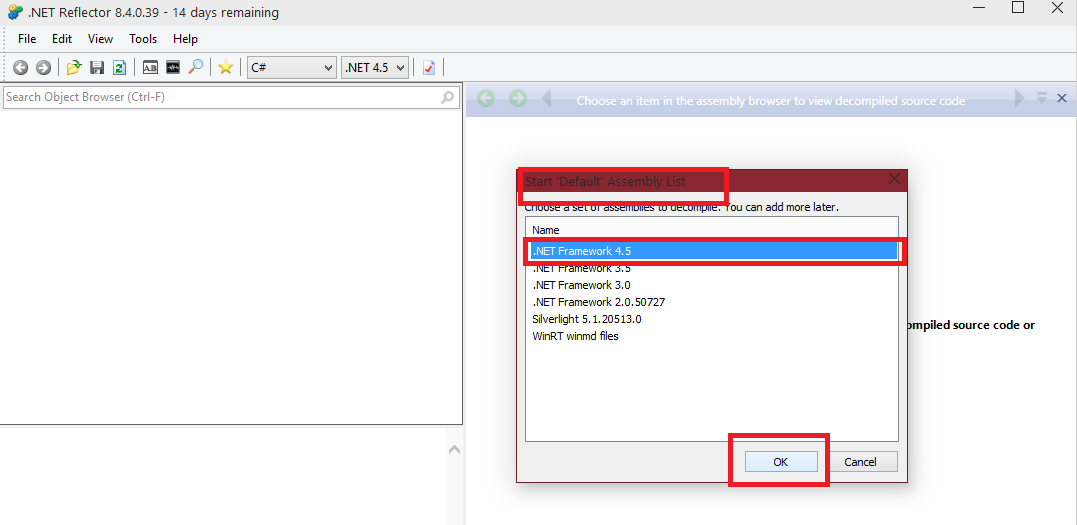
First use notice: You may be prompted with a dialog like in the below screenshot. You can select .NET Framework 4.5 and continue with that. Either way, you can add more later on.
Once we are done with this, you should have the following look of an application:
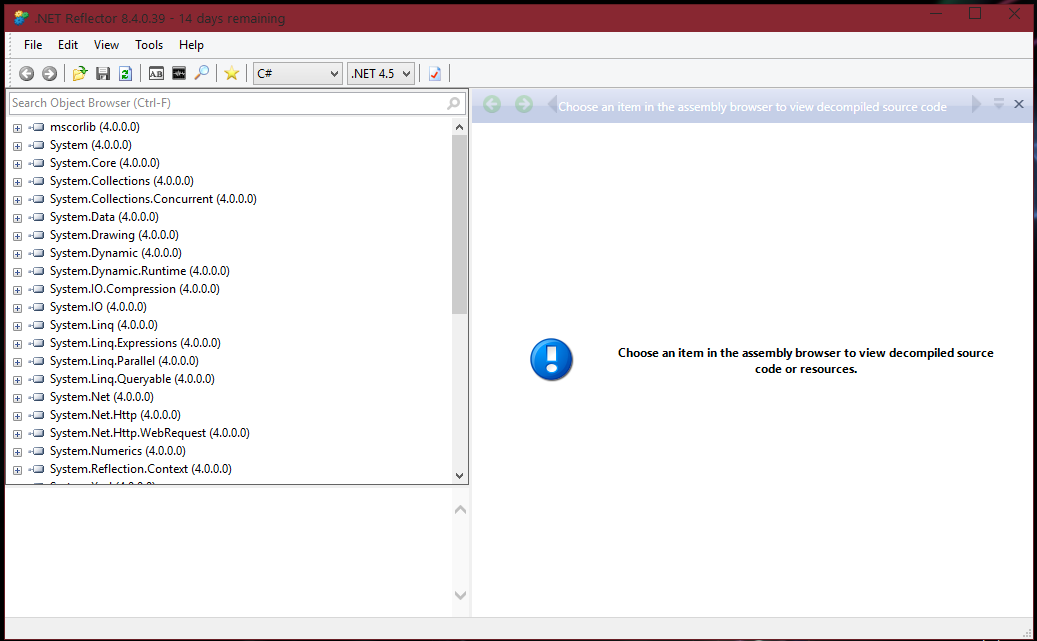
On the left hand side, you have the Object Browser. This contains a grouped list of the assemblies loaded in Reflector, available to be reverse engineered. By clicking the arrows next to them, a dropdown with nested items will occur, which can be expanded more.
See the below screenshot for another example of what this looks like:
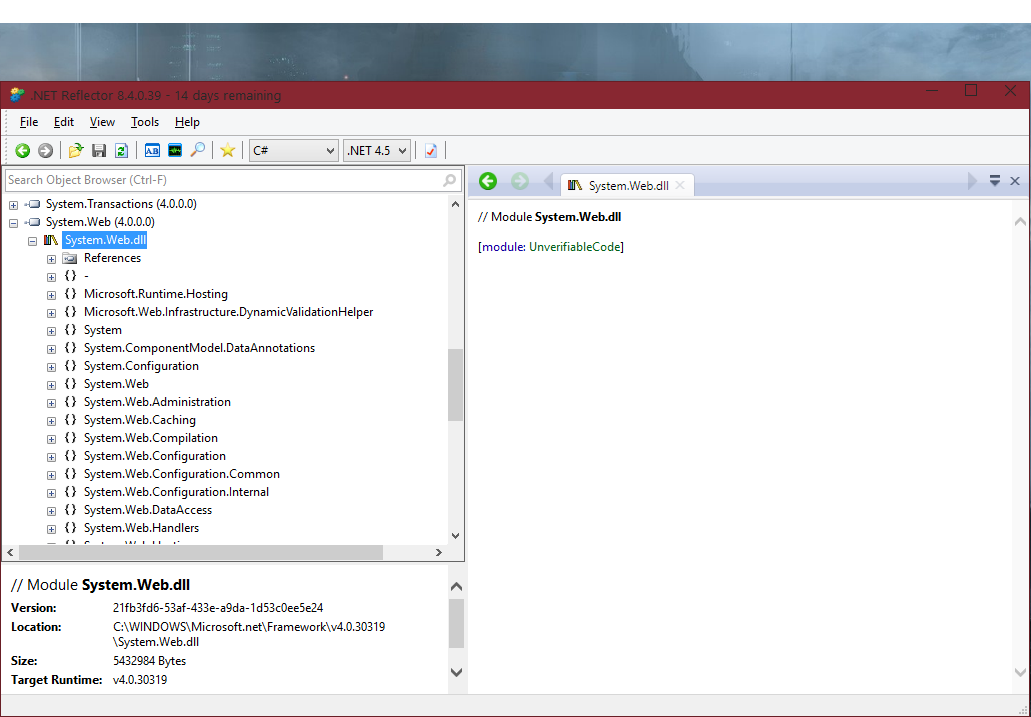
By expanding those objects shown, you will be presented with more nested items, representing the classes. Inside these classes contains the code. This may be the designer class which holds the code for the window design (if you had experience with a .NET language you would understand this better), or the code for the actions of when a certain control is clicked (in other words, an “Event”).
At the top you will notice that there is what .NET developers can call a “Combo box”, but what you may call a “dropdown box” which value is “C#”. C# is the language it will convert the code too. You can change this to VB, IL, MC++ (C++.NET) and F#.
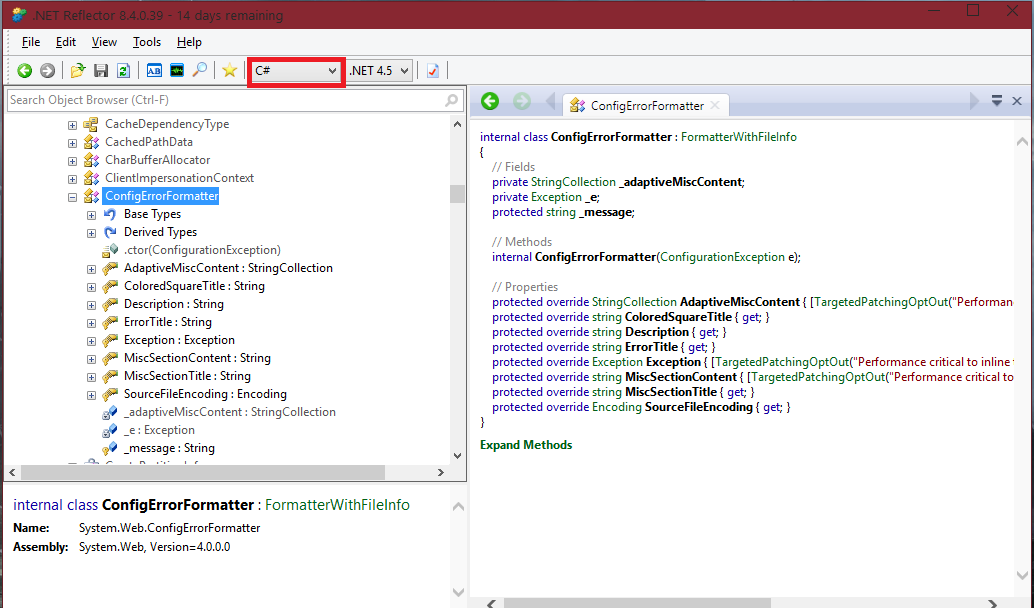
What I will now do to help you understand more how to use this software, is choose another .NET assembly, and expand to the classes, pick a class and then display the code to it in the Code browser (which is shown on the right hand side, by the way). I will then change the language with the combo box shown at the top to VB.NET.
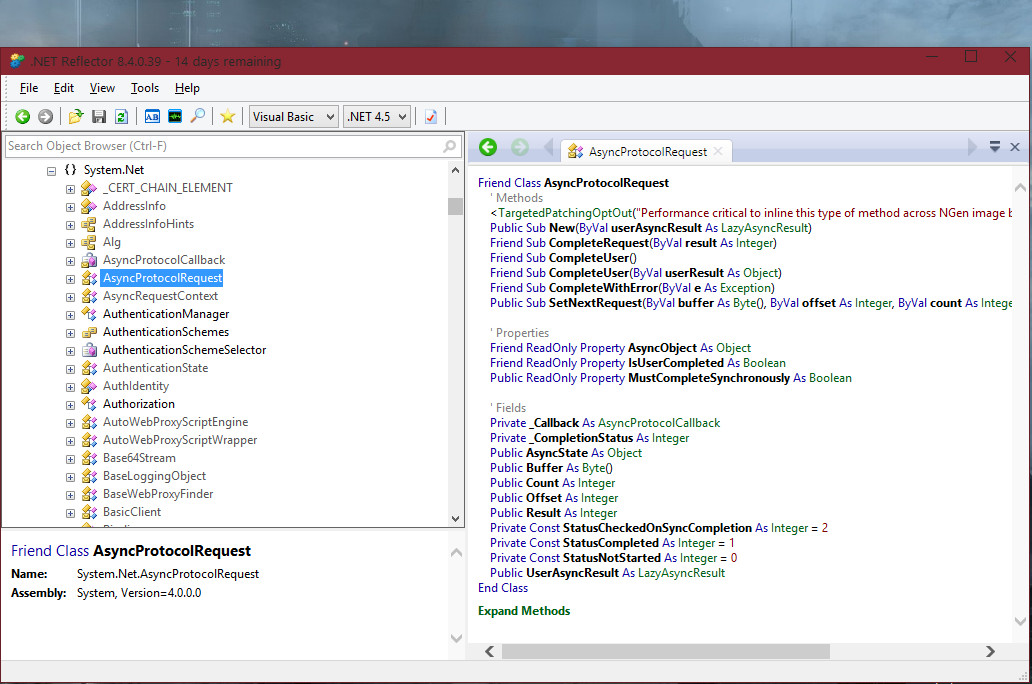
As we can see in the above screenshot, I chose System > System.dll > System.Net > AsyncProtocolRequest. The code for it is then shown in the Code browser to the right.
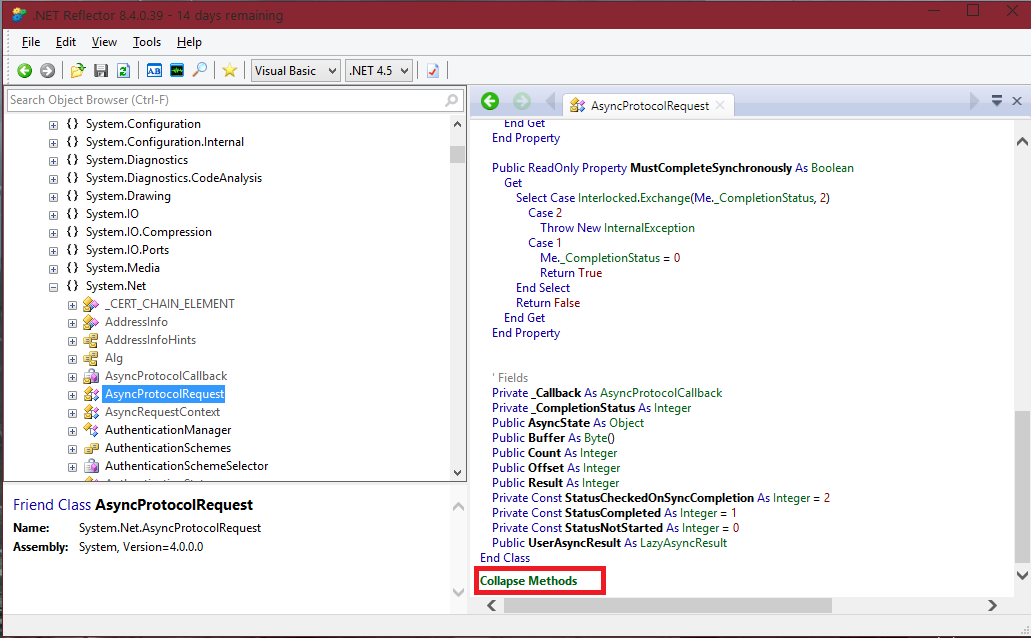
If you would like to view all the methods, click the “Expand Methods” link at the bottom. Once clicked, it will expand the methods. It will then change too “Collapse Method”, which will then hide them. (See below image).
.NET Reflector also has some more additional options, such as the “Analyze” option. It also supports third-party add-ins. J
Once you have downloaded .NET reflector (filename should be ReflectorInstaller.exe (setup file), or it is at least now when I am making this thread), open it up to install it.
After the installer has opened, follow the on-screen instructions on the setup to complete the installation.
Once the installation has successfully completed, find .NET reflector on your system and open it up – this can be accomplished through searching for “.NET Reflector” in Start menu, without the “” of course.
Usage:
Open up .NET Reflector.
First use notice: You may be prompted with a dialog like in the below screenshot. You can select .NET Framework 4.5 and continue with that. Either way, you can add more later on.

Once we are done with this, you should have the following look of an application:

On the left hand side, you have the Object Browser. This contains a grouped list of the assemblies loaded in Reflector, available to be reverse engineered. By clicking the arrows next to them, a dropdown with nested items will occur, which can be expanded more.
See the below screenshot for another example of what this looks like:

By expanding those objects shown, you will be presented with more nested items, representing the classes. Inside these classes contains the code. This may be the designer class which holds the code for the window design (if you had experience with a .NET language you would understand this better), or the code for the actions of when a certain control is clicked (in other words, an “Event”).
At the top you will notice that there is what .NET developers can call a “Combo box”, but what you may call a “dropdown box” which value is “C#”. C# is the language it will convert the code too. You can change this to VB, IL, MC++ (C++.NET) and F#.

What I will now do to help you understand more how to use this software, is choose another .NET assembly, and expand to the classes, pick a class and then display the code to it in the Code browser (which is shown on the right hand side, by the way). I will then change the language with the combo box shown at the top to VB.NET.

As we can see in the above screenshot, I chose System > System.dll > System.Net > AsyncProtocolRequest. The code for it is then shown in the Code browser to the right.
If you would like to view all the methods, click the “Expand Methods” link at the bottom. Once clicked, it will expand the methods. It will then change too “Collapse Method”, which will then hide them. (See below image).

.NET Reflector also has some more additional options, such as the “Analyze” option. It also supports third-party add-ins. J
De4dot:
Installation:
Extract De4dot to another folder from the ZIP.
Usage:
Open up the de4dot folder. There should be another folder with the name of Bin and Licenses, along with some other files in that root directory of the de4dot folder (de4dot > …).
The main program we need for the deobfuscation process is de4dot.exe.
1) Open up the path of the malware sample which is based in .NET (obfuscated) which needs to be used in de4dot.
2) Drag the target program and drop it onto de4dot.exe from the de4dot folder.
3) A CMD like (console) window should appear to show the progress for the deobfuscation process.
4) A copy of the program should be dropped <LOCATION> (desktop?) with “cleaned” added to the filename. This is the de-obfuscated copy.
5) Try to use reverse engineering software like .NET Reflector with the de-obfuscated sample, and see if it then works.
(Screenshots coming soon, I promise).
Please bear in mind, for .NET reverse engineering to understand code and find out malicious code you will need at least some knowledge. You can learn some VB and understand a lot of code within a few weeks – a few months of learning. VB/C# isn’t too difficult, don’t worry!
Remember, de4dot cannot deobfuscate every .net obfuscation. It has a list of supported obfuscators listed on the website.
However, soon, there should be a tutorial on using a disassembler called IDA, which won’t be restricted to just .NET malware. A majority of malware is built from Assembly, C, C++, Python, Java etc… So that will be more useful.
I personally feel that this thread is certainly not as good as it should be. I will make a few more tutorials on other things, and then I will come back here and change some things.
As usual, spot anything incorrect, let me know ASAP to change it.
Before I end this thread, I will say that you are probably thinking: so how do I use any of this for malware analysis? Right now, I am pretty much just explaining some uses of the tools and brief instructions, but a few threads from now I will setup a thread where I will show how to use all the skills from the threads I have been creating to analyze malware. A thread about rootkit analysis, and so on will also be coming soon. That should be good, excited to write it up... But I can't for now until all the other threads necessary, as you must first be taught about things like the different types of hooking, what a rootkit will do to things like the SSDT (System Service Descripter Table), etc.
Next tutorial: Malware Analysis #4 - Lots of information, maybe more than you need
Cheers.
Last edited by a moderator: