Hey guys, Aura AKA Yoan for a third Windows tutorial on malwaretips.com !
In this tutorial, I'll go over an important Window utility that many people have difficulty to use, which is the Disk Management utility. The Disk Management utility is Windows integrated utility to manage disks, volumes and partitions. From there, you can see the disks that are currently detected by Windows, mount and unmount volumes, as well as create and delete partitions. This utility is one of the easiest to use when you want to do quick disks management on your Windows system.
First of all, we have to access the Disk Management utility window. The standard way of proceding is by right-clicking on Computer and selecting "Manage" (requires Admin. Rights). From there, you just click on the "Disk Management" option in the left tab of the Computer Management window. Simple, no ?


Now, let's analyze what we have here in the first top half of the window.

First of all, every volumes detected by Windows are listed in the first half of the Window. Which means, every hard disk drives (HDD), solid states drives (SSD), USB flash key, CD/DVD-ROM, SD cards, etc. Every storage device will be listed in this section. Then, we have different informations listen about these volumes.
Now, let's take a look at the second bottom half of the window.

Here is where you'll see of what partitions and volumes are composed every disks as well as the total space of these disks and if they are actually connected or not. We can see that I have two "disks" connected to my computer right now : my main hard disk drive (HDD) and a I have a CD/DVD-ROM. We can see that the Disk 0 represents my HDD and that it's composed of two partitions : a system reserved partition (present on every HDDs) and the main partition of my HDD (where I'll put all my files, folders, programs, etc.) which have the letter C: attributed to it, which means, that it's the partition where my Windows is installed. We can also see that the CD ROM 0 space represents my CD/DVD-ROM where I can insert my CDs and DVDs. Right now, I have a 278MBs CD/DVD in it, therefore it explains why a size is displayed.
Now, let's see the options we have when we right-click on a disk, volume or partition.

Now, let's see that I want to create a new partition on which I want to store random files (pictures, music, videos, etc.) Because I don't have any unallocated space to create a new partition, I'll have to shrink my one of my current partition. For that, I'll shrink 50GBs off my D: partition, which is my whole HDD. For that, I'll right-click on my U: (this screenshot is from Harlem. In his case, one of his partition add the letter U: attributed) partition and select "Shrink volume" and a new window will then pop up.
Let's see what we have here :
Because I want to create a 50GBs partition, I'll have to shrink 50 x 1024 MBs = 51200 MBs from that partition. I know have a 50GBs size unallocated partition, on which I can right-click and select "New Simple Volume".

When selecting that option, a Volume Creation Assistant window will pop up, helping us through the steps of creating a new partition.

Let's start by clicking on "Next". The first step is to determine what size we want to allow to that new partition in MBs. Because I shrunk 50GBs of my D: partition, I'll create a 50GBs partition, therefore allowing 51200 MBs of space.

Next, we'll be asked if we want to attribute a letter to our new partition, mount it in a NTFS folder or just create the partition, without attributing it any drive letter or access path (if you pick that option, you'll have to use the Modify drive letter and access paths option after creating the partition by right-clicking on it). In my case, I want to attribute my partition a letter, so it will be mounted as a "drive" and I'll have easy access to it via the Windows Explorer.

Now it's the time for the last details before creating our new partition. It can be summed up to two options : to format the unallocated space before creating the partition, or to not format it. Everytime you create a new partition from scratch, you should format it. Then you'll have to select the file system of that partition, the allocation unit size and the name you want to give to that new partition (the name that will show up in the Windows Explorer). Also, you can choose to do a quick format and to activate files and folders compression. This window here is the same as the one you get when you right-click on a partion and select "Format". In my case, I'll leave everything as it is, except that I'll name my new partition "Files".

Then click "Next" and you'll get to that last window that will sum up all the informations on your new partition. When you're ready to create it, just click "Finish" and let Windows create your new partition. And here's the results ! I know have a brand new partition named Files with 50GBs of space to store all my personal files ! And this is how you create a simple new partition via Windows Disk Management Utility.

[align=center]If you have any questions about how to use Windows Disk Management Utility, or you don't understand a point, or you would want me to detail more a point that I covered or didn't cover in that tutorial, tell me and I'll gladly do it.
In this tutorial, I'll go over an important Window utility that many people have difficulty to use, which is the Disk Management utility. The Disk Management utility is Windows integrated utility to manage disks, volumes and partitions. From there, you can see the disks that are currently detected by Windows, mount and unmount volumes, as well as create and delete partitions. This utility is one of the easiest to use when you want to do quick disks management on your Windows system.
First of all, we have to access the Disk Management utility window. The standard way of proceding is by right-clicking on Computer and selecting "Manage" (requires Admin. Rights). From there, you just click on the "Disk Management" option in the left tab of the Computer Management window. Simple, no ?
Now, let's analyze what we have here in the first top half of the window.
First of all, every volumes detected by Windows are listed in the first half of the Window. Which means, every hard disk drives (HDD), solid states drives (SSD), USB flash key, CD/DVD-ROM, SD cards, etc. Every storage device will be listed in this section. Then, we have different informations listen about these volumes.
- Volume : This details the name of the volume and the letter attributed to that volume (exemple, C: being the letter attributed to the primary volume, where Windows is installed).
- Layout : The layout of the drive, which will mention if the volume is a volume, a partition or a disk.
- Type : The type of the drive : basic or dynamic.
- Basic drive :
Basic disks are the storage types most often used with Windows. The term basic disk refers to a disk that contains partitions, such as primary partitions and logical drives, and these in turn are usually formatted with a file system to become a volume for file storage.
- Dynamic drive :
Dynamic disks provide features that basic disks do not, such as the ability to create volumes that span multiple disks (spanned and striped volumes) and the ability to create fault-tolerant volumes (mirrored and RAID-5 volumes).
- Basic drive :
- File System : This identify the file system of the volume. Under Windows, you'll mostly see NTFS (Windows NT File System) volumes. There's also other type of File Systems like FAT32, ext2, ext3, ext4, swap, etc. You can find a list of these File Systems here : List of file systems
- Status : The current status of the volume, for exemple healthy and unhealthy. An healthy volume means that the volume is running normally without any problems, while an unhealthy volume means that this volume requires attention as there might be a default in it or it's corrupted.
- Capacity : The size of the volume (in KBs, MBs, GBs, TBs, etc.).
Free Space : The amount of free space on that volume (in KBs, MBs, GBs, TBs, etc.). - % Free : How many % is still free to be filled on the volume.
Fault Tolerance : If the drive uses Windows 2000 fault tolerance features, like mirroring or striping. - Overhead : If you use the fault tolerance feature on the volume, this will display the additional volume space required by the volume to use the Fault Tolerance feature.
Now, let's take a look at the second bottom half of the window.
Here is where you'll see of what partitions and volumes are composed every disks as well as the total space of these disks and if they are actually connected or not. We can see that I have two "disks" connected to my computer right now : my main hard disk drive (HDD) and a I have a CD/DVD-ROM. We can see that the Disk 0 represents my HDD and that it's composed of two partitions : a system reserved partition (present on every HDDs) and the main partition of my HDD (where I'll put all my files, folders, programs, etc.) which have the letter C: attributed to it, which means, that it's the partition where my Windows is installed. We can also see that the CD ROM 0 space represents my CD/DVD-ROM where I can insert my CDs and DVDs. Right now, I have a 278MBs CD/DVD in it, therefore it explains why a size is displayed.
Now, let's see the options we have when we right-click on a disk, volume or partition.
- Open : Open in the Windows Explorer the current partition (which means, if I select that option on my C: partition, it will open the Windows Explorer in my C: drive);
- Explore : Same thing as Open;
- Mark Partition as Active : This means that you identify that partition as a partition that contains an OS from which you can boot;
- Change Drive Letter and Paths : This is where you'll attribute a letter to a partition and where you'll define the path of this partitions;
- Format : This option allows you to format your partition. It will ask what name you want to give to the new partition, what file system you want to use for that patition as well as the unit allocation size. It will also give you checkboxes options that are : quick format and activate files and folder compression. Usually when using that option, you would just leave everything as it is and click "OK";
- Expand Volume : This option is used when you have an unallocated volume and you wish that allocate to a partition more space, by taking space from that unallocation volume/partition;
- Shrink Volume : This option is used when you want to shrink the size or a partition/volume. The shrinked space will convert itself into an unallocated volume and will wait to be formatted and allocated before being used. You can use the free space of that unallocated volume/partition to expand the size of another volume/partition;
- Add Mirror : This option allows you to add a miror disk to the current partition. A miror disk is a fault-tolerant volume that uses two copy of the actual volume to duplicate the data stored on that volume. Everything that is written to that miror will be written on both miror that should be located on two different physical disks.
- Delete Volume : Like the name state, this allows you to delete the current partition/volume, and will transform all of it into an unallocated volume/partition;
- Properties : This option will prompt you the properties window of the partition, where you can see general informations about it, tools that can be used on it, what is the partition material, if you want to share it, etc.
- Help : Need an explanation on this one ?;
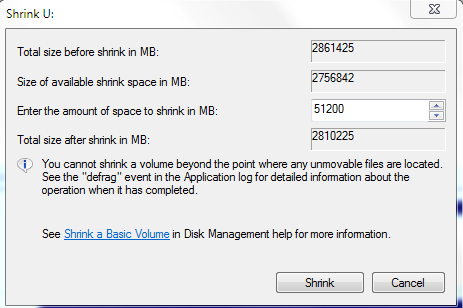
Now, let's see that I want to create a new partition on which I want to store random files (pictures, music, videos, etc.) Because I don't have any unallocated space to create a new partition, I'll have to shrink my one of my current partition. For that, I'll shrink 50GBs off my D: partition, which is my whole HDD. For that, I'll right-click on my U: (this screenshot is from Harlem. In his case, one of his partition add the letter U: attributed) partition and select "Shrink volume" and a new window will then pop up.
Let's see what we have here :
- Total size in MBs before shrinking : This shows the total size of the actual partition in MBs;
- Available shrinking size in MBs : This shows the actual total size we can shrink of that volume in MBs;
- Size to shrink in MBs : This is the only space that you can modify. Here, you'll enter the total size in MBs you want to shrink of the current partition. [1024 MBs = 1GB];
- Total size in MBs after shrinking : The total size of the partition after the shrink operation (Total size in MBs before shrinking - Size to shrink in MBs);
Because I want to create a 50GBs partition, I'll have to shrink 50 x 1024 MBs = 51200 MBs from that partition. I know have a 50GBs size unallocated partition, on which I can right-click and select "New Simple Volume".
When selecting that option, a Volume Creation Assistant window will pop up, helping us through the steps of creating a new partition.
Let's start by clicking on "Next". The first step is to determine what size we want to allow to that new partition in MBs. Because I shrunk 50GBs of my D: partition, I'll create a 50GBs partition, therefore allowing 51200 MBs of space.
Next, we'll be asked if we want to attribute a letter to our new partition, mount it in a NTFS folder or just create the partition, without attributing it any drive letter or access path (if you pick that option, you'll have to use the Modify drive letter and access paths option after creating the partition by right-clicking on it). In my case, I want to attribute my partition a letter, so it will be mounted as a "drive" and I'll have easy access to it via the Windows Explorer.
Now it's the time for the last details before creating our new partition. It can be summed up to two options : to format the unallocated space before creating the partition, or to not format it. Everytime you create a new partition from scratch, you should format it. Then you'll have to select the file system of that partition, the allocation unit size and the name you want to give to that new partition (the name that will show up in the Windows Explorer). Also, you can choose to do a quick format and to activate files and folders compression. This window here is the same as the one you get when you right-click on a partion and select "Format". In my case, I'll leave everything as it is, except that I'll name my new partition "Files".
Then click "Next" and you'll get to that last window that will sum up all the informations on your new partition. When you're ready to create it, just click "Finish" and let Windows create your new partition. And here's the results ! I know have a brand new partition named Files with 50GBs of space to store all my personal files ! And this is how you create a simple new partition via Windows Disk Management Utility.
[align=center]If you have any questions about how to use Windows Disk Management Utility, or you don't understand a point, or you would want me to detail more a point that I covered or didn't cover in that tutorial, tell me and I'll gladly do it.


")