- Sep 10, 2019
- 65
Description
WinDefThreatsView is tool for Windows 10 that displays the list of all threats detected by Windows Defender Antivirus and allows you to easily set the default action (Allow, Quarantine, Clean, Remove, Block, or No Action) for multiple threats at once. You can use this tool on your local computer and also on remote computer, as long as you have permission to access WMI on the remote machine.
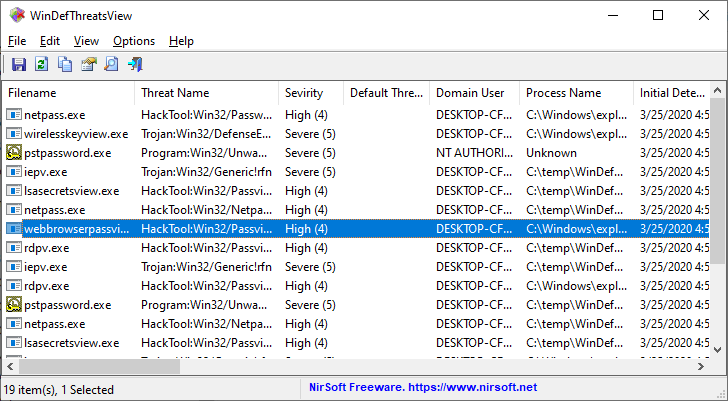
For every threat, the following information is displayed: Filename, Threat Name, Severity, Process Name, Initial Detect Time, Status Change Time, Remediation Time, Threat ID, Threat Status, Default Threat Action, and more...

System Requirements
This tool works only on Windows 10 and Windows 8.1. Both 32-bit and 64-bit systems are supported. You can also use this tool on Windows 7 to connect a Windows 10 remote computer.
Start Using WinDefThreatsView
WinDefThreatsView doesn't require any installation process or additional DLL files. In order to start using it, simply run the executable file - WinDefThreatsView.exe
After running WinDefThreatsView, the main window displays the list of all threats detected by Windows Defender Antivirus.
Connect Windows Defender on remote computer
In order to view the Windows Defender threats on a remote computer, simply open the 'Advanced Options' window (F9), choose the 'Load threats data from remote computer' option, type the IP address or the computer name of the remote computer and then press the 'Ok' button. If you get 'Access Denied' error on the status bar, you may also need to specify the user name and password to connect the remote computer. Be aware that this feature works only if you have permission to access WMI on the remote machine.
Set default action of Windows Defender
After the list of all Windows Defender threats is displayed on the main window, you can select one or more threats and then set the default action for these threats. You can set on of the following actions: Allow, Quarantine, Clean, Remove, Block, or No Action. You can set the default action for your local computer and for remote computer on your network.
You can use this feature to quickly handle multiple false positive issues: Simply select the threats that are false positives, set their default action to 'Allow' and then WinDefThreatsView will not block anymore.
Be aware that setting the default action of Windows Defender threat requires elevation (Run As Administrator)
View threat information
You can get more information about Windows Defender threat from Microsoft Web site by selecting the threat item and using the 'Open Threat Web Page' option (Ctrl+W).
Link: Nirsoft - WinDefThreatsView
WinDefThreatsView is tool for Windows 10 that displays the list of all threats detected by Windows Defender Antivirus and allows you to easily set the default action (Allow, Quarantine, Clean, Remove, Block, or No Action) for multiple threats at once. You can use this tool on your local computer and also on remote computer, as long as you have permission to access WMI on the remote machine.
For every threat, the following information is displayed: Filename, Threat Name, Severity, Process Name, Initial Detect Time, Status Change Time, Remediation Time, Threat ID, Threat Status, Default Threat Action, and more...

System Requirements
This tool works only on Windows 10 and Windows 8.1. Both 32-bit and 64-bit systems are supported. You can also use this tool on Windows 7 to connect a Windows 10 remote computer.
Start Using WinDefThreatsView
WinDefThreatsView doesn't require any installation process or additional DLL files. In order to start using it, simply run the executable file - WinDefThreatsView.exe
After running WinDefThreatsView, the main window displays the list of all threats detected by Windows Defender Antivirus.
Connect Windows Defender on remote computer
In order to view the Windows Defender threats on a remote computer, simply open the 'Advanced Options' window (F9), choose the 'Load threats data from remote computer' option, type the IP address or the computer name of the remote computer and then press the 'Ok' button. If you get 'Access Denied' error on the status bar, you may also need to specify the user name and password to connect the remote computer. Be aware that this feature works only if you have permission to access WMI on the remote machine.
Set default action of Windows Defender
After the list of all Windows Defender threats is displayed on the main window, you can select one or more threats and then set the default action for these threats. You can set on of the following actions: Allow, Quarantine, Clean, Remove, Block, or No Action. You can set the default action for your local computer and for remote computer on your network.
You can use this feature to quickly handle multiple false positive issues: Simply select the threats that are false positives, set their default action to 'Allow' and then WinDefThreatsView will not block anymore.
Be aware that setting the default action of Windows Defender threat requires elevation (Run As Administrator)
View threat information
You can get more information about Windows Defender threat from Microsoft Web site by selecting the threat item and using the 'Open Threat Web Page' option (Ctrl+W).
Link: Nirsoft - WinDefThreatsView