A USPS notice says your PO Box access is about to be suspended. One missing signature supposedly stands between you and interrupted mail service.
The message looks administrative rather than dramatic. That quiet tone makes its unusual instructions worth examining before anyone replies.
Overview
The notice invents a PO Box verification problem
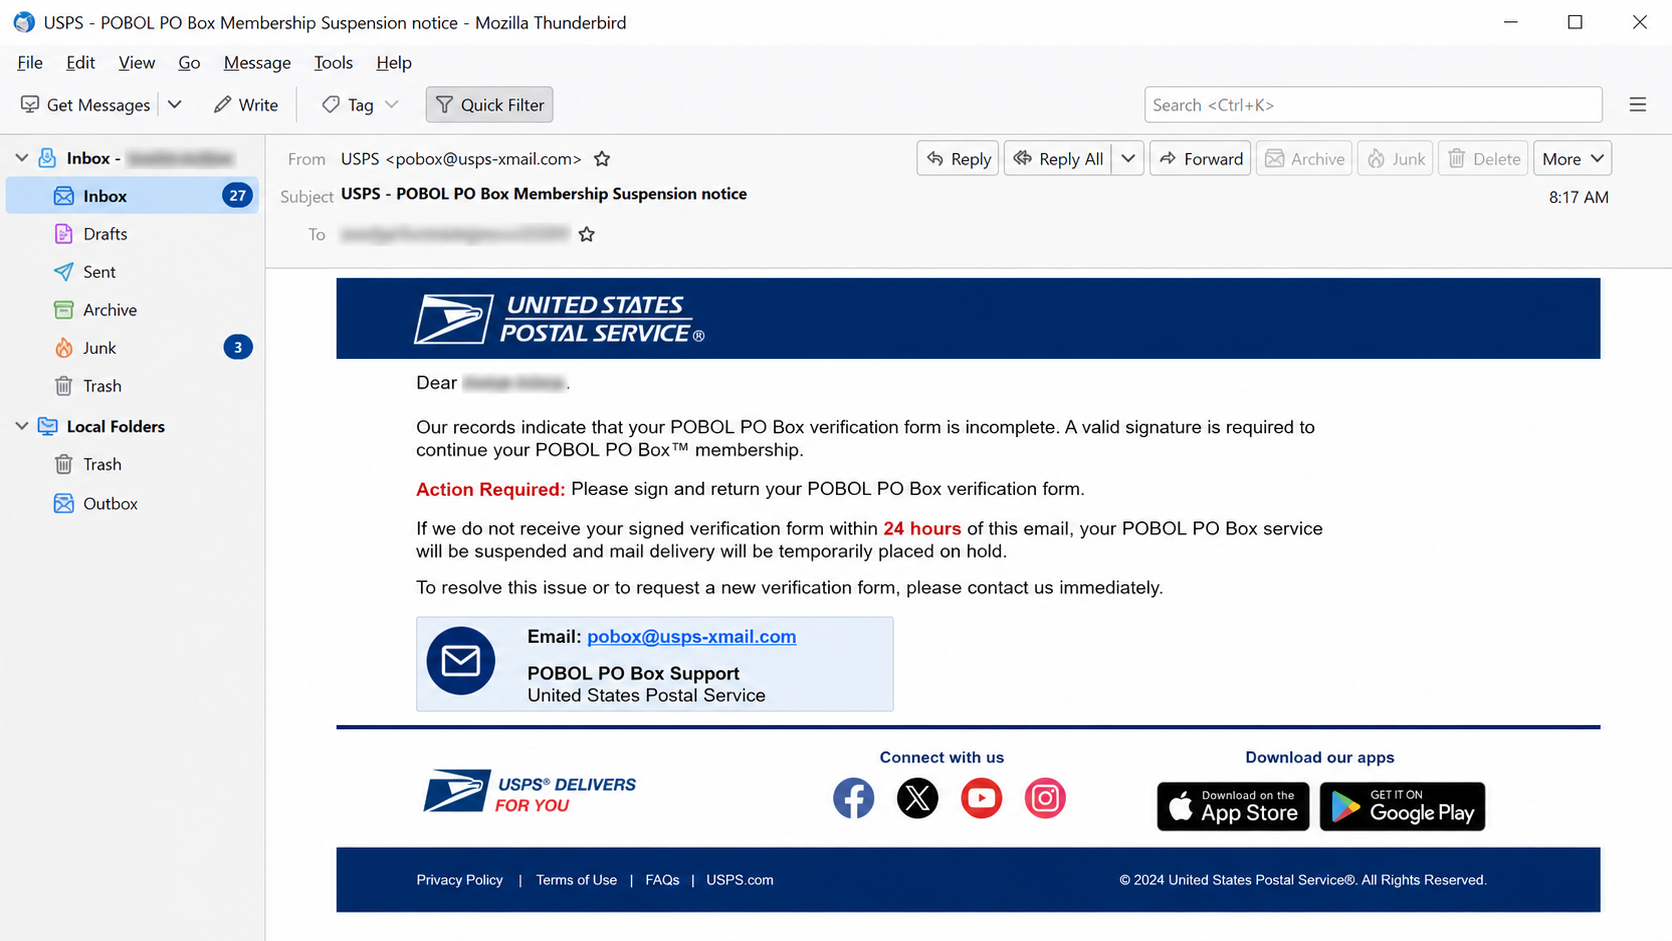
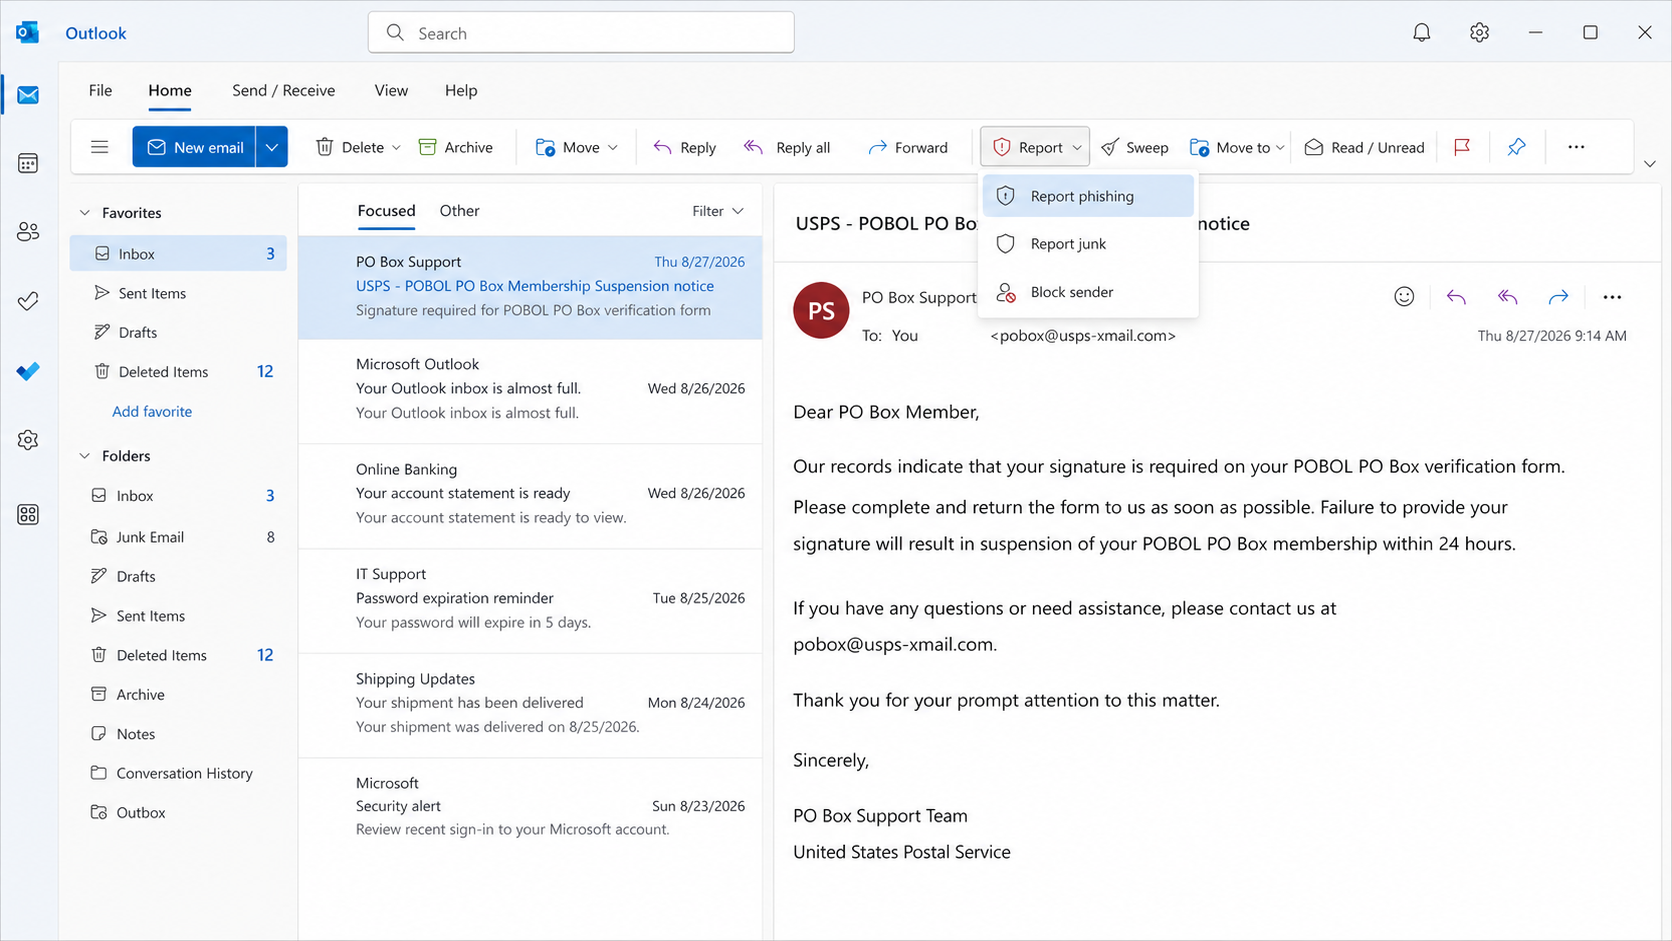
The USPS Signature Required email scam claims a recipient must verify a supposed POBOL PO Box membership.
It warns that the service will be suspended within 24 hours unless the owner provides a required signature.
The language sounds procedural, but POBOL PO Box is not a recognized United States Postal Service product.
That invented label gives the campaign flexibility. Recipients may assume it describes an unfamiliar online feature connected with their existing mailbox.
No tracking number, post office location, box number, or verifiable case reference supports the alleged request.
The message sends victims to an unofficial email address
Instead of directing customers to USPS.com, the notice asks them to contact pobox@usps-xmail.com.
The important part is the domain after the @ symbol. USPS-xmail.com is not the official usps.com domain.
A familiar word placed before a hyphen does not establish ownership. Anyone can register a similar-looking domain when it remains available.
Email contact also lets the operator continue the conversation privately. The next request can be adjusted to whatever the victim reveals.
The reply itself confirms that the address is active, monitored, and attached to someone concerned about postal service.
The likely objective is personal and financial information
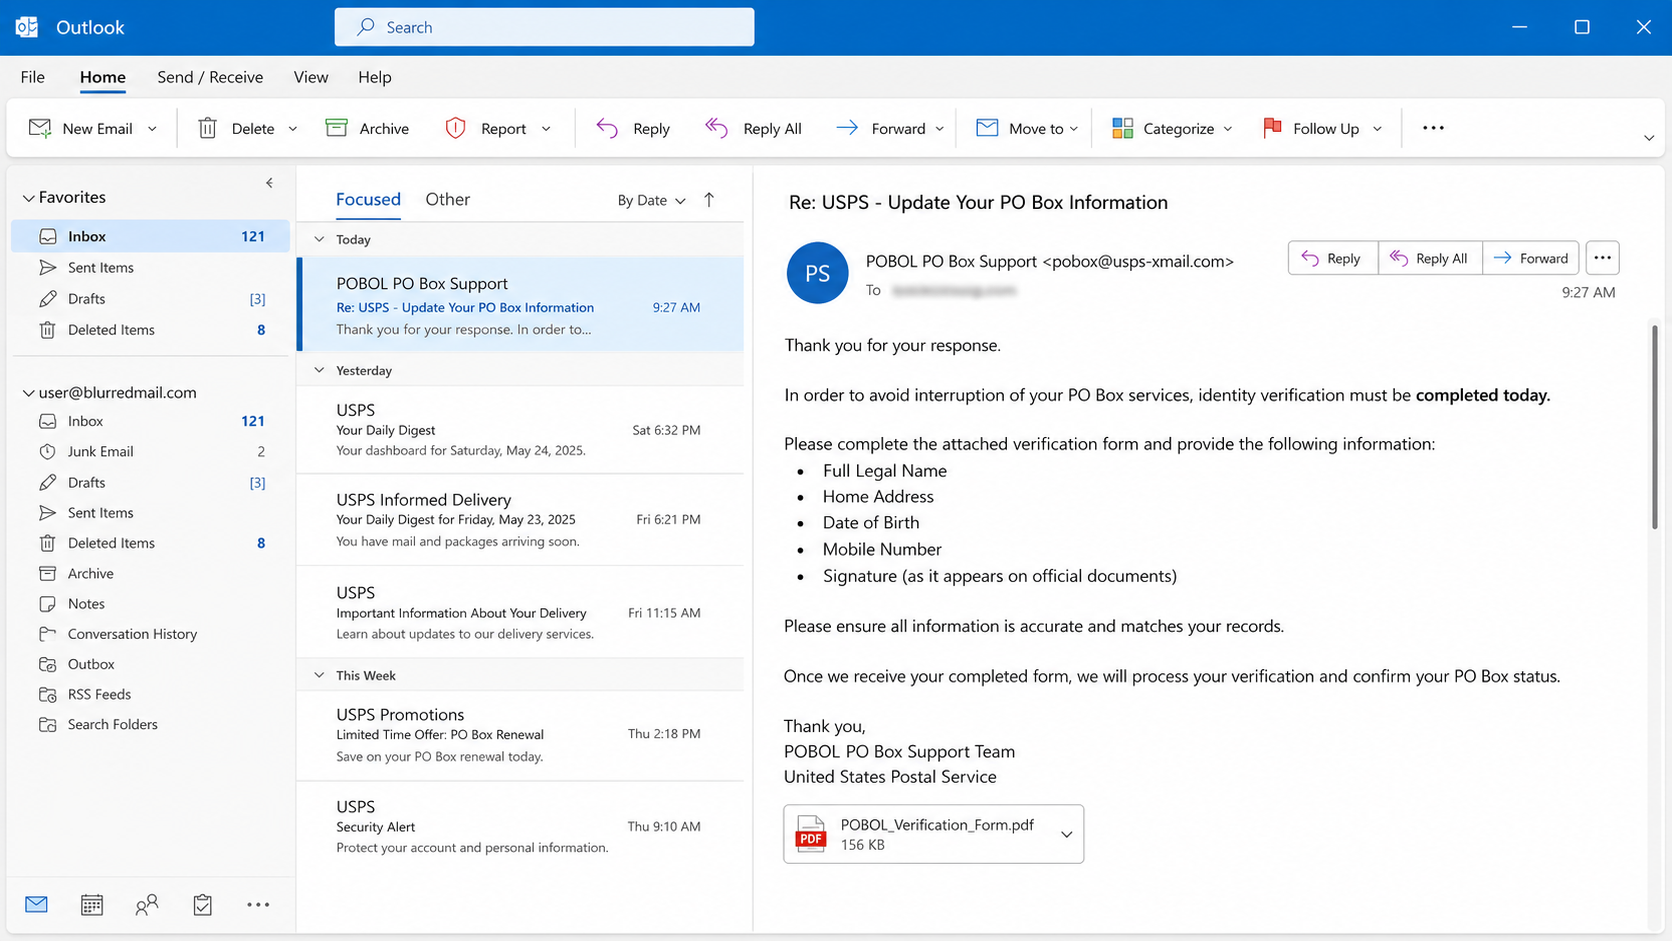
The observed lure begins with a reply request rather than an immediate payment page or credential form.
A follow-up may ask for a name, home address, birth date, telephone number, identification image, or payment details.
Those later demands can vary. Treat them as likely next steps, not as a guaranteed script used in every conversation.
Information collected under a postal pretext can support identity theft, account recovery abuse, payment fraud, or more convincing future scams.
The warning signs are easier to recognize when viewed together:
The message names a service called POBOL PO Box that USPS does not offer.
A 24-hour suspension threat creates pressure without verifiable account details.
The contact address ends in usps-xmail.com instead of usps.com.
No legitimate tracking number, box number, office, or signed request appears.
The notice asks for an email reply instead of secure account verification.
The footer may show an outdated year, weakening the official appearance.
The sender provides no independent route for confirming the alleged problem.
Receiving the email does not mean USPS has suspended anything. It also does not prove that criminals already possess sensitive information.
The immediate risk begins when a recipient replies, follows new instructions, or provides identity and payment details.
Why a Reply-Based Scam Can Be So Effective
A web form must anticipate every visitor. A live email exchange lets a scammer study each response and shape the next request.
Someone who says they recently moved may receive an address-verification story. A business owner may hear about commercial mailbox compliance.
The operator can answer simple objections, repeat postal vocabulary, and offer reassurance before requesting anything obviously sensitive.
That gradual approach lowers resistance. Each harmless-looking answer makes the following disclosure feel like a continuation rather than a new decision.
Replies also bypass some protection. A later malicious link may arrive inside an ongoing thread that the victim now recognizes.
The scammer might claim a refundable verification fee is required. They may also request card details to prevent suspension.
Another variation could ask for identification supposedly needed to match the box holder’s signature.
Never send an identity document to an address discovered through an unsolicited warning. Copies contain durable information that passwords cannot replace.
How The Scam Works
Step 1: The campaign reaches people with a broadly believable postal concern
The email does not need to know whether every recipient rents a PO Box. Postal messages are familiar enough to attract curiosity.
Some recipients have boxes, receive business mail, recently moved, or expect important deliveries. Those coincidences make the notice feel personally timed.
Bulk campaigns can reach thousands of addresses cheaply. Even a small response rate identifies people willing to discuss the invented issue.
The message may use a recipient’s name or email address. Such details can come from public directories, marketing lists, or earlier breaches.
Personalization proves only that the sender has information, not that USPS created or authorized the notice.
Step 2: An unfamiliar service name discourages confident rejection
POBOL resembles abbreviations used by technical or administrative systems, yet it does not identify a genuine USPS PO Box program.
People often hesitate when they encounter jargon. They may assume the term belongs to an internal system they have never seen.
The scam benefits from that uncertainty. A completely absurd claim would be dismissed, while a vaguely official label invites investigation.
Legitimate USPS services can be confirmed through USPS.com, a local post office, or established customer service channels.
An undefined membership that exists only inside one email should never become the basis for sharing private information.
Step 3: The suspension deadline converts uncertainty into urgency
The notice gives the recipient 24 hours to act. That short window makes independent verification seem inconvenient or risky.
Mail interruption can affect bills, benefits, legal documents, medication, and business correspondence. The threatened consequence therefore feels unusually serious.
Fear narrows attention toward the offered solution. Recipients may stop evaluating why a signature issue arrived through an unfamiliar sender.
A real administrative dispute provides account identifiers, written policies, appeal options, and a contact route that can be verified independently.
The scam substitutes a countdown for evidence. The deadline has no authority beyond the sentence that announces it.
Step 4: The unofficial address moves the conversation away from USPS
The call to action is a reply or message to pobox@usps-xmail.com.
That address contains USPS at the beginning, where hurried readers are most likely to notice it.
Domain ownership is determined by the ending, not by a brand word appearing somewhere before it.
USPS-xmail.com and usps.com are separate properties. A padlock, polished signature, or postal logo cannot merge them.
By moving the exchange onto its own domain, the operator controls the responses and avoids genuine USPS account systems.
Step 5: A reply opens the door to tailored verification demands
The first reply signals concern. It may also reveal a full name, company signature, telephone number, job title, and other useful context.
The operator can then request additional details supposedly needed to locate the account or match the missing signature.
Likely requests include an address, birth date, PO Box number, identification image, or telephone confirmation.
Some conversations may introduce a link to a copied postal page. Others may remain entirely inside email.
Because variations are possible, judge every new demand by the verified organization and channel, not by one expected sequence.
Step 6: Collected details support identity theft or payment fraud
A name and address may seem ordinary, but combined records can help criminals answer account recovery questions and impersonate the victim.
An identification copy can expose a birth date, license number, signature, photograph, and document identifiers.
Card information or a small verification payment creates immediate financial risk. It can also establish a path for unauthorized recurring charges.
Scammers may reuse confirmed contact information in delivery, tax, banking, or technical support lures.
Data can also be sold or shared, producing new approaches long after the postal conversation ends.
Step 7: The operator preserves pressure while making recovery difficult
If challenged, the sender may repeat the deadline, claim a case is already open, or warn that restarting verification will take longer.
Those statements are designed to keep the victim inside the fraudulent conversation instead of calling a real post office.
After receiving information, the operator may stop answering. The victim then has no trustworthy receipt, policy, or accountable business identity.
A fraudulent charge might use an unrelated billing descriptor, making the postal origin difficult to recognize later.
The safest break occurs before replying. Independent verification removes the scammer’s ability to define the problem and its solution.
Sender, Service, Contact, and Identity Checks
Inspect the complete sender and reply address
Expand the sender details instead of trusting the displayed name. Compare both the From and Reply-To domains with usps.com.
Watch for hyphens, added words, altered endings, and brand names placed inside a longer unrelated domain.
A display name reading USPS Customer Support can be typed by anyone. It is not an identity certificate.
Authentication indicators can help administrators, but ordinary recipients should still verify unexpected requests through known channels.
Confirm that the named service actually exists
Search USPS.com directly or contact a local post office using a number found independently.
Ask whether POBOL PO Box is a recognized membership and whether any signature request exists for your real box.
Do not let the sender define the verification method. A genuine organization should be reachable without using details inside the suspicious email.
If the service cannot be found outside the message, the administrative story has failed a basic reality check.
Reject identity requests sent through ordinary email
Do not email a driver’s license, passport, Social Security number, birth date, card image, or handwritten signature to an unknown address.
These records remain useful after a campaign closes. Unlike a password, a birth date or document number may be difficult to change.
Ask why each item is necessary, how it will be protected, and which published policy authorizes collection.
A rushed answer, vague privacy statement, or threat of immediate suspension is a reason to stop.
Separate a postal question from any payment demand
Never pay a verification charge requested during an unsolicited email exchange.
Check real PO Box fees through your existing USPS account, receipt, or local post office.
Wire transfers, gift cards, cryptocurrency, and card details sent by reply provide little protection and are inappropriate for account verification.
If a payment page appears later, inspect its domain and terms independently. A postal logo does not establish who receives the money.
What to Do if You Have Fallen Victim to This Scam
Stop the conversation. Do not answer additional questions, open new attachments, or use links sent after your first reply.
Record exactly what was shared. Save the messages, headers, addresses, dates, payment receipts, and a list of every personal detail disclosed.
Contact USPS independently. Use USPS.com, your local post office, or an established customer service number to verify the real account and report impersonation.
Call the card issuer or bank. If money or payment details were provided, request fraud review, block further charges, and replace compromised cards.
Protect your identity. If identification or Social Security information was exposed, place credit freezes and review official identity-theft recovery guidance.
Change reused credentials. If any password was disclosed, replace it from a trusted device everywhere it was reused and enable multifactor authentication.
Scan affected devices. If you opened a download, run a full Malwarebytes scan and remove anything detected before resuming sensitive activity.
Reduce repeat exposure. AdGuard can block many malicious pages and intrusive redirects, but it cannot make an unofficial email conversation trustworthy.
Warn relevant contacts. Tell household members or coworkers if their information appeared in the exchange or if impostor messages might follow.
Report the campaign. Mark the message as phishing and submit it to appropriate postal, consumer protection, and law-enforcement reporting channels.
Is Your Device Infected? Run a Free Malware Scan
Slow performance, constant pop-ups, or strange behavior? These are classic signs of a malware infection. The fastest way to find out is to scan your device with Malwarebytes Anti-Malware Free — one of the most trusted malware removal tools available.
The free version detects and removes the most common threats, including:
Adware — the cause of those annoying pop-ups
Browser hijackers — unwanted redirects and changed homepages
Trojans and spyware — hidden programs stealing your data
Potentially unwanted programs (PUPs) — software you never asked for
👉 Select your device below — Windows, Mac, or Android — then follow the simple steps to download Malwarebytes, scan your system, and remove any threats it finds. The whole process takes about 5 minutes.
Malwarebytes for WindowsMalwarebytes for MacMalwarebytes for Android
Run a Malware Scan with Malwarebytes for Windows
Malwarebytes is one of the most popular and trusted anti-malware tools for Windows — and it’s completely free for removing infections. It catches threats that many antivirus programs miss, including adware, browser hijackers, and trojans. Follow the steps below to scan and clean your PC in just a few minutes.
Download Malwarebytes
Click the button below to download the latest version of Malwarebytes for Windows from the official source. The free version is all you need — it will scan your computer and remove adware, browser hijackers, and other malicious software at no cost.
(The link opens in a new page where your download will start)
Install Malwarebytes
When the download finishes, open your Downloads folder and double-click the MBSetup file. If Windows shows a User Account Control pop-up, click “Yes” to allow the installation.
Follow the On-Screen Prompts to Install Malwarebytes
The setup wizard will walk you through a few quick screens:
Choose where you’re installing the program — “Personal Computer” or “Work Computer” — then click Next.
Malwarebytes will now install on your device. This usually takes under a minute.
When installation is complete, the “Welcome to Malwarebytes” screen will open automatically.
On the final screen, click Open Malwarebytes to launch the program.
Enable “Scan for Rootkits”
Before scanning, turn on rootkit detection so Malwarebytes can find even the most hidden threats. Click the Settings gear icon on the left side of the screen.
In the settings menu, find “Scan for rootkits” and click the toggle so it turns blue.
Done? Click “Dashboard” in the left pane to return to the main screen.
Start the Scan
Click the blue Scan button. Malwarebytes will automatically update its virus database and start checking your computer for malware.
Wait for the Scan to Finish
The scan checks your entire system for browser hijackers and other malicious programs, so it can take several minutes. Feel free to do something else — just check back occasionally to see the progress.
Quarantine the Detected Threats
When the scan is done, you’ll see a list of everything Malwarebytes found — malware, adware, and potentially unwanted programs. Click the “Quarantine” button to remove all of them at once.
Malwarebytes will now remove the malicious files and registry entries and move them safely into quarantine.
Restart Your Computer
Some threats can only be fully removed after a reboot. If Malwarebytes asks you to restart, click Yes. Once you’re logged back in, your PC is clean and you can continue with the next steps in this guide.
When the scan finishes, click Quarantine to remove everything Malwarebytes found. That’s it — your Windows PC is now clean of trojans, adware, and other malware, and should be back to running smoothly.
If your current antivirus allowed this malicious program on your computer, you may want to consider purchasing Malwarebytes Premium to protect against these types of threats in the future. If you are still having problems with your computer after completing these instructions, then please follow one of the steps:
Malwarebytes for Mac is a free on-demand scanner that removes the malware other security software tends to miss — adware, browser hijackers, and unwanted programs included. Cleaning an infected Mac with Malwarebytes has always been completely free, and it’s our go-to recommendation. Follow the steps below to scan and clean your Mac in just a few minutes.
Download Malwarebytes for Mac
Click the button below to download the latest version of Malwarebytes for Mac.
When the download finishes, open your Downloads folder and double-click the setup file to begin the installation.
Follow the On-Screen Prompts to Install Malwarebytes
The Malwarebytes for Mac Installer will guide you through a few quick screens. Click “Continue” and keep following the prompts until the installation completes.
When the installation is complete, Malwarebytes opens to the Welcome to Malwarebytes screen. Click “Get started“.
Select “Personal Computer” or “Work Computer”
Malwarebytes will ask what type of computer you’re installing it on. Click either Personal Computer or Work Computer, whichever applies.
Start the Scan
Click the “Scan” button. Malwarebytes will automatically update its detection database and begin checking your Mac for malware.
Wait for the Scan to Finish
Malwarebytes will scan your Mac for adware, browser hijackers, and other malicious programs. This can take a few minutes, so feel free to do something else — just check back occasionally to see the progress.
Quarantine the Detected Threats
When the scan is done, you’ll see a list of everything Malwarebytes found. Click the “Quarantine” button to remove all the threats at once.
Restart Your Mac
Malwarebytes will now remove all the malicious files it found. Some threats can only be fully removed after a reboot — if Malwarebytes asks you to restart, allow it. Once you’re logged back in, your Mac is clean.
Once the scan is done, remove every threat it detected. Your Mac is now free of adware, rogue browser extensions, and other potentially harmful software.
If your current antivirus allowed a malicious program on your computer, you might want to consider purchasing the full-featured version of Malwarebytes Anti-Malware to protect against these types of threats in the future. If you are still experiencing problems while trying to remove a malicious program from your computer, please ask for help in our Mac Malware Removal Help & Support forum.
Run a Malware Scan with Malwarebytes for Android
Malwarebytes for Android automatically detects and removes dangerous threats like malware and ransomware so you don’t have to worry about your most-used device being compromised. Aggressive detection of adware and potentially unwanted programs keeps your Android phone or tablet running smooth.
Download Malwarebytes for Android.
You can download Malwarebytes for Android by clicking the link below.
In the Google Play Store, tap “Install” to install Malwarebytes for Android on your device.
When the installation process has finished, tap “Open” to begin using Malwarebytes for Android. You can also open Malwarebytes by tapping on its icon in your phone menu or home screen.
Follow the on-screen prompts to complete the setup process
When Malwarebytes will open, you will see the Malwarebytes Setup Wizard which will guide you through a series of permissions and other setup options. This is the first of two screens that explain the difference between the Premium and Free versions. Swipe this screen to continue. Tap on “Got it” to proceed to the next step. Malwarebytes for Android will now ask for a set of permissions that are required to scan your device and protect it from malware. Tap on “Give permission” to continue. Tap on “Allow” to permit Malwarebytes to access the files on your phone.
Update database and run a scan with Malwarebytes for Android
You will now be prompted to update the Malwarebytes database and run a full system scan.
Click on “Update database” to update the Malwarebytes for Android definitions to the latest version, then click on “Run full scan” to perform a system scan.
Wait for the Malwarebytes scan to complete.
Malwarebytes will now start scanning your phone for adware and other malicious apps. This process can take a few minutes, so we suggest you do something else and periodically check on the status of the scan to see when it is finished.
Click on “Remove Selected”.
When the scan has been completed, you will be presented with a screen showing the malware infections that Malwarebytes for Android has detected. To remove the malicious apps that Malwarebytes has found, tap on the “Remove Selected” button.
Restart your phone.
Malwarebytes for Android will now remove all the malicious apps that it has found. To complete the malware removal process, Malwarebytes may ask you to restart your device.
After the scan, tap Remove Selected to delete all detected threats. Your Android phone is now clean — no more malicious apps, adware, or browser redirects.
If your current antivirus allowed a malicious app on your phone, you may want to consider purchasing the full-featured version of Malwarebytes to protect against these types of threats in the future. If you are still having problems with your phone after completing these instructions, then please follow one of the steps:
Restore your phone to factory settings by going to Settings > General management > Reset > Factory data reset.
Now that your device is clean, keep it that way. Most infections start with a malicious ad or a fake download button — so blocking them at the source is your best defense.
We recommend AdGuard, which blocks malicious ads, phishing pages, and dangerous redirects before they can reach you.
No recognized USPS service uses that name. Verify current products through USPS.com or a local post office instead of trusting the message.
An unfamiliar acronym should be confirmed before it becomes a reason to disclose information.
Does USPS request signatures by email?
Some legitimate postal notifications can involve delivery signatures, but they should connect to verifiable tracking or account information on official channels.
A vague suspension notice using an unrelated domain does not become genuine because it mentions a signature.
What happens if I only replied?
A simple reply usually does not compromise a device. It confirms an active address and may expose details contained in your signature.
Stop responding, expect follow-up attempts, and tighten spam filtering. Review what the reply automatically included.
Could the sender already know my address?
Yes. Addresses can come from directories, marketing databases, public records, breaches, or earlier correspondence.
Prior knowledge makes the approach more convincing, but it does not prove access to USPS systems.
Should I send identification to prevent suspension?
No. Do not send identity documents to an address introduced by an unsolicited warning.
Confirm any genuine requirement through your local post office and ask for the secure, documented submission process.
What if I paid a small verification fee?
Contact the issuer immediately. A small charge can test whether the payment method works or conceal enrollment in later unauthorized billing.
Monitor statements, replace exposed card details, and challenge transactions you did not knowingly authorize.
The Bottom Line
The USPS Signature Required email scam invents a POBOL PO Box suspension and directs recipients to an unofficial usps-xmail.com address.
The conversation can progress toward identity details, account information, or payment requests shaped around each victim’s responses.
Verify postal concerns through USPS.com or a local post office. Never let an unsolicited sender choose the only route to confirmation.
If information was shared, stop contact, protect financial and identity records, scan downloaded files, and report the impersonation promptly.
10 Rules to Avoid Online Scams
Here are 10 practical safety rules to help you avoid malware, online shopping scams, crypto scams, and other online fraud. Each tip includes a quick “if you already got hit” action.
Stop and verify before you click, log in, download, or pay.
Most scams win by creating urgency. Verify using a trusted method: type the website address yourself, use the official app, or call a known number (not the one in the message).
If you already clicked: close the page, do not enter passwords, and run a malware scan.
Keep your operating system, browser, and apps updated.
Updates patch security holes used by malware and malicious ads. Turn on automatic updates where possible.
If you saw a scary “update now” pop-up: close it and update only through your device settings or the official app store.
Use layered protection: antivirus plus an ad blocker.
Antivirus helps block malware. An ad blocker reduces scam redirects, phishing pages, and malvertising.
If your browser is acting weird: remove unknown extensions, reset the browser, then run a full scan.
Install apps, software, and extensions only from official sources.
Avoid cracked software, “keygens,” and random downloads. During installs, choose Custom/Advanced and decline bundled offers you do not recognize.
If you already installed something suspicious: uninstall it, restart, and scan again.
Treat links and attachments as untrusted by default.
Phishing often impersonates delivery services, banks, and popular brands. If it is unexpected, do not open attachments or log in through the message.
If you entered credentials: change the password immediately and enable 2FA.
Shop safely: research the store, then pay with protection.
Be cautious with brand-new stores, “closing sale” stories, and prices that make no sense. Prefer credit cards or PayPal for dispute options. Avoid wire transfers, gift cards, and crypto payments.
If you already paid: contact your card issuer or PayPal quickly to dispute the transaction.
Crypto rule: never pay a “fee” to withdraw or recover money.
Common patterns include fake profits, then “tax,” “gas,” or “verification” fees. Another is a “recovery agent” who demands upfront crypto.
If you already sent crypto: stop paying, save evidence (wallet addresses, TXIDs, chats), and report the scam to the platform used.
Secure your accounts with unique passwords and 2FA (start with email).
Use a password manager and unique passwords for every account. Enable 2FA using an authenticator app when possible.
If you suspect an account takeover: change passwords, sign out of all devices, and review recent logins and recovery settings.
Back up important files and keep one backup offline.
Backups protect you from ransomware and device failure. Keep at least one backup on an external drive that is not always connected.
If you suspect infection: do not connect backup drives until the system is clean.
If you think you are a victim: stop losses, document evidence, and escalate fast.
Move quickly. Speed matters for disputes, account recovery, and limiting damage.
Stop payments and contact: do not send more money or respond to the scammer.
Call your bank or card issuer: block transactions, replace the card if needed, and start a dispute or chargeback.
Secure your email first: change the email password, enable 2FA, and remove unfamiliar recovery options.
Secure other accounts: change passwords, enable 2FA, and log out of all sessions.
Scan your device: remove suspicious apps or extensions, then run a full malware scan.
Save evidence: screenshots, emails, order pages, tracking pages, wallet addresses, TXIDs, and chat logs.
Report it: to the payment provider, marketplace, social platform, exchange, or wallet service involved.
These rules are intentionally simple. Most online losses happen when decisions are rushed. Slow down, verify independently, and use payment methods and account controls that give you recourse.
Hello! I'm Lapain Epuran, your go-to source for detailed and honest product reviews. From tech gadgets to miracle cures, I provide insights to help you make informed choices. Join me as we discover what's truly worth your time and money.