Email synchronization usually happens quietly, so a warning that it stopped can feel both confusing and urgent. Nobody wants important messages stranded somewhere unseen.
The notice offers a one-click repair, but the fastest-looking route is not necessarily connected to the mailbox it claims to protect.
Overview
The Message Invents a Synchronization Failure
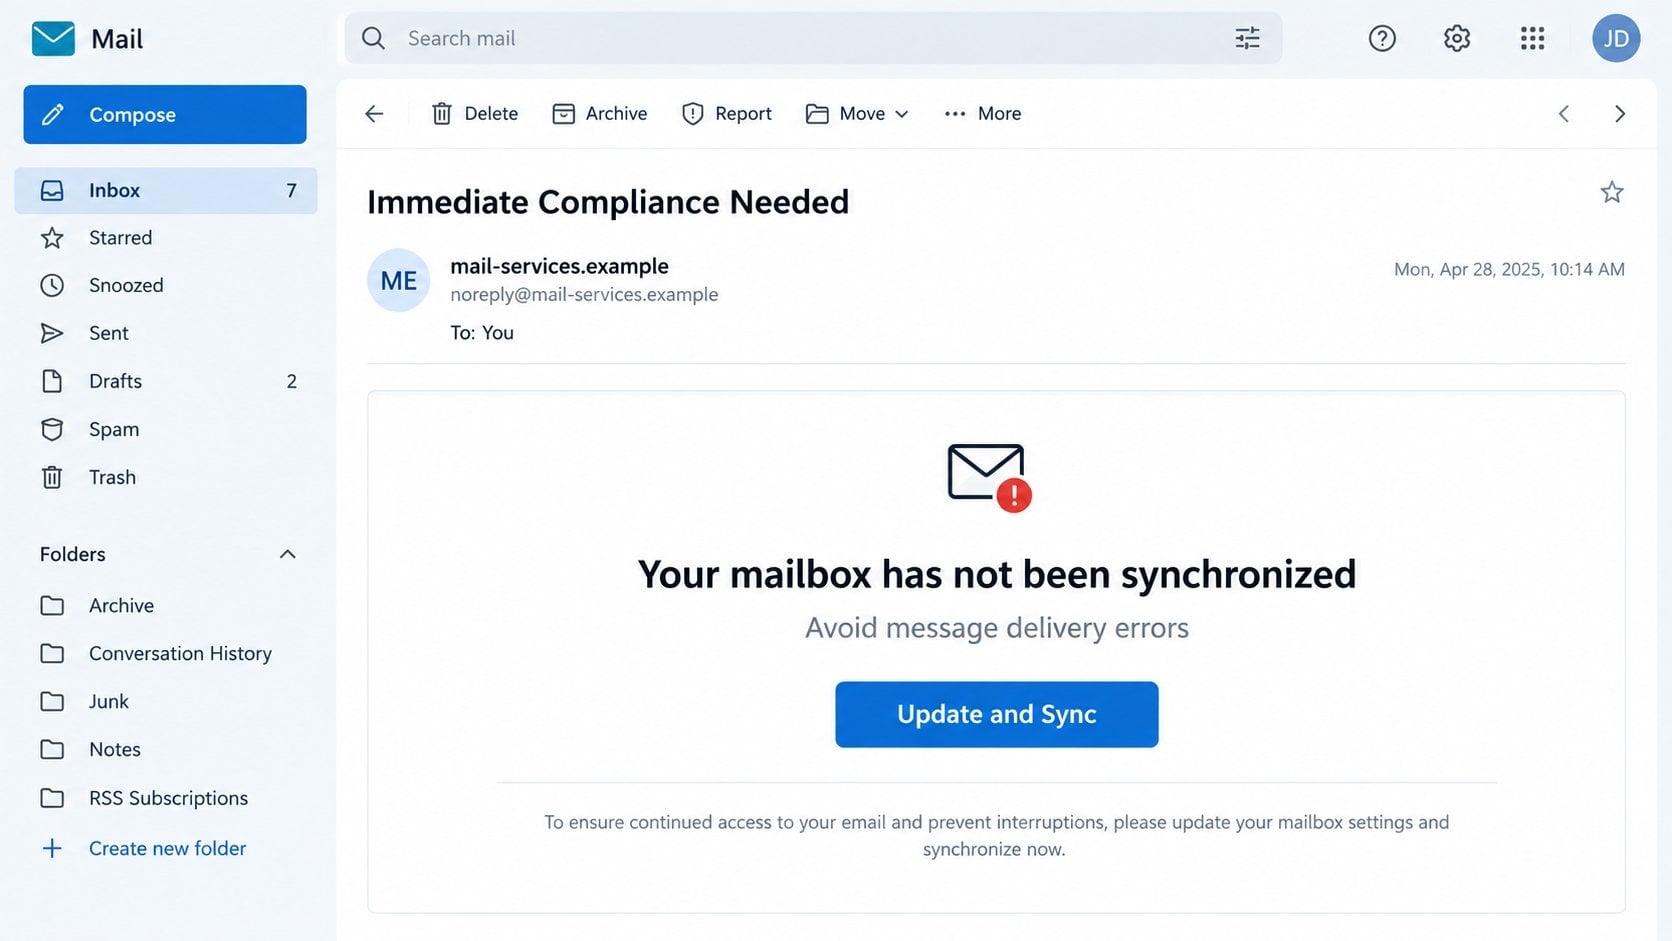
The Update and Synchronize Your Mailbox email claims the account has not synchronized since a precise date and time.
It warns that delivery, sent items, or other mailbox functions may fail. An “Update and Sync” button promises to correct everything immediately.
Synchronization is a familiar concept because messages appear across phones, browsers, and desktop applications. The campaign borrows that everyday experience.
However, the message does not identify a genuine provider, affected device, protocol, folder, or error code. Its explanation remains deliberately universal.
Labels such as “Mail Services” and “Webmail” sound official while avoiding a company name that recipients could verify.
The Claimed Repair Is Really a Password Request
The button directs the visitor away from normal mailbox settings. In examined campaigns, the original destination later became unavailable.
That disappearance is common. Phishing operators abandon addresses quickly when hosting companies or browser defenses begin blocking them.
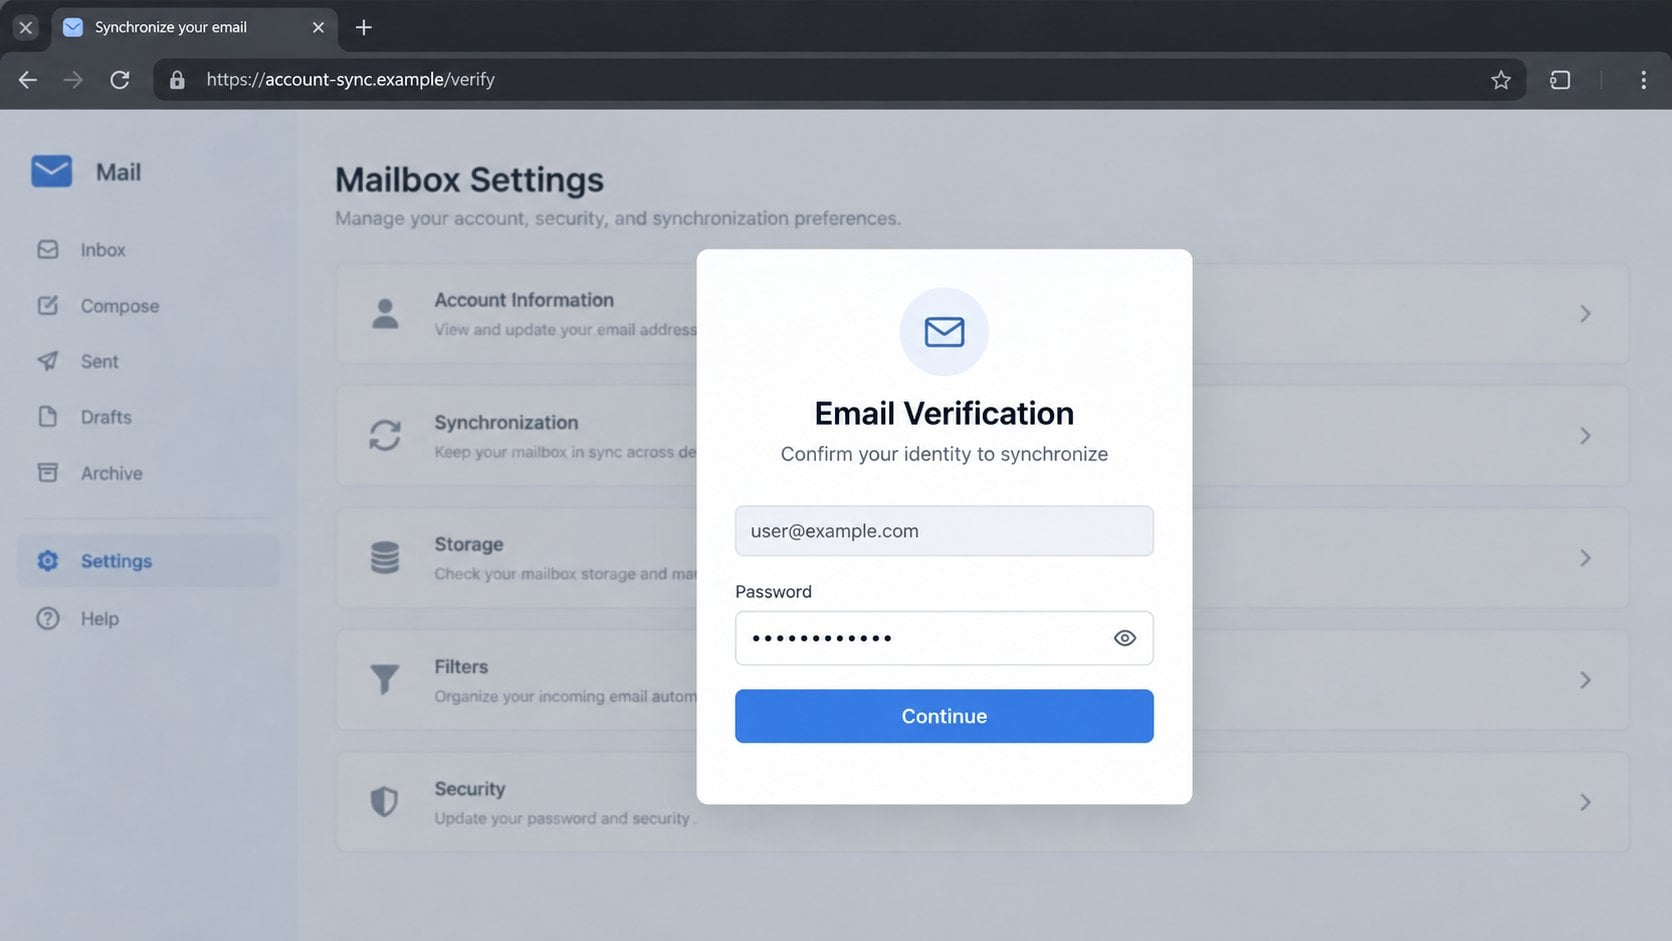
The promoted page likely imitated a generic mail login or adapted its appearance using the victim’s email domain.
A password entered there does not trigger synchronization. It is captured because the attacker controls the form or receives its submissions.
Real synchronization changes occur inside client settings, official account pages, or administrator tools. They never require sending credentials to unrelated hosting.
A Mailbox Password Opens More Than Email
Inbox access can expose conversations, attachments, receipts, security notifications, and the recovery path for many other services.
Criminals may use the account quietly, hiding alerts while they learn which contacts and transactions offer the greatest opportunity.
A precise timestamp creates artificial technical credibility.
Generic branding lets the template target any provider.
Delivery problems make recipients fear missing urgent mail.
The repair button points outside known account settings.
A provider-themed form requests the mailbox password.
False errors can collect repeated credential entries.
Account access enables reset and impersonation fraud.
Receiving the notice does not prove the mailbox is malfunctioning. The email presents no server-side evidence and cannot inspect the recipient’s actual configuration.
Reading it normally does not install malware. Risk increases after clicking, entering information, granting permissions, or opening a downloaded file.
A real sync issue should also appear inside the official service or affected application. Independent confirmation is both safer and more technically meaningful.
How the Update and Synchronize Your Mailbox Scam Works
Step 1: A Generic Template Reaches Many Providers
The campaign distributes the same message to addresses using different domains. It avoids specific product details that would expose a mismatch.
Because “webmail” can describe many services, recipients may mentally substitute the provider they already use.
The sender can insert the target address and a recent timestamp automatically. Those personalized fields require no access to the mailbox.
Some messages claim synchronization stopped weeks earlier. Most users cannot remember a background process well enough to challenge that date immediately.
Step 2: The Email Predicts Vague Delivery Problems
The warning says incoming mail, sent items, or general functions will suffer. These broad symptoms cover nearly any minor email inconvenience.
If a recipient recently experienced delay, the scam seems to explain it. That coincidence strengthens the lure without any real diagnosis.
“Immediate compliance” language frames the task as mandatory. The button becomes the apparent difference between normal service and continued disruption.
Legitimate technical notices normally provide incident identifiers, device names, service status, or documented steps. This email supplies none.
The footer may say Mail Services or Group, Inc. Such vague identity cannot be matched to an account contract or official support page.
A simple envelope icon and clean layout create authority. These design elements are easy to reproduce and carry no proof of origin.
The actual sender domain may have no relationship with the user’s provider. Display-name familiarity should never outweigh domain ownership.
Authentication results only show whether a sending domain authorized the message. They do not show that the domain represents the mailbox service.
Step 4: The Button Leads to a Provider-Aware Phishing Kit
The destination can read the email address included within a URL parameter. It then chooses colors, logos, or wording associated with that domain.
That adaptation makes one campaign appear customized for Gmail, Outlook, Yahoo, or privately hosted webmail accounts.
A blurred settings screen behind the form suggests the visitor has almost reached protected content. The visual shortcut discourages inspection of the host.
The address bar remains decisive. A copied interface on an unrelated domain is still controlled by whoever registered or hosted that address.
Step 5: The Form Harvests Credentials
The email field may already be populated, leaving only the password box. A shorter form can feel like a normal reauthentication step.
When the victim presses Continue, browser code sends the password to the operator. It may do so before any visible error appears.
The site can request a second attempt, claiming the first password was incorrect. This provides a cleaner copy or a second password candidate.
Finally, the page may redirect to a real mail portal. The victim often blames an expired session and never reports the event.
Step 6: Attackers Turn Access Into Persistence
Successful credentials are tested quickly. Criminals may register a new session, application password, or connected application before the owner reacts.
Forwarding rules can silently export messages. Inbox filters can conceal security alerts and responses from people targeted through the account.
Reset emails allow access to shopping, storage, social media, and business tools. Password reuse creates additional paths even without resets.
The compromised mailbox may send fresh synchronization notices to contacts. Messages originating from a familiar account receive less scrutiny.
How to Check a Mailbox Sync Warning
Look at the Official Account Status
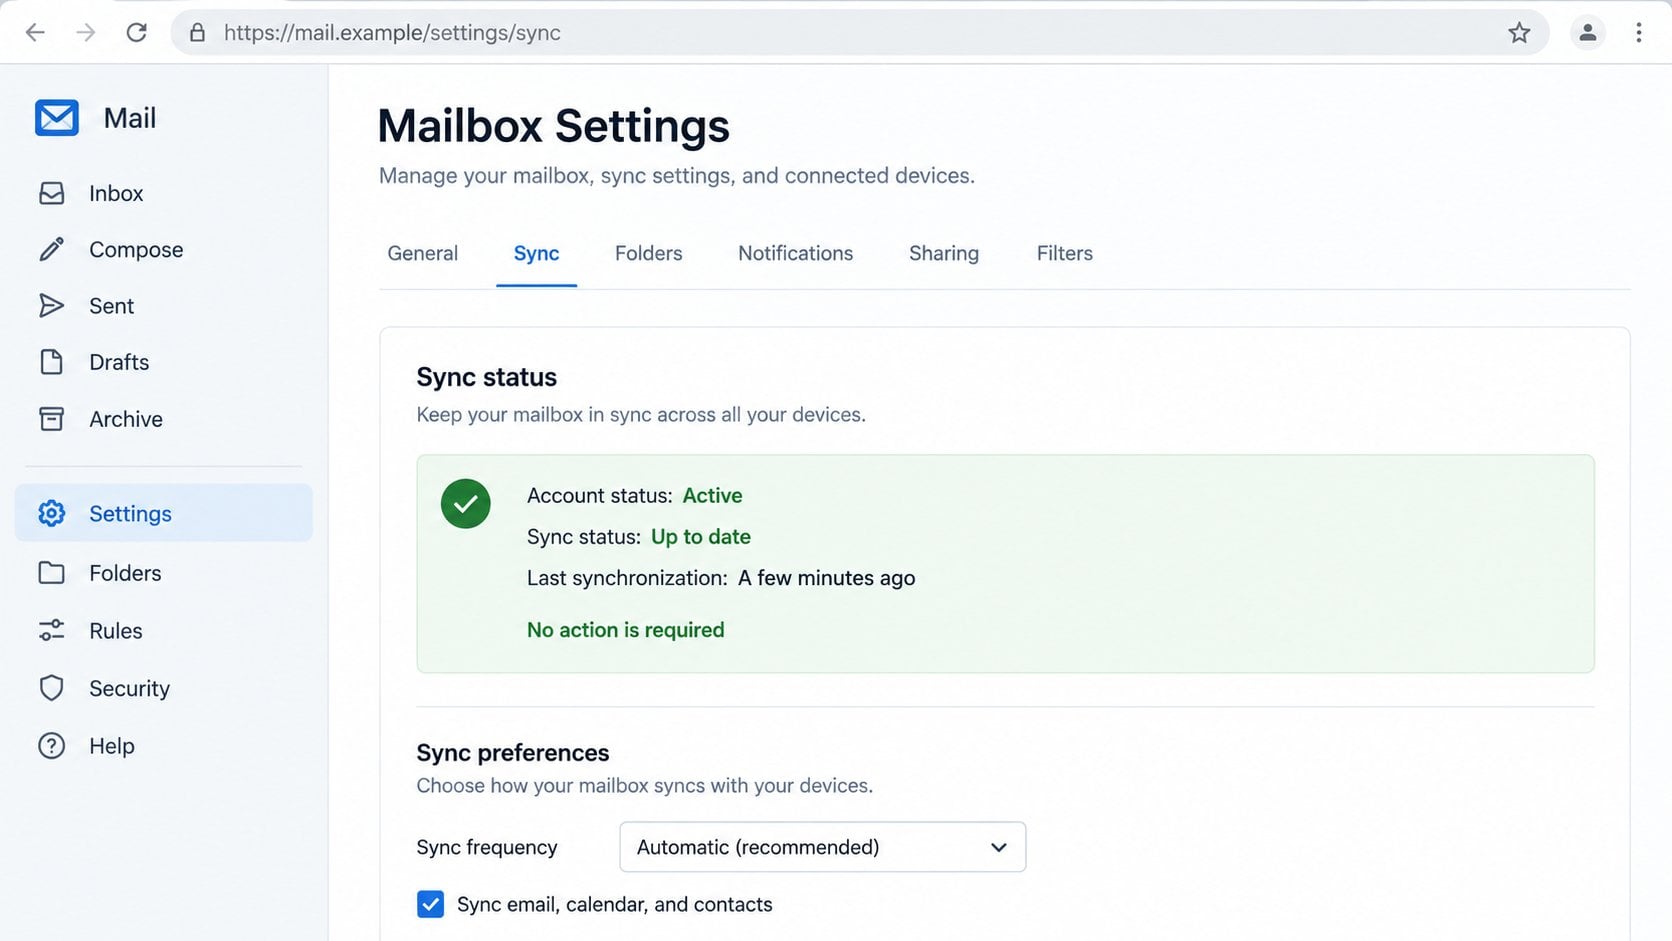
Open the mail service through a trusted bookmark or typed address. Review alerts, storage, connected devices, and synchronization settings.
Many providers show account health and recent activity. An authentic service problem should leave evidence beyond an unsolicited message.
For workplace accounts, check the internal status page or help desk. Organization-wide outages usually affect multiple people and have a documented incident.
If the official dashboard says the account is active and current, the email’s repair demand has no credible foundation.
Check the Device That Supposedly Stopped Syncing
Open the mail application and note which folders or timestamps appear delayed. Compare the same account in a web browser.
A local problem may involve connectivity, outdated software, storage, or changed settings. None requires entering a password on an unknown website.
Review configured account types, such as Exchange, IMAP, or POP3. A generic email cannot accurately diagnose these without device information.
Contact support before deleting and recreating an account. Unnecessary changes can remove locally stored mail or complicate recovery.
Inspect the Sender and Destination
Reveal the complete From address, Reply-To field, and authentication details. Compare them with earlier genuine notices.
Hover over the update button and identify the registered domain. Shorteners, free hosting, and unfamiliar cloud pages deserve caution.
Do not be reassured by HTTPS. Encryption protects traffic to the operator but does not establish the operator’s identity.
Use Known Support Instead of the Email
Reach the provider from its official help center, account page, contract, or saved support number. Do not reply to the alert.
Give support the subject, timestamp, and sender domain. Ask whether the service issued a synchronization notice for your account.
Company users should involve IT because administrators can inspect server logs and identify whether messages are actually queued.
A legitimate representative should help diagnose the client. They should never demand a reusable password through a third-party page.
What to Do If You Fell Victim to the Mailbox Sync Scam
The situation is recoverable when handled promptly. Start with account control, then check persistence, connected services, and the device.
Stop interacting and document what happened.
Close the fraudulent page. Save the original email, full headers, destination, submission time, and any error message you saw.
Note whether the browser downloaded a file or requested permissions. This determines whether device cleanup is necessary.
Create a new password on the genuine site.
Navigate independently to the mail provider and replace the exposed secret. Make the new password unique and sufficiently long.
Change reused versions on other accounts. Prioritize services capable of spending money, storing documents, or resetting additional identities.
Revoke sessions and unauthorized access methods.
Use the provider’s sign-out-everywhere feature. Remove unknown devices, application passwords, recovery contacts, and connected applications.
Enable strong multifactor authentication. Passkeys or hardware-backed methods resist phishing better than codes that can be relayed.
Audit rules, delegates, and forwarding.
Search for filters that delete alerts, hide replies, or forward mail externally. Review POP3 and IMAP connections too.
Check Sent and Deleted folders for messages you did not create. Ask administrators for server-side logs when local history appears incomplete.
Secure accounts linked to the inbox.
Review recent password resets, purchase confirmations, and profile changes. Reverse unauthorized changes through each service’s official recovery process.
Notify contacts if the account sent phishing or altered payment instructions. Use a channel the attacker does not control.
Scan when content was downloaded.
If you opened an attachment or installed software, run a complete Malwarebytes scan and remove anything it identifies.
AdGuard can help prevent access to recognized phishing and advertising networks. Browser protection complements, but cannot replace, a password reset.
Escalate financial or identity exposure.
Contact banks immediately if statements, card data, or payment messages were accessible. Monitor accounts for unusual activity.
Report identity theft through the appropriate national service. Keep copies of alerts, case references, and provider correspondence.
Is Your Device Infected? Run a Free Malware Scan
Slow performance, constant pop-ups, or strange behavior? These are classic signs of a malware infection. The fastest way to find out is to scan your device with Malwarebytes Anti-Malware Free — one of the most trusted malware removal tools available.
The free version detects and removes the most common threats, including:
Adware — the cause of those annoying pop-ups
Browser hijackers — unwanted redirects and changed homepages
Trojans and spyware — hidden programs stealing your data
Potentially unwanted programs (PUPs) — software you never asked for
👉 Select your device below — Windows, Mac, or Android — then follow the simple steps to download Malwarebytes, scan your system, and remove any threats it finds. The whole process takes about 5 minutes.
Malwarebytes for WindowsMalwarebytes for MacMalwarebytes for Android
Run a Malware Scan with Malwarebytes for Windows
Malwarebytes is one of the most popular and trusted anti-malware tools for Windows — and it’s completely free for removing infections. It catches threats that many antivirus programs miss, including adware, browser hijackers, and trojans. Follow the steps below to scan and clean your PC in just a few minutes.
Download Malwarebytes
Click the button below to download the latest version of Malwarebytes for Windows from the official source. The free version is all you need — it will scan your computer and remove adware, browser hijackers, and other malicious software at no cost.
(The link opens in a new page where your download will start)
Install Malwarebytes
When the download finishes, open your Downloads folder and double-click the MBSetup file. If Windows shows a User Account Control pop-up, click “Yes” to allow the installation.
Follow the On-Screen Prompts to Install Malwarebytes
The setup wizard will walk you through a few quick screens:
Choose where you’re installing the program — “Personal Computer” or “Work Computer” — then click Next.
Malwarebytes will now install on your device. This usually takes under a minute.
When installation is complete, the “Welcome to Malwarebytes” screen will open automatically.
On the final screen, click Open Malwarebytes to launch the program.
Enable “Scan for Rootkits”
Before scanning, turn on rootkit detection so Malwarebytes can find even the most hidden threats. Click the Settings gear icon on the left side of the screen.
In the settings menu, find “Scan for rootkits” and click the toggle so it turns blue.
Done? Click “Dashboard” in the left pane to return to the main screen.
Start the Scan
Click the blue Scan button. Malwarebytes will automatically update its virus database and start checking your computer for malware.
Wait for the Scan to Finish
The scan checks your entire system for browser hijackers and other malicious programs, so it can take several minutes. Feel free to do something else — just check back occasionally to see the progress.
Quarantine the Detected Threats
When the scan is done, you’ll see a list of everything Malwarebytes found — malware, adware, and potentially unwanted programs. Click the “Quarantine” button to remove all of them at once.
Malwarebytes will now remove the malicious files and registry entries and move them safely into quarantine.
Restart Your Computer
Some threats can only be fully removed after a reboot. If Malwarebytes asks you to restart, click Yes. Once you’re logged back in, your PC is clean and you can continue with the next steps in this guide.
When the scan finishes, click Quarantine to remove everything Malwarebytes found. That’s it — your Windows PC is now clean of trojans, adware, and other malware, and should be back to running smoothly.
If your current antivirus allowed this malicious program on your computer, you may want to consider purchasing Malwarebytes Premium to protect against these types of threats in the future. If you are still having problems with your computer after completing these instructions, then please follow one of the steps:
Malwarebytes for Mac is a free on-demand scanner that removes the malware other security software tends to miss — adware, browser hijackers, and unwanted programs included. Cleaning an infected Mac with Malwarebytes has always been completely free, and it’s our go-to recommendation. Follow the steps below to scan and clean your Mac in just a few minutes.
Download Malwarebytes for Mac
Click the button below to download the latest version of Malwarebytes for Mac.
When the download finishes, open your Downloads folder and double-click the setup file to begin the installation.
Follow the On-Screen Prompts to Install Malwarebytes
The Malwarebytes for Mac Installer will guide you through a few quick screens. Click “Continue” and keep following the prompts until the installation completes.
When the installation is complete, Malwarebytes opens to the Welcome to Malwarebytes screen. Click “Get started“.
Select “Personal Computer” or “Work Computer”
Malwarebytes will ask what type of computer you’re installing it on. Click either Personal Computer or Work Computer, whichever applies.
Start the Scan
Click the “Scan” button. Malwarebytes will automatically update its detection database and begin checking your Mac for malware.
Wait for the Scan to Finish
Malwarebytes will scan your Mac for adware, browser hijackers, and other malicious programs. This can take a few minutes, so feel free to do something else — just check back occasionally to see the progress.
Quarantine the Detected Threats
When the scan is done, you’ll see a list of everything Malwarebytes found. Click the “Quarantine” button to remove all the threats at once.
Restart Your Mac
Malwarebytes will now remove all the malicious files it found. Some threats can only be fully removed after a reboot — if Malwarebytes asks you to restart, allow it. Once you’re logged back in, your Mac is clean.
Once the scan is done, remove every threat it detected. Your Mac is now free of adware, rogue browser extensions, and other potentially harmful software.
If your current antivirus allowed a malicious program on your computer, you might want to consider purchasing the full-featured version of Malwarebytes Anti-Malware to protect against these types of threats in the future. If you are still experiencing problems while trying to remove a malicious program from your computer, please ask for help in our Mac Malware Removal Help & Support forum.
Run a Malware Scan with Malwarebytes for Android
Malwarebytes for Android automatically detects and removes dangerous threats like malware and ransomware so you don’t have to worry about your most-used device being compromised. Aggressive detection of adware and potentially unwanted programs keeps your Android phone or tablet running smooth.
Download Malwarebytes for Android.
You can download Malwarebytes for Android by clicking the link below.
In the Google Play Store, tap “Install” to install Malwarebytes for Android on your device.
When the installation process has finished, tap “Open” to begin using Malwarebytes for Android. You can also open Malwarebytes by tapping on its icon in your phone menu or home screen.
Follow the on-screen prompts to complete the setup process
When Malwarebytes will open, you will see the Malwarebytes Setup Wizard which will guide you through a series of permissions and other setup options. This is the first of two screens that explain the difference between the Premium and Free versions. Swipe this screen to continue. Tap on “Got it” to proceed to the next step. Malwarebytes for Android will now ask for a set of permissions that are required to scan your device and protect it from malware. Tap on “Give permission” to continue. Tap on “Allow” to permit Malwarebytes to access the files on your phone.
Update database and run a scan with Malwarebytes for Android
You will now be prompted to update the Malwarebytes database and run a full system scan.
Click on “Update database” to update the Malwarebytes for Android definitions to the latest version, then click on “Run full scan” to perform a system scan.
Wait for the Malwarebytes scan to complete.
Malwarebytes will now start scanning your phone for adware and other malicious apps. This process can take a few minutes, so we suggest you do something else and periodically check on the status of the scan to see when it is finished.
Click on “Remove Selected”.
When the scan has been completed, you will be presented with a screen showing the malware infections that Malwarebytes for Android has detected. To remove the malicious apps that Malwarebytes has found, tap on the “Remove Selected” button.
Restart your phone.
Malwarebytes for Android will now remove all the malicious apps that it has found. To complete the malware removal process, Malwarebytes may ask you to restart your device.
After the scan, tap Remove Selected to delete all detected threats. Your Android phone is now clean — no more malicious apps, adware, or browser redirects.
If your current antivirus allowed a malicious app on your phone, you may want to consider purchasing the full-featured version of Malwarebytes to protect against these types of threats in the future. If you are still having problems with your phone after completing these instructions, then please follow one of the steps:
Restore your phone to factory settings by going to Settings > General management > Reset > Factory data reset.
Now that your device is clean, keep it that way. Most infections start with a malicious ad or a fake download button — so blocking them at the source is your best defense.
We recommend AdGuard, which blocks malicious ads, phishing pages, and dangerous redirects before they can reach you.
The sender calls itself Webmail without naming the company responsible for the account. That ambiguity supports mass distribution.
A precise last-sync time appears without a device, client, mailbox folder, server, or error code. The specificity is decorative rather than diagnostic.
The message claims multiple functions will fail but offers only a login button. Real troubleshooting provides settings or support guidance.
The footer uses generic corporate wording that cannot be traced to a known legal entity or service agreement.
The link leaves the provider’s domain. This ownership mismatch matters more than copied colors, icons, or brand artwork.
The page requests a mailbox password to repair synchronization. A legitimate provider already manages authentication and does not need credentials submitted elsewhere.
A disappearing destination is also suspicious. Providers maintain stable account portals, while phishing pages often vanish after abuse reports.
No single clue is required. The combined inconsistencies make independent verification the only sensible response.
Better Ways to Handle Real Sync Problems
First compare webmail with the affected application. If webmail is current, the server likely holds the messages and the local client needs attention.
Confirm network access and available storage. Large queues, full devices, or offline modes can delay updates without threatening the account.
Install updates through the operating system or application vendor. Never accept an installer offered by a synchronization email.
Review server names, ports, encryption, and authentication methods against official documentation. Small configuration mistakes can prevent connections.
Use provider-generated application passwords where required. Do not reuse the main account password in unsupported legacy clients.
Ask support before removing a mailbox profile. Locally stored folders may require export or backup before reconfiguration.
Organizations should document approved clients and settings. Clear instructions reduce the credibility of vague external repair notices.
Regular backups protect locally archived mail. Account security and data preservation are separate tasks, and both deserve attention.
Why Generic Mail Alerts Keep Working
Email is invisible infrastructure until something goes wrong. Most users cannot observe server queues, authentication exchanges, or synchronization states directly.
That knowledge gap gives vague warnings room to sound credible. Technical words suggest expertise even when the explanation contains no usable diagnosis.
Different providers also use similar visual language. Envelopes, blue buttons, and white login cards can resemble almost any mail service.
Recipients often manage several addresses across work, personal, and legacy accounts. They may not remember which system uses which settings.
The campaign exploits that uncertainty with one universal repair. Real support must understand the actual account, application, protocol, and device.
Organizations can reduce confusion by publishing approved login domains and support routes. Users should not need to identify infrastructure from memory.
Password managers add a practical warning. A saved credential that refuses to autofill can reveal that the visitor reached an unfamiliar domain.
That signal is not infallible, but it creates a useful pause. The address bar should then decide whether the page deserves trust.
Frequently Asked Questions
Can a mailbox genuinely stop synchronizing?
Yes. Connectivity, storage, authentication, software, and configuration problems can cause delays. Diagnose them through the application and official provider tools.
Does the precise timestamp prove the alert is genuine?
No. Templates can generate realistic dates automatically. A meaningful notice should also identify the affected account, client, server, and support record.
Why does the fake page change its appearance?
Phishing kits can inspect the email domain and load matching artwork. Visual adaptation does not establish a connection with the real provider.
What if the linked site is now offline?
It may have been removed or abandoned. The vanished page does not validate the email, and submitted credentials may already be stolen.
Should I delete and re-add my mail account?
Not immediately. Confirm backups and ask official support first, because removing a profile can affect locally stored messages.
Can a password reset alone remove the attacker?
Not always. Revoke sessions, application passwords, forwarding rules, delegates, connected apps, and unfamiliar recovery methods as well.
The Bottom Line
The Update and Synchronize Your Mailbox scam invents a vague service failure, then replaces genuine troubleshooting with a counterfeit password form.
Check synchronization inside the real account and affected application. Never send a reusable mail password to a destination reached through an unsolicited repair button.
10 Rules to Avoid Online Scams
Here are 10 practical safety rules to help you avoid malware, online shopping scams, crypto scams, and other online fraud. Each tip includes a quick “if you already got hit” action.
Stop and verify before you click, log in, download, or pay.
Most scams win by creating urgency. Verify using a trusted method: type the website address yourself, use the official app, or call a known number (not the one in the message).
If you already clicked: close the page, do not enter passwords, and run a malware scan.
Keep your operating system, browser, and apps updated.
Updates patch security holes used by malware and malicious ads. Turn on automatic updates where possible.
If you saw a scary “update now” pop-up: close it and update only through your device settings or the official app store.
Use layered protection: antivirus plus an ad blocker.
Antivirus helps block malware. An ad blocker reduces scam redirects, phishing pages, and malvertising.
If your browser is acting weird: remove unknown extensions, reset the browser, then run a full scan.
Install apps, software, and extensions only from official sources.
Avoid cracked software, “keygens,” and random downloads. During installs, choose Custom/Advanced and decline bundled offers you do not recognize.
If you already installed something suspicious: uninstall it, restart, and scan again.
Treat links and attachments as untrusted by default.
Phishing often impersonates delivery services, banks, and popular brands. If it is unexpected, do not open attachments or log in through the message.
If you entered credentials: change the password immediately and enable 2FA.
Shop safely: research the store, then pay with protection.
Be cautious with brand-new stores, “closing sale” stories, and prices that make no sense. Prefer credit cards or PayPal for dispute options. Avoid wire transfers, gift cards, and crypto payments.
If you already paid: contact your card issuer or PayPal quickly to dispute the transaction.
Crypto rule: never pay a “fee” to withdraw or recover money.
Common patterns include fake profits, then “tax,” “gas,” or “verification” fees. Another is a “recovery agent” who demands upfront crypto.
If you already sent crypto: stop paying, save evidence (wallet addresses, TXIDs, chats), and report the scam to the platform used.
Secure your accounts with unique passwords and 2FA (start with email).
Use a password manager and unique passwords for every account. Enable 2FA using an authenticator app when possible.
If you suspect an account takeover: change passwords, sign out of all devices, and review recent logins and recovery settings.
Back up important files and keep one backup offline.
Backups protect you from ransomware and device failure. Keep at least one backup on an external drive that is not always connected.
If you suspect infection: do not connect backup drives until the system is clean.
If you think you are a victim: stop losses, document evidence, and escalate fast.
Move quickly. Speed matters for disputes, account recovery, and limiting damage.
Stop payments and contact: do not send more money or respond to the scammer.
Call your bank or card issuer: block transactions, replace the card if needed, and start a dispute or chargeback.
Secure your email first: change the email password, enable 2FA, and remove unfamiliar recovery options.
Secure other accounts: change passwords, enable 2FA, and log out of all sessions.
Scan your device: remove suspicious apps or extensions, then run a full malware scan.
Save evidence: screenshots, emails, order pages, tracking pages, wallet addresses, TXIDs, and chat logs.
Report it: to the payment provider, marketplace, social platform, exchange, or wallet service involved.
These rules are intentionally simple. Most online losses happen when decisions are rushed. Slow down, verify independently, and use payment methods and account controls that give you recourse.
Hello! I'm Lapain Epuran, your go-to source for detailed and honest product reviews. From tech gadgets to miracle cures, I provide insights to help you make informed choices. Join me as we discover what's truly worth your time and money.