

A document is waiting for your signature, but a verification window blocks the preview. It offers a manual alternative that looks like a quick technical workaround.
Then the page asks you to open a terminal. Before treating that as another routine check, consider why reading an agreement would require control of your computer.
Overview
A document-signing pretext leads outside the browser
AvisLoader is a Windows malware loader associated with a fake document-verification lure. Its role is to establish access and enable the delivery of additional malicious software.
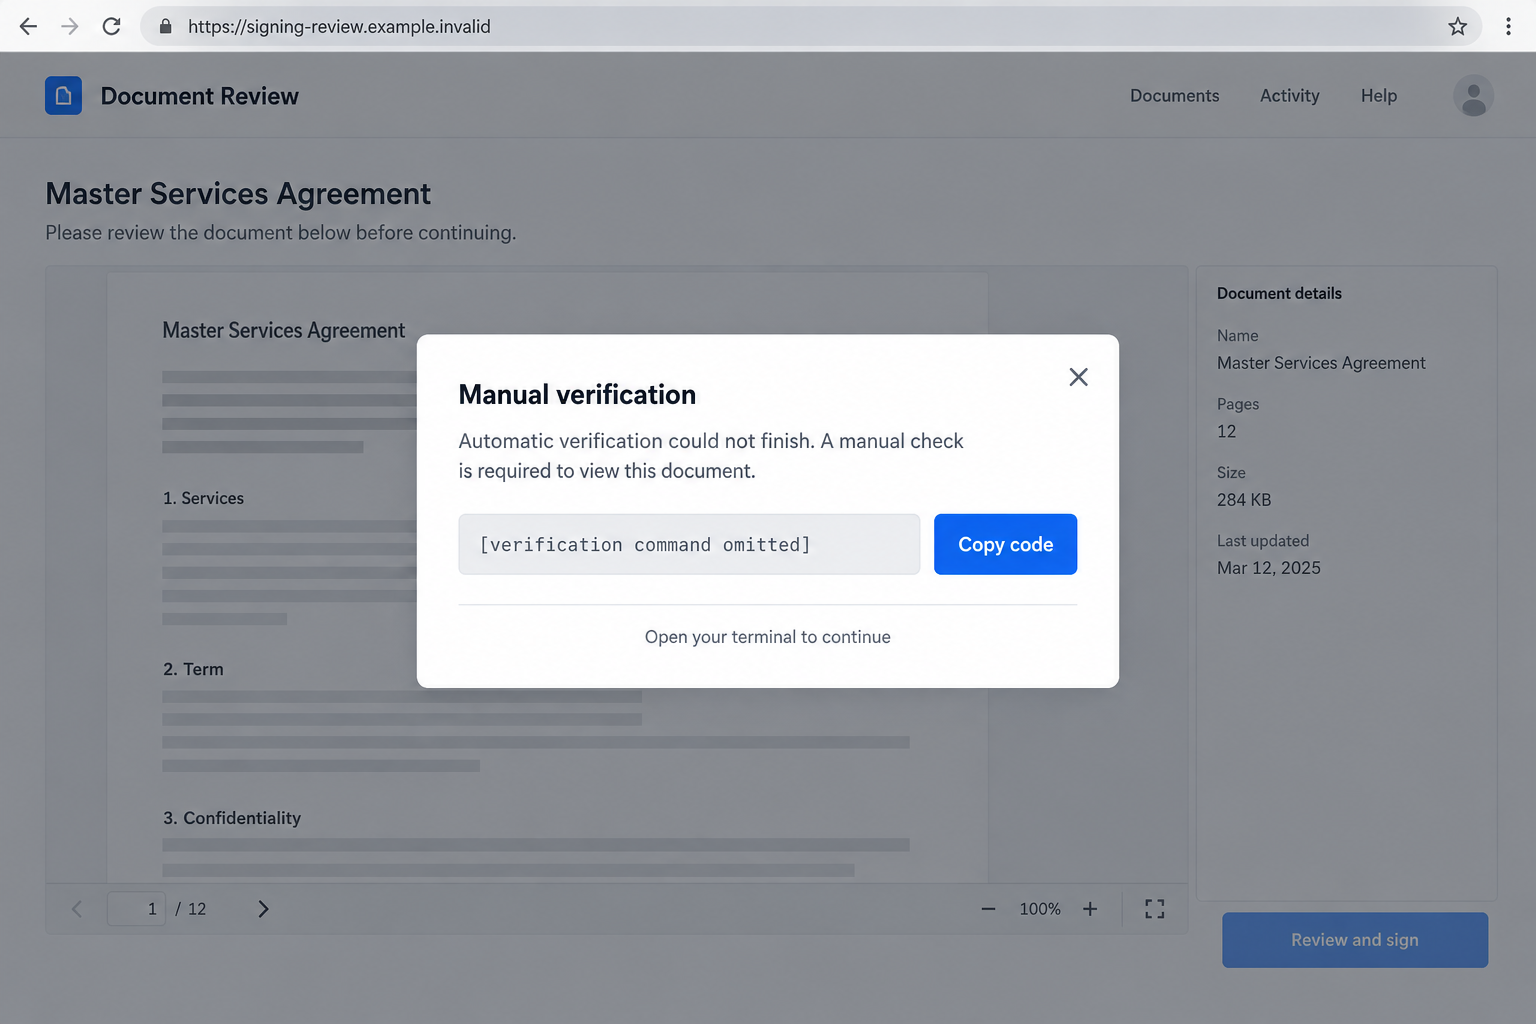
Varonis identified a signing-themed ClickFix page alongside recovered loader files. The page turns an alleged verification failure into a request to execute a command.
That request is the point to stop. Do not run a stranger’s terminal instructions to unlock an agreement, even when the surrounding page resembles a familiar service.
The danger is what the command can start
Copying text is not the same as executing it. The critical exposure occurs when instructions are pasted into a command interface and run.
The reported Windows loader uses Tox communications, and recovered artifacts indicate a shortcut-based persistence mechanism. Operators can use the access to issue tasks and deliver files.
- The lure claims that an automatic check needs a manual replacement.
- A supposed verification code is actually intended for execution.
- Later software delivery can expand the incident beyond the initial loader.
- Normal-looking applications and shortcuts do not establish that the system is clean.
Cleanup must consider more than the first alert
AvisLoader removal should include containment, examination of the command’s effects, and checks for subsequent payloads. Do not assume that deleting one download completes recovery.
The published investigation recovered a Windows payload. A macOS option in the lure does not establish that researchers also obtained a functioning macOS version.
The image is a fictional interface illustration with its command deliberately omitted. It is not an original contract, a working challenge, or an antivirus finding.
Why the Manual Verification Story Gets People to Cooperate
Most people have encountered a legitimate verification check that failed once. Trying a suggested alternative can feel more reasonable than abandoning a document they expected.
The attacker uses that everyday frustration to change the rules. A browser task becomes a system-level task before the reader has a reason to question it.
A command box can also feel impersonal and official. Someone who would refuse an unknown application might still paste a string described as a security code.
The label does not change its function. A command interpreter treats executable instructions as instructions, not as harmless proof that a person is present.
If you cannot explain what a pasted instruction does, you cannot make the request safe by trusting the page’s reassuring description.
For a real signing request, contact the sender through an existing conversation. Ask them to confirm the document and offer a supported way to access it.
How the AvisLoader Infection Chain Works
Step 1: A signing page supplies a believable reason to continue
The documented lure imitates a document-signing workflow. A contract preview and familiar business language make the page look like part of ordinary work.
That context matters. You may be more willing to troubleshoot when you believe a customer, employer, or supplier is waiting for your signature.
Check the request against the conversation that preceded it. If nobody discussed an agreement, there is no reason to solve the page’s supposed technical problem.
Even an expected document needs a trustworthy delivery route. An attacker can borrow a real person’s name or exploit a compromised conversation.
Step 2: A failed check introduces a terminal command
The page offers manual verification after claiming the automatic process failed. It makes the next instruction sound like a normal fallback rather than a new security decision.
In the investigated lure, the copied instruction retrieves and executes code. The browser’s ordinary download process is not the route the user is being asked to follow.
Do not reproduce the command in a terminal to find out what it does. A responder can inspect the text without running it on your computer.
If you copied it but have not executed it, replace the clipboard contents with harmless text and close any terminal you opened for the page.
Keep the distinction clear when reporting the incident. Clicking Copy, pasting into an unsent message, and pressing Enter in a terminal are different events.
Step 3: The loader provides a channel for further instructions
A loader is a starting point for additional activity, not a description of everything that will happen on every affected machine.
Tox gives the reported malware a communications method that does not depend on one fixed web domain. Removing the initial lure page therefore cannot clean an infected endpoint.
The messaging technology itself is not the culprit. Legitimate software can use the same protocol without performing the loader’s actions.
For the owner, the practical question is what ran locally and what arrived afterward. A network block alone cannot answer that.
Step 4: Familiar shortcuts may conceal a route back into execution
Recovered artifacts point to changes that can launch the loader when a familiar application shortcut is used, while still opening the application the user expected.
That makes successful application launches a poor recovery test. An app opening normally does not establish that its shortcut points only where it should.
The original research also examined helper tools whose use in an actual intrusion was not confirmed. Their presence should not become a blanket claim of invisible rootkits.
A responder should investigate observed behavior and the recovered components together. Avoid diagnosing every slow computer or odd shortcut as AvisLoader.
DocuSign, Cloudflare, and Tox Are Not the Scam
The campaign borrows trust from recognizable services and infrastructure. That does not mean those services authorized the document, installed the loader, or endorsed the verification instructions.
Cloudflare-hosted addresses can serve legitimate content as well as abusive pages. Blocking every site using that infrastructure is not a sensible personal cleanup strategy.
Likewise, a page mentioning DocuSign does not prove that the real signing service sent it. Confirm the document through an independent, established route.
Look at what the page asks you to do: leave the signing process and run code on your computer. That is the warning worth acting on.
That is the rule worth remembering when the branding changes. A different logo does not make the same terminal-based verification request safer.
Assess Your Exposure Before Choosing a Remedy
You saw the page or copied its text
Seeing the prompt alone does not demonstrate execution of AvisLoader. Close the page, avoid its instructions, and report the suspicious signing request.
If you downloaded a file but did not open it, do not test it. Let your security software assess it and preserve details needed for reporting.
You ran the command
Treat this as a potential endpoint compromise even if nothing visibly happened. A brief terminal window or a silent return is not proof that execution failed.
Record whether you pressed Enter, accepted a privilege prompt, or saw an error. Those details help the responder identify what could have happened.
You also entered passwords or accessed sensitive accounts
Tell the responder about those accounts. A loader can deliver other threats, but the investigation should establish the exposure rather than invent a list of stolen information.
While the device remains untrusted, use another system for recovery. Prioritize email and financial access if you have evidence of unauthorized activity.
What to Do If You Ran the AvisLoader Verification Command
Take the affected Windows computer off the network. Stop the connection rather than leaving the suspected loader online while searching for a fix.
For a managed laptop, contact your security team immediately from another device. Follow its containment instructions and preserve the computer for investigation.
Write down the sequence before details fade. Record the signing request, page address, copied text if already available, and approximate execution time.
Do not reopen the trap to collect a better screenshot. Do not run the instruction a second time because the first attempt looked unsuccessful.
Use trusted malware scanning and retain its results. Malwarebytes is one option for investigating unwanted Windows software. Obtain it through a legitimate route.
Allow the scan to finish and review detections, quarantine actions, and restart requests. A shortened scan or dismissed alert is not a completed cleanup.
Check what followed the loader. Ask the responder to assess additional payloads, unexpected applications, and modified shortcuts rather than stopping at the first executable.
Do not repair shortcuts by guessing at command lines. Preserve suspicious targets and let someone qualified distinguish legitimate launch arguments from unauthorized additions.
Escalate when the system remains untrustworthy. Recurring detections, disabled protection, or unexplained changes justify deeper assessment and possibly a clean operating-system installation.
Back up necessary personal documents carefully. Avoid restoring untrusted scripts, installers, or the same altered software setup that may carry the problem forward.
Protect exposed online access from a different device. Change compromised credentials and end unauthorized sessions. Contact your employer about work tokens, credentials, or confidential files.
If financial misuse appears, alert the institution directly. Scanning the computer cannot reverse a transfer or remove information someone already copied.
Reduce the chance of another misleading verification request. Update your browser and operating system, and obtain signing access through established service links.
AdGuard can help filter some malicious advertisements and destinations. Keep it as an additional layer, not permission to execute instructions supplied by unfamiliar pages.
Is Your Device Infected? Run a Free Malware Scan
Slow performance, constant pop-ups, or strange behavior? These are classic signs of a malware infection. The fastest way to find out is to scan your device with Malwarebytes Free — one of the most trusted malware removal tools available.
The free version detects and removes the most common threats, including:
- Adware — the cause of those annoying pop-ups
- Browser hijackers — unwanted redirects and changed homepages
- Trojans and spyware — hidden programs stealing your data
- Potentially unwanted programs (PUPs) — software you never asked for
👉 Select your device below — Windows, Mac, or Android — then follow the simple steps to download Malwarebytes, scan your system, and remove any threats it finds. The scan usually takes 5 to 20 minutes.
Run a Malware Scan with Malwarebytes for Windows
Malwarebytes is one of the most popular and trusted anti-malware tools for Windows — and it’s completely free for removing infections. It catches threats that many antivirus programs miss, including adware, browser hijackers, and trojans. Follow the steps below to scan and clean your PC in just a few minutes.
Download Malwarebytes
Click the button below to download the latest version of Malwarebytes for Windows from the official source. The free version is all you need — it will scan your computer and remove adware, browser hijackers, and other malicious software at no cost.
Download MalwarebytesOfficial installer for Windows 11 and 10. Your download starts right away.Want real-time protection? See Malwarebytes Premium Malwarebytes Free for WindowsScans and removes malware at no cost
-
Install Malwarebytes
When the download finishes, open your Downloads folder and double-click the MBSetup file. If Windows shows a User Account Control pop-up, click “Yes” to allow the installation.

Follow the On-Screen Prompts to Install Malwarebytes
The setup wizard will walk you through a few quick screens:
-
Choose where you’re installing the program — “Personal Computer” or “Work Computer” — then click Next.

-
Malwarebytes will now install on your device. This usually takes under a minute.

-
When installation is complete, the “Welcome to Malwarebytes” screen will open automatically.

-
On the final screen, click Open Malwarebytes to launch the program.

-
Enable “Scan for Rootkits”
Before scanning, turn on rootkit detection so Malwarebytes can find even the most hidden threats. Click the Settings gear icon on the left side of the screen.

In the settings menu, find “Scan for rootkits” and click the toggle so it turns blue.

Done? Click “Dashboard” in the left pane to return to the main screen.
Start the Scan
Click the blue Scan button. Malwarebytes will automatically update its virus database and start checking your computer for malware.

-
Wait for the Scan to Finish
The scan checks your entire system for browser hijackers and other malicious programs, so it can take 5 to 20 minutes depending on your computer. Feel free to do something else — just check back occasionally to see the progress.

-
Quarantine the Detected Threats
When the scan is done, you’ll see a list of everything Malwarebytes found — malware, adware, and potentially unwanted programs. Click the “Quarantine” button to remove all of them at once.

Malwarebytes will now remove the malicious files and registry entries and move them safely into quarantine.

-
Restart Your Computer
Some threats can only be fully removed after a reboot. If Malwarebytes asks you to restart, click Yes. Once you’re logged back in, Malwarebytes has finished removing the threats it found.

That’s it — your Windows PC is now clean of trojans, adware, and other malware, and should be back to running smoothly.
If you are still having problems with your computer after completing these instructions, then please follow one of the steps:
- Run a computer scan with ESET Online Scanner
- Ask for help in our Windows Malware Removal Help & Support forum.
Run a Malware Scan with Malwarebytes for Mac
Malwarebytes for Mac is a free on-demand scanner that removes the malware other security software tends to miss — adware, browser hijackers, and unwanted programs included. Cleaning an infected Mac with Malwarebytes has always been completely free, and it’s our go-to recommendation. Follow the steps below to scan and clean your Mac in just a few minutes.
-
Download Malwarebytes for Mac
Click the button below to download the latest version of Malwarebytes for Mac.
Download MalwarebytesOfficial installer for macOS. Your download starts right away.Want real-time protection? See Malwarebytes PremiumMalwarebytes Free for MacScans and removes malware at no cost -
Open the Malwarebytes setup file
When the download finishes, open your Downloads folder and double-click the setup file to begin the installation.

-
Follow the On-Screen Prompts to Install Malwarebytes
The Malwarebytes for Mac Installer will guide you through a few quick screens. Click “Continue” and keep following the prompts until the installation completes.



When the installation is complete, Malwarebytes opens to the Welcome to Malwarebytes screen. Click “Get started“.
-
Select “Personal Computer” or “Work Computer”
Malwarebytes will ask what type of computer you’re installing it on. Click either Personal Computer or Work Computer, whichever applies.

-
Start the Scan
Click the “Scan” button. Malwarebytes will automatically update its detection database and begin checking your Mac for malware.

-
Wait for the Scan to Finish
Malwarebytes will scan your Mac for adware, browser hijackers, and other malicious programs. This can take a few minutes, so feel free to do something else — just check back occasionally to see the progress.

-
Quarantine the Detected Threats
When the scan is done, you’ll see a list of everything Malwarebytes found. Click the “Quarantine” button to remove all the threats at once.

-
Restart Your Mac
Malwarebytes will now remove all the malicious files it found. Some threats can only be fully removed after a reboot — if Malwarebytes asks you to restart, allow it. Once you’re logged back in, your Mac is clean.

That’s it — your Mac is now free of adware, rogue browser extensions, and other potentially harmful software.
If you are still experiencing problems while trying to remove a malicious program from your computer, please ask for help in our Mac Malware Removal Help & Support forum.
Run a Malware Scan with Malwarebytes for Android
Malwarebytes for Android automatically detects and removes dangerous threats like malware and ransomware so you don’t have to worry about your most-used device being compromised. Aggressive detection of adware and potentially unwanted programs keeps your Android phone or tablet running smooth.
-
Download Malwarebytes for Android.
You can download Malwarebytes for Android by clicking the link below.
Get Malwarebytes for AndroidOpens Google Play in a new tab.Want real-time protection? See Malwarebytes Premium for AndroidMalwarebytes for AndroidScans your phone and removes malware at no cost -
Install Malwarebytes for Android on your phone.
In the Google Play Store, tap “Install” to install Malwarebytes for Android on your device.

When the installation process has finished, tap “Open” to begin using Malwarebytes for Android. You can also open Malwarebytes by tapping on its icon in your phone menu or home screen.

-
Follow the on-screen prompts to complete the setup process
When Malwarebytes will open, you will see the Malwarebytes Setup Wizard which will guide you through a series of permissions and other setup options.
This is the first of two screens that explain the difference between the Premium and Free versions. Swipe this screen to continue.
Tap on “Got it” to proceed to the next step.
Malwarebytes for Android will now ask for a set of permissions that are required to scan your device and protect it from malware. Tap on “Give permission” to continue.
Tap on “Allow” to permit Malwarebytes to access the files on your phone.
-
Update database and run a scan with Malwarebytes for Android
You will now be prompted to update the Malwarebytes database and run a full system scan.

Click on “Update database” to update the Malwarebytes for Android definitions to the latest version, then click on “Run full scan” to perform a system scan.

-
Wait for the Malwarebytes scan to complete.
Malwarebytes will now start scanning your phone for adware and other malicious apps. This process can take a few minutes, so we suggest you do something else and periodically check on the status of the scan to see when it is finished.

-
Click on “Remove Selected”.
When the scan has been completed, you will be presented with a screen showing the malware infections that Malwarebytes for Android has detected. To remove the malicious apps that Malwarebytes has found, tap on the “Remove Selected” button.

-
Restart your phone.
Malwarebytes for Android will now remove all the malicious apps that it has found. To complete the malware removal process, Malwarebytes may ask you to restart your device.
That’s it — your Android phone is now clean — no more malicious apps, adware, or browser redirects.
If you are still having problems with your phone after completing these instructions, then please follow one of the steps:
- Restore your phone to factory settings by going to Settings > General management > Reset > Factory data reset.
- Ask for help in our Mobile Malware Removal Help & Support forum.
Stay Protected: Block Ads and Malicious Sites
Now that your device is clean, keep it that way. Most infections start with a malicious ad or a fake download button — so blocking them at the source is your best defense.
We recommend AdGuard, which blocks malicious ads, phishing pages, and dangerous redirects before they can reach you.
👉 Download AdGuard and browse safely
What a Useful Cleanup Review Should Cover
A cleanup report should explain what was found and addressed. It should not promise certainty based only on the disappearance of a browser warning.
Microsoft’s malware-removal troubleshooting covers recurring detections and offline scanning when ordinary cleanup does not resolve the problem.
Keep evidence of the initial command alongside scanner findings. The command may identify a delivery route even when the final malware uses a different filename.
- Was the instruction prevented, or did it actually start a process?
- Were any additional programs or scripts retrieved after that point?
- Were application shortcuts changed, and have approved targets been restored?
- Are antivirus settings and operating-system updates functioning again?
- Were online sessions or work credentials exposed during the affected period?
For a home computer, ask the technician which questions remain unresolved. For a business machine, the incident team may need to assess connected services as well.
There is no reason to upload private contracts or complete browsing histories to a public support forum. Share sensitive evidence only with the responsible trusted team.
If someone contacts you unexpectedly claiming to have detected AvisLoader, verify them independently. The real incident should not become a second remote-support deception.
A Safer Way to Handle a Document That Will Not Open
If you followed the macOS instructions
Do not dismiss the incident because the recovered AvisLoader sample was Windows software. A command executed on your Mac still needs to be assessed on its own merits.
Tell a qualified responder which system you used and what happened. Do not apply Windows-only removal directions or assume the same payload must have been delivered.
Keep any existing command text for that assessment without running it again. The distinction between an unconfirmed malware variant and a potentially dangerous action is important.
Ask for a supported signing route
Return to the person who sent the document using a known address or number. Describe the verification prompt without forwarding a runnable command.
Ask whether the agreement can be accessed from your existing signing account or resent through an approved channel. A legitimate business can accommodate that check.
Do not let a deadline turn a suspicious request into an exception. Urgency changes how quickly you should contact the sender, not what code is safe.
Organizations can make this easier by telling employees how to report broken signing links. A clear alternative reduces the temptation to improvise a technical repair.
Frequently Asked Questions
What does AvisLoader do?
It is a Windows loader that gives operators a means to issue instructions and deliver additional files. The impact depends on subsequent activity on the affected computer.
Is the manual verification code safe to paste?
Do not paste it into a command interface. The campaign presents executable instructions as verification text, and running them can initiate the malware delivery.
Did copying the code infect my computer?
Copying alone does not establish execution. Tell your responder whether you merely copied text, pasted it somewhere harmless, or ran it in a terminal.
Does this mean DocuSign was hacked?
No such conclusion follows from the lure. A fraudulent page can imitate document-signing branding without compromising or being authorized by the real service.
Is AvisLoader also confirmed on macOS?
The referenced analysis recovered a Windows loader despite macOS instructions in the lure. That distinction should not be turned into a confirmed macOS malware finding.
Why check shortcuts after a malware scan?
Persistence artifacts involve familiar application shortcuts. Their targets need to be assessed because an application opening normally does not prove its launch path is unchanged.
The Bottom Line
Never run a terminal command to satisfy this document-verification prompt. A request to execute code is not an ordinary step in reading or signing an agreement.
If you already ran it, isolate the PC and investigate the complete infection. AvisLoader removal needs to account for persistence, subsequent payloads, and any exposed access.

Join the discussion
0 commentsShare your experience or ask a question about this article.
Your progress
Did these steps help?
Let us know how the guide worked for you.
Describe what you see and the step you reached. Keep passwords and other private information out.
Discussion
Start the conversation
Have a question or something useful to share? Add the first comment.