


A virus warning appears in the corner of your screen. You close it, return to what you were doing, and another one arrives.
If you can still see the name underneath the warning, keep it in mind. That little line is more useful than the alarming headline above it.
Overview
Two names to look for in your notification settings
Breachlabs[.]it.com and Essoaxole[.]co.in are associated with deceptive browser notifications. Both presented a notification permission request as part of a robot check.
The address on your screen might start with a longer string before either name. Write down the full address shown by the browser without opening it.
You don’t have to decide whether the two sites share an operator to fix the problem. They use the same permission, and each matching entry can be blocked separately.
A website can send an alert that looks like it belongs to Windows
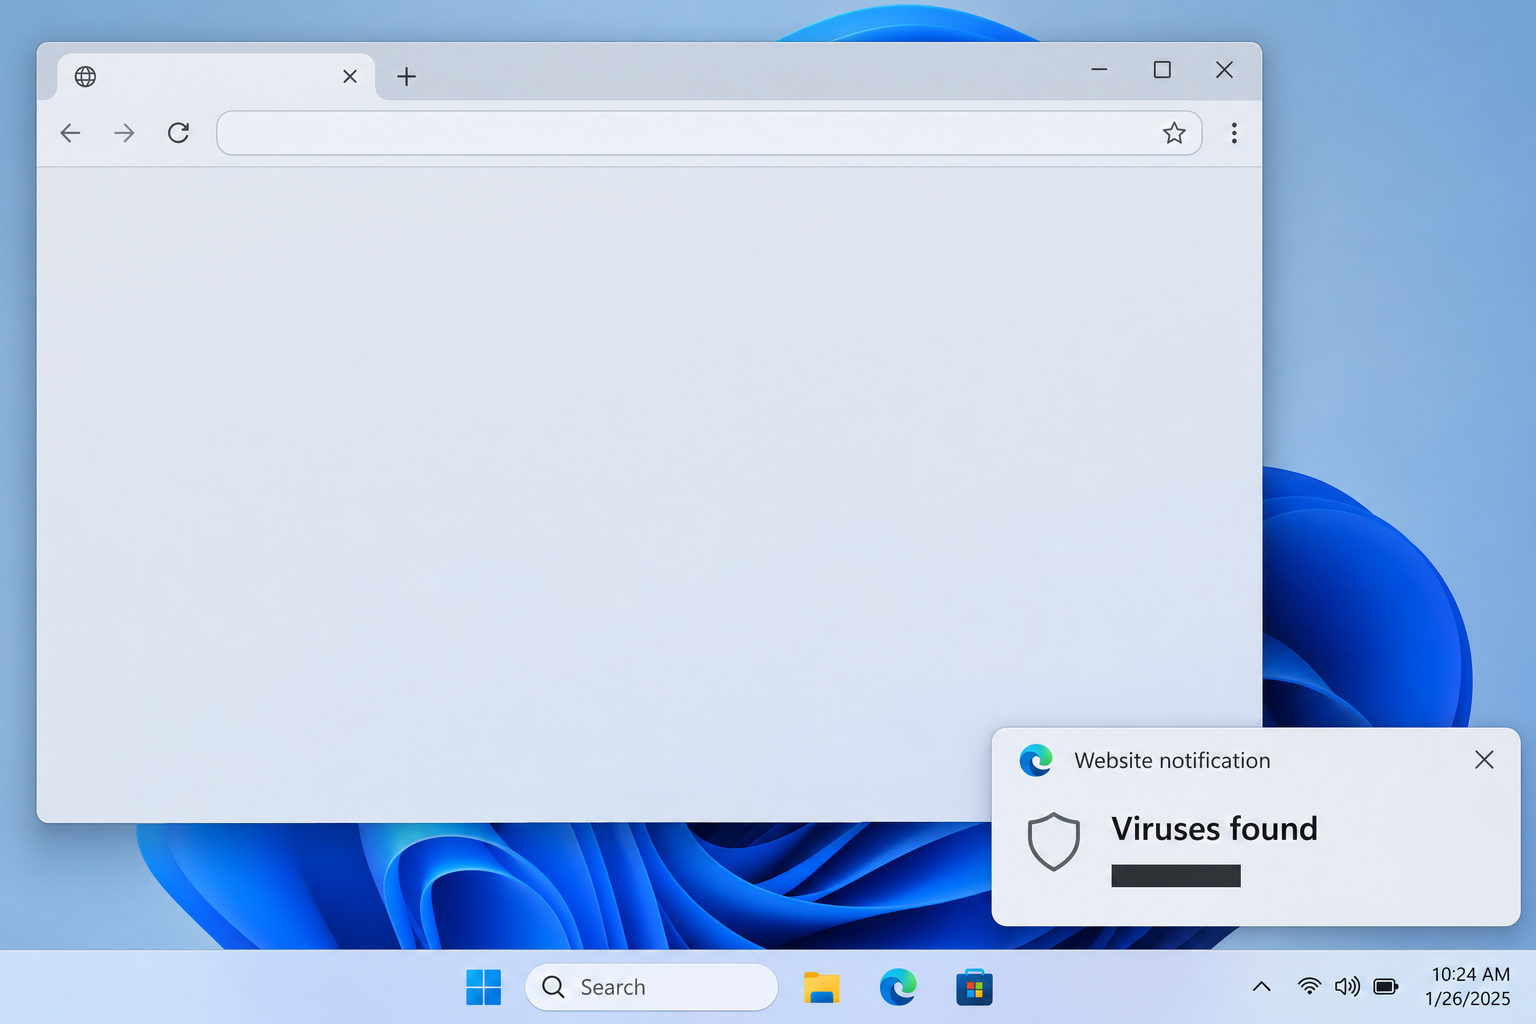
The illustration shows the placement to look for: a notification on the desktop, outside the web page itself. The browser can display a warning written by a website.
In the reported examples, Breachlabs used Windows security language and a supposed count of threats. Essoaxole claimed an infection and tried to send readers toward a security report.
Neither message is a record of what Microsoft Defender found. To check that, open Windows Security yourself and look at what the app recorded.
Start with what you actually did
Someone who tapped Allow has a browser setting to change. Someone who later installed an app, called a number, or entered a password has a separate problem to address.
- Note the browser and website shown on the notification.
- Check which browser profile has that website marked as allowed.
- Block only the unwanted permission first, then check whether the warnings stop.
- Handle any download, payment, or account action separately.
Browser spam can appear without an infection. Silencing it doesn’t rule out problems from software you may have run later.
How the Breachlabs and Essoaxole Notification Scam Works
Step 1: The browser opens a page you did not mean to visit
Perhaps you were watching a clip or downloading a file when another tab opened. An unfamiliar address is easy to miss when you expect an interruption.
A redirect alone doesn’t tell you which site, advertisement, or extension sent you there. It also doesn’t show that the page had already received permission to contact you later.
If you’re helping someone else, ask what they were trying to do before the tab appeared. That may explain the timing without turning a guess into a diagnosis.
There’s no need to follow the same route again. If the browser history records the address, you can note it without selecting the history entry.
Step 2: The fake robot check points to a real permission
The page says you must prove you’re a person. The browser presents a decision about notifications, which is an entirely different request.
A genuine browser permission prompt can sit beside a dishonest explanation. The prompt itself doesn’t tell you that the website’s reason for asking is true.
The surprise is that the visitor may think they passed a test, even when nothing useful loaded. In the browser, the lasting change is the permission they granted.
If the prompt is still on your screen, decline it or close the tab. You won’t need to return to the page to block an existing permission either.
Step 3: The warning arrives somewhere that looks more trustworthy
Once a site can send notifications, it doesn’t need your attention on the original tab. A new card can appear while you’re reading mail or working in another window.
Microsoft’s Edge notification guide distinguishes website notifications from pop-up tabs. It also explains why Edge website notifications can appear even when the browser looks closed.
That is why a warning might seem to come from the program you were using at the time. The active window and the source of the notification are separate.
The Breachlabs threat count sounds like the result of a completed scan. But the website can put a number in its alert without scanning anything.
Step 4: The next click changes what you need to check
The warning asks you to do something about an alleged threat. The next page may try to sell software, collect information, or send you to a supposed support agent.
There is no reason to assume each notification takes the same route. You can keep the address and time for a report without following the alert to find out.
On a shared computer, one person might have dismissed alerts while another opened a page. Ask about each action separately instead of relying on the first person’s recollection.
That distinction gives you a practical starting point. A browser permission can be blocked immediately, while an actual payment or software installation needs its own follow-up.
Stop the Notifications Without Erasing Your Browser
Step 1: Find the browser and the profile that received them
Use the app name on the notification or look in your notification history, if your system offers one. Read the source without clicking the warning body.
Open that browser from your usual shortcut. If it has separate Work and Personal profiles, use the profile menu to inspect the one you were using.
When the source is unclear, check the profiles you actually use, one at a time. Blocking a site in a profile that never allowed it won’t solve the problem.
Look for the complete website name, including any letters or numbers before the domain. Don’t type the website into a new tab to confirm what it is.
Step 2: Block the entry in Chrome
Open Chrome’s three-dot menu and choose Settings. Under Privacy and security, open Site settings, then Notifications.
Find the relevant address under the allowed sites. Use the menu beside that row and choose Block, or open the site’s permission details and set Notifications to blocked.
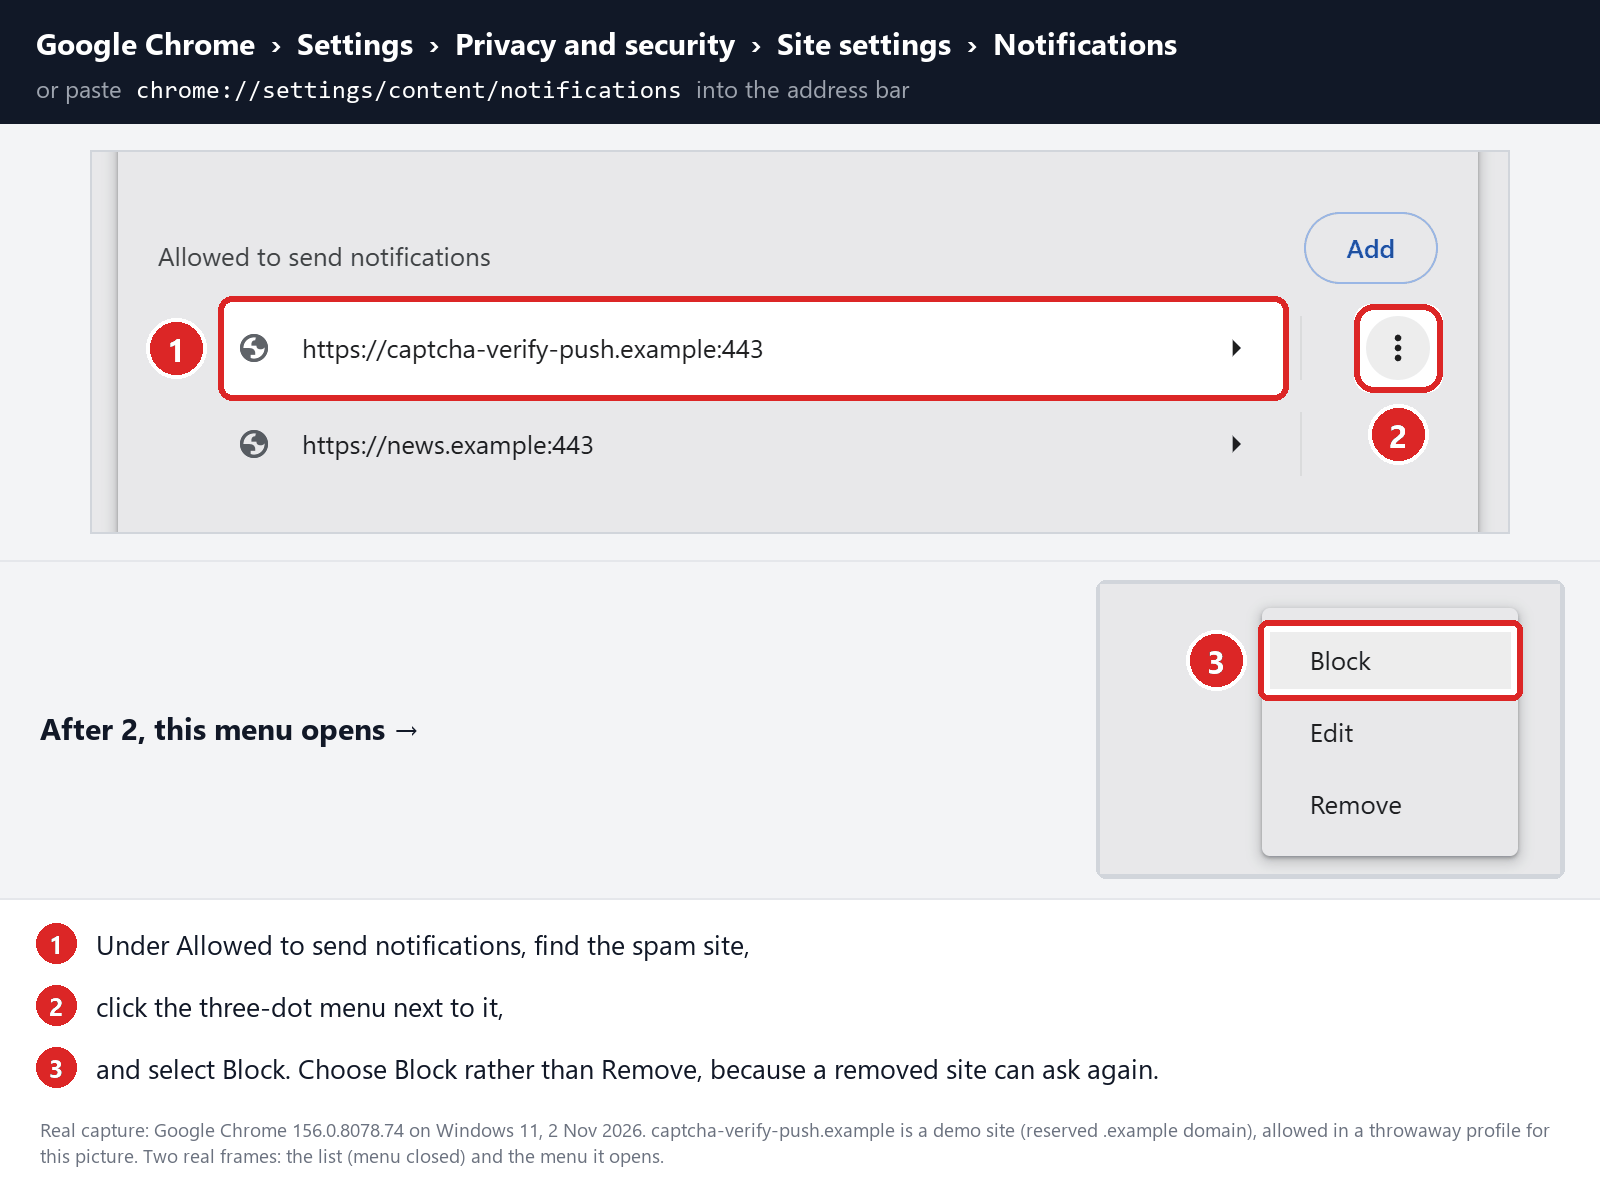
If you see two matching entries with different prefixes, check both. The row to change is the site permission, not a similarly worded item inside a web page.
Check that the entry is no longer allowed before leaving settings. Google’s notification instructions also cover reviewing exceptions and stopping future requests.
Chrome treats notifications and pop-ups as separate permissions. Changing only its pop-up and redirect settings won’t necessarily affect notices you’ve already allowed.
Step 3: Remove the same permission in Edge or Firefox
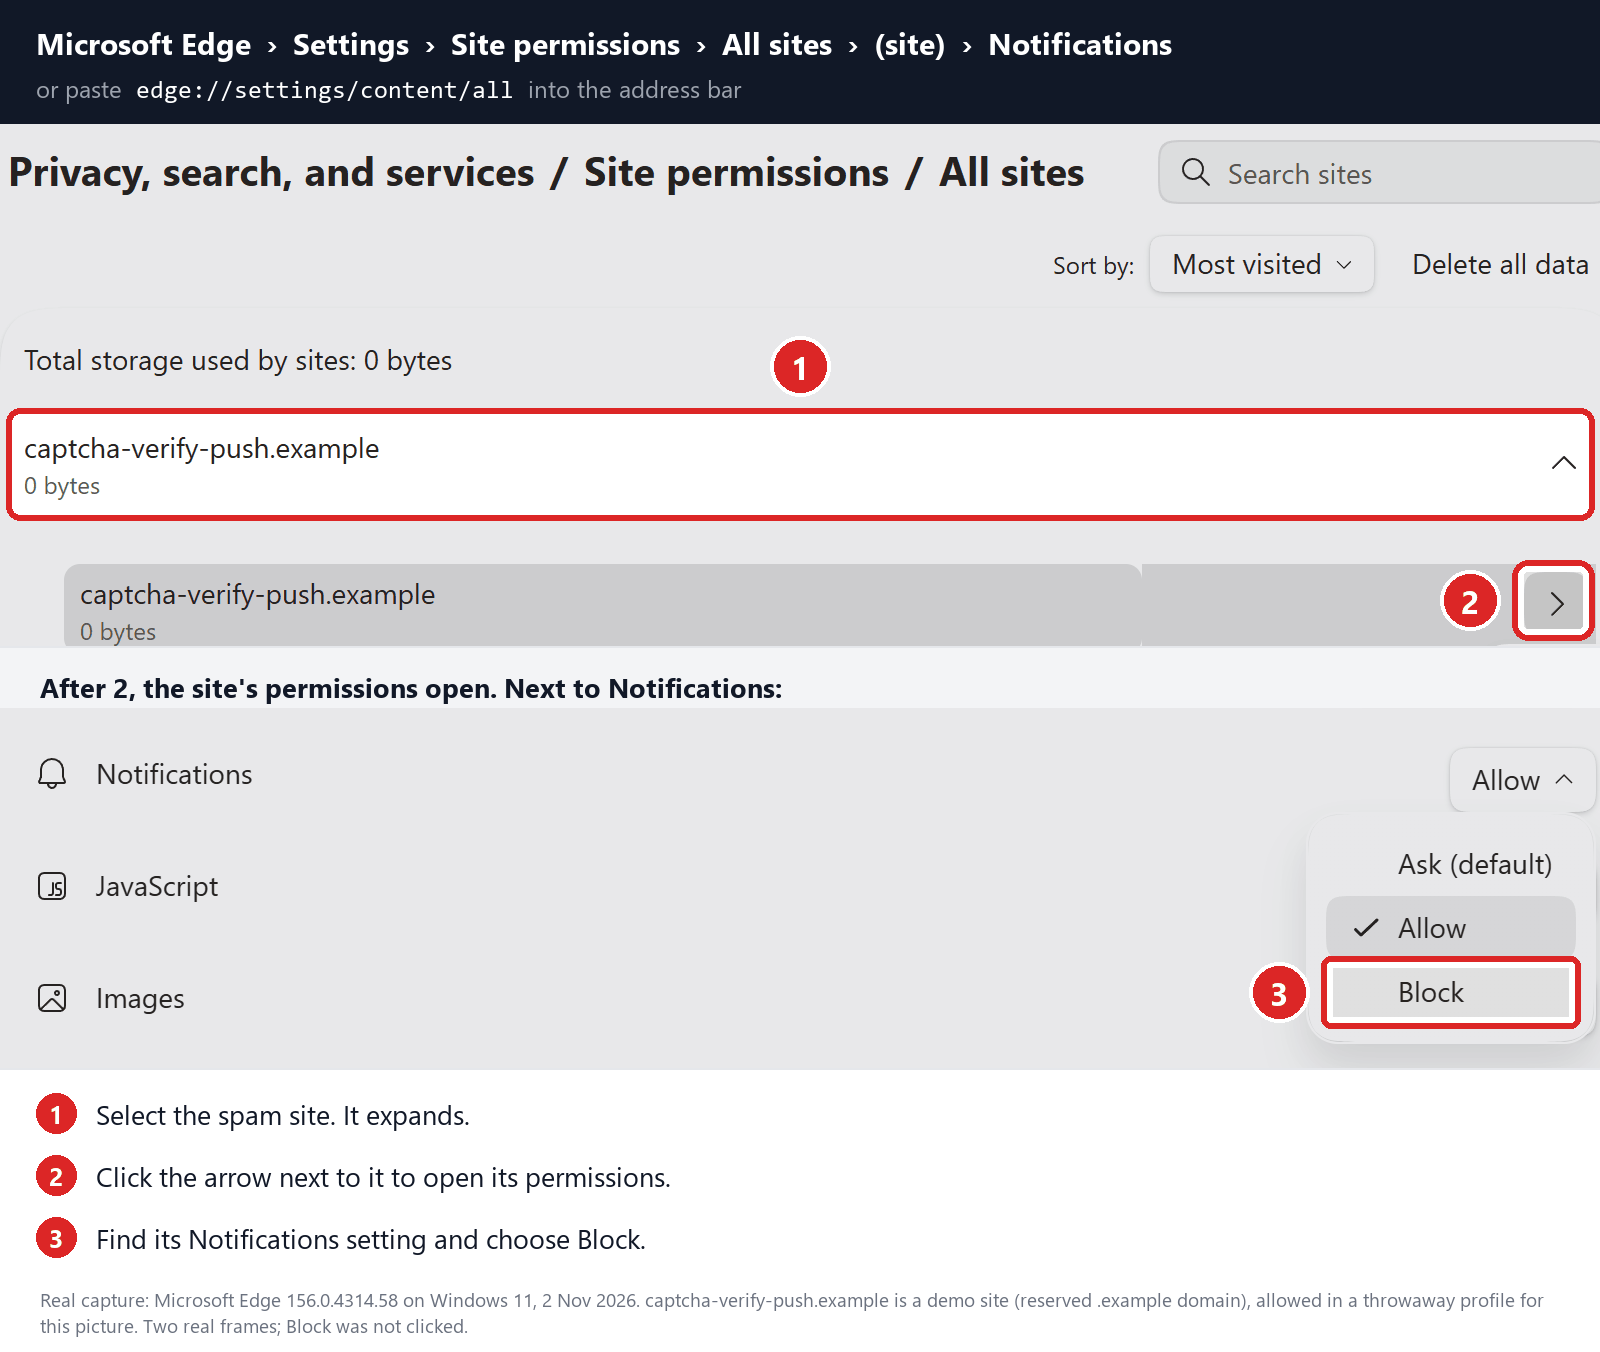
In Edge, open Settings, select Privacy, search, and services, then open Site permissions and All sites.
Find the exact entry, expand it, and open its permissions. Next to Notifications, select Block and leave unrelated settings alone.
In Firefox, open Settings and find the Permissions section. Open the settings beside Notifications, select Block for the site, and save the changes.
Mozilla’s notification guide explains the difference between blocking an address and removing its saved preference. Removing it can allow the site to ask again, so block the unwanted entry.
If the setting is locked on a work computer, ask your help desk to check it. A managed setting isn’t a reason to disable company security tools.
Step 4: Check whether new warnings still arrive
Dismiss existing cards from your notification center without opening them. An old card can still be visible even after you’ve blocked its source.
Watch for a genuinely new notification. If one appears, compare the time, browser, and site name with the earlier warning rather than assuming the first change failed.
A different browser profile or sender can need its own setting change. If the new item comes from Windows Security itself, inspect that independently instead of dismissing it automatically.
On Windows, open Windows Security from Start and check Protection history. If you use another antivirus, open that program directly and inspect its own records.
If your browser keeps opening new tabs or changing its search engine, those symptoms deserve a separate check. They aren’t explained by the presence of one old notification card.
What the Notification Can Tell You, and What It Cannot
Suppose the warning says five threats were found, but the line beneath it names a browser and an unfamiliar website. That identifies who supplied the message.
If Windows Security has no corresponding record, don’t treat the website’s number as a missing entry. A browser message and an antivirus detection are different kinds of evidence.
Microsoft says Protection history keeps its events for two weeks. An empty history isn’t proof that nothing happened, especially if you’re investigating an older download.
Likewise, a genuine detection near the same time doesn’t authenticate the website alert. In the security app, check its timestamp and affected item, then follow the app’s guidance.
A notification history might identify the browser without naming the website. In that case, use the list of allowed websites and your recollection to narrow the search.
Don’t remove a familiar work or calendar entry just because you can’t identify the sender immediately. Start with a source you can match to the unwanted notice.
If you’re working from a screenshot a family member sent you, ask whether the alerts happened before or after they downloaded anything. That timing helps separate two remedies.
A blocked site no longer has permission in that profile. It does not remove files, end account sessions, or tell you whether a transfer went through.
On a shared device, note which browser profile you checked and what you changed. The next person can inspect the remaining profile without repeating the same work.
What to Do If You Responded to the Warning
-
If you only allowed notifications, block the specific source. You don’t have to erase your bookmarks, stored passwords, or entire browsing history to undo that permission.
If the problem stops, keep using your browser normally. You don’t need to buy anything to cancel a website’s right to send you notifications.
-
If you opened the page, close it without going back. Check your browser’s Downloads list if you’re not sure whether it saved something.
Don’t run an unexpected file to see what it does. On a work device, tell your help desk the time and file name before deleting evidence.
-
If you installed software or gave remote access, treat that separately. Disconnect the affected computer from the network and contact your organization’s support team from another device.
On a personal computer, get help through a trusted channel, such as MalwareTips’ Windows removal forum. Say what was run and when, without posting private information.
A scan can help investigate installed malware. It cannot undo what somebody did during a remote session, and a clean result doesn’t settle whether information was copied.
-
If you entered a password, use the legitimate account recovery route. Change it from a trusted device, check recent activity, and follow the provider’s instructions for ending unauthorized sessions.
Tell your administrator if it was a work account. Record whether you shared a code or approved a sign-in, because that can change what they need to check.
-
If you paid or gave card details, contact the issuer directly. Use the number on the card or the contact route in your banking app.
Describe the amount and payment method, and keep the receipt. A person offering to reverse the charge through another payment isn’t your bank’s dispute process.
When the computer belongs to someone else, narrate the action you’re taking with them. They may know which notifications are legitimate and which browser profile they use.
That small check matters for things like schedules, work messages, and accessibility tools. You can remove the unwanted site’s access without shutting off every useful notification.
Save timing and the full source name if the alerts keep coming. A record of what changed is more helpful than reopening the suspicious page to reproduce the message.
Frequently Asked Questions
Does either address mean Microsoft found a virus?
No, those site names identify a possible source of browser messages. Read any actual detection by opening Windows Security or your installed security app independently.
Why is there a long prefix before the name?
A prefix can identify a subdomain, which may appear as a separate entry in your permission list. Match the complete address shown by your browser before blocking it.
Can the warning appear without the website open?
Yes, website notifications don’t need the original tab to stay visible. The exact behavior when the browser closes depends on the browser and its background notification support.
Will clearing my browsing history stop these warnings?
Clearing history alone is not the same as changing a notification permission. Open the browser’s notification settings and block the address actually sending the warnings.
What if I cannot find either name on my computer?
Check the browser named on a new notification and the profile receiving it. If the next alert shows another source, check that one rather than blocking unrelated sites.
Should I reinstall Windows because I clicked Allow?
No, permission to send notifications is not evidence that software ran. Block the site first, and get separate help if you later installed something or handed over remote access.
The Bottom Line
Don’t use a Breachlabs or Essoaxole warning to check your computer. Block the exact address in the browser profile that allowed it, and verify real detections in your security app.
If you went beyond the alert, respond to what you actually shared, paid, or ran. Silencing the notices is useful, but it doesn’t replace those separate follow-ups.

Join the discussion
0 commentsShare your experience or ask a question about this article.
Your progress
Did these steps help?
Let us know how the guide worked for you.
Describe what you see and the step you reached. Keep passwords and other private information out.
Discussion
Start the conversation
Have a question or something useful to share? Add the first comment.