

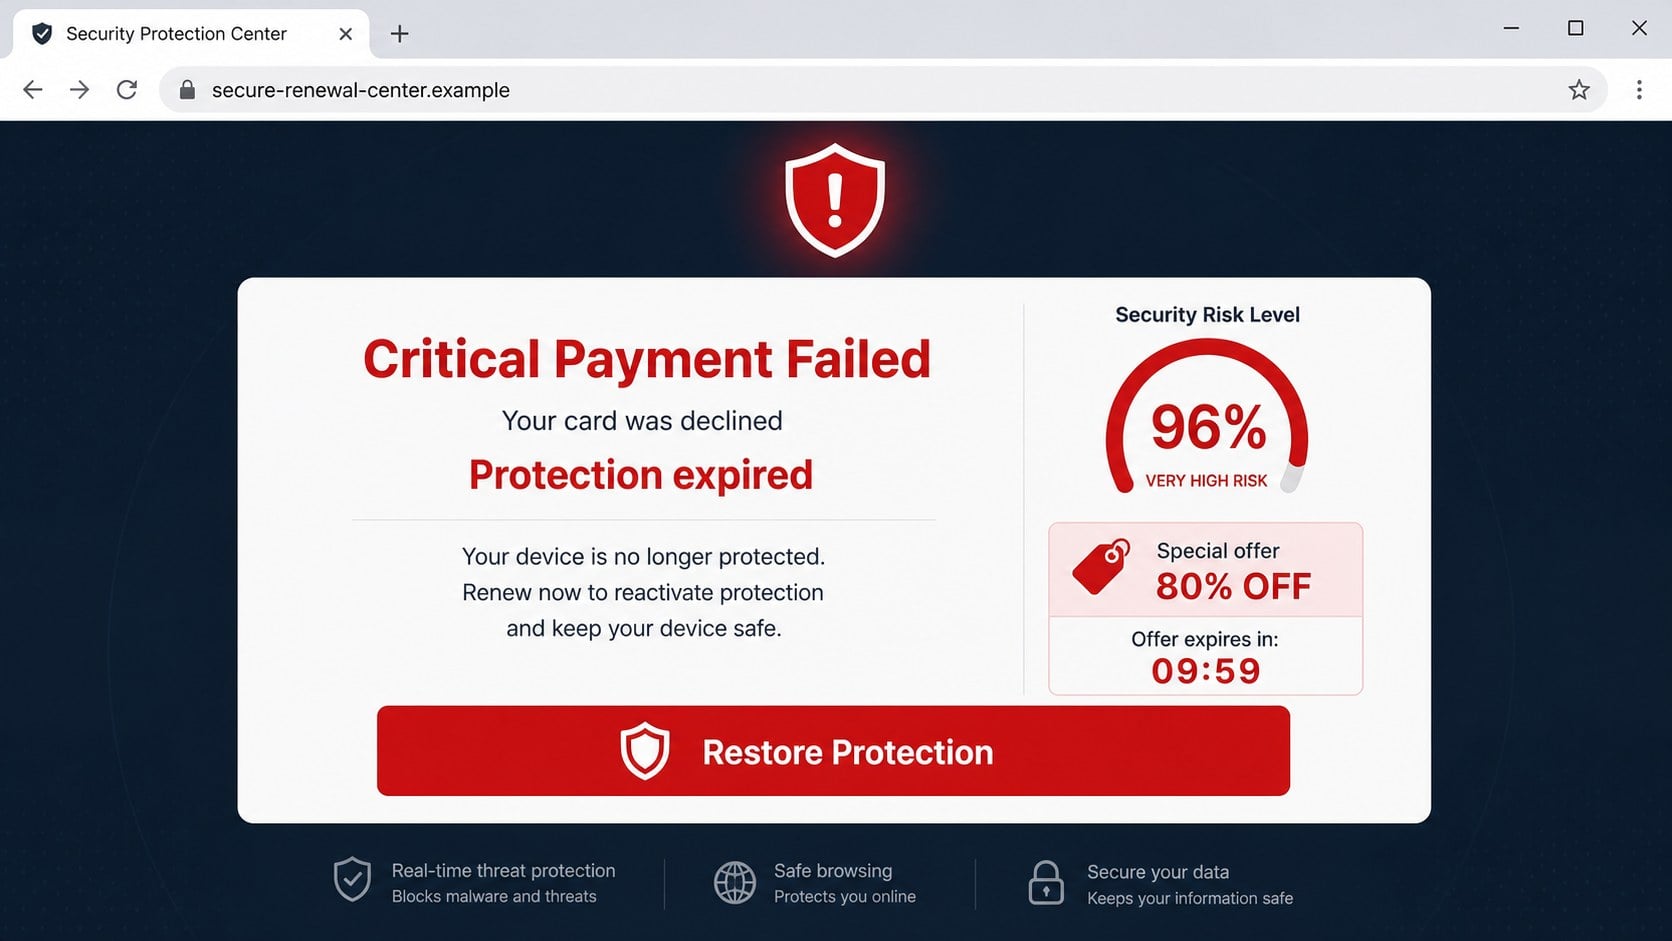
A red “Critical Payment Failed” alert can make it seem that important computer protection has vanished because a card was declined.
The countdown, risk score, and large discount encourage an instant decision, but the billing story deserves verification before any renewal.
Overview
The pop-up invents a failed security renewal
The page claims a recent payment for device protection could not be processed.
It may say the subscription expired, the computer is exposed, and personal data faces immediate danger.
A risk meter, account reference, timer, and bright renewal button turn an ordinary advertisement into a false billing emergency.
- The page appears without a verified account login.
- The supposed subscription may never have existed.
- Security scores and expiry claims are manufactured.
- Clicks can generate affiliate commissions or expose payment details.
Several versions promote different security products
The campaign is not tied to one fixed brand, price, or visual design.
Operators can replace logos, discounts, payment language, and destination offers while preserving the same failed-renewal story.
That flexibility lets an affiliate funnel continue after individual domains or advertisements are blocked.
A legitimate destination does not validate the dishonest alert
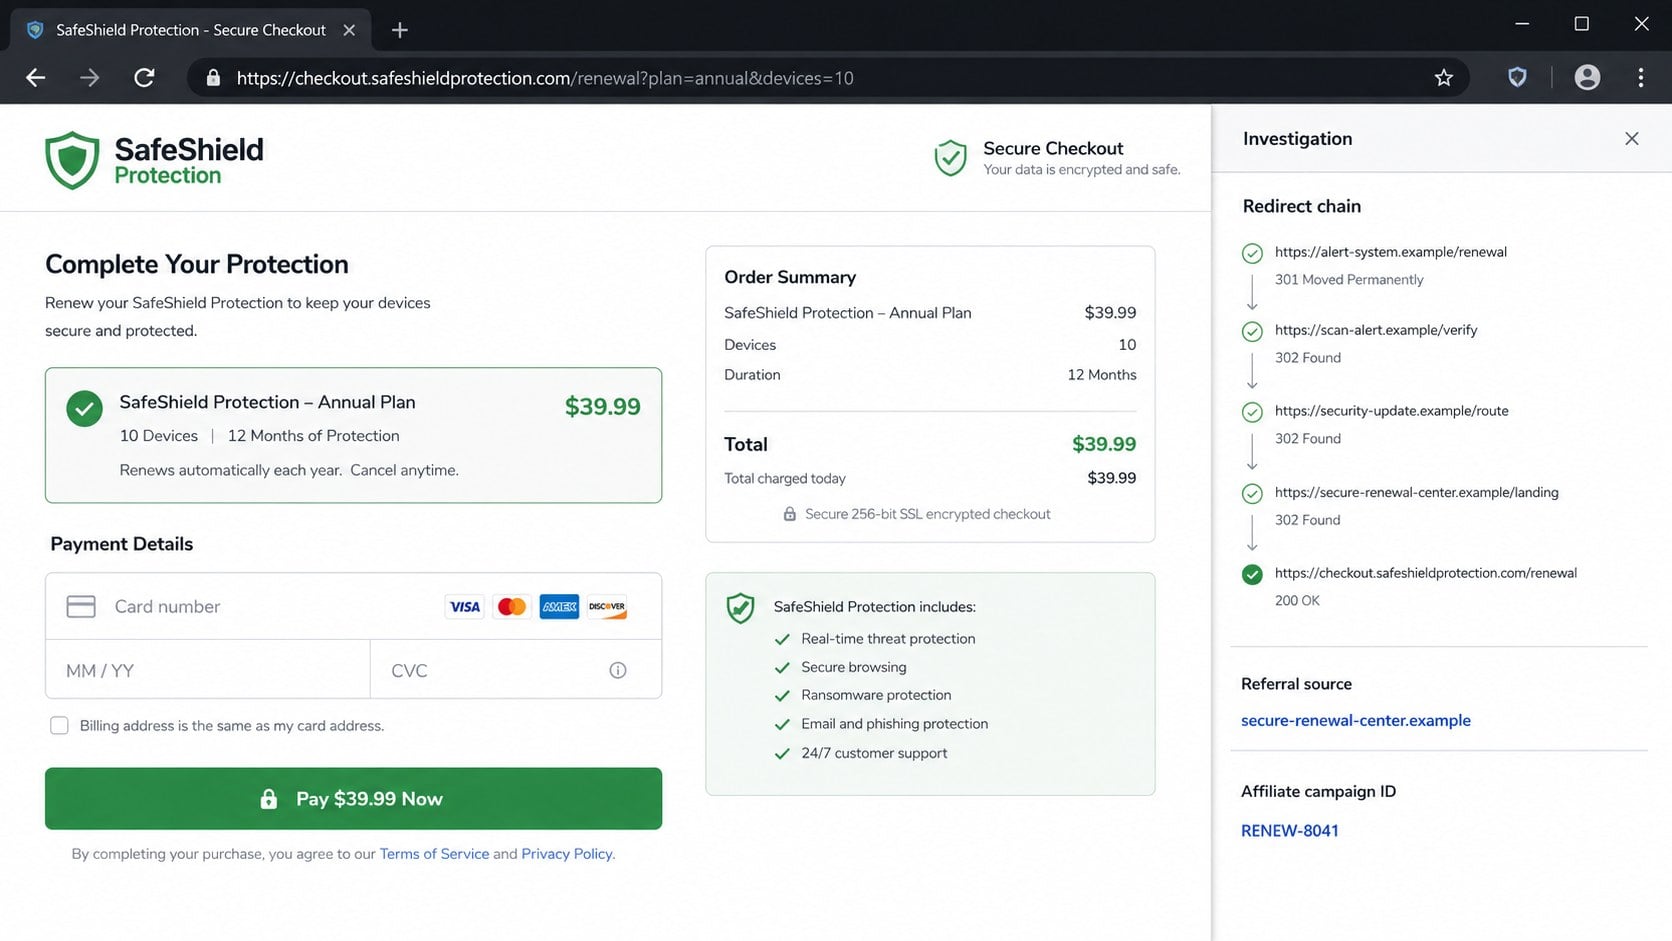
Some versions eventually redirect visitors to a real seller or genuine security-product checkout through affiliate tracking.
The promoted company may have no role in creating the deceptive pop-up.
The scam is the fabricated account problem and fear-based route used to obtain the sale, lead, or payment information.
Why a Failed Security Payment Creates Urgency
A billing failure combines two familiar worries: losing protection and having a payment card rejected.
The visitor may think malware can attack immediately, while the card problem suggests a personal account event already occurred.
The page often describes protection as completely inactive rather than nearing renewal.
This wording removes the comfortable option of checking later.
A numerical threat score, sometimes shown near 96%, gives the warning an appearance of measurement.
No meaningful device scan supports that figure. It is a graphic chosen to increase pressure.
Discounts such as 80% or 90% off add a second deadline.
The victim is told both security and savings will disappear unless the button is pressed now.
Real subscription providers keep billing history inside an authenticated account.
They do not need an unrelated advertising page to guess whether a visitor owns a particular plan.
What the Page Can and Cannot Know
A website can observe basic browser details, language, screen size, and an approximate location derived from the network address.
It cannot automatically read every security subscription, card status, malware detection, or account renewal stored elsewhere.
If the page never asked the visitor to sign in, it has no reliable basis for displaying a personal account reference.
Random numbers and generic dates can still look convincing when surrounded by polished billing language.
The warning may claim it scanned files or checked an antivirus installation.
Modern browser protections prevent ordinary webpages from examining the computer in the broad way these alerts suggest.
A moving progress bar is animation, not proof of analysis.
The displayed result is usually predetermined before the visitor arrives.
Where the Renewal Button May Lead
Different operators monetize the same scare in several ways.
One route forwards the visitor through multiple tracking addresses to a genuine seller, recording an affiliate referral along the way.
Another route opens an imitation checkout designed to collect card details, contact information, or an inflated recurring payment.
A third version requests a telephone call and becomes a technical-support or refund scam.
Some pages ask permission to send browser notifications, creating a channel for repeated warnings after the tab closes.
The destination can change according to country, device, advertising campaign, or time of day.
This makes one victim’s experience different from another’s without changing the original deception.
Never assume safety because the final page looks familiar.
Start from the genuine provider’s application or a bookmark, then inspect the account without using the pop-up’s route.
How the Critical Payment Failed Pop-Up Scam Works
Step 1: The visitor is pushed onto a rogue advertising page
The alert can appear after a misleading advertisement, compromised page, questionable download site, or accidental click on a deceptive overlay.
Spam messages, unwanted browser notifications, and adware can also open the funnel.
The source often has no connection with security software or the subscription mentioned later.
A chain of redirects hides the original advertising partner and selects an offer for the visitor’s location.
Step 2: A fake scan produces a predetermined danger score
The page may animate a device check, display threat categories, or state that protection is 96% at risk.
Every visitor can receive the same result because no local antivirus examination occurred.
Technical labels and progress indicators keep the visitor watching while the site prepares the next sales screen.
The completed scan becomes false evidence for the urgent renewal claim.
Step 3: The page says an automatic payment failed
A red banner announces that a recent charge was declined or could not be processed.
The visitor may not recognize the plan, but fear can create doubt about an old trial, bundled purchase, or forgotten family subscription.
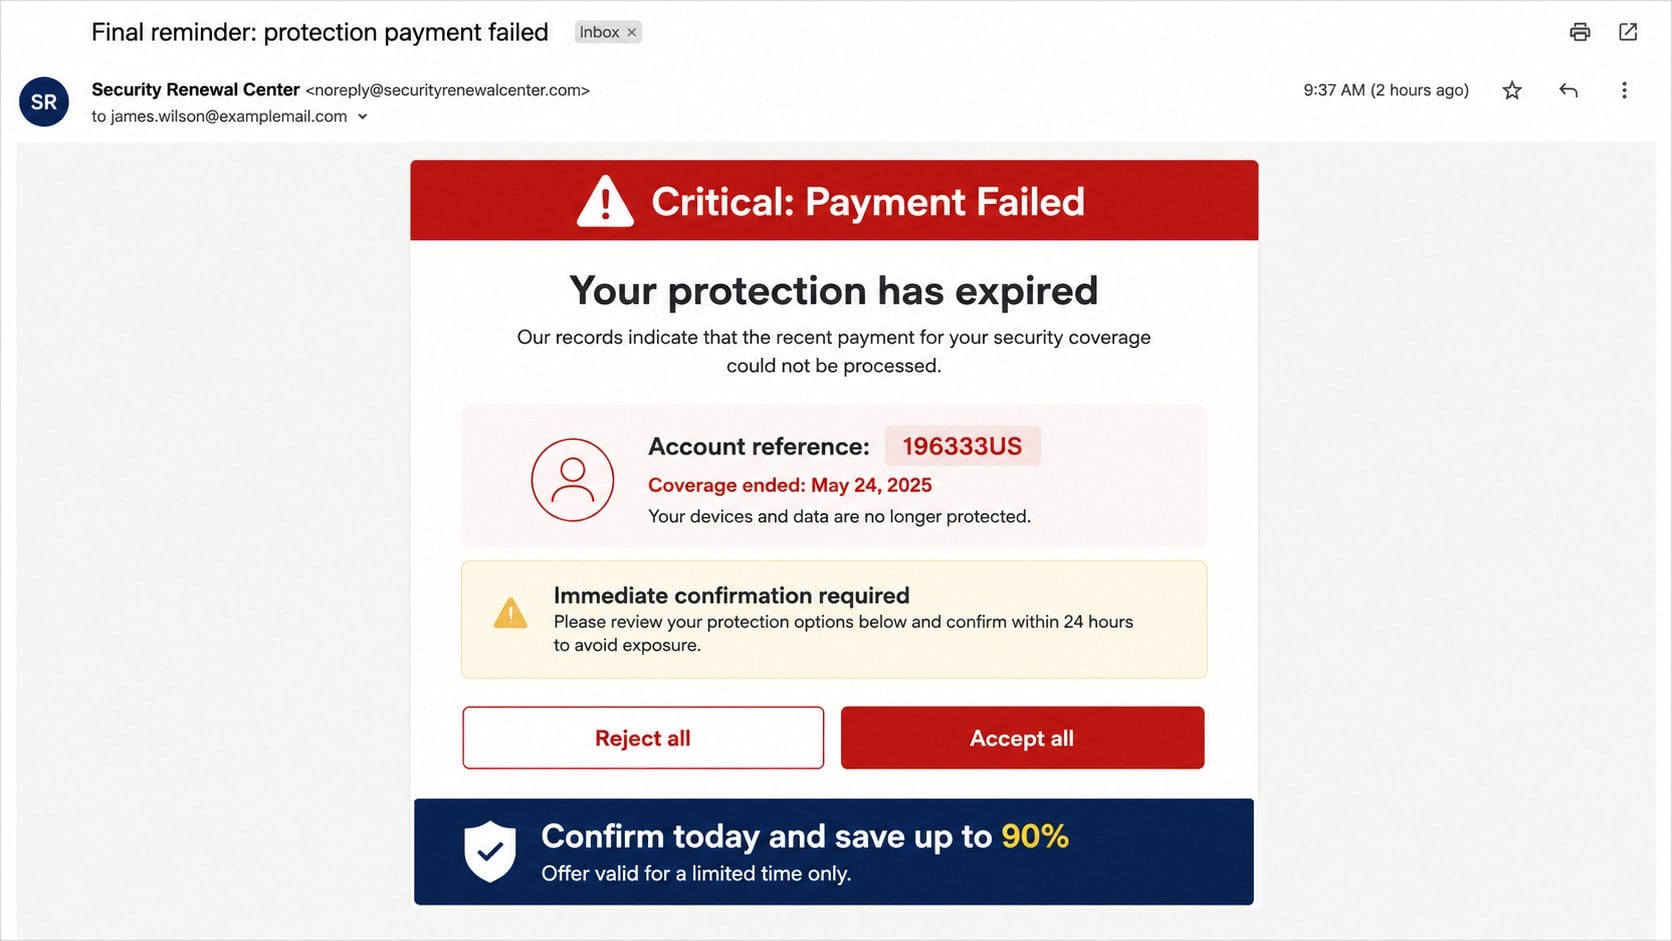
Generic account references make the message appear personalized without identifying a real account.
The page usually provides no verifiable invoice, transaction date, card ending, or authenticated billing history.
Step 4: A large discount and timer narrow the decision
The offer promises 80% or 90% off if the visitor renews before the countdown reaches zero.
Timers may restart after a refresh, proving the deadline was a visual pressure tool rather than a genuine account limit.
Buttons can say “Renew now,” “Accept protection,” or “Fix payment.”
Reject buttons may redirect too, because any interaction can advance the affiliate funnel.
Step 5: Tracking redirects identify the source of the sale
The click can travel through several domains carrying campaign, partner, device, and location identifiers.
If a purchase occurs, the final seller may credit a commission to the affiliate that delivered the visitor.
This explains why some deceptive alerts end on a legitimate checkout.
It does not mean the final provider approved the false risk score or payment story.
Step 6: The victim enters payment or personal information
On a genuine destination, the person may buy a product they did not need because of the fabricated emergency.
On a counterfeit destination, card numbers, security codes, addresses, passwords, and telephone details may go directly to criminals.
Fine print can also introduce recurring billing that was not clear on the alarm page.
The safest choice is to close the route before determining which version appeared.
Step 7: The campaign continues through notifications or follow-ups
A site granted notification permission can send new expiry alerts even when the browser is not actively visiting it.
Submitted telephone numbers may attract sales calls, refund impersonation, or remote-support attempts.
Captured email addresses can receive further invoices and renewal notices shaped around the original click.
Each follow-up tries to turn earlier concern into another opportunity for payment or credential theft.
Is the Antivirus Company Behind the Pop-Up?
Not necessarily. Deceptive affiliates frequently use the name of a real product without the provider’s knowledge or approval.
Affiliate programs can involve multiple networks and sub-affiliates, making abusive traffic difficult for a seller to see immediately.
A genuine checkout proves only that the final page belongs to that seller.
It does not authenticate the warning, risk score, failed-payment claim, or countdown shown earlier.
The distinction matters when reporting the campaign.
Preserve the full redirect chain, not just the last address, because the deceptive page may disappear after forwarding visitors.
If a real provider received the purchase, contact it through verified support and explain that the sale followed a fabricated renewal notice.
Ask whether the order can be canceled and whether the referring affiliate can be investigated.
Do not accuse an unrelated brand solely because its product appeared at the end.
Focus on the specific claims, domains, tracking identifiers, and payment recipient shown during your session.
How to Verify a Real Subscription
Close the pop-up and open the security application already installed on the computer.
Its account or subscription area should show the plan name, expiry date, licensed devices, and renewal status.
You can also type the provider’s known address yourself or use a trusted bookmark.
Sign in only after confirming the registered domain and secure connection.
Review previous invoices, bank statements, and application-store subscriptions for a matching merchant and amount.
A real renewal failure should correspond with an actual attempted charge.
Contact the provider using support details inside the verified application or account.
Do not use a telephone number displayed by the warning, advertisement, or follow-up email.
If no account, invoice, or attempted transaction exists, the pop-up’s billing claim has no foundation.
Even when a subscription genuinely expired, renew through the independent account route rather than the alarm page.
Warning Signs Inside the Sales Funnel
The strongest clue is an account-specific claim presented before authentication.
A page cannot know a particular card failed when it cannot identify the customer or subscription.
Another clue is the combination of catastrophic security language with an enormous discount.
Protection decisions should be based on product needs and verified account status, not a timer.
Look for a changing brand across refreshes or visits from different devices.
A real provider’s billing portal does not randomly promote competing products.
Check whether pressing a neutral button causes a redirect.
Deceptive funnels often make the entire page clickable, including areas that appear to close or reject the offer.
Unexpected notification prompts are another warning.
A billing resolution does not require permanent permission to send browser alerts.
Why the Timer and Discount Are Misleading
A countdown creates urgency without adding useful information.
The visitor cannot reasonably compare plans, verify invoices, or inspect terms while watching seconds disappear.
Many timers restart when the page reloads, when cookies are cleared, or when another browser opens the same address.
That behavior shows the deadline belongs to the webpage session, not an individual customer account.
The percentage discount can be equally slippery.
It may compare an inflated reference price with a common promotional price available elsewhere.
Even a real discount does not repair the false statement that payment failed.
Price and truthfulness are separate questions.
Leave the page, confirm whether protection is needed, then compare offers through verified sellers.
A legitimate deal will survive the few minutes required for basic verification.
Browser Notifications Can Make the Scam Seem Persistent
Some visitors see repeated payment warnings after closing the original tab.
This can happen because a rogue site received permission to send browser notifications.
The messages may appear near the system clock and imitate alerts from security software.
They are still delivered by the browser on behalf of a website.
Open browser settings and review every site allowed to send notifications.
Remove unfamiliar entries and sites associated with unexpected alerts.
Do not click the notification to identify its source, because that opens the advertising route again.
Check extensions and installed applications if permissions return or redirects continue.
Adware can inject advertising into otherwise normal browsing sessions.
A security scan can help distinguish a one-time website redirect from persistent unwanted software.
If You Already Purchased Through the Page
First determine who actually received the payment.
Read the receipt, card statement, checkout address, and order confirmation instead of relying on the pop-up’s branding.
If a legitimate seller fulfilled the order, contact its verified support and request cancellation or a refund.
Explain that a deceptive failed-payment alert influenced the transaction.
If the merchant is unknown or the checkout was counterfeit, call the card issuer and report possible fraud.
Ask whether the card should be replaced and whether recurring transactions or merchant tokens can be blocked.
Review the statement for small test charges and later renewals.
Criminal operators sometimes delay larger attempts to avoid immediate detection.
Change passwords only when credentials were entered or reused during checkout.
Preserve screenshots and confirmation details before disputed pages disappear.
Alert, Subscription, Redirect, and Checkout Checks
Test the alert’s account claim
Ask whether the page identified a real account before announcing a failed charge.
Compare its plan, expiry, merchant, and amount with authenticated billing records.
- Look for a genuine attempted transaction.
- Check installed security software.
- Ignore unverified risk scores.
- Do not race the countdown.
Inspect the subscription independently
Open the provider’s application or type its established address yourself.
Verify renewal status, covered devices, invoices, and payment methods after signing in through the normal route.
No matching account means there is nothing to renew.
Record the redirect chain
Several tracking domains may sit between the warning and final seller.
Save browser history or screenshots without revisiting questionable links.
The first deceptive page and affiliate identifiers are often more important than the familiar destination.
Confirm the checkout and billing terms
Identify the legal merchant, total charged today, renewal frequency, cancellation method, and refund policy.
Do not enter card information when the address or merchant cannot be verified.
A secure padlock encrypts a connection but does not prove honest claims.
What to Do if You Have Fallen Victim to This Scam
- Close the advertising route. Do not continue clicking buttons, timers, warnings, or supposed rejection controls on the same page.
- Identify the payment recipient. Compare the receipt, statement descriptor, checkout domain, amount, and renewal terms to determine whether the final merchant was legitimate or unknown.
- Cancel through verified support. Contact the actual provider independently, explain the deceptive promotion, and request written confirmation that the order and automatic renewal are canceled.
- Call the card issuer when details may be exposed. Report the transaction, ask about replacement, dispute options, merchant-token removal, and blocks against recurring charges.
- Check for hidden notification permission. Remove unfamiliar websites from the browser’s allowed notification list and delete suspicious extensions.
- Scan persistent redirects. Use Malwarebytes to check for adware, unwanted extensions, and other software that could repeatedly open deceptive security pages.
- Reduce future exposure. AdGuard can block many known malvertising and scam domains, although no filter can identify every newly created page.
- Change submitted passwords. Use unique replacements, enable multi-factor authentication, and revoke sessions when a counterfeit checkout requested account credentials.
- Watch future statements. Look for small test transactions, renewals, foreign charges, or a merchant name different from the one displayed.
- Ignore refund callers. Anyone citing the incident and requesting remote access, gift cards, cryptocurrency, or banking codes is attempting another scam.
- Preserve and report evidence. Save screenshots, addresses, notification details, redirect history, receipts, support replies, and dispute reference numbers.
Is Your Device Infected? Run a Free Malware Scan
Slow performance, constant pop-ups, or strange behavior? These are classic signs of a malware infection. The fastest way to find out is to scan your device with Malwarebytes Free — one of the most trusted malware removal tools available.
The free version detects and removes the most common threats, including:
- Adware — the cause of those annoying pop-ups
- Browser hijackers — unwanted redirects and changed homepages
- Trojans and spyware — hidden programs stealing your data
- Potentially unwanted programs (PUPs) — software you never asked for
👉 Select your device below — Windows, Mac, or Android — then follow the simple steps to download Malwarebytes, scan your system, and remove any threats it finds. The scan usually takes 5 to 20 minutes.
Run a Malware Scan with Malwarebytes for Windows
Malwarebytes is one of the most popular and trusted anti-malware tools for Windows — and it’s completely free for removing infections. It catches threats that many antivirus programs miss, including adware, browser hijackers, and trojans. Follow the steps below to scan and clean your PC in just a few minutes.
Download Malwarebytes
Click the button below to download the latest version of Malwarebytes for Windows from the official source. The free version is all you need — it will scan your computer and remove adware, browser hijackers, and other malicious software at no cost.
Download MalwarebytesOfficial installer for Windows 11 and 10. Your download starts right away.Want real-time protection? See Malwarebytes Premium Malwarebytes Free for WindowsScans and removes malware at no cost
-
Install Malwarebytes
When the download finishes, open your Downloads folder and double-click the MBSetup file. If Windows shows a User Account Control pop-up, click “Yes” to allow the installation.

Follow the On-Screen Prompts to Install Malwarebytes
The setup wizard will walk you through a few quick screens:
-
Choose where you’re installing the program — “Personal Computer” or “Work Computer” — then click Next.

-
Malwarebytes will now install on your device. This usually takes under a minute.

-
When installation is complete, the “Welcome to Malwarebytes” screen will open automatically.

-
On the final screen, click Open Malwarebytes to launch the program.

-
Enable “Scan for Rootkits”
Before scanning, turn on rootkit detection so Malwarebytes can find even the most hidden threats. Click the Settings gear icon on the left side of the screen.

In the settings menu, find “Scan for rootkits” and click the toggle so it turns blue.

Done? Click “Dashboard” in the left pane to return to the main screen.
Start the Scan
Click the blue Scan button. Malwarebytes will automatically update its virus database and start checking your computer for malware.

-
Wait for the Scan to Finish
The scan checks your entire system for browser hijackers and other malicious programs, so it can take 5 to 20 minutes depending on your computer. Feel free to do something else — just check back occasionally to see the progress.

-
Quarantine the Detected Threats
When the scan is done, you’ll see a list of everything Malwarebytes found — malware, adware, and potentially unwanted programs. Click the “Quarantine” button to remove all of them at once.

Malwarebytes will now remove the malicious files and registry entries and move them safely into quarantine.

-
Restart Your Computer
Some threats can only be fully removed after a reboot. If Malwarebytes asks you to restart, click Yes. Once you’re logged back in, Malwarebytes has finished removing the threats it found.

That’s it — your Windows PC is now clean of trojans, adware, and other malware, and should be back to running smoothly.
If you are still having problems with your computer after completing these instructions, then please follow one of the steps:
- Run a computer scan with ESET Online Scanner
- Ask for help in our Windows Malware Removal Help & Support forum.
Run a Malware Scan with Malwarebytes for Mac
Malwarebytes for Mac is a free on-demand scanner that removes the malware other security software tends to miss — adware, browser hijackers, and unwanted programs included. Cleaning an infected Mac with Malwarebytes has always been completely free, and it’s our go-to recommendation. Follow the steps below to scan and clean your Mac in just a few minutes.
-
Download Malwarebytes for Mac
Click the button below to download the latest version of Malwarebytes for Mac.
Download MalwarebytesOfficial installer for macOS. Your download starts right away.Want real-time protection? See Malwarebytes PremiumMalwarebytes Free for MacScans and removes malware at no cost -
Open the Malwarebytes setup file
When the download finishes, open your Downloads folder and double-click the setup file to begin the installation.

-
Follow the On-Screen Prompts to Install Malwarebytes
The Malwarebytes for Mac Installer will guide you through a few quick screens. Click “Continue” and keep following the prompts until the installation completes.



When the installation is complete, Malwarebytes opens to the Welcome to Malwarebytes screen. Click “Get started“.
-
Select “Personal Computer” or “Work Computer”
Malwarebytes will ask what type of computer you’re installing it on. Click either Personal Computer or Work Computer, whichever applies.

-
Start the Scan
Click the “Scan” button. Malwarebytes will automatically update its detection database and begin checking your Mac for malware.

-
Wait for the Scan to Finish
Malwarebytes will scan your Mac for adware, browser hijackers, and other malicious programs. This can take a few minutes, so feel free to do something else — just check back occasionally to see the progress.

-
Quarantine the Detected Threats
When the scan is done, you’ll see a list of everything Malwarebytes found. Click the “Quarantine” button to remove all the threats at once.

-
Restart Your Mac
Malwarebytes will now remove all the malicious files it found. Some threats can only be fully removed after a reboot — if Malwarebytes asks you to restart, allow it. Once you’re logged back in, your Mac is clean.

That’s it — your Mac is now free of adware, rogue browser extensions, and other potentially harmful software.
If you are still experiencing problems while trying to remove a malicious program from your computer, please ask for help in our Mac Malware Removal Help & Support forum.
Run a Malware Scan with Malwarebytes for Android
Malwarebytes for Android automatically detects and removes dangerous threats like malware and ransomware so you don’t have to worry about your most-used device being compromised. Aggressive detection of adware and potentially unwanted programs keeps your Android phone or tablet running smooth.
-
Download Malwarebytes for Android.
You can download Malwarebytes for Android by clicking the link below.
Get Malwarebytes for AndroidOpens Google Play in a new tab.Want real-time protection? See Malwarebytes Premium for AndroidMalwarebytes for AndroidScans your phone and removes malware at no cost -
Install Malwarebytes for Android on your phone.
In the Google Play Store, tap “Install” to install Malwarebytes for Android on your device.

When the installation process has finished, tap “Open” to begin using Malwarebytes for Android. You can also open Malwarebytes by tapping on its icon in your phone menu or home screen.

-
Follow the on-screen prompts to complete the setup process
When Malwarebytes will open, you will see the Malwarebytes Setup Wizard which will guide you through a series of permissions and other setup options.
This is the first of two screens that explain the difference between the Premium and Free versions. Swipe this screen to continue.
Tap on “Got it” to proceed to the next step.
Malwarebytes for Android will now ask for a set of permissions that are required to scan your device and protect it from malware. Tap on “Give permission” to continue.
Tap on “Allow” to permit Malwarebytes to access the files on your phone.
-
Update database and run a scan with Malwarebytes for Android
You will now be prompted to update the Malwarebytes database and run a full system scan.

Click on “Update database” to update the Malwarebytes for Android definitions to the latest version, then click on “Run full scan” to perform a system scan.

-
Wait for the Malwarebytes scan to complete.
Malwarebytes will now start scanning your phone for adware and other malicious apps. This process can take a few minutes, so we suggest you do something else and periodically check on the status of the scan to see when it is finished.

-
Click on “Remove Selected”.
When the scan has been completed, you will be presented with a screen showing the malware infections that Malwarebytes for Android has detected. To remove the malicious apps that Malwarebytes has found, tap on the “Remove Selected” button.

-
Restart your phone.
Malwarebytes for Android will now remove all the malicious apps that it has found. To complete the malware removal process, Malwarebytes may ask you to restart your device.
That’s it — your Android phone is now clean — no more malicious apps, adware, or browser redirects.
If you are still having problems with your phone after completing these instructions, then please follow one of the steps:
- Restore your phone to factory settings by going to Settings > General management > Reset > Factory data reset.
- Ask for help in our Mobile Malware Removal Help & Support forum.
Stay Protected: Block Ads and Malicious Sites
Now that your device is clean, keep it that way. Most infections start with a malicious ad or a fake download button — so blocking them at the source is your best defense.
We recommend AdGuard, which blocks malicious ads, phishing pages, and dangerous redirects before they can reach you.
👉 Download AdGuard and browse safely
Frequently Asked Questions
Did my antivirus payment really fail?
The pop-up does not prove that.
Check the installed application, authenticated provider account, and bank statement for a matching subscription and attempted charge.
Can a webpage scan my computer and calculate a 96% risk?
Not in the way the warning claims.
The score and scan animation are typically predetermined sales graphics rather than results from a local security examination.
Why did the button lead to a real security company?
Deceptive affiliates can redirect visitors to legitimate sellers and receive commissions for resulting purchases.
The final provider may not know about the false warning.
Is a 90% discount proof that the offer is fake?
The discount alone is not proof, but it becomes suspicious beside a fabricated billing emergency and restarting countdown.
Compare prices through verified channels.
Why do the alerts continue after I close the browser?
A rogue site may have browser notification permission, or adware may be opening new pages.
Remove permissions, inspect extensions, and scan the device.
Should I call the telephone number shown on the warning?
No. Use contact information inside the genuine provider account or application.
A pop-up telephone number can lead directly to technical-support or refund fraud.
The Bottom Line
The Critical Payment Failed pop-up fabricates a subscription emergency, adds a meaningless danger score, and pushes visitors through an urgent affiliate or payment funnel.
Verify protection through the real account, not the alert. If you paid or shared information, cancel independently, protect the card, and remove persistent notification access.

Join the discussion
0 commentsShare your experience or ask a question about this article.
Discussion
Start the conversation
Have a question or something useful to share? Add the first comment.