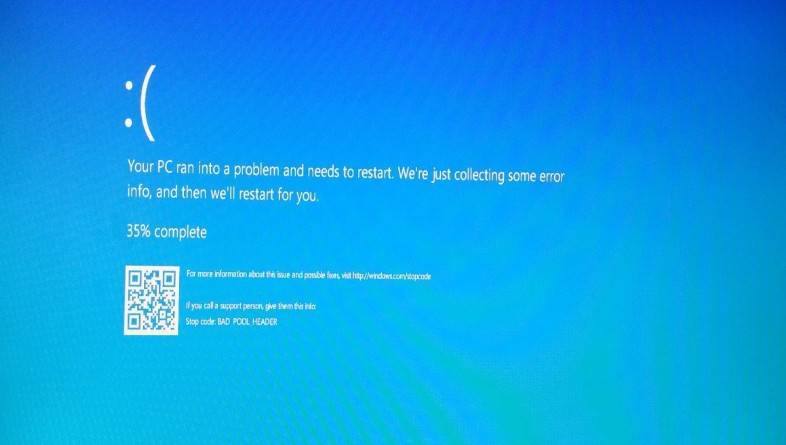
The Blue Screen of Death (BSoD) is a dreaded error message that appears on Windows computers when a critical system error occurs. One of the common causes of BSoD is the dxgmms2.sys error. In this article, we will explore what dxgmms2.sys is, why it causes BSoD, and how to fix it.
What is dxgmms2.sys?
Dxgmms2.sys is a system file associated with DirectX, a collection of application programming interfaces (APIs) developed by Microsoft for handling multimedia and gaming tasks on Windows. The file is responsible for managing the DirectX graphics kernel subsystem, which includes tasks like rendering graphics, handling video memory, and managing graphics drivers.
When you encounter a dxgmms2.sys BSoD error, it means that there is a problem with the DirectX graphics kernel subsystem, which can be caused by various factors.
Causes of dxgmms2.sys BSoD
Several factors can contribute to the dxgmms2.sys BSoD error. Here are some common causes:
- Outdated or incompatible graphics drivers: Graphics drivers are essential for the proper functioning of DirectX. Outdated or incompatible drivers can cause conflicts and result in BSoD errors.
- Corrupted system files: If the dxgmms2.sys file or other system files related to DirectX become corrupted, it can lead to BSoD errors.
- Hardware issues: Faulty hardware components, such as a malfunctioning graphics card or RAM, can trigger BSoD errors.
- Overheating: Excessive heat can cause hardware components to malfunction, leading to BSoD errors.
- Malware or virus infections: Some malware or viruses can interfere with system files, including dxgmms2.sys, and cause BSoD errors.
How to Fix dxgmms2.sys BSoD
Now that we understand the causes of dxgmms2.sys BSoD errors, let’s explore some effective solutions to fix them:
1. Run the DISM and SFC scans
DISM (Deployment Image Servicing and Management) and SFC (System File Checker) are built-in Windows tools that can repair corrupted or missing system files and restore the health of your computer. Both DISM and SFC scans can be run from an elevated command prompt (with administrative privileges). Here are the steps to do so:
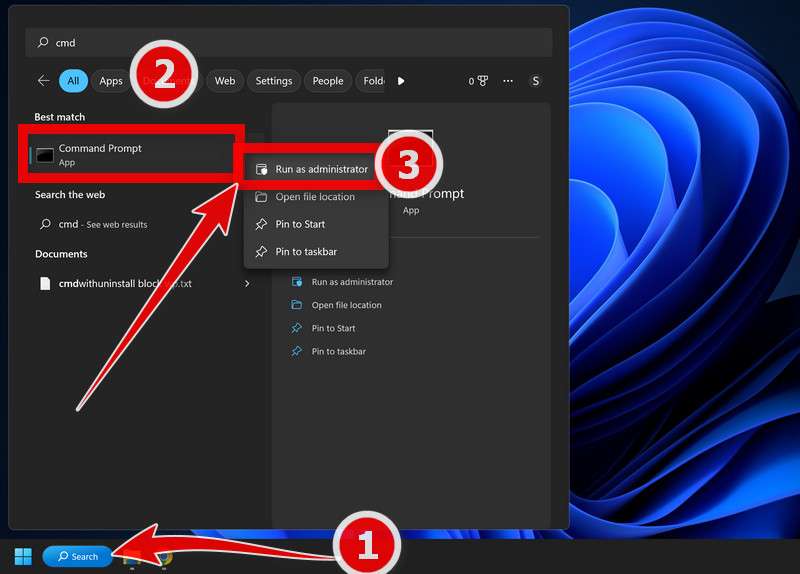
- To open the Command Prompt as an administrator in Windows, type “cmd” in the search bar and then right-click on the Command Prompt result and select “Run as administrator” as shown in the image below.

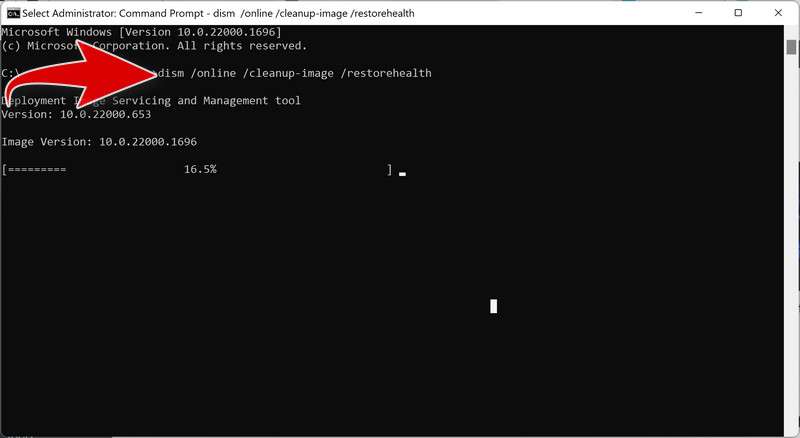
- To run a DISM scan, type the following command and press Enter:
dism /online /cleanup-image /restorehealth
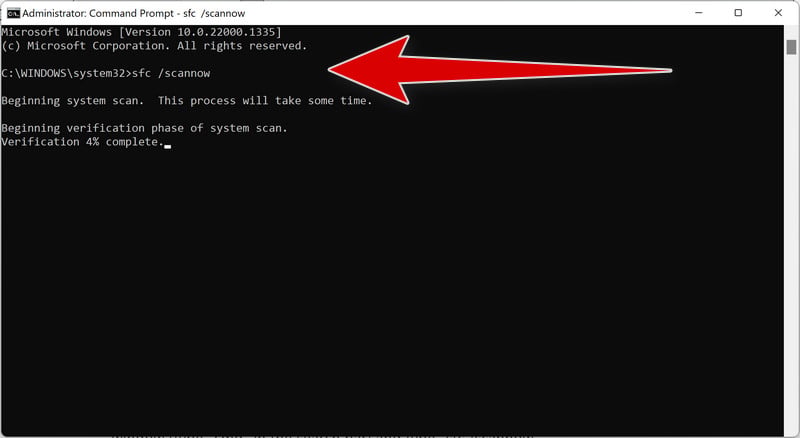
This will check your Windows component store for corruption and automatically fix any problems it finds. This process may take several minutes or longer depending on your system - To run an SFC scan, type in the Command Prompt the following command and press Enter:
sfc /scannow

This will scan all protected system files and replace any corrupted or missing ones with a cached copy. Wait for the scan to complete. It may take some time depending on your system configuration.
- After both scans are completed, you should restart your computer to apply any changes. Check to see if the issue is solved.
2. Check for faulty software.
If there is a specific program that is causing this issue, try uninstalling and then reinstalling it (eg. Microsoft DirectX, Microsoft Visual C++ Redistributable, NET Framework) to check if it will solve the problem.
-
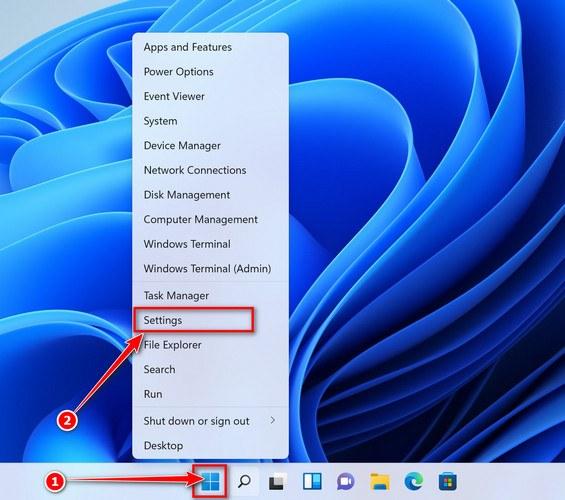
First, open Windows Settings by pressing Windows+I on your keyboard. You can also right-click your Start button and select “Settings” from the list.

-
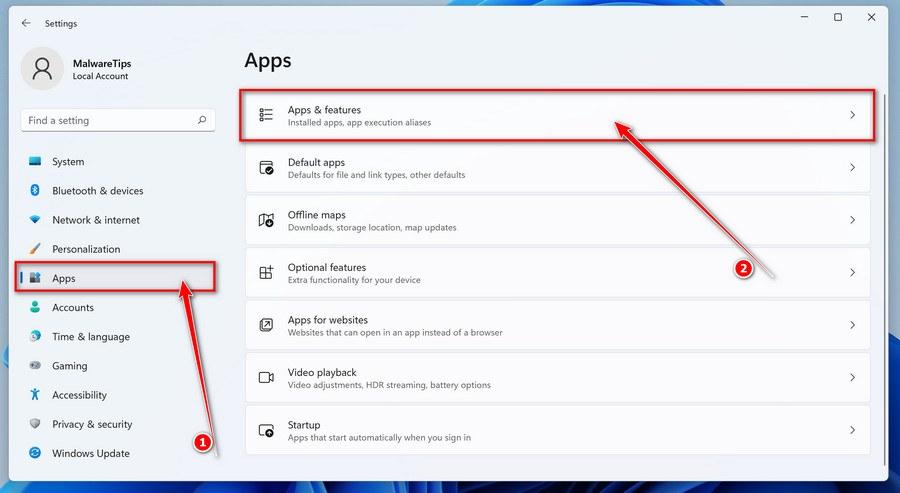
When Settings opens, click “Apps” in the sidebar, then select “Apps & Features”.

-
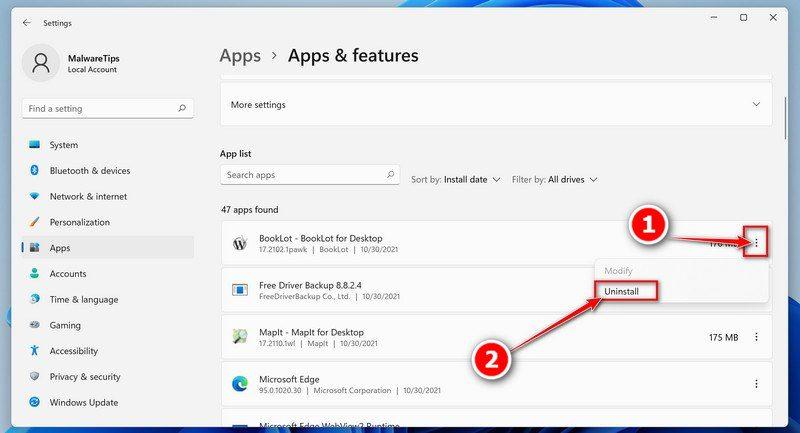
In Apps & Features settings, scroll down to the app list and search for the program you want to uninstall. When you find the program, click the three dots button beside it and select “Uninstall” in the menu that appears.

-
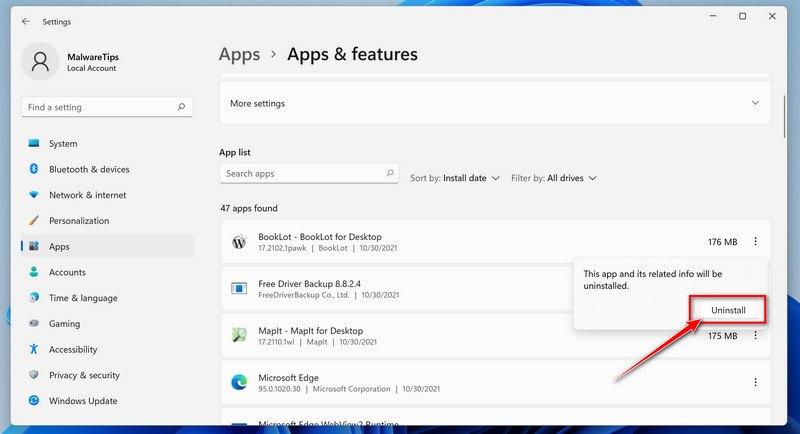
In the next message box, confirm the uninstall process by clicking on Uninstall, then follow the prompts to uninstall the program.

- Press the Windows key + I on your keyboard to open the Settings app. You can also ope the Settings app by clicking the Start button on the taskbar, then select “Settings” (gear icon).

-
When the “Windows Settings” window opens, click on “Apps“. By default, it should open “Apps and Features” but if it doesn’t, select it from the list on the left.

-
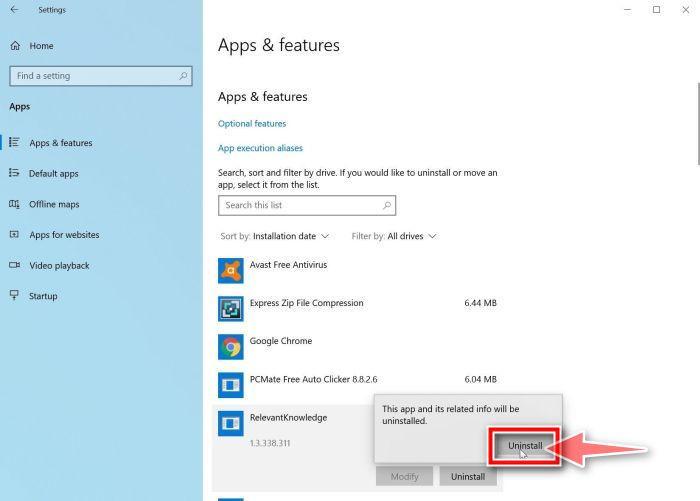
In Apps & Features settings, scroll down to the app list and search for the program you want to uninstall. When you find the program, click on it and select “Uninstall” in the menu that appears.

-
In the next message box, confirm the uninstall process by clicking on Uninstall, then follow the prompts to uninstall the program.

-
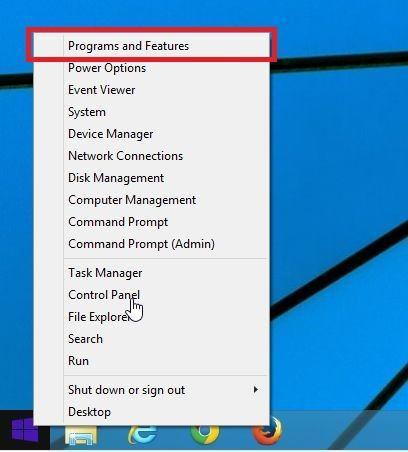
Right-click on the Start button in the taskbar, then select “Programs and Features”. This will take you directly to your list of installed programs.

-
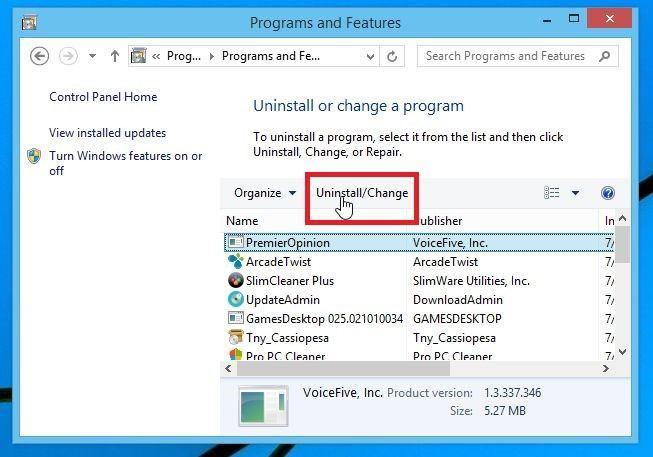
The “Programs and Features” screen will be displayed with a list of all the programs installed on your computer. Scroll through the list until you find the program, then click to highlight it, then click the “Uninstall” button.

- In the next message box, confirm the uninstall process by clicking on Yes, then follow the prompts to uninstall program.
-
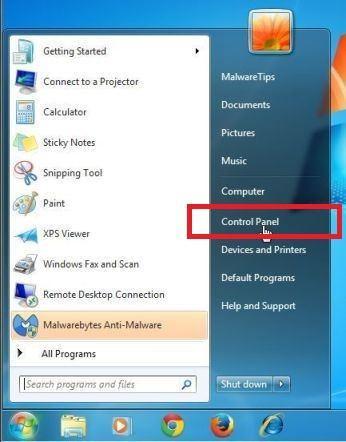
Click on the “Start” button, then click on “Control Panel“.

-
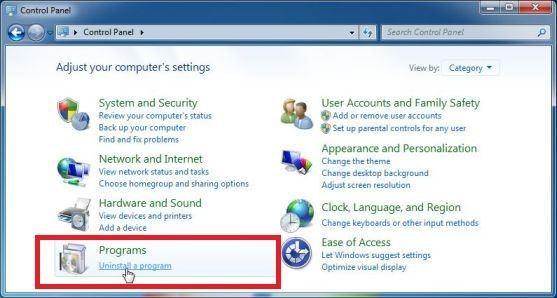
When the “Control Panel” appears, click on “Uninstall a Program” from the Programs category.

-
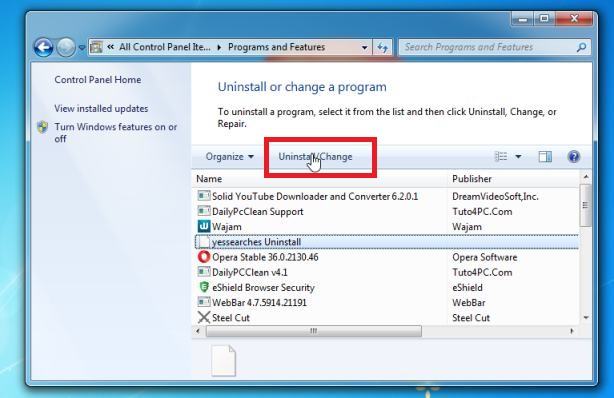
The “Programs and Features” screen will be displayed with a list of all the programs installed on your computer. Scroll through the list until you find any suspicious or unknown program, then click to highlight it, then click the “Uninstall” button.
Look out for any suspicious program that could be behind all the drama – anything you don’t remember downloading or that doesn’t sound like a genuine program.

- In the next message box, confirm the uninstall process by clicking on Yes, then follow the prompts to uninstall program.
3. Scan for your computer for malware
Malware can damage your system files and registry entries and cause various errors. We will now, download and run a scan with Malwarebytes to check if you’re device is clean.
Malwarebytes is one of the most popular and most used anti-malware software for Windows, and for good reasons. It is able to destroy many types of malware that other software tends to miss, without costing you absolutely nothing. When it comes to cleaning up an infected device, Malwarebytes has always been free and we recommend it as an essential tool in the fight against malware.
-
You can download Malwarebytes by clicking the link below.
 MALWAREBYTES FOR WINDOWS DOWNLOAD LINK
(The above link will open a new page from where you can download Malwarebytes) -
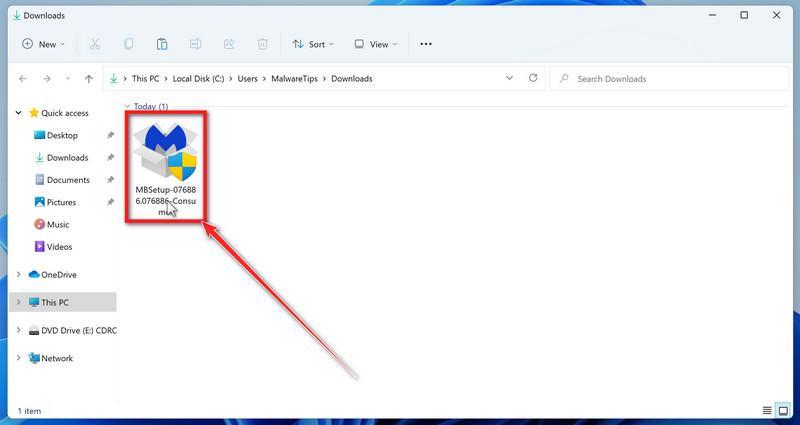
When Malwarebytes has finished downloading, double-click on the MBSetup file to install Malwarebytes on your computer. In most cases, downloaded files are saved to the Downloads folder.

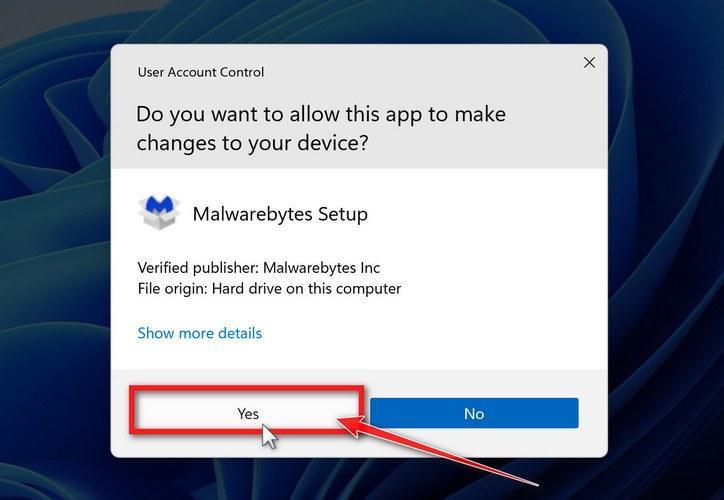
You may be presented with a User Account Control pop-up asking if you want to allow Malwarebytes to make changes to your device. If this happens, you should click “Yes” to continue with the Malwarebytes installation.

-
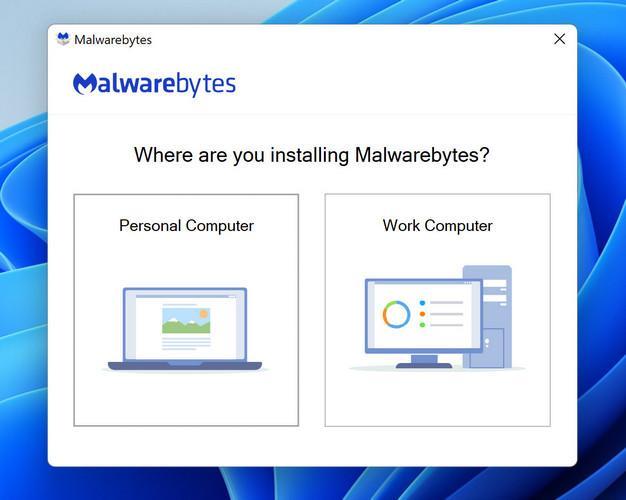
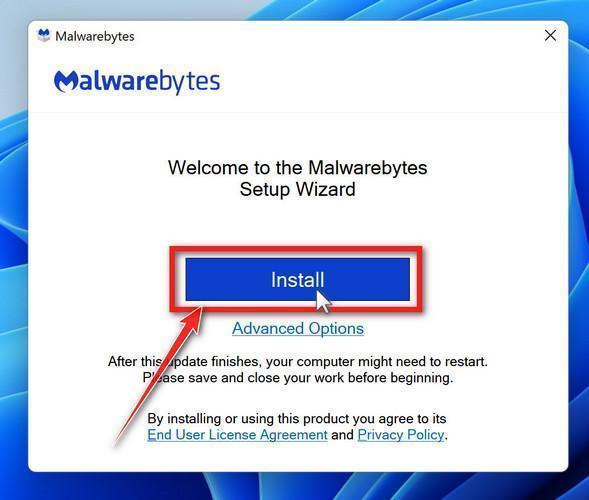
When the Malwarebytes installation begins, you will see the Malwarebytes setup wizard which will guide you through the installation process. The Malwarebytes installer will first ask you what type of computer are you installing this program on, click either Personal Computer or Work Computer.

On the next screen, click “Install” to install Malwarebytes on your computer.

When your Malwarebytes installation completes, the program opens the Welcome to Malwarebytes screen.
-
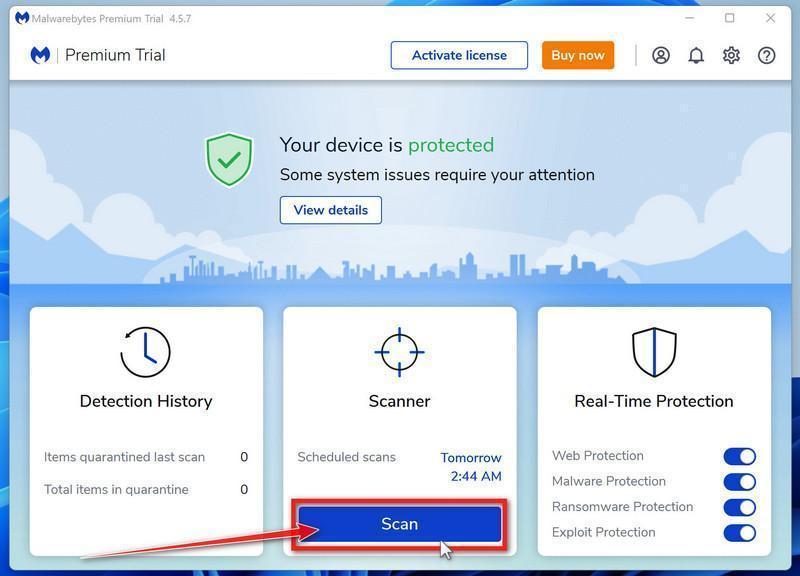
Malwarebytes is now installed on your computer, to start a scan click on the “Scan” button. Malwarebytes will automatically update the antivirus database and start scanning your computer for malicious programs.

-
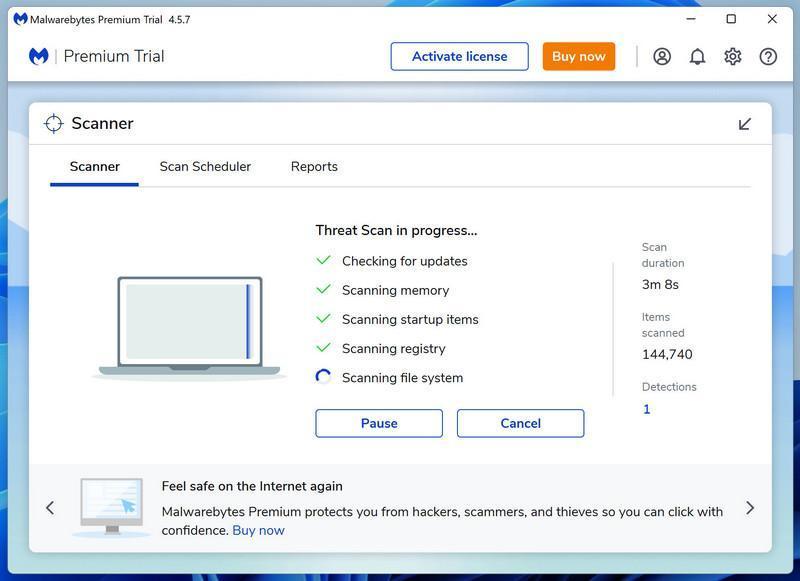
Malwarebytes will now scan your computer for browser hijackers and other malicious programs. This process can take a few minutes, so we suggest you do something else and periodically check on the status of the scan to see when it is finished.

-
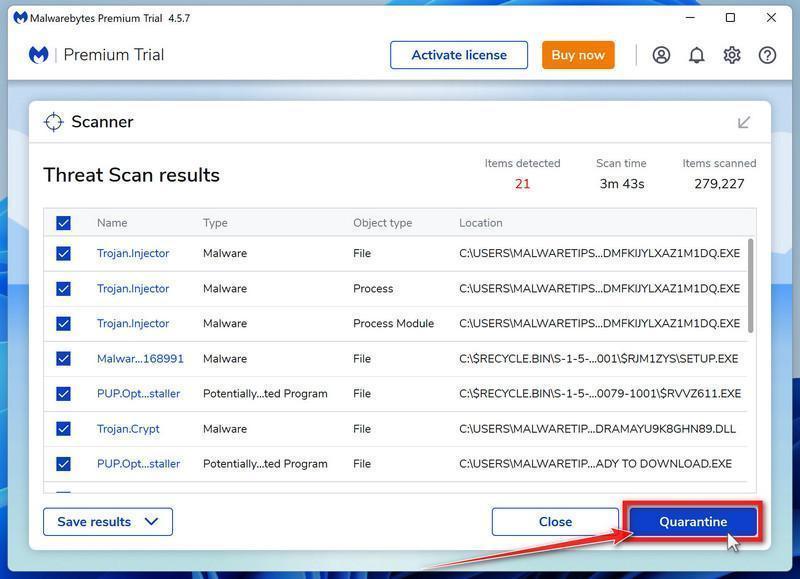
When the Malwarebytes scan is finished scanning it will show a screen that displays any malware, adware, or potentially unwanted programs that it has detected. To remove the malicious programs that Malwarebytes has found, click on the “Quarantine” button.

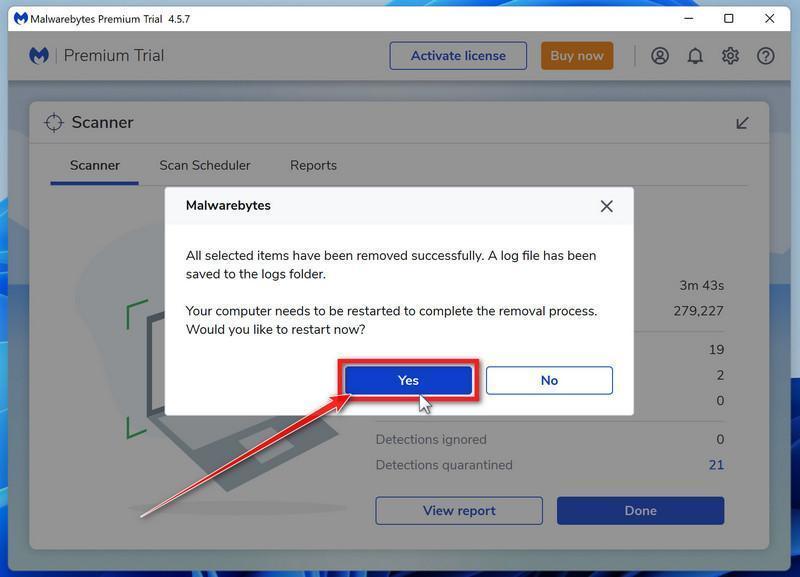
Malwarebytes will now remove all the malicious files and registry keys that it has found. To complete the malware removal process, Malwarebytes may ask you to restart your computer.

4. Check for updates
Make sure your operating system, drivers, and other software are up to date. If the errors started happening after an update, you can uninstall that specific update patch.
To check for Windows updates, follow the below steps:
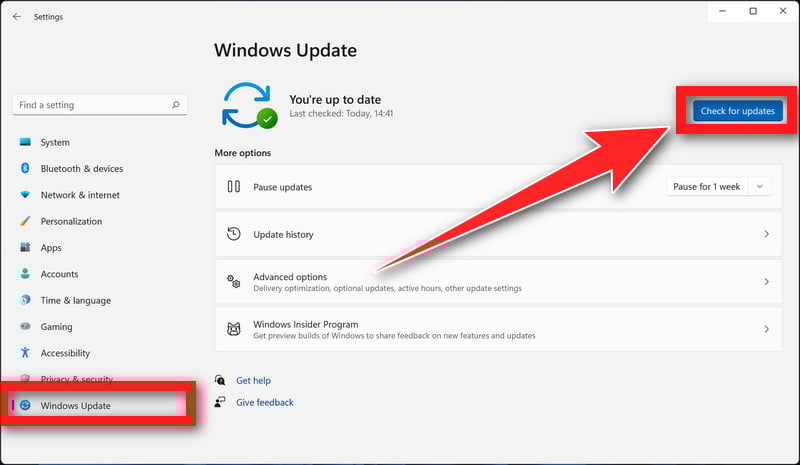
- Press the Windows key + I to open the Settings menu. Click the “Windows Update” tab on the left side of the screen.
For Windows 10 users, the Windows Update menu can be found in Settings > Update & Security > Windows Update. - Click the “Check for updates” button. This will initiate a scan for updates. If any updates are available, they will be downloaded and installed automatically.

- If you want to check for updates for other software, you can do so by opening the software and looking for a “Check for updates” option in the menu. You can also check the software’s website for updates.
5. Disable any unnecessary startup programs
Startup programs are applications that automatically launch when you start your computer. While some of these programs may be necessary for your system to function properly, others may be unnecessary and can cause errors.
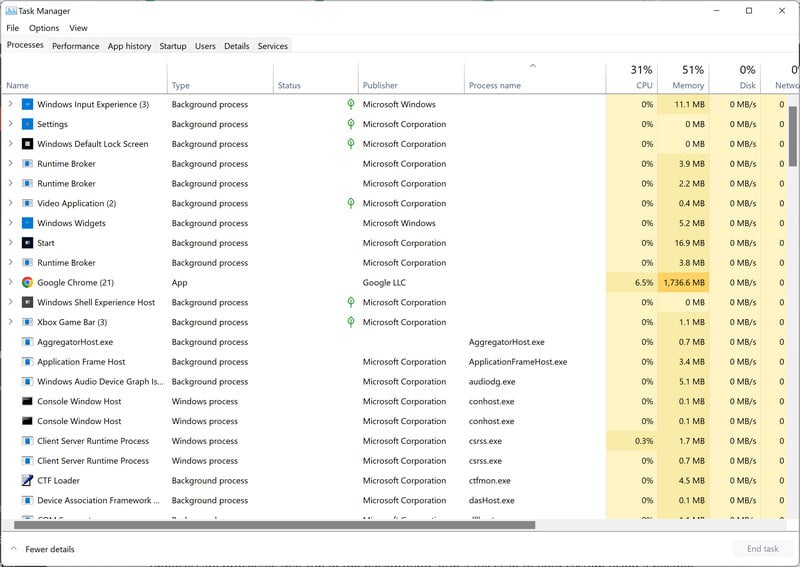
- Open the Task Manager by pressing the Ctrl + Shift + Esc keys on your keyboard simultaneously.

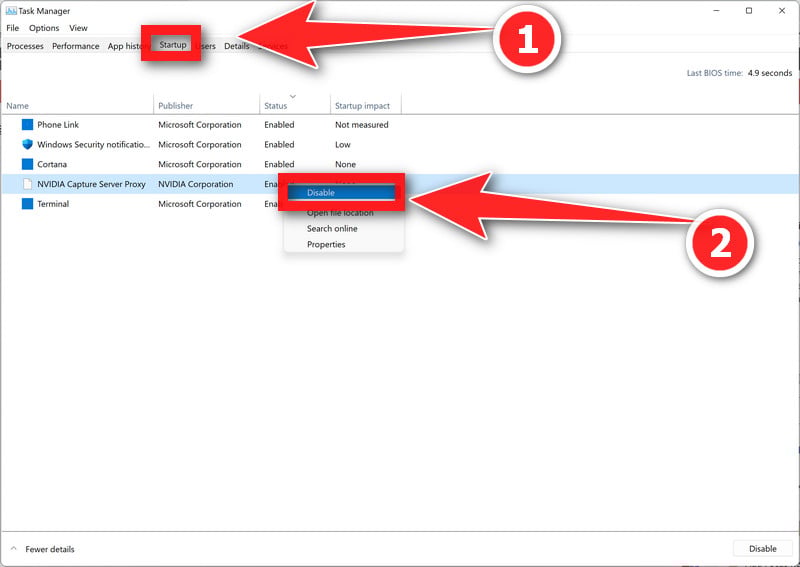
- In the Task Manager, go to the “Startup” tab and disable any programs that you do not need to start automatically when you turn on your computer.
Keep in mind that some startup programs may be essential to the functioning of your system, so be careful not to disable any important programs.

6. Run a memory test
A faulty RAM module can cause random crashes. Run a memory test to check for any issues with your RAM. To run a memory test, follow these steps:
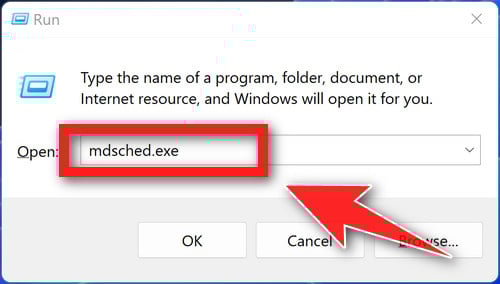
- Press the Windows key + R to open the Run dialog.
- Type “mdsched.exe” into the Run dialog and press Enter. This will launch the Windows Memory Diagnostic tool.

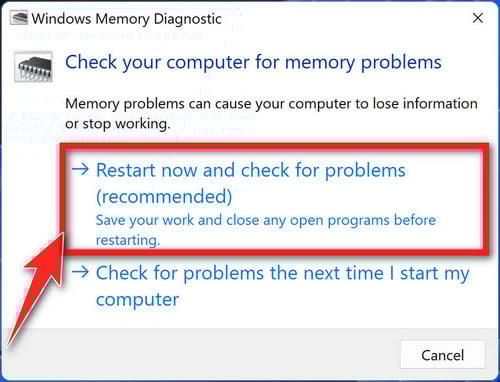
- You will be asked whether you want to restart your PC and run the test immediately or schedule the test to run the next time you start your PC. Choose the option you prefer and click “OK”.

If you choose to run the test immediately, your PC will restart and the test will begin. The test will run automatically and may take several minutes to complete.- If the test finds any errors, it will display a message indicating the type and location of the error. You may need to replace your RAM if the test finds any errors.
- If the test completes without finding any errors, it will display a message indicating that the test has completed successfully.
7.Check your hardware
Start by inspecting your computer’s hardware components for any signs of damage or failure. Ensure that all connections are secure and that there are no loose cables. If you suspect a faulty component, consider consulting a professional or replacing it if necessary.
Next, check your RAM, hard drive, graphics card, and any other hardware components using the Windows Device Manager.
-
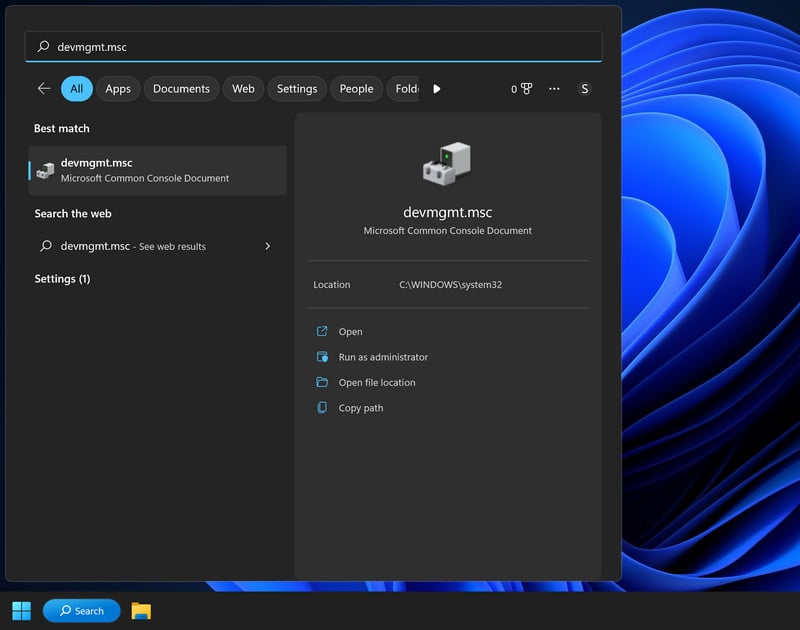
To access the Device Manager, type “devmgmt.msc” into the search bar on the Start menu and select “Device Manager” from the list of results.

-
In the Device Manager, you can view a list of all the hardware devices connected to your computer and check for any errors or issues. If you see a yellow exclamation point next to a device, it may indicate a problem with that device. You can right-click on the device and select “Update driver” or “Troubleshoot” to try and fix any issues.

8. Try a system restore.
If you have a restore point saved, you can try using it to revert your system to a previous state. This may fix the issue if it was caused by a recent change. To do a system restore follow these steps:
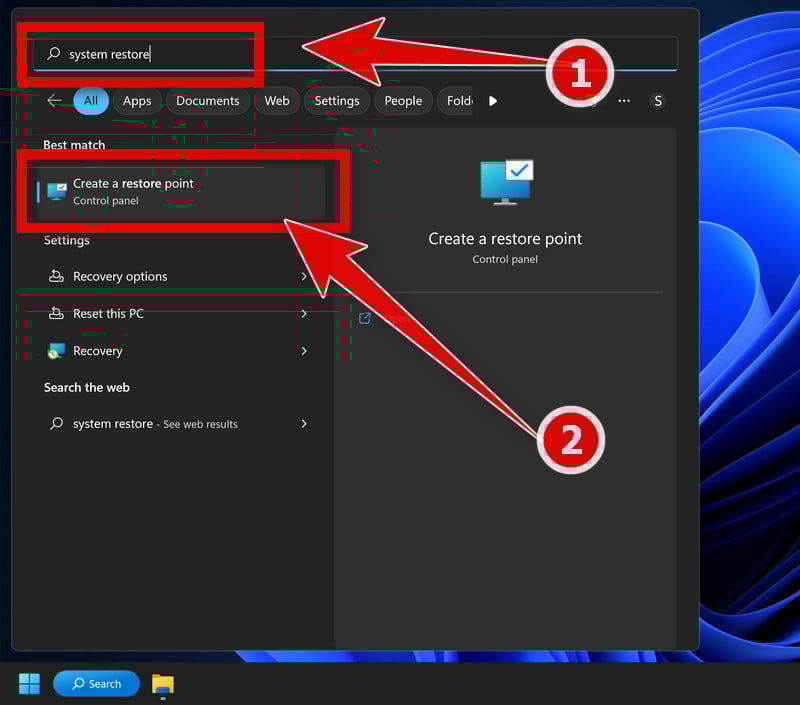
- Press the Windows key + S to open the Search menu.
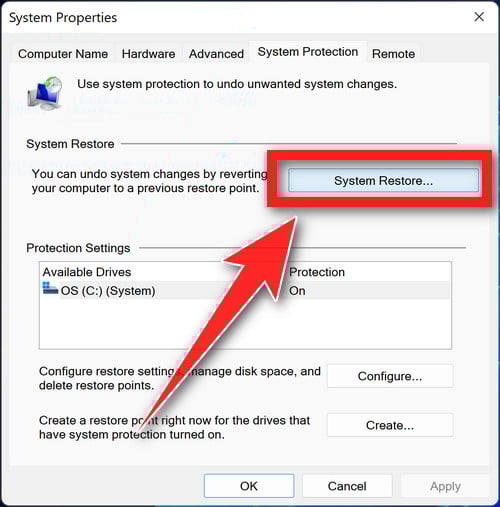
- Type “system restore” into the search bar and click the “Create a restore point” result.

- Click the “System Restore” button.

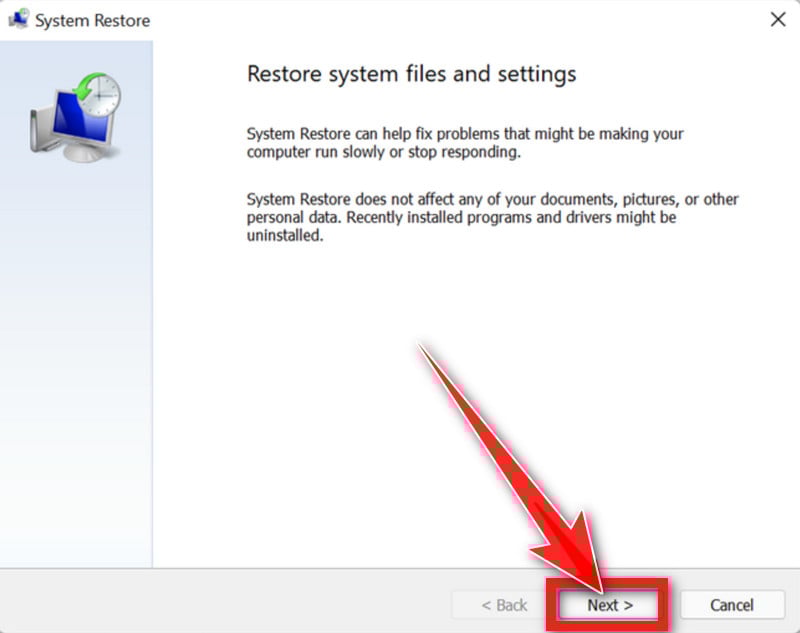
- In the System Restore window, click “Next.”

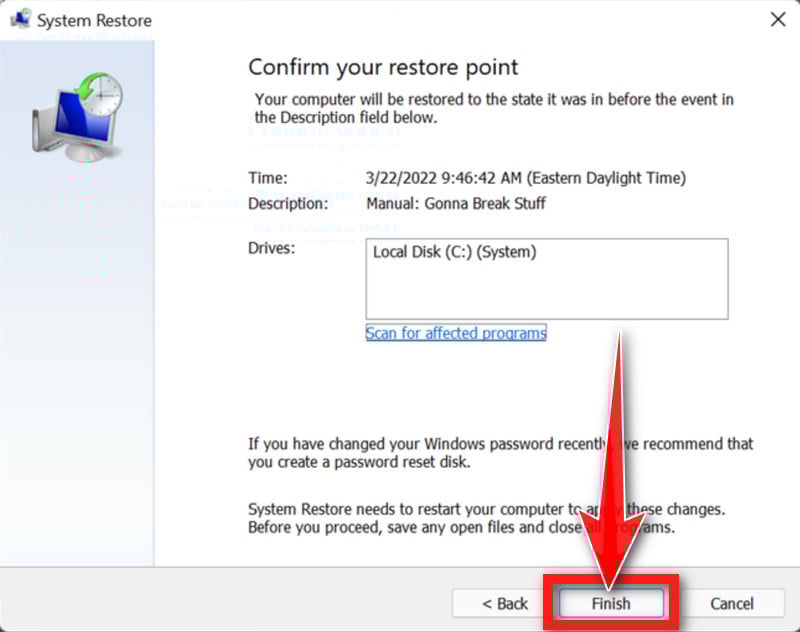
- Select a restore point from the list and click “Next.” A restore point is a saved state of your system that you can use to revert your system to a previous state. Make sure to select a restore point that was created before you started experiencing problems.
- Click “Finish” to begin the restore process. Your PC will restart and the restore process will begin. This may take several minutes to complete.

- When the restore is complete, your PC will restart again. You may need to adjust your settings and reinstall any software that was installed after the restore point was created.
9. Reset your PC
One of the most drastic solutions is to reset your PC to its default configuration. This can be considered the nuclear option for fixing errors because it will wipe out all the third-party software you installed on your computer. However, this option can also be effective if none of the other methods work for you.
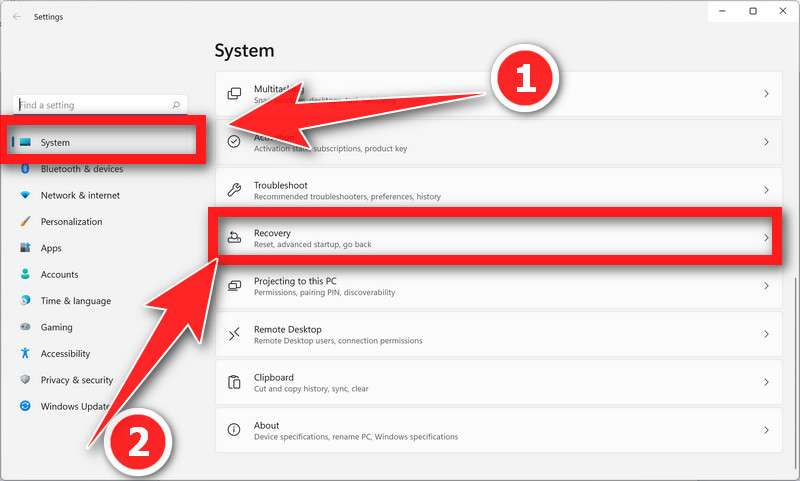
- Open Settings by pressing Windows + I keys.
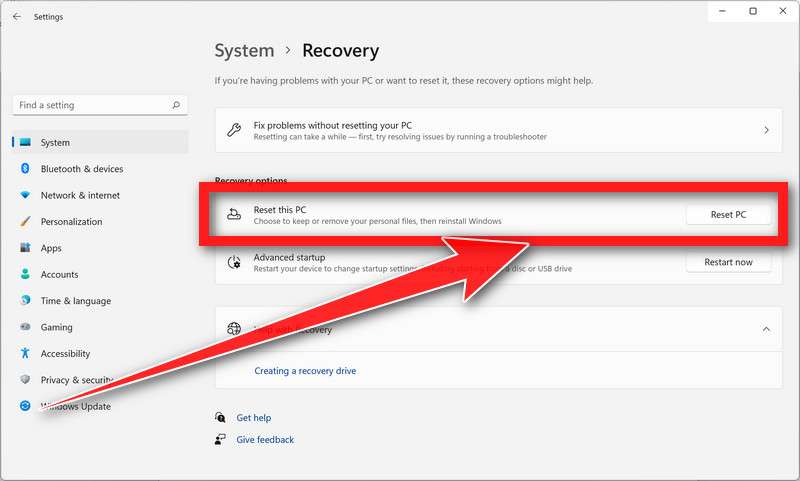
- Click on System and then on Recovery.

- Under Reset this PC section, click on Reset PC button.

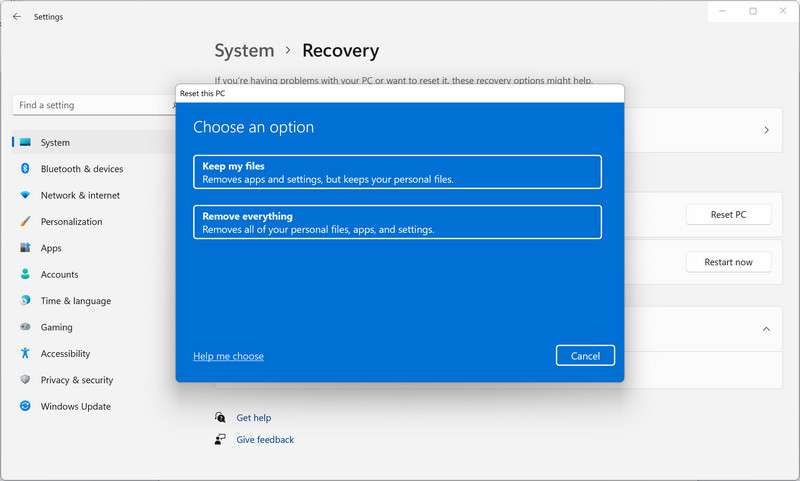
- Choose whether you want to keep your files or remove everything.

- Follow the on-screen instructions to complete the process.
Summary
The dxgmms2.sys BSoD error is a common issue that Windows users may encounter. It is caused by problems with the DirectX graphics kernel subsystem, such as outdated drivers, corrupted system files, hardware issues, overheating, or malware infections. To fix dxgmms2.sys BSoD errors, update your graphics drivers, run the System File Checker, check for hardware issues, and scan for malware. By following these steps, you can resolve the issue and ensure a stable and error-free computing experience.

