

A client appears to share several working documents through Google Drive Workspace. The filenames look ordinary, and the email presents them as convenient attachments.
One file behaves differently from the others. Before opening it, there are several details worth examining that the polished notification quietly leaves unexplained.
Overview
The message imitates a routine client handoff
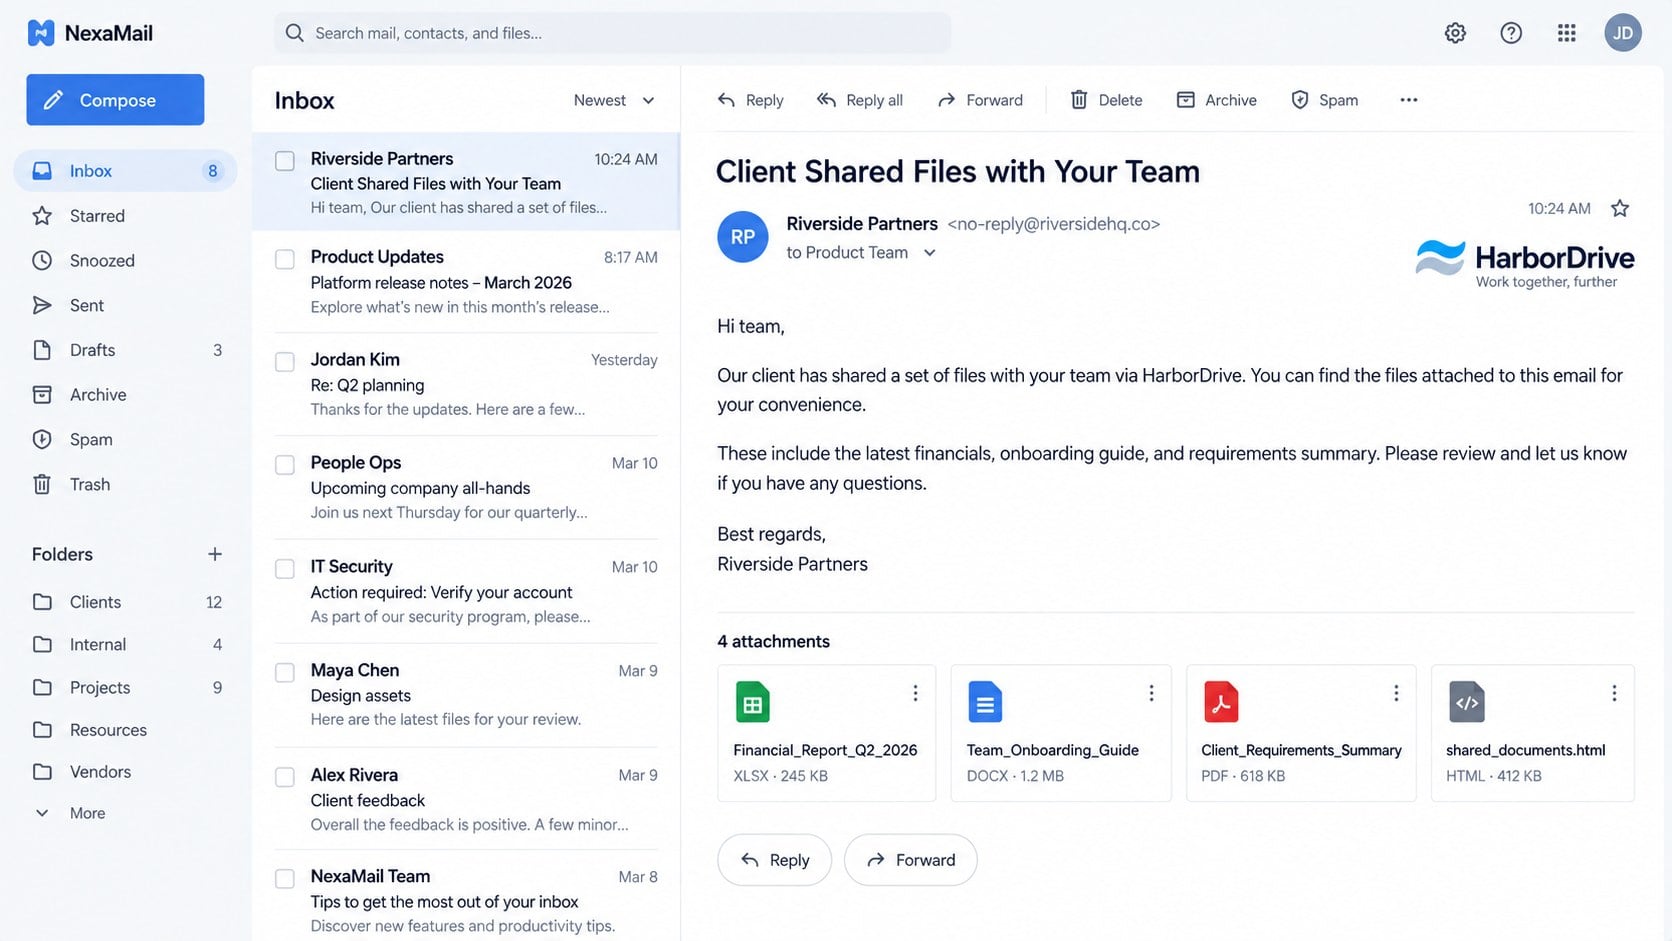
The Google Drive Shared Files email says a client has delivered documents to the recipient’s team through Google Drive Workspace.
It may list plausible business filenames covering financial results, onboarding guidance, and client requirements. That mixture makes the package feel connected to active work.
The message claims the requested files were included directly as attachments for quick access, while mentioning familiar viewing, commenting, and editing permissions.
The dangerous attachment is a webpage, not a shared document
The campaign includes an HTML file whose name can resemble a spreadsheet, document, or shared-file package when viewed quickly inside an inbox.
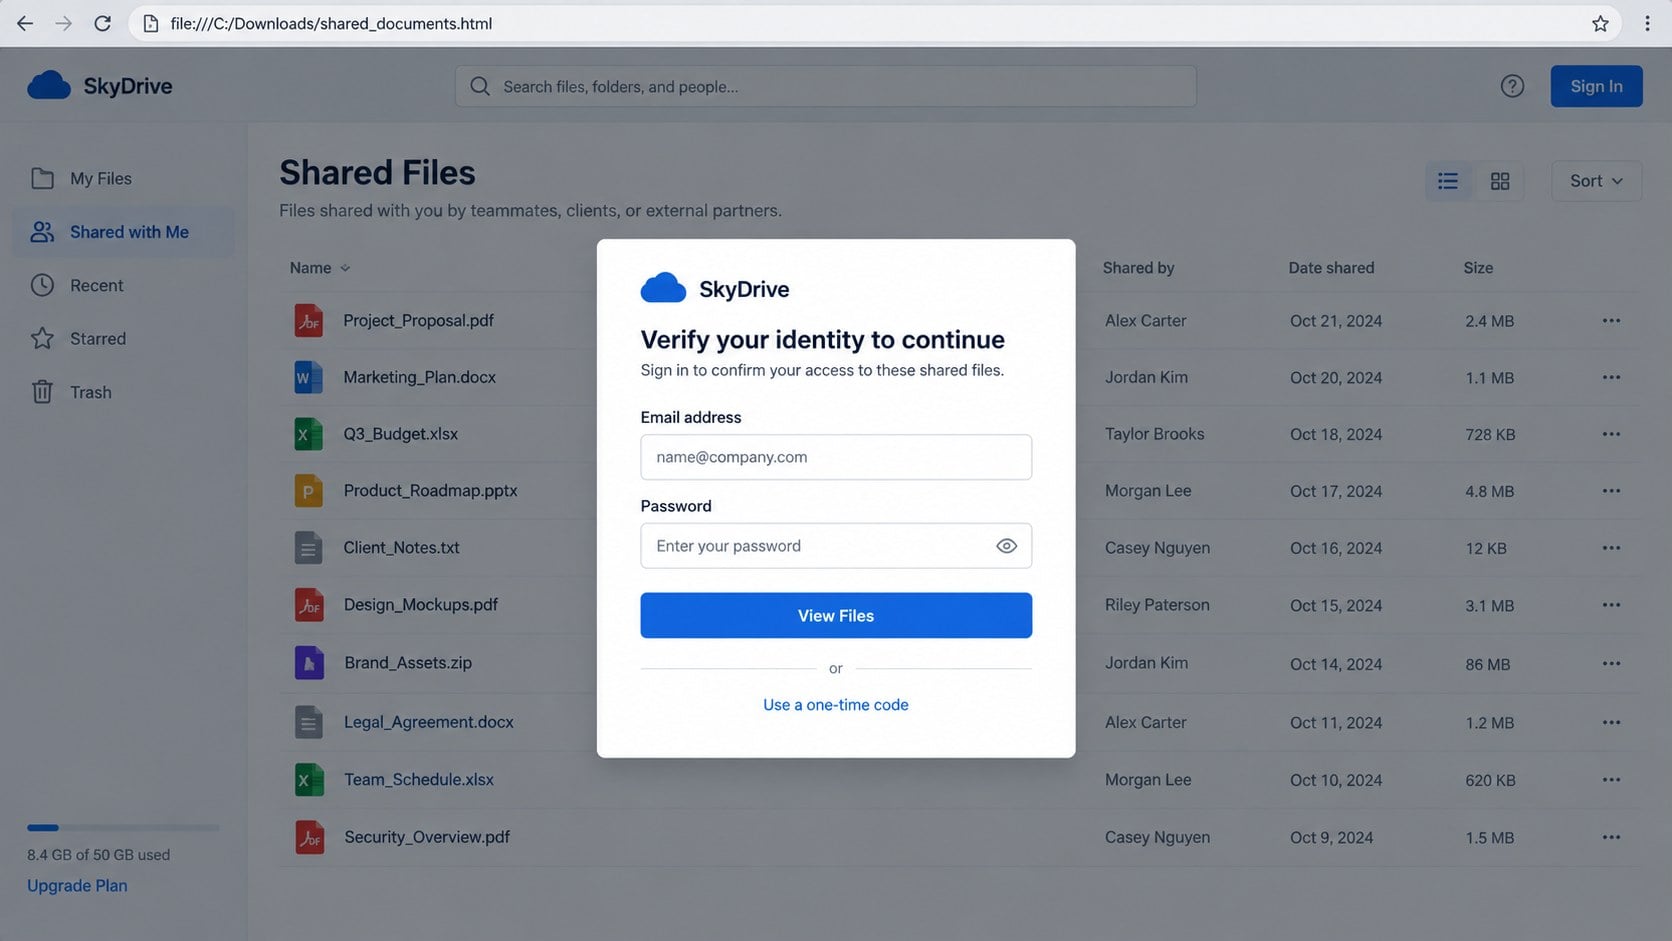
Opening the file launches a locally stored webpage in the browser. It draws a counterfeit cloud-drive interface using code contained inside the attachment.
A login dialog then asks for an email address and password before the documents can supposedly be viewed. The form is built to capture credentials.
The real sharing workflow does not require this detour
Google Drive sends notifications when files are shared, but access belongs inside the authenticated Drive service and its verified web domains.
A genuine sharing invitation does not need an attached HTML page to recreate a login screen on the recipient’s computer.
Warning signs include:
- An unexpected client with no recognizable project or earlier conversation.
- An HTML attachment presented as a document or spreadsheet.
- A browser address beginning with file rather than a verified web domain.
- A locally rendered page displaying a cloud-service logo and password form.
- Files that cannot be found by opening Google Drive independently.
- A sign-in prompt before any authentic sharing record appears.
- Sender details unrelated to Google or the supposed client.
How an HTML Attachment Can Display a Convincing Login Page
HTML is the language browsers use to arrange text, forms, buttons, images, and interactive page elements. An attached file can contain all those components.
When opened, the browser may show a normal-looking page even though it came from the Downloads folder rather than a legitimate website.
The browser address bar can reveal this difference. A local page often begins with “file:///” and a path leading to the downloaded attachment.
Scripts inside the page may read the target’s email address, display tailored branding, validate fields, and transmit submitted information to a remote server.
The interface can also show an error after submission. That delay may persuade the victim to enter a second password or assume the document expired.
A padlock image drawn inside the page offers no protection. Only the actual browser address and verified service domain establish where information is going.
How the Google Drive Shared Files Email Scam Works
Step 1: The email arrives during an ordinary workday
Attackers send the notification to employees who regularly exchange reports, specifications, invoices, designs, or onboarding material with people outside their organization.
The subject may include a team name, reference number, or generic client label. It does not need detailed personalization to resemble daily collaboration.
Busy recipients recognize the task before they examine the sender. The promise of several useful files creates a reason to open the package immediately.
Step 2: Familiar filenames make the attachment set believable
Names such as Financial_Report_Q2_2026 or Client_Requirements_Summary look mundane enough to avoid the alarm created by executable files.
The email can display several file icons while delivering only one operational HTML attachment. Decorative listings inside a message are not proof those files exist.
A deceptive double extension or long filename can hide the real file type in narrow attachment panels. Always inspect the final extension before opening anything.
Step 3: Opening the HTML file bypasses the expected Drive page
The attachment launches through the default browser and creates its own interface. No connection to Google Drive is required to display a convincing imitation.
Because the page loads locally, security filters may not see the final presentation during email delivery. Remote scripts or form destinations can activate afterward.
The fake dashboard may list documents, permissions, recent files, or storage usage to create the impression that the victim has reached a real workspace.
Step 4: A verification dialog collects the Google account password
The page claims identity verification is required to reveal the documents. It requests the same credentials used for Gmail and other Google services.
Any password submitted can be sent to the operator. The form may ask again, reporting that the first password was incorrect even after capturing it.
If multi-factor authentication is enabled, the attacker may immediately trigger a prompt or request a one-time code while the victim remains on the page.
Step 5: A stolen Google account exposes more than email
Successful access can reveal Gmail messages, Drive documents, contacts, calendars, Photos content, saved account details, and recovery information.
The mailbox can reset passwords for unrelated services. Drive contents may expose business plans, invoices, customer records, contracts, and internal project material.
Attackers can send a fresh shared-file lure from the real account, making the next message much more convincing to colleagues and clients.
Step 6: Persistence hides the compromise after the password changes
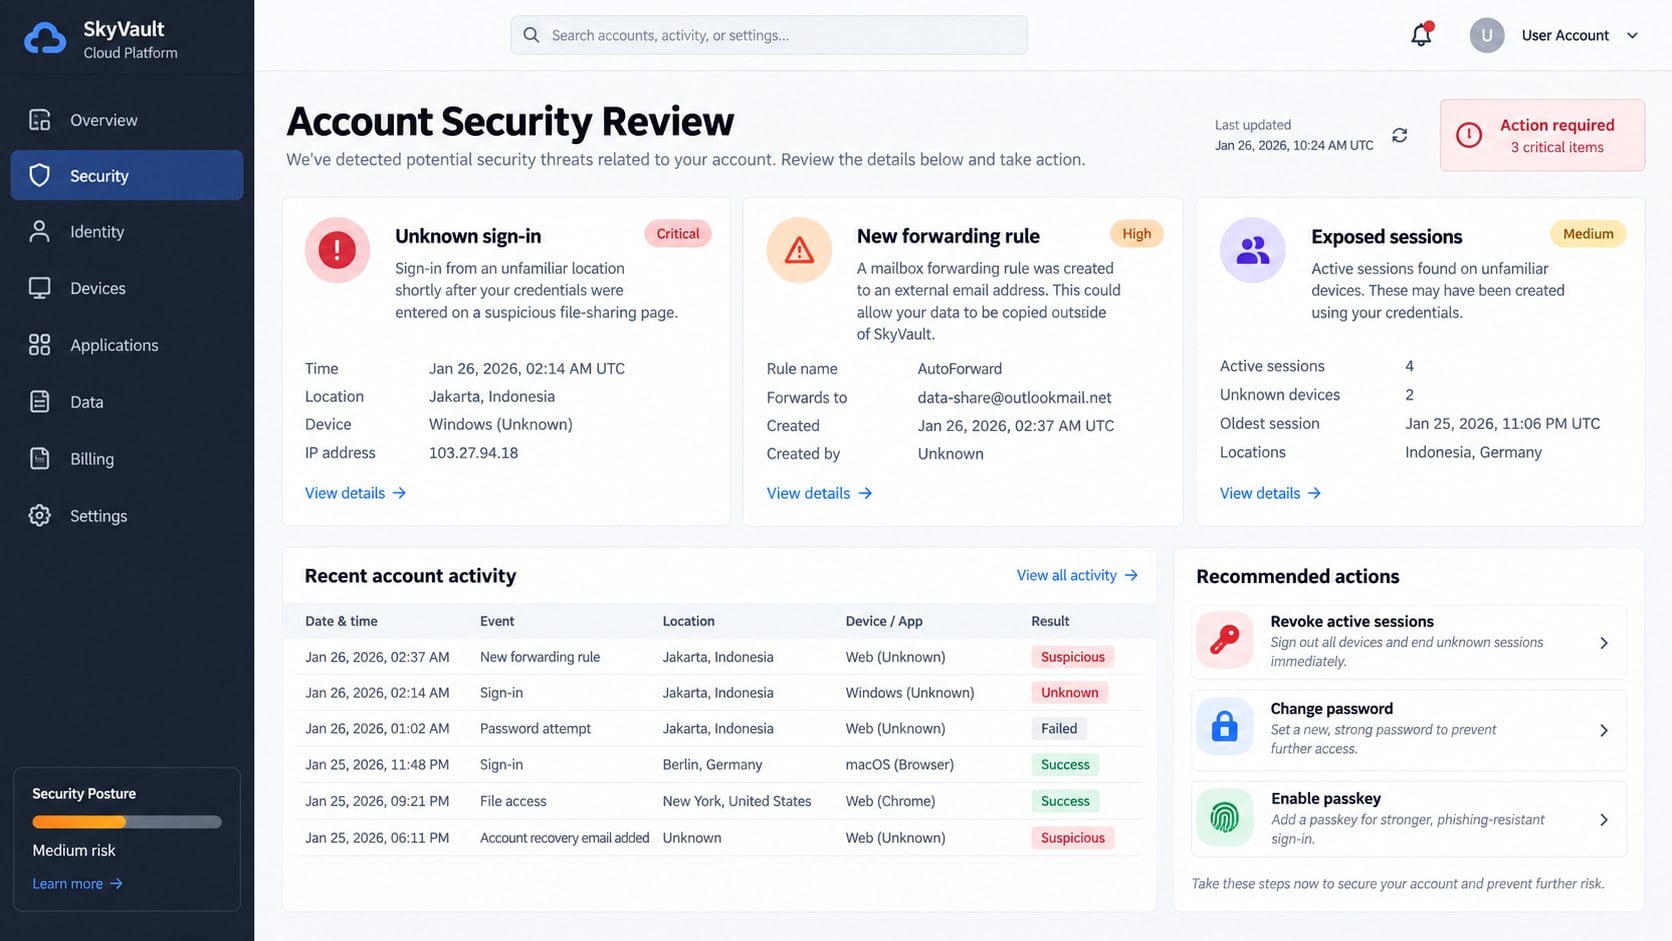
An intruder may create forwarding rules, connect a malicious application, add recovery details, generate app passwords, or keep an active session token.
Changing only the password may not remove every access path. Account activity, sessions, applications, forwarding, filters, and recovery options all require inspection.
Business administrators should also review audit logs for file downloads, permission changes, shared links, deleted content, and messages sent after the exposure.
Sender, Attachment, Destination, and Account Verification Checks
The supposed client must be recognizable outside the message
Check the full sender and Reply-To addresses against an established project thread, customer record, contract, or independently stored contact information.
Do not reply and ask whether the message is genuine. The same attacker controlling the suspicious mailbox can provide a reassuring answer.
Call the client through a known number and ask for the exact document title, owner, sharing method, and intended recipient.
The attachment type exposes the unexpected delivery method
Google’s official sharing guidance describes selecting a Drive file, choosing recipients and permissions, then sending a notification linked to that hosted item.
An HTML attachment is a webpage package. It is not an Excel workbook, Word document, PDF, or proof that Google generated the notification.
Configure mail gateways to quarantine HTML attachments when the organization rarely needs them. Security teams can examine the code without opening it interactively.
The destination should remain on a verified Google service
Open Drive from a trusted bookmark or type drive.google.com yourself. Search Shared with me and notifications for the alleged client files.
A genuine item should appear within the authenticated account when permissions were granted to that address. Missing records undermine the email’s story.
Check the browser address before entering credentials. A local file path, unrelated host, misspelled domain, or generic cloud name is not Google authentication.
The account request should match the service being accessed
Password managers normally fill credentials only on the domains where they were saved. A refusal to autofill can reveal that the page belongs elsewhere.
Never approve an unexpected sign-in prompt generated immediately after visiting a shared-file page. That prompt may be the attacker attempting to use the captured password.
Use passkeys or hardware security keys when available. They bind authentication to the legitimate domain and resist ordinary password-harvesting pages.
Why Simply Receiving the Email Does Not Mean the Account Is Hacked
Reading the message normally does not disclose the account password. The central danger begins when the attachment opens and information is entered.
Opening an HTML file without submitting anything still deserves caution. Scripts may contact remote services, track interaction, or attempt additional downloads.
Do not assume every HTML attachment installs malware. This campaign centers on credential theft, but the same file type can support other malicious behavior.
The response should match the action taken. A recipient who deleted the unopened message needs reporting, while submitted credentials require immediate account recovery.
Damage a Compromised Workspace Account Can Cause
Cloud accounts concentrate communication and documents in one identity. That convenience makes a stolen session valuable to attackers and disruptive to the owner.
Private files may be downloaded quietly before the victim notices. Sharing permissions can be changed to expose folders through public or attacker-controlled links.
Email access lets intruders study ongoing projects and payment discussions. They can write replies that match the language, timing, and participants of genuine conversations.
Connected applications may inherit account permissions. An attacker who gains OAuth access can sometimes retain data access without repeatedly using the stolen password.
Administrators should establish a timeline from the first malicious interaction through containment. That record helps identify files, recipients, and connected systems requiring review.
Look for unfamiliar sign-ins, new devices, security changes, mass downloads, deleted alerts, forwarding, application grants, new filters, and unusual sent messages.
What to Do if You Have Fallen Victim to This Scam
- Close the attachment and disconnect suspicious downloads. Do not submit more information, approve sign-in prompts, or reopen the HTML file for testing.
- Change the Google password from a clean device. Create a unique credential that is not used for email, work systems, shopping, or banking.
- Sign out every active session. Remove unfamiliar devices and force reauthentication so stolen browser sessions cannot remain quietly connected.
- Review account recovery settings. Remove unknown telephone numbers, addresses, passkeys, app passwords, security keys, and backup codes.
- Audit Gmail and Drive changes. Inspect forwarding, filters, delegates, sent mail, trash, sharing permissions, downloads, and public links.
- Revoke suspicious application access. Disconnect OAuth applications or browser extensions that appeared near the phishing event.
- Notify workplace security immediately. Administrators can review audit logs, revoke tokens, preserve evidence, and identify affected files or recipients.
- Warn contacts from a trusted channel. Tell colleagues if scam messages may have been sent from the compromised account.
- Run Malwarebytes after opening the attachment. A complete scan can detect additional files, scripts, or unwanted software delivered alongside the credential form.
- Add AdGuard as a browsing safeguard. Its filters can block many known phishing hosts and malicious redirects before their pages finish loading.
- Preserve evidence for reporting. Save the original email, headers, attachment hash, screenshots, sign-in history, and administrator audit events.
Is Your Device Infected? Run a Free Malware Scan
Slow performance, constant pop-ups, or strange behavior? These are classic signs of a malware infection. The fastest way to find out is to scan your device with Malwarebytes Free — one of the most trusted malware removal tools available.
The free version detects and removes the most common threats, including:
- Adware — the cause of those annoying pop-ups
- Browser hijackers — unwanted redirects and changed homepages
- Trojans and spyware — hidden programs stealing your data
- Potentially unwanted programs (PUPs) — software you never asked for
👉 Select your device below — Windows, Mac, or Android — then follow the simple steps to download Malwarebytes, scan your system, and remove any threats it finds. The scan usually takes 5 to 20 minutes.
Run a Malware Scan with Malwarebytes for Windows
Malwarebytes is one of the most popular and trusted anti-malware tools for Windows — and it’s completely free for removing infections. It catches threats that many antivirus programs miss, including adware, browser hijackers, and trojans. Follow the steps below to scan and clean your PC in just a few minutes.
Download Malwarebytes
Click the button below to download the latest version of Malwarebytes for Windows from the official source. The free version is all you need — it will scan your computer and remove adware, browser hijackers, and other malicious software at no cost.
Download MalwarebytesOfficial installer for Windows 11 and 10. Your download starts right away.Want real-time protection? See Malwarebytes Premium Malwarebytes Free for WindowsScans and removes malware at no cost
-
Install Malwarebytes
When the download finishes, open your Downloads folder and double-click the MBSetup file. If Windows shows a User Account Control pop-up, click “Yes” to allow the installation.

Follow the On-Screen Prompts to Install Malwarebytes
The setup wizard will walk you through a few quick screens:
-
Choose where you’re installing the program — “Personal Computer” or “Work Computer” — then click Next.

-
Malwarebytes will now install on your device. This usually takes under a minute.

-
When installation is complete, the “Welcome to Malwarebytes” screen will open automatically.

-
On the final screen, click Open Malwarebytes to launch the program.

-
Enable “Scan for Rootkits”
Before scanning, turn on rootkit detection so Malwarebytes can find even the most hidden threats. Click the Settings gear icon on the left side of the screen.

In the settings menu, find “Scan for rootkits” and click the toggle so it turns blue.

Done? Click “Dashboard” in the left pane to return to the main screen.
Start the Scan
Click the blue Scan button. Malwarebytes will automatically update its virus database and start checking your computer for malware.

-
Wait for the Scan to Finish
The scan checks your entire system for browser hijackers and other malicious programs, so it can take 5 to 20 minutes depending on your computer. Feel free to do something else — just check back occasionally to see the progress.

-
Quarantine the Detected Threats
When the scan is done, you’ll see a list of everything Malwarebytes found — malware, adware, and potentially unwanted programs. Click the “Quarantine” button to remove all of them at once.

Malwarebytes will now remove the malicious files and registry entries and move them safely into quarantine.

-
Restart Your Computer
Some threats can only be fully removed after a reboot. If Malwarebytes asks you to restart, click Yes. Once you’re logged back in, Malwarebytes has finished removing the threats it found.

That’s it — your Windows PC is now clean of trojans, adware, and other malware, and should be back to running smoothly.
If you are still having problems with your computer after completing these instructions, then please follow one of the steps:
- Run a computer scan with ESET Online Scanner
- Ask for help in our Windows Malware Removal Help & Support forum.
Run a Malware Scan with Malwarebytes for Mac
Malwarebytes for Mac is a free on-demand scanner that removes the malware other security software tends to miss — adware, browser hijackers, and unwanted programs included. Cleaning an infected Mac with Malwarebytes has always been completely free, and it’s our go-to recommendation. Follow the steps below to scan and clean your Mac in just a few minutes.
-
Download Malwarebytes for Mac
Click the button below to download the latest version of Malwarebytes for Mac.
Download MalwarebytesOfficial installer for macOS. Your download starts right away.Want real-time protection? See Malwarebytes PremiumMalwarebytes Free for MacScans and removes malware at no cost -
Open the Malwarebytes setup file
When the download finishes, open your Downloads folder and double-click the setup file to begin the installation.

-
Follow the On-Screen Prompts to Install Malwarebytes
The Malwarebytes for Mac Installer will guide you through a few quick screens. Click “Continue” and keep following the prompts until the installation completes.



When the installation is complete, Malwarebytes opens to the Welcome to Malwarebytes screen. Click “Get started“.
-
Select “Personal Computer” or “Work Computer”
Malwarebytes will ask what type of computer you’re installing it on. Click either Personal Computer or Work Computer, whichever applies.

-
Start the Scan
Click the “Scan” button. Malwarebytes will automatically update its detection database and begin checking your Mac for malware.

-
Wait for the Scan to Finish
Malwarebytes will scan your Mac for adware, browser hijackers, and other malicious programs. This can take a few minutes, so feel free to do something else — just check back occasionally to see the progress.

-
Quarantine the Detected Threats
When the scan is done, you’ll see a list of everything Malwarebytes found. Click the “Quarantine” button to remove all the threats at once.

-
Restart Your Mac
Malwarebytes will now remove all the malicious files it found. Some threats can only be fully removed after a reboot — if Malwarebytes asks you to restart, allow it. Once you’re logged back in, your Mac is clean.

That’s it — your Mac is now free of adware, rogue browser extensions, and other potentially harmful software.
If you are still experiencing problems while trying to remove a malicious program from your computer, please ask for help in our Mac Malware Removal Help & Support forum.
Run a Malware Scan with Malwarebytes for Android
Malwarebytes for Android automatically detects and removes dangerous threats like malware and ransomware so you don’t have to worry about your most-used device being compromised. Aggressive detection of adware and potentially unwanted programs keeps your Android phone or tablet running smooth.
-
Download Malwarebytes for Android.
You can download Malwarebytes for Android by clicking the link below.
Get Malwarebytes for AndroidOpens Google Play in a new tab.Want real-time protection? See Malwarebytes Premium for AndroidMalwarebytes for AndroidScans your phone and removes malware at no cost -
Install Malwarebytes for Android on your phone.
In the Google Play Store, tap “Install” to install Malwarebytes for Android on your device.

When the installation process has finished, tap “Open” to begin using Malwarebytes for Android. You can also open Malwarebytes by tapping on its icon in your phone menu or home screen.

-
Follow the on-screen prompts to complete the setup process
When Malwarebytes will open, you will see the Malwarebytes Setup Wizard which will guide you through a series of permissions and other setup options.
This is the first of two screens that explain the difference between the Premium and Free versions. Swipe this screen to continue.
Tap on “Got it” to proceed to the next step.
Malwarebytes for Android will now ask for a set of permissions that are required to scan your device and protect it from malware. Tap on “Give permission” to continue.
Tap on “Allow” to permit Malwarebytes to access the files on your phone.
-
Update database and run a scan with Malwarebytes for Android
You will now be prompted to update the Malwarebytes database and run a full system scan.

Click on “Update database” to update the Malwarebytes for Android definitions to the latest version, then click on “Run full scan” to perform a system scan.

-
Wait for the Malwarebytes scan to complete.
Malwarebytes will now start scanning your phone for adware and other malicious apps. This process can take a few minutes, so we suggest you do something else and periodically check on the status of the scan to see when it is finished.

-
Click on “Remove Selected”.
When the scan has been completed, you will be presented with a screen showing the malware infections that Malwarebytes for Android has detected. To remove the malicious apps that Malwarebytes has found, tap on the “Remove Selected” button.

-
Restart your phone.
Malwarebytes for Android will now remove all the malicious apps that it has found. To complete the malware removal process, Malwarebytes may ask you to restart your device.
That’s it — your Android phone is now clean — no more malicious apps, adware, or browser redirects.
If you are still having problems with your phone after completing these instructions, then please follow one of the steps:
- Restore your phone to factory settings by going to Settings > General management > Reset > Factory data reset.
- Ask for help in our Mobile Malware Removal Help & Support forum.
Stay Protected: Block Ads and Malicious Sites
Now that your device is clean, keep it that way. Most infections start with a malicious ad or a fake download button — so blocking them at the source is your best defense.
We recommend AdGuard, which blocks malicious ads, phishing pages, and dangerous redirects before they can reach you.
👉 Download AdGuard and browse safely
Practical Defenses for Shared-File Phishing
Teach employees to identify the difference between a hosted sharing link and an attached webpage pretending to host documents.
Block or isolate HTML attachments where business operations do not require them. Open questionable files only inside approved security-analysis environments.
Require users to access shared material through bookmarks or official applications. Matching files should appear in the service independently of the email.
Deploy phishing-resistant authentication for high-value accounts. Monitor new forwarding, application grants, mass downloads, recovery changes, and impossible sign-in patterns.
Make reporting fast and blame-free. An employee who reports immediately can help administrators revoke access before attackers exploit trusted conversations.
A Safer Routine for Unexpected Shared Documents
Pause before opening any attachment. Identify the sender, project, expected filenames, and service through records that existed before the message arrived.
View the complete filename and extension. An item ending in .html is a webpage, even when its icon or earlier name suggests a spreadsheet.
Open the cloud service from a bookmark and search for the item there. Genuine permissions should follow the account, not an attached imitation.
Confirm the share through a separate client contact. Ask who owns the file, what it contains, and why the chosen delivery method was used.
When the file remains questionable, send it to security without launching it. Analysts can inspect hashes, scripts, network destinations, and embedded forms safely.
Document the result in the project record. That simple note prevents another team member from treating a repeated notification as a new request.
This routine takes minutes and works across Drive, OneDrive, Dropbox, Box, and lesser-known collaboration platforms without trusting brand appearance.
Frequently Asked Questions
Does Google Drive send file-sharing emails?
Yes. Genuine notifications correspond to hosted Drive items and permissions. They do not require an attached HTML page to imitate the login service.
Why does the attachment open in my browser?
HTML files are webpages. The browser renders their code locally, allowing a fake workspace and password form to appear without reaching Google.
Is the account safe if I opened the file but entered nothing?
The credential risk is lower, but close the page, report the email, scan downloaded content, and watch for unexpected browser or account activity.
What does a file:/// address mean?
It means the browser is displaying a local file from the device. That page is not automatically connected to the brand it depicts.
Can multi-factor authentication stop this scam?
It helps, but victims can still approve fraudulent prompts or share codes. Passkeys and security keys provide stronger domain-bound protection.
Should administrators reset every employee password?
Not automatically. Identify affected accounts and actions through logs, then revoke sessions, reset exposed credentials, and contain related activity promptly.
The Bottom Line
The Google Drive Shared Files email scam turns an attached HTML webpage into a convincing cloud workspace and uses it to request account credentials.
Open Drive independently, verify the client, and inspect the file type. If credentials were entered, recover the complete account rather than changing only one password.

Join the discussion
0 commentsShare your experience or ask a question about this article.
Discussion
Start the conversation
Have a question or something useful to share? Add the first comment.