


Your mailbox has supposedly stopped synchronizing, and a single blue button appears to offer the fastest route back to normal.
The warning arrives at exactly the wrong moment for anyone expecting an important reply, which makes its details worth examining carefully.
Overview
What the mailbox warning claims
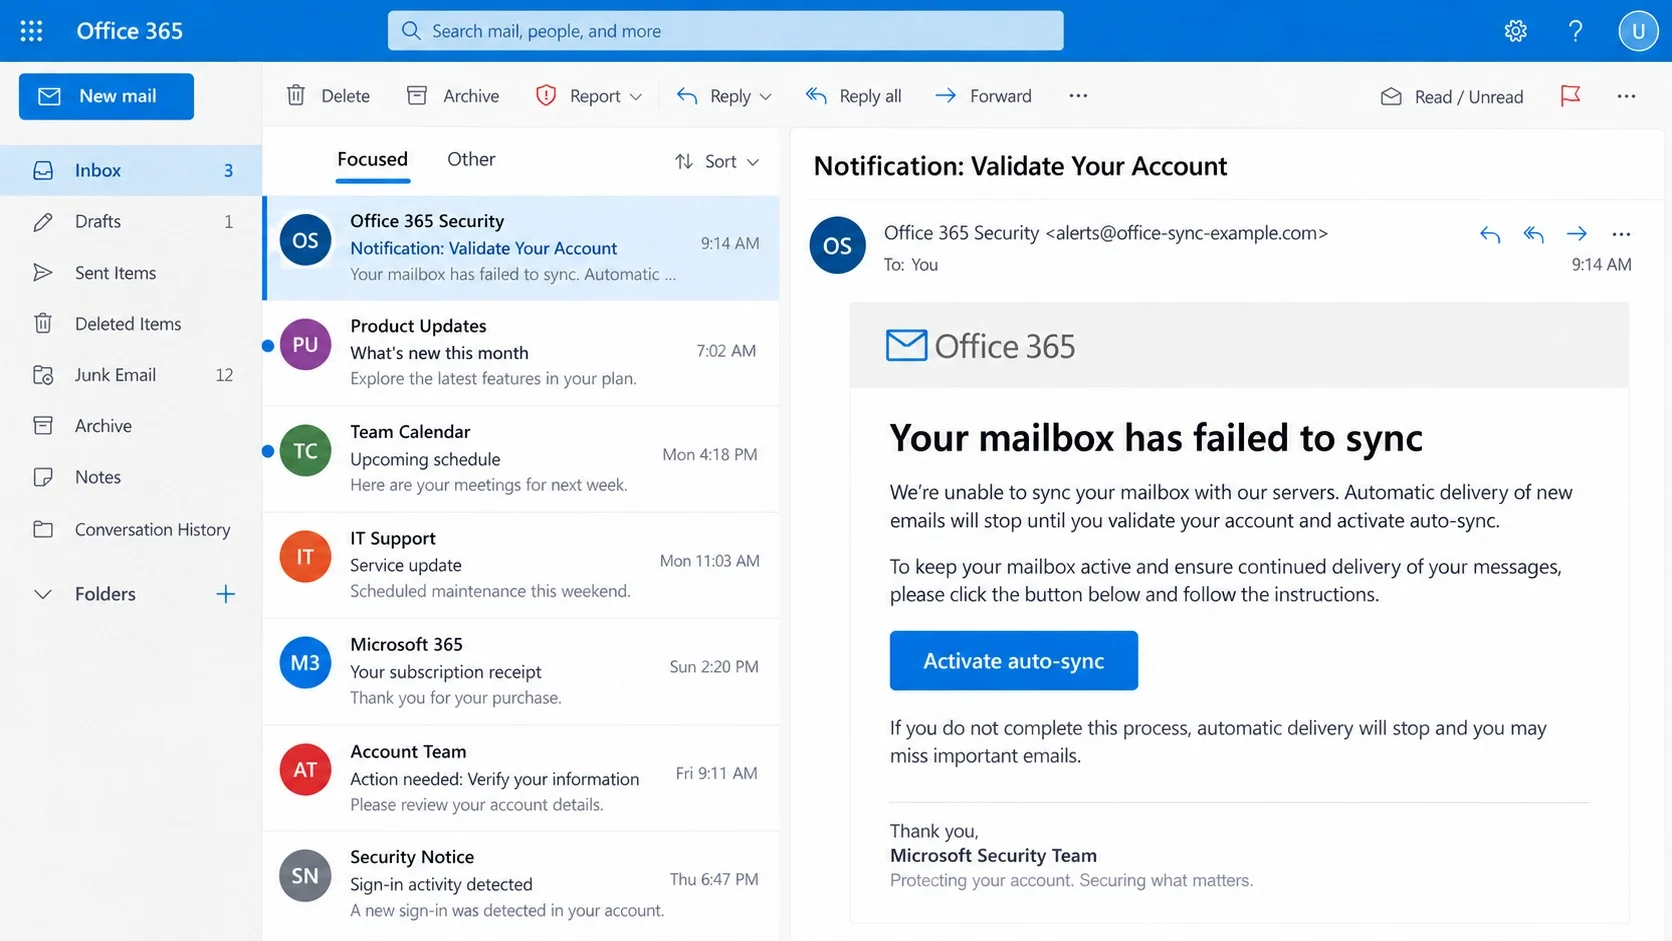
The email arrives with a subject resembling “Notification: Validate Your Account.” It says the recipient’s Office 365 mailbox failed to synchronize.
According to the notice, automatic message delivery has stopped. A prominent “Activate auto-sync” button supposedly restores the missing function.
The message signs itself as the “Microsoft Security Team,” borrowing a familiar corporate name without providing a verifiable support case.
It does not identify a failed folder, affected device, error code, outage, or exact synchronization time.
Those omissions matter because genuine technical alerts normally contain account-specific information that can be checked inside the service.
Where the activation button actually leads
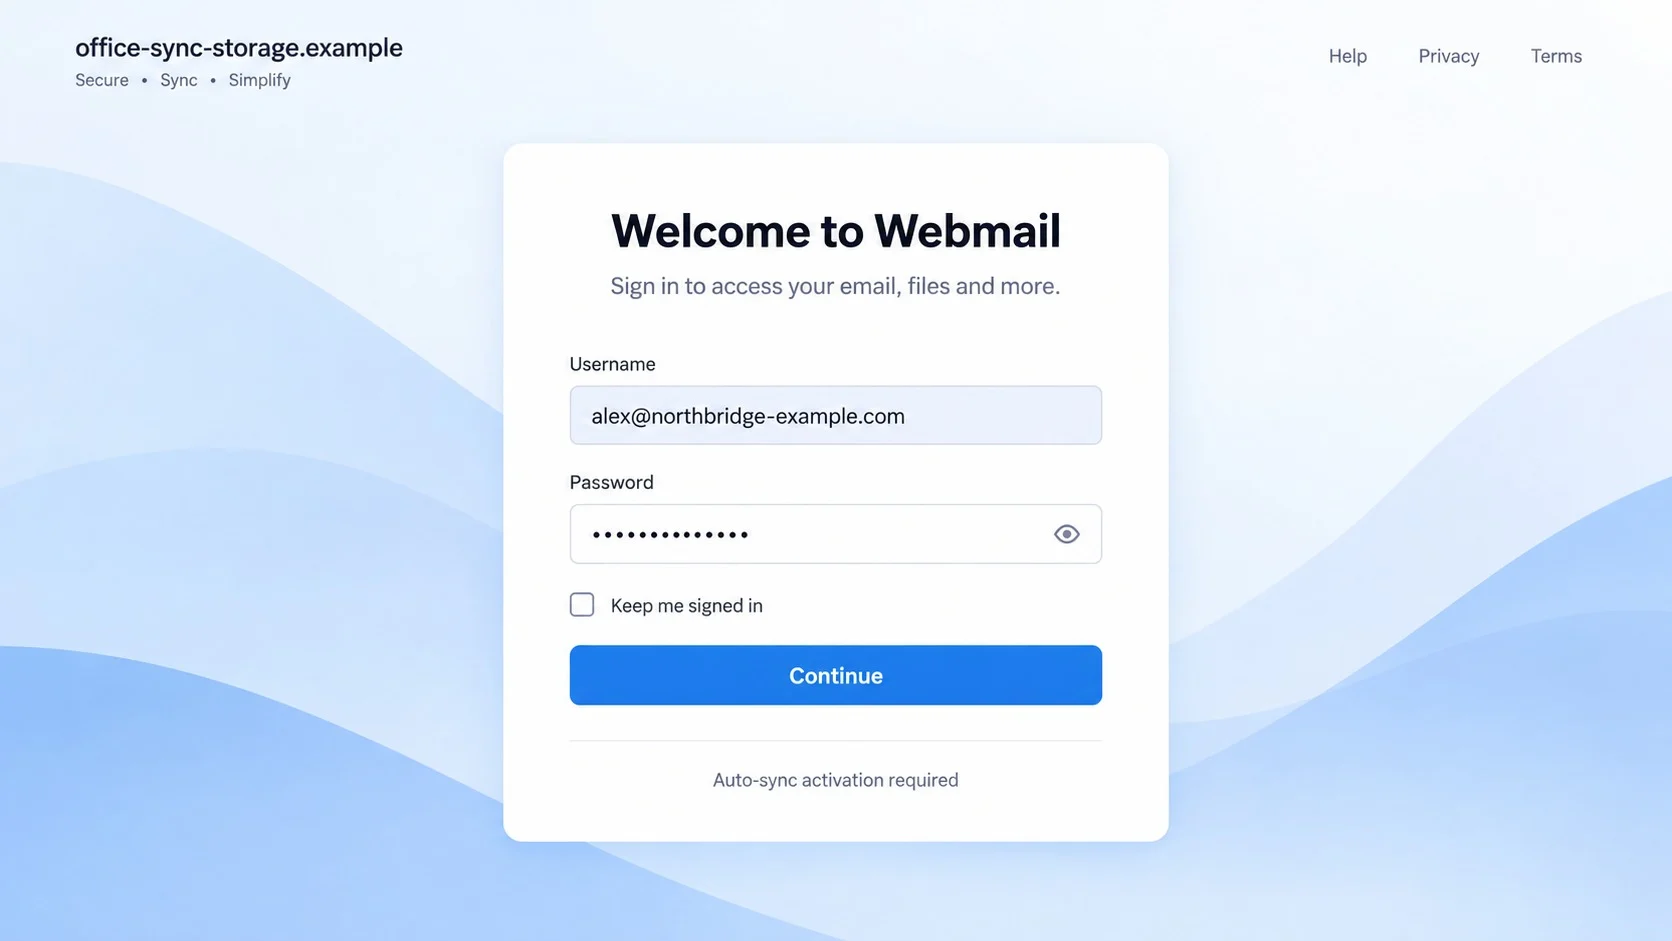
The observed button opened a generic “Welcome to Webmail” sign-in page, not an authenticated Office 365 settings screen.
The page was hosted through cloud file storage. Criminals often abuse reputable hosting because its address looks less suspicious than an unknown server.
A legitimate hosting provider is not endorsing content merely because someone placed a file on its infrastructure.
The visitor’s email address may already appear in the form. That small detail can make the page feel connected to the mailbox.
The password field is the real purpose of the journey. Submitted credentials go to the phishing operator rather than Microsoft.
What the attacker can do with a work mailbox
A Microsoft 365 account can connect email, files, contacts, calendars, meetings, internal applications, and organization-wide identity services.
One stolen password may therefore expose much more than a single inbox.
Possible consequences include:
- Reading confidential conversations and downloaded attachments.
- Sending convincing payment requests from a trusted address.
- Resetting passwords for services tied to the mailbox.
- Stealing cloud documents shared with the compromised account.
- Creating forwarding rules that quietly copy future messages.
- Targeting coworkers with lures based on real projects.
The fake synchronization story is simply a route into the organization’s identity system.
How the Office 365 Mailbox Sync Email Scam Works
Step 1: A routine technical failure creates believable concern
Synchronization errors are familiar to anyone using several devices. Mail applications can pause, display stale folders, or request authentication after an update.
The scam borrows that ordinary frustration. It does not need a dramatic threat when delayed email already feels disruptive.
Someone waiting for a contract, customer reply, password code, or meeting change may react before questioning the notice.
The phrase “failed to sync” also sounds temporary and repairable. It invites action instead of provoking the skepticism associated with prize messages.
Yet the email offers no diagnostic evidence. It merely states that synchronization failed and that delivery has stopped.
Step 2: The message invents an immediate service consequence
The claim that automatic delivery has stopped raises the cost of waiting. Every minute now appears capable of hiding another important message.
The “Activate auto-sync” button frames the decision as maintenance, not authentication. Clicking feels similar to enabling a disabled setting.
Real synchronization controls belong inside the mail application or authenticated account portal. An email cannot safely repair them through an arbitrary external form.
A genuine administrator can also confirm whether a tenant-wide incident exists. The scam discourages that independent check by offering instant relief.
No mailbox feature changes when the button is pressed. The campaign is moving the recipient toward a credential request.
Step 3: Reputable cloud hosting provides borrowed credibility
The phishing page may live on infrastructure operated by a well-known technology company. That arrangement can confuse both people and basic filters.
Cloud storage lets customers publish files and websites. The provider does not manually approve every page before it becomes reachable.
Attackers exploit that openness, then rely on the host’s familiar domain and encryption certificate to lower suspicion.
The browser padlock only confirms encrypted transport to the current server. It does not confirm Microsoft owns the page or requested the login.
Users must evaluate the complete destination and expected workflow. Familiar fragments elsewhere in the address are not enough.
Step 4: A generic webmail form replaces the promised repair
After clicking, the recipient does not see synchronization diagnostics. The landing page simply welcomes them to “Webmail” and requests a password.
That change in purpose is a decisive warning. A repair action has quietly become a full credential submission.
The email field may be locked or prefilled, making the page appear to recognize the account automatically.
In reality, the address can be copied from the link itself. No connection to the real tenant is required.
Generic branding also allows the same kit to target many organizations. Only the recipient address and a few colors need to change.
Step 5: The password is collected and tested elsewhere
When the form is submitted, a script records the entered secret. It may then display an error and request another attempt.
A false error can capture a corrected password when the first entry contained a typo. It may also collect a second password the victim reuses.
The page might redirect to a real Microsoft sign-in screen afterward. That handoff disguises the theft as a temporary browser problem.
Criminals can test the credential immediately, sometimes from automated infrastructure in another country.
If multifactor authentication is enabled, the attacker may trigger a prompt and pressure the user to approve it.
Step 6: The compromised identity supports business email fraud
Once access succeeds, the intruder can search for active invoices, payment conversations, payroll records, and suppliers.
They may monitor a thread until the right moment, then substitute banking instructions from the legitimate employee’s account.
Other attackers send internal document lures because coworkers naturally trust links coming from someone they know.
Mailbox rules can hide replies, security alerts, or words such as “fraud” and “password.” This persistence may survive a simple password reset.
A work account compromise therefore requires both identity recovery and a careful review of mailbox configuration.
Why the Fake Office 365 Alert Can Look Genuine
It copies the language of ordinary workplace maintenance
Words such as “validate,” “sync,” “automatic delivery,” and “security team” belong in normal technical conversations.
The attacker avoids extravagant claims. The message resembles a dull operational notice that an employee might process quickly between other tasks.
That restraint is intentional. Routine language can bypass the emotional alarms triggered by obvious threats or rewards.
It uses a familiar product name as a substitute for proof
Office 365 remains widely recognized, even though Microsoft now uses Microsoft 365 branding across many services.
Placing the name in a heading does not establish the sender, destination, or tenant involved.
Anyone can type a company name into an email template. Technical ownership must be confirmed through domains and account records.
It reduces a complicated problem to one convenient button
Actual mail synchronization may involve connectivity, credentials, application settings, storage, licensing, or a provider outage.
The scam ignores every cause and promises one-click restoration. That simplicity is attractive when the reader is busy.
Convenience becomes the trap. The button bypasses the normal application and moves the user into the attacker’s environment.
It may already know the recipient’s address
Seeing a correct work address can feel like evidence that the page belongs to the employer’s mail system.
Email addresses are easy to obtain from public websites, professional directories, marketing lists, previous breaches, and compromised address books.
Possessing an address does not prove the sender controls or understands the account.
How Genuine Microsoft 365 Sync Problems Are Usually Resolved
Start with the application already installed
Check whether the mailbox updates through another trusted device or the official web application reached from a saved bookmark.
If one application is stale while webmail works, the issue is likely local rather than a suspended mailbox.
Restarting the application, checking connectivity, or following approved company support procedures is safer than using an unsolicited link.
Review provider and organization service status
Large outages normally create multiple reports. Administrators can inspect tenant health dashboards and provider notices through authenticated management tools.
Employees can ask the internal help desk whether other accounts are affected. That conversation should begin through a known phone number or support portal.
A solitary email with no matching incident deserves suspicion.
Look for a real account error
Official applications display error codes, failed folders, credential prompts, storage limits, or connection details that support troubleshooting.
The phishing email supplies none of these. Its diagnosis cannot be reproduced outside the message.
If the genuine account shows normal delivery, the claimed failure was invented.
Use established password recovery channels
When reauthentication is genuinely required, begin from the known Microsoft sign-in page or organization portal.
Never reach account recovery by following a link from an unexpected sync warning.
Organizations using single sign-on may have a custom approved route. Employees should know that route before an incident occurs.
Sender, Service Status, Hosting, and Account Checks
Verify the sender beyond its display name
Expand the complete From address and Reply-To field. “Microsoft Security Team” is plain text and can accompany any underlying address.
Compare the domain with previous verified notices and your organization’s documented support channel.
Spelling variations, consumer mailboxes, unrelated domains, and mismatched replies are strong reasons to stop.
Do not answer the message for reassurance. Contact support independently so the attacker cannot control both sides of the conversation.
Check the service without touching the button
Open Outlook or the official web application through a bookmark. Send a harmless test message from another trusted account if policy permits.
Review outbox errors, storage usage, connected status, and recent provider alerts.
For business tenants, ask administrators to check message trace and service health. Those records can confirm a real interruption.
If mail is arriving normally, the warning’s central claim fails.
Separate the hosting company from the page operator
Cloud storage, website builders, and form platforms host customer content. Their recognizable names do not validate each uploaded page.
Read the entire address and identify who controls the relevant registered domain and file path.
A Microsoft alert should not unexpectedly become a generic webmail form on public file storage.
Report abusive pages to the hosting provider, but do not assume the provider created the campaign.
Inspect the real account for intrusion
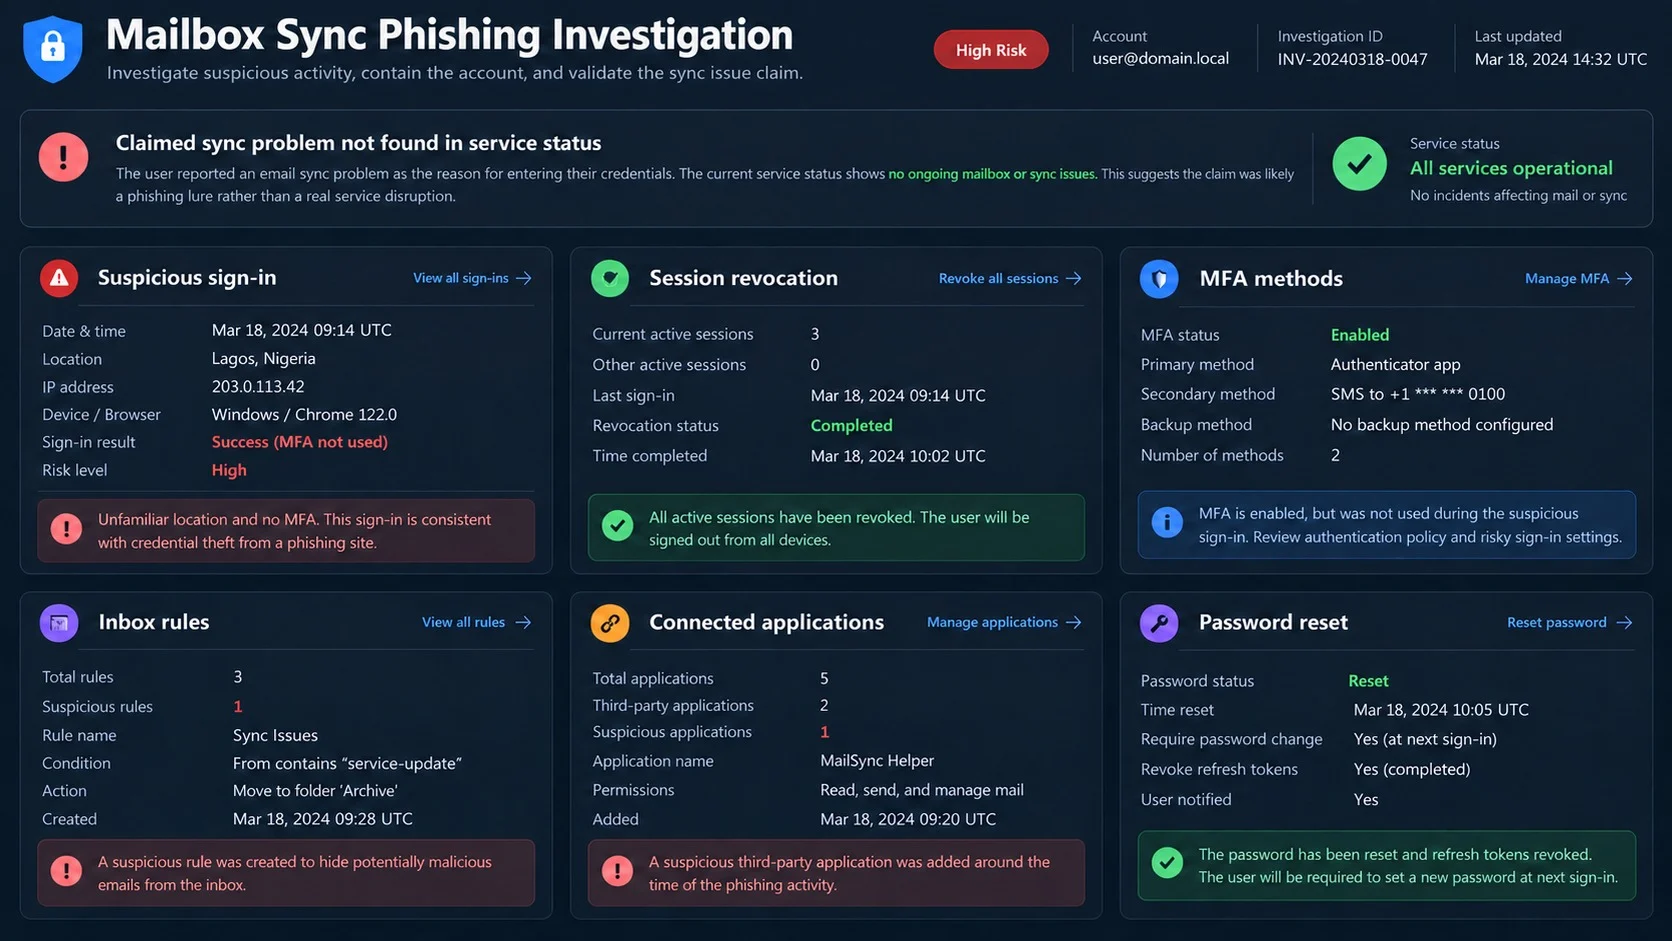
Review sign-in history, locations, devices, active sessions, recovery methods, connected applications, and multifactor authentication registrations.
Examine forwarding addresses, inbox rules, delegates, and deleted messages. Attackers use these features to retain visibility and hide warnings.
Confirm that no unknown consent grant allows an application to read mail after the password changes.
Escalate suspicious business access to the organization’s security team immediately.
What to Do If You Fell for the Office 365 Mailbox Sync Scam
Do not wait for missing mail to prove anything. Base your response on whether you clicked, submitted credentials, approved a prompt, or downloaded a file.
Work accounts require rapid reporting because one mailbox can expose colleagues, customers, documents, and payment conversations.
- Close the phishing page. Do not retry the form, approve a notification, install software, or test another account.
- Contact workplace support. Use a known internal number or portal and describe the email, destination, information entered, and approximate time.
- Change the password safely. Open the genuine account independently and create a unique password not used on any other service.
- Revoke active access. End unfamiliar sessions, remove unknown devices, invalidate app passwords, and withdraw suspicious application consent.
- Repair authentication. Remove unrecognized methods, register a passkey or security key, and never approve a prompt you did not initiate.
- Audit mailbox settings. Check forwarding, rules, delegates, automatic replies, sent items, deleted mail, and hidden security notifications.
- Protect reused accounts. Replace the exposed password anywhere else it appeared, beginning with financial, cloud, and recovery accounts.
- Scan affected devices. If anything downloaded, use Malwarebytes to check for information stealers, loaders, or remote-access malware.
- Block repeat destinations. AdGuard can reduce exposure to many reported phishing and malicious advertising pages during future browsing.
- Warn likely targets. Tell coworkers and contacts to distrust recent links, invoices, document shares, or payment changes from the account.
Is Your Device Infected? Run a Free Malware Scan
Slow performance, constant pop-ups, or strange behavior? These are classic signs of a malware infection. A quick way to check is to scan your device with Malwarebytes Free, one of the most trusted malware removal tools available. If you only visited a scam page and didn’t download or install anything, this scan is optional.
The free version detects and removes the most common threats, including:
- Adware — the cause of those annoying pop-ups
- Browser hijackers — unwanted redirects and changed homepages
- Trojans and spyware — hidden programs stealing your data
- Potentially unwanted programs (PUPs) — software you never asked for
👉 Select your device below — Windows, Mac, or Android — then follow the simple steps to download Malwarebytes, scan your system, and remove any threats it finds. The scan usually takes 5 to 20 minutes.
Run a Malware Scan with Malwarebytes for Windows
Malwarebytes is one of the most popular and trusted anti-malware tools for Windows — and it’s completely free for removing infections. It catches threats that many antivirus programs miss, including adware, browser hijackers, and trojans. Follow the steps below to scan your PC and remove what Malwarebytes finds.
Download Malwarebytes
Click the button below to download the latest version of Malwarebytes for Windows from the official source. The free version is all you need — it will scan your computer and remove adware, browser hijackers, and other malicious software at no cost.
Download MalwarebytesOfficial installer for Windows 11 and 10. Your download starts right away.Want real-time protection? See Malwarebytes Premium Malwarebytes Free for WindowsScans and removes malware at no cost
-
Install Malwarebytes
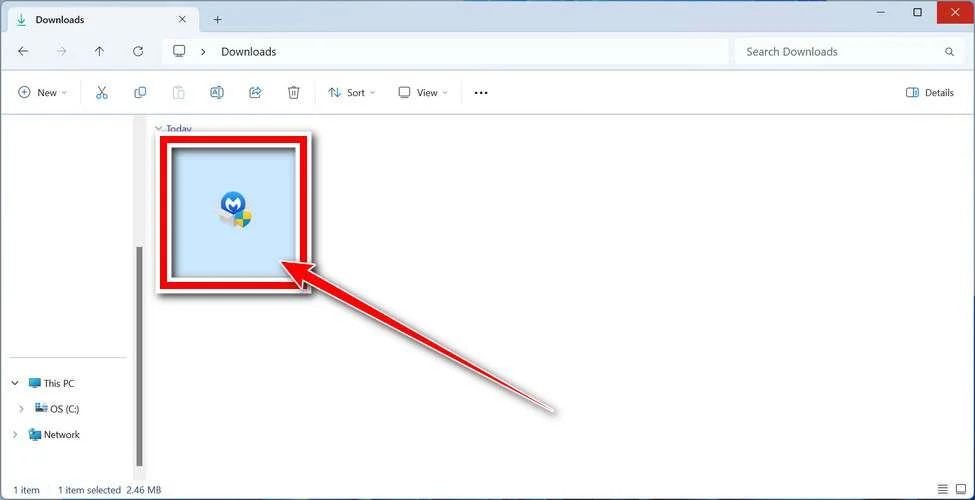
When the download finishes, open your Downloads folder and double-click the MBSetup file. If Windows shows a User Account Control pop-up, click “Yes” to allow the installation.
Follow the On-Screen Prompts to Install Malwarebytes
The setup wizard will walk you through a few quick screens:
-
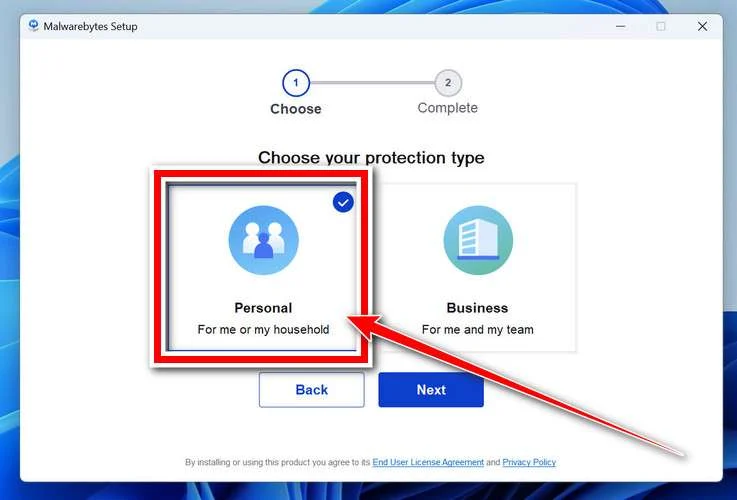
Choose where you’re installing the program — “Personal Computer” or “Work Computer” — then click Next.
-
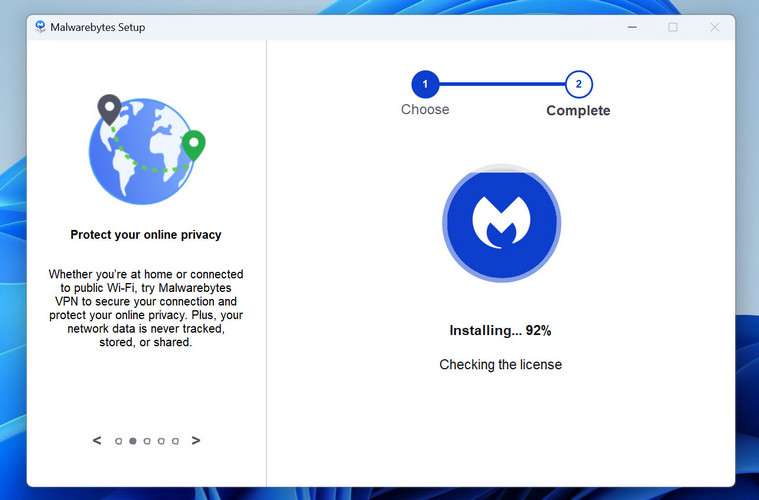
Malwarebytes will now install on your device. This usually takes under a minute.
-
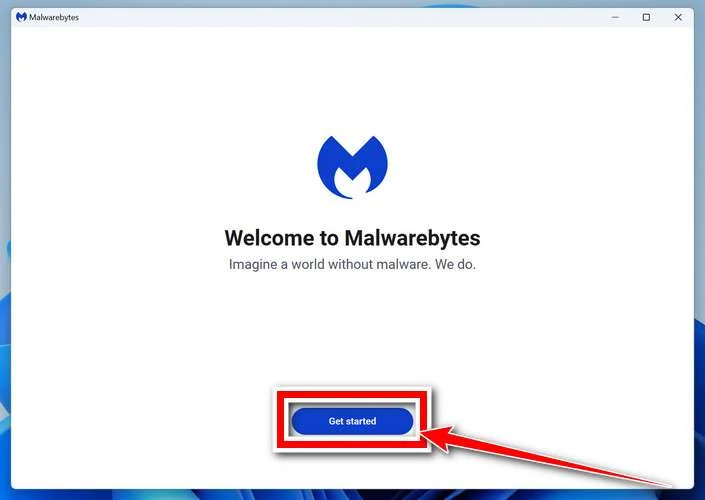
When installation is complete, the “Welcome to Malwarebytes” screen will open automatically.
-
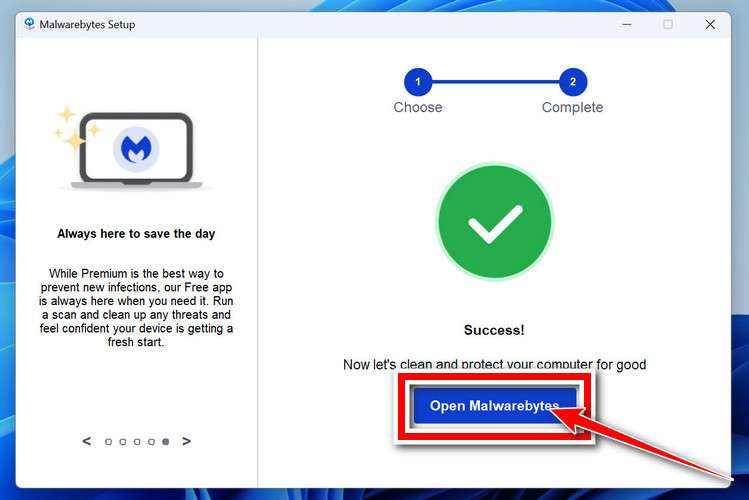
On the final screen, click Open Malwarebytes to launch the program.
-
Optional: Check for rootkits with a Custom Scan
You don’t need to change any settings for a normal scan. The standard Threat Scan in the next step is enough for most problems, so you can go straight to it.
If you also want to check for rootkits, use a Custom Scan. In current versions of Malwarebytes, rootkit scanning is only available there:
- On the Scanner tile, click the three-dot menu and select Advanced Scan.
- Choose Custom Scan. In its options, check Scan for rootkits.
- Select your system drive (usually C:\) as the location to scan, then start the scan. It takes longer than a Threat Scan.
- When it finishes, review and quarantine the results as described in the steps below.
Rootkit scanning isn’t available on Windows devices with ARM processors.
Start the Scan
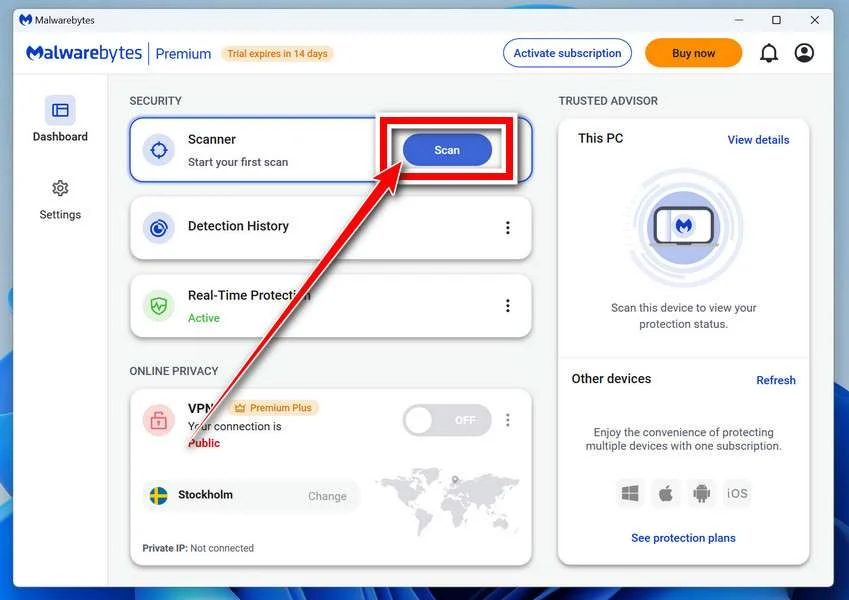
Click the blue Scan button. Malwarebytes will automatically update its virus database and start checking your computer for malware.
-
Wait for the Scan to Finish
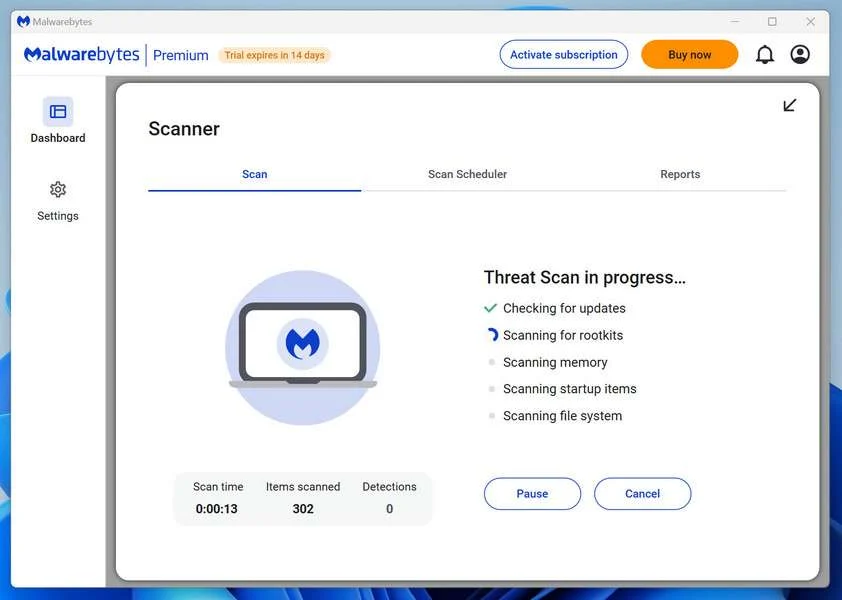
The scan checks your entire system for browser hijackers and other malicious programs, so it can take 5 to 20 minutes depending on your computer. Feel free to do something else — just check back occasionally to see the progress.
-
Quarantine the Detected Threats
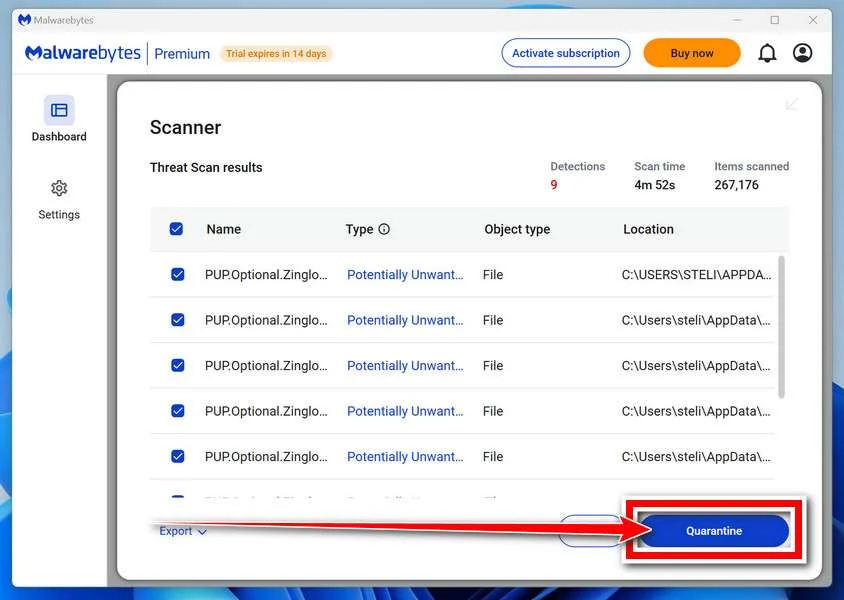
When the scan is done, you’ll see a list of everything Malwarebytes found — malware, adware, and potentially unwanted programs. Click the “Quarantine” button to remove all of them at once.
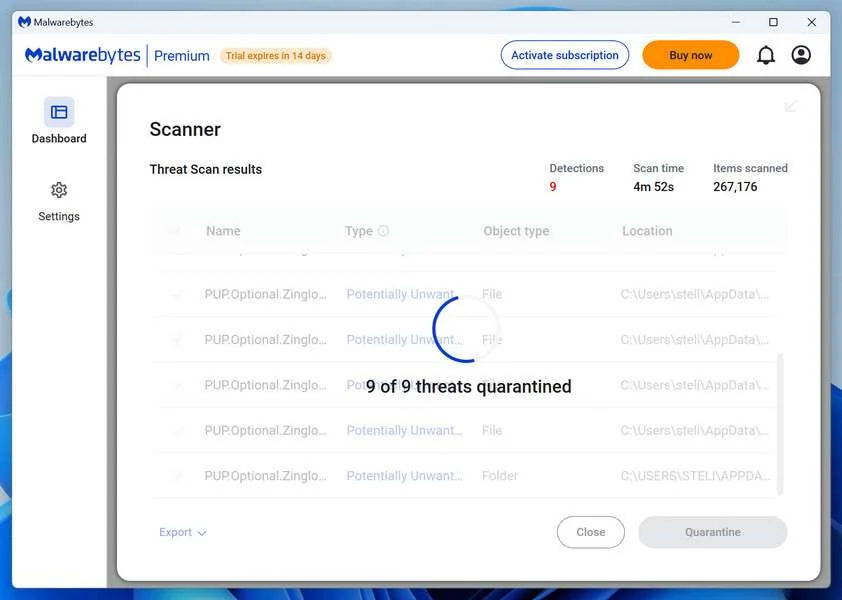
Malwarebytes will now remove the malicious files and registry entries and move them safely into quarantine.
-
Restart Your Computer
Some threats can only be fully removed after a reboot. If Malwarebytes asks you to restart, click Yes. Once you’re logged back in, Malwarebytes has finished removing the threats it found.
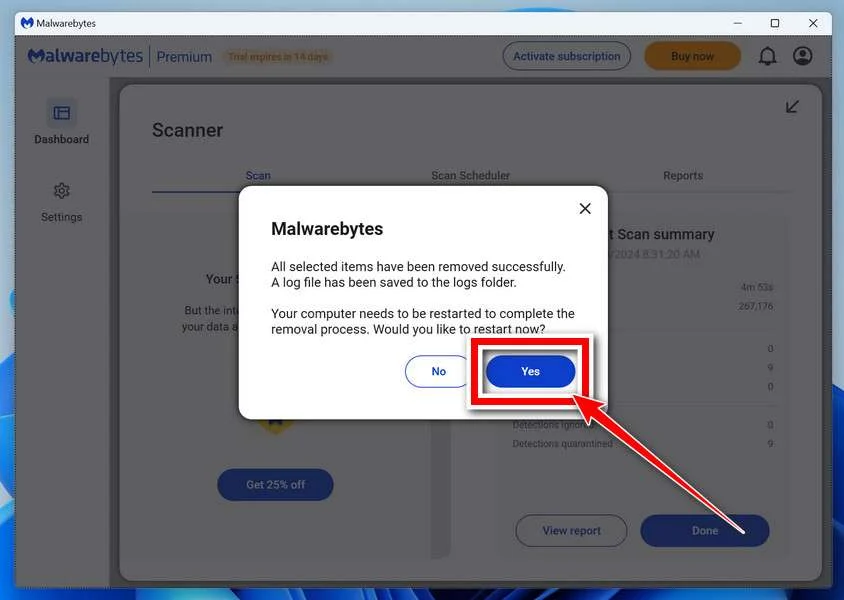
When the scan is done, check whether the problems you noticed have stopped. If they continue, see the options below.
If you are still having problems with your computer after completing these instructions, then please follow one of the steps:
- Run a computer scan with ESET Online Scanner
- Ask for help in our Windows Malware Removal Help & Support forum.
Run a Malware Scan with Malwarebytes for Mac
Malwarebytes for Mac is a free on-demand scanner that removes the malware other security software tends to miss — adware, browser hijackers, and unwanted programs included. Cleaning an infected Mac with Malwarebytes has always been completely free, and it’s our go-to recommendation. Follow the steps below to scan your Mac and remove what Malwarebytes finds.
-
Download Malwarebytes for Mac
Click the button below to download the latest version of Malwarebytes for Mac.
Download MalwarebytesOfficial installer for macOS. Your download starts right away.Want real-time protection? See Malwarebytes PremiumMalwarebytes Free for MacScans and removes malware at no cost -
Open the Malwarebytes setup file
When the download finishes, open your Downloads folder and double-click the setup file to begin the installation.
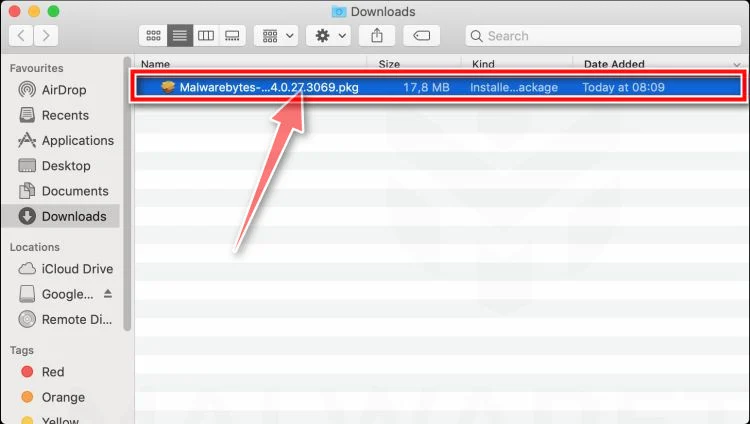
-
Follow the On-Screen Prompts to Install Malwarebytes
The Malwarebytes for Mac Installer will guide you through a few quick screens. Click “Continue” and keep following the prompts until the installation completes.
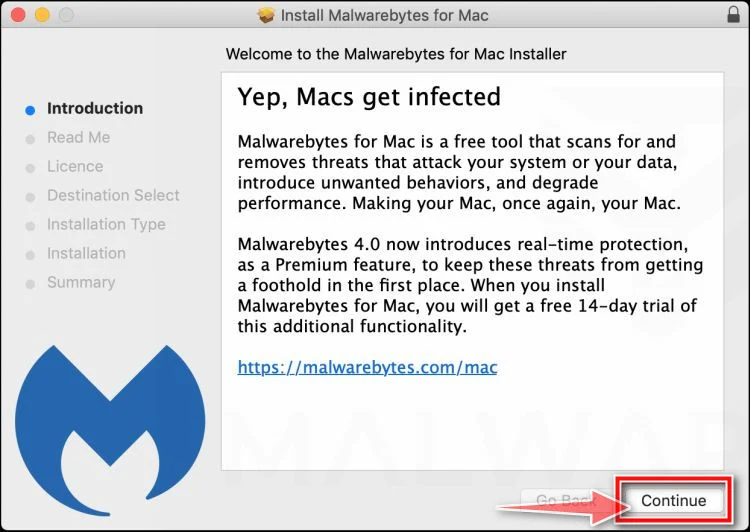
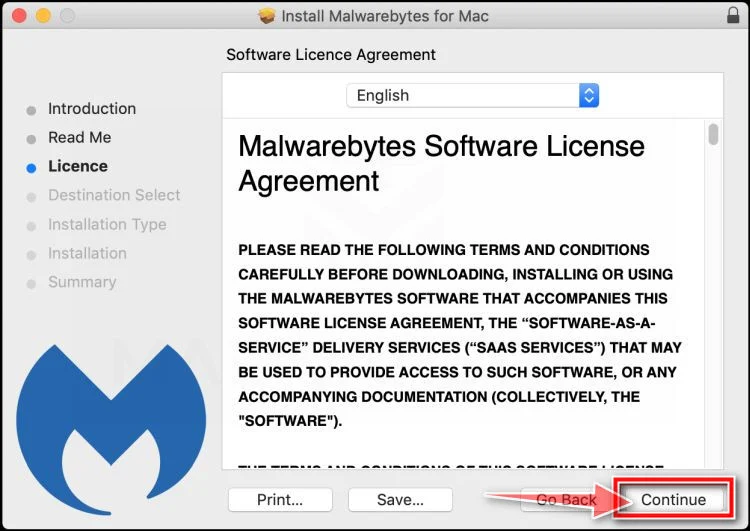
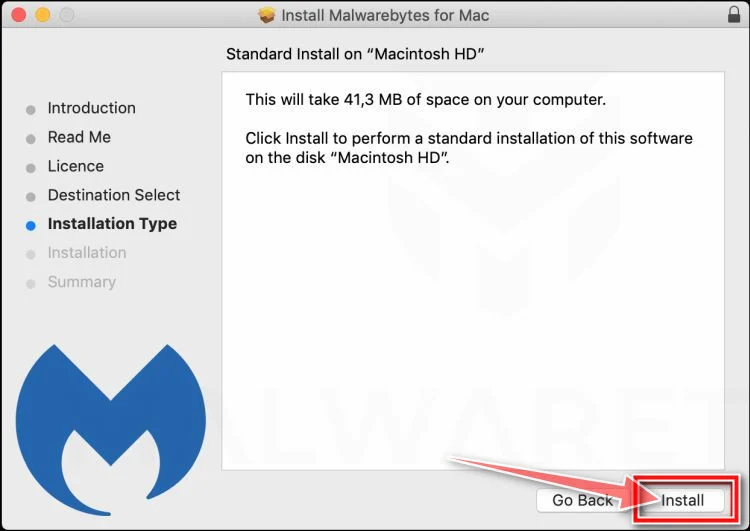
When the installation is complete, Malwarebytes opens to the Welcome to Malwarebytes screen. Click “Get started“.
Malwarebytes needs Full Disk Access to check your whole Mac. When it asks, open System Settings > Privacy & Security > Full Disk Access, turn on Malwarebytes (it may be listed as Malwarebytes Protection), and confirm with your password or Touch ID. Then return to Malwarebytes. On macOS Monterey and earlier, this setting is in System Preferences > Security & Privacy > Privacy.
-
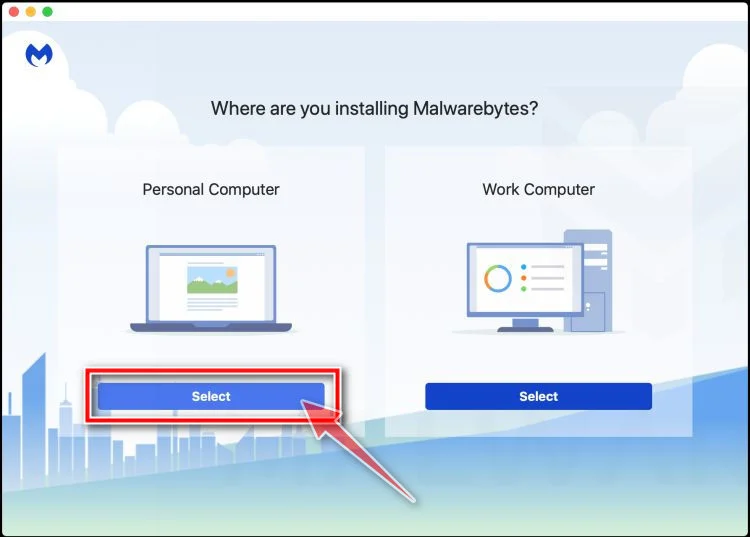
Select “Personal Computer” or “Work Computer”
Malwarebytes will ask what type of computer you’re installing it on. Click either Personal Computer or Work Computer, whichever applies.
-
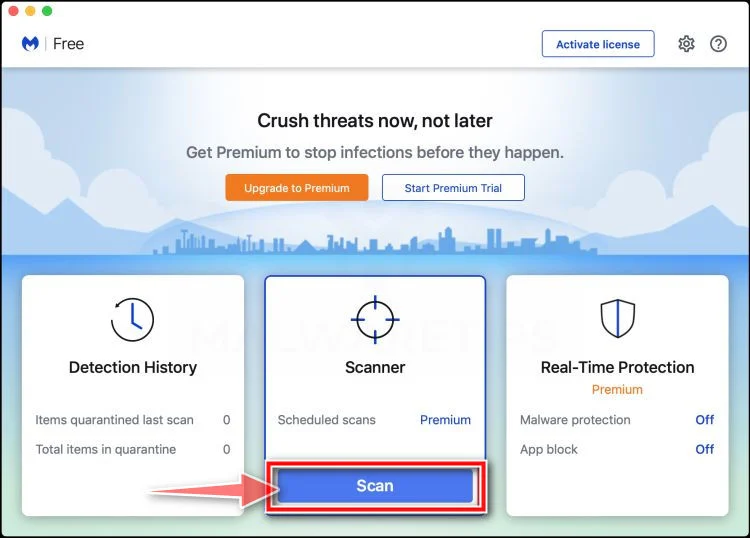
Start the Scan
Click the “Scan” button. Malwarebytes will automatically update its detection database and begin checking your Mac for malware.
-
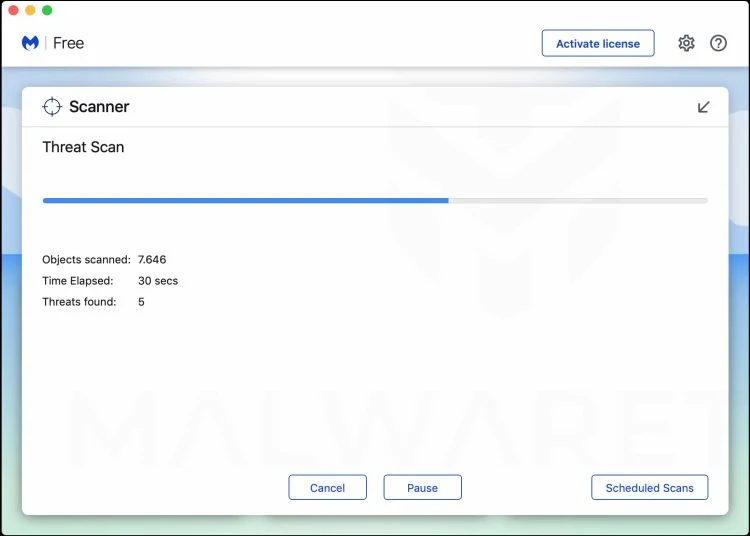
Wait for the Scan to Finish
Malwarebytes will scan your Mac for adware, browser hijackers, and other malicious programs. This can take a few minutes, so feel free to do something else — just check back occasionally to see the progress.
-
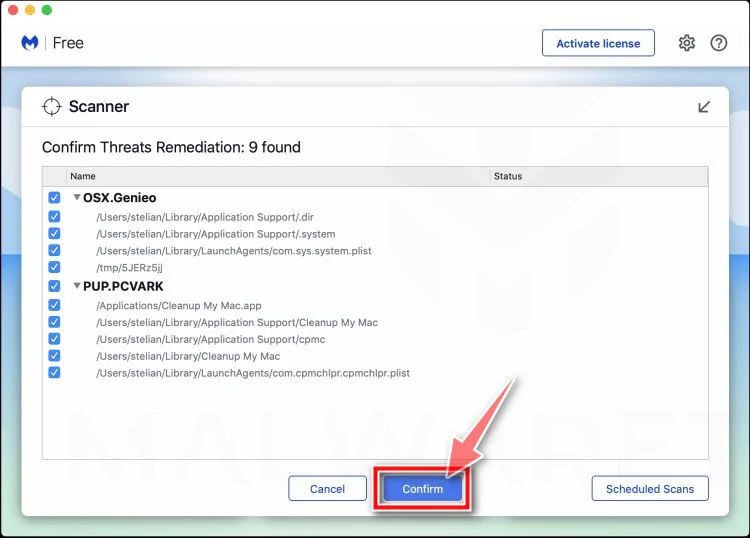
Quarantine the Detected Threats
When the scan is done, you’ll see a list of everything Malwarebytes found. Click the “Quarantine” button to remove all the threats at once.
-
Restart Your Mac
Malwarebytes will now remove all the malicious files it found. Some threats can only be fully removed after a reboot — if Malwarebytes asks you to restart, allow it. Once you’re logged back in, check whether the problems you noticed have stopped. If they come back, save the scan report and ask for help in our forum.
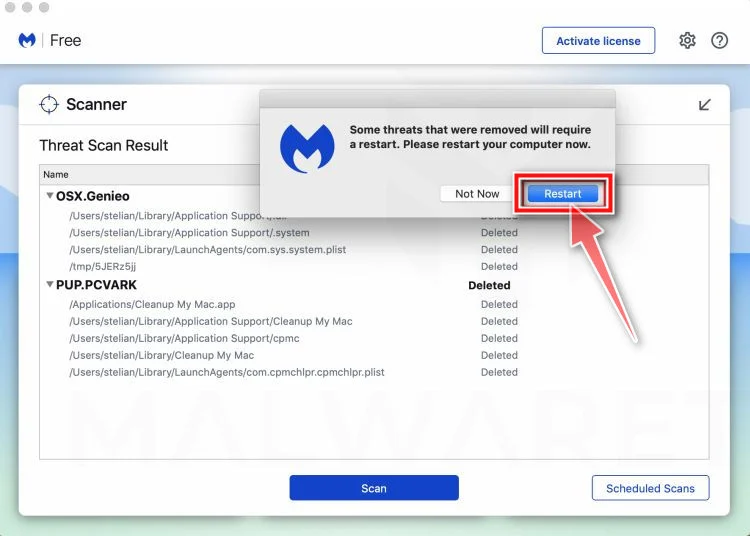
If the problems you noticed continue after the scan, see the options below.
If you are still experiencing problems while trying to remove a malicious program from your computer, please ask for help in our Mac Malware Removal Help & Support forum.
Run a Malware Scan with Malwarebytes for Android
Malwarebytes for Android scans your phone or tablet for malware, adware, and potentially unwanted apps. The free version scans only when you start a scan. Real-time protection, which checks apps automatically, is part of the paid Premium version.
-
Download Malwarebytes for Android.
You can download Malwarebytes for Android by clicking the link below.
Get Malwarebytes for AndroidOpens Google Play in a new tab.Want real-time protection? See Malwarebytes Premium for AndroidMalwarebytes for AndroidScans your phone and removes malware at no cost -
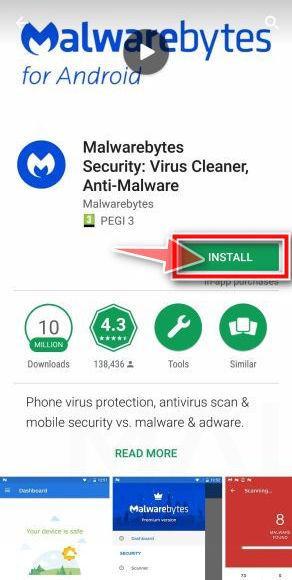
Install Malwarebytes for Android on your phone.
In the Google Play Store, tap “Install” to install Malwarebytes for Android on your device.
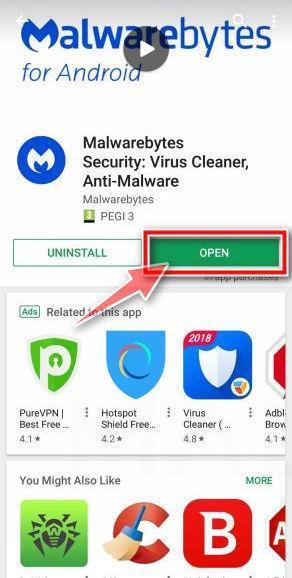
When the installation process has finished, tap “Open” to begin using Malwarebytes for Android. You can also open Malwarebytes by tapping on its icon in your phone menu or home screen.
-
Follow the on-screen prompts to complete the setup process
When Malwarebytes opens, it walks you through a short setup. Tap Get started and follow the prompts. If you see an offer for a trial or a paid plan, read it before you accept. You can skip it and keep using the free scanner.
Malwarebytes will ask for permission to access the files on your phone so it can scan them. Tap Allow, or turn on the permission in the Android screen that opens, then return to Malwarebytes.
-
Run a scan with Malwarebytes for Android
On the main screen, tap Scan now. In some versions, you open the menu, tap Scanner, and then tap Run a scan.
-
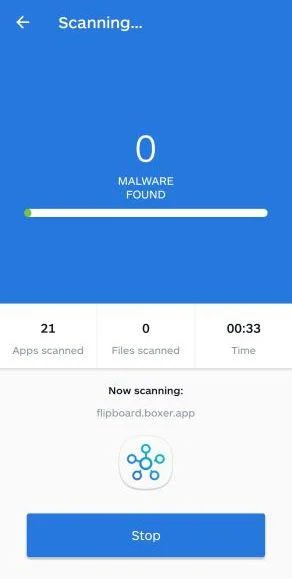
Wait for the Malwarebytes scan to complete.
Malwarebytes will now start scanning your phone for adware and other malicious apps. This process can take a few minutes, so we suggest you do something else and periodically check on the status of the scan to see when it is finished.
-
Remove the detected apps.
When the scan has been completed, you will see a list of the threats that Malwarebytes for Android has detected. Next to each detected item, tap the menu icon (three dots), then choose to uninstall the app or delete the file. Android then asks you to confirm. Tap OK or Uninstall to remove the app.
-
Restart your phone.
When the detected apps are removed, restart your phone if Malwarebytes asks you to. Then check whether the problems you noticed have stopped.
If the problems you noticed continue after the scan, see the options below.
If you are still having problems with your phone after completing these instructions, then please follow one of the steps:
- Ask for help in our Mobile Malware Removal Help & Support forum.
- Only as a last resort, reset your phone to factory settings. Read the warning below first.
- Back up your photos, videos, files, and messages, for example to your Google account or a computer.
- Make sure you know your Google account email and password. The phone asks for them after the reset. If you changed the password recently, Google recommends waiting 24 hours before you reset.
- On a Samsung phone, also make sure you know your Samsung account password.
- If you use an authenticator app for two-step verification, move your accounts to another device or save your backup codes first.
Stay Protected: Block Ads and Malicious Sites
No scan can prove a device is completely clean, so it helps to block threats before they reach you. Most infections start with a malicious ad or a fake download button — so blocking them at the source is your best defense.
We recommend AdGuard, which blocks malicious ads, phishing pages, and dangerous redirects before they can reach you.
👉 Download AdGuard and browse safely
Frequently Asked Questions
Can an email button really reactivate mailbox synchronization?
Not through an unrelated external page. Genuine controls appear inside the approved mail application, account portal, or administrator console.
A button that immediately requests a password on generic webmail is not diagnosing the promised problem.
Why did the page show my correct email address?
The campaign can place the recipient address inside the link. The landing page reads that value and displays it automatically.
This does not prove access to the mailbox, tenant, or synchronization status.
Is a page safe because it uses a well-known cloud host?
No. Reputable platforms can be abused to host fraudulent customer content before it is detected and removed.
Judge the requested action, complete address, page ownership, and expected login route together.
What if I clicked but entered nothing?
Close the page, report the link, and review recent account activity. A password reset is usually unnecessary when no secret was supplied.
Change it if autofill completed the form, a download occurred, or an unexpected authentication request was approved.
Could the attacker bypass multifactor authentication?
Some phishing systems relay sessions or trigger approval prompts after obtaining a password. Careless approval can complete the intrusion.
Passkeys and hardware security keys provide stronger resistance than codes that can be copied into a fraudulent page.
How should an organization reduce this risk?
Document the official support route, use phishing-resistant authentication, monitor new inbox rules, and provide a simple reporting button.
Administrators should investigate submitted credentials quickly and review identity, mailbox, and application-consent evidence together.
The Bottom Line
The Office 365 mailbox sync email invents a delivery failure, then replaces the promised repair with a generic password-collection page.
Check the real service independently, report work-account exposure immediately, and review sessions, rules, and connected applications after any submitted credential.

Join the discussion
0 commentsShare your experience or ask a question about this article.
Discussion
Start the conversation
Have a question or something useful to share? Add the first comment.