


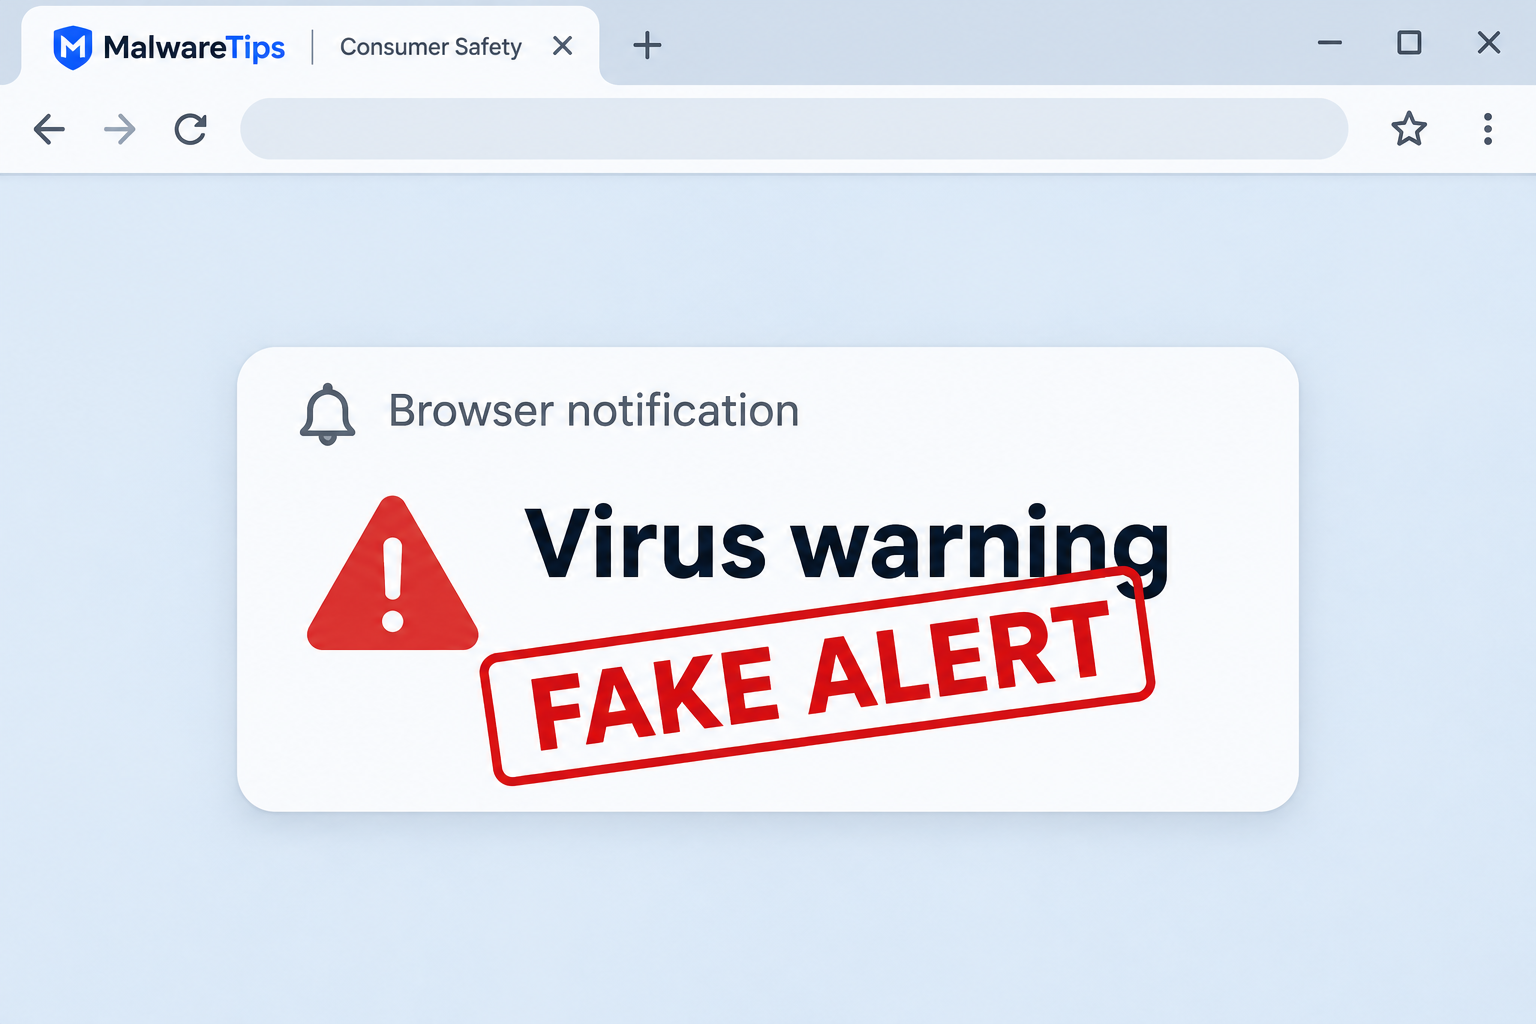
The warning looks like it came from Windows. It says there’s a threat on your computer, and it may keep returning after you close the page you were on.
Before trying to remove anything, find out where the alert is coming from. That small detail changes the cleanup.
Overview
Primefixbridge sends alerts through a browser permission
Primefixbridge.it.com is associated with unwanted browser notifications. In a documented version of the lure, a page displayed a fake human verification check and told visitors to select Allow.
Allow was part of the browser’s notification prompt. It gave the site permission to send messages. It did not verify that the visitor was human or run a security check.
That’s why a fresh alert can appear while you’re working in a different tab or looking at something unrelated. You’re seeing a notification, not necessarily another page opening by itself.
This also explains why closing the original page may not help. The permission stays with the browser profile until it is changed or otherwise cleared.
The virus message is not a scan result
The alerts documented in this case copied the look of Windows Security and claimed the computer was at risk. One version urged the reader to remove a virus.
Treat that as advertising or a deceptive prompt, not as evidence of a detection. If you’re worried about a real infection, open Windows Security separately and check its own records.
The same browser can send a legitimate meeting reminder and a fake security warning. The operating system may display both in the same place, even though their sources differ.
Look for the browser or website listed with the alert. It’s a better clue than a shield, an urgent headline or a picture that resembles a system icon.
The right response depends on what you did
- Saw a fake CAPTCHA but denied notifications: close the page and leave it closed.
- Allowed notifications: block the site in the browser profile that received the request.
- Followed an alert and entered a password: protect the account from a trusted device.
- Downloaded and ran software: investigate the device as a separate exposure.
- Gave someone remote access or paid: disconnect the session and contact your bank or IT team.
More than one of these can apply. Blocking notifications is still useful, but it won’t recover a payment, revoke an account session or remove a program you already installed.
How the Primefixbridge Fake Virus Alert Scam Works
Step 1: A page promises an ordinary verification check
People may reach the page through a redirect rather than by typing its name. The page can therefore arrive in the middle of a completely different task.
A fake CAPTCHA looks like a familiar interruption. The sample copied the idea of a checkbox and placed instructions near it telling the visitor what to choose next.
You may not see that exact layout every time. Different destinations or paths can show other lures, so a screenshot shouldn’t be the only way you identify the problem.
The rule to remember is simpler: a browser prompt that asks to send notifications grants notification access. It doesn’t turn into a human verification prompt because a website says so.
Step 2: The site gains the right to send notifications
The prompt comes from real browser software. That part of the experience can look entirely normal, even though the site’s explanation for the request is misleading.
If you choose Allow, the permission can remain after the tab closes. You don’t need to keep visiting the site to keep seeing messages from it.
This permission alone does not install an extension, give anyone remote access or establish that your files were read. Those are different capabilities with different signs.
If you noticed the problem early, the narrow fix is enough to try first. Change the permission rather than wiping the browser or assuming you need a paid repair.
Step 3: The site sends a false security warning
An alert may appear in the corner of the screen with language that sounds like a built-in security tool. It may claim Windows found threats it could not remove.
Those claims come from the message sender. The browser doesn’t independently scan your computer and endorse the text of each notification it delivers.
If a warning remains in the notification center, dismiss it without opening it. For a genuine Windows check, use the Start menu to open Windows Security yourself.
Look at Protection history and the timing of any entry there. If you’re using work equipment, ask IT to interpret it rather than changing managed protections.
Step 4: Following the warning can create a different problem
Once you leave the notification, what happens depends on the page you reach. Fake support, unwanted software and forms asking for sensitive information are separate risks.
There isn’t evidence that every click runs the same program, produces a charge or opens the same destination. Don’t assume the worst, but be specific about what happened.
The alert doesn’t need to install anything to be harmful. A purchase made because of a fake detection or a password typed into an untrusted page can be enough.
Save a record of what you did if there was a charge or installation. Do not return to the alert to recreate it for a screenshot.
Stop Primefixbridge Notifications in Your Browser
Start with the browser and profile named in the alert
Open settings from the browser’s menu, not from the notification. If you use separate work and personal profiles, start with the one that was active when you clicked Allow.
The option you want is the site’s permission to send notifications. A general pop-up blocker can be useful, but it controls a different feature.
If you can still see the alert, check its source without selecting the body. An existing notification may remain in the operating system after new ones are blocked.
Chrome on a computer
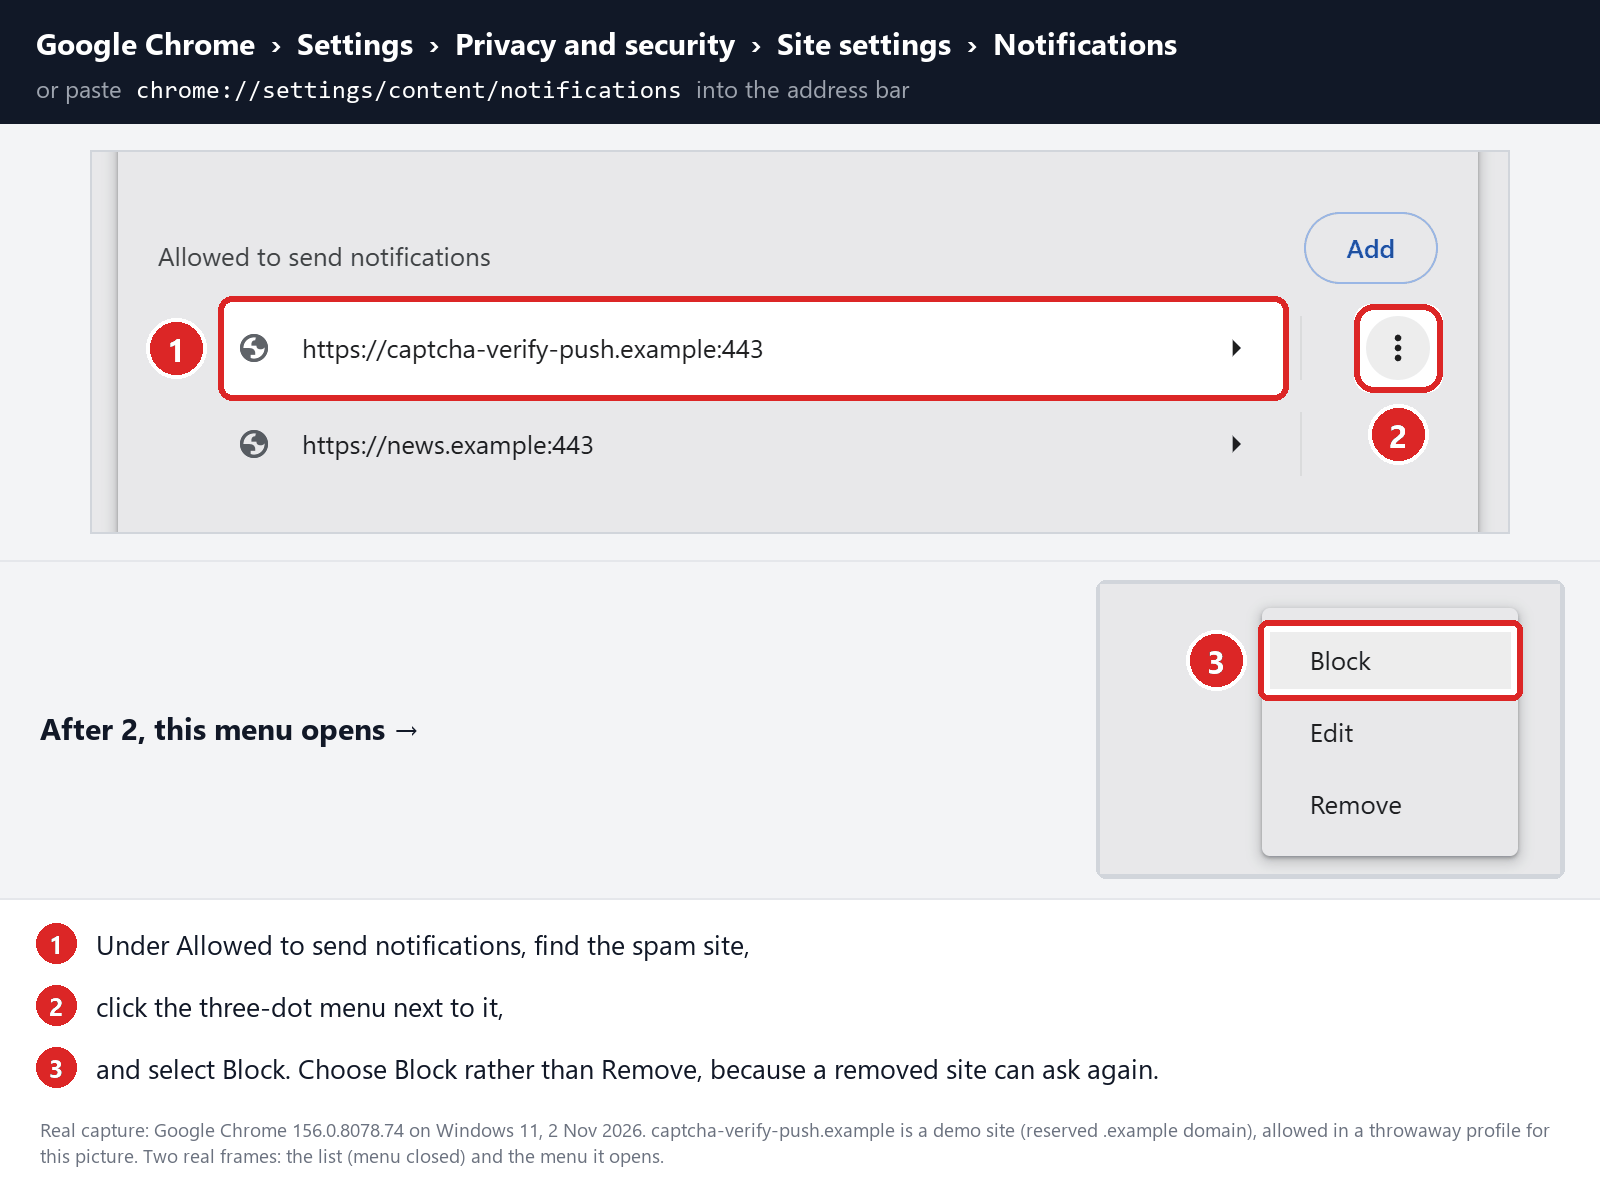
In Chrome, go to Settings, then Privacy and security, Site settings and Notifications. In the allowed list, look for the exact site shown with the alert.
Open the menu for the entry and choose Block if available. You can also remove the old allowance and add the address to the blocked list through Settings.
Use Chrome’s notification settings guide if you need help finding the list. There’s no reason to visit the site to make the change.
Edge or Firefox on a computer
In Edge, open Settings, then Privacy, search, and services. Choose Site permissions and All sites, find the entry and change its notification permission to Block.
Microsoft’s Edge notification instructions show where the controls are. A website alert can still appear after the original tab is gone.
In Firefox, open Settings and go to Privacy & Security. Find Permissions, open the Settings button next to Notifications, locate the site and remove or block its access.
Save your Firefox changes before leaving the dialog. If the permission list is empty, check whether a different browser or profile produced the alert.
Safari on a Mac and Chrome on Android
On a Mac, open Safari settings, choose Websites and then Notifications. Set the unwanted site to Deny. You can clear old alerts separately.
On Android Chrome, open the menu and choose Settings, Site settings and Notifications. Look for the site in the allowed list and remove or block its permission.
Menu names vary by version. If an alert names an unfamiliar app instead of Chrome, use the device’s app notification settings to identify the sender.
Check what happens after the change
Clear the old notification and keep using the browser normally. Don’t return to the page to see whether it can ask for permission again.
If you see a new message, read the source label again. It may belong to a different site that also has permission, a second profile or an entirely different app.
Avoid turning off all system notifications just to hide the symptom. That can suppress useful reminders while leaving the site on your browser’s allow list.
If the site appears under more than one entry, match the full sender shown on the alert. Blocking one address won’t necessarily cover a separately allowed subdomain.
What to Do if You Have Fallen Victim to This Scam
Take away the site’s permission first.
Follow the instructions for the browser that showed the message. Check other profiles only if you keep receiving new alerts or can’t find the permission in the first profile.
If settings are locked by your employer, report the website and alert time to IT. Don’t remove managed browser policies on your own.
If you typed a login, use the service’s real account recovery.
Reset the affected password from a trusted device. Sign out other sessions where possible and check recovery details or authentication methods that may have been changed.
Tell your workplace help desk if it was a work login. Mention whether you also accepted a prompt on your authenticator.
If you installed something, investigate beyond the notification.
Don’t open the installer again. If a remote support session is still active, disconnect the device from the network and contact your organization or a trusted technician.
For a personal Windows computer, Malwarebytes can help check for unwanted software after a suspect installation. Use the guide below if that situation applies to you.
If you paid, contact the payment provider directly.
Keep the genuine transaction record, receipt and support conversation. Tell your bank whether you entered card details, authorized a transfer or bought a subscription.
Ask the provider what protection, dispute or cancellation options apply. Do not pay the same operator to reverse the transaction.
Reduce exposure without losing the useful alerts you want.
Keep permissions only for services you recognize and use. A filter such as AdGuard can help reduce deceptive ads, but it is not the way to revoke an existing permission.
If suspicious redirects or new browser settings continue, ask for help investigating extensions and installed apps. That is a different symptom from a saved notification permission.
Is Your Device Infected? Run a Free Malware Scan
Slow performance, constant pop-ups, or strange behavior? These are classic signs of a malware infection. A quick way to check is to scan your device with Malwarebytes Free, one of the most trusted malware removal tools available. If you only visited a scam page and didn’t download or install anything, this scan is optional.
The free version detects and removes the most common threats, including:
- Adware — the cause of those annoying pop-ups
- Browser hijackers — unwanted redirects and changed homepages
- Trojans and spyware — hidden programs stealing your data
- Potentially unwanted programs (PUPs) — software you never asked for
👉 Select your device below — Windows, Mac, or Android — then follow the simple steps to download Malwarebytes, scan your system, and remove any threats it finds. The scan usually takes 5 to 20 minutes.
Run a Malware Scan with Malwarebytes for Windows
Malwarebytes is one of the most popular and trusted anti-malware tools for Windows — and it’s completely free for removing infections. It catches threats that many antivirus programs miss, including adware, browser hijackers, and trojans. Follow the steps below to scan your PC and remove what Malwarebytes finds.
Download Malwarebytes
Click the button below to download the latest version of Malwarebytes for Windows from the official source. The free version is all you need — it will scan your computer and remove adware, browser hijackers, and other malicious software at no cost.
Download MalwarebytesOfficial installer for Windows 11 and 10. Your download starts right away.Want real-time protection? See Malwarebytes Premium Malwarebytes Free for WindowsScans and removes malware at no cost
-
Install Malwarebytes
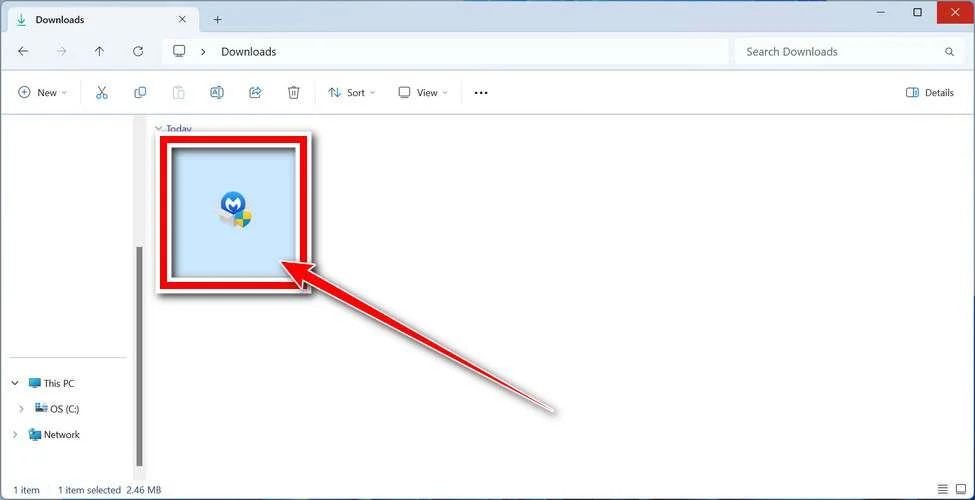
When the download finishes, open your Downloads folder and double-click the MBSetup file. If Windows shows a User Account Control pop-up, click “Yes” to allow the installation.
Follow the On-Screen Prompts to Install Malwarebytes
The setup wizard will walk you through a few quick screens:
-
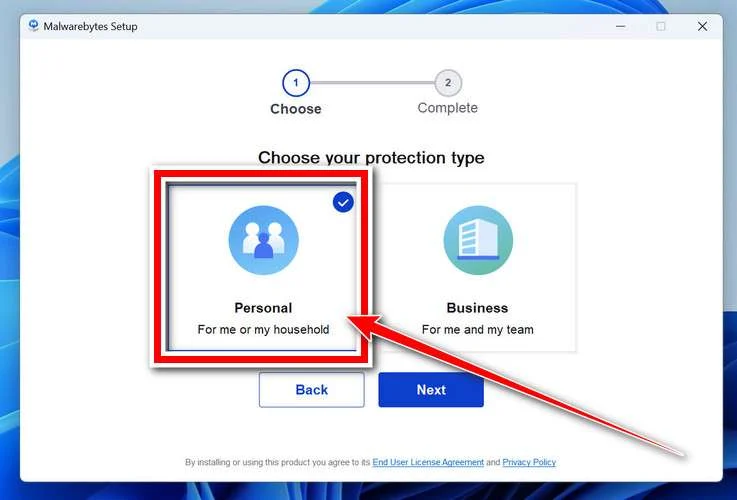
Choose where you’re installing the program — “Personal Computer” or “Work Computer” — then click Next.
-
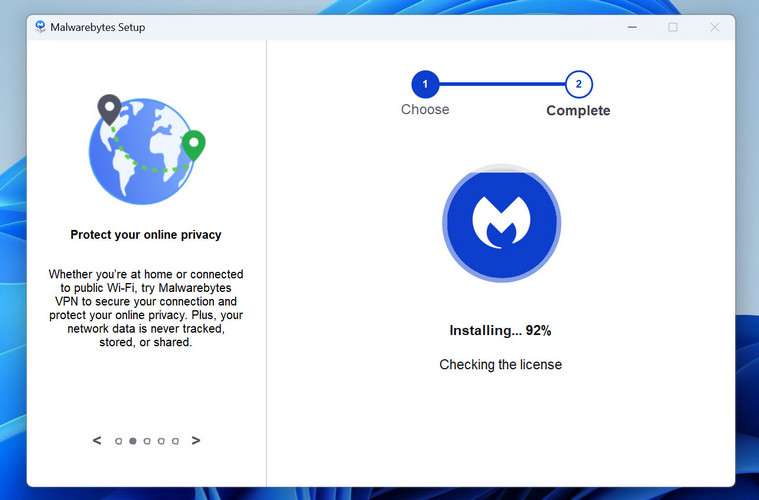
Malwarebytes will now install on your device. This usually takes under a minute.
-
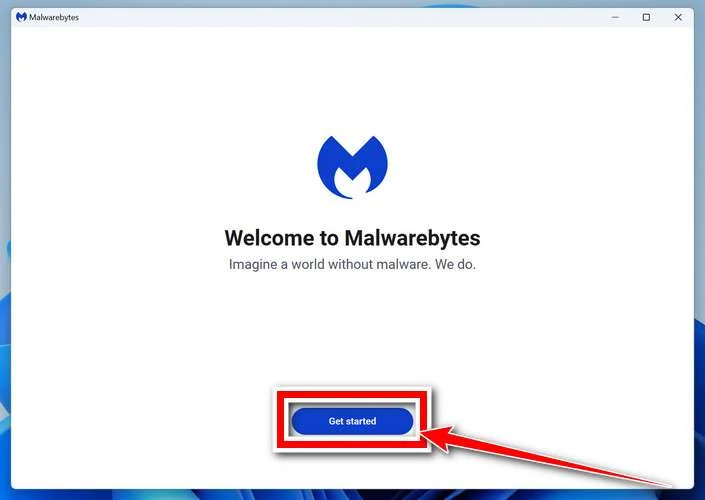
When installation is complete, the “Welcome to Malwarebytes” screen will open automatically.
-
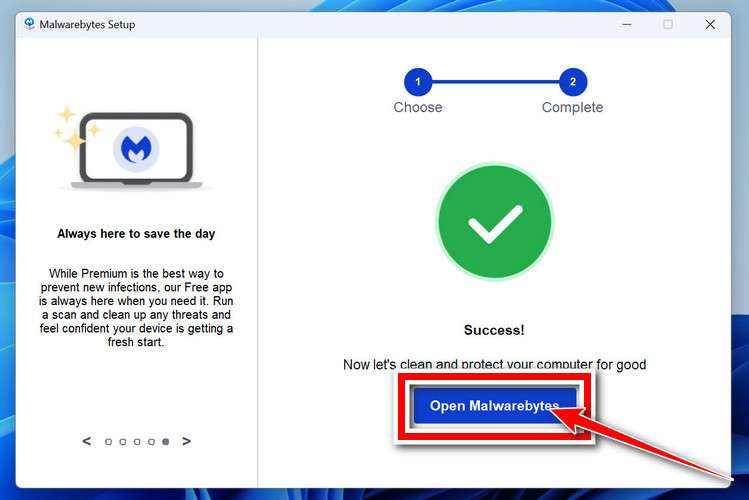
On the final screen, click Open Malwarebytes to launch the program.
-
Optional: Check for rootkits with a Custom Scan
You don’t need to change any settings for a normal scan. The standard Threat Scan in the next step is enough for most problems, so you can go straight to it.
If you also want to check for rootkits, use a Custom Scan. In current versions of Malwarebytes, rootkit scanning is only available there:
- On the Scanner tile, click the three-dot menu and select Advanced Scan.
- Choose Custom Scan. In its options, check Scan for rootkits.
- Select your system drive (usually C:\) as the location to scan, then start the scan. It takes longer than a Threat Scan.
- When it finishes, review and quarantine the results as described in the steps below.
Rootkit scanning isn’t available on Windows devices with ARM processors.
Start the Scan
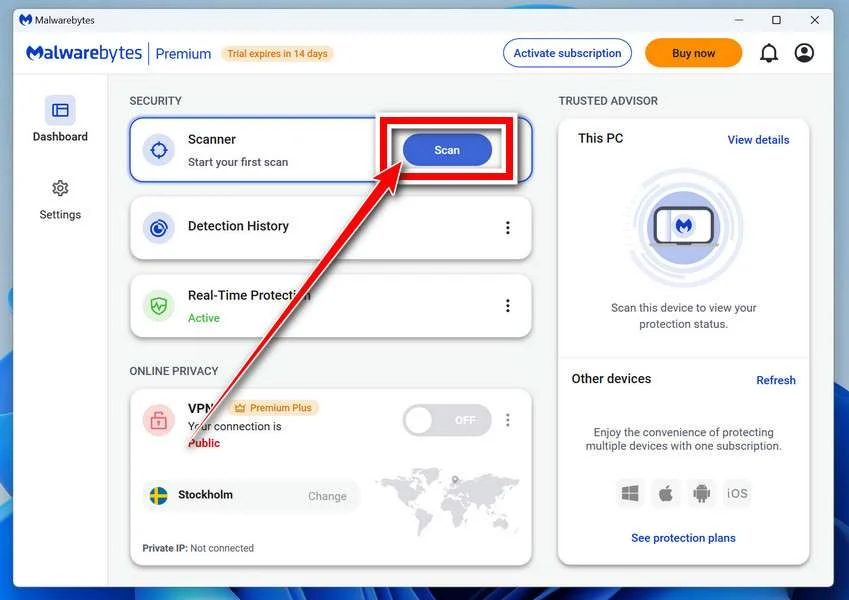
Click the blue Scan button. Malwarebytes will automatically update its virus database and start checking your computer for malware.
-
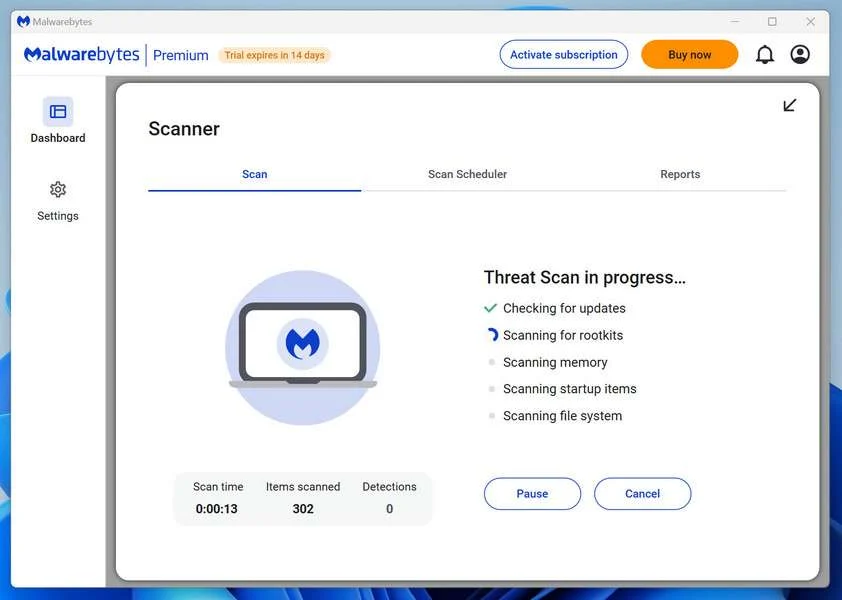
Wait for the Scan to Finish
The scan checks your entire system for browser hijackers and other malicious programs, so it can take 5 to 20 minutes depending on your computer. Feel free to do something else — just check back occasionally to see the progress.
-
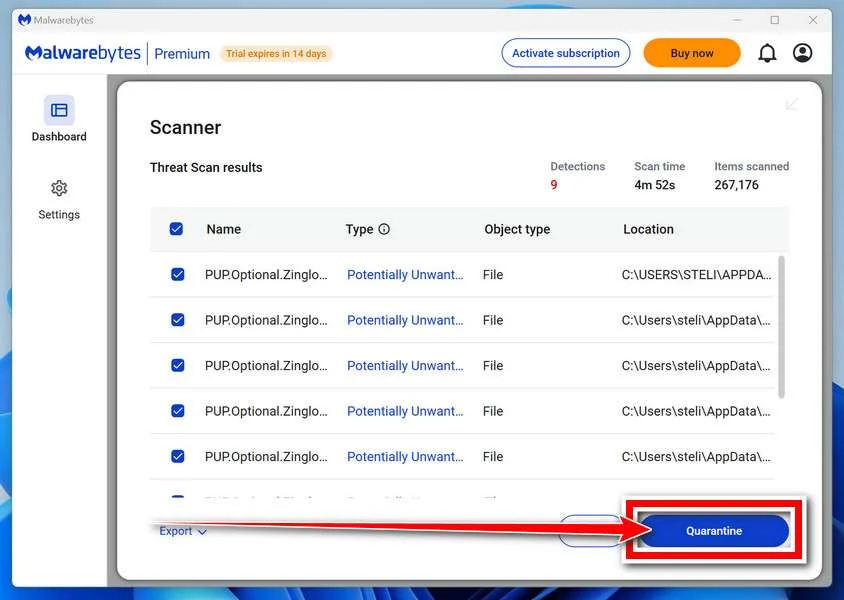
Quarantine the Detected Threats
When the scan is done, you’ll see a list of everything Malwarebytes found — malware, adware, and potentially unwanted programs. Click the “Quarantine” button to remove all of them at once.
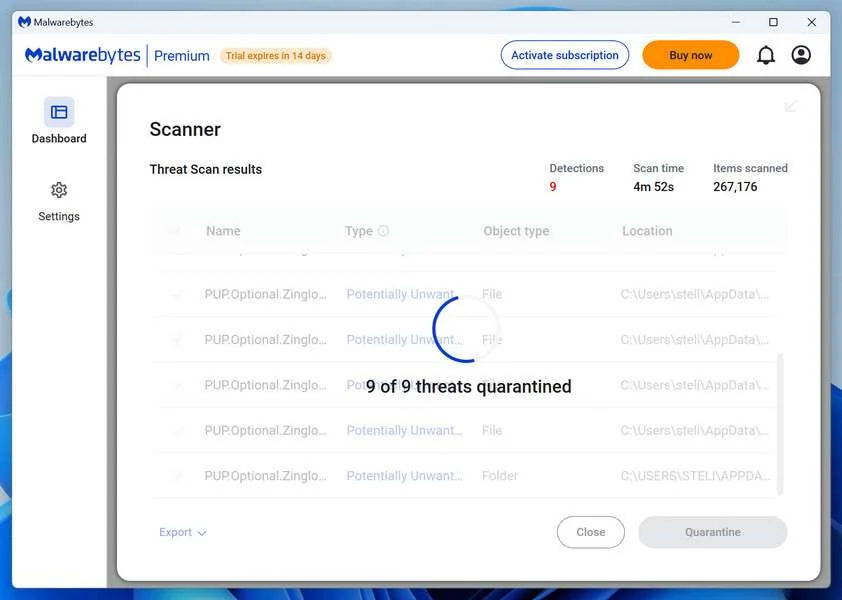
Malwarebytes will now remove the malicious files and registry entries and move them safely into quarantine.
-
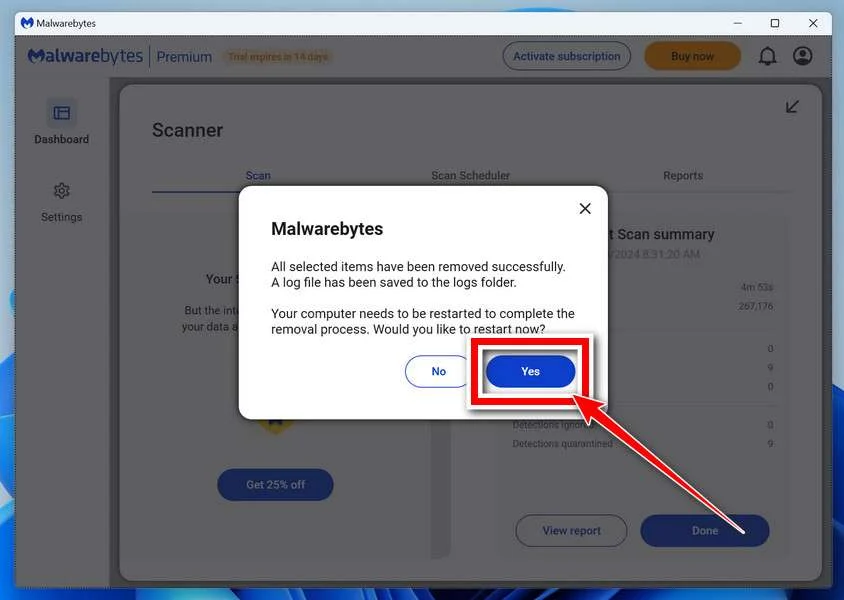
Restart Your Computer
Some threats can only be fully removed after a reboot. If Malwarebytes asks you to restart, click Yes. Once you’re logged back in, Malwarebytes has finished removing the threats it found.
When the scan is done, check whether the problems you noticed have stopped. If they continue, see the options below.
If you are still having problems with your computer after completing these instructions, then please follow one of the steps:
- Run a computer scan with ESET Online Scanner
- Ask for help in our Windows Malware Removal Help & Support forum.
Run a Malware Scan with Malwarebytes for Mac
Malwarebytes for Mac is a free on-demand scanner that removes the malware other security software tends to miss — adware, browser hijackers, and unwanted programs included. Cleaning an infected Mac with Malwarebytes has always been completely free, and it’s our go-to recommendation. Follow the steps below to scan your Mac and remove what Malwarebytes finds.
-
Download Malwarebytes for Mac
Click the button below to download the latest version of Malwarebytes for Mac.
Download MalwarebytesOfficial installer for macOS. Your download starts right away.Want real-time protection? See Malwarebytes PremiumMalwarebytes Free for MacScans and removes malware at no cost -
Open the Malwarebytes setup file
When the download finishes, open your Downloads folder and double-click the setup file to begin the installation.
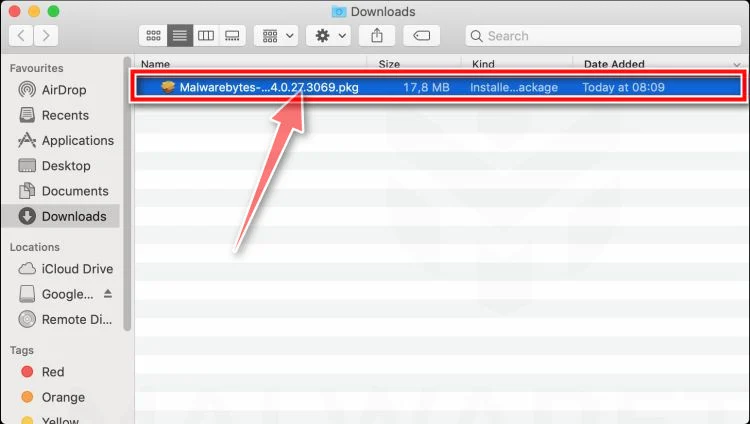
-
Follow the On-Screen Prompts to Install Malwarebytes
The Malwarebytes for Mac Installer will guide you through a few quick screens. Click “Continue” and keep following the prompts until the installation completes.
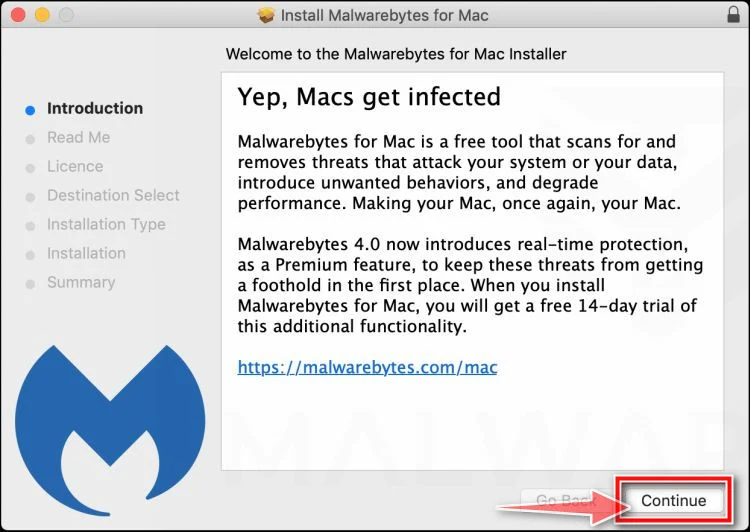
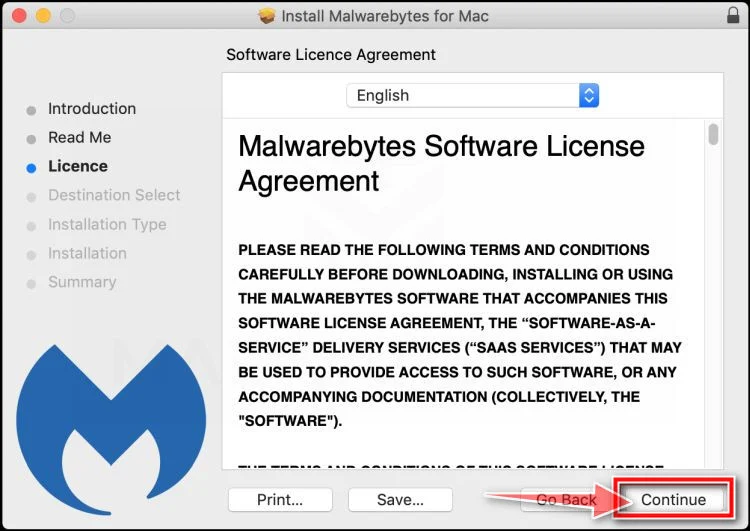
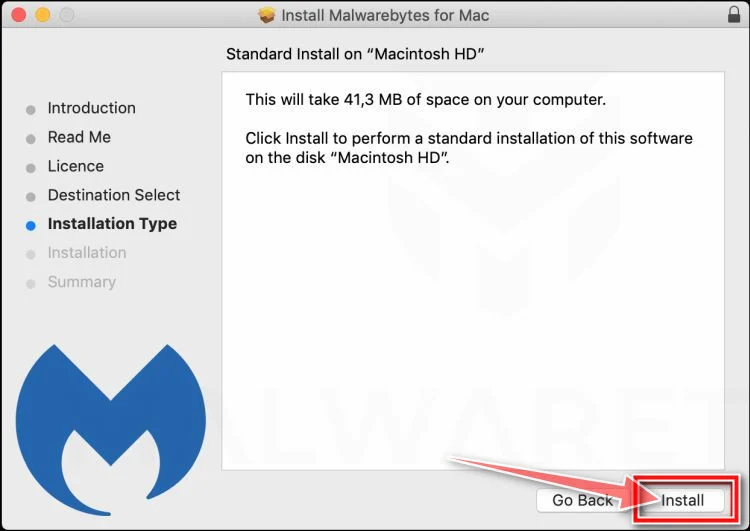
When the installation is complete, Malwarebytes opens to the Welcome to Malwarebytes screen. Click “Get started“.
Malwarebytes needs Full Disk Access to check your whole Mac. When it asks, open System Settings > Privacy & Security > Full Disk Access, turn on Malwarebytes (it may be listed as Malwarebytes Protection), and confirm with your password or Touch ID. Then return to Malwarebytes. On macOS Monterey and earlier, this setting is in System Preferences > Security & Privacy > Privacy.
-
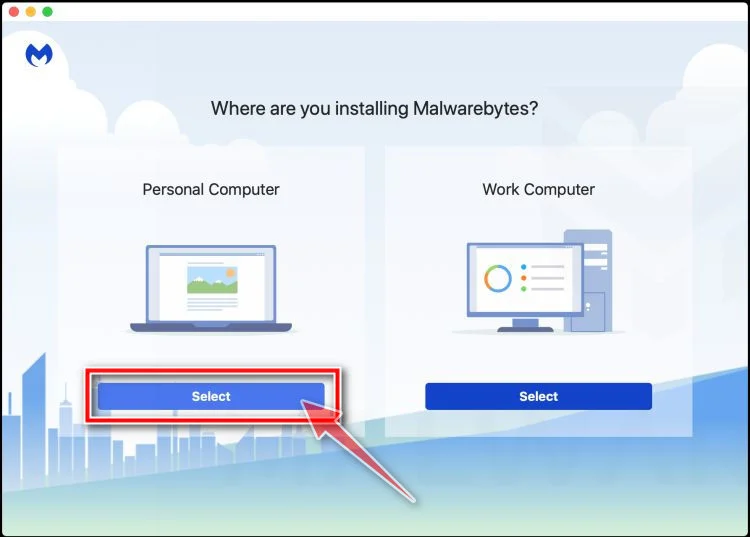
Select “Personal Computer” or “Work Computer”
Malwarebytes will ask what type of computer you’re installing it on. Click either Personal Computer or Work Computer, whichever applies.
-
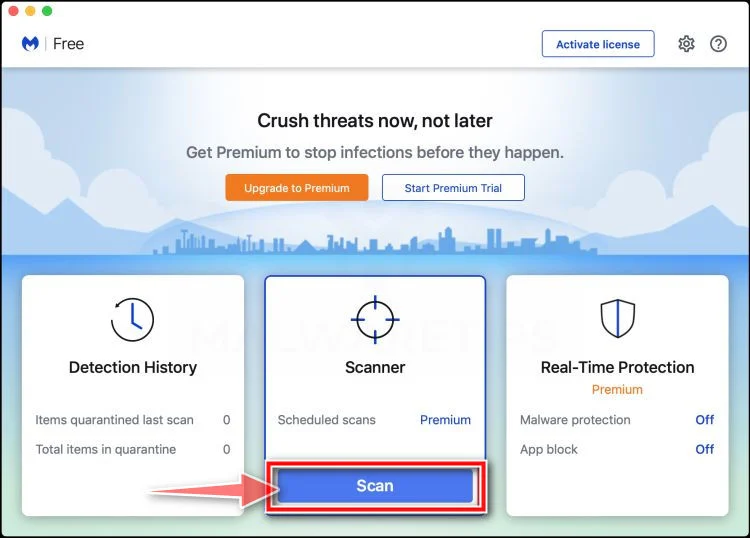
Start the Scan
Click the “Scan” button. Malwarebytes will automatically update its detection database and begin checking your Mac for malware.
-
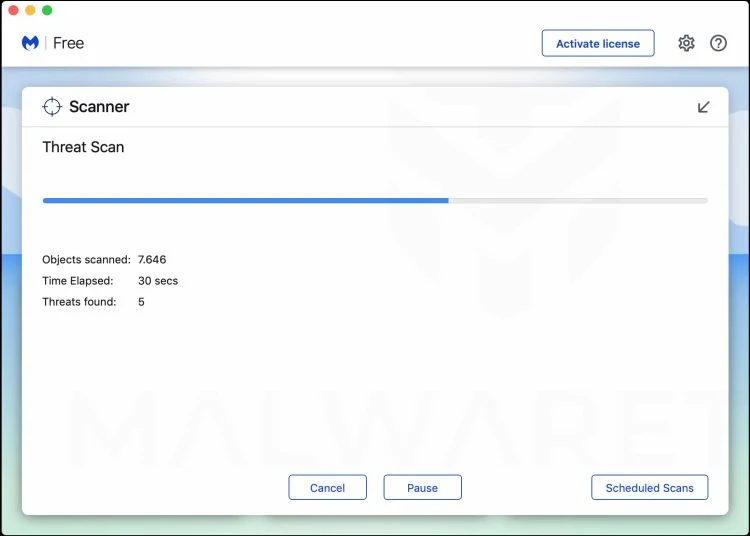
Wait for the Scan to Finish
Malwarebytes will scan your Mac for adware, browser hijackers, and other malicious programs. This can take a few minutes, so feel free to do something else — just check back occasionally to see the progress.
-
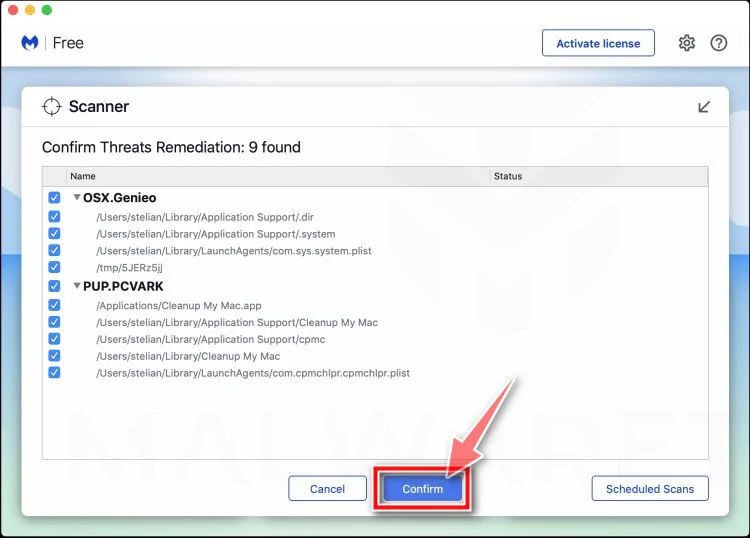
Quarantine the Detected Threats
When the scan is done, you’ll see a list of everything Malwarebytes found. Click the “Quarantine” button to remove all the threats at once.
-
Restart Your Mac
Malwarebytes will now remove all the malicious files it found. Some threats can only be fully removed after a reboot — if Malwarebytes asks you to restart, allow it. Once you’re logged back in, check whether the problems you noticed have stopped. If they come back, save the scan report and ask for help in our forum.
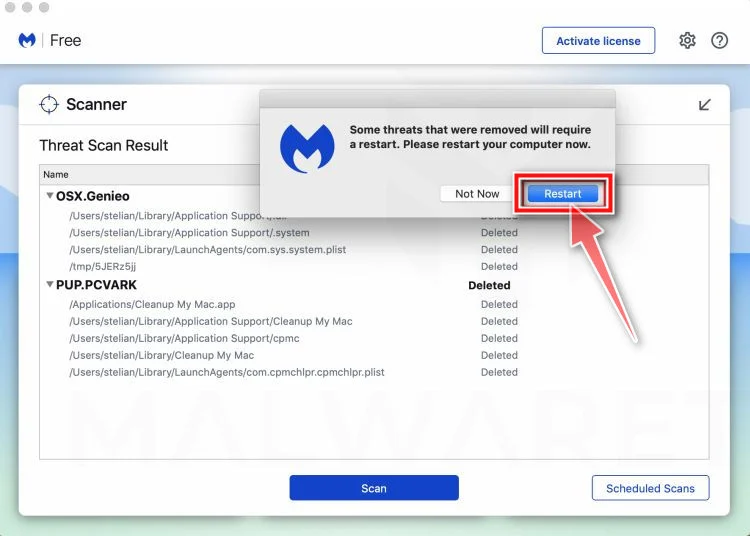
If the problems you noticed continue after the scan, see the options below.
If you are still experiencing problems while trying to remove a malicious program from your computer, please ask for help in our Mac Malware Removal Help & Support forum.
Run a Malware Scan with Malwarebytes for Android
Malwarebytes for Android scans your phone or tablet for malware, adware, and potentially unwanted apps. The free version scans only when you start a scan. Real-time protection, which checks apps automatically, is part of the paid Premium version.
-
Download Malwarebytes for Android.
You can download Malwarebytes for Android by clicking the link below.
Get Malwarebytes for AndroidOpens Google Play in a new tab.Want real-time protection? See Malwarebytes Premium for AndroidMalwarebytes for AndroidScans your phone and removes malware at no cost -
Install Malwarebytes for Android on your phone.
In the Google Play Store, tap “Install” to install Malwarebytes for Android on your device.
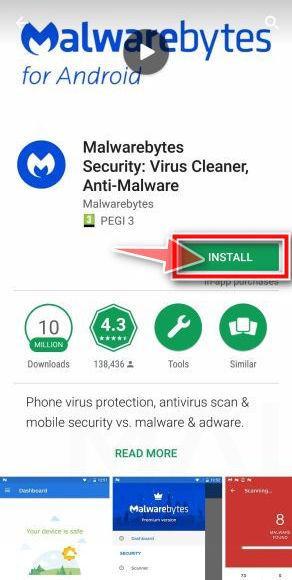
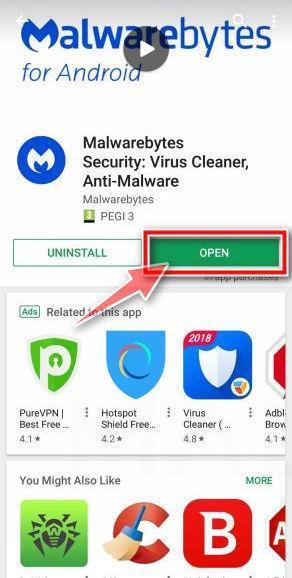
When the installation process has finished, tap “Open” to begin using Malwarebytes for Android. You can also open Malwarebytes by tapping on its icon in your phone menu or home screen.
-
Follow the on-screen prompts to complete the setup process
When Malwarebytes opens, it walks you through a short setup. Tap Get started and follow the prompts. If you see an offer for a trial or a paid plan, read it before you accept. You can skip it and keep using the free scanner.
Malwarebytes will ask for permission to access the files on your phone so it can scan them. Tap Allow, or turn on the permission in the Android screen that opens, then return to Malwarebytes.
-
Run a scan with Malwarebytes for Android
On the main screen, tap Scan now. In some versions, you open the menu, tap Scanner, and then tap Run a scan.
-
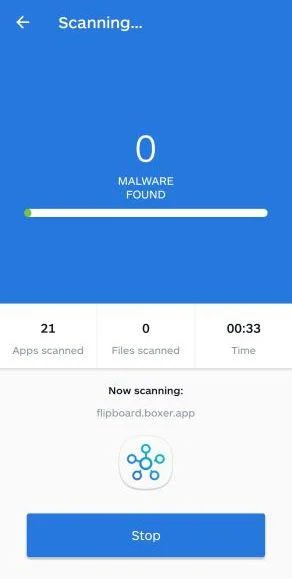
Wait for the Malwarebytes scan to complete.
Malwarebytes will now start scanning your phone for adware and other malicious apps. This process can take a few minutes, so we suggest you do something else and periodically check on the status of the scan to see when it is finished.
-
Remove the detected apps.
When the scan has been completed, you will see a list of the threats that Malwarebytes for Android has detected. Next to each detected item, tap the menu icon (three dots), then choose to uninstall the app or delete the file. Android then asks you to confirm. Tap OK or Uninstall to remove the app.
-
Restart your phone.
When the detected apps are removed, restart your phone if Malwarebytes asks you to. Then check whether the problems you noticed have stopped.
If the problems you noticed continue after the scan, see the options below.
If you are still having problems with your phone after completing these instructions, then please follow one of the steps:
- Ask for help in our Mobile Malware Removal Help & Support forum.
- Only as a last resort, reset your phone to factory settings. Read the warning below first.
- Back up your photos, videos, files, and messages, for example to your Google account or a computer.
- Make sure you know your Google account email and password. The phone asks for them after the reset. If you changed the password recently, Google recommends waiting 24 hours before you reset.
- On a Samsung phone, also make sure you know your Samsung account password.
- If you use an authenticator app for two-step verification, move your accounts to another device or save your backup codes first.
Stay Protected: Block Ads and Malicious Sites
No scan can prove a device is completely clean, so it helps to block threats before they reach you. Most infections start with a malicious ad or a fake download button — so blocking them at the source is your best defense.
We recommend AdGuard, which blocks malicious ads, phishing pages, and dangerous redirects before they can reach you.
👉 Download AdGuard and browse safely
How to Tell Whether the Cleanup Worked
The best test for a permission issue is whether new notifications from that specific site stop. The old entries may still sit in your notification history until you dismiss them.
If the notices disappear but tabs still open on their own, don’t attribute everything to Primefixbridge. Record which browser opens, what happens first and whether another user profile behaves differently.
If your homepage or search engine also changed, check the extensions list for unfamiliar additions. Ask IT before removing an extension from a work browser.
If Windows Security itself records a detection, keep its name and timestamp for support. A real detection needs its own response, even if fake alerts also showed up that day.
If you can’t identify the source, collect the browser name and a redacted image of the new alert without opening it. The source line is often the most helpful part.
If no site appears in browser settings, check whether a recently installed app sends the alerts. Record the app’s name and installation date before asking support to investigate.
If you use several Windows accounts, check which one receives the alert. Blocking a site in one user’s browser does not necessarily change another user’s permissions.
When children or guests use the same device, show them where notification requests appear. They don’t have to know a site’s name to recognize what Allow would grant.
Keep legitimate reminder permissions for the sites you recognize. Denying the suspect sender is more useful than silencing the entire notification area and hoping the problem has gone away.
Frequently Asked Questions
Is Primefixbridge.it.com itself a computer virus?
The documented behavior is deceptive browser notifications, not proof that an executable installed on your computer. Some follow-up destinations can present additional risks.
Why do the warnings still appear after I close the tab?
The permission is stored by the browser profile, not by the open tab. Remove or block it in settings to stop new alerts from that site.
Does selecting Allow on the fake check install software?
Allowing notifications does not by itself install a program. A later download, an extension installation or a remote support session needs separate attention.
Is a red alert in the Windows notification area always from Windows Security?
No. Windows can display notifications sent by browser websites. Check the listed source and open Windows Security independently if you want to see its actual findings.
Should I reset the browser to make the alerts stop?
Start by blocking the permission for the offending site. A broader reset may be relevant if other settings changed, but it’s unnecessary for many notification-only cases.
Can an ad blocker remove a permission I already granted?
Don’t rely on it to do that. Revoke the permission in your browser’s settings. Use ad blocking, if you want it, to reduce future exposure to deceptive pages.
The Bottom Line
Primefixbridge’s fake virus alerts are sent through a browser permission. Don’t use the warning to start a scan or buy support. Block the site in the affected profile.
If you went further, respond to that action too. Secure any account you used on the next page, report suspicious payments, and check the device if you ran software.

Join the discussion
0 commentsShare your experience or ask a question about this article.
Your progress
Did these steps help?
Let us know how the guide worked for you.
Describe what you see and the step you reached. Keep passwords and other private information out.
Discussion
Start the conversation
Have a question or something useful to share? Add the first comment.