

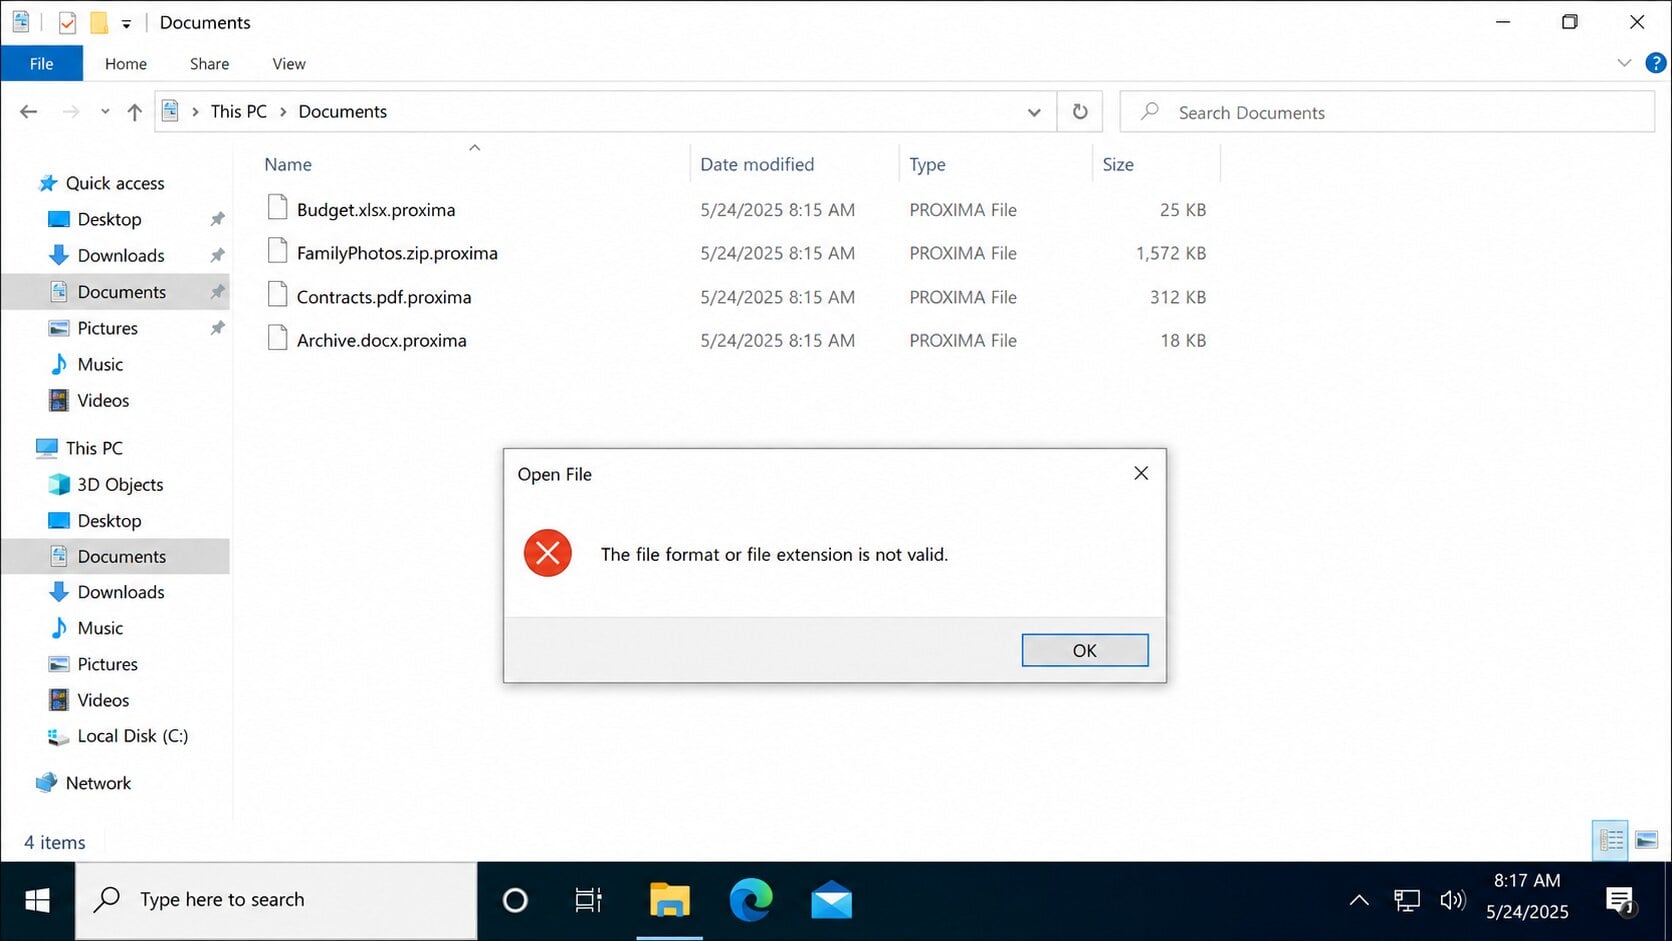
A document that opened yesterday now ends in `.proxima`, and Windows says its format is invalid. Nearby folders contain the same unfamiliar extension.
Then `Proxima_Readme.txt` appears with payment instructions and a warning about stolen data. The next decisions determine whether the damage spreads or remains contained.
Overview
Proxima encrypts data and changes filenames
Proxima is ransomware designed to make files unusable through encryption. It appends `.proxima` after the existing filename and extension.
For example, `Budget.xlsx` becomes `Budget.xlsx.proxima`, while `Photo.jpg` becomes `Photo.jpg.proxima`. Renaming the file does not reverse the encrypted contents.
Applications reject affected documents because their internal data no longer matches the expected format. The original names may remain visible beneath the added extension.
Local disks, connected external storage, and reachable network locations may be exposed while the ransomware process is active.
The ransom note claims encryption and data theft
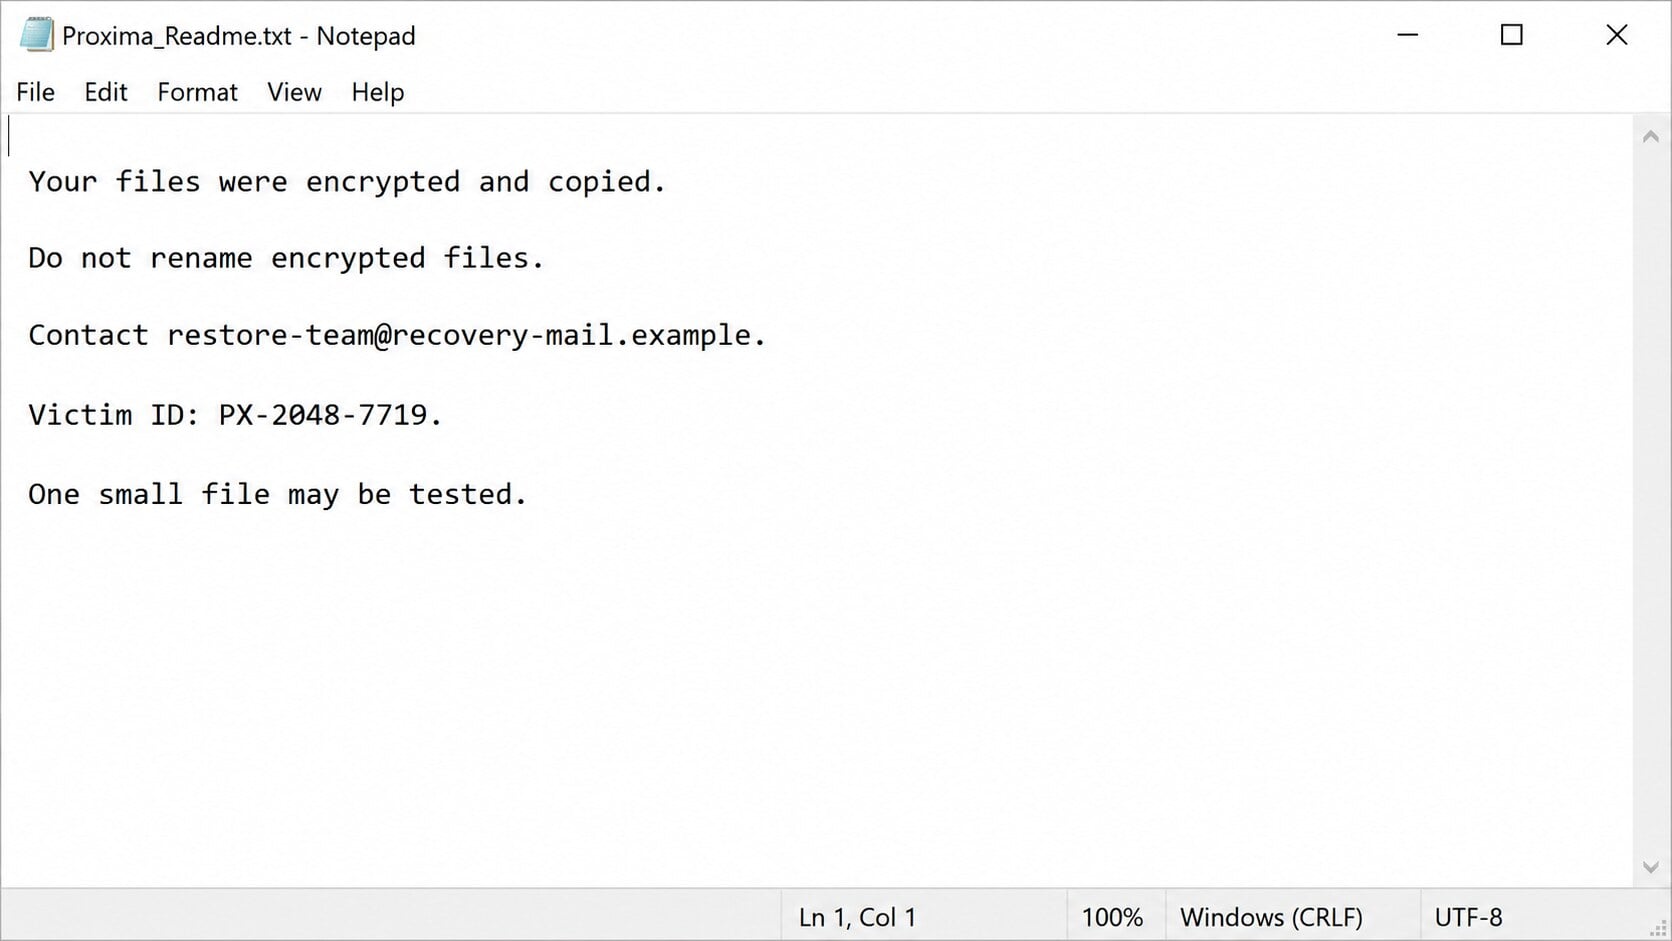
After encryption, the malware creates `Proxima_Readme.txt`. The note says files were encrypted and copied, introducing both recovery pressure and a possible leak threat.
Victims are told to contact the attackers and may be offered one small test decryption. That demonstration proves possession of some capability, not reliable recovery.
The note warns against renaming files or using third-party tools. Criminals use this language to control the response and discourage independent investigation.
- Encrypted filenames end in `.proxima`.
- The note is named `Proxima_Readme.txt`.
- The message claims files were copied.
- A small test decryption may be offered.
- No payment guarantees a working decryptor or deletion.
Containment and recovery are separate jobs
Stopping the malware prevents additional encryption, but it does not decrypt files already transformed. File restoration begins only after the environment is safe.
Likewise, restoring one folder while Proxima remains active can encrypt the recovered copy. Isolation and removal must come before reconnecting backups.
The data-theft claim also requires separate investigation. A clean computer does not establish whether information left the network before encryption.
Organizations should coordinate technical containment, legal assessment, credential protection, and recovery. Home users should preserve evidence and avoid improvised decryption attempts.
How to Recognize a Proxima Infection
The `.proxima` suffix is the clearest visible clue. Check several directories rather than relying on one damaged document or renamed file.
Show file extensions in File Explorer. Windows can hide known extensions, making a renamed file harder to interpret accurately.
Open the ransom note as text without following links or contacting the attacker. Record its filename, wording, victim identifier, and any listed addresses.
Do not publish the note or encrypted samples containing confidential information. Provide copies only to trusted responders and identification services.
Review security alerts, recently installed programs, scheduled tasks, startup entries, remote-access tools, and suspicious accounts. Encryption may be the final stage of a longer intrusion.
A business should inspect authentication and network logs for activity before the encryption timestamp. That window may reveal stolen credentials or earlier data access.
Keep one untouched encrypted sample and a copy of the note. Future decryptors or forensic analysis may require the original bytes and exact metadata.
Work from duplicates during testing. Repeated repair attempts can damage the only copy or change evidence needed to identify the ransomware family.
What the Ransom Note Does and Does Not Prove
The note proves someone wants payment and knows the Proxima campaign format. It does not prove the operator retained every decryption key correctly.
A free test can show that one file is decryptable. It does not guarantee the tool handles large files, databases, backups, or every infected system.
The claim that data was stolen may be true, exaggerated, or copied into a standard template. Network evidence is needed to assess possible exfiltration.
Even if files return, attackers may keep copied information. Payment cannot technically force deletion, silence, or an end to future extortion.
Criminal support can disappear after payment. A faulty decryptor may corrupt data or stop when the operator’s infrastructure goes offline.
Payment also signals willingness to pay, which can invite additional demands. Intermediaries and fake recovery firms may approach victims afterward.
Law enforcement, insurers, and incident-response contracts may impose reporting or approval requirements. Organizations should consult those parties before negotiating.
Preserve the note, but do not treat its deadlines as instructions. Build decisions around safety, evidence, legal obligations, and tested recovery options.
How Proxima Ransomware Works
Initial access places malicious code on the system
Ransomware can arrive through malicious attachments, fake downloads, pirated software, exposed remote services, stolen credentials, or compromised administrative tools.
The exact route for a particular infection must be established from logs and evidence. The presence of `.proxima` alone does not identify the entry point.
An intruder may spend time exploring a network before encryption. During that period, credentials, backups, and valuable data can be located.
The attacker prepares the environment
Malware or a human operator may seek elevated privileges, disable defenses, stop applications, delete shadow copies, or locate connected storage.
Business environments can expose shared folders, hypervisors, backup consoles, and domain administration. One privileged account can greatly increase the affected area.
Security logs may show command execution, service creation, remote logins, or unusual archive activity. Preserve those records before they rotate.
Proxima encrypts accessible files
The ransomware reads targeted data and transforms it with cryptography. Without the corresponding key, ordinary applications cannot interpret the result.
Filenames receive the `.proxima` suffix as a visible marker. The extra extension does not contain the key and removing it changes only the name.
Encryption may skip certain system files so Windows remains usable enough to display the demand. User documents and operational data carry greater leverage.
The note introduces payment and leak pressure
`Proxima_Readme.txt` tells victims to contact the operator. It may claim both file encryption and theft, a model commonly described as double extortion.
The message can offer a small test and warn against outside help. These tactics create authority while isolating the victim from safer advice.
A countdown or leak threat should not override containment. Responders need time to identify scope, protect evidence, and determine whether clean backups exist.
Continuing access can cause renewed damage
If the original foothold remains, attackers can return after files are restored. They may deploy another payload or target backups reconnected too soon.
Changing one password is insufficient when privileged accounts, tokens, remote tools, or malicious services remain active. The environment needs a broader trust reset.
Recovery succeeds when restored systems are clean, credentials are rotated, entry points are closed, and monitoring confirms the attacker has lost access.
Immediate Actions After Discovering `.proxima` Files
Disconnect affected systems from wired and wireless networks. Isolate shared storage if encryption is actively spreading, but avoid shutting down critical systems without response guidance.
Unplug external backup drives that are not already damaged. Do not connect clean media to any computer that has not been examined.
For one home computer, sleep or shutdown may stop active work, but it can also remove volatile evidence. Organizations should follow their incident plan.
Photograph or record visible messages and note the discovery time. Keep the ransom note, several encrypted files, suspicious emails, and recently downloaded installers.
Do not delete logs, wipe disks, or run random cleaners before deciding whether forensic evidence matters. Those actions can obscure the initial access path.
Notify administrators, executives, insurers, and legal counsel according to the organization’s plan. Ransomware can create contractual and regulatory deadlines.
Home users should contact trusted technical help if the computer contains financial, identity, medical, or business information.
Report the incident to national cybercrime or law-enforcement authorities. Reports help connect wallet addresses, infrastructure, and recurring campaigns.
Should You Pay the Proxima Ransom?
Payment does not guarantee a working key, complete recovery, safe software, or deletion of stolen data. The transaction funds the same criminal operation.
Some organizations face severe operational pressure, but the decision should involve leadership, legal counsel, law enforcement, insurers, and experienced incident responders.
Cryptocurrency transfers can implicate sanctions rules depending on the recipient. A professional review is essential before any organization considers payment.
First identify clean backups, shadow copies, unaffected replicas, application exports, email attachments, cloud version history, and possible public decryptors.
Search reputable decryption resources using copies of the note and encrypted files. Do not upload confidential originals to unknown websites.
Beware of companies promising guaranteed decryption without examining the variant. Some secretly pay criminals and add a fee; others simply take another payment.
A recovery plan should assume the attacker may not cooperate. Prioritize rebuilding essential services from verified sources and clean data.
Keep encrypted archives if storage permits. A legitimate decryptor may appear later, even when immediate recovery is unavailable.
What to Do if Proxima Ransomware Infected Your Computer
Follow the order below. Each step protects the next one from re-encryption, evidence loss, or restored access for the attacker.
- Isolate the affected devices. Disconnect networks and removable storage. Separate clean systems without destroying logs or powering off critical infrastructure impulsively.
- Preserve evidence. Copy the ransom note, encrypted samples, timestamps, security alerts, suspicious downloads, and relevant logs to protected storage.
- Identify the scope. Determine which endpoints, shares, accounts, servers, cloud locations, and backups were reachable during the incident.
- Protect credentials from a clean device. Rotate privileged, email, VPN, remote-access, backup, and service-account secrets after isolating compromised systems.
- Notify appropriate parties. Contact security staff, insurers, legal counsel, law enforcement, and affected partners according to the incident plan.
- Remove active malware before recovery. Scan and rebuild where necessary. Do not reconnect a backup while Proxima or another foothold may remain.
- Evaluate recovery sources. Prioritize offline backups, immutable snapshots, cloud version history, unaffected replicas, and reputable decryptor projects.
- Investigate possible data theft. Review outbound traffic, archive creation, cloud access, and attacker activity instead of relying solely on the ransom note.
- Restore in controlled stages. Validate clean systems, patch the entry point, monitor authentication, and reconnect only the services needed for each phase.
- Retain encrypted copies. Keep untouched samples for future analysis or decryption, even when immediate restoration comes from backups.
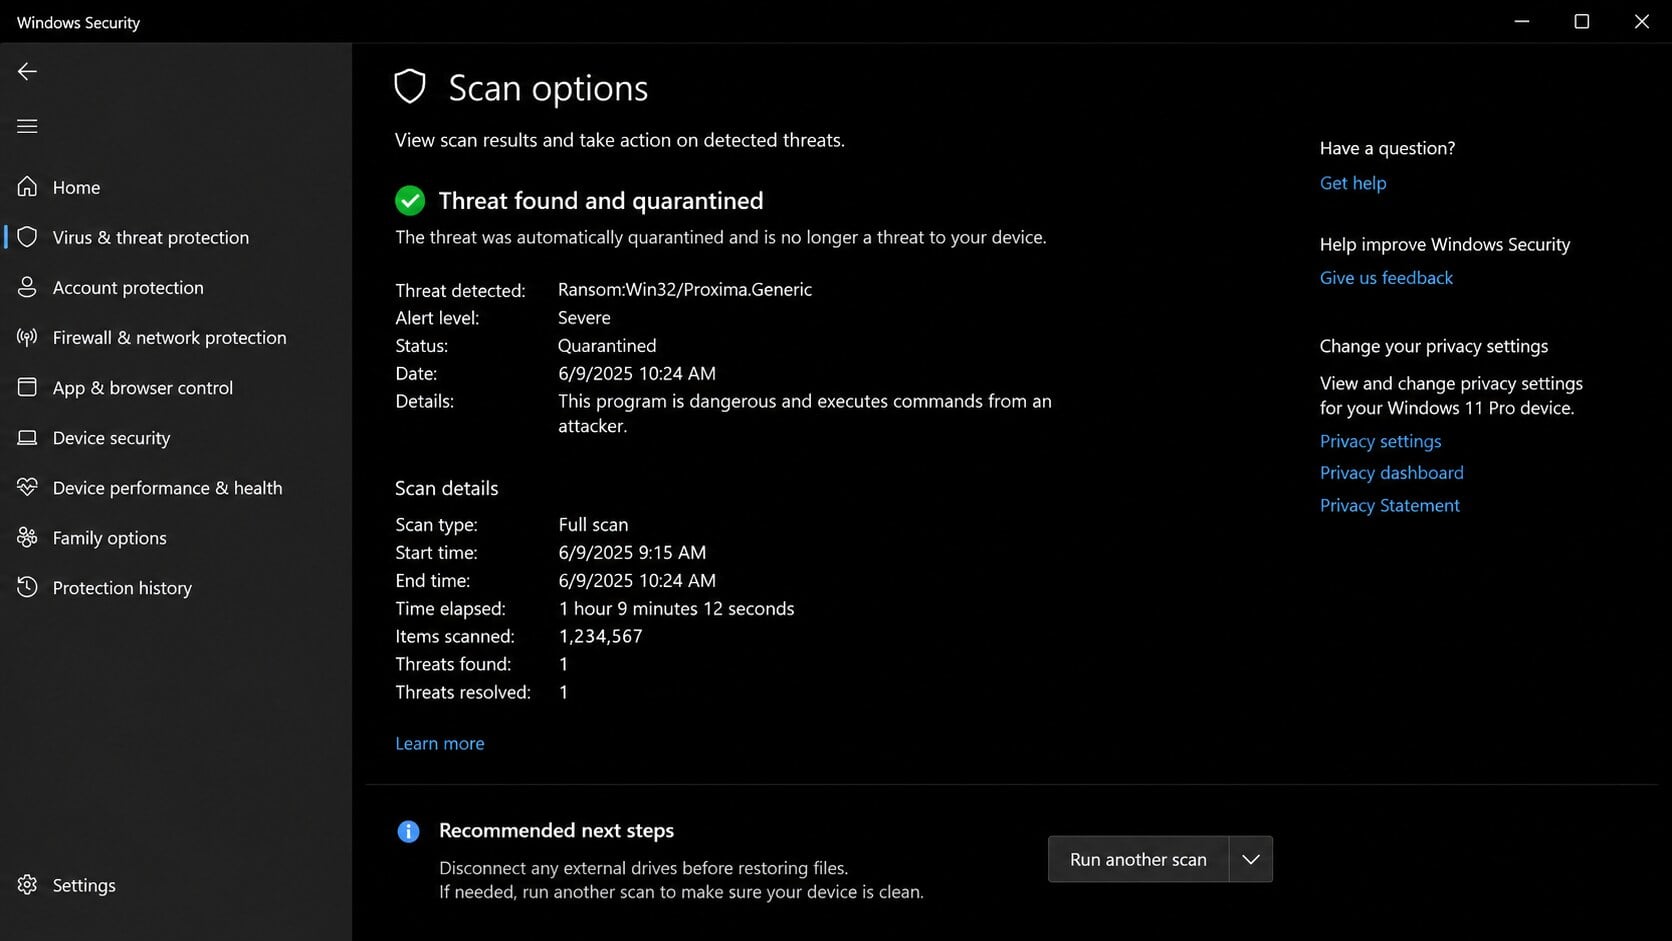
A scan can remove known ransomware components, but no antivirus product can recreate encryption keys that it never possessed. Removal and decryption are different outcomes.
Do not test cleaners or decryptors on original files. Duplicate the data, document every attempt, and stop if output becomes smaller or corrupted.
Remove Proxima Ransomware and Recover the Files
Step 1: Restart Windows in Safe Mode with Networking
Safe Mode limits many startup components, making some malicious processes easier to detect. Keep the device isolated except for controlled access to trusted tools.
- Press Windows key + I to open Settings. If that doesn’t work, right-click the Start button and select Settings. Then, in the right-hand pane, click Recovery.
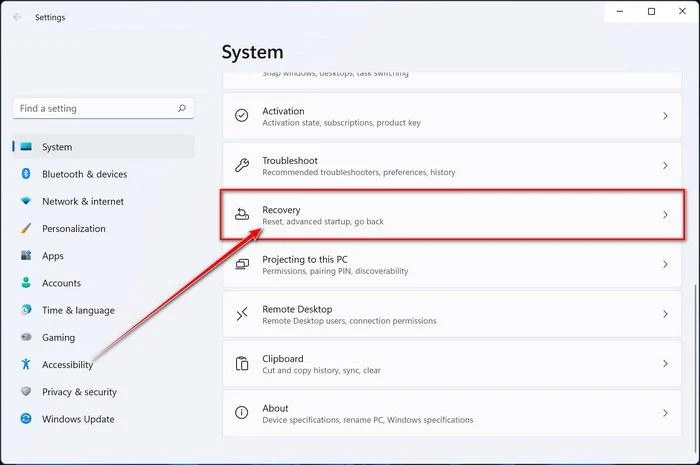
- Under Advanced startup, click Restart now. Save any open work first — your PC will restart immediately.
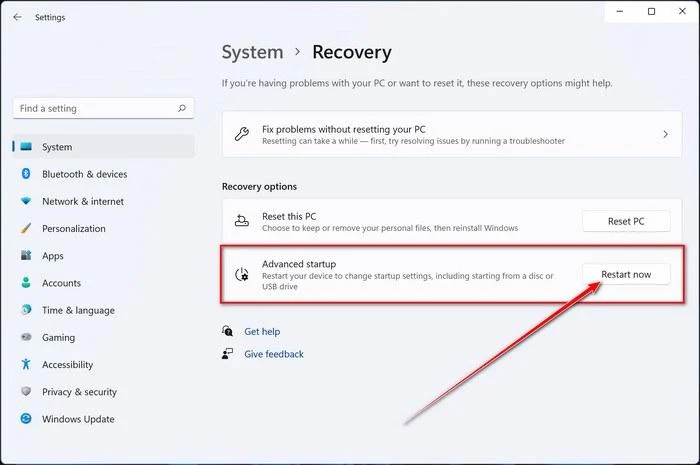
Your PC will restart into the Windows Recovery Environment. From there, follow these steps to reach Safe Mode:
- On the Choose an option screen, select Troubleshoot.
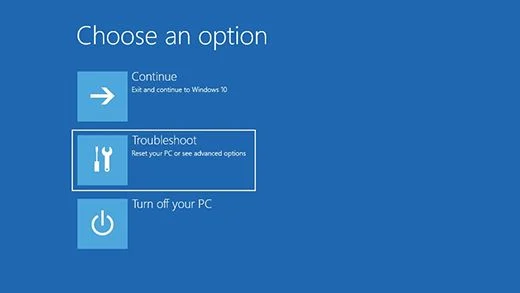
- On the Troubleshoot screen, click Advanced Options.
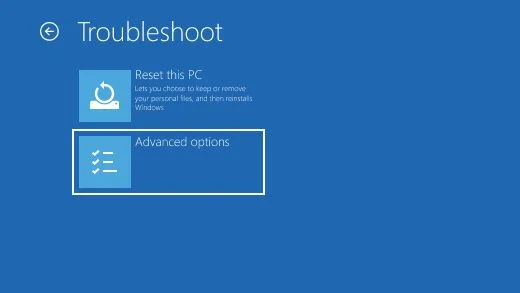
- On the Advanced Options page, click Startup Settings.
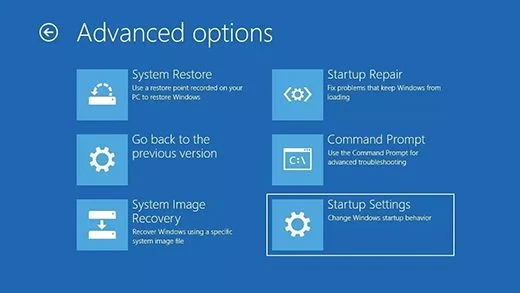
- On the Startup Settings page, click Restart.
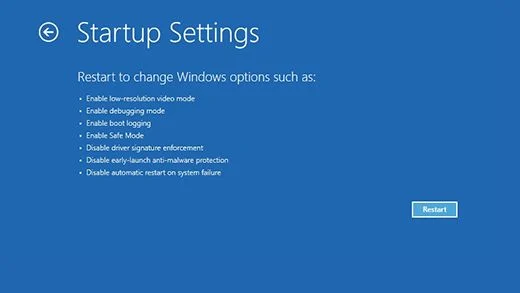
- After your PC restarts, you’ll see a list of startup options. Press 5 or F5 to start Safe Mode with Networking.
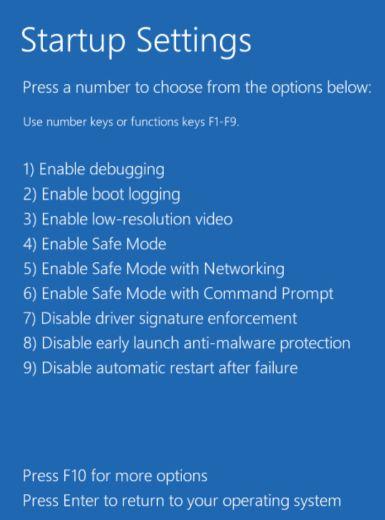
- You’ll know you’re in Safe Mode when “Safe Mode” appears in the corners of the screen. Now continue with the next step of this guide — downloading and running Malwarebytes (explained in Step 2).
- Press Windows key + I to open Settings. If that doesn’t work, click the Start button and select Settings (the gear icon).
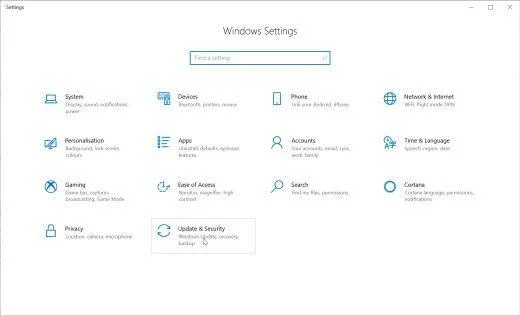
- In the Windows Settings window, select Update & Security, then click Recovery.
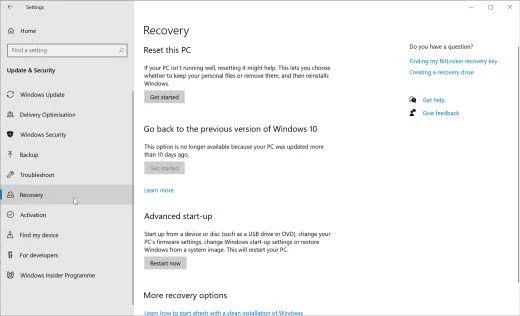
- Under Advanced startup, click Restart now. Save any open work first — your PC will restart immediately.
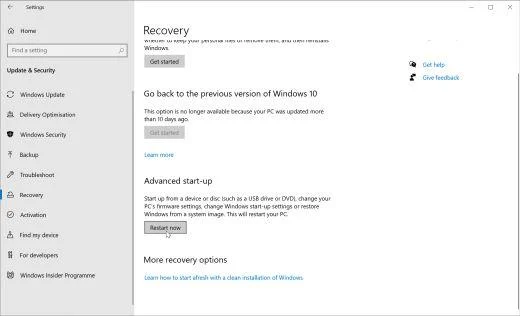
Your PC will restart into the Windows Recovery Environment. From there, follow these steps to reach Safe Mode:
- On the Choose an option screen, select Troubleshoot.
- On the Troubleshoot screen, click Advanced Options.
- On the Advanced Options page, click Startup Settings. (On Windows 8, this option is labeled Windows Startup Settings.)
- On the Startup Settings page, click Restart.
- After your PC restarts, you’ll see a list of startup options. Press 5 or F5 to start Safe Mode with Networking.
- You’ll know you’re in Safe Mode when “Safe Mode” appears in the corners of the screen. Now continue with the next step of this guide — downloading and running Malwarebytes (explained in Step 2).
- Remove any CDs, DVDs, or USB drives from your computer, then restart it.
- As soon as the computer starts (when the hardware information appears on screen), press the F8 key repeatedly until the Advanced Boot Options menu appears. If Windows starts normally instead, you pressed F8 too late — restart and try again.
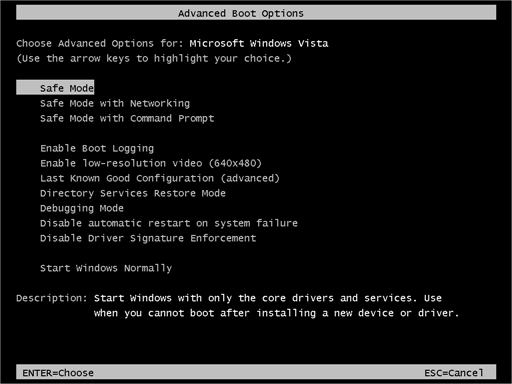
- On the Advanced Boot Options screen, use the arrow keys to highlight Safe Mode with Networking, then press Enter.
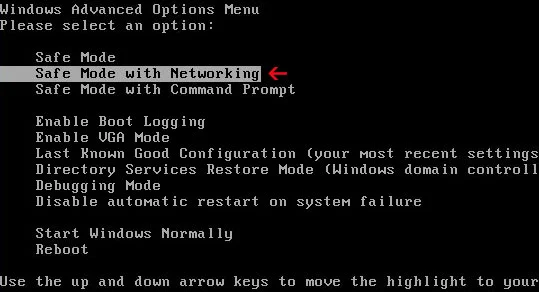
- Once you’re in Safe Mode with Networking, continue with the next step of this guide — downloading and running Malwarebytes (explained in Step 2).
Can’t get into Safe Mode with Networking? No problem — you can run the Malwarebytes scan in normal mode instead and continue the guide from there.
Step 2: Scan the computer with Malwarebytes
Run a full scan and quarantine confirmed threats. Record detections before removal so responders can connect filenames, paths, services, and persistence.
Malwarebytes is one of the most popular and trusted anti-malware tools for Windows — and it’s completely free for removing infections. It catches threats that many antivirus programs miss, including adware, browser hijackers, and trojans. Follow the steps below to scan and clean your PC in just a few minutes.
Download Malwarebytes
Click the button below to download the latest version of Malwarebytes for Windows from the official source. The free version is all you need — it will scan your computer and remove adware, browser hijackers, and other malicious software at no cost.
Download MalwarebytesOfficial installer for Windows 11 and 10. Your download starts right away.Want real-time protection? See Malwarebytes Premium Malwarebytes Free for WindowsScans and removes malware at no cost
-
Install Malwarebytes
When the download finishes, open your Downloads folder and double-click the MBSetup file. If Windows shows a User Account Control pop-up, click “Yes” to allow the installation.

Follow the On-Screen Prompts to Install Malwarebytes
The setup wizard will walk you through a few quick screens:
-
Choose where you’re installing the program — “Personal Computer” or “Work Computer” — then click Next.

-
Malwarebytes will now install on your device. This usually takes under a minute.

-
When installation is complete, the “Welcome to Malwarebytes” screen will open automatically.

-
On the final screen, click Open Malwarebytes to launch the program.

-
Enable “Scan for Rootkits”
Before scanning, turn on rootkit detection so Malwarebytes can find even the most hidden threats. Click the Settings gear icon on the left side of the screen.

In the settings menu, find “Scan for rootkits” and click the toggle so it turns blue.

Done? Click “Dashboard” in the left pane to return to the main screen.
Start the Scan
Click the blue Scan button. Malwarebytes will automatically update its virus database and start checking your computer for malware.

-
Wait for the Scan to Finish
The scan checks your entire system for browser hijackers and other malicious programs, so it can take 5 to 20 minutes depending on your computer. Feel free to do something else — just check back occasionally to see the progress.

-
Quarantine the Detected Threats
When the scan is done, you’ll see a list of everything Malwarebytes found — malware, adware, and potentially unwanted programs. Click the “Quarantine” button to remove all of them at once.

Malwarebytes will now remove the malicious files and registry entries and move them safely into quarantine.

-
Restart Your Computer
Some threats can only be fully removed after a reboot. If Malwarebytes asks you to restart, click Yes. Once you’re logged back in, Malwarebytes has finished removing the threats it found.

Step 3: Run a second-opinion scan with HitmanPro
A second engine can find components missed by the first. Repeated or returning detections may indicate that rebuilding Windows is safer than continued cleaning.
HitmanPro is a second-opinion scanner — it’s designed to catch what your main antivirus might have missed. Instead of relying on a single detection engine, it checks the behavior of files in the locations where malware usually hides. Anything suspicious gets sent to the cloud, where it’s analyzed by two of the best antivirus engines available: Bitdefender and Kaspersky.
Good news: scanning is completely free, with no limits. You only need a license when it’s time to remove what was found — and even then, you can activate a free one-time 30-day trial to clean your PC at no cost. (A full license is $24.95 per year for 1 PC.)
-
Download HitmanPro
Click the button below to download HitmanPro. Remember — the scan is free, so you have nothing to lose by checking your PC.
Download HitmanProFree scan. Removing threats needs the free 30-day trial. Opens the official HitmanPro page in a new tab. HitmanProSecond-opinion malware scanner from Sophos
 -
Install HitmanPro
When the download finishes, open your Downloads folder and double-click the file: “hitmanpro.exe” on 32-bit Windows, or “hitmanpro_x64.exe” on 64-bit Windows.
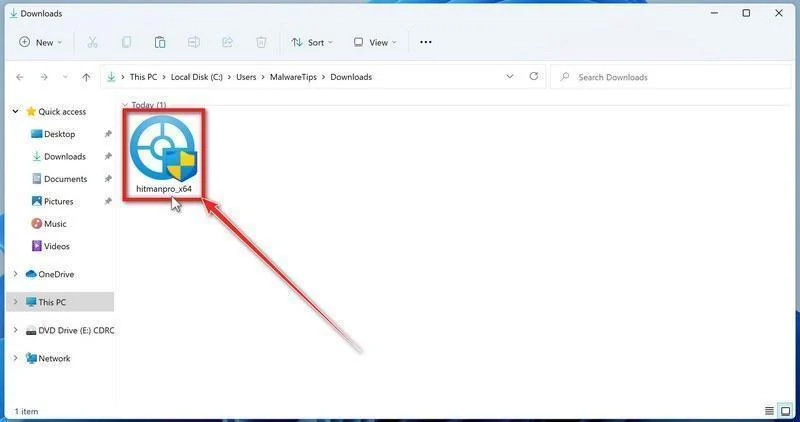
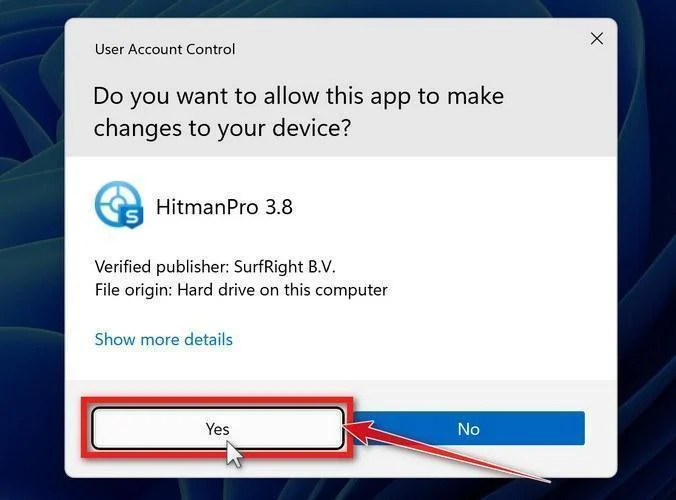
If a User Account Control pop-up asks whether HitmanPro can make changes to your device, click “Yes” to continue.
-
Follow the On-Screen Prompts
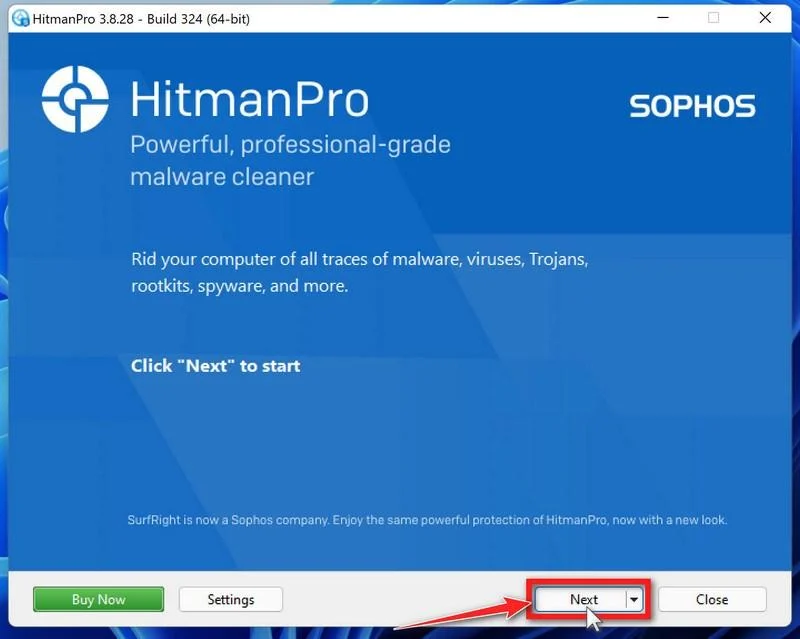
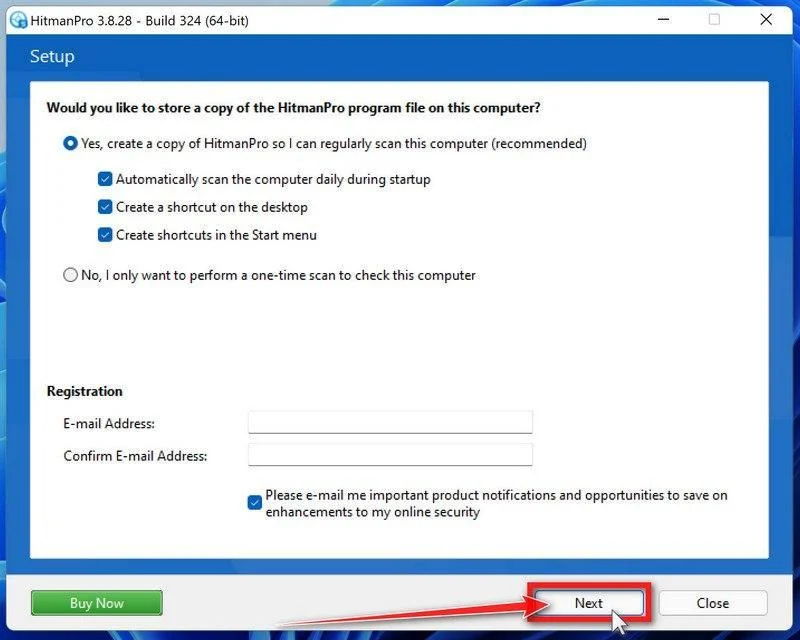
On the HitmanPro start screen, click “Next” to begin the system scan. No lengthy setup required — it goes straight to work.
-
Wait for the Scan to Finish
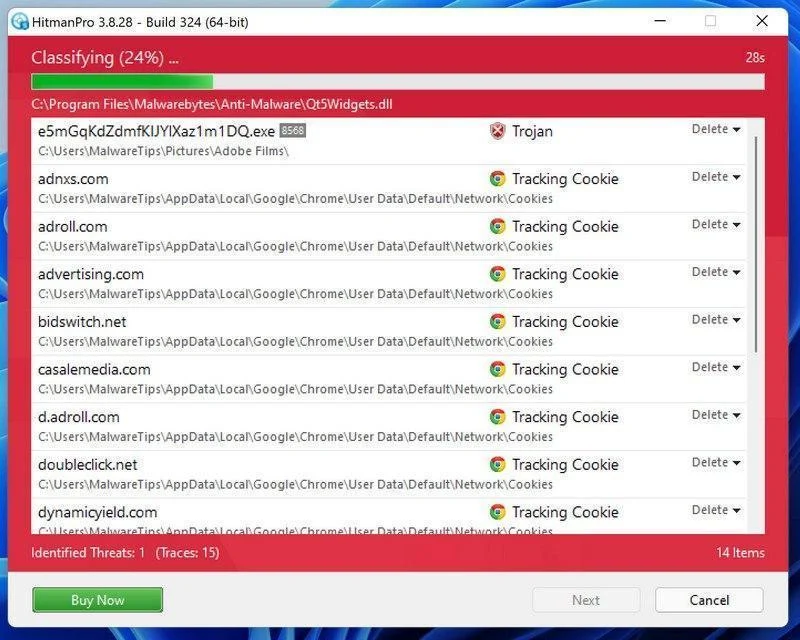
HitmanPro will now check your computer for malicious programs. This usually takes just a few minutes thanks to its cloud-based scanning.
-
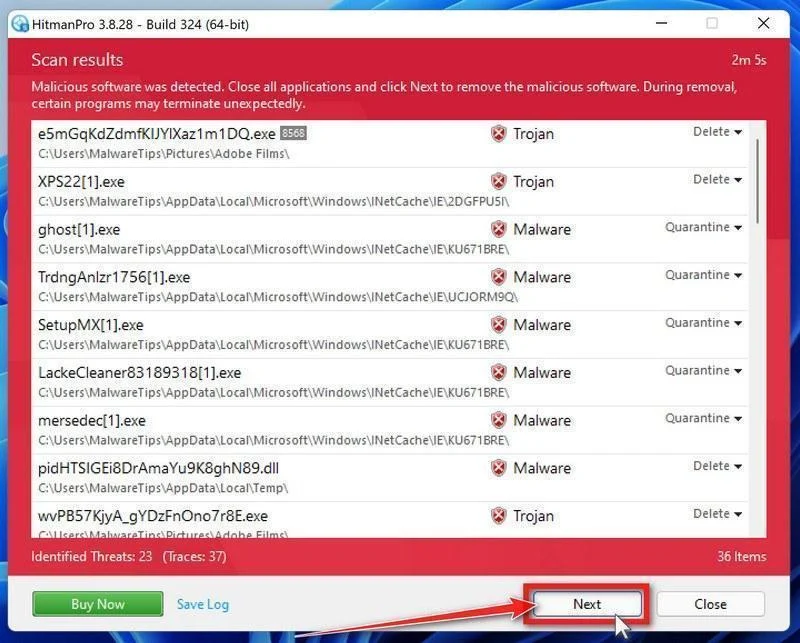
Review the Results and Click “Next”
When the scan is done, HitmanPro will show you everything it found. Click “Next” to remove the detected threats.
-
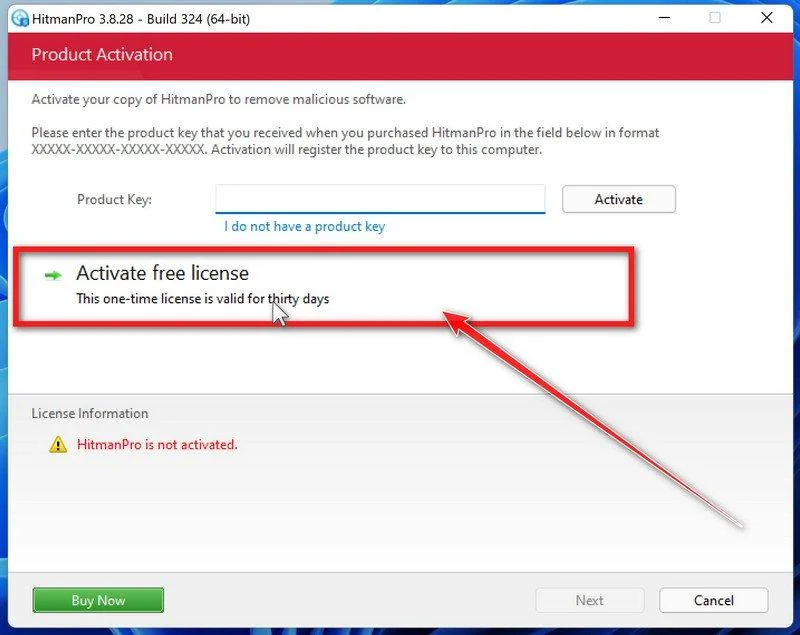
Click “Activate Free License”
To remove the malicious files, click the “Activate free license” button. This starts your free 30-day trial — no payment details needed — and unlocks the full cleanup.
When the removal is complete, HitmanPro will show a summary of everything it cleaned. Click Next, then click Reboot if prompted. If there’s no reboot prompt, just click Close — your PC is clean.
Step 4: Check for remaining threats with ESET
Use the additional scan to inspect the system after initial quarantine. Do not reconnect production shares merely because one result appears clean.
ESET Online Scanner is a free second-opinion scanner that performs a deep, full-system check for viruses, trojans, rootkits, and other malware. We use it as the final step because it’s thorough — if anything slipped past the previous scans, ESET will find it. A clean result here means your computer is malware-free.
-
Download ESET Online Scanner
Click the button below to download ESET Online Scanner.
Download ESET Online ScannerOpens the official download page in a new tab. ESET Online ScannerFree one-time malware scan from ESET
 -
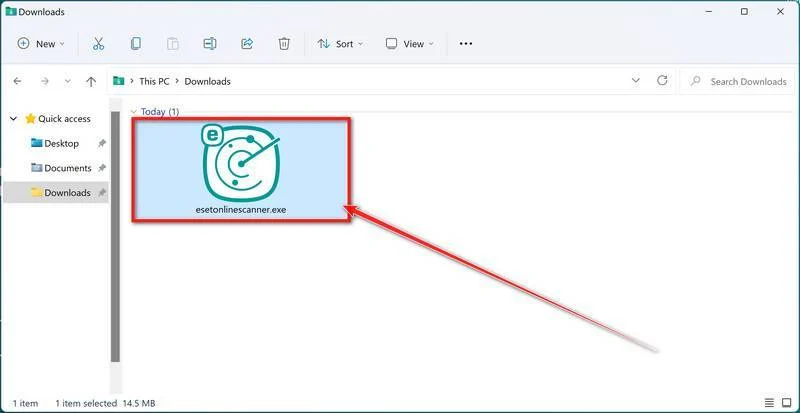
Run the Installer
When the download finishes, open your Downloads folder and double-click “esetonlinescanner.exe“.
-
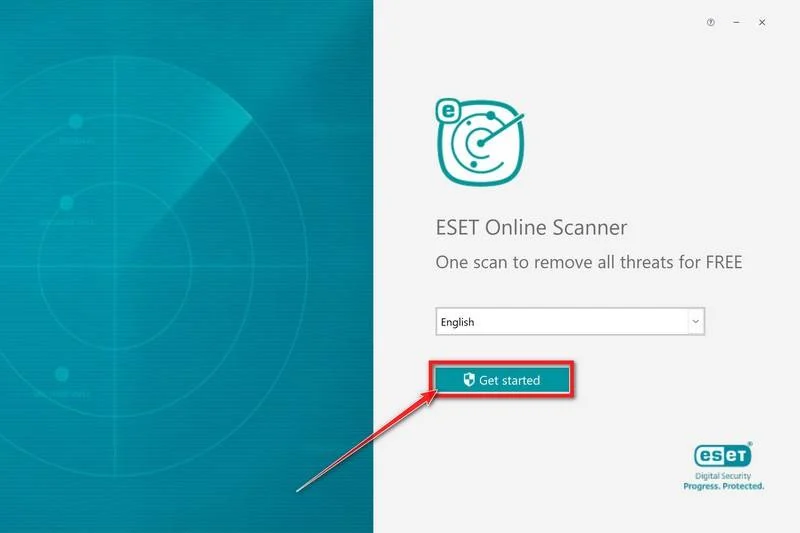
Install ESET Online Scanner
On the start screen, select your language from the drop-down menu and click Get started.
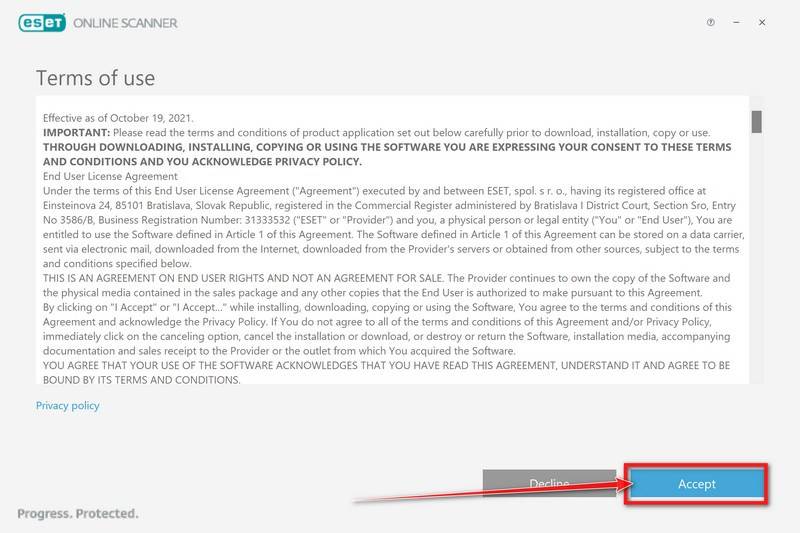
On the Terms of use screen, click Accept.
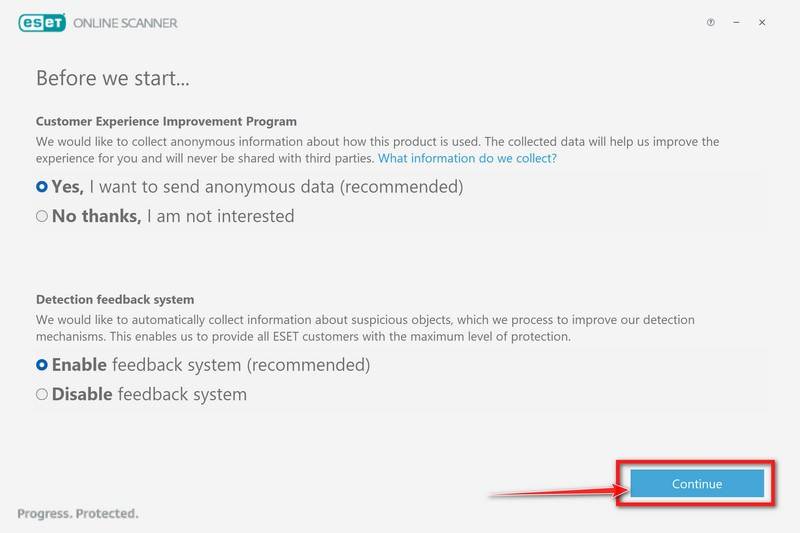
Choose your preferences for the Customer Experience Improvement Program and the Detection feedback system (either choice is fine), then click Continue.
-
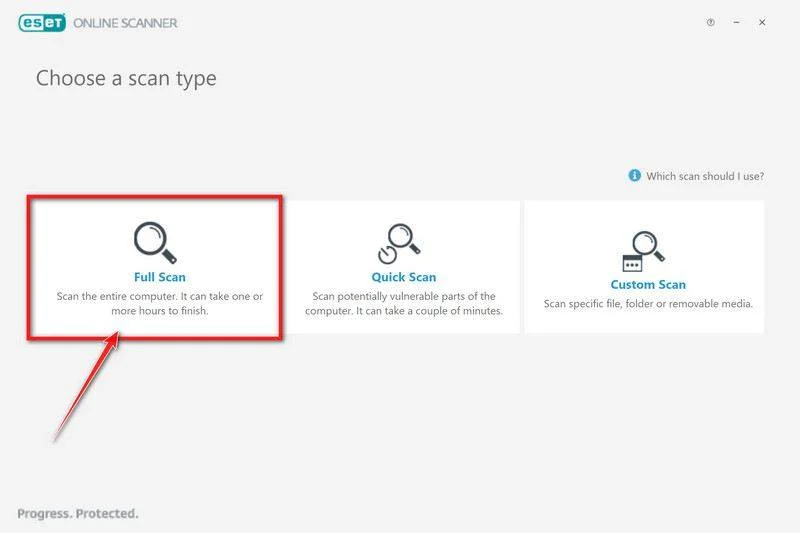
Start a Full Scan
Click Full Scan — this checks your entire computer, not just the common hiding spots.
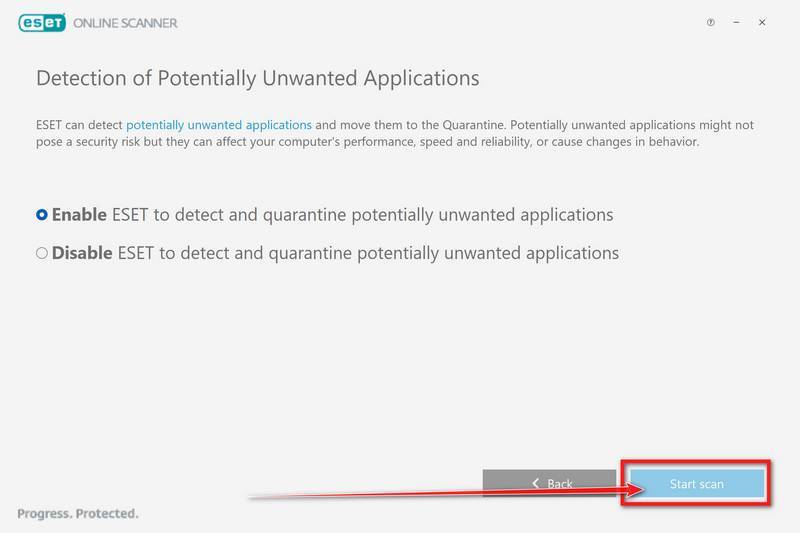
Select Enable for Detection of Potentially Unwanted Applications — this lets ESET catch adware and bundled junk programs, not just viruses. Then click Start scan.
-
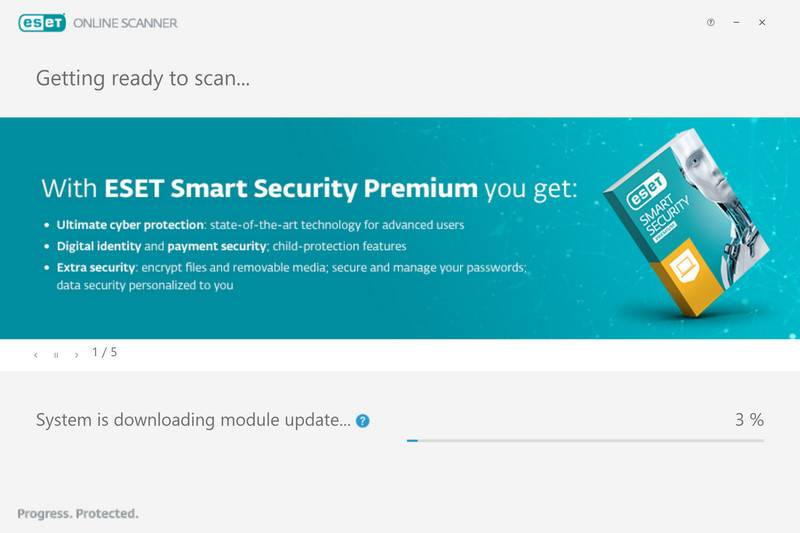
Wait for the Scan to Finish
ESET will now check every file on your computer. Because it’s a full scan, this can take a while — often an hour or more, depending on how much data you have. Leave it running in the background and check on it from time to time.
-
Review the Results
When the scan completes, the Found and resolved detections screen appears. Any threats found were automatically cleaned and quarantined — there’s nothing extra you need to do. Click View detailed results if you want to see exactly what was removed.
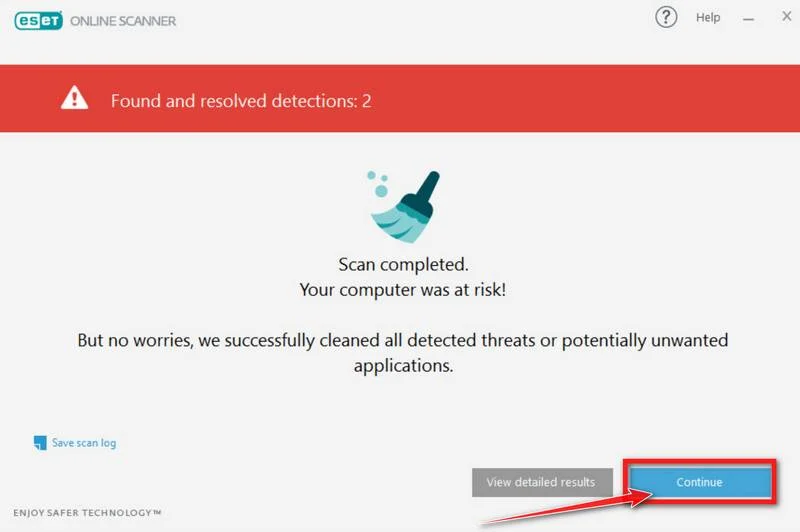
If ESET found nothing — congratulations, your computer has passed the final check and is malware-free.
Step 5: Attempt recovery only after the infection is removed
Restore copies into a clean, monitored environment. Confirm that the original access route is closed before returning recovered systems to ordinary network access.
Unfortunately, in most cases, it’s not possible to recover the files encrypted by this ransomware virus because the private key which is needed to unlock the encrypted files is only available through the attackers. However, below we’ve listed three options you can use to try and recover your files.
Option 1: Search a decryption tool for this ransomware
The cybersecurity community is constantly working to create ransomware decryption tools, so you can try to search these sites for updates:
- https://id-ransomware.malwarehunterteam.com/
- https://decrypter.emsisoft.com/
- https://noransom.kaspersky.com/
- https://www.avast.com/ransomware-decryption-tools
Option 2: Use EaseUS Data Recovery Wizard Free to recover the encrypted files
EaseUS Data Recovery Wizard Free can restore files and repair corrupted files with simple clicks. Its powerful scanning algorithms can identify and retrieve huge file type library, including all of the popular video files, audio files, photos, and document formats.
While the free version only allows you to recover 2 GB of data, this can be helpful to see if the recovery is possible and restore back the most important files from your computer.
-
Download EaseUS Data Recovery Wizard Free.
You can download EaseUS Data Recovery Wizard Free by clicking the link below.
Download EaseUS Data Recovery WizardOpens the download page in a new tab. EaseUS Data Recovery WizardFile recovery tool with a free version
 -
Double-click on the EaseUS Data Recovery Wizard Free setup file.
When EaseUS Data Recovery Wizard Free has finished downloading, double-click on the setup file to install EaseUS Data Recovery Wizard on your computer. In most cases, downloaded files are saved to the Downloads folder.
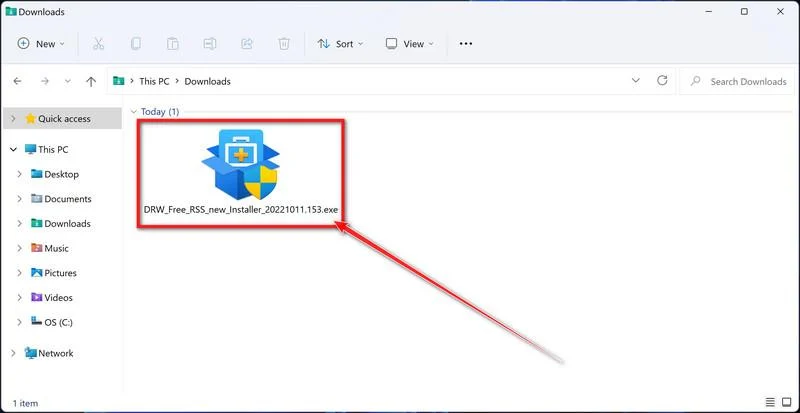
You may be presented with a User Account Control pop-up asking if you want to allow EaseUS to make changes to your device. If this happens, you should click “Yes” to continue with the EaseUS Data Recovery Wizard Free installation.
-
Follow the on-screen prompts to install EaseUS Data Recovery Wizard.
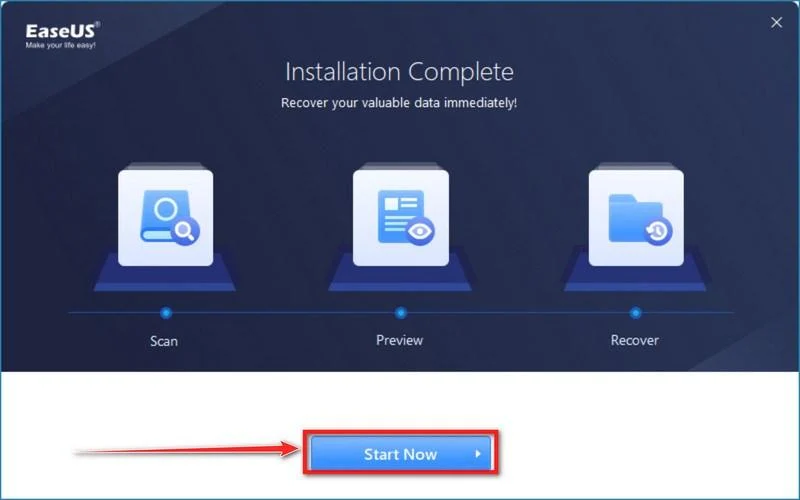
When the EaseUS Data Recovery Wizard installation begins, click on the “Install Now” as seen in the image below.
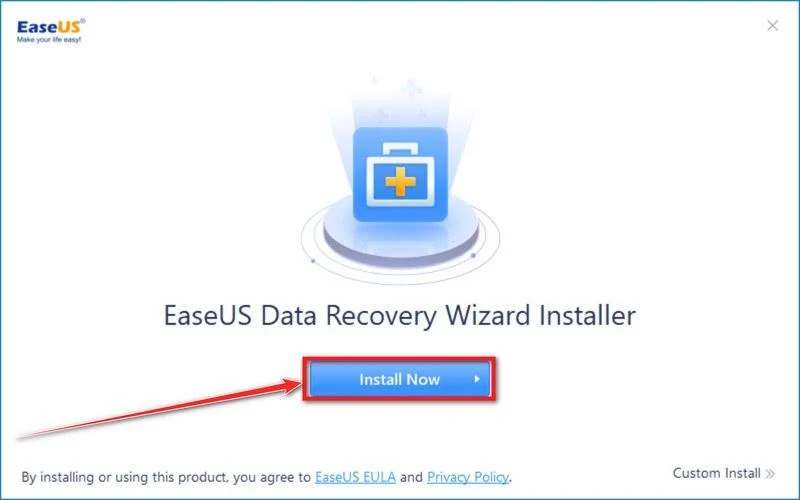
When your EaseUS Data Recovery Wizard installation completes, click the “Start Now” button to start the program.
-
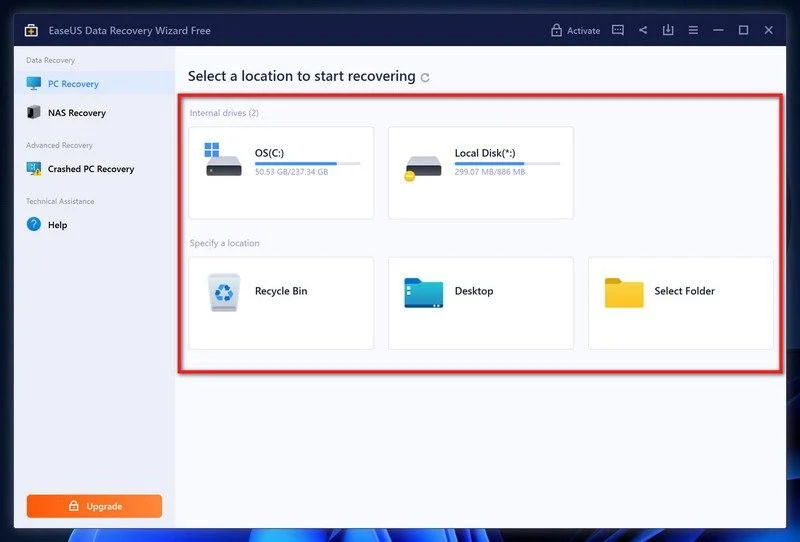
Select a location to start recovering the encrypted files.
Choose the drive or folder where you are the encrypted files that you want to recover and click “Scan“.
-
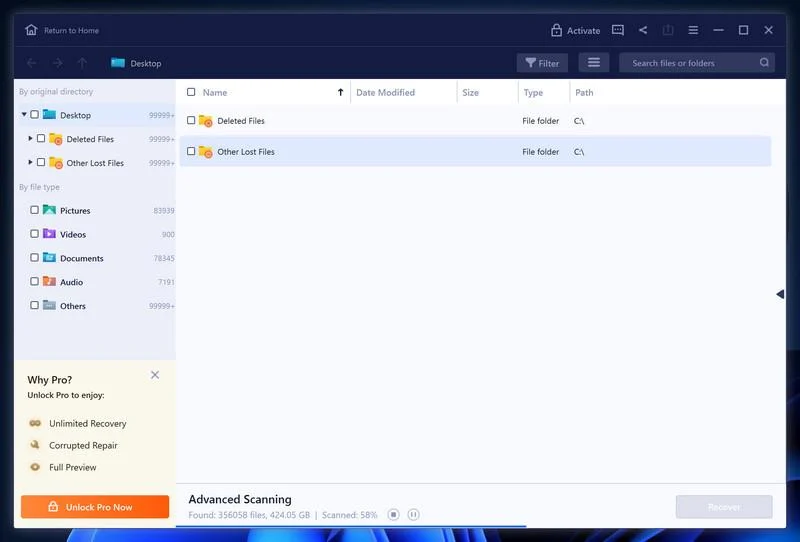
Wait for the EaseUS Data Recovery Wizard scan to complete.
EaseUS Data Recovery Wizard will now scan your computer files that can be restored. This process can take a few minutes, so we suggest you do something else and periodically check on the status of the scan to see when it is finished.
-
Find the files you want to recover.
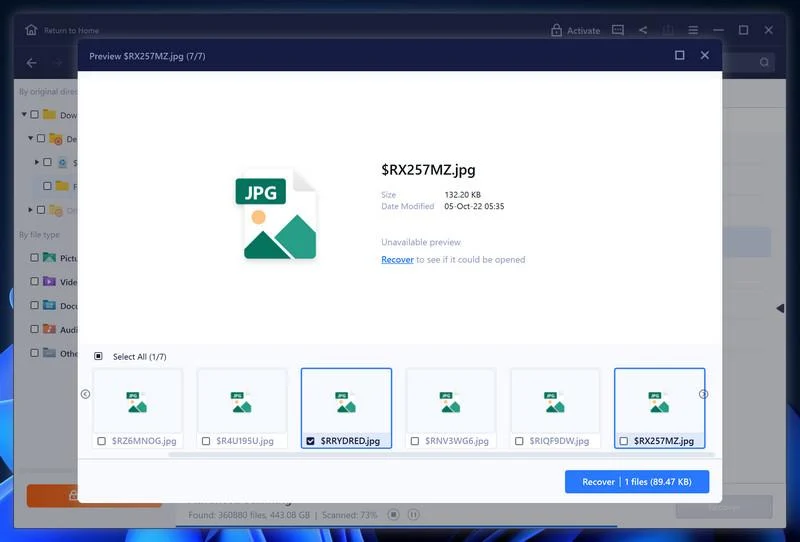
When the EaseUS Data Recovery Wizard scan is finished scanning it will show a screen that displays the files that can be recovered. This tool can recover a lot of data, use the “Filter” button to quickly filter specific file types and find the files that you want to recover.
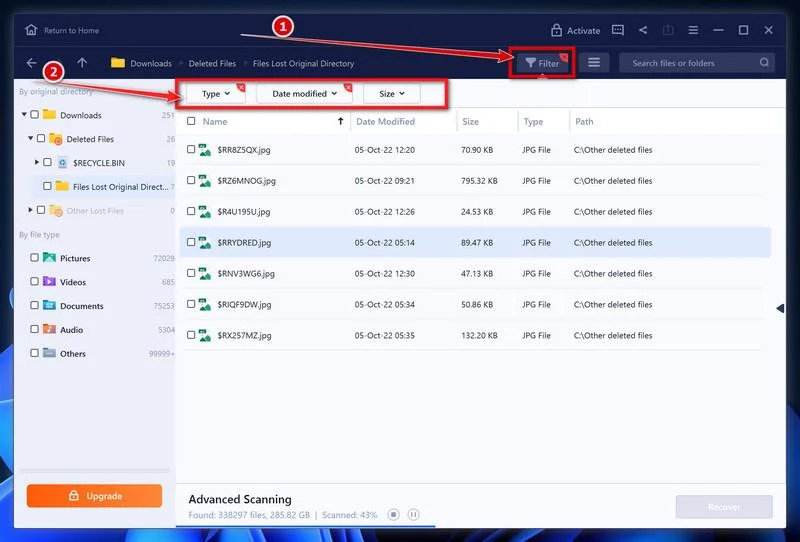
Click the “Preview” button or double-click on a file for a full preview.
-
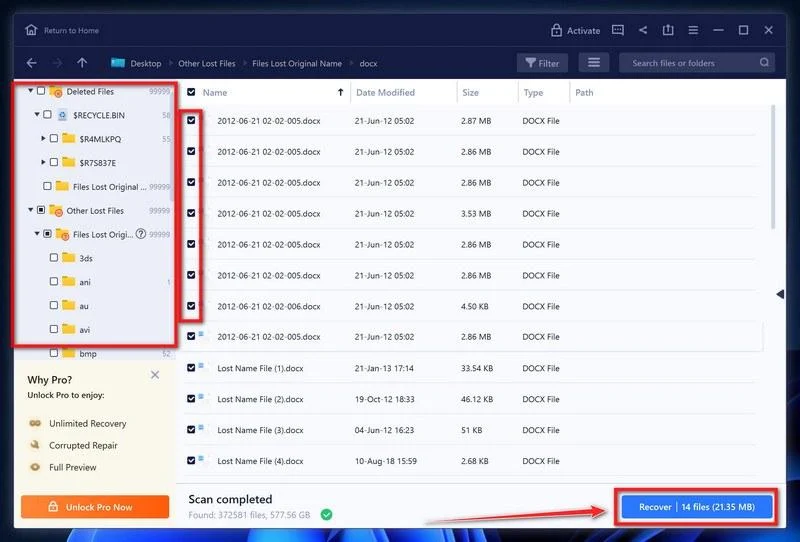
Select your files and click “Recover”.
Finally, select the the files you want to recover and click “Recover“.
Choose a safe location to save all the files.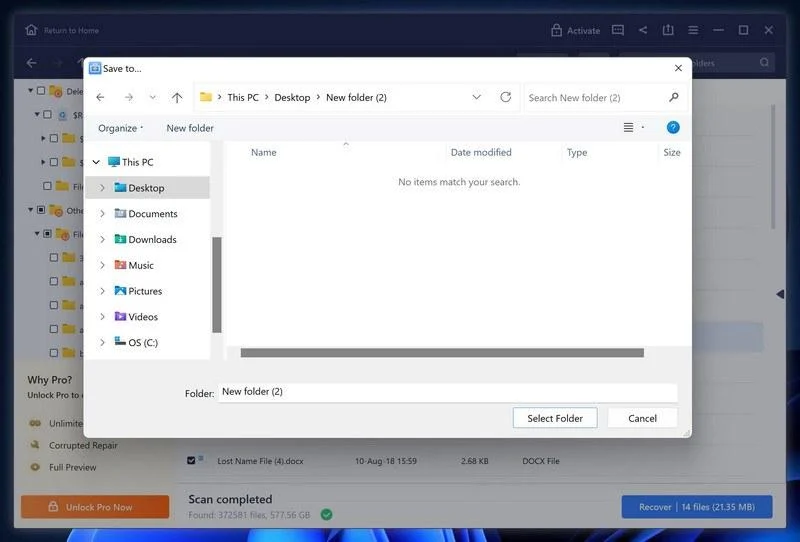
The free version only allow you to recover 2 GB of data, however, this will allow you to recover the most important files and see if EaseUS Data Recovery Wizard can correctly recover them.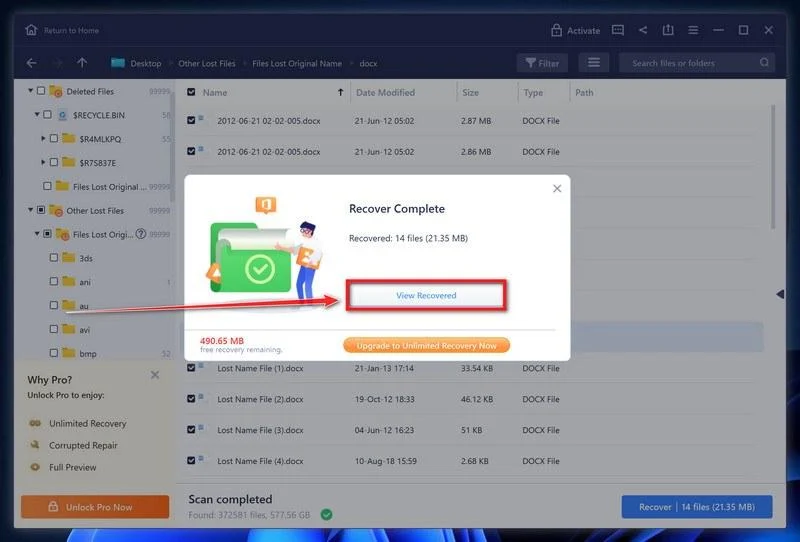
Option 3: Try to restore your files with ShadowExplorer
This ransomware will attempt to delete all shadow copies when you first start any executable on your computer after becoming infected. Thankfully, the infection is not always able to remove the shadow copies, so you should continue to try restoring your files using this method.
-
Download ShadowExplorer.
You can download ShadowExplorer from the below link.
Download ShadowExplorerOpens the official download page in a new tab.ShadowExplorerRestores files from Windows Shadow Volume Copies -
Install ShadowExplorer.
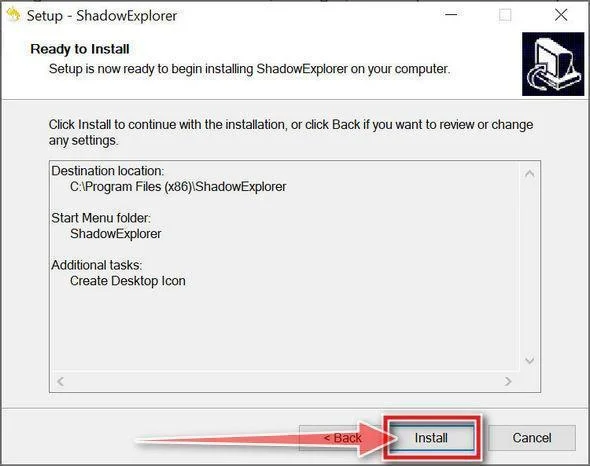
Double-click on the ShadowExplorer-x.x-setup file to start the installation process, then follow the on-screen promts to install this program.
-
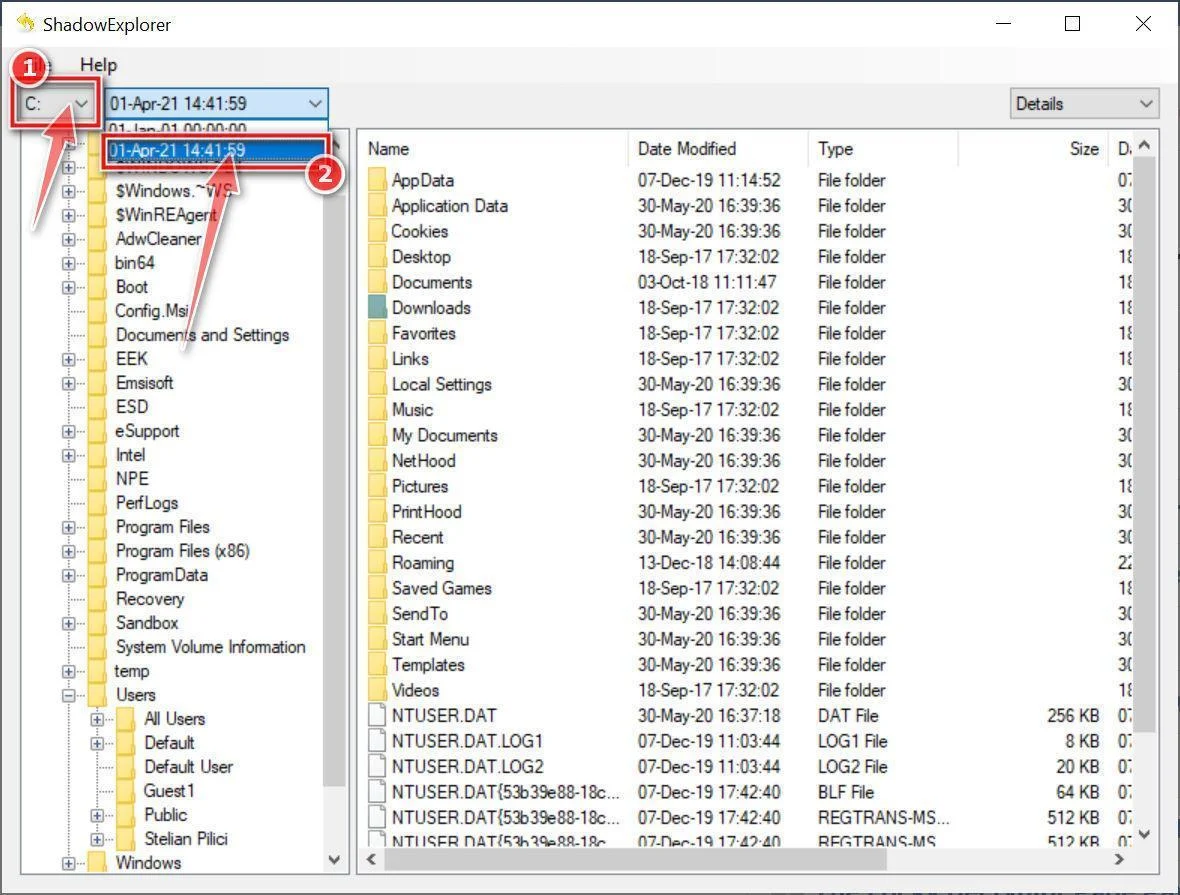
Select snapshot date.
Open ShadowExplorer and then from the top bar select the drive where the files that you want to save are located, then select from the snapshot available one previous to this infection.
-
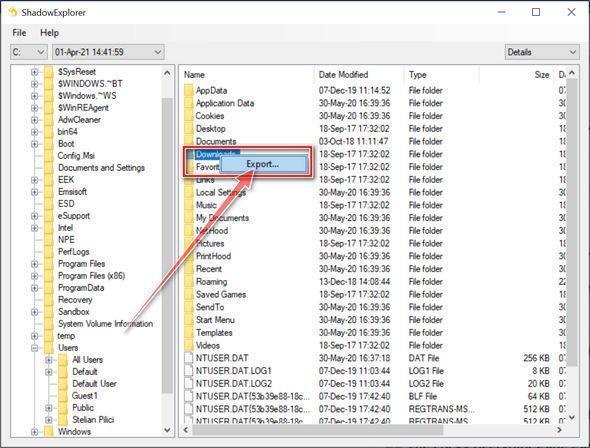
Export the files that you want to recover.
Once you have found a copy of the original file or folder, right-click on it and the select “Export”. A window will prompt you where you want to save the file or folder.
Recovery Options for `.proxima` Files
Begin with offline or immutable backups created before the intrusion. Verify several restored files and applications before trusting the entire recovery set.
Cloud storage may retain version history or deleted-file recovery. Access those features from a clean device and prevent synchronization with infected folders.
Volume Shadow Copies may help if Proxima failed to remove them. Their absence is common and should not be treated as evidence of a separate problem.
Check reputable projects such as No More Ransom and recognized ransomware identification services. Availability can change as researchers obtain keys or find implementation flaws.
File-carving tools may recover deleted originals from unused disk space in limited situations. Success falls when new data overwrites those areas.
Application-specific sources can help. Email attachments, shared portals, exported reports, collaborator copies, and previous revisions may rebuild part of the lost data.
Do not assume an online tool supports Proxima because it accepts the extension. Generic extensions and misleading advertisements can produce false identifications.
Never upload sensitive documents to an unknown “decryptor.” A recovery site can steal the data again or deliver another executable.
How to Prevent Another Ransomware Incident
Make backups unreachable from ordinary accounts
Keep multiple copies, including one offline or immutable version. A backup continuously mounted with write access can be encrypted alongside production files.
Test restoration regularly. A green backup dashboard is not proof that applications, permissions, databases, and dependencies can be rebuilt under pressure.
Reduce entry points and privilege
Patch operating systems, browsers, VPNs, remote-management tools, and internet-facing services. Disable unused remote access and require multifactor authentication for administrative accounts.
Separate everyday users from privileged administration. Limit service accounts and network shares to the access they genuinely need.
Make suspicious execution visible
Block unsigned or unapproved applications where practical. Monitor service creation, mass file changes, archive tools, disabled security controls, and unusual remote logins.
Train users to verify unexpected attachments and download links through another channel. One convincing invoice or update can bypass simple visual caution.
Proxima Ransomware FAQ
Can I open a file after removing `.proxima` from its name?
No. Removing the suffix changes only the filename. The contents remain encrypted and require a valid recovery source or working decryptor.
Is a free Proxima decryptor available?
Availability can change. Check reputable ransomware identification and decryption projects using copies, and never trust advertisements promising guaranteed recovery.
Will Malwarebytes decrypt Proxima files?
No. Malwarebytes can detect and remove active malware, but it cannot reconstruct unknown encryption keys. File recovery is a separate phase.
Should I delete Proxima_Readme.txt?
Keep a protected copy. Its wording, identifier, and contact information can help identify the campaign and support law-enforcement or forensic work.
Does the note prove my files were stolen?
No. Treat the claim seriously, but investigate network and system evidence. The same statement may appear in a standard note whether exfiltration occurred or not.
Can I reconnect backups after one clean scan?
Not safely. Confirm the foothold is closed, credentials are rotated, and affected systems are clean before exposing writable backup data.
The Bottom Line
Proxima ransomware appends `.proxima`, leaves `Proxima_Readme.txt`, and may combine file encryption with a claim that data was stolen.
Contain the environment first, preserve evidence, remove every access path, and recover from verified copies only after the systems are trustworthy.
Do not let the ransom note set the response plan. Careful isolation and tested recovery provide more control than promises from the attacker.
If you are still having problems with your computer after completing these instructions, then please follow one of the steps:
- Run a computer scan with Emsisoft Emergency Kit
- Ask for help in our Malware Removal Assistance for Windows forum.

Join the discussion
0 commentsShare your experience or ask a question about this article.
Your progress
Did these steps help?
Let us know how the guide worked for you.
Describe what you see and the step you reached. Keep passwords and other private information out.
Discussion
Start the conversation
Have a question or something useful to share? Add the first comment.