If your web browser is constantly being redirected to sites that display a “Apple Warning Alert” notification, asking you to call a support number to fix it, then it is possible that you have an potentially unwanted application installed on your device.
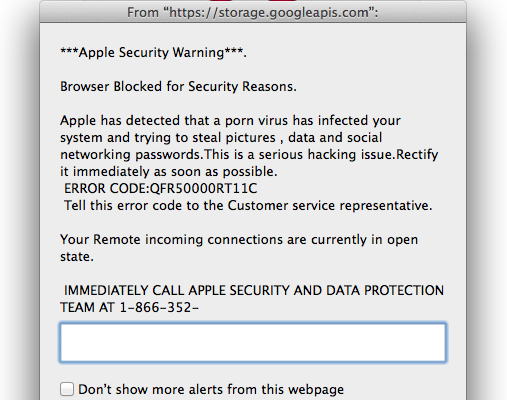
The bogus “Apple Warning Alert” alert is shown in such a way as to trick the user into thinking their computer has crashed or that a virus has been detected on the computer. It does this to try and scare the infected user into calling one of the listed numbers in order to receive support. In reality, though, they will only be greeted with people who are trying to sell them unneeded support contracts and services.
The “Apple Warning Alert” pop-up will have this message:
Apple Support Center-Attention!!!
Apple Warning Alert !! Apple cloud scan has detected critical vulnerabilities in your device. And only Apple-certified repairs that are backed by Apple can resolve the issue. Start your repair request now by calling
Critical Warning Alert !! Apple Device Infected
Error Code: 268D3 System ID:
Status: Call for immediate support
Malicious Pornographic Spyware/Riskware/Ransomware Detected
Do not ignore this critical alert.
If you close this page, your computer access will be disabled to prevent further damage to our network.
Where to get a repair
Whichever option you choose, you’ll get your product back working exactly the way it should.
Call Apple Repair Center
Start online or give us a call and we’ll arrange shipment for your product to an Apple Repair Center — all on your schedule and without an appointment. This service is available for most Apple products.
Call and then Visit an Apple Authorized Service Provider
We created our network of Apple Authorized Service Providers to give you a great selection of nearby locations for Apple-certified repairs. All repairs are done by technicians we train so that you’ll receive the same quality of service you get from Apple.
Call with a Genius at an Apple Store
You can do more than shop and learn in an Apple Retail Store. Make a reservation with a Genius to get help with a hardware repair. Our team will take great care of your product and make sure you get the help you need.
The scammer will typically attempt to get the victim to allow remote access to their computer. After remote access is gained, the scammer relies on confidence tricks typically involving utilities built into Windows and other software in order to gain the victim’s trust to pay for the supposed “support” services, when the scammer actually steals the victim’s credit card account information.
How to remove Apple Warning Alert Adware from Apple Mac OS (Guide)
Please perform all the steps in the correct order. If you have any questions or doubt at any point, STOP and ask for our assistance.
- STEP 1: Uninstall the malicious apps from macOS
- STEP 2: Remove the unwanted extensions from your Web Browser
- STEP 3: Perform a system scan with Malwarebytes for Mac Free
This step is needed if the malicious “Apple Warning Alert” pop-ups will not allow you to close your browser.
- Press Command + Option + Escape simultaneously. This will open the open the Force Quit Applications window.
![Press Command + Option + Escape to start Force Quit menu [Image: Press Command + Option + Escape to start Force Quit menu]](https://malwaretips.com/blogs/wp-content/uploads/2013/07/Force-Quit-an-Application-in-Mac-OS-X-Step-1.jpg)
- Select Safari, Chrome, Firefox or any other browser in which your are seeing the Tech Support Scam – Call for Support ransomware notification.
![Select Firefox, Chrome or Safari from Force Quit menu [Image: Select Firefox, Chrome or Safari from Force Quit menu]](https://malwaretips.com/blogs/wp-content/uploads/2013/07/Force-Quit-an-Application-in-Mac-OS-X-Step-2.jpg)
- Click the button that says “Force Quit“. This will forcefully end your browser program, thus removing the Tech Support Scam – Call for Support browser hijacker.
![How to remove "Apple Warning Alert" Pop-up (Support Scam) 2 [Image: Click on the Force Quit button to remove Eu-security-dangerous-alert-01.in virus]](https://malwaretips.com/blogs/wp-content/uploads/2013/07/Force-Quit-an-Application-in-Mac-OS-X-Step-3.jpg)
If you cannot switch from the unresponsive app, press Command + Option + Shift + Esc for three seconds to force it to quit. This key combination tells macOS to force quit the frontmost app.Alternatively, if you are using Safari or any other browser, you can disconnect your Internet, then open the web browser, navigate from the malicious web page, then reconnect to the Internet.
STEP 1: Uninstall the malicious apps from macOS
In this first step, we will try to identify and remove any malicious apps that might be installed on your device. The bellow video will explain how to remove unwanted apps from your macOS.
Known malicious apps: MacSaver, MacVX (and variants like MacVaX), MacCaptain, MacPriceCut, SaveOnMac, Mac Global Deals or MacDeals, MacSter, MacXcoupon, Shop Brain (or variants like SShoP Braaiin), PalMall, MacShop, MacSmart, News Ticker Remover, Shopper Helper Pro, Photo Zoom, Best YouTube Downloader, ArcadeYum, Extended protection, Video download helper, FlashFree or GoldenBoy.
STEP 2: Remove the unwanted extensions from your Web Browser
Safari
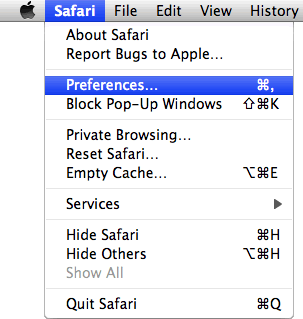
- From the Safari menu, select “Preferences“.
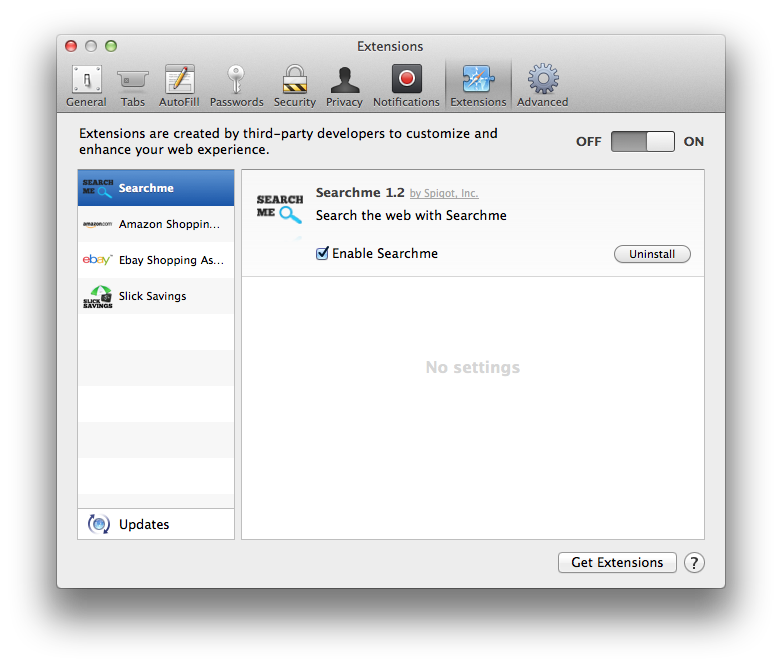
In the Safari Preferences window, click the “Extensions” tab. Find any unknown plugin, then click on the “Uninstall” button.This infection can add more than one extension, it is recommended that you remove all unknown extensions from Safari.
Known malicious extensions: MacSaver, MacVX (and variants like MacVaX), MacCaptain, MacPriceCut, SaveOnMac, Mac Global Deals or MacDeals, MacSter, MacXcoupon, Shop Brain (or variants like SShoP Braaiin), PalMall, MacShop, MacSmart, News Ticker Remover, Shopper Helper Pro, Photo Zoom, Best YouTube Downloader, ArcadeYum, Extended protection, Video download helper, FlashFree or GoldenBoy.
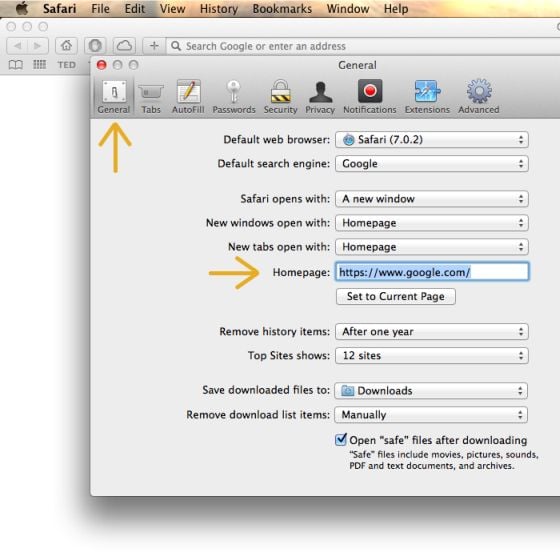
- Next, select “Preferences“, go to the “General” tab and change the “Default Search Engine” to Google. Then, in the “General” tab, find the “Home Page” and change it to “google.com”.
Google Chrome
- Click on Chrome’s main menu button, represented by three horizontal lines. When the drop-down menu appears, select the option labeled Settings.
![Click on Settings button [Image: Click on Settings button]](https://malwaretips.com/blogs/wp-content/uploads/2014/11/reset-Chrome-1.jpg)
- Chrome’s Settings should now be displayed in a new tab or window, depending on your configuration. Next, scroll to the bottom of the page and click on the Show advanced settings link (as seen in the below example).
![Click on Show advanced settings link [Image: Click on Show advanced settings link]](https://malwaretips.com/blogs/wp-content/uploads/2014/11/reset-Chrome-2.jpg)
- Chrome’s advanced Settings should now be displayed. Scroll down until the Reset browser settings section is visible, as shown in the example below. Next, click on the Reset browser settings button.
![Click on Reset browser button [Image: Click on Reset browser button]](https://malwaretips.com/blogs/wp-content/uploads/2014/11/reset-Chrome-3.jpg)
- A confirmation dialog should now be displayed, detailing the components that will be restored to their default state should you continue on with the reset process. To complete the restoration process, click on the Reset button.
![Click on Reset button to restore Chrome to default settings [Image: Click on Reset button to restore Chrome to default settings]](//malwaretips.com/blogs/wp-content/uploads/2014/11/reset-Chrome-4.jpg)
Mozilla Firefox
- In the Firefox’s address bar type: about:support, then click on Enter.
- Click the “Reset Firefox” button in the upper-right corner of the “Troubleshooting Information” page.
![Reset Firefox to its default settings [Image: Reset Firefox to its default settings]](https://malwaretips.com/blogs/wp-content/uploads/2014/11/reset-Firefox-1.jpg)
- To continue, click on the “Reset Firefox” button in the new confirmation window that opens.
!['Click [Image: Click on the Reset Firefox button]](https://malwaretips.com/blogs/wp-content/uploads/2014/11/reset-Firefox-2.jpg)
- Firefox will close itself and will revert to its default settings. When it’s done, a window will list the information that was imported. Click on the “Finish“.
(OPTIONAL) STEP 3: Perform a system scan with Malwarebytes for Mac Free
Malwarebytes for Mac quickly scans your Mac for malware and adware and then lets you remove it with just a few clicks.
This step should be performed only if your issues have not been solved by the previous steps.
- You can download Malwarebytes fro Mac Free from the below link:
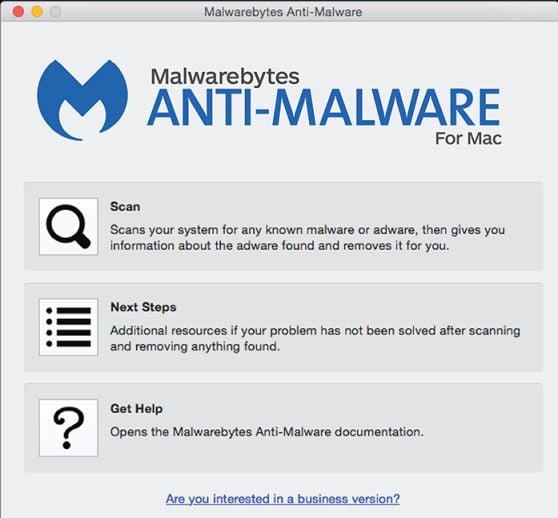
MALWAREBYTES FOR MAC DOWNLOAD LINK (This link will open a new web page from where you can download “Malwarebytes for Mac”) - Install Malwarebytes for Mac on your device, then click on the “Scan” button to perform a system check-up.
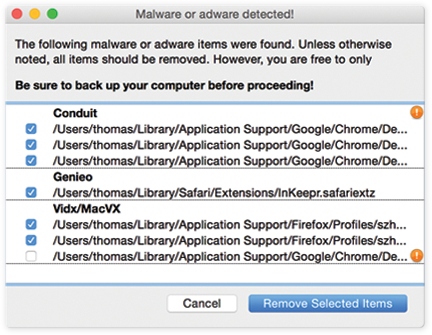
- When the scan has completed, click on the “Remove Selected Items” to remove all the malware that Malwarebytes has detected.

![Click on Reset button to restore Chrome to default settings [Image: Click on Reset button to restore Chrome to default settings]](http://malwaretips.com/blogs/wp-content/uploads/2014/11/reset-Chrome-4.jpg)

