The Fast Search World extension is a browser hijacker that it will change the homepage and search engine for your web browser to Fast Search World New Tab Search.
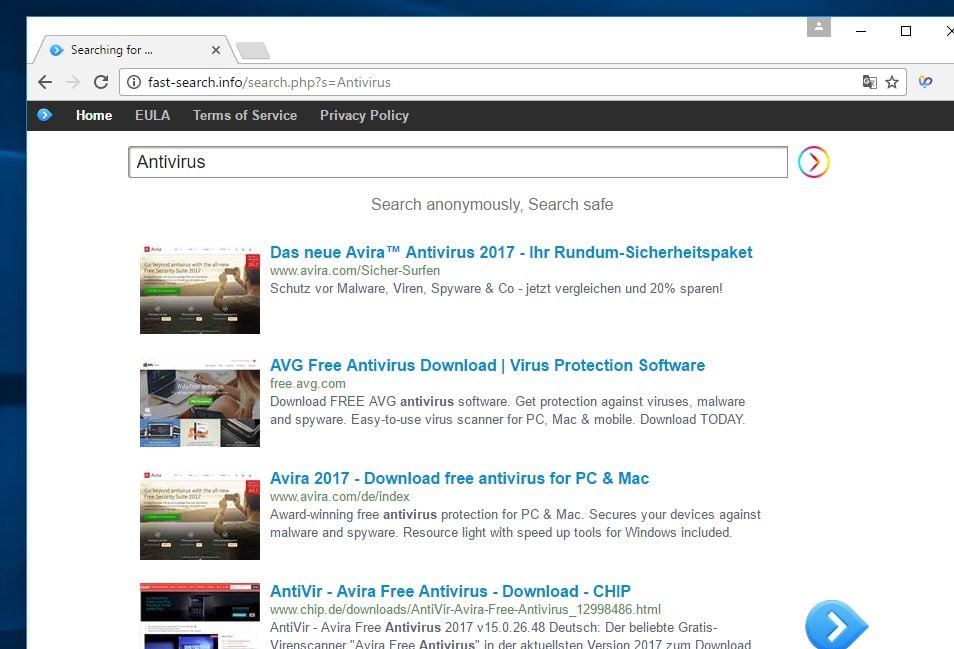
The Fast Search World New Tab Search redirect is caused by a browser hijacker which is installed by the users, whether that is knowingly or not. Often, this type of program is offered through advertisements or bundled with other software, leaving the user puzzled where this software came from.
Browser hijackers are a type of malware created for the purpose of modifying Internet browser settings without the user’s knowledge or consent.
The Fast Search World browser hijacker will change your browser search provider to Fast Search World New Tab Search, which will redirect to search result pages from http://search.yahoo.com. This is most likely done to generate advertising revenue by using Yahoo Search for its search results.
When the Fast Search World New Tab Search browser hijacker is installed on a PC, common symptoms include:
- Changing the web browser’s default homepage to Fast Search World New Tab
- Changing the browser’s search provider, built-in search box to Fast Search World New Tab Search
- Ability to modify the ‘new tab’ functionality to launch the modified search portal page
- Loads into the web browser via the Fast Search World extension or add-on
Always opt for the custom installation and deselect anything that is not familiar, especially optional software that you never wanted to download and install in the first place. It goes without saying that you should not install software that you don’t trust.
How to remove Fast Search World New Tab Search search redirect (Removal Guide)
Please perform all the steps in the correct order. If you have any questions or doubt at any point, STOP and ask for our assistance.
- STEP 1: Uninstall Fast Search World from Windows
- STEP 2: Use Malwarebytes to remove the Fast Search World New Tab Search
- STEP 3: Use HitmanPro to scan for malware and unwanted programs
- (OPTIONAL) STEP 4: Reset the browser settings to their original defaults
STEP 1 : Uninstall Fast Search World from Windows
In this first step, we will try to identify and remove any malicious program that might be installed on your computer.
Windows 10
Go to “Apps and Features”.
Right-click on the Start
 button in the lower-left corner and select “Apps and Features”. This will take you directly to your list of installed programs.
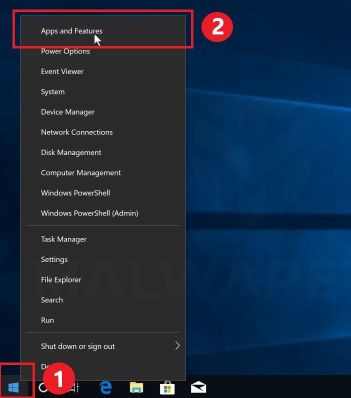 If you can’t find the “Apps and Features” option in the Start menu, click on the Start
 button, then go to “Settings” > “Apps”
Find the malicious program and uninstall it.
The “App and Features” screen will be displayed with a list of all the programs installed on your PC. Scroll through the list until you find the “Fast Search World” program, click it, and then click “Uninstall”.
The malicious program may have a different name on your computer. If you cannot find any malicious programs on your PC, you can proceed with the next step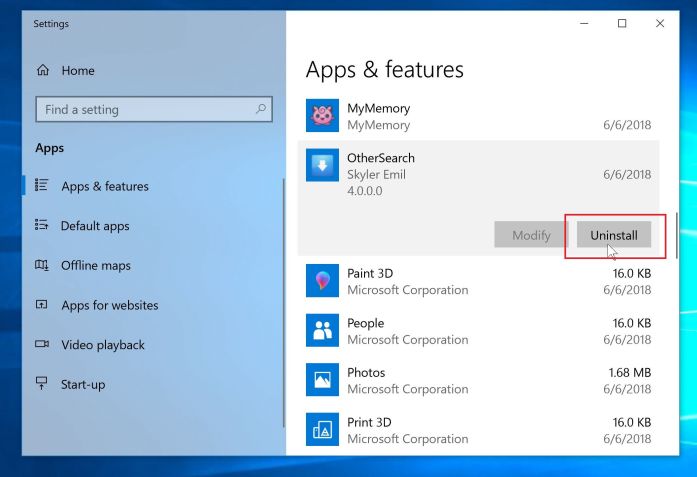
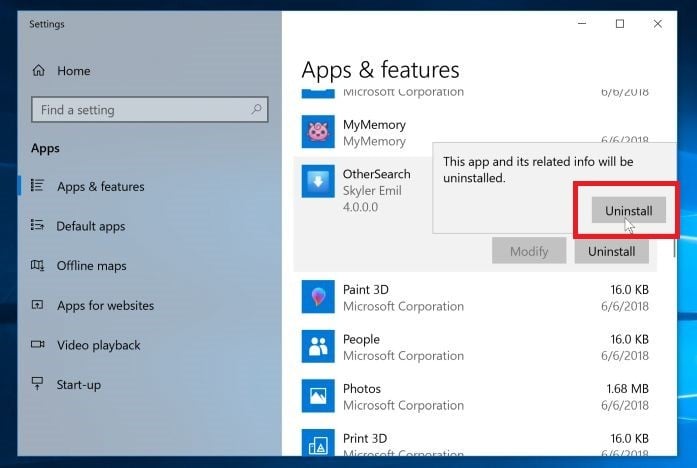
Follow the on-screen prompts to uninstall the program.
You will now see a pop-up window informing you that the program and its related info will be uninstalled. Click on the “Uninstall” button to complete the process (you may also see a pop-up asking if you want to let this program make changes to your computer, hit “Yes” to proceed).
Make sure to read all of the prompts carefully, because some malicious programs try to sneak things in hoping that you won’t read closely.
Windows 8
Go to “Program and Features”.
Right-click on the Start
 button in the lower-left corner and select “Programs and Features”. This will take you directly to your list of installed programs.
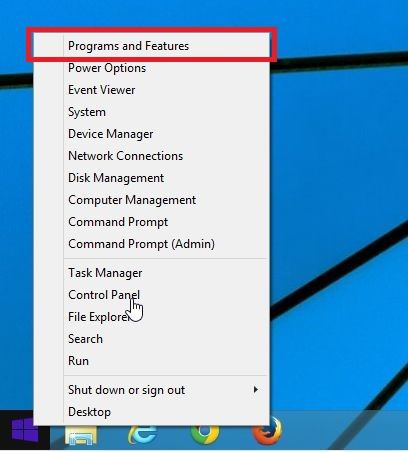
- If you can’t find the Programs and Features in the Start menu, type “programs and features” into the search bar at the bottom of the Start window, then click the “Programs and Features” result.
- If you don’t have a Start button, you are likely running Windows 8 instead of Windows 8.1. Press the Windows key + X to open the menu instead and select “Programs and Features”.
Find the malicious program and uninstall it.
The “Programs and Features” screen will be displayed with a list of all the programs installed on your PC. Scroll through the list until you find the “Fast Search World” program, then click to highlight it, then click the “Uninstall” button that appears on the top toolbar.
The malicious program may have a different name on your computer. If you cannot find any malicious programs on your PC, you can proceed with the next step.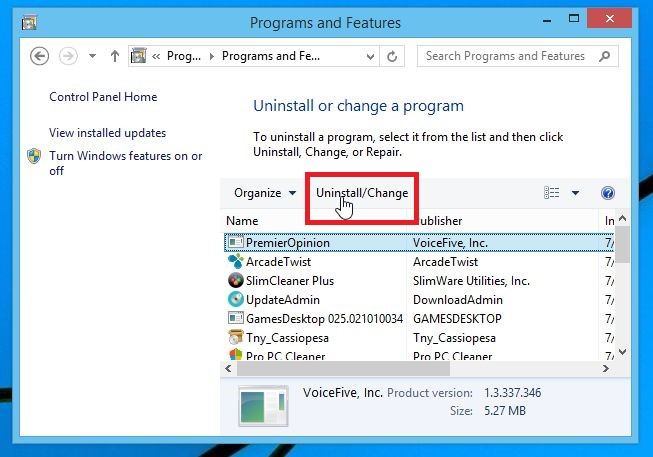
Follow the on-screen prompts to uninstall the program.
In the next message box, confirm the uninstall process by clicking on Yes, then follow the prompts to uninstall the program. Make sure to read all of the prompts carefully, because some malicious programs try to sneak things in hoping that you won’t read closely.
Windows 7
Click on Start, then select “Control Panel”.
Start by clicking on the Start
 button, then click on “Control Panel”.
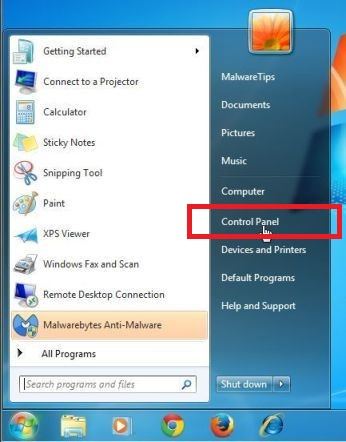 If you don’t see “Control Panel” here, type control panel into the search bar at the bottom of the Start window, then click the “Control Panel” result.
Click on “Uninstall a Program”.
When the “Control Panel” appears, click on “Uninstall a Program” from the Programs category.
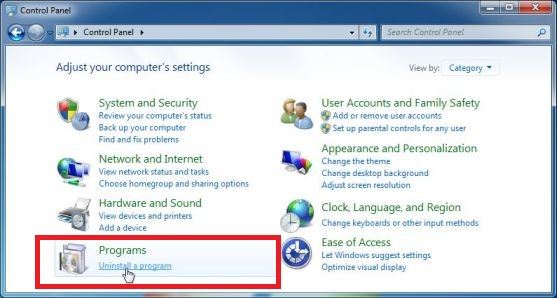
Find the malicious program and uninstall it.
The “Programs and Features” screen will be displayed with a list of all the programs installed on your PC. Scroll through the list until you find the “Fast Search World” program, then click to highlight it, then click the “Uninstall” button that appears on the top toolbar.
The malicious program may have a different name on your computer. If you cannot find any malicious programs on your PC, you can proceed with the next step.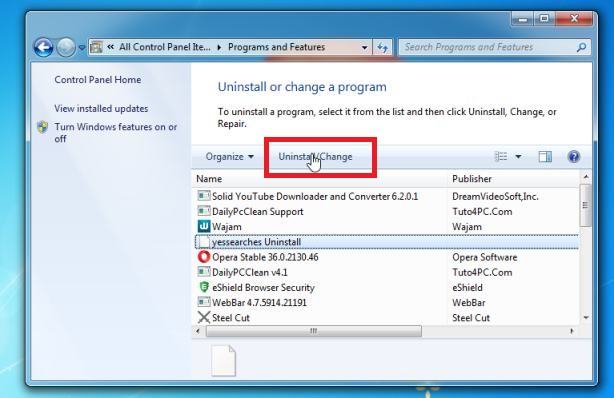
Follow the on-screen prompts to uninstall the program.
In the next message box, confirm the uninstall process by clicking on Yes, then follow the prompts to uninstall the program. Make sure to read all of the prompts carefully, because some malicious programs try to sneak things in hoping that you won’t read closely.
STEP 2: Use Malwarebytes to remove the Fast Search World New Tab Search
Malwarebytes is one of the most popular and most used anti-malware software for Windows, and for good reasons. It is able to destroy many types of malware that other software tends to miss, without costing you absolutely nothing. When it comes to cleaning up an infected device, Malwarebytes has always been free and we recommend it as an essential tool in the fight against malware.
The first time you install Malwarebytes, you’re given a free 14-day trial of the premium edition, which includes preventative tools like real-time scanning and specific protection from ransomware. After two weeks, it automatically reverts to the basic free version that will detect and clean up malware infections only when you run a scan. It is important to note that Malwarebytes will run alongside antivirus software without conflicts.
Download Malwarebytes.
You can download Malwarebytes by clicking the link below.
 MALWAREBYTES DOWNLOAD LINK
(The above link open a new page from where you can download Malwarebytes)Double-click on the Malwarebytes setup file.
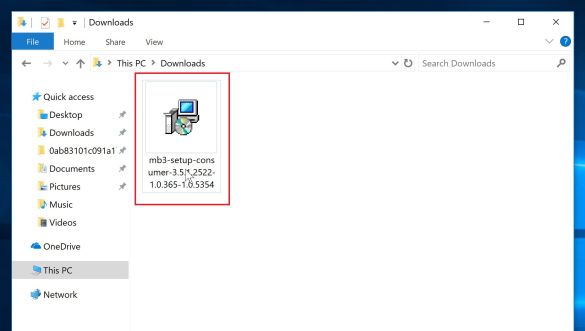
When Malwarebytes has finished downloading, double-click on the mb3-setup-consumer-x.x.x.xxxx.exe file to install Malwarebytes on your PC. In most cases, downloaded files are saved to the Downloads folder.
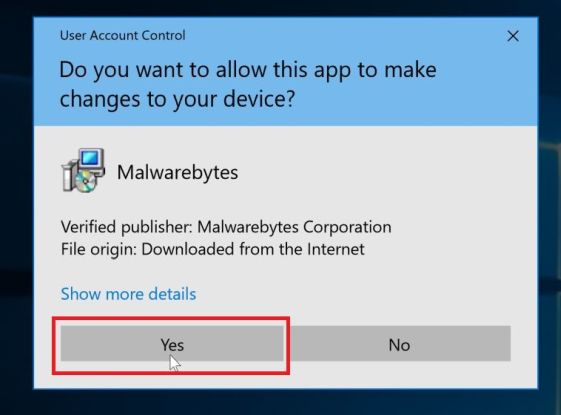
You may be presented with an User Account Control pop-up asking if you want to allow Malwarebytes to make changes to your device. If this happens, you should click “Yes” to continue with the installation.
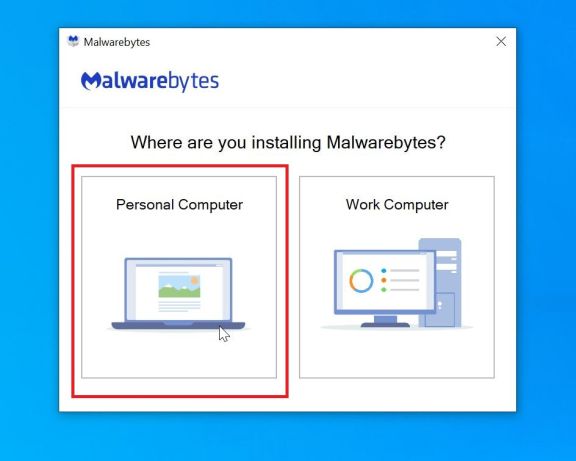
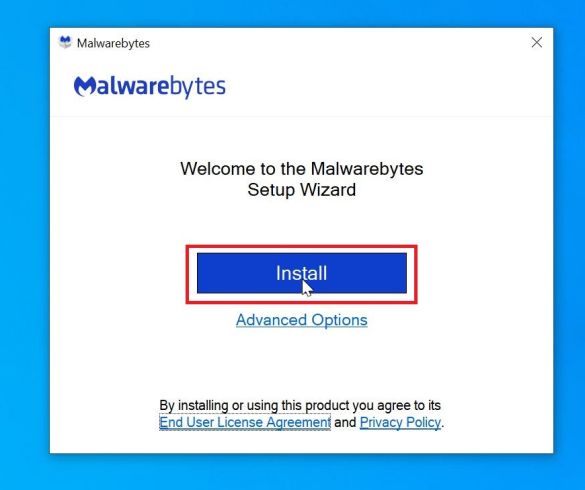
Follow the on-screen prompts to install Malwarebytes.
When the Malwarebytes installation begins, you will see the Malwarebytes Setup Wizard which will guide you through the installation process. To install Malwarebytes on your PC, click on the “Agree and Install” button.
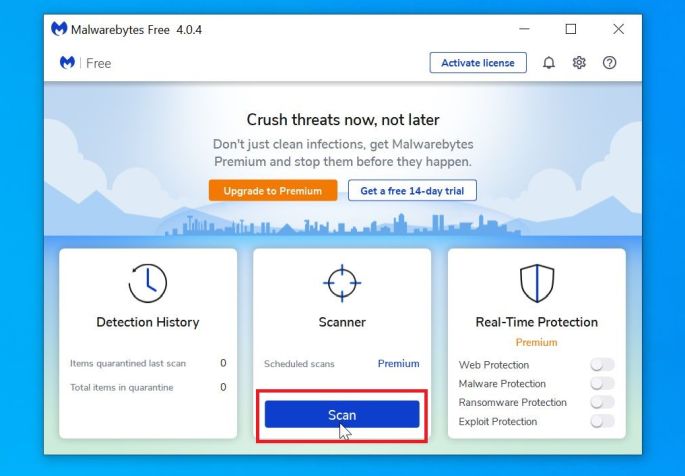
Click on “Scan Now”.
Once installed, Malwarebytes will automatically start and update the antivirus database. To perform a system scan, click on the “Scan Now” button.
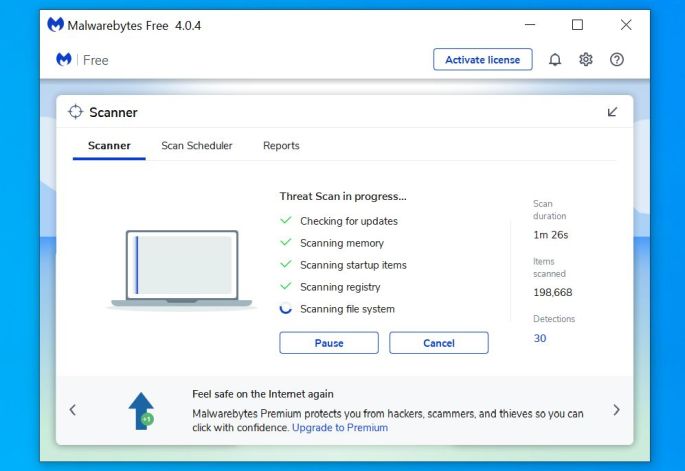
Wait for the Malwarebytes scan to complete.
Malwarebytes will now start scanning your computer for adware and other malicious programs. This process can take a few minutes, so we suggest you do something else and periodically check on the status of the scan to see when it is finished.
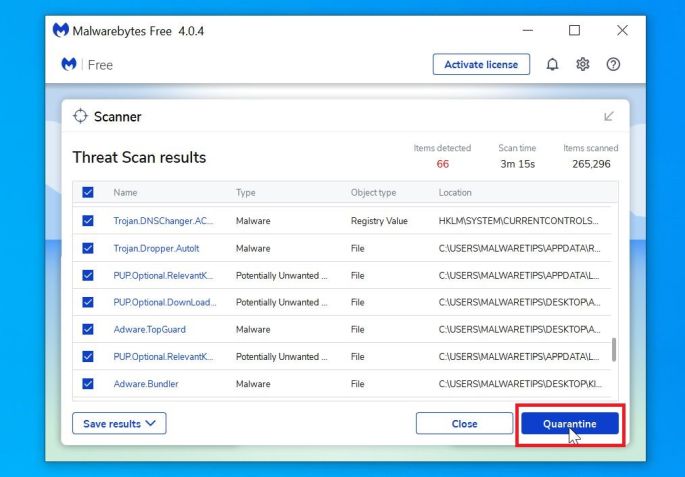
Click on “Quarantine Selected”.
When the scan has completed, you will be presented with a screen showing the malware infections that Malwarebytes has detected. To remove the malicious programs that Malwarebytes has found, click on the “Quarantine Selected” button.
Reboot your computer.
Malwarebytes will now remove all the malicious files and registry keys that it has found. To complete the malware removal process, Malwarebytes may ask you to restart your computer.
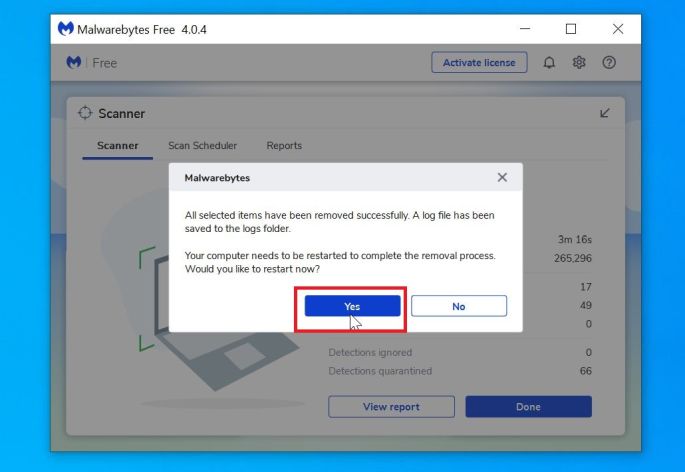
When the malware removal process is complete, you can close Malwarebytes and continue with the rest of the instructions.
STEP 3: Use HitmanPro to scan for malware and unwanted programs
HitmanPro is a second opinion scanner that takes a unique cloud-based approach to malware scanning. HitmanPro scans the behavior of active files and also files in locations where malware normally resides for suspicious activity. If it finds a suspicious file that’s not already known, HitmanPro sends it to their clouds to be scanned by two of the best antivirus engines today, which are Bitdefender and Kaspersky.
Although HitmanPro is shareware and costs $24.95 for 1 year on 1 PC, there is actually no limit in scanning. The limitation only kicks in when there is a need to remove or quarantine detected malware by HitmanPro on your system and by then, you can activate the one time 30 day trial to enable the clean up.
Download HitmanPro.
You can download HitmanPro by clicking the link below.
 HITMANPRO DOWNLOAD LINK
(The above link will open a new web page from where you can download HitmanPro)Install HitmanPro.
When HitmanPro has finished downloading, double-click on “hitmanpro.exe” (for 32-bit versions of Windows) or “hitmanpro_x64.exe” (for 64-bit versions of Windows) to install this program on your PC. In most cases, downloaded files are saved to the Downloads folder.
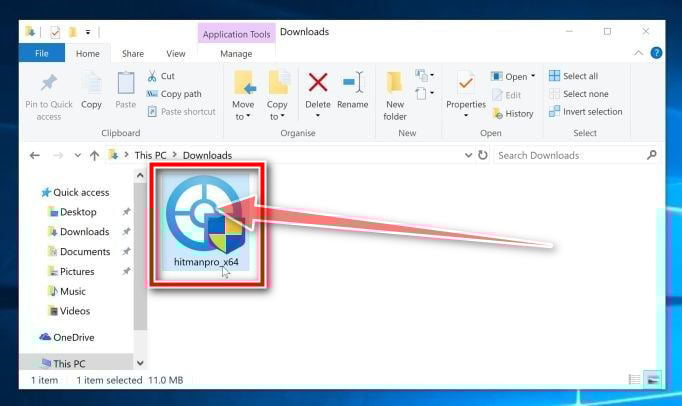
You may be presented with an User Account Control pop-up asking if you want to allow HitmanPro to make changes to your device. If this happens, you should click “Yes” to continue with the installation.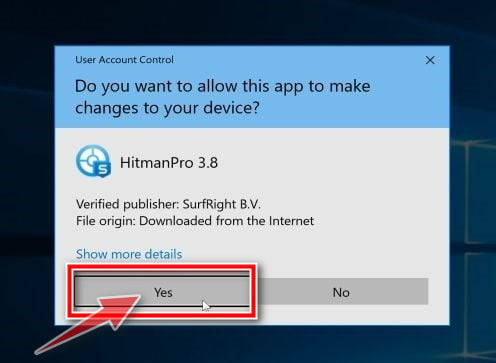
Follow the on-screen prompts.
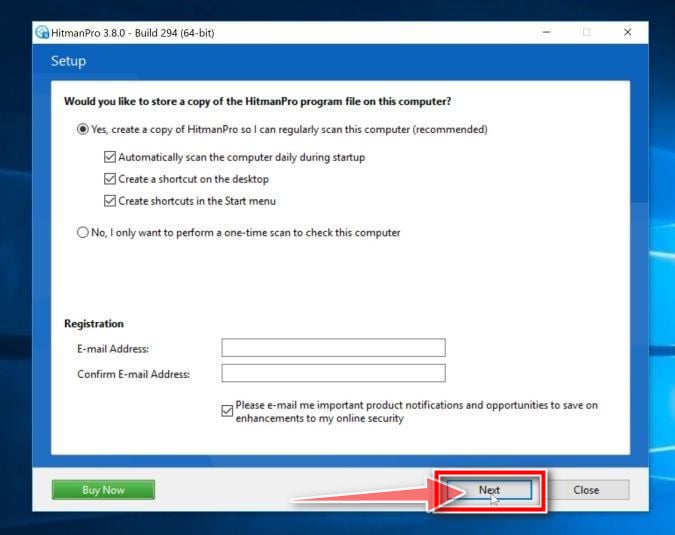
When HitmanPro starts you will be presented with the start screen as shown below. Click on the “Next” button to perform a system scan.
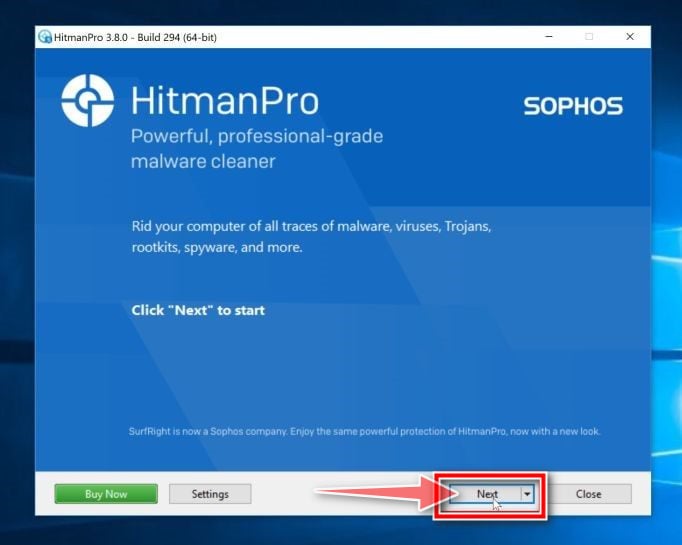
Wait for the HitmanPro scan to complete.
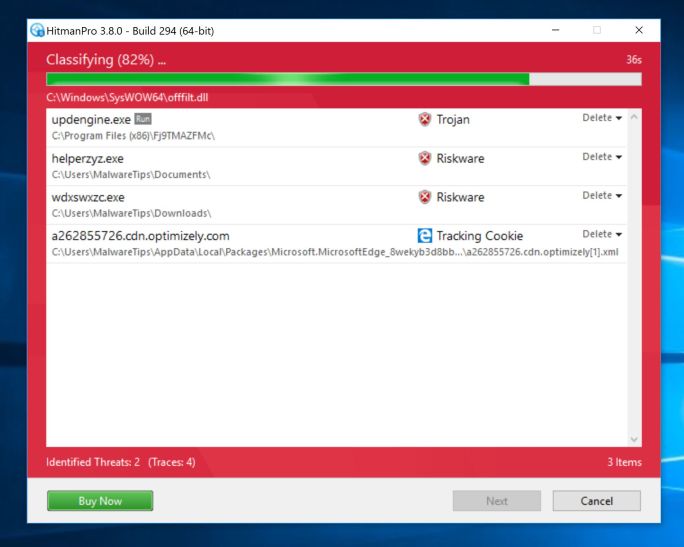
HitmanPro will now begin to scan your computer for malicious programs. This process will take a few minutes.
Click on “Next”.
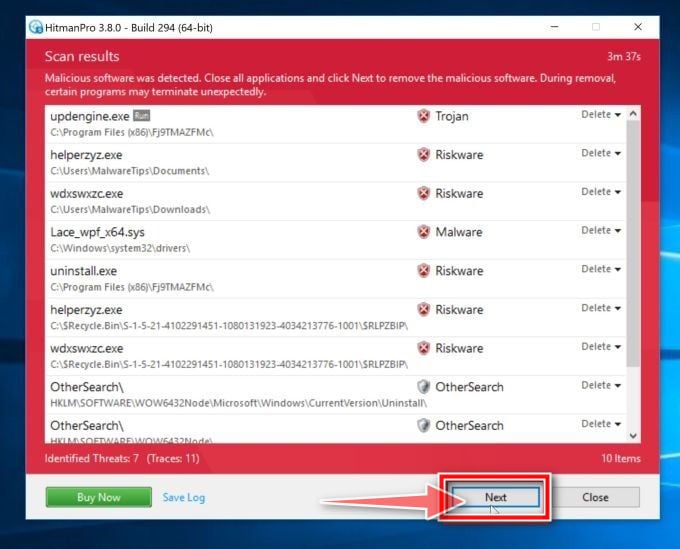
When HitmanPro has finished the scan, it will display a list of all the malware that the program has found. Click on the “Next” button to remove the malicious programs.
Click on “Activate free license”.
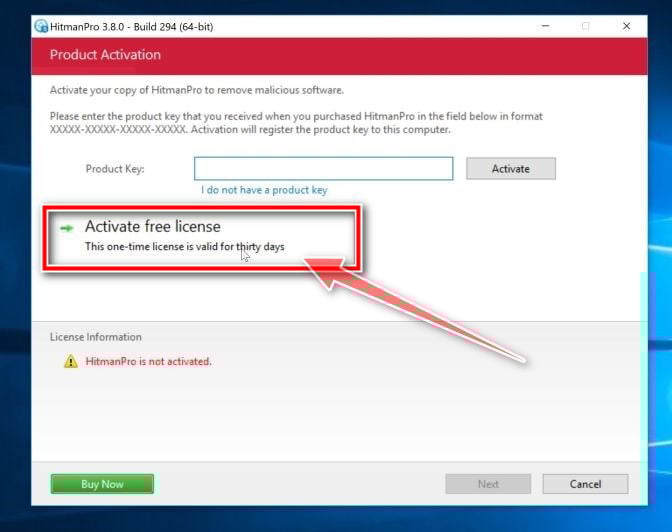
Click on the “Activate free license” button to begin the free 30 days trial and remove all the malicious files from your PC.
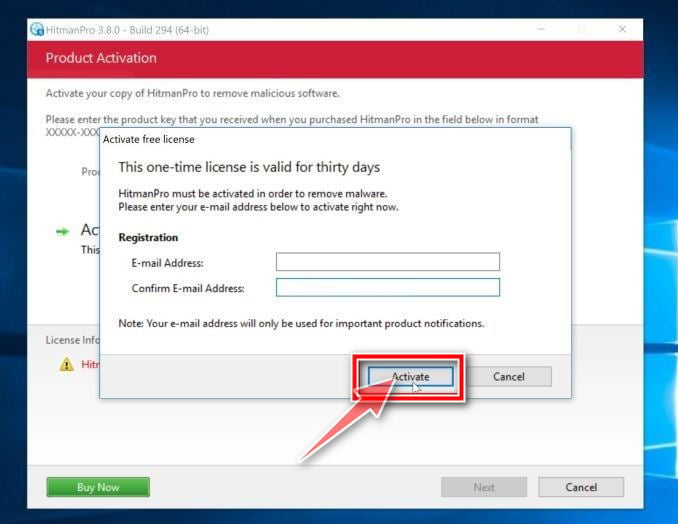
When the process is complete, you can close HitmanPro and continue with the rest of the instructions.
(OPTIONAL) STEP 4: Reset the browser settings to their original defaults
If your PC is being redirected to the Fast Search World New Tab Search, we will need to reset the web browser settings to their original defaults. This step should be performed only if your issues have not been solved by the previous steps.
Google Chrome
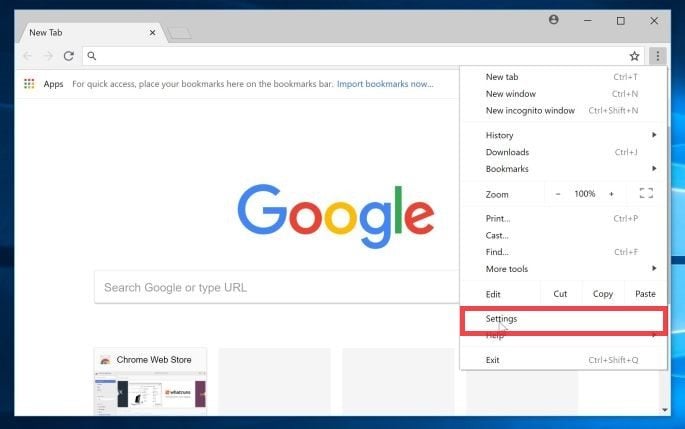
Click on the three dots at the top right and click “Settings”.
Click on Chrome’s main menu button, represented by three dots at the top right corner. Now click on the menu option labeled Settings as shown by the arrow in the picture below, which will open the basic settings screen.
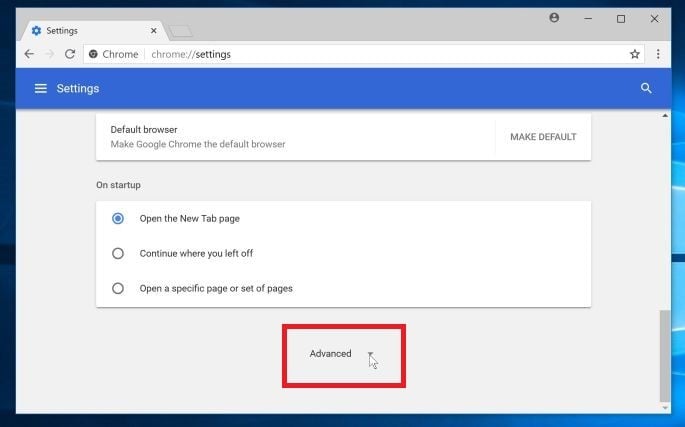
At the bottom, click “Advanced”.
Chrome’s “Settings” should now be displayed in a new tab or window, depending on your configuration. Next, scroll to the bottom of the page and click on the “Advanced” link (as seen in the below example).
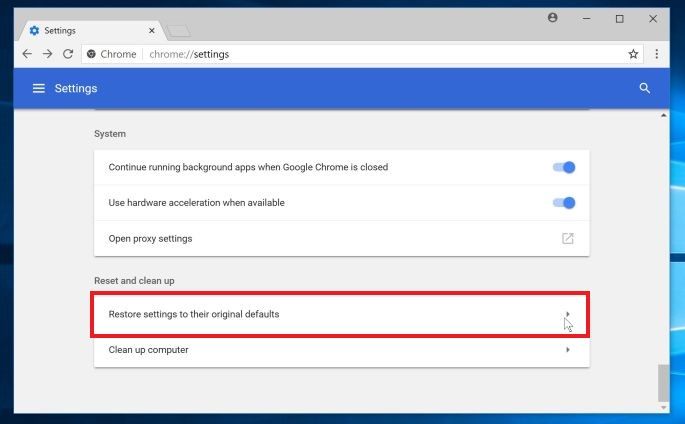
Under the section “Reset,” click “Reset”.
Chrome’s advanced settings should now be displayed. Scroll down until the “Reset and clean up” section is visible, as shown in the example below. Next, click on the “Reset settings to their original defaults” button.
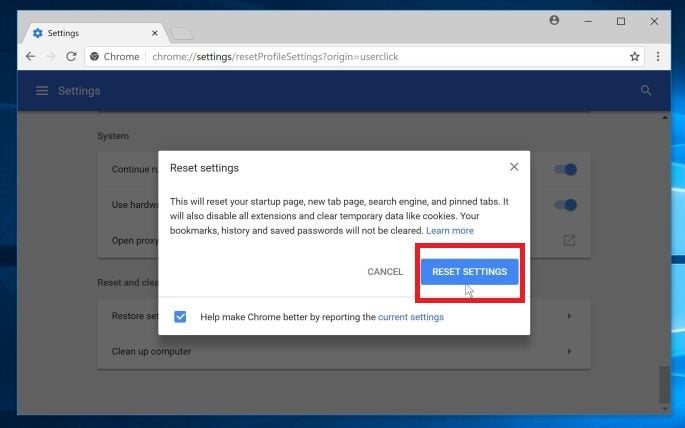
Confirm by clicking “Reset”.
A confirmation dialog should now be displayed, detailing the components that will be restored to their default state should you continue on with the reset process. To complete the restoration process, click on the “Reset Settings” button.
Mozilla Firefox
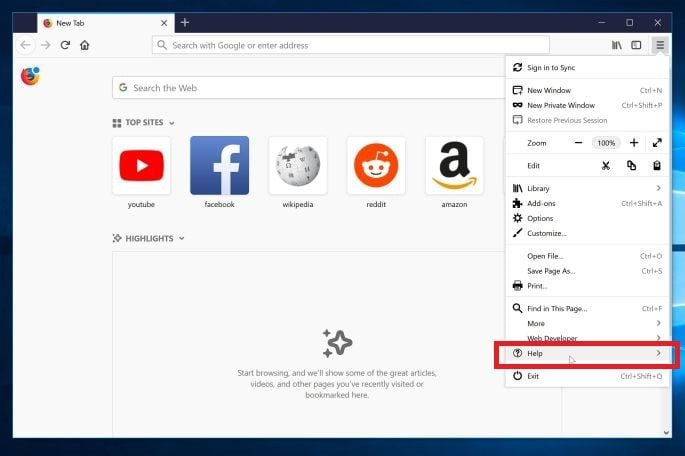
Go to the “Help” menu.
Click on Firefox’s main menu button, represented by three horizontal lines. When the drop-down menu appears, select the option labeled “Help“.
Click “Troubleshooting Information”.
From the Help menu, click on “Troubleshooting Information“.
If you’re unable to access the “Help” menu, type about:support in your address bar to bring up the Troubleshooting information page.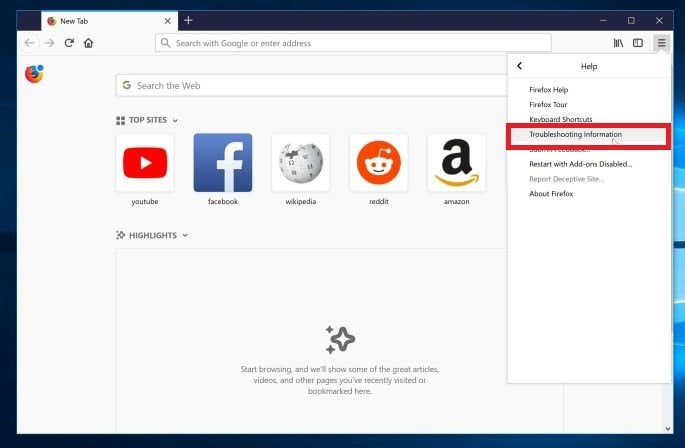
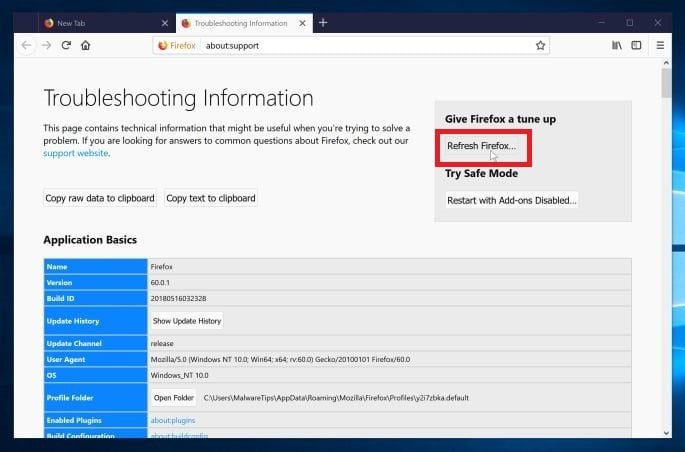
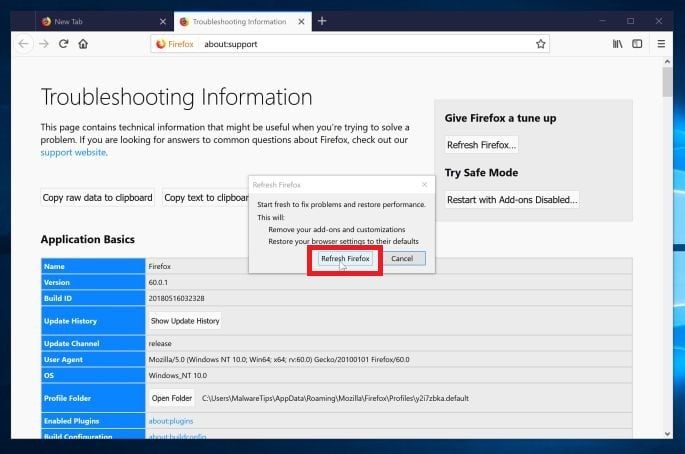
Click on “Refresh Firefox”
Click the “Refresh Firefox” button in the upper-right corner of the “Troubleshooting Information” page.
Confirm.
To continue, click on the “Refresh Firefox” button in the new confirmation window that opens.
Click on “Finish”.
Firefox will close itself and will revert to its default settings. When it’s done, a window will list the information that was imported. Click on the “Finish“.
Internet Explorer
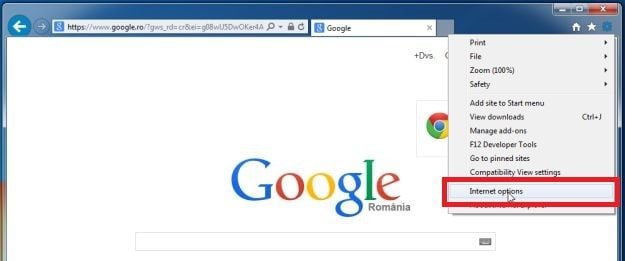
Go to “Internet Options”.
Open Internet Explorer, click on the gear icon in the upper right part of your browser, then select “Internet Options“.
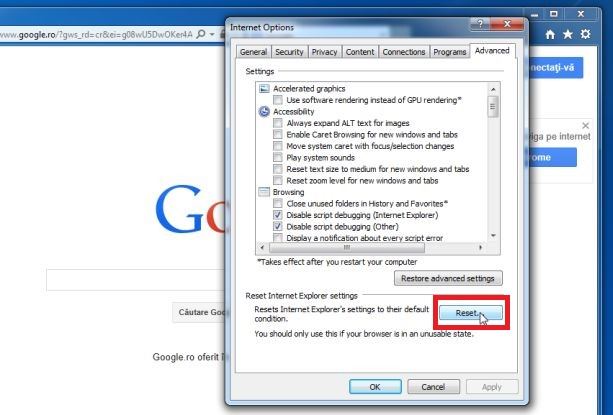
Select the “Advanced” tab, then click “Reset”
In the “Internet Options” dialog box, select the “Advanced” tab, then click on the “Reset” button.
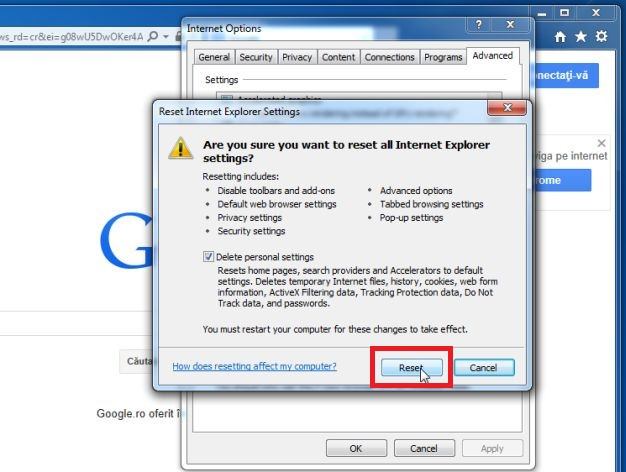
Click on “Reset”.
In the “Reset Internet Explorer settings” section, select the “Delete personal settings” check box, then click on “Reset” button.
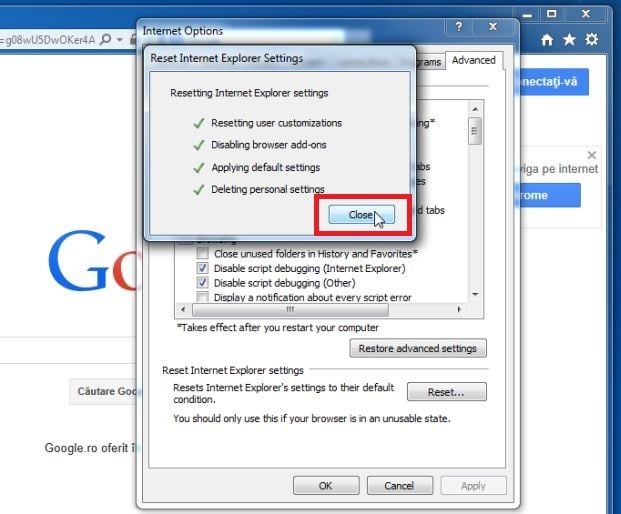
Click on “Close”.
When Internet Explorer has completed its task, click on the “Close” button in the confirmation dialogue box.
You will now need to close your browser, and then you can open Internet Explorer again.
Microsoft Edge
Go to “Apps and Features”.
Right-click on the Start
 button in the lower-left corner and select “Apps and Features“. This will take you directly to your list of installed programs.

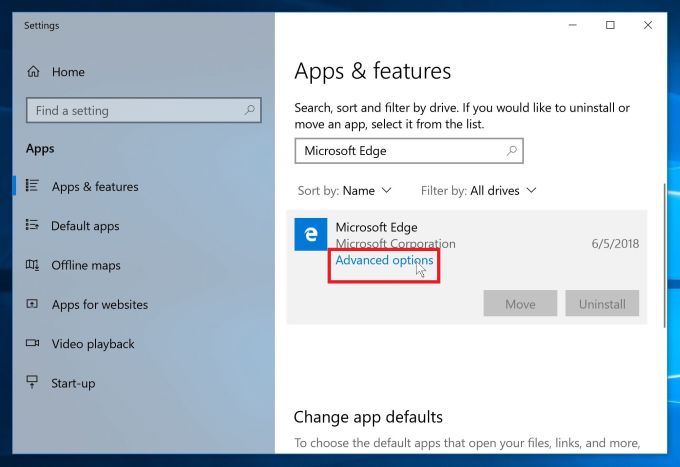
Find Microsoft Edge, then select “Advanced Options”.
The “App and Features” screen will be displayed with a list of all the programs installed on your PC. Scroll through the list until you find “Microsoft Edge”, click it, and then click on the “Advanced options” link.
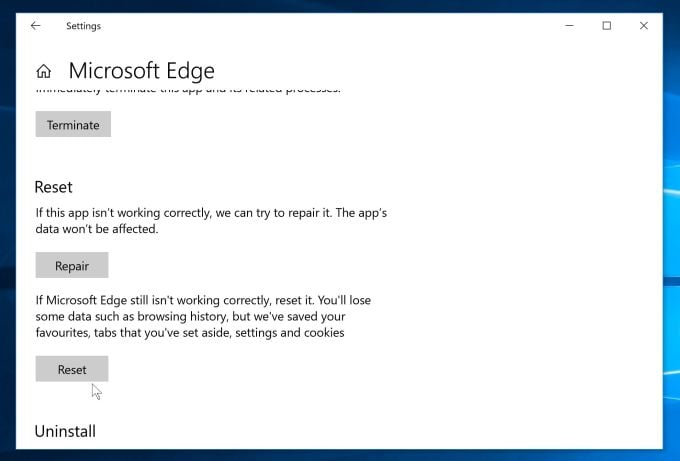
Click on “Reset”.
The “Advanced Options” screen will now be displayed. Scroll down until the “Reset” section is visible, as shown in the example below. Next, click on the “Reset” button.
Your computer should now be free of the Fast Search World New Tab Search redirect. If you are still experiencing problems while trying to remove Fast Search World New Tab Search redirect adware from your PC, please do one of the following:
- Run a computer scan with ESET Online Scanner
- Ask for help in our Malware Removal Assistance for Windows forum.


