


If you are seeing a fake alert from S.M.A.R.T Check or S.M.A.R.T Repair then you’re probably reading this article so you can understand how to get rid of it.Thankfully we’ve got the instructions to help you get rid of this virus.
First off all , you should know that , S.M.A.R.T Check and S.M.A.R.T Repair are both fake components of Data Recovery or Smart HDD malicious software, this infections will display fake alerts, claiming that several hard drive errors were detected on your computer.In reality, none of the reported issues are real, and are only used to scare you into buying S.M.A.R.T virus and stealing your personal financial information.
The infections has changed your desktop background to a black scren, has hidden your files and shortcuts and it’s causing browsing redirects.
If you’ve got a S.M.A.R.T virus infection , you’ll be seeing this screens :
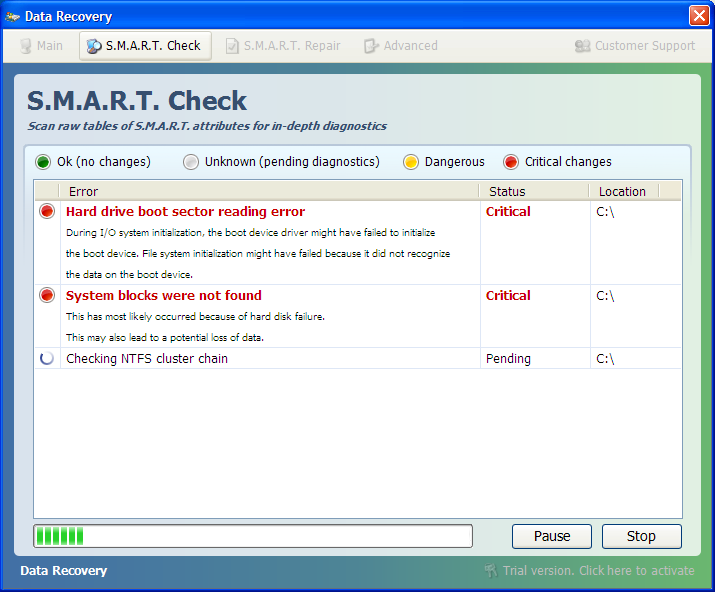
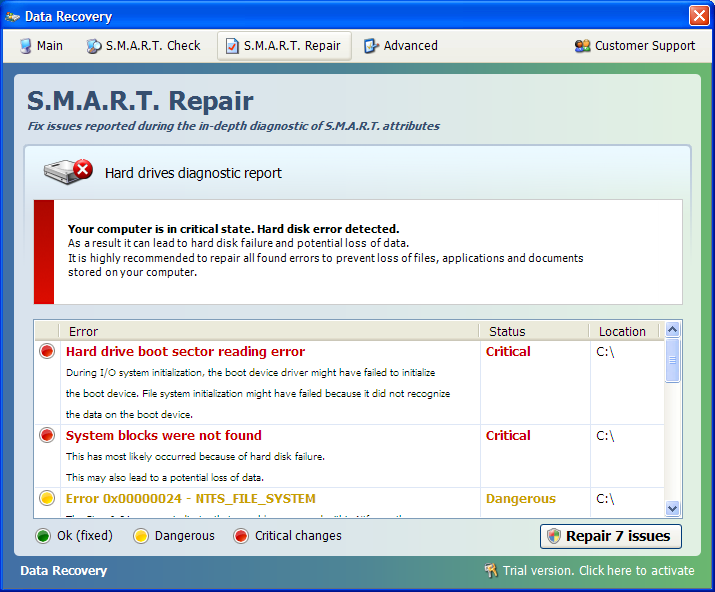
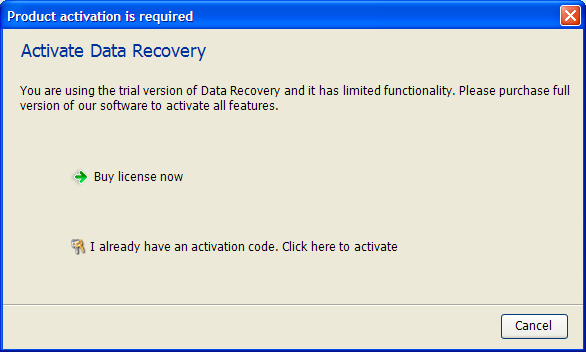
Registration codes for S.M.A.R.T virus
As an optional step,you can use the following license key to register S.M.A.R.T virus and stop the fake alerts.
Data Recovery Rogue: 08869246386344953972969146034087
SMART HDD Rogue: 15801587234612645205224631045976
Please keep in mind that entering the above registration code will NOT remove S.M.A.R.T virus from your computer , instead it will just stop the fake alerts so that you’ll be able to complete our removal guide more easily.
Removal guide for S.M.A.R.T virus
STEP 1 : Start your computer in Safe Mode with Networking
- Remove all floppy disks, CDs, and DVDs from your computer, and then restart your computer.
- Press and hold the F8 key as your computer restarts.Please keep in mind that you need to press the F8 key before the Windows start-up logo appears.
- On the Advanced Boot Options screen, use the arrow keys to highlight Safe Mode with Networking , and then press ENTER.

- Log on to your computer with a user account that has administrator rights

STEP 2: Remove S.M.A.R.T virus malicious proxy server
S.M.A.R.T virus may add a proxy server which prevents the user from accessing the internet,follow the below instructions to remove the proxy.
- Start Internet Explorer
 and if you are using Internet Explorer 9 ,click on the gear icon
 (Tools for Internet Explorer 8 users) ,then select Internet Options.

- Go to the tab Connections.At the bottom, click on LAN settings.
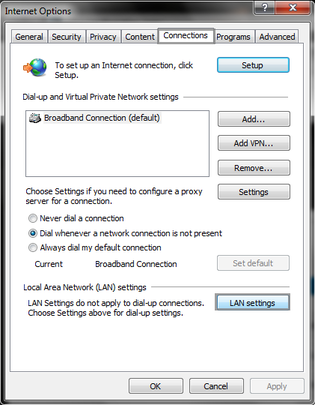
- Uncheck the option Use a proxy server for your LAN. This should remove the malicious proxy server and allow you to use the internet again.

 and if you are using Internet Explorer 9 ,click on the gear icon
 (Tools for Internet Explorer 8 users) ,then select Internet Options.


If you are a Firefox users, go to Firefox(upper left corner) → Options → Advanced tab → Network → Settings → Select No Proxy
STEP 3: Run RKill to terminate known malware processes associated with S.M.A.R.T virus.
RKill is a program that attempts to terminate any malicious processes associated with S.M.A.R.T virus ,so that your normal security software can then run and clean your computer of infections.
As RKill only terminates a program’s running process, and does not delete any files, after running it you should not reboot your computer as any malware processes that are configured to start automatically will just be started again.
- While your computer is in Safe Mode with Networking ,please download the latest official version of RKill.

- Double-click on the RKill iconin order to automatically attempt to stop any processes associated with S.M.A.R.T virus.

- RKill will now start working in the background, please be patient while the program looks for various malware programs and tries to terminate them.

IF you receive a message that RKill is an infection, that is a fake warning given by the rogue. As a possible solution we advise you to leave the warning on the screen and then try to run RKill again.Run RKill until the fake program is not visible but not more than ten times.
IF you continue having problems running RKill, you can download the other renamed versions of RKill from here. - When Rkill has completed its task, it will generate a log. You can then proceed with the rest of the guide.
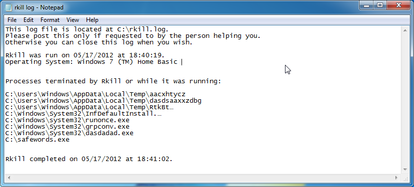


WARNING: Do not reboot your computer after running RKill as the malware process will start again , preventing you from properly performing the next step.
STEP 4: Remove S.M.A.R.T virus malicious files with Malwarebytes Anti-Malware FREE
- Please download the latest official version of Malwarebytes Anti-Malware FREE.
- Install Malwarebytes’ Anti-Malware by double clicking on mbam-setup.

- When the installation begins, keep following the prompts in order to continue with the installation process. Do not make any changes to default settings and when the program has finished installing, make sure you leave both the Update Malwarebytes’ Anti-Malware and Launch Malwarebytes’ Anti-Malware checked. Then click on the Finishbutton. If Malwarebytes’ prompts you to reboot, please do not do so.

- Malwarebytes Anti-Malware will now start and you’ll be prompted to start a trial period , please select ‘Decline‘ as we just want to use the on-demand scanner.

- On the Scanner tab,please select Perform full scan and then click on the Scan button to start scanning your computer for any possible infections.

- Malwarebytes’ Anti-Malware will now start scanning your computer for S.M.A.R.T virus malicious files as shown below.

- When the scan is finished a message box will appear, click OK to continue.

- You will now be presented with a screen showing you the malware infections that Malwarebytes’ Anti-Malware has detected.Please note that the infections found may be different than what is shown in the image.Make sure that everything is Checked (ticked) and click on the Remove Selected button.

- Malwarebytes’ Anti-Malware will now start removing the malicious files.If during the removal process Malwarebytes will display a message stating that it needs to reboot, please allow this request.


STEP 5: Double check your system for any left over infections with HitmanPro
- This step can be performed in Normal Mode ,so please download the latest official version of HitmanPro.
- Double click on the previously downloaded file to start the HitmanPro installation.

NOTE : If you have problems starting HitmanPro, use the “Force Breach” mode. Hold down the left CTRL-key when you start HitmanPro and all non-essential processes are terminated, including the malware process. (How to start HitmanPro in Force Breach mode – Video) - Click on Next to install HitmanPro on your system.

- The setup screen is displayed, from which you can decide whether you wish to install HitmanPro on your machine or just perform a one-time scan, select a option then click on Next to start a system scan.

- HitmanPro will start scanning your system for malicious files. Depending on the size of your hard drive, and the performance of your computer, this step will take several minutes.

- Once the scan is complete,a screen displaying all the malicious files that the program found will be shown as seen in the image below.After reviewing each malicious object click Next.
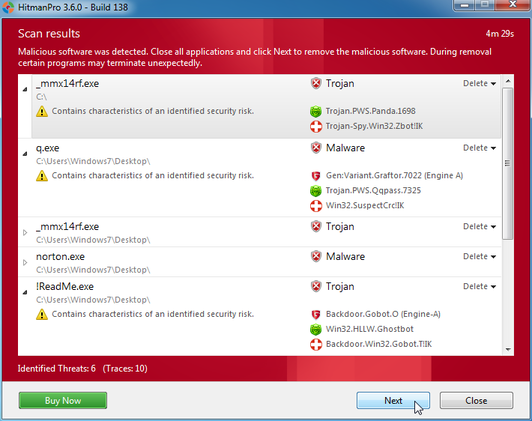
- Click Activate free license to start the free 30 days trial and remove the malicious files.
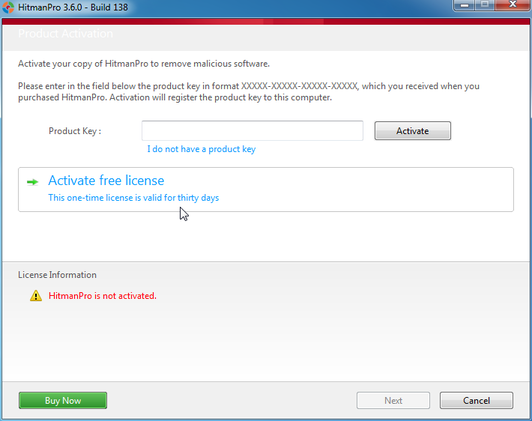
- HitmanPro will now start removing the infected objects, and in some instances, may suggest a reboot in order to completely remove the malware from your system. In this scenario, always confirm the reboot action to be on the safe side.


STEP 6: Unhide your files and folders
S.M.A.R.T virus modifies your file system in such a way that all files and folders become hidden, to restore the default settings , you’ll need to run the below program.
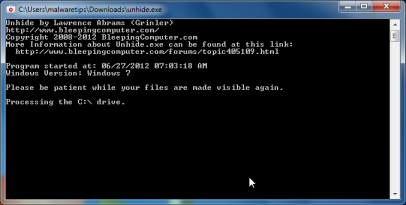
- Download Unhide.exe, to unhide your files and folders.
- Double-click on the Unhide.exe icon on your desktop and allow the program to run.The whole process should not take more than 5 minutes to complete,and at the end this utility will generate a report.
STEP 7 : Restore your shortcuts and remove any left over malicious registry keys
S.M.A.R.T virus has moved your shortcuts files in the Temporary Internet folder and added some malicious registry keys to your Windows installation , to restore your files we will need to perform a scan with RogueKiller.
- Please download the latest official version of RogueKiller.
- Double click on RogueKiller.exe to start this utility and then wait for the Prescan to complete.This should take only a few seconds and then you can click the Start button to perform a system scan.
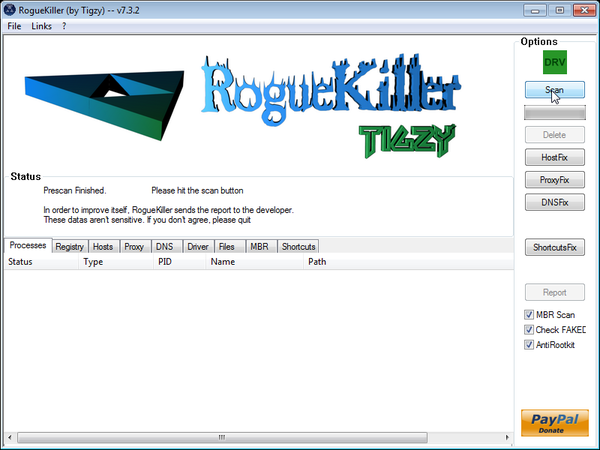
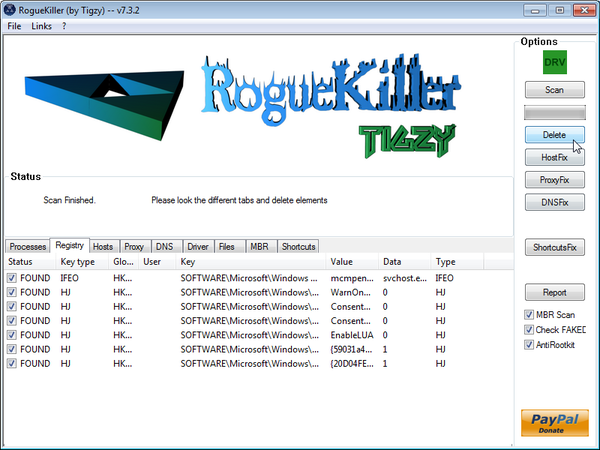
- After the scan has completed, press the Delete button to remove any malicious registry keys.
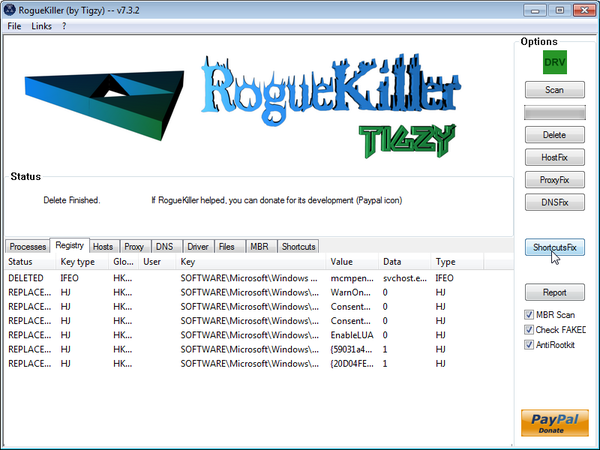
- Next we will need to restore your shortcuts, so click on the ShortcutsFix button and allow the program to run.
STEP 8: Get your desktop look back!
S.M.A.R.T virus changes your desktop background to a solid black color,to change it back to default one follow the below instruction.
- Windows XP : Click on the Start button and then select Control Panel. When the Control Panel opens, please click on the Display icon. From this screen you can now change your Theme and desktop background.
- Windows 7 and Vista : Click on the Start button and then select Control Panel. When the Control Panel opens, please click on the Appearance and Personalization category. Then select Change the Theme or Change Desktop Background to revert back to your original Theme and colors.
If you are still experiencing problems while trying to remove Smart HDD from your machine, please start a new thread in our Malware Removal Assistance forum.
What’s next? Join our amazing community and build up your malware defenses !

Join the discussion
138 commentsShare your experience or ask a question about this article.
Your progress
Did these steps help?
Let us know how the guide worked for you.
Describe what you see and the step you reached. Keep passwords and other private information out.
Discussion
thank you, thank you, thank you !!!!!!!!!!!!!!!!!!!!!!!!!!!!!!!
I wish every guide would be as straightforward and well explained as yours.
it fixed my PC perfectly
Got infected yesterday after a prompt to download a video codec file!You guide works!
Thank you verry much, really apreciate people like you !
Respect o/
You are an angel!!!!!!!!!!!!!!
I had no internet in safe mode,but thanks to your step by step instructions everything is up and running. THANK YOU !
Thanks!!!!
In reply to Mateneess
I can’t thank you enough for this info! Great stuff!
Thanks for the article. It worked for me but I had to run everything in safe mode. It seems restarting in normal mode before everything was removed allowed the virus to start backup. Hitmanpro found some things that Malwarebytes didn’t find and I removed them manually rather than buying the software. Seems to have worked. Thanks again!
In reply to Ryan
Hello Ryan,
HitmanPro and Malwarebytes should have removed this rogue antivirus,however for your peace of mind I would suggest that you perform a scan with the following utilities:
1.Run a scan with Kaspersky Virus Removal Tool
Click here to download the Kaspersky Virus Removal Tool.
2.Run a scan with Eset Online Scanner.
ESET Online Scanner Download Link (This link will automatically download ESET Online Scanner on your computer.)
thank you isn’t enough!can I make a donation?
I had this virus 2 weeks ago and removed it following your guide, no problem. I even ran ESET OnlineScan afterwards. My 14 day trial for malwarebytes expired and the virus came back. Now…I ran rkill, malwarebytes and emsisoft (found 27 threats but only removed 20??, now on the Dr web and still no luck. Help!! This time the virus did not block me from the Internet, which was good. Should I try to start over from step 1 on your post?
In reply to Courtney
Hello,
Can you please run a scan with Combofix, ESET online scanner and post the logs here so that I can get an idea on what’s going on:
STEP 1 : Run a scan with Combofix
Download ComboFix from one of the following locations:
COMBOFIX DOWNLOAD LINK #1 (This link will automatically download Combofix on your computer)
COMBOFIX DOWNLOAD LINK #2 (This link will automatically download Combofix on your computer)
VERY IMPORTANT !!! Save as Combo-Fix.exe during the download.ComboFix must be renamed before you download to your Desktop
Notes:
STEP 2: Run a scan with ESET Online Scanner:
ESET Online Scanner Download Link (This link will automatically download ESET Online Scanner on your computer.)
NEXT,please run a scan with HitmanPro and RogueKiller as seen on the guide.
Waiting for your reply to tell me if your machine is ok and the logs.
I can not access IE even after trying to run iexplore.exe. A box pops up that says Windows can not find iexplore.exe. Please mae sure you typed name correcty and try again. I need help!!
In reply to amy
Hello Amy,
Did you login in Safe Mode with Networking?
It worked without any problems for me!Thank you! :-*
thanks!
Stelian,I LOVE YOU!!!!!!!!!!
All my KUDOS go to you!!:D
THank you!
This is a message from a very grateful man!My computer is clean! THANK YOU!
In reply to Pam
Thanks a million! You saved me a lot time. I was about to reimage my system.
In reply to Pam
Thank you for the step-by-step process. It is extremely organized and detailed. Thank you for not allowing me to format my hard drive. THANK YOU!
In reply to Ted E.
Thanks so much for putting this info online. I am not computer literate at all but with your guide I managed to get rid of this malicious virus
thank you!!
thank you !it works!!
I ran the programs and my computer is working, but the icon is still in the bottom tray. I had to run the programs twice because the first time once my computer went idle the virus started again.
Absolutely outstanding!!!! You saved me from losing my mind…. not to mention my laptop =) A morning full of aggravation & tears and then I stumbled upon this page, 2 hours later I have my computer back…. THANK YOU!!!
A big thank you for your detailed instruction. After half day of downloading, scanning and deleting. My PC is finally working again. Can you please suggest any anti-virtus software to prevent anything like this in the future? Many thanks again.
In reply to Lucy
Hello Lucy,
It’s good to see that you’ve manage to get rid of this virus. :)
As far as your real time protection goes,I advise to install a security product to protect your computer.Below you can find some quick suggestions:
Free – Avast 7 Free version or COMODO Internet Security
Paid : Norton Internet Security 2012,Avast Internet Security 7,G-DATA Internet Security 2012 or ESET Smart Security 5.
Anyway ,you should really start a thread in our Security Configuration forum as you need to build a layered security config: http://malwaretips.com/Forum-Security-Configuration-Wizard
Also it would very good if you took the time and read this article that I’ve wrote: http://malwaretips.com/blogs/how-to-easily-avoid-pc-infections/ .. If you follow it,then we’ll never meet again in this conditions:)