


You open a new browser tab and land somewhere you never chose. A search eventually reaches familiar results, yet the address bar briefly flashes a different name.
That small detour is easy to dismiss. It is also the clue that helps explain why your browser keeps changing back after you fix it.
Overview
What Smart Search changes
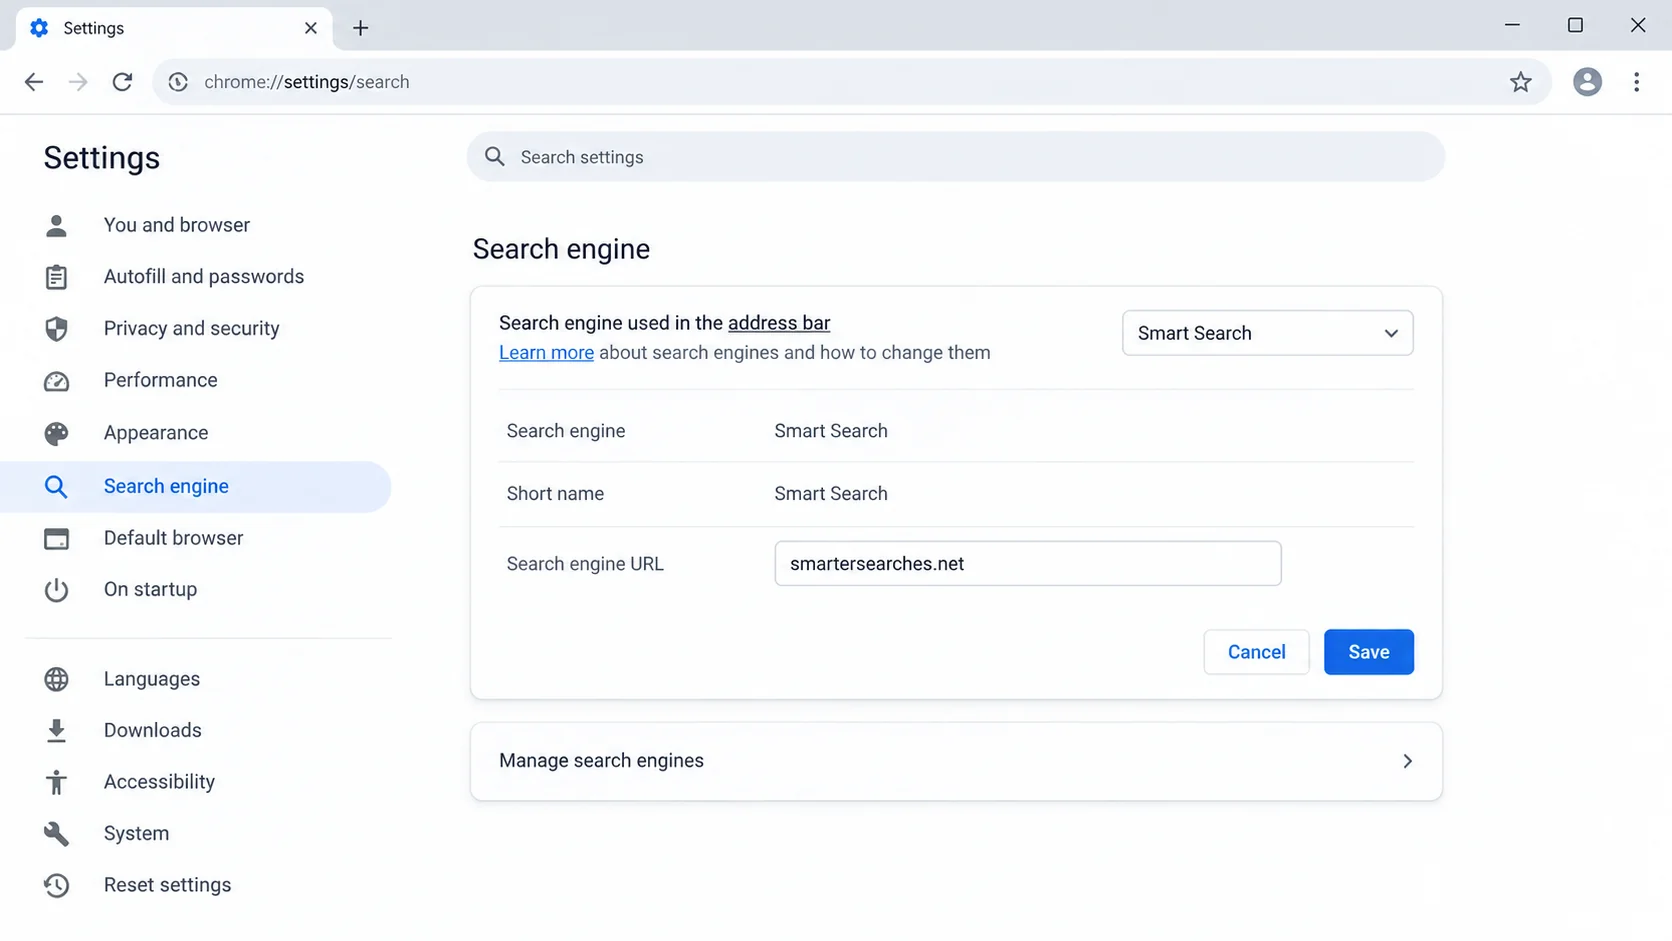
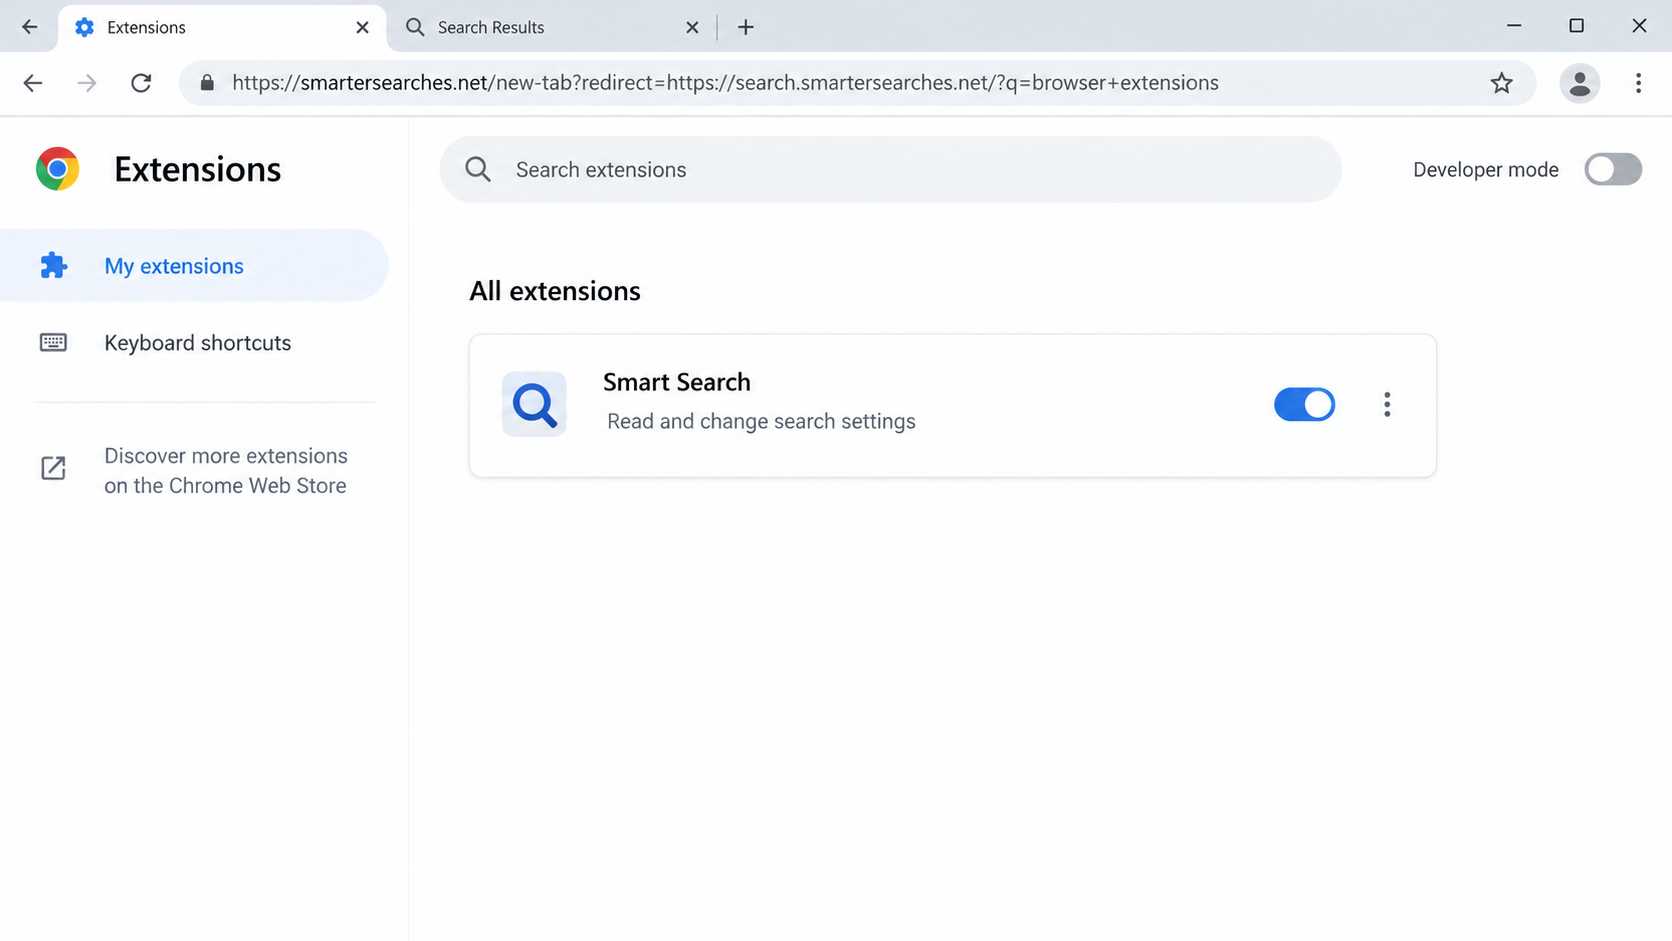
Smart Search is an extension promoted as a way to search in multiple languages. The version associated with smartersearches.net changes browser settings after installation.
Those settings include the default search engine, the page opened by a new tab, and sometimes the page shown when the browser starts.
As a result, typing a query in the address bar may send it through smartersearches.net instead of the search provider you deliberately selected.
The behavior is characteristic of a browser hijacker. It is not evidence that Yahoo or any final search provider is malicious.
Why the familiar results are misleading
In observed redirects, smartersearches.net did not supply its own search results. The chain eventually delivered users to a legitimate search engine.
That final page can make the detour feel harmless. The important question is why an unwanted extension inserted itself between your query and the destination.
Redirect routes can vary by location, campaign, or browser state. A user may see a different intermediate address or final results page.
A brief address-bar flash is therefore a useful clue, not a reliable list of every server involved in the redirect.
What is confirmed, and what is not
- The Smart Search extension has been observed changing search-related browser settings.
- Smartersearches.net acts as a redirecting intermediary rather than an independent search engine.
- An unexpected extension deserves removal and a review of its permissions.
- A redirect alone does not prove passwords were stolen or that the computer has a banking trojan.
Some browser hijackers collect browsing data. The exact data collected by this installation cannot be determined from a redirect alone.
Review the installed extension and its privacy disclosures, but do not treat broad claims about tracking as proof of a specific theft.
Why Your Browser Keeps Visiting Smartersearches.net
A search engine setting is only one piece of the puzzle. An extension can retain permission to alter it again after you choose another provider.
That is why changing the search dropdown may appear to work for a few minutes, then fail when the browser restarts.
The extension may also control the new-tab page. A new tab can trigger the redirect even when the search engine setting looks normal.
On some browsers, a policy or another unwanted program may lock settings. Do not assume every locked policy is malicious, especially on a managed work computer.
Ask your workplace administrator before removing a policy on a company device. On a personal computer, an unfamiliar policy needs closer inspection.
The illustrated settings image shows where a changed search provider might appear. It is a teaching reconstruction, not a capture of your browser.
Look for the extension itself, its permissions, and the exact address it promotes. A generic extension name can resemble unrelated legitimate tools.
Identifying the domain matters because several products use names such as Smart Search. This report concerns the smartersearches.net redirect specifically.
How the Smart Search Redirect Works
Step 1: An extension arrives through a download or promotion
A browser extension can be installed after a direct store visit, a promotional page, or a bundled software installer. The route varies.
Often the user is focused on another task, such as finding a document, translating a page, or installing a free utility.
A description promising easier multilingual search may sound ordinary. The risk is not the phrase itself, but what the extension does after permission is granted.
Check the installation history and recent downloads. If the browser changed immediately after installing something, that timing can narrow the investigation.
Step 2: Search and new-tab settings are reassigned
Once active, Smart Search can replace the browser’s preferred search engine and new-tab address with settings that point toward smartersearches.net.
This does not require a dramatic pop-up. Many people first notice it only when searches feel slower or the address bar changes briefly.
Some extensions request permission to read or change data on websites. Review those permissions in the extension manager before deciding whether to keep it.
If a permission seems wider than the advertised function, treat that mismatch as a reason to remove the extension.
Step 3: A search passes through an intermediary
When you type a search, the browser follows its changed setting. The request goes to smartersearches.net before landing at a results provider.
Because the final page may be familiar, the earlier step is easy to miss. Watching the address bar or checking browser history can reveal it.
The redirect chain may contain more than one address. It can also change over time, so one screenshot should not be treated as universal.
This intermediary role is why the browser’s configuration, not the final search site, is the main issue to fix.
Step 4: The final search page creates false reassurance
Seeing normal-looking results does not mean the route was the one you chose. A genuine search provider can receive traffic sent through unwanted software.
The same distinction applies to advertisements in results. A legitimate results page does not certify the extension that delivered you there.
Do not click a supposed cleanup advertisement merely because it appears beside search results. It may be unrelated to the browser change.
Instead, open the browser’s own settings and extension list. Those controls show what is installed and which provider is selected.
Step 5: Changing one setting may not remove the cause
Users sometimes restore their preferred search engine but leave Smart Search enabled. The extension may then put the unwanted setting back.
Likewise, removing a homepage entry may not fix the new-tab setting. Each browser option should be checked separately after uninstalling the extension.
If the extension cannot be removed, look for a separate unwanted app or device policy that is managing the browser.
Do not delete registry entries or policy files based on a generic online checklist. The wrong change can disrupt a managed or healthy browser.
Step 6: Repeated exposure increases avoidable risk
Every forced detour is another reason to inspect how your browser handles searches. It also creates uncertainty about which party sees your query.
Search terms can reveal interests, work topics, or private concerns. That does not establish what this particular extension retained or shared.
Unexpected extensions can also coexist with other unwanted software. A full security scan is sensible if the redirect returns after cleanup.
The goal is to restore your chosen browser settings and confirm the problem stays gone, not to assume the worst from one redirect.
Extension, Settings, Policy, and Privacy Checks
Inspect the exact extension
Open the browser extension manager and look for Smart Search or another recent addition you do not recognize.
Read the permissions and installation source. An extension that changes searches without a clear reason should not stay installed.
Compare all three browser settings
Check the default search engine, startup page, and new-tab behavior. Fixing only one can leave the redirect visible elsewhere.
After making changes, close the browser completely and reopen it. A fresh session is a better test than an already open tab.
Check for unexpected management
If settings say they are managed by an organization, first determine whether the computer really belongs to one.
A work laptop may have legitimate policies. A personally owned machine with a new, unexplained policy may need professional help.
Separate privacy concern from proven theft
Review stored passwords and account sessions if you used sensitive sites while the extension was present, especially if other warning signs appeared.
Do not claim a stolen password based only on a redirect. Document unusual logins, settings changes, or alerts before escalating.
How to Tell a Browser Redirect From a Website Problem
It helps to distinguish a setting change from a temporary website error. A hijacker affects the route your browser takes before a page loads.
Try the same harmless search in another browser that does not share extensions or settings. If only one browser redirects, its configuration is the likelier cause.
Next, open a new tab without typing anything. Does it show a page you did not choose? That can reveal a separate new-tab setting.
Check a second search query from the address bar. If the unwanted domain appears repeatedly, the pattern is stronger than one accidental navigation.
Browser history can sometimes show intermediate domains, but redirects happen quickly and may not leave an obvious entry. Do not rely on history alone.
Remember that a website you visited cannot normally change the browser’s default search setting by itself. An extension, installed app, or policy is usually involved.
On a shared computer, ask whether another person installed a search tool. A browser profile can also sync extensions from a different device.
If the unwanted extension keeps reappearing after removal, review synchronization settings and other signed-in browser profiles before repeating the same cleanup.
A full browser reset is a later option, not the first click. It can disable useful extensions and restore defaults that you may need to set again.
Take a screenshot of your settings before resetting. It makes it easier to tell whether the same extension or policy returns afterward.
Preventing the Same Detour Next Time
Extensions deserve the same scrutiny as desktop software. They can shape what you see every time you search, open a tab, or visit a website.
Install from an official extension store when possible, but do not treat a store listing as a guarantee. Read permissions and recent reviews.
Be wary of a download page that insists a search extension is required to continue. A file, video, or translation task rarely needs control over all searches.
During software installation, choose a custom setup when offered and decline unrelated browser changes. “Recommended” options can hide a new search provider.
Keep the browser and operating system updated. Updates will not undo a permission you granted, but they can close vulnerabilities that unwanted software might exploit.
Every few weeks, scan your extension list and remove tools you no longer use. Fewer extensions mean fewer opportunities for an unnoticed settings change.
Ad blocking can reduce exposure to aggressive promotions, but it cannot make a deceptive extension safe after you install it.
Finally, make a habit of noticing the address bar. A familiar final page can hide a route you never agreed to take.
What to Do if Your Browser Was Changed
Stop using the affected browser for sensitive tasks until you understand the change. Open account sites in a separate, clean browser if needed.
This reduces the chance of sharing more searches or credentials through an unknown extension while you investigate.
Remove Smart Search from the browser’s extension manager. Also remove recent extensions you cannot identify, but preserve anything required by your employer.
If removal is blocked, note the exact message. A managed policy or bundled program may need attention before the extension will disappear.
Restore your preferred search engine, homepage, and new-tab page. Check each setting individually after the extension is gone.
Restart the browser, run a harmless test query, and watch whether smartersearches.net still appears in the address bar.
Review recent installed programs and downloads. Uninstall only software you can positively identify as unwanted or connected to the timing of the redirect.
Do not erase unfamiliar system components on suspicion alone. If a work device is involved, involve the IT team.
Run a full scan with Malwarebytes or another reputable security tool if settings revert, the extension returns, or you notice additional suspicious behavior.
AdGuard can reduce exposure to malicious ads, but it does not replace extension removal or an anti-malware scan.
Check important account activity from a clean browser. Change passwords and sign out other sessions if you find unauthorized logins or submitted credentials.
Use unique passwords and two-factor authentication. If no account misuse appears, monitoring is more proportionate than changing every password immediately.
Keep a brief record of the extension name, permissions, unusual URLs, and when the problem started. This helps support staff investigate recurrence.
If the redirect persists after removal and a scan, seek trusted technical help instead of installing random “one-click” fixers from search ads.
Is Your Device Infected? Run a Free Malware Scan
Slow performance, constant pop-ups, or strange behavior? These are classic signs of a malware infection. A quick way to check is to scan your device with Malwarebytes Free, one of the most trusted malware removal tools available. If you only visited a scam page and didn’t download or install anything, this scan is optional.
The free version detects and removes the most common threats, including:
- Adware — the cause of those annoying pop-ups
- Browser hijackers — unwanted redirects and changed homepages
- Trojans and spyware — hidden programs stealing your data
- Potentially unwanted programs (PUPs) — software you never asked for
👉 Select your device below — Windows, Mac, or Android — then follow the simple steps to download Malwarebytes, scan your system, and remove any threats it finds. The scan usually takes 5 to 20 minutes.
Run a Malware Scan with Malwarebytes for Windows
Malwarebytes is one of the most popular and trusted anti-malware tools for Windows — and it’s completely free for removing infections. It catches threats that many antivirus programs miss, including adware, browser hijackers, and trojans. Follow the steps below to scan your PC and remove what Malwarebytes finds.
Download Malwarebytes
Click the button below to download the latest version of Malwarebytes for Windows from the official source. The free version is all you need — it will scan your computer and remove adware, browser hijackers, and other malicious software at no cost.
Download MalwarebytesOfficial installer for Windows 11 and 10. Your download starts right away.Want real-time protection? See Malwarebytes Premium Malwarebytes Free for WindowsScans and removes malware at no cost
-
Install Malwarebytes
When the download finishes, open your Downloads folder and double-click the MBSetup file. If Windows shows a User Account Control pop-up, click “Yes” to allow the installation.
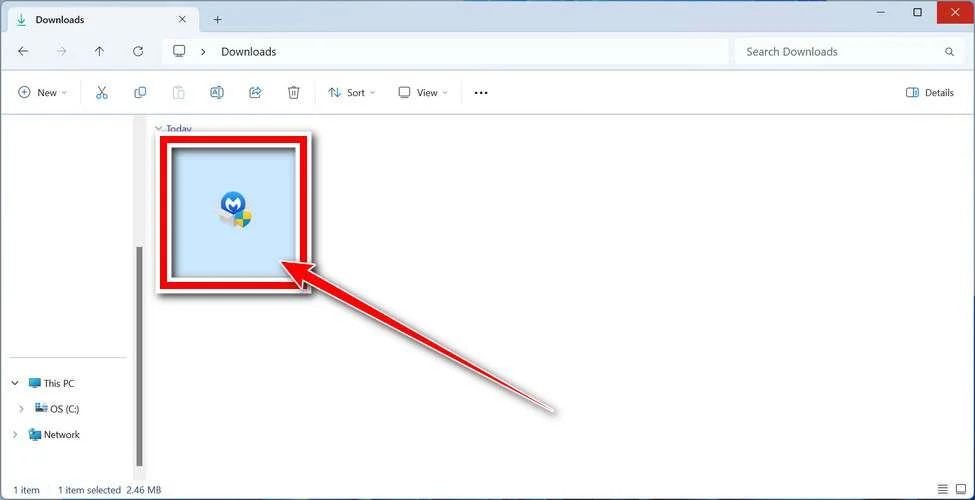
Follow the On-Screen Prompts to Install Malwarebytes
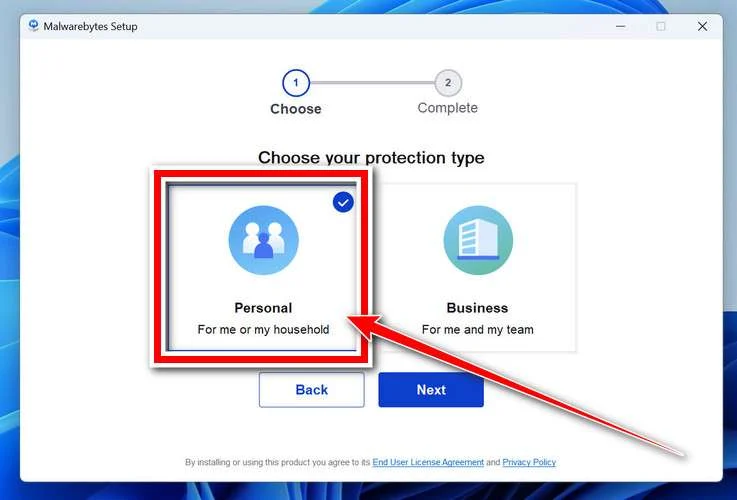
The setup wizard will walk you through a few quick screens:
-
Choose where you’re installing the program — “Personal Computer” or “Work Computer” — then click Next.
-
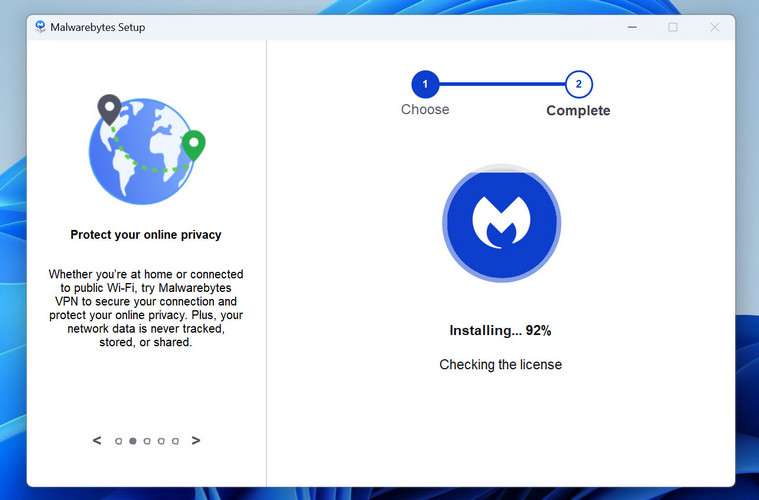
Malwarebytes will now install on your device. This usually takes under a minute.
-
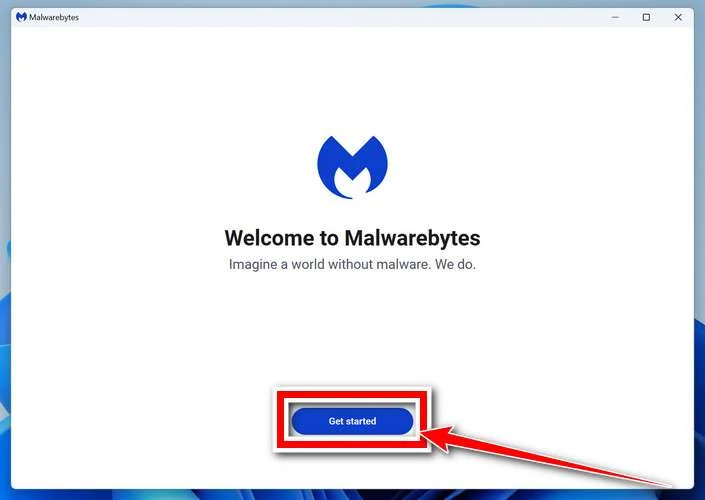
When installation is complete, the “Welcome to Malwarebytes” screen will open automatically.
-
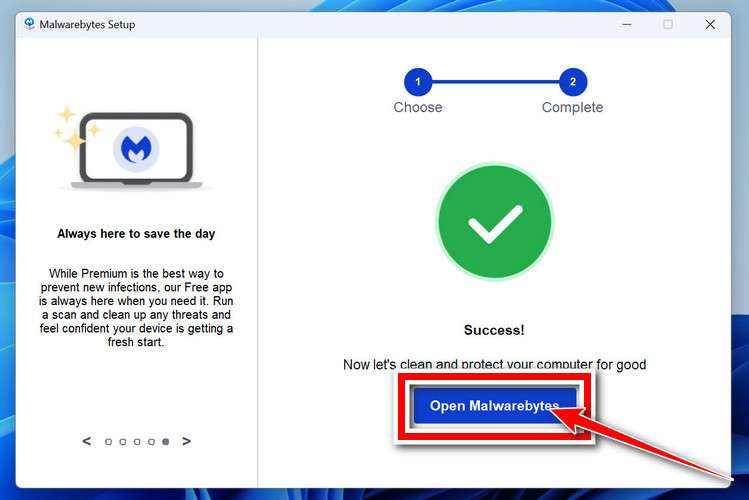
On the final screen, click Open Malwarebytes to launch the program.
-
Optional: Check for rootkits with a Custom Scan
You don’t need to change any settings for a normal scan. The standard Threat Scan in the next step is enough for most problems, so you can go straight to it.
If you also want to check for rootkits, use a Custom Scan. In current versions of Malwarebytes, rootkit scanning is only available there:
- On the Scanner tile, click the three-dot menu and select Advanced Scan.
- Choose Custom Scan. In its options, check Scan for rootkits.
- Select your system drive (usually C:\) as the location to scan, then start the scan. It takes longer than a Threat Scan.
- When it finishes, review and quarantine the results as described in the steps below.
Rootkit scanning isn’t available on Windows devices with ARM processors.
Start the Scan
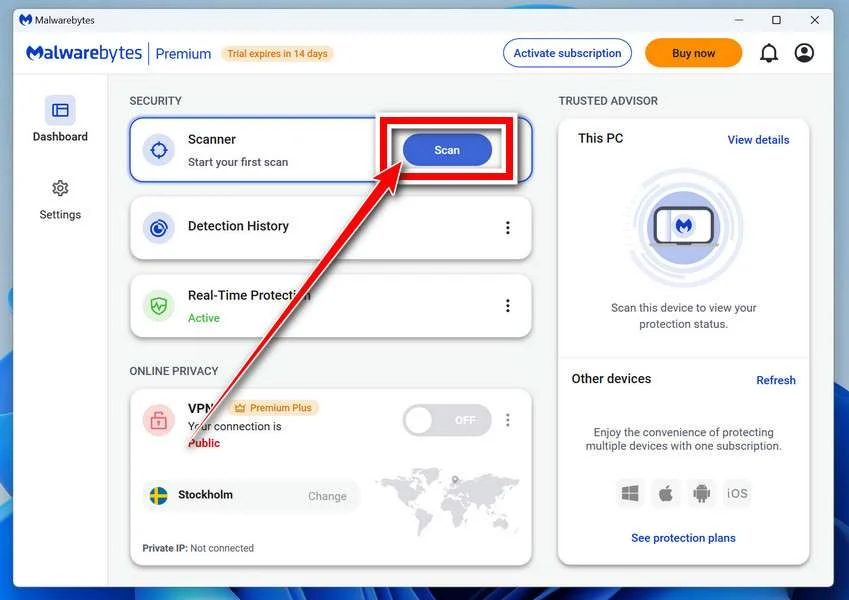
Click the blue Scan button. Malwarebytes will automatically update its virus database and start checking your computer for malware.
-
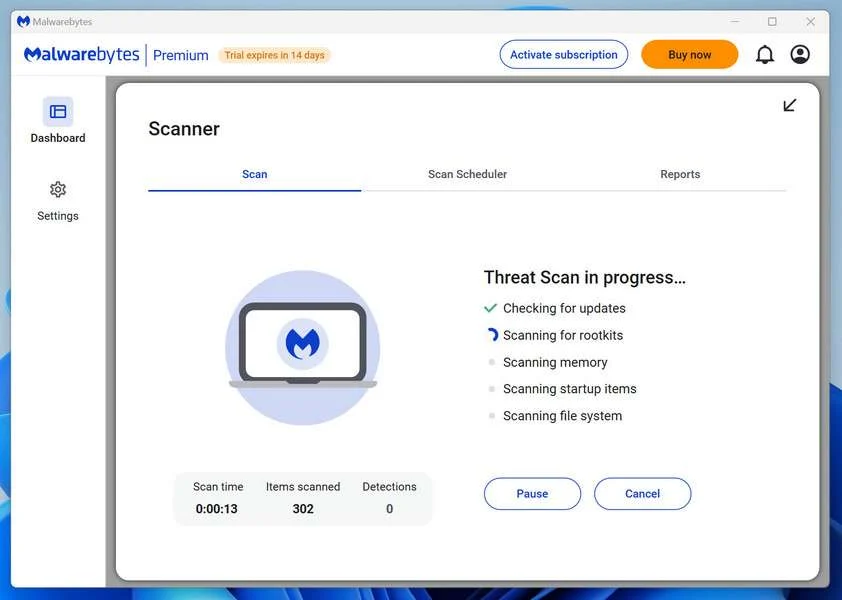
Wait for the Scan to Finish
The scan checks your entire system for browser hijackers and other malicious programs, so it can take 5 to 20 minutes depending on your computer. Feel free to do something else — just check back occasionally to see the progress.
-
Quarantine the Detected Threats
When the scan is done, you’ll see a list of everything Malwarebytes found — malware, adware, and potentially unwanted programs. Click the “Quarantine” button to remove all of them at once.
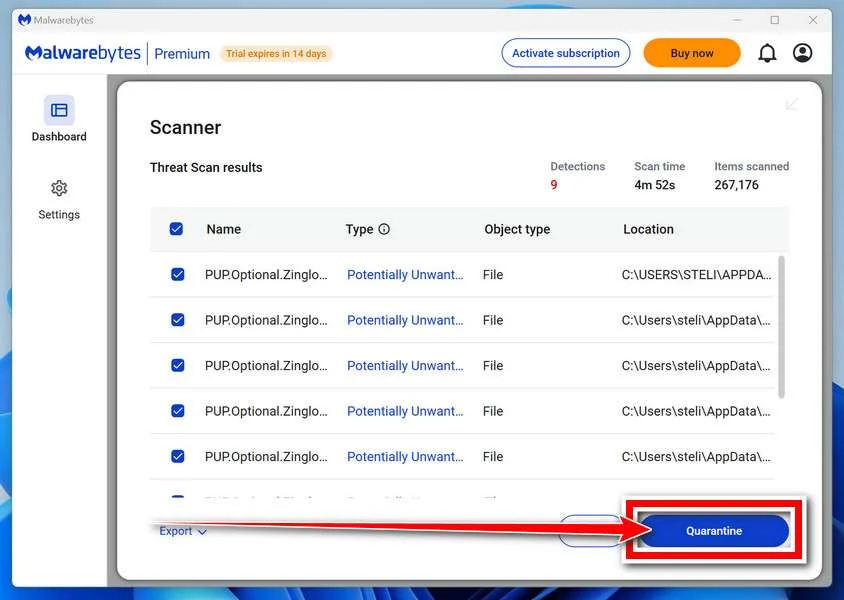
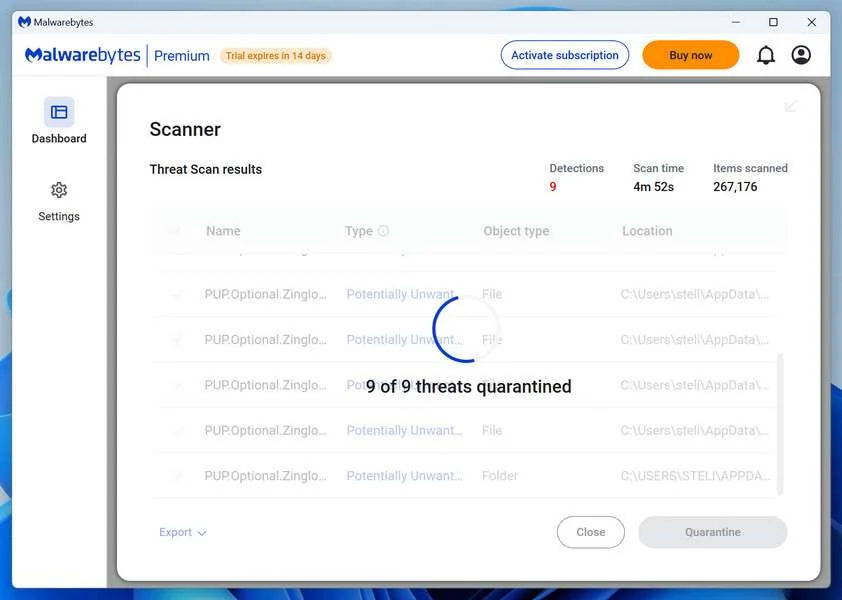
Malwarebytes will now remove the malicious files and registry entries and move them safely into quarantine.
-
Restart Your Computer
Some threats can only be fully removed after a reboot. If Malwarebytes asks you to restart, click Yes. Once you’re logged back in, Malwarebytes has finished removing the threats it found.
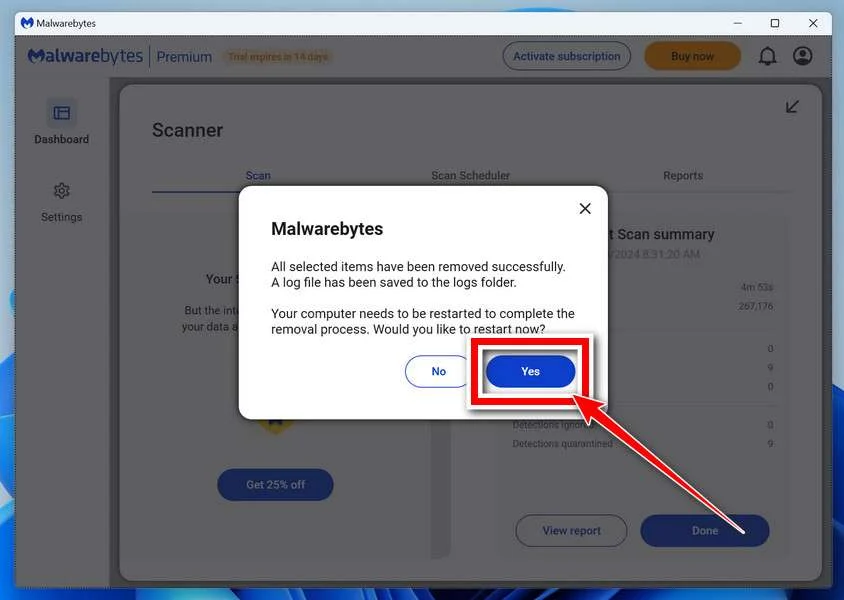
When the scan is done, check whether the problems you noticed have stopped. If they continue, see the options below.
If you are still having problems with your computer after completing these instructions, then please follow one of the steps:
- Run a computer scan with ESET Online Scanner
- Ask for help in our Windows Malware Removal Help & Support forum.
Run a Malware Scan with Malwarebytes for Mac
Malwarebytes for Mac is a free on-demand scanner that removes the malware other security software tends to miss — adware, browser hijackers, and unwanted programs included. Cleaning an infected Mac with Malwarebytes has always been completely free, and it’s our go-to recommendation. Follow the steps below to scan your Mac and remove what Malwarebytes finds.
-
Download Malwarebytes for Mac
Click the button below to download the latest version of Malwarebytes for Mac.
Download MalwarebytesOfficial installer for macOS. Your download starts right away.Want real-time protection? See Malwarebytes PremiumMalwarebytes Free for MacScans and removes malware at no cost -
Open the Malwarebytes setup file
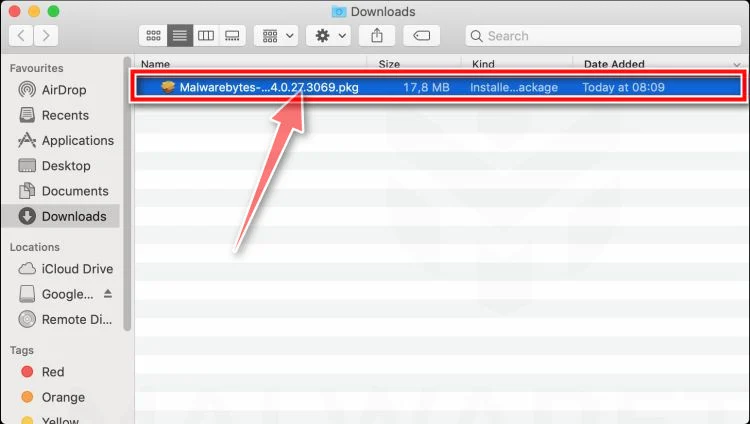
When the download finishes, open your Downloads folder and double-click the setup file to begin the installation.
-
Follow the On-Screen Prompts to Install Malwarebytes
The Malwarebytes for Mac Installer will guide you through a few quick screens. Click “Continue” and keep following the prompts until the installation completes.
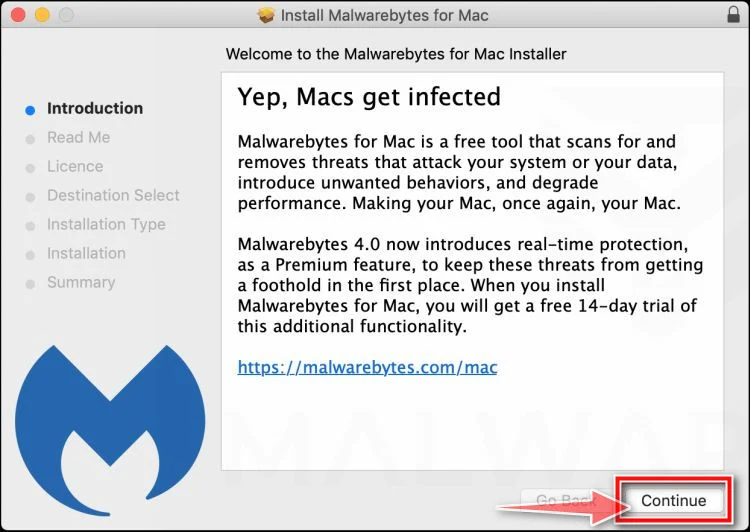
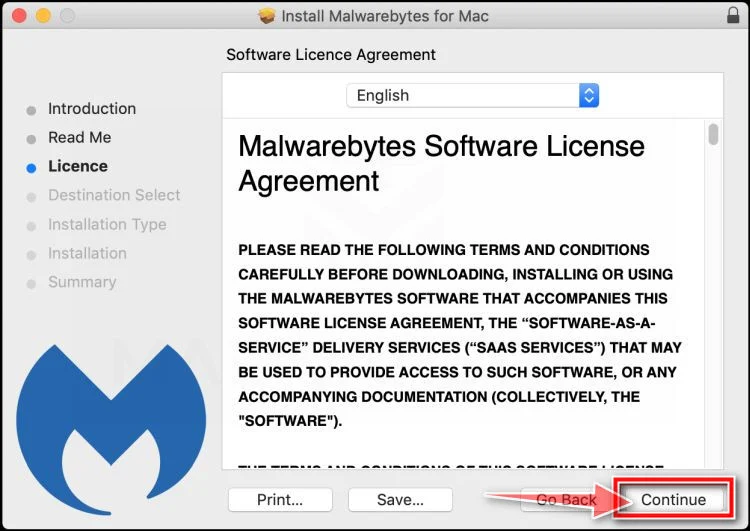
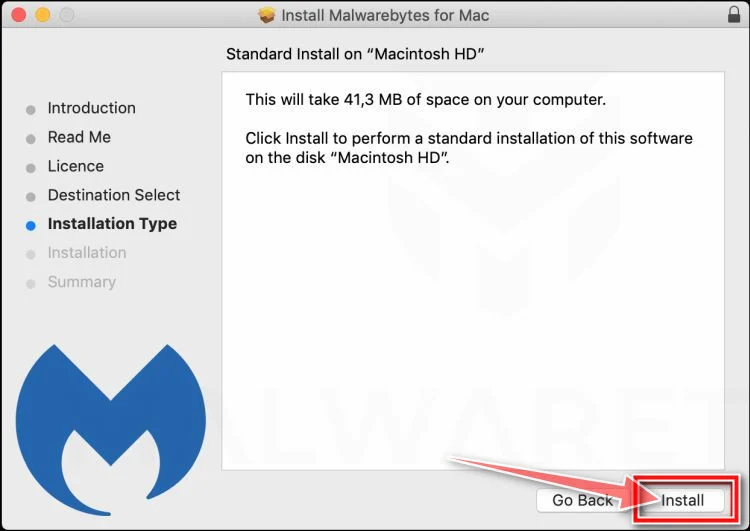
When the installation is complete, Malwarebytes opens to the Welcome to Malwarebytes screen. Click “Get started“.
Malwarebytes needs Full Disk Access to check your whole Mac. When it asks, open System Settings > Privacy & Security > Full Disk Access, turn on Malwarebytes (it may be listed as Malwarebytes Protection), and confirm with your password or Touch ID. Then return to Malwarebytes. On macOS Monterey and earlier, this setting is in System Preferences > Security & Privacy > Privacy.
-
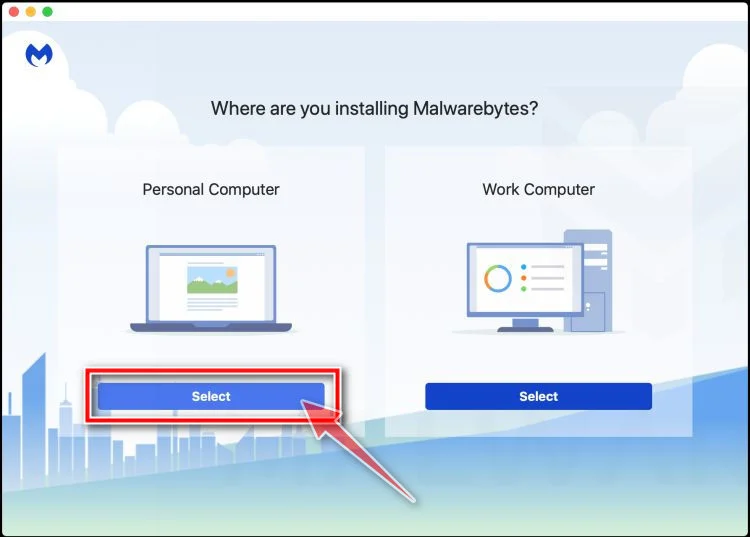
Select “Personal Computer” or “Work Computer”
Malwarebytes will ask what type of computer you’re installing it on. Click either Personal Computer or Work Computer, whichever applies.
-
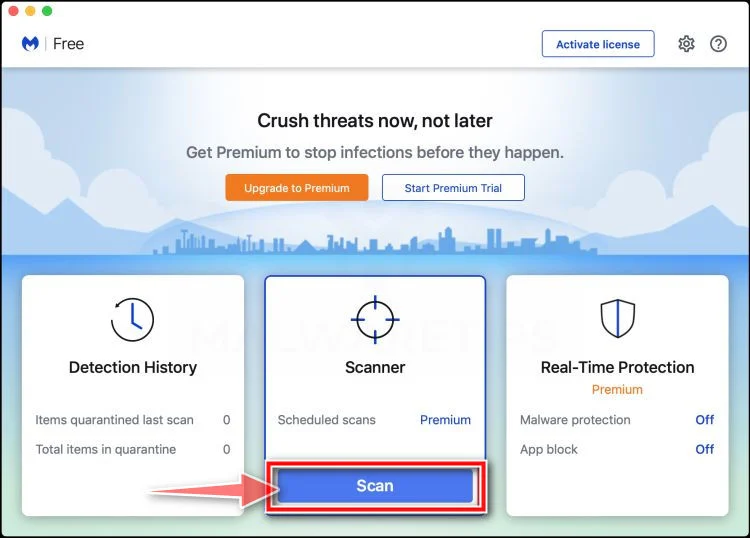
Start the Scan
Click the “Scan” button. Malwarebytes will automatically update its detection database and begin checking your Mac for malware.
-
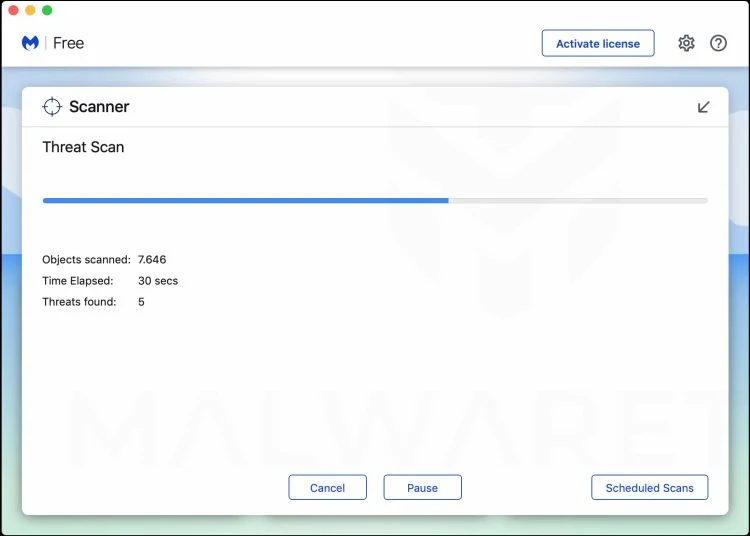
Wait for the Scan to Finish
Malwarebytes will scan your Mac for adware, browser hijackers, and other malicious programs. This can take a few minutes, so feel free to do something else — just check back occasionally to see the progress.
-
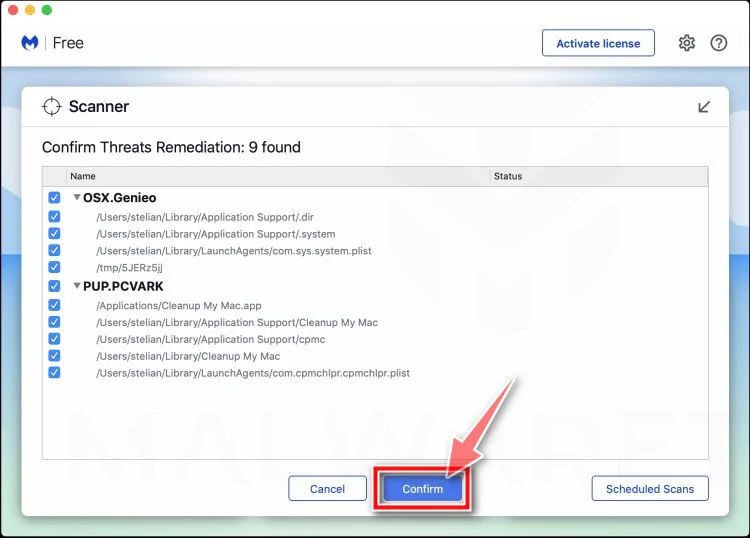
Quarantine the Detected Threats
When the scan is done, you’ll see a list of everything Malwarebytes found. Click the “Quarantine” button to remove all the threats at once.
-
Restart Your Mac
Malwarebytes will now remove all the malicious files it found. Some threats can only be fully removed after a reboot — if Malwarebytes asks you to restart, allow it. Once you’re logged back in, check whether the problems you noticed have stopped. If they come back, save the scan report and ask for help in our forum.
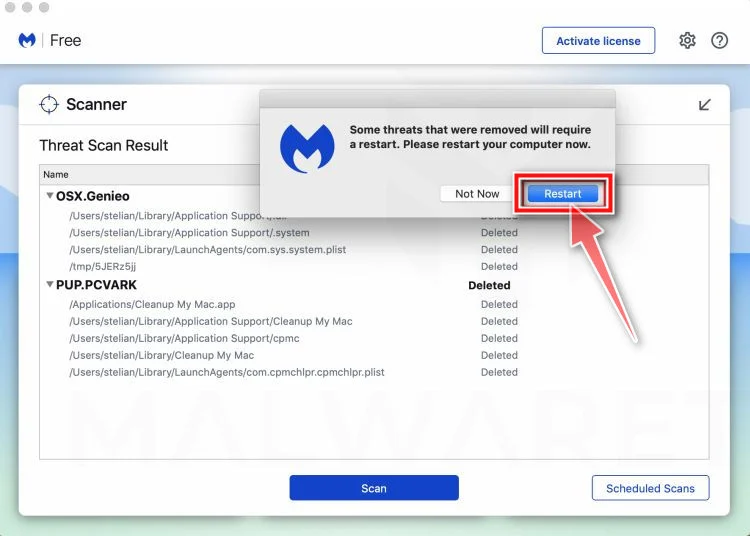
If the problems you noticed continue after the scan, see the options below.
If you are still experiencing problems while trying to remove a malicious program from your computer, please ask for help in our Mac Malware Removal Help & Support forum.
Run a Malware Scan with Malwarebytes for Android
Malwarebytes for Android scans your phone or tablet for malware, adware, and potentially unwanted apps. The free version scans only when you start a scan. Real-time protection, which checks apps automatically, is part of the paid Premium version.
-
Download Malwarebytes for Android.
You can download Malwarebytes for Android by clicking the link below.
Get Malwarebytes for AndroidOpens Google Play in a new tab.Want real-time protection? See Malwarebytes Premium for AndroidMalwarebytes for AndroidScans your phone and removes malware at no cost -
Install Malwarebytes for Android on your phone.
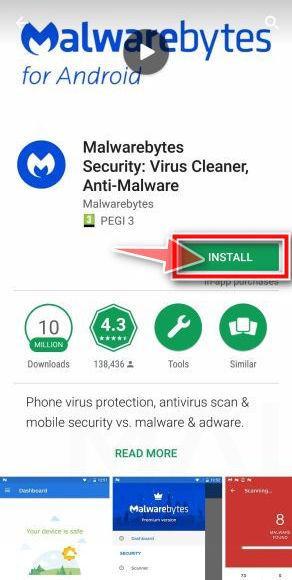
In the Google Play Store, tap “Install” to install Malwarebytes for Android on your device.
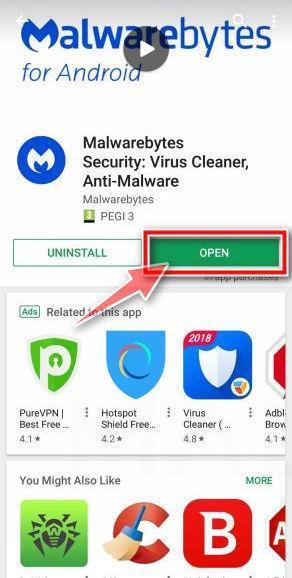
When the installation process has finished, tap “Open” to begin using Malwarebytes for Android. You can also open Malwarebytes by tapping on its icon in your phone menu or home screen.
-
Follow the on-screen prompts to complete the setup process
When Malwarebytes opens, it walks you through a short setup. Tap Get started and follow the prompts. If you see an offer for a trial or a paid plan, read it before you accept. You can skip it and keep using the free scanner.
Malwarebytes will ask for permission to access the files on your phone so it can scan them. Tap Allow, or turn on the permission in the Android screen that opens, then return to Malwarebytes.
-
Run a scan with Malwarebytes for Android
On the main screen, tap Scan now. In some versions, you open the menu, tap Scanner, and then tap Run a scan.
-
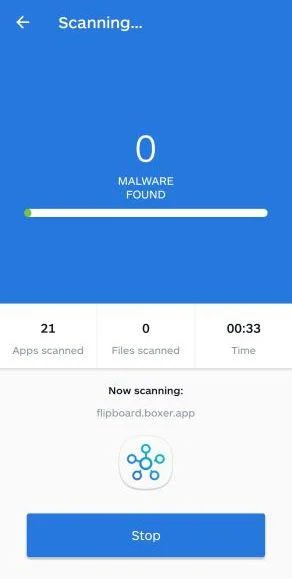
Wait for the Malwarebytes scan to complete.
Malwarebytes will now start scanning your phone for adware and other malicious apps. This process can take a few minutes, so we suggest you do something else and periodically check on the status of the scan to see when it is finished.
-
Remove the detected apps.
When the scan has been completed, you will see a list of the threats that Malwarebytes for Android has detected. Next to each detected item, tap the menu icon (three dots), then choose to uninstall the app or delete the file. Android then asks you to confirm. Tap OK or Uninstall to remove the app.
-
Restart your phone.
When the detected apps are removed, restart your phone if Malwarebytes asks you to. Then check whether the problems you noticed have stopped.
If the problems you noticed continue after the scan, see the options below.
If you are still having problems with your phone after completing these instructions, then please follow one of the steps:
- Ask for help in our Mobile Malware Removal Help & Support forum.
- Only as a last resort, reset your phone to factory settings. Read the warning below first.
- Back up your photos, videos, files, and messages, for example to your Google account or a computer.
- Make sure you know your Google account email and password. The phone asks for them after the reset. If you changed the password recently, Google recommends waiting 24 hours before you reset.
- On a Samsung phone, also make sure you know your Samsung account password.
- If you use an authenticator app for two-step verification, move your accounts to another device or save your backup codes first.
Stay Protected: Block Ads and Malicious Sites
No scan can prove a device is completely clean, so it helps to block threats before they reach you. Most infections start with a malicious ad or a fake download button — so blocking them at the source is your best defense.
We recommend AdGuard, which blocks malicious ads, phishing pages, and dangerous redirects before they can reach you.
👉 Download AdGuard and browse safely
Frequently Asked Questions
Is smartersearches.net itself a search engine?
It has been observed acting as a redirecting intermediary. The search results may come from another provider, which can hide the unwanted detour.
Why do my searches end at Yahoo?
The final provider can be legitimate even when an extension changed the route. Remove the unwanted extension and restore your own search settings.
Does the redirect prove my passwords were stolen?
No. A browser redirect is a reason to investigate permissions and account activity, but it does not by itself prove credential theft.
Why did changing the search engine not work?
The extension may still be installed, or a separate policy may control the setting. Remove the cause before testing the new configuration.
Should I reset the whole browser?
Try extension removal and setting restoration first. A reset can help persistent problems, but export important data and review what the reset changes.
Could Smart Search be required by my employer?
A managed browser can contain legitimate policies. Ask IT before removing anything from a work device, especially if the extension was centrally installed.
The Bottom Line
Smartersearches.net appearing between your search and the results is a sign that your browser may no longer be following the settings you chose.
Remove the unwanted extension, restore the affected settings, and test again. Treat account theft as a question to verify, not an automatic conclusion.

Join the discussion
0 commentsShare your experience or ask a question about this article.
Discussion
Start the conversation
Have a question or something useful to share? Add the first comment.