


One moment, familiar documents have ordinary names. The next, they carry an unfamiliar extension while a full-screen demand repeatedly blocks access to the computer.
That combination points to a disruptive ransomware incident requiring careful containment. Understanding what changed is the safest place to begin.
Overview
What Sword ransomware changes
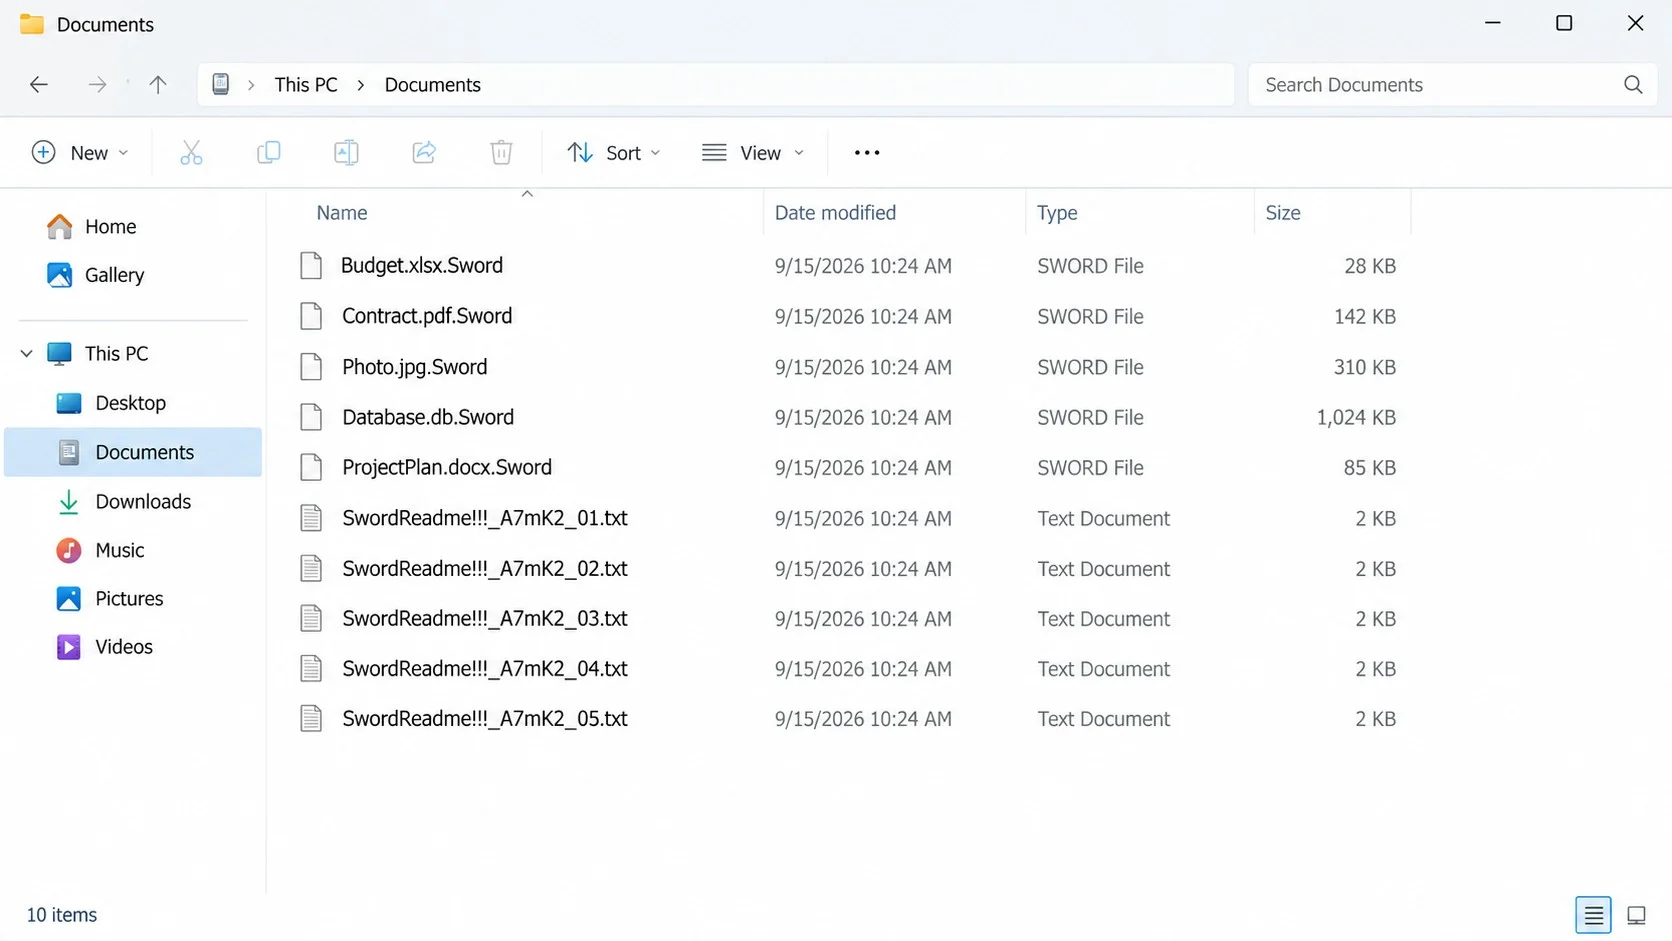
Sword is file-encrypting malware that appends the .Sword extension to affected data. A document can remain visible in its folder while its contents become unusable.
The malware also drops numerous ransom-note copies with names beginning “SwordReadme.” Repetition ensures that victims encounter the attacker’s instructions throughout the damaged environment.
A full-screen lock message adds pressure. Reports indicate that closing it provides only brief relief because the screen can return roughly ten seconds later, including after restarts.
What the attackers claim
The ransom message says systems across the network were encrypted and that backups or shadow copies were affected. Such statements must be investigated, not automatically believed.
It also claims that production databases, financial material, customer records, internal files, and source code were stolen. This introduces a possible data-theft dimension beyond encryption.
The demand is $5,000, offered through cryptocurrency payment options. Paying does not establish that a working decryption tool exists or that copied information will be deleted.
The immediate priorities
- Disconnect affected computers from wired, wireless, and shared networks.
- Do not erase encrypted files, ransom notes, logs, or suspicious programs.
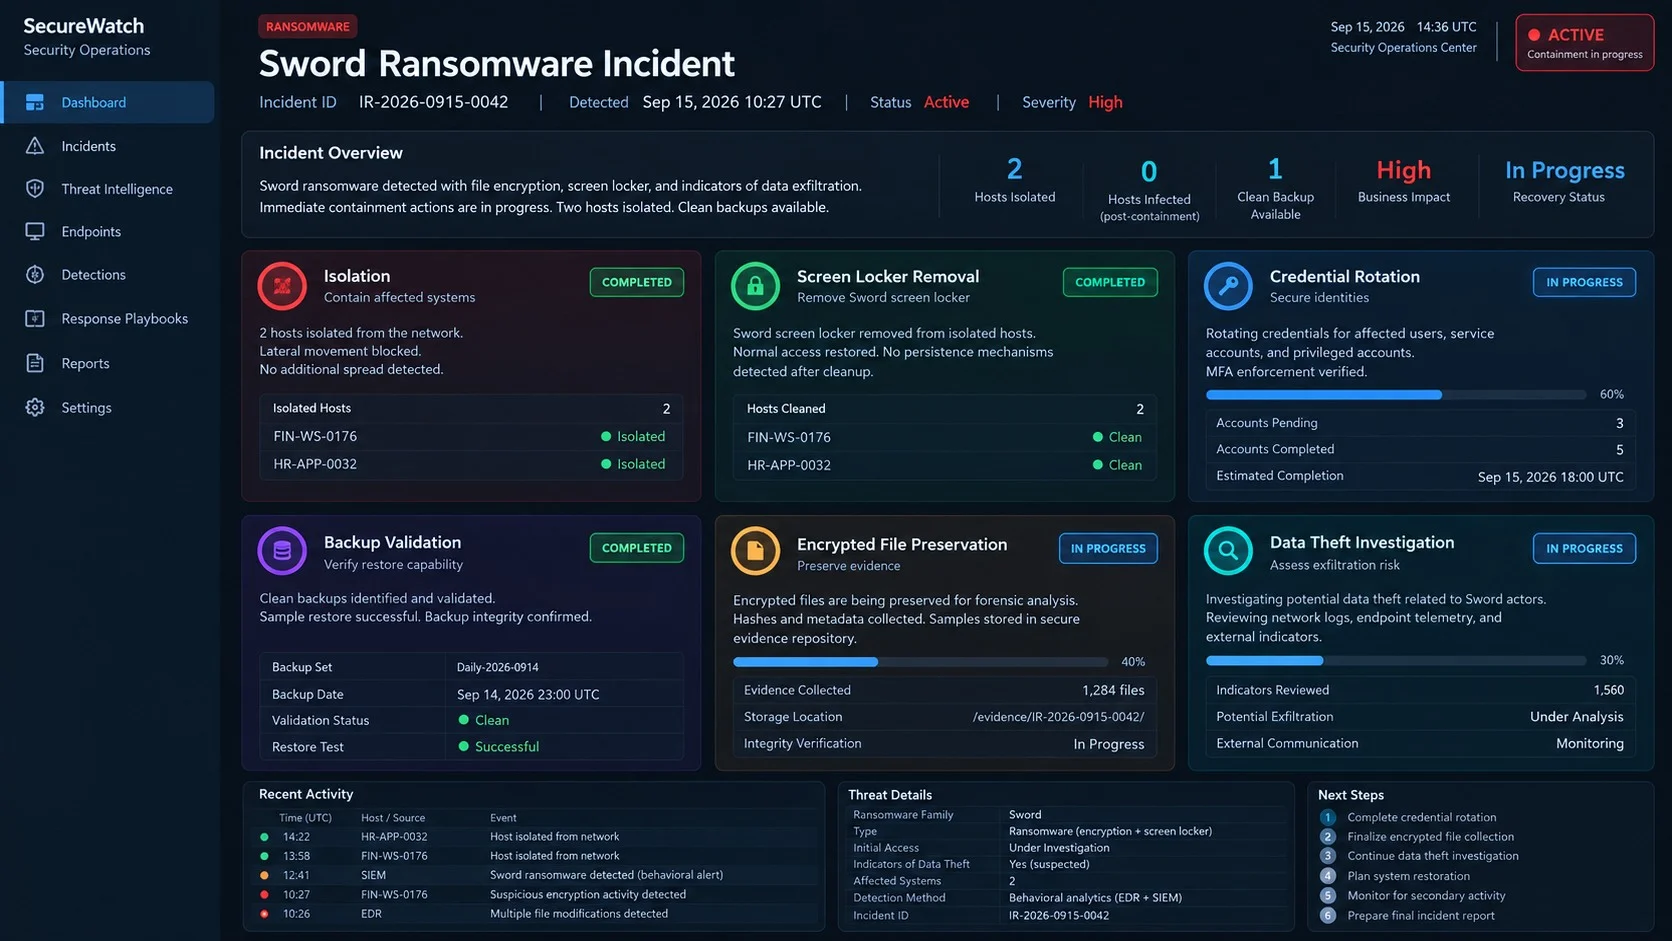
- Identify whether encryption is still progressing before beginning restoration.
- Protect clean backups from access by compromised accounts or systems.
- Determine whether business, personal, regulated, or customer information may have left the network.
- Separate malware removal from data recovery because one does not accomplish the other.
Fast action matters, but random changes can destroy evidence or spread damage. Containment should come before experiments with encrypted data.
How Sword Ransomware Works
Step 1: Malicious code reaches a Windows system
The exact delivery route can vary between incidents. Ransomware commonly arrives through malicious attachments, stolen remote-access credentials, cracked software, deceptive downloads, or unpatched exposed services.
That list describes common possibilities, not a confirmed Sword distribution method for every victim. Incident logs are needed to identify the original entry point.
An executable may be launched directly by a user or indirectly by another infection. Once running, it can inspect the computer, available drives, and reachable network resources.
Business networks face additional risk when one account can write to shared folders. A compromised workstation may damage files that belong to many users.
Step 2: The ransomware prepares the environment
Before encryption, malware may check language settings, security tools, running processes, drive letters, and available storage. These checks help it decide what to target.
Some ransomware attempts to stop database or backup services so normally locked files become available. Whether Sword succeeds depends on privileges and system configuration.
Claims about deleted shadow copies should be verified with administrative tools. A ransom note is written by the attacker and may exaggerate damage to discourage independent recovery.
Network defenders should preserve event logs and endpoint telemetry promptly. Normal log rotation can remove the timeline needed to understand these preparatory actions.
Step 3: Files are encrypted and renamed
Sword processes selected file types and transforms their contents using encryption. The familiar filename remains, but the added .Sword extension marks the altered version.
Renaming alone is not the problem. Simply deleting the extension will not restore the original bytes and can make later file organization more confusing.
Different folders may be affected at different times. Modified timestamps, endpoint events, and storage logs can help reconstruct the order of encryption.
Disconnecting quickly may save data on resources the malware has not reached. It cannot reverse files already encrypted, but it can limit continuing access.
Step 4: Sword floods folders with ransom notes
The malware reportedly places about twenty SwordReadme files with randomized name portions. Multiple copies make the instructions difficult to overlook or remove accidentally.
The note describes a broad compromise and presents payment as the only practical route. That framing is intended to replace technical assessment with fear and urgency.
Contact details and wallet information can change between campaigns. Publishing or following them blindly may expose victims to impersonators who have no connection to the original intrusion.
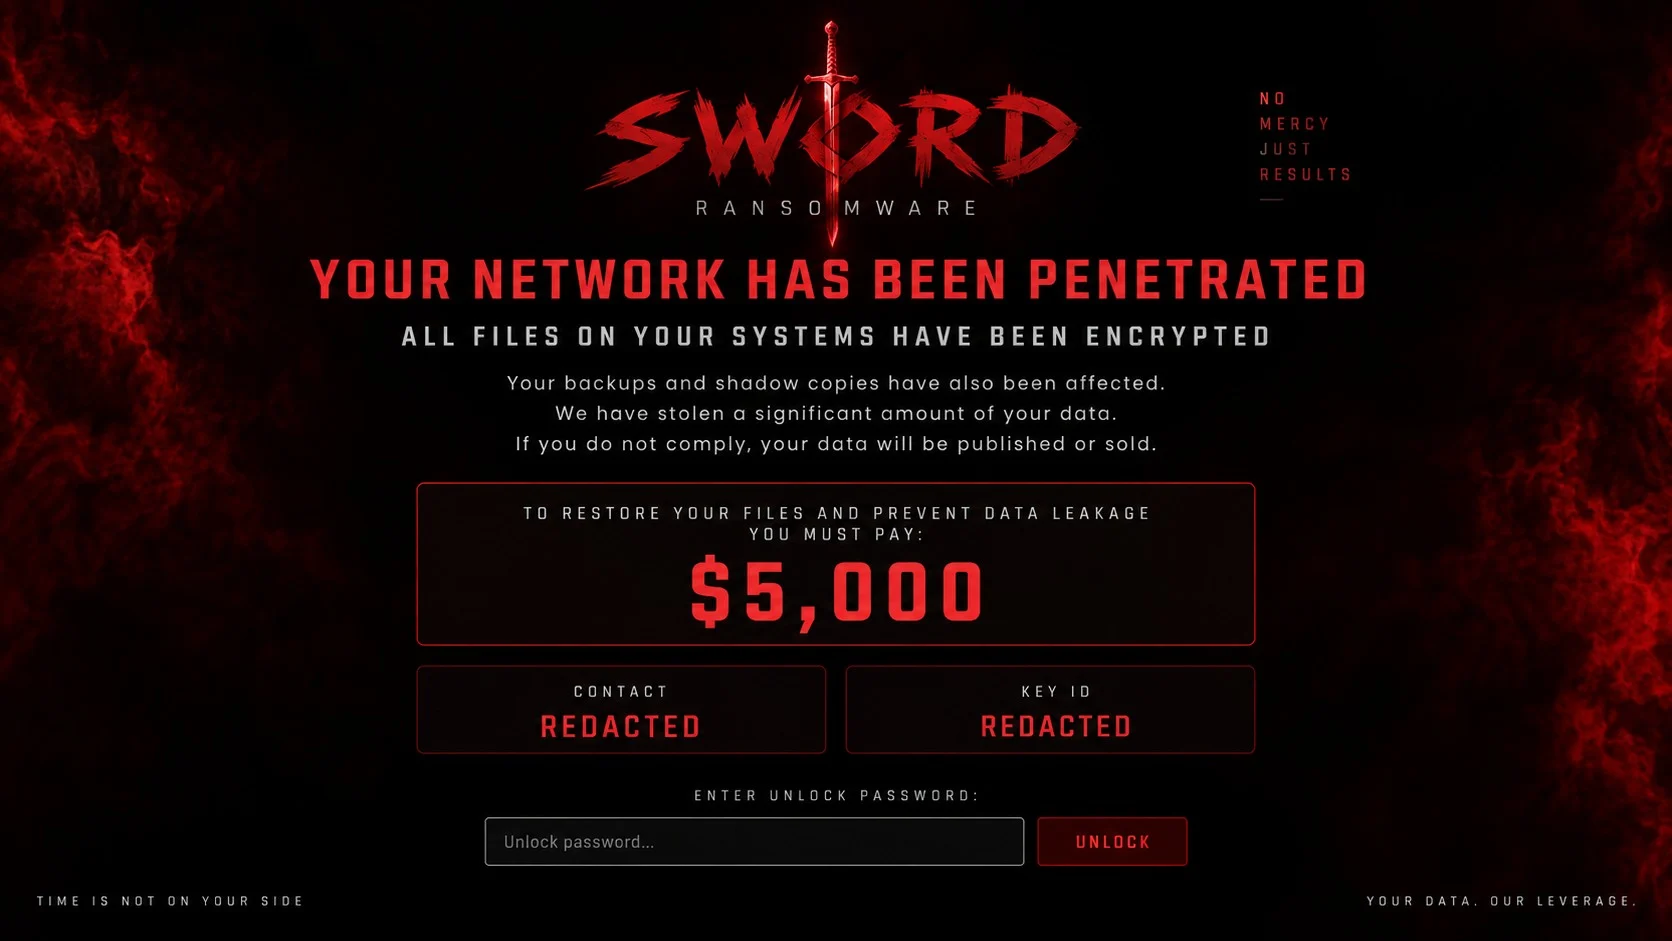
The full-screen interface reinforces that pressure by interrupting normal use. A password field may suggest that payment unlocks the machine, but it offers no independent guarantee.
Because the lock returns quickly, ordinary cleanup can become frustrating. Starting Windows in Safe Mode with Networking may provide a more stable environment for assessment.
Safe Mode is not a decryption technique. It merely limits startup components, which can make it easier to stop persistence and run trusted security tools.
Step 5: The attacker introduces a possible leak threat
Sword’s message reportedly says sensitive information was taken before encryption. This follows a double-extortion pattern, where confidentiality and availability are threatened together.
Victims should not assume the claim is false because no sample appears publicly. Nor should they assume every listed data category was actually stolen.
Network traffic, cloud audit records, archive creation, unusual command execution, and large outbound transfers can support or weaken the exfiltration claim.
Organizations handling customer or regulated information may have notification duties. Legal counsel and incident-response professionals can help evaluate those obligations based on evidence and jurisdiction.
Step 6: Payment pressure competes with sound recovery
The $5,000 demand may look smaller than downtime costs, creating pressure for a quick decision. However, payment introduces technical, legal, and ethical uncertainties.
Attackers may provide a broken decryptor, disappear after payment, demand more money, or leave persistence behind. Decryption also does not prove that stolen data was erased.
Cryptocurrency transfers are difficult to reverse. Victims can additionally face sanctions and compliance questions depending on the recipient and their location.
A structured recovery plan examines clean backups, unaffected copies, application-level exports, cloud history, and possible future decryptors before treating payment as an answer.
Removal Does Not Decrypt .Sword Files
Security software can detect malicious executables, persistence entries, scripts, and related payloads. Removing those components prevents further activity from the identified malware.
Encrypted documents remain encrypted afterward because their contents were already mathematically transformed. Antivirus products cannot recreate missing decryption keys through ordinary malware removal.
This distinction protects victims from false expectations. A clean scan is necessary before restoration, but it is not evidence that damaged data has been repaired.
Keep at least one untouched copy of encrypted files before attempting recovery. Future research may produce a decryptor, or forensic specialists may identify weaknesses not currently known.
Work only on duplicates during experiments. A faulty utility or incorrect command can overwrite metadata and reduce the value of otherwise recoverable evidence.
How to Identify a Sword Ransomware Infection
Look for the .Sword filename extension
Files that previously opened normally may now end in .Sword and fail in their associated applications. Confirm several folders rather than relying on one isolated filename.
Do not rename originals. Document paths, timestamps, sizes, and affected storage locations to create an initial incident inventory.
Find SwordReadme ransom-note copies
Search for text files beginning with SwordReadme and preserve representative samples. Their contents can help responders identify the variant and compare known cases.
Avoid contacting addresses or paying wallets found inside them while emotions are high. First validate the infection and obtain professional guidance.
Confirm the recurring lock screen
A Sword screen that reappears shortly after being closed is a strong behavioral clue. Photograph or capture it without exposing live attacker contact details publicly.
Record when it appears, which account is logged in, and whether Safe Mode suppresses it. Those details can help locate persistence.
Measure the actual incident scope
Check local drives, removable media, shared folders, servers, cloud synchronization, and backup repositories. Identify the earliest known encrypted file and newest clean copy.
Review accounts used by the affected host. A compromised administrator or service credential can leave other systems exposed even after one machine is isolated.
What to Do If Sword Encrypted Your Files
- Isolate affected systems. Unplug network cables and disable Wi-Fi and Bluetooth. Disconnect shared storage through administrative controls when several machines are involved.
- Protect backups immediately. Remove backup access from compromised accounts. Do not connect offline media until the infected environment is contained and examined.
- Preserve evidence. Keep ransom notes, encrypted samples, logs, suspicious files, memory captures, and timeline details. Businesses should establish documented evidence handling.
- Determine whether encryption continues. Watch file changes from a safe administrative system. Do not reconnect an isolated computer merely to test network access.
- Use trusted security tools. Run Malwarebytes from a clean installation source, using Safe Mode with Networking if the recurring screen blocks normal scanning.
- Remove persistence before restoring. Confirm that malicious processes, scheduled tasks, startup entries, services, and secondary payloads are gone from every affected host.
- Reset exposed credentials. From a known-clean device, change passwords and revoke sessions for accounts used on compromised computers. Prioritize administrators and remote access.
- Evaluate recovery sources. Test offline backups, snapshots, cloud versions, exports, and unaffected devices. Restore into a clean environment, not over an active infection.
- Reduce malicious web exposure. AdGuard can block known harmful destinations and deceptive downloads, but patching and access controls remain essential.
- Report and escalate appropriately. Contact law enforcement, insurers, legal counsel, and incident responders when sensitive data, business operations, or regulated records are involved.
Is Your Device Infected? Run a Free Malware Scan
Slow performance, constant pop-ups, or strange behavior? These are classic signs of a malware infection. A quick way to check is to scan your device with Malwarebytes Free, one of the most trusted malware removal tools available. If you only visited a scam page and didn’t download or install anything, this scan is optional.
The free version detects and removes the most common threats, including:
- Adware — the cause of those annoying pop-ups
- Browser hijackers — unwanted redirects and changed homepages
- Trojans and spyware — hidden programs stealing your data
- Potentially unwanted programs (PUPs) — software you never asked for
👉 Select your device below — Windows, Mac, or Android — then follow the simple steps to download Malwarebytes, scan your system, and remove any threats it finds. The scan usually takes 5 to 20 minutes.
Run a Malware Scan with Malwarebytes for Windows
Malwarebytes is one of the most popular and trusted anti-malware tools for Windows — and it’s completely free for removing infections. It catches threats that many antivirus programs miss, including adware, browser hijackers, and trojans. Follow the steps below to scan your PC and remove what Malwarebytes finds.
Download Malwarebytes
Click the button below to download the latest version of Malwarebytes for Windows from the official source. The free version is all you need — it will scan your computer and remove adware, browser hijackers, and other malicious software at no cost.
Download MalwarebytesOfficial installer for Windows 11 and 10. Your download starts right away.Want real-time protection? See Malwarebytes Premium Malwarebytes Free for WindowsScans and removes malware at no cost
-
Install Malwarebytes
When the download finishes, open your Downloads folder and double-click the MBSetup file. If Windows shows a User Account Control pop-up, click “Yes” to allow the installation.
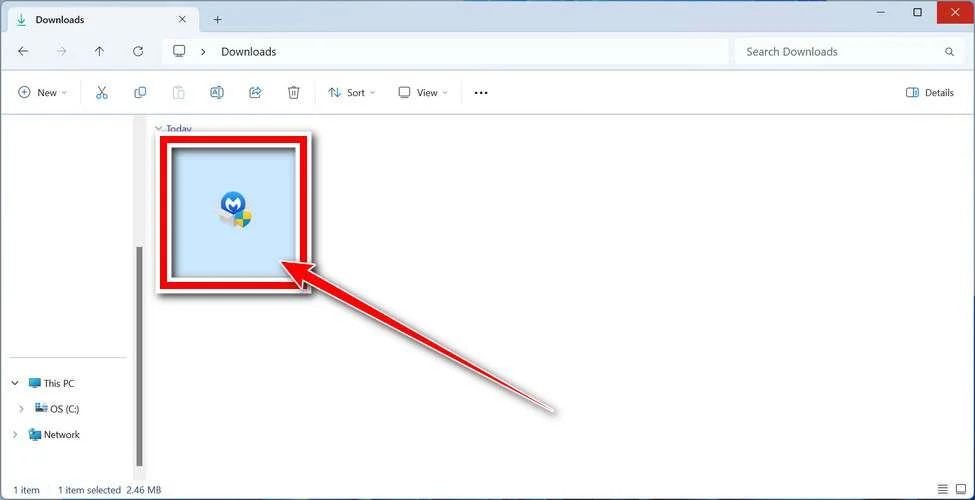
Follow the On-Screen Prompts to Install Malwarebytes
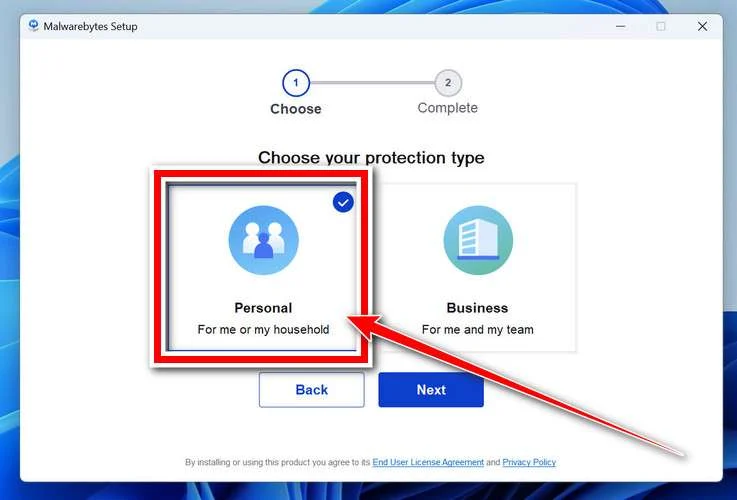
The setup wizard will walk you through a few quick screens:
-
Choose where you’re installing the program — “Personal Computer” or “Work Computer” — then click Next.
-
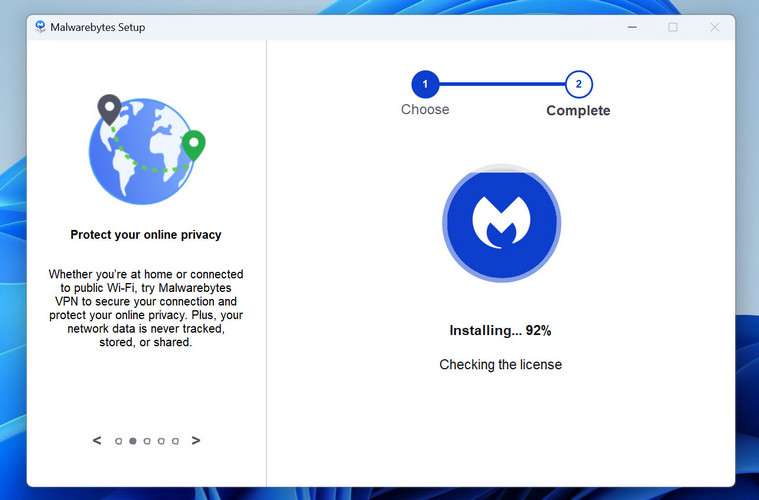
Malwarebytes will now install on your device. This usually takes under a minute.
-
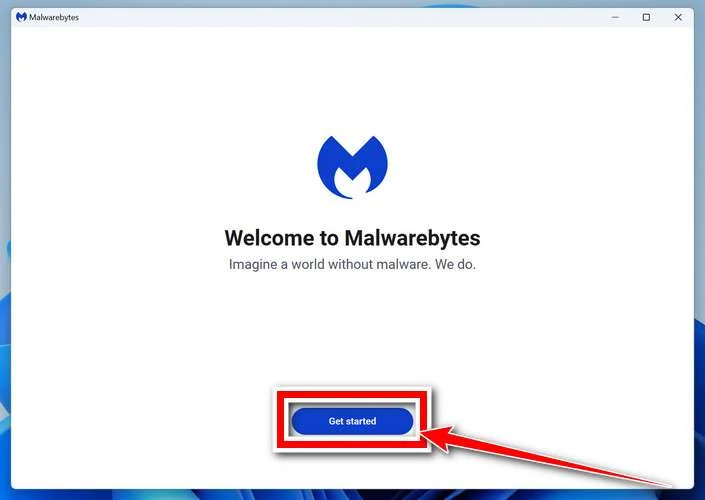
When installation is complete, the “Welcome to Malwarebytes” screen will open automatically.
-
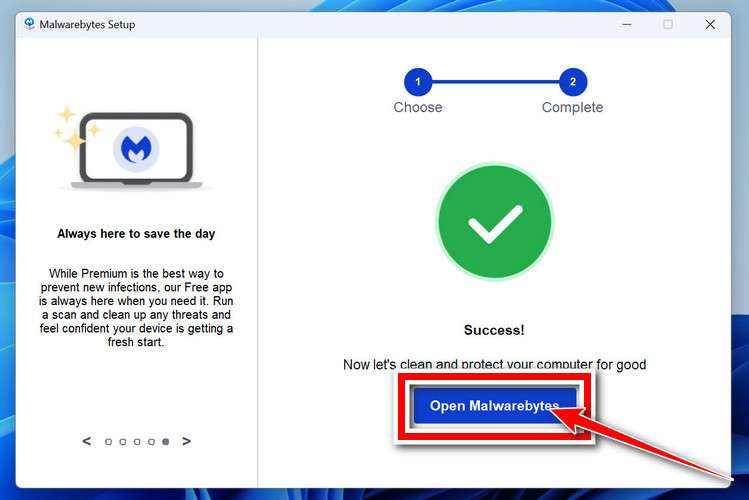
On the final screen, click Open Malwarebytes to launch the program.
-
Optional: Check for rootkits with a Custom Scan
You don’t need to change any settings for a normal scan. The standard Threat Scan in the next step is enough for most problems, so you can go straight to it.
If you also want to check for rootkits, use a Custom Scan. In current versions of Malwarebytes, rootkit scanning is only available there:
- On the Scanner tile, click the three-dot menu and select Advanced Scan.
- Choose Custom Scan. In its options, check Scan for rootkits.
- Select your system drive (usually C:\) as the location to scan, then start the scan. It takes longer than a Threat Scan.
- When it finishes, review and quarantine the results as described in the steps below.
Rootkit scanning isn’t available on Windows devices with ARM processors.
Start the Scan
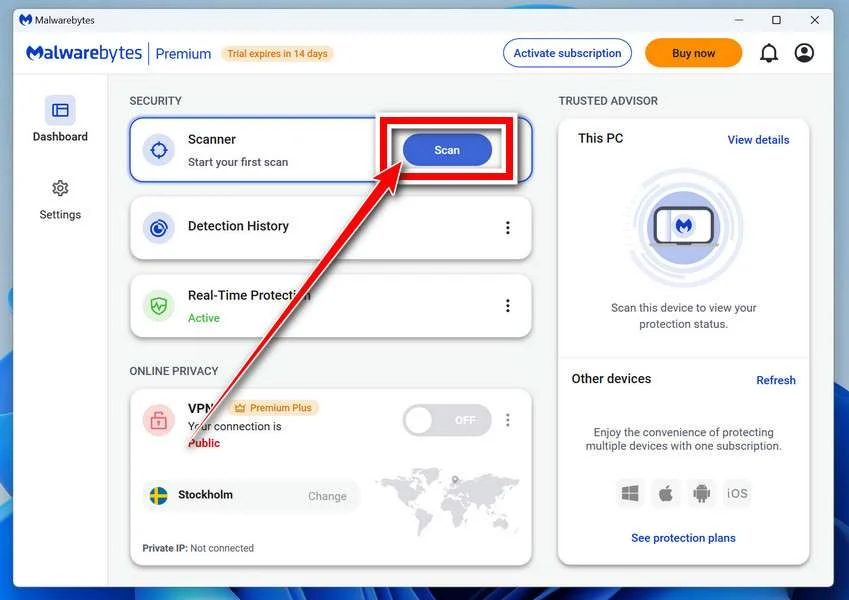
Click the blue Scan button. Malwarebytes will automatically update its virus database and start checking your computer for malware.
-
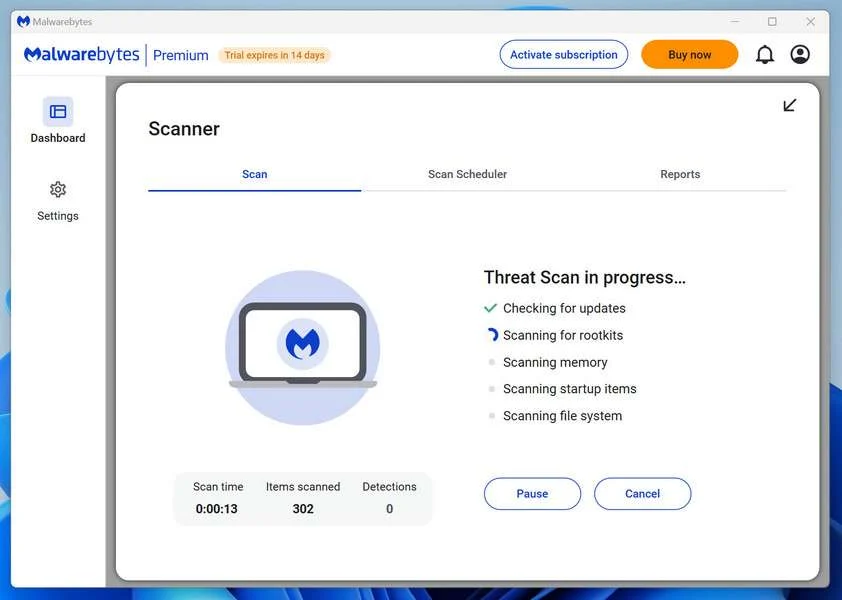
Wait for the Scan to Finish
The scan checks your entire system for browser hijackers and other malicious programs, so it can take 5 to 20 minutes depending on your computer. Feel free to do something else — just check back occasionally to see the progress.
-
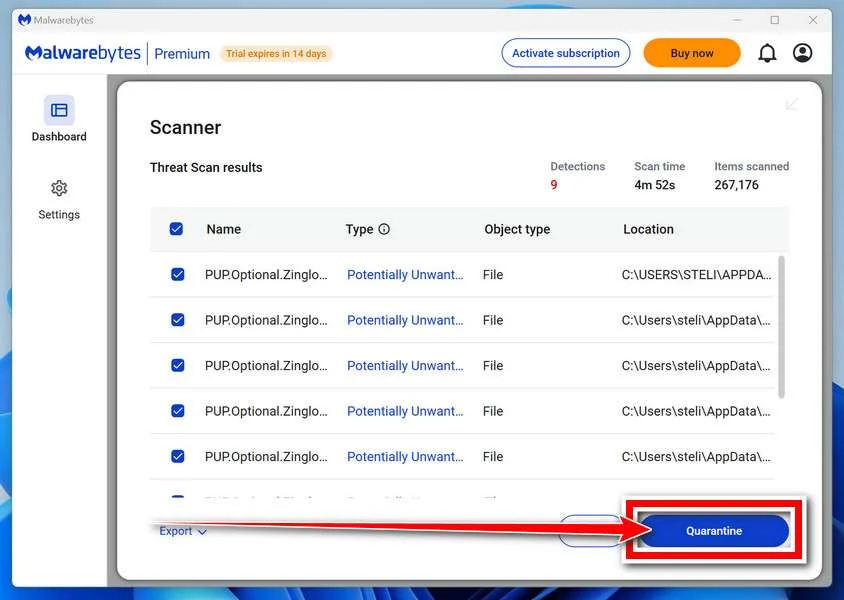
Quarantine the Detected Threats
When the scan is done, you’ll see a list of everything Malwarebytes found — malware, adware, and potentially unwanted programs. Click the “Quarantine” button to remove all of them at once.
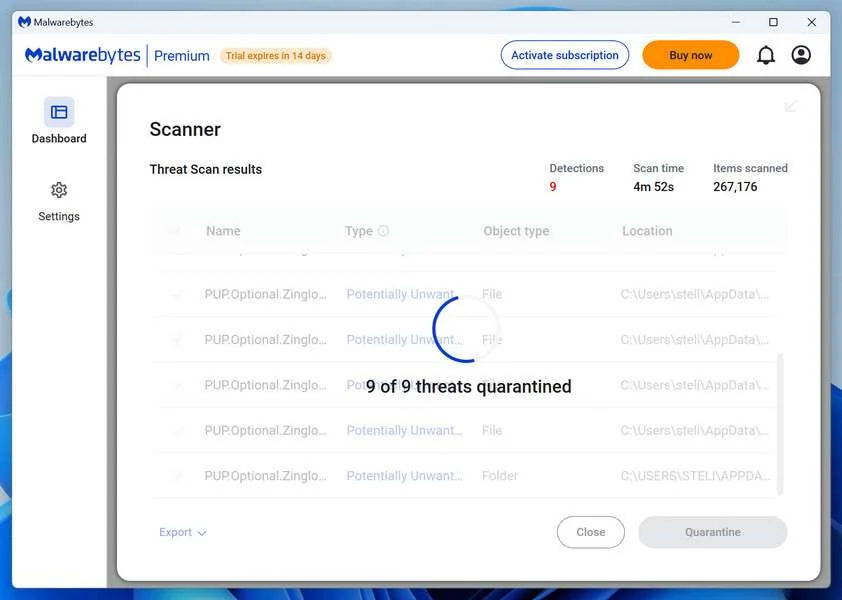
Malwarebytes will now remove the malicious files and registry entries and move them safely into quarantine.
-
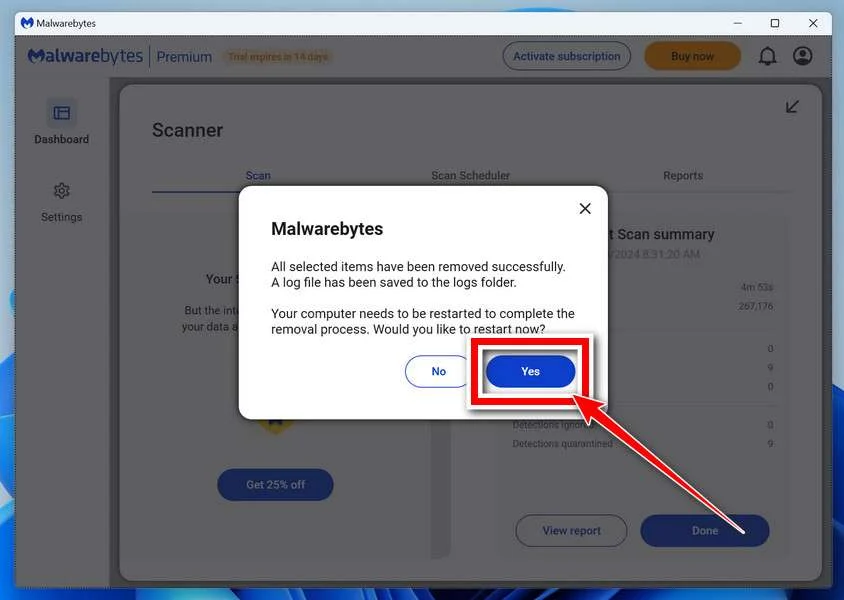
Restart Your Computer
Some threats can only be fully removed after a reboot. If Malwarebytes asks you to restart, click Yes. Once you’re logged back in, Malwarebytes has finished removing the threats it found.
When the scan is done, check whether the problems you noticed have stopped. If they continue, see the options below.
If you are still having problems with your computer after completing these instructions, then please follow one of the steps:
- Run a computer scan with ESET Online Scanner
- Ask for help in our Windows Malware Removal Help & Support forum.
Run a Malware Scan with Malwarebytes for Mac
Malwarebytes for Mac is a free on-demand scanner that removes the malware other security software tends to miss — adware, browser hijackers, and unwanted programs included. Cleaning an infected Mac with Malwarebytes has always been completely free, and it’s our go-to recommendation. Follow the steps below to scan your Mac and remove what Malwarebytes finds.
-
Download Malwarebytes for Mac
Click the button below to download the latest version of Malwarebytes for Mac.
Download MalwarebytesOfficial installer for macOS. Your download starts right away.Want real-time protection? See Malwarebytes PremiumMalwarebytes Free for MacScans and removes malware at no cost -
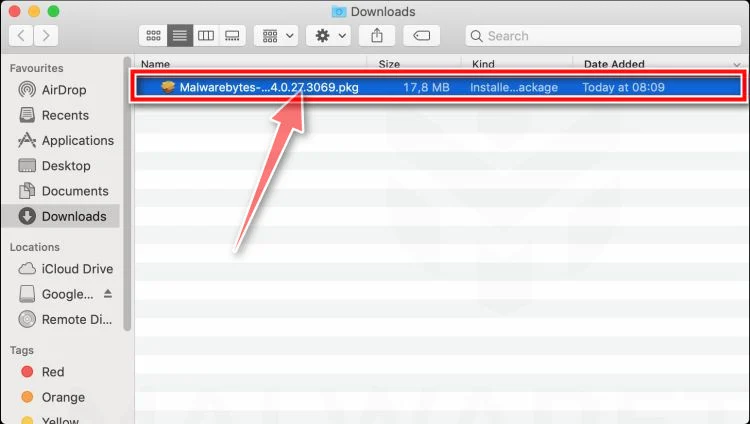
Open the Malwarebytes setup file
When the download finishes, open your Downloads folder and double-click the setup file to begin the installation.
-
Follow the On-Screen Prompts to Install Malwarebytes
The Malwarebytes for Mac Installer will guide you through a few quick screens. Click “Continue” and keep following the prompts until the installation completes.
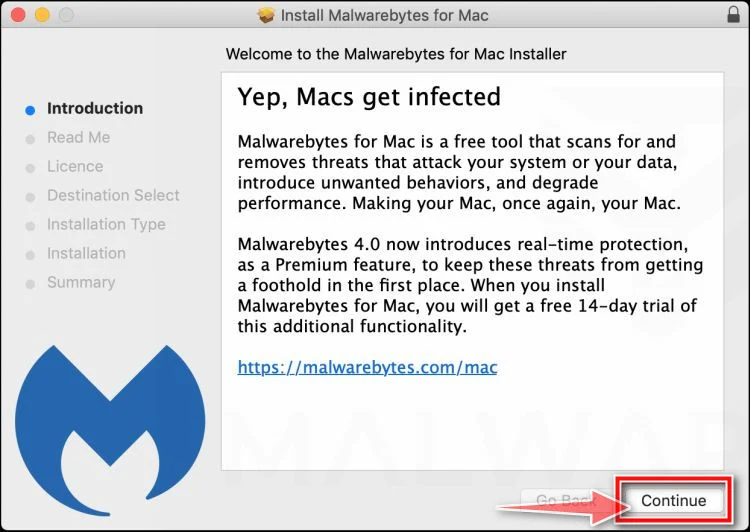
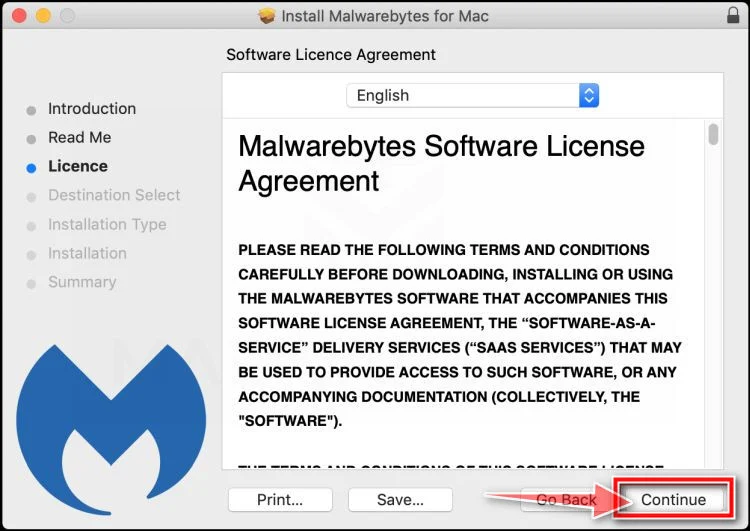
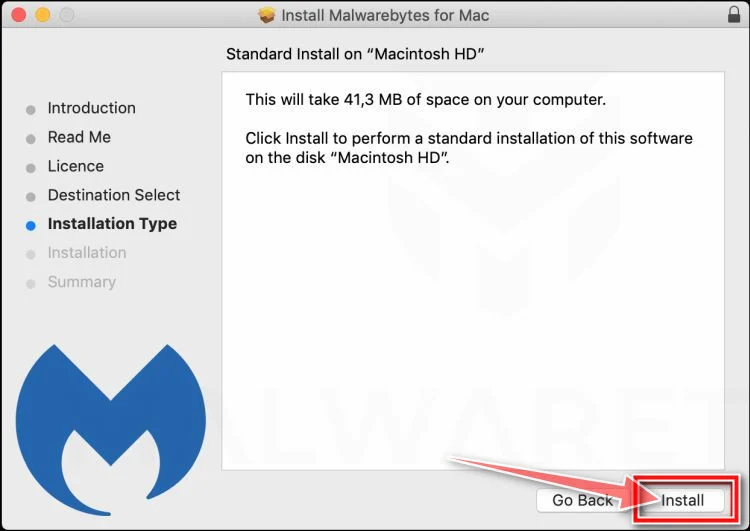
When the installation is complete, Malwarebytes opens to the Welcome to Malwarebytes screen. Click “Get started“.
Malwarebytes needs Full Disk Access to check your whole Mac. When it asks, open System Settings > Privacy & Security > Full Disk Access, turn on Malwarebytes (it may be listed as Malwarebytes Protection), and confirm with your password or Touch ID. Then return to Malwarebytes. On macOS Monterey and earlier, this setting is in System Preferences > Security & Privacy > Privacy.
-
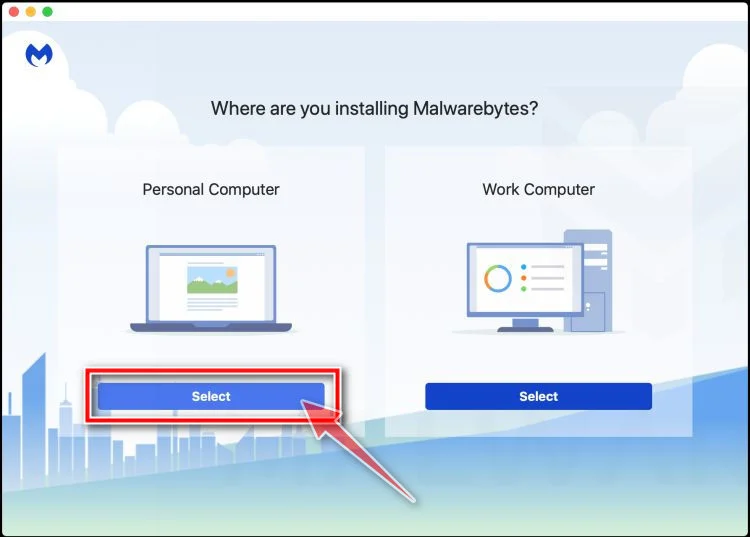
Select “Personal Computer” or “Work Computer”
Malwarebytes will ask what type of computer you’re installing it on. Click either Personal Computer or Work Computer, whichever applies.
-
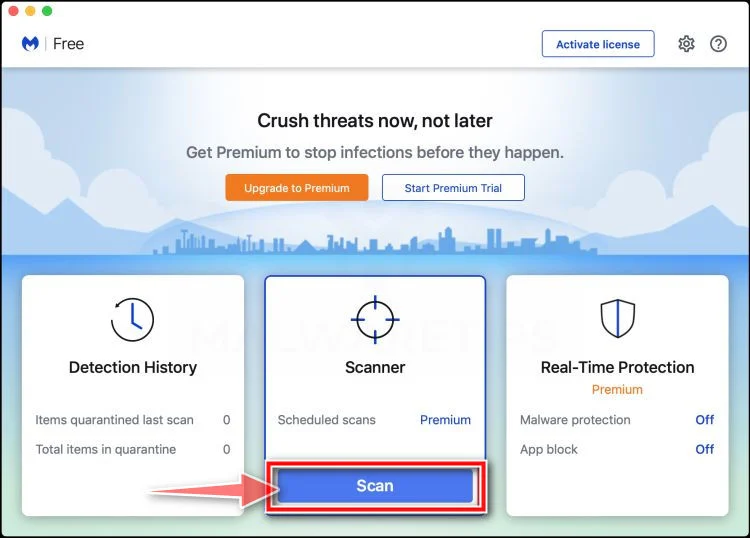
Start the Scan
Click the “Scan” button. Malwarebytes will automatically update its detection database and begin checking your Mac for malware.
-
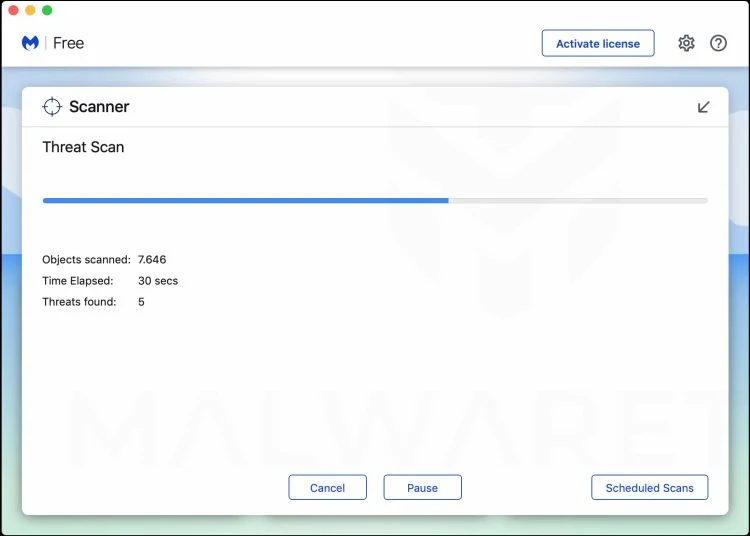
Wait for the Scan to Finish
Malwarebytes will scan your Mac for adware, browser hijackers, and other malicious programs. This can take a few minutes, so feel free to do something else — just check back occasionally to see the progress.
-
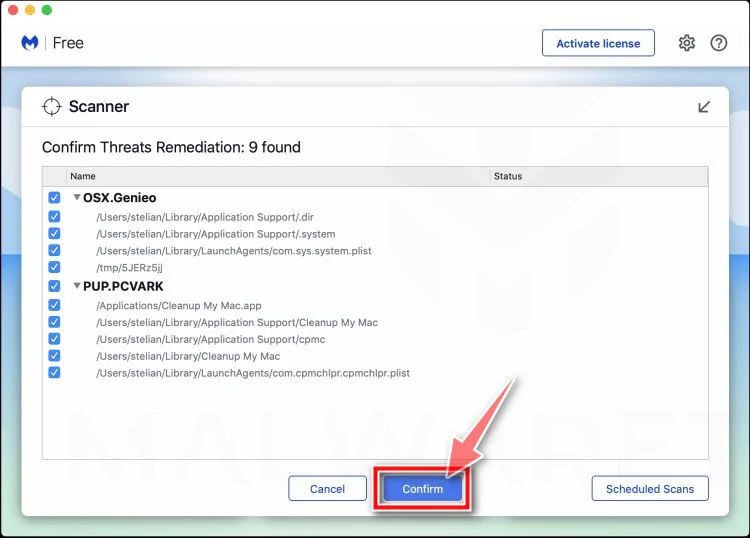
Quarantine the Detected Threats
When the scan is done, you’ll see a list of everything Malwarebytes found. Click the “Quarantine” button to remove all the threats at once.
-
Restart Your Mac
Malwarebytes will now remove all the malicious files it found. Some threats can only be fully removed after a reboot — if Malwarebytes asks you to restart, allow it. Once you’re logged back in, check whether the problems you noticed have stopped. If they come back, save the scan report and ask for help in our forum.
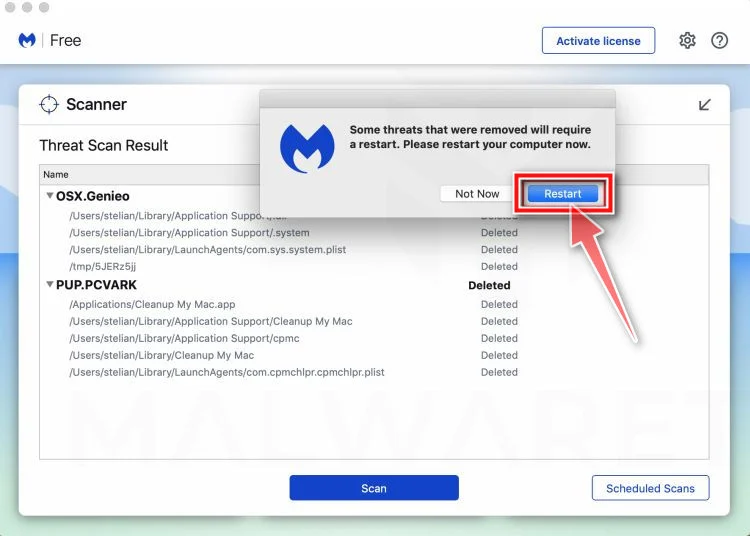
If the problems you noticed continue after the scan, see the options below.
If you are still experiencing problems while trying to remove a malicious program from your computer, please ask for help in our Mac Malware Removal Help & Support forum.
Run a Malware Scan with Malwarebytes for Android
Malwarebytes for Android scans your phone or tablet for malware, adware, and potentially unwanted apps. The free version scans only when you start a scan. Real-time protection, which checks apps automatically, is part of the paid Premium version.
-
Download Malwarebytes for Android.
You can download Malwarebytes for Android by clicking the link below.
Get Malwarebytes for AndroidOpens Google Play in a new tab.Want real-time protection? See Malwarebytes Premium for AndroidMalwarebytes for AndroidScans your phone and removes malware at no cost -
Install Malwarebytes for Android on your phone.
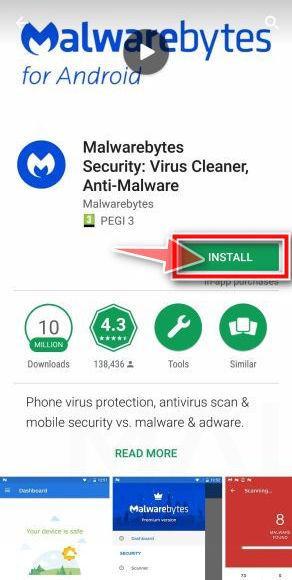
In the Google Play Store, tap “Install” to install Malwarebytes for Android on your device.
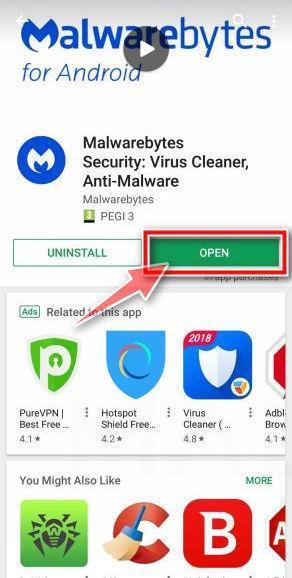
When the installation process has finished, tap “Open” to begin using Malwarebytes for Android. You can also open Malwarebytes by tapping on its icon in your phone menu or home screen.
-
Follow the on-screen prompts to complete the setup process
When Malwarebytes opens, it walks you through a short setup. Tap Get started and follow the prompts. If you see an offer for a trial or a paid plan, read it before you accept. You can skip it and keep using the free scanner.
Malwarebytes will ask for permission to access the files on your phone so it can scan them. Tap Allow, or turn on the permission in the Android screen that opens, then return to Malwarebytes.
-
Run a scan with Malwarebytes for Android
On the main screen, tap Scan now. In some versions, you open the menu, tap Scanner, and then tap Run a scan.
-
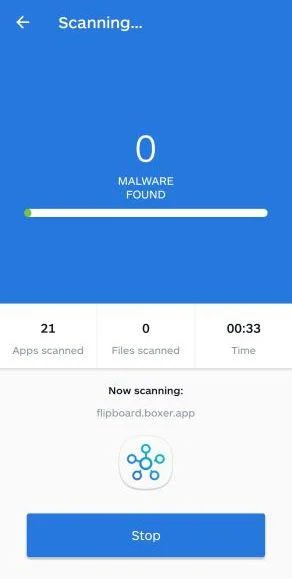
Wait for the Malwarebytes scan to complete.
Malwarebytes will now start scanning your phone for adware and other malicious apps. This process can take a few minutes, so we suggest you do something else and periodically check on the status of the scan to see when it is finished.
-
Remove the detected apps.
When the scan has been completed, you will see a list of the threats that Malwarebytes for Android has detected. Next to each detected item, tap the menu icon (three dots), then choose to uninstall the app or delete the file. Android then asks you to confirm. Tap OK or Uninstall to remove the app.
-
Restart your phone.
When the detected apps are removed, restart your phone if Malwarebytes asks you to. Then check whether the problems you noticed have stopped.
If the problems you noticed continue after the scan, see the options below.
If you are still having problems with your phone after completing these instructions, then please follow one of the steps:
- Ask for help in our Mobile Malware Removal Help & Support forum.
- Only as a last resort, reset your phone to factory settings. Read the warning below first.
- Back up your photos, videos, files, and messages, for example to your Google account or a computer.
- Make sure you know your Google account email and password. The phone asks for them after the reset. If you changed the password recently, Google recommends waiting 24 hours before you reset.
- On a Samsung phone, also make sure you know your Samsung account password.
- If you use an authenticator app for two-step verification, move your accounts to another device or save your backup codes first.
Stay Protected: Block Ads and Malicious Sites
No scan can prove a device is completely clean, so it helps to block threats before they reach you. Most infections start with a malicious ad or a fake download button — so blocking them at the source is your best defense.
We recommend AdGuard, which blocks malicious ads, phishing pages, and dangerous redirects before they can reach you.
👉 Download AdGuard and browse safely
Do not delete the encrypted dataset after restoring a few essential files. Keep a protected archive because a reliable decryptor may become available later.
Businesses should rebuild high-risk systems from known-good media rather than trusting a cleaned installation. Hidden access tools can survive incomplete remediation.
Sword Ransomware Recovery Options
Offline backups offer the strongest path when they were created before compromise and cannot be modified from production accounts. Verify integrity before beginning a large restoration.
Cloud storage may retain earlier versions or deleted items. Pause synchronization first, because encrypted replacements can propagate and complicate selection of clean copies.
Email attachments, collaboration platforms, external recipients, and application exports sometimes contain usable copies. These fragments may restore critical records even without complete backup coverage.
Shadow copies are worth checking, but do not depend on them. Ransomware often attempts to delete them, and attacker claims about success can be either accurate or exaggerated.
No publicly confirmed free Sword decryptor should be assumed available. Downloading random tools carrying that label can introduce another infection or destroy files.
Reputable decryptors normally identify supported variants clearly and never demand remote access from an unknown operator. Test any recovery method on copies.
Preventing Another Ransomware Incident
Maintain backups that cannot be rewritten by everyday user accounts. Include offline or immutable copies and practice restoring them before an emergency.
Patch internet-facing services promptly and remove those no longer needed. Remote desktop access should sit behind strong authentication, limited networks, and monitored gateways.
Use separate administrative accounts for privileged tasks. Daily email and browsing should not occur under credentials that can change servers, backups, or security controls.
Restrict script interpreters and application execution where practical. Allowlisting can stop unfamiliar programs even when a malicious file reaches an employee.
Monitor unusual archive creation, backup deletion, security-tool interference, and rapid file modifications. Early detection can turn a network-wide disaster into a contained workstation event.
Train staff to report suspicious attachments and login prompts without embarrassment. Fast reporting matters more than assigning blame after a mistake.
Segment servers and workstations so one compromised account cannot write everywhere. Critical storage should accept connections only from systems that genuinely need them.
Protect backup consoles with different credentials from the production domain. This separation prevents a captured administrator password from immediately reaching every recovery copy.
Endpoint logs should be retained centrally, beyond the reach of an infected workstation. Local evidence may disappear during encryption, cleanup, or an attacker’s deliberate tampering.
Test alert escalation outside business hours. Ransomware does not wait for office schedules, and an ignored overnight warning can become a morning-wide outage.
Document who can isolate switches, cloud accounts, and storage systems. Responders lose valuable minutes when nobody knows which person controls a critical connection.
Recovery drills should include corrupted backups and unavailable staff. Realistic complications reveal fragile assumptions before criminals can exploit them during a genuine emergency.
Frequently Asked Questions
Can I recover .Sword files by renaming them?
No. Removing the extension changes only the filename. It does not reverse the encryption applied to the file’s contents.
Is there a free Sword ransomware decryptor?
No confirmed universal free decryptor is currently established for this threat. Preserve samples and check reputable security resources for future developments.
Should I pay the $5,000 ransom?
Payment carries no recovery guarantee and may create legal complications. Explore clean backups and professional incident response before making any decision.
Why does the lock screen return after closing?
Persistence can relaunch the ransomware interface. Safe Mode may make removal easier, although responders must still locate and eliminate the underlying startup mechanism.
Does a Malwarebytes scan restore encrypted files?
No. A scan helps remove active malware and related components. File restoration requires backups, a compatible decryptor, or other clean copies.
How can I know whether data was stolen?
Examine network, endpoint, cloud, and server records for collection or outbound transfers. A ransom-note claim alone cannot establish the scope of exfiltration.
The Bottom Line
Sword ransomware combines .Sword file encryption, repeated ransom notes, a persistent lock screen, and alleged data theft to pressure victims into a $5,000 payment.
Isolate systems, preserve evidence, remove malware, and restore only from verified clean sources. Keep encrypted copies safely stored in case better recovery options emerge.

Join the discussion
0 commentsShare your experience or ask a question about this article.
Community experiences
Did this happen to you?
Your experience could help someone recognize the same scam. Submit a private report for our team to review.
I experienced this tooReports are reviewed before publication. Sharing publicly is always your choice.
Discussion
Start the conversation
Have a question or something useful to share? Add the first comment.