

A final warning lands in the inbox and claims an ordinary email account is suddenly approaching a deadline.
The message looks administrative, the clock is already running, and the safest response is not the one its large button suggests.
Overview
The email invents a last-chance security review
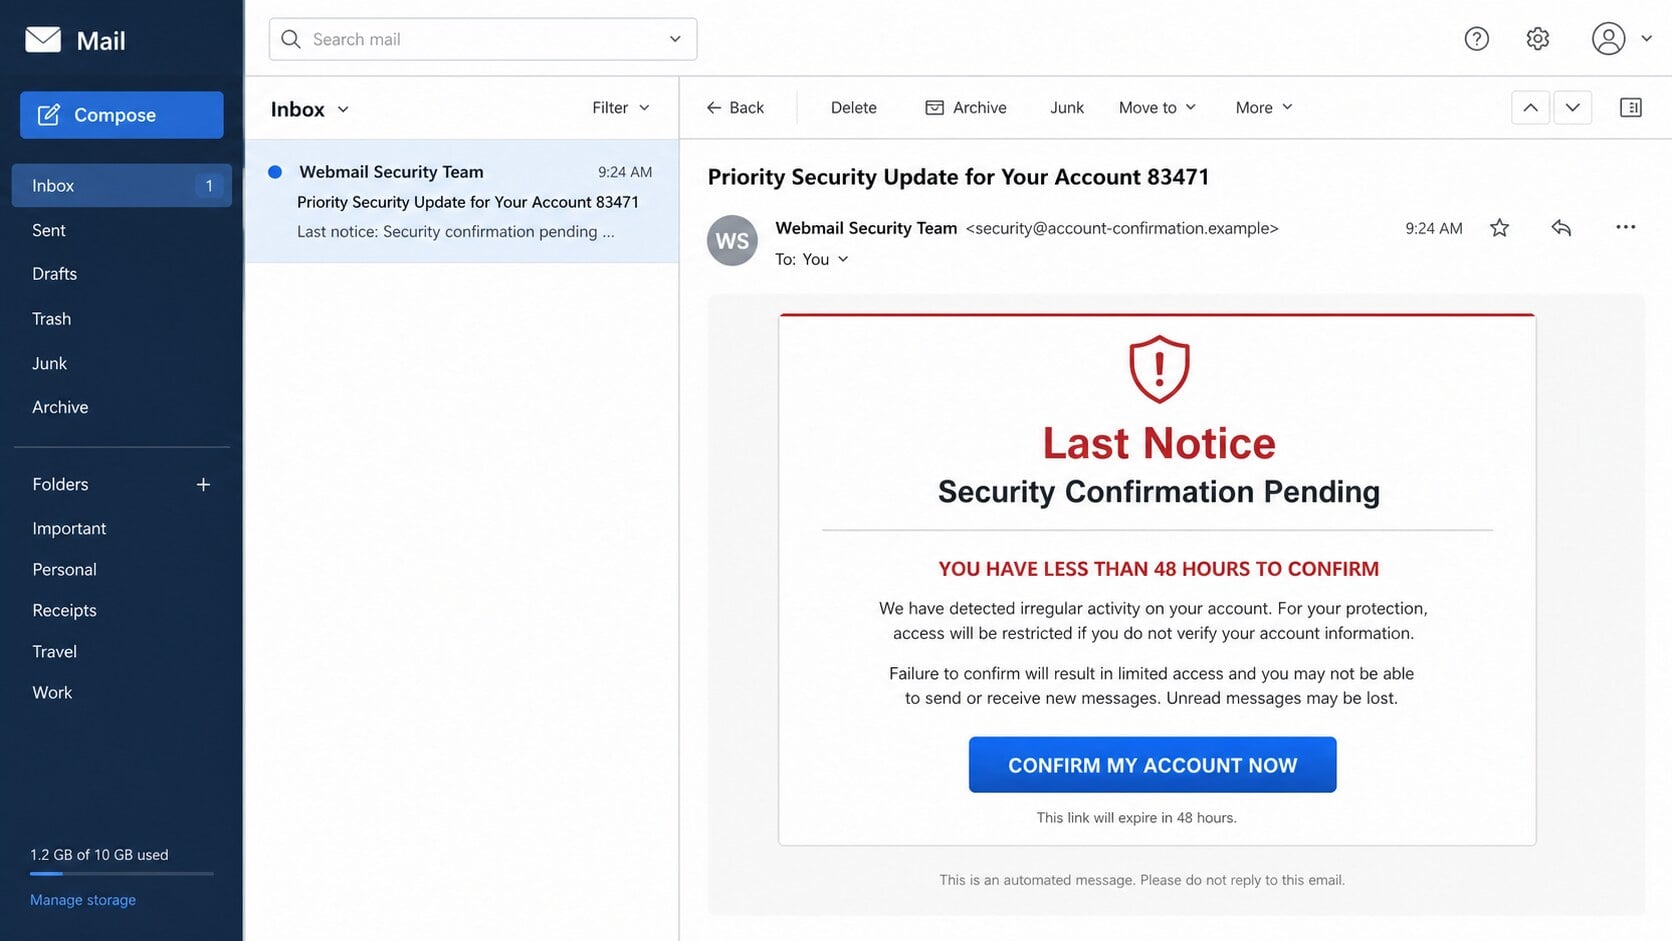
The Webmail Security Confirmation Pending email presents itself as a final notice from an unnamed mail provider.
It claims several identity checks failed and says the recipient has less than 48 hours to confirm the account.
The alleged consequences include restricted access, missing unread messages, and a lengthy reactivation process.
- The provider is described generically instead of being identified clearly.
- The warning supplies no genuine case number or account history.
- A short deadline discourages careful verification.
- The confirmation button leads away from the real mail service.
The deadline is designed to feel personal
A subject such as “Priority Security Update for Your Account 83471” gives the email a record number and official tone.
The recipient’s address may appear in the message, making a mass campaign feel like a provider has reviewed that specific mailbox.
Neither detail proves the sender controls the account. Both can be inserted automatically from a mailing list.
The destination asks for the mailbox password
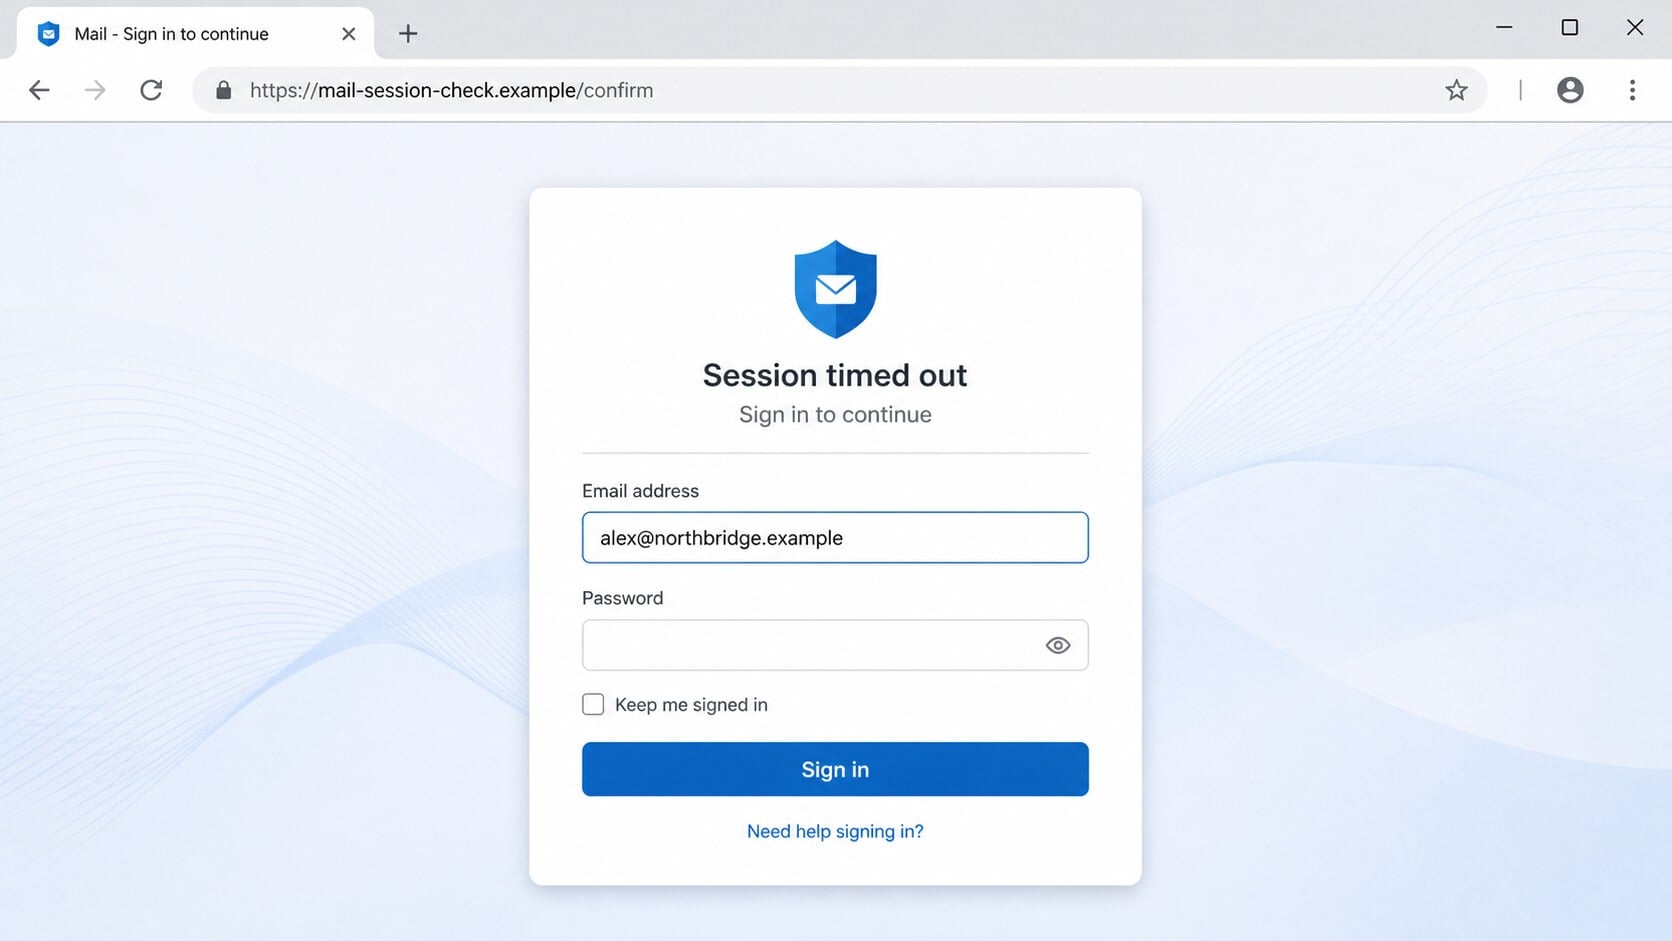
The confirmation button opens a counterfeit sign-in page rather than a real security dashboard.
The address field can already contain the victim’s email, while a session-expired message explains why another login is supposedly necessary.
Submitting the password sends it to the phishing operator. It does not complete a legitimate identity check.
Why This Warning Can Feel Convincing
Email access sits at the center of daily life. Losing it could interrupt work, bills, travel plans, purchases, and password recovery.
The scammers do not need to know which concern matters most. A vague threat lets each reader imagine the worst relevant outcome.
“Last Notice” implies earlier warnings were missed. The recipient may blame a busy inbox instead of questioning whether those warnings ever existed.
A 48-hour window feels long enough to sound procedural, yet short enough to make postponing the task seem risky.
The message also threatens unread mail. That detail turns an account issue into possible loss of information the victim cannot yet see.
A promised three-to-five-day reactivation delay adds inconvenience. People may click simply to avoid dealing with support later.
The button offers immediate relief from every invented problem. One action appears easier than researching an unfamiliar security notice.
That emotional shortcut is the campaign’s real advantage. The design only needs to keep the reader moving for another minute.
What the Email Actually Shows
A generic sender, not a confirmed provider
The display name may say Webmail, Security Team, or Account Administration. Those labels are chosen by the sender and prove nothing.
Expanding the header often reveals an unrelated domain, compromised mailbox, or address that does not match the recipient’s normal provider.
The reply-to field may point somewhere different again. Multiple identities inside one message are a strong warning sign.
A claim without an auditable event
Real account reviews normally identify the service, affected action, approximate location, device, or time that triggered the notice.
This campaign speaks about “failed verification attempts” without saying when they happened or what was being verified.
There is no trusted activity log, support ticket, or security page where the recipient can confirm the allegation independently.
A button that controls the entire journey
The email does not encourage opening the provider’s application or typing its known address.
Instead, every claimed solution begins with one embedded button controlled by the sender.
That route can pass through redirects, tracking links, or compromised websites before the final phishing form appears.
How the Webmail Security Confirmation Pending Scam Works
Step 1: A broad phishing list receives the final notice
Criminals send the warning to addresses collected from data breaches, public pages, marketing lists, compromised accounts, or automated guessing.
The template requires little customization because almost every recipient uses email and understands the cost of losing access.
Some copies include the address, organization, or domain to make the message appear targeted.
That information may already be public or included in the destination URL. It is not evidence of provider access.
Step 2: The message creates a false 48-hour deadline
The email claims identity checks failed and labels the current message a last warning.
It predicts restricted access, lost unread mail, or delayed reactivation if the recipient does not respond.
No real countdown is connected to the mailbox. The deadline exists to replace verification with urgency.
A changing account number or timestamp can make each copy look freshly generated.
Step 3: The confirmation button hides the real destination
The button text describes an account action, but the underlying link belongs to infrastructure unrelated to the claimed provider.
The first address may be a redirector that records the click and forwards visitors to a second site.
Compromised websites and disposable domains help attackers rotate pages when a host is reported or blocked.
On smaller screens, the destination is easy to miss because the full address is not always visible.
Step 4: A counterfeit login adapts to the victim
The landing page displays a familiar-looking sign-in box, sometimes selected from the domain portion of the victim’s email address.
A prefilled username saves the attacker from asking twice and creates the illusion that the provider recognizes the visitor.
“Session timed out” or “Verify your identity” explains why an already signed-in person is being asked for a password.
Logos, colors, and a padlock icon are visual decorations. The registered domain remains the important identity check.
Step 5: The password is captured
When the victim selects Sign in, the form transmits the entered credential to a server controlled by the campaign.
The page may display an error and request the password again. A second entry helps criminals filter out typing mistakes.
Afterward, the victim may be redirected to a genuine homepage or shown a meaningless success message.
That smooth ending reduces immediate suspicion and gives the attacker time to test the credential.
Step 6: The mailbox is searched and persistence is added
Attackers try the password against the real service, often from automated infrastructure or a residential proxy.
Once inside, they can read conversations, search financial terms, inspect contacts, and request password resets for connected accounts.
They may add forwarding rules, delegates, application passwords, recovery methods, or malicious connected applications.
These changes can preserve access even after the original password is replaced.
Step 7: Trust inside the mailbox is exploited
A compromised account lets criminals continue existing conversations without introducing a strange sender.
They can send fake invoices, altered payment details, malicious documents, or another account warning to colleagues and customers.
Reused credentials may unlock shopping, cloud, social, and workplace services directly.
The first fake deadline can therefore grow into identity theft, business email compromise, and financial fraud.
Why the Prefilled Email Address Proves Nothing
Many victims become less suspicious when the landing page already knows their address. That personalization is technically simple.
The address can be appended to the link as plain text, encoded data, or a short identifier connected to the campaign’s database.
When the page loads, a script reads that value and places it inside the username field.
The same script can extract the company domain and choose a matching background, logo, or sign-in layout.
None of this requires access to the real mailbox. The phishing page is repeating information the sender possessed before the click.
A legitimate provider may also prefill a username, so personalization alone cannot decide whether a page is safe.
Check who owns the domain, how the page was reached, and whether the same alert appears after independent login.
A correct email address on the wrong website should increase concern, not reduce it.
How a Real Account Security Alert Behaves
Legitimate providers can send urgent warnings, but their messages usually connect to verifiable activity inside the real account.
The notice may identify a sign-in time, approximate location, browser, device type, or security change.
You should be able to open the provider independently and find recent activity without using the email link.
Established services normally use consistent sending domains and documented support routes.
They do not rely on an unnamed “Webmail” identity while threatening unexplained loss of unread messages.
A provider may ask you to sign in again, but the address bar must show its genuine registered domain.
Security teams also avoid language that makes verification impossible. A real event can be checked, challenged, or reported through known channels.
When an email supplies only pressure and its own button, close it and begin again from a trusted bookmark.
How to Verify the Warning Safely
Open the account through a route you already trust
Use the official application, a saved bookmark, or an address you type yourself.
Do not copy a domain from the suspicious message because lookalike spellings can be difficult to notice.
Check notifications, recent activity, security settings, and service status after signing in normally.
Inspect the complete message header
Reveal the actual sender, reply-to address, mailed-by domain, and authentication results where your mail client provides them.
A familiar display name can sit above a completely unrelated address.
Failed authentication is useful evidence, although a passing result only authenticates the sending domain, not the story inside the email.
Preview the link without visiting it
Hover over the button on a computer or use the mail application’s safe link-preview feature.
Read the registered domain from right to left. Ignore reassuring words placed in subdomains, paths, or page titles.
A free host, unrelated business domain, URL shortener, or unusual country domain cannot confirm an account held elsewhere.
Ask through an independent support channel
Workplace users should forward the message to their established IT or security reporting address.
Personal users should reach the provider through its application or official help center.
Give support the subject, sender, and time received. Never provide the password or a verification code.
Sender, Domain, Deadline, and Account Checks
The sender identity may be entirely disposable
“Webmail Security Team” is not a legal entity, product name, or accountable support department.
Scam campaigns commonly send from breached mailboxes, newly registered domains, free accounts, and servers that disappear after complaints begin.
The listed reply address may be inactive or controlled by another account. Silence is useful to criminals because it keeps victims on the button’s path.
The hosting address exposes the deception
A polished login can be placed on hacked websites, cloud storage, free hosting, or domains purchased only days earlier.
That host does not become your mail provider because it displays the correct logo or enables HTTPS.
HTTPS protects data while it travels to that host. In this case, it can protect the stolen password on its way to scammers.
The deadline has no independent source
The claimed 48-hour restriction appears only inside the suspicious message.
There is no matching banner, support case, account notice, or status entry when the genuine service is opened independently.
A deadline that cannot be verified is pressure, not proof.
The real account record tells the useful story
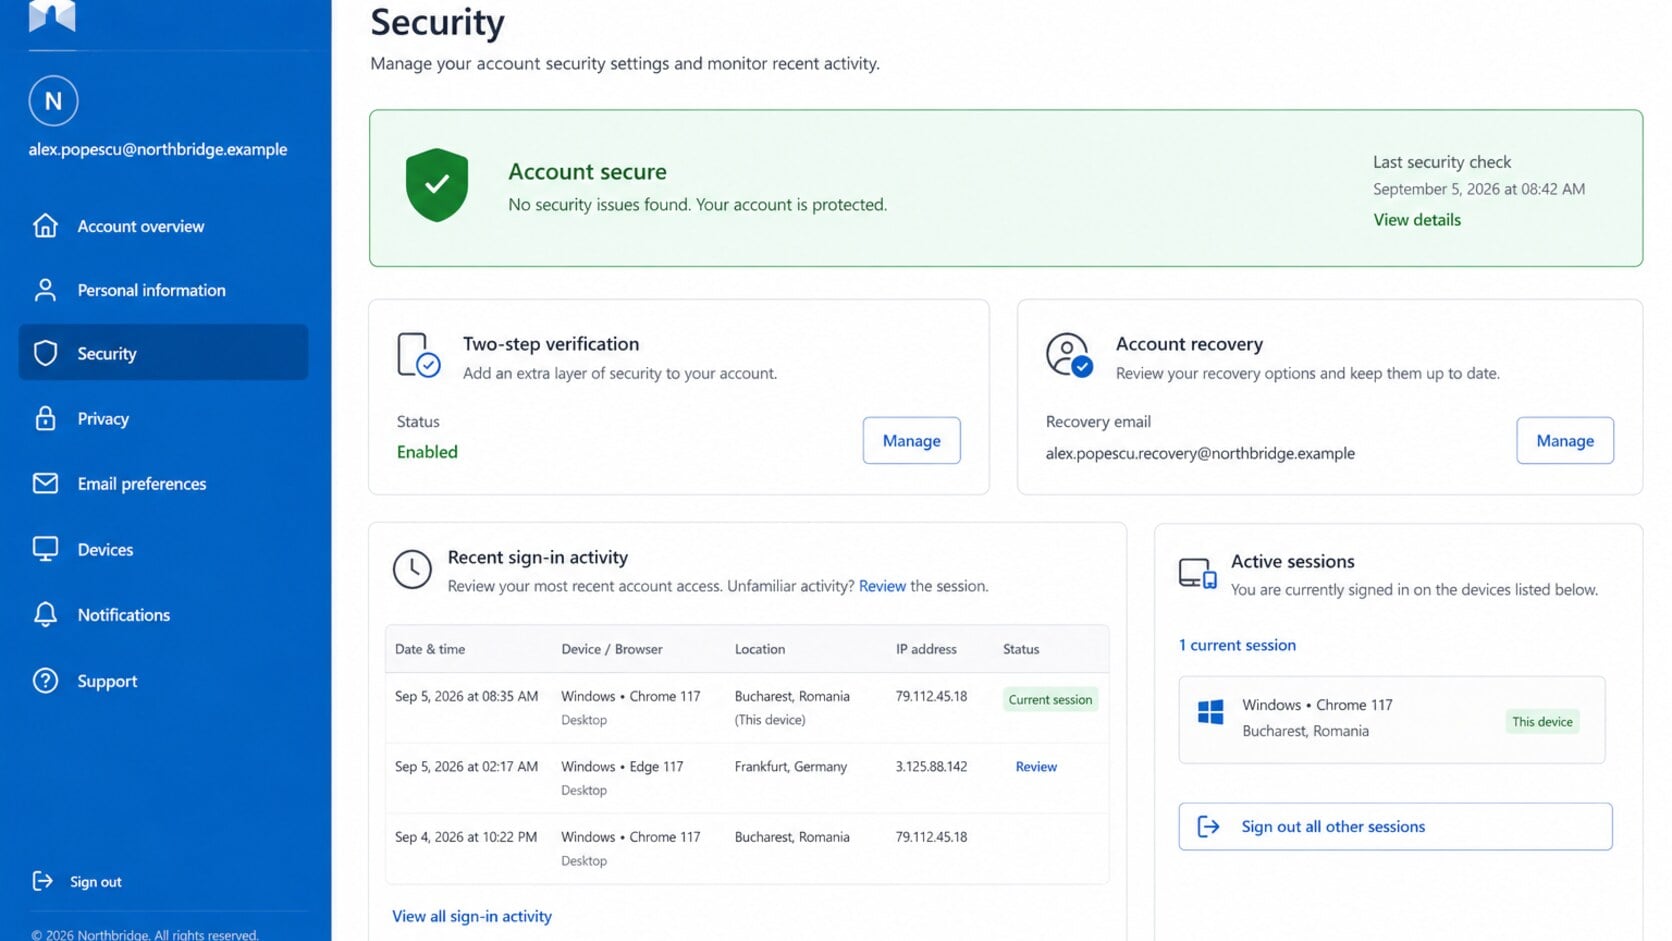
Review sign-in history, active sessions, forwarding, recovery options, delegates, application passwords, and connected applications.
Unexpected entries matter more than the email’s invented account number.
For business mail, administrators should preserve audit logs before removing access, especially when payment conversations or customer data may be involved.
What Criminals Can Do With a Mailbox Password
An inbox is both a communication archive and a recovery channel for other accounts.
Search functions let attackers locate invoices, identity documents, travel records, customer data, and messages containing temporary credentials.
Password-reset emails can hand them control of services even when every account originally used a different password.
Saved conversations reveal how colleagues write, who approves payments, and which suppliers normally send invoices.
That context supports convincing payment diversion. A small change to bank details can look natural inside an existing thread.
Attackers can also create forwarding rules that silently copy future mail to an outside address.
They may delete security alerts or move them into obscure folders so the victim sees nothing unusual.
Contacts are valuable targets because messages sent from the genuine mailbox can pass ordinary trust checks.
This is why changing only one reused password may not be enough. Recovery channels and persistent access require a complete account review.
What to Do if You Have Fallen Victim to This Scam
- Close the phishing page. Do not submit another password, approve an authentication prompt, or download any offered security tool.
- Change the email password immediately. Open the genuine provider independently and create a strong credential used nowhere else.
- Sign out unknown sessions. Revoke every unfamiliar login, remembered device, application password, authentication token, and connected application.
- Repair recovery settings. Remove unknown phone numbers, backup addresses, passkeys, security keys, delegates, and account aliases.
- Inspect mailbox rules. Look for forwarding, filters, automatic replies, hidden delegates, and rules that delete or archive security messages.
- Review account activity. Check sent, deleted, drafts, archive, recent searches, and sign-in history for actions you did not perform.
- Enable stronger authentication. Prefer a passkey, hardware security key, or authenticator application over text-message codes when supported.
- Secure connected accounts. Change reused passwords and review financial, workplace, cloud, shopping, and social accounts recoverable through the mailbox.
- Notify your organization. Business users should contact IT quickly so administrators can revoke tokens, preserve logs, and assess exposed conversations.
- Warn affected contacts. Tell them to ignore unexpected files, links, invoices, or payment changes sent from your address.
- Check the device. Run Malwarebytes if the page delivered a download, browser extension, or other unexpected content.
- Add web protection. AdGuard can block many reported phishing hosts, but continue verifying account notices through the provider’s genuine service.
- Preserve evidence. Save the original email, full headers, destination address, screenshots, timestamps, and account alerts before deleting anything.
Is Your Device Infected? Run a Free Malware Scan
Slow performance, constant pop-ups, or strange behavior? These are classic signs of a malware infection. The fastest way to find out is to scan your device with Malwarebytes Free — one of the most trusted malware removal tools available.
The free version detects and removes the most common threats, including:
- Adware — the cause of those annoying pop-ups
- Browser hijackers — unwanted redirects and changed homepages
- Trojans and spyware — hidden programs stealing your data
- Potentially unwanted programs (PUPs) — software you never asked for
👉 Select your device below — Windows, Mac, or Android — then follow the simple steps to download Malwarebytes, scan your system, and remove any threats it finds. The scan usually takes 5 to 20 minutes.
Run a Malware Scan with Malwarebytes for Windows
Malwarebytes is one of the most popular and trusted anti-malware tools for Windows — and it’s completely free for removing infections. It catches threats that many antivirus programs miss, including adware, browser hijackers, and trojans. Follow the steps below to scan and clean your PC in just a few minutes.
Download Malwarebytes
Click the button below to download the latest version of Malwarebytes for Windows from the official source. The free version is all you need — it will scan your computer and remove adware, browser hijackers, and other malicious software at no cost.
Download MalwarebytesOfficial installer for Windows 11 and 10. Your download starts right away.Want real-time protection? See Malwarebytes Premium Malwarebytes Free for WindowsScans and removes malware at no cost
-
Install Malwarebytes
When the download finishes, open your Downloads folder and double-click the MBSetup file. If Windows shows a User Account Control pop-up, click “Yes” to allow the installation.

Follow the On-Screen Prompts to Install Malwarebytes
The setup wizard will walk you through a few quick screens:
-
Choose where you’re installing the program — “Personal Computer” or “Work Computer” — then click Next.

-
Malwarebytes will now install on your device. This usually takes under a minute.

-
When installation is complete, the “Welcome to Malwarebytes” screen will open automatically.

-
On the final screen, click Open Malwarebytes to launch the program.

-
Enable “Scan for Rootkits”
Before scanning, turn on rootkit detection so Malwarebytes can find even the most hidden threats. Click the Settings gear icon on the left side of the screen.

In the settings menu, find “Scan for rootkits” and click the toggle so it turns blue.

Done? Click “Dashboard” in the left pane to return to the main screen.
Start the Scan
Click the blue Scan button. Malwarebytes will automatically update its virus database and start checking your computer for malware.

-
Wait for the Scan to Finish
The scan checks your entire system for browser hijackers and other malicious programs, so it can take 5 to 20 minutes depending on your computer. Feel free to do something else — just check back occasionally to see the progress.

-
Quarantine the Detected Threats
When the scan is done, you’ll see a list of everything Malwarebytes found — malware, adware, and potentially unwanted programs. Click the “Quarantine” button to remove all of them at once.

Malwarebytes will now remove the malicious files and registry entries and move them safely into quarantine.

-
Restart Your Computer
Some threats can only be fully removed after a reboot. If Malwarebytes asks you to restart, click Yes. Once you’re logged back in, Malwarebytes has finished removing the threats it found.

That’s it — your Windows PC is now clean of trojans, adware, and other malware, and should be back to running smoothly.
If you are still having problems with your computer after completing these instructions, then please follow one of the steps:
- Run a computer scan with ESET Online Scanner
- Ask for help in our Windows Malware Removal Help & Support forum.
Run a Malware Scan with Malwarebytes for Mac
Malwarebytes for Mac is a free on-demand scanner that removes the malware other security software tends to miss — adware, browser hijackers, and unwanted programs included. Cleaning an infected Mac with Malwarebytes has always been completely free, and it’s our go-to recommendation. Follow the steps below to scan and clean your Mac in just a few minutes.
-
Download Malwarebytes for Mac
Click the button below to download the latest version of Malwarebytes for Mac.
Download MalwarebytesOfficial installer for macOS. Your download starts right away.Want real-time protection? See Malwarebytes PremiumMalwarebytes Free for MacScans and removes malware at no cost -
Open the Malwarebytes setup file
When the download finishes, open your Downloads folder and double-click the setup file to begin the installation.

-
Follow the On-Screen Prompts to Install Malwarebytes
The Malwarebytes for Mac Installer will guide you through a few quick screens. Click “Continue” and keep following the prompts until the installation completes.



When the installation is complete, Malwarebytes opens to the Welcome to Malwarebytes screen. Click “Get started“.
-
Select “Personal Computer” or “Work Computer”
Malwarebytes will ask what type of computer you’re installing it on. Click either Personal Computer or Work Computer, whichever applies.

-
Start the Scan
Click the “Scan” button. Malwarebytes will automatically update its detection database and begin checking your Mac for malware.

-
Wait for the Scan to Finish
Malwarebytes will scan your Mac for adware, browser hijackers, and other malicious programs. This can take a few minutes, so feel free to do something else — just check back occasionally to see the progress.

-
Quarantine the Detected Threats
When the scan is done, you’ll see a list of everything Malwarebytes found. Click the “Quarantine” button to remove all the threats at once.

-
Restart Your Mac
Malwarebytes will now remove all the malicious files it found. Some threats can only be fully removed after a reboot — if Malwarebytes asks you to restart, allow it. Once you’re logged back in, your Mac is clean.

That’s it — your Mac is now free of adware, rogue browser extensions, and other potentially harmful software.
If you are still experiencing problems while trying to remove a malicious program from your computer, please ask for help in our Mac Malware Removal Help & Support forum.
Run a Malware Scan with Malwarebytes for Android
Malwarebytes for Android automatically detects and removes dangerous threats like malware and ransomware so you don’t have to worry about your most-used device being compromised. Aggressive detection of adware and potentially unwanted programs keeps your Android phone or tablet running smooth.
-
Download Malwarebytes for Android.
You can download Malwarebytes for Android by clicking the link below.
Get Malwarebytes for AndroidOpens Google Play in a new tab.Want real-time protection? See Malwarebytes Premium for AndroidMalwarebytes for AndroidScans your phone and removes malware at no cost -
Install Malwarebytes for Android on your phone.
In the Google Play Store, tap “Install” to install Malwarebytes for Android on your device.

When the installation process has finished, tap “Open” to begin using Malwarebytes for Android. You can also open Malwarebytes by tapping on its icon in your phone menu or home screen.

-
Follow the on-screen prompts to complete the setup process
When Malwarebytes will open, you will see the Malwarebytes Setup Wizard which will guide you through a series of permissions and other setup options.
This is the first of two screens that explain the difference between the Premium and Free versions. Swipe this screen to continue.
Tap on “Got it” to proceed to the next step.
Malwarebytes for Android will now ask for a set of permissions that are required to scan your device and protect it from malware. Tap on “Give permission” to continue.
Tap on “Allow” to permit Malwarebytes to access the files on your phone.
-
Update database and run a scan with Malwarebytes for Android
You will now be prompted to update the Malwarebytes database and run a full system scan.

Click on “Update database” to update the Malwarebytes for Android definitions to the latest version, then click on “Run full scan” to perform a system scan.

-
Wait for the Malwarebytes scan to complete.
Malwarebytes will now start scanning your phone for adware and other malicious apps. This process can take a few minutes, so we suggest you do something else and periodically check on the status of the scan to see when it is finished.

-
Click on “Remove Selected”.
When the scan has been completed, you will be presented with a screen showing the malware infections that Malwarebytes for Android has detected. To remove the malicious apps that Malwarebytes has found, tap on the “Remove Selected” button.

-
Restart your phone.
Malwarebytes for Android will now remove all the malicious apps that it has found. To complete the malware removal process, Malwarebytes may ask you to restart your device.
That’s it — your Android phone is now clean — no more malicious apps, adware, or browser redirects.
If you are still having problems with your phone after completing these instructions, then please follow one of the steps:
- Restore your phone to factory settings by going to Settings > General management > Reset > Factory data reset.
- Ask for help in our Mobile Malware Removal Help & Support forum.
Stay Protected: Block Ads and Malicious Sites
Now that your device is clean, keep it that way. Most infections start with a malicious ad or a fake download button — so blocking them at the source is your best defense.
We recommend AdGuard, which blocks malicious ads, phishing pages, and dangerous redirects before they can reach you.
👉 Download AdGuard and browse safely
Frequently Asked Questions
Is the 48-hour webmail deadline real?
Not in this campaign. The deadline is written by the sender and does not appear inside the genuine account.
Verify any restriction through the provider directly.
Why did the fake page already know my email?
The address can be embedded in the link or connected to a campaign identifier.
A script then copies it into the form before requesting the password.
What if I clicked but did not enter anything?
Close the page and inspect downloads, browser extensions, and notification permissions.
Your password was probably not captured if you submitted no information.
Does a padlock prove the login is safe?
No. A padlock means the connection to the displayed domain is encrypted.
It does not show that the domain belongs to your provider.
Should I reply to ask whether the notice is genuine?
No. A reply can confirm that your address is active and reaches the same unverified sender.
Contact the provider through an independent channel.
Can changing the password remove every attacker?
Not always. Active sessions, forwarding rules, delegates, application passwords, or malicious app grants may survive.
Review and revoke each form of access.
The Bottom Line
The Webmail Security Confirmation Pending scam uses a fabricated final notice and 48-hour deadline to steer recipients toward a counterfeit login page.
Open the real account independently, verify its activity there, and treat any password entered on the linked page as compromised.

Join the discussion
0 commentsShare your experience or ask a question about this article.
Discussion
Start the conversation
Have a question or something useful to share? Add the first comment.