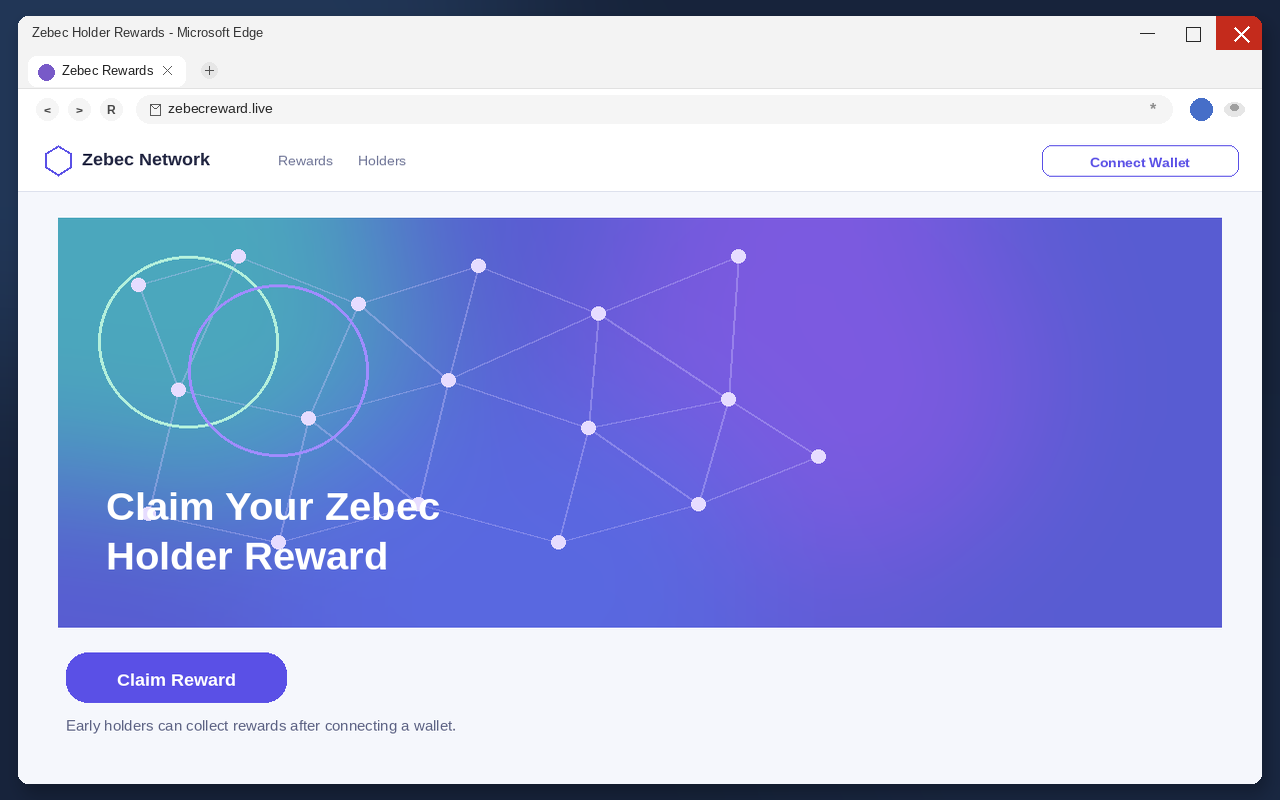
A post says early Zebec holders can collect rewards. The page looks like the real payments project. Same name. Same product language. A Claim Reward button waits like a checkout you already earned.
That is the trap. The page is a visual clone of a real finance platform. The reward is bait. The wallet you connect is the product. Tomorrow the hostname will be different. The funnel will not.
A fake Zebec holder-rewards page. Claim Reward is the trap.
Overview
Fake Zebec Network Rewards pages are cryptocurrency drainers wearing a real project’s clothes. Zebec is a real blockchain platform for payments and other financial services. Its official site is the official Zebec site. These copies are not that site, and they are not a Zebec program.
The pitch is short. If you held the project’s native token early, you are eligible to receive rewards. Connect a wallet to collect them. After that connection, a malicious contract can move assets to addresses the operator controls.
One host in this wave used zebecreward.live. That name is already the wrong thing to memorize. Operators rotate hosts. Learn the mechanism: a clone of a real payments project, an early-holder reward story, a connect button, a drain.
The official check is the address you type yourself. Open the official Zebec site. A lock icon does not settle it. HTTPS only wraps the trip to whatever host you landed on. Encryption can carry a wallet prompt to a criminal as neatly as it carries a payroll login.
This page is not a review of Zebec. The real platform still does payments work. The copies still need you to skip the one check that would end the visit. Type the official host, or use a bookmark you saved before the rumor arrived.
An official-looking clone
The costume is the real brand. Zebec is not the villain in this story. It is a payments and payroll project that people already know. That familiarity is what the clone buys. You do not have to be sold on a new ticker. You only have to believe the door is the same door you have seen before.
A close visual imitation is enough. Colors. Layout. Product language about moving money. A header that says Zebec Network. A button that talks like a claim. On a phone, the address bar is short. You see a familiar word and stop reading. The extra syllable in the host hides to the right, or sits in a redirect you never inspect.
A lock icon is not a badge from Zebec. Anyone can buy a certificate. Anyone can copy a logo. Anyone can put Network and Rewards next to a name people already trust. If you did not type the official host yourself, assume you are in someone else’s lobby until the full address is in front of you.
People who have been around crypto for five minutes have seen words like network, rewards, allocation, and claim on real sites. Those words sound technical. They sound like a project name. They sound like something a legitimate team would register. That is why they work.
You are not being asked to visit a random string of letters. You are being asked to visit a host that is almost the real one, plus a word that feels like homework. The clone wants a hurried glance. You see Zebec. You see rewards. You do not read the rest of the host. Everything after that glance is theater.
The real defense is boring. Type the official Zebec site yourself. Do not trust a card in a feed, a comment under a video, or a “rewards are live” message that already contains the destination. The clone’s job is to be the first door you open. The official site does not need that shortcut.
Early-holder bait
The sentence that does the harm sounds like a thank-you. Early holders of the native token can receive rewards. That line borrows a real habit from crypto. Projects do run distributions. Teams do talk to holders. The clone strips the paperwork and leaves the compliment.
Early is a gift of a word. It means you already qualified. It means you are not applying. It means waiting is how you miss an allocation you earned months ago. People who would never wire $500 to a stranger will tap a button that says the money is already theirs.
Rewards is the other half. Rewards sounds like a coupon, not a transfer. You are not sending assets. You are collecting a thank-you. The page never has to name a dollar amount. It only has to make Connect Wallet feel like picking up a package. The drainer names the amount later, on-chain, after the permission is already granted.
That is why the pitch works on people who would never send $2,000 to a new desk. Connecting a wallet feels like logging in, not like signing a check. Free is the word that shuts down the part of your brain that asks who signed the contract. Free also hides the price. You are not paying in dollars. You are paying with whatever is already sitting in the wallet you connect.
There is no public allocation record on a stranger’s host that turns that story into a fact. There is no official announcement on the real site that points you to a random rewards page. There is a button, a familiar logo, and a clock you cannot see. Instantly, live, limited, exclusive: those words are lighting. They are there so you do not open a new tab.
A real program, when one exists, is boring on purpose. A snapshot. A published rule set. A claim that happens on a site the project has used for months. Nobody who is actually sending you tokens needs you to panic about missing a live window in the next five minutes. Hurry is the clone’s favorite lighting.
Holder culture makes that hurry feel rational. People brag about catching a distribution in the first hour. Everyone else learns to fear being late. The fake rewards page borrows that reflex. It does not need you to believe in a new product. It needs you to believe that waiting is how you miss a thank-you you already earned.
Connect, then drain
Connecting a wallet is a habit now. You have done it on real apps. The prompt looks familiar. The page talks like a rewards desk. The brain files the click under maintenance, not under payment. You are not sending tokens. You are proving you held them early. That is the story. The story is false.
A connection is a conversation with software you do not control. Until the wallet is attached, the page is only a picture. After the wallet is attached, the page can ask for a signature, an approval, or a transaction that moves value. The eligibility story is the costume. The permission is the product.
Once the wallet is connected, a malicious contract is signed and a cryptocurrency drainer can run. Holdings move to addresses the operator controls. The transfers are automated. They can look vague in a wallet history. They can sit quiet long enough that a person thinks they got away clean. Drainers can also approximate the value of what you hold and take the best assets first.
You may not see a big red “send everything” label. Drainers hide inside ordinary-looking wallet prompts. The screen can say claim, verify, switch network, or confirm eligibility. The chain sees a transfer or a spending permission. If you approve it, the money does not come back with a ticket number. Crypto transfers are not like card charges. There is no bank in the middle that can reverse the rail.
The FTC crypto fraud spotlight put numbers on that rail. Since the start of 2021, more than 46,000 people reported losing over $1 billion in crypto to scams. That was about 1 out of every 4 dollars reported lost, more than any other payment method. About 25% of those reported fraud dollars rode a chain instead of a card. Those figures are not a tally of Zebec victims. They are the reason a free-reward page can pay for ads.
Getting the stolen balance back is usually a dead end. Once the drain lands in an address the operator controls, the next hop can be a mixer, a bridge, a swap, or a deposit that is already being emptied. A quiet hour after you clicked is not proof that you got away clean. It is a reason to treat the wallet as burned until you finish the cleanup. There is a 0% chargeback on a confirmed chain transfer.
Hardware wallets are not a free pass at this step. A device still signs what you tell it to sign. If the prompt is a drain approval dressed as a reward, the device will do the harm you authorize. The metal box protects the key from malware on the computer. It does not protect you from saying yes to the wrong contract.
How The Scam Works
The funnel is short. A lure. A clone. A compliment for early holders. A wallet connect. A drain. A new host tomorrow. Each stage exists to make the next one feel small. The hostname is a costume change. The sequence is the product.
Step 1: The lure rides ads, spam, and borrowed accounts
These pages do not need to hack Zebec. They need a crowd that already knows the name. That crowd is easy to find. People who used the real payments tools. People who held the token. People who search the project name plus rewards at 1 a.m. and click the first card that looks official.
The link travels on social media spam, including posts and direct messages from accounts that used to belong to real people. It also rides compromised websites, rogue pop-up ads, junk advertising networks, browser-notification spam, email, forum posts, and software you never meant to install. The costume changes. The destination does not have to.
Nearly half the people who told the FTC they lost crypto to a scam said the contact started with an ad, a post, or a message on social media. A Zebec-shaped reward fits that pipe. It looks like news. It looks like a community drop. It looks like something you are late for.
If the post is in your feed, that does not mean the real project posted it. Compromised accounts keep their old profile photos. They keep their old followers. They keep the little bits of trust that make a stranger’s link feel like a friend’s tip. Read the destination, not the avatar. If the destination was handed to you, it is already doing the clone’s job.
Search traffic is part of the funnel too. People type the project name plus rewards, claim, or allocation and click whatever looks closest. Junk ads and poisoned results love that habit. A paid card can sit above the official site. A lookalike can rank because it stuffed the same words. Type the official host. Do not let a results page choose it for you.
Pop-ups do the same work for people who never open crypto social feeds. A shady download site, a fake “your wallet is eligible” interstitial, a push notification from a page you should never have allowed to alert you. The destination is still a rewards clone. The story is still that early holders are late. Some of those pop-ups are fully functional drainers on their own. Closing the tab is cheaper than finishing the prompt.
Step 2: A clone of a real payments project
The landing page poses as Zebec. It does not have to invent a new brand. Zebec is a real blockchain platform meant to move payments and other financial services. The official site is the one you type. The clone is a close visual imitation of that site, not a cousin product and not a partner desk.
Cloning a real payments project is more effective than inventing a fake token from scratch. A made-up ticker has to sell you on the story. A real name only has to sell you on the door. You already wanted the project to be real. You already heard there might be something for holders. The lookalike does not need to invent desire. It only needs to stand between you and the official host for one click.
This is not a smear of Zebec. The official site is still the official site. The real products still have to answer how you know you are on the legitimate page, because that question is the entire defense against a copy. The clone is counting on you never asking it.
A close copy does not have to be pixel-perfect. It has to be close enough that a person who has seen the real site, or who has only heard the name, accepts the room as the right room. A header. A claim button. Product language about money moving. That is enough for a three-second glance on a phone. Three seconds is enough to tap Claim Reward. Three seconds is not enough to notice you never typed the official host.
When one host dies, the template does not have to die with it. A new registration can swap one extra word, one prefix, or one suffix and reuse the same costume. Learn the tell, not a blacklist of yesterday’s names. If the host is not the official Zebec site you typed, it is not Zebec.
That is why this family of pages keeps coming back. The real name exists. People keep searching for it. Operators keep standing up hosts that look like the search. When one domain gets reported, the template moves. Learn the official address. Do not learn a list of last week’s clones.
Step 3: Early holders are invited to collect
The dangerous sentence is the helpful one. Early token holders are eligible to receive rewards. Connect a wallet to collect them. That is the documented ask. It is also the moment the page stops being a picture and starts being a drain.
A real team that wants to thank holders has official channels, a host people already use, and time to read. A clone has a compliment and a button. Eligibility does not require a blank check. A public address can be read without emptying a wallet. A snapshot can be checked from chain data. It does not need a surprise approval that can move every token you hold.
The clone needs the connection because the connection is how the drainer gets a chance to speak. Wallet software will show a prompt. The prompt can look like a simple attach. It can look like a signature. It can look like a network switch. It can look like a claim with a tiny fee. Read it the way you would read a wire form, not the way you would dismiss a cookie banner.
If the request is blank, unlimited, unreadable, or different from “look up my address,” reject it. If the page wants a recovery phrase, stop immediately. No official rewards desk needs the words that recreate the wallet. The documented move on this pattern is the connect path, not a seed-phrase form, but a page that already lies about its host can lie about the next screen too.
A real check also does not need to happen on a stranger’s domain. If you already use the official site, open that site by typing it. If you are not sure you are eligible for anything, the official channels are the place to read, not a countdown on a host you met five seconds ago. Hurry is not a feature of a real thank-you. Hurry is a feature of a drain.
Some visitors hesitate and look for a “check eligibility” step, hoping the site will say they do not qualify and leave them alone. That step, when it appears, is still a connect. Eligibility is the excuse. The wallet is the target. A page that cannot see your address without a connection is not checking a list. It is asking for the keys to the list.
Step 4: Connect Wallet arms the drain
Tap the claim and the wallet picker appears. It is the same family of connection UI used across legitimate apps, which is why it feels safe. You have connected wallets to real sites before. The habit is useful on a project you already trust. It is dangerous on a page that showed up this morning.
The list is often long on purpose. A genuine holder thank-you for one project does not need to greet every ecosystem in one breath. A drainer does. The operator does not care which chain you use. The operator cares that you approve something. Choosing a familiar wallet brand from the list is not a verification of Zebec. It is you handing the page a live session with the account that holds your coins.
Read the prompt the way you would read a bank transfer. What is being spent. Which contract is asking. Whether the permission is unlimited. Whether the action is a simple sign-in or a token approval. If you cannot answer those questions in one sentence, the answer is no. A reward will not expire while you decline.
People lose coins here because the window feels like a login wall. Login walls are supposed to be boring. Drain approvals are not. A site that needs a signature to “prove you own the wallet” can also use that signature to move the wallet. Treat every prompt as a spending decision, even when the button says Claim Reward.
If a later prompt says the claim failed, or that you need to unlock the drop, or that gas must be paid from a token you do not hold, stop. Those lines are second bites. They exist to push another signature after the first one already opened the door. Close the tab. Do not try to finish a claim that was never a claim.
Do not open a rewards clone to “just look.” On a phone the address bar is easy to ignore, and looking is how a Claim tap becomes a connected wallet. If a friend forwarded the link, tell them the same thing. The page is the attack, not a preview of an attack.
Step 5: The drainer takes what the wallet will sign
After the wallet is attached, the malicious tool can transfer holdings to the operator. The holdings in that wallet are the target. The visitor still thinks they are waiting on a rewards result. The chain is already moving value the other way.
Some drains are loud. The balance hits zero while you are still on the page. Some are quieter. An unlimited approval sits in the wallet. Hours later, when you top the account up or when a token you forgot about gets liquid, the same permission spends it. “I connected but I did not see a send” is not a clean bill of health. The approval can be the theft. The transfer can wait.
Drainers can approximate the value of digital assets and decide which to take first. Liquid tokens go early. Quiet coins can wait. Dust can stay behind so the wallet still looks alive. That leftover is not kindness. It is a hook for a second sweep, or for a recovery pitch that asks you to send more to “unlock” the rest. Do not feed the old address.
The operator does not need your name. They need a destination they control and a signature you thought was a claim. After that, the money is theirs on the same public rules that make crypto useful. No chargeback. There is a 0% chance a network validator honors “I did not mean to.” The FTC said the quiet part out loud: once the money is gone, there is no getting it back on that rail.
Because confirmations are irreversible, the operator does not need you to stay on the page. You can close the laptop. You can reboot. You can delete the site from history. The chain does not care. The new owner of those coins is the address the drainer specified, and there is no Zebec support desk that can freeze a foreign transfer.
Follow-up damage is part of the business. People who post about a drained wallet attract recovery agents. Those agents promise a tracer, a hacker, or a special backdoor at the chain. They want an upfront fee, remote access, or the new recovery phrase. That is a second scam standing on the first one. The clone already took what the wallet would sign. Do not pay a stranger to reverse a rail that does not reverse.
Step 6: Tomorrow’s copy uses a different host
When one lookalike dies, the template moves. A new registration can swap a word like reward, allocation, claim, or network and reuse the same Zebec costume. Bookmarking yesterday’s host does not keep you safe tomorrow. The official address will not change to match a rumor.
The tell is stable. If the host is not the official Zebec site you typed, it is not the official site. If a page that is not that site wants a wallet connection because you were an early holder, treat it as a drain until official channels say otherwise. Official channels means the site you typed and accounts you already verified, not the link that arrived with the rumor.
Holder rewards are not automatically scams. Real projects run real distributions, and a real payments platform can have real holder programs. The clone is effective because the real name exists. You cannot protect yourself by deciding every reward is fake. You protect yourself by deciding that only the official host is allowed to talk to the wallet.
If a friend forwards a claim link, do not argue about the screenshot. Ask whether they typed the official Zebec site. If they did not, the picture is not proof. It is bait with better lighting. Open a new tab. Type the official host. If the real site does not match the rumor, the rumor was the product.
Airdrop season, claim season, and “early holder” season are all the same hunting weather. The next page will hope you only remember last week’s hostname and not the sequence that emptied the last wallet. Learn the sequence. Clone of a real payments project. Early-holder bait. Connect. Drain. That sequence will outlive any one domain.
What To Do If You Have Fallen Victim to This Scam
If you connected a wallet to a fake Zebec rewards page, assume the attacker can still spend what is left. Work in this order. Do not send more coins to the same address to unlock a claim. Do not paste a seed phrase into any site that offers to reverse the drain. Those are second scams that feed on the first.
If you only opened the clone and did not connect a wallet, stop there. Close the tab. Do not go back to see whether the page still loads. Do not connect a throwaway wallet “just to look.” Looking is how people finish a prompt on a phone. If you need a second pair of eyes, send a screenshot with the link unclicked, or send the URL as text to a person you already know.
Disconnect the site from the wallet. Open the wallet’s connected-app or connected-site list and remove the fake rewards page, plus any other unknown sessions from the same sitting. Disconnect is not a full fix. It is the first door you shut so the page cannot keep asking for new signatures while you clean up.
Create a new wallet on a device you trust. Use the official wallet app to generate a fresh recovery phrase. Write it down offline. Do not reuse the old words, and do not edit them. Every account derived from the old phrase can still be reached if a key or an approval is already in someone else’s hands. The new wallet is the only clean room you can still build.
Revoke approvals and spending permissions from the old wallet. Use the wallet’s official approval manager or a reputable blockchain explorer for the network you connected. Remove unlimited token allowances, NFT operators, and anything tied to the clone. Revocation stops future spends that were pre-approved. It does not pull back coins that already moved, and it does not repair an exposed recovery phrase.
Move remaining assets to the new wallet before the operator does. Start with the most valuable and most liquid tokens. Leave enough native coin on the old address to pay network fees. Verify each destination on the wallet screen, not in a message someone just sent you. Do not send more value into the old wallet to “test” a claim or to cover a supposed gas fee from the clone.
Preserve transaction IDs and the rest of the record. Save TXIDs, destination addresses, token contracts, approval events, timestamps, screenshots of the clone, and balances before and after. Export what the wallet and the explorer will give you. This packet is what an exchange fraud team, a cop, an insurer, or a tax person can actually use. Memory is not a record.
Report the clone and the drain. File at the FTC ReportFraud site if you are in a position to use it. In the United States, add the FBI Internet Crime Complaint Center. Tell your wallet provider through its official support page. If stolen funds landed at an exchange deposit, send that exchange the TXIDs the same day. A freeze is not a promise. Delay makes it a fantasy.
Ignore recovery agents, guaranteed tracers, and anyone who messages you first. A stranger who found your report is not your incident responder. Do not pay an upfront crypto fee. Do not install remote-support software. Do not hand over the new recovery phrase. Work with law enforcement, the exchange you already have an account with, or a firm you chose yourself. If you want a human walkthrough after the cleanup, use the MalwareTips support forum on a page you opened yourself.
If you never approved a prompt and you only attached the wallet for a second, still disconnect, still review approvals, and still watch the old address. If you approved anything you did not fully read, treat the old wallet as compromised even if the balance looks the same tonight. Drainers are allowed to be patient. You should not be.
Do not use the official Zebec site as a place to undo a drain. The official team cannot reverse a foreign chain transfer, and a support impersonator will pretend they can. Open the official Zebec site only if you already use it for real products, and only by typing the host. Never paste a recovery phrase into any Zebec-shaped page.
Tax and recordkeeping are unglamorous and still worth a calendar reminder. Stolen crypto is still a transaction history you may need. Keep the TXIDs with the date you connected. If you use an accountant, send that packet once rather than reconstructing it from memory in April. Do not pay anyone who promises to turn the hashes into a refund.
Going forward, keep reward hunting off the wallet that holds your rent. A burner address with a tiny balance can survive a bad click. The main wallet cannot. Official claims, when they are real, will wait for you on a site you already use. They will not need you to connect a stranger’s page because a holder compliment said the window was closing.
The Bottom Line
The fake Zebec holder-reward page is a clone of a real payments project, not a review of that project. Zebec’s official site is the one you type. The copies add a rewards story for early token holders, ask you to connect a wallet, and drain what the wallet will sign. The connected wallet is what they came for. The drainer is how they get paid.
You cannot collect a holder reward on a stranger’s host without giving that host a chance to talk to your keys. You check a real program the long way: type the official Zebec site, read what the real team published, and refuse any extra hostname that showed up in an ad, a spam post, or a borrowed account.
If you already connected, disconnect, open a new wallet, revoke, move what is left, save the TXIDs, report the clone, and hang up on anyone who promises a guaranteed recovery for another payment.
Free rewards on the wrong host are not a thank-you. They are a price tag facing the wrong way. Next week’s clone will have a different hostname. The official address will not. Type it before the button does the rest.
STEP 1: Use Rkill to terminate suspicious programs.
In this first step, we will download and run Rkill to terminate suspicious programs that may be running on your computer.
RKill is a program that was developed at BleepingComputer.com that attempts to terminate known malware processes so that your normal security software can then run and clean your computer of infections. When RKill runs it will kill malware processes and then removes incorrect executable associations and fixes policies that stop us from using certain tools.
Download Rkill.
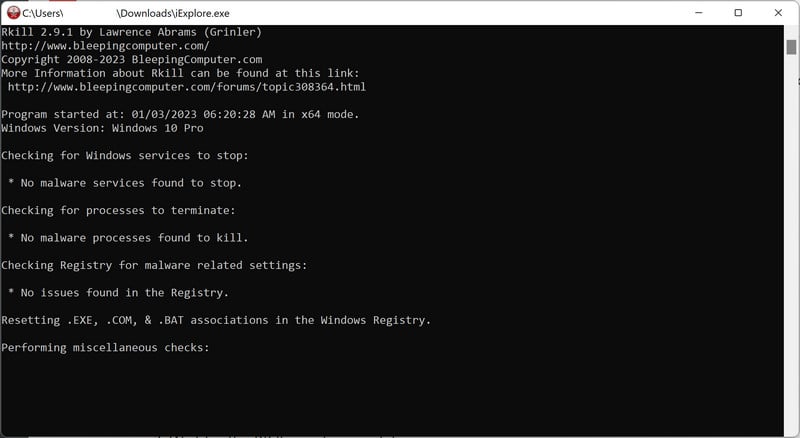
You can download RKill to your computer from the below link. When at the download page, click on the Download Now button labeled iExplore.exe. We are downloading a renamed version of Rkill (iExplore.exe) because some malware will not allow processes to run unless they have a certain filename.
RKILL DOWNLOAD LINK (The above link will open a new page from where you can download Rkill)
Run RKill.
After downloading, double-click the iExplore.exe icon to kill malicious processes. In most cases, downloaded files are saved to the Downloads folder. The program may take some time to search for and end various malware programs.
When it is finished, the black window will close automatically and a log file will open. Do not restart your computer. Proceed to the next step in this guide.
STEP 2: Use Malwarebytes to remove Ransomware and Unwanted Programs
In this second step, we will install Malwarebytes to scan and remove any infections, adware, or potentially unwanted programs that may be present on your computer.
Malwarebytes is one of the most popular and trusted anti-malware tools for Windows — and it’s completely free for removing infections. It catches threats that many antivirus programs miss, including adware, browser hijackers, and trojans. Follow the steps below to scan and clean your PC in just a few minutes.
Download Malwarebytes
Click the button below to download the latest version of Malwarebytes for Windows from the official source. The free version is all you need — it will scan your computer and remove adware, browser hijackers, and other malicious software at no cost.
(The link opens in a new page where your download will start)
Install Malwarebytes
When the download finishes, open your Downloads folder and double-click the MBSetup file. If Windows shows a User Account Control pop-up, click “Yes” to allow the installation.
Follow the On-Screen Prompts to Install Malwarebytes
The setup wizard will walk you through a few quick screens:
Choose where you’re installing the program — “Personal Computer” or “Work Computer” — then click Next.
Malwarebytes will now install on your device. This usually takes under a minute.
When installation is complete, the “Welcome to Malwarebytes” screen will open automatically.
On the final screen, click Open Malwarebytes to launch the program.
Enable “Scan for Rootkits”
Before scanning, turn on rootkit detection so Malwarebytes can find even the most hidden threats. Click the Settings gear icon on the left side of the screen.
In the settings menu, find “Scan for rootkits” and click the toggle so it turns blue.
Done? Click “Dashboard” in the left pane to return to the main screen.
Start the Scan
Click the blue Scan button. Malwarebytes will automatically update its virus database and start checking your computer for malware.
Wait for the Scan to Finish
The scan checks your entire system for browser hijackers and other malicious programs, so it can take several minutes. Feel free to do something else — just check back occasionally to see the progress.
Quarantine the Detected Threats
When the scan is done, you’ll see a list of everything Malwarebytes found — malware, adware, and potentially unwanted programs. Click the “Quarantine” button to remove all of them at once.
Malwarebytes will now remove the malicious files and registry entries and move them safely into quarantine.
Restart Your Computer
Some threats can only be fully removed after a reboot. If Malwarebytes asks you to restart, click Yes. Once you’re logged back in, your PC is clean and you can continue with the next steps in this guide.
STEP 3: Use HitmanPro to remove Rootkits and other Malware
In this third step, while the computer is in normal back, we will download and run a scan with HitmanPro to remove Trojans, rootkits, and other malicious programs.
HitmanPro is a second-opinion scanner — it’s designed to catch what your main antivirus might have missed. Instead of relying on a single detection engine, it checks the behavior of files in the locations where malware usually hides. Anything suspicious gets sent to the cloud, where it’s analyzed by two of the best antivirus engines available: Bitdefender and Kaspersky.
Good news: scanning is completely free, with no limits. You only need a license when it’s time to remove what was found — and even then, you can activate a free one-time 30-day trial to clean your PC at no cost. (A full license is $24.95 per year for 1 PC.)
Download HitmanPro
Click the button below to download HitmanPro. Remember — the scan is free, so you have nothing to lose by checking your PC.
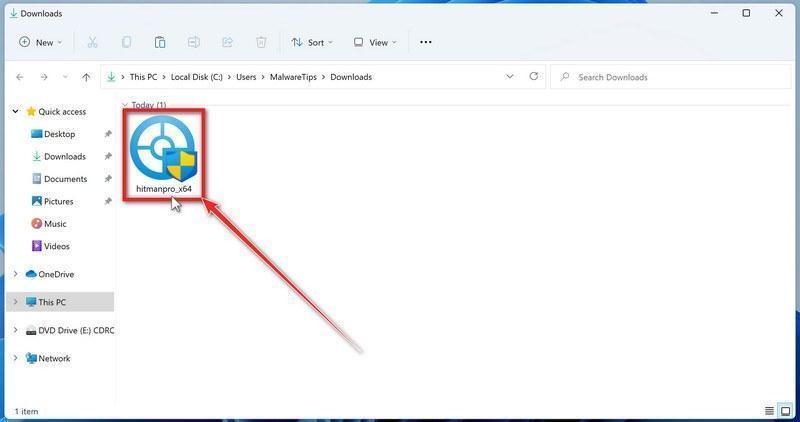
When the download finishes, open your Downloads folder and double-click the file: “hitmanpro.exe” on 32-bit Windows, or “hitmanpro_x64.exe” on 64-bit Windows.
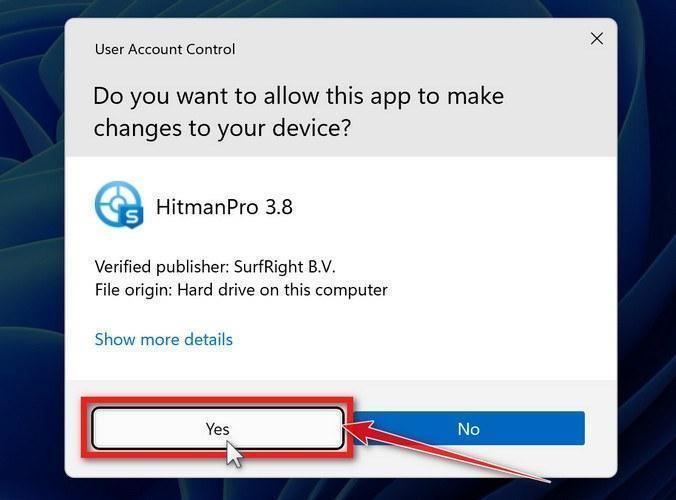
If a User Account Control pop-up asks whether HitmanPro can make changes to your device, click “Yes” to continue.
Follow the On-Screen Prompts
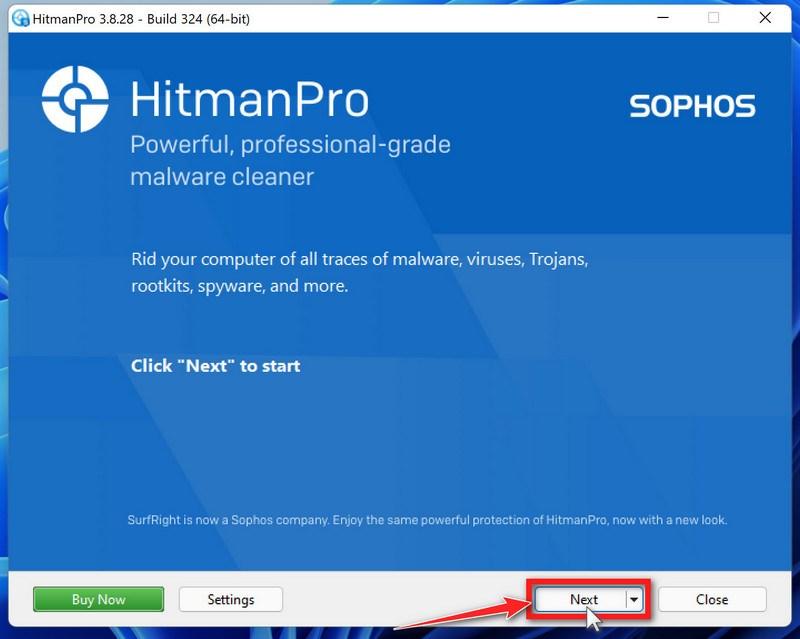
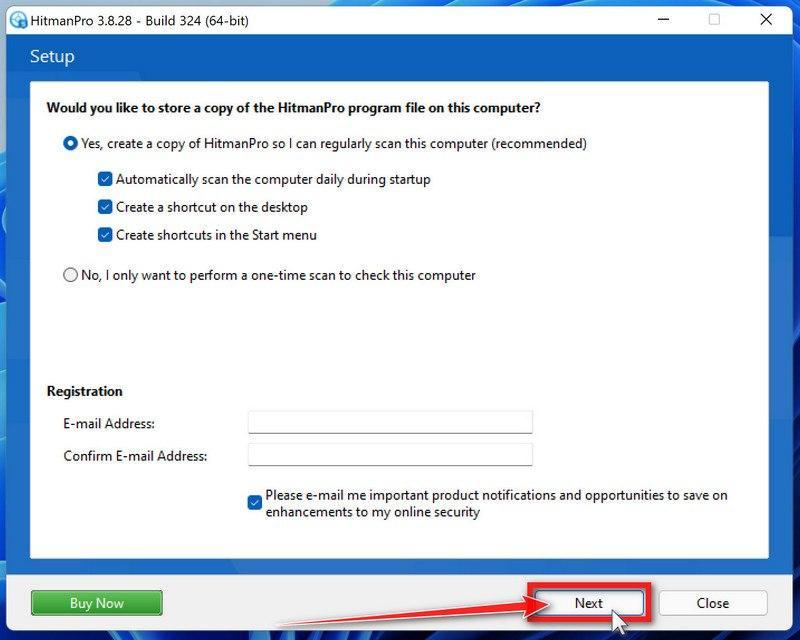
On the HitmanPro start screen, click “Next” to begin the system scan. No lengthy setup required — it goes straight to work.
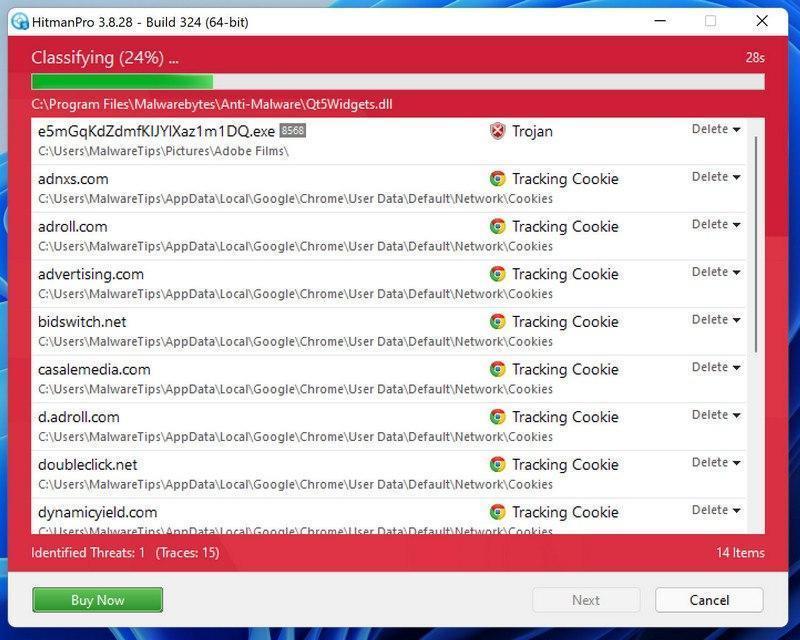
Wait for the Scan to Finish
HitmanPro will now check your computer for malicious programs. This usually takes just a few minutes thanks to its cloud-based scanning.
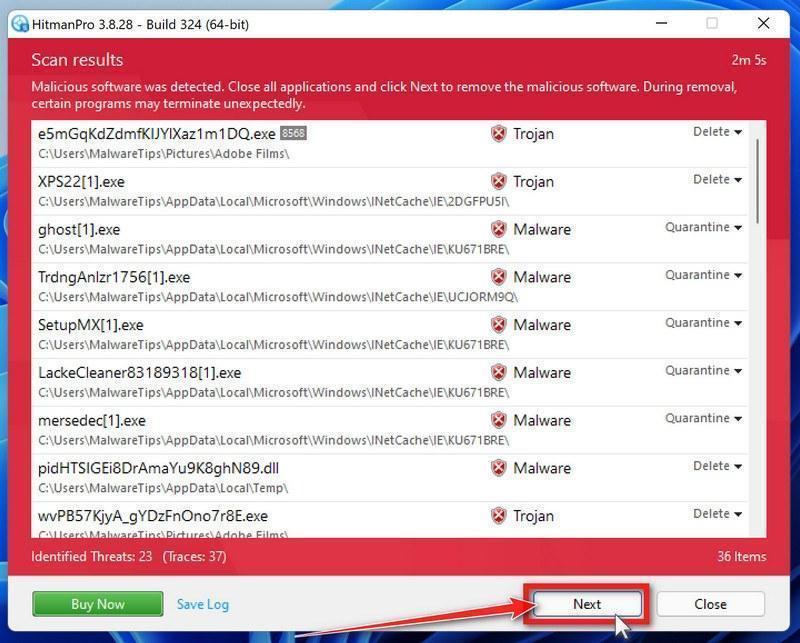
Review the Results and Click “Next”
When the scan is done, HitmanPro will show you everything it found. Click “Next” to remove the detected threats.
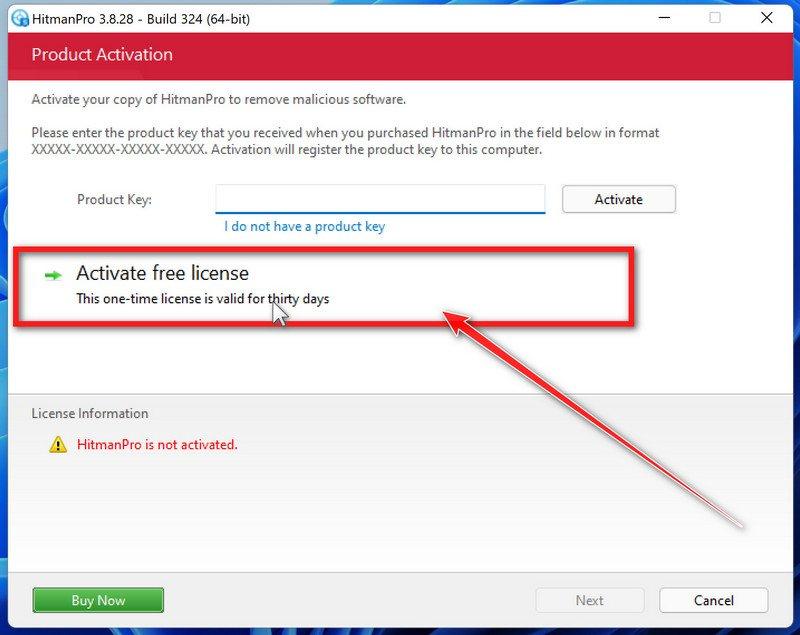
Click “Activate Free License”
To remove the malicious files, click the “Activate free license” button. This starts your free 30-day trial — no payment details needed — and unlocks the full cleanup.
When the removal is complete, HitmanPro will show a summary of everything it cleaned. Click Next, then click Reboot if prompted. If there’s no reboot prompt, just click Close — your PC is clean.
STEP 4: Use AdwCleaner to remove Malicious Browser Extensions and Adware
In this next step, we will use AdwCleaner to remove malicious browser policies and unwanted browser extensions from your computer.
AdwCleaner is a free on-demand scanner that specializes in adware, browser hijackers, and unwanted toolbars — the exact threats that mainstream antivirus programs often miss. It also includes tools that repair the damage malware leaves behind, like hijacked browser settings and malicious policies. It’s a quick scan that’s well worth running.
Download AdwCleaner
Click the button below to download AdwCleaner — it’s free, portable, and requires no installation.
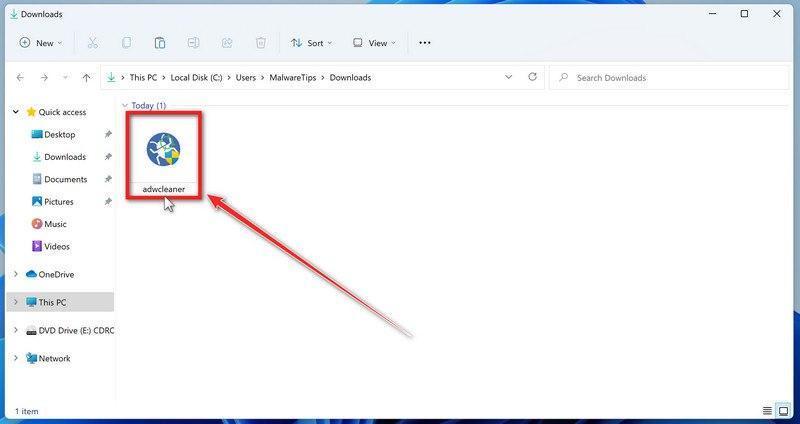
Open your Downloads folder and double-click the file named “adwcleaner_x.x.x.exe“. There’s no installation — the program starts right away.
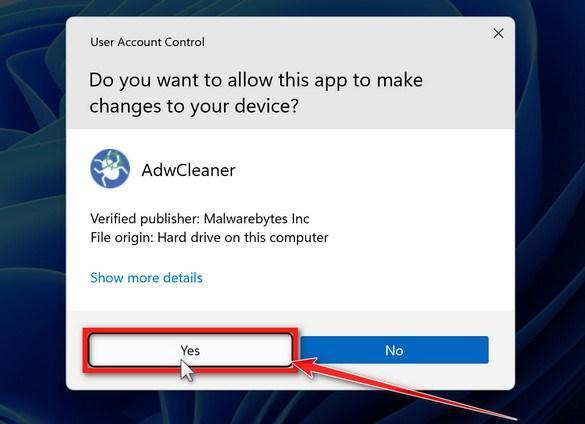
If Windows asks whether you want to allow AdwCleaner to run, click “Yes“. When the license agreement appears, click I agree to continue.
Enable “Reset Chrome policies”
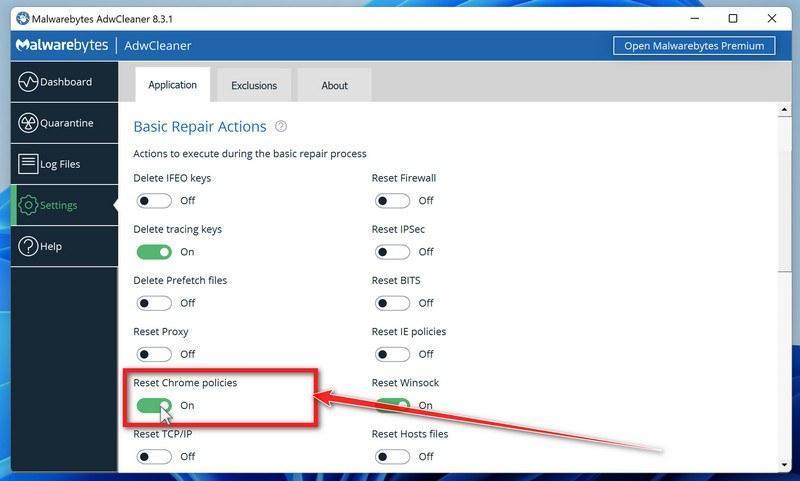
This setting removes malicious browser policies — a trick malware uses to lock your browser settings so you can’t change them back. Click “Settings” on the left side of the window, then turn on “Reset Chrome policies“.
Start the Scan
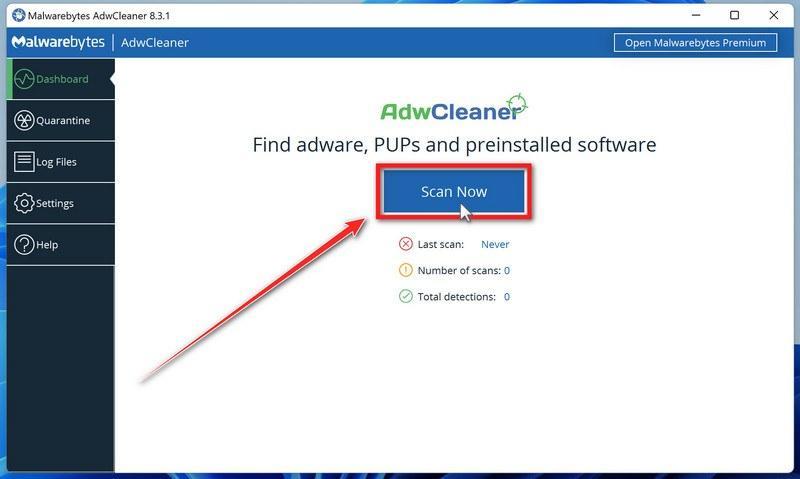
Click “Dashboard” on the left side of the window, then click the “Scan” button.
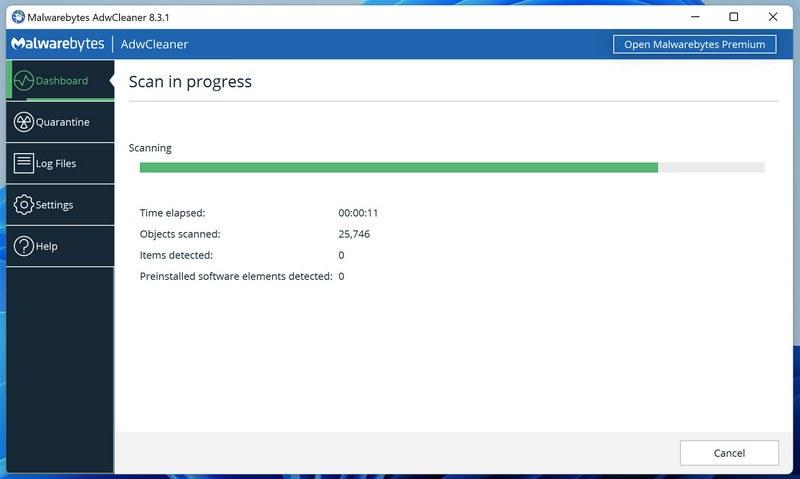
Wait for the Scan to Finish
AdwCleaner will now check your computer for adware and other malware. This usually takes only a few minutes — it’s one of the fastest scanners around.
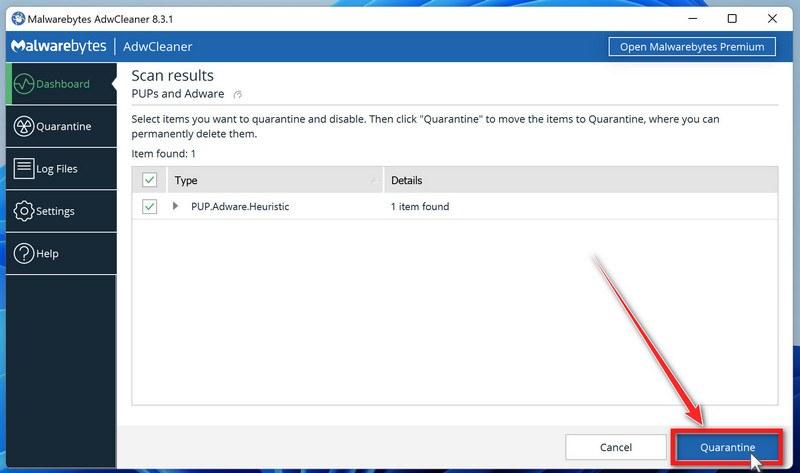
Quarantine the Detected Threats
When the scan finishes, AdwCleaner will list everything it found. Click the “Quarantine” button to remove all the malicious items at once.
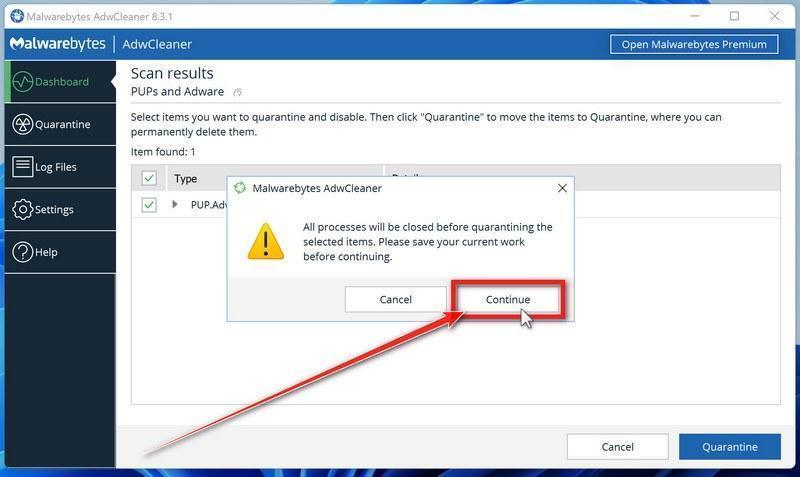
Click “Continue” to Finish the Cleanup
Save any open work first — AdwCleaner needs to close your open programs before it can clean. When you’re ready, click the “Continue” button.
AdwCleaner will now delete all detected malware from your computer. If it asks you to restart your PC, allow it — your computer will be clean when you log back in.
STEP 5: Perform a final check with ESET Online Scanner
This final step involves installing and running a scan with ESET Online Scanner to check for any additional malicious programs that may be installed on the computer..
ESET Online Scanner is a free second-opinion scanner that performs a deep, full-system check for viruses, trojans, rootkits, and other malware. We use it as the final step because it’s thorough — if anything slipped past the previous scans, ESET will find it. A clean result here means your computer is malware-free.
Download ESET Online Scanner
Click the button below to download ESET Online Scanner.
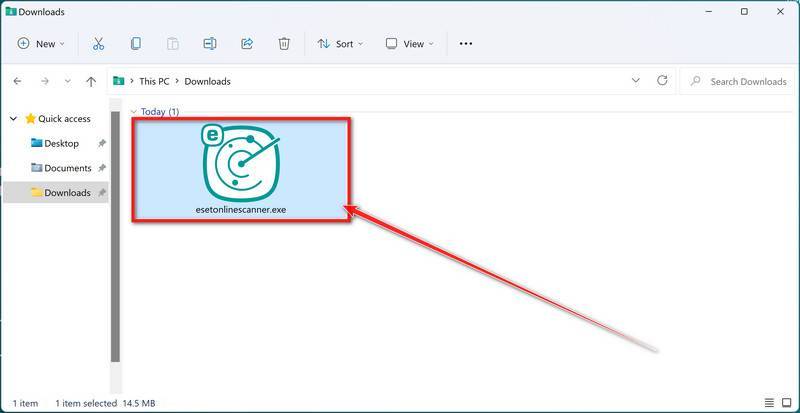
When the download finishes, open your Downloads folder and double-click “esetonlinescanner.exe“.
Install ESET Online Scanner
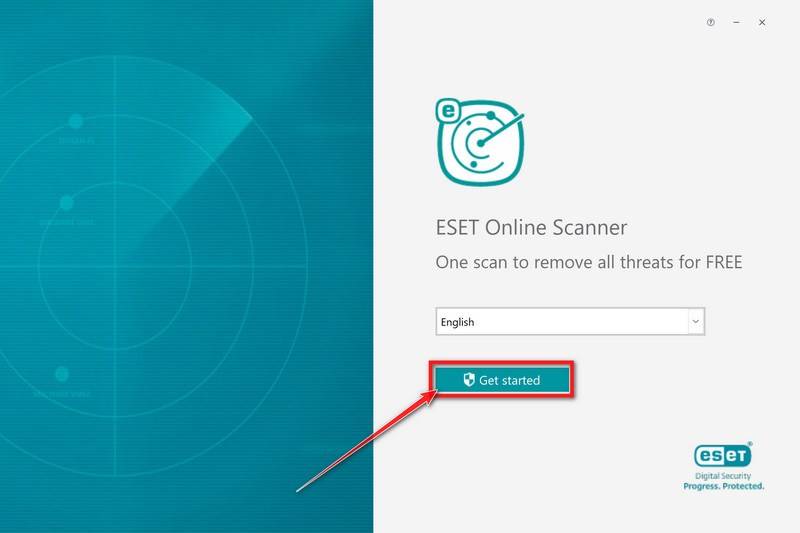
On the start screen, select your language from the drop-down menu and click Get started.
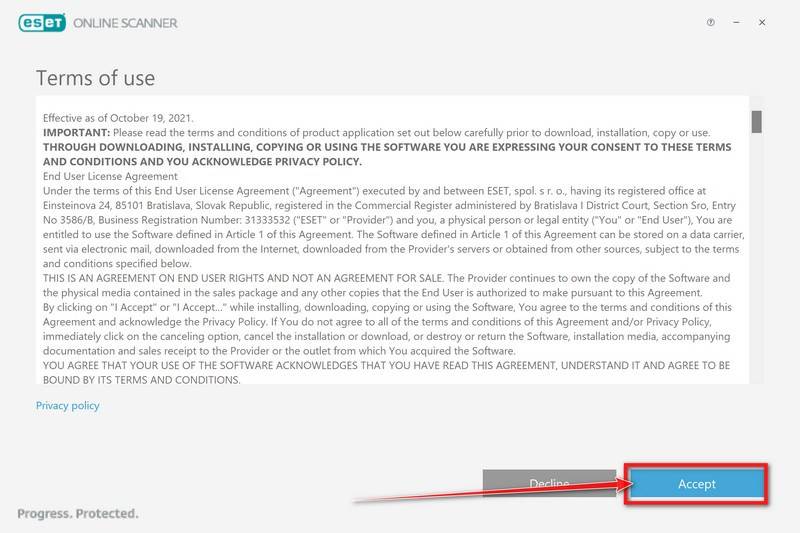
On the Terms of use screen, click Accept.
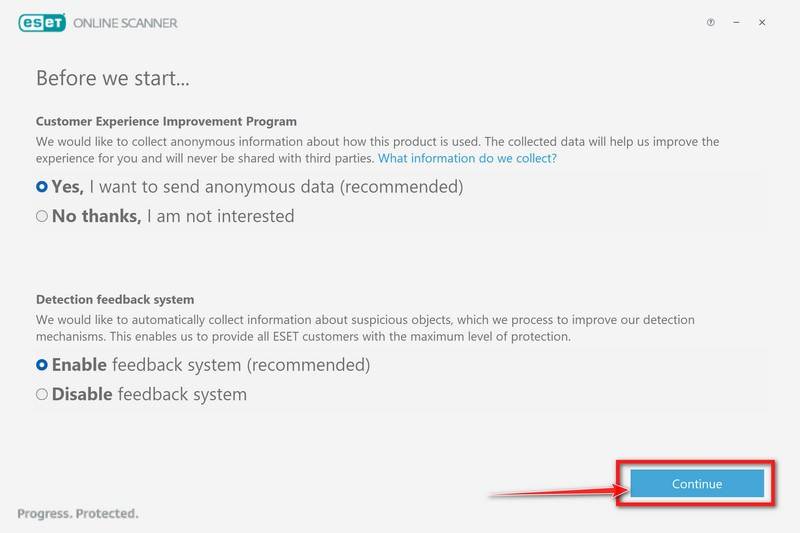
Choose your preferences for the Customer Experience Improvement Program and the Detection feedback system (either choice is fine), then click Continue.
Start a Full Scan
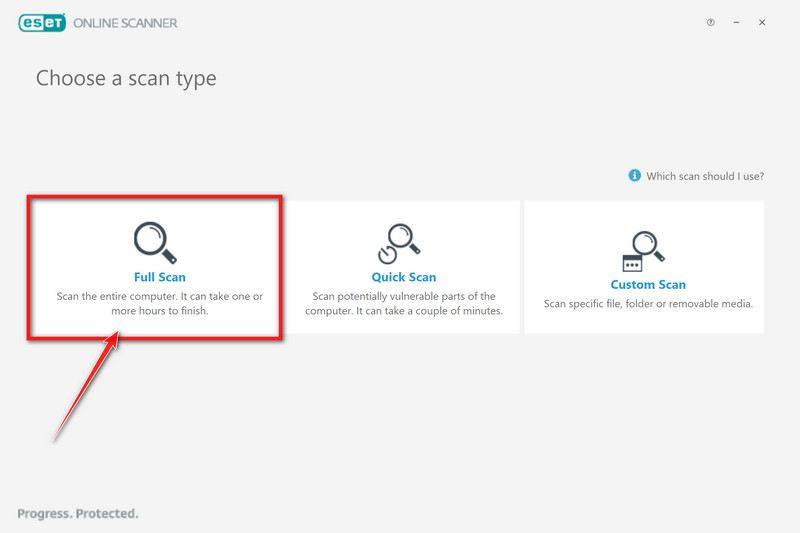
Click Full Scan — this checks your entire computer, not just the common hiding spots.
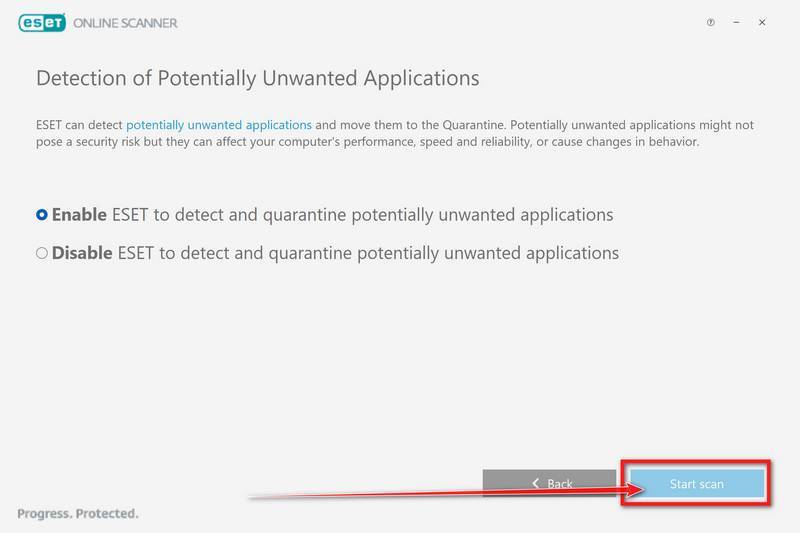
Select Enable for Detection of Potentially Unwanted Applications — this lets ESET catch adware and bundled junk programs, not just viruses. Then click Start scan.
Wait for the Scan to Finish
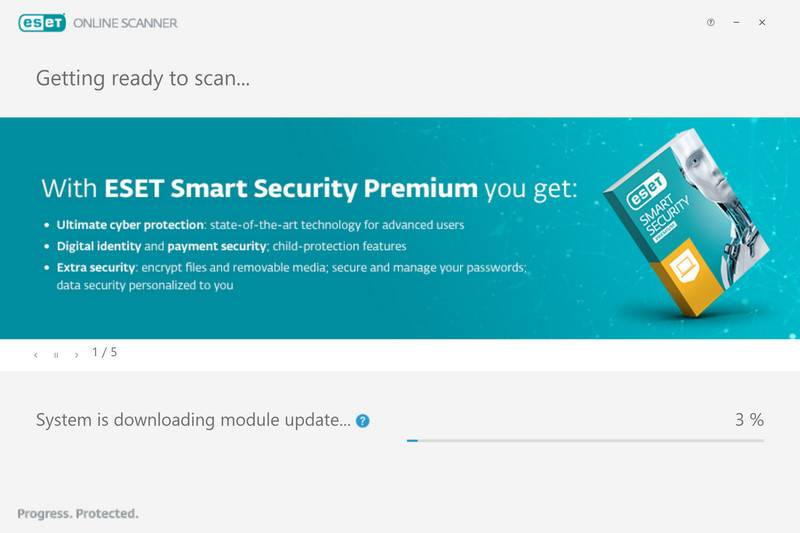
ESET will now check every file on your computer. Because it’s a full scan, this can take a while — often an hour or more, depending on how much data you have. Leave it running in the background and check on it from time to time.
Review the Results
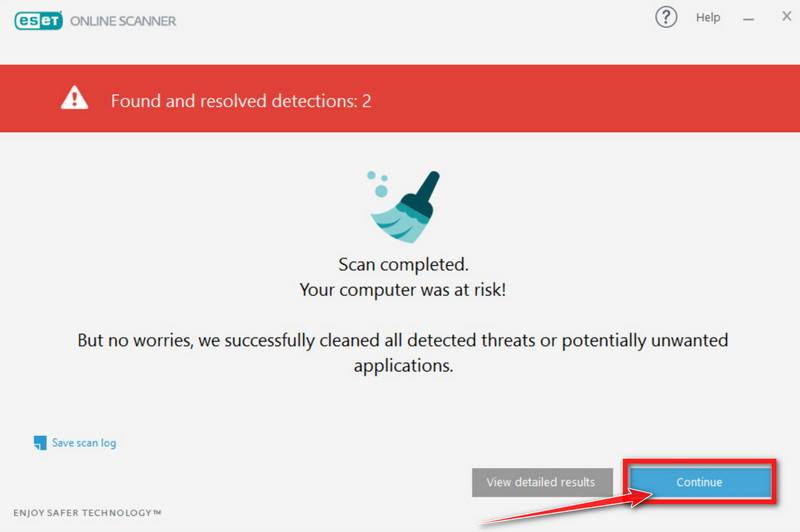
When the scan completes, the Found and resolved detections screen appears. Any threats found were automatically cleaned and quarantined — there’s nothing extra you need to do. Click View detailed results if you want to see exactly what was removed.
If ESET found nothing — congratulations, your computer has passed the final check and is malware-free.
STEP 6: Restore the files encrypted by ransomware
Unfortunately, in most cases, it’s not possible to recover the files encrypted by this ransomware virus because the private key which is needed to unlock the encrypted files is only available through the attackers. However, below we’ve listed three options you can use to try and recover your files.
Make sure you remove the malware from your computer first, otherwise, it will repeatedly lock your system or encrypt files. If you suspect that your computer is still infected with malware, you can run a free scan with Emsisoft Emergency Kit.
Option 1: Search a decryption tool for this ransomware
The cybersecurity community is constantly working to create ransomware decryption tools, so you can try to search these sites for updates:
Option 2: Use EaseUS Data Recovery Wizard Free to recover the encrypted files
EaseUS Data Recovery Wizard Free can restore files and repair corrupted files with simple clicks. Its powerful scanning algorithms can identify and retrieve huge file type library, including all of the popular video files, audio files, photos, and document formats. While the free version only allows you to recover 2 GB of data, this can be helpful to see if the recovery is possible and restore back the most important files from your computer.
Download EaseUS Data Recovery Wizard Free.
You can download EaseUS Data Recovery Wizard Free by clicking the link below.
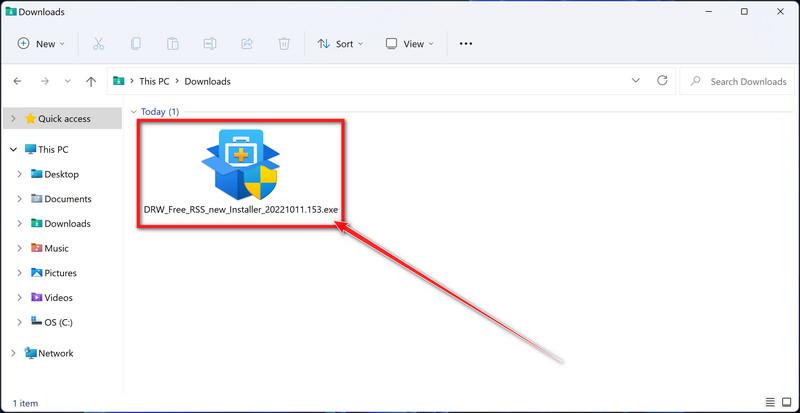
Double-click on the EaseUS Data Recovery Wizard Free setup file.
When EaseUS Data Recovery Wizard Free has finished downloading, double-click on the setup file to install EaseUS Data Recovery Wizard on your computer. In most cases, downloaded files are saved to the Downloads folder.
You may be presented with a User Account Control pop-up asking if you want to allow EaseUS to make changes to your device. If this happens, you should click “Yes” to continue with the EaseUS Data Recovery Wizard Free installation.
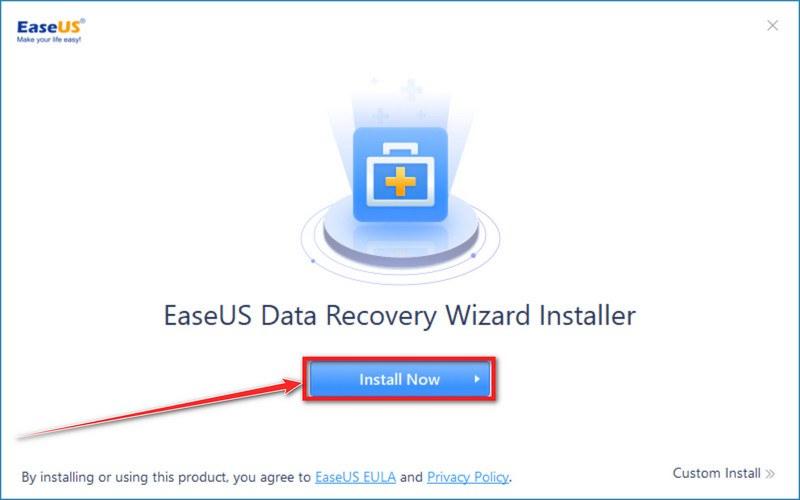
Follow the on-screen prompts to install EaseUS Data Recovery Wizard.
When the EaseUS Data Recovery Wizard installation begins, click on the “Install Now” as seen in the image below.
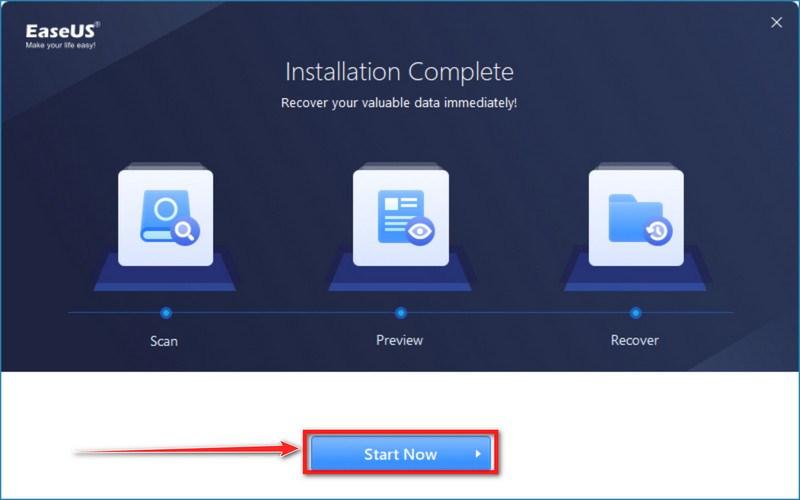
When your EaseUS Data Recovery Wizard installation completes, click the “Start Now” button to start the program.
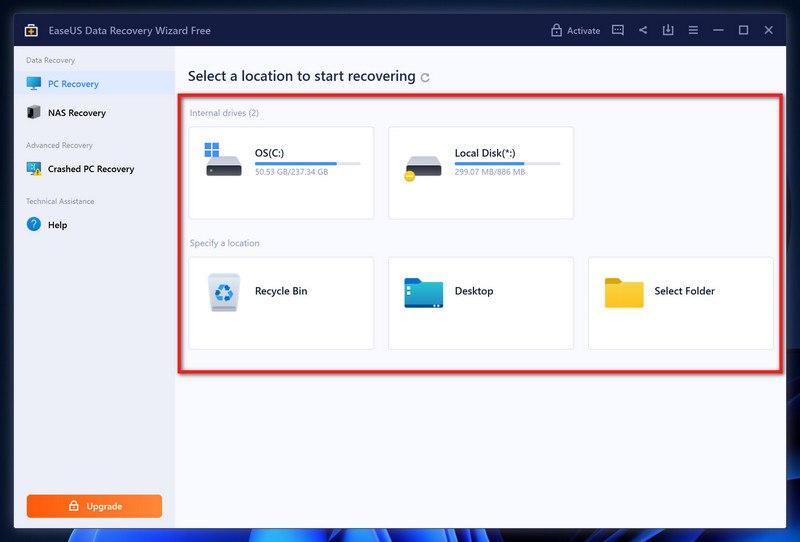
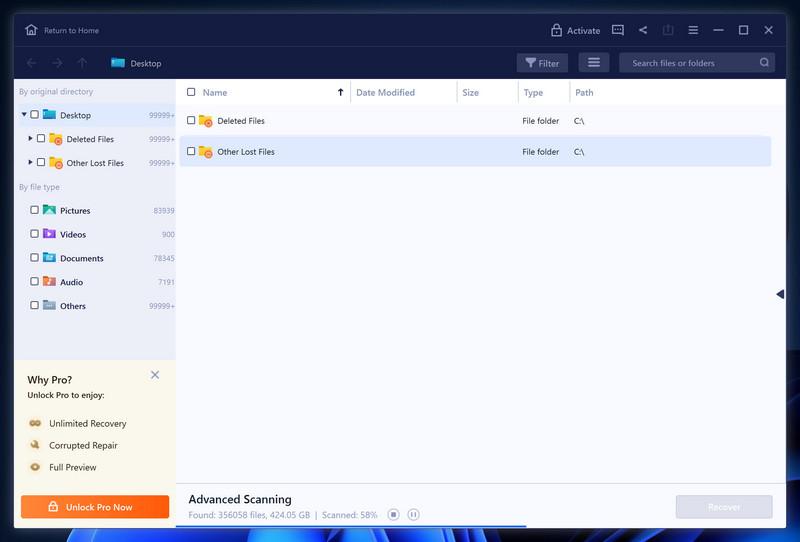
Select a location to start recovering the encrypted files.
Choose the drive or folder where you are the encrypted files that you want to recover and click “Scan“.
Wait for the EaseUS Data Recovery Wizard scan to complete.
EaseUS Data Recovery Wizard will now scan your computer files that can be restored. This process can take a few minutes, so we suggest you do something else and periodically check on the status of the scan to see when it is finished.
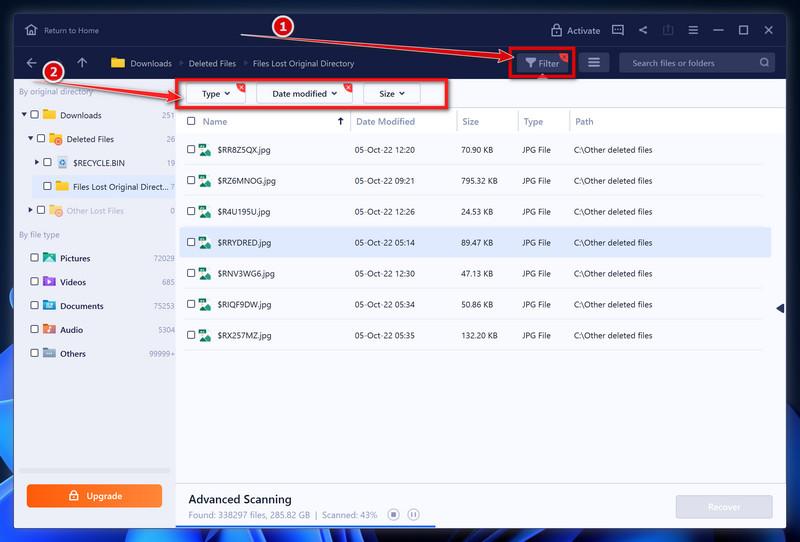
Find the files you want to recover.
When the EaseUS Data Recovery Wizard scan is finished scanning it will show a screen that displays the files that can be recovered. This tool can recover a lot of data, use the “Filter” button to quickly filter specific file types and find the files that you want to recover.
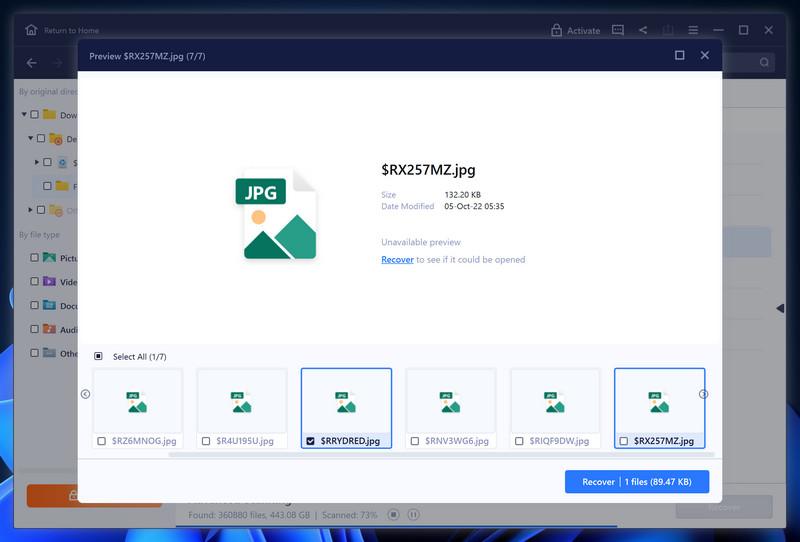
Click the “Preview” button or double-click on a file for a full preview.
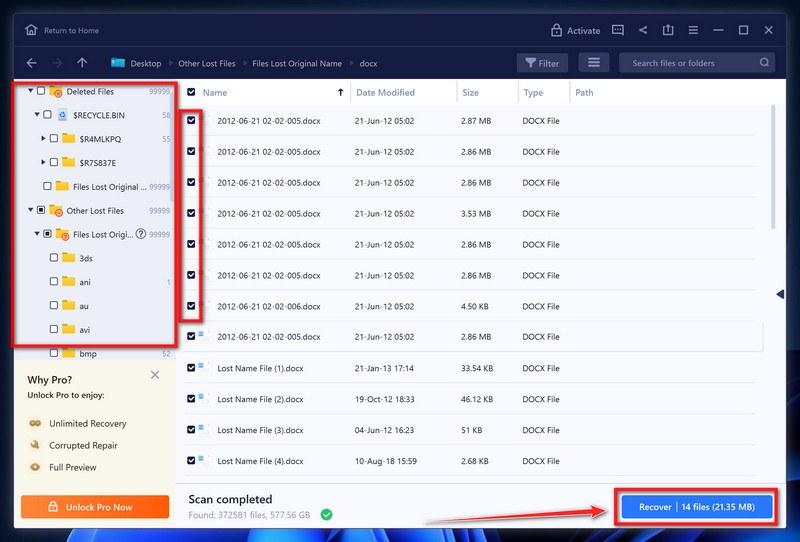
Select your files and click “Recover”.
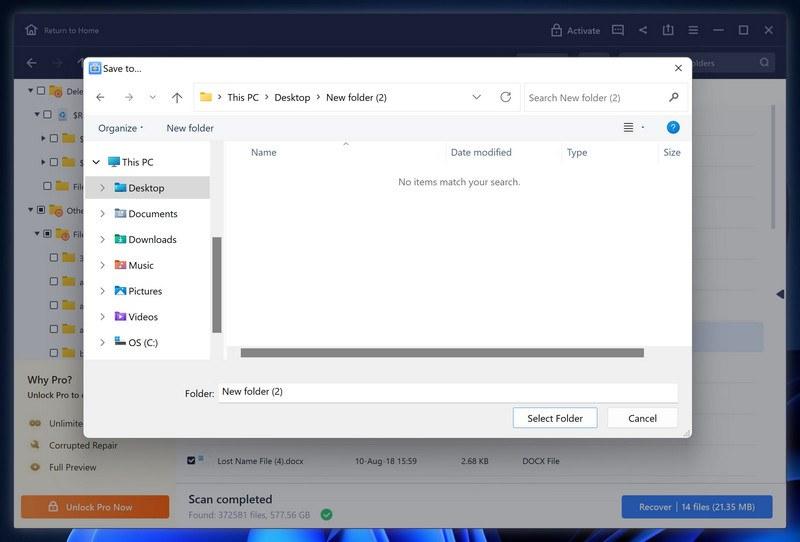
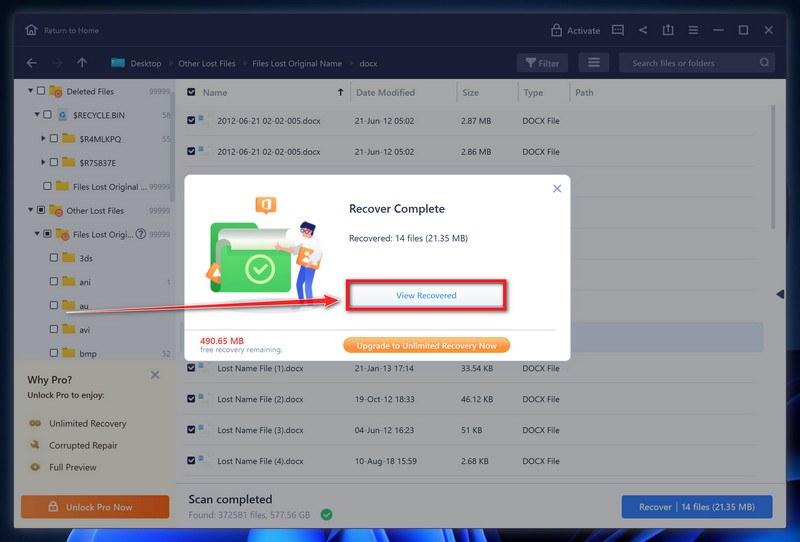
Finally, select the the files you want to recover and click “Recover“. Choose a safe location to save all the files. The free version only allow you to recover 2 GB of data, however, this will allow you to recover the most important files and see if EaseUS Data Recovery Wizard can correctly recover them.
Option 3: Try to restore your files with ShadowExplorer
This ransomware will attempt to delete all shadow copies when you first start any executable on your computer after becoming infected. Thankfully, the infection is not always able to remove the shadow copies, so you should continue to try restoring your files using this method.
Download ShadowExplorer.
You can download ShadowExplorer from the below link.
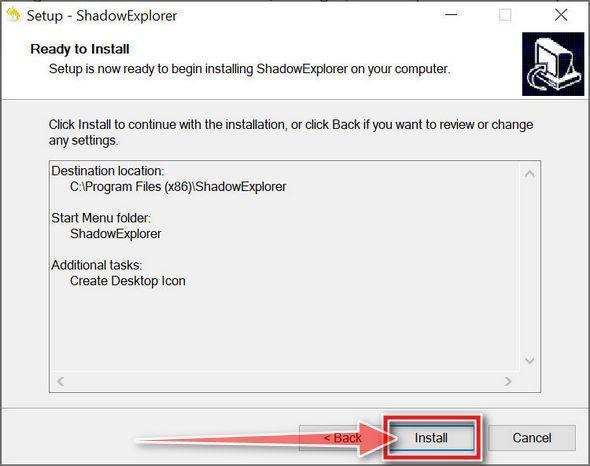
Double-click on the ShadowExplorer-x.x-setup file to start the installation process, then follow the on-screen promts to install this program.
Select snapshot date.
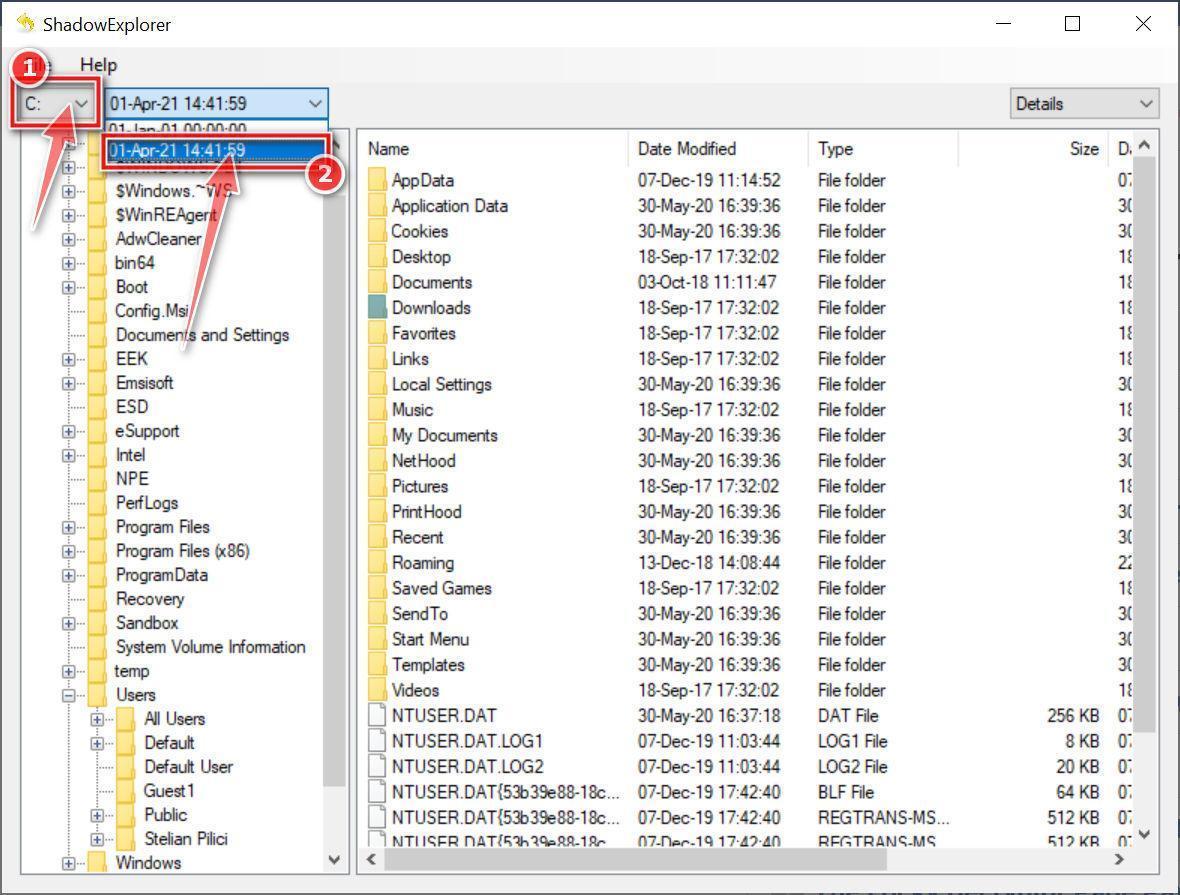
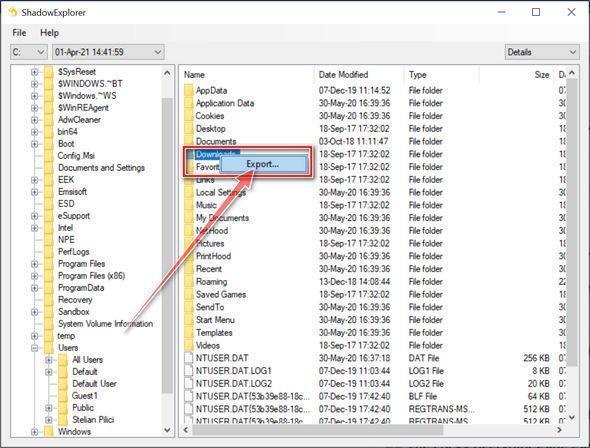
Open ShadowExplorer and then from the top bar select the drive where the files that you want to save are located, then select from the snapshot available one previous to this infection.
Export the files that you want to recover.
Once you have found a copy of the original file or folder, right-click on it and the select “Export”. A window will prompt you where you want to save the file or folder.
10 Rules to Avoid Online Scams
Here are 10 practical safety rules to help you avoid malware, online shopping scams, crypto scams, and other online fraud. Each tip includes a quick “if you already got hit” action.
Stop and verify before you click, log in, download, or pay.
Most scams win by creating urgency. Verify using a trusted method: type the website address yourself, use the official app, or call a known number (not the one in the message).
If you already clicked: close the page, do not enter passwords, and run a malware scan.
Keep your operating system, browser, and apps updated.
Updates patch security holes used by malware and malicious ads. Turn on automatic updates where possible.
If you saw a scary “update now” pop-up: close it and update only through your device settings or the official app store.
Use layered protection: antivirus plus an ad blocker.
Antivirus helps block malware. An ad blocker reduces scam redirects, phishing pages, and malvertising.
If your browser is acting weird: remove unknown extensions, reset the browser, then run a full scan.
Install apps, software, and extensions only from official sources.
Avoid cracked software, “keygens,” and random downloads. During installs, choose Custom/Advanced and decline bundled offers you do not recognize.
If you already installed something suspicious: uninstall it, restart, and scan again.
Treat links and attachments as untrusted by default.
Phishing often impersonates delivery services, banks, and popular brands. If it is unexpected, do not open attachments or log in through the message.
If you entered credentials: change the password immediately and enable 2FA.
Shop safely: research the store, then pay with protection.
Be cautious with brand-new stores, “closing sale” stories, and prices that make no sense. Prefer credit cards or PayPal for dispute options. Avoid wire transfers, gift cards, and crypto payments.
If you already paid: contact your card issuer or PayPal quickly to dispute the transaction.
Crypto rule: never pay a “fee” to withdraw or recover money.
Common patterns include fake profits, then “tax,” “gas,” or “verification” fees. Another is a “recovery agent” who demands upfront crypto.
If you already sent crypto: stop paying, save evidence (wallet addresses, TXIDs, chats), and report the scam to the platform used.
Secure your accounts with unique passwords and 2FA (start with email).
Use a password manager and unique passwords for every account. Enable 2FA using an authenticator app when possible.
If you suspect an account takeover: change passwords, sign out of all devices, and review recent logins and recovery settings.
Back up important files and keep one backup offline.
Backups protect you from ransomware and device failure. Keep at least one backup on an external drive that is not always connected.
If you suspect infection: do not connect backup drives until the system is clean.
If you think you are a victim: stop losses, document evidence, and escalate fast.
Move quickly. Speed matters for disputes, account recovery, and limiting damage.
Stop payments and contact: do not send more money or respond to the scammer.
Call your bank or card issuer: block transactions, replace the card if needed, and start a dispute or chargeback.
Secure your email first: change the email password, enable 2FA, and remove unfamiliar recovery options.
Secure other accounts: change passwords, enable 2FA, and log out of all sessions.
Scan your device: remove suspicious apps or extensions, then run a full malware scan.
Save evidence: screenshots, emails, order pages, tracking pages, wallet addresses, TXIDs, and chat logs.
Report it: to the payment provider, marketplace, social platform, exchange, or wallet service involved.
These rules are intentionally simple. Most online losses happen when decisions are rushed. Slow down, verify independently, and use payment methods and account controls that give you recourse.
Hello! I'm Lapain Epuran, your go-to source for detailed and honest product reviews. From tech gadgets to miracle cures, I provide insights to help you make informed choices. Join me as we discover what's truly worth your time and money.