D
Deleted member 21043
Thread author
Hi,
Introduction - So you want to get started in Malware Analysis?
Hmm, this is probably one of the trickier questions to answer so far recently, the post about Malware Removal was easier in my opinion which I posted on another thread.
Before you can even begin to start Malware Analysis, you must remember that it will be a long way through to the end of education, and you must also first set up your environment and learn how to use each of the different tools for the analysis. There are a vast majority of different tools out there, I will list many below which you can use, and I will try to explain how to use each one a bit, too. One day I will make a post which will exceed the maximum characters limit whilst making one of these “helpful, long posts”, assuming you will find this all helpful and I’m not just ranting on forever…
Statis analysis - Analysis without executing the sample
Dynamic analysis - Analysis with executing the sample
Part 1 – Analysis environment
Before you can do any Malware Analysis, you need to have space to execute malware without it causing damage to your real system.
I personally recommend using a spare PC for malware analysis since some malware is Anti-Sandbox and Anti-VM, however if you do not have a secondary, spare PC which you do not need/will need, then a Virtual Machine will be more than enough and fine, and many people do analysis on a Virtual Machine day-in and day-out without issues. Of course, if the sample won’t run since it knows it is in a VM or Sandbox, you could just move onto the code reverse engineering parts of analysis. Since, if the sample crashes and won’t execute to analyse it that way, you’ll need to know if it’s malicious or not.
With that being said, I think I should note that some samples don’t work on certain operating systems. For example, one sample may be specifically made for Windows XP, and not work on Windows 7 and 8, or a sample may be specifically made for Windows 8 and no other Operating Systems.
Anyway, let’s continue…
2 recommendations of the top of my head would be to use VMware Server or VirtualBox. There are many other Virtual Machines available online, you can take your pick of which one you want.
You can view more information about VMware Server here: Server Virtualization with VMware vSphere | VMware United Kingdom
You can view more information about VirtualBox here: Oracle VM VirtualBox
Before I end this stage, make sure to take a snapshot before infecting the machine for malware analysis and to use a firewall. The firewall is to protect your network.
If you weren’t already aware, a snapshot is like a “picture” of the Virtual Machine state before an event, so it can revert back and roll back the changes since the snapshot, hence removing the changes the malware made after you’ve finished analysis. This is helpful because cleaning the whole VM, or even reinstalling the whole OS, all the analysis tools and other things all over again after each malware infection will be very time consuming and tiresome.
Part 2 - Tools used for Malware Analysis
The amount of tools used in Malware Analysis can be phenomenal depending on the task you are carrying out in the analysis, however:
For monitoring the processes running on the system, I recommend using: Process Explorer
For monitoring the file system: Process Monitor and Capture BAT
For monitoring Network: Wireshark, Fiddler (HTTPS traffic)
For monitoring the registry for changes, new keys etc.: RegShot.
Disassembler – IDA Pro
If it’s a .NET sample, for easier understanding (because using IDA can be tricky at first): de4dot, .NET reflector.
Debugger – Ollydbg
Other tools: Malcode Analysts Pack, Resource Hacker, Objdump, LordPE, PEview, OllyDump.
On your chosen environment (whether it be another spare physical computer or a Virtual Machine), you will need to download the tools.
Part 3 – Acquiring the tools used for Malware Analysis
Process Explorer: Process Explorer
Process Monitor: Process Monitor1
Capture BAT: Capture-BAT Download Page | The Honeynet Project
Wireshark: Wireshark · Download
Fiddler: Fiddler free web debugging proxy
TCPView: TCPView for Windows
Regshot: regshot
IDA Pro/IDA free: IDA: About
Ollydbg: http://www.ollydbg.de/
LordPE: http://www.woodmann.com/collaborative/tools/index.php/LordPE
OllyDump: http://www.openrce.org/downloads/download_file/108
GUNPacker http://www.woodmann.com/collaborative/tools/index.php/GUnPacker
PEview: http://wjradburn.com/software/
Resource Hacker: http://www.angusj.com/resourcehacker/
FileAlyzer: http://www.safer-networking.org/products/filealyzer/
Malcode Analysts Pack: http://www.woodmann.com/collaborative/tools/index.php/Malcode_Analysis_Pack
Part 4 – So how do I use the tools?
I will go through and try to explain SOME of the tools for use, however there is a lot of documentation available online and probably video tutorials also, for starting off. The more I include in this reply, the better quality of the post as long as things are done correctly.
Before starting, I recommend making a folder somewhere on your environment called “AnalysisTools” and having a shortcut to the installed program/portable executables there for easy access. Or, desktop shortcuts. I take the folder approach.
Process Explorer:
Regshot:
BEFORE YOU CONTINUE READING, REMEMBER THIS: There is so many more threads, like a series, by me.. On Malware Analysis, and I shall continue to create new threads on a regular basis (see below of this thread). All are currently available from the Malware Talk subforum this was posted on (check it out!).
Just wait, threads about static and dynamic analysis, using all the tools, etc... Over time, they will have work done to the threads and more will be made.
Personally, I would use a Virtual Machine to start out at least, since you can easily create new and revert back to previous snapshots for quick reverting of a malware infection.
Remember your Firewall and (if possible), VPN client enabled.
Hope I helped you, if anyone notices any mistakes let me know ASAP and I will quickly correct this post. I tend to make mistakes sometimes, especially with such long replies like this…; everyone makes mistakes sometimes. This took a long time to write up for you…
Anyway, like I said! - I will include all the other essential things like using the rest of the tools, and other things like the malware types, signatures/file hashing and identifying, HEX editors and using them as well... Malware connecting to C&C domains/hosts, networking etc over the next few days - week or so.
Follow the series - I created more threads so a comment on one would be for that specific topic, and to keep it nice and neat.
Article 2, Entropy - : http://malwaretips.com/threads/malw...nd-how-do-i-find-the-entropy-of-a-file.42333/
Article 3, reverse engineering .NET assemblies - : http://malwaretips.com/threads/malware-analysis-3-reverse-engineering-net-malware.42338/
Article 4 - lots of information - : http://malwaretips.com/threads/malw...f-information-maybe-more-than-you-need.42344/
Article 5 - more information covered - : http://malwaretips.com/threads/malware-analysis-5-covering-just-a-tad-more-information.42349/
Article 6 - Understanding packers and detecting a packed file - : http://malwaretips.com/threads/malw...nd-detecting-a-packed-file.42356/#post-349547
Article 7 - more information on HEX and AV signatures - : http://malwaretips.com/threads/malware-analysis-7-bytes-and-hex.42385
Article 8 - C&C explanation - : http://malwaretips.com/threads/malware-analysis-8-c-c-explanation.42394/
Article 9 - more in-depth analysis with HEX (houdini worm) - : http://malwaretips.com/threads/malw...n-depth-analysis-with-hex-houdini-worm.42399/
Cheers.
Introduction - So you want to get started in Malware Analysis?
Hmm, this is probably one of the trickier questions to answer so far recently, the post about Malware Removal was easier in my opinion which I posted on another thread.
Before you can even begin to start Malware Analysis, you must remember that it will be a long way through to the end of education, and you must also first set up your environment and learn how to use each of the different tools for the analysis. There are a vast majority of different tools out there, I will list many below which you can use, and I will try to explain how to use each one a bit, too. One day I will make a post which will exceed the maximum characters limit whilst making one of these “helpful, long posts”, assuming you will find this all helpful and I’m not just ranting on forever…
Statis analysis - Analysis without executing the sample
Dynamic analysis - Analysis with executing the sample
Part 1 – Analysis environment
Before you can do any Malware Analysis, you need to have space to execute malware without it causing damage to your real system.
I personally recommend using a spare PC for malware analysis since some malware is Anti-Sandbox and Anti-VM, however if you do not have a secondary, spare PC which you do not need/will need, then a Virtual Machine will be more than enough and fine, and many people do analysis on a Virtual Machine day-in and day-out without issues. Of course, if the sample won’t run since it knows it is in a VM or Sandbox, you could just move onto the code reverse engineering parts of analysis. Since, if the sample crashes and won’t execute to analyse it that way, you’ll need to know if it’s malicious or not.
With that being said, I think I should note that some samples don’t work on certain operating systems. For example, one sample may be specifically made for Windows XP, and not work on Windows 7 and 8, or a sample may be specifically made for Windows 8 and no other Operating Systems.
Anyway, let’s continue…
2 recommendations of the top of my head would be to use VMware Server or VirtualBox. There are many other Virtual Machines available online, you can take your pick of which one you want.
You can view more information about VMware Server here: Server Virtualization with VMware vSphere | VMware United Kingdom
You can view more information about VirtualBox here: Oracle VM VirtualBox
Before I end this stage, make sure to take a snapshot before infecting the machine for malware analysis and to use a firewall. The firewall is to protect your network.
If you weren’t already aware, a snapshot is like a “picture” of the Virtual Machine state before an event, so it can revert back and roll back the changes since the snapshot, hence removing the changes the malware made after you’ve finished analysis. This is helpful because cleaning the whole VM, or even reinstalling the whole OS, all the analysis tools and other things all over again after each malware infection will be very time consuming and tiresome.
Part 2 - Tools used for Malware Analysis
The amount of tools used in Malware Analysis can be phenomenal depending on the task you are carrying out in the analysis, however:
For monitoring the processes running on the system, I recommend using: Process Explorer
For monitoring the file system: Process Monitor and Capture BAT
For monitoring Network: Wireshark, Fiddler (HTTPS traffic)
For monitoring the registry for changes, new keys etc.: RegShot.
Disassembler – IDA Pro
If it’s a .NET sample, for easier understanding (because using IDA can be tricky at first): de4dot, .NET reflector.
Debugger – Ollydbg
Other tools: Malcode Analysts Pack, Resource Hacker, Objdump, LordPE, PEview, OllyDump.
On your chosen environment (whether it be another spare physical computer or a Virtual Machine), you will need to download the tools.
Part 3 – Acquiring the tools used for Malware Analysis
Process Explorer: Process Explorer
Process Monitor: Process Monitor1
Capture BAT: Capture-BAT Download Page | The Honeynet Project
Wireshark: Wireshark · Download
Fiddler: Fiddler free web debugging proxy
TCPView: TCPView for Windows
Regshot: regshot
IDA Pro/IDA free: IDA: About
Ollydbg: http://www.ollydbg.de/
LordPE: http://www.woodmann.com/collaborative/tools/index.php/LordPE
OllyDump: http://www.openrce.org/downloads/download_file/108
GUNPacker http://www.woodmann.com/collaborative/tools/index.php/GUnPacker
PEview: http://wjradburn.com/software/
Resource Hacker: http://www.angusj.com/resourcehacker/
FileAlyzer: http://www.safer-networking.org/products/filealyzer/
Malcode Analysts Pack: http://www.woodmann.com/collaborative/tools/index.php/Malcode_Analysis_Pack
Part 4 – So how do I use the tools?
I will go through and try to explain SOME of the tools for use, however there is a lot of documentation available online and probably video tutorials also, for starting off. The more I include in this reply, the better quality of the post as long as things are done correctly.
Before starting, I recommend making a folder somewhere on your environment called “AnalysisTools” and having a shortcut to the installed program/portable executables there for easy access. Or, desktop shortcuts. I take the folder approach.
Process Explorer:
Once you have downloaded Sysinternals Process Explorer (ZIP), extract it to another folder.
Once you have extracted the contents of the ZIP to another folder, inside that folder should be an executable file with the filename as “procexp.exe”. This is the main process explorer executable which you should open to launch Process Explorer. Open it.
You should be given a dialog to accept the EULA license. Once you have read it, if you agree, proceed by clicking Agree. If you do not agree, click Decline. However, declining means stopping here on using the tool.
When Process Explorer has finally opened and the EULA has been accepted, you will see the main window for Process Explorer. It should look like this:
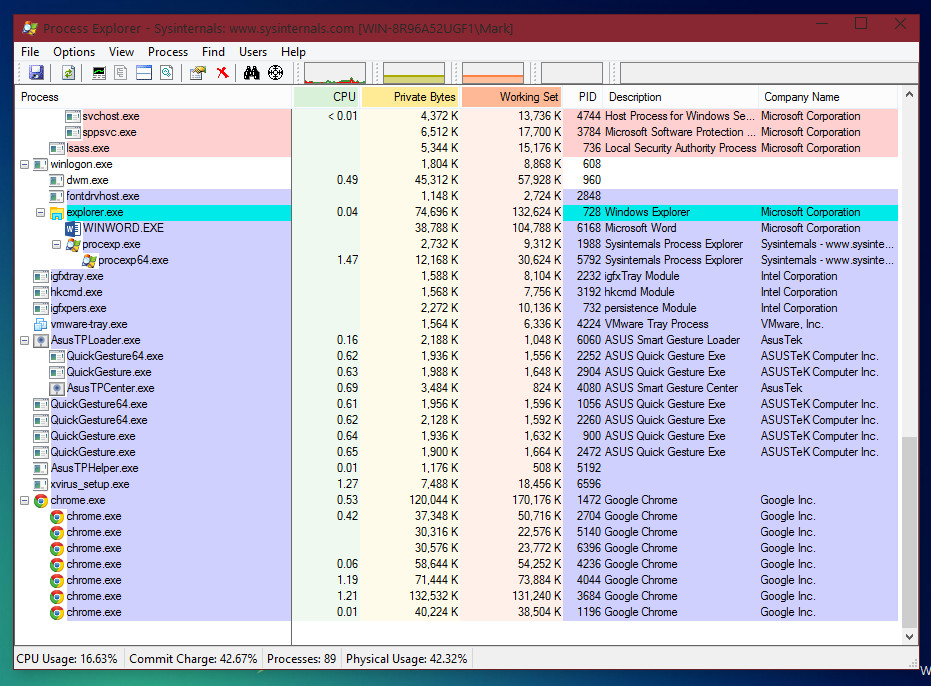
As you can see in the above cropped screenshot I have taken for you, at the top are visible column headers which explain that is listed below.
The first column is for the Process, which will display the Process Name beneath it. For example, we can see at the very bottom “chrome.exe”, and 7 other instances of this process nested inside it. “chrome.exe” is the process name for Google Chrome, and Process Explorer will also show us the icon corresponding from the file.
Next to Process column, we can see the CPU usage, Private Bytes, Working Set, PID, the description for the file and the company name.
When a new process is created, it will be listed in the list of processes. Whilst it is opening, the box will highlight in different colours so you are aware that a new process has been created. Very useful. J
So how does this help me with Malware Analysis?
It’s very helpful. It allows you to watch for when a new process is created. For example, if you execute malware it may execute other processes in the background which will be listed by Process Explorer, allowing you to be aware of the process. Of course, in a rootkit situation where it injects a DLL into all the running processes and loads a kernel mode driver… It may be able to actually “hide” itself/another process being executed.
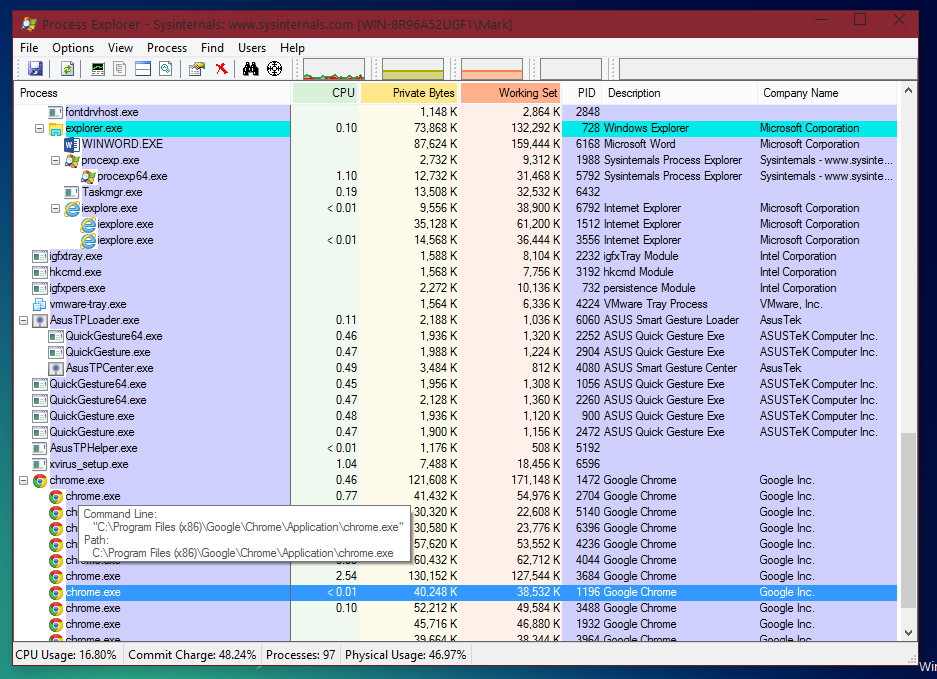
Another very helpful use of Process Explorer is that you’ll notice, if you hover your mouse over an item listed in Process Explorer it will display you information for: Command Line and the path of the process being executed (referring to the executable file). See the below screenshot to see what I mean:
Like it yet?
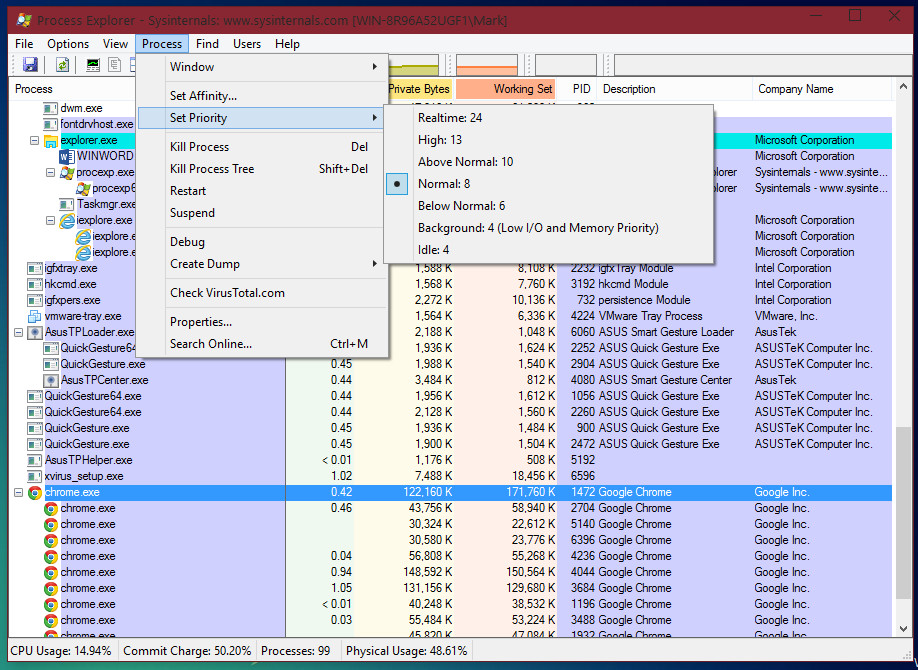
Anyway, there is more options available. If you select a process you can do things like kill it from memory (or try too, if it has a loaded driver which is hooking functions and making itself “unkillable” through its protection with its kernel mode driver, you may be unable to kill it (protected process – self-protection).
You can also select a process and restart it, create a dump log of the process, set it’s priority and affinity, and other things.
(See below screenshot to see the: selected process > Process dropdown.
Some extra tips:
Once you have extracted the contents of the ZIP to another folder, inside that folder should be an executable file with the filename as “procexp.exe”. This is the main process explorer executable which you should open to launch Process Explorer. Open it.
You should be given a dialog to accept the EULA license. Once you have read it, if you agree, proceed by clicking Agree. If you do not agree, click Decline. However, declining means stopping here on using the tool.
When Process Explorer has finally opened and the EULA has been accepted, you will see the main window for Process Explorer. It should look like this:

As you can see in the above cropped screenshot I have taken for you, at the top are visible column headers which explain that is listed below.
The first column is for the Process, which will display the Process Name beneath it. For example, we can see at the very bottom “chrome.exe”, and 7 other instances of this process nested inside it. “chrome.exe” is the process name for Google Chrome, and Process Explorer will also show us the icon corresponding from the file.
Next to Process column, we can see the CPU usage, Private Bytes, Working Set, PID, the description for the file and the company name.
When a new process is created, it will be listed in the list of processes. Whilst it is opening, the box will highlight in different colours so you are aware that a new process has been created. Very useful. J
So how does this help me with Malware Analysis?
It’s very helpful. It allows you to watch for when a new process is created. For example, if you execute malware it may execute other processes in the background which will be listed by Process Explorer, allowing you to be aware of the process. Of course, in a rootkit situation where it injects a DLL into all the running processes and loads a kernel mode driver… It may be able to actually “hide” itself/another process being executed.
Another very helpful use of Process Explorer is that you’ll notice, if you hover your mouse over an item listed in Process Explorer it will display you information for: Command Line and the path of the process being executed (referring to the executable file). See the below screenshot to see what I mean:

Like it yet?
Anyway, there is more options available. If you select a process you can do things like kill it from memory (or try too, if it has a loaded driver which is hooking functions and making itself “unkillable” through its protection with its kernel mode driver, you may be unable to kill it (protected process – self-protection).
You can also select a process and restart it, create a dump log of the process, set it’s priority and affinity, and other things.
(See below screenshot to see the: selected process > Process dropdown.

Some extra tips:
If I execute a file called “hellothere.exe” and it tries to cloak itself as e.g. “winlogon.exe”, to me this is suspicious. You can then decide to take further analysis on the sample (to check for traits of other things to threat name it, however this is optional). If you find the sample suspicious after X amount of things, then you can classify it as malware. However, other analysts may check the file and see what they can find, to see if they find it clean or malware also.
Regshot:
Before we start using Regshot, I should probably first explain what Regshot will help you with during Malware Analysis, and what it does.
Regshot is a tool which will allow you to create logs (in other words of the program, “shots”) of your registry. The use for this is to take a shot before executing a malware sample, and then to take another shot afterwards (or after a certain time duration of executing a sample). You can them compare the two logs (“shots”) to check the registry keys which have been created, deleted, changed.
It can be very useful during malware analysis. If you ever have a malware sample you wish to upload onto the Malware Hub, you could be more helpful by using your analysis skills to analyse the sample and created a report on the post. This is optional of course, however if you did, you could include registry change information.
Anyway, let’s continue to learning how to use the tool.
After you have extracted the ZIP containing Regshot to a folder, you should have 9 items in the folder, and those items should be like in the following screenshot I have taken for you:
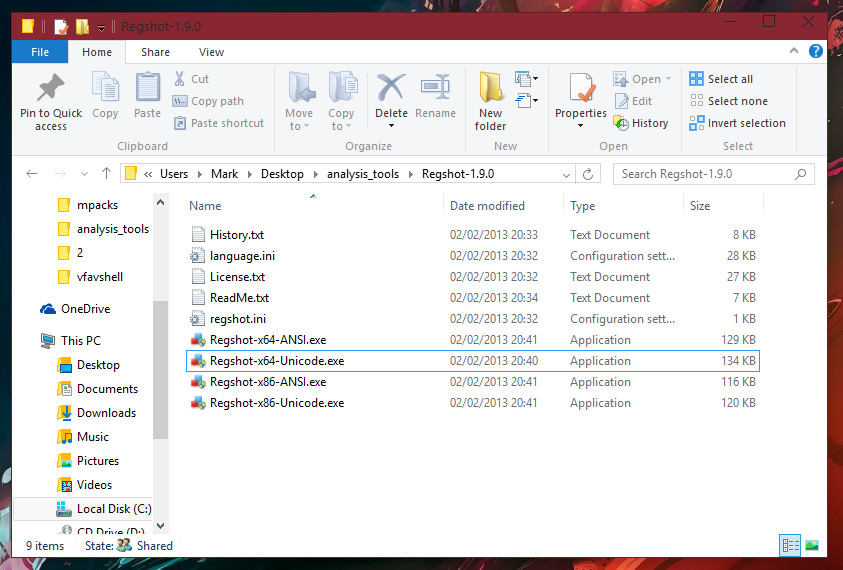
Depending on whether you are a 32-bit (x86) or 64-bit user (x64) you will need to open the different executable file to launch Regshot. Because I am an x64 user, I will open up Regshot-x64-Unicode.exe.
Once the program has opened, it should look like the following screenshot:
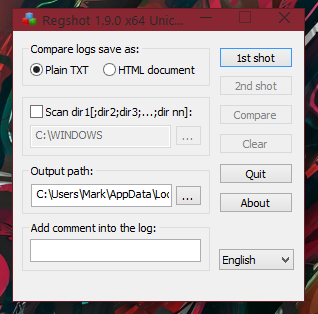
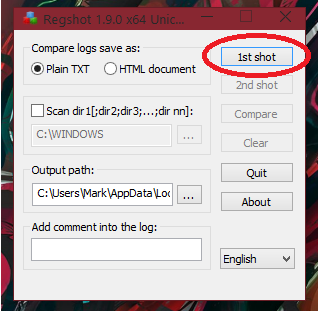
To start off before you open up a malware sample, (or any sample you are analysing because you won’t necessarily know if it’s malicious or not until after analysing it, in the case of a submission which is FUD), you must first take your 1st shot. You can accomplish this of course by clicking the 1st shot button, shown in the below image:
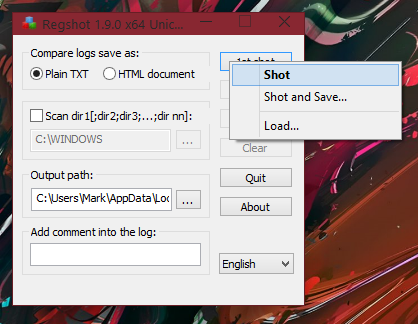
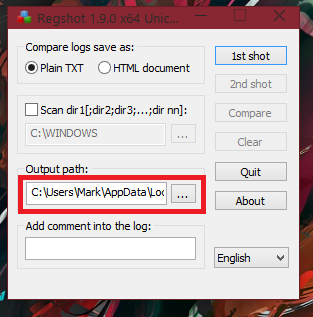
You should receive a dropdown menu after clicking this, displaying items to “Shot”, “Shot and Save…” and “Load…”. If you select “Shot”, the default location for the log report will be in the “Output path”, which for me is: C:\Users\Mark\AppData\Local\Temp\ (of course you can change the output path if you’d like, for easy access this may be a folder on the Desktop, for example).
Once your first shot has been created you can execute your sample. Once you are ready, take the second shot, and then click on Compare.
Once the Compare process has completed, the log will be executed into the text editor. This will be notepad for me, in this case.
The log for me includes Keys added, Values added, Values modified. At the bottom is a integer value corresponding to the total amount of changes.
The rest of the screenshots are provided below:
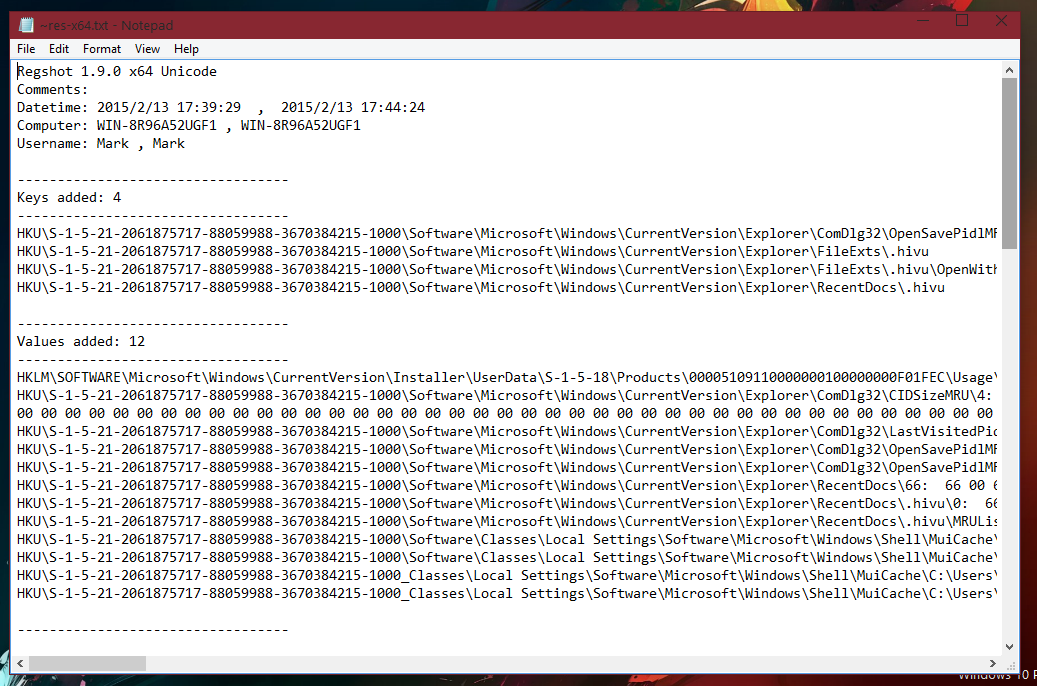
As you can see, this tool is very useful.
Regshot is a tool which will allow you to create logs (in other words of the program, “shots”) of your registry. The use for this is to take a shot before executing a malware sample, and then to take another shot afterwards (or after a certain time duration of executing a sample). You can them compare the two logs (“shots”) to check the registry keys which have been created, deleted, changed.
It can be very useful during malware analysis. If you ever have a malware sample you wish to upload onto the Malware Hub, you could be more helpful by using your analysis skills to analyse the sample and created a report on the post. This is optional of course, however if you did, you could include registry change information.
Anyway, let’s continue to learning how to use the tool.
After you have extracted the ZIP containing Regshot to a folder, you should have 9 items in the folder, and those items should be like in the following screenshot I have taken for you:

Depending on whether you are a 32-bit (x86) or 64-bit user (x64) you will need to open the different executable file to launch Regshot. Because I am an x64 user, I will open up Regshot-x64-Unicode.exe.
Once the program has opened, it should look like the following screenshot:

To start off before you open up a malware sample, (or any sample you are analysing because you won’t necessarily know if it’s malicious or not until after analysing it, in the case of a submission which is FUD), you must first take your 1st shot. You can accomplish this of course by clicking the 1st shot button, shown in the below image:

You should receive a dropdown menu after clicking this, displaying items to “Shot”, “Shot and Save…” and “Load…”. If you select “Shot”, the default location for the log report will be in the “Output path”, which for me is: C:\Users\Mark\AppData\Local\Temp\ (of course you can change the output path if you’d like, for easy access this may be a folder on the Desktop, for example).
Once your first shot has been created you can execute your sample. Once you are ready, take the second shot, and then click on Compare.
Once the Compare process has completed, the log will be executed into the text editor. This will be notepad for me, in this case.
The log for me includes Keys added, Values added, Values modified. At the bottom is a integer value corresponding to the total amount of changes.
The rest of the screenshots are provided below:


As you can see, this tool is very useful.
BEFORE YOU CONTINUE READING, REMEMBER THIS: There is so many more threads, like a series, by me.. On Malware Analysis, and I shall continue to create new threads on a regular basis (see below of this thread). All are currently available from the Malware Talk subforum this was posted on (check it out!).
Just wait, threads about static and dynamic analysis, using all the tools, etc... Over time, they will have work done to the threads and more will be made.
Personally, I would use a Virtual Machine to start out at least, since you can easily create new and revert back to previous snapshots for quick reverting of a malware infection.
Remember your Firewall and (if possible), VPN client enabled.
Hope I helped you, if anyone notices any mistakes let me know ASAP and I will quickly correct this post. I tend to make mistakes sometimes, especially with such long replies like this…; everyone makes mistakes sometimes. This took a long time to write up for you…
Anyway, like I said! - I will include all the other essential things like using the rest of the tools, and other things like the malware types, signatures/file hashing and identifying, HEX editors and using them as well... Malware connecting to C&C domains/hosts, networking etc over the next few days - week or so.
Follow the series - I created more threads so a comment on one would be for that specific topic, and to keep it nice and neat.
Article 2, Entropy - : http://malwaretips.com/threads/malw...nd-how-do-i-find-the-entropy-of-a-file.42333/
Article 3, reverse engineering .NET assemblies - : http://malwaretips.com/threads/malware-analysis-3-reverse-engineering-net-malware.42338/
Article 4 - lots of information - : http://malwaretips.com/threads/malw...f-information-maybe-more-than-you-need.42344/
Article 5 - more information covered - : http://malwaretips.com/threads/malware-analysis-5-covering-just-a-tad-more-information.42349/
Article 6 - Understanding packers and detecting a packed file - : http://malwaretips.com/threads/malw...nd-detecting-a-packed-file.42356/#post-349547
Article 7 - more information on HEX and AV signatures - : http://malwaretips.com/threads/malware-analysis-7-bytes-and-hex.42385
Article 8 - C&C explanation - : http://malwaretips.com/threads/malware-analysis-8-c-c-explanation.42394/
Article 9 - more in-depth analysis with HEX (houdini worm) - : http://malwaretips.com/threads/malw...n-depth-analysis-with-hex-houdini-worm.42399/
Cheers.
Last edited by a moderator: