If you don't like the idea of giving up Windows 7 or 8.1 for Windows 10, or if you want to run Windows 10 inside of a VM with Linux or Mac as your default system, here's how to run Windows 10 inside of a VM (and potentially for free).
Pre-Installation:
NOTICE: Before you try to install Windows 10 inside of a VM, remember that the main filesystem is not completely safe from infections from the VM. As such, remember to behave cautiously even on your VM system.
- You will need 20 GB free Hard Drive Space
- The Virtual Machine will consume a large portion of RAM when running, so it's not advisable to run games or intensive software on your main system when the VM is running.
- Remember to update your drivers to be Windows 10-compatible, especially video/audio.
- If you are running Windows Vista or below, or Linux or Mac, you will need to purchase a license key for Windows 10, either from a retailer or online. You can *technically* run Windows 10 VM for free if you have a copy of Windows 7 or Windows 8.
Initial Software/Files Needed:
Install VirtualBox: Oracle VM VirtualBox
The Current Version is 5.1 Install either x86 or 64 based on your system architecture. If you need help finding which system architecture your computer has, go to the "Run" software and type in "dxdiag".
Download The iso file: Windows 10 ISO
Select Windows 10, and your language, and your system architecture (32 (x86) or 64 bit).
Creating The VM:
In VirtualBox, click on "New" and type in Windows 10 for the name. Then select either the 32 or 64 bit version of Windows (the same version you selected when you downloaded the ISO file).

You should then select the amount of memory you want to distribute to your VM.

Finally, the Hard Disk.
First off, you can either create a new file for your VM to store files that you created or downloaded within the VM, or select an existing one.

If you have created a new one, you then will need to select the file type. You should go with the VDI file unless you have another VM software.

Then, you will need to select the type of file you want, either dynamic (grows the file size when you download or create a new file up to the limit of your choosing), or fixed (creates a file of the size of your choosing- will take longer but is faster).

You then need to give the VM some Hard-Disk space (Depends what you want to do with it and the amount of physical space on your computer, ex. Games and Photo Editing will need 100 or more GBs of space, while just light browsing and app downloading will only need a GB or two. This will be the limit file size if you have a dynamic hard disk file, and will be the size of the file if you chose the fixed file type.

NOTICE: Don't create a file larger than your physical available hard disk space, which you can check in "My Computer" or "About This Mac".
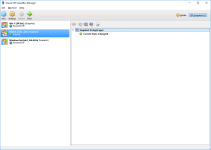
Your Virtual Machine should now appear on the screen.

Click "Start".
Configuring Windows 10
You should now have arrived at this screen (Sorry for the resolution drop but these photos are not natively taken on my computer). Select your ISO file that you just downloaded and click "Start"

You then will go throw the process of downloading Windows 10. When you get to this screen after installing, enter a valid Product Key (if you have Win Vista or lower/ Mac/ Linux) or click "I don't have a Product Key" (if you have Windows 7 or 8.1).

It should then be fairly straight forward until you get here:

Click on "Custom: Install Windows Only" to install Windows inside the VM which is currently empty.
It should be fairly straightforward again (Don't mess with any settings just click "Next/ Install") and don't boot from the CD/DVD which in this case is the ISO file. Just let it do it's thing.
You can just click "Use Express Settings" at this screen:

Then you should select "I own it":

You can then put in or create a Microsoft account if you want stuff like the Microsoft App Store. If you don't you can just click "Skip This Step"

If you didn't want to link up your Microsoft account you will need to create a user account and password that you will need to use to log in to your VM (if you linked up your account your account email and password will become your login for your VM.

Once you hit next you should be granted with some "Welcome" and "Getting Ready" screens until you get access to your desktop!
You can also delete your ISO file you downloaded because it is a 4.6 GB file and takes up space on your computer.
Pre-Installation:
NOTICE: Before you try to install Windows 10 inside of a VM, remember that the main filesystem is not completely safe from infections from the VM. As such, remember to behave cautiously even on your VM system.
- You will need 20 GB free Hard Drive Space
- The Virtual Machine will consume a large portion of RAM when running, so it's not advisable to run games or intensive software on your main system when the VM is running.
- Remember to update your drivers to be Windows 10-compatible, especially video/audio.
- If you are running Windows Vista or below, or Linux or Mac, you will need to purchase a license key for Windows 10, either from a retailer or online. You can *technically* run Windows 10 VM for free if you have a copy of Windows 7 or Windows 8.
Initial Software/Files Needed:
Install VirtualBox: Oracle VM VirtualBox
The Current Version is 5.1 Install either x86 or 64 based on your system architecture. If you need help finding which system architecture your computer has, go to the "Run" software and type in "dxdiag".
Download The iso file: Windows 10 ISO
Select Windows 10, and your language, and your system architecture (32 (x86) or 64 bit).
Creating The VM:
In VirtualBox, click on "New" and type in Windows 10 for the name. Then select either the 32 or 64 bit version of Windows (the same version you selected when you downloaded the ISO file).
You should then select the amount of memory you want to distribute to your VM.
Finally, the Hard Disk.
First off, you can either create a new file for your VM to store files that you created or downloaded within the VM, or select an existing one.
If you have created a new one, you then will need to select the file type. You should go with the VDI file unless you have another VM software.
Then, you will need to select the type of file you want, either dynamic (grows the file size when you download or create a new file up to the limit of your choosing), or fixed (creates a file of the size of your choosing- will take longer but is faster).
You then need to give the VM some Hard-Disk space (Depends what you want to do with it and the amount of physical space on your computer, ex. Games and Photo Editing will need 100 or more GBs of space, while just light browsing and app downloading will only need a GB or two. This will be the limit file size if you have a dynamic hard disk file, and will be the size of the file if you chose the fixed file type.
NOTICE: Don't create a file larger than your physical available hard disk space, which you can check in "My Computer" or "About This Mac".
Your Virtual Machine should now appear on the screen.
Click "Start".
Configuring Windows 10
You should now have arrived at this screen (Sorry for the resolution drop but these photos are not natively taken on my computer). Select your ISO file that you just downloaded and click "Start"
You then will go throw the process of downloading Windows 10. When you get to this screen after installing, enter a valid Product Key (if you have Win Vista or lower/ Mac/ Linux) or click "I don't have a Product Key" (if you have Windows 7 or 8.1).
It should then be fairly straight forward until you get here:
Click on "Custom: Install Windows Only" to install Windows inside the VM which is currently empty.
It should be fairly straightforward again (Don't mess with any settings just click "Next/ Install") and don't boot from the CD/DVD which in this case is the ISO file. Just let it do it's thing.
You can just click "Use Express Settings" at this screen:
Then you should select "I own it":
You can then put in or create a Microsoft account if you want stuff like the Microsoft App Store. If you don't you can just click "Skip This Step"
If you didn't want to link up your Microsoft account you will need to create a user account and password that you will need to use to log in to your VM (if you linked up your account your account email and password will become your login for your VM.
Once you hit next you should be granted with some "Welcome" and "Getting Ready" screens until you get access to your desktop!
You can also delete your ISO file you downloaded because it is a 4.6 GB file and takes up space on your computer.


