Gandalf_The_Grey
Level 85
Thread author
Verified
Honorary Member
Top Poster
Content Creator
Well-known
Forum Veteran
Since a few weeks, Microsoft has released their 22H2 update. This update has some new features and bugfixes. With the introduction of Windows 11 also came some restrictions on supported hardware. Like the need for a fairly recent CPU, TPM 2.0 and secure boot. The 22H2 update seems to change some things that could prevent to work around the hardware checks. The original method to upgrade from Windows 10 to 11 on unsupported hardware is no longer working and also on Windows 11 installations that used any of the workarounds to overcome the hardware check, the 22H2 update will most likely not be offered through Windows update. In this article I will describe alternative and how to still upgrade Windows 11 22H2 on unsupported hardware, either running already on Windows 11 or from Windows 10.
Video's:
For the upgrade from Windows 10 to Windows 11 22H2:
For the upgrade from an existing Windows 11 install to Windows 11 22H2:
Text:
Introduction
If you would be looking to do a fresh install or dual boot, the original workaround still works for the 22H2 version. I did an extensive article on that which you can find here: Install Windows 11 on unsupported hardware | Jensd's I/O buffer.
The workaround that I will explain here works for both upgrading from Windows 10 or to upgrade to Windows 11 22H2 on an unsupported system that is already on Windows 11.
Solution
The solution to this is to use the installer from the ISO to upgrade to 22H2. Obviously, we will need to work around the hardware check that is part of the installer.
To work around this in the past, we could simply delete a file, called appraiserres.dll from the installation media and there would not be any hardware check. With the 22H2 release, this method no longer works and if you try to use it, you would see the following.
Fortunately, it’s not very hard to fix this. The only difference in the procedure is that we now will need to replace the file with a version that is always telling that the hardware is fine, rather than removing it.
This method works for both Home and Pro. After upgrading, if you had an activated system, the new version will be activated as well.
Step 1) Get the Windows 11 ISO
To start, we need to download the Windows 11 22H2 ISO. You could simply download the ISO from Microsoft’s website but this can lead to a mismatch with the language version of your original Windows installation. By using the Media Creation Tool instead, it will detect the correct version and there is more chance for success.
On the Microsoft Windows 11 download page, which you can find here: Download Windows 11, click on Download now in the Create Windows 11 Installation Media section.
Once downloaded open the file from your Downloads folder.
Accept the licensing terms and leave the recommended version as is selected automatically. As mentioned this prevents a language mismatch which would not allow you to keep your files during the upgrade.
In the next screen, Choose to download the ISO file rather than creating installation media and save it in your Downloads folder as well.
Let the tool do the rest of the work and once completed, click Finish.
Step 2) Apply the workaround
Now that we have the ISO downloaded with the Media Creation Tool, navigate to where you decided to save the ISO file. We can now mount this ISO by simply double-clicking on it.
As you can see, this creates an extra virtual DVD drive on this computer representing the ISO file which we downloaded.
Since we need to replace a file here we will first need to copy all of the contents of the mounted ISO to a new folder on the desktop. First create that folder, I’ll call it 22H2:
Then we can, from the DVD drive, select all files and copy them in the 22H2 folder on the desktop.
Since we have a copy, we no longer need the ISO so we can right click on the virtual DVD drive and choose Eject. If you’re short on space you can now also delete the file from your Downloads folder.
At this point we need to replace the appraiserress.dll file, this file is located in the sources folder and it is responsible for the hardware check.
You can download the modified version of this file from here: https://jensd.be/download/appraiserres.zip. Once you have downloaded the zip file with the modified appraiserress.dll, open it and simply drag it into the sources folder.
Then confirm that you want to replace it.
To double-check, make sure that the file size in the sources folder is now 192 kilobytes.
That’s all we had to do to apply the workaround to the installer and we’re ready to start installing the upgrade.
Step 3) Upgrade to Windows 11 22H2
All preparation is done at this point and now we can just launch setup.exe from the 22H2 folder.
In the first step, make sure to disable any updates as that might undo the replaced file. To do so, go to “Change how Setup downloads updates” and check “Not right now”.
If this doesn’t work or you want to be very sure, you can also disconnect the cable or disconnect from wifi.
The rest of the steps should be pretty straightforward. Accept the licensing terms and if all goes well, you should see the following screen. Click Install to continue with the upgrade.
Once you do, the upgrade will take place and your current installation will become Windows 11 22H2 not important if you started this from Windows 10 or already from Windows 11.
This takes a bit of time and one or more reboots, I think it was around 15 minutes on my Dell OptiPlex 9020. If your user is password protected, you will need to log in at some point.
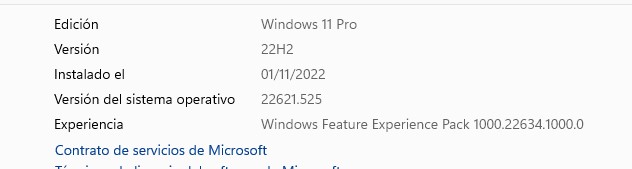
Eventually if all goes fine, you should be greeted with your trusty desktop but this time running Windows 11 22H2. About this PC shows us clearly that we are on Windows 11 22H2, still on the same unsupported hardware.
As I mentioned in the beginning, the installation stays activated as it was.
And in case you would be curious, updates seem to work fine as well. Probably until the next big feature update, which time will tell.
Step 4) Cleanup
At this point you can also safely delete the folder that we created from the desktop.
Hope this post can help you to upgrade to Windows 11 22H2.
Read this how-to with pictures here:
Video's:
For the upgrade from Windows 10 to Windows 11 22H2:
For the upgrade from an existing Windows 11 install to Windows 11 22H2:
Text:
Introduction
If you would be looking to do a fresh install or dual boot, the original workaround still works for the 22H2 version. I did an extensive article on that which you can find here: Install Windows 11 on unsupported hardware | Jensd's I/O buffer.
The workaround that I will explain here works for both upgrading from Windows 10 or to upgrade to Windows 11 22H2 on an unsupported system that is already on Windows 11.
Solution
The solution to this is to use the installer from the ISO to upgrade to 22H2. Obviously, we will need to work around the hardware check that is part of the installer.
To work around this in the past, we could simply delete a file, called appraiserres.dll from the installation media and there would not be any hardware check. With the 22H2 release, this method no longer works and if you try to use it, you would see the following.
Fortunately, it’s not very hard to fix this. The only difference in the procedure is that we now will need to replace the file with a version that is always telling that the hardware is fine, rather than removing it.
This method works for both Home and Pro. After upgrading, if you had an activated system, the new version will be activated as well.
Step 1) Get the Windows 11 ISO
To start, we need to download the Windows 11 22H2 ISO. You could simply download the ISO from Microsoft’s website but this can lead to a mismatch with the language version of your original Windows installation. By using the Media Creation Tool instead, it will detect the correct version and there is more chance for success.
On the Microsoft Windows 11 download page, which you can find here: Download Windows 11, click on Download now in the Create Windows 11 Installation Media section.
Once downloaded open the file from your Downloads folder.
Accept the licensing terms and leave the recommended version as is selected automatically. As mentioned this prevents a language mismatch which would not allow you to keep your files during the upgrade.
In the next screen, Choose to download the ISO file rather than creating installation media and save it in your Downloads folder as well.
Let the tool do the rest of the work and once completed, click Finish.
Step 2) Apply the workaround
Now that we have the ISO downloaded with the Media Creation Tool, navigate to where you decided to save the ISO file. We can now mount this ISO by simply double-clicking on it.
As you can see, this creates an extra virtual DVD drive on this computer representing the ISO file which we downloaded.
Since we need to replace a file here we will first need to copy all of the contents of the mounted ISO to a new folder on the desktop. First create that folder, I’ll call it 22H2:
Then we can, from the DVD drive, select all files and copy them in the 22H2 folder on the desktop.
Since we have a copy, we no longer need the ISO so we can right click on the virtual DVD drive and choose Eject. If you’re short on space you can now also delete the file from your Downloads folder.
At this point we need to replace the appraiserress.dll file, this file is located in the sources folder and it is responsible for the hardware check.
You can download the modified version of this file from here: https://jensd.be/download/appraiserres.zip. Once you have downloaded the zip file with the modified appraiserress.dll, open it and simply drag it into the sources folder.
Then confirm that you want to replace it.
To double-check, make sure that the file size in the sources folder is now 192 kilobytes.
That’s all we had to do to apply the workaround to the installer and we’re ready to start installing the upgrade.
Step 3) Upgrade to Windows 11 22H2
All preparation is done at this point and now we can just launch setup.exe from the 22H2 folder.
In the first step, make sure to disable any updates as that might undo the replaced file. To do so, go to “Change how Setup downloads updates” and check “Not right now”.
If this doesn’t work or you want to be very sure, you can also disconnect the cable or disconnect from wifi.
The rest of the steps should be pretty straightforward. Accept the licensing terms and if all goes well, you should see the following screen. Click Install to continue with the upgrade.
Once you do, the upgrade will take place and your current installation will become Windows 11 22H2 not important if you started this from Windows 10 or already from Windows 11.
This takes a bit of time and one or more reboots, I think it was around 15 minutes on my Dell OptiPlex 9020. If your user is password protected, you will need to log in at some point.
Eventually if all goes fine, you should be greeted with your trusty desktop but this time running Windows 11 22H2. About this PC shows us clearly that we are on Windows 11 22H2, still on the same unsupported hardware.
As I mentioned in the beginning, the installation stays activated as it was.
And in case you would be curious, updates seem to work fine as well. Probably until the next big feature update, which time will tell.
Step 4) Cleanup
At this point you can also safely delete the folder that we created from the desktop.
Hope this post can help you to upgrade to Windows 11 22H2.
Read this how-to with pictures here:


")