Microsoft Teams Helpdesk Scam Exposed: PowerShell Cleaner Installs Malware
Written by: Lapain Epuran
Published on:
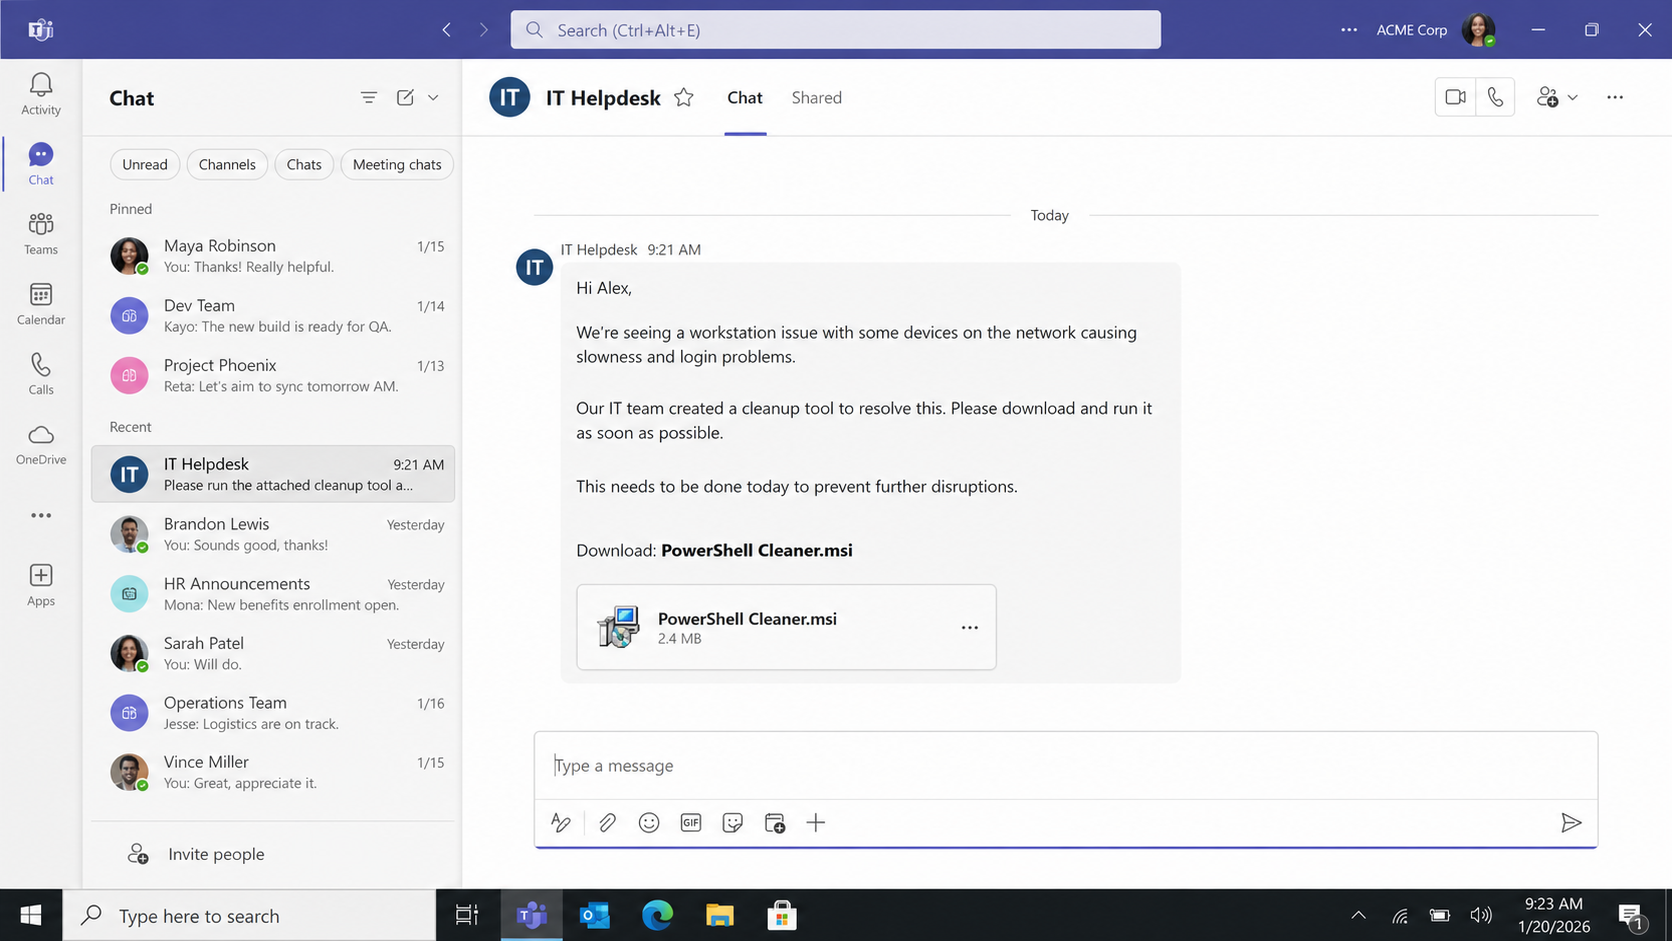
A Teams message from IT says your workstation needs an urgent cleanup. The attached installer has a reassuring name, and the request fits neatly into a busy day.
Everything appears internal until one detail feels wrong. This investigation follows what can happen when that small installer is trusted.
Overview
The approach begins as an ordinary support conversation
SynkLoader campaigns have used Microsoft Teams phishing to impersonate an IT help desk and persuade employees to install a malicious MSI package.
The file may be presented as “PowerShell Cleaner,” a believable name for a utility that supposedly repairs slowness, login problems, or network errors.
This approach is more personal than a random attachment. A live chat lets the attacker answer questions, increase urgency, and guide the target through security warnings.
Teams branding does not guarantee that a sender belongs to the organization. External users, compromised tenants, guest access, or stolen accounts can create convincing contact points.
A legitimate support technician should connect the request with a ticket, asset record, known staff identity, and approved software distribution process.
The campaign replaces those controls with persuasion. Its goal is to make the employee run code before contacting the real help desk.
The installer deploys a modular malware loader
SynkLoader is a loader first observed in 2026. It can install additional components rather than limiting the attack to one fixed capability.
The malware carries its own Python environment and performs much of its work in memory. That design can reduce obvious files left on disk.
Its components can collect the hostname, username, privilege level, active processes, installed services, and Active Directory information.
The tool also supports a reverse PowerShell shell, remote screen control, keyboard and mouse interaction, and a backconnect proxy through the infected computer.
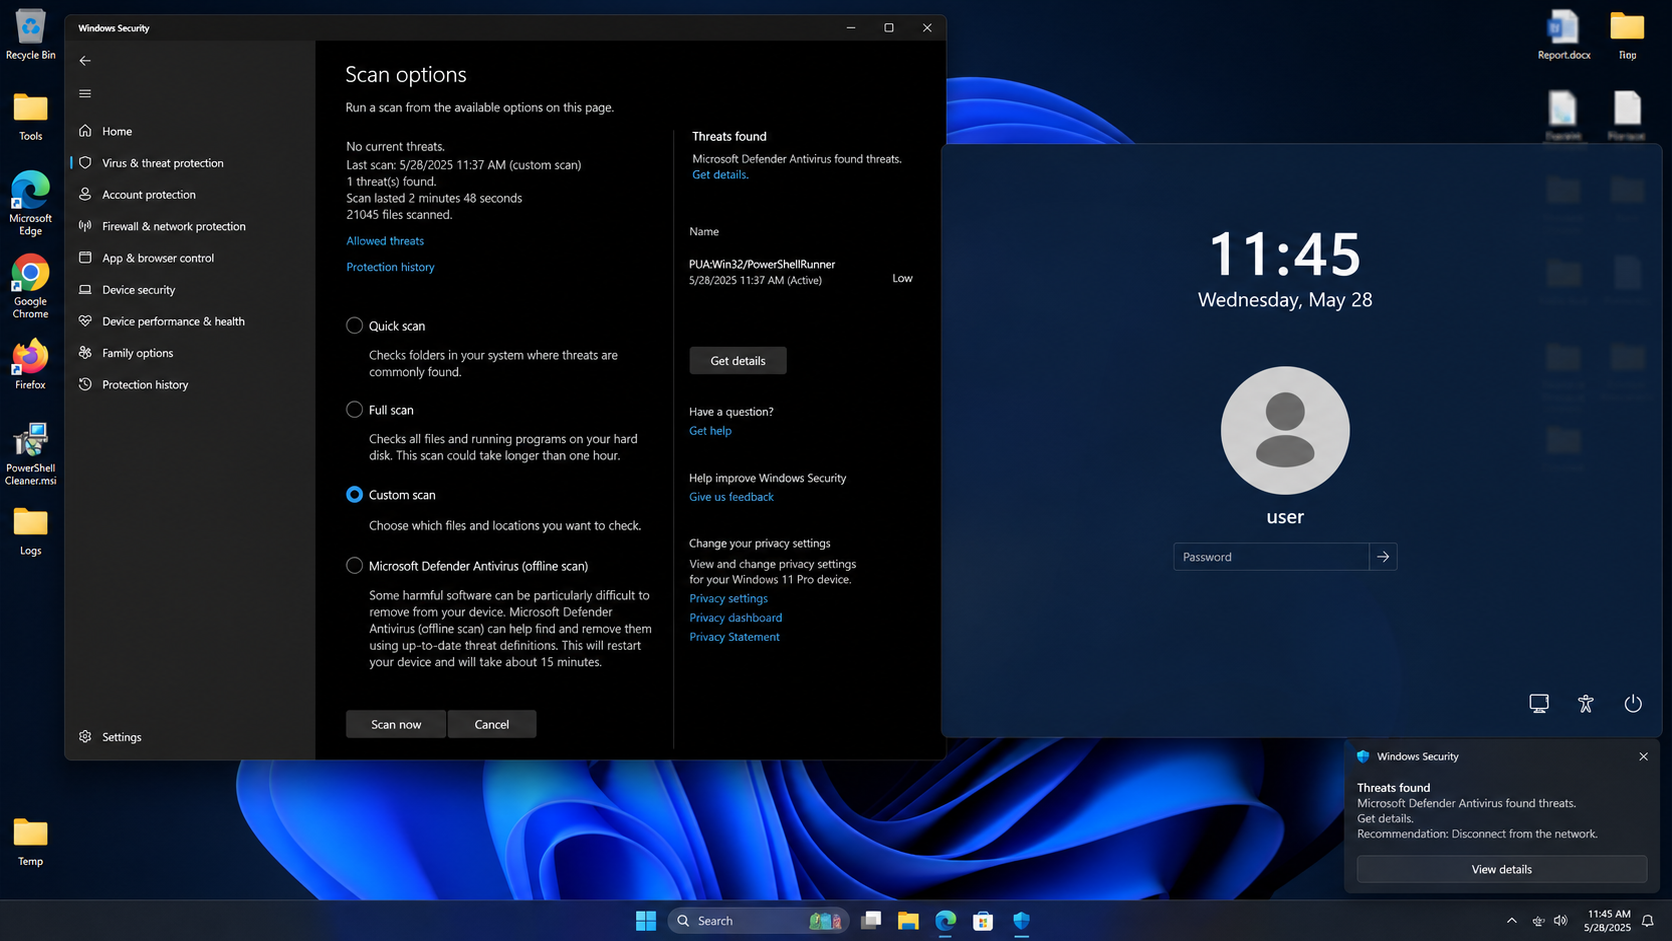
A fake full-screen Windows lock screen can capture the user’s password. It reuses the real username and wallpaper to appear native.
The result is not merely a slow computer. A successful infection can expose credentials, workplace infrastructure, and trusted network access.
The filename is harmless-looking, but the behavior is not
Terms such as cleaner, patch, security update, and diagnostic tool reduce suspicion. They describe a helpful purpose while concealing the package’s actual publisher and origin.
Strong warning signs include:
An unsolicited IT conversation without a matching ticket.
A request to install software directly from chat.
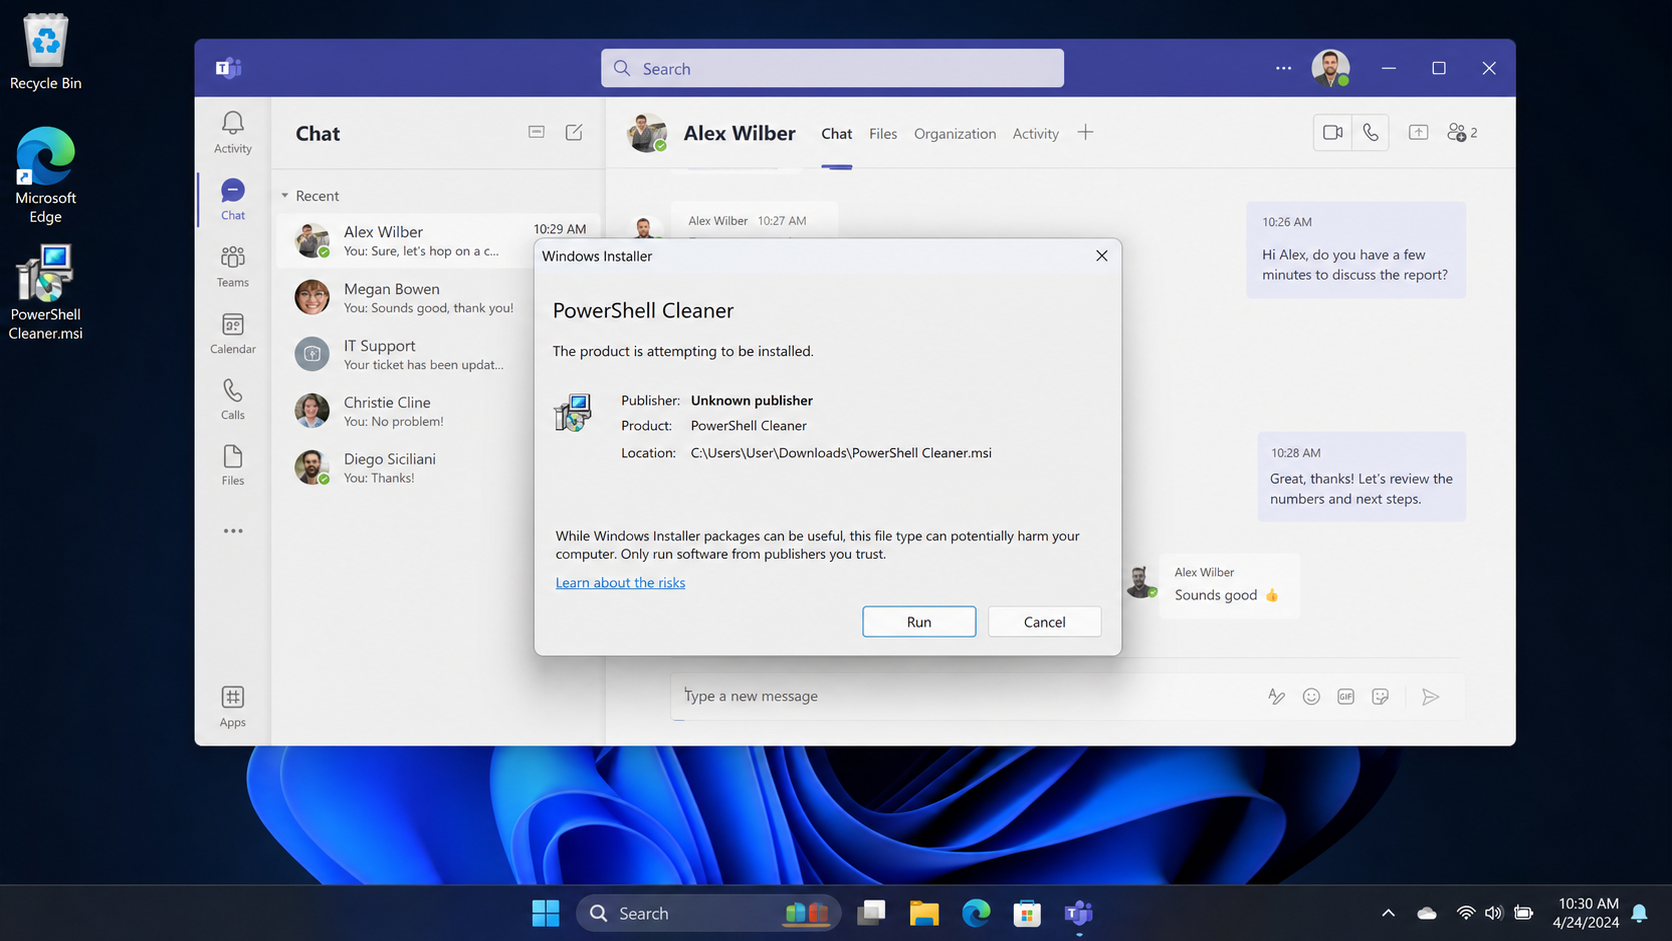
An MSI signed by an unknown or unexpected publisher.
Instructions to bypass Windows security prompts.
Pressure to complete the task immediately.
A technician who refuses independent verification.
A cleanup utility absent from the approved software catalog.
Opening the chat is not the infection point. Downloading and running the installer gives the campaign its opportunity to execute on Windows.
Employees should stop before installation and contact IT through the usual telephone number or ticket portal. A genuine technician can confirm the package hash and deployment method.
If the MSI already ran, disconnect the machine from networks. Treat the device as potentially controlled until an incident-response review proves otherwise.
How The Scam Works
Step 1: The attacker reaches an employee through Teams
The criminal establishes a chat identity that resembles internal support. It may use an external tenant, compromised account, or deceptively named guest profile.
Display names and profile pictures are easy to copy. Employees often focus on the support label rather than the tenant, email address, or external-user indicator.
The first message can be polite and specific enough to feel routine. It might mention device performance, authentication maintenance, or a required security cleanup.
Some operators begin with conversation instead of immediately attaching a file. That slower approach builds rapport and tests whether the employee is responsive.
The real help desk may have no record of the contact. Checking the ticket number before proceeding breaks the attack at its earliest stage.
Step 2: A believable problem creates urgency
The sender claims monitoring detected a workstation issue affecting logins, network speed, compliance, or upcoming updates.
These symptoms are common enough that many users have experienced them. The story can accidentally match a genuine annoyance on the device.
The supposed technician warns that delay could disrupt work or lock the account. That makes the attachment look like the fastest way to stay productive.
Authority and helpfulness operate together. The target wants to cooperate with IT and avoid appearing responsible for a broader outage.
Real administrators can identify the device, incident, policy, and approved remedy. Vague monitoring claims should not justify an unknown installer.
Step 3: “PowerShell Cleaner” disguises the malicious MSI
The attachment uses an MSI extension because Windows Installer packages are common in enterprise software deployment.
The phrase PowerShell Cleaner sounds technical without describing a recognized Microsoft product. It suggests maintenance while avoiding a name that employees can verify easily.
The attacker may instruct the target to ignore an unknown-publisher warning or say that internal tools are not digitally signed.
That explanation reverses a valuable safety control. Publisher verification exists precisely because a familiar filename cannot identify who built the package.
Approved corporate software usually arrives through managed deployment, a documented portal, or a technician using established remote-support tooling.
Step 4: Running the package establishes SynkLoader
When the MSI executes, it launches the infection chain and prepares the loader’s runtime. The user may see little or no meaningful cleanup interface.
SynkLoader can use Python, C#, and C++ components. It decrypts and runs modular code received through its command infrastructure.
Communication can rotate among hardcoded command servers. The loader selects a destination and waits for instructions or additional modules.
Much of the activity can occur in memory. Traditional reliance on one suspicious executable file may therefore miss the broader behavior.
Endpoint telemetry, process lineage, network connections, scheduled tasks, and memory analysis become important for a reliable investigation.
Step 5: Reconnaissance maps the victim and organization
The malware gathers the computer name, signed-in user, current privileges, running programs, and installed services.
In a domain environment, Active Directory details can reveal organizational structure, reachable resources, and accounts worth targeting next.
This reconnaissance helps the operator decide whether the device belongs to an ordinary employee, administrator, developer, or valuable business unit.
A low-privilege infection can still expose documents and session data. A privileged account can create a much wider route into the network.
The collection stage may be quiet because immediate disruption would alert the victim. Attackers often value persistent observation over obvious damage.
Step 6: Remote-control modules deepen access
SynkLoader can provide a reverse PowerShell shell, allowing commands to run from outside the organization through the infected endpoint.
A VNC-style component can expose the screen and accept mouse or keyboard input. The operator may interact with applications as if seated at the computer.
The fake Windows lock screen adds credential theft. It uses familiar wallpaper and username information while collecting whatever password the user enters.
Pressing Alt+Tab may reveal that the prompt is only an application, but the malware attempts to bring itself back into focus.
Any password entered after suspicious lock-screen behavior should be considered compromised, even if the desktop later returns normally.
Step 7: Persistence and proxying support longer operations
The malware can create a scheduled task with a random name. It may run at user logon and again at a regular daily time.
Persistence allows access to resume after restarting. Removing the original MSI does not necessarily remove installed components or the scheduled trigger.
A traffic-redirector module can route attacker connections through the victim’s IP address. That helps malicious activity resemble traffic originating inside the trusted environment.
Proxying can bypass location filters and hide the attacker’s own address. It may also implicate the victim’s network in unrelated abuse.
Containment must cover the endpoint, credentials, sessions, nearby systems, and logs. Treating the incident as one unwanted file is insufficient.
What SynkLoader Can Expose
Device reconnaissance reveals what security products are running, which services are installed, and whether valuable administrative tools are available.
User information connects the machine with a real identity. That can support impersonation inside email, Teams, ticketing systems, and business applications.
Active Directory data offers a roadmap for lateral movement. Group membership and reachable systems help attackers prioritize accounts with broader access.
Remote screen control exposes anything displayed, including dashboards, customer records, documents, and authentication prompts.
Keyboard interaction can change settings, open cloud applications, or authorize actions while the endpoint retains a trusted network position.
The lock-screen module targets a particularly valuable secret. A Windows or domain password may unlock email, file shares, VPN services, and remote desktops.
A backconnect proxy turns the machine into infrastructure. Fraudulent logins routed through it may avoid controls that trust the company’s normal address range.
Additional payloads determine the final impact. Data theft, ransomware, credential dumping, or further loaders remain possible after the initial foothold.
Organizations should assume scope is unknown until logs and neighboring systems are reviewed. The visible symptoms rarely show every action taken.
Sender, Installer, Device, and Network Checks
Verify the support identity through another route
Call the known help-desk number or open the official ticket portal. Ask whether the named technician and issue exist.
Inspect the Teams profile for external or guest markers, tenant information, email address, and conversation history. A copied display name proves nothing.
Real support staff should welcome verification. Resistance, urgency, or instructions to avoid coworkers are serious warning signs.
Validate the package before execution
Compare its digital signature, publisher, hash, filename, and download source with the organization’s approved software catalog.
An unknown publisher deserves a stop, especially when the package arrived through chat. Do not accept a screenshot of a hash from the same sender.
Security teams can examine the file in an isolated environment. Employees should never test suspicious installers on production devices.
Look for persistence and credential capture
Investigators should review scheduled tasks, startup locations, services, process trees, PowerShell activity, Python runtimes, and newly created files.
Examine lock-screen anomalies, authentication events, and credential use after the suspected installation. Reset potentially captured secrets from a clean system.
Do not trust a normal-looking desktop after reboot. Persistence may reactivate only at logon or another scheduled time.
Hunt beyond the original computer
Search proxy, DNS, endpoint, identity, and firewall logs for related command servers and unusual connections.
Review neighboring accounts and machines accessed by the affected user. Stolen sessions can move the incident beyond the first endpoint quickly.
Block the attachment hash, sender, domains, and indicators across the environment while preserving evidence for later analysis.
What to Do if You Have Fallen Victim to This Scam
Disconnect the device from networks. Disable Wi-Fi and unplug Ethernet without shutting down unless your incident team instructs otherwise.
Contact security from another device. Use a known telephone number, not the suspicious Teams chat, and explain that the MSI executed.
Preserve volatile evidence. Avoid deleting files, clearing logs, or running random cleanup utilities before responders collect necessary information.
Reset credentials from a clean system. Change Windows, domain, email, VPN, and privileged passwords that may have been typed after installation.
Run Malwarebytes during guided cleanup. A complete scan can identify malicious components, but enterprise incidents still require professional scope analysis.
Use AdGuard on browsers after recovery. It can reduce malicious redirects and known command destinations, while endpoint controls address installed malware.
Inspect persistence thoroughly. Review scheduled tasks, startup entries, services, scripts, remote-control software, and the attached file’s complete execution chain.
Review organizational access. Check Active Directory, file shares, email, and administrative systems for activity performed through the affected account.
Rebuild when confidence is insufficient. A professionally reimaged device is safer than assuming every in-memory module and persistence point was removed.
Is Your Device Infected? Run a Free Malware Scan
Slow performance, constant pop-ups, or strange behavior? These are classic signs of a malware infection. The fastest way to find out is to scan your device with Malwarebytes Anti-Malware Free — one of the most trusted malware removal tools available.
The free version detects and removes the most common threats, including:
Adware — the cause of those annoying pop-ups
Browser hijackers — unwanted redirects and changed homepages
Trojans and spyware — hidden programs stealing your data
Potentially unwanted programs (PUPs) — software you never asked for
👉 Select your device below — Windows, Mac, or Android — then follow the simple steps to download Malwarebytes, scan your system, and remove any threats it finds. The whole process takes about 5 minutes.
Malwarebytes for WindowsMalwarebytes for MacMalwarebytes for Android
Run a Malware Scan with Malwarebytes for Windows
Malwarebytes is one of the most popular and trusted anti-malware tools for Windows — and it’s completely free for removing infections. It catches threats that many antivirus programs miss, including adware, browser hijackers, and trojans. Follow the steps below to scan and clean your PC in just a few minutes.
Download Malwarebytes
Click the button below to download the latest version of Malwarebytes for Windows from the official source. The free version is all you need — it will scan your computer and remove adware, browser hijackers, and other malicious software at no cost.
(The link opens in a new page where your download will start)
Install Malwarebytes
When the download finishes, open your Downloads folder and double-click the MBSetup file. If Windows shows a User Account Control pop-up, click “Yes” to allow the installation.
Follow the On-Screen Prompts to Install Malwarebytes
The setup wizard will walk you through a few quick screens:
Choose where you’re installing the program — “Personal Computer” or “Work Computer” — then click Next.
Malwarebytes will now install on your device. This usually takes under a minute.
When installation is complete, the “Welcome to Malwarebytes” screen will open automatically.
On the final screen, click Open Malwarebytes to launch the program.
Enable “Scan for Rootkits”
Before scanning, turn on rootkit detection so Malwarebytes can find even the most hidden threats. Click the Settings gear icon on the left side of the screen.
In the settings menu, find “Scan for rootkits” and click the toggle so it turns blue.
Done? Click “Dashboard” in the left pane to return to the main screen.
Start the Scan
Click the blue Scan button. Malwarebytes will automatically update its virus database and start checking your computer for malware.
Wait for the Scan to Finish
The scan checks your entire system for browser hijackers and other malicious programs, so it can take several minutes. Feel free to do something else — just check back occasionally to see the progress.
Quarantine the Detected Threats
When the scan is done, you’ll see a list of everything Malwarebytes found — malware, adware, and potentially unwanted programs. Click the “Quarantine” button to remove all of them at once.
Malwarebytes will now remove the malicious files and registry entries and move them safely into quarantine.
Restart Your Computer
Some threats can only be fully removed after a reboot. If Malwarebytes asks you to restart, click Yes. Once you’re logged back in, your PC is clean and you can continue with the next steps in this guide.
When the scan finishes, click Quarantine to remove everything Malwarebytes found. That’s it — your Windows PC is now clean of trojans, adware, and other malware, and should be back to running smoothly.
If your current antivirus allowed this malicious program on your computer, you may want to consider purchasing Malwarebytes Premium to protect against these types of threats in the future. If you are still having problems with your computer after completing these instructions, then please follow one of the steps:
Malwarebytes for Mac is a free on-demand scanner that removes the malware other security software tends to miss — adware, browser hijackers, and unwanted programs included. Cleaning an infected Mac with Malwarebytes has always been completely free, and it’s our go-to recommendation. Follow the steps below to scan and clean your Mac in just a few minutes.
Download Malwarebytes for Mac
Click the button below to download the latest version of Malwarebytes for Mac.
When the download finishes, open your Downloads folder and double-click the setup file to begin the installation.
Follow the On-Screen Prompts to Install Malwarebytes
The Malwarebytes for Mac Installer will guide you through a few quick screens. Click “Continue” and keep following the prompts until the installation completes.
When the installation is complete, Malwarebytes opens to the Welcome to Malwarebytes screen. Click “Get started“.
Select “Personal Computer” or “Work Computer”
Malwarebytes will ask what type of computer you’re installing it on. Click either Personal Computer or Work Computer, whichever applies.
Start the Scan
Click the “Scan” button. Malwarebytes will automatically update its detection database and begin checking your Mac for malware.
Wait for the Scan to Finish
Malwarebytes will scan your Mac for adware, browser hijackers, and other malicious programs. This can take a few minutes, so feel free to do something else — just check back occasionally to see the progress.
Quarantine the Detected Threats
When the scan is done, you’ll see a list of everything Malwarebytes found. Click the “Quarantine” button to remove all the threats at once.
Restart Your Mac
Malwarebytes will now remove all the malicious files it found. Some threats can only be fully removed after a reboot — if Malwarebytes asks you to restart, allow it. Once you’re logged back in, your Mac is clean.
Once the scan is done, remove every threat it detected. Your Mac is now free of adware, rogue browser extensions, and other potentially harmful software.
If your current antivirus allowed a malicious program on your computer, you might want to consider purchasing the full-featured version of Malwarebytes Anti-Malware to protect against these types of threats in the future. If you are still experiencing problems while trying to remove a malicious program from your computer, please ask for help in our Mac Malware Removal Help & Support forum.
Run a Malware Scan with Malwarebytes for Android
Malwarebytes for Android automatically detects and removes dangerous threats like malware and ransomware so you don’t have to worry about your most-used device being compromised. Aggressive detection of adware and potentially unwanted programs keeps your Android phone or tablet running smooth.
Download Malwarebytes for Android.
You can download Malwarebytes for Android by clicking the link below.
In the Google Play Store, tap “Install” to install Malwarebytes for Android on your device.
When the installation process has finished, tap “Open” to begin using Malwarebytes for Android. You can also open Malwarebytes by tapping on its icon in your phone menu or home screen.
Follow the on-screen prompts to complete the setup process
When Malwarebytes will open, you will see the Malwarebytes Setup Wizard which will guide you through a series of permissions and other setup options. This is the first of two screens that explain the difference between the Premium and Free versions. Swipe this screen to continue. Tap on “Got it” to proceed to the next step. Malwarebytes for Android will now ask for a set of permissions that are required to scan your device and protect it from malware. Tap on “Give permission” to continue. Tap on “Allow” to permit Malwarebytes to access the files on your phone.
Update database and run a scan with Malwarebytes for Android
You will now be prompted to update the Malwarebytes database and run a full system scan.
Click on “Update database” to update the Malwarebytes for Android definitions to the latest version, then click on “Run full scan” to perform a system scan.
Wait for the Malwarebytes scan to complete.
Malwarebytes will now start scanning your phone for adware and other malicious apps. This process can take a few minutes, so we suggest you do something else and periodically check on the status of the scan to see when it is finished.
Click on “Remove Selected”.
When the scan has been completed, you will be presented with a screen showing the malware infections that Malwarebytes for Android has detected. To remove the malicious apps that Malwarebytes has found, tap on the “Remove Selected” button.
Restart your phone.
Malwarebytes for Android will now remove all the malicious apps that it has found. To complete the malware removal process, Malwarebytes may ask you to restart your device.
After the scan, tap Remove Selected to delete all detected threats. Your Android phone is now clean — no more malicious apps, adware, or browser redirects.
If your current antivirus allowed a malicious app on your phone, you may want to consider purchasing the full-featured version of Malwarebytes to protect against these types of threats in the future. If you are still having problems with your phone after completing these instructions, then please follow one of the steps:
Restore your phone to factory settings by going to Settings > General management > Reset > Factory data reset.
Now that your device is clean, keep it that way. Most infections start with a malicious ad or a fake download button — so blocking them at the source is your best defense.
We recommend AdGuard, which blocks malicious ads, phishing pages, and dangerous redirects before they can reach you.
SynkLoader is modular Windows malware that can gather system information, receive additional components, control the screen, capture credentials, and proxy attacker traffic.
Its flexible loader design means the final payload and impact may differ between affected systems.
Is PowerShell Cleaner a real Microsoft utility?
The name used in this campaign does not make the attached MSI an approved Microsoft tool. A filename can be chosen by anyone.
Trust verified publishers and documented company deployment channels, not a helpful-sounding label inside an unsolicited chat.
Can opening the Teams message infect my computer?
Reading the conversation alone is not the described installation path. The serious risk begins when the attached MSI is downloaded and executed.
Report the sender and preserve the chat so administrators can search for other targeted employees.
Why is a fake lock screen dangerous?
It imitates Windows while collecting the password typed into its field. Familiar wallpaper and username details make the imitation convincing.
Treat credentials entered during unusual lock behavior as stolen and reset them from a separate clean device.
Can antivirus removal fully resolve the incident?
Detection is valuable, but it may not reveal stolen credentials, issued tokens, proxy abuse, lateral movement, or every downloaded component.
Organizations need endpoint, identity, and network investigation before declaring the environment clean.
Should the infected computer be turned off?
Disconnect it first and contact responders. Immediate shutdown can remove volatile evidence, while leaving it networked can permit continued attacker activity.
Follow the incident team’s direction because evidence priorities and containment needs vary by organization.
The Bottom Line
The fake Teams IT Helpdesk approach turns employee cooperation into an installation path for SynkLoader. “PowerShell Cleaner” is the disguise, not the function.
Verify every unsolicited support request through established channels. Unknown MSI packages should never be installed because a chat identity sounds authoritative.
If the file ran, isolate the endpoint and involve security immediately. Credentials, cloud sessions, Active Directory access, and nearby systems may all require review.
Thorough recovery is wider than deleting one installer. It must remove persistence, revoke access, examine proxy behavior, and rebuild the computer when trust cannot be restored.
10 Rules to Avoid Online Scams
Here are 10 practical safety rules to help you avoid malware, online shopping scams, crypto scams, and other online fraud. Each tip includes a quick “if you already got hit” action.
Stop and verify before you click, log in, download, or pay.
Most scams win by creating urgency. Verify using a trusted method: type the website address yourself, use the official app, or call a known number (not the one in the message).
If you already clicked: close the page, do not enter passwords, and run a malware scan.
Keep your operating system, browser, and apps updated.
Updates patch security holes used by malware and malicious ads. Turn on automatic updates where possible.
If you saw a scary “update now” pop-up: close it and update only through your device settings or the official app store.
Use layered protection: antivirus plus an ad blocker.
Antivirus helps block malware. An ad blocker reduces scam redirects, phishing pages, and malvertising.
If your browser is acting weird: remove unknown extensions, reset the browser, then run a full scan.
Install apps, software, and extensions only from official sources.
Avoid cracked software, “keygens,” and random downloads. During installs, choose Custom/Advanced and decline bundled offers you do not recognize.
If you already installed something suspicious: uninstall it, restart, and scan again.
Treat links and attachments as untrusted by default.
Phishing often impersonates delivery services, banks, and popular brands. If it is unexpected, do not open attachments or log in through the message.
If you entered credentials: change the password immediately and enable 2FA.
Shop safely: research the store, then pay with protection.
Be cautious with brand-new stores, “closing sale” stories, and prices that make no sense. Prefer credit cards or PayPal for dispute options. Avoid wire transfers, gift cards, and crypto payments.
If you already paid: contact your card issuer or PayPal quickly to dispute the transaction.
Crypto rule: never pay a “fee” to withdraw or recover money.
Common patterns include fake profits, then “tax,” “gas,” or “verification” fees. Another is a “recovery agent” who demands upfront crypto.
If you already sent crypto: stop paying, save evidence (wallet addresses, TXIDs, chats), and report the scam to the platform used.
Secure your accounts with unique passwords and 2FA (start with email).
Use a password manager and unique passwords for every account. Enable 2FA using an authenticator app when possible.
If you suspect an account takeover: change passwords, sign out of all devices, and review recent logins and recovery settings.
Back up important files and keep one backup offline.
Backups protect you from ransomware and device failure. Keep at least one backup on an external drive that is not always connected.
If you suspect infection: do not connect backup drives until the system is clean.
If you think you are a victim: stop losses, document evidence, and escalate fast.
Move quickly. Speed matters for disputes, account recovery, and limiting damage.
Stop payments and contact: do not send more money or respond to the scammer.
Call your bank or card issuer: block transactions, replace the card if needed, and start a dispute or chargeback.
Secure your email first: change the email password, enable 2FA, and remove unfamiliar recovery options.
Secure other accounts: change passwords, enable 2FA, and log out of all sessions.
Scan your device: remove suspicious apps or extensions, then run a full malware scan.
Save evidence: screenshots, emails, order pages, tracking pages, wallet addresses, TXIDs, and chat logs.
Report it: to the payment provider, marketplace, social platform, exchange, or wallet service involved.
These rules are intentionally simple. Most online losses happen when decisions are rushed. Slow down, verify independently, and use payment methods and account controls that give you recourse.
Hello! I'm Lapain Epuran, your go-to source for detailed and honest product reviews. From tech gadgets to miracle cures, I provide insights to help you make informed choices. Join me as we discover what's truly worth your time and money.