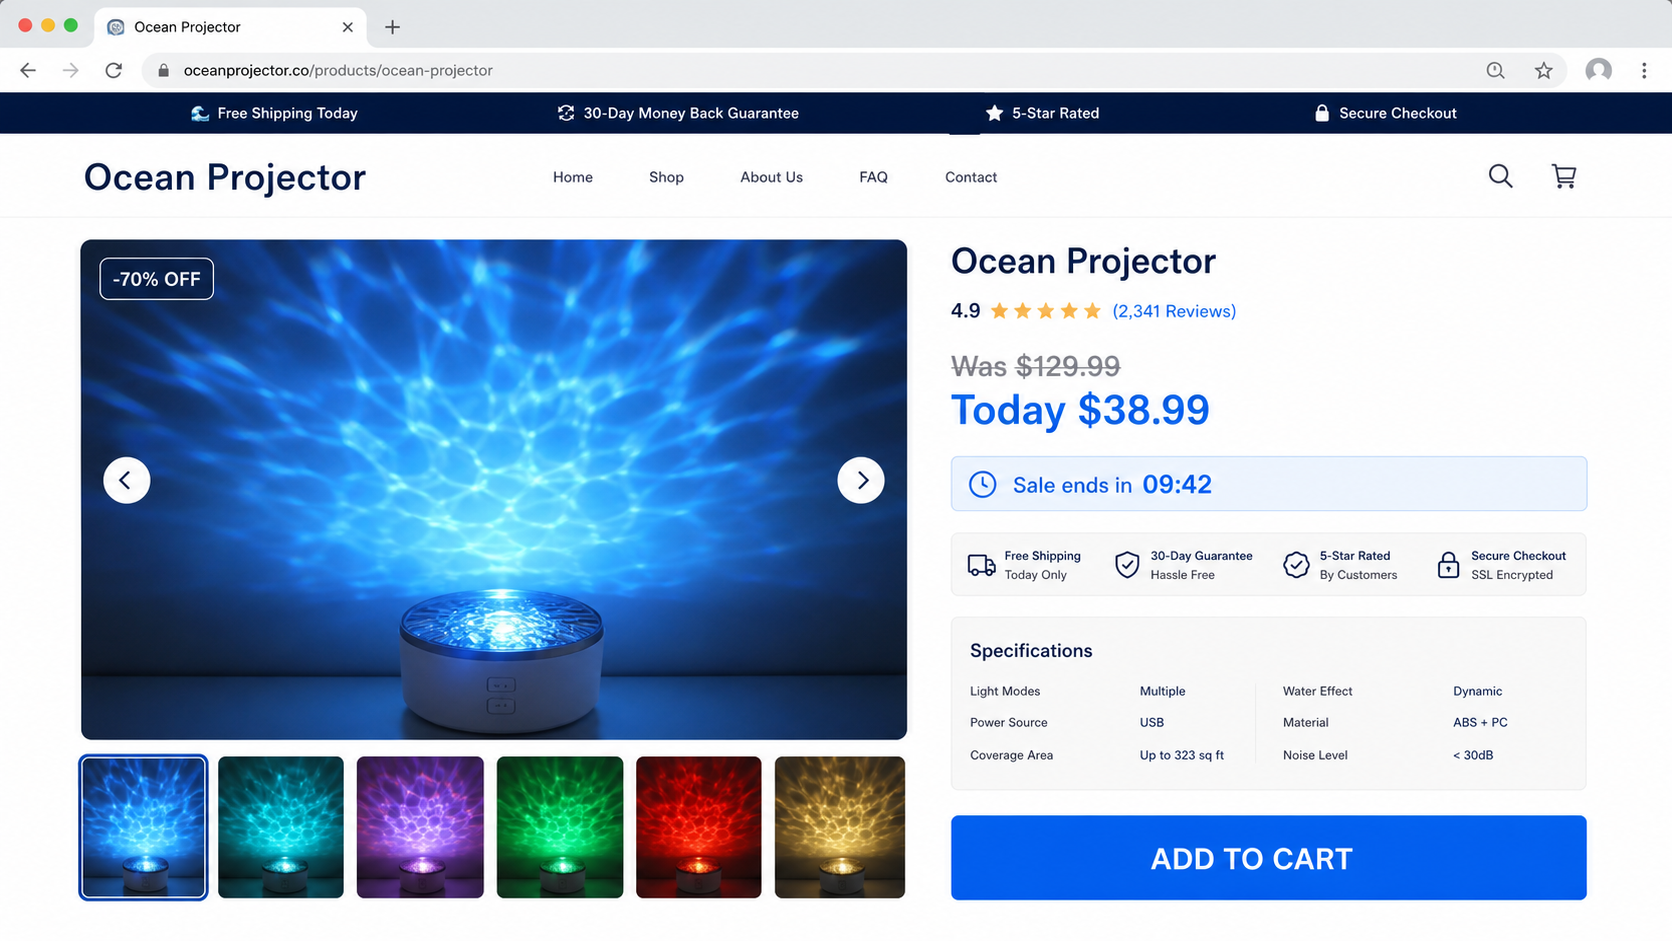
Ocean Projector Scam Ads: The Fake 5D Effects and Shopping Trap Exposed
Written by: Lapain Epuran
Published on:
A dark bedroom fills with moving coral, bright fish, and a ceiling that seems to open into the ocean. The social media video makes a small plug-in lamp look almost magical.
The product delivered after that video may tell a very different story.
Overview
The product category is real, but many advertising claims are not
An ocean projector is generally a small LED lamp that casts moving blue or multicolored light patterns onto a wall or ceiling. Some versions include a rotating lens, remote control, timer, speaker, or several lighting modes.
That modest product can create a pleasant water-ripple effect. It cannot turn a bedroom into a realistic underwater world filled with detailed swimming animals, deep coral landscapes, or three-dimensional scenery extending through the room.
The Ocean Projector scam ad is not about every lamp sold under this generic description. It is about deceptive promotions and questionable storefronts that use edited footage, computer-generated scenes, copied reviews, or false scarcity to sell something far less impressive.
A viral video can hide who actually takes the payment
The ad may lead to a recently created store with a polished product page and no clear legal company. It often uses a broad product name rather than a traceable manufacturer, making it difficult to identify who produced the item or honors the warranty.
Possible outcomes include:
A basic ripple lamp arrives instead of the dramatic projector shown
A generic item is sold at a large markup under a new name
The buyer receives a different size, shape, or feature set
Tracking stops updating and no product arrives
The store charges for add-ons the buyer did not intend to select
A refund is delayed until the return period becomes difficult to use
Card and contact details are collected by an outright fake checkout
The safest judgment comes from separating the ad from the item
A cheap atmosphere light may still be enjoyable if it is described honestly and priced accordingly. The problem begins when a seller presents impossible visual effects as a recording of the actual device.
Before buying, search the exact model image, compare ordinary customer videos, identify the legal seller, and read the return terms. A spectacular fifteen-second clip should never be the only evidence behind a purchase.
The Federal Trade Commission warns that an advertisement appearing on social media is not proof the advertiser was vetted. The platform placement does not guarantee that the product, price, or store is legitimate.
What a Real Ocean Projector Can Actually Do
A typical water-wave projector uses LEDs shining through textured plastic or a moving optical disc. As the internal component rotates, the light produces soft ripples that can resemble reflected water.
Room darkness, wall color, distance, brightness, camera exposure, and editing all change how impressive the effect appears. A seller can film in perfect conditions, increase saturation, and crop out the lamp’s weak edges.
Some projectors combine a ripple with scattered laser dots. Others play sound or allow color changes through a remote. These are ordinary features that can be confirmed in a manual or unedited demonstration.
Detailed fish and coral require image projection, video projection, augmented reality, or post-production. A small ripple lamp with no display panel and no media source cannot create detailed moving scenes simply because an ad calls it “5D.”
“5D” is not a meaningful technical specification for this type of household lamp. If the seller cannot explain resolution, projection technology, input source, brightness, focus, and supported media, the phrase is marketing rather than a measurable feature.
Why the Video Looks Better Than the Delivered Lamp
Some ads use footage taken from a much more capable video projector, an art installation, or a digital animation. The clip is then placed beside an image of a small lamp, encouraging viewers to assume the lamp created it.
Other videos add fish, reefs, stars, and moving shadows after filming. Fast cuts prevent viewers from seeing the continuous path between the advertised device and the projected scene.
A genuine demonstration should show the lamp, the beam, and the resulting wall or ceiling in one uninterrupted shot. It should also show the room with some ordinary ambient light, not only a carefully staged black room.
Customer footage is useful only when it comes from a source independent of the store. Questionable sellers can copy videos, invent accounts, or display selected reviews without allowing purchasers to post their own.
Try a reverse-image search on the product photos. The same plastic device may appear on wholesale marketplaces for a fraction of the advertised price and with far more modest descriptions.
How the Scam Works
Step 1: A dramatic clip stops the viewer’s scroll
The ad opens with an ordinary room transformed into a cinematic ocean, galaxy, or aquarium. Children, pets, or amazed adults may appear to react to the effect.
The scene sells a feeling before the viewer has time to ask whether the hardware shown could produce it.
Step 2: A countdown and steep discount create urgency
The landing page claims inventory is nearly gone, an introductory offer ends tonight, or a seasonal sale removes 50% or more. The timer may reset whenever the page is reopened.
Urgency discourages comparison shopping, reverse-image searches, and careful reading of return costs.
Step 3: Reviews and awards manufacture confidence
The page may show thousands of five-star reviews, media logos, or “best projector” badges without links to independent coverage. Review photos can be copied from other stores.
A high rating inside the seller’s own page is a claim controlled by the seller. It is not the same as a verifiable history on an established marketplace.
Step 4: The buyer pays an unfamiliar storefront
The checkout collects name, address, phone number, email, and payment information. Preselected bundles, shipping protection, or subscription-style add-ons can increase the final total.
An outright fraudulent page may capture card details without processing a legitimate order at all.
Step 5: Tracking creates the appearance of fulfillment
The buyer may receive a generic tracking code that remains in a pre-shipment state, shows movement in another country, or eventually marks a small package as delivered.
A tracking event proves that a parcel moved. It does not prove that the advertised product was inside or delivered to the correct address.
Step 6: A cheap substitute or disappointing lamp arrives
The delivered item may produce only blurry blue ripples. It can be smaller, noisier, dimmer, or less capable than the page suggested.
The seller then points to vague wording and argues that the edited video was merely illustrative.
Step 7: Refund barriers exhaust the buyer
Support requests receive templates, partial-refund offers, or a demand to ship the item internationally at the buyer’s expense. Return postage can approach the value of the lamp.
Delays may push the dispute beyond the store’s deadline. The site can later disappear and reopen under another brand.
Company, Address, and Fulfillment Checks
Identify the legal seller before paying
Look for a complete company name, registration details where applicable, support address, telephone number, and terms that consistently identify the same operator.
A brand label at the top of a page is not necessarily the merchant that will appear on the card statement.
Verify the return address and real cost
Read whether returns go to a domestic warehouse or an overseas location. Check who pays postage, whether opened items are eligible, and whether authorization is required.
“Easy returns” means little if the page does not disclose a usable address until after the purchase.
Compare images, specifications, and manuals
Search product photos and distinctive wording. If an identical item appears elsewhere, compare its actual features, dimensions, power source, controls, and unedited demonstrations.
A seller promising realistic scenes should be able to explain how the projector stores or receives the moving imagery.
Check how the order will be fulfilled
Find the processing time, carrier, origin, tracking method, warranty provider, and procedure for a missing parcel. Save these terms before checkout because the page may change.
Use a credit card or another payment method with meaningful purchase protection. Avoid cryptocurrency, wire transfers, gift cards, and payment methods that make disputes difficult.
Red Flags in Ocean Projector Promotions
The room contains detailed creatures that the hardware cannot generate
The video never shows the device and effect in one continuous shot
“5D” appears without a technical explanation
The countdown resets or the same discount is always active
Only five-star reviews appear and none can be independently verified
Media logos are shown without links to the claimed coverage
The company name changes between checkout, terms, and privacy pages
The return address is hidden until the buyer contacts support
The only payment choices offer weak chargeback protection
Product photos match inexpensive generic listings elsewhere
No single clue settles every case. A new small business may have a limited history, while an experienced scam store can copy polished policies.
What matters is whether the seller’s identity, product capability, fulfillment path, and refund promise can all be verified together.
How to Shop for a Projector Without Falling for the Ad
Begin with the effect you actually want. If soft moving color is enough, search for a water-ripple LED lamp and compare honest demonstrations rather than chasing the most spectacular viral clip.
If you want recognizable fish, coral, or films, you likely need a video projector or a purpose-built image projector. Check resolution, brightness, throw distance, focus, inputs, and the source of the content.
Read the worst reviews as well as the best. Repeated complaints about weak brightness, noisy motors, misleading photos, missing remotes, or impossible returns reveal more than generic praise.
Take screenshots of the ad, product description, selected options, price, delivery promise, and return policy. This evidence can be important if the merchant changes the page or disputes what was advertised.
Do not assume a store is safe because it advertises through a major platform. The FTC also cautions that social media ads with unusually low prices can lead to imitation goods or websites that take money and deliver nothing.
What to Do if You Have Fallen Victim to This Scam
Save the original offer. Capture the ad, video, product page, specifications, order confirmation, card descriptor, tracking history, refund terms, and all support messages.
Ask the seller for a clear remedy in writing. State whether the item was missing, materially different, defective, or charged incorrectly. Give a reasonable response deadline without accepting endless delays.
Contact the payment provider. If the merchant refuses a valid refund, ask about a chargeback or purchase-protection claim. Submit the saved advertisement and photos of what arrived.
Protect the payment card. If the checkout looked suspicious or unauthorized charges appear, freeze the card, notify the issuer, request a replacement, and review recent transactions.
Do not pay a second release or redelivery fee. A fraudulent seller may invent customs, insurance, or verification charges after the first payment. Verify any carrier fee directly with the named carrier.
Check the device if you downloaded anything. A lamp should not require a surprise computer installer from an unknown site. Remove suspicious software and scan the system with Malwarebytes.
Reduce repeat exposure. Block the advertiser and report the ad to the platform. A content blocker such as AdGuard can help filter known malicious ads and domains, although it cannot judge every seller.
Report deceptive marketing. File a report with the FTC, your local consumer-protection authority, and the marketplace or social platform that carried the promotion.
Watch for recovery scams. Ignore strangers claiming they can force a refund for an upfront payment. Continue through the card issuer, platform, or official consumer authority.
Is Your Device Infected? Run a Free Malware Scan
Slow performance, constant pop-ups, or strange behavior? These are classic signs of a malware infection. The fastest way to find out is to scan your device with Malwarebytes Anti-Malware Free — one of the most trusted malware removal tools available.
The free version detects and removes the most common threats, including:
Adware — the cause of those annoying pop-ups
Browser hijackers — unwanted redirects and changed homepages
Trojans and spyware — hidden programs stealing your data
Potentially unwanted programs (PUPs) — software you never asked for
👉 Select your device below — Windows, Mac, or Android — then follow the simple steps to download Malwarebytes, scan your system, and remove any threats it finds. The whole process takes about 5 minutes.
Malwarebytes for WindowsMalwarebytes for MacMalwarebytes for Android
Run a Malware Scan with Malwarebytes for Windows
Malwarebytes is one of the most popular and trusted anti-malware tools for Windows — and it’s completely free for removing infections. It catches threats that many antivirus programs miss, including adware, browser hijackers, and trojans. Follow the steps below to scan and clean your PC in just a few minutes.
Download Malwarebytes
Click the button below to download the latest version of Malwarebytes for Windows from the official source. The free version is all you need — it will scan your computer and remove adware, browser hijackers, and other malicious software at no cost.
(The link opens in a new page where your download will start)
Install Malwarebytes
When the download finishes, open your Downloads folder and double-click the MBSetup file. If Windows shows a User Account Control pop-up, click “Yes” to allow the installation.
Follow the On-Screen Prompts to Install Malwarebytes
The setup wizard will walk you through a few quick screens:
Choose where you’re installing the program — “Personal Computer” or “Work Computer” — then click Next.
Malwarebytes will now install on your device. This usually takes under a minute.
When installation is complete, the “Welcome to Malwarebytes” screen will open automatically.
On the final screen, click Open Malwarebytes to launch the program.
Enable “Scan for Rootkits”
Before scanning, turn on rootkit detection so Malwarebytes can find even the most hidden threats. Click the Settings gear icon on the left side of the screen.
In the settings menu, find “Scan for rootkits” and click the toggle so it turns blue.
Done? Click “Dashboard” in the left pane to return to the main screen.
Start the Scan
Click the blue Scan button. Malwarebytes will automatically update its virus database and start checking your computer for malware.
Wait for the Scan to Finish
The scan checks your entire system for browser hijackers and other malicious programs, so it can take several minutes. Feel free to do something else — just check back occasionally to see the progress.
Quarantine the Detected Threats
When the scan is done, you’ll see a list of everything Malwarebytes found — malware, adware, and potentially unwanted programs. Click the “Quarantine” button to remove all of them at once.
Malwarebytes will now remove the malicious files and registry entries and move them safely into quarantine.
Restart Your Computer
Some threats can only be fully removed after a reboot. If Malwarebytes asks you to restart, click Yes. Once you’re logged back in, your PC is clean and you can continue with the next steps in this guide.
When the scan finishes, click Quarantine to remove everything Malwarebytes found. That’s it — your Windows PC is now clean of trojans, adware, and other malware, and should be back to running smoothly.
If your current antivirus allowed this malicious program on your computer, you may want to consider purchasing Malwarebytes Premium to protect against these types of threats in the future. If you are still having problems with your computer after completing these instructions, then please follow one of the steps:
Malwarebytes for Mac is a free on-demand scanner that removes the malware other security software tends to miss — adware, browser hijackers, and unwanted programs included. Cleaning an infected Mac with Malwarebytes has always been completely free, and it’s our go-to recommendation. Follow the steps below to scan and clean your Mac in just a few minutes.
Download Malwarebytes for Mac
Click the button below to download the latest version of Malwarebytes for Mac.
When the download finishes, open your Downloads folder and double-click the setup file to begin the installation.
Follow the On-Screen Prompts to Install Malwarebytes
The Malwarebytes for Mac Installer will guide you through a few quick screens. Click “Continue” and keep following the prompts until the installation completes.
When the installation is complete, Malwarebytes opens to the Welcome to Malwarebytes screen. Click “Get started“.
Select “Personal Computer” or “Work Computer”
Malwarebytes will ask what type of computer you’re installing it on. Click either Personal Computer or Work Computer, whichever applies.
Start the Scan
Click the “Scan” button. Malwarebytes will automatically update its detection database and begin checking your Mac for malware.
Wait for the Scan to Finish
Malwarebytes will scan your Mac for adware, browser hijackers, and other malicious programs. This can take a few minutes, so feel free to do something else — just check back occasionally to see the progress.
Quarantine the Detected Threats
When the scan is done, you’ll see a list of everything Malwarebytes found. Click the “Quarantine” button to remove all the threats at once.
Restart Your Mac
Malwarebytes will now remove all the malicious files it found. Some threats can only be fully removed after a reboot — if Malwarebytes asks you to restart, allow it. Once you’re logged back in, your Mac is clean.
Once the scan is done, remove every threat it detected. Your Mac is now free of adware, rogue browser extensions, and other potentially harmful software.
If your current antivirus allowed a malicious program on your computer, you might want to consider purchasing the full-featured version of Malwarebytes Anti-Malware to protect against these types of threats in the future. If you are still experiencing problems while trying to remove a malicious program from your computer, please ask for help in our Mac Malware Removal Help & Support forum.
Run a Malware Scan with Malwarebytes for Android
Malwarebytes for Android automatically detects and removes dangerous threats like malware and ransomware so you don’t have to worry about your most-used device being compromised. Aggressive detection of adware and potentially unwanted programs keeps your Android phone or tablet running smooth.
Download Malwarebytes for Android.
You can download Malwarebytes for Android by clicking the link below.
In the Google Play Store, tap “Install” to install Malwarebytes for Android on your device.
When the installation process has finished, tap “Open” to begin using Malwarebytes for Android. You can also open Malwarebytes by tapping on its icon in your phone menu or home screen.
Follow the on-screen prompts to complete the setup process
When Malwarebytes will open, you will see the Malwarebytes Setup Wizard which will guide you through a series of permissions and other setup options. This is the first of two screens that explain the difference between the Premium and Free versions. Swipe this screen to continue. Tap on “Got it” to proceed to the next step. Malwarebytes for Android will now ask for a set of permissions that are required to scan your device and protect it from malware. Tap on “Give permission” to continue. Tap on “Allow” to permit Malwarebytes to access the files on your phone.
Update database and run a scan with Malwarebytes for Android
You will now be prompted to update the Malwarebytes database and run a full system scan.
Click on “Update database” to update the Malwarebytes for Android definitions to the latest version, then click on “Run full scan” to perform a system scan.
Wait for the Malwarebytes scan to complete.
Malwarebytes will now start scanning your phone for adware and other malicious apps. This process can take a few minutes, so we suggest you do something else and periodically check on the status of the scan to see when it is finished.
Click on “Remove Selected”.
When the scan has been completed, you will be presented with a screen showing the malware infections that Malwarebytes for Android has detected. To remove the malicious apps that Malwarebytes has found, tap on the “Remove Selected” button.
Restart your phone.
Malwarebytes for Android will now remove all the malicious apps that it has found. To complete the malware removal process, Malwarebytes may ask you to restart your device.
After the scan, tap Remove Selected to delete all detected threats. Your Android phone is now clean — no more malicious apps, adware, or browser redirects.
If your current antivirus allowed a malicious app on your phone, you may want to consider purchasing the full-featured version of Malwarebytes to protect against these types of threats in the future. If you are still having problems with your phone after completing these instructions, then please follow one of the steps:
Restore your phone to factory settings by going to Settings > General management > Reset > Factory data reset.
Now that your device is clean, keep it that way. Most infections start with a malicious ad or a fake download button — so blocking them at the source is your best defense.
We recommend AdGuard, which blocks malicious ads, phishing pages, and dangerous redirects before they can reach you.
No. Water-ripple and atmosphere lamps are real products. The concern is a seller that misrepresents a basic light as producing detailed, room-filling scenes or fails to deliver what was purchased.
Can a small lamp really project swimming fish and coral?
A basic rotating LED ripple lamp cannot generate detailed moving animals. That effect requires stored imagery, video, specialized optics, or digital editing that should be explained in the specifications.
Why do customer videos look so different?
Camera exposure, darkness, editing, wall color, and distance can improve the appearance. Some advertisements may also use unrelated projector footage or digitally added scenes.
Is a 70% discount proof of fraud?
Not by itself, but a permanent discount based on an invented reference price is a warning. Compare the identical model across other sellers before treating the stated savings as real.
What payment method is safest?
A credit card generally provides a clearer dispute path than cryptocurrency, gift cards, wires, or direct transfers. Read the issuer’s rules and keep evidence of the advertised product.
What if a cheap projector arrived but it works?
Compare it with the specific claims that influenced the purchase. If the item is materially different, document the mismatch and request a refund under the seller’s policy and applicable consumer protections.
The Bottom Line
Ocean Projector scam ads turn an ordinary atmosphere lamp into a fantasy product through edited scenes, vague “5D” language, and pressure to buy immediately. A real ripple effect can be pleasant, but it should be sold for what it is.
Judge the hardware, seller, price, and return route separately. If the device cannot plausibly create the video, the company cannot be identified, or the refund address is hidden, leave the offer behind.
10 Rules to Avoid Online Scams
Here are 10 practical safety rules to help you avoid malware, online shopping scams, crypto scams, and other online fraud. Each tip includes a quick “if you already got hit” action.
Stop and verify before you click, log in, download, or pay.
Most scams win by creating urgency. Verify using a trusted method: type the website address yourself, use the official app, or call a known number (not the one in the message).
If you already clicked: close the page, do not enter passwords, and run a malware scan.
Keep your operating system, browser, and apps updated.
Updates patch security holes used by malware and malicious ads. Turn on automatic updates where possible.
If you saw a scary “update now” pop-up: close it and update only through your device settings or the official app store.
Use layered protection: antivirus plus an ad blocker.
Antivirus helps block malware. An ad blocker reduces scam redirects, phishing pages, and malvertising.
If your browser is acting weird: remove unknown extensions, reset the browser, then run a full scan.
Install apps, software, and extensions only from official sources.
Avoid cracked software, “keygens,” and random downloads. During installs, choose Custom/Advanced and decline bundled offers you do not recognize.
If you already installed something suspicious: uninstall it, restart, and scan again.
Treat links and attachments as untrusted by default.
Phishing often impersonates delivery services, banks, and popular brands. If it is unexpected, do not open attachments or log in through the message.
If you entered credentials: change the password immediately and enable 2FA.
Shop safely: research the store, then pay with protection.
Be cautious with brand-new stores, “closing sale” stories, and prices that make no sense. Prefer credit cards or PayPal for dispute options. Avoid wire transfers, gift cards, and crypto payments.
If you already paid: contact your card issuer or PayPal quickly to dispute the transaction.
Crypto rule: never pay a “fee” to withdraw or recover money.
Common patterns include fake profits, then “tax,” “gas,” or “verification” fees. Another is a “recovery agent” who demands upfront crypto.
If you already sent crypto: stop paying, save evidence (wallet addresses, TXIDs, chats), and report the scam to the platform used.
Secure your accounts with unique passwords and 2FA (start with email).
Use a password manager and unique passwords for every account. Enable 2FA using an authenticator app when possible.
If you suspect an account takeover: change passwords, sign out of all devices, and review recent logins and recovery settings.
Back up important files and keep one backup offline.
Backups protect you from ransomware and device failure. Keep at least one backup on an external drive that is not always connected.
If you suspect infection: do not connect backup drives until the system is clean.
If you think you are a victim: stop losses, document evidence, and escalate fast.
Move quickly. Speed matters for disputes, account recovery, and limiting damage.
Stop payments and contact: do not send more money or respond to the scammer.
Call your bank or card issuer: block transactions, replace the card if needed, and start a dispute or chargeback.
Secure your email first: change the email password, enable 2FA, and remove unfamiliar recovery options.
Secure other accounts: change passwords, enable 2FA, and log out of all sessions.
Scan your device: remove suspicious apps or extensions, then run a full malware scan.
Save evidence: screenshots, emails, order pages, tracking pages, wallet addresses, TXIDs, and chat logs.
Report it: to the payment provider, marketplace, social platform, exchange, or wallet service involved.
These rules are intentionally simple. Most online losses happen when decisions are rushed. Slow down, verify independently, and use payment methods and account controls that give you recourse.
Hello! I'm Lapain Epuran, your go-to source for detailed and honest product reviews. From tech gadgets to miracle cures, I provide insights to help you make informed choices. Join me as we discover what's truly worth your time and money.