CMA CGM Bill of Lading Email Scam: Fake Shipping Login Page Fully Exposed
Written by: Lapain Epuran
Published on:
A draft Bill of Lading can affect cargo release, customs paperwork, and delivery schedules. That makes an unexpected review notice difficult for shipping staff to ignore.
The message looks operational rather than dramatic. Its danger sits behind the document button, where the normal freight workflow quietly changes direction.
Overview
A Shipping Document That Appears Time-Sensitive
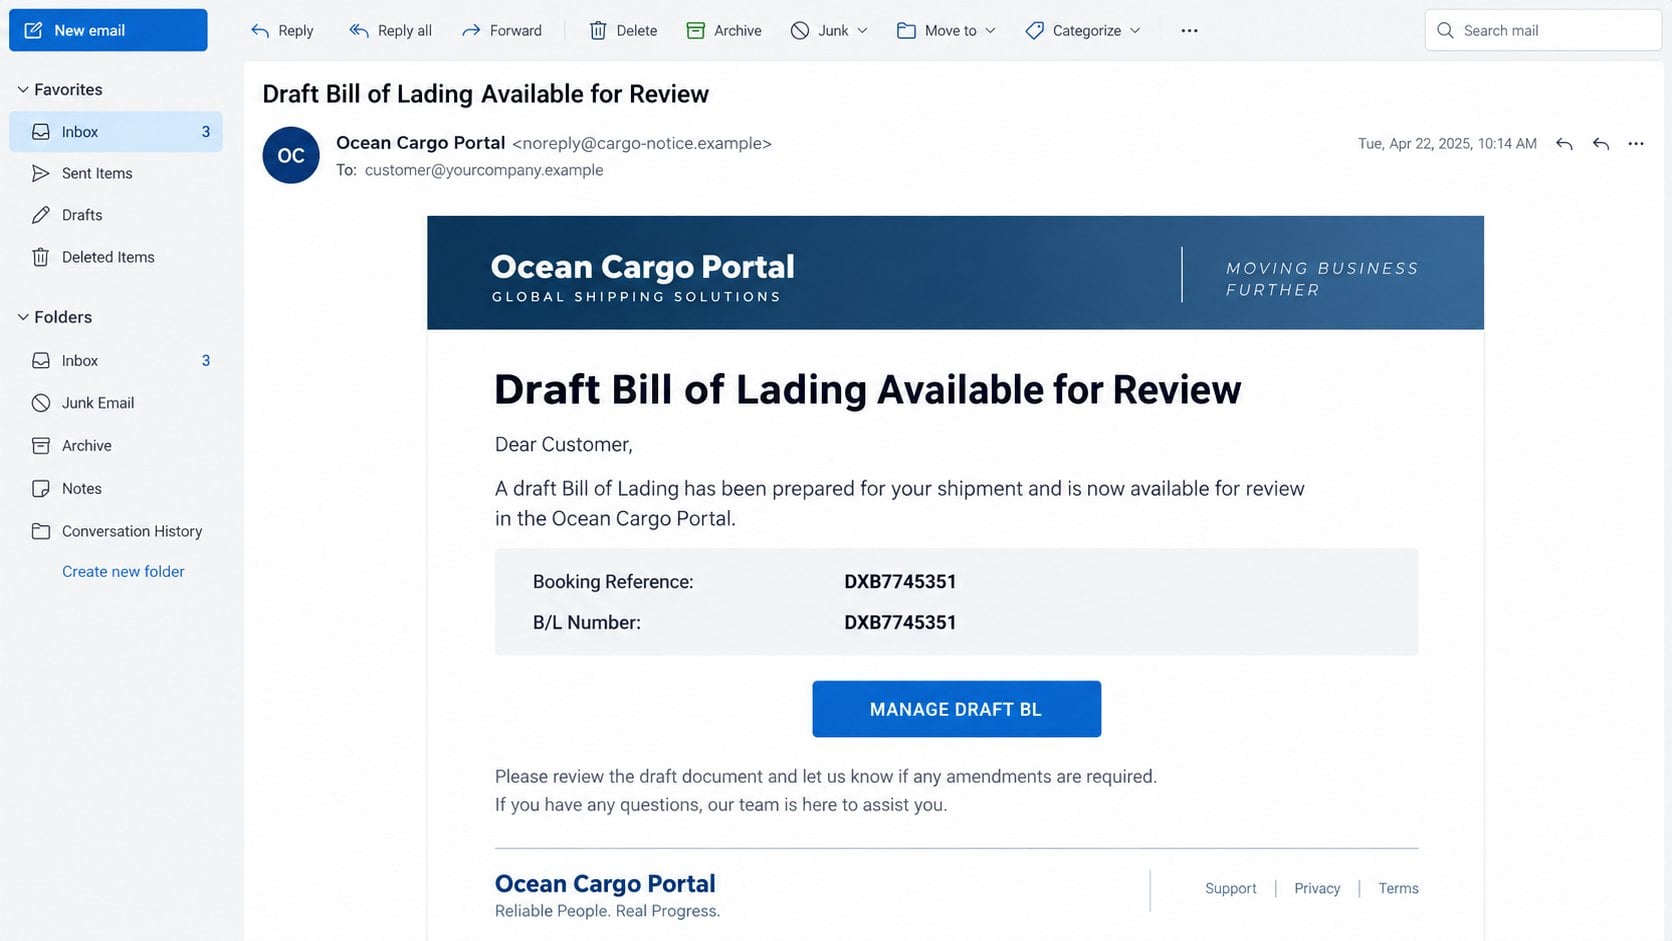
The CMA CGM Bill of Lading email scam claims that a draft transport document is ready for the recipient’s review.
It includes a booking reference and B/L number, often repeating the same value. Those identifiers make a mass-produced email look connected to real cargo.
The recipient is invited to manage the draft and request amendments. That is a familiar task for importers, exporters, freight forwarders, and logistics teams.
A Bill of Lading is important paperwork. It describes a shipment and may serve as a receipt, contract evidence, or document of title.
Because errors can delay goods, recipients may prioritize the message before checking whether the booking actually belongs to them.
The Document Portal Is Not a Carrier Service
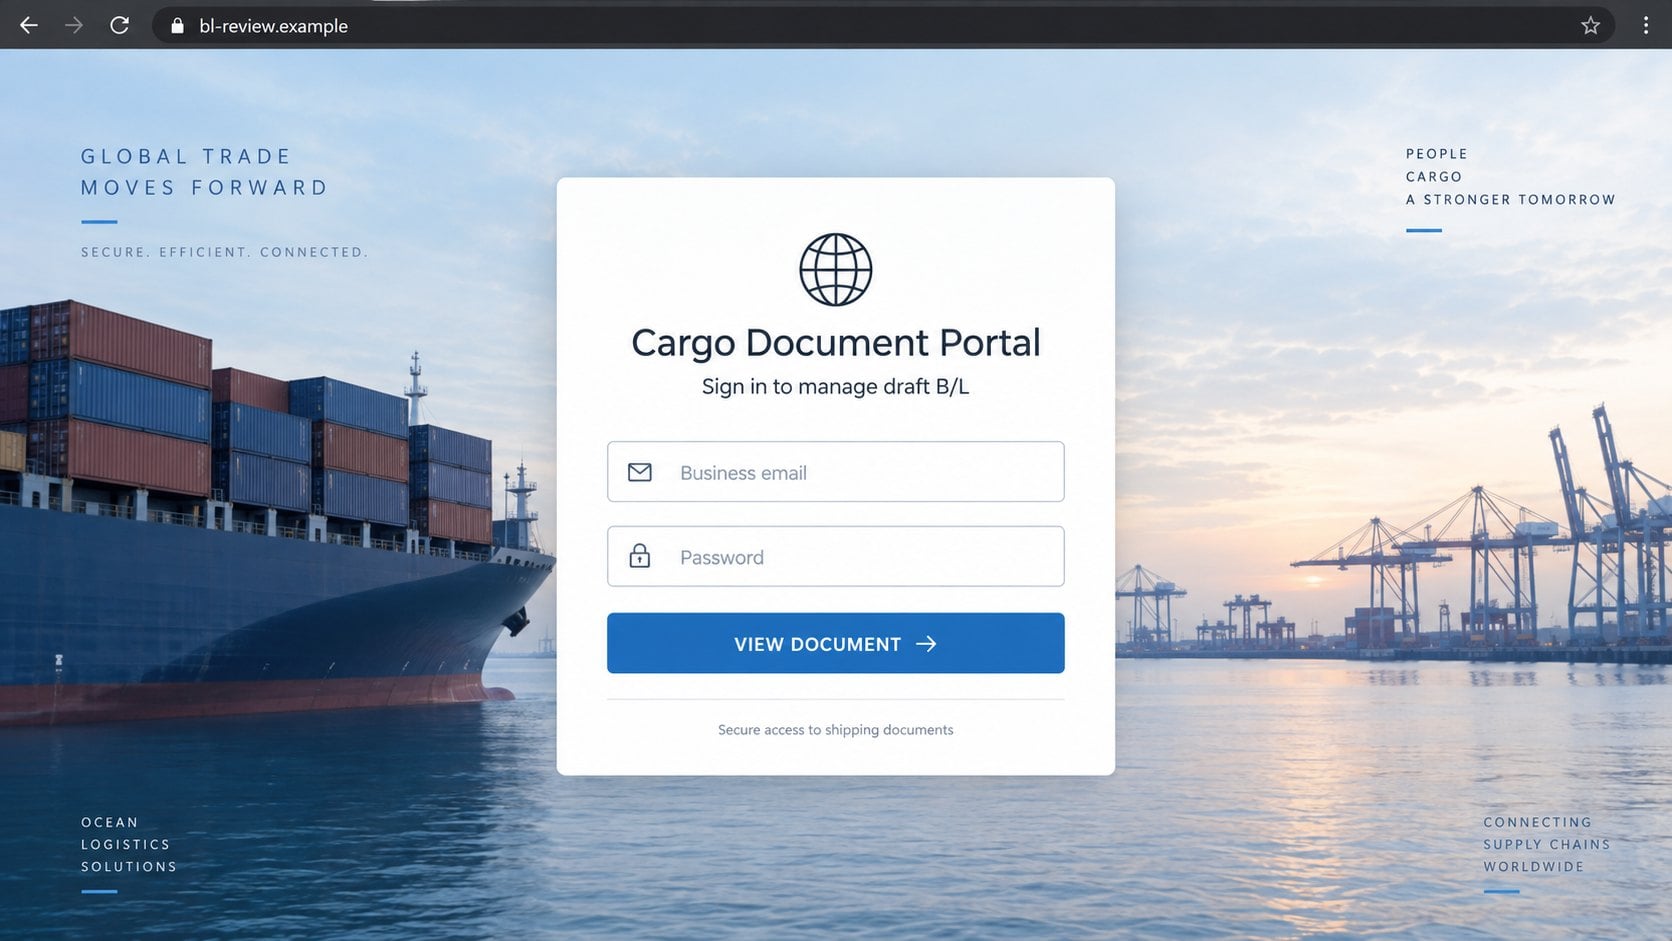
The button leads away from the carrier’s genuine systems. The destination presents a webmail sign-in form instead of a shipping record.
That change is the central deception. Reviewing freight paperwork should not require giving an outside website the password to an email account.
The counterfeit form may claim the document is protected or linked to the recipient’s mailbox. No technical necessity supports that explanation.
Credentials submitted there can be captured by the operator. The visitor may see an error, empty file, or harmless redirect afterward.
CMA CGM is a real international shipping company. Its identity is being impersonated and does not legitimize the email.
The Likely Goal Is Business Email Compromise
A logistics mailbox can contain commercial invoices, supplier details, arrival notices, payment instructions, customs records, and ongoing negotiations.
The lure refers to an ordinary shipping task.
Booking and B/L numbers add false precision.
A review deadline is implied by cargo operations.
The button directs users outside the real carrier.
The destination requests business email credentials.
Stolen correspondence reveals vendors and payment routines.
Attackers can alter future invoices or delivery instructions.
A compromised mailbox can become a platform for payment diversion. Criminals may wait for the right conversation before inserting replacement banking details.
The email therefore threatens more than one login. It can expose an entire commercial relationship and the organizations connected to it.
How the CMA CGM Bill of Lading Email Scam Works
Step 1: The Email Selects a Specialized Business Story
Rather than using a generic parcel notice, the campaign mentions a draft Bill of Lading. The vocabulary targets people accustomed to international shipping paperwork.
Specialized language raises credibility because outsiders may assume only a real carrier would use it. In practice, terminology is easily copied from genuine notifications.
The recipient may handle dozens of active bookings. A number that looks plausible can blend into daily operations even when it matches nothing.
Attackers benefit from uncertainty. Employees often open the document first, expecting the contents to identify the shipment.
Step 2: Reference Numbers Simulate a Real Record
The message displays a booking reference and a B/L number. Repeating a random identifier is inexpensive but gives the layout an automated appearance.
True shipment identifiers can be checked through an official carrier portal. The email does not need to control where that verification happens.
A false notice keeps all validation inside its own button. This prevents the recipient from noticing that the booking is absent from the legitimate account.
Companies should never treat a number as proof by itself. A convincing format cannot demonstrate who generated the record.
Draft corrections often have operational deadlines. A reader may fear demurrage, customs trouble, document fees, or a delayed release.
The scam does not need to state a countdown. The business context already supplies pressure for anyone responsible for the shipment.
Criminals exploit that professional reflex. Fast service is usually valuable, yet urgency becomes dangerous when it replaces authentication.
A brief check against the transport management system can resolve the uncertainty without touching the email’s link.
Step 4: The Manage Button Crosses Into an Unrelated Domain
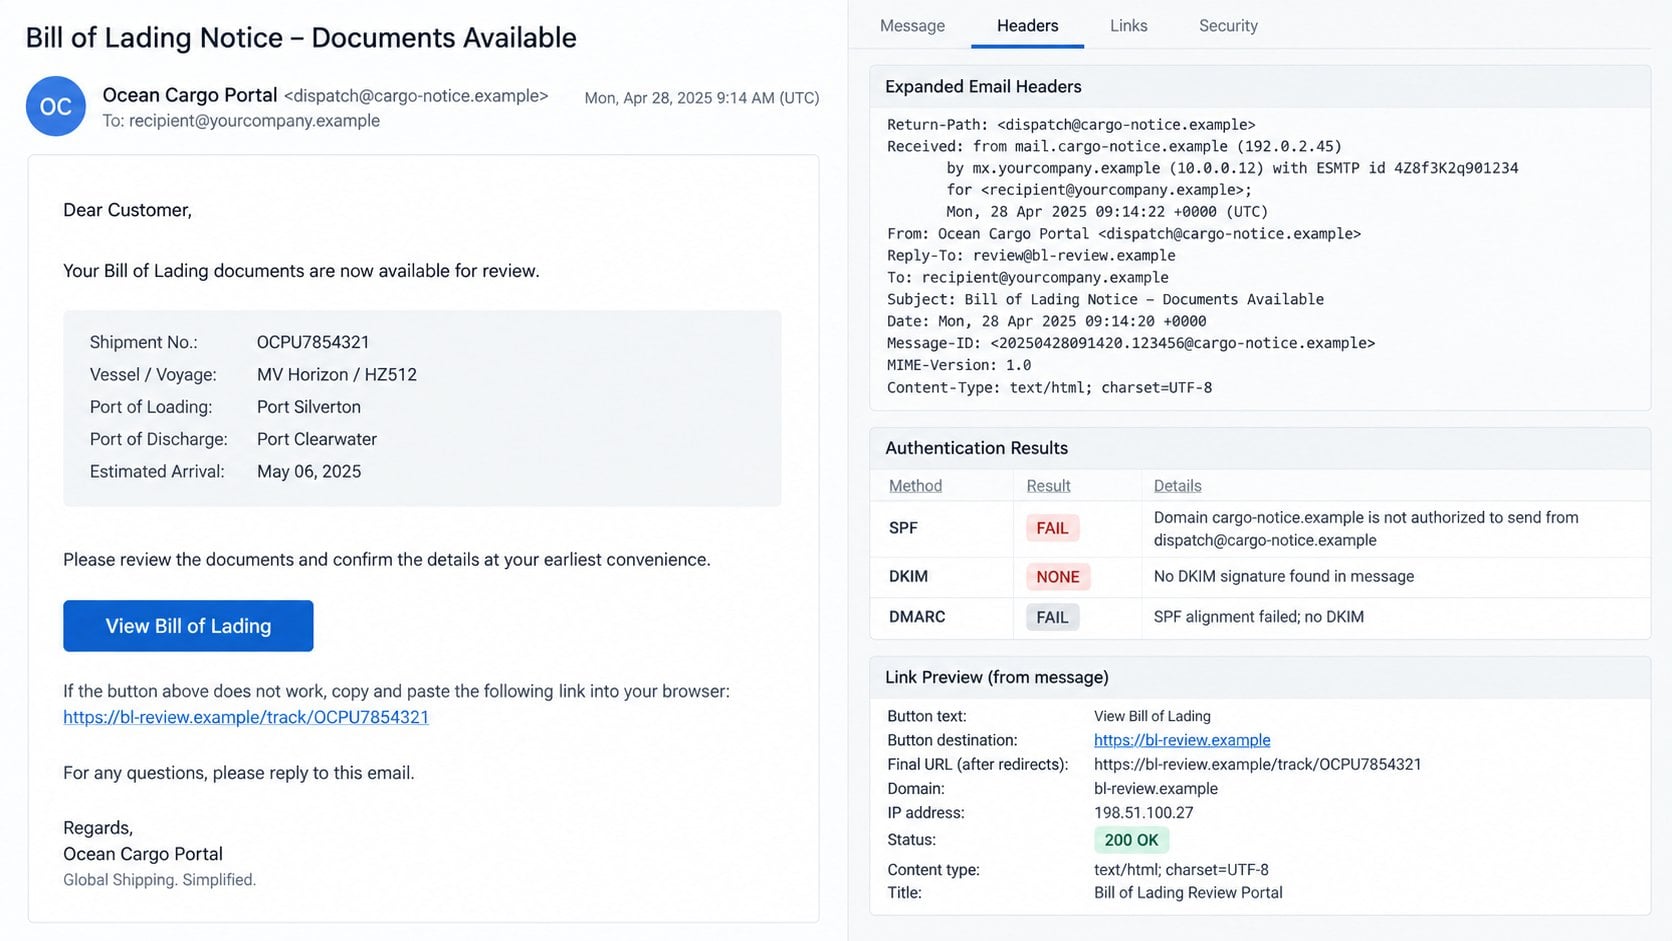
The “Manage Draft BL” control disguises its destination. Hovering over it can reveal a host with no valid relationship to the carrier.
Some campaigns use recently created domains, compromised websites, or cloud hosting. Others add redirects to make the final location less obvious.
The page may still display cargo imagery and professional navigation. Attractive design is content, not proof of ownership.
Even a valid certificate confirms only encrypted transport. It does not confirm that the website belongs to the shipping company named in the email.
Step 5: The Portal Converts Document Access Into Email Login
Instead of showing shipment details, the site asks for a business email address and password. This request has no legitimate freight purpose.
The carrier does not need the private password of a customer’s Microsoft, Google, or hosted mailbox to display a transport document.
Victims may accept the form because companies use single sign-on. Genuine single sign-on redirects to the organization’s trusted identity provider.
A page under an unknown domain cannot become an approved identity provider simply by copying familiar fields and colors.
Step 6: The Intruder Studies Commercial Conversations
Once inside, the criminal can search for invoices, quotations, purchase orders, shipment schedules, and names of people authorized to approve changes.
The operator may remain quiet while learning language and timing. A carefully timed reply inside a real thread can redirect a substantial payment.
Forwarding rules can send selected messages to the attacker. Filters may hide replies containing words such as “bank,” “invoice,” or “payment.”
The compromised address can also target customers and agents. Those recipients see a genuine domain, established history, and relevant subject matter.
How to Check a Bill of Lading Notice Safely
Search the Official Carrier Account
Open the carrier website from a saved bookmark or manually typed address. Sign in through the normal business portal, not through the message.
Enter the booking reference in the genuine system. Confirm the shipper, consignee, voyage, container, and document status against internal records.
If no matching booking exists, preserve the email and contact the carrier through its published support channel.
Compare the Booking With Internal Systems
Check the transport management system, purchase order, freight forwarder correspondence, and expected sailing schedule. A real draft should connect to known business activity.
Ask the employee or agent responsible for that route. Verification through an existing contact is safer than replying to the unexpected sender.
Pay attention when the same number appears in multiple fields. That shortcut can indicate a template populated without authentic shipment data.
Examine Sender Authentication and Link Ownership
Open the full headers and review the sending domain, Reply-To value, and authentication results. Misalignment supports the impersonation finding.
Preview the action button and identify the registered domain. Cargo words in a subdomain do not establish carrier ownership.
Remember that compromised legitimate sites can host phishing. Domain age or HTTPS alone cannot replace confirmation through the real account.
Call a Known Logistics Contact
Use a telephone number from a signed contract, official carrier directory, or established address book. Do not use numbers introduced by the questionable message.
Read the booking reference and ask whether a draft was issued. The real contact can confirm the proper portal and expected sender.
If a payment instruction changed, confirm it verbally with an authorized person. Treat email-only banking changes as a separate fraud risk.
What to Do If You Fell Victim to the Bill of Lading Scam
Act promptly, especially when the affected mailbox handles payments or shipping instructions. A fast response can interrupt both account theft and follow-on fraud.
Disconnect from the phishing page and document what occurred.
Close the site and record the URL, email subject, time, and information entered. Keep the original headers available for investigators.
Notify the company security team and logistics manager. They may need to warn other recipients, carriers, and business partners.
Reset the business email password through the official administrator.
Use a known-clean device or trusted corporate route. Set a unique credential that does not resemble the exposed one.
Change reused passwords on other services immediately. Shipping portals, accounting systems, and cloud drives deserve early attention.
Terminate sessions and revoke unauthorized applications.
Review current sessions, OAuth grants, application passwords, mobile connections, and registered devices. Remove entries that cannot be traced to approved use.
Invalidate all sessions where possible. Ask the administrator to review identity-provider and mail-server logs around the interaction time.
Audit forwarding rules and financial conversations.
Search for hidden forwarding, unfamiliar delegates, inbox rules, and deleted alerts. Examine recent sent messages for unauthorized replies.
Review invoices and payment-change discussions from the affected account. Contact counterparties through established numbers if anything appears unusual.
Strengthen authentication and approval controls.
Enable a passkey, hardware security key, or authenticator-based multifactor protection. Remove weaker fallback methods that are not required.
Require a second channel for banking changes. No employee should approve replacement payment instructions from email alone.
Check any downloaded material for malware.
This campaign seeks credentials, but shipping lures also distribute malicious archives and documents. Use Malwarebytes for a complete scan after opening files.
AdGuard can help stop known phishing hosts and malicious advertising. Keep the browser, filters, operating system, and security tools updated.
Alert partners and pursue financial recovery quickly.
Tell carriers, customers, and agents if fraudulent mail left the account. Use verified contacts and clearly identify the compromised time window.
If money moved, call the bank’s fraud department immediately and request a recall. Preserve invoice versions, headers, transfer records, and communication logs.
Is Your Device Infected? Run a Free Malware Scan
Slow performance, constant pop-ups, or strange behavior? These are classic signs of a malware infection. The fastest way to find out is to scan your device with Malwarebytes Anti-Malware Free — one of the most trusted malware removal tools available.
The free version detects and removes the most common threats, including:
Adware — the cause of those annoying pop-ups
Browser hijackers — unwanted redirects and changed homepages
Trojans and spyware — hidden programs stealing your data
Potentially unwanted programs (PUPs) — software you never asked for
👉 Select your device below — Windows, Mac, or Android — then follow the simple steps to download Malwarebytes, scan your system, and remove any threats it finds. The whole process takes about 5 minutes.
Malwarebytes for WindowsMalwarebytes for MacMalwarebytes for Android
Run a Malware Scan with Malwarebytes for Windows
Malwarebytes is one of the most popular and trusted anti-malware tools for Windows — and it’s completely free for removing infections. It catches threats that many antivirus programs miss, including adware, browser hijackers, and trojans. Follow the steps below to scan and clean your PC in just a few minutes.
Download Malwarebytes
Click the button below to download the latest version of Malwarebytes for Windows from the official source. The free version is all you need — it will scan your computer and remove adware, browser hijackers, and other malicious software at no cost.
(The link opens in a new page where your download will start)
Install Malwarebytes
When the download finishes, open your Downloads folder and double-click the MBSetup file. If Windows shows a User Account Control pop-up, click “Yes” to allow the installation.
Follow the On-Screen Prompts to Install Malwarebytes
The setup wizard will walk you through a few quick screens:
Choose where you’re installing the program — “Personal Computer” or “Work Computer” — then click Next.
Malwarebytes will now install on your device. This usually takes under a minute.
When installation is complete, the “Welcome to Malwarebytes” screen will open automatically.
On the final screen, click Open Malwarebytes to launch the program.
Enable “Scan for Rootkits”
Before scanning, turn on rootkit detection so Malwarebytes can find even the most hidden threats. Click the Settings gear icon on the left side of the screen.
In the settings menu, find “Scan for rootkits” and click the toggle so it turns blue.
Done? Click “Dashboard” in the left pane to return to the main screen.
Start the Scan
Click the blue Scan button. Malwarebytes will automatically update its virus database and start checking your computer for malware.
Wait for the Scan to Finish
The scan checks your entire system for browser hijackers and other malicious programs, so it can take several minutes. Feel free to do something else — just check back occasionally to see the progress.
Quarantine the Detected Threats
When the scan is done, you’ll see a list of everything Malwarebytes found — malware, adware, and potentially unwanted programs. Click the “Quarantine” button to remove all of them at once.
Malwarebytes will now remove the malicious files and registry entries and move them safely into quarantine.
Restart Your Computer
Some threats can only be fully removed after a reboot. If Malwarebytes asks you to restart, click Yes. Once you’re logged back in, your PC is clean and you can continue with the next steps in this guide.
When the scan finishes, click Quarantine to remove everything Malwarebytes found. That’s it — your Windows PC is now clean of trojans, adware, and other malware, and should be back to running smoothly.
If your current antivirus allowed this malicious program on your computer, you may want to consider purchasing Malwarebytes Premium to protect against these types of threats in the future. If you are still having problems with your computer after completing these instructions, then please follow one of the steps:
Malwarebytes for Mac is a free on-demand scanner that removes the malware other security software tends to miss — adware, browser hijackers, and unwanted programs included. Cleaning an infected Mac with Malwarebytes has always been completely free, and it’s our go-to recommendation. Follow the steps below to scan and clean your Mac in just a few minutes.
Download Malwarebytes for Mac
Click the button below to download the latest version of Malwarebytes for Mac.
When the download finishes, open your Downloads folder and double-click the setup file to begin the installation.
Follow the On-Screen Prompts to Install Malwarebytes
The Malwarebytes for Mac Installer will guide you through a few quick screens. Click “Continue” and keep following the prompts until the installation completes.
When the installation is complete, Malwarebytes opens to the Welcome to Malwarebytes screen. Click “Get started“.
Select “Personal Computer” or “Work Computer”
Malwarebytes will ask what type of computer you’re installing it on. Click either Personal Computer or Work Computer, whichever applies.
Start the Scan
Click the “Scan” button. Malwarebytes will automatically update its detection database and begin checking your Mac for malware.
Wait for the Scan to Finish
Malwarebytes will scan your Mac for adware, browser hijackers, and other malicious programs. This can take a few minutes, so feel free to do something else — just check back occasionally to see the progress.
Quarantine the Detected Threats
When the scan is done, you’ll see a list of everything Malwarebytes found. Click the “Quarantine” button to remove all the threats at once.
Restart Your Mac
Malwarebytes will now remove all the malicious files it found. Some threats can only be fully removed after a reboot — if Malwarebytes asks you to restart, allow it. Once you’re logged back in, your Mac is clean.
Once the scan is done, remove every threat it detected. Your Mac is now free of adware, rogue browser extensions, and other potentially harmful software.
If your current antivirus allowed a malicious program on your computer, you might want to consider purchasing the full-featured version of Malwarebytes Anti-Malware to protect against these types of threats in the future. If you are still experiencing problems while trying to remove a malicious program from your computer, please ask for help in our Mac Malware Removal Help & Support forum.
Run a Malware Scan with Malwarebytes for Android
Malwarebytes for Android automatically detects and removes dangerous threats like malware and ransomware so you don’t have to worry about your most-used device being compromised. Aggressive detection of adware and potentially unwanted programs keeps your Android phone or tablet running smooth.
Download Malwarebytes for Android.
You can download Malwarebytes for Android by clicking the link below.
In the Google Play Store, tap “Install” to install Malwarebytes for Android on your device.
When the installation process has finished, tap “Open” to begin using Malwarebytes for Android. You can also open Malwarebytes by tapping on its icon in your phone menu or home screen.
Follow the on-screen prompts to complete the setup process
When Malwarebytes will open, you will see the Malwarebytes Setup Wizard which will guide you through a series of permissions and other setup options. This is the first of two screens that explain the difference between the Premium and Free versions. Swipe this screen to continue. Tap on “Got it” to proceed to the next step. Malwarebytes for Android will now ask for a set of permissions that are required to scan your device and protect it from malware. Tap on “Give permission” to continue. Tap on “Allow” to permit Malwarebytes to access the files on your phone.
Update database and run a scan with Malwarebytes for Android
You will now be prompted to update the Malwarebytes database and run a full system scan.
Click on “Update database” to update the Malwarebytes for Android definitions to the latest version, then click on “Run full scan” to perform a system scan.
Wait for the Malwarebytes scan to complete.
Malwarebytes will now start scanning your phone for adware and other malicious apps. This process can take a few minutes, so we suggest you do something else and periodically check on the status of the scan to see when it is finished.
Click on “Remove Selected”.
When the scan has been completed, you will be presented with a screen showing the malware infections that Malwarebytes for Android has detected. To remove the malicious apps that Malwarebytes has found, tap on the “Remove Selected” button.
Restart your phone.
Malwarebytes for Android will now remove all the malicious apps that it has found. To complete the malware removal process, Malwarebytes may ask you to restart your device.
After the scan, tap Remove Selected to delete all detected threats. Your Android phone is now clean — no more malicious apps, adware, or browser redirects.
If your current antivirus allowed a malicious app on your phone, you may want to consider purchasing the full-featured version of Malwarebytes to protect against these types of threats in the future. If you are still having problems with your phone after completing these instructions, then please follow one of the steps:
Restore your phone to factory settings by going to Settings > General management > Reset > Factory data reset.
Now that your device is clean, keep it that way. Most infections start with a malicious ad or a fake download button — so blocking them at the source is your best defense.
We recommend AdGuard, which blocks malicious ads, phishing pages, and dangerous redirects before they can reach you.
Logistics connects many independent organizations. A single shipment can involve sellers, buyers, carriers, ports, brokers, warehouses, and financial institutions.
That complexity creates many believable reasons for unexpected documents. Employees cannot personally recognize every party whose name appears in a transaction.
Messages also cross time zones. A recipient may feel responsible for resolving an issue before another office closes.
Freight paperwork contains useful operational details. Criminals can reuse those details to make later impersonation more accurate.
Shipping mailboxes frequently exchange attachments. Staff become accustomed to opening PDFs, spreadsheets, and archive files from outside the organization.
Payment amounts can be substantial. Redirecting one freight invoice may produce a larger return than stealing many consumer accounts.
Attackers exploit process gaps, not just technical weaknesses. Unclear ownership and hurried approvals make a false document easier to introduce.
A reliable verification routine removes that advantage. Every booking should be traceable through an independent system before credentials or money move.
Practical Protections for Logistics Teams
Maintain a directory of approved carrier domains, portals, and support contacts. Make it accessible to employees handling shipments outside normal hours.
Link every document review to an internal booking record. An email without a matching shipment should stop rather than accelerate the process.
Separate mailbox access from document access. External suppliers should never ask employees to provide corporate email passwords on vendor-hosted pages.
Use phishing-resistant multifactor authentication for finance and logistics accounts. These mailboxes deserve the same protection as direct banking systems.
Monitor new forwarding rules, delegates, and suspicious OAuth permissions. Quiet persistence can outlive a simple password reset.
Require verbal confirmation for bank changes, refunds, and unusual release instructions. Call a stored number, not one included in the latest email.
Configure banners for external senders, but teach staff that banners are context rather than a final verdict. Compromised partner mailboxes remain dangerous.
Run short simulations using realistic freight scenarios. Training should practice the correct verification path, not merely ask employees to spot spelling mistakes.
Centralize incident reporting. One employee’s quick report can protect every office receiving the same booking reference.
After an incident, review both identity logs and commercial consequences. Investigators must determine whether instructions, invoices, or relationships were manipulated.
Frequently Asked Questions
Is CMA CGM responsible for this Bill of Lading email?
No. Fraudsters are borrowing the identity of a legitimate carrier. The unrelated login destination is controlled outside the genuine shipping workflow.
Why does the email include a booking reference?
A reference number makes the notice feel automated. It proves nothing until it matches a shipment inside the official portal and internal records.
Should a carrier ask for my email password?
No external carrier needs the private password for your company mailbox. Approved single sign-on should use your organization’s recognized identity provider.
What if the shipment details seem familiar?
Verify them independently. Criminals can copy real details from compromised accounts, leaked documents, or earlier conversations.
Can this scam lead to invoice fraud?
Yes. Mailbox access can reveal payment discussions and let attackers introduce false bank details inside convincing commercial threads.
What should I do after clicking without entering credentials?
Close the site, report the message, inspect downloads, and remove unexpected browser permissions. Escalate if any file executed or information was submitted.
The Bottom Line
The CMA CGM Bill of Lading scam turns ordinary freight paperwork into a gateway for stealing a business mailbox and studying commercial relationships.
Match every booking through the official portal, confirm unfamiliar requests with known contacts, and never provide an email password to a shipping document page.
10 Rules to Avoid Online Scams
Here are 10 practical safety rules to help you avoid malware, online shopping scams, crypto scams, and other online fraud. Each tip includes a quick “if you already got hit” action.
Stop and verify before you click, log in, download, or pay.
Most scams win by creating urgency. Verify using a trusted method: type the website address yourself, use the official app, or call a known number (not the one in the message).
If you already clicked: close the page, do not enter passwords, and run a malware scan.
Keep your operating system, browser, and apps updated.
Updates patch security holes used by malware and malicious ads. Turn on automatic updates where possible.
If you saw a scary “update now” pop-up: close it and update only through your device settings or the official app store.
Use layered protection: antivirus plus an ad blocker.
Antivirus helps block malware. An ad blocker reduces scam redirects, phishing pages, and malvertising.
If your browser is acting weird: remove unknown extensions, reset the browser, then run a full scan.
Install apps, software, and extensions only from official sources.
Avoid cracked software, “keygens,” and random downloads. During installs, choose Custom/Advanced and decline bundled offers you do not recognize.
If you already installed something suspicious: uninstall it, restart, and scan again.
Treat links and attachments as untrusted by default.
Phishing often impersonates delivery services, banks, and popular brands. If it is unexpected, do not open attachments or log in through the message.
If you entered credentials: change the password immediately and enable 2FA.
Shop safely: research the store, then pay with protection.
Be cautious with brand-new stores, “closing sale” stories, and prices that make no sense. Prefer credit cards or PayPal for dispute options. Avoid wire transfers, gift cards, and crypto payments.
If you already paid: contact your card issuer or PayPal quickly to dispute the transaction.
Crypto rule: never pay a “fee” to withdraw or recover money.
Common patterns include fake profits, then “tax,” “gas,” or “verification” fees. Another is a “recovery agent” who demands upfront crypto.
If you already sent crypto: stop paying, save evidence (wallet addresses, TXIDs, chats), and report the scam to the platform used.
Secure your accounts with unique passwords and 2FA (start with email).
Use a password manager and unique passwords for every account. Enable 2FA using an authenticator app when possible.
If you suspect an account takeover: change passwords, sign out of all devices, and review recent logins and recovery settings.
Back up important files and keep one backup offline.
Backups protect you from ransomware and device failure. Keep at least one backup on an external drive that is not always connected.
If you suspect infection: do not connect backup drives until the system is clean.
If you think you are a victim: stop losses, document evidence, and escalate fast.
Move quickly. Speed matters for disputes, account recovery, and limiting damage.
Stop payments and contact: do not send more money or respond to the scammer.
Call your bank or card issuer: block transactions, replace the card if needed, and start a dispute or chargeback.
Secure your email first: change the email password, enable 2FA, and remove unfamiliar recovery options.
Secure other accounts: change passwords, enable 2FA, and log out of all sessions.
Scan your device: remove suspicious apps or extensions, then run a full malware scan.
Save evidence: screenshots, emails, order pages, tracking pages, wallet addresses, TXIDs, and chat logs.
Report it: to the payment provider, marketplace, social platform, exchange, or wallet service involved.
These rules are intentionally simple. Most online losses happen when decisions are rushed. Slow down, verify independently, and use payment methods and account controls that give you recourse.
Hello! I'm Lapain Epuran, your go-to source for detailed and honest product reviews. From tech gadgets to miracle cures, I provide insights to help you make informed choices. Join me as we discover what's truly worth your time and money.