

BambooToken is not the kind of threat that announces itself with pop-ups or a locked screen. It is built for quiet access and patient control.
Its unusual network behavior and trusted-looking execution chain make the details important. Understanding the evidence helps defenders respond without blaming legitimate software incorrectly.
Overview
What BambooToken malware is
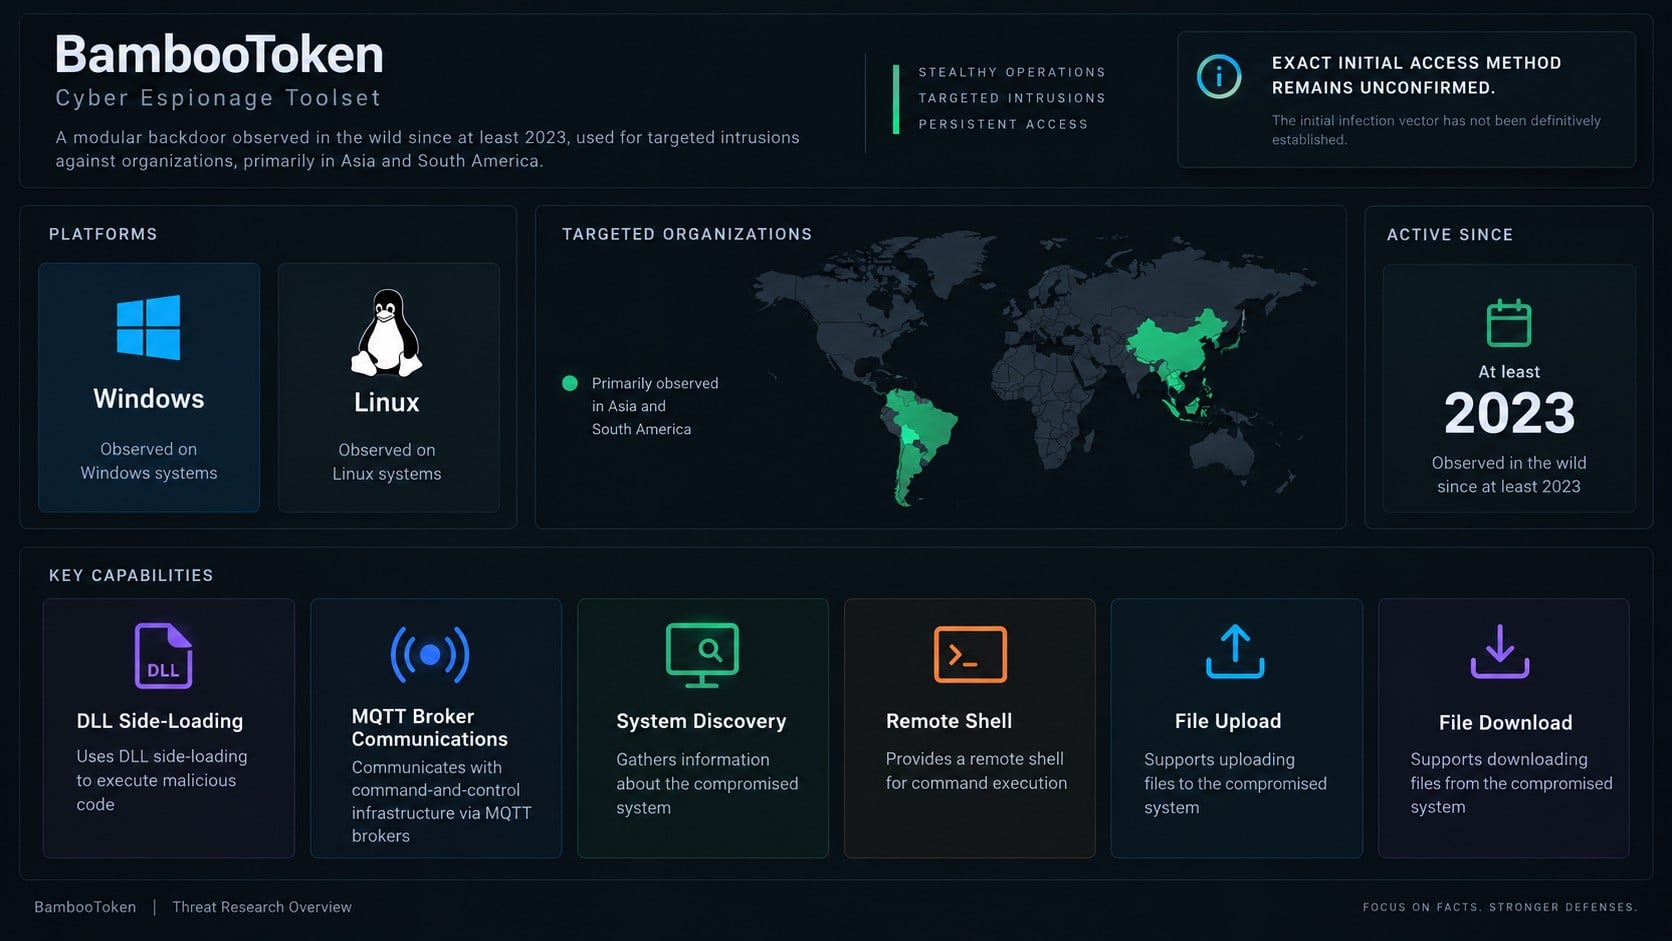
BambooToken is a backdoor framework observed on Windows and Linux. It gives an operator a concealed channel for system discovery, command execution, and file operations.
Researchers found artifacts indicating development activity dating to at least February 2023. Later versions changed both capabilities and communication methods.
The operation primarily affected organizations in Asia, with additional activity identified in South America. The available evidence points toward targeted intrusions rather than indiscriminate consumer spam.
Investigators have not publicly attributed the campaign to a named threat group. Similarities to broader regional activity are not enough for a confident assignment.
Why its MQTT communication stands out
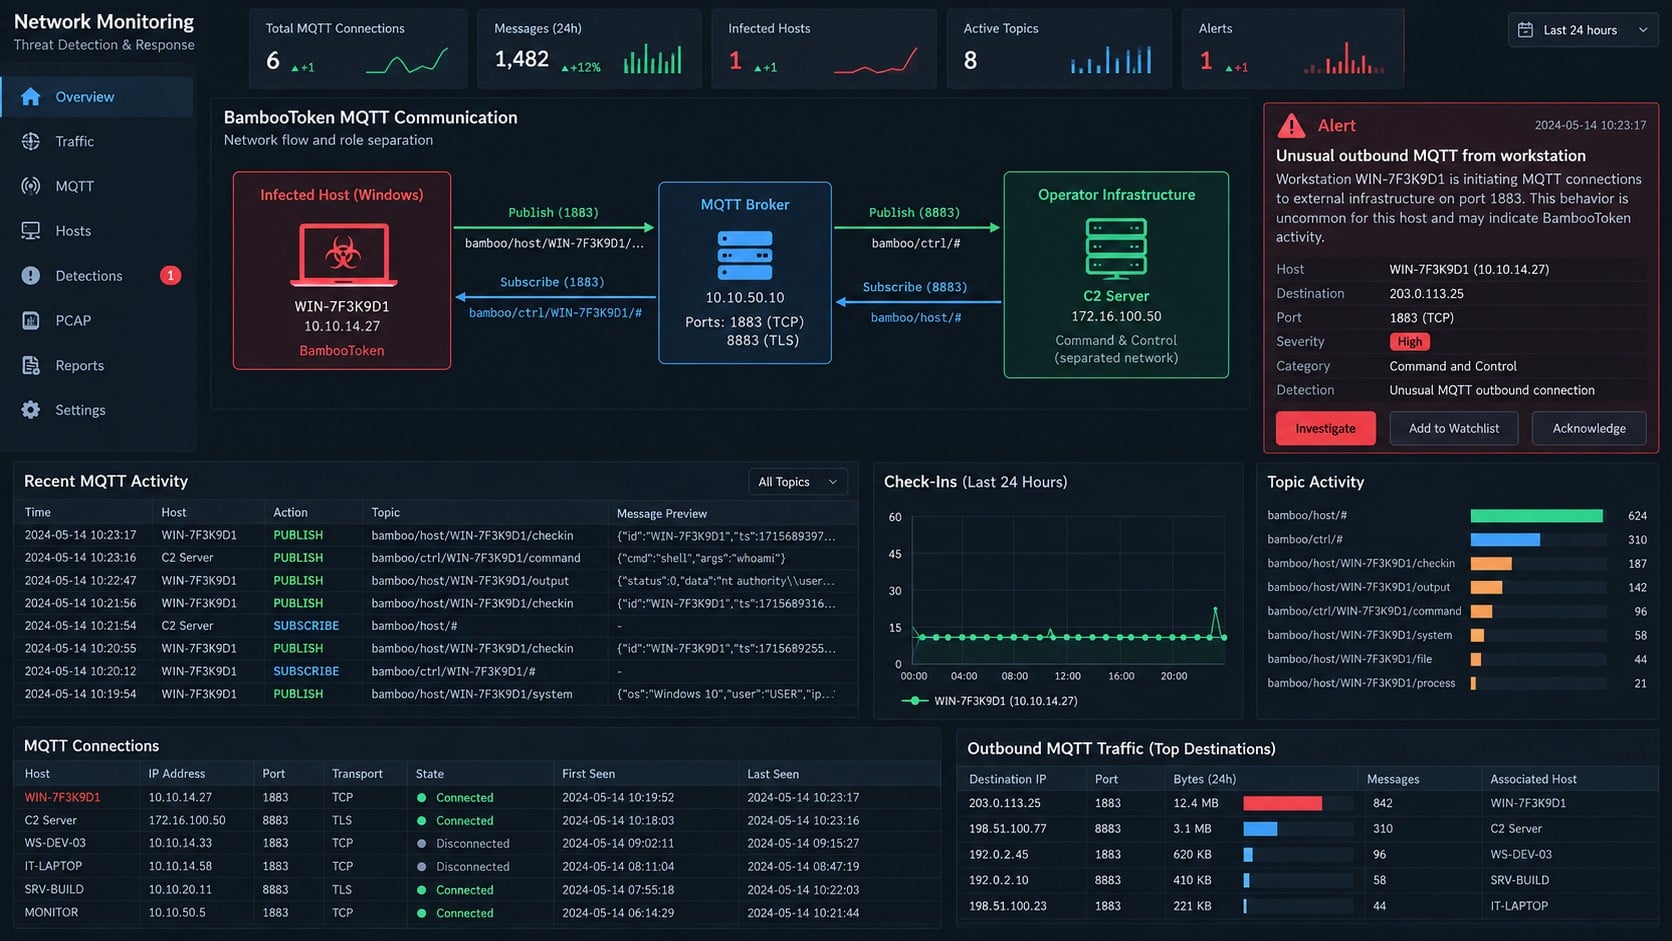
Recent BambooToken versions use Message Queuing Telemetry Transport, commonly shortened to MQTT, for command-and-control communication.
MQTT is a legitimate publish-and-subscribe protocol widely used by sensors, automation systems, and Internet of Things equipment.
Instead of contacting an operator-controlled server directly, an infected host exchanges messages through an MQTT broker and specific topic channels.
That intermediary can separate the compromised machine from the attacker’s deeper infrastructure. Ordinary monitoring may also overlook MQTT traffic where the protocol has legitimate business uses.
What the confirmed samples can do
BambooToken collects host details and waits for instructions. Its core functions provide enough access for reconnaissance, remote control, and further intrusion activity.
- Collect operating-system, processor, memory, network, and hardware information.
- Open a command shell and execute instructions on the compromised host.
- Upload files to the victim system or download files from it.
- Delete selected files when directed by the operator.
- Report which security products are running through an observed plugin.
- Maintain periodic contact so operators can identify available machines.
Unused code references suggested possible future surveillance features. Those remnants do not prove that keylogging, audio recording, or webcam capture occurred in analyzed intrusions.
How BambooToken Reaches Windows and Linux Environments
The precise initial compromise route remains unconfirmed. Researchers identified execution and loading mechanisms, but those mechanisms do not explain every victim’s first point of entry.
On Windows, observed samples abused a weakness in how a legitimate Tendyron OnKey program searched for required libraries.
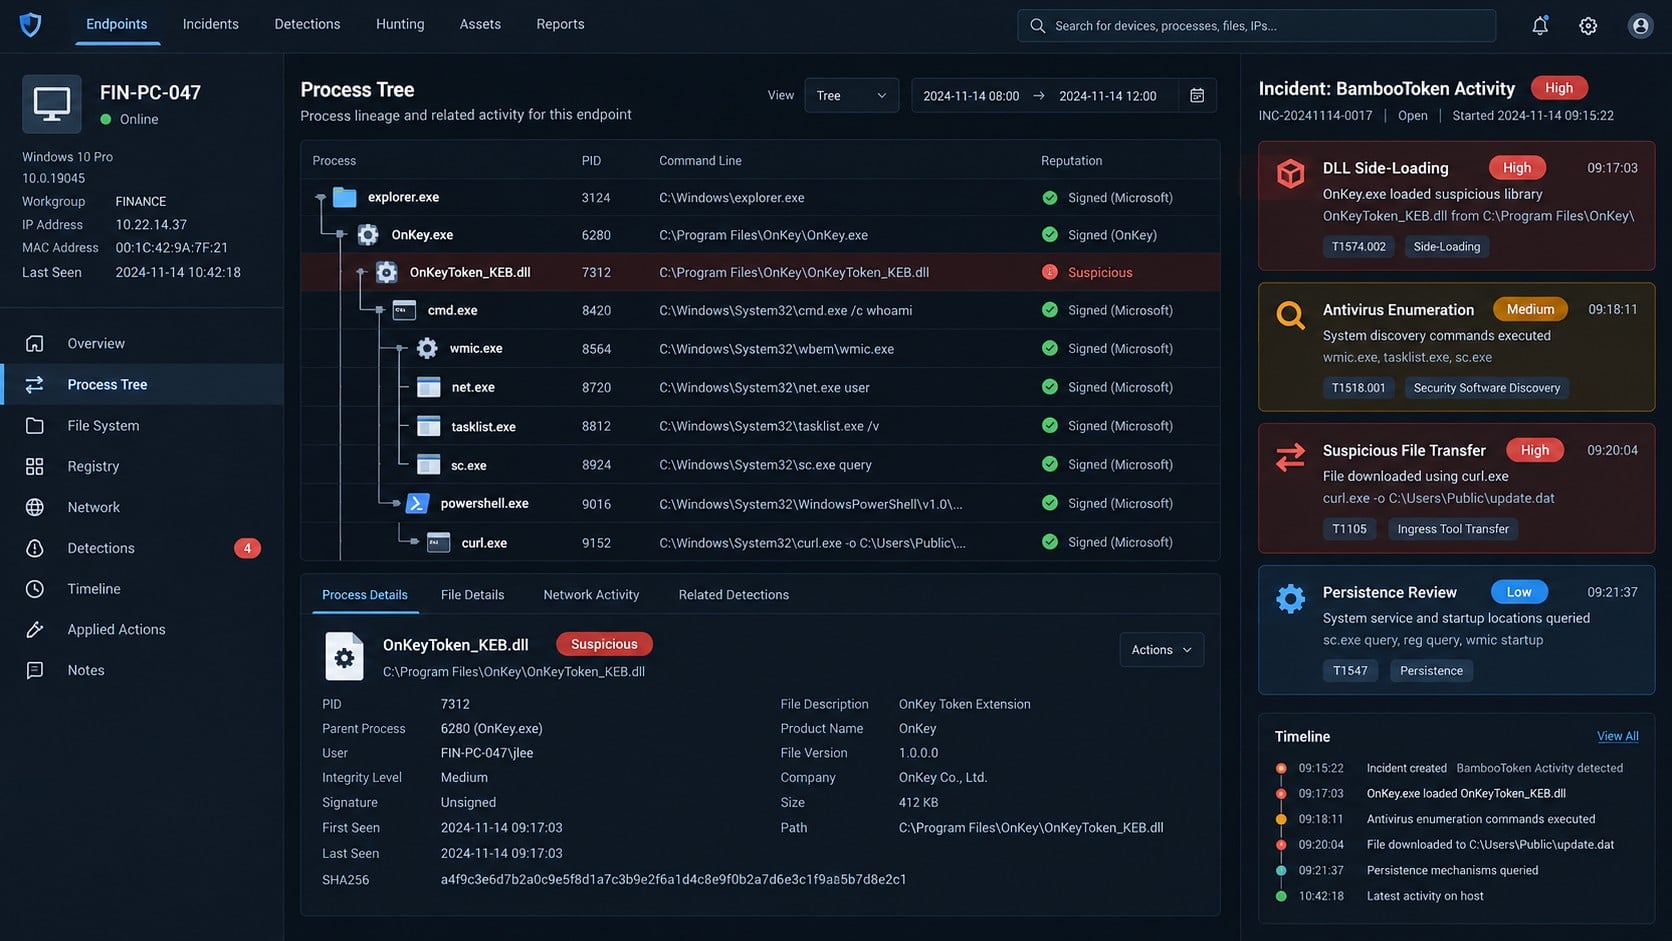
A malicious DLL named OnKeyToken_KEB.dll was placed where the signed application would load it. This technique is known as DLL side-loading.
The trusted program launches normally, then loads the attacker’s nearby library. Security tools may see a legitimate signed parent process before detecting the malicious component.
Available evidence did not indicate that Tendyron’s code-signing certificate or development environment was compromised. The attacker abused loading behavior around the genuine program.
Another variant used material impersonating software from Kingsoft Office. A familiar product context can reduce suspicion around files introduced into a targeted environment.
The Linux version appeared later and offered similar core functions, including a remote shell, system enumeration, file transfer, and file deletion.
Some affected infrastructure included organizational servers. A compromised server can expose sensitive repositories, business data, application backends, or downstream users.
Defenders should therefore avoid assuming BambooToken is only a desktop problem. Investigation must include Linux hosts, servers, and network devices supporting suspicious communication.
What MQTT Changes for Defenders
MQTT organizes communication around brokers and topics rather than ordinary request-and-response browsing. That pattern changes which network records are most useful.
A client publishes a message to one topic and subscribes to another. The broker distributes content without exposing every participant directly.
Legitimate factories, buildings, logistics systems, and monitoring platforms may produce large volumes of MQTT traffic. A simple protocol block can disrupt essential operations.
Defenders should document approved brokers, expected clients, certificate identities, ports, topic patterns, and normal message rates.
A finance workstation suddenly becoming an MQTT client is more suspicious than an authorized sensor gateway using its established broker.
Process-level network telemetry adds important context. The application initiating MQTT should match the asset’s assigned role and installed software.
Encrypted MQTT over TLS hides message content from ordinary sensors. Destination, certificate, timing, process ownership, and connection history still support detection.
Unencrypted sessions can expose topic names and message structure. Analysts should capture only what policy and law permit during an investigation.
Broker logs can reveal subscriptions, client identifiers, disconnects, and published topics. Those records may survive after an infected endpoint is isolated.
An operator can move to another broker or port. Behavioral baselines are therefore more durable than one destination address.
Network segmentation limits which systems can reach external brokers. Egress rules should reflect business requirements rather than allowing every protocol from every host.
DNS history and proxy records can connect MQTT infrastructure with other command channels. Earlier BambooToken versions used web traffic instead.
Incident teams should ask when unusual broker activity began and which account or deployment changed immediately beforehand.
Comparing that timeline with module creation, OnKey execution, shell commands, and file transfers can establish a coherent compromise sequence.
This evidence also prevents false attribution. MQTT use alone cannot identify BambooToken because the protocol remains legitimate and widely deployed.
The strongest conclusion comes from several independent signals converging on the same host, time window, and suspicious process chain.
How BambooToken Works
Step 1: A malicious component is introduced into a targeted system
The public research does not establish one universal initial-access vector. Entry could differ between organizations and may involve earlier access that delivered the framework.
This uncertainty matters. Discovering the BambooToken DLL explains execution, but responders must still determine how the file reached that location.
Possible evidence includes remote logins, exploited services, administrative tools, software deployment activity, or another loader. Conclusions should come from host and network records.
Step 2: A legitimate process side-loads the Windows payload
In the documented Windows chain, the OnKey application searches for a library and accepts the attacker-supplied DLL placed beside it.
The signed executable provides a trusted-looking launch path. The malicious code gains execution inside the context created by the legitimate program.
Detection should focus on the loaded module, its path, signature, hash, ancestry, and behavior. Trusting the parent’s signature alone misses the abuse.
Step 3: The backdoor inventories the compromised host
BambooToken gathers details about the operating system, CPU, memory, network adapters, public address, serial information, and other host characteristics.
On Windows, some collection uses Windows Management Instrumentation. The results help operators understand the machine’s value and technical environment.
System discovery can reveal whether the host is a workstation, development server, application system, or gateway toward additional assets.
Step 4: The malware connects through MQTT topics
The infected machine establishes contact with a broker and publishes status information to assigned topics. It subscribes to channels used for incoming instructions.
MQTT brokers route messages between publishers and subscribers. The compromised host does not need a conventional direct session with the operator’s backend.
Earlier framework versions used ordinary web communication. The move to MQTT demonstrates deliberate development rather than one static malware sample.
Step 5: Operators issue shell and file commands
Once the channel is active, the backdoor can open a command shell. That ability lets an operator run tools already present on the host.
File upload supports introducing additional components. File download can remove business records, configurations, credentials, source code, or collected reconnaissance.
Deletion can erase staged files or interfere with evidence. Its impact depends on operator intent and the privileges available to the process.
Step 6: A plugin reports defensive software
One identified plugin checks which antivirus products are active and sends that information back. Frequent checks help the attacker understand changes in protection.
Knowledge of installed defenses can influence which follow-up tools are deployed. It can also help operators avoid actions likely to expose their presence.
The plugin system suggests extensibility. Responders should look for components beyond the known core instead of assuming every infection has identical files.
Step 7: The foothold supports longer-term intrusion activity
A quiet backdoor creates options for surveillance, credential theft by secondary tools, data removal, or movement toward more sensitive systems.
The observed framework can serve as access infrastructure even when it lacks a specialized theft module. Remote shell capability lets operators expand functionality later.
Incident scope should include accounts, neighboring hosts, management systems, repositories, and applications reachable from the compromised machine.
System, Process, Network, and Scope Verification Checks
Verify suspicious loading around OnKey
Check whether OnKey.exe loaded OnKeyToken_KEB.dll from an unexpected directory. Validate the DLL signature, creation time, origin, and known-good software package.
The presence of legitimate OnKey software alone is not proof of infection. The evidence must connect a suspicious library or behavior to the process.
Preserve the executable, loaded modules, process tree, and memory before making changes. Those artifacts can separate compromise from a normal installation.
Review unusual MQTT activity
Look for workstations or servers initiating outbound MQTT traffic without a documented business reason. Common ports include 1883 and 8883.
Port numbers are only clues because protocols can use nonstandard ports. Analyze destination history, message timing, topic structure, certificates, and related process telemetry.
Do not block all MQTT blindly where operational technology depends on it. Baseline approved brokers and isolate traffic that falls outside those relationships.
Examine shell, file, and discovery behavior
Correlate the suspected process with WMI queries, command shells, file transfers, security-product enumeration, and access to sensitive directories.
One administrative command may be legitimate. A sequence of side-loading, discovery, MQTT communication, and remote shell behavior is far more meaningful.
Review scheduled tasks, services, startup locations, user profiles, temporary directories, and server application folders for additional components.
Determine organizational exposure
Identify what the host could access, which credentials were present, and whether the same account authenticated elsewhere during the suspected period.
Search enterprise telemetry for related files, destinations, MQTT patterns, and parent processes. A single detection may be one part of a wider intrusion.
Include Linux systems and exposed infrastructure in the hunt. BambooToken’s cross-platform development means a Windows-only review can miss connected activity.
How to Remove BambooToken and Recover Safely
- Isolate suspected systems. Remove affected hosts from normal networks while preserving access for trained responders. Do not power off servers without considering volatile evidence.
- Engage the security team. BambooToken is associated with targeted intrusion activity. Business environments need coordinated containment, forensics, legal review, and stakeholder communication.
- Preserve evidence first. Capture memory, process data, network connections, loaded modules, logs, and suspicious files before removal alters the timeline.
- Run trusted endpoint scans. Use the organization’s managed security platform and a current Malwarebytes scan where appropriate. Quarantine findings only after evidence requirements are understood.
- Remove malicious components. Eliminate confirmed BambooToken files, loaders, plugins, persistence, and related tooling. Reinstall questionable software from verified vendor packages.
- Block confirmed infrastructure. Apply validated indicators to network controls and monitor abnormal MQTT. Avoid broad changes that disrupt legitimate operational systems.
- Reset exposed credentials. Rotate passwords, service credentials, tokens, keys, and administrative secrets accessible from compromised hosts. Revoke active sessions.
- Hunt across the environment. Search Windows and Linux telemetry for matching loading patterns, communications, commands, files, and account activity.
- Rebuild when trust cannot be restored. A clean reimage from approved media is safer than piecemeal removal when attackers obtained remote shell access.
- Reduce repeat exposure. AdGuard can filter many malicious web destinations for end users, but enterprise recovery also requires EDR, segmentation, patching, and controlled software deployment.
Is Your Device Infected? Run a Free Malware Scan
Slow performance, constant pop-ups, or strange behavior? These are classic signs of a malware infection. The fastest way to find out is to scan your device with Malwarebytes Free — one of the most trusted malware removal tools available.
The free version detects and removes the most common threats, including:
- Adware — the cause of those annoying pop-ups
- Browser hijackers — unwanted redirects and changed homepages
- Trojans and spyware — hidden programs stealing your data
- Potentially unwanted programs (PUPs) — software you never asked for
👉 Select your device below — Windows, Mac, or Android — then follow the simple steps to download Malwarebytes, scan your system, and remove any threats it finds. The scan usually takes 5 to 20 minutes.
Run a Malware Scan with Malwarebytes for Windows
Malwarebytes is one of the most popular and trusted anti-malware tools for Windows — and it’s completely free for removing infections. It catches threats that many antivirus programs miss, including adware, browser hijackers, and trojans. Follow the steps below to scan and clean your PC in just a few minutes.
Download Malwarebytes
Click the button below to download the latest version of Malwarebytes for Windows from the official source. The free version is all you need — it will scan your computer and remove adware, browser hijackers, and other malicious software at no cost.
Download MalwarebytesOfficial installer for Windows 11 and 10. Your download starts right away.Want real-time protection? See Malwarebytes Premium Malwarebytes Free for WindowsScans and removes malware at no cost
-
Install Malwarebytes
When the download finishes, open your Downloads folder and double-click the MBSetup file. If Windows shows a User Account Control pop-up, click “Yes” to allow the installation.

Follow the On-Screen Prompts to Install Malwarebytes
The setup wizard will walk you through a few quick screens:
-
Choose where you’re installing the program — “Personal Computer” or “Work Computer” — then click Next.

-
Malwarebytes will now install on your device. This usually takes under a minute.

-
When installation is complete, the “Welcome to Malwarebytes” screen will open automatically.

-
On the final screen, click Open Malwarebytes to launch the program.

-
Enable “Scan for Rootkits”
Before scanning, turn on rootkit detection so Malwarebytes can find even the most hidden threats. Click the Settings gear icon on the left side of the screen.

In the settings menu, find “Scan for rootkits” and click the toggle so it turns blue.

Done? Click “Dashboard” in the left pane to return to the main screen.
Start the Scan
Click the blue Scan button. Malwarebytes will automatically update its virus database and start checking your computer for malware.

-
Wait for the Scan to Finish
The scan checks your entire system for browser hijackers and other malicious programs, so it can take 5 to 20 minutes depending on your computer. Feel free to do something else — just check back occasionally to see the progress.

-
Quarantine the Detected Threats
When the scan is done, you’ll see a list of everything Malwarebytes found — malware, adware, and potentially unwanted programs. Click the “Quarantine” button to remove all of them at once.

Malwarebytes will now remove the malicious files and registry entries and move them safely into quarantine.

-
Restart Your Computer
Some threats can only be fully removed after a reboot. If Malwarebytes asks you to restart, click Yes. Once you’re logged back in, Malwarebytes has finished removing the threats it found.

That’s it — your Windows PC is now clean of trojans, adware, and other malware, and should be back to running smoothly.
If you are still having problems with your computer after completing these instructions, then please follow one of the steps:
- Run a computer scan with ESET Online Scanner
- Ask for help in our Windows Malware Removal Help & Support forum.
Run a Malware Scan with Malwarebytes for Mac
Malwarebytes for Mac is a free on-demand scanner that removes the malware other security software tends to miss — adware, browser hijackers, and unwanted programs included. Cleaning an infected Mac with Malwarebytes has always been completely free, and it’s our go-to recommendation. Follow the steps below to scan and clean your Mac in just a few minutes.
-
Download Malwarebytes for Mac
Click the button below to download the latest version of Malwarebytes for Mac.
Download MalwarebytesOfficial installer for macOS. Your download starts right away.Want real-time protection? See Malwarebytes PremiumMalwarebytes Free for MacScans and removes malware at no cost -
Open the Malwarebytes setup file
When the download finishes, open your Downloads folder and double-click the setup file to begin the installation.

-
Follow the On-Screen Prompts to Install Malwarebytes
The Malwarebytes for Mac Installer will guide you through a few quick screens. Click “Continue” and keep following the prompts until the installation completes.



When the installation is complete, Malwarebytes opens to the Welcome to Malwarebytes screen. Click “Get started“.
-
Select “Personal Computer” or “Work Computer”
Malwarebytes will ask what type of computer you’re installing it on. Click either Personal Computer or Work Computer, whichever applies.

-
Start the Scan
Click the “Scan” button. Malwarebytes will automatically update its detection database and begin checking your Mac for malware.

-
Wait for the Scan to Finish
Malwarebytes will scan your Mac for adware, browser hijackers, and other malicious programs. This can take a few minutes, so feel free to do something else — just check back occasionally to see the progress.

-
Quarantine the Detected Threats
When the scan is done, you’ll see a list of everything Malwarebytes found. Click the “Quarantine” button to remove all the threats at once.

-
Restart Your Mac
Malwarebytes will now remove all the malicious files it found. Some threats can only be fully removed after a reboot — if Malwarebytes asks you to restart, allow it. Once you’re logged back in, your Mac is clean.

That’s it — your Mac is now free of adware, rogue browser extensions, and other potentially harmful software.
If you are still experiencing problems while trying to remove a malicious program from your computer, please ask for help in our Mac Malware Removal Help & Support forum.
Run a Malware Scan with Malwarebytes for Android
Malwarebytes for Android automatically detects and removes dangerous threats like malware and ransomware so you don’t have to worry about your most-used device being compromised. Aggressive detection of adware and potentially unwanted programs keeps your Android phone or tablet running smooth.
-
Download Malwarebytes for Android.
You can download Malwarebytes for Android by clicking the link below.
Get Malwarebytes for AndroidOpens Google Play in a new tab.Want real-time protection? See Malwarebytes Premium for AndroidMalwarebytes for AndroidScans your phone and removes malware at no cost -
Install Malwarebytes for Android on your phone.
In the Google Play Store, tap “Install” to install Malwarebytes for Android on your device.

When the installation process has finished, tap “Open” to begin using Malwarebytes for Android. You can also open Malwarebytes by tapping on its icon in your phone menu or home screen.

-
Follow the on-screen prompts to complete the setup process
When Malwarebytes will open, you will see the Malwarebytes Setup Wizard which will guide you through a series of permissions and other setup options.
This is the first of two screens that explain the difference between the Premium and Free versions. Swipe this screen to continue.
Tap on “Got it” to proceed to the next step.
Malwarebytes for Android will now ask for a set of permissions that are required to scan your device and protect it from malware. Tap on “Give permission” to continue.
Tap on “Allow” to permit Malwarebytes to access the files on your phone.
-
Update database and run a scan with Malwarebytes for Android
You will now be prompted to update the Malwarebytes database and run a full system scan.

Click on “Update database” to update the Malwarebytes for Android definitions to the latest version, then click on “Run full scan” to perform a system scan.

-
Wait for the Malwarebytes scan to complete.
Malwarebytes will now start scanning your phone for adware and other malicious apps. This process can take a few minutes, so we suggest you do something else and periodically check on the status of the scan to see when it is finished.

-
Click on “Remove Selected”.
When the scan has been completed, you will be presented with a screen showing the malware infections that Malwarebytes for Android has detected. To remove the malicious apps that Malwarebytes has found, tap on the “Remove Selected” button.

-
Restart your phone.
Malwarebytes for Android will now remove all the malicious apps that it has found. To complete the malware removal process, Malwarebytes may ask you to restart your device.
That’s it — your Android phone is now clean — no more malicious apps, adware, or browser redirects.
If you are still having problems with your phone after completing these instructions, then please follow one of the steps:
- Restore your phone to factory settings by going to Settings > General management > Reset > Factory data reset.
- Ask for help in our Mobile Malware Removal Help & Support forum.
Stay Protected: Block Ads and Malicious Sites
Now that your device is clean, keep it that way. Most infections start with a malicious ad or a fake download button — so blocking them at the source is your best defense.
We recommend AdGuard, which blocks malicious ads, phishing pages, and dangerous redirects before they can reach you.
👉 Download AdGuard and browse safely
Prevention and Hardening Measures
Organizations should inventory applications vulnerable to side-loading and restrict write access around signed executables. Application control can prevent unapproved libraries from loading.
Monitor child processes, module loads, and command activity from security-token or office applications. Unexpected shells deserve investigation even when the parent is signed.
Allow MQTT only where required, through approved brokers and documented assets. Network detection should alert when ordinary workstations begin publishing unexplained topic traffic.
Keep internet-facing servers patched and minimize administrative exposure. Centralized logging should retain enough history to reconstruct targeted intrusions discovered months later.
Segment development, application, and management environments. A compromised server should not automatically provide access to code repositories or production control planes.
Maintain tested offline backups and incident playbooks. Backups protect data availability, while playbooks reduce improvisation during a stealthy compromise.
Frequently Asked Questions
Is BambooToken a virus or a backdoor?
It is best described as backdoor malware. It provides covert remote capabilities rather than behaving like a self-replicating traditional computer virus.
Does BambooToken affect home users?
Published observations emphasize targeted organizations and servers. Home users are not the documented focus, but any confirmed detection still requires serious response.
Is Tendyron OnKey itself malicious?
No. Researchers assessed that attackers abused DLL loading around the legitimate software; they did not report its signing certificate or build environment as compromised.
Does every MQTT connection indicate BambooToken?
No. MQTT is widely used for legitimate systems. Detection depends on host context, destinations, topics, process behavior, and other correlated evidence.
Were keylogging and webcam capture confirmed?
Researchers found leftover code suggesting possible future capabilities, but those functions were not active in the analyzed samples. They should not be reported as confirmed behavior.
Can deleting the suspicious DLL fully solve the problem?
Not reliably. Remote shell access may support additional tools and account compromise. Responders must investigate persistence, related hosts, credentials, and data exposure.
The Bottom Line
BambooToken is a cross-platform backdoor that combines trusted-process side-loading, detailed host discovery, remote file operations, and an unusual MQTT-based command channel.
A confirmed detection should trigger organization-wide incident response, not simple file deletion. Preserve evidence, isolate systems, rotate exposed secrets, and hunt for connected activity.

Join the discussion
0 commentsShare your experience or ask a question about this article.
Discussion
Start the conversation
Have a question or something useful to share? Add the first comment.